

Page 1

A22
Page 2

User’s Reference Manual
inside i-Guide
™
The Power of i.
™
Page 3

Table of Contents
1
Welcome
5
Digital Cable Box (Set-Top Box)
6
otorola DCT6208
M
6
6
7
7
9
10
10
11
12
13
13
15
Basic i-Guide Navigation Tips
17
Remote Control Features
17
Your Access to Digital Cable
18
18
Recording Capacity
The DCT6208 Front Panel
The DCT6208 Back Panel
Important Safety Instructions
Motorola DCT2500
The DCT2500 Front Panel
The DCT2500 Back Panel
Important Safety Instructions
Motorola DCT2000
The DCT2000 Front Panel
Important Safety Instructions
Main Menu
18
18
20
20
21
21
21
21
22
23
On-Screen Program Guide
Quick M
Search Categories and Listings
T
Navigating Listings
Listings By Channel
A-Z
Adult Programming
ogram Information
r
P
Action Icons
enu
V Listings
Title Search
CONTENTS
1
Page 4

Reminders
24
24
24
25
25
25
26
27
27
28
28
28
29
29
29
30
Setting Reminders
Reminder Options
Smart Channel Surfing (Flip & Mini Guide)
Flip
Mini Guide and “Control the Scroll”
Digital Music
Local Weather
Messages
Parental Locks and Purchase PINS
PINS Setup
Parental Locks Setup
View Locked Programs
Bypass or Clear Locks
Restore Locks
Favorites
Setup
31
31
31
32
32
32
33
33
34
CONTENTS
34
34
35
36
2
36
36
Guide Setup
Cable Box Setup
Audio Setup
Screen Position Setup
Text Language Setup
Digital Pay-Per-View (PPV) (Optional Feature)
dering Pay-Per-View
Or
Ordering Pay-Per-View By Phone
Ordering Pay-Per-View Packages
Canceling a Pay-Per-View Order
er-View Notices
y-P
a
P
On Demand (OND) (Optional Feature)
Accessing On Demand
Ordering On Demand Programs
37
38
Watching On Demand Programs
On Demand Packages
Page 5

HDTV (Optional Feature)
39
igital Video Recording (DVR) (Optional Feature)
D
40
40
40
41
41
41
41
42
42
42
42
42
43
44
47
48
Control Live TV
Playback Controls - Using the Video Control Buttons
Playback Controls – Using the Remote Control Arrow Buttons
Pause
Rewind
Fast Forward
Slow Motion
Instant Replay
Get Back to Live TV
Your Personal Video Library
Building Your Library - Recording Programs
View Your List of Scheduled Recordings
Modifying Recording Options
View Programs Stored In Your Personal Video Library
Managing Your Personal Video Library
Frequently Asked Questions
49
49
50
50
51
52
53
53
Interactive Program Guide
On Demand (Optional Feature)
DIgital Video Recorder (Optional Feature)
ecording and Playback of Recorded Programs (Optional Feature)
R
our R
anaging
M
Controlling Live TV (Optional Feature)
Troubleshooting
Y
ecordings (Optional Feature)
CONTENTS
3
Page 6

WELCOME
4
Page 7

Welcome to The Power of i™.
Introducing the all new interactive program guide from TV Guide.
i-GuideTMgives you The Power of i.It’s intuitive, intelligent, and inspiring. It unlocks a world
of greater choice,convenience and control as you watch television.
With Digital Cable, you have more programming choices than ever before.And with i-Guide,you can effortlessly find
the television entertainment you want to see. i-Guide puts you in control, all at the touch of a button.
i-Guide displays 90 minutes of program listings.Best of all, it’s so easy to use,you won’t need a degree in computer
science to find out what’s on.
you want. In no time, you’ll be able to Set Reminders, Favorites,Parental Locks, and use our Mini Guide to find out
what’s next,while you continue to enjoy great TV.
i-Guide, the world of television is at your fingertips.
With
That’s The Power of i.
Use this Reference Guide to get started enjoying your Digital Cable……
i-Guide’s Quick Menu allows you to move easily to the programming and information
WELCOME
5
Page 8
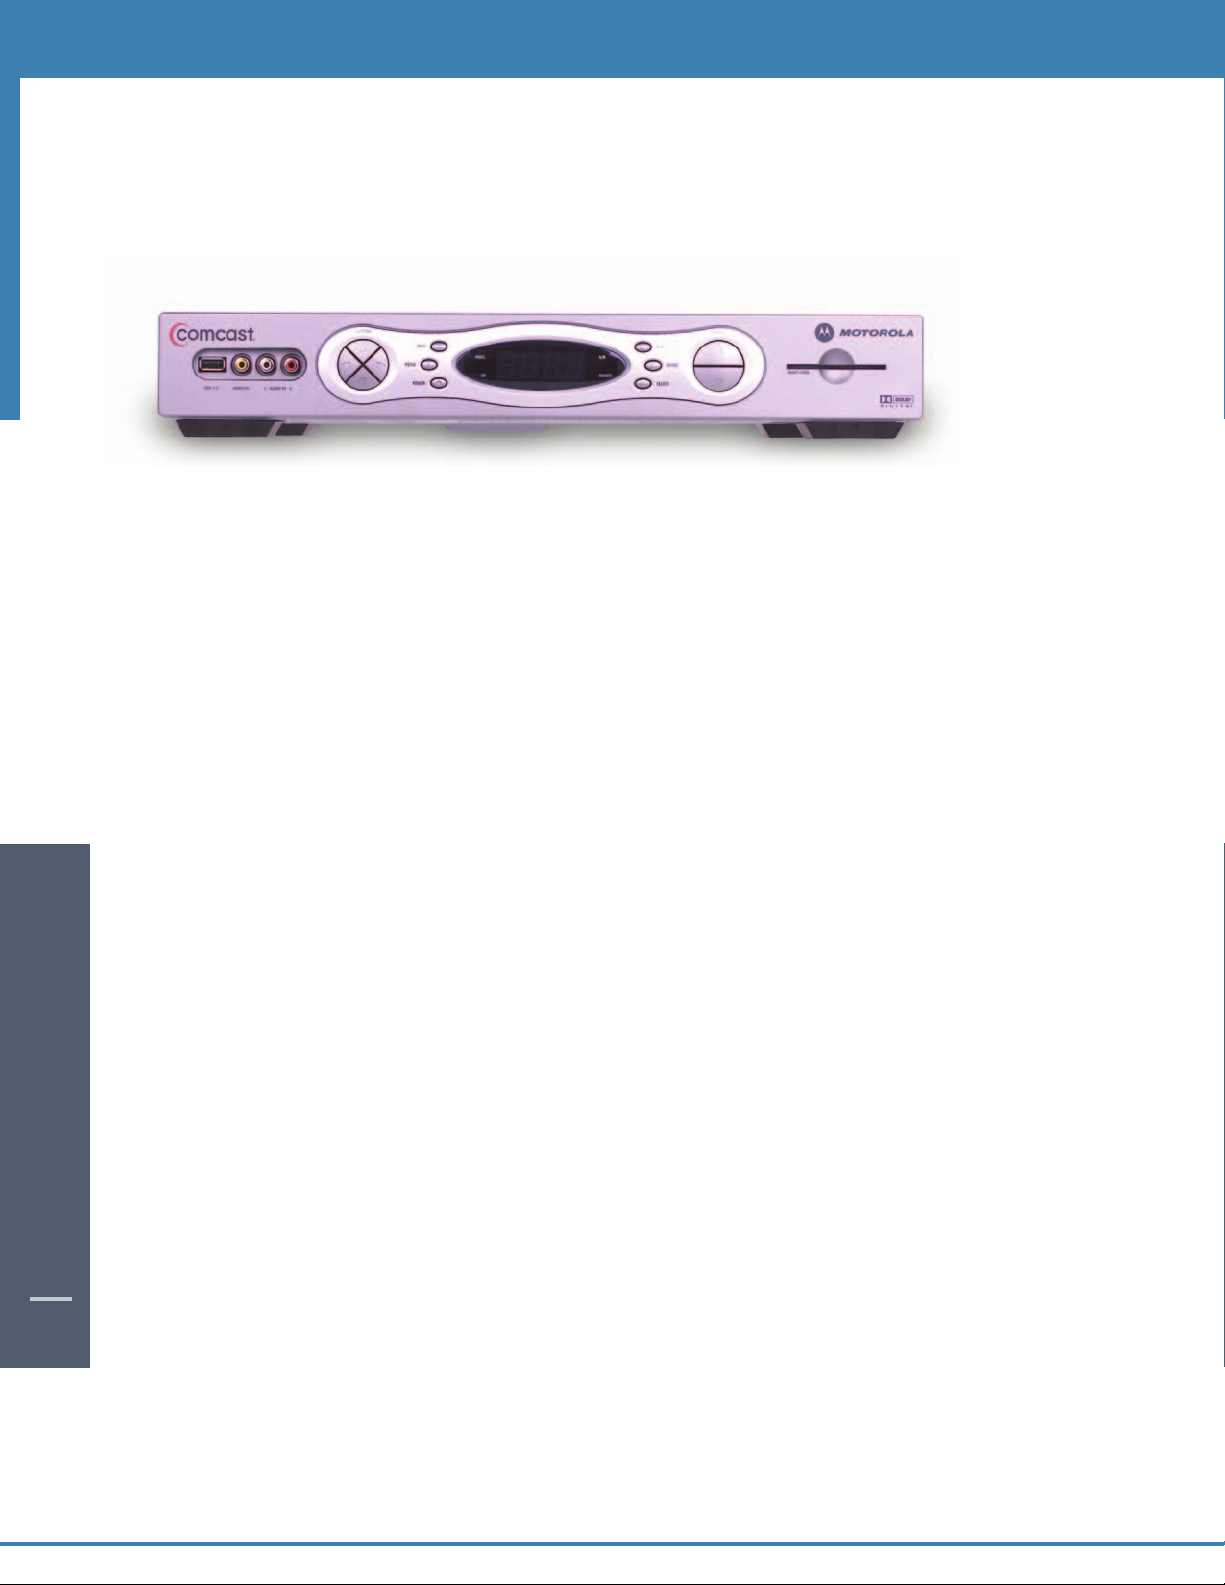
Digital Cable Box(Set-Top Box)
Motorola DCT6208
Your DVR service features the Motorola DCT6208 with built in DVR (Digital Video Recorder) which gives you total
control over what you watch and when you watch it.Your DVR allows you to store and access TV programs —
functioning like a VCR, but without videotape. With your DVR you can also pause live TV and record shows through
i-Guide, across multiple channels and time slots.
Recording Capacity
The recording capacity on the DVR depends on the video format of the programming you wish to record. Here are
some guidelines for determining recording capacity:
• Analog TV Shows (not digital) – Typically analog cable channels are channels 2 through 78, but may vary
depending on your cable system. Recording capacity is up to 25 hours.
DIGITAL CABLE BOX / DCT6208
6
• Digital TV Shows (compressed) – Typically digital cable channels are channels 100 and above,but vary
depending on your cable system. Recording capacity is between 30 and 60 hours.
• High Definition TV Shows (HDTV) – Shows that are broadcast in HD may be recorded in the same format,
provided your
DVR is connected to a High Definition Television.Recording capacity is up to 10 hours.
DIGITAL CABLE BOX / DCT6208
DIGITAL CABLE BOX
5
5
Page 9
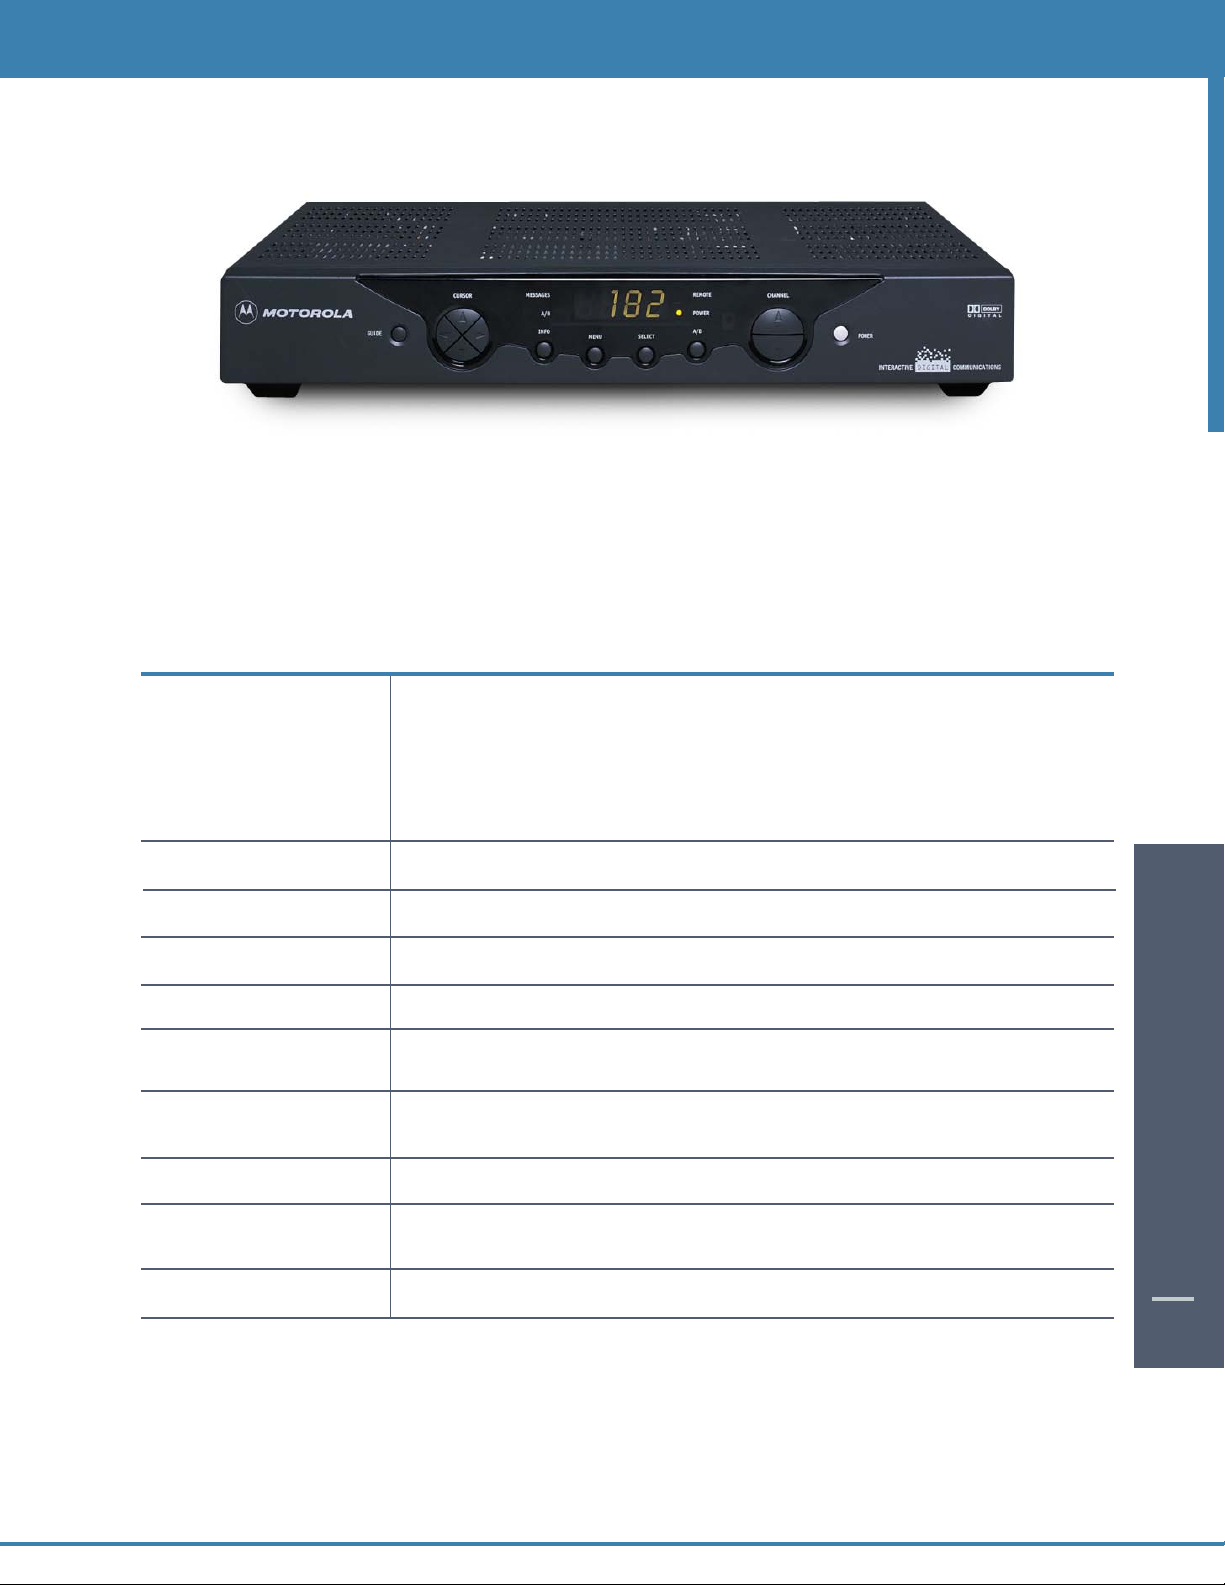
The DCT6208 Front Panel
The DCT6208 front panel has 12 keys and an LED display. Use the keys to perform basic functions such as access the
interactive program guide,navigate menus, and purchase
Key Description
1 LED Displays the channel number or time of day.
There are four indicator lights on the LED screen:
• MSGS - the DCT6208 has received
• A/B - the RF bypass is active
• ON - the DCT6208 is powered on
• REMOTE - the remote control is in use
On Demand (OND) and Pay-Per-View events.
Messages for you to read
2
3 MENU Displays the
4 POWER Turns the device on or off.
5 INFO Displays the current channel and program information.
6 A/B Use to manually enable the RF bypass function.You must have a cable-ready TV
7 SELECT Selects menu options,
8 GUIDE Displays the program guide.
9 CHANNEL + Changes the channels by moving up or down.
DIGIATAL CABLE BOX / DCT6208
DIGITAL CABLE BOX
10 SMART CARD SLOT Not currently enabled – intended for future use.
There are also inputs for a Universal Serial Bus (USB),audio/video jacks and a Smart Card slot. These inputs are for future
applications under development and are not enabled on this unit.
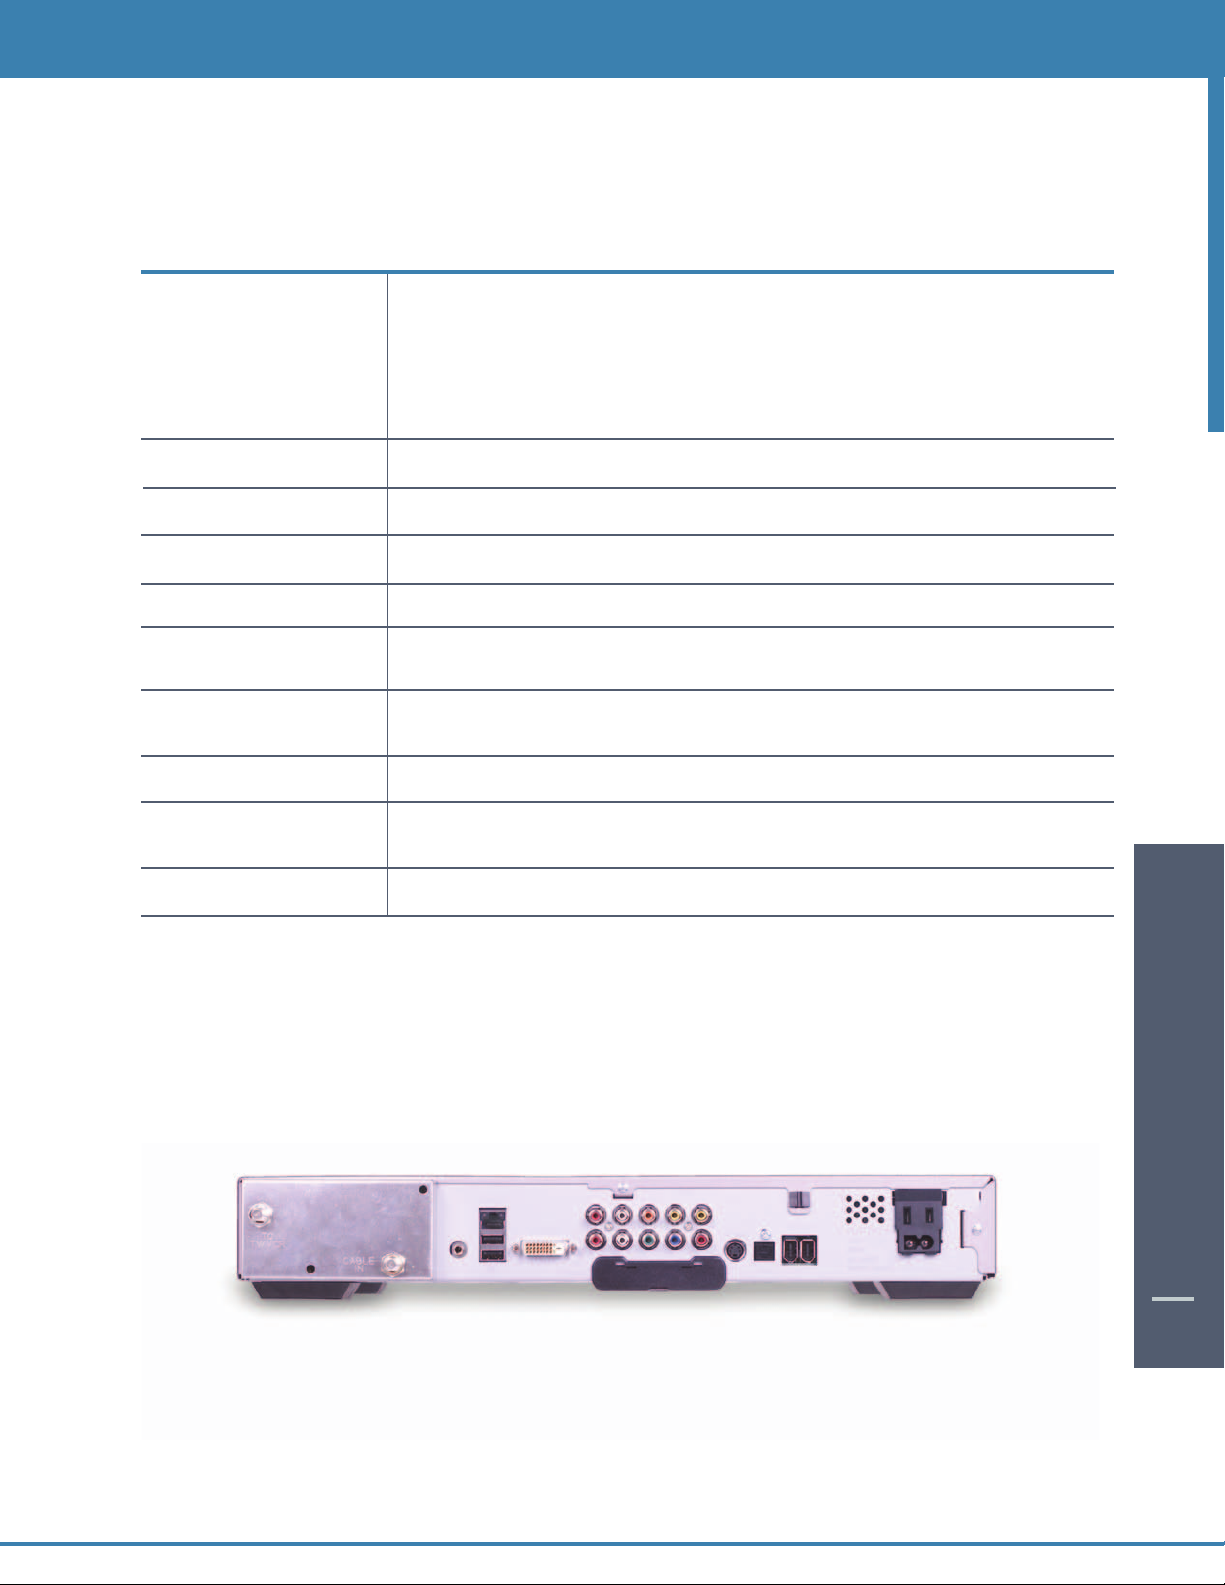
The DCT6208 Back Panel
ear panel of the DCT6208 c
he r
T
describes each connection and its use.
5634 CURSOR Moves the cursor around the program guide and menu screens.
Main Menu.
for this function to operate.(Optional Feature)
On Demand programming, Pay-Per-View events or
programs from the program guide.
CHANNEL -
ypes of interfaces - audio, video and data. The table following this drawing
onsists of thr
ee t
DIGITAL CABLE BOX / DCT6208
6
6
7
Page 10

Key Description
1 TO TV/VCR This coaxial output connector is used to connect the DCT6208 to a TV or VCR
operating on channel 3 or 4.
2 CABLE IN The CABLE IN connector receives the incoming signal from your cable
service provider.
3 ETHERNET Not currently enabled - intended for future use.
4 AUDIO IN R These connectors are used to connect a set-top between a peripheral audio
AUDIO IN L device such as a CD player and a stereo tuner or A/V receiver.In the current
DCT6208 release, the audio from the peripheral device will pass through the
DCT6208 when it is turned off.
5 SPDIF The orange coaxial SPDIF connector is a digital output connection that carries
Dolby Digital 5.1 audio or PCM audio.
It is used to connect the DCT6208 to a stereo tuner or A/V receiver to provide
surround-sound, theater-style audio.
6 VIDEO IN The VIDEO IN connector accepts a baseband video input from a VCR,camcorder
or other video device. (Not currently enabled.)
VIDEO OUT The VIDEO OUT connector is used to deliver baseband video to an external device
such as a VCR or TV.
7 OUTLET This AC outlet may be used to plug your TV into the DCT6208 as a convenient
additional outlet.
8 IR This connector enables the DCT6208 to control a VCR while recording a selected
9 USB Not currently enabled - intended for future use.
10 DVI-D Digital Video Interface.To connect High Definition monitor or High
DIGITAL CABLE BOX / DCT6208
11 AUDIO OUT R The RCA phono-type connectors are used to deliver audio to a stereo receiver.
12 Y Pb Pr These connectors are used to deliver component video to an HD-ready TV or
13
14
15
16 IEEE 1394 Firewall Digital Interface.To connect High Definition monitor or High
program. Not all electronic program guides support this feature.
Definition television.
AUDIO OUT L
monitor.Though capable of delivering standard definition video to your TV or
monitor,these cables are necessary to deliver High Definition video.
TV PASS CARD For future use.
tor is used to deliver high quality,standard definition video to
onnec
his c
S-VIDEO
AL
OPTIC
SPDIF
T
xternal devices that accept S-Video inputs, such as a high-end VCR or TV.
e
he OPTIC
T
Dolby Digital 5.1 audio or PCM audio.
It is used to connect the DCT6208 to a stereo tuner or A/V receiver to provide
sur
efinition t
D
AL SPDIF connector is an optical digital output connection that carries
ound-sound
r
ele
thea
,
vision.
ter-style audio.
DIGITAL CABLE BOX / DCT6208
DIGITAL CABLE BOX
8
17 POWER INLET For the female end of the supplied power cord.
7
7
Page 11

Important Safety Instructions
Please refer to the Motorola DCT6208 User Guide for complete safety and operating instructions.The Motorola DCT6208
has been designed to operate reliably in a well-ventilated household environment. Slots and openings in the unit cabinet
are provided for ventilation.These openings should never be blocked. As such, do not place the product on a bed, sofa,rug,
or similar surface.
• Position the DCT6208 with at least 2 inches of space above and on all sides.
• Do not block the slots and openings in the DCT6208.
• Do not place anything on top of the DCT6208.
• Do not position the DCT6208 in an enclosed space that would restrict airflow around the unit.
• Do not position the DCT6208 near any external heat source that could raise the temperature around the unit.
DIGITAL CABLE BOX / DCT6208
DIGITAL CABLE BOX
8
8
DIGITAL CABLE BOX / DCT6208
9
Page 12
Motorola DCT2500
The Motorola DCT2500 set-top,the next generation of the successful DCT2000 platform, adds increased memory,
more processing power, and better graphics capabilities. All of which enables the DCT2500 to support additional
interactive applications,guide enhancements, increased performance and true “watch and surf” capabilities while
viewing the IPG.
The DCT2500 Front Panel
The DCT2500 front panel has 12 keys and an LED display. Use the keys to perform basic functions such as access the
interactive program guide,navigate menus, and purchase On Demand (OND) and Pay-Per-View events.
Key Description
1 LED Displays the channel number or time of day.
There are four indicator lights on the LED screen:
• MSGS - the DCT2500 has received
• A/B - the RF bypass is active
• ON - the DCT2500 is powered on
• REMOTE - the remote control is in use
Messages for you to read
2
DIGITAL CABLE BOX / DCT2500
3 MENU Displays the
4 POWER Turns the device on or off.
5 INFO Displays the current channel and program information.
6 A/B Use to manually enable the RF bypass function.You must have a cable-ready TV
7
8
9 CHANNEL + Changes the channels by moving up or down.
10 SMART CARD SLOT Not currently enabled – intended for future use.
10
There are also inputs for a Universal Serial Bus (USB),audio/video jacks and a Smart Card slot. These inputs are for
future applications under development and are not enabled on this unit.
5634 CURSOR Moves the cursor around the program guide and menu screens.
Main Menu.
for this function to operate.(Optional Feature)
SELECT
GUIDE
CHANNEL -
ts menu options
elec
S
programs from the program guide.
s the program guide.
y
ispla
D
,
On D
emandpro
amming
gr
,
er-Vie
y-P
a
P
w
ts or
en
v
e
DIGITAL CABLE BOX / DCT2500
DIGITAL CABLE BOX
9
9
Page 13

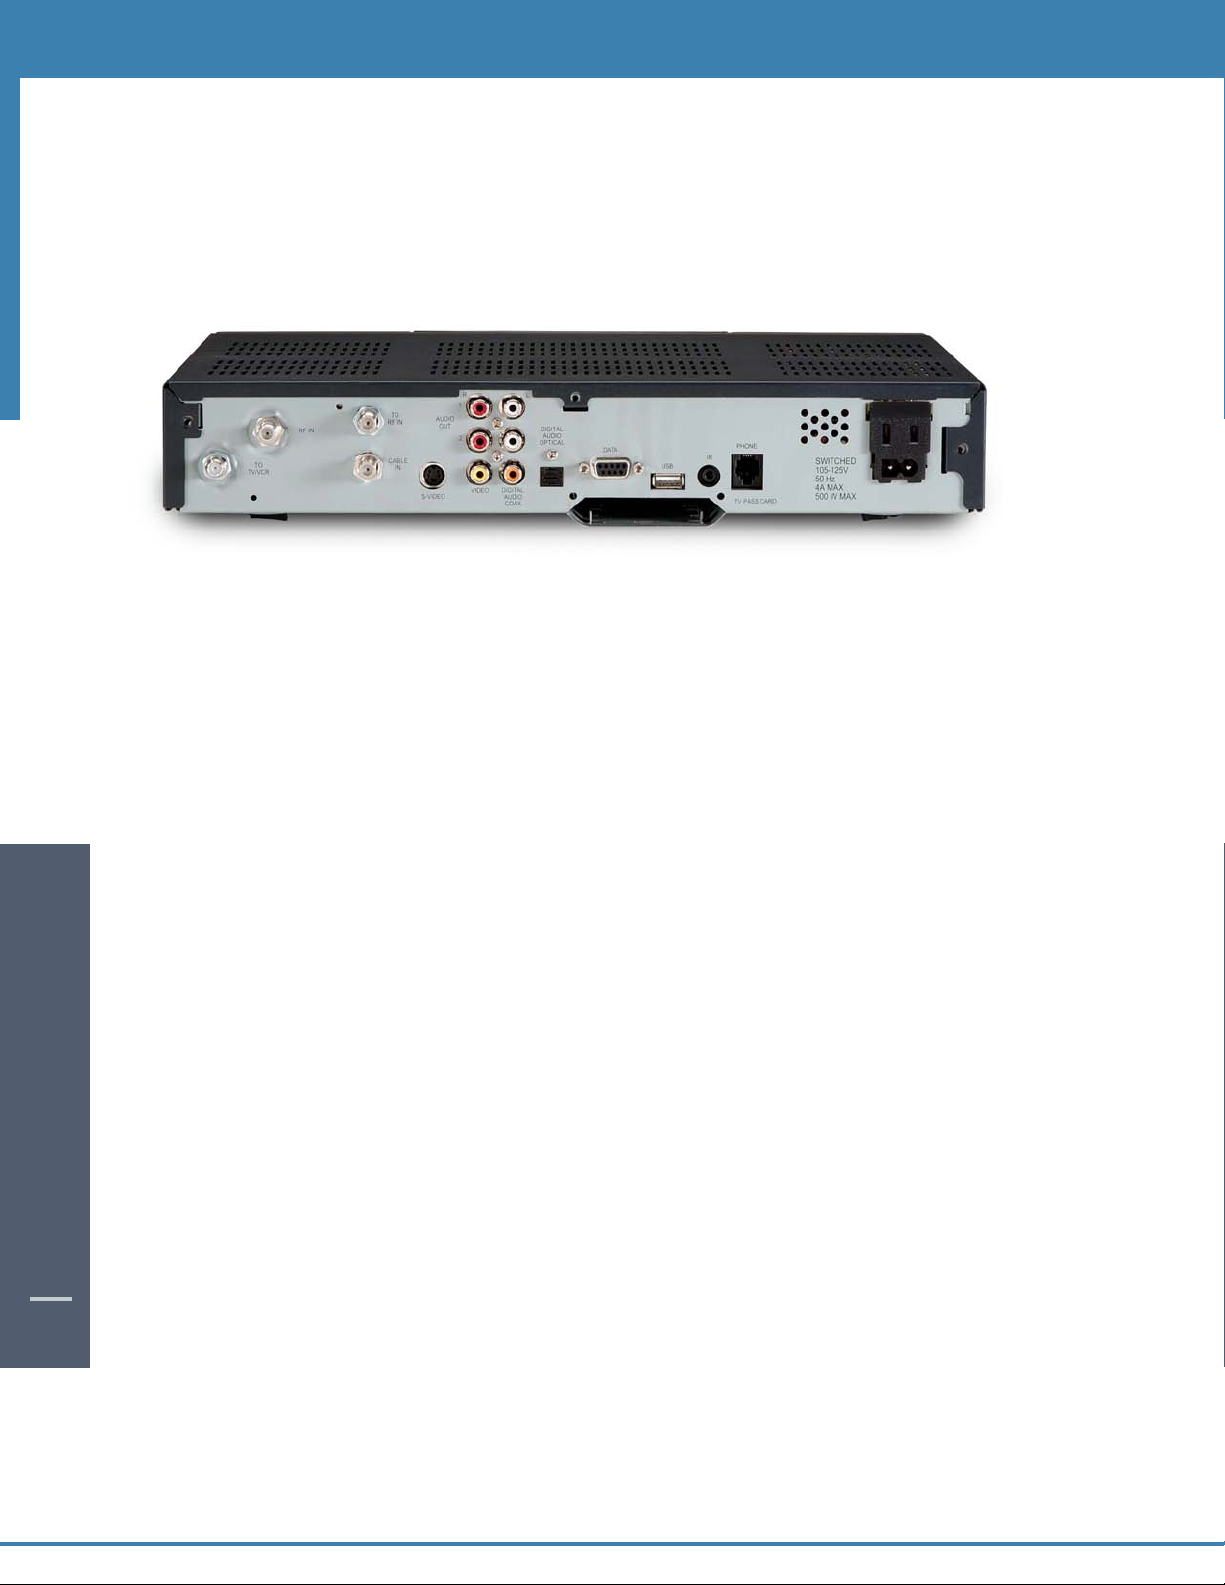
The DCT2500 Back Panel
The rear panel of the DCT2500 consists of three types of interfaces - audio, video and data. The table following this drawing
describes each connection and its use.
Key Description
1 TO TV/VCR This coaxial output connector is used to connect the DCT6208 to a TV or VCR
operating on channel 3 or 4.
2
3 ETHERNET Not currently enabled - intended for future use.
4 AUDIO IN R These connectors are used to connect a set-top between a peripheral audio
5 SPDIF The orange coaxial SPDIF connector is a digital output connection that carries
6 VIDEO IN The VIDEO IN connector accepts a baseband video input from a VCR,camcorder
7 OUTLET This AC outlet may be used to plug your TV into the DCT2500 as a convenient
8 IR This connector enables the DCT2500 to control a VCR while recording a selected
DIGITAL CABLE BOX / DCT2500
9 USB Not currently enabled - intended for future use.
CABLE IN The CABLE IN connector receives the incoming signal from your cable
service provider.
AUDIO IN L device such as a CD player and a stereo tuner or A/V receiver.In the current
DCT2500 release, the audio from the peripheral device will pass through the
DCT2500 when it is turned off.
Dolby Digital 5.1 audio or PCM audio.
It is used to connect the DCT2500 to a stereo tuner or A/V receiver to provide
surround-sound, theater-style audio.
or other video device. (Not currently enabled.)
VIDEO OUT The VIDEO OUT connector is used to deliver baseband video to an external device
such as a VCR or TV.
additional outlet.
program. Not all electronic program guides support this feature.
DIGITAL CABLE BOX
10
10
10 DVI-D Digital Video Interface.To connect High Definition monitor or High
Definition television.
11 AUDIO OUT R The RCA phono-type connectors are used to deliver audio to a stereo receiver.
UDIO OUT L
A
12 Y Pb Pr These connectors are used to deliver component video to an HD-ready TV or
.Though capable of delivering standard definition video to your TV or
or
monit
monitor,these cables are necessary to deliver High Definition video.
13
14 S-VIDEO This connector is used to deliver high quality, standard definition video to
15
16 IEEE 1394 Firewall Digital Interface.To connect High Definition monitor or High
17 POWER INLET For the female end of the supplied power cord.
TV PASS CARD For future use.
xternal devices that accept S-Video inputs, such as a high-end VCR or TV.
e
OPTIC
SPDIF
AL
he OPTIC
T
Dolby Digital 5.1 audio or PCM audio.
It is used to connect the DCT2500 to a stereo tuner or A/V receiver to provide
sur
efinition t
D
AL SPDIF connector is an optical digital output connection that carries
ound-sound
r
ele
theater-style audio.
,
vision.
DIGITAL CABLE BOX / DCT2500
11
Page 14
Important Safety Instructions
Please refer to the Motorola DCT2500 User Guide for complete safety and operating instructions.The Motorola
DCT2500 has been designed to operate reliably in a well-ventilated household environment. Slots and openings in
the unit cabinet are provided for ventilation.These openings should never be blocked. As such, do not place the
product on a bed, sofa, rug,or similar surface.
• Position the DCT2500 with at least 2 inches of space above and on all sides.
• Do not block the slots and openings in the DCT2500.
DIGITAL CABLE BOX / DCT2500
• Do not place anything on top of the DCT2500.
• Do not position the DCT2500 in an enclosed space that would restrict airflow around the unit.
• Do not position the DCT2500 near any external heat source that could raise the temperature around the unit.
12
DIGITAL CABLE BOX / DCT2500
DIGITAL CABLE BOX
11
11
Page 15
Motorola DCT2000
The Motorola DCT2000 set-top platform,the world's most widely deployed digital set-top,offers the capability of
supporting multiple interactive services including Interactive Program Guides (IPG),
e-mail, e-commerce, chat rooms, and impulse Pay-Per-View.
On Demand (OND), Internet access,
The DCT2000 Front Panel
The DCT2000 front panel has 12 keys and an LED display. Use the keys to perform basic functions such as access the
interactive program guide,navigate menus, and purchase On Demand (OND) and Pay-Per-View events.
Key Description
1 LED Displays the channel number or time of day.
There are four indicator lights on the LED screen:
• MSGS - the DCT2000 has received
• A/B - the RF bypass is active
• ON - the DCT2000 is powered on
• REMOTE - the remote control is in use
Messages for you to read
2 5634 CURSOR Moves the cursor around the program guide and menu screens.
DIGITAL CABLE BOX / DCT2000
DIGITAL CABLE BOX
12
12
3 MENU Displays the
4 POWER Turns the device on or off.
5 INFO Displays the current channel and program information.
6 A/B Use to manually enable the RF bypass function.You must have a cable-ready TV
7 SELECT Selects menu options,
8 GUIDE Displays the program guide.
9 CHANNEL + Changes the channels by moving up or down.
10 SMART CARD SLOT Not currently enabled – intended for future use.
There are also inputs for a Universal Serial Bus (USB),audio/video jacks and a Smart Card slot. These inputs are for future
applications under development and are not enabled on this unit
CHANNEL -
Main Menu.
o operate.(Optional Feature)
or this func
f
ograms from the program guide.
pr
tion t
On Demand programming, Pay-Per-View events or
DIGITAL CABLE BOX / DCT2000
13
Page 16

Key Description
1 TO TV/VCR This coaxial output connector is used to connect the DCT2000 to a TV or VCR
op
erating on channel 3 or 4.
2 CABLE IN The CABLE IN connector receives the incoming signal from your cable
service provider.
3 ETHERNET Not currently enabled - intended for future use.
4 AUDIO IN R These connectors are used to connect a set-top between a peripheral audio
AUDIO IN L device such as a CD player and a stereo tuner or A/V receiver.In the current
DCT2000 release, the audio from the peripheral device will pass through the
DCT2000 when it is turned off.
5 SPDIF The orange coaxial SPDIF connector is a digital output connection that carries
Dolby Digital 5.1 audio or PCM audio.
It is used to connect the DCT2000 to a stereo tuner or A/V receiver to provide
surround-sound, theater-style audio.
6 VIDEO IN The VIDEO IN connector accepts a baseband video input from a VCR,camcorder
or other video device. (Not currently enabled.)
VIDEO OUT The VIDEO OUT connector is used to deliver baseband video to an external device
such as a VCR or TV.
7 OUTLET This AC outlet may be used to plug your TV into the DCT2000 as a convenient
additional outlet.
8 IR This connector enables the DCT2000 to control a VCR while recording a selected
9 USB Not currently enabled - intended for future use.
10 DVI-D Digital Video Interface.To connect High Definition monitor or High
DIGITAL CABLE BOX / DCT2000
11 AUDIO OUT R The RCA phono-type connectors are used to deliver audio to a stereo receiver.
12 Y Pb Pr These connectors are used to deliver component video to an HD-ready TV or
13
14 S-VIDEO This connector is used to deliver high quality, standard definition video to
15 OPTICAL The OPTICAL SPDIF connector is an optical digital output connection that carries
16 IEEE 1394 Firewall Digital Interface.To connect High Definition monitor or High
program. Not all electronic program guides support this feature.
Definition television.
AUDIO OUT L
monit
monit
ASS CARD For future use.
V P
T
ternal devices that accept S-Video inputs, such as a high-end VCR or TV.
x
e
olby Digital 5.1 audio or PCM audio.
SPDIF
D
It is used to connect the DCT2000 to a stereo tuner or A/V receiver to provide
surround-sound, theater-style audio.
Definition television.
hough c
T
.
or
or,these cables are necessary to deliver High Definition video.
apable of delivering standard definition video to your TV or
DIGITAL CABLE BOX / DCT2000
DIGITAL CABLE BOX
14
17 POWER INLET For the female end of the supplied power cord.
13
13
Page 17

Important Safety Instructions
Please refer to the Motorola DCT2000 User Guide for complete safety and operating instructions.
The Motorola DCT2000 has been designed to operate reliably in a well-ventilated household environment. Slots and
openings in the unit cabinet are provided for ventilation.These openings should never be blocked. As such, do not
place the product on a bed, sofa, rug,or similar surface.
• Position the DCT2000 with at least 2 inches of space above and on all sides.
• Do not block the slots and openings in the DCT2000.
• Do not place anything on top of the DCT2000.
• Do not position the DCT2000 in an enclosed space that would restrict airflow around the unit.
• Do not position the DCT2000 near any external heat source that could raise the temperature around the unit.
DIGITAL CABLE BOX / DCT2000
DIGITAL CABLE BOX
14
14
DIGITAL CABLE BOX / DCT2000
15
Page 18

DIGITAL CABLE BOX / DCT2000
DIGITAL CABLE BOX / DCT2000
DIGITAL CABLE BOX
16
15
15
Page 19

BASIC i-GUIDE NAVIGATION TIPS /
BASIC i-GUIDE NAVIGATION TIPS
REMOTE CONTROL FEATURES
Basic i-Guide Navigation Tips
Yellow is always the highlight color. As you navigate listings using your remote, the highlight appears on screen to
*
indicate your current selection.
* Press the
* Press OK to make your selection.
* Press the EXIT button on your remote to return to watching TV.
5634 buttons on your remote to move the highlight.
Remote Control Features
Info
Lock
Restrict viewing with
Parental Locks
Help
Learn more about a feature
Exit
Return to watching television
Guide
See program listings for the
current time
Day*
See listings for the next
or previous day
See program information
Arrows
Use to highlight guide features,or
while watching television, press to
begin browsing.Note: Arrows
control playback of recorded
programs with DVR
CHAN
Change channels and access the
Flip Bar
OK
Select a highlighted item; or while
watching a program, press to
display or remove the Flip Bar or
Mini Guide
16
16
Numbers
Press channel numbers,then
OK/SEL t
o tune t
o a channel
Music
See digital music channels
VCR Controls
Controls VCR, ON DEMAND
and Digital Video Recording
(if available)
actual remote. Basic functions should be the same.
*Amount of programming data varies by system.
MENU
Enter and exit the Main Menu
LAST
Return to the previous screen or
channel
FAV
Tune to your Favorite channels,
once you set them up
PAG E
o the ne
oll t
Scr
of listings
Note: Remote pictured may not reflect your
xt or previous page
REMOTE CONTROL FEATURES
BASIC i-GUIDE NAVAGATION TIPS /
17
Page 20

YOUR ACCESS TO DIGITAL CABLE
Your Access to Digital Cable
Main Menu
i-Guide’s Main Menu* gives you easy access to all the
eatures of digital cable. Simply press
f
remote,then select from the options available, including TV
Listings By Time,viewing options by category,Parental
, Favorites,Local Weather and more.
Locks
MENU t
wice on your
On-Screen Program Guide
The on-screen guide is your source for finding out what’s on
your digital cable service.The program guide for i-Guide
provides 90 minutes of listings on each screen.As you
navigate throughout the guide,your current selection is
highlighted in yellow, and a program or feature description
appears on screen. Press
Listings for the current time.
GUIDE on your remote to access TV
18
Quick Menu
vides shortcuts to the key
o
he Quick M
T
features of your program guide and digital cable service.
Simply press
he Quick M
T
when the
Quick Menu is designed to allow you to launch directly into
uidefeatures without having to navigate through a series
i-G
of menus.
*Menu selections vary depending on the services you cable provider offers.
enu
MENU on your remote to access Quick Menu.
enu
MENU button on your remote is selected.The
tur
ea
f
will app
e pr
ear o
er any video or guide screens
v
YOUR ACCESS TO DIGITAL CABLE
YOUR ACCESS TO DIGITAL CABLE
17
17
Page 21

Guide Symbols to Know – Quick Menu Icons
These icons may appear in Quick Menu*, depending on the services your cable provider offers. Highlight and select the
icon with your remote and you will immediately access the area indicated.
Guide Main Menu Digital Recordings
Search Menu On Demand Menu
Pay-Per-View Listings Digital Music Listings
Favorites List Movies Search Menu
Kids Search Menu Listings By Time
Sports Search Menu Guide Setup Menu
Listings By Channel Pay-Per-View Events
YOUR ACCESS TO DIGITAL CABLE
YOUR ACCESS TO DIGITAL CABLE
18
18
Message Center Pay-Per-View by Title
*Menu selections vary depending on the services you cable provider offers.
YOUR ACCESS TO DIGITAL CABLE
19
Page 22

Search Categories and Listings
Finding something to watch is easy with i-Guide.View
ogram listings the way you want,including
pr
Time and By Channel or,by category such as Movies, Sports,
Children and more.Select a Search category from the Main
Menu or Quick Menu to display listings.
You can narrow your program options by theme using subcategories provided.*
Listings B
y
SEARCH CATEGORIE AND LISTINGS
TV Listings
TV Listings appear in a grid format with channel numbers
and network call letters down the left side and times along
Listings are color coded to help you identify different
.
op
the t
types of programs:
Blue – Regular programs
Purple – Movies
Green – Sports
hildr
– C
t Blue
20
*Amount of programming data varies by system.
Ligh
’s programs
en
SEARCH CATEGORIES AND LSTINGS
19
19
Page 23

SEARCH CATEGORIES AND LISTINGS
Gui
de Tip
Gui
de Tip
Navigating Listings
• Make a selection from one of the i-Guide menus, or just press GUIDE on your remote to go to program listings
for the current hour.
• Use the 56 buttons on your remote to navigate program titles, and the 34 buttons to see program listings
for later that day and for future days.
or faster searching:
• F
• Use the
• Press the DAY 34 buttons on your remote to advance ahead a day at a time.
INFO on your remote to see detailed program information.
• Press
• Highlight a program title and press
will see an information screen that provides program details and other features.
PAG E 56 buttons on your remote while in the listings
or
OK. If the program is on now, you will tune to it. If the program is on later,you
Press and hold34 to rapidly move ahead in the listings.
Listings By Channel
• Select Listings By Channel on the Main Menu to see
listings organized By Channel.
• Press the 34 button to see listings for the next
channel in sequence.
• Use the 56 or the PAGE 56 buttons on your to
navigate listings.
• Highlight your selection and press OK to tune to
it if the program is airing now,or press INFO to see program
information if the program airs at a later time.
20
20
A-Z Title Search
A-Z Title Search allows you to find a specific program by
entering the first few letters of the program name.
• Select
• Advance to the next box by pressing the 4 button on
• Continue entering letters until the program you are looking
• Press OK to jump to see your sesarch results.Highlight a
A-Z Title Search from the Search Menu and use the
56 buttons until the letters you want appear in the boxes.
your remote.
f
or appears in the listings.
program you want to watch and press OK.
Adult Programming
egory,accessed from the
t
a
dult c
he A
T
programming may be purchased as a single program or as a time-block package,depending on your cable
provider’s service.For your convenience, you may also restrict Adult titles from being viewed in the listings by
setting
Paren
tal L
ocks
ee
S
ar
.
P
en
tal L
PPV M
ocks
sec
enu
tion f
,
pr
vides acc
o
or mor
e inf
o listings f
ess t
ormation.
or adult-oriented programming.Adult
SEARCH CATEGORIE AND LISTINGS
21
Page 24

Program Information
i-Guide provides Instant Information while you view program listings so you see a brief overview of the program
t a glance.
a
and helpful indicators that identify your settings,such as Reminders Recordings and Favorites .
If you want to access more information on a program while viewing listings or watching TV,press the INFO button
on your remote.Here you can read a longer description about the program as well as additional details such as
release year, category and runtime.
Instan
t Information
includes pr
ogram title, start/end time, program rating, a brief program description
PROGRAM INFORMATION
22
PROGRAM INFORMATION
PROGRAM INFORMATION
21
21
Page 25

Action Icons
Guide Tip
Guide Tip
From the Program Information screen, you can perform a number of actions by using the Action Icons at the bottom of
the screen, such as set a Reminder or see upcoming air times for a program. Use the 34 arrow buttons to highlight each
icon, and a description appears below.
Guide Symbols To Know - Action Icons
ACTION ICONS
ACTION ICONS
22
22
Go back to the previous screen
Watch this program
Record/Change Record Options*
Place a Lock on the program to restrict viewing
Display all the Times the program will be airing
Set a Reminder for this program
Save the channel in your Favorites list
Order PPV and other pay services
ith
W
air
uide,you can look ahead to see listings and schedule recordings for programs
i-G
ing in the futur
e.The amount of data you will find varies by cable system.
ACTION ICONS
23
* Requires separate VCR Setup or use of Digital Video Recorder.
Page 26

Reminders
With i-Guide, you can set Reminders so you don’t miss shows you want to watch.
Setting Reminders
From a Program Information screen, highlight the __ Icon from Quick Menu and press OK. Follow the on-screen
prompts to confirm the Reminder or set Reminder Options.
Reminder Options
Reminder Options let you customize the frequency and timing for Reminders.
REMINDERS
This option appears only if you have already set a lock for that program.
*
24
• Use the34 buttons to set repeating Reminders that will
appear Once, Once a Day,Once a Week, Mon-Fri or Sat-Sun.
• Determine the Start Time for the Reminder to appear on screen,
up to 15 minutes prior to the program start.
• Reminder End Time enables you to extend the reminder period
beyond the end of the program up to 2 hours after the program is over.
When you set a
•
ypassing lo
b
can then tune directly to the program from the
Reminder without having to enter your Locks PIN,
v
ou ha
if y
more information).
Reminder,
ou plac
cks* y
e set one up (See
you have the option of
tal Locks
en
ogram.You
sec
ed on the pr
ar
P
tion f
or
REMINDERS
23
23
Page 27

Smart Channel Surfing (Flip & Mini Guide)
Guide Tip
Guide Tip
Flip
The Flip Bar allows you to see program information as you change channels to help you know more about what’s on.
Information on the Flip Bar includes program name,start and end time, channel,current time and a brief program description.
ress
• P
CHAN56 t
When you find a program you like,press
•
or press INFO for more program details.
• To see the Flip Bar for the program you are watching, just press the
INFO button on the remote.
o change channels and see the Flip Bar
o make the Flip Bar
OK t
on scr
een.
disapp
ear
Mini Guide (Browse)
The Mini Guide screen allows you to watch television and view program listings without having to leave the program you
are watching or go to the full screen guide.Mini Guide is seen on the lower 1/3 of your television screen and displays two
SMART CHANNEL SURFING
24
24
channels and 90 minutes of listings.To access Mini Guide, press the OK button on your remote.Use the 56 arrows to see
listings on other channels and the 34 arrows to see listings at other times. At anytime, press INFO to see additional
inf
ormation about that program.
se the LOCK
U
using
V
A
, F
and INFO butt
Flip and Mini Guide.
ons on y
our r
e to activate these features while
emot
SMART CHANNEL SURFING
25
Page 28

Digital Music
Guide Tip
Guide Tip
Digital Music is continuous, commercial-free music in a variety of formats.
To access Digital Music:
• Select Digital Music from the Main Menu,
or
• Press the Icon on the Quick Menu,
or
• Press the MUSIC button on the remote if available.
You can press INFO for more information on each category.
Then select a music format and enjoy the music.
As you’re listening, press INFO for more information on title, track and artist. *
DIGITAL MUSIC
26
Digital Music channels may also be set as Favorites so you can quickly navigate through
your favorite music channels.Refer to the Favorites section for more information.
DIGITAL MUSIC
25
25
* Where available. Some digital music providers may offer title, track and artist on screen.
Page 29

Local Weather
et accurate,up-to-date local weather conditions and a 3-day forecast.
G
• Highlight Local Weather from the Main Menu and press OK.
• Use the
Note:Weather service not available for all locations.
6 button to see a detailed local weather forecast.
LOCAL WEATHER / MESSAGES
26
26
Messages
Messages may be sent occasionally by your cable company to announce new services, special promotions or other
information. If you have a Message, an envelope indicator will appear in the upper left corner on the screen and a red light
will appear on your set-top box.From the Main Menu, select Messages. Highlight the desired Message and press OK to
read it.
LOCAL WEATHER / MESSAGES
27
Page 30

Parental Locks and Purchase PINS
Parental Locks allow you to restrict viewing and purchases of TV programming based on your viewing preferences.
et a personalized 4-digit
S
adult titles from being displayed on screen.
PIN and y
PINS Setup
Set up and change your Parental Locks PIN and Purchase PIN in PIN
.Your Parental Locks PIN allows you to restrict viewing of
Setup
programs.Your Purchase PIN is used to restrict pay programming
purchases.
• Select Setup from the Main Menu
• Select PINs Setup
• Follow the on-screen prompts to setup, clear, or change
your PINs
ou can place Locks
Parental Locks Setup
Set Locks anytime in the guide or while watching television. Just
press the
information screen. Enter your 4-digit Parental Locks PIN and Lock
the channel, title or rating using the on-screen prompts.
on selec
ted ratings,channels and titles.You can also hide
LOCK button on your remote,or use the Icon on an
PARENTAL LOCKS AND
You can also set
ons to make your selections, including title, rating or channel and then press
PURCHASE PINS
butt
28
Locks from the Setup Menu. From the Main Menu select Setup, then Locks Setup. Use the 56 34
o confirm each setting.
OK t
PARENTAL LOCKS AND
27
27
PURCHASE PINS
Page 31

View Locked Programs
Guide Tip
Guide Tip
To view programs and channels you have locked,tune to the program or select it from the listings. Enter your PIN when
prompted.
PARENTAL LOCKS AND
PURCHASE PINS
28
28
Bypass or Clear Locks
Temporarily open or clear all Locks for easier viewing. Select
Master Locks from the Locks Setup screen and change the
option from No to Ye s .
Restore Locks
Locks may be restored in any of the following ways:
ess the
r
• P
elec
• S
• Turn the set-top box off,and back on.
OCK
L
butt
cks S
o
etup
A symb
To unlock,press the
t
L
ytime and en
on an
om the Setup M
fr
ol app
ter your 4-digit
enu
then selec
,
ears in the instan
LOCK button on the remote and enter your 4-digit code.
t inf
PIN.
t
YES t
or
ma
n
o tur
tion t
cks
o
L
back on.
o indicate a program has been locked
PARENTAL LOCKS AND
PURCHASE PINSCONTENTS
29
Page 32

Favorites
Guide Tip
Guide Tip
The Favorites feature allows you to quickly access the
channels y
To add channels to your Favorites listings:
To remove a channel from your Favorites, highlight it in Favorites Setup
and press
Select
ou have designated as yourFavorites
• Select Setup from the Main Menu
• Select Favorites Setup
• Highlight a channel and press OK - a
indicator will appear next to the listing,
designating it as a
OK. The indicator disappears and the channel will no longer be designated as a Favorite.
Favorites from the Main Menu or from the Quick Menu to see a list of your Favorite channels.
Favorite
.
FAVORITES
30
While you are in TV Listings,press the
hile watching TV, press
channel.
W
ou c
Y
igital M
D
A
F
an also use the
usic
FAV button on your remote to move the highlight to your next favorite
V
t
.
o quick
ly tune to your favorites.
orites
v
a
F
ess the
r
P
V
A
F
butt
e within Digital Music listings or while listening to
tur
ea
f
our favorite music channels.
ough y
e thr
t
viga
o na
on t
FAVORITES
29
29
Page 33

Setup
ou can activate and customize certain
Y
settings and Languages from the Setup Menu.
uidefeatures such as the Flip Bar Posistion
i-G
Guide Setup
Use your remote to select Setup from the Main Menu, then select Guide
Setup
. Use the34 buttons to select from the following setup options:
Flip Bar Position – The Flip Bar can appear either at the
•
top or bottom of your screen.
Flip Bar Timeout – Change the amount of time in which
•
the Flip Bar will stay on your screen from 3 to 15 seconds.
• Auto-Tune –
• Ye s – Automatically tunes after 2 seconds when you
enter numbers directly on your remote.
No – Enter 3 digits or press OK after entering
•
numbers on the remote.
• Message – Select On to make the message envelope appear when a
new message is received.
Reminder Notice – Adjust the amount of time before the start of a
•
program in which the Reminder Notice will appear from 1–15 minutes.
Listing Grid Height – Adjust the listings for single- or
•
dual-height grid display.
, L
ock
options
, Cable Box settings, Audio
SETUP
30
30
Cable Box Setup
Time Display –
• Off - Displays the currently tuned channel on the front
of the cable box.
On - Displays the current time on the cable box.
•
AC Outlet –
• Switched - Determines that power is available only when the cable box is on.
• Unswitched - Means that power is always available to the outlet on the back of the cable box.
See Configuration –
• Highligh
need in the event of a problem with your service).
t and pr
ess
OK t
w the configuration screen (includes information your cable company may
o sho
SETUP
31
Page 34

Audio Setup
Default Audio Language – Change secondary digital audio available with certain networks and programs. Press
34 buttons to change the default language to English, Spanish,French or Portuguese.
Optimal Stereo Volume -
Volume is unchanged from the current setting.
• No-
•
Ye s - Volume is automatically adjusted to the optimal level.
Dolby Digital –
• ON – Turns Dolby Digital on (available only for equipment supporting Dolby Digital).
• OFF – Turns Dolby Digital off.
Audio Output - Choose if the audio output goes to your TV or to your stereo.
TV Speaker is the default setting.
•
• Select Advanced to change the settings for Compression and Stereo Output.
Screen Position Setup
To alter your screen position:
• From the Setup Menu, select Screen Position Setup to Adjust the screen position.
• Use the
5634 buttons on your remote until the display arrows are centered on the screen.
Text Language Setup
• From the Setup Menu, select Text Language Setup
and use the buttons to select the desired language.
• Select English, Canadian English,Canadian French
or Spanish to change the language of the
on-screen commands, selection bars and help
screens within
• To confirm, select Yes.
i-Guide.
SETUP
32
Note: Changing the language of i-Guide can take several minutes. During this time, i-Guide is not accessible.
SETUP
31
31
Page 35

Digital Pay-Per-View (Optional Feature)
V Guide’s i-Guide
T
es ordering and watching Pay-Per-View (PPV)programs easy.
mak
Ordering Pay-Per-View
rom the Main Menu
F
options and see programs available in a variety of categories.
When you find a program of interest,highlight the title and press OK for the Information Screen.
To purchase a program, highlight the
your order.
uick Menu,select
and Q
o go to the
PPV t
Icon and follow the on-screen prompts to complete and confirm
Search Menu.Then select any of the
PPV
PPV
DIGITAL PAY-PER-VIEW
32
32
If the program is scheduled to air at a future time,a
egins.
am b
gr
o
the pr
ols to Know - PPV Information Screens
ymb
uide S
G
Go back to the previous screen See all the times the program will be airing
Order the program, or cancel an ordered Save this channel in your Favorites list
am
gr
o
pr
Set Recording Timers (Requires separate Indicates the program is available as a
VCR Setup or use of Digital Video Recorder) package
Place a Lock on the program to restrict viewing
Reminder is automatically set to notify you of your order before
DIGITAL PAY-PER-VIEW
33
Page 36

Ordering Pay-Per-View By Phone
f your cable provider offers phone ordering,the order instructions
I
appear on-screen. Simply call the number to place your order.Then
select Continue to complete your order.
Ordering Pay-Per-View Packages
Your cable service may offer programs in a package by title, time bock,
et
c. Select the package title from the listings,and if available in a
package, a icon will appear if the program is part of a package.
DIGITAL PAY-PER-VIEW
34
Canceling a Pay-Per-View Order
To cancel a PPV order before the program starts:
• Select the ordered program in any of the listings menus
(there will be a $ sign in the
• From the information screen,select the Icon and
follow the prompts to cancel the order.
Note: In some cable systems, your order will automatically be cancelled if you do not tune to the program. In systems
that use phone ordering,you will need to call in your cancellation. Please check with your cable provider for the
correct
Pay-Per-View cancellation procedure.
Instant Information).
33
33
DIGITAL PAY-PER-VIEW
Page 37

Pay-Per-View Notices
Pay-Per-View Program Started
rogram Started
A P
in progress but is within the purchase window.You may still order this program,
but you may miss a portion of the program.
Note: The purchase window is established by your cable provider.
PPV Order Conflict
When you order a PPV program that airs at the same time as an
existing PPV order, you will be alerted on-screen with the option to
cancel an order or keep both orders.
een will appear if you try to order a
scr
PPV pr
ogram that is
DIGITAL PAY-PER-VIEW
34
34
Pay-Per-View Program Missed
ou have ordered a
f y
I
Missed notice will appear, asking if you would like to reschedule your
order.
Note: This screen will not appear in systems that use phone ordering.
PPV pr
gram but didn’t tune to it a
o
ogram
r
P
DIGITAL PAY-PER-VIEW
35
Page 38

On Demand (Optional Feature)
Watch movies and other programs whenever you want with On Demand.* When you rent an On Demand program
or pack
many times as you want within the rental period.You can even pause,fast forward and rewind using your remote.
Note: Rental period is establisthed by your cable
provider.
Accessing On Demand
You can access On Demand programming multiple
ways,depending on your cable provider’s service.
Ordering On Demand Programs
The On Demand Menu displays categories of
programming.Use the
access sub-category menus.**
age, it is reserved for a specific period of time. You can access and watch the program at your convenience as
+
• From the Main Menu
• From the Quick Menu
• From a channel in the TV Listings
• From an On Demand Tab in the Flip Bar
5634 buttons on your remote to select a category and access listings for the category or
o buy the pr
T
ON DEMAND
program is available at no cost+,a
ou can watch as often as you want during the period.
and y
36
Select a title to access detailed information, including title length,
cost, program rating and a program description.
ompts to complete your order. If the
highlight the
am,
gr
o
and f
Icon,
Icon will appear instead of .Your selection will begin playing immediately
w the on-scr
ollo
een pr
ON DEMAND
35
* On Demand not available in all areas.On Demand programs may not be
recorded with DVR (if available).
el and categories vary by cable provider.
enu lab
**M
+
If available from your cable provider.
35
Page 39

Guide Symbols to Know – On Demand Action Icons
OK
Guide Tip
Guide Tip
- Go back to the previous screen
- Order the program, or cancel an ordered program
- Tune to a program (for free and subscription programming)
- Preview
- Place a Lock on the program to restrict viewing
- Resume play of the video (appears for purchased videos)
- Restart the video from the beginning (appears for purchased videos)
- Delete the title from your rented titles list (appears for purchased videos)
- Indicates the program is available as a package
Watching On Demand Programs
Use your remote to pause,fast forward, rewind and stop the program.
ON DEMAND
36
36
- Cancel Selection
• Rewind
• Play
•Pause
• Fast Forward
ON DEMAND
• Stop
37
y also be able to use the VCR control buttons available on some digital cable
ou ma
Y
remotes. Remote control features vary.
Page 40

If you have stopped a program and want to come back to it
Guide Tip
Guide Tip
Guide Tip
Guide Tip
later, select My Rentals* from the On Demand Menu.
• Highlight and select a title and see an information
screen that displays your remaining rental time and
other program details.
• Select to start watching where you left off, or
select to start the program from the beginning.
• Watch as many times as you want within the
rental period.
On Demand Packages
Some programs may be available as part of a package. If a program is available in a package, or available with a
subscription service, a notice will appear on your screen.You can select Icon to continue with the purchase,
to cancel or
Note: On Demand programs that are free or part of a subscription may not appear on the My Rentals list.These
programs can be accessed at any time from the listings.
ON DEMAND
You can also find rented titles in other
appears in the Instant Information to identify it as a rented program.
Icon to learn more about the package.
On Demand listing screens. A checkmark
38
If a Reminder appears during a On Demand program you are watching, you can accept
the Reminder and tune to the program, which stops the On Demand program. To return
to your On Demand program later, access it from your list of rented titles and Resume or
Restartfr
* Menu label varies by cable system
om the b
eginning
.
ON DEMAND
37
37
Page 41

HDTV (Optional Feature)
High D
the highest resolution digital television format available, offering up to 5 times the resolution of standard analog
television. HD delivers theater-quality pictures and Dolby DigitalTMsurround sound.
Watch your favorite shows, movies, sports and events with a wider screen,life-like picture and crystal clear sound.
Only through your local cable provider can you access all the
networks in HD, all without an antenna.
To find a listing of the HD programming available in your area, press MENU to go to the Main Menu and select HD.
You can also search for HD programs from the Search Menu.
Note:You must have HD equipment to view HD programming.
efinition
(HD or HDTV) is the most dr
amatic change for viewers since the introduction of color TV!
HD programming available,including local broadcast
HD is
HDTV
38
38
HDTV
39
Page 42

Digital Video Recording (DVR) (Optional Feature)
Imagine…c
whenever it’s convenient for you.It’s TV for your schedule.
Pause live television! Rewind and replay programs so you don’t miss a beat.
Record up to 40 hours* of your favorite programs and view them as many times as you want, whenever you want.
You can even record High Definition TV**. All without rentals, tapes or returns.
DVR has made recording and watching your favorite programs easier than ever. Powered by i-Guide, now you can
record your favorite programs and watch them at your convenience. You have your own personal video library,
stored on your digital set-top box.You can even pause,fast forward and rewind LIVE TV to playback the scenes
you’ve missed. In fact, your
programming!**
oming home to your own personal library of television programs,movies, and sports that you can watch
DVR is one of the first available that can actually record and play High Definition
Control Live TV
Using your DVR with i-Guide, you can control LIVE TV. Anytime you tune to a channel, the DVR begins making a
temporary recording of whatever you’re watching.So you can
missed and FAST FORWARD to skip what you don’t want to watch.Your DVR will record up to two hours of live TV+.
The live TV recording is not a permanent recording, unless you actually record it to the DVR’s hard drive. For live TV
recordings,the temporary recording will be erased if any of the following occur:
• You turn off the
• You change the channel.
• You begin recording the program you are watching or another program to the
• You watch more than two hours. After two hours, the DVR removes the earlier minutes of the
recording,so that the most recent two hours are kept in the temporary recording.
DVR.
PAUSE if the phone rings, REWIND the scene you
DVR.
Playback Controls
You can play back your video reordings using the buttons on your remote.using the Video Control Buttons
DIGITAL VIDEO RECORDING
Note: Some remotes will have an Instant Replay button.
40
*Recording capacity varies.
**Recording and pla
+
These buttons function like VCR
controls. Plus, you have new DVR
control features,like
yback of High D
Recording buffer (temporary hard drive) will record as long as you stay tuned to the same channel.
efinition programs requires DVR connection to High Definition television.
Instant Replay.
DIGITAL VIDEO RECORDING
39
39
Page 43

Using the Remote Control Arrow Buttons
OK
The 5634 buttons on your remote control will control playback when you are watching a recording in progress or
while watching a recorded program.
• Play
•Pause
DIGITAL VIDEO RECORDING
• Rewind
• Slow Rewind from Pause
• Go to Live TV
Pause
As you watch live TV and recorded programs press PAUSE
and the video on your TV screen instantly freezes.No more missing
the climactic scene of a movie or the winning play of the game! For
programs you are watching live, your
up to two hours*. Press PLAY to resume normal play of the
program.
DVR will remain in pause for
Rewind
Want to review a portion of your live show? It’s a snap with DVR.
Press REWIND . Press it again up to 4 times to increase the
rewind speed.REW, REW2, REW3 and REW4 will appear on screen.
REW is the slowest setting and REW4 is the fastest. Press REW a fifth
time or press play to resume normal play.
• Fast Forward
• Slow Forward from Pause
40
40
Fast Forward
ograms you are watching live,
or pr
F
activated if you have paused or rewound the program.
Press
FAST FORWARD to move forward in the program.Press it
o 4 times to increase the fast forward speed.FF, FF2, FF3 and FF4
up t
will appear on screen. FF is the slowest setting and FF4 is the fastest.
ends on video f
* Pause capacit
Definition pr
y dep
gramming.
o
AST FOR
F
ormat; less than two hours for High
WARD
an b
c
e
DIGITAL VIDEO RECORDING
41
Page 44

Slow Motion
Guide Tip
Guide Tip
Your DVR is equipped with slow-forward and slow-rewind functions
o give you crisp and clear Slow Motion
t
the referees are looking at when they review a controversial play?
se
U
low Motionto get an inside look.To activate slow-forward,
S
press PAUSE and then FAST FORWARD .To use slow-rewind,
PAUSE and then REWIND .To return to regular speed,
press
PLAY.
press
. Ever wonder what
images
Instant Replay
With Instant Replay*, you can go back to see the last play of the game or replay the last scene of your movie.Just
press PAG E 6on your remote to replay the last 15 seconds. Press PAG E 6repeatedly to continue skipping back in
15-second increments.
Get Back to Live TV
Anytime you pause or rewind a live program,the show continues to be broadcast in real time.To return to live
programming,press the 6button*.
Using Parental Locks With DVR - You can restrict viewing of recorded programs, just like
any other program. If you schedule a recording for a program you have LOCKED, the
program will be recorded,however, audio is muted and no video will appear while the
program is recording.A restricted notice appear allowing you to enter your PIN to view
the program during recording.Once the program has been recorded,you can access it
from your list of recorded programs.Just enter your PIN to view it.
Your Personal Video Library
Using your DVR with i-Guide, you can build your own personal library of programs, movies, sports,TV shows …
whatever you want.Follow the steps below to build and manage your personal video library.
Building Your Library - Recording Programs
DIGITAL VIDEO RECORDING
You can set and schedule recordings three ways with i-Guide:one touch record, interactively by program and by
manually scheduling your recording.
One Touch Record
Press RECORD on your remote any time while watching TV or while navigating through the guide.
Recording begins immediately at the point you pressed RECORD for programs airing now.You can
42
ally schedule r
tic
oma
aut
later time or date by pressing
ding will star
or
ec
R
*Some remotes are equipped with Instant Replay and LIVE buttons.
ec
RECORD while in the listings.
t at the program’s scheduled start time.
ograms starting at a
or pr
dings f
or
DIGITAL VIDEO RECORDING
41
41
Page 45

Record From Program Information
From the listings,highlight and select a program, scheduled for a later time. Press the INFO button and you will see
an information screen. Highlight the
program is scheduled to start.
Note: For more information on Action Icons,see the Action Icons section in this manual.
Icon and press OK to start a recording for the time the
Manually Schedule a Recording
Step 1: From the Main Menu or Quick Menu, select DVR*.
Step 2: Select Set a Recording.
Step 3: Enter the start and end time for the recording, enter the
y to record and select Ic
da
Step 4: Select the channel you want to record and you’re
set to go.
To schedule a repeat recording,such as multiple episodes of a program, you can modify the recording options. See
Modify Recording Options section.
on to confirm.
DIGITAL VIDEO RECORDING
42
42
View Your List of Scheduled Recordings
ep 1:
t
S
select DVR*
* Menu label ma
y v
om the
r
F
ary
M
ain M
enu
or Q
uick M
Managing Scheduling Conflicts
If you try to schedule a recording that overlaps another
scheduled recording time,you will see a Scheduling Conflict
Message. Use the icons to decide which program to record.
- To keep the new recording and cancel the old one.
- To keep the old recording and cancel the new one.
enu
,
DIGITAL VIDEO RECORDING
43
Page 46

Step 2: Select Future Recordings.
Step 3: See a list of all the programs you have scheduled to record, select a title to cancel the scheduled recording or
modify recording options.
DIGITAL VIDEO RECORDING
Modifying Recording Options
i-Guide gives you flexibility to manage your personal video library.You can change your Recording Options at any
time
C
From the Main Menu
S
of y
and press
44
, as often as you like.
hange Options f
t
elec
VR,
D
then select F
our scheduled r
OK or INFO.
or Scheduled Rec
e Rec
utur
Highligh
.
dings
or
ec
dings
or
ordings
o see a list
t
t a program title
DIGITAL VIDEO RECORDING
43
43
Page 47

Select the Icon from the program information screen. Select to change the Recording Options, or select
to delete this program from your list of Future Recordings.
From Listings
Select your Scheduled Recording in the listings indicated by
the red dot in the instant info.
se the 5634butt
U
ording Options
Rec
• Change the frequency of the recording,such as every
day or once a week.
• Specify how many recordings to save.
• Set a Save Until parameter, either until you delete or
automatically when space is needed.
• Change the start and end times in order to catch every
minute of a program, even if it runs over.
ons on your remote to change
:
DIGITAL VIDEO RECORDING
P
44
44
ess
r
OK or INFO and selec
t the
Icon.
DIGITAL VIDEO RECORDING
45
Page 48

From here,select Icon to cancel the recording,or select Icon to modify the Recording Options.
Guide Tip
Guide Tip
Note: A scheduled recording will begin at the indicated start time and channel you select.The Scheduled
Recording is not tied to a program title.The DVR will record whatever program airs on that channel at that time.
DVR is not a long-term storage device.To maximize your storage space,review the
contents of your library regularly and discard the recordings you no longer wish to save.
See “Managing Your Personal Video Library” in this manual.
DIGITAL VIDEO RECORDING
46
DIGITAL VIDEO RECORDING
45
45
Page 49

View Programs Stored In Your Personal Video Library
Guide Tip
Guide Tip
tep 1:From the DVR Menu,select My Recordings.Use the
S
and highlight titles from your list of recorded programs.Press
Step 2: From the Information Screen, select Icon to resume
play from where you left off or select
the beginning.
Guide Symbols to Know: Recorded Program
Information Screens
- Go back to the previous screen - Delete the program from My Recordings
56 butt
OK to select the program.
ons on your remote to search through
Icon to restart from
DIGITAL VIDEO RECORDING
46
46
- Play the recording - Change the Delete Priority Rule
- Start the recording from the beginning - Place a Lock on the program to restrict viewing
Step 3: To control playback while watching a recorded program, use either the video control buttons or the arrow
buttons on your remote.See the “Playback Control”section for more information.
ding Starting Notice
or
Rec
Before a scheduled recording begins,a notice will appear on-screen giving you the opportunity to confirm or cancel
the scheduled r
tic
oma
aut
e er
will b
ecording.If you don’t do anything when the recording is scheduled to start, theDVR
ally tune to the channel and begin recording.Live TV programming that has been temporarily recorded
ased onc
e the scheduled r
ec
or
ding star
ts.
ecording.
r
hanging the channel during a recording will
C
ording.You will see a notice
op the r
st
confirming whether you want to stop the
recording and change channels or continue
ec
will
DIGITAL VIDEO RECORDING
47
Page 50

Managing Your Personal Video Library
A recorded program remains in your personal video library until you decide to delete it,unless you have it set to
e when space is needed.Your DVR
delet
and up to 40 hours of
these guidelines:
To Delete Recordings
From the program information screen,select the Icon to delete the recording,or select the Icon to modify
Delete Priority. For example, you can tell the guide to delete the recording when space is needed.
the
High Definition programming*.To make the most efficient use of DVR storage space, follow
ecord and store up to 40 hours of standard definition programming
will r
Copy Recordings to A VCR Tape
After you watch a recording, decide to either erase it or
keep it permanently by transferring it to a VCR tape.
When you copy recordings to a VCR tape, make sure
that the recording is displayed on the TV screen for the
entire time the recording is being copied.If you
change channels or display guide screens during the
copying process,your tape copy will contain these
images and you will not have a complete copy of the
recording.
1. Connect the
2. Put a tape in your VCR.
3. Access your list of
FREQUENTLY ASKED QUESTIONS
4. Use the 5634buttons on your remote to highlight a program from your list of Recorded Programs.Press OK to
select a program.
5. From the Information Screen, select to resume play from where you left off or select to restart from
the beginning.
6. Start recording on the VCR when playback begins.
7. As the recording plays, it is taped to your VCR.
Note: Refer to your VCR User Manual for specific instructions on using your VCR.
Cable Out or OUT 1 (TV) connection on the back of the DVR to the Cable IN of your VCR.
48
Recorded Programs.
To help you manage your personal video library,
i-Guide will advise you with an on-screen notice when
the available memory gets low or full.
If recording space becomes full during a recording,the
recording will stop.Make sure you have enough
recording space to record the entire program before
you begin to avoid missing part of the program.
* Recording HD programing requires a DVR connection to a
vision.
ele
HD t
DIGITAL VIDEO RECORDING
47
47
Page 51

Frequently Asked Questions
Interactive Program Guide
Q.What are the icons (little pictures) at the bottom of the screen?
Quick Menu Iconsare available to help you find what you’re looking for faster.The Quick Menu
A.
o other areas of the guide, such as
go t
highlighting it and pressing OK, you can use the Action Icons on the information screens to set Reminders and
Parental Locks,schedule Recordings, BUY programs and more.
Q. How do I tell what the icons mean?
A. You will find descriptive text in the Instant Information area when you have an icon highlighted.This
information changes as you move the yellow highlight using the arrow buttons on your remote.On Program
Information screens,the Action Icons are specific to the program. For example, a BUY Icon will appear only for OND
and PPV programs. Playback Control Icons will appear only for recorded programs or rented On Demand (OND)
titles. Descriptive text appears beneath the row of these icons.
Q. I can’t see the entire program title in the listings grid.
A. Some program titles are too long to fit in the space provided in the grid.You might see “…”to indicate there is
more to the title. (For example:“Third Rock From the Sun”might look like “Third Rock…”). Highlight the program and
check the
including rating,actors, start/end times,etc.
Q.What is the graphic bar that appears when I change channels?
A. The Flip Bar appears for a few seconds as you’re changing channels to provide important information about
programs.You will find the name of the current program, start and end times and channel number.
Instant Information area at the top of the grid for program title and other valuable information,
M
ovies
or F
avorites
. Once you have selected a program title by
menu
lets y
ou quickly
Q. How do I get information on programs?
A. i-Guide provides detailed information on programs including movies and sporting events. While in a listings
screen, you can access information by pressing the INFO button on your remote.While you are tuned to a program,
FREQUENTLY ASKED QUESTIONS
48
48
press Info once for Instant Information or twice for complete information.Information includes program details
like actors, ratings and a brief program synopsis. You can also set Reminders,place Parental Locks, order Pay-Per-
View movies and events and see other times the program is airing.To remove the Information Screen and return to
watching television, press the EXIT button on the remote.
Q.
A. Occasionally your cable provider may send a Message to let you know of new services and special promotions. To
read the message, go to the Main Menu and select Messages. You can keep or delete the message once you have
ead it.
r
Q. How do I set my digital audio language?
A. N
change the secondary digital audio that is available with certain networks and programs. Choose
the Setup Menu and change the default setting. Choose from English, Spanish, Portuguese or French.This feature is
only supp
v
a
Q.What if I forget my Parental Locks/Purchase PINs?
A. Y
will need to enter new PINs.
What is the red light on my box and/or what is the envelope on the screen?
ou choose the language that displays in the on-screen commands and help text,but you can also
ot only c
ailable, the default audio language will be heard.
ou must call your local cable company to have these
an y
orted on certain digital channels that provide secondary audio. If the chosen audio language is not
eset. All of the
PINs r
PINs will b
Audio Setup from
FREQUENTLY ASKED QUESTIONS
e cleared.Once reset, you
49
Page 52

Q.Why can’t I purchase this Pay-Per-View program?
A. There are several things that could restrict Pay-Per-View ordering:
1. Check to make sure the phone line is plugged in.
2.You may have inadvertently made too many Pay-Per-View orders.You may have to cancel one before you make
another order.
3.You may have reached your credit limit.Call your cable company and have them check your account.
Q.What if I missed a Pay-Per-View movie/event that I ordered?
A. In cities that provide impulse-ordering capability,you will not be billed for Pay-Per-View on channels that aren’t
tuned. In cities that require phone ordering, you need to call your cable company to cancel
Check with your cable company to confirm canceling procedures.
Pay-Per-View orders.
On Demand (Optional Feature)
Q. Do my Parental Locks & Purchase PIN settings stay the same for On Demand purchases as with regular
programs?
Yes. PINs and settings apply to On Demand ratings and purchases.
A.
Q.What if I only watched 15 minutes of my On Demand program and didn’t get to watch the rest before it
expired?
You will have to order it again.Refer to the On Demand section in this manual for remaining rental and viewing
A.
time for more information on rental and viewing times.
Q. If I get to the end of a On Demand program and want to watch it again, can I restart at the beginning?
A. Yes,as long as your viewing period has not expired, you may watch it again.
Q. How do I return to watching an On Demand program after I’ve tuned to another channel?
Select My Rentals from the On Demand Menu and choose the program you want to resume watching.You can
A.
either begin watching where you left off by selecting Resume, or start over with the Restart.
FREQUENTLY ASKED QUESTIONS
50
Q. Some of the programs appear in the listings with a checkmark or a dollar sign next to the title.What does
this mean?
A. Depending on the services your cable provider offers, you may see a checkmark or a dollar sign to indicate a
program you have ordered is available for viewing.
Q. How many On Demand programs can I order at one time?
A. Typically,there is no limit on purchases. Check with your cable operator for system-specific ordering information.
Q. I tried to order an On Demand program and received an error screen that said,“Unable to Process
Request.”What does this mean?
The “Unable to Process Request”message occurs when the set-top box is unable to communicate with the On
A.
Demand equipment at your cable company.Try turning your set-top box off,and then turn it on again. If the
message appears again, note the time it appeared and the action you took and call your cable operator.
Q.When I select a category from the On Demand menu, I receive a message that says,“No program listings
available”.
e no listings f
e ar
f ther
A. I
DVR (Optional Feature) and Digital Services
Q. I have a home theater system.Can I record a program in Dolby DigitalTM5.1 on my DVR?
A. As long as the program is being broadcast in digital audio,the DVR will record the digital audio portion. A Dolby
Digital indicator will appear on the
or a par
tegory,this message will appear.
ticular c
a
Flip Bar for programs that are broadcast in Dolby Audio.
FREQUENTLY ASKED QUESTIONS
49
49
Page 53

Q. Can I receive and record programs in High Definition with my DVR?
A. Yes. As long as you have the DVR connected to a High Definition television (HD), you can watch HD
programming as well as record it on your DVR. Note: Recording HD programs will take more storage space on your
DVR.
Q.What is the picture quality of recorded programs?
A. The DVR records programs in the same quality in which they are broadcast. For example, programs broadcast in
HDTV format are recorded in HDTV quality (if your DVR is connected to a High Definition television). Broadcast
quality may vary.
Q. Can I record Digital Music channels?
Yes, you can record and playback Digital Music. However, the playback controls (Pause,FF and REW) are not
A.
functional for recorded digital music.
Q. Can I record On Demand and Pay-Per-View programs?
A. On Demand cannot be recorded with the DVR. You may record Pay-Per-View programs like any other program.
Recording and Playback of Recorded Programs (Optional Feature)
Q. How many recordings can I schedule for the future?
A. There is no limit to the number of recordings you can schedule as long as you do not schedule more than one
program to record at the same time and you have available recording space.
Q.What if the program I want to record runs over its scheduled airtime such as when a football game goes
into overtime.How can I make sure I record everything?
A. Change the Record Options for the program. Just adjust the start and end times for the recording to ensure
everything gets recorded.
Q. Can I watch another program while I’m recording?
FREQUENTLY ASKED QUESTIONS
50
50
A.
menu. However,if you change channels you will see a screen asking you to confirm you want to change the channel
and stop the recording.
Q. Can I watch a show I am recording before recording is completed?
A. Yes! You can either watch it in “real time”as it’s being recorded or you can rewind the program you are currently
recording and watch it from the beginning while the recording continues.
Q.
A. Yes.As you are watching a program you have recorded on your DVR, you can record it to a tape. See “Managing
Your Personal Video Library” in the DVR Section of this manual.
Q. Can I set up my DVR to record every episode of a specific program title?
A. Your DVR will allow you to schedule recordings based on a program’s airtime and channel.You can set a
repeating recording,such as every day or once a week. However,if the program you want to record does not air in
the scheduled time slot, the DVR will record whatever is airing at that time on that channel.
Tip: Use
episodes, no matter what time they’re on.
Q. Can I schedule a recording for two shows airing at the same time?
A. Currently,your DVR can only record one program at a time. If you try to schedule a recording at the same time
you have scheduled another, you will see a
your Recording Options.
You can watch a previously recorded program while you are recording a live program by accessing the DVR
an I make a VHS tape of a recorded program?
C
Title Search to find all air times for a particular title.You can then set up individual recordings for any or all
Scheduling Conflict message that gives you the opportunity to change
FREQUENTLY ASKED QUESTIONS
51
Page 54

Q. Can I increase the Rewind and Fast Forward speed?
A. Yes. Your DVR will control rewind and fast forward at four speeds. Just press the REW or FF buttons up to four
times.The on-screen indicator will tell you at what speed you are controlling playback.
Can I set the DVR to skip commercials as it is recording?
Q.
A. No.You can only fast forward through commercials if you’re watching a previously recorded program.
Q. Can I “bookmark” a program I have recorded?
A. Yes! When you stop playback of a recorded program,it will stop where you left off.To continue watching the
program, select Resume or Restart from the Action Icons.
Q. On occasion,a recording starts a minute or two after the program has begun.Why?
A. The DVR timer is synchronized with the program guide time. If a broadcaster starts the program a minute earlier
than the program guide’s scheduled time,the DVR will miss that first minute. You can program your DVR to start
early or end late by adjusting your Recording Options.
Q. Only part of my program recorded.Why?
If the beginning of the program did not record,you may set it to record after the program began.If the end
A.
of the program did not record,the DVR may have reached its storage capacity before it was able to record the
entire program.
Q. Do Parental Locks work with DVR?
A. Yes. Parental Locks restrict viewing of recorded programs. If you schedule a recording for a program you have
Locked, the program will be recorded, however audio is muted and no video will appear while the program is
recording.A restricted notice remains on screen allowing you to enter your PIN to view the program during the
recording.Once the program has been recorded,you can access it from My Recordings.Just enter your PIN to view.
Note:You can also set Parental Locks on recorded programs.Use the LOCK button on your remote or Icon after
you have selected the program from My Recordings or you can select the Lock Icon from an Information Screen.
FREQUENTLY ASKED QUESTIONS
52
Managing Your Recordings (Optional Feature)
Q. How many hours of programming can I store on my DVR?
Recording capacity depends on the video format that is being recorded.Your DVR can record up to 25 hours of
A.
analog, between 30 and 60 hours of digital programming, or up to 12 hours of High Definition programming. See
the “Managing Your Personal Video Library” section in this manual for more information.
Q. How long can I keep My Recordings?
an keep them as long as you want. Just remember, the recording space is limited, so you may need to delete
ou c
A. Y
some recorded programs from time to time in order to make room for new ones.
Q. How will I know when I’m almost out of recording space?
A. An on-screen message will appear advising you when recording space is low (80% full) or full.You can also
manually delete recordings and manage recording space from the recorded program’s Information Screen.
If you are recording a program and run out of recording space, the recording will stop.You can always see how much
recording space is available from
automatically delete recorded programs when space is needed. See:“Managing Your Personal Video Library”.
Q. Does the DVR automatically delete programs when the record space is full?
A. Only if you set it up that way.The DVR will automatically delete programs if you tell it to do so by setting the
programs to be deleted when space is needed.When the record space is full,the oldest recordings that you have set
to be deleted,will be deleted first. If you do not want the
them so that the
y ar
e only delet
My Recordings.You can also manually delete recordings and set your DVR to
DVR to automatically delete certain recordings, you can set
ed by you.
FREQUENTLY ASKED QUESTIONS
51
51
Controlling Live TV (Optional Feature)
Page 55

Q. How long can I pause live TV?
A. You can pause up to 90 minutes of standard programming; less with analog and HD programming.
Q. How far back can I rewind live TV?
ou can rewind up to two hours of standard TV programming as long as you were tuned to the same channel.
A. Y
Q. Can I use Instant Replay?
A. Yes.If your remote control is equipped with a REPLAY button, press it to Instantly Replay the last 15 seconds of
the program. If there is no
Q. If I’m watching a program in progress and want to record it,can I record from the beginning?
No.Currently,the DVR begins recording at the point in the program you pressed RECORD .
A.
Q. How can I catch up to the live point of a program after I’ve paused it?
A. Press the LIVE button (if available) or the 6 button on the remote. Or,you can FAST FORWARD to the point
of live programming.The on-screen indicator will display “LIVE”.
REPLAY button, use the PAGE 6 button on your remote.
Troubleshooting
Q.Why doesn’t the set-top box respond when I press the keys on my remote?
A. Make sure your remote is in the Cable mode. Press the CABLE button on the remote.
Q. If the power goes out, do I need to reset my Parental Locks and Purchase PINs, Favorite Channels,Locks
and Reminders?
A. No.These items will not be lost if the terminal loses its power.
Q. Nothing happens when the MENU button is pushed, but I can change the channel up and down.
A. If the terminal was just installed, it takes approximately 15-30 minutes for the guide to be downloaded to the
set-top.If after 15-30 minutes nothing happens, unplug the terminal,plug it back in and wait another 15-30 minutes.
If
FREQUENTLY ASKED QUESTIONS
Q. I can’t see the edges of the i-Guide screens.
A.
screen are centered.
Q.The guide has locked up.Neither the buttons on the remote,nor the buttons on the terminal itself work.
A. Try unplugging the terminal and then plugging it back in. This will reset the terminal and allow for data to be
do
appeared,call your cable company.
Q. I have no video,a snowy picture, or I cannot tune to any of the digital channels.
A. Make sure that all of the cable connections are secure and that the TV is tuned to the correct channel (3 or 4).
Also,make sure you are actually controlling the cable terminal (press the CABLE button on the remote).
Q.Why won’t my remote control respond when I press a button?
A.
1. Press the CABLE button on the remote to make sure it is in Cable mode. Try using the remote again.
Move to Step 2 if necessary.
52
52
2. If the remote is still not functioning correctly, press the CHAN
channel changes, there is a problem with the remote control.The batteries or the remote control itself may need
to be replaced.
i-Guide still does not appear,contact your cable company.
Select the Adjust Screen Position option from the Setup screen. Press the 5634 buttons until the arrows on the
wnloaded
Go through this quick checklist to determine the problem:
. It will take some time for the information to appear.If there is still a problem after the information has
56 button on the front of the terminal. If the
FREQUENTLY ASKED QUESTIONS
53
Page 56

Q.There are no listings in i-Guide,or the words “To Be Announced” appear in the listings screens.
A. This can happen if there has been a power failure or if the terminal was unplugged. Make sure everything is
plugged in and r
Q. I have a message on my screen that says ‘This feature is currently being restored.’What does this mean?
This screen appears if you try to access a feature that is not available because the set-top box has not received all
A.
the necessary data.This most commonly happens following a power loss.
Q. I have a message on the screen that says “This channel should be available shortly.”What does this mean?
This screen will appear when you tune to a channel that is currently not available. If the channel is not available
A.
after 15-30 minutes, call your cable company.
Q.What do I do if I am stuck in a screen or menu I do not understand and want to get out?
A. You can always press the EXIT button to immediately return to watching TV.You can also press the LAST button
to back up one screen at a time.
Q.The displayed listing information or pricing information is incorrect.
Although i-Guide checks all data thoroughly before it is sent to your home, programmers do sometimes change
A.
their schedules at the last minute without letting us know.Please report erroneous data to your cable company.
Q.What happens to my DVR recordings if my digital cable box temporarily loses power?
A. All recordings that were saved prior to the power loss are preserved, as well as future recording schedules.You
miss only the recordings scheduled to be recorded while the power was out.
Note: If you experience continued problems with your cable box, remote control or program listings,please contact
your local cable company.
unning.Wait 15-30 minutes as the channels and program data start to fill in.
FREQUENTLY ASKED QUESTIONS
54
FREQUENTLY ASKED QUESTIONS
53
53
 Loading...