


GM3188
User Guide
6804113J31-O

InsideCover.fm Page 1 Friday, April 18, 2003 2:21 PM
COMPUTER SOFTWARE COPYRIGHTS
The Motorola products described in this manual may include copyrighted Motorola computer
programs stored in semiconductor memories or other media. Laws in the United States and other
countries preserve for Motorola certain exclusive rights for copyrighted computer programs
including, but not limited to, the exclusive right to copy or reproduce in any form the copyrighted
computer program. Accordingly, any copyrighted Motorola computer programs contained in the
Motorola products described in this manual may not be copied, reproduced, modified, reverseengineered, or distributed in any manner without the express written permission of Motorola.
Furthermore, the purchase of Motorola products shall not be deemed to grant either directly or by
implication, estoppel, or otherwise, any license under the copyrights, patents or patent
applications of Motorola, except for the normal non-exclusive license to use that arises by
operation of law in the sale of a product.
© Motorola Inc., 2003
MOTOROLA and the Stylized M Logo are registered in the U.S. Patent and Trademark Office. All
other product or service names are the property of their respective owners.
10_QR-Card.fm Page 21 Thursday, March 20, 2003 4:18 PM
Turning the Radio On or Off
1. Rotate the On/Off/Volume Control knob clockwise. You will hear the self-test
pass tone and see the green LED indicator light momentarily.
2. Rotate the On/Off/Volume Control knob counterclockwise until you hear a
click and both the display and the LED indicators turn off.
Adjusting the Volume
1. Turn the On/Off/Volume Control knob clockwise to increase the volume, or
counterclockwise to decrease the volume.
Selecting a Radio Channel
1. Press the
or button to select the desired channel.
Sending a Call
1. Turn radio on and select appropriate channel.
2. Press PTT button, hold the microphone 1 to 2 inches (2.5 to 5 cm) from your
mouth, and speak clearly into it.
3. Release PTT button to listen.
Receiving a Call
1. Turn radio on and adjust volume to the desired level.
2. Select desired channel.
3. To respond to an incoming call, press PTT button, hold the microphone 1 to 2
inches (2.5 to 5 cm) from your mouth, and speak clearly into it.
Starting or Stopping Scan
1. Press the preprogrammed Scan button to start scan. The green LED indictor
blinks during scan operation. Or, select a channel that has been preprogrammed to start Auto Scan.
2. Press the Scan button again to stop scan. Or, select a channel that has not
been preprogrammed to stop Auto Scan.
Deleting a Nuisance Channel During Scanning
1. While radio is on a nuisance channel, hold down preprogrammed Nuisance
Delete button until you hear a tone.
2. Release Nuisance Delete button.
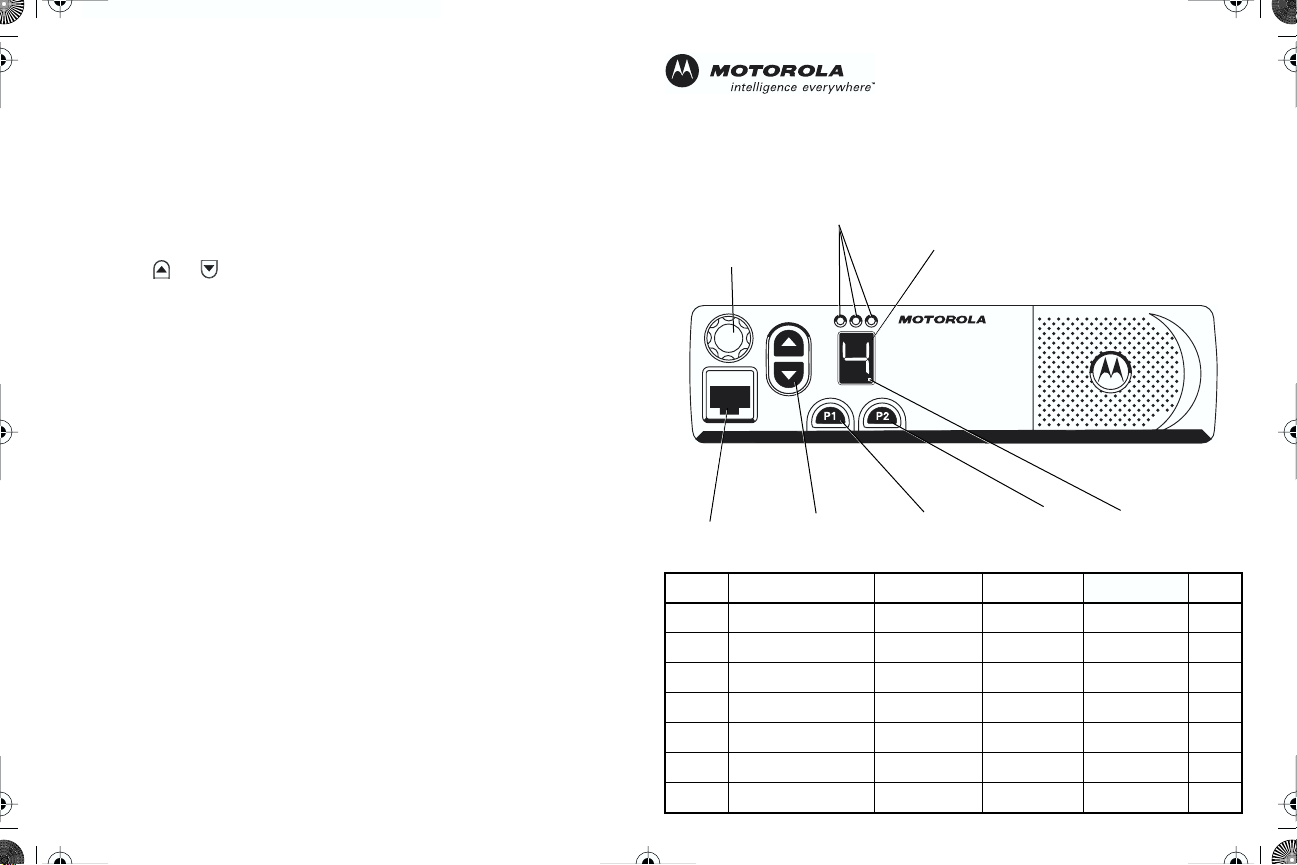
GM3188 Quick Reference Card
Record the functions for your radio’s programmable buttons in the table
provided below. For further information, see page 8 of this User Guide.
Red/Yellow/Green
LED Indicators
On/Off/Volume
Knob
Microphone
Jack
Button Function Short Press Long Press
Channel Selector
Buttons
7-Segment
Display
Programmable
Button 1 (P1)
Programmable
Button 2 (P2)
High Power
Indicator
Hold Down Page

10_QR-Card.fm Page 22 Thursday, March 20, 2003 4:18 PM
LED Indicators Audio Indicators for Programmable Buttons
LED State/Color Indication
Radio Call
Red Transmitting
Flashing Red Receiving
Flashing Red Channel Busy
Scan
Flashing Green Scanning for activity
Call Alert
Flashing Yellow Indicates receiving a Call Alert
Programmable
Button
Scan
Power Level
Squelch
Repeater/
Talkaround
VOX VOX
Local/Distance
Positive Indicator
Tone
Start scan
High power selected Low power selected
Tight
Squelch
Does not use
repeater
enabled
Local
Mode
Selective Call
Flashing Yellow Indicates receiving a Selective Call
Sticky Monitor/Open Squelch
Yellow While monitoring
High/Low Power
Dot on Display Indicates High Power
Dot Not On
Display Indicates Low Power
Negative Indicator
Tone
Stop scan
Normal
Uses
VOX
Distance
Squelch
repeater
disabled
Mode

#English.book Page 1 Friday, April 18, 2003 2:22 PM
CONTENTS
Safety Information. . . . . . . . . . . . . . . . . . . . 2
Product Safety and RF
Exposure Compliance. . . . . . . . . . . . . . . . . . 2
Radio Overview . . . . . . . . . . . . . . . . . . . . . . 3
Parts of the Radio . . . . . . . . . . . . . . . . . . . . . 3
Optional Enhanced Keypad Microphone
(RMN5029) . . . . . . . . . . . . . . . . . . . . . . . 4
On/Off/Volume Knob . . . . . . . . . . . . . . . . 5
Seven Segment Display. . . . . . . . . . . . . . 5
Channel Selector Buttons . . . . . . . . . . . . 5
LED Indicators . . . . . . . . . . . . . . . . . . . . . 5
Programmable Buttons . . . . . . . . . . . . . . 6
Push-to-Talk (PTT) Button . . . . . . . . . . . . 6
Microphone . . . . . . . . . . . . . . . . . . . . . . . 6
Use with Enhanced Keypad Microphone
(RMN5029) . . . . . . . . . . . . . . . . . . . . . . . 6
Indicator Tones . . . . . . . . . . . . . . . . . . . . . . . 8
Improved Audio Features . . . . . . . . . . . . . . . 8
Companding. . . . . . . . . . . . . . . . . . . . . . . 8
Getting Started . . . . . . . . . . . . . . . . . . . . . . 9
Turning the Radio On or Off . . . . . . . . . . . . . 9
Adjusting the Volume . . . . . . . . . . . . . . . . . . 9
Selecting a Radio Channel . . . . . . . . . . . . . . . 9
Sending a Call . . . . . . . . . . . . . . . . . . . . . . . 10
Receiving a Call . . . . . . . . . . . . . . . . . . . . . . 10
Monitoring. . . . . . . . . . . . . . . . . . . . . . . . . . .10
VOX Operation . . . . . . . . . . . . . . . . . . . . . . . 11
Radio Calls . . . . . . . . . . . . . . . . . . . . . . . . . 12
Selective Radio Inhibit . . . . . . . . . . . . . . . . . 12
Repeater or Talkaround Mode . . . . . . . . . . . 12
Setting the Power Level . . . . . . . . . . . . . . . . 12
Setting Tight or Normal Squelch. . . . . . . . . . 13
Receiving a Selective Call . . . . . . . . . . . . . . 13
Receiving a Call Alert Page . . . . . . . . . . . . .13
Setting Local or Distance Mode . . . . . . . . . . 13
Sending DTMF Tones . . . . . . . . . . . . . . . . .14
Scan . . . . . . . . . . . . . . . . . . . . . . . . . . . . . . . 15
Starting or Stopping Scan. . . . . . . . . . . . . . . 15
Talkback . . . . . . . . . . . . . . . . . . . . . . . . . . . . 15
Deleting a Nuisance Channel . . . . . . . . . . . . 16
Restoring Channels to the Scan List . . . .16
CONTENTS
1
English
#English.book Page 2 Friday, April 18, 2003 2:22 PM
SAFETY
INFORMATION
SAFETY INFORMATION
PRODUCT SAFETY AND RF
EXPOSURE COMPLIANCE
Before using this product, read
the operating instructions for safe
usage contained in the Product
Safety and RF Exposure booklet
enclosed with your radio.
ATTENTION!
This radio is restricted to occupational use
only to satisfy FCC RF energy exposure
requirements. Before using this product, read
the RF energy awareness information and
operating instructions in the Product Safety
and RF Exposure booklet enclosed with your
radio (Motorola Publication part number
6804110J47) to ensure compliance with RF
energy exposure limits.
For a list of Motorola-approved antennas,
batteries, and other accessories, visit the
following web site which lists approved
accessories: http://www.motorola.com/cgiss/
index.shtml.
English
2

#English.book Page 3 Friday, April 18, 2003 2:22 PM
RADIO OVERVIEW
PARTS OF THE RADIO
On/Off/Volume
Knob
Red/Yellow/Green
LED Indicators
Push-To-Talk
(PTT) Button
Microphone
7-Segment
Display
Speaker
RADIO OVERVIEW
Microphone
Jack
Channel Selector
Buttons
Programmable
Button 1 (P1)
Programmable
Button 2 (P2)
High Power
Indicator
3
English

#English.book Page 4 Friday, April 18, 2003 2:22 PM
Optional Enhanced Keypad Microphone
(RMN5029)
Your radio may be ordered with an optional
DTMF (Dual-Tone Multi-Frequency)
microphone that has a direct entry keypad.
Push-to-Talk
(PTT) button
This keypad microphone has three
programmable buttons (A, B, C) below the
keypad that can be programmed to
conveniently activate select radio features also
available for the programmable g and h
buttons.
DTMF Keypad
Programmable
Buttons
(A, B, C)
RADIO OVERVIEW
English
4

#English.book Page 5 Friday, April 18, 2003 2:22 PM
On/Off/Volume Knob
Tu r ns the radio on or off, and adjusts the
radio’s volume.
Seven Segment Display
The seven segment display indicates what
channel is active and the power level.
Channel Selector Buttons
Used for channel selection. Pressing a
channel selector button causes its
associated channel indicator to light.
Each press of the button increments the
channel. Each press of the button
decrements the channel.
LED Indicators
Indicates power up, transmit, receive, scan,
monitor status, busy, power, Call Alert™
receive, and Selective Call receive.
Basic Features
LED State/Color Indication
Radio Call
Red Transmitting
Flashing Red Receiving
Flashing Red Channel Busy
Scan
Flashing Green Scanning for activity
Call Alert
Flashing Yellow Indicates receiving a Call Alert
Selective Call
Flashing Yellow
Sticky Monitor/Open Squelch
Yellow While monitoring
High/Low Power
Dot on Display Indicates High Power
Dot Not On
Display Indicates Low Power
Indicates receiving a Selective
Call
RADIO OVERVIEW
5
English

#English.book Page 6 Friday, April 18, 2003 2:22 PM
h
RADIO OVERVIEW
Programmable Buttons
Your radio has two programmable buttons. Your
dealer can program these buttons as shortcuts
to various radio features.
Check with your dealer for a complete list of
functions your radio supports.
Programmable buttons include the g and
buttons (see page 3).
These buttons can access up to two features,
depending on the type of button press:
• short press—quickly pressing and releasing
the programmable buttons
• long press—pressing and holding the
programmable buttons for a period of time
(default 1 1/2 seconds or programmed
value)
• hold down—pressing and holding down the
programmable buttons while checking
status or making adjustments
A summary of programmable radio features
and corresponding page references appear
beginning on page 7.
In the “Button” column, have your dealer record
the name of the programmable button next to
the feature that has been programmed to it.
The dealer can use the abbreviations (P1, P2)
shown in the radio illustration on page 3.
Also, where appropriate, have your dealer
indicate whether the button press requires a short
press, a long press, or needs to be held down.
Push-to-Talk (PTT) Button
Press and hold down this button on the
microphone to talk (transmit); release it to listen.
Microphone
Hold the microphone 1 to 2 inches (2.5 to
5 cm) from your mouth, and speak clearly
into it.
Use with Enhanced Keypad Microphone
(RMN5029)
DTMF Keypad
Programmable
Buttons
(A, B, C)
English
6

#English.book Page 7 Friday, April 18, 2003 2:22 PM
These keys are used to:
• Send DTMF tones (see page 14)
• Directly access preprogrammed features
Function Short Press Long Press Hold Down Page Button
Volume Set Sound a tone for adjusting your radio’s volume level.
Toggle silent monitor
operation (also turn off
Sticky Monitor
Repeater/
Talkaround
Power Level
Voice Operated
Tr ansmission
(VOX)
Squelch
Local/Distance Toggle between local mode and distance mode.
Scan/Nuisance
Channel Delete
†
This function is activated by EITHER a short OR a long press, but not both.
open squelch monitor
when it has been
activated).
Toggle between using a repeater or transmitting directly
to another radio.
Toggle transmit power level between High and Low. An
indication for high power is a dot on the display. The dot
does not appear while in low power.
Toggle VOX on and off.
Toggles your radio’s squelch level between tight and
normal squelch.
Toggle scan on and off.
†
Tu rn on open squelch
monitor.
†
—10
—12
9
—12
†
†
—11
RADIO OVERVIEW
—13
†
Delete a nuisance channel
while scanning.
—13
—15
7
English

#English.book Page 8 Friday, April 18, 2003 2:22 PM
RADIO OVERVIEW
INDICATOR TONES
High pitched tone Low pitched tone
Self Test Pass Tone
Self Test Fail Tone
Positive Indicator Tone
Negative Indicator Tone
Some programmable buttons use tones to
indicate one of two modes:
Button
Scan
Power Level
Squelch
Positive
Indicator Tone
Start
scan
High power
selected
Tight
Squelch
Negative
Indicator Tone
Stop
scan
Low power
selected
Normal
Squelch
Button
Repeater/
Talkaround
VOX VOX
Local/Distance
Indicator Tone
Does not use
repeater
Local
Positive
enabled
Mode
Negative
Indicator Tone
Uses
repeater
VOX
disabled
Distance
Mode
IMPROVED AUDIO FEATURES
Companding
Companding is a feature that allows further
improvement of voice quality. It compresses
your voice at transmission, and expands it
when receiving while simultaneously reducing
extraneous noise. However, to enjoy this
benefit, all transmitting and receiving radios
must have this feature activated.
English
8

#English.book Page 9 Friday, April 18, 2003 2:22 PM
1
2
3
GETTING STARTED
TURNING THE RADIO ON OR OFF
On/Off/Volume
Control Knob
ON OFF
Rotate the On/Off/
Volume Control knob
clockwise. If power-up
is successful, you will
hear the Self-Test Pass
Tone ( ) and
see the green LED
indicator light
momentarily.
If the radio fails to
power up, you will hear
the Self Test Fail Tone
().
Rotate the
Volume Control
counterclockwise until
you hear a click and both
the display and LED indicators turn off.
On/Off/
knob
ADJUSTING THE VOLUME
Tu rn the On/Off/Volume Control knob
clockwise to increase the volume, or
counterclockwise to decrease the volume.
–or–
Note: Your dealer can preprogram one of the
programmable buttons to Volume Set.
Hold down the Volume Set
page 7). You will hear a continuous tone.
Tu rn the On/Off/Volume Control knob to the
desired volume level.
Release the Volume Set button.
button
(see
SELECTING A RADIO CHANNEL
Your radio offers eight channels.
Note: Due to government regulations, some
channels may not be programmed.
See your dealer for more information.
To Select a Channel
Press the button or button to select
the desired channel.
GETTING STARTED
9
English

#English.book Page 10 Friday, April 18, 2003 2:22 PM
1
2
3
1
2
3
4
1
3
GETTING STARTED
SENDING A CALL
Tu rn your radio on.
Select the desired channel.
Hold the microphone vertically 1 to 2 inches
(2.5 to 5 cm) from your mouth. Press the PTT
button to talk; release it to listen.
RECEIVING A CALL
Tu rn your radio on.
Adjust the radio’s volume, if necessary (see
page 9).
Select the desired channel.
To respond, hold the microphone vertically 1
to 2 inches (2.5 to 5 cm) from your mouth.
Press the PTT button to talk; release it to listen.
MONITORING
It is important to monitor traffic before
transmitting to ensure that you do not “talk
over” someone who is already transmitting.
A short press of the preprogrammed Monitor
button places the radio in Sticky Permanent
Monitor mode.
•You hear a high-pitched tone.
A short press of the Monitor button cancels
Sticky Permanent Monitor mode and returns
the radio to normal operation.
To place the radio in open squelch mode,
press and hold the preprogrammed Monitor
button until you hear a high-pitched tone.
4
Momentarily press the
return to normal operation.
Monitor
button to
English
10

#English.book Page 11 Friday, April 18, 2003 2:22 PM
1
2
3
VOX OPERATION
When hands-free operation is desired, your
radio can transmit by voice alone using the
VOX feature when you speak through a voice
activated external microphone that is
connected to your radio.
To enable or disable VOX operation, press the
preprogrammed VOX button (see page 7).
Note: Pressing the PTT button disables
VOX.
–or–
Select a channel that has been
preprogrammed by your dealer to enable
VOX.
Note: You do not need to press a prepro-
grammed VOX button.
Note: Pressing the PTT button disables
VOX.
Select a channel that has not been
preprogrammed by your dealer to disable
VOX.
GETTING STARTED
11
English

#English.book Page 12 Friday, April 18, 2003 2:22 PM
RADIO CALLS
RADIO CALLS
SELECTIVE RADIO INHIBIT
Your radio is equipped with a security feature
that can temporarily render the unit inoperative
when an inhibit signal is sent from the base
station.
This feature is commonly used to disable
radios:
• In case of theft
•When your vehicle is being serviced
•For system control reasons
Note: When your radio has been disabled by
the base station, the seven segment
display indicates 0 and all controls will
be inoperative except for the On/Off
button.
REPEATER OR TALKAROUND
MODE
Talkaround Mode enables you to communicate
with another radio when either:
• The repeater is not operating
–or–
•Your radio is out of the repeater’s range but
within communicating distance of another
radio. An audible indicator is heard when
changing between modes.
To select either Repeater Mode or Talkaround
Mode:
Press the preprogrammed Repeater/
Talkaround button (see page 7) to toggle
between Repeater Mode and Talkaround
Mode.
SETTING THE POWER LEVEL
Each channel in your radio has a predefined
transmit power level that can be changed.
• High power
•Low power
To set the power level, press the
preprogrammed Power Level button (see
page 7) to toggle between
appears on the display indicating high power.
low
and
high
.
A dot
English
12

#English.book Page 13 Friday, April 18, 2003 2:22 PM
SETTING TIGHT OR NORMAL
SQUELCH
Use this feature to filter out nuisance
(unwanted) calls and/or background noise.
However, tightening squelch could cause calls
from remote locations to be filtered out as well.
In this case, normal squelch may be more
desirable.
Press the preprogrammed Squelch button
(see page 7) to toggle between tight and
normal squelch.
RECEIVING A SELECTIVE CALL
When you receive a selective call:
• The yellow LED indicator flashes, if programmed by your dealer.
•You hear two high-pitched tones.
To answer the call, press the PTT button.
RECEIVING A CALL ALERT PAGE
When you receive a Call Alert page:
• The yellow LED indicator flashes, if programmed by your dealer.
•You hear four high-pitched tones.
To answer the page, press the PTT button; to
cancel the page, press any other key.
SETTING LOCAL OR DISTANCE
MODE
Use this feature between Local mode (low
sensitivity) and Distance mode (normal
sensitivity). When Local mode is set, you will
not hear weak transmissions. When Distance
mode is set you will hear all transmissions,
including weaker signals.
Press the preprogrammed Local/Distance
button (see page 7) to toggle between Local
and Distance mode.
RADIO CALLS
13
English

#English.book Page 14 Friday, April 18, 2003 2:22 PM
RADIO CALLS
SENDING DTMF TONES
Use with Enhanced Keypad Microphone
(RMN5029)
Use this feature to send DTMF tones to a
repeater.
1 Press and hold the microphone’s PTT button.
2 Press and release the required DTMF
buttons.
3 Release the microphone’s PTT button.
English
14

#English.book Page 15 Friday, April 18, 2003 2:22 PM
SCAN
You can monitor multiple channels and receive
any calls that are transmitted on them.
Channels can be programmed into a scan list
by your dealer. Your radio automatically
switches to a scan list channel when it detects
activity on it.
STARTING OR STOPPING SCAN
The green LED indicator blinks during a scan
operation and stops blinking when the radio
switches to a channel.
You can start or stop a scan operation by:
1 To start or stop a scan operation, press the
preprogrammed Scan button (see page 7).
–or–
2 Select a channel that has been
preprogrammed by your dealer to start Auto
Scan.
Note: You do not need to press a prepro-
grammed Scan button.
3 Select a channel that has not been
preprogrammed by your dealer to stop Auto
Scan.
TALKBACK
The Talkback feature allows you to respond to
a transmission while scanning. If transmission
is detected on a channel while scanning, the
radio will stop on that channel for a
preprogrammed period of time. During this
“hangtime” you may respond by pressing the
PTT button.
Notes: If transmission ceases or if the PTT
button is not pressed for a preprogrammed duration, the radio continues
to scan. The LED scan indicator stops
blinking while the radio is in hangtime.
SCAN
15
English

#English.book Page 16 Friday, April 18, 2003 2:22 PM
SCAN
DELETING A NUISANCE CHANNEL
Note: Your dealer must have preprogrammed
a button to Nuisance Delete to access
this feature.
If a channel continually generates unwanted
calls or noise (a “nuisance” channel), you can
temporarily remove it from the scan list:
1 While the radio is on the Nuisance Channel,
press the preprogrammed Nuisance
Channel Delete button until you hear a tone.
2 Release the Nuisance Channel Delete
button. The nuisance channel is deleted.
Note: You cannot delete a priority channel or
last remaining channel in the scan list.
Restoring Channels to the Scan List
1 Press the Scan button to stop the scan.
2 Press the Scan button again to start scanning
again. The Deleted Nuisance Channels are
restored to the scan list.
English
16
 Loading...