


LEX L10 MISSION CRITICAL
HANDHELD USER GUIDE


Contents
List of Figures.................................................................................................................................. 7
List of Tables..................................................................................................................................
List of Processes............................................................................................................................. 13
List of Procedures.......................................................................................................................... 15
Chapter 1: About this Guide.................................................................................19
1.1 Contact Us..................................................................................................................................................... 19
1.2 Versions.........................................................................................................................................................20
1.2.1 Operating System Version..............................................................................................................20
1.2.2 Software Build Number..................................................................................................................20
1.2.3 Kernel Version............................................................................................................................... 20
1.3 Chapter Descriptions..................................................................................................................................... 20
1.4 Helpful Background Information.................................................................................................................. 21
1.5 Notational Conventions.................................................................................................................................21
1.6 Icon Conventions...........................................................................................................................................21
1.7 Regulatory Information................................................................................................................................. 22
1.8 Service Information.......................................................................................................................................22
1.9 Documentation Set........................................................................................................................................ 23
Contents | 3
11
Chapter 2: Getting Started with the LEX L10....................................................25
2.1 LEX L10 Features......................................................................................................................................... 25
2.2 Unpacking..................................................................................................................................................... 27
2.3 Setting Up the LEX L10................................................................................................................................27
2.3.1 Removing the Screen Protective Film............................................................................................28
2.3.2 Removing the Battery Cover..........................................................................................................28
2.3.3 Installing a microSD or CRYPTR micro Encryption Card............................................................29
2.3.4 Removing the microSD or CRYPTR Card.................................................................................... 30
2.3.5 Installing the Public and Private SIM Cards.................................................................................. 30
2.3.6 Removing the Public and Private SIM Cards.................................................................................31
2.3.7 Installing the Battery...................................................................................................................... 31
2.3.8 Removing the Battery.....................................................................................................................32
2.4 Charging the LEX L10..................................................................................................................................32
2.4.1 Charging Temperature....................................................................................................................33
2.4.2 Battery Charge Indications.............................................................................................................33
2.4.3 Battery Management...................................................................................................................... 34
2.4.3.1 Monitor Battery Usage.................................................................................................... 34
2.4.3.2 Low Battery Notification.................................................................................................35
2.4.3.3 Battery Optimization....................................................................................................... 36
2.5 Powering On the LEX L10 for the First Time.............................................................................................. 37
2.6 Powering Off the LEX L10...........................................................................................................................38
2.7 Entering and Exiting the Suspend Mode.......................................................................................................38
2.7.1 Setting Time Out to Enter Suspend Mode......................................................................................38
2.8 Covert Mode..................................................................................................................................................39
2.8.1 Turning On Covert Mode...............................................................................................................39
2.8.2 Turning Off Covert Mode.............................................................................................................. 40
2.9 Locking the LEX L10....................................................................................................................................40
2.9.1 Selecting a Locking Option............................................................................................................40
2.9.1.1 Specifying a Pattern.........................................................................................................41
2.9.1.2 Specifying a PIN or Password.........................................................................................41

4 | Contents
2.9.1.3 Setting the Timeout for Locking the LEX L10............................................................... 41
2.9.2 Unlocking the LEX L10
2.9.2.1 Unlocking the LEX L10 Using a Pattern........................................................................ 42
2.9.2.2 Unlocking the LEX L10 Using a PIN or Password.........................................................42
2.9.3 Calling Emergency from a Locked LEX L10................................................................................ 42
2.10 Setting the Date and Time...........................................................................................................................43
2.11 Setting the Display...................................................................................................................................... 43
2.11.1 Setting Screen Brightness.............................................................................................................43
2.11.2 Setting Screen Rotation................................................................................................................44
2.11.3 Setting Up Sleep Mode.................................................................................................................44
2.11.4 Setting Up Daydream................................................................................................................... 44
2.11.5 Setting the Font Size.....................................................................................................................45
2.12 General Sound Setting.................................................................................................................................45
2.13 Public and Private Carrier Modes............................................................................................................... 47
2.13.1 Switching Modes Using the Power Button.................................................................................. 47
2.13.2 Switching Modes Using the Settings App....................................................................................47
.................................................................................................................42
Chapter 3: Using the LEX L10............................................................................. 49
3.1 Using the Touchscreen.................................................................................................................................. 49
3.2 Using the On-Screen Keyboard.....................................................................................................................50
3.2.1 Android Keyboard Settings............................................................................................................51
3.3 Motorola Solutions Home Experience (MHx).............................................................................................. 51
3.3.1 Home Screen.................................................................................................................................. 51
3.3.1.1 Home Screen Overlay..................................................................................................... 53
3.3.2 Customizing the Home Screen.......................................................................................................53
3.3.2.1 Adding Widgets...............................................................................................................53
3.3.2.2 Moving Widgets..............................................................................................................58
3.3.2.3 Removing Widgets..........................................................................................................58
3.3.2.4 Example of a Customized Home Screen Panel............................................................... 59
3.4 Status Bar...................................................................................................................................................... 59
3.5 Notification Icons..........................................................................................................................................60
3.6 Status Icons....................................................................................................................................................61
3.7 Managing Notifications.................................................................................................................................63
3.8 Working with Status......................................................................................................................................63
3.9 Quick Settings............................................................................................................................................... 64
3.10 Applications.................................................................................................................................................65
3.11 Folders.........................................................................................................................................................67
3.11.1 Creating a Folder..........................................................................................................................67
3.11.2 Naming Folders............................................................................................................................ 67
3.11.3 Removing a Folder....................................................................................................................... 68
Chapter 4: Calling..................................................................................................69
4.1 Making a Call Using the Dialer.....................................................................................................................70
4.2 Making a Call Using People List Contacts................................................................................................... 72
4.3 Making a Call Using Call History.................................................................................................................73
4.4 Making a Conference Call.............................................................................................................................73
4.5 Answering Calls with a Bluetooth Headset...................................................................................................76
4.6 Call Settings.................................................................................................................................................. 76
Chapter 5: Radio Remote Control........................................................................79
5.1 Pairing Radio with the LEX L10...................................................................................................................80
5.2 Unpairing the Radio...................................................................................................................................... 83
5.3 Requesting an Emergency Alert....................................................................................................................85

Contents | 5
5.4 Setting Zone and Channel............................................................................................................................. 87
5.5 Setting Radio Volume
5.6 Favorite Channels..........................................................................................................................................89
5.6.1 Viewing Favorite Channels............................................................................................................89
5.6.2 Adding a Favorite Zone and Channel.............................................................................................91
5.6.3 Removing a Favorite Channel........................................................................................................93
................................................................................................................................... 88
Chapter 6: Messaging............................................................................................ 97
6.1 Sending a Text Message................................................................................................................................97
6.2 Sending a Multimedia Message.................................................................................................................... 98
Chapter 7: Applications.........................................................................................99
7.1 File Browser.................................................................................................................................................. 99
7.2 People.......................................................................................................................................................... 100
7.2.1 Adding People.............................................................................................................................. 100
7.2.2 Editing People.............................................................................................................................. 101
7.2.3 Deleting People............................................................................................................................ 101
7.3 Camera.........................................................................................................................................................101
7.3.1 Taking Photos...............................................................................................................................102
7.3.2 Taking a Panoramic Photo........................................................................................................... 104
7.3.3 Recording Videos.........................................................................................................................105
7.3.4 Camera Settings............................................................................................................................106
7.3.5 Video Settings.............................................................................................................................. 108
7.4 Gallery.........................................................................................................................................................109
7.4.1 Working with Albums..................................................................................................................110
7.4.1.1 Sharing an Album..........................................................................................................111
7.4.1.2 Getting Album Information...........................................................................................111
7.4.1.3 Deleting an Album........................................................................................................ 112
7.4.2 Working with Photos....................................................................................................................112
7.4.2.1 Viewing and Browsing Photos......................................................................................112
7.4.2.2 Rotating a Photo............................................................................................................ 113
7.4.2.3 Cropping a Photo...........................................................................................................113
7.4.2.4 Setting a Photo as a Contact Icon..................................................................................114
7.4.2.5 Sharing a Photo............................................................................................................. 114
7.4.2.6 Deleting a Photo............................................................................................................ 115
7.4.3 Working with Videos................................................................................................................... 115
7.4.3.1 Watching a Video..........................................................................................................115
7.4.3.2 Sharing a Video.............................................................................................................115
7.4.3.3 Deleting a Video............................................................................................................116
7.5 Sound Recorder........................................................................................................................................... 116
7.6 Voice Dialer................................................................................................................................................ 118
7.6.1 Calling a Person by Name............................................................................................................118
7.6.2 Redialing a Previous Call.............................................................................................................118
7.6.3 Dialing by Number.......................................................................................................................118
7.6.4 Opening an Application................................................................................................................119
Chapter 8: Wireless..............................................................................................121
8.1 Wireless Wide Area Networks.................................................................................................................... 121
8.1.1 Sharing the Mobile Data Connection........................................................................................... 121
8.1.1.1 USB Tethering...............................................................................................................121
8.1.1.2 Bluetooth Tethering.......................................................................................................122
8.1.1.3 Portable WiFi Hotspot...................................................................................................122
8.1.2 Data Usage................................................................................................................................... 124

6 | Contents
8.1.2.1 Setting Data Usage Warning......................................................................................... 124
8.1.2.2 Setting Auto-Sync.........................................................................................................
8.1.3 Disabling Data When Roaming....................................................................................................125
8.1.4 Limiting Data Connection to a Network...................................................................................... 125
8.1.5 Editing the Access Point Name....................................................................................................125
8.1.6 Adding a Virtual Private Network (VPN)....................................................................................126
8.1.7 Cell Broadcasts.............................................................................................................................127
8.2 Wireless Local Area Networks....................................................................................................................127
8.2.1 Scanning and Connecting to a WiFi Network..............................................................................127
8.2.2 Configuring a WiFi Network....................................................................................................... 129
8.2.3 Adding a WiFi Network...............................................................................................................130
8.2.4 Manually Adding a WiFi Network...............................................................................................130
8.2.5 Advanced WiFi Settings...............................................................................................................131
8.2.6 WLAN Configuration...................................................................................................................131
8.2.7 Modifying a WiFi Network..........................................................................................................131
8.2.8 Removing a WiFi Network.......................................................................................................... 132
8.3 Bluetooth..................................................................................................................................................... 132
8.3.1 Adaptive Frequency Hopping...................................................................................................... 133
8.3.2 Security.........................................................................................................................................133
8.3.3 Bluetooth Profiles.........................................................................................................................133
8.3.4 Bluetooth Power States................................................................................................................ 134
8.3.5 Bluetooth Radio Power — Android............................................................................................. 134
8.3.5.1 Enabling Bluetooth........................................................................................................134
8.3.5.2 Disabling Bluetooth.......................................................................................................135
8.3.6 Discovering Bluetooth Device(s)................................................................................................. 135
8.3.7 Changing the Bluetooth Name..................................................................................................... 136
8.3.8 Connecting to a Bluetooth Device................................................................................................136
8.3.9 Selecting Profiles on a Bluetooth Device.....................................................................................137
8.3.10 Unpairing a Bluetooth Device....................................................................................................137
8.4 Pairing the LEX L10 with a Radio..............................................................................................................137
8.4.1 Establishing a Connection............................................................................................................138
125
Chapter 9: Accessories.........................................................................................141
9.1 LEX L10 Accessories..................................................................................................................................141
9.2 USB Cable...................................................................................................................................................142
9.3 Desktop Cradle............................................................................................................................................142
9.4 Vehicle Cradle.............................................................................................................................................143
9.5 Holster......................................................................................................................................................... 144
Chapter 10: Maintenance & Troubleshooting.................................................. 145
10.1 Maintaining the LEX L10......................................................................................................................... 145
10.2 Battery Safety Guidelines..........................................................................................................................145
10.3 Cleaning Instructions.................................................................................................................................146
10.4 Cleaning the LEX L10.............................................................................................................................. 147
10.5 Cleaning the Interface Connector..............................................................................................................147
10.6 Cleaning the Battery Contacts...................................................................................................................147
10.7 Troubleshooting the LEX L10.................................................................................................................. 148
10.8 Backing Up the LEX L10..........................................................................................................................150
10.8.1 Backing up Contacts...................................................................................................................150
10.9 Resetting the LEX L10..............................................................................................................................152
10.9.1 Performing Factory Data Reset.................................................................................................. 152
Chapter 11: LEX L10 Technical Specifications................................................ 155

List of Figures | 7
List of Figures
Figure 1: Manufacturing Label .......................................................................................................................................22
Figure 2: LEX L10 Features
Figure 3: Removing the Screen Protective Film ............................................................................................................ 28
Figure 4: Removing the Battery Cover .......................................................................................................................... 29
Figure 5: Installing the microSD or CRYPTR micro Encryption Card ......................................................................... 29
Figure 6: Installing the Public and Private SIM Cards ...................................................................................................31
Figure 7: Installing the Battery .......................................................................................................................................32
Figure 8: Charging the LEX L10 ................................................................................................................................... 33
Figure 9: Charge and Notification LED .........................................................................................................................33
Figure 10: Battery Screen ...............................................................................................................................................35
Figure 11: Low Battery Notification ..............................................................................................................................35
Figure 12: Battery Depleted Screen ............................................................................................................................... 36
Figure 13: Quick Settings Menu — Airplane Mode ...................................................................................................... 37
Figure 14: LEX L10 Boot Screen ...................................................................................................................................37
Figure 15: Selecting Power Off ......................................................................................................................................38
Figure 16: Power Button Menu ......................................................................................................................................39
Figure 17: Power Button Menu ......................................................................................................................................40
Figure 18: Sound Screen ................................................................................................................................................ 46
Figure 19: Volume Button ..............................................................................................................................................46
Figure 20: Service Switch .............................................................................................................................................. 47
Figure 21: Switch Networks Confirmation Popup .........................................................................................................48
Figure 22: Android Keyboard Settings .......................................................................................................................... 50
Figure 23: Default Home Screen ....................................................................................................................................52
Figure 24: Widgets Screen ............................................................................................................................................. 54
Figure 25: Example of a Widget Added to New Panel .................................................................................................. 55
Figure 26: Empty My Apps Widget ...............................................................................................................................56
Figure 27: List of Shortcuts for My Apps Widgets ........................................................................................................56
Figure 28: My Apps Widget with Shortcuts Added .......................................................................................................57
Figure 29: My Status Widget ......................................................................................................................................... 57
Figure 30: Available/Busy Status Selection ...................................................................................................................58
Figure 31: Example of a Customized Home Screen Panel ............................................................................................ 59
Figure 32: Status Bar ......................................................................................................................................................59
Figure 33: Notification Panel ......................................................................................................................................... 63
Figure 34: Quick Settings Panel .....................................................................................................................................65
Figure 35: Opened Unnamed Folder ..............................................................................................................................67
Figure 36: Named Folder ............................................................................................................................................... 67
Figure 37: Insert Wired Headset Plug ............................................................................................................................ 70
Figure 38: Dialer Screen .................................................................................................................................................71
Figure 39: Call in Progress .............................................................................................................................................71
Figure 40: People List Contact .......................................................................................................................................72
Figure 41: Call History Tab ............................................................................................................................................73
Figure 42: Two Calls ......................................................................................................................................................74
Figure 43: Two Calls Connected ....................................................................................................................................75
Figure 44: Merged Calls .................................................................................................................................................75
Figure 45: Radio Remote Control Screen ...................................................................................................................... 80
Figure 46: Pair With a Radio Screen ..............................................................................................................................81
Figure 47: Blue Pairing Dots ..........................................................................................................................................81
Figure 48: Bluetooth Connection Screen ....................................................................................................................... 82
...........................................................................................................................................25

8 | List of Figures
Figure 49: Radio Remote Control Screen ...................................................................................................................... 82
Figure 50: Radio Remote Control Screen
Figure 51: ....................................................................................................................................................................... 84
Figure 52: Select Unpair .................................................................................................................................................84
Figure 53: Unpaired Screen ............................................................................................................................................85
Figure 54: Emergency Alert Activation Popup ..............................................................................................................86
Figure 55: Notification Screen with Emergency Notification ........................................................................................86
Figure 56: Radio Remote Control Screen ...................................................................................................................... 87
Figure 57: Channel Selection Screen ............................................................................................................................. 88
Figure 58: Radio Remote Control Screen ...................................................................................................................... 89
Figure 59: Radio Volume Slider .................................................................................................................................... 89
Figure 60: Radio Remote Control Screen ...................................................................................................................... 90
Figure 61: Radio Remote Control — Favorites Screen ................................................................................................. 91
Figure 62: Radio Remote Control Screen ...................................................................................................................... 92
Figure 63: Favorites Screen ............................................................................................................................................92
Figure 64: Radio Remote Control Screen ...................................................................................................................... 94
Figure 65: Favorites Screen ............................................................................................................................................94
Figure 66: New Message Screen .................................................................................................................................... 97
Figure 67: New Multimedia Message Screen ................................................................................................................ 98
Figure 68: File Browser Screen ......................................................................................................................................99
Figure 69: Camera Photo Screen ..................................................................................................................................102
Figure 70: Camera Screen ............................................................................................................................................ 103
Figure 71: Camera Option Bar ..................................................................................................................................... 103
Figure 72: Camera Zoom ............................................................................................................................................. 104
Figure 73: Panoramic Mode .........................................................................................................................................104
Figure 74: Panoramic Frame ........................................................................................................................................ 105
Figure 75: Video Mode ................................................................................................................................................ 105
Figure 76: Camera Settings .......................................................................................................................................... 106
Figure 77: First More Options Screen ..........................................................................................................................107
Figure 78: Second More Options Screen ..................................................................................................................... 107
Figure 79: Third More Options Screen ........................................................................................................................ 108
Figure 80: Video Settings .............................................................................................................................................108
Figure 81: First More Options Video Screen ............................................................................................................... 109
Figure 82: Second More Options Video Screen ...........................................................................................................109
Figure 83: Gallery — Albums ......................................................................................................................................110
Figure 84: Photos/Videos Inside an Album ................................................................................................................. 111
Figure 85: Photo Example ............................................................................................................................................112
Figure 86: Cropping Grid .............................................................................................................................................114
Figure 87: Start Recording ........................................................................................................................................... 116
Figure 88: Record Your Message .................................................................................................................................117
Figure 89: Finish Recording .........................................................................................................................................117
Figure 90: Voice Dialer Window ................................................................................................................................. 118
Figure 91: USB Cable Connection to Host Computer ................................................................................................. 122
Figure 92: Set up WiFi Hotspot Dialog Box ................................................................................................................123
Figure 93: Settings Screen ............................................................................................................................................128
Figure 94: WiFi Screen ................................................................................................................................................ 128
Figure 95: WLAN Network Security Dialog Boxes .................................................................................................... 129
Figure 96: Bluetooth Pairing ........................................................................................................................................ 136
Figure 97: Pairing Screen .............................................................................................................................................138
Figure 98: Blue Pairing Dots ........................................................................................................................................139
Figure 99: USB Cable .................................................................................................................................................. 142
Figure 100: Desktop Cradle ......................................................................................................................................... 143
...................................................................................................................... 83

List of Figures | 9
Figure 101: Vehicle Cradle on Windshield ..................................................................................................................144
Figure 102: Holster .......................................................................................................................................................
Figure 103: Contacts Menu .......................................................................................................................................... 151
Figure 104: Import/Export Contacts Popup ................................................................................................................. 151
Figure 105: Export Confirmation Popup ......................................................................................................................152
144

10 | List of Figures

List of Tables | 11
List of Tables
Table 1: LEX L10 Features ............................................................................................................................................25
Table 2: Charge and Notification LED — Charging Indications
Table 3: Using the Touchscreen .....................................................................................................................................49
Table 4: Android Keyboard Settings ..............................................................................................................................51
Table 5: Home Screen Items .......................................................................................................................................... 52
Table 6: Notification Icons .............................................................................................................................................60
Table 7: Status Icons ...................................................................................................................................................... 61
Table 8: Applications ..................................................................................................................................................... 65
Table 9: Camera Icons and Actions ............................................................................................................................. 102
Table 10: General Accessories ..................................................................................................................................... 141
Table 11: Troubleshooting the LEX L10 ..................................................................................................................... 148
Table 12: LEX L10 Technical Specifications .............................................................................................................. 155
Table 13: General Accessories ..................................................................................................................................... 158
...................................................................................34

12 | List of Tables

List of Processes
13 | List of Processes
MN001456A01-A | February 2015 |
Send Feedback


15 | List of Procedures
List of Procedures
Removing the Battery Cover ..........................................................................................................................................28
Installing a microSD or CRYPTR micro Encryption Card
Removing the microSD or CRYPTR Card .................................................................................................................... 30
Installing the Public and Private SIM Cards .................................................................................................................. 30
Removing the Public and Private SIM Cards .................................................................................................................31
Installing the Battery ...................................................................................................................................................... 31
Removing the Battery .....................................................................................................................................................32
Turning Off the Radio .................................................................................................................................................... 36
Powering Off the LEX L10 ............................................................................................................................................38
Entering and Exiting the Suspend Mode ........................................................................................................................38
Setting Time Out to Enter Suspend Mode ......................................................................................................................38
Turning On Covert Mode ...............................................................................................................................................39
Turning Off Covert Mode .............................................................................................................................................. 40
Selecting a Locking Option ............................................................................................................................................40
Specifying a Pattern ........................................................................................................................................................41
Specifying a PIN or Password ........................................................................................................................................41
Setting the Timeout for Locking the LEX L10 .............................................................................................................. 41
Unlocking the LEX L10 Using a Pattern ....................................................................................................................... 42
Unlocking the LEX L10 Using a PIN or Password ........................................................................................................42
Calling Emergency from a Locked LEX L10 ................................................................................................................ 42
Setting the Date and Time ..............................................................................................................................................43
Setting Screen Brightness ...............................................................................................................................................43
Setting Screen Rotation ..................................................................................................................................................44
Setting Up Sleep Mode ...................................................................................................................................................44
Setting Up Daydream ..................................................................................................................................................... 44
Setting the Font Size .......................................................................................................................................................45
Switching Modes Using the Power Button .................................................................................................................... 47
Switching Modes Using the Settings App ......................................................................................................................47
Adding Widgets ..............................................................................................................................................................53
Adding Shortcuts to the My Apps Widget ..................................................................................................................... 55
Changing My Status ....................................................................................................................................................... 57
Moving Widgets .............................................................................................................................................................58
Removing Widgets .........................................................................................................................................................58
Creating a Folder ............................................................................................................................................................67
Naming Folders .............................................................................................................................................................. 67
Removing a Folder ......................................................................................................................................................... 68
Making a Call Using the Dialer ......................................................................................................................................70
Making a Call Using People List Contacts .................................................................................................................... 72
Making a Call Using Call History ..................................................................................................................................73
Making a Conference Call ..............................................................................................................................................73
Pairing Radio with the LEX L10 ....................................................................................................................................80
Unpairing the Radio ....................................................................................................................................................... 83
Requesting an Emergency Alert .....................................................................................................................................85
Setting Zone and Channel .............................................................................................................................................. 87
Setting Radio Volume .................................................................................................................................................... 88
Viewing Favorite Channels ............................................................................................................................................89
Adding a Favorite Zone and Channel .............................................................................................................................91
Removing a Favorite Channel ........................................................................................................................................93
............................................................................................29
MN001456A01-A | February 2015 |
Send Feedback

16 | List of Procedures
Sending a Text Message .................................................................................................................................................97
Sending a Multimedia Message
Adding People .............................................................................................................................................................. 100
Editing People .............................................................................................................................................................. 101
Deleting People ............................................................................................................................................................ 101
Taking Photos ...............................................................................................................................................................102
Taking a Panoramic Photo ........................................................................................................................................... 104
Recording Videos .........................................................................................................................................................105
Sharing an Album .........................................................................................................................................................111
Getting Album Information ..........................................................................................................................................111
Deleting an Album ....................................................................................................................................................... 112
Viewing and Browsing Photos .....................................................................................................................................112
Rotating a Photo ........................................................................................................................................................... 113
Cropping a Photo ..........................................................................................................................................................113
Setting a Photo as a Contact Icon .................................................................................................................................114
Sharing a Photo ............................................................................................................................................................ 114
Deleting a Photo ........................................................................................................................................................... 115
Watching a Video .........................................................................................................................................................115
Sharing a Video ............................................................................................................................................................115
Deleting a Video ...........................................................................................................................................................116
Calling a Person by Name ............................................................................................................................................118
Redialing a Previous Call .............................................................................................................................................118
Dialing by Number .......................................................................................................................................................118
Opening an Application ................................................................................................................................................119
USB Tethering ..............................................................................................................................................................121
Bluetooth Tethering ......................................................................................................................................................122
Portable WiFi Hotspot ..................................................................................................................................................122
Configuring the WiFi Hotspot ......................................................................................................................................123
Setting Data Usage Warning ........................................................................................................................................ 124
Setting Auto-Sync ........................................................................................................................................................ 125
Disabling Data When Roaming ....................................................................................................................................125
Limiting Data Connection to a Network ...................................................................................................................... 125
Editing the Access Point Name ....................................................................................................................................125
Adding a Virtual Private Network (VPN) ....................................................................................................................126
Cell Broadcasts .............................................................................................................................................................127
Scanning and Connecting to a WiFi Network ..............................................................................................................127
Configuring a WiFi Network ....................................................................................................................................... 129
Adding a WiFi Network ...............................................................................................................................................130
Manually Adding a WiFi Network ...............................................................................................................................130
Modifying a WiFi Network ..........................................................................................................................................131
Removing a WiFi Network .......................................................................................................................................... 132
Enabling Bluetooth .......................................................................................................................................................134
Disabling Bluetooth ......................................................................................................................................................135
Discovering Bluetooth Device(s) ................................................................................................................................. 135
Changing the Bluetooth Name ..................................................................................................................................... 136
Connecting to a Bluetooth Device ................................................................................................................................136
Selecting Profiles on a Bluetooth Device .....................................................................................................................137
Unpairing a Bluetooth Device ......................................................................................................................................137
Establishing a Connection ............................................................................................................................................138
Cleaning the Interface Connector .................................................................................................................................147
Cleaning the Battery Contacts ......................................................................................................................................147
Backing Up the LEX L10 .............................................................................................................................................150
..................................................................................................................................... 98
Send Feedback | February 2015 | MN001456A01-A

List of Procedures | 17
Backing up Contacts .....................................................................................................................................................150
Resetting the LEX L10
Performing Factory Data Reset .................................................................................................................................... 152
.................................................................................................................................................152
MN001456A01-A | February 2015 |
Send Feedback

Chapter
1
About this Guide
This guide provides information about using the LEX L10 Mission Critical Handheld and accessories.
Note: Screens and menu options may be changed or customized by your agency to show different
information.
1.1 Contact Us
19 | About this Guide
Motorola Solution Support Center
The Solution Support Center (SSC) is the primary Motorola Solutions support contact. Call:
• Before any software reload.
• To confirm troubleshooting results and analysis before removing and replacing a Field Replaceable Unit (FRU)
and Field Replaceable Entity (FRE) to repair the system.
For... Phone
United States Calls 800-221-7144
International Calls 302-444-9800
North America Parts Organization
For assistance in ordering replacement parts or identifying a part number, contact the Motorola Parts organization.
Your first response when troubleshooting your system is to call the Motorola SSC.
For... Phone
Phone Orders
800-422-4210 (US and Canada Orders)
For help identifying an item or part number, select choice 3 from
the menu.
302-444-9842 (International Orders)
Includes help for identifying an item or part number and for
translation as needed.
Fax Orders 800-622-6210 (US and Canada Orders)
Comments
Send questions and comments regarding user documentation to documentation@motorolasolutions.com.
Provide the following information when reporting a documentation error:
• The document title and part number
MN001456A01-A | February 2015 | Send Feedback
20 | About this Guide
• The page number with the error
A description of the error
•
We welcome your feedback on this and other Motorola manuals. To take a short, confidential survey on Motorola
Customer Documentation, go to docsurvey.motorolasolutions.com or scan the following QR code with your mobile
device to access the survey.
1.2 Versions
This guide covers various software configurations and references are made to operating system or software versions
discussed in the following three subsections.
1.2.1 Operating System Version
To determine the Operating System version, from the Home screen touch → → About phone → Android
Version. The last line provides the Android version information. For example: 4.4.4.
1.2.2 Software Build Number
To determine the software build number, from the Home screen touch → → About phone → Build Number.
1.2.3 Kernel Version
To determine the kernel version, from the Home screen, touch → → About phone → Kernel version.
1.3 Chapter Descriptions
This Guide provides information on the features listed in the chapter descriptions below:
•
Chapter 1, About this Guide: Customer contacts and general information related to this product.
• Chapter 2, Getting Started with the LEX L10: Getting the LEX L10 up and running for the first time.
• Chapter 3, Using the LEX L10: Operating the LEX L10.
• Chapter 4, Calling: Making and receiving calls.
• Chapter 5, Radio Remote Control: Connecting the LEX L10 to a Land Mobile Radio for communicating on LTE
and P25 systems.
• Chapter 6, Messaging: Sending text and multimedia messages.
• Chapter 7 Applications: Using basic applications installed on the LEX L10 such as Camera, People and File
Browser.
• Chapter 8, Wireless: Configuring the LEX L10 to operate on a personal, local and wide area wireless network.
• Chapter 9, Accessories: Available accessories and how to use them with the LEX L10.
• Chapter 10, Maintenance & Troubleshooting :Cleaning and storing the LEX L10, and troubleshooting solutions
for potential problems.
Send Feedback | February 2015 | MN001456A01-A
• Chapter 11, Technical Specifications: Technical specifications for the LEX L10.
1.4 Helpful Background Information
Motorola offers various courses designed to assist in learning about the system. For information, go to http://
www.motorolasolutions.com/training to view the current course offerings and technology paths.
1.5 Notational Conventions
The following conventions are used in this document:
Italics are used to highlight the following:
Icons on a screen
•
• Chapters and sections in this and related documents
Bold text is used to highlight the following:
About this Guide | 21
• Dialog box, window, and screen names
• Drop-down list and list box names
• Check box and radio button names
• Key names on a keypad
• Button names on a screen
Bullets (•) indicate:
• Action items
• Lists of alternatives
• Lists of required steps that are not necessarily sequential
Sequential lists (e.g., those that describe step-by-step procedures) appear as numbered lists.
1.6 Icon Conventions
The documentation set is designed to give the reader more visual clues. The following graphic icons are used
throughout the documentation set. These icons and their associated meanings are described below.
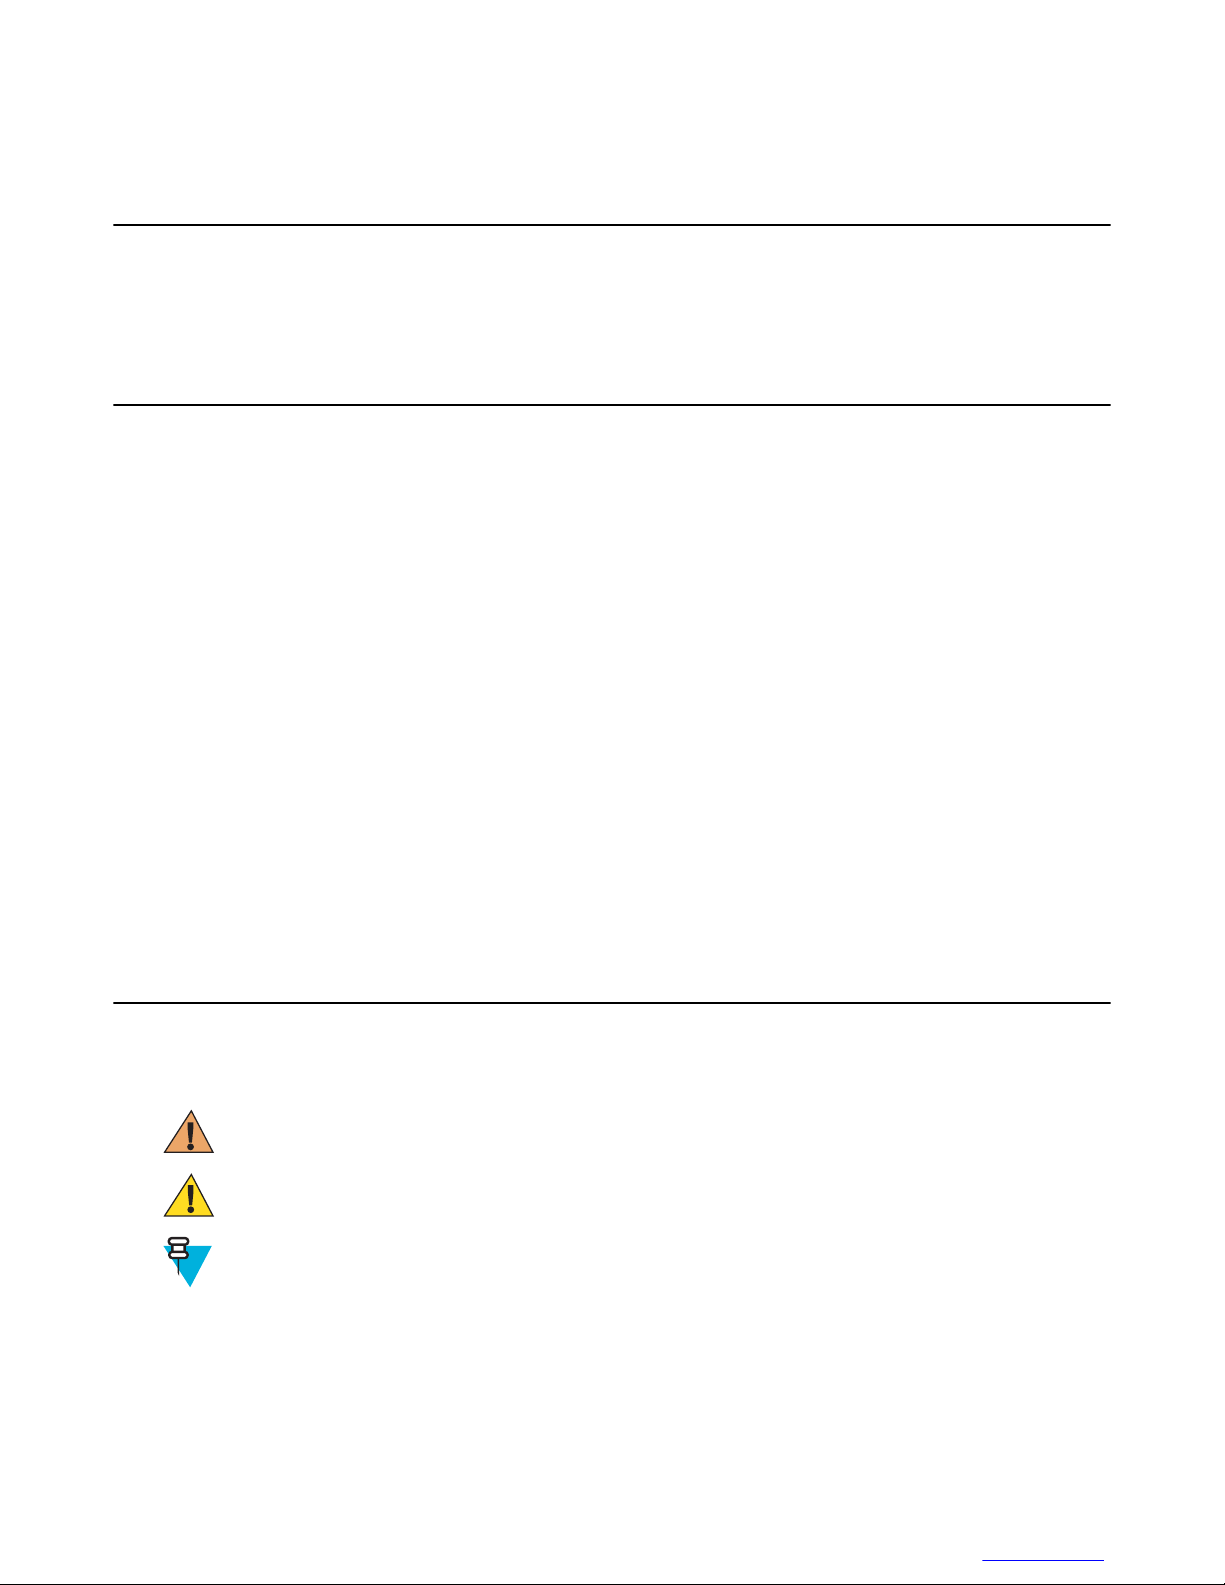
Warning: The word WARNING with the associated safety icon implies information that, if disregarded,
could result in death or serious injury, or serious product damage.
Caution: The word CAUTION with the associated safety icon implies information that, if disregarded,
may result in minor or moderate injury, or serious product damage.
Note: NOTE contains information more important than the surrounding text, such as exceptions or
preconditions. They also refer the reader elsewhere for additional information, remind the reader how to
complete an action (when it is not part of the current procedure, for instance), or tell the reader where
something is located on the screen. There is no warning level associated with a note.
MN001456A01-A | February 2015 | Send Feedback
22 | About this Guide
1.7 Regulatory Information
BEFORE USING THIS device, READ the Product Regulatory, Safety & RF Exposure Guide (PN MN001458A01-A)
included with this package.
1.8 Service Information
If you have a problem with your equipment, contact Motorola Solutions Global Customer Support Center for your
region. Contact information is available at: http://www.motorolasolutions.com/support. You can also call
1-800-323-9949 for support and select option 6 for PS LTE infrastructure and devices. When contacting support, have
the following information available:
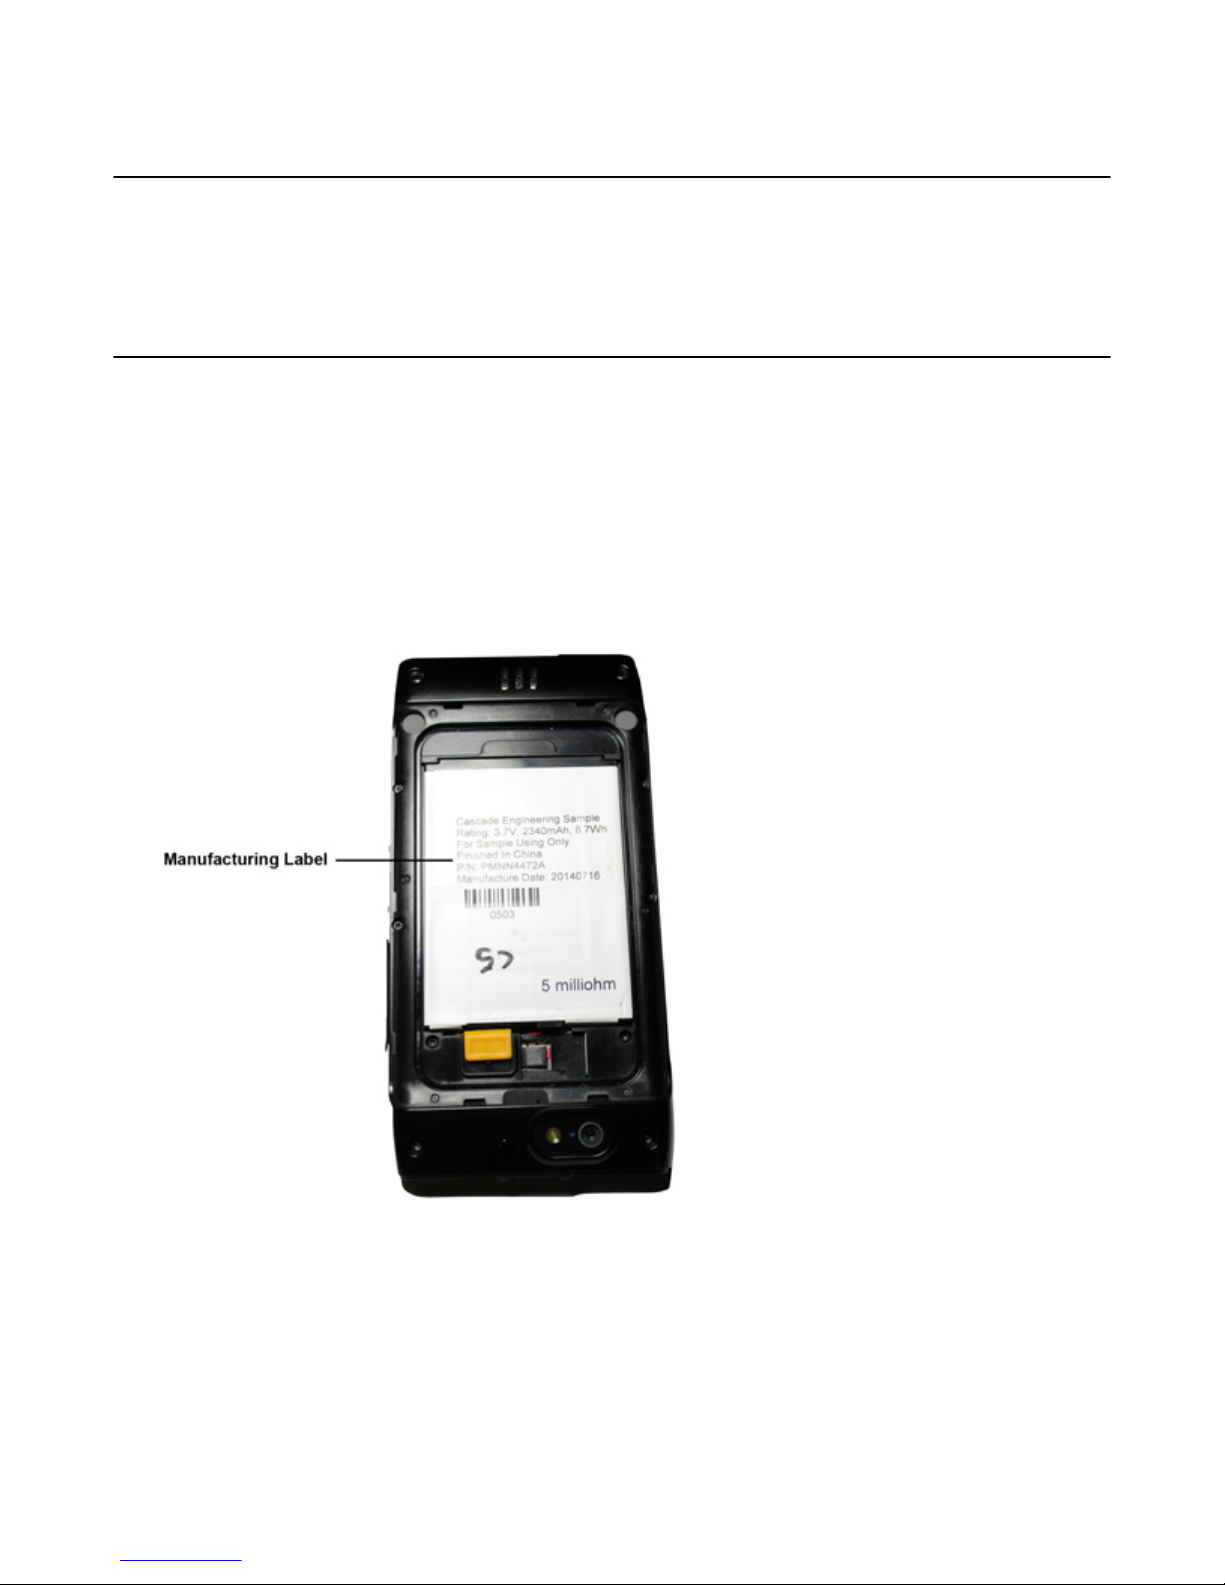
Serial number of the unit (found on manufacturing label)
•
• Model number or product name (found on manufacturing label)
• Software type and version number
Figure 1: Manufacturing Label
Motorola Solutions responds to calls by e-mail, telephone or fax within the time limits set forth in support
agreements.
If your problem cannot be solved by Motorola Solutions Global Customer Support Center, you may need to return
your equipment for servicing and will be given specific directions. Motorola Solutions is not responsible for any
damages incurred during shipment if the approved shipping container is not used. Shipping the units improperly can
possibly void the warranty. Remove the CRYPTR card or microSD card and SIM card before shipping.
If you purchased your product from a Motorola Solutions business partner, contact that business partner for support.
Send Feedback | February 2015 | MN001456A01-A

About this Guide | 23
1.9 Documentation Set
Unless otherwise specified, Motorola Solutions documents listed here are available from Motorola Online at https://
businessonline.motorolasolutions.com. If you are new to Motorola Online, follow the on-screen instructions to sign
up for an account To access Public Safety LTE infrastructure and device manuals, select Resource Center →
Product Information → Manuals → Network Infrastructure.
The documentation set for the LEX L10 provides information for specific user needs, and includes:
• LEX L10 Quick Start Guide PN MN001457A01-A: describes how to get the LEX L10 up and running.
• LEX L10 Mission Critical Handheld User Guide (this guide) MN001456A01-A: describes how to use the LEX
L10.
• LEX L10 Push-To-Talk User Guide PN xxxxxxxxA01-A: describes how to use the PTT feature on the LEX L10.
• LEX L10 Regulatory and Safety Guide PN MN001458A01-A: describes how to safely use the LEX L10.
• LEX L10 Service Provisioning Guide PN MN001462A01-A: provides technical instructions on how to activate,
provision, and configure the LEX L10.
• LEX L10 Vehicle Cradle Quick Reference Guide PN MN001460A01-A: describes how to charge a single LEX
L10 unit inside a vehicle.
• LEX L10 Desktop Cradle Quick Reference Guide PN MN001459A01-A: describes how to charge a single LEX
L10 unit inside a vehicle.
For the latest version of this guide and all guides, go to: https://businessonline.motorolasolutions.com.
MN001456A01-A | February 2015 | Send Feedback

Chapter
2
Getting Started with the LEX L10
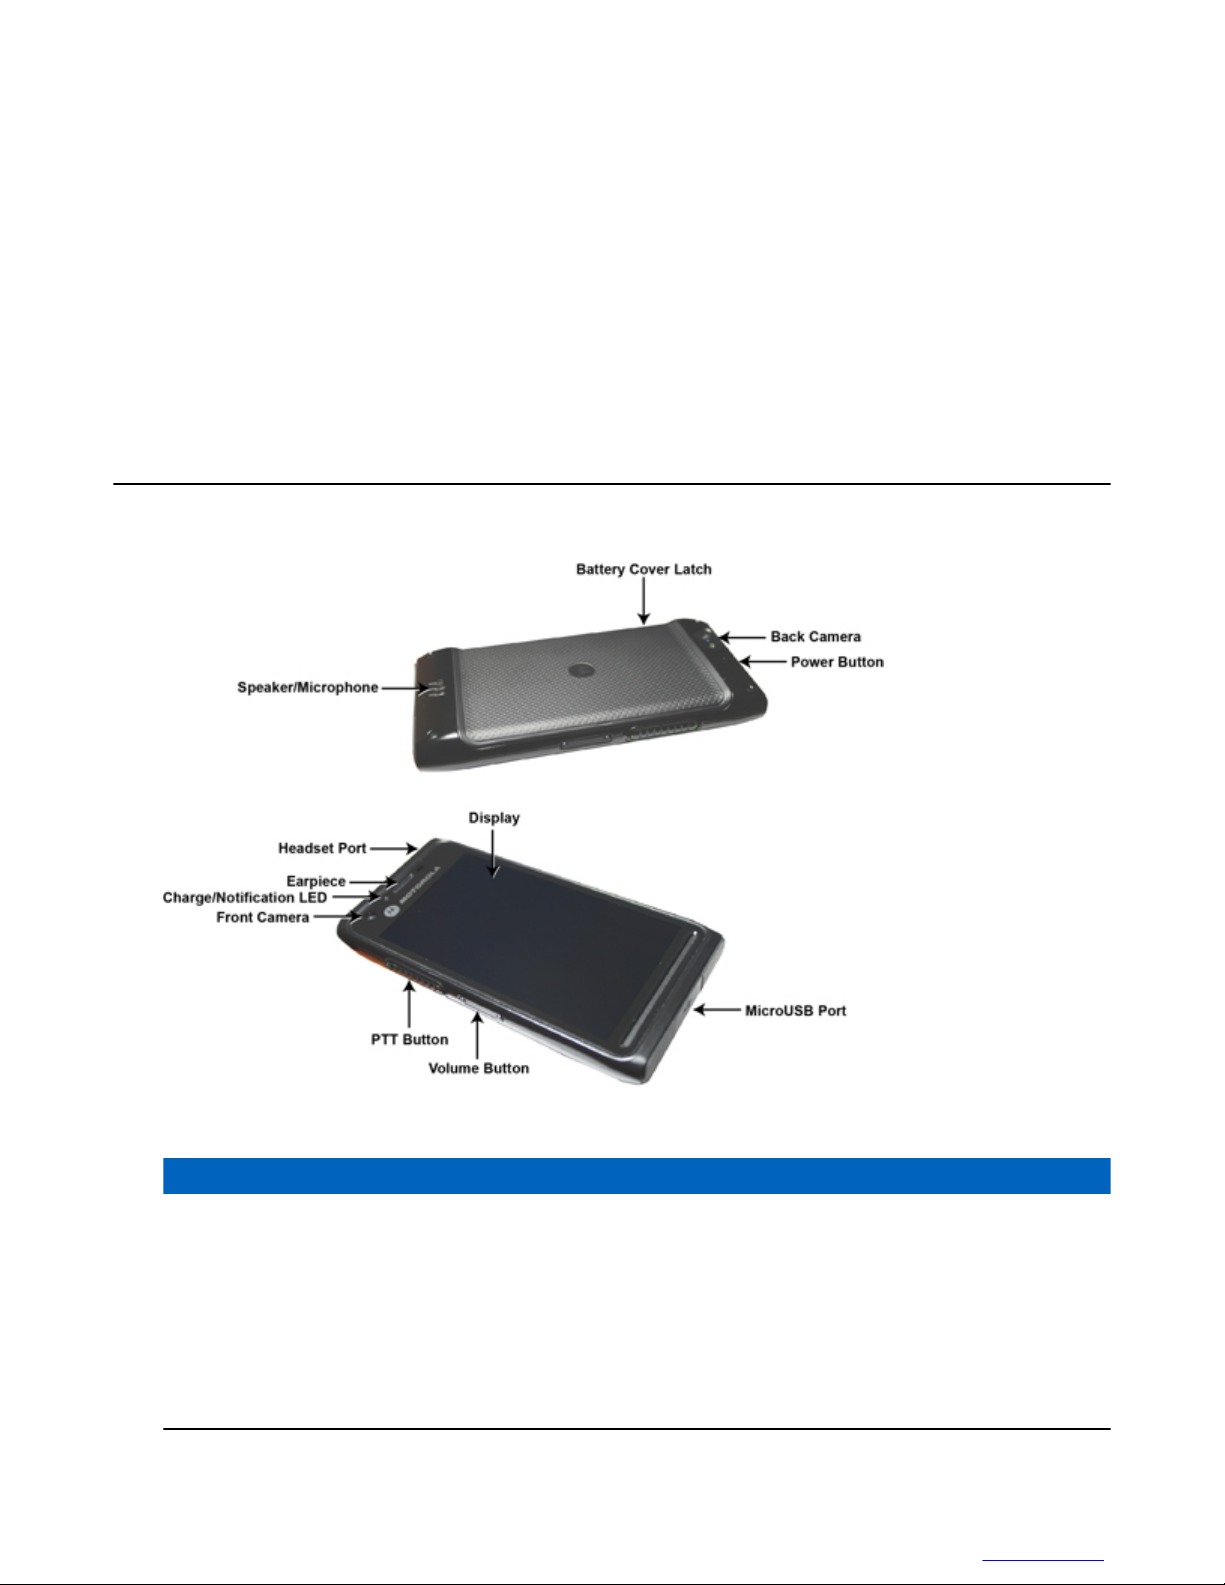
2.1 LEX L10 Features
Figure 2: LEX L10 Features
25 | Getting Started with the LEX L10
Table 1: LEX L10 Features
Item Function
Charge and Notification LED Solid Blue: New notification (New Voice mail, New
Text messages, Missed Calls, Android App Notifications,
etc.)
Off: Battery is not charging.
Solid Red: Battery is charging.
Blinking Amber: Waiting to charge.
Solid Green: Fully Charged.
Table continued…
MN001456A01-A | February 2015 | Send Feedback
26 | Getting Started with the LEX L10
Item Function
Ambient Light Sensor Determines ambient light for controlling display back-
light intensity.
Proximity Sensor Turning off display when the phone is close to ear.
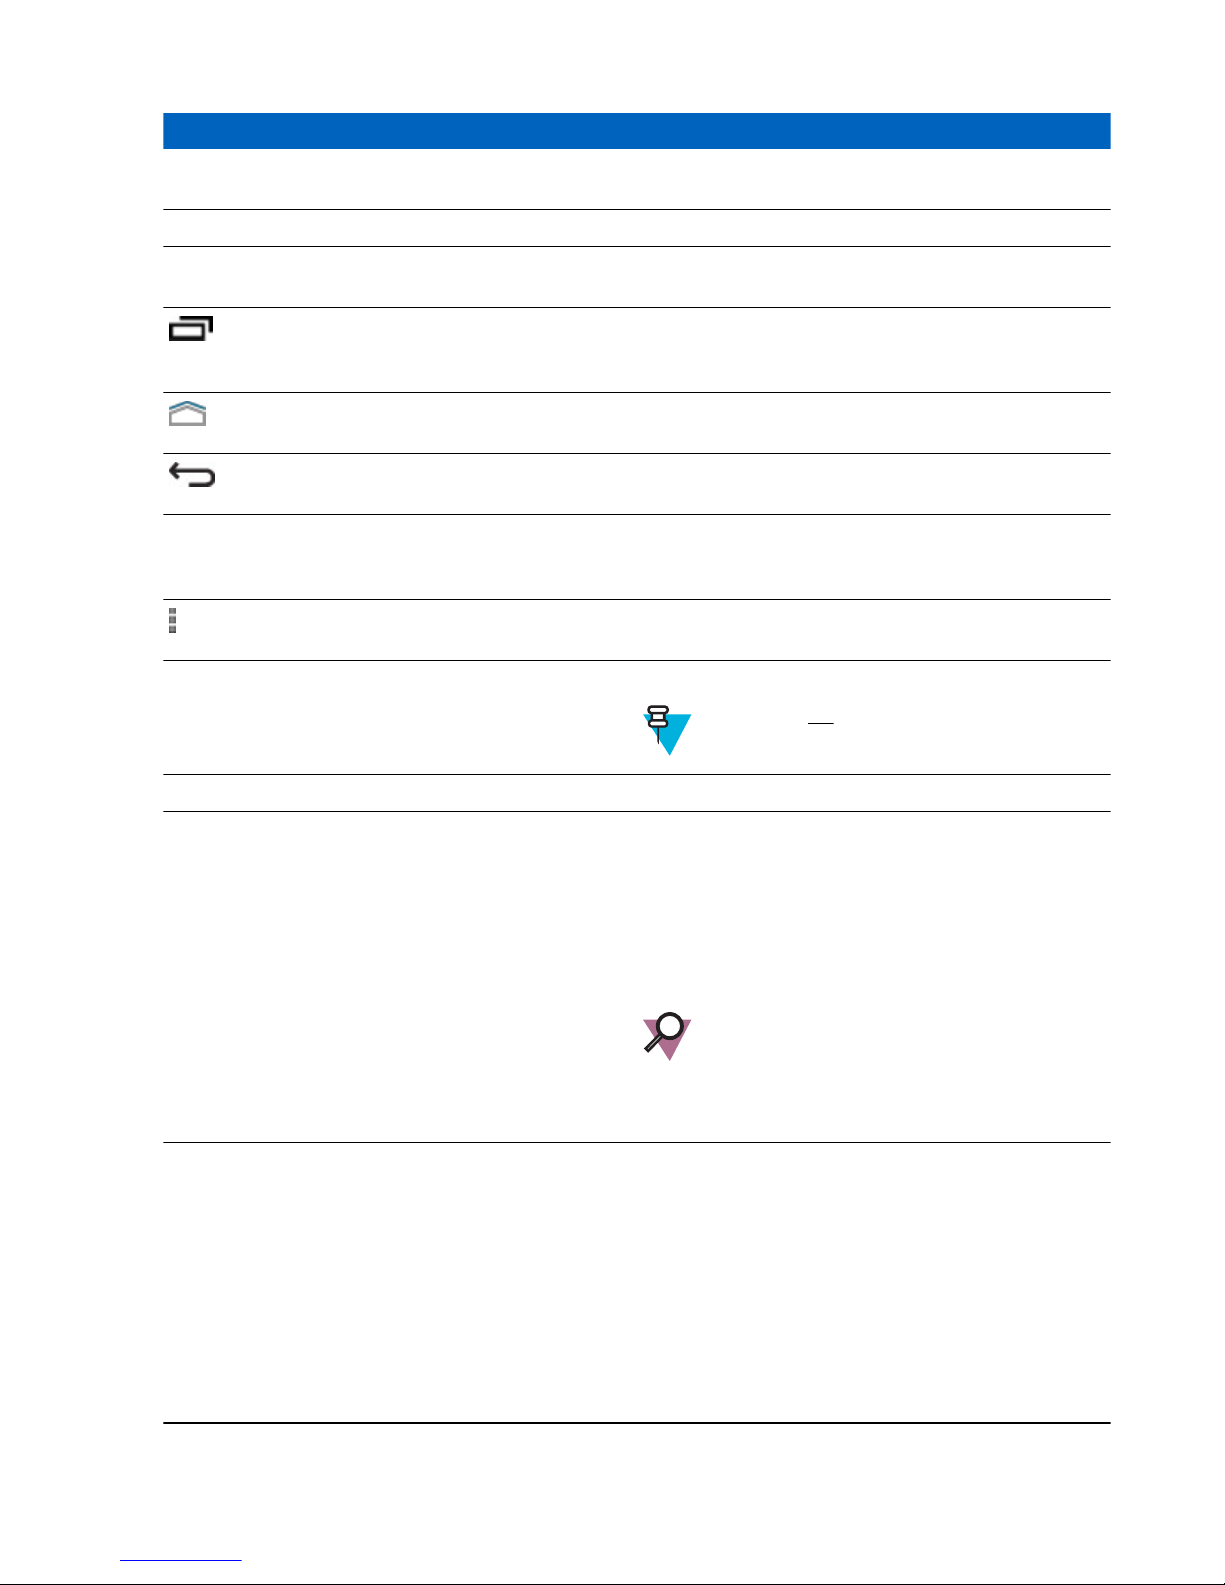
Screen Tap screen displays all information needed to operate the
LEX L10.
Recent Apps key — Press to switch to, stop or manage
applications currently running on the background of the
LEX L10.
Home key — Displays the Home screen with a single
tap.
Back key — Displays the previous screen. Closes the
keyboard if the on-screen keyboard is open.
Primary Microphone/Speaker Use for communications in handset mode. Provides au-
dio output for video and voice playback in speakerphone
mode.
Menu key — At any screen or application, press to see
available options.
Headset Port Connects to headsets (3.5 mm plug).
Note: Do not user 2.5 mm to 3.5 mm adapters
Volume Up/Down Buttons Increase and decrease audio volume.
PTT Button Push-to-Talk (PTT) button enables Push-to-Talk services
over a broadband network and can also be interconnected
to Project 25 Land Mobile Radio (LMR) networks. The
PTT application offers calls, alerts, group calls, Talk
Group calls, and Talk Group monitoring and scanning.
For PTT button and application operations, see Push-toTalk User Guide for LEX L10 PN MNxxxxxxxxx
Important: The PTT is an optional feature
that requires installation of software and system connection following the LEX L10 shipping. To verify if the PTT feature is enabled
on the device, contact your technical support.
Power Button Press and hold to turn on the LEX L10. Press to turn the
screen on or off. Press and hold to select one of these options:
Send Feedback | February 2015 | MN001456A01-A
• Power On/Off — Turn On/Off the LEX L10.
• Airplane mode — Disables all wireless connections.
• Service switch — Switches between public and Private carrier modes.
• Covert mode — In covert mode, all sounds and visual indications of the LEX L10 are turned off. See
Covert Mode on page 39.
Table continued…
Getting Started with the LEX L10 | 27
Item Function
• Vibrate mode — Sets the LEX L10 to vibrate only.
• Speaker on — Routes the earpiece sound to the
speaker.
Front Camera Used to capture live video for video calls.
Earpiece Provides audio in handset mode.
Secondary Microphone Use for making voice recordings and communications in
speakerphone mode.
Interface Connector Provides power to the LEX L10 from cradles.
Battery Cover Latch Assists in battery cover removal to provide access to the
battery, SIM, CRYPTR and microSD card holders.
Camera Button Starts the camera and takes photos and video.
microUSB Port Provides USB client and host communications.
Radio Paring Point Serves as a secure Bluetooth pairing point with Motorola
Solutions Land Mobile Radios (LMR).
Back Camera and Flash Takes photos and video, and provides flash illumination
for the camera.
2.2 Unpacking
Carefully remove all protective material from the LEX L10 and save the shipping container for later storage and
shipping. Verify that the following were received:
LEX L10
•
• Battery Cover
• 2280 mAh Lithium-ion battery
• USB Charger
• USB Cable
• Regulatory Guide
• Quick Start Guide
Inspect the equipment for damage. If any equipment is missing or damaged, contact the Motorola Solutions Support
Center immediately.
2.3 Setting Up the LEX L10
Note: The LEX L10 may be delivered to you with battery, SIM card, microSD card and/or CRYPTR cards
already installed, activated and ready for use. In this case, ignore steps 2 through 6 of the following section
if they were already performed.
Before using the LEX L10 for the first time, perform the following:
1 Remove the screen protection film from the LEX L10 screen. (See Removing the Screen Protective Film
28).
2 Install the public and/or Private SIM cards. (See Installing the Public and Private SIM Cards on page 30).
MN001456A01-A | February 2015 |
Send Feedback
on page
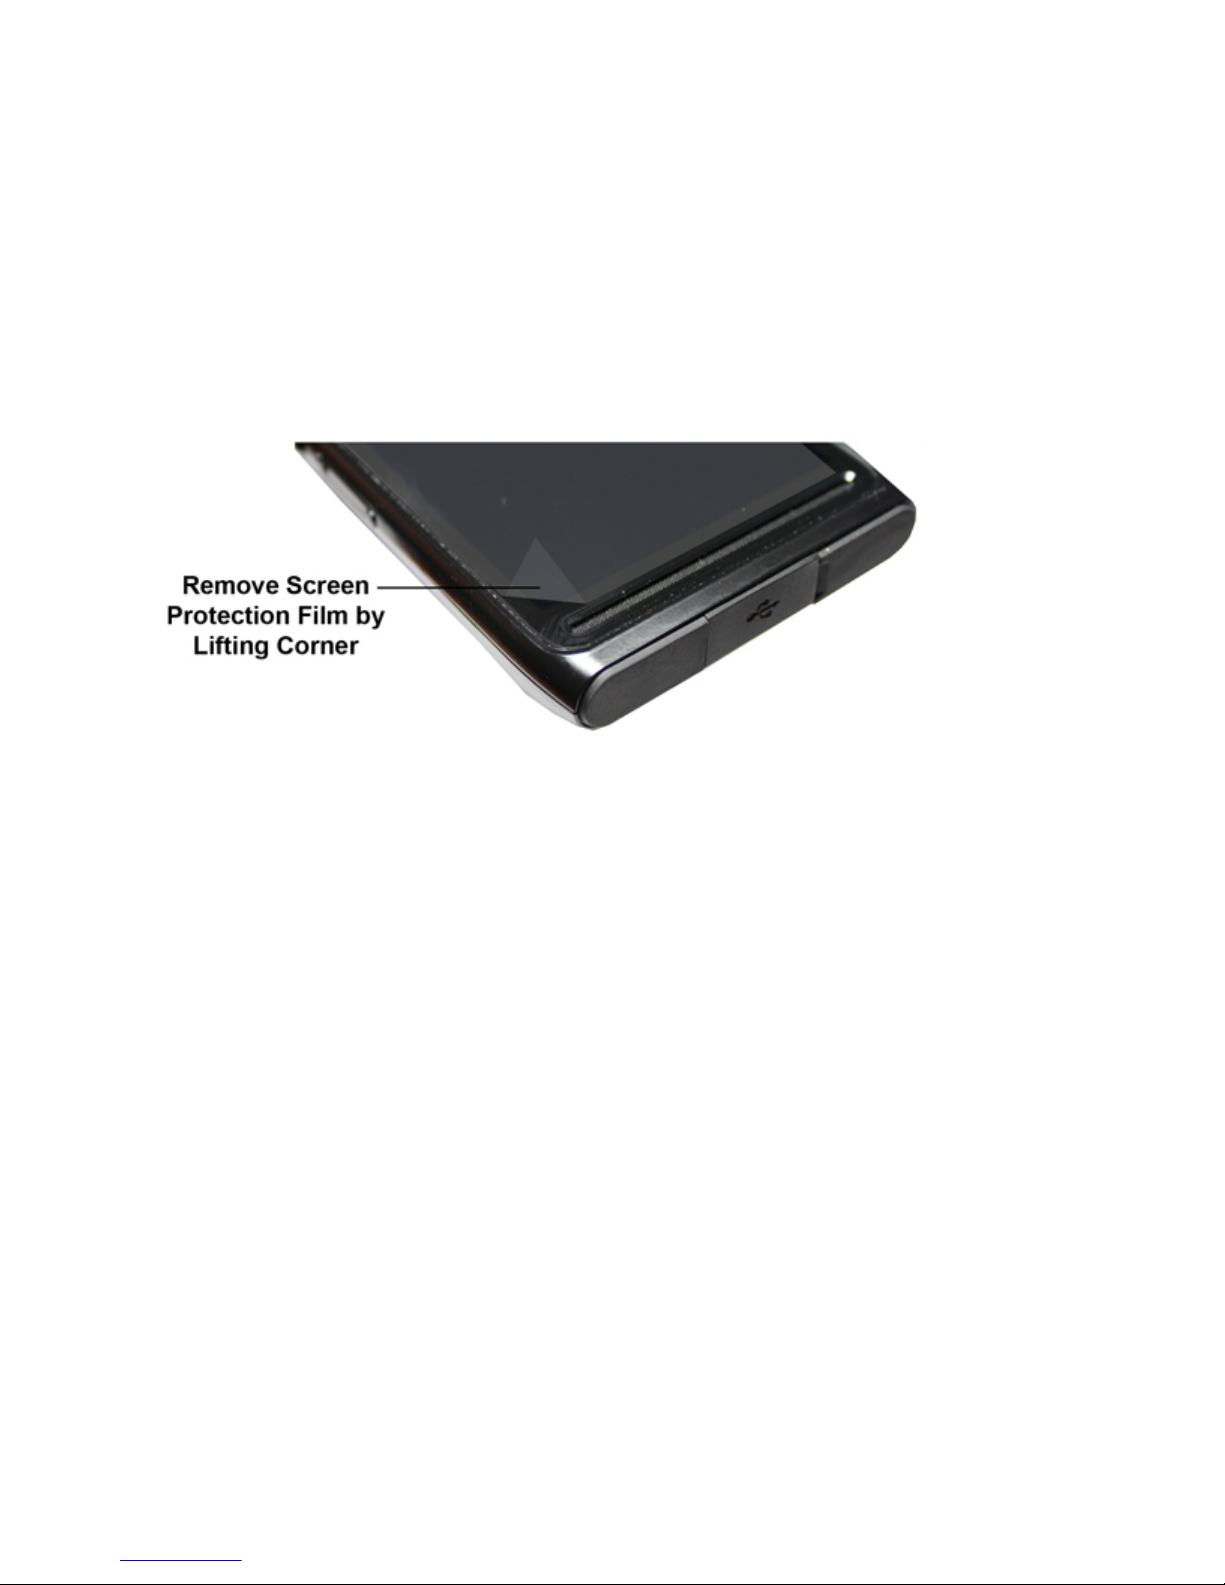
Getting Started with the LEX L10
28 |
3 Install the microSD or CRYPTR card (optional). (See Installing a microSD or CRYPTR micro Encryption Card
on page 29).
4 Install the battery. (See Installing the Battery
5 Install the battery cover.
6 Charge the LEX L10. (See Charging the LEX L10 on page 32).
on page 31).
2.3.1 Removing the Screen Protective Film
The LEX L10 is provided with a screen protective film that protects the device during shipping. To enable proper
operation of the LEX L10, the screen protector must be removed before use.
Figure 3: Removing the Screen Protective Film
2.3.2 Removing the Battery Cover
This procedure explains how to remove the battery cover.
Procedure:
1 Hold the LEX L10 firmly as shown.
2 Using the battery cover removal slot, gently lift the battery cover up and away from the LEX L10.
Send Feedback | February 2015 | MN001456A01-A

Figure 4: Removing the Battery Cover
Getting Started with the LEX L10 | 29
2.3.3 Installing a microSD or CRYPTR micro Encryption Card
The LEX L10 card holder can support either a microSD card or a CRYPTR micro encryption card. The microSD card
is a removable flash memory used for storing media on the LEX L10. The LEX L10 can support microSD cards with
up to 64GB memory space. The CRYPTR micro encryption card is used for voice encryption in features such as data
and phone over Virtual Private Network (VPN) and Push-to-Talk (PTT) communication. The slot of the card is
located under the LEX L10 battery
When and where to use:
Note: The LEX L10 may be delivered to you with battery, SIM card and microSD or CRYPTR card
already installed, activated and ready for use. In case a CRYPTR is pre-installed in the LEX L10, you will
be required to change the CRYPTR password initially provided by your technical support. CRYPTR
password is required whenever the LEX L10 is restarted.
Procedure:
1 Slide the card into the card holder slot with contacts facing down.
2 Push the card into the slot until it is fully seated and locked into place.
Figure 5: Installing the microSD or CRYPTR micro Encryption Card
MN001456A01-A | February 2015 | Send Feedback

30 | Getting Started with the LEX L10
2.3.4 Removing the microSD or CRYPTR Card
When and where to use: Use this procedure to remove the microSD or CryptR micro Encryption Card:
Procedure:
1 Press and hold the Powerbutton for three seconds.
2 Touch Power Off.
3 Touch OK.
4 Lift the battery cover.
5 Push the Card Holder lock down to release the card.
6 Remove the Card from the holder.
7 Replace the battery cover.
2.3.5 Installing the Public and Private SIM Cards
Prerequisites: Public and private phone services require a Subscriber Identification Module (SIM) card. The card can
contain the following information:
•
Mobile phone service provider account details.
• Information regarding service access and preferences.
• Contact information, which can be moved to the People application on the LEX L10.
• Any additional subscribed services.
Note: The LEX L10 requires activated SIM cards. Obtain activated SIM cards from your organization
administrator.
Caution:
Electrostatic discharge (ESD) precaution.
•
• For proper ESD precautions to avoid damaging the SIM card. Proper ESD precautions include, but not
limited to, working on an ESD mat and ensuring that the user is properly grounded.
When and where to use: Use this procedure to install a SIM card:
Procedure:
1 If the battery is in place, remove the battery as described in Removing the Battery on page 32.
2 Slide the SIM card into the SIM card holder with the contacts facing down. Note the card notch position.
3 Push that the SIM card into the holder until it is fully seated and flat.
You should hear a click when the SIM card in fully in place.
Send Feedback | February 2015 | MN001456A01-A

Figure 6: Installing the Public and Private SIM Cards
2.3.6 Removing the Public and Private SIM Cards
When and where to use: Use this procedure to remove the public or private SIM Cards:
Procedure:
Getting Started with the LEX L10 | 31
1 Press and hold the Power button for three seconds.
2 Touch Power Off.
3 Touch OK.
4 Lift the battery cover.
5 Slide the battery latch to Unlock position.
6 Lift the battery out of the LEX L10.
7 Push the SIM card to release it from the holder.
8 Remove the SIM card.
9 Place the battery back into the LEX L10.
10 Sanp the battery cover back into place.
2.3.7 Installing the Battery
When and where to use: Use this procedure to install the battery:
Procedure:
1 Remove the battery from the packaging.
2 Insert the battery into the battery compartment with the battery contacts facing the bottom of the LEX L10.
3 Press the top of battery into place.
4 Place the battery cover into place.
MN001456A01-A | February 2015 | Send Feedback

32 | Getting Started with the LEX L10
Figure 7: Installing the Battery
2.3.8 Removing the Battery
When and where to use: Use this procedure to remove the battery:
Procedure:
1 Slide a finger nail (preferably a thumb nail) into the Battery Cover removal slot and gently pull the Battery Cover
away from the LEX L10
2 Remove the Battery Cover.
3 Slide the Battery Lock up and hold it.
4 With the tip of your finger, lift up the battery from the side closest to the top side of the LEX L10.
2.4 Charging the LEX L10
Before using the LEX L10 for the first time, charge the battery using the provided USB Charger and USB Cable or
connect the USB Cable to the USB port of a personal computer. An unused battery fully charges in less than six
hours.
The LEX L10 battery can also be charged by one of the optional charging cradles.
Send Feedback | February 2015 | MN001456A01-A

Getting Started with the LEX L10 | 33
Figure 8: Charging the LEX L10
Note: For detailed description, installation and operation of the LEX L10 accessories, refer the quick start
guides provided with each accessory.
2.4.1 Charging Temperature
Charge batteries in temperatures from 0°C to 40°C (32°F to 104°F). Note that charging is intelligently controlled by
the LEX L10.
To accomplish this, for small periods of time, the LEX L10 alternately enables and disables battery charging to keep
the battery at acceptable temperatures. The LEX L10 LED indicates when charging is disabled due to abnormal
temperatures by fast blinking amber (once every 2 seconds).
2.4.2 Battery Charge Indications
The Charge and Notification LED is located at the top, front of the LEX L10.
Battery charging and power level is also indicated by a battery icon on the status bar.
Note: Before checking the battery charge level, remove the LEX L10 from any power source (cradle or
USB cable connection).
Figure 9: Charge and Notification LED
MN001456A01-A | February 2015 | Send Feedback

34 | Getting Started with the LEX L10
Table 2: Charge and Notification LED — Charging Indications
Status Indications
Off Battery is not charging. Could indicate that:
LEX L10 is not inserted correctly in the cradle
•
• LEX L10 is not connected to a USB cable
• Charger or cradle is not powered
Slowly blinking red (once every 2 seconds) Battery power is extremely low (less than 10% power
left).
Solid red LEX L10 is charging.
Fast blinking red (once every 0.5 second) Charging error:
• Temperature is too low or too high
• Charging has gone on too long without completion
(typical charge is four hours)
Slowly blinking green (once every 2 seconds) Battery is greater than 90% charged.
Solid green LEX L10 is completely charged.
Slowly blinking blue (once every 4 seconds) A new notification has been received.
Alternately blinking blue (1 second) and red (3 seconds) LEX L10 is charging and a new notification is received.
Alternately blinking blue (1 second) and green (3 seconds)
Slowly blinking blue and red (every other second) Battery power is extremely low (less than 10% power
Alternately blinking blue (1 second) and fast blinking red
(every 0.5 seconds for 3 seconds)
Slowly blinking amber (once every 2 seconds) LEX L10 is waiting to charge.
When the battery power falls below a predetermined level the icon indicates the status and a battery dialog box
appears indicating the status of the battery. The message displays until the user taps Dismiss.
To monitor battery usage, from the Home screen, touch → → Battery.
LEX L10 is completely charged and a new notification is
received.
left) and a new notification is received..
A new notification is received during a charging error.
2.4.3 Battery Management
Note: Before checking the battery charge level, remove the LEX L10 from any AC power source (cradle or
cable).
To check the charge status of the main battery, tap → → About phone → Status.
Battery status indicates that the battery is discharging and Battery level lists the battery charge (as a percentage of
fully charged).
2.4.3.1 Monitor Battery Usage
The Battery screen lists which applications consume the most battery power. Also use it to turn off applications that
were downloaded if they are consuming too much power.
To monitor battery usage, tap → → Battery.
Send Feedback | February 2015 | MN001456A01-A

Figure 10: Battery Screen
Getting Started with the LEX L10 | 35
The Battery screen lists the applications using the battery. The discharge graph at the top of the screen shows the rate
of the battery discharge since last charged (short periods of time when connected to a charger are shown as thin green
lines at the bottom of the chart), and how long it has been running on battery power.
Tap an application in the Battery screen to display details about its power consumption. Different applications
display different information. Some applications include buttons that open screens with settings to adjust power use.
2.4.3.2 Low Battery Notification
When the battery charge level drops below 20%, the LEX L10 displays a notice to connect the LEX L10 to power.
The user should charge the battery using one of the charging accessories.
Figure 11: Low Battery Notification
When the battery charge drops below 10%, the LEX L10 displays a notice to connect the LEX L10 to power. The
user must charge the battery using one of the charging accessories.
When the battery charge drops below 4%, the LEX L10 turns off. Anytime the user then tries to power on the LEX
L10, the following screen appears.
The user must charge the LEX L10 using one of the charging accessories to retain data.
MN001456A01-A | February 2015 | Send Feedback

36 | Getting Started with the LEX L10
Figure 12: Battery Depleted Screen
The user must charge the LEX L10 using one of the charging accessories.
2.4.3.3 Battery Optimization
Observe the following battery saving tips:
Leave the LEX L10 inside a cradle connected to AC power at all times when not in use.
•
• Turn off Bluetooth if not needed.
• Turn off WiFi if not needed.
• Change screen time-out to as short as possible.
• Charge the LEX L10 when not in use.
• Set the screen to Suspend (Sleep) after a short period of non-use.
• Reduce screen brightness.
• Minimize use of applications that keep the LEX L10 from suspending, for example, music or video applications.
2.4.3.3.1 Turning Off the Radio
When and where to use: Use this procedure to turn off the LEX L10 radios.
Procedure:
1 Press the Power button until the Quick Settings menu appears.
Send Feedback | February 2015 | MN001456A01-A

Getting Started with the LEX L10 | 37
Figure 13: Quick Settings Menu — Airplane Mode
2
Tap Airplane mode. Alternately, open the Notification panel and tap → Airplane Mode.
The airplane icon appears in the Status bar indicating that all the radios are off.
2.5 Powering On the LEX L10 for the First Time
Press the Power button to turn on the LEX L10. The LEX L10 boot screen displays as the LEX L10 boots.
Figure 14: LEX L10 Boot Screen
MN001456A01-A | February 2015 | Send Feedback

38 | Getting Started with the LEX L10
2.6 Powering Off the LEX L10
When and where to use: Use this procedure to power off the LEX L10:
Procedure:
1 Press and hold the Power button until the Power Button menu appears.
Figure 15: Selecting Power Off
2 Tap Power off and then OK.
Your phone will shut down is displayed on the screen.
2.7 Entering and Exiting the Suspend Mode
Suspend mode (also known as sleep mode) is a low-power mode of operation that helps reduce electrical power
consumption by shutting down parts of the LEX L10 that are not in use. The LEX L10 goes into Suspend mode when
the Power button is pressed or after a time out period of inactivity.
When and where to use: Use this procedure to enter and exit Suspend mode:
Procedure:
1 To enter Suspend mode, press and release the Power button.
The LEX L10 screen turns off.
Note: In Suspend mode, the following items continue to operate:
• Power button
• PTT Button (if set to be used)
Notification LEDs
•
• Wireless communication.
2 To exit Suspend mode, press and release the Power button.
2.7.1 Setting Time Out to Enter Suspend Mode
When and where to use: Use this procedure to set the period of inactivity before suspend mode occurs:
Procedure:
1 From the Home screen, tap: Settings → Display → Sleep.
2 Check the inactivity duration before Suspend mode becomes active.
Send Feedback | February 2015 | MN001456A01-A

Getting Started with the LEX L10 | 39
3 Press the Home key.
2.8 Covert Mode
Covert Mode gives to you the ability to shut down all visible and audible LEX L10 alerts and notifications. This
feature makes the LEX L10 effectively unnoticeable even in a silent and dark environment.
In Covert Mode, the following sounds, visual indications, and keys of the LEX L10 are disabled
Display brightness
•
• Touchscreen
• Keylight
• LED indications
• Vibration
• Speaker audio
Note: In Covert Mode, sound is routed to a Bluetooth headset, if connected or sound is routed to a
wired earpiece, if connected. Alternatively, sound is routed to the LEX L10 earpiece.
• Tone indications
Note: In Covert Mode, the following features remain active:
• Power button
• PTT button
• Volume button
Four front panel keys
•
• Camera button
• Audio or tone indications are available using a wired headset( through headset port) or a Bluetooth
headset
2.8.1 Turning On Covert Mode
Procedure:
1 Press and hold the Power button for at least two seconds.
The following Power Button menu displays:
Figure 16: Power Button Menu
2 Tap Covert mode.
The LEX L10 screen goes blank.
MN001456A01-A | February 2015 | Send Feedback

40 | Getting Started with the LEX L10
2.8.2 Turning Off Covert Mode
Procedure:
1 Press and hold the Power button for at least two seconds.
The following Power Button menu displays:
Figure 17: Power Button Menu
2 Tap Covert mode.
The Home screen appears.
2.9 Locking the LEX L10
The lock screen automatically displays after predefined time out to prevent unauthorized people using the LEX L10.
The LEX L10 does not lock at the same time as it is suspended. The LEX L10 can also be locked manually by the
user to disable unwanted key presses or screen tap or to keep data secured. To manually lock the LEX L10, press and
release the Power button. When the LEX L10 is locked and cellular network signal is available, phone calls,
notification of new messages, missed calls and upcoming appointments still can be received. The LEX L10 locks after
a specified time.
2.9.1 Selecting a Locking Option
When and where to use: Security dictates a specific level of locking for the LEX L10.
Procedure:
1
Tap .
2
Tap .
3 Tap Security.
4 Tap Screen lock.
The following options are displayed:
• None.
• Slide — User slides the lock to unlock the device.
• Pattern — User must replicate a specified pattern to unlock the device.
• PIN — User must enter a pin to unlock the device.
• Password — User must enter a specified password to unlock the device.
5 Select an option.
Send Feedback | February 2015 | MN001456A01-A

Getting Started with the LEX L10 | 41
If None or Slide is selected, the Security screen is re-displayed. If Pattern, PIN, or Password is selected, a
pattern, pin or password must be specified. Then, the Security screen is re-displayed.
The LEX L10 is now set to lock.
Postrequisites: Specify a pattern as described in Specifying a Pattern
described in Specifying a PIN or Password on page 41. Then, specify a timeout value as described in Setting the
Timeout for Locking the LEX L10 on page 41.
on page 41 Specify a pin, or password as
2.9.1.1 Specifying a Pattern
Prerequisites: The Pattern option has been selected for Screen lock.
Procedure:
1
Tap
2
Tap .
3 Tap Security lock.
4 Select Pattern.
5 Using a finger, draw a pattern to unlock your LEX L10
6 Tap Continue.
7 Draw the same pattern again.
8 Tap Confirm.
The Security screen is re-displayed.
A pattern must be entered to unlock the LEX L10.
.
2.9.1.2 Specifying a PIN or Password
Prerequisites: The PIN or Password option has been selected for Screen lock.
Procedure:
1
Tap .
2
Tap .
3 Tap Security lock.
4 Select PIN or Password.
5 Enter a pin or password.
6 Tap Continue.
7 Enter the pin or password again.
8 Tap OK.
The Security screen is re-displayed.
A pin or password must be entered to unlock the LEX L10.
2.9.1.3 Setting the Timeout for Locking the LEX L10
Select a timeout value to lock the LEX L10.
Prerequisites: Screen lock must be set to Pattern, PIN, or Password.
Procedure:
1
Tap .
MN001456A01-A | February 2015 | Send Feedback

42 | Getting Started with the LEX L10
2
Tap .
3 Tap Security.
4 Tap Automatically lock.
A list of timeout values is displayed.
5 Select a timeout value from the list.
6 The Security screen is re-displayed.
2.9.2 Unlocking the LEX L10
When the LEX L10 is not used for a period of time and the user tries to access the device, the Lock screen displays.
Depending on which Screen lock option is active, the user does one of the following:
Nothing
•
• Slide the slider to the unlock position
• Enter a pattern, pin, or password.
2.9.2.1 Unlocking the LEX L10 Using a Pattern
When and where to use: Use this procedure to unlock the screen with a pattern.
Procedure:
1 Press and release the Power button.
2 Using a finger, draw the specified pattern on the screen.
Once the correct pattern is drawn, the LEX L10 unlocks.
2.9.2.2 Unlocking the LEX L10 Using a PIN or Password
When and where to use: Use this procedure to unlock the screen with a pin or password.
Procedure:
1 Press and release the Power button.
2 In the text field, enter your pin or password.
3 Tap Done.
The LEX L10 unlocks and the Home screen is shown.
2.9.3 Calling Emergency from a Locked LEX L10
You can make an emergency call even when the LEX L10 is locked and you do not remember the PIN.
When and where to use: Use this procedure to make an emergency call when the LEX L10 is locked and you do not
remember the PIN:
Procedure:
1 Tap EMERGENCY CALL at the bottom of the lock screen.
The Emergency Dialer screen displays.
2 Enter the emergency number.
3
Tap
Send Feedback | February 2015 | MN001456A01-A
.

Getting Started with the LEX L10 | 43
2.10 Setting the Date and Time
When the LEX L10 is connected to cellular network, date and time are automatically synchronized.
When and where to use: Perform this procedure to manually set the date and time:
Procedure:
1
Tap .
2
Tap .
3 Tap Date & time.
4 Tap Automatic date & time to disable automatic date and time synchronization.
5 Tap Automatic time zone to disable automatic time zone synchronization.
6 Tap Set date.
7 Slide your finger up and down to select the month, date and year.
8 Tap Done.
9 Tap Set time.
10 Slide your finger up and down to select the hour, minutes and part of the day.
11 Tap Done.
12 Tap Select time zone.
13 Tap to select a time zone from the list.
14
Tap .
2.11 Setting the Display
The following LEX L10 display features can be customize:
•
Brightness — Set the brightness of the display.
• Auto-rotate — Set the content to rotate automatically when the LEX L10 is turned.
• Sleep — Set the length of time the LEX L10 waits before turning off the display’s backlight.
• Daydream — Set the LEX L10 to launch a screensaver when the LEX L10 is docked inside a cradle or charging.
• Font size — Change the font size for display text.
• Cast screen —
2.11.1 Setting Screen Brightness
To set the screen brightness:
Procedure:
1
Tap
2
Tap .
3 Tap Display.
4 Tap Brightness.
5 Tap Automatic brightness to set the device to automatically adjust the brightness using the built-in light sensor.
Use the slider to set a brightness level.
6
Tap .
.
MN001456A01-A | February 2015 | Send Feedback

44 | Getting Started with the LEX L10
2.11.2 Setting Screen Rotation
Screen rotation enables the LEX L10 to automatically determine the orientation of the screen to portrait or landscape.
When and where to use: Use this procedure to set screen rotation:
Procedure:
1 Note: Some applications may not support screen rotation.
Tap .
2
Tap .
3 Tap Display.
4 Check Auto-rotate screen to automatically switch orientation when the LEX L10 is rotated.
Note: The Home screen does not rotate.
5
Tap .
2.11.3 Setting Up Sleep Mode
When and where to use: Use this procedure to set up sleep mode (screen time-out):
Procedure:
1
Tap .
2
Tap .
3 Tap Display.
4 Tap Sleep.
5 Select one of the sleep values:
•
15 seconds
• 30 seconds (default)
• 1 minutes
• 2 minutes
• 5 minutes
• 10 minutes
• 30 minutes
6
Tap
.
2.11.4 Setting Up Daydream
The Daydream application behaves as a screensaver when the LEX L10 is docked inside a cradle and/or in sleep
mode.
Procedure:
1
From the Home screen, tap .
2
Tap .
3 Tap Display.
4 Tap Daydream.
5 Select from Clock, Colors, Photo Frame or Photo Table.
Send Feedback | February 2015 | MN001456A01-A

Getting Started with the LEX L10 | 45
6
Tap to configure the item selected in the previous step.
7 Tap WHEN TO DAYDREAM and select when you would like the feature to be active (While docked, while
charging or either).
8 Tap START NOW to preview and confirm your selection.
9
Tap .
2.11.5 Setting the Font Size
When and where to use: Use this procedure to change the font size.
Procedure:
1
Tap .
2
Tap .
3 Tap Display.
4 Tap Font size.
5 Select one of the font size values:
•
Small
• Normal (default)
• Large
• Huge
6
Press
.
2.12 General Sound Setting
Use the Sounds settings to configure media and alarm volumes. On the Home screen, tap → → Sound.
Alternately, open the Notification panel and tap → Settings → Sound.
MN001456A01-A | February 2015 |
Send Feedback

46 | Getting Started with the LEX L10
Figure 18: Sound Screen
• Volumes – Use to change the volume of media, ringtones, notifications, and alarms.
• Call Ringtone and Vibrate
- Phone ringtone — Tap to select a ringtone to sound when an incoming call is received.
- Vibrate when ringing — Check to make the device vibrate when a call is received.
Note: Setting volume can also be done by pressing the Volume button, up and down, during a call,
or while playing music or a video. When not on a call, pressing the Volume button all the way down
to set the LEX L10 to vibrate. During an in-coming call, pressing the Volume button up and down
changes the ringtone volume.
Figure 19: Volume Button
• System
- Default notification sound — Tap to select a sound to play for all system notifications.
- Dial pad tap tones — Check to play a sound when a LEX L10 key is touched.
- Touch sounds — Check to play a sound when making screen selections.
Send Feedback | February 2015 | MN001456A01-A

Getting Started with the LEX L10 | 47
- Screen lock sounds — Check to play a sound when locking and unlocking the screen.
- Vibrate on tap — Check to have the device vibrate when touching soft keys and on certain screen
interactions.
- Emergency tone — Select and check Alert to play a tone or Vibrate when an emergency notification is
received. Select Off to disable emergency notification.
2.13 Public and Private Carrier Modes
The LEX L10 is capable of operating on the following bands:
Private Mode
LTE B14
•
Public Mode
• LTE B4 and B13
• CDMA EVDO Rev. A (Band 0, Band 1) 3G, 1X
The user can manually switch modes to operate on the Private Mode LTE network or the Public Carrier Mode.
2.13.1 Switching Modes Using the Power Button
Prerequisites: The LEX L10 is equipped with Private and Public enabled SIM cards.
When and where to use: You may need to switch between private and public network modes when you want to use
capabilities provided by one network that are not provided by the other. For example, if the phone is in private mode,
switch to public mode before you can dial numbers that are not included in the private network.
Procedure:
1 Press and hold the Power button until a menu appears.
Figure 20: Service Switch
2 Tap Service switch.
The current carrier mode is indicated under the Service switch option.
3 Tap Reboot now.
The LEX L10 powers off and restarts in the optional carrier mode.
2.13.2 Switching Modes Using the Settings App
Prerequisites: The LEX L10 is equipped with Private and Public enabled SIM cards.
MN001456A01-A | February 2015 | Send Feedback

48 | Getting Started with the LEX L10
When and where to use: You may need to switch between private and public network modes when you want to use
capabilities provided by one network that are not provided by the other. For example, if the phone is in private mode,
switch to public mode before you can dial numbers that are not included in the private network.
Procedure:
1
On the Home screen, tap .
2
Tap .
3 Tap More... .
4 Tap Mobile networks.
5 Tap Select network.
6 Select Public or Private.
A confirmation popup is displayed.
Figure 21: Switch Networks Confirmation Popup
7 Tap Switch.
Send Feedback | February 2015 | MN001456A01-A

49 | Using the LEX L10
Chapter
3
Using the LEX L10
This chapter explains the indicators, buttons, status icons, and controls on the LEX L10. This chapter also provides
basic instructions for using the device.
3.1 Using the Touchscreen
Use the multi-tap sensitive screen to operate the device.
Table 3: Using the Touchscreen
Action Result
Tap Tap to:
select items on the screen
•
• type letters and symbols using the on-screen keyboard
• press on-screen buttons
Tap and Hold Tap and hold:
• an item on the Home screen to move it to a new location or to the trash
• an item in Apps to create a shortcut on the Home
screen
• the Home screen to open a menu for customizing the
Home screen
• an empty area on the Home screen until the menu appears
Drag Tap and hold an item for a moment and then move finger
on the screen until reaching the new position.
Swipe Move finger up and down or left and right on the screen
to:
• unlock the screen
• view additional Home screens
• view additional application icons in the Launcher
window
• view more information on an application’s screen
Double-tap Tap twice on a web page, map, or other screen to zoom
in and out.
Table continued…
MN001456A01-A | February 2015 | Send Feedback

50 | Using the LEX L10
Action Result
Pinch In some applications, zoom in and out by placing two
fingers on the screen and pinching them together (to
zoom out) or spreading them apart (to zoom in).
3.2 Using the On-Screen Keyboard
Use the on-screen keyboard to enter text in a text field. To configure the keyboard settings, tap and hold (comma
key) > slide your finger up to and then select Android Keyboard Settings.
Figure 22: Android Keyboard Settings
A description of the settings can be found in Android Keyboard Settings
on page 51.
Editing Text
Edit entered text and use menu commands to cut, copy, and paste text within or across applications. Some
applications do not support editing some or all of the text they display; others may offer their own way to select text.
Entering Numbers, Symbols and Special Characters
To enter numbers and symbols:
• Without switching to the Numbers or Symbols keyboard, tap and hold one of the top-row keys until a menu
appears then select a number. Keys with alternate characters display an ellipsis ( ... ) below the character.
• Tap the Shift key to enter one capital letter.
• Tap and hold the Shift key until it changes state (Shift key is underlined) to enter two or more capital letters. Tap
Shift key again to return to the lowercase keyboard.
Send Feedback | February 2015 | MN001456A01-A

Using the LEX L10 | 51
• Tap to switch to the numbers and symbols keyboard.
Tap the
•
To enter special characters, tap and hold a number or symbol key to open a menu of additional symbols.
• A larger version of the key displays briefly over the keyboard.
• Keys with alternate characters display an ellipsis ( ... ) below the character.
key on the numbers and symbols keyboard to view additional symbols.
3.2.1 Android Keyboard Settings
Table 4: Android Keyboard Settings
Setting Description
GENERAL
Input Languages Selects the language used in the keyboard.
Auto-capitalization Automatically capitalize the first letter after a period.
Vibrate on keypress Vibrates the LEX L10 when a key is pressed.
Sound on keypress Makes a sound on the LEX L10 when a key is pressed.
Popup on keypress Pops up a duplicate of the key pressed.
Voice input key Allows you to speak the name of the key to input a key.
TEXT CORRECTION
Personal Dictionary Uses your personal dictionary when correcting words.
Add-on dictionaries Allows you to add additional dictionaries to correct
words.
Block offensive words Blocks offensive words from being suggested to correct
words.
Auto-correction Sets the level of auto-correction to: Off, Modest, Ag-
gressive, or Very aggressive.
Show correction suggestions Displays a list of corrections so that you can select make
a selection.
OTHER OPTIONS
Next word suggestions Anticipates the next word that you want to type based on
the last word typed.
Advanced settings The Advanced settings should only be set by experts.
3.3 Motorola Solutions Home Experience (MHx)
The Motorola Solutions Home Experience (MHx) is the engine that drives the user interface of the LEX L10.
Specifically, MHx provides an unique experience for customizing the LEX L10 Home screen.
3.3.1 Home Screen
The Home screen displays after the LEX L10 turns on and unlocks.
MN001456A01-A | February 2015 | Send Feedback

52 | Using the LEX L10
Figure 23: Default Home Screen
The Home screen is completely customizable depending on the specifications for your agency. Each organization
may have a different Home screen. Contact your technical support for more information.
Note: When CRYPTR Card is used, the LEX L10 requires setting a password after initial boot and entering
this password whenever the LEX L10 restarts.
After a suspend or screen time-out, the screen displays with the lock slider. Slide in any direction towards the
outside of the screen to unlock the screen.
Note: If you have changed the Screen lock option, depending on the selected option, you will have to enter
a pattern, pin, or password to unlock the LEX L10.
The Home Screen Items table lists some of the items that may appear on the Home screen.
Table 5: Home Screen Items
Item Description
Core Applications Widget Provides shortcuts to:
•
Phone Dialer
• Contacts
• Application Launcher
• Camera
• Search Feature
Other Possible Widgets Provides access to application features thru:
• Calendar Widget
• eMail Widget
Send Feedback | February 2015 | MN001456A01-A
Table continued…

Using the LEX L10 | 53
Item Description
• Messaging Widget
Search Widget
•
• My Apps Widget
Home Screen Overlay Provides quick access to core functions.
The Home screen provides four screens for placement of widgets and shortcuts. Swipe the screen left or right to view
the additional screens.
3.3.1.1 Home Screen Overlay
The Home screen overlay provides quick access to core functions. Each organization may have a different Home
screen overlay. Contact your technical support for more information.
Swipe the Home screen up from the icon to access the Home screen overlay.
3.3.2 Customizing the Home Screen
The Home screen contains panels that can be accessed by swiping the page to the left or right. Panels provide more
space for adding widgets to the Home screen and can be customized by the user.
This section describes how to:
Add Widgets
•
• Move Widgets
• Remove Widgets
• Configure Home Screen Settings
3.3.2.1 Adding Widgets
When and where to use: You want to add one or more widgets to your Home screen.
Procedure:
1 Swipe the Home screen left or right to locate the panel that you want to add a widget to.
2 Touch and hold a gray area of the panel until you see the following icons near the bottom of the screen:
3 Tap the Widgets icon to reveal the widgets.
MN001456A01-A | February 2015 | Send Feedback

54 | Using the LEX L10
Figure 24: Widgets Screen
4 The Widgets screen contains five panels. Swipe the Widgets screen left or right to locate the widget that you want
to add.
5 Touch and hold the widget; then, slide the widget down the screen and place it in the current panel.
If there is not enough room in the panel or you want to place the widget in a new panel, slide the widget to the
right of the screen until a blank panel appears. Then, place the widget in the new panel.
Send Feedback | February 2015 | MN001456A01-A

Figure 25: Example of a Widget Added to New Panel
Using the LEX L10 | 55
3.3.2.1.1 Adding Shortcuts to the My Apps Widget
Prerequisites: A My Apps widget has been added to the Home screen.
When and where to use: An empty My Apps needs shortcuts to be functional.
Procedure:
1 Add a My Apps widget as described under Adding Widgets.
An empty My Apps widget displays.
MN001456A01-A | February 2015 | Send Feedback

56 | Using the LEX L10
Figure 26: Empty My Apps Widget
2 Tap the My Appss widget to add shortcuts to it.
A screen with a list of shortcuts is displayed.
Figure 27: List of Shortcuts for My Apps Widgets
Send Feedback | February 2015 | MN001456A01-A

3 Select each shortcut that you want to add to the My Apps widget.
You may add up to five shortcuts.
4 Tap Done.
Shortcuts are added to the My Apps widget.
Figure 28: My Apps Widget with Shortcuts Added
Using the LEX L10 | 57
3.3.2.1.2 Changing My Status
Perform this procedure to set the status of the LEX L10 user to either Available or Busy. No matter what the status is
set to, calls are still received. This status is shown to other users.
Note: The My Status widget must be added before it is visible in the Home screen.
Procedure:
1 Tap the My Status dropdown menu.
Figure 29: My Status Widget
The My Status options menu is displayed.
MN001456A01-A | February 2015 | Send Feedback

58 | Using the LEX L10
Figure 30: Available/Busy Status Selection
2 Tap Available or Busy.
Status is immediately set to the selected state.
3.3.2.2 Moving Widgets
When and where to use: There is a need to move a widget to another location.
Procedure:
1 Navigate to the Home screen panel where the widget is located.
2 Touch and hold the widget; then, slide the widget to a new location.
If you want to move the widget to another panel, slide the widget left or right to that panel; then slide the widget to
a location in the panel.
3.3.2.3 Removing Widgets
When and where to use: There is a need to remove a widget from a Home screen panel.
Procedure:
1 Slide the Home screen panel until you locate the panel that holds the widget that you want to remove.
2 Touch and hold the widget while sliding it down to the bottom of the panel.
X Remove appears near the bottom of the screen.
3 Slide the widget to X Remove until the widget turns red; then, release the widget.
The widget is removed from the panel.
Note: The widget is only removed from the panel. It is not deleted from the LEX L10.
Send Feedback | February 2015 | MN001456A01-A

3.3.2.4 Example of a Customized Home Screen Panel
Figure 31: Example of a Customized Home Screen Panel
Using the LEX L10 | 59
The above figure shows a customized Home screen panel with the following widgets:
• My Status
Two Direct dial widgets
•
• Calendar
• My Apps
3.4 Status Bar
The Status bar displays the time, notification icons (left side) and status icons (right side).
Figure 32: Status Bar
If there are more notifications than can fit in the Status bar, it is indicate that more notifications exist. Open the
Notifications panel to view all notifications and status.
MN001456A01-A | February 2015 | Send Feedback

60 | Using the LEX L10
3.5 Notification Icons
Table 6: Notification Icons
Icon Description
Indicates that more notifications are available for viewing.
Indicates that data is syncing.
Indicates an incoming email.
Indicates that network auto-switching is enable.
Indicates that network auto-switching is disabled.
Network Services notification.
Network Services error notification.
Indicates that location reporting service is enabled.
Indicates that the LEX L10 is searching location data.
Indicates an error or a warning that requires user action
in the location application.
Indicates an error or a warning that requires user action
in the presence application.
CRYPTR feature error.
Indicates an upcoming event.
Indicates that an open WiFi network is available.
Radio Remote Control application is on.
Send Feedback | February 2015 | MN001456A01-A
Indicates that a song is playing.
Indicates that a problem with sign-in or sync has occurred.
Indicates that the LEX L10 is uploading data.
Table continued…

Icon Description
Indicates that the microSD card is almost full.
Indicates that the LEX L10 is downloading data when
animated and download is complete when static.
Indicates that the LEX L10 is connected via USB cable.
Indicates that the LEX L10 is connected to or disconnected from virtual private network (VPN).
Preparing SD card.
Indicates that no SIM is installed.
Indicates that USB debugging is enabled on the LEX
L10.
Using the LEX L10 | 61
3.6 Status Icons
Table 7: Status Icons
Indicates that the LEX L10 has received a text message.
Indicates a missed call.
Indicates that tethering is active for bluetooth or USB.
Also used to indicate a WiFi hotspot is active.
Screenshot captured.
Indicates that WiFi hotspot is active.
My Status indicates device is available.
My Status indicates device is busy.
Icon Description
Indicates that GPS is in use.
Indicates that the LEX L10 is searching location data.
Indicates that the Alarm is active.
MN001456A01-A | February 2015 | Send Feedback
Table continued…

62 | Using the LEX L10
Icon Description
Indicates that all sounds except media and alarms are silenced and vibrate mode is active.
Indicates that the ringer is silenced.
Microphone is muted during a call.
Indicates that the battery is fully charged.
Indicates that the battery is partially drained.
Indicates that the battery charge is low.
Indicates that the battery charge is very low.
Indicates that the battery is charging.
Indicates that the Airplane Mode is active. All radios are
turned off.
Indicates that Bluetooth is on.
LEX L10 is set to operate on Private network.
Connected to a WiFi network.
No WiFi signal.
Mobile network signal strength.
No mobile network signal.
Connected to a 4G network.
Connected to a 3G network.
Connected to an HSPA network.
Connected to an EDGE network.
Send Feedback | February 2015 | MN001456A01-A
Connected to a GPRS network.
Roaming from a network.
No SIM card installed.

3.7 Managing Notifications
Notification icons report the arrival of new messages, calendar events, alarms, and ongoing events. When a
notification occurs, an icon appears in the Status bar with a brief description. See Notification Icons
list of possible notification icons and their description. Open the Notifications panel to view a list of all the
notifications.
To open the Notification panel drag the Status bar down from the top of the screen.
Figure 33: Notification Panel
Using the LEX L10 | 63
on page 60 for a
To respond to a notification, open the Notifications Panel and then tap a notification. The Notifications Panel closes
and the subsequent activity is dependent on the notification.
To clear all notifications, open the Notifications Panel and then tap . All event-based notifications are removed.
Ongoing notifications remain in the list.
Note: Some notifications cannot be cleared and will remain to inform you of running applications
To close the Notification Panel, drag the bottom of the Notifications Panel to the top of the screen or tap .
3.8 Working with Status
LEX L10 users work with status in two ways: setting their own status (Available or Busy) and viewing the status of
their contacts.
The status displayed for Contacts shows the following:
MN001456A01-A | February 2015 | Send Feedback

64 | Using the LEX L10
• The presence status currently detected by a call system or network (offline or online status)
The availability status currently selected by the contact (Available or Busy)
•
My Status
The LEX L10 user sets the value of My Status to Available or Busy. This status is shown in the Contacts and
Session Log screens of other LEX L10 users. The Available status:
• Is the default “sign-on” state
• Indicates that the LEX L10 user is willing to send and receive calls
The Busy status indicates that the LEX L10 user is busy but the LEX L10 is still able to send and receive calls.
Status of Contacts
The status of LEX L10 contacts is shown in all of the Contacts screens, and People list. The status of a contact can
be:
• Offline
• Available
• Busy
If the contact is not connected to and registered with a system server, the status shown is Offline.
If the contact is connected to and registered with the system server, the My Status value (Available or Busy) of the
contact is shown.
When the Contacts are synchronized with the People list, the Contacts are added to the regular LEX L10 contacts.
3.9 Quick Settings
The Quick Settings panel provides easy access to some frequently used settings.
Drag the Status Bar down from the top of the screen. The Quick Settings icon displays in the top right corner. Tap
to display the Quick Settings panel.
Send Feedback | February 2015 | MN001456A01-A

Figure 34: Quick Settings Panel
Using the LEX L10 | 65
• Display the owner’s contact image. Tap to open the owner’s contact information.
• Brightness — Opens the Brightness setting dialog box to set the screen brightness.
• Settings — Opens the Settings screen.
• WiFi — Displays the current WiFi connection. Tap to open the WiFi settings screen.
• Service — Displays the current cellular service used; public or Private.
• Battery Status — Displays the current battery charge level. Tap to open the Battery screen.
• Airplane Mode — Displays the Airplane mode status. Tap to toggle Airplane mode on and off. Turn on Airplane
mode to turn off all the radios.
• Bluetooth — Displays the current state of the Bluetooth radio. Tap to open the Bluetooth settings screen.
• Location — Displays the current state.
To close the Quick Settings Panel, drag the bottom of the Quick Settings Panel to the top of the screen or tap .
3.10 Applications
The Apps screen displays icons for all installed applications.
Table 8: Applications
Icon Description
AOSP Browser — Use to access the Internet or agency
intranet.
Calculator — Provides the basic and scientific arithmetic functions.
Table continued…
MN001456A01-A | February 2015 | Send Feedback

66 | Using the LEX L10
Icon Description
Calendar — Use to manage events and appointments.
Allows synchronization with Google account calendar.
Camera / Video Recorder — Take photos or record
videos. For more information, see Camera on page 101.
Clock / Alarms — Use to set an alarm, stopwatch or
timer.
Device Search —
Dialer — Use to make phone calls. See Calling on page
69 for more information.
Downloads — lists all downloads files.
Email — Use to send and receive email.
File Browser — Use to view and manage files on the
LEX L10.
Gallery — Use to view photos stored on the microSD
card. For more information, see Gallery
more information.
Messaging - Send SMS and MMS messages. See Mes-
saging on page 97 for more information.
Motorola Device Management —
Movie Studio —
Music — Access music stored on the LEX L10.
My Status — Use to view the current availability of the
user and LEX L10 device to other agency users and system.
People — Use to manage contact information.
Quick Action — Use to notify an emergency situation to
a dispatcher or staff.
Radio Services — Use to pair radios.
Radio Manager Link Client — Enables connecting the
LEX L10 to a remote host computer for staging, firmware installation, application installation, and application
removal by technical support.
on page 109 for
Send Feedback | February 2015 | MN001456A01-A
Reader —
Settings — Use to configure the LEX L10.
Software Licensing — Licensing for software installed
on the LEX L10.
Table continued…

Using the LEX L10 | 67
Icon Description
Sound Recorder — Use to record audio.
Voice Dialer — Use to place calls by speaking.
VPN / MVPN —
3.11 Folders
Use Folders to organize similar applications together. Tap the folder to open and display items in the folder.
3.11.1 Creating a Folder
To create a folder, there must be at least two app icons on the Home screen.
Procedure:
1 Go to the desired Home screen.
2 Tap and hold on one application icon.
3 Drag the icon and stack on top of another icon.
4 Lift and release.
3.11.2 Naming Folders
Procedure:
1 Tap the folder.
Figure 35: Opened Unnamed Folder
2 Tap the title area and enter a folder name using the keyboard.
3 Tap Done.
4 Tap anywhere on the Home screen to close the folder.
The folder name appears under the folder.
Figure 36: Named Folder
MN001456A01-A | February 2015 | Send Feedback

68 | Using the LEX L10
3.11.3 Removing a Folder
Procedure:
1 Tap and hold the folder until it enlarges and the device vibrates.
2 Drag the folder to X Remove until the folder turns red; then release.
The folder is removed from the screen.
Send Feedback | February 2015 | MN001456A01-A

Chapter
4
Calling
Make a phone call from the Phone application, the People application or other applications or widgets that display
contact information.
Emergency Calling
The service provider programs one or more emergency phone numbers that you can call under any circumstances,
even when the phone is locked, a SIM card is not inserted or the phone is not activated. However, the SIM card must
be installed in the LEX L10 to enable preset emergency numbers stored on it.
Emergency numbers vary by country. The LEX L10 must be switched to public mode to use the emergency numbers
for your country on the public SIM.
69 | Calling
The LEX L10 pre-programmed emergency number(s) may not work in all locations, and sometimes an emergency
call cannot be placed due to network, environmental, or interference issues. For additional information, contact your
organization’s technical support.
Important: The numbers you can call depend on whether the LEX L10 is in private mode or public mode.
For example, if the LEX L10 is in private mode, you need to switch to public mode before you can call
numbers that are not included in the private network. To switch modes, see Switching Private and Public
Modes.
Note: You can set up other emergency alert methods if your device is licensed for these options. See Radio
Remote Control
on page 79.
Audio Modes
The device offers three audio modes for use during phone calls:
• Handset Mode: Switches audio to the receiver at the top front of the device, so the user can use the device as a
handset. This is the default mode.
• Speaker Mode: Use the device as if on speaker phone.
• Headset Mode: Connect a Bluetooth or wired headset to automatically switch audio to the headset.
Using a Bluetooth Headset
Use a Bluetooth headset for audio communication when using an audio-enabled application. See Bluetooth
132 for information on connecting a Bluetooth headset to the device. Set the volume appropriately before putting on
the headset. When a Bluetooth headset is connected, the speakerphone is muted.
on page
Using a Wired Headset
Use a wired headset (with 3.5 mm plug) for audio communication when using an audio-enabled application. Set the
volume appropriately before putting on the headset. When a wired headset is connected, the speakerphone is muted.
Lift the headset cover and insert the headset plug.
To end a call using the wired headset, press and hold the headset button until the call ends.
MN001456A01-A | February 2015 | Send Feedback

70 | Calling
Figure 37: Insert Wired Headset Plug
Adjusting Audio Volume
Use the Volume buttons to adjust the volume of the ringer when not in a call and the audio volume when in a call.
Note: Adjust the conversation phone volume during a call. Adjusting the volume while not in a call affects
the ring and notification sound levels.
4.1 Making a Call Using the Dialer
Use the dialer tab to dial phone numbers.
Procedure:
1
On the Home screen, tap .
Send Feedback | February 2015 | MN001456A01-A

Figure 38: Dialer Screen
Calling | 71
2
Tap the tab above the dialer.
3 Tap the keys to enter the phone number.
4
Tap below the dialer to initiate the call.
Figure 39: Call in Progress
MN001456A01-A | February 2015 | Send Feedback

72 | Calling
If... Then...
You want to display the dialer.
You want to turn on the speakerphone.
You want to mute the call.
You want to add another person to the call.
5
Tap to end the call.
Tap .
Tap .
Tap .
Tap .
4.2 Making a Call Using People List Contacts
Procedure:
1
On the Home screen, tap .
2
Tap the tab.
3 From the people list contacts, tap a phone contact or a PTT contact for making a One-to-One Private or Alert Call
(see Push-To-Talk User Guide For LEX L10).
Figure 40: People List Contact
4 Tap the phone number next to the contact to initiate the call or press the PTT button for making a One-to-One
Private or Alert Call.
5
Tap to end the call.
Send Feedback | February 2015 | MN001456A01-A

4.3 Making a Call Using Call History
Call History is a list of all the calls placed, received, or missed. It provides a convenient way to redial a number,
return a call, or add a number to Contacts.
Arrow icons beside a call indicate the type of call. Multiple arrows indicate multiple calls:
• — Missed incoming call
• — Received incoming call
• — Outgoing call
Procedure:
1
On the Home screen tap .
2
Tap the tab.
Figure 41: Call History Tab
Calling | 73
3
Tap next to the contact to initiate the call.
4
Tap
to end the call.
4.4 Making a Conference Call
This procedure describes how to create a conference phone session with multiple people.
MN001456A01-A | February 2015 |
Send Feedback

74 | Calling
Note: Conference calling may not be supported by your service provider. Check with your technical
support for conference calling availability. The total number of conference call participants may be limited
by your service provider. For the maximum number of participants in a conference call, contact technical
support.
Procedure:
1
On the Home screen tap .
2
Tap the tab above the dialer.
3 Tap the keys to enter the phone number.
4
Tap below the dialer to initiate the call.
5
When the call connects, tap .
The first call is placed on hold.
6 Tap the keys to enter the second phone number.
7
Tap below the dialer to initiate the call.
8 When the call connects, the first call is placed on hold and the second call is active.
Figure 42: Two Calls
The screen quickly changes to:
Send Feedback | February 2015 | MN001456A01-A

Figure 43: Two Calls Connected
Calling | 75
9
Tap to create a conference call with three people.
Figure 44: Merged Calls
10
Tap to add another call.
The conference is placed on hold.
MN001456A01-A | February 2015 | Send Feedback

76 | Calling
11 Tap the keys to enter the second phone number.
12
Tap below the dialer to initiate the call.
13
Tap to add the third call to the conference.
14
Tap to rotate between the individual calls.
Calls are rotated starting with the first call. This allows you to speak privately to one party. Tap to rotate to the
next party. When the rotation is complete, you are placed back into conference mode and all calls are active.
4.5 Answering Calls with a Bluetooth Headset
When you receive a phone call, the Incoming Call screen opens, displaying the caller ID and any additional
information about the caller that is in the People application.
Note: To connect a Bluetooth headset to the LEX L10, see Connecting to a Bluetooth Device
When a call arrives, tap the Call button on the Bluetooth headset to answer the call.
To silence the ringer before answering the call, press the volume down button on the side of LEX L10.
To end the call press the Call button on the Bluetooth headset.
All incoming calls are recorded in the Phone application call Logs tab. If you miss a call, you will receive a
notification.
4.6 Call Settings
Note: Not all options are available for all configurations.
Use the Call Settings to modify options related to the phone call feature.
• Ringtone & Vibrate
- Phone Ringtone — Tap to select a ringtone to sound when an incoming call is received.
- Vibrate When Ringing — Check to make the device vibrate when a call is received.
• Other Call Settings
on page 136.
- Ringtone Settings — When using a Bluetooth headset, select the path that the ring is heard. Options:
Bluetooth or Speaker and Bluetooth (default).
Note: Bluetooth headset connection is required to set this option.
- Voicemail — Tap to configure voicemail settings
+ Service — Set the service provider or other provider for voicemail service.
+ Setup — Tap to update the phone number used to access voicemail.
+ Sound — Tap to select a sound when a voicemail is received.
+ Vibrate — Tap to vibrate when a voicemail is received.
.
- Dial pad touch tones — Check to play a sound when a phone key is touched.
Send Feedback | February 2015 | MN001456A01-A

Calling | 77
- Quick Responses - Tap to edit quick responses to use instead of answering a call.
- Fixed Dialing Numbers — Use Fixed Dialing to restrict the phone to dial only the phone number(s) or area
code(s) specified in a Fixed Dialing list.
- TTY mode — Tap to set the TTY setting. Use an optional teletypewriter (TTY) device with the LEX L10 to
send and receive calls. Plug the TTY device into the LEX L10 headset jack and set the LEX L10 to operate in
one of the TTY modes.
Note: Use a TSB-121 compliant cable (provided by the TTY manufacturer) to connect the TTY
device to the LEX L10.
Set the LEX L10 volume to a middle level setting for proper operation. If you experience a high
number of incorrect characters, adjust the volume as needed to minimize the error rate.
For optimal performance, the LEX L10 should be at least 30 cm (12 inches) from the TTY device.
Placing the LEX L10 too close to the TTY device may cause high error rates.
+ TTY Off (default) — TTY is off.
+ TTY Full — Transmit and receive TTY characters.
+ TTY HCO — Transmit TTY characters but receive by listening to earpiece.
+ TTY VCO — Receive TTY characters but transmit by speaking into microphone.
DTMF tones — Set the length of the DTMF tones. Available options are : Normal or Long.
-
- CDMA Call Settings:
+ Voice privacy — Enable enhanced privacy mode.
• Internet Call Settings
- SIP Accounts — Choose to receive Internet calls for accounts added to the device, view or change SIP
accounts, or add an Internet calling account.
- Use Internet Calling — Use Internet calling for all calls, only for calls to Internet calling addresses (the
default setting), or to ask for each call. Must be connected to a WiFi network and have added an Internet
calling account to the device to use Internet calling.
- IMS Account — Enable/Disable IMS Service Capability.
MN001456A01-A | February 2015 |
Send Feedback


79 | Radio Remote Control
Chapter
5
Radio Remote Control
The Radio Remote Control application enables a LEX L10 user to control a P25 Land Mobile Radio (LMR) directly
from the LEX L10. In this way, the P25 radio can operate when carried inside a pouch and radio voice
communication is routed directly between the radio and a headset.
To communicate, the user taps and holds the Push-to-Talk (PTT) button on the LEX L10 screen. The button
simulates the PTT button on the side of the radio. The user can also switch between the radio zones, select favorite
channels and change the volume directly from the LEX L10 screen.
Note:
This chapter applies to your LEX L10 only if your organization licensed this feature for your LEX L10.
•
• Pairing with APX models of the P25 Land Mobile Radio, requires purchasing a Mission Critical
Wireless option (an optional Bluetooth board inside the APX radio).
Before starting to use the P25 radio with the LEX L10, Bluetooth pairing is required. After paired with the radio, the
LEX L10 initiates a secure connection with the radio.
Important: After pairing the LEX L10 with the P25 Land Mobile Radio (LMR), maintain a distance of no
more than 30 feet (10 meters) between the LEX L10 and the radio. Controlling the radio and initiating an
emergency alert from the LEX L10 beyond 30 feet (10 meters) may fail.
The Radio Remote Controlapplication is used for:
Push-to-Talk communication
•
• Switching radio zones
• Changing channels
• Setting and selecting favorite channels
• Changing radio volume
• Sending an emergency alert
• Monitoring the radio battery and signal power
MN001456A01-A | February 2015 |
Send Feedback

80 | Radio Remote Control
Figure 45: Radio Remote Control Screen
5.1 Pairing Radio with the LEX L10
This procedure pairs a radio with a LEX L10.
Prerequisites:
Verify that your Land Mobile Radio (LMR) includes a secure Bluetooth pairing feature. Turn on Bluetooth feature
•
of the LEX L10 and radio. In the radio, enable the Bluetooth tones (see LMR User Guide).
• The LEX L10 is not paired with other radio.
When and where to use: Use this procedure to pair a LEX L10 with a radio.
Note: To pair the LEX L10 to a radio, ensure that the Bluetooth feature of the LEX L10 is enabled and
bring the blue pairing points on each device to within 2.5 cm. Once paired, their Bluetooth link has a lineof-sight range of 30 feet (10 meters).
Procedure:
1
From the Home screen, tap .
The Application screen displays.
2
Tap .
The Pair with a radio screen appears.
Send Feedback | February 2015 | MN001456A01-A

Figure 46: Pair With a Radio Screen
Radio Remote Control | 81
3 Place the radio close to the LEX L10, aligning the blue pairing point on the LEX L10 with the blue pairing point
on the radio.
Note: The blue pairing points must be within 2.5 cm of each other for pairing to happen.
Figure 47: Blue Pairing Dots
• If the pairing process is successful, the radio sounds an incremental-pitched tone to indicate paired.
•
If the pairing process fails, the radio sounds a short, low pitched tone. On the LEX L10 screen, tap Tap Pair to
try again to resume pairing.
Once a successful pairing is established, the Bluetooth Connection screen is displayed for a few seconds,
followed by the Radio Remote Control screen.
MN001456A01-A | February 2015 |
Send Feedback

82 | Radio Remote Control
Figure 48: Bluetooth Connection Screen
Figure 49: Radio Remote Control Screen
After pairing, the range of Bluetooth operation is 30 feet (10 meters) line-of-sight communication. That means an
unobstructed path between the LEX L10 and the radio. Line-of-sight obstructions include trees, buildings,
mountains, cars, and so on.
Send Feedback | February 2015 | MN001456A01-A

Do not leave the radio behind and expect the LEX L10 to work with a high degree of reliability when they are
separated. At the fringe areas of reception, link can be broken. To correct this problem, position the LEX L10 and
radio closer to each other to reestablish connection.
The LEX L10 remembers the radio and will automatically resume connection whenever the radio is on and within
connection range.
5.2 Unpairing the Radio
This procedure unpairs a set of paired radio with a LEX L10.
Prerequisites: The LEX L10 is paired with the radio.
When and where to use: Use this procedure to unpair the LEX L10 from a radio.
Procedure:
1
From the Home screen, tap .
2
Tap .
The Radio Remote Control screen appears.
Radio Remote Control | 83
Figure 50: Radio Remote Control Screen
3
Tap → Unpair.
MN001456A01-A | February 2015 | Send Feedback

84 | Radio Remote Control
Figure 51:
4 Tap OK.
5
Tap .
A menu displays.
Figure 52: Select Unpair
6 Select Unpair.
7 Tap Yes.
The LEX L10 emits a sound indication and the Unpaired screen is displayed. The LEX L10 and radio are no
longer paired.
Send Feedback | February 2015 | MN001456A01-A

Figure 53: Unpaired Screen
Radio Remote Control | 85
5.3 Requesting an Emergency Alert
This emergency alert procedure is used to indicate a critical situation and is similar to pressing the emergency alert
button on the radio. The emergency alert signal overrides any other communication over the selected channel on the
radio.
Prerequisites:
The radio is licensed and capable of P25 emergency call
•
• The radio and the LEX L10 are successfully paired
When and where to use: Use this procedure to use the LEX L10 to trigger an emergency alert on the radio.
Procedure:
1
Swipe up from the
2 2.Tap Activate Emergency.
A popup displays giving you 2 seconds to cancel the emergency alert.
icon.
MN001456A01-A | February 2015 | Send Feedback

86 | Radio Remote Control
Figure 54: Emergency Alert Activation Popup
3 swipe down from the top of the LEX L10 to view notifications.
An Emergency notification should be included in the list of notifications.
Figure 55: Notification Screen with Emergency Notification
4 Tap Clear Emergency.
Send Feedback | February 2015 | MN001456A01-A

Radio Remote Control | 87
5.4 Setting Zone and Channel
This procedure remotely selects the zones of the remote radio on the LEX L10.
Prerequisites: The radio and the LEX L10 are successfully paired.
When and where to use: Use this procedure to remotely set the zones of the remote radio on the LEX L10.
Procedure:
1
From the Home screen, tap .
2
Tap .
The Radio Remote Control dialog box displays.
Figure 56: Radio Remote Control Screen
3 Select a zone.
The Channel Selection screen appears, displaying a list of channels available for that zone.
MN001456A01-A | February 2015 | Send Feedback

88 | Radio Remote Control
Figure 57: Channel Selection Screen
4 Select a channel.
The Change Channel Confirmation screen appears if the channel was selected for the first time. Tap Yes to
confirm. The Radio Remote Control screen is displayed.
5.5 Setting Radio Volume
This procedure remotely selects the volume for the remote radio on the LEX L10.
Prerequisites: The radio and the LEX L10 are successfully paired.
When and where to use: Use this procedure to remotely set the volume for the remote radio on the LEX L10.
Procedure:
1
From the Home screen, tap .
2
Tap .
The Radio Remote Control screen appears.
Send Feedback | February 2015 | MN001456A01-A

Figure 58: Radio Remote Control Screen
Radio Remote Control | 89
3
Tap .
The radio volume slider displays.
Figure 59: Radio Volume Slider
4 Tap anywhere on the Radio Volume slider to jump to a volume or drag to change the volume between 0 to 15.
5.6 Favorite Channels
The Favorites screen is used to have a quick glance at all saved zones and channels. Select one to connect.
5.6.1 Viewing Favorite Channels
This procedure displays the Radio Remote Control favorite zones and channels on the LEX L10.
Prerequisites: The radio and the LEX L10 are successfully paired.
When and where to use: Use this procedure to view the Radio Remote Control favorite zones and channels on the
LEX L10.
Procedure:
1
From the Home screen, tap .
MN001456A01-A | February 2015 | Send Feedback

90 | Radio Remote Control
2
Tap .
The Radio Remote Control screen appears.
Figure 60: Radio Remote Control Screen
3
Tap .
The Favorites screen appears to view favorite zones and channels.
Send Feedback | February 2015 | MN001456A01-A

Figure 61: Radio Remote Control — Favorites Screen
Radio Remote Control | 91
5.6.2 Adding a Favorite Zone and Channel
This procedure adds a Radio Remote Control favorite Zone and Channel on the LEX L10.
Prerequisites: The radio and the LEX L10 are successfully paired.
When and where to use: Use this procedure to add a Radio Remote Control favorite Zone and Channel on the LEX
L10.
Procedure:
1
From the Home screen, tap .
2
Tap .
The Radio Remote Control screen displays.
MN001456A01-A | February 2015 | Send Feedback

92 | Radio Remote Control
Figure 62: Radio Remote Control Screen
3
Tap .
The Favorites screen displays.
Figure 63: Favorites Screen
Send Feedback | February 2015 | MN001456A01-A

4
Tap . The Favorites menu displays.
Radio Remote Control | 93
5 Select Edit Favorites.
6 Select the Zone and Channel that you want to add to your favorites.
7 Tap < (top left side of screen) to return to the Radio Remote Control screen.
5.6.3 Removing a Favorite Channel
This procedure removes a Radio Remote Control favorite zone or channel on the LEX L10.
Prerequisites: The radio and the LEX L10 are successfully paired.
When and where to use: Use this procedure to remove a Radio Remote Control favorite zone or channel on the
LEX L10.
Procedure:
1
From the Home screen, tap .
2
Tap .
The Radio Remote Control screen appears.
MN001456A01-A | February 2015 | Send Feedback

94 | Radio Remote Control
Figure 64: Radio Remote Control Screen
3
Tap .
The Favorites screen is displayed.
Figure 65: Favorites Screen
Send Feedback | February 2015 | MN001456A01-A

4 Select Edit Favorites.
5 Tap the x next to the favorite channel to delete it.
6 Tap < (top left side of screen) to return to the Radio Remote Control screen.
Radio Remote Control | 95
MN001456A01-A | February 2015 | Send Feedback


Chapter
6
Messaging
Use Messaging to send and receive SMS and MMS messages. From a Home or All Apps screen, touch .
6.1 Sending a Text Message
Procedure:
97 | Messaging
1
In the main Messaging screen, tap .
The New Message screen displays.
Figure 66: New Message Screen
2 In the To field, enter a name or a mobile phone number.
3 In the Type message field, enter the text message.
Messages are limited to 160 characters. When the limit is approached, a counter displays, above the Send control,
showing how many characters are left. If the limit is reached and the user keeps typing, a new message is created,
which is joined with its predecessors when received.
MN001456A01-A | February 2015 | Send Feedback

98 | Messaging
If the user presses the Back button while composing a message, it is saved as a draft in the Messaging screen. Tap
the conversation to resume composing it.
4
Tap to send the message.
6.2 Sending a Multimedia Message
Note: Multimedia messaging is only supported when the LEX L10 is in Public network mode.
Procedure:
1
In the main Messaging screen, tap .
The New Multimedia Message screen displays.
Figure 67: New Multimedia Message Screen
2 In the To field, enter a name or a mobile phone number.
3
Tap to attach the media file of your choice:
• Pictures — Select a picture to attach.
• Capture picture — Camera opens to take a picture and attach it.
• Videos — Select a video to attach.
• Capture video — Camcorder opens to record a video and attach it to the message.
• Audio — Choose a sound file to attach.
• Record audio — Sound Recorder opens to record a spoken message and attach it to the message.
• Slideshow — Opens a screen to assemble text, photos, videos, and recordings into a slideshow of up to 10
slides to attach to the message.
4
Tap to send the message.
Send Feedback | February 2015 | MN001456A01-A

Chapter
7
Applications
This chapter describes the applications installed on the LEX L10.
Normally, you access the applications through the Home screen overlay by clicking the icon. Swipe the Home
screen up from the icon to reveal the icon.
7.1 File Browser
Applications
99 |
Use the File Browser application to view and manage files on the device.
To open File Browser, tap → .
Figure 68: File Browser Screen
The address bar indicates the current folder path. Tap the current folder path to manually enter a path and folder
name.
Tap to select multiple files/folder.
MN001456A01-A | February 2015 |
Send Feedback

100 | Applications
Tap to view the internal storage root folder.
Tap to view the microSD card root folder.
Tap to view the previous folder or to exit the application.
Tap and hold an item to perform an operation on that item. Select one of the options from the File Operations menu:
• Information — View detailed information about the file or folder.
• Move — Move the file or folder to a new location.
• Copy — Copy the select file.
• Delete — Delete the selected file.
• Rename — Rename the select file.
• Open as — Open the selected file as a specific file type.
• Share — Share the file with other devices.
Tap to open additional functionality:
•
•
•
•
•
•
•
Tap the
Tap the
Tap the
Tap the
Tap the
Tap the
Tap the
key → New Folder to create a new folder in the current folder.
key → Search to search for a file or folder.
key → Sort to sort the list by name, by type, by size or by date.
key → Refresh to re-display the contents of the current folder.
key → List View to change the folder view from tile to list format
key → Change Size to change the size of the icons: Large, Normal or Small.
key → About File Browser to view the application version information.
7.2 People
Use the People application to manage contacts.
From a Home or Apps screen, tap . The People application, displays four tabs at the top of the screen: Search,
Groups, All contacts, and Favorites. Tap the tabs to change how to view the contacts. Swipe up or down to scroll
through the lists.
7.2.1 Adding People
Procedure:
1
In the People application, tap .
2 If there are more than one account with contacts, tap the one to use.
3 Type the contact’s name and other information. Tap a field to start typing, and swipe down to view all categories.
4 Adding more than one entry for a category requires an additional step. For example:
• To add a work address after typing a personal address, tap Add new for that field.
• To open a menu with preset labels, such as Home or Work for an email address, tap the label to the right of
the item of contact information.
• To create your own label, tap Custom in the menu.
5 Tap Done.
Send Feedback | February 2015 | MN001456A01-A
 Loading...