


Applicant: Motorola, Inc. FCC ID: AZ489FT7002
Exhibit VIII. User Information and Manual:
1.) User Card - 2 pages
User Safety Training and Safety Information
Operational Instructions and Training Guidelines
2.) User Manual - 119 pages
DIAD III Reference Guide
Exhibit 8
2963C77ODRAFT2.fm Page 1 Thursday, February 28, 2002 5:16 PM
DIADIII Terminal
with GPRS Radio-Modem
User Safety, Training, and General Information
READ THIS IMPORTANT INFORMATIONON SAFE AND
EFFICIENT OPERATION BEFORE USING YOUR MOTOROLA
HANDHELD PORTABLE TERMINAL
The information provided in this document supersedes the general safety
information contained in user guides published prior to June 2001. For
information regarding terminal use in a hazardous atmosphere please refer
to the Factory Mutual (FM) Approval Manual Supplement or Instruction Card,
which is included with terminal models that offer this capability.
Compliance with RF Energy Exposure Standards
Your Motorola terminal is designed and tested to comply with a number of
national and international standards and guidelines (listed below) regarding
human exposure to terminal frequency electromagnetic energy.This terminal
complies with the IEEE (FCC) and ICNIRP exposure limits.
Your Motorolaterminal complieswith the followingRF energy exposure
standards and guidelines:
International Commission on Non-Ionizing Radiation Protection
•
(ICNIRP) 1998
• United States Federal Communications Commission, Code of Federal
Regulations; 47CFR part 2 sub-part J
• American National Standards Institute (ANSI) / Institute of Electrical and
Electronic Engineers (IEEE) C95. 1-1992
• Institute of Electrical and Electronic Engineers (IEEE) C95.1-1999
Edition
• Ministry of Health (Canada) Safety Code 6. Limits of Human Exposure
to Terminal frequency Electromagnetic Fields in the Frequency Range
from 3 kHz to 300 GHz, 1999
• Australian Communications Authority Terminal communications (Elec-
tromagnetic Radiation - Human Exposure) Standard 1999 (applicable to
wireless phones only)
• ANATEL, Brasil Regulatory Authority, Resolution 256 (April 11, 2001)
"additional requirements for SMR, cellular and PCS product certification."
OPERATIONAL INSTRUCTIONS AND TRAINING GUIDELINES
Body-worn operation
• Always place the terminal in a Motorola approved clip, holder, holster,case, or body harness for this product. Use of non-Motorola-
approved accessories may exceed FCC RF exposure guidelines.
Antennas & Batteries
• Use only Motorola approved supplied antenna or Motorola
approved replacement antenna. Unauthorized antennas, modifica-
tions,or attachmentscould damage the terminal and may violate FCC
regulations.
• Use only Motorola approved, supplied batteries or Motorola
approved replacement batteries. Use of non-Motorola-approved
antennas or batteries may exceed FCC RF exposure guidelines.
APPROVED ACCESSORIES
The list of Approved Motorola accessories is given below:
• DIADIII Battery FNN5101
• UPS Carrying Bag for DIADIII
• DIADIII Handle (part of terminal)
ELECTROMAGNETIC INTERFERENCE/COMPATIBILITY
Note: Nearly every electronic device is susceptible to electromagnetic
interference (EMI) if inadequately shielded, designed, or otherwise
configured for electromagnetic compatibility.
Facilities
To avoid electromagnetic interference and/or compatibility conflicts, turn off
your terminal in any facility where posted notices instruct you to do so.
Hospitals or health care facilities may be using equipment that is sensitive to
external RF energy.
Aircraft
When instructed to do so, turn off your terminal when on board an aircraft.
Any use of a terminal must be in accordance with applicable regulations per
airlinecrewinstructions.
Medical Devices
Pacemakers
The Advanced Medical TechnologyAssociation (AdvaMed) recommends that
a minimum separation of 6 inches (15 centimeters) be maintained between a
68P02963C77-O, March 2002 Safety
Please retain for future use

2963C77ODRAFT2.fm Page 2 Thursday, February 28, 2002 5:16 PM
handheld wireless terminal and a pacemaker. These recommendations are
consistent with those of the U.S. Food and Drug Administration.
Persons with pacemakers should:
• ALWAYS keep the terminal more than 6 inches (15 centimeters) from
their pacemaker when the terminal is turned ON.
• not carry the terminal in the breast pocket.
• use the ear opposite the pacemaker to minimize the potential for interference.
• turn the terminal OFF immediately if you have any reason to suspect
that interference is taking place.
Hearing Aids
Some digital wireless terminals may interfere with some hearing aids. In the
event of such interference, you may want to consult your hearing aid
manufacturer to discuss alternatives.
Other Medical Devices
If you use any other personal medical device, consult the manufacturer of
your device to determine if it is adequately shielded from RF energy. Y our
physician may be able to assist you in obtaining this information.
Driver Safety
Checkthe laws and regulations on the use of terminals in the areawhere
you drive. Always obey them.
When using your terminal while driving, please:
• Givefullattentiontodrivingandtotheroad.
• Use hands-free operation, if available.
• Pull off the road and park before making or answering a call if driving
conditions so require.
!
!
OPERATIONAL WARNINGS
W A R N I N G
For Vehicles With an Air B ag
Do not place a portableterminal in the area over an air bag or in the air
bag deployment area. Air bags inflate with great force. If a portable
terminal is placed in the air bag deployment area and the air bag
inflates, the terminal may be propelled with great force and cause
serious injury to occupants of the vehicle.
Potentially Explosive Atmospheres
Turn off your terminal prior to entering any area with a potentially
explosive atmosphere, unless it is a terminal type especially qualified
for use in such areas as “Intrinsically Safe” (for example, Factory
Mutual, CSA, UL, or CENELEC). Do not remove, install, or charge
batteries in such areas. Sparks in a potentially explosive atmosphere
can cause an explosion or fire resulting in bodily injury or even death.
The areas with potentially explosive atmospheres referred to above
include fueling areas such as below decks on boats, fuel or chemical
transfer or storage facilities, areas where the air contains chemicals or
particles, such as grain, dust or metal powders, and any other area
where you would normally be advised to turn off your vehicle engine.
Areas with potentially explosive atmospheres are often but not always
posted.
Blasting Caps and Blasting Areas
To avoid possible interference with blasting operations, turn off your
terminal when you are near electrical blasting caps, in a blasting area,
or in areas posted: “Turn off terminal.” Obey all signs and instructions.
!
OPERATIONAL CAU TIONS
C a u t i o n
Batteries
All batteries can cause property damage and/or bodily injury such as burns if
a conductive material such as jewelry, keys, or beaded chains touches
exposed terminals. The conductive material may complete an electrical
circuit (short circuit) and become quite hot. Exercise care in handling any
charged battery, particularly when placing it inside a pocket, purse, or other
container with metal objects.
Risk of explosion if battery is replaced by an incorrect type. Dispose of used
batteries according to the instructions.
MOTOROLA and the Stylized M Logo are
registered in the U.S.Patent and Trademark
Office. All other product or service names are
the property of their respective owners.
68P02963C77-O
@6802963C77@

DIAD III
Reference Guide
This guide is current through DIAD 21.32
Copyright 1999 United Parcel Service of America, Inc. All rights reserved.

Table of Contents
Introduction.......................................................................................................................4
How to Use the Reference Guide .................................................................................. 4
About DIAD III .............................................................................................................. 4
Features.......................................................................................................................... 5
Safety Information........................................................................................................... 7
DIAD Keys and Functions................................................................................................7
Use of Function Keys ................................................................................................... 11
Soft Key Function Selection......................................................................................... 11
Quick Reference – A.M. Routine....................................................................................13
A.M. Routine ................................................................................................................13
Verify Driver Information Screen................................................................................. 15
Verify Driver Information Screen Definitions..................................................................................................15
Menu Overview.................................................................................................................17
Main Menu ................................................................................................................... 17
Statistics Menu (Main Menu Option 5) ........................................................................... 18
Break/Lunch (Statistics Card Option 1)...........................................................................................................18
Inside Building (Statistics Card Option 2).......................................................................................................19
Other Work (Statistics Card Option 3).............................................................................................................20
Recap (Statistics Card Option 4).......................................................................................................................22
Review C.O.D. Data (Statistics Card Option 5)...............................................................................................23
Road Call (Statistics Card Option 6).................................................................................................................24
Summary (Statistics Card Option 7)..................................................................................................................25
Turn-In (Statistics Card Option 8).....................................................................................................................27
Vehicles (Statistics Card Option 9)...................................................................................................................28
Quick Reference – Typical Delivery Stop.......................................................................30
Delivery (Main Menu Option 4)................................................................................... 30
Recording Package information.........................................................................................................................30
Getting the Signature ..........................................................................................................................................31
Delivery Address Screen.............................................................................................. 32
Delivery Address Screen Definitions and Operations...................................................................................32
Delivery Package Screen.............................................................................................. 34
Delivery Package Screen Definitions................................................................................................................34
ASD Delivery................................................................................................................ 35
Scanning ........................................................................................................................ 36
Bar Coded Packages............................................................................................................................................36
Non-Bar Coded Packages...................................................................................................................................37
Signature Screen........................................................................................................... 38
Signed Service Notice.........................................................................................................................................39
C.O.D. Packages........................................................................................................... 39
Recording C.O.D. Packages ...............................................................................................................................39
C.O.D. Requirements Prompt.............................................................................................................................41
Non-Delivery................................................................................................................. 42
Non-Delivery Menu Definitions........................................................................................................................43
Missed Packages.................................................................................................................................................43
Package Info .................................................................................................................44
Package Type Menu Definitions.......................................................................................................................44
Late Air Reasons .......................................................................................................... 45
© Copyright 1999 United Parcel Service of America, Inc. i
All Rights Reserved.

Table of Contents
Late Air Reasons Screen Definitions................................................................................................................46
Edit Late Air Reason Screen..............................................................................................................................46
Other Delivery Options....................................................................................................47
Pre-Recording............................................................................................................... 47
To Pre-Record a Stop..........................................................................................................................................47
To Access Stops From the Pre-Record List....................................................................................................47
Stop the DIAD Alert Screen..............................................................................................................................48
Multiple Stops Left At One Location........................................................................... 49
Multiple Stops Left At Central Receiving Location/Mail Room................................. 52
Editing a Completed Stop and Tracking Information.................................................. 55
Completed Stop....................................................................................................................................................55
Package Tracking Information...........................................................................................................................55
Voiding a Delivery Package or Stop............................................................................. 56
To Void a Package...............................................................................................................................................56
To Void a Delivery Stop.....................................................................................................................................56
Paper Record Totals..................................................................................................... 56
Paper Delivery Record Screen Definitions:...................................................................................................... 58
Delivery Confirmation.................................................................................................. 58
Delivery Confirmation Screen Definitions:......................................................................................................58
Special Counts Screen.................................................................................................. 60
Special Counts Screen Definitions:................................................................................................................... 60
Preload Communications .............................................................................................. 61
Accessing the Preload Communication Misload Screen...............................................................................61
Selecting the Preload Communications Load Screen.....................................................................................62
Load Quality Prompt...........................................................................................................................................63
International Shipment Checklist................................................................................. 63
Quick Reference - Pickups..............................................................................................65
Overview....................................................................................................................... 67
Scheduled Pickups (Main Menu Option 1)...................................................................... 67
Letter Center.........................................................................................................................................................67
Alert Screens........................................................................................................................................................70
Unscheduled Pickups (Main Menu Option 2) .................................................................71
Non-Letter Center................................................................................................................................................71
One-Time Pickup (Main Menu Option 3) ........................................................................ 73
Pickup Summary Bar Codes ......................................................................................... 74
Completing the Pickup........................................................................................................................................75
On Demand Events (Main Menu Option 9) .....................................................................77
System Overview: How it Works................................................................................. 77
Receiving On Demand Event Messages..................................................................... 77
Accepting On Demand Events ..................................................................................... 78
Overriding an On Demand Event................................................................................. 78
Editing On Demand Events.......................................................................................... 79
On Demand Event: Pickup ........................................................................................... 80
ODS Pickup Status Menu...................................................................................................................................83
On Demand Event: Delivery........................................................................................ 83
ODS Delivery Status Menu................................................................................................................................86
On Demand Event: Assist............................................................................................ 87
ODS Assist Status Menu...................................................................................................................................88
ii © Copyright 1999 United Parcel Service of America, Inc.
All Rights Reserved.

Table of Contents
DIAD Alerts.....................................................................................................................89
ETA Alert .....................................................................................................................89
Commit Time Alert ....................................................................................................... 89
Missed Commit Alert................................................................................................... 90
Exceeded Maximum Retries Alert .............................................................................. 91
PHONE ODS (Communications Menu Option 6)........................................................ 92
ODS Alerts .................................................................................................................... 94
On Demand Events Not Complete Alert ..........................................................................................................94
Messages Pending Communication Alert .......................................................................................................94
Text Messages (Communications Menu Option 3)...........................................................96
Text Messages Overview...................................................................................................................................96
Text Only Messages ...........................................................................................................................................96
Response Required Messages..........................................................................................................................97
Service Provider Created Text Messages ........................................................................................................98
Radio Status Indicator........................................................................................................................................99
DIAD Alerts ................................................................................................................ 100
Transmission Commit Times ..................................................................................... 100
Speaker-Comm Calls (Communications Menu Option 1)...........................................101
Radio Transmitter Disable Function...........................................................................103
Print (Main Menu Option 7)........................................................................................... 104
Transmitting Data ....................................................................................................... 104
Del Link (Main Menu Option 8).....................................................................................107
Using UPS Delivery Link ...........................................................................................107
Alert Screen................................................................................................................ 108
DIAD Restart .................................................................................................................111
Exception Reporting......................................................................................................112
DIAD Drivers ............................................................................................................. 112
Non-DIAD Drivers ..................................................................................................... 112
Recording on the Paper Delivery Record.....................................................................113
Quick Reference – P.M. Routine...................................................................................114
P.M. Routine............................................................................................................... 114
Turn-In Summary Screen............................................................................................ 115
Scanning a Daily Turn-In Envelope ............................................................................ 115
Turn-In Signature Screen........................................................................................... 116
DIAD III Maintenance ............................................................................................... 117
Soft key Function Definitions ..................................................................................... 118
© Copyright 1999 United Parcel Service of America, Inc. iii
All Rights Reserved.

DIAD Keys and Functions
INTRODUCTION
How to Use the Reference Guide
This reference guide is designed to assist you in using the DIAD. It is broken into several
sections, reflecting the DIAD menus. In general, the sections are arranged according to the
order of events followed by a typical driver on a typical day. The events you will encounter
earlier and most frequently are covered first.
The Table of Contents shows you where particular sections begin, and graphics indicate quick
reference pages. These step-by-step instructions will show you how to complete a common
activity.
To find information on a particular topic, you can also check the index in the back of the book.
Purpose
The DIAD is used by service providers to:
• Record and store:
Ø Delivery information.
Ø Pickup information.
Ø Statistical information (automatically calculated).
• Send and receive On Demand messages.
• In most units, transmits tracked and exception data to the tracking system through a
radio link built into the DIAD.
About DIAD III
DIAD stands for Delivery Information Acquisition Device. The DIAD III is the third model of
DIAD to be put into service. The changes in design incorporated into DIAD III are the result of
many recommendations by experienced service providers. The primary features of the DIAD III
are described in the following paragraphs.
4 © Copyright 1999 United Parcel Service of America, Inc.
All Rights Reserved.

DIAD Keys and Functions
Features
• The DIAD case has a contoured, hourglass shape. The carrying handle retracts when
not in use.
• The DIAD III is equipped with more data memory and a faster digital processor than
previous models.
• A small built in flashlight is provided for viewing package labels or other objects in low
light conditions. The keypad glows in the dark for easy viewing in low light conditions.
• Pressing any key activates the DIAD. The DIAD is deactivated automatically (without
loss of screen data) if no keyboard activity occurs during any 30-second interval.
• The DIAD has a 10-line, 40-character LCD display screen for the display of
information during operation.
• Display screen is backlit for easy viewing in low light conditions.
• The DIAD stylus is used to record signatures on the display screen.
• The DIAD contains a bar code scanner, which scans tracking and other bar-coded
labels.
• A small speaker is mounted in the hand rest area near the top of the unit. It signals
certain operating conditions and is also used to transfer data over the telephone.
• The DIAD III has an automatic dialing system, when transferring data over the
telephone.
• Most DIAD III units are supplied with a built-in radio for use in transmitting data to the
tracking system.
• The DIAD is powered by a rechargeable battery that provides power for 12 hours of
operation. The unit is recharged at night in the base station at the center. The service
provider can exchange the battery for a fresh one during use if necessary.
© Copyright 1999 United Parcel Service of America, Inc. 5
All Rights Reserved.
DIAD Keys and Functions
Hand Rest
Handle
(Recessed)
Stylus (In Holder)
Communication speaker
Display Screen
Lights
Replaceable
Battery
Keypad
DIAD III
Warning Label (on back)
6 © Copyright 1999 United Parcel Service of America, Inc.
All Rights Reserved.
Safety Information
Street #
Street Name Type Dir Suf
Note:1 –
CDS N
SAFETY INFORMATION
WARNING
Potentially Explosive Atmospheres
Most battery-powered equipment, including DIAD III, should not be used in
areas where potentially explosive atmosphere is present. If the DIAD III battery
is removed in a potentially explosive atmosphere, a spark from the battery
contacts could cause an explosion of fire. To avoid such an occurrence, record
packages and obtain signatures at the package car.
Blasting Areas
Many blasting operations use radio signals to trigger their expl osions. In the
event that a blasting operation is vulnerable to radio interference, the DIAD III
radio could trigger an explosion. To avoid such an occurrence, turn off the
transmitter in any areas marked as "blasting areas" or areas with notices posted
instructing you to turn off cellular telephones or two-way radios.
DIAD Keys and Functions
Health Care Facilities
Most medical equipment is shielded from electromagnetic interference. However,
in the event that medical equipment is not shielded, the DIAD III device could
interfere with the operation of the equipment. To avoid such an occurrence, turn
off the DIAD III transmitter in any health care facilities with notices posted
instructing you to turn off cellular telephones or two-way radios.
DIAD KEYS AND FUNCTIONS
DIAD III has three types of keys: Alpha, Numeric, and Function keys.
121 SIR WILLIAM BLVD
City PostCode Unit
ASEANA 27369 1001
Consignee Room Fir
LINE TECHNOLOGY 502 5
Completed Stop = 0 Prerec Stop = 0
SplCnts IntlChk PreComm /
Edit Dup PreRec Override
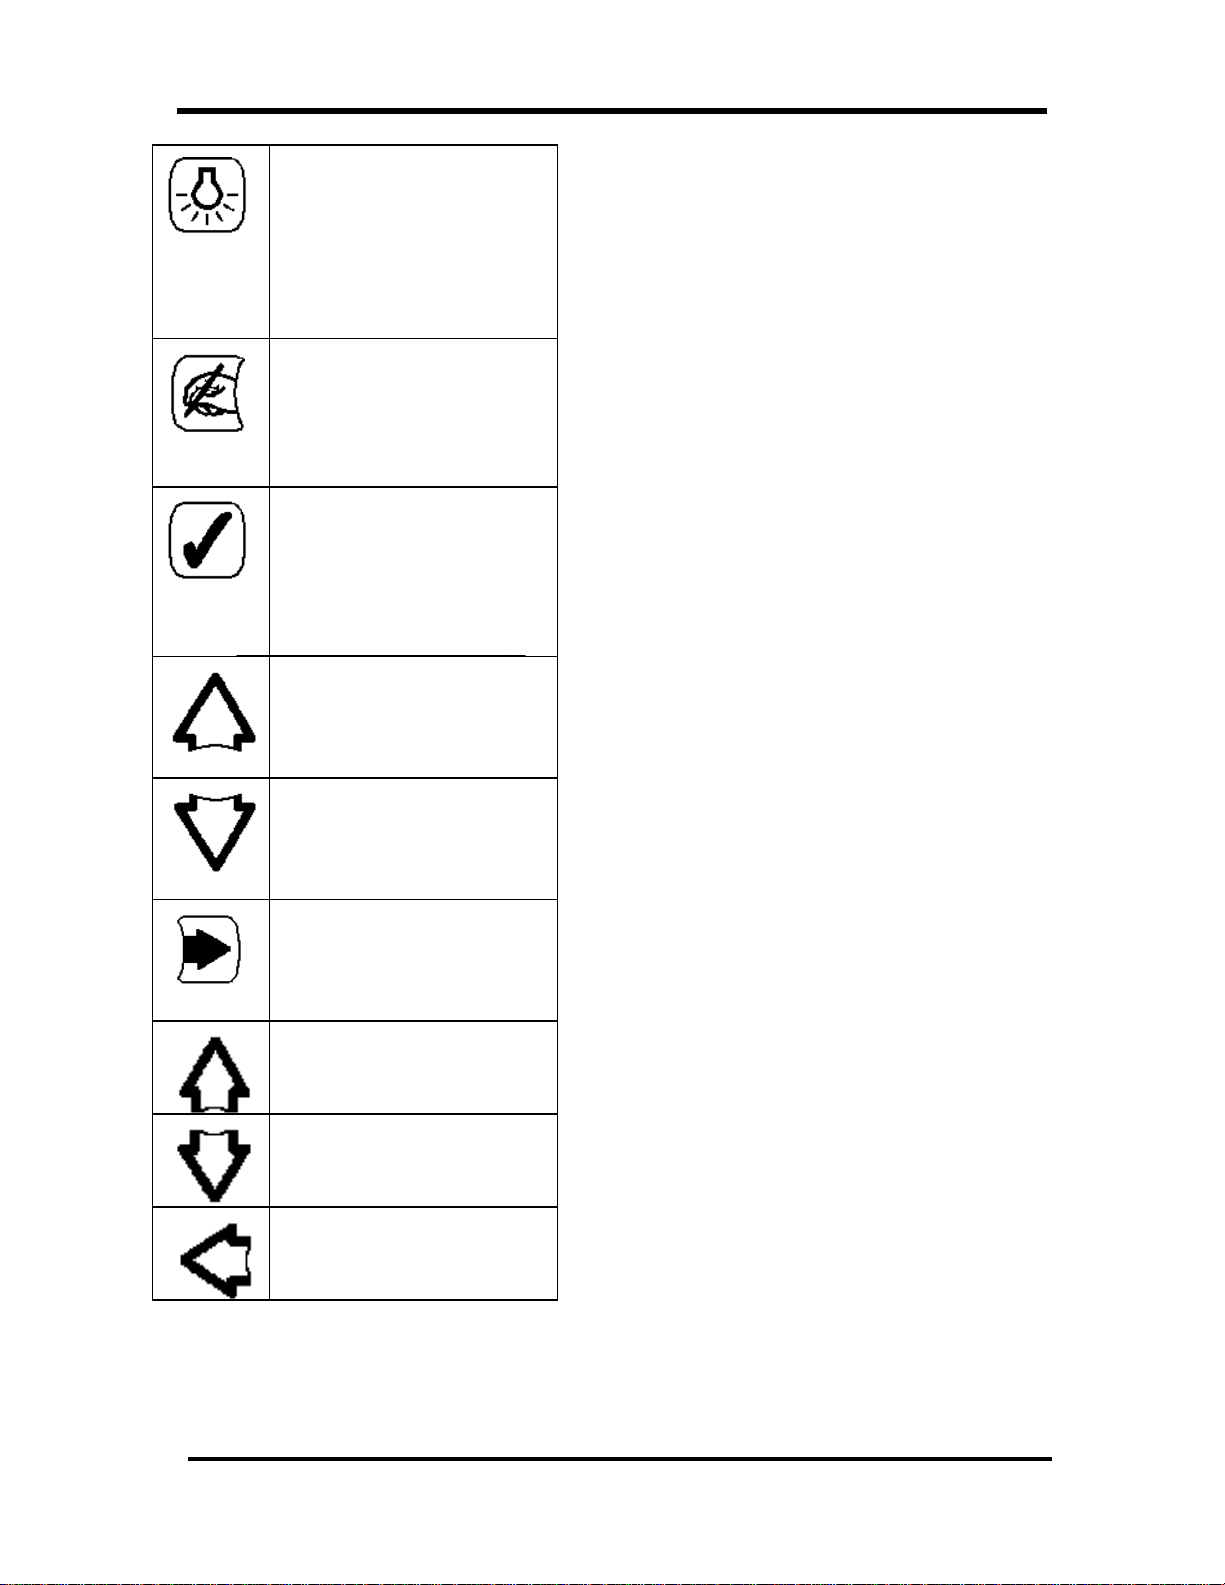
Little Arrow Up
Signature
Soft Keys (5)
© Copyright 1999 United Parcel Service of America, Inc. 7
All Rights Reserved.
DIAD Keys and Functions
Cycle
Shifts function of space key between
space and backspace.
Shifts control of light key between
backlight and DIAD flashlight.
Shifts selection of soft key functions
between bottom two lines on display
screens.
Little Arrow Left
Cycle
Alpha
A through Z keys are used to
record text data (such as address
information or package detail).
Numeric
0 through 9 keys are used to
record numeric data (such as
address information or package
detail).
Space/Backspace
Inserts space character when keying in
Soft Key (Five Available)
Selects highlighted option that is
directly above the specific key in bottom
line and next to bottom line of screen.
Space/
Backspace
Escape VoidLittle Arrow Down
data.
Backspaces over previous character
when cycle key is pressed before
space key.
Big Arrow Up
Enter
Stop Complete
Scan (2)
Big Arrow Down
Scan
Activates the laser bar code
scanner. There is a Scan key on
each side of the DIAD for ease
of access.
Void
Deletes previously entered
information.
Escape
Deletes data from current field,
and returns to Main Menu from
scheduled Pickup screen. Also
allows DIAD to exit from most
lists.
8 © Copyright 1999 United Parcel Service of America, Inc.
All Rights Reserved.
DIAD Keys And Functions
Lights
Pressed to turn backlight on and
off. Also controls small
flashlight at top underside of
DIAD. To control flashlight
press and release cycle key
before pressing backlight key.
Signature
Displays DIAD signature screen.
Pressed while in signature
screen, it displays signature
clarification screen.
Stop Complete
Signals DIAD that all
information on the current stop
has been entered and DIAD
should prepare to receive data
for next stop.
Big Arrow Up (Right Side)
Moves cursor to previous
screen, or in lists, moves up four
lines of data.
Big Arrow Down (Right Side)
Moves cursor to next screen, or
in lists, moves down four lines of
data.
Enter Arrow (Right Side)
Accepts key-entered data or
highlighted information and
stores it in the DIAD.
Little Arrow Up (Left Side)
Moves cursor up one line.
Little Arrow Down (Left Side)
Moves cursor down one line.
Little Arrow Left (Left Side)
Moves cursor left one character.
© Copyright 1999 United Parcel Service of America, Inc. 9
All Rights Reserved.

DIAD Keys And Functions
10 © Copyright 1999 United Parcel Service of America, Inc.
All Rights Reserved.

DIAD Keys And Functions
Use of Function Keys
The DIAD selects most functions and data processing operations through the use of five general
selection keys (called Soft Keys because of they are used in conjunction with DIAD software).
The following paragraphs describe the use of Soft Keys in DIAD operation, define the functions
controlled by Soft Keys (as listed on the two bottom function lines), and provide examples of
Soft Key operation as an aid in understanding their use.
Soft Key Function Selection
The five Soft Keys are identical in appearance and are used to select varying functions as they
appear on the display screen above each key. The bottom two lines of the display screen
designate functions associated with the specific screen. Pressing the Soft Key directly beneath a
function on the screen chooses that function. The illustration on the next page shows the Soft
Key selection procedure.
In that example, any of the functions listed in the bottom two rows of the Delivery Address
Screen can be selected. In the picture, notice that the Delivery Address Screen appears with the
upper line highlighted. As shown, the Precommunication Screen can be selected by pressing the
Cycle Key to highlight the upper function select line and pressing the Soft Key ¤ that is
just beneath the “PreComm” designation in the upper function line.
Similarly, to select the "Prerecord" function, simply press the Soft Key ¤ that is just beneath
the “PreRec" designation in the lower function line.
Note: The "PreRec" selection described above is based on the lower line being highlighted (i.e.
This is the default condition). If the upper line is highlighted, press the Cycle Key to highlight
the lower function select line before pressing the Soft Key¤¤.
© Copyright 1999 United Parcel Service of America, Inc. 11
All Rights Reserved.
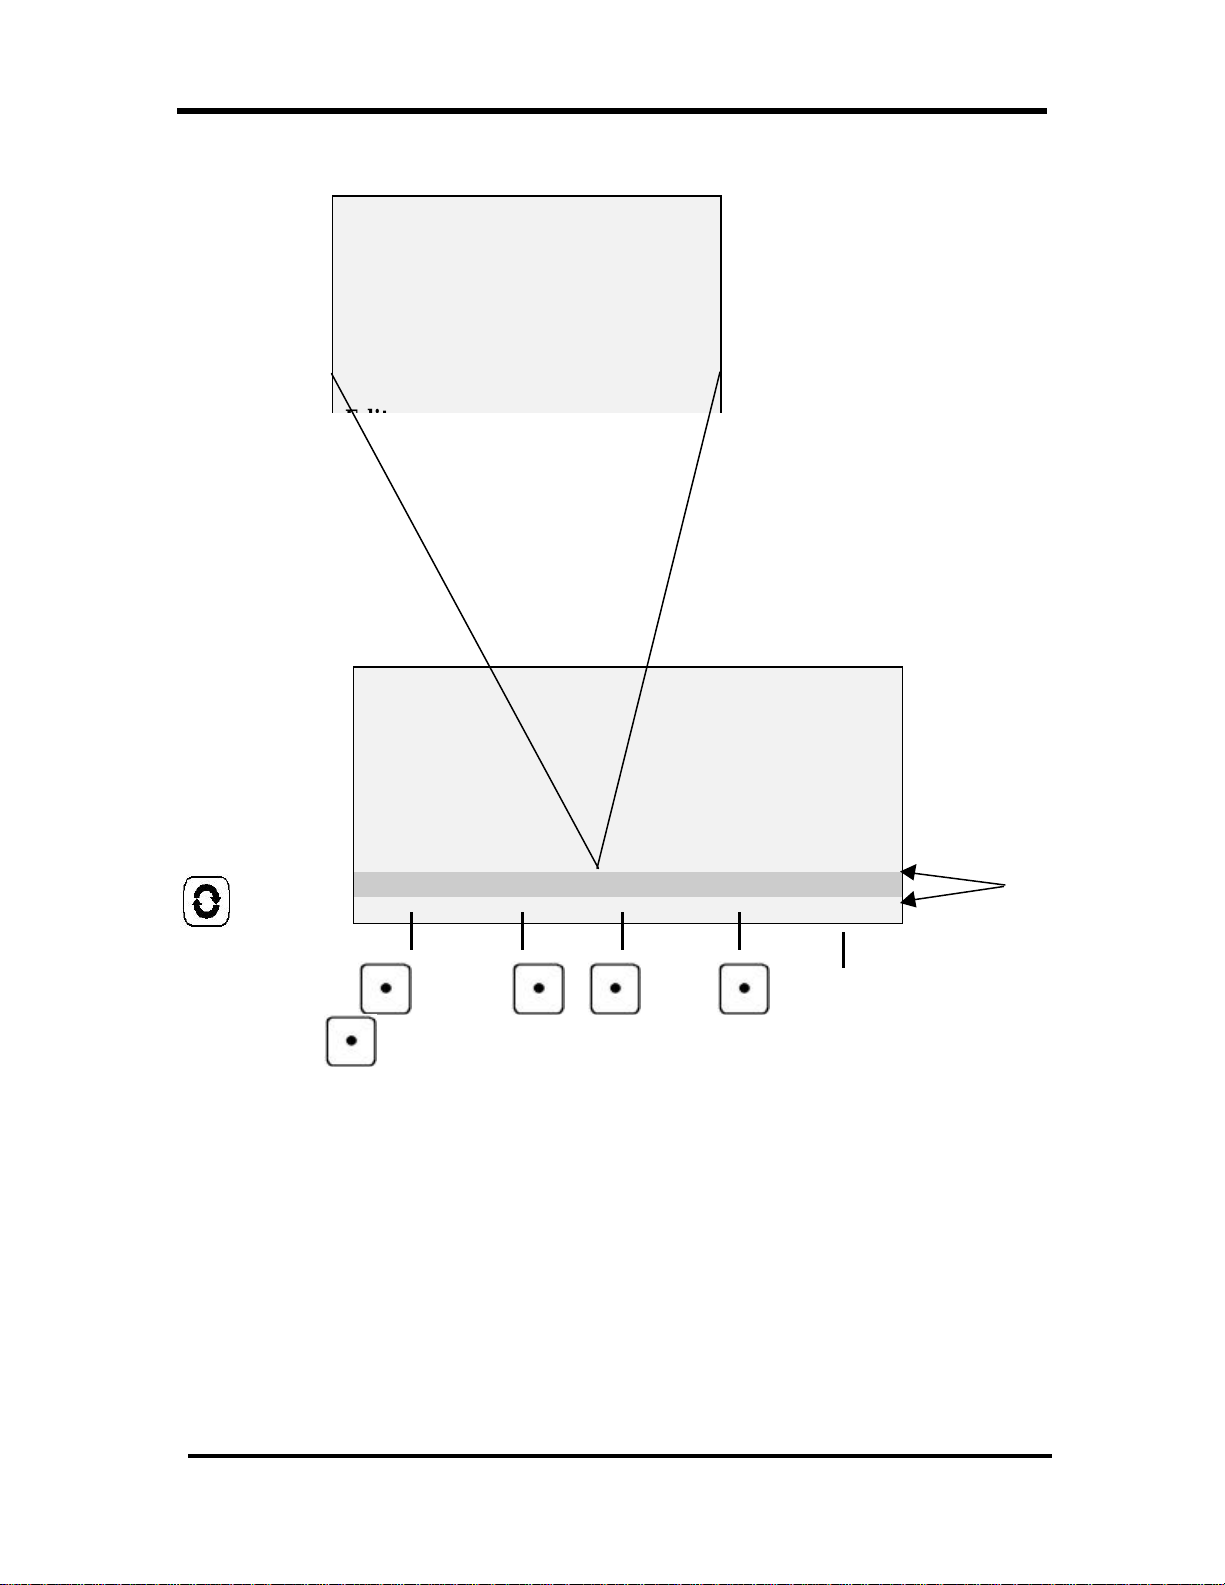
DIAD Keys And Functions
Daily Totals Unit Totals for
Add Tot this Stop
ARS XXX XXX || Special A XXXX
Special 1 XXX XXX || Special B XXXX
Special 2 XXX XXX ||
||
||
||
Cycle Key
Used to highlight upper
and lower function lines
Street # Street Name Type Dir Suf
121 SIR WILLIAM BLVD
City PostCode Unit
ASEANA 27369 1001
Consignee Room Flr
LINE TECHNOLOGY 502 5
Note:1 CDS N
Completed Stop = 0 Prerec Stop = 0
SplCnts IntlChk PreComm /
Edit Dup PreRec Ovrride
DIAD III Soft Key Function Selection Sample Procedures
Function Lines
12 © Copyright 1999 United Parcel Service of America, Inc.
All Rights Reserved.
A.M. Routine
||||||||||
QUICK REFERENCE – A.M. ROUTINE
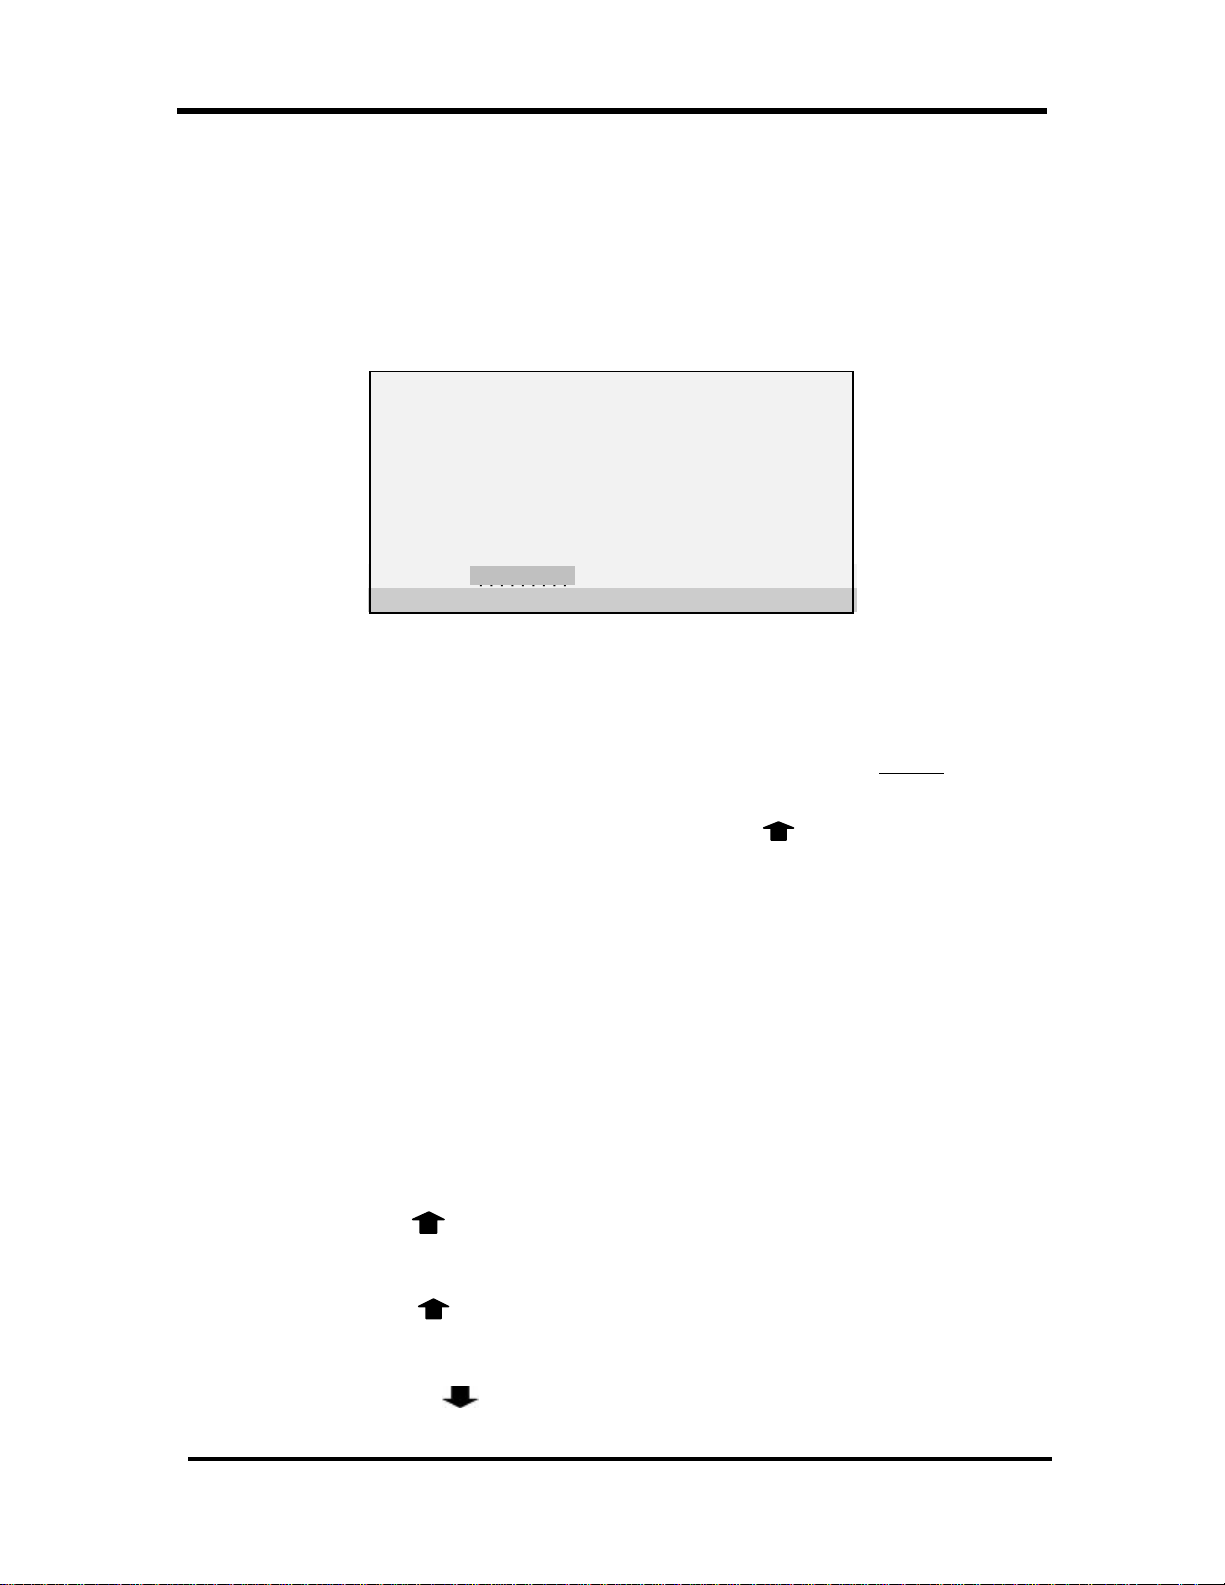
A.M. Routine
1. After obtaining your DIAD from the base station, review the Verify Driver Information
screen. Make sure all information is correct. Edit as necessary.
Verify Driver Information
------ ------ ---------- Name: KONG, WAI
ID#: 000000001 SUP GROUP: 1
Code: 06 Sched Start: 8:30
OJS: Driv/Help (D/H): D
Ctr: 9999 Time: 08:15
Route: A01 Date: 05/03/99
Battery:E||||||||||F Radio
Verify Driver Information Screen
2. Verify that battery has been charged by viewing next to last line of display screen. If not,
replace with charged battery.
Note: “Ctr”, “Date”, “Route”, and “Time” are display only fields. They cannot be
modified.
3. When all driver information is correct, press Big Arrow Up .
4. DIAD displays “Do You Want To Start the DIAD (Y/N)?” and “Yes” function
designation appears on bottom line. Select Soft Key ¤¤ directly beneath “Yes”. Vehicles
screen will automatically display.
Note: If the DIAD is being used by a driver helper or at a customer counter, the Vehicles
screen will not be displayed. This is indicated by entering “H” for Helper or “C”
for Counter in the “Driv/Help” field on the Verify Driver Information screen.
5. Key enter vehicle starting mileage. If applicable, enter trailer numbers.
Note: The “Car #” field will remain blank. Once you insert the DIAD into the DVA, the
DIAD will automatically retrieve the car number. If you do not have a DVA,
manually enter the car number.
6. Press Big Up Arrow to get to Statistics Card Menu.
7. Press 2 (“Inside Building”). Record Trip 1 Start Time when actually leaving UPS property.
8. Press Big Arrow Up twice to return to the Main Menu.
9. Press 4 (“Delivery”). Enter address for your first stop.
10. Press Big Arrow Down to get to Delivery Package screen.
© Copyright 1999 United Parcel Service of America, Inc. 13
All Rights Reserved.

A.M. Routine
11. Place DIAD in DVA while vehicle is in motion.
14 © Copyright 1999 United Parcel Service of America, Inc.
All Rights Reserved.

A.M. Routine
||||||||||
Verify Driver Information Screen
The Verify Driver Information screen is used to verify information downloaded to the DIAD,
such as pay code and scheduled start time. Verify or make any changes needed.
Verify Driver Information
------ ------ ---------- Name: KONG, WAI
ID#: 000000001 SUP GROUP: 1
Code: 06 Sched Start: 08:30
OJS: Driv/Help (D/H): D
Ctr: 9999 Date: 05/03/99
Route: A01 Time: 08:15
Battery:E||||||||||F
Battery gauge in fully
charged condition
Verify Driver Information Screen
Note: “Ctr”, “Date”, “Route”, and “Time” are view only (display only). Fields are listed below in
order of cursor movement.
Verify Driver Information Screen Definitions
• Name - Driver Name: Last name, first initial.
• ID# - Driver’s Identification number.
• Sup Group – Your supervisor group number.
• Code – Pay code.
• Sched Start – Scheduled start time.
• OJS – Your supervisors initials (when you have an OJS).
• Driv/Help – Indicates whether DIAD is being used by:
D-Driver
H-Helper
C-UPS customer counter.
• Ctr – Center SLIC code.
• Date – Date as set by DCS computer.
• Time – Time as set by DCS computer.
• Battery – Make sure battery is fully charged.
© Copyright 1999 United Parcel Service of America, Inc. 15
All Rights Reserved.

A.M. Routine
16 © Copyright 1999 United Parcel Service of America, Inc.
All Rights Reserved.
Menu Overview
MENU OVERVIEW
DIAD III is menu driven, making it fast and easy to operate. This means you will choose an
option from a menu in order to reach another screen. Now we will explore the DIAD menus in
greater detail, beginning with the Main Menu.
Main Menu
The Main Menu has nine selections, which are discussed in the following paragraphs. We will
start with Option 5, “Statistics”.
DIAD Main Menu V21.32_D3 [14:42]
1 2 3
Scheduled Unscheduled OneTime
4 5 6
Delivery Statistics Comm
7 8 9
Print DelLink ODS
Battery:E||||||||||F Radio
SplCnts IntlChk PreComm Verify StpDIAD
|||||||||
Main Menu
Current Time Display
© Copyright 1999 United Parcel Service of America, Inc. 17
All Rights Reserved.
Statistics Menu
Statistics Menu (Main Menu Option 5)
The Statistics Card Menu also has nine numbered selections. “StpDIAD” and “Verify”
functions can also be selected by Soft Keys. Various options that can be selected in the
Statistics Card Menu are shown below, and are discussed in the following pages.
Statistics Card [14:42]
1 2 3
BreakLunch InsideBldg OtherWork
4 5 6
Recap ReviewCols Roadcall
7 8 9
Summary TurnIn Vehicles
S=StopDIAD V=Verify
Battery:E||||||||||F Radio
SplCnts IntlChk PreComm Verify StpDIAD
|||||||||
Statistics Card Menu
Break/Lunch (Statistics Card Option 1)
This screen is used to record the times of your breaks and lunch.
[13:00]
Break Lunch
Start Finish Start Finish
: : : :
:
: :
Break and Lunch Screen
1. From the Statistics Card Menu, press 1. Break and Lunch screen is displayed with cursor in
first empty data field. (E.g. If no data has been entered, cursor appears in “Break” “Start” field
as shown below.)
2. Enter the start and/or finish time for each period. Press Enter èto accept entered data and
move to next field or cursor will move automatically to next field when a field is full.
3. Press Big Arrow Up to store entered data and return to the Statistics Card menu.
18 Copyright 1999 United Parcel Service of America,
Inc.
All Rights Reserved

Statistics Menu
Inside Building (Statistics Card Option 2)
This screen contains fields for entry of specific activities performed while inside the center.
Inside Building Data Entry Procedure
From the Statistics Card Menu, press 2. Inside Building screen is displayed with cursor in first
empty field.
Inside Building [08:30]
Start Finish Counts
Srt&Ld : : DT Unload 0
LocSrt : : DT Load 0
Wash
Trip 1 : : N Recovery 0
Trip 2 : : N High Value 0
Trip 3 : : N Waybill 0
Yes No
Inside Building Screen
Inside Building Data Field Definitions
• “Srt&Ld” (Sort and Load) – Enter times under “Start” and “Finish” for any package
sorting or vehicle loading activities before departure from the center in the morning.
• “LocSrt” (Local Sort) - Enter times under “Start” and “Finish” for any unloading of
vehicles at the end of the working day.
• “Trip 1”, “Trip 2”, and “Trip 3” - Enter the time you leave UPS property (under
“Start”) and the time you return to UPS property (under “Finish”) for up to three separate
trips during a workday.
• “Wash” – Field has a default of no (“N”). Press soft key under “Yes” if you washed the
vehicle on the associated trip.
• “DT Unload” (Double Trip Unload) - Enter the number of packages unloaded after
each trip when the same vehicle is to be used for an additional trip.
• “DT Load” (Double Trip Load) - Enter the number of packages loaded for an
additional trip after returning from a previous trip.
• “Recovery” - Enter the number of packages unloaded at a recovery point, that are not
clerk packages or send again packages.
• “High Value” - Enter the number of packages that require additional processing during
the End-of-Day routine.
• “Waybill” - Enter the number of international shipments picked up.
© Copyright 1999 United Parcel Service of America, Inc. 19
All Rights Reserved.
Statistics Menu
Other Work (Statistics Card Option 3)
This screen is used to record other tasks performed during a workday.
Other Work [ 9:00]
Center Grp Description Start Finish
8491 4 Train New 8:30 9:00
: :
: :
Other Work Screen
Other Work Screen Definitions
• Center – Enter the center’s SLIC where the work is performed.
• Grp – Enter the number of the supervisory group where the work was performed.
• Description – Select the description of the work performed from the menus, or press Big
Arrow Down for additional selections.
• Start and Finish – Enter the start and finish times for each task performed.
Note: Highlight cursor moves only to fields that can logically be entered. A “Finish” field, for
example, cannot be entered until a time has been entered in the associated “Start”
field.
Other Work Codes
1 2 3
Physical Train Area Train Recu
4 5 6
Train Oth Optional Train New
7 8 9
Serv Aware TLA/JRD APP PCM
ττ
Other Work Codes Screen
20 Copyright 1999 United Parcel Service of America,
Inc.
All Rights Reserved

Statistics Menu
Other Work Screen Selections
If required description does not appear on Other Work Codes screen, press Big Arrow
Down. Other Work Codes screen 2 is displayed.
A-Drvr Mrktg I-Funeral Q-Ls-unskill σσ
B-Auto accid J-Comp Train R-Lunch
C-Car wash K-Acct Ride S-Orientatn
D-Clk-cash L-Injury T-Paid Break
E-Clk-count M-Jury Duty U-Pd trav tm
F-Clk-other N-Group Meet V-Dispatch
G-Dr as help O-Train Insd W-Shifting
H-FeederWash P-Ls-skilled X-OTHER ττ
Other Work Codes Screen 2
If required description does not appear on Other Work Codes screen 2, press Big Arrow
Down Other Work Codes screen 3 is displayed.
a-Ship Audit i-Union/LP q-Future 93 σσ
b-Sick j-Union time r-Future 94
c-Sl-skilled k-Safe Meet s-Future 95
d-Sl-unskill l-Hskpg t-Future 96
e-Split Shft m-AIR Shut u-Future 97
f-Trans-feed n-Other Shut v-Future 98
g-Trans-hub o-Fam Leave w-Future 99
h-Trans-w/in p-Drv Assist
Other Work Codes Screen 3
Select appropriate description by pressing associated number, capital letter, or small letter.
© Copyright 1999 United Parcel Service of America, Inc. 21
All Rights Reserved.
Statistics Menu
Recap (Statistics Card Option 4)
This screen shows work performed by the Delivery or Pickup Loop Detail unit. This is a
display-only screen.
DEL A TOT TOT DR PU PU PL LS
UNIT PKGS STP STP STP PKGS LT TR
---- - ---- --- --- --- ---- -- --- 1001 90 10 3 11 14 0 0
Paper
Packages
Recap Screen Field Definitions
• Del Unit - Delivery or pickup unit.
P1004 30 50 20 10 100 0 0*
* Spec A= 1 Spec B= 1
Recap Screen
Special
Counts
• A - Area type.
• Tot Pkgs - Total number of packages per unit.
• Tot Stp - Total number of stops per unit.
• Dr Stp - Driver release stops.
• PU Stp - Pickup stops.
• PU Pkgs - Pickup packages.
• PL LT - Pallets picked up.
• LS TR - Loose trailer packages.
• Spec A - Total number of packages delivered weighing over 70 pounds.
• Spec B - Total number of packages picked up weighing over 70 pounds.
Note:Check local guidelines for recording Special A and Special B packages. A “*” will
appear when a package has been tagged as Special A or Special B.
Note:A “P” displays to the left of a defined area that contains paper-recorded packages.
22 Copyright 1999 United Parcel Service of America,
Inc.
All Rights Reserved

Statistics Menu
Review C.O.D. Data (Statistics Card Option 5)
This screen allows you to view C.O.D. information by stop and by package. This is a displayonly screen.
Shipper Col Amt Check Amt Stop
333333 12.00 12.00 D4
333333 6.00 6.00
666666 9.00 9.00 ODS D
ASD OP 3.00 3.00 ODS P
222222 150.00 150.00 P3
ASD S 15.00 15.00 P8
ASD U 11.00 11.00 P4
Review C.O.D. Screen
Review C.O.D. Screen Field Definitions
• Shipper—Shipper number.
• ASD S—Collection amount for an ASD at a scheduled pickup.
• ASD U—Collection amount for an ASD at an unscheduled pickup.
• ASD OP—Collection amount for an ASD at an On Demand pickup.
• Col Amt—C.O.D. amount.
• Check Amt—Check amount if recorded.
• Stop—Delivery or pickup stop number.
D = Delivery.
P = Pickup.
ODS = On Demand System Event.
© Copyright 1999 United Parcel Service of America, Inc. 23
All Rights Reserved.

Statistics Menu
Road Call (Statistics Card Option 6)
This screen is used to record road call information.
Road Call Menu [17:30]
Start :
Finish :
Memo Number
Mechanic's Init
Bkdwn Code (Ctr/Road) R
Road Center
Road Call Menu
Note: Highlight cursor moves only to fields that can logically be entered. The “Finish” field, for
example, cannot be entered until a time has been entered in the “Start” field.
Key in the appropriate data, or select soft key under “Road” or “Center” to select the
Breakdown Code.
Road Call Menu Definitions
• Start—Time breakdown began.
• Finish—Time road call ended.
• Memo Number—From the automotive department breakdown memo.
• Mechanic’s Init—Mechanic’s initials.
• Bkdwn Code
C = In center.
R = On road.
24 Copyright 1999 United Parcel Service of America,
Inc.
All Rights Reserved

Statistics Menu
Summary (Statistics Card Option 7)
The Statistics Summary screen is a display only screen, which shows information on the
shipments delivered and picked up during the course of the day. Press Big Arrow Down
to access two additional summary screens, which contain information on special counts and
service class totals.
Delv PU Assist| DR Stops= 21
-----------------------| Net Col = 15
Stops = 123 34 | Net Cal = 1
Pkgs = 234 879 | Fur = 0
Missed= 0 0 | Prerec = 0
| Handwrit= 0
|
ODSEvt= 3 4 0 | ττ
Statistics Summary Screen
Statistics Summary Screen Field Definitions
• Delv—Delivery information.
• PU—Pickup information.
• Assist—Assist information.
• Stops—Total number of stops recorded.
• Pkgs—Total number of packages recorded.
• Missed—Total number of missed delivery and pickup stops.
• ODSEvt—Total number of ODS deliveries, generic pickups, and assists.
• DR Stops—Total number of driver release stops.
• Net Col—Completed collection packages.
• Net Cal—Completed Call Tag packages.
• Fur—Fur call packages.
• Prerec—Pre-recorded (PPRS) packages.
• Handwrit—Total number of packages handwritten on the Delivery Information Record.
Press Big Arrow Down to access the Special Counts summary screen.
© Copyright 1999 United Parcel Service of America, Inc. 25
All Rights Reserved.

Statistics Menu
Special Counts Summary Screen
Special Counts | Pickup Counts σσ
ARS = 3 PAS |
Spc1= 21 Stps= 1|
Spc2= 0 Pkgs= 80|
Spkr= 0 Pgs = 2|
RA = 0 OMsg= 2|COP= 5
|Tracked Pickup Scan
OCAStps= 5 |Scan= 35 Keyd= 2
ττ
Special Counts Summary Screen
Special Counts Summary Screen Definitions
• ARS—Number of Authorized Return Service packages picked up.
• Spc1—Number of CDS packages and additional information.
• Spc2—Number of phone calls to CSC to report tracking information.
• Spkr —Number of successful Speaker-Comm calls.
• RA—Number of remote area deliveries.
• PAS (Print-At-Stop Information):
Ø Stps—Print-At-Stop delivery stops.
Ø Pkgs—Print-At-Stop packages.
Ø Pgs—Print-At-Stop pages.
Ø OMsg—Number of On Demand messages received.
• OCA Stps—On Call Air Stops
• COP—Collect on Pickup packages recorded.
• Tracked Pickup Scan
Ø Scan—Number of tracking labels origin scanned.
Ø Keyd—Number of tracking labels key entered as origin.
Press Big Arrow Down to access the Service Class Totals screen.
26 Copyright 1999 United Parcel Service of America,
Inc.
All Rights Reserved

Statistics Menu
Service Class Totals
This screen displays bar code totals scanned during pickup and delivery by service class.
Service Class Totals σσ
Del Pup|| Del Pup
EAM 3 1||3DS 2 6
1DA 3 4||Stand 0 0
1DS 20 15||Economy 0 2
2DA 0 0||Inter'l 5 6
Service Class Totals Screen
Turn-In (Statistics Card Option 8)
The Turn-In Summary screen and the Turn-In Signature screen allow you to:
• Turn in C.O.D. and C.O.P. collections.
• Scan your daily turn-in envelopes.
• Complete your signature for your daily turn-in envelopes.
| Cash Recd 12.34
Currency 12.00 |-Vouchers 0.00
Coins .34 |-M/O 0.00
|=Cash Due 12.34
|
|Currency 12.00
|Coins 0.34
|Over/Short 0.00
Edit NoBarCd
Turn-In Summary Screen
Tot Tags: 1 Cash Turn-In: 12.34
Tot Checks: 0 Amt Ov/Sht: 0.00
W. Kong
Driver Signature CASH ENV 1
Ovrride
Turn-In Signature Screen
These screens are used at the end of the day just before you stop the DIAD.
© Copyright 1999 United Parcel Service of America, Inc. 27
All Rights Reserved.

Statistics Menu
Vehicles (Statistics Card Option 9)
The Vehicles screen is used to record daily information for up to three vehicles.
Vehicle 1 Car # 221234
Start 1243 Finish 0 Tot 0
Pump1 0 Fuel1 0 Oil 0
Pump2 0 Fuel2 0 ττ
----Trailer #--------Couple---Uncouple-1 1 0
2 0 0
3 0 0
Ovrride
Vehicles Screen
Vehicles Screen Definitions
• Vehicle—Displays the number of the vehicle driven.
• Car #—Displays the UPS car number. You can enter this manually, or let the DIAD
retrieve it automatically from the DVA.
• Start—Starting mileage.
• Finish—Ending mileage.
• Tot—Total mileage for each vehicle (automatically calculated).
• Pump1—Pump number used.
• Fuel1—Gallons (or liters) used.
Note: For outside (off-area) fuel purchases, your supervisor will provide you with the
Pump2—Pump number used.
• Fuel2—Gallons (or liters) used.
• Oil—Amount of engine oil added (if any).
• Trailer #—Enter the UPS trailer number. Enter the PT 60 trailer number.
• Couple— Number of times the trailer is coupled.
• Uncouple— Number of times the trailer is uncoupled.
28 Copyright 1999 United Parcel Service of America,
Inc.
All Rights Reserved

Statistics Menu
Press Big Arrow Up or Big Arrow Down to display additional Vehicles screens or
other vehicles.
First trip must be completed with entry of start and finish mileage before starting a second trip.
A prompt is displayed requesting load quality information at the finish of each trip.
Vehicle 1 Car # 221234
Start 1243 Finish 1298 Tot 55
Pump1 1 Fuel1 5 Oil 0
Pump2 0 Fuel2 0 ττ
----Trailer #--------Couple---Uncouple-1 1 0
2 0 0
Was Load Quality Acceptable (Y/N)? N
Yes No
Vehicles Screen With Load Quality Prompt
© Copyright 1999 United Parcel Service of America, Inc. 29
All Rights Reserved.

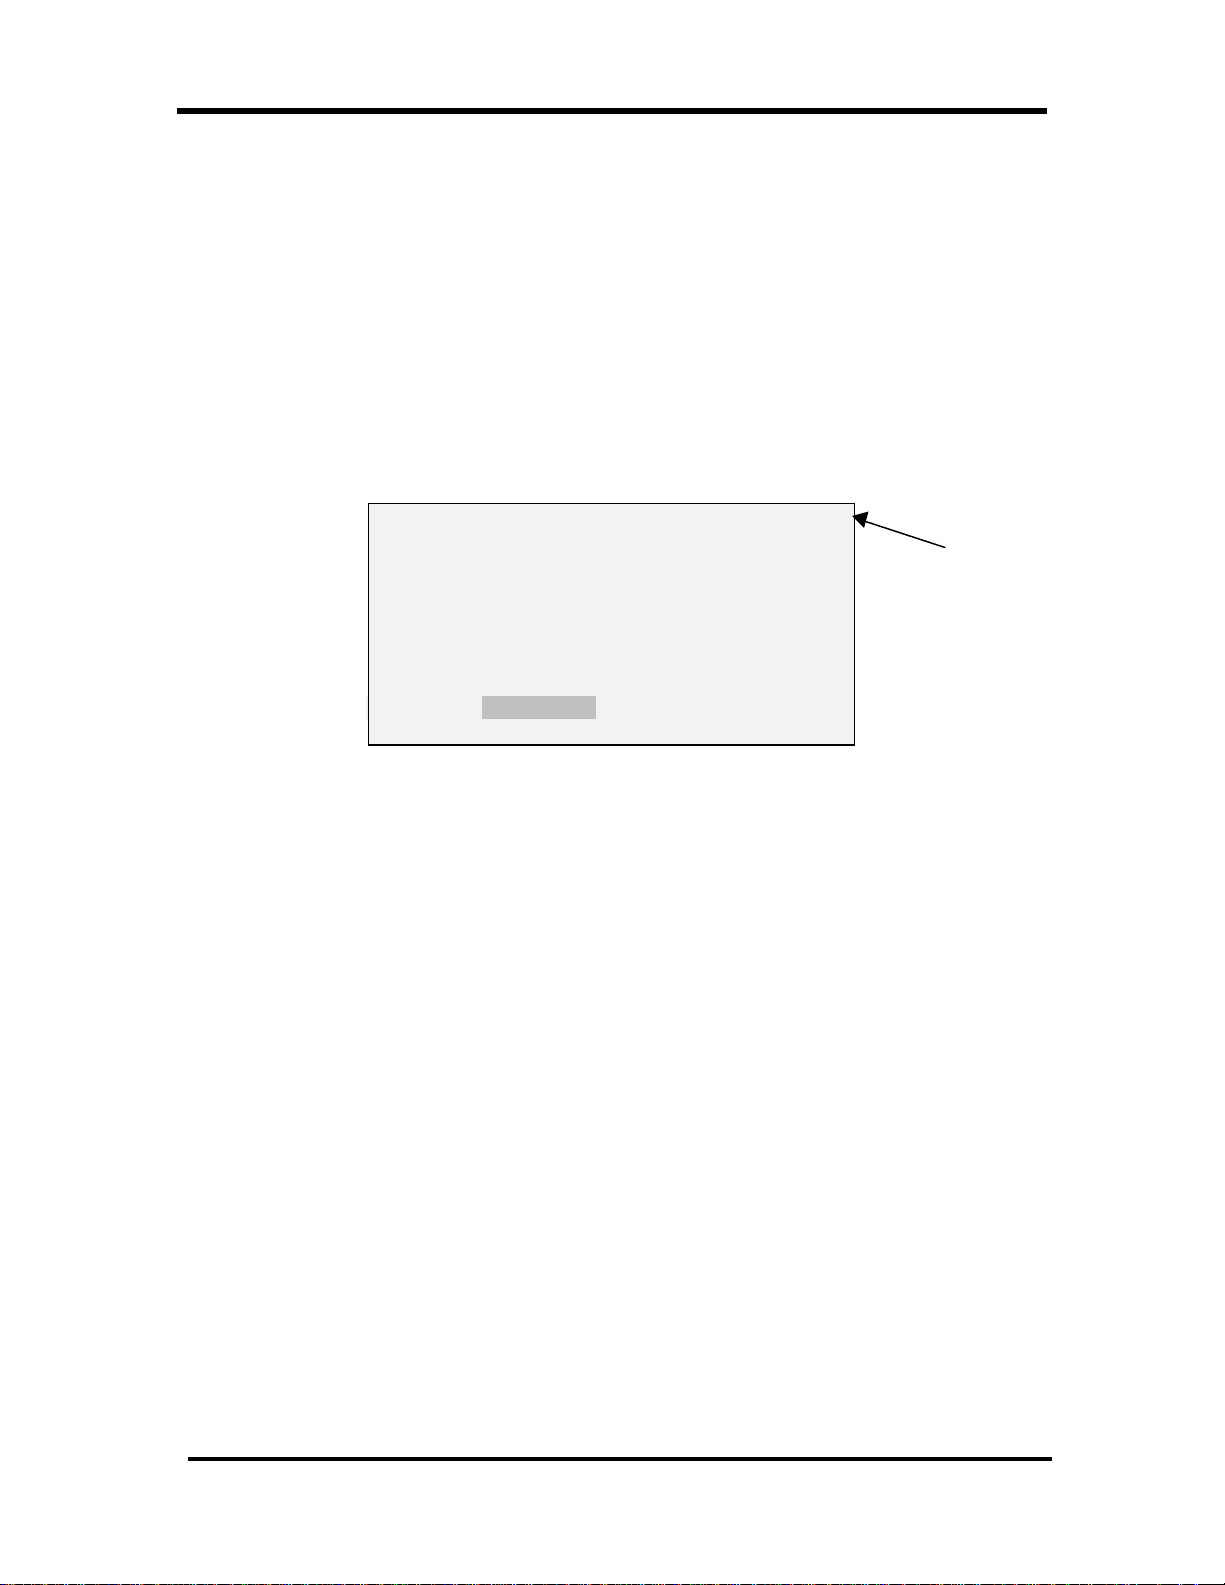
Delivery
QUICK REFERENCE – TYPICAL DELIVERY STOP
Delivery (Main Menu Option 4)
1. From the Main Menu, press 4 (“Delivery”). Delivery Address screen is displayed.
Street # Street Name Type Dir Suf
121 SIR WILLIAM BLVD
City PostCode Unit
ASEANA 27369 1001
Consignee Room Flr
LINE TECHNOLOGY 502 5
Note:1 CDS N
Completed Stop = 0 Prerec Stop = 0
SplCnts IntlChk PreComm /
Edit Dup PreRec Ovrride
Delivery Address Screen
2. Key in correct data in “Street #” field. Press Enter è to accept data and move cursor to “
Street Name” field.
3. Key in first few letters of street name in “Street Name” field. Press Enter è.
Note: This activates the DIAD address guidance system. The DIAD displays a list of all street
names that match what you have entered.
4. Highlight the correct street in the street name list and press Enter è. Delivery Address screen
will reappear with selected street data in “Street Name”, “Type”, “Dir”, and “Suf” fields.
5. Key in correct data, if necessary, in “Consignee,” “Room,” and “Flr” fields. Press Enter è to
accept entry in each field and move cursor to next field.
6. Press Big Arrow Down . Delivery Package screen is displayed.
Recording Package information
7. Press Scan.
Bar Coded Packages
• Scan or key enter bar coded label information.
• If bar code number starts with 1Z, cursor automatically moves to “Remark” field.
• If bar code is PTN number, enter correct Shipper Number in “Ship #” field and cursor
will automatically move to “ID#” field.
30 Copyright 1999 United Parcel Service of America, Inc.
All Rights Reserved

Delivery
Non-Bar Coded Packages
• On Non-Bar Coded Packages, key enter six-digit alphanumeric shipper number in
“Ship #” field and cursor will automatically move to “ ID#” field.
8. Key enter ID number into “ID#” field. After three numbers are keyed, cursor moves to
“Remark” field.
9. For additional packages, press Enter è or Little Arrow Up ⇑ then scan or key enter any
additional packages.
Getting the Signature
Note: Whenever possible, obtain the signature before entering package detail.
10. Press Signature − to display signature screen, and press Enter è to verify number of
packages and stops.
11. Present the DIAD with the top of the unit toward the customer. It does not need to be reversed.
Signature screen image will be reversed so that it appears correctly for the customer.
Note: Customer must sign directly on display within boxed area. Signature appears directly
beneath tip of stylus.
12. Press Signature − again. Signature screen (with signature) will be reversed so that it appears
correctly to you. Key enter receiver’s last name in “Clarification” field. Press Enter è again.
13. Press Stop Complete 4 or record packages.
© Copyright 1999 United Parcel Service of America, Inc. 31
All Rights Reserved.

Delivery
Delivery Address Screen
Street # Street Name Type Dir Suf
121 SIR WILLIAM BLVD
City PostCode Unit
ASEANA 27369 1001
Consignee Room Flr
LINE TECHNOLOGY 502 5
Note:1 CDS N
Completed Stop = 0 Prerec Stop = 0
SplCnts IntlChk PreComm /
Edit Dup PreRec Ovrride
Delivery Address Screen
Delivery Address Screen Definitions and Operations
• Street #
Note: When the “Street #” data includes a fraction (e.g. 123 ½ Wing Hong St), type the
whole numbers followed by the Space key and the “1” key. Then press the Cycle
key to shift the highlight from the lower to the upper line, followed by the Soft
key ¤ located directly beneath the “/” function to type the slash. Finally type the
“2” to complete the fraction.
• Street Name
Select “Street Name” by using the DIAD’s built-in address guidance system. Loop Detail
information for specific delivery areas is downloaded to each DIAD. Select streets from the
downloaded list using an Alphabetical Search, using a Delivery Order List, or overriding the
list and keying in the street name.
Alphabetical Search
1. From the “Street Name” field, key enter first few letters of street name. Each
additional letter you enter will narrow selection list.
2. Highlight correct street from displayed list and press Enter è. (If only one street
displays, it is automatically highlighted.)
Delivery Order Listing
1. From the “Street Name” field, press Little Arrow Down ⇓ A street selection list
will appear.
2. Highlight correct street name. Press Enter è to select it.
32 Copyright 1999 United Parcel Service of America, Inc.
All Rights Reserved

Delivery
Override Feature
If the desired address is not contained in your Loop Detail, you can manually key enter
information by overriding the address guidance function.
1. From the “Street Name” field, key enter the entire street name.
2. Observe that highlight is on lower function selection line. If not, press Cycle key to
highlight lower line.
3. Press Soft key ¤ directly beneath “Ovrride” to accept data and move cursor to “Typ”
field.
• Type - Type of street (Ave., Blvd., etc.).
• Dir - Direction prefix (N., N.E., S., etc.).
• Suf - Direction suffix (N., N.E., S., etc.).
• City – City name.
• PostCode – Postal code.
• Unit - Loop Detail unit number.
• Consignee - Receiver’s name on package.
• Room - Office, suite, or apartment number.
• Flr - Floor number.
• Note - Driver release risk levels and any additional comments relating to driver
release.
• CDS - Indicates if the stop is a CDS account.
© Copyright 1999 United Parcel Service of America, Inc. 33
All Rights Reserved.

Delivery
Delivery Package Screen
The Delivery Package screen is where you enter all delivery information about each package.
Street # Street Name Type Dir Suf
121 SIR WILLIAM BLVD
--------------------------------------- 4 Col Amt Ship # ID# Remark
1 #994934 W
2 #517821 E
3 #123456 E
Edit Dup Ship#6 +Paper
COD NonDel PkgInfo PreRec Deliver
Delivery Package Screen
Note: The top two lines of the Delivery Package screen display the address information for the
stop.
Delivery Package Screen Definitions
• “4” – Indicates the Driver Release risk level (for that address).
• Col Amt - Shows the collection/C.O.D. amount entered for each package. Press the Soft
key ¤ located directly beneath the “COD” function to access the C.O.D. screen and enter
the collection amount. For more on C.O.D. collections, see pages 36-38.
• Ship # (Shipper Number) - Requires that six characters be entered in the field. If a
shipper number is not available and you enter a name with fewer than six characters:
1. Enter name (e.g. ABC). Press Cycle key to highlight upper line.
2. Press Soft key ¤ directly beneath “Ship#6” and then press Enter è to move the
cursor to the “ID#” field.
• ID# (Package Identification Number) - If there are fewer than three characters,
press Enter è to move the cursor to the “Remark” field.
• Remark - This field is for specific information, such as left at, Non-Delivery, and package
type.
• Line Number (1) - Line number of packages recorded (1 to 999)
34 Copyright 1999 United Parcel Service of America, Inc.
All Rights Reserved

Delivery
ASD Delivery
Additional information is required when you deliver a package that has an ASD, or Air Shipping
Document, attached. Proceed as follows:
1. From the Delivery Package screen, scan the ASD bar code and the ASD screen will display.
Air Shipping Document
ASD Trk # -> N2151613179
BIN ->
Shipper # ->
Pkg Weight -> (or N=None L=Ltr)
Msg->
Dup Ship#<6
ASD Screen
2. If the BIN is present, key enter it. Otherwise, press Enter è to go to the “Shipper #” field.
Key enter the shipper number from the ASD.
Note: The BIN field will only accept a valid 10-digit BIN number.
Air Shipping Document
ASD Trk # -> N2151613179
BIN -> 2165413743
Shipper # -> ASDASD
Pkg Weight -> L (or N=None L=Ltr)
Msg->
Dup Ship#<6
ASD Screen (Example)
Note: If a BIN is entered, and no shipper number is entered, the DIAD will automatically fill
the field with “ASDASD.”
3. Enter the weight. Use “N” if there is no weight and “L” for “letter.” Accurate weights are
important because they can affect billing.
4. Press Big Arrow Up and complete the delivery stop.
Note: Entering information in the “Pkg Weight” field automatically fills in the “ID Number”
field on the Delivery Package screen.
© Copyright 1999 United Parcel Service of America, Inc. 35
All Rights Reserved.

Delivery
Scanning
Bar Coded Packages
1. From the Delivery Package screen, scan. The Warning Laser screen will appear.
Note: Be sure that the laser beam is pointing away from your eyes before scanning.
****************************
* *
* WARNING LASER ACTIVE *
****************************
Warning Laser Screen
2. Hold the DIAD about 12 inches above the bar code at a 45° angle. The laser beam projects
downward and forward at a slight angle, so you will be able to see the beam.
3. The scanning beam must cover the bar code completely from left to right for a successful scan.
4. When the scan is successful, you will hear a DIAD confirmation tone.
5. If the scan is unsuccessful, you will see this screen:
****************************************
* Barcode Entry *
* *
* Please Enter Entire Barcode *
* --------------------------- *
* *
*Msg->Scan Failed or Not Ready *
****************************************
Bar Code Entry Screen with Message
36 Copyright 1999 United Parcel Service of America, Inc.
All Rights Reserved

Delivery
6. Try once more to scan the bar code. If the second attempt fails, key enter the numbers exactly
as they appear below the bar code, but do not enter any spaces. Press Enter è. Delivery
Package screen is displayed.
Street # Street Name Type Dir Suf
121 SIR WILLIAM BLVD
--------------------------------------- 1 Col Amt Ship # ID# Remark
1 #123456 E
Edit Dup Ship#<6 +Paper
COD NonDel PkgInfo PreRec Deliver
Delivery Package Screen
7. Key enter additional delivery package detail.
Note: When multiple bar codes are present, scan the highest level first. Then scan all remaining
bar codes.
Non-Bar Coded Packages
1. From Delivery Package screen, key enter six-digit alphanumeric shipper number.
Note: If there is no shipper number, use the first six letters of the shipper’s name. If six letters are
not available, use as many as are available. Then press Cycle key if necessary to
highlight upper function line and press Soft key ¤ directly beneath “Ship#<6” to complete
the entry.
1. Highlight upper
function line
Edit Dup Ship#<6 +Paper
COD NonDel PkgInfo PreRec Deliver
Delivery Package Screen – Shipper Number Less Than 6 Selection
2. Press the soft key directly
beneath the option
2. Key enter additional delivery package detail following current procedures.
© Copyright 1999 United Parcel Service of America, Inc. 37
All Rights Reserved.

Delivery
Signature Screen
This is where you obtain the customer’s signature on the DIAD.
1. Press Signature − to display signature screen, and press Enter è to verify number of
packages and stops.
2. Present the DIAD with the top of the unit toward the customer. It does not need to be reversed.
Signature screen image will be reversed so that it appears correctly for the customer.
Note: Customer must sign directly on display within the boxed area. Signature appears directly
beneath tip of stylus.
3. Press Signature − again. Signature screen (with signature) will be reversed so that it appears
correctly to you. Key enter receiver’s last name in the Clarification field. Press Enter è again.
121 SIR WILLIAM 502
Stops: [ 1] Pkgs: [ 1]
R.Leung
Clarification: [ MR LEUNG ]
Ovrride
Signature Screen
Hint: The key sequence is Signature − - Enter è - Signature − - Enter è.
38 Copyright 1999 United Parcel Service of America, Inc.
All Rights Reserved

Delivery
Signed Service Notice
Use this procedure whenever you deliver a package by accepting a signed Service Notice.
1. Press Soft key ¤¤ directly beneath “SDN”.
2. Delivery Package Screen is displayed with “Clarify Signature” field.
Street # Street Name Type Dir Suf
121 SIR WILLIAM BLVD
--------------------------------------- 1 Col Amt Ship # ID# Remark
1 #123456 E
Clarify Signature
/
Delivery Package Screen Showing Enter Location Field
3. Perform steps 3 through 7 of Driver Release procedure to select the appropriate release
location and complete the stop.
Note: Turn in your signed Service Notice(s) at your center during the End-of-Day routine.
C.O.D. Packages
Recording C.O.D. Packages
After scanning the bar code and/or entering the shipper number proceed as follows from the
Delivery Package screen:
1. Press Soft key ¤¤ beneath “COD” on screen. Collection Due Entry screen is displayed.
Street # Street Name Type Dir Suf
121 SIR WILLIAM BLVD
--------------------------------------- 1 Col Amt Ship # ID# Remark
1 #123456 E
Press the soft key
beneath COD
© Copyright 1999 United Parcel Service of America, Inc. 39
All Rights Reserved.
Edit Dup Ship#<6 +Paper
COD NonDel PkgInfo PreRec Deliver
Delivery Package Screen

Delivery
10.00
Collection Entry Ship#/ID: 123456 E
Col Barcode Type Amount
--------------------------------------- COD
FC
Check
2. Key enter the C.O.D. amount.
Collection Due Entry Screen
3. When you accept a check for the C.O.D., press Soft key ¤¤ beneath “Check” on screen. The
C.O.D. Calculation screen will display.
Cash (Stop): 130.00
Ship # Cash due Col Amt Chk Amt
123456 10.00 0.00
455655 25.00 0.00
30.00 0.00
15.00 0.00
666666 50.00 0.00
Edit
Multchk NonDel Check
C.O.D. Calculation Screen
4. Press Soft key ¤¤ beneath “Check” again if the check is for the full amount. The default
amount will automatically display the total amount of the C.O.D.s for that shipper number. For
example, in the screen below, the default check amount for shipper #111111 will be $10.00.
For shipper #455655 the default check amount will be $70.00.
Ship # Cash due Col Amt Chk Amt
123456 10.00 10.00
455655 25.00 70.00
30.00 0.00
15.00 0.00
666666 50.00 50.00
Multchk NonDel Check
C.O.D. Calculation Screen (Example)
40 Copyright 1999 United Parcel Service of America, Inc.
All Rights Reserved

Delivery
5. If the check amount does not equal the total amount due, key enter the amount of the check.
Press Enter è the “Cash Due” field will show the balance due.
You may change the status of a C.O.D. to show it was not collected by pressing Soft key ¤¤
beneath “NonDel” while in the C.O.D. Calculation screen or the Delivery Package screen. If a
C.O.D. is marked as a Non-Delivery, the C.O.D. is no longer displayed on this screen.
All C.O.D.s on this screen are used to calculate the revenue collection to be turned in.
Note: You can accept multiple checks for one package by pressing Soft key ¤¤ beneath
“Multchk” from the “Chk Amt” field.
C.O.D. Requirements Prompt
The DIAD prompts you with the “Does Shipper Require Cash (Y/N)?” message when a C.O.D.
package has a “Not In” or “Closed” status. You must determine if the C.O.D. requires cash only
or if the customer may pay with a check.
Street # Street Name Type Dir Suf
121 SIR WILLIAM BLVD
--------------------------------------- 1 Col Amt Ship # ID# Remark
1 10.00 #123456 E NI1
Does Shipper Require Cash (Y/N)? N
Yes No
Delivery Package Screen with C.O.D. Requirements Pop-Up
© Copyright 1999 United Parcel Service of America, Inc. 41
All Rights Reserved.

Delivery
Non-Delivery
The Non-Delivery Menu is used to select a reason for a package that could not be delivered or
picked up. When you press Non-Delivery, the DIAD will prompt you for the necessary
information.
Non Delivery Menu
1 2 3
Other REFused CLOsed
4 5 6
Not In No Money Not Ready
Non-Delivery Menu
1. Select a reason from the Non-Delivery Menu or press 1 (“Other”) to display the Other Non-
Delivery Reasons screen.
Other Non Delivery Reasons
1 2 3
Damaged Future Moved
4 5 6
Need Apt Need Dir NS Co./Per
7 8 9
NS Number NS Street Will Call
ττ
Other Non-Delivery Reasons Screen
2. For additional options press Big Arrow Down . The Additional Non-Delivery Reasons
screen will appear. Select a reason or press X (“Other”) to key enter a reason.
A-APO/FPO I-Out Of Ter Q-RemoteAre σσ
B-Deceased J-Over 108 R C-Emer Cond K-Over 130 S D-Missed L-Overgoods T E-Need Suite M-Overweight U F-No COD Amt N-Strike V G-NS Cty/Twn O-Vacation W H-Out Of Bus P-Will Keep X-Other ττ
Additional Non-Delivery Reasons Screen
3. Record your next package or follow stop complete procedures.
42 Copyright 1999 United Parcel Service of America, Inc.
All Rights Reserved

Delivery
Non-Delivery Menu Definitions
• 1 (“Other”)—Select this option if the reason for Non-Delivery does not appear.
• 2 (“REFused”)—The DIAD will display a list of reasons for refusal. Select the appropriate
reason and the DIAD will prompt you for the return address.
• 3 (“CLOsed”)—Indicates a business that is closed during normal delivery hours. The
DIAD will prompt for attempt number 1, 2, or 3 (or H = Holiday).
• 4 (“Not In”)—Use this selection when the consignee is not in and you are unable to make
an indirect delivery. The DIAD will prompt you for attempt number 1, 2, or 3. If this is the
third delivery attempt, the DIAD will prompt you for the return address.
• 5 (“No Money”)—For C.O.D. packages. The DIAD will prompt you for attempt number
1, 2, or 3. If this is the third delivery attempt, the DIAD will prompt you for the return
address.
• 6 (“Not Ready”)—For Call Tag packages and one-time pickups. The DIAD will prompt
you for attempt number 1, 2, or 3. If this is the third delivery attempt, the DIAD will prompt
you for the return address.
Missed Packages
Reporting missed packages correctly is important. Be sure to record every package for which you
are unable to make a delivery attempt. Examples of missed packages:
• Damages loaded on car, no delivery attempt made.
• Needed to be re-wrapped.
• Delivery attempt to business before or after posted hours or during lunch (1200 to 1300).
• Mis-load, not delivered. (Requires Center authorization.)
To record a missed package, press D (“Missed”) from the Additional Non-Delivery Reasons
screen.
© Copyright 1999 United Parcel Service of America, Inc. 43
All Rights Reserved.

Delivery
Package Info
The Package Info Sort Key is used to capture additional package information. When you select the
package type, the DIAD will prompt you for the necessary information.
Package Type Menu
1 2 3
Return
4 5 6
AOD Call MX|FC|DF
SplCnts IntlChk PreComm
Package Type Menu
Package Type Menu Definitions
• 2 (“Return”)—A package that is being returned to the original shipper. Enter the name of the
original receiver.
• 4 (“AOD”)—A package, with an AOD, or Acknowledgement of Delivery, attached.
Important: This package type is not used for a Delivery Confirmation package. Scan the
Delivery Confirmation label instead. Continue to pull and turn in all AOD tags.
• 5 (“Call”)—Call Tag. Select when picking up a Call Tag package without a 1Z bar code.
There are two ways to process Call Tags. Not applicable worldwide.
• 6 (“MX/FC/DF”)—Use to record merchandise exchange packages, fur calls, and driver
follow-ups.
44 Copyright 1999 United Parcel Service of America, Inc.
All Rights Reserved

Delivery
Late Air Reasons
The DIAD requires you to select a late air reason after a stop complete when one of the following
types of packages is delivered past its commit time:
• Early A.M.
• Next Day Air.
• Next Day Air Saver (Commercial stop only).
• 2nd Day Air A.M. (Commercial stop only).
• Time-Sensitive International.
If you scan a Worldwide waybill bar code, you will be prompted to select the service class that has
been designated on the waybill. The DIAD cannot determine which class of service is indicated on
the waybill (such as Express, Expedited, or Standard).
Select Service Class
A-Early AM/Express Plus
B-Express
C-Express Saver
D-Expedited/Rapido
E-3 Day Select
F-Standard
G-Economy
Select Service Class Screen
The commit times for Postal Codes and city exceptions have been downloaded to the DIAD. The
DIAD also distinguishes between rural and city address ranges that have two different commit times.
These commit times reflect the commit times listed in the current Air Services Guide that is
distributed to our customers.
121 SIR WILLIAM BLVD
LINE TECHNOLOGY RM:502
Select Late Air Reason
A – Customer Opens After Commit Time/
Consignee Requested Late Delivery
B - Severe Weather Delay On Area
C – Other
Late Air Reasons Screen
© Copyright 1999 United Parcel Service of America, Inc. 45
All Rights Reserved.

Delivery
Late Air Reasons Screen Definitions
• A (“Customer Opens After Commit Time/Consignee Requested Late Delivery”)—Choose
this reason when the firm’s posted hours show that the business is closed until after the
commit time or when the consignee requested a delivery time later than the commit time.
• B (“Severe Weather Delay On Area”)—Choose this reason to indicate an on-area delay
caused by environmental circumstances beyond your control (such as earthquake, flood, etc.).
You must have center approval to use this reason.
• C (“Other”)—Select for any other reason.
Note: The DIAD will prompt you for a late air reason on enhanced UPS Next Day Air Saver and
UPS 2nd Day Air A.M. packages that are delivered past their commit times to a
commercial stop only. Only the first two choices will be transmitted to TTS. You will not be
prompted for a late air reason if a previous attempt was made prior to the commit time (with
the same DIAD).
Edit Late Air Reason Screen
If you choose to edit a stop, and that particular stop has a late air reason, you will be prompted by
the following screen.
121 SIR WILLIAM BLVD
LINE TECHNOLOGY RM:502
Edit Late Air Reason
====================
Other
Change Late Air Reason Y or N ? N
Yes No
Edit Late Air Reason Screen
Either accept the existing late air reason or select another.
• Press Soft key ¤¤ beneath “Yes” to return to the Late Air Reasons screen.
• Press Soft key ¤¤ beneath “No” to accept the current reason and return to the Delivery
Address screen.
46 Copyright 1999 United Parcel Service of America, Inc.
All Rights Reserved

Other Delivery Options
OTHER DELIVERY OPTIONS
Pre-Recording
To Pre-Record a Stop
1. From Delivery Address screen, key enter the street number and street name.
2. Highlight last line and press Soft key ¤ beneath “PreRec” to automatically pre-record the
stop.
Highlight last line and press the
soft key beneath PreRec
SplCnts IntlChk PreComm /
Edit Dup PreRec Ovrride
Delivery Address Screen
Note: A stop can also be pre-recorded after the package detail has been added.
To Access Stops From the Pre-Record List
1. From “Street #” field on Delivery Address screen, highlight bottom line and press Soft key ¤
beneath “PreRec” to access pre-record stop list.
121 LINE TECHNOLOGY
SIR WILLIAM BLVD
ASEANA Rm 502 Flr 5
------------------------------- # Pkg-LA
SIR WILLIAM BLVD 2
TAMAN WARNA RISE 1
Dup/Com Dup/Res LA/Com LA/Res
Pre-Record List
2. Press Little Arrow Down ⇓ or Little Arrow Up ⇑ to highlight appropriate consignee and
press Enterè.
© Copyright 1999 United Parcel Service of America, Inc. 47
All Rights Reserved.

Other Delivery Options
Stop the DIAD Alert Screen
You cannot stop the DIAD until all pre-recorded pickup or delivery stops are given a stop
completed status. If any pre-recorded scheduled pickup stops are not complete at the end of the
day, the Pre-Record Pickups Exist screen will display to alert you.
Complete or Void Prerecorded Stops
Press Any Key to Continue
Pre-Recorded Pickups Exist Screen
Press Big Arrow Up and enter stop disposition.
48 Copyright 1999 United Parcel Service of America, Inc.
All Rights Reserved

Other Delivery Options
Multiple Stops Left At One Location
Follow these steps if you attempt to deliver multiple stops and leave them at one address. Each
recorded address is counted as a stop.
1. Highlight bottom line and press Soft key ¤ beneath “PreRec” to access pre-record stop list.
121 LINE TECHNOLOGY
SIR WILLIAM BLVD
ASEANA Rm 502 Flr 5
--------------------------------# Pkg-LA
SIR WILLIAM BLVD 2
TAMAN WARNA RISE 1
Dup/Com Dup/Res LA/Com LA/Res
Pre-Record List
2. Use Little Arrow Up ⇑ and Little Arrow Down ⇓ to scroll to each stop that will be tagged as
“left at”.
3. Press Soft key ¤ beneath “LA/Com” (commercial) or “LA/Res” (residence) at each stop.
Original Receiver Residence/Commercial Indicator screen will display for each stop.
Note: The flag “LR” will appear next to packages marked “Left At-Residence.”
The flag “LC” will appear next to packages marked “Left At-Commercial.”
121 LINE TECHNOLOGY
SIR WILLIAM BLVD
ASEANA Rm 502 Flr 5
--------------------------------# Pkg-LA
SIR WILLIAM BLVD 2 LR
TAMAN WARNA RISE 1 LC
Dup/Com Dup/Res LA/Com LA/Res
2. The
corresponding
Left At flag
appears here
Pre-Record List
1. Press the soft key under the
appropriate Left At option
© Copyright 1999 United Parcel Service of America, Inc. 49
All Rights Reserved.

Other Delivery Options
50 Copyright 1999 United Parcel Service of America, Inc.
All Rights Reserved

Other Delivery Options
4. After tagging the necessary stops, press Signature −.
5. Verify the number of stops and packages and press Enter è.
6. Have the receiver sign the DIAD using the stylus. Press Signature − again.
7. Clarify the receiver’s last name in the “Clarification” field. Press Enter è.
8. Press Stop Complete 44. The Delivery Location/Receiver screen will appear.
Delivery Location/Receiver
1 2 3
Residence Dock
4 5 6
Front Desk Reception Mail Room
7 8 9
Office Receiver Guard
0-OTHER
Delivery Location/Receiver Screen
9. Indicate where you left the packages.
10. Key enter the left-at address for the packages.
Left – At Address Screen
Left – At Location:
/
Left - At Address Screen
© Copyright 1999 United Parcel Service of America, Inc. 51
All Rights Reserved.

Other Delivery Options
Multiple Stops Left At Central Receiving
Location/Mail Room
Follow these steps to deliver multiple delivery addresses to one central receiving location or
mailroom. This type of delivery counts as one stop.
1. From the “Street #” field on the Delivery Address screen, press Soft key ¤ beneath “PreRec”
to access pre-record stop list.
121 LINE TECHNOLOGY
SIR WILLIAM BLVD
ASEANA Rm 502 Flr 5
--------------------------------# Pkg-LA
SIR WILLIAM BLVD 2
TAMAN WARNA RISE 1
Dup/Com Dup/Res LA/Com LA/Res
Pre-Record List
2. Use Little Arrow Up ⇑⇑ and Little Arrow Down ⇓⇓ to highlight appropriate consignee.
3. Press Soft key ¤ beneath “Dup/Com” (commercial) or “Dup/Res” (residence) at selected
stop to tag each one, as left at the receiving location or mailroom.
Note: The flag “LR” will appear to the right of the “# Pkg” column for the consignee’s first
package. The flag “DR” or ”DC” (for “Duplicate”) will appear for additional packages left
at the same address.
121 LINE TECHNOLOGY
2. The
corresponding
Duplicate option
appears here
1. Press the soft
key under the
appropriate
Duplicate
option
SIR WILLIAM BLVD
ASEANA Rm 502 Flr 5
--------------------------------# Pkg-LA
SIR WILLIAM BLVD 2 LR
TAMAN WARNA RISE 1 DC
Dup/Com Dup/Res LA/Com LA/Res
Pre-Record List
4. After tagging the necessary stops, press Signature −.
5. Verify the number of stops and packages and press Enter è.
6. Have the receiver sign the DIAD using the stylus. Press Signature − again.
7. Clarify the receiver’s last name in the “Clarification” field. Press Enter è.
52 Copyright 1999 United Parcel Service of America, Inc.
All Rights Reserved

Other Delivery Options
8. Press Stop Complete 44. The Delivery Location/Receiver screen will appear.
© Copyright 1999 United Parcel Service of America, Inc. 53
All Rights Reserved.

Other Delivery Options
Delivery Location/Receiver
1 2 3
Residence Dock
4 5 6
Front Desk Reception Mail Room
7 8 9
Office Receiver Guard
0-OTHER
Delivery Location/Receiver Screen
9. Indicate where you left the packages.
10. Key enter the left-at address for the packages.
Left – At Address Screen
Left – At Location:
/
Left – At Address Screen
54 Copyright 1999 United Parcel Service of America, Inc.
All Rights Reserved

Other Delivery Options
02100000006
Editing a Completed Stop and Tracking Information
Completed Stop
1. From “Street #” field on Delivery Address screen, highlight last line and press Soft key ¤
beneath “Edit” to access the stop. Big Arrow Down displays Delivery Package screen.
Street # Street Name EDIT Type Dir Suf
121 SIR WILLIAM BLVD
City PostCode Unit
ASEANA 27369 1001
Consignee Room Flr
LINE TECHNOLOGY 502 5
Note:1 CDS N
Completed Stop = 0 Prerec Stop = 0
SplCnts IntlChk PreComm /
Edit Dup PreRec Ovrride
Delivery Package Screen With EDIT Designation
2. Make the changes, then press Stop Complete 4.
Package Tracking Information
1. In the Delivery Package screen, move the cursor to the shipper number to be edited.
2. Highlight next to last line and press Soft key ¤ beneath “Edit” to access Package Edit screen
to view and edit information.
Package Edit Screen
Shipper / ID # ->ASDASD N
1Z/3Z Tag # ->
Tracking # ->
Delivery Conf# ->
Cons Billing # -> Edit Addl Info
Edit
Package Edit Screen
Package Edit Screen Definitions
• Shipper/ID#—Shipper number and identification number of the package.
• 1Z/3Z Tag #—Shipper number, service class, and package reference number.
• Tracking #—Tracking number (PTN).
• Delivery Conf #—Delivery Confirmation control number from the Delivery Confirmation label.
• Cons Billing #—Consignee Billing tracking number from the Consignee Billing label.
• Edit Addl Info —This package has additional information (PO#, Dept#, or Ref#).
• Saturday Pkg —Will only appear if the DIAD is used for Saturday delivery.
© Copyright 1999 United Parcel Service of America, Inc. 55
All Rights Reserved.

Other Delivery Options
Voiding a Delivery Package or Stop
To Void a Package
1. In the Delivery Package screen, move cursor to the shipper number and press Void .
2. Press Soft key ¤ beneath “Yes” to answer the question: “Void This Package (Y/N)?”
3. If stop is active, package data disappears. If stop is complete, package is marked as void.
To Void a Delivery Stop
1. Void all packages first on the Delivery Package screen.
2. Press Big Arrow Up key to display Delivery Address screen.
3. Press Void and press Soft key ¤ beneath “Yes” to answer the question: “Void Stop
(Y/N)?”
Note: You cannot void a delivery stop once you have pressed Stop Complete 4.
Paper Record Totals
This screen is used both to enter packages that have been recorded on the Delivery Information
Record, and to record the total number of packages delivered to a stop.
1. From the Delivery Package screen, with cursor in “Ship #” field, press Soft key ¤ beneath
“+Paper”. Paper Delivery Record screen appears.
Street # Street Name Type Dir Suf
121 SIR WILLIAM BLVD
--------------------------------------- 1 Col Amt Ship # ID# Remark
1 #123456 E
Edit Dup Ship#<6 +Paper
COD NonDel PkgInfo PreRec Deliver
Delivery Package Screen
Gross Pkgs This Stop: 30
Total Pkgs Handwritten by Driver: 6
56 Copyright 1999 United Parcel Service of America, Inc.
All Rights Reserved

Other Delivery Options
Paper Delivery Record Screen
© Copyright 1999 United Parcel Service of America, Inc. 57
All Rights Reserved.

Other Delivery Options
Paper Delivery Record Screen Definitions:
• Gross Pkgs This Stop—Includes all packages delivered to this stop whether recorded on
DIAD, PPRS (pre-recorded), or Delivery Information Record.
• Total Pkgs Handwritten by Driver—Number of packages handwritten by driver either on
the Delivery Information Record or on customer copy.
2. Enter gross packages for this stop.
3. Enter total packages recorded on paper.
4. Press Big Arrow Up to return to the Delivery Package screen.
5. Record your next package or complete the stop.
Delivery Confirmation
The Delivery Confirmation screen appears after you scan or key enter a green Delivery
Confirmation tracking label. These labels are used by shippers without automated shipping systems.
Delivery Confirmation
Shipper #->123456
Tracking #->D1807155665
Alt Ctrl #->654321
Sig Req'd Y/N Y
Msg->
Ship#<6 Yes No
Delivery Confirmation Screen
Delivery Confirmation Screen Definitions:
• Shipper #—Shipper number on the package.
• Tracking #—Tracking number on the package.
• Alt Ctrl #—Alternate control number that a shipper may be using to track the package.
• Sig Req’d—“Y” is default.
• Msg—For messages.
58 Copyright 1999 United Parcel Service of America, Inc.
All Rights Reserved

Other Delivery Options
1. Scan or key enter the shipper number.
• Key enter the alternate control number or press Enter è if there is not one.
2. If Delivery Confirmation label has “Y” in the “Signature Required” field, you must obtain
signature.
3. Complete required information and press Big Arrow Up to return to Delivery Package
screen.
4. Record your next package or complete stop.
Note: Some Delivery Confirmation PTN and 1Z bar code ranges automatically require you to
obtain a signature when they are scanned.
© Copyright 1999 United Parcel Service of America, Inc. 59
All Rights Reserved.

Other Delivery Options
Special Counts Screen
The Special Counts screen allows you to keep track of specific events.
1. From most Delivery, Pickup, or Statistics Card screens, or at the Package Type Screen, press
Soft key ¤ beneath “Splcnts”.
Package Type Menu
1 2 3
Return
4 5 6
AOD Call MX|FC|DF
SplCnts IntlChk PreComm
Package Type Menu
2. The Special Counts screen will display.
Daily Totals Unit Totals for
Add Tot this Stop
ARS 0 || Special A 0
Special 1 0 0 || Special B 0
Special 2 0 0 ||
||
||
||
Special Counts Screen
3. Use Big Arrow Up and/or Big Arrow Down to select move the cursor to appropriate
field, and enter information.
Special Counts Screen Definitions:
• ARS—Number of Authorized Return Service packages picked up.
• Special 1—Number of CDS packages requiring key-entered additional package detail.
• Special 2—Number of calls made to CSC to report tracking information on deliveries or
exceptions.
• Special A—Number of packages delivered that weighed over 70 lbs.
• Special B—Number of packages picked up that weighed over 70 lbs.
Important Note: Check local guidelines for recording Special A and Special B packages.
60 Copyright 1999 United Parcel Service of America, Inc.
All Rights Reserved

Other Delivery Options
Preload Communications
You can key enter information about:
• The car load condition.
• Misloaded packages.
This information is printed out each morning on the Preload Communications Report and given to
the preloader.
Accessing the Preload Communication Misload Screen
If you access Preload Communications after you have key entered the delivery address, the DIAD
will attach misload information to the specific address.
Use this option to enter more detailed information about a misloaded package.
To access the Preload Communication Misload screen:
1. From Delivery Address screen, key enter address of misloaded package. Press Big Arrow
Down .
2. Press Soft key ¤ beneath “PkgInfo”. Package Type Screen is displayed.
3. Press Soft key ¤ beneath “PreComm” from the Package Type Screen. The Preload
Communication Misload screen displays.
Preload Communication (Misload)
Found in Section: 1A
Should be Section: 1B
Out of Seg Y/N: Y
Seq Nbr on Pkg: N
On Area Y/N: Y
On Trailer Y/N: N
Yes No
Preload Communication Misload Screen
4. Enter specific information about a misloaded package as listed on the Delivery Package screen.
5. Press Soft key ¤ beneath “Yes” or “No” as required to answer Y/N questions.
6. Press Big Arrow Up to return to the Delivery Package screen. Complete key entry of
package detail.
© Copyright 1999 United Parcel Service of America, Inc. 61
All Rights Reserved.

Other Delivery Options
7. If you are not going to deliver the misloaded package, follow the steps to record a missed
package.
• Select “Non-Del” and then press 1 (“Other”).
• Press Big Arrow Down and press “D” (“Missed”).
8. Record your next package or complete the stop.
Selecting the Preload Communications Load Screen
Use the Preload Communications Load screen for information on the package car load in general.
1. From most Delivery, Pickup, or Statistics Card screens, except the Delivery Package screen,
press Soft key ¤ beneath “PreComm”.
2. The Preload Communications Load screen will display.
Preload Comm (Load) Car 221234
Y 1. Was load acceptable?
Y 2. Commit time pkgs in proper area?
Y 3. Labels spaced for selection?
Y 4. Pkgs loaded securely?
Y 5. Pkgs loaded in sequential order?
Comments:
Yes No
Preload Communications Load Screen
3. The Preload Communications Load screen describes the quality of the package car load in
general. Press Soft key ¤ beneath “Yes” or “No” as required to answer questions.
4. If necessary, you can enter and edit any additional “Comments” information, up to 71
characters.
5. Press Big Arrow Up to return to the previous screen.
62 Copyright 1999 United Parcel Service of America, Inc.
All Rights Reserved

Other Delivery Options
Load Quality Prompt
If you key enter an ending mileage without entering the load quality rating for the current vehicle, a
Load Quality prompt will display.
Vehicle 1 Car # 221234
Start 1234 Finish 1298 Tot 64
Pump1 1 Fuel1 15 Oil 0
Pump2 0 Fuel2 0 ττ
----Trailer #--------Couple---Uncouple-1 1 0
2 0 0
Was Load Quality Acceptable (Y/N)? N
Yes No
Vehicle Screen With Load Quality Prompt
International Shipment Checklist
The International Shipment Checklist on the DIAD allows you to review and obtain information on
each international package picked up. The International Shipment Checklist can be accessed from
most Delivery, Pickup, or Statistics Card screens, and is view-only.
1. From most screens, press Soft key ¤ beneath “IntlCkList” or select “IntlChk” from any of
several screens. International Shipment Checklist screen displays.
2. Press Little Arrow Up ⇑ or Little Arrow Down ⇓ to move the highlight bar up or down one
row.
ALL INTERNATIONAL SHIPMENTS CHECKLIST
Verify invoice on lead package: οο Value
οο Currency οο Description of Goods
οο Country of Origin
Except Express Envelopes, Documents of
No commercial value and EU to EU goods
in Free Circulation
οο Verify all packages in multiple
International Shipment Checklist Screen (Initial Screen)
© Copyright 1999 United Parcel Service of America, Inc. 63
All Rights Reserved.

Other Delivery Options
pkg shipment
WAYBILL AUDIT (All Shipments):
οο Shipper number/account number
οο Name of sender & phone number
οο Shipper name & address (including
postal code)
οο Receiver contact person/phone number
οο Receiver name & address (including
International Shipment Checklist (First Continuation Screen)
postal code)
οο One Payment of Charges selected
οο One Service Level selected for all
Packages within the shipment
οο No. of Packages in Shipment is
Recorded
οο Description of goods
οο Shipper signature and current date
International Shipment Checklist (Second Continuation Screen)
οο Tracking labels on all other
packages in shipment (2 of _, 3 of _)
Additionally, Audit For:
οο T doc present for all goods not in
Free circulation
οο EUR Certification stamped by customs
if applicable
International Shipment Checklist (Third Continuation Screen)
Note: This screen is view only. No entry can be made.
3. Review the list of instructions to verify that all the documentation needed by Customs is on each
international package that is picked up.
4. Press Big Arrow Up to return to screen you were viewing prior to selecting International
Shipment Checklist.
Note: Whenever the DIAD experiences a memory restart, the International Shipment Checklist
may be deleted.
64 Copyright 1999 United Parcel Service of America, Inc.
All Rights Reserved

Pickups
QUICK REFERENCE - PICKUPS
Typical Scheduled
Pickup Stop
(Non-Letter Center)
Scheduled pickups have been downloaded to the DIAD and must be picked up daily.
1. Press 1 (“Scheduled”) from the Main Menu.
DIAD Main Menu V21.32_D3 [12:14]
1 2 3
Scheduled Unscheduled OneTime
4 5 6
Delivery Statistics Comm
7 8 9
Print DelLink ODS
SplCnts IntlChk PreComm
Main Menu
2. The Scheduled Pickup Account List will appear. This list shows each of your regular pickup
accounts in pickup order. Scroll through the Scheduled Pickup Account List using Little
Arrows or Big Arrows. (Little Arrows advance one line at a time. Big Arrows advance four
lines at a time.) Highlight the pickup account to be edited and press Enterè.
1025 LEUNG ENTERPRISES 17:30
VICTORIA HARBOUR DOCK
ASEANA Rm Flr
----------------------- 0 Prerecorded - LEUNG ENTERPRISES 90123456 17:30
DAVIS INVESTMENTS 78901234 17:30
PEARL GARDEN HOTE 56789012 18:00
MAJESTIC HOTEL 34567890 18:00
Scheduled Pickup Account List
3. The Scheduled Pickup Package screen will appear. Key enter number of packages being
picked up and record any money collected at pickup (C.O.P.).
© Copyright 1999 United Parcel Service of America, Inc. 65
All Rights Reserved.

Pickups
LEUNG ENTERPRISES DOCK 17:00
Scheduled Ship#:123456
Unit:1001 LBX (Y/N): N
---------------------------------------Totl:0
Tot: 0.00
Loos:0 Ck: 0.00
Pall:0
SplCnts IntlChk NoLBXBC
COP NonPU PreRec Check
Scheduled Pickup Package Screen
4. Press Stop Complete 4. You will return to Account List. Highlight next pickup account using
Little Arrow Up ⇑ and Little Arrow Down ⇓, or press Escape to return to Main Menu.
Note: If you are unable to complete the pickup for any reason, use Soft key ¤ to select
“NonPU”. The Non-Pickup Menu will appear.
Note: You can pre-record a scheduled pickup stop. Enter the stop, then press the Soft key ¤
beneath “PreRec” while you are in the Scheduled Pickup Package screen. A “P” is
displayed to the left of a pre-recorded account in the Scheduled Pickup Account List. An
asterisk “*” is displayed to the left of a completed stop account.
A “P” indicates a
Pre-recorded
account
An “*”
Indicates a
completed
Stop Account
1025 LEUNG ENTERPRISES 17:30
VICTORIA HARBOUR DOCK
ASEANA Rm Flr
----------------------- 1 Prerecorded - LEUNG ENTERPRISES 90123456 17:30
DAVIS INVESTMENTS 78901234 17:30
PPEARL GARDEN HOTE 56789012 18:00
*MAJESTIC HOTEL 34567890 18:00
Scheduled Pickup Account List
66 Copyright 1999 United Parcel Service of America, Inc.
All Rights Reserved

Pickups
•
identifier
Overview
There are several types of pickups you can complete with the DIAD. The first three appear on the
Main Menu.
• Scheduled Pickup—A pickup that has been downloaded to the DIAD and is completed daily.
• Unscheduled Pickup—A pickup that is not requested on a daily basis. For example, when
you assist other service providers by completing pickups for them.
• One-Time Pickup—A customer-requested pickup for a predetermined number of packages.
• On Demand Pickup (On Call or Generic)—See On Demand section, page 80.
Scheduled Pickups (Main Menu Option 1)
Letter Center
Use the following procedures when the pickup location is a Letter Center.
Note: You can also make Letter Center pickups as unscheduled or On Demand.
1. Locate the nine-digit, unique Letter Center bar code inside the Letter Center, on the upper-right
corner of the opened door. (Example: 7L0005414.)
Œ
Ž
7L-Letter Center
6-digit shipper
number
Check digit
© Copyright 1999 United Parcel Service of America, Inc. 67
All Rights Reserved.

Pickups
2. From Scheduled Letter Box Pickup Package screen, scan the Letter Center bar code. Six-digit
shipper number will fill “LBX Id” field.
10:50
Scheduled LBX Id:
Unit:1001 LBX (Y/N):Y
---------------------------------------Totl:0
SplCnts IntlChk NoLBxBc
COD NonPU PreRec Check
Scheduled Letter Box Pickup Package Screen
Note: If you are unable to scan or key enter the Letter Center bar code, press Soft key ¤
beneath “NoLBxBc” to exit the “LBX Id” field.
3. As you remove each letter or pak from the Letter Center, verify that the ASD is complete. Fill
in any missing information. Make sure the billing information and weight are complete.
000 541
ASD Label
4. Remove the green UPS copy and turn it in with all other Letter Center pickup documents
(ASDs, UPS Shipping Records, etc.).
Note: Any other pickup record documents must be segregated and turned in with the ASDs so the
customer receives the Letter Center rate.
5. At the Pickup Package screen, scan or key enter the ASD bar code. All ASDs must be origin
scanned!
6. After scanning, the Tracking Number screen displays. Enter the method of payment for each
ASD.
68 Copyright 1999 United Parcel Service of America, Inc.
All Rights Reserved

Pickups
Tracking # Cr Cash Check
2 N1421618234 N 0.00 15.50
1 N3214687425 N 0.00 20.00
COP Check
Tracking Number Screen
7. Press Big Arrow Up .
8. Record additional pickup package information and the total number of packages picked up.
The ASD revenue fields display ASD totals. These fields only display if cash or checks are
associated with the scanned ASD.
10:50
Scheduled LBX Id:XE1234
Unit:1001 LBX (Y/N):Y
ASD Fields
Total = cash and checks
---------------------------------------Totl:2 ----- ASD --- Tot: 35.50
Ck: 35.50
Cash Due: 0.00
SplCnts IntlChk NoLBxBc
COD NonPU PreRec Check
Scheduled Letter Box Pickup Summary Screen - Display ASD Revenue Feature
9. The “Cash Due” field displays total cash due at this Letter Center stop. Non-ASD totals do not
display.
10. Follow normal stop complete and Letter Center routine.
Note: For prepaid ASDs, leave the credit indicator at “Y.”
Note: If you are unable to complete the pickup for any reason, use Soft key ¤ to select
“NonPU”. The Non-Pickup Menu will appear.
© Copyright 1999 United Parcel Service of America, Inc. 69
All Rights Reserved.

Pickups
Complete This Stop (Y/N)? N
Alert Screens
You will see this screen if you press Stop Complete 44 and one or both of the conditions shown on
the screen exists.
****************************************
*Notice: Following Condition(s) Exist *
*--Revenue Exists, but no pkgs present *
Œ
*--Pickup Scanned pkgs > Total pkgs *
•
* *
* *
* *
****************************************
Yes No
Stop Complete Conditions Exist Screen
ΠOccurs when revenue from a scanned ASD has been entered
and a stop shows an exception, such as “NI-1.”
• Indicates more origin-scanned packages than the “Totl” field
displays.
70 Copyright 1999 United Parcel Service of America, Inc.
All Rights Reserved

Pickups
Unscheduled Pickups (Main Menu Option 2)
Non-Letter Center
1. Press 2 (“Unscheduled”) from the Main Menu.
2. If there are ASDs at the pickup point, verify the ASD to ensure that it is complete. Fill in the
missing information. Make sure that billing information and weight are complete.
3. Key enter address information and press Big Arrow Down .
4. Key enter the customer’s shipper number.
5. Remove the green UPS copy and return it to your center.
6. At the Unscheduled Non-Letter Box Pickup Package screen, scan or key enter the ASD bar
code. All ASDs must be origin scanned!
GREAT EAGLE HOTEL
Unscheduled Ship#:123456
Unit:1001 LBX (Y/N):N
---------------------------------------Totl:0
Tot: 0.00
Loos:0 Ck: 0.00
Pall:0
SplCnts IntlChk NoLBxBc Yes No
COP NonPU Ship#<6 Check
Unscheduled Non-Letter Box Pickup Package Screen
Note: For an unscheduled Letter Center pickup, scan the Letter Center bar code and the DIAD
will automatically prompt you with “Make This a LBX Pickup (Y/N)?” Select Yes and the
“Ship #” field will automatically display the LBX ID.
7. After scanning, the Tracking Number screen displays. Enter the method of payment for each
ASD. If the package is prepaid, leave default for “CR” as “Y.”
Tracking # Cr Cash Check
2 N1421618234 N 0.00 45.00
1 N3214687425 N 32.00
COP Check
Tracking Number Screen
Note: The DIAD provides an override feature for ASD bar codes that might not be recognized by
the DIAD. Select “COD” after scanning the ASD to display the “Revenue Amounts” fields.
© Copyright 1999 United Parcel Service of America, Inc. 71
All Rights Reserved.

Pickups
Check = total checks
Check = total checks
8. Press Big Arrow Up . Record additional pickup package information and the total number
of packages picked up. ASD revenue fields display any cash or checks that were entered as a
method of payment on the previous Tracking Number screen. These fields only display if cash
or checks are associated with the scanned ASD. ASD fields include: “Totl” (total cash and
checks) and “Chk.”
GREAT EAGLE HOTEL
Unscheduled Ship#: 123456
Unit:1001 LBX (Y/N):N
----------------------------------------
ASD Fields
Total = cash and checks
Unscheduled Non-Letter Box Pickup Summary Screen - Display ASD Revenue Feature
Totl:3 ----- ASD ---- --- NON ASD - Tot: 77.00 Tot: 0.00
Ck: 45.00 Ck: 0.00
Cash Due: 32.00
SplCnts IntlChk NoLBxBC Yes No
COP NonPU Ship#<6 Check
9. Key enter any non-ASD amounts. Non-ASD fields include: “Totl” (total cash and checks) and
“Chk.”
GREAT EAGLE HOTEL
Unscheduled Ship#:123456
Unit:1001 LBX (Y/N):N
---------------------------------------Totl:3 ----- ASD ---- --- NON ASD - Tot: 77.00 Tot: 15.00
Ck: 45.00 Ck: 15.00
Cash Due: 32.00
SplCnts IntlChk NoLBxBC Yes No
COP NonPU Ship#<6 Check
Non-ASD Fields
Total=cash and checks
Unscheduled Non-Letter Box Pickup Summary Screen - Display ASD Revenue Feature
10. View the “Cash Due” field for the total amount of cash (no checks) due on both ASD and non-
ASD pickups.
11. Press Stop Complete 4.
Note: If you are unable to complete the pickup for any reason, use Soft key ¤ to select
“NonPU”. The Non-Pickup Menu will appear.
72 Copyright 1999 United Parcel Service of America, Inc.
All Rights Reserved

Pickups
One-Time Pickup (Main Menu Option 3)
To record one-time pickup stops:
1. Press 3 (“OneTime”) from the Main Menu.
2. Key enter the address. Press Big Arrow Down .
3. Key enter the last three digits of the One-Time ID (the last three digits of the customer’s
telephone number).
4. Record the pickup information.
COOMBS RESTAURANT
One Time Ship#:123456
Unit:1001 ID:
---------------------------------------Totl:0
Tot: 0.00
Loos:0 Ck: 0.00
Pall:0
SplCnts IntlChk
COP NonPU Ship#<6 Check
Pickup Screen
5. Key enter the amount of money collected.
6. Press Stop Complete 4. You will return to the Main Menu.
Note: If you are unable to complete the pickup for any reason, use Soft key ¤ to select
“NonPU”. The Non-Pickup Menu will appear.
Non Pickup Menu
1 2 3
Missed Cancelled Closed
4 5 6
Not In No Money Not Ready
Non-Pickup Menu
© Copyright 1999 United Parcel Service of America, Inc. 73
All Rights Reserved.

Pickups
Pickup Summary Bar Codes
With the automation of UPS shipping systems, many of our customers generate a Pickup Summary
Bar Code Report when they close out their shipping activity at the end of the day. The Pickup
Summary Bar Code (PSB) is a 23-character code generated by any customer using an automated
shipping system, such as TeleShip, OnLine Office, or OnLine Professional.
Pickup Summary Bar Code Report
74 Copyright 1999 United Parcel Service of America, Inc.
All Rights Reserved

Pickups
Completing the Pickup
If customers generate Pickup Summary Bar Code Reports at their locations, follow these steps
during your normal pickup routine:
1. Verify the total number of packages picked up against information on the Pickup Summary Bar
Code Report.
2. From the Scheduled Non-Letter Box Pickup Summary screen, scan or key enter the pickup
summary bar code.
LEUNG ENTERPRISES DOCK 17:30
Scheduled Ship#:123456
Unit:1001
---------------------------------------Totl:0
Tot: 0.00
Loos:0 Ck: 0.00
Pall:0
Scheduled Non-Letter Box Pickup Summary Screen
3. Once you scan pickup summary bar code, Tracking Number screen displays label.
Tracking # Cr Cash Check
2 91123456000000003000038
1 91123456000000003000046
COD Check
Tracking Number Screen
4. Scan any remaining unique pickup summary bar codes at same stop.
5. Press Big Arrow Up to return to Pickup Package screen.
LEUNG ENTERPRISES DOCK 17:30
Scheduled Ship#:123456
Unit:1001 Total PSB’s:2
---------------------------------------Totl:30
Tot: 0.00
Loos:0 Ck: 0.00
Pall:0
SplCnts IntlChk
COP NonPU Ship#<6 Check
Pickup Package Screen
© Copyright 1999 United Parcel Service of America, Inc. 75
All Rights Reserved.

Pickups
6. Key enter the total number of packages picked up in the DIAD.
7. Sign the Pickup Summary Bar Code Report, recording the pickup time and the number of
packages picked up. The report stays with the shipper.
8. If high-value packages are in the pickup, the automated shipping system will generate a High
Value Report. The system can produce two separate reports for total value over $1,000 and
$5,000. Sign the High Value Report and return it to the center.
High Value Report
76 Copyright 1999 United Parcel Service of America, Inc.
All Rights Reserved

On Demand Events
New
ON DEMAND EVENTS (MAIN MENU OPTION 9)
System Overview: How it Works
DIAD III, which is equipped with a data radio, can send messages to a center and/or dispatch site,
and receive messages from either site. The service provider can receive messages such as requests
for a pickup, a delivery, or an assist. These are called On Demand events.
You can receive or initiate these types of On Demand events:
Pickup:
• OCA—A pickup with the service type of On Call Air (OCA).
• Generic—A pickup with the service type of generic will include Rapid Recovery
requests, such as a customer’s request for an additional pickup.
Delivery:
• Generic—A delivery with the service type of generic will include Rapid Recovery
requests. Examples include a customer’s request for a re-delivery attempt or request to
pick up a package that was previously delivered, such as a misdelivery, a refused, or a
damaged package.
Assist:
• Generic—An assist with the service type of generic.
Receiving On Demand Event Messages
The On Demand Alert screen appears on your DIAD whenever the center or dispatch site transmits
an On Demand event message. This indicates that a customer needs a specific service, such as an
On Call Air pickup (OCA).
On Demand Alert
Pickup - OCA
KENNETH CHAN CHEVROLET
145 SIR WILLIAM BLVD
ASEANA
Commit: 17:45 Pkgs: 3
Ready: 17:00 Close: 18:00 Time: 15:00
Enter OVERRIDE, PRERECORD or ETA:
PreRec Ovrride
On Demand Alert Screen
© Copyright 1999 United Parcel Service of America, Inc. 77
All Rights Reserved.

On Demand Events
On Demand Alert Screen Definitions
• Alert—Status of the alert.
Ø New—First time message has been dispatched.
Ø Modify—Contains updated information about an existing event, such as an address or
commit time change. Check the screen for new or changed information. Appears only if
the event has not been stop completed.
Ø Cancel—Cancels a previously dispatched event and removes it from the list (only if the
stop has not been stop completed).
• Comment—May contain additional information about the event (up to 24 characters) or
future service type information, such as Rapid Dispatch Recovery.
• Customer Name
• Address
• Ready—The time that the customer will be ready.
• Commit—The time committed for completion of the service.
• Pkgs—The number of packages expected.
• Close—The time that the customer facility closes.
Accepting On Demand Events
To acknowledge receipt and accept the On Demand Event enter an “ETA” (Estimated Time of
Arrival). Once you accept the event, the DIAD adds it to the On Demand Event List.
Highlight the bottom line. Then press Soft key ¤ beneath “Ovrride” to tell the center you are
unable to service the event.
Overriding an On Demand Event
If you receive an On Demand message that you are unable to service due to a breakdown or being
out of the area:
1. When “Ovrride” has been selected, DIAD displays Select Override Response screen. Enter a
reason for answering with an override.
Select Override Response
1 – Vehicle breakdown
2 – Out of area
3 4 5 0 – Other
Select Override Response Screen
78 Copyright 1999 United Parcel Service of America, Inc.
All Rights Reserved

On Demand Events
2. Select a listed option or press 2 for (“Out of area”).
Enter Details (Optional):
To:
Out of area
Escape - Clear Enter - Send
Override Response Key Entry Screen for Pre-Defined Response
3. To send the completed message, press Enter è. Then press Soft key ¤ to select “Yes” to
respond to the question, “OK to Send Y/N?”
Enter Details (Optional):
To:
Out of area
OK to Send Y/N?
Yes No
Override Response Key Entry Screen With OK Message
Editing On Demand Events
1. Access the On Demand Event List from the On Demand Services Menu. This process is similar
to servicing an event for a pickup, delivery, or assist.
2. Use Little Arrow Down ⇓ to place the cursor on the On Demand stop to be edited.
3. Press Enter è.
4. Update as needed.
5. Press Stop Complete 4.
© Copyright 1999 United Parcel Service of America, Inc. 79
All Rights Reserved.

On Demand Events
On Demand Event: Pickup
1. Press 9 (“ODS”) on the Main Menu.
DIAD Main Menu V21.32_D3 [12:14]
1 2 3
Scheduled Unscheduled OneTime
4 5 6
Delivery Statistics Comm
7 8 9
Print DelLink ODS
SplCnts IntlChk PreComm
Main Menu
2. Press 1 (“Pickup”) from the On Demand Services Menu.
On Demand Services Menu
1 2 3
Pickup Assist
4 5 6
Delivery
On Demand Services Menu
3. The On Demand Pickup List will appear. Select an event from the On Demand Event List and
service it, or add an event by using Soft key ¤ to select “AddStop”.
Note: When adding an event, the Delivery Address screen will appear prior to the ODS Pickup
Detail screen.
KENNETH CHAN CHEVROLET 18:00
BILL MUNSON ASEANA
press PRERECORD to add Pickup ----ETA 197 AYUTHAYA LOOP 17:30
*246 LONG XUYEN TERR 17:45
493 YAMAGUCHI W 18:00
505 FINNALYSON RD 18:10
AddStop
ODS Pickup List
4. Press Enter è and the ODS Pickup Detail screen will appear.
80 Copyright 1999 United Parcel Service of America, Inc.
All Rights Reserved

On Demand Events
On Demand Event Pickup Detail
Commit: 17:45 Ready: 17:00 ETA: 17:30
Event #:0000AB1234 Close: 18:00
Phone #:4100-4567 Type: OCA
Pkgs: 3 Wgt: 75
Contact:BILL MUNSON O/W
SplCnts IntlChk PreComm PreRec
ODS Pickup Detail Screen
5. Verify or key enter information in the On Demand Event Pickup Detail screen.
Notes:
• Once the On Demand event is pre-recorded, the ETA can’t be modified until you receive a
new ETA alert.
• If you have the event number, enter it. Otherwise, the DIAD automatically assigns an event
number.
• If the dispatch site sends the message, most fields will already be filled. If you initiate the
communication, then you will need to enter the appropriate details.
6. Press Big Arrow Down . The On Demand Event Pickup Summary screen will appear.
KENNETH CHAN CHEVROLET 18:00
Pickup OCA Ship#:123X56
Unit:1001 LBX (Y/N):N
---------------------------------------Totl:3
Wgt :75 Tot: 70.50
Loos:0 *Ck: 70.50
Pall:0 Credit:N
SplCnts IntlChk PreComm
COD NonPU PreRec Check
ODS (Non Letter Box) Pickup Summary Screen
7. Enter data as you would with any unscheduled pickup.
8. Press Big Arrow Down . The ODS Pickup Package Level Detail screen will appear.
KENNETH CHAN CHEVROLET 18:00
On Demand Event Pickup - OCA 123X56
-Pkg--Weight---Srv Cls------Cost------ 1 72 2DA 46.50
2 1 1DA 13.75
3 2 2DA 10.25
4 .
5 .
SplCnts IntlChk PreComm PreRec
© Copyright 1999 United Parcel Service of America, Inc. 81
All Rights Reserved.

On Demand Events
ODS Pickup Package Level Detail Screen
82 Copyright 1999 United Parcel Service of America, Inc.
All Rights Reserved

On Demand Events
Note: This screen appears only if the dispatch site transmits package detail information for five or
fewer packages.
9. Verify customer-provided package detail information.
10. To complete the On Demand Event, press Big Arrow Up to return to the Pickup
Summary screen. Then press Stop Complete 4.
ODS Pickup Status Menu
1. If you were unable to complete the pickup for any of the reasons listed, use Soft key ¤ to
select “NonPU” from summary screen.
2. ODS Pickup Status Menu is displayed. Select appropriate reason you were unable to complete
the pickup.
On Demand Pickup Status Menu
1 2 3
Missed Cancelled CLO Early
4 5 6
Not In No Money Not Ready
7 8 9
Already PU
ODS Pickup Status Menu
On Demand Event: Delivery
To complete an On Demand delivery, follow the same procedures as you would for an On Demand
pickup.
1. From the On Demand Services Menu, press 4 (“Delivery”).
On Demand Services Menu
1 2 3
Pickup Assist
4 5 6
Delivery
On Demand Services Menu
2. The On Demand Delivery List will appear. Select an event from the On Demand Event List and
service it, or add an event by using Soft key ¤ to select “AddStop”.
© Copyright 1999 United Parcel Service of America, Inc. 83
All Rights Reserved.

On Demand Events
Note: When adding an event, the Delivery Address screen will appear prior to the ODS Pickup
Detail screen.
84 Copyright 1999 United Parcel Service of America, Inc.
All Rights Reserved

On Demand Events
GUAT KENG INC 18:00
PAT REDDAN ASEANA
press PRERECORD to add Delivery ----ETA-
103 N ZAMA SEN 14:00
*250 OAK JUNCTION 15:00
790 CHEMPAKA RING RD 15:30
AddStop
ODS Delivery List
3. The DIAD displays the ODS Delivery Address screen. Verify and correct necessary address
information .
Street # Street Name Type Dir Suf
103 ZAMA SEN N
City PostCode Unit
ASEANA 27369 1001
Consignee Room Flr
GUAT KENG INC 412 4
Note: CDS N
On Demand Event Delivery – Gen
SplCnts IntlChk PreComm /
Dup PreRec Ovrride
ODS Delivery Address Screen
4. Press Big Arrow Down ODS Delivery Detail screen will appear.
On Demand Event Delivery Detail
Commit: 14:00 Ready: 13:30 ETA: 14:00
Event #:0000BC1425 Close: 18:00
Type: Gen
Amt: 25.00
SplCnts IntlChk PreComm PreRec
ODS Delivery Detail Screen
5. View or key enter detail data beginning with “Commit” field. DIAD will display additional
comments received from dispatch site or center.
6. Press Big Arrow Down to display ODS Delivery Package screen.
© Copyright 1999 United Parcel Service of America, Inc. 85
All Rights Reserved.

On Demand Events
Street # Street Name Type Dir Suf
103 ZAMA SEN N
--------------------------------------- Col Amt Ship # ID# Remark
Edit Dup Ship#<6 +Paper
COD NonDel PkgInfo PreRec Deliver
ODS Delivery Package Screen
7. Scan or key enter package detail.
ODS Delivery Status Menu
If you are unable to complete the delivery, follow the current procedures for accessing NonDelivery reasons by selecting “NonDel” from package screen.
86 Copyright 1999 United Parcel Service of America, Inc.
All Rights Reserved

On Demand Events
On Demand Event: Assist
1. Select 2 (“Assist”) from On Demand Services Menu.
On Demand Services Menu
1 2 3
Pickup Assist
4 5 6
Delivery
On Demand Services Menu
2. The ODS Assist List will appear. Select an event from the On Demand Event List and service
it, or add an event by using Soft key ¤ to select “AddStop”.
3. Verify or key enter information in the ODS Assist Address screen.
Street # Street Name Type Dir Suf
1123 PACIFIC AV
City PostCode Unit
ASEANA 27369 1001
Consignee Room Flr
MO DAVIS INVESTMENTS 200 2
On Demand Event Assist – Gen
SplCnts IntlChk PreComm /
Dup PreRec Ovrride
ODS Assist Address Screen
4. Press Big Arrow Down to view the ODS Assist Detail screen.
On Demand Event Assist Detail
Commit: 15:00 Ready: 14:30 ETA: 15:00
Event #:0000GB1525 Close: 17:00
Type: Gen
SplCnts IntlChk PreComm
NonDel PreRec
ODS Assist Detail Screen
© Copyright 1999 United Parcel Service of America, Inc. 87
All Rights Reserved.

On Demand Events
ODS Assist Status Menu
If you are unable to complete an assist you previously accepted, use Soft key ¤ to select
“NonDel” in ODS Assist Detail Screen. ODS Assist Status Menu will be displayed.
On Demand Assist Status Menu
1 2 3
Missed Cancelled CLO Early
4 5 6
Not In Not Ready
7 8 9
AlreadySvc
ODS Assist Status Menu
88 Copyright 1999 United Parcel Service of America, Inc.
All Rights Reserved

DIAD Alerts
Commit:14:0
ETA: 14:00
DIAD ALERTS
Alerts can:
• Notify you of upcoming ETA and commit times.
• Ask you for information about a missed commitment time.
• Review work that needs to be completed.
• Alert you to On Demand System (ODS) communication conditions.
ETA Alert
The ETA Alert Screen reminds you that an Estimated Time of Arrival (ETA) is approaching.
The alert is defaulted to 20 minutes prior to the ETA.
ETA Alert
Delivery – Gen
MO DAVIS INVESTMENTS
1123 PACIFIC AV
ASEANA
Commit: 14:00 Pkgs: 1
Ready: 13:30 Close: 18:00 Time: 13:40
BIG UP to Return
PreRec Ovrride
ETA Alert Screen
Commit Time Alert
The Commit Time Alert Screen notifies you that an On Demand event commit time is
approaching. The DIAD highlights the commit time (the default is set at 20 minutes.)
Commit Time Alert
Delivery – Gen
MO DAVIS INVESTMENTS
1123 PACIFIC AV
ASEANA
ETA: 14:00 Pkgs: 1
Ready: 13:30 Close: 18:00 Time: 13:40
BIG UP to Return
PreRec Ovrride
Commit Time Alert Screen
© Copyright 1999 United Parcel Service of America, Inc. 89
All Rights Reserved.

DIAD Alerts
Commit: 14:00
14:00
Missed Commit Alert
The Missed Commit Alert screen requires you to establish a new ETA and requests information
about the missed commit time.
Missed Commit Alert
Delivery - Gen
MO DAVIS INVESTMENTS
1123 PACIFIC AV
ASEANA
Pkgs: 1
Ready: 13:30 Close: 18:00 Time:
Enter ETA:
PreRec Ovrride
Missed Commit Alert Screen
1. Enter new ETA and Select Missed Commit Reason screen appears.
Select Missed Commit Reason
1 – Received past commit time
2 – Packages not ready
3 – Incorrect pickup address
4 – Delayed in traffic
5 0 – Other
Select Missed Commit Reason Screen
2. Select one of the four options, or O (“Other”). The Missed Commit Reason Key Entry
screen will appear.
Missed Commit Reason Key Entry
Delayed in traffic
Escape - Clear Enter - Send
Yes No
Missed Commit Reason Key Entry Screen - For Pre-Defined Response
3. Enter additional information at the Missed Commit Reason Key Entry screen if necessary.
4. To send the completed message, press Enter è and press Soft key ¤ to select “Yes” to
respond to the question, “OK to Send Y/N?”
90 Copyright 1999 United Parcel Service of America,
Inc.
All Rights Reserved

DIAD Alerts
Exceeded Maximum Retries Alert
When the DIAD has exceeded the maximum number of retries while attempting to transmit data
through the DVA back to the dispatch site or center, the Exceeded Maximum Retries Alert
screen will appear. See next page.
ODS Transmission Alert
COMMUNICATION FAILURE
Follow Center Instructions
Press BIG UP to Return
PreRec
Exceeded Maximum Retries Alert ScreenPhone ODS
© Copyright 1999 United Parcel Service of America, Inc. 91
All Rights Reserved.

Phone ODS
PHONE ODS (Communications Menu Option 6)
The Exceeded Maximum Retries Alert screen tells you that you need to use the telephone to
verbally communicate your messages.
1. To perform this function, return to the Main Menu.
DIAD Main Menu V21.32_D3 [12:14]
1 2 3
Scheduled Unscheduled OneTime
4 5 6
Delivery Statistics Comm
7 8 9
Print DelLink ODS
SplCnts IntlChk PreComm
Main Menu
2. Select 6 (“Comm”). The Communications Menu will display.
Communications Menu
1 2 3
Phone DVA Send Send Txt Msg
4 5 6
Phone ODS
Rad On Rad Off
Communications Menu
Note: When the radio has been disabled, a prompt to enable the radio transmitter appears
every 10 minutes. Press the soft key beneath “Yes” to enable the radio or beneath “No” to
continue the disable function.
92 Copyright 1999 United Parcel Service of America,
Inc.
All Rights Reserved

Phone ODS
3. From the Communications Menu, select 6 (“Phone ODS”). The Phone ODS
Instructions screen will display.
Phone ODS - Instructions
1) Dial 9999-9999
2) The next screen displays a list of
On Demand Messages that need to be
Communicated to the On Demand System.
3) Press Stop Complete on each message
when finished communicating.
Press Big Down to continue....
Phone ODS Instructions Screen
4. Dial the dispatch number listed, and prepare to talk through your pending messages.
5. Press Big Arrow Down The ODS Messages Waiting for Communication screen will
display.
ODS Messages Waiting for Communication
-Event #-----Message Info--Time---Dest-*0000GH1328 Delivery ETA 12:30
0000DE1620 Pickup Comp 10:50
0000GB1525 Assist Comp 10:00
Text DISP
Resp Req
ODS Messages Waiting for Communication Screen
6. An asterisk “*” will display to the left of the first event on the list. It indicates that the
message exceeded the maximum retry count.
Note: The DIAD also lists all the other ODS messages that have not been transmitted.
7. Press Enter è if you need more details about the selected event.
8. To show that you’ve verbally communicated the message, press Stop Complete 4. This
removes the event from the list. Complete all messages.
© Copyright 1999 United Parcel Service of America, Inc. 93
All Rights Reserved.

Phone ODS
ODS Alerts
On Demand Events Not Complete Alert
The following screen warns you that you still need to complete pre-recorded On Demand
events before stopping the DIAD.
[18:30]
On Demand Events Are Not Complete!
Delivery – COMPLETE
Pickup - COMPLETE
Assist - NOT COMPLETE
Press Any Key to Continue
On Demand Events Not Completed Warning Screen
Messages Pending Communication Alert
If you attempt to stop the DIAD while On Demand messages are pending transmission to the
ODS System, even if all On Demand events are complete, the following screen appears.
[18:30]
On Demand Messages Are Pending
Successful Transmission!
Pending Messages Must Be
Verbally Communicated!
Press Any Key to Continue
On Demand Events Messages Pending Communication Screen
94 Copyright 1999 United Parcel Service of America,
Inc.
All Rights Reserved

Phone ODS
1. Press Big Arrow Up to return to the ODS Messages Waiting for Communication
screen.
ODS Messages Waiting for Communication
-Event #-----Message Info--Time---Dest-*0000GH1328 Delivery ETA 12:30
0000DE1620 Pickup Comp 10:50
0000GB1525 Assist Comp 10:00
Text DISP
Resp Req
ODS Messages Waiting for Communication Screen
2. Verbally communicate all the pending messages before stopping the DIAD.
© Copyright 1999 United Parcel Service of America, Inc. 95
All Rights Reserved.

Radio Status Indicator
TEXT MESSAGES (Communications Menu Option 3)
Text Messages Overview
The DIAD is capable of sending and receiving text messages. These messages can alert you to
traffic problems, Next Day Air arrivals, meet points, etc. You can receive two types of
messages:
• Response Required.
• Text.
To send and receive this essential information, you need to establish contact between the DIAD
and the ODS system. This link or log-in automatically occurs.
Text Only Messages
When a text message is sent by the dispatch site or center, it is displayed on the Text Message
Alert screen.
Read the text message, making a mental note of its contents.
Text Message Alert
ACCIDENT ON PHUA CHU KANG LANE
BIG UP to Return or PRERECORD to defer
PreRec
Text Message Alert Screen
Note: If you were in the process of completing a stop when you received the text message,
you could defer it once by using Soft key ¤ beneath “PreRec”. This is also true for On
Demand event alerts. If you defer an alert while other alerts are pending for display, the DIAD
will automatically defer the other alerts as well.
The DIAD displays the text message again following the next stop complete. To exit the
message permanently, press Big Arrow Up .
96 Copyright 1999 United Parcel Service of America,
Inc.
All Rights Reserved
 Loading...