


r765/r765is
User’s Guide
6802985C35-A, draft,
August 27, 2008
@6802985C35@

IMPORTANT NOTICE: PLEASE READ
PRIOR TO USING YOUR HANDSET
The provided SIM cards are intended for use with your
handset.
Loss of certain features will result when using a SIM
card from one of the following models: i30sx, i35s,
i50sx, i55sr, i58s, i60c, i80s, i85s, i88s, i90c, i95cl
series, and the i2000 series.
For more information on SIM card compatibility, go to
www.motorola.com/iden.
Defects or damage to your Motorola handset that result
from the use of non-Motorola branded or certified
Accessories, including but not limited to replacement
housings and or other peripheral accessories, are
excluded from warranty coverage. Please refer to the
text of Motorola's Limited One Year warranty located in
this user’s guide for complete details.

FCC Interference
Note:
This equipment has been tested and found to comply with
the limits for a Class B digital device, pursuant to part 15 of the
FCC Rules. These limits are designed to provide reasonable
protection against harmful interference in a residential
installation. This equipment generates, uses and can radiate radio
frequency energy and, if not installed and used in accordance with
the instructions, may cause harmful interference to radio
communications. However, there is no guarantee that interference
will not occur in a particular installation.
If this equipment does cause harmful interference to
radio or television reception, which can be
determined by turning the equipment off and on, the
user is encouraged to try to correct the interference
by one or more of the following measures:
•
Reorient or relocate the receiving antenna.
•
Increase the separation between the equipment and
receiver.
•
Connect the equipment into an outlet on a circuit different
from that to which the receiver is connected.
•
Consult the dealer or an experienced radio/TV technician
for help.
This device complies with Part 15 of the FCC Rules.
Operation is subject to the following two conditions:
(1) This device may not cause harmful interference.
(2) This device must accept any interference
received, including interference that may cause
undesired operation.
Changes or modifications made in the handheld
computer, not expressly approved by Motorola, will
void the user's authority to operate the equipment.

Use and Care
Use and Care
To care for your Motorola handset, please keep it away from:
extreme heat or cold
For both handset models avoid
temperatures below -10°C/14°F
or above 60°C/140°F.
microwaves
Don’t try to dry your handset in
a microwave oven.
cleaning solutions
To clean your handset, use only
a dry soft cloth. Don’t use
alcohol or other cleaning
solutions.
Use and Care
iii

contents
Use and Care . . . . . . . . . iii
introducing your handset 1
menu map. . . . . . . . . . . . 2
handset basics . . . . . . . . 5
about this guide . . . . . . 5
insert the SIM cards. . . 5
battery and charger. . . . 7
antenna installation . . 10
antenna removal. . . . . 10
turn it on & off . . . . . . 10
SIM card security . . . . . 11
display . . . . . . . . . . . . 13
main menu . . . . . . . . . 15
text entry . . . . . . . . . . 15
navigation key. . . . . . . 17
Press the navigation key
up, down, left, or right to
scroll to items in the
display. When you scroll to
highlight the desired item,
press .. . . . . . . . . . . . . 17
volume . . . . . . . . . . . . 17
handsfree speaker . . . 18
transmitters . . . . . . . . 18
use GPS with map
software . . . . . . . . . . . 18
features for the vision
impaired . . . . . . . . . . . 20
calls . . . . . . . . . . . . . . . . 21
group calls, talkgroups,
sets, and hubs . . . . . . 21
emergency group calls
and alert notifications . 29
make a phone call. . . . 35
answer a phone call . . 36
make a private call . . . 36
answer a private call . . 37
store a phone number or
private ID . . . . . . . . . . 38
call a stored phone
number or private ID. . 38
your phone number and
Private ID . . . . . . . . . . 39
turn off a call alert. . . . 39
recent calls . . . . . . . . . 39
redial. . . . . . . . . . . . . . 40
caller ID . . . . . . . . . . . 41
call forward. . . . . . . . . 41
voice names . . . . . . . . 42
emergency calls . . . . . 42
international calls . . . . 43
speed dial . . . . . . . . . . 44
voicemail. . . . . . . . . . . 44
contents
iv

selective dynamic group
(SDG) calls . . . . . . . . . . 45
using your handset as a
modem . . . . . . . . . . . . 49
MOSMS messages . . . . 51
text messages. . . . . . . 51
manage memory . . . . . 54
advanced features . . . . . 56
PTV features . . . . . . . . 56
one touch PTT . . . . . . . 63
PT manager . . . . . . . . . 65
MMS . . . . . . . . . . . . . . 66
Bluetooth
MOTOtalk
®
. . . . . . . . . 80
TM . . . . . . . . . . . . . . 83
use dual SIM cards . . . 91
select frequency band. 92
customize your handset 93
ring tones . . . . . . . . . . 93
wallpaper. . . . . . . . . . . 94
datebook . . . . . . . . . . . 95
contents
v
hide or show location
information . . . . . . . . . 95
other special features . . 97
advanced calling . . . . . 97
contacts. . . . . . . . . . . . 98
datebook . . . . . . . . . . . 98
GPS . . . . . . . . . . . . . . . 99
handsfree . . . . . . . . . 100
My Info . . . . . . . . . . . 101
pc applications. . . . . . 102
personalize . . . . . . . . 102
security . . . . . . . . . . . 103
TTY . . . . . . . . . . . . . . 104
Safety and General
Information . . . . . . . . . 107
Service & Repairs . . . . 113
Limited Warranty Motorola
Communications Products
(International) . . . . . . . 114
Information From the
World Health Organization
118
Patent and Trademark
Information . . . . . . . . . 120
Privacy and Data Security.
121
Smart Practices While
Driving . . . . . . . . . . . . . 122
index. . . . . . . . . . . . . . . 124
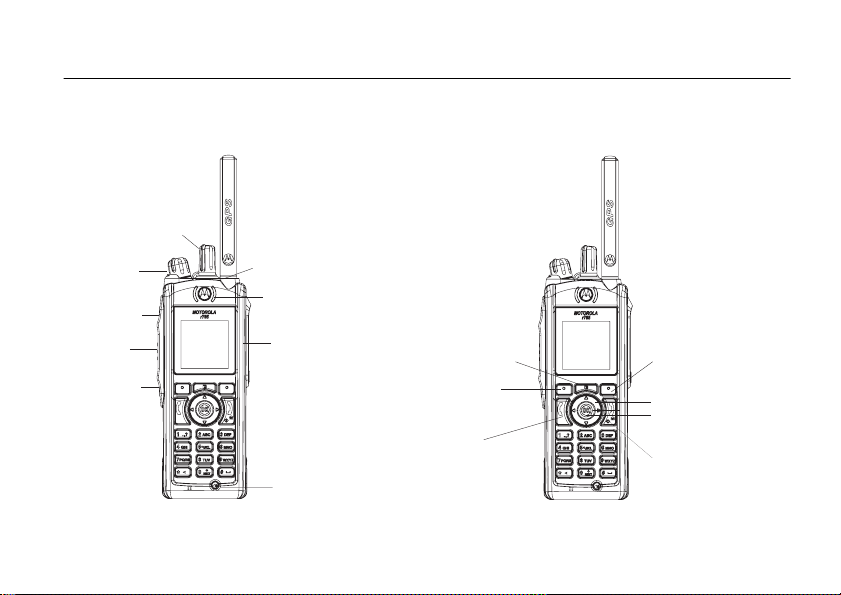
introducing your handset
Left Soft Key
Perform function
in lower left
display.
Right Soft Key
Perform function
in lower right
display.
Menu Key
From home screen,
open main menu.
Talk Key
Make &
answer calls.
Power/Home/End Key
End calls, exit menu system.
OK Key
In menus & lists, press
to select highlighted option.
Earpiece
Press the Navigation key
up, down, left, or right to
highlight a menu feature.
Speaker On/Off Key
Unified Connector
Channel/Talkgroup Knob
Volume Knob
Emergency Button
PTT Key
Shortcut 1 Key
Shortcut 2 Key
1

menu map
main menu
1
Net
L
Java Apps
•[Buy More]
• Location Assist
• Java System
u
Settings
• (see next page)
0
VoiceRecord
• [New VoiceRec]
A
Contacts
• [New Contact]
• [New SDG List]
E
Messages
•[Create Mesg]
•Voice Mail
• Inbox
•Drafts
• Sent Items
• Net Alert
•SMS
P
Call Forward
D
Datebook
l
Memo
menu map
2
M
Call Timers
•Last Call
• Phone Reset
• Phone Lifetime
•Prvt/Grp Reset
•Prvt/Grp Life
• Circuit Reset
•Circuit Lifetime
• Kbytes Reset
B
Recent Calls
K
Shortcuts
• [New Shortcurt]
• 1)Shortcuts
• 2)Cntcs[New Contact]
• 3)Recent Calls
• 4)Contacts
• 5)Datebook
• 6)Messages
• 7)VoiceRecord
•8)Net
• 9)Call Forward
J
o
p
c
My Info
•My Name
• Line 1
• Line 2
• Private ID
• Group ID
• Carrier IP
• IP1 Address
• IP2 Address
• Circuit Data
Profiles
Call Alert
GPS
• Position
• Privacy
• Interface

main menu (cont.)
t
Ring Tones
•[Buy More]
• Vibrate All
• Ringer 1-12
• Vibrate
• Silent
P
MOTOtalk
•Go To MOTOTalk
• Setup
•Help
O
My Pictures
L
Quick PTT
• PTT: Contacts
N
PT Manager
•Quick PTT
• Send Message
• Send Picture
• Send Event
• Send My Info
• Send Contact
• Configure
•
TBD Location Assist
• Send Alert
• AlertReceptionListener
• Configuration
C
Bluetooth
• Hands Free
• Link to Devices
• Device History
•Setup
•Find Me
This is the standard Main Menu layout.
Your handset’s menu may be a little
different.
menu map
3

settings menu
Display/Info
• Wallpaper
•Text Size
• Theme
• Home Icons
• Backlight
•Clock
• Menu View
• Large Dialing
• Contrast
• Status Light
• Language
Phone Calls
• Set Line
•Any Key Ans
• Auto Redial
• Call Waiting
• Auto Ans
• Minute Beep
• Call Duration
• TTY
• Hearing Aid
• Notifications
• DTMF Dialing
• Prepend
menu map
4
2-Way Radio
• Scan
• Tkgrp Silent
•Tkgrp Area
• One Touch PTT
• Alert Type
• PTT Quick Notes
•On/Off PTT
• Knob Position
• Store Rcvd Info
Pers onali ze
• Menu Options
•Up Key
•Down Key
•Left Key
• Right Key
• Center Key
• Left Sftkey
• Right Sftkey
Vol u me
• Line 1
• Line 2
• Messages
•Keypad
•Data
Security
• Phone Lock
• Keypad Lock
• SIM PIN
• GPS PIN
• Change Passwds
Advanced
• Alert Timeout
• Headset/Spkr
• Connectivity
• Reset Defaults
• Return to Home
•Dual SIM
• Band Selection
•Transmitters
• Phone Only
• Baud Rate
These may be different depending on the
service provider.
handset basics
Caution:
first time, read the Important Safety and Legal
information included in the gray-edged pages
at the back of this guide.
Before using the handset for the
about this guide
This guide shows how to locate a menu
feature as follows:
Find it:
This means that, from the home screen:
1
Press the menu key to open the
Settings
> u >
menu.
Phone Calls
2
Press the navigation key to scroll to
Calls
, and press the center key to
select it.
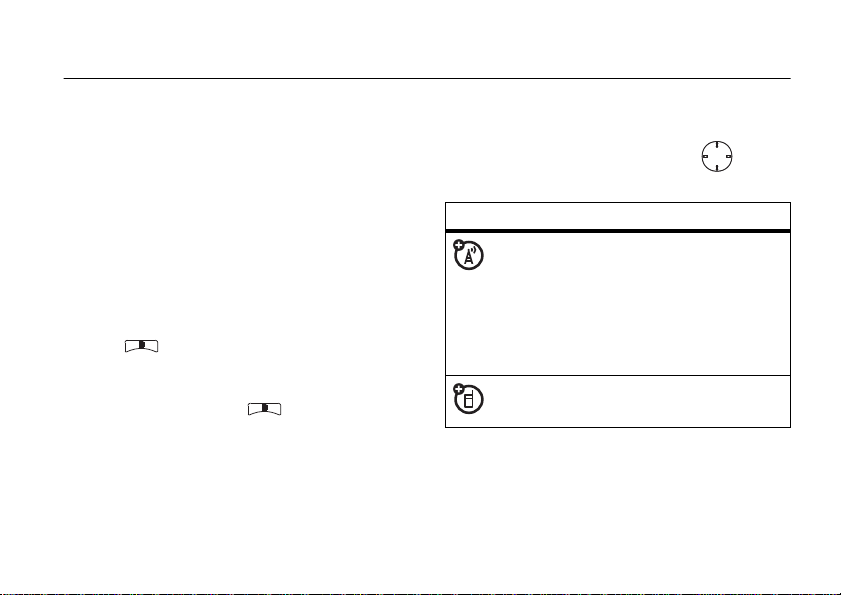
symbols
This means a feature is network or
subscription dependent and may
not be available in all areas, or might
not be offered by your service
provider. Contact customer service
for more information.
This means a feature requires an
optional accessory.
Phone
OK
insert the SIM cards
This handset has two SIM card
one SIM card must be inserted to connect to
handset basics
slots.
At least
5

a network for services. Only one SIM card can
be selected for use at any time (see page 91).
Warning :
To avoid loss or damage, do not
remove your SIM card from your handset
unless absolutely necessary.
handset basics
6
1
Turn off your handset and remove your
battery before you install or remove a SIM
card.
2
Carefully slide the SIM card into your
handset, until it lies flat in the SIM card
holder.

battery and charger
Battery Use & Battery Safety
• Motorola recommends you always
use Motorola-branded batteries and
chargers.
damage caused by non-Motorola
batteries and/or chargers.
•
Use only certified power supply, or UL
(Underwriters Laboratories Inc.) listed
or recognized or specific chargers:
Single-Unit Charger PMLN5197
Multi-Unit Charger WPLN4187
Caution:
or charger may present a risk of fire,
explosion, leakage, or other hazard.
Improper battery use, or use of a
damaged battery, may result in a fire,
explosion, or other hazard.
The warranty does not cover
Use of an unqualified battery
•
Battery usage by children should be
supervised.
• Important
are designed to work best with
qualified batteries. If you see a
message on your display such as
Battery
following steps:
•
•
•
•
•
New batteries or batteries stored for a
long time may take more time to
charge.
: Motorola mobile devices
or
Unable to Charge
Remove the battery and inspect it to
confirm that it bears a Motorola
“Original Equipment” hologram;
If there is no hologram, the battery
is not a qualified battery;
If there is a hologram, replace the
battery and retry charging it;
If the message remains, contact a
Motorola Authorized Service Center.
, take the
Invalid
handset basics
7

• Charging precautions:
When charging
your battery, keep it near room
temperature. Never expose batteries to
temperatures below 0°C (32°F) or
above 45°C (113°F) when charging.
Always take your mobile device with
you when you leave your vehicle.
•
When storing your battery, keep it in a
cool, dry place.
•
It is normal over time for battery life to
decrease, and for the battery to exhibit
shorter runtime between charges or
require more frequent or longer
charging times.
• Avoid damage to battery and mobile
device.
Do not disassemble, open,
crush, bend, deform, puncture, shred,
or submerge the battery or mobile
device. Avoid dropping the battery or
mobile device, especially on a hard
surface. If your battery or mobile
handset basics
8
device has been subjected to such
damage, take it to a Motorola
Authorized Service Center before
using.
Do not
attempt to dry it with an
appliance or heat source, such as a hair
dryer or microwave oven.
• Use care when handling a charged
battery:
Particularly when placing it
inside a pocket, purse, or other
container with metal objects. Contact
with metal objects (e.g., jewelry, keys,
beaded chains) could complete an
electrical circuit (short circuit), causing
the battery to become very hot, which
could cause damage or injury.
Promptly dispose of used batteries in
accordance with local regulations.
Contact your local recycling center for
proper battery disposal.
Warning :
Never dispose of batteries in a fire
because they may explode.
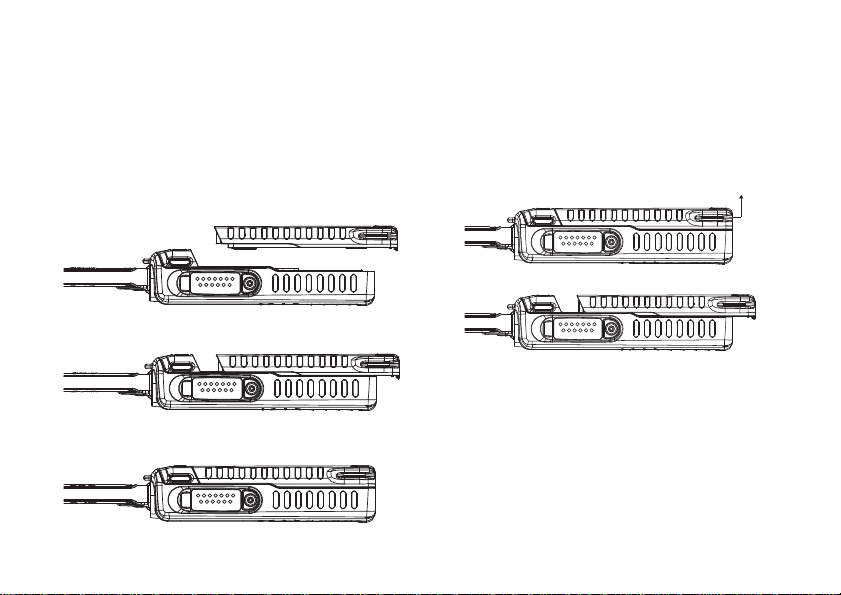
battery installation battery removal
Pull latch upPull latch up
1
1
Place the battery on the back of the
handset as shown.
2
Slide the battery towards the top of the
handset until it snaps into place.
Release the battery latch by pulling it
upwards as shown.
2
Slide the battery towards the bottom of
the handset.
battery charging
New batteries are not fully charged.
1
Insert your handset into the charger.
2
Plug the other end of the charger into the
appropriate electrical outlet.
handset basics
9

For battery charging, see the user guide that
accompanies the Single-Unit Charger or the
Multi-Unit Charger.
When you charge the battery, the battery level
indicator at the upper right of the screen
shows charging progress. At least one
segment of the indicator must be visible to
ensure full handset functionality while
charging.
Tip:
Motorola batteries have circuitry that
protects the battery from damage from
overcharging.
Note:
This handset complies with
environmental energy consumption
requirements by notifying the user to unplug
the charger from the power outlet when the
charger is disconnected from handset/power
outlet. This notice can be dismissed
permanently by pressing
handset basics
10
-
underNo.
antenna installation
Note:
Attach the handset antenna before
using your handset.
1
Insert the bottom of the antenna into the
screw-in base on the top of the handset.
2
Turn clockwise until it will no longer turn.
antenna removal
1
Grip the antenna firmly and turn it counterclockwise until it is loose.
2
Remove the antenna from the antenna
socket.
turn it on & off
To turn on your handset, press and hold
for a few seconds or until the display turns on.
If prompted, enter your four-digit unlock code.

To turn off your handset, press and hold
for two seconds.
SIM card security
Note:
Except for making emergency phone
calls, your phone will not function without the
SIM card.
To prevent unauthorized use of your phone,
your SIM card is protected by a PIN that you
enter each time the phone is powered on. You
can change the PIN or turn off the
requirement that it be entered.
enter the PIN
You may be required to enter a SIM PIN when
you first use your phone.
When you receive your phone, the SIM PIN is
0000. Change your PIN to prevent fraudulent
use of the SIM card.
Important: If you enter your PIN
incorrectly 3 times, your SIM card is
blocked. To unblock your SIM card, you
must contact your service provider. See
“unblock the PIN” on page 12.
1
When the Enter SIM PIN Code screen
appears, enter your SIM PIN. An asterisk
appears for each character entered.
2
Press - under Ok.
Change the PIN
1
From the main menu, select
Change Password > SIM PIN
2
At the
Enter Old SIM PIN Code
u > Security >
.
screen, enter the
current SIM PIN.
3
Press - under Ok.
4
At the
Enter New SIM PIN Code
screen, enter
the new 4 to 8-digit SIM PIN.
5
Press - under Ok.
handset basics
11

6
At the
Re-enter New SIM PIN Code screen,
re-enter the new SIM PIN to confirm.
7
Press - under Ok.
turn the PIN requirement On and Off
When the SIM PIN requirement is on, you are
prompted to enter your PIN each time you
turn on your phone.
Note:
If a SIM PIN is required, your phone will
not function until the SIM PIN is entered,
except for making emergency phone calls.
When the PIN requirement is off, your phone
can be used without entering a PIN.
Important: When the SIM PIN
requirement is off, the personal data on
your SIM card is not protected. Anyone
can use your phone and access your
personal data.
1
From the main menu, select
u > Security >
SIM PIN.
handset basics
12
2
Select On or
3
Enter the current SIM PIN.
4
Press - under Ok.
Off
.
unblock the PIN
If you enter your PIN incorrectly 3 times, your
SIM card is blocked. To unblock your SIM
card, you must contact your service provider
to get a PIN Unblock Code (PUK).
Important: If you unsuccessfully enter
the PUK code 10 times, your SIM card is
permanently blocked and must be
replaced. If this happens, all data is lost.
You will get a message to contact your
service provider. Except for making
emergency phone calls, your phone will
not function with a blocked SIM card.
To unblock the PIN:
1
Press * # 1.

2
TBD
Date and Time
Right Soft
Key Label
Left Soft
Key Label
Motorola
10:05 am 4/17
Contcs
Mesg
At your service provider representative’s
request, provide the information needed
to give you a PUK code.
3
Select
Unblock PIN
4
Enter the PUK code.
5
Enter a new 4 to 8-digit SIM PIN.
6
Re-enter your SIM PIN.
7
If you entered the codes properly,
Unlocked
appears on the display.
.
display
The home screen shows when you turn on
the handset. To dial a number from the home
screen, press number keys and .
SIM
Note:
Your home screen may look different.
Soft key labels show the current soft key
functions. For soft key locations, see page 1.
handset basics
13

status indicators
TBD
1.
2.
3.
4.
5.
6.
7.
Motorola
10:05 am 4/17
Contcs
Mesg
Status indicators are shown at the top of the
home screen:
1 Signal Strength Indicator:
show the strength of the network
connection. You can’t make or receive
calls when
14
handset basics
1
or 0 shows.
Vertical bars
2 Active Phone Line:
1 indicates phone line
1 is ready to make calls; 2 indicates phone
line 2 is ready to make calls.
3 Speaker On/Off
: Sounds associated with
Private calls and group calls can be set to
come through the earpiece rather than
through the speaker.
4Ringer Vibe/Off:
Your handset is set to
not ring.
5 Message Indicator:
Shows when
you receive a text message.
6 Packet Data:
Your handset is ready to
transfer packet data or is transferring
packet data when it shows a blinking
arrow.
7 Battery Charge Indicator:
A fuller battery
indicates a greater charge. Recharge the
battery when your handset shows
Battery
.
Low
main menu
All your handset’s features can be accessed
through the main menu. You can set the main
menu to appear as
Find it:
List View
> u >
or
Display/Info
Icon View
>
Menu View
.
.
text entry
Some features let you enter text.
Your handset provides convenient ways to
enter words, letters, punctuation, and
numbers whenever you are prompted to
enter text (for example, when adding a
Contacts entry or when using Text
Messaging).
change the character input mode
1
When you see a screen where you can
enter text, press to change the
character input mode.
2
Select one of the following options:
entry method
Alpha
Word
Symbols
Numeric
Tip:
to change letter capitalization (
Press a key several times for
different characters.
Enter words using a predictive
text entering system that lets
you enter a word with fewer key
presses.
Enter symbols.
Enter numbers by pressing the
numbers on the keypad.
When entering text, press and hold
Abc
>
ABC
>
abc
word method
The Word English text input method lets you
enter text into your handset by pressing keys
just once per letter.
).
handset basics
15

The Word English text input method
combines the groups of letters found on each
handset key with a fast-access dictionary of
words, and recognizes what you want to text
as you type. It first offers the most commonlyused word for the key sequence you enter
and lets you access other choices with one or
more presses of the
0
key.
enter a word using “word” method
character input
1
Select the
2
Press the corresponding keys once per
Word
character input method.
letter to enter a word (for example, to
enter the word
If you make a mistake, press
Delete
or * to erase a single character.
Press and hold
Bill
, press
-
under
2455
-
under
Delete
or * to
).
delete an entire entry.
3
To accept a word and insert a space,
press
#
.
handset basics
16
To accept a word completion (such as
Billion when you entered Bill), press
right.
If you get a word you don’t want, you can
press the
0
key to see more word
choices and pick the one you want.
alpha method
To enter characters by tapping the keypad:
1
Select the
2
Press the corresponding keys repeatedly
until the desired letter appears. (For
example, to enter the word
twice,
and
If you make a mistake, press
Delete
hold
entry.
Alpha
method.
Bill
, press 2
4
three times, 5 three times,
5
three times again.
-
under
to erase a single character. Press and
-
under
Delete
to erase an entire
OK

By default, the first letter of an entry is
OK
capitalized and the following letters are
lowercased. After a character is entered, the
cursor automatically advances to the next
space after two seconds or when you enter a
character on a different key.
Characters scroll in the following order:
characters
1
2
3
4
5
6
7
8
9
0
. ? ! , @ & : ; “ - ( ) ‘ ¿ ¡ % £ $ ¥
A B C 2 Á Ã Â À Ç
D E F 3 É Ê È
G H I 4 Í Ì
J K L 5
M N ñ O 6 Ó Õ Ô Ò
P Q R S 7 ß
T U V 8 Ú Ü Û Ù
W X Y Z 9
+ - 0 * / \ [ ] = > < # §
characters
#
*
Space
Back
navigation key
Press the navigation key up, down, left,
or right to scroll to items in the display. When
you scroll to highlight the desired item, press
.
OK
volume
Turn the volume knob to set the volume of the
high audio (in conjunction with the output
audio through the side connector).
Set
Line 1, Line 2, Messages, Keypad
volume levels via >
u
, and
>
Volume
Data
.
handset basics
17

The only exception is during a call: set the
volume of the earpiece via up/down or
left/right arrows.
OK
handsfree speaker
You can use your handset’s handsfree speaker
to make calls without holding the handset to
your ear.
During a call, press
handsfree speaker On.
The handsfree speaker stays on until you
press
-
under
-
Speaker
under
.
Speaker
to turn the
transmitters
Note:
Consult airline staff about the use of
the Transmitters Off feature during flight. Turn
off your handset whenever instructed to do so
by airline staff.
handset basics
18
Transmitters Off turns off your handset’s
calling features in situations where wireless
handset use is prohibited, but you can use the
handset’s other non-calling features when
Transmitters is turned Off.
Find it:
> u >
Advanced > Transmitters > Off
use GPS with map software
Your handset is enabled with a highly-capable
GPS receiver that sends location information
to a USB port on a PC, laptop, or PDA.
Note:
No serial port connectivity is provided
by your handset. Applications on the host
device which are expecting to receive the
GPS location information via a serial port must
instead use a Virtual Serial Comm Port.
The data sent to the host device is formatted
as prescribed in the National Marine
.

Electronics Association 0183 V3.0 (NMEA-
0183) standard. As such it supports the
following sentences: GGA, GLL, GSA, GSV,
RMC, and VTG.
This handset is not a full NMEA-0183
compliant device supporting electrical RS-422/
RS-232 connectivity as dictated by the NMEA0183 standard. Consequently it's unsuitable
for conventional marine NMEA-0183
equipment use. Its intended use is for normal
“terrestrial” mobile users who want to enable
their USB hosting computing devices such as
a PC, laptop or PDA with the handset's highlycapable GPS functionality.
get connected
1
Remove the protective cover from
the handset's side connector and insert a
cable into the handset's side connector.
2
Insert the other end of the cable into a
vacant USB receptacle of your host
device. A virtual USB Comm Port will be
created on your host device upon
successful enumeration of the handset as
a USB Communications Device Class
device.
3
Ensure no application in your host device
is using the created COMM port. You may
need to ensure that the created virtual
COMM port settings are set as follows:
• Bits per second
•Data bits
• Parity
• Stop bits
•Flow control
4
Start the GPS application on your host
device. Set the GPS application to start
accepting NMEA-0183 formatted data
from the created Virtual COMM port.
: None
: 4 800
: 8
: 1
: None
handset basics
19

5
Set your handset to start sending NMEA0183 formatted location information.
Find it:
Your handset is now actively sending location
NMEA-0183 formatted GPS data to your USB
host device.
To stop your handset from sending location
data:
Find it:
Note:
NMEA OUT is automatically set to Off and
you need to manually restart it using the
menu selections above.
Your USB host device will generally provide
charging power (5V, up to 500mA) to your
handset via the cable therefore no other
charging power to it will normally be required.
However some laptops may require that you
provide external AC/DC power to the laptop in
20
>
GPS > Interface > NMEA OUT > On
>
GPS > Interface > NMEA OUT > Off
Each time you power your handset Off,
handset basics
.
.
order for it to provide full 500mA charging
current capability to the handset.
features for the vision impaired
high contrast theme
Your handset comes with a standard high
contrast theme that provides black and white
text with reverse text highlighting and very
large icons for easy visualization of selection.
Find it:
Contrast
.
> u >
Display/Info
>
Theme
>
High

calls
group calls, talkgroups, sets, and hubs
A group call is similar to a Private call, but is
made to all members of a Talkgroup at once.
A Talkgroup is a predetermined group of
members of the same fleet*.
The Talkgroup knob on top of the handset has
16 positions. You can assign a set of up to 16
Talkgroups or MOTOtalk settings to each
position.
(For additional information on MOTOtalk, see
page 83.)
A Talkgroup in a Talkgroup knob set can also
be part of a Hub. You can differentiate them
by their icons:
T Talkgroup Talkgroup number
H Hub Hub number
On power up or when you change Talkgroups
or Hubs, the handset affiliates to the system
You must join a Talkgroup to make or receive
calls on that Talkgroup. You join a Talkgroup by
affiliating with it. You affiliate by joining the
particular Hub or Talkgroup.
*Service provider dependent
calls
21

A Hub may consist of 1 to 4 Talkgroups*. One
OK
of the four Talkgroups is preset as primary and
the other three as secondary.
If you turn on the Scan feature and your
handset is idle, it will monitor the activity of
up to four Talkgroups in the same way.
That is, the handset checks for all four
Talkgroups in every group call request that it
receives from the system. If the Group ID in
the group call request matches any of the four
Talkgroups the handset is monitoring, it
responds with a group call response and
attempts to join the call. The handset can
initiate a group call on the primary Talkgroup,
and respond to a group call on any of the
three secondary Talkgroups.
*Service provider dependent
calls
22
With Scan on, all group calls you make are
Hub calls. Group calls you receive are Hub
calls or Talkgroup calls to Talkgroups in the
Hub you have joined.
assign a knob position to a
Talkgroup or MOTOtalk
Note:
First create a set as explained on page
25.
1
From the main menu, select
Way Radio > Knob Position
2
Scroll to the knob position for assignment
and press .
3
Choose an option from the following list
and press :
OK
Settings > 2-
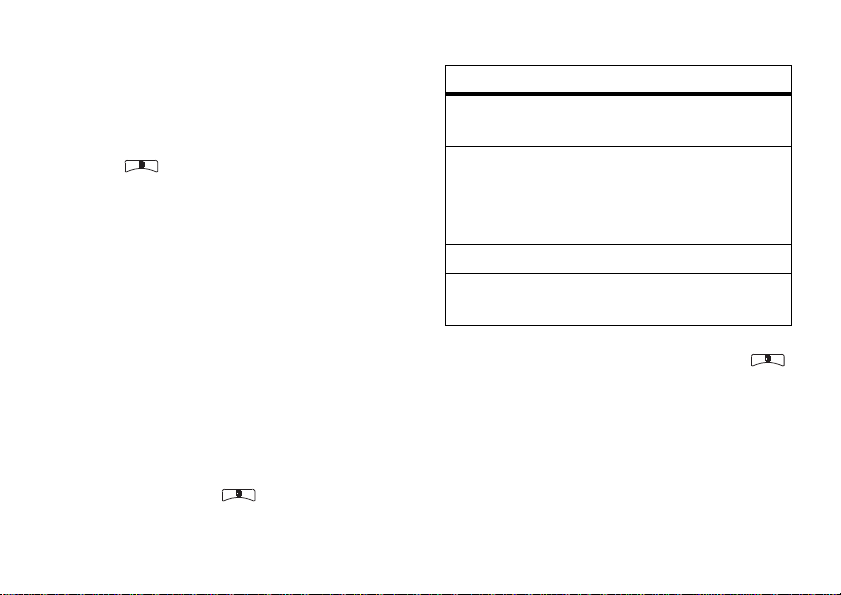
.

option
Assign to Talkgroup:
the Talkgroup name and ID.
Assign to MOTOtalk:
the MOTOtalk name, code, and channel. A
channel is a number between 1 and 10. A
code is a number between 1 and 14.
Notes:
•
If you do not enter a MOTOtalk name, a
default name is displayed in the format
“MT Channel X, Code Y”.
•
Private Only and Receive All codes are
not supported.
4
Press - under
Assign the knob position to
Assign the knob position to
Done
.
change Talkgroup within a set
1
In the network screen turn the Talkgroup
knob until you reach the desired talkgroup.
2
Wait for timeout. The idle network screen
appears.
Note:
The set to which the Talkgroup belongs
is called the active set.
enter and exit MOTOtalk
1
In the network screen turn the Talkgroup
knob until it reaches the required
MOTOtalk.
2
Wait for timeout.
Wait
displays. After a few seconds, the
MOTOtalk idle screen appears.
Note:
The MOTOtalk idle screen layout and
functionality differ from those of MOTOtalk
accessed via the main menu.
3
To exit MOTOtalk, turn the Talkgroup knob
until it reaches the required Talkgroup.
4
Wait for timeout.
Wait
displays. After a few seconds, the
network idle screen appears.
Switching to MOTOtalk Please
Switching to Network Please
calls
23

view Talkgroup knob
OK
assignments
1
From the main menu, select
Way Radio > Knob Position
Note:
Only the current Active Set Talkgroups
appear.
2
Scroll to the required position and press
OK
. The display shows the selected
position assignments.
edit Talkgroup knob
assignments
1
From the main menu, select
Way Radio > Knob Position
Note:
Only the current Active Set Talkgroups
appear.
2
Scroll to the required position and press
OK
. The display shows the selected
position assignments.
calls
24
.
.
Settings > 2-
Settings > 2-
3
Press .
4
Select
Edit
.
5
Choose an option from the following list
and press :
option
Edit assigned Talkgroup:
Edit the Talkgroup name
and ID previously assigned to the knob
position.
Reassign to MOTOtalk:
Enter name, code, and
channel assigned to the knob position.
or
option
Reassign to Talkgroup:
Enter the Talkgroup name
and ID assigned to the knob position.
Edit assigned MOTOtalk:
Edit the previously
assigned MOTOtalk name, code, and
channel.
 Loading...