


i930 Smartphone Welcome Guide
@NNTN5641A@
NNTN5641A
DRAFT: 5/16/05


i
Contents
What’s in the Box? .................................... 1
Settin g Up Yo u r Sm a rt p h on e.................... 1
Remove the Battery Door..................................1
Locate Your SIM Card.......................................2
Insert the Battery...............................................3
Charge the Battery ............................................3
Turning On Your Smartphone and
Activating Service.................................. 5
Turn On Your Smartphone................................5
Activate Servic e ... ................ .......................... ....6
Turn Off Your Smartphone................................6
Backlight Dimming.............................................6
Making the Nextel Customer Car e Number
Easy to Fi n d... .. .......... ................. ............ 6
Maki ng an d Re ce i vi n g Ca ll s ......... ............ 7
Make a Phone Call............................................7
Receiving Phone Call........................................7
Make a Direct Connect Call...............................7
Receiving a Direct Connect Call .......................8
Contacts and Recent Calls
on the Home Screen.....................................8
Making Emergency Phone Calls .......................8
Synch ro n iz ing Outl o ok .... .. ... ..................... 9
Install ActiveSync on the Computer ..................9
Assemble the i930 Sync Cradle and Connect.10
Set Up a Partnership.......................................12
Getting to Know Your Smart Phone.......13
Flip-Closed Features.......................................13
Flip-Open Features .........................................16
Using Nextel® Voice Ma il ...... ................. ..19
Setting Up Your Voice Mail Box ......................19
Receiving a Voice Mail Message ....................19
Retrieving a Voice Mail Message....................20
Setting up an Email Account...................20
Using Web-Based Email ..........................20
Start Pocket Internet Explorer .........................20
Access Your Email ..........................................21

ii
Unders tandin g S ta t u s In d ic a to r s ... ........ 21
Entering Text, Numbers, and Symbols.. 23
Start a New Line..............................................23
Delete Characters ...........................................23
Enter a Symbol.... ................ .......................... ..2 3
Understand in g Inp u t Modes ....... .... ............... ..23
Customizing Features ............................. 24
Set Vibrate All..................................................24
Set Ring Tones................................................24
Set Keypad Tone.............................................25
Set Time and Date ..........................................25
Securing You r S ma rt p h on e ... ......... ........ 25
Lock the Keypad..............................................25
Unlock the Keypad ..........................................25
Using the SIM Card PIN..................................26
Turn Off Phone Calls, Direct Connect Calls, and
All Data Tran s fers.............. .... .... ............... ..27
Wireless Local Number Portability:
Bringing Your Phone Number From
Anothe r C a rr ie r ..................................... 27
Nextel Worldwide
®
Servi ce ... .. .................28
Accessories..............................................28
Need Help?................................................28
Nextel® Customer Care...................................28
Finding More Information ................................29
Patent and Trademark Information.........32

iii
DECLARATION OF CONFORMITY
Per FCC CFR 47 Part 2 Section 2.1077(a)
Responsible Part y Name: Motorola, Inc .
Address: 8000 West Sunrise Boulevard
Plantation, FL 33322 USA
Phone Number: 1 (8 00) 453-0920
Hereby d eclares t hat the product:
Product Name: i930
Model Number: H72UAH9JR7AN
Conforms to the following regulations:
FCC Part 15, subpart B, sectio n 15.107(a),
15.107(d) and section 15.109(a)
Class B Digital Device
As a personal compu ter peripheral, t his device
complies with Part 15 of the FCC Rules. Operation
is subject to the following two conditions: (1) this
device may not cau se ha rmf ul int er fer e nce, an d (2 )
this device must accept any interference received,
includ ing interference that may cause undesi red
operation.
Note: This equipment has been tested and
found to comply with the limits for a Class
B digital device, pursuant to part 15 of the
FCC Rul es. These l imits are designed to
provide reasonable protectio n against
harmful inter ference in a residential
inst allation. This equipment generates,
uses and can radiate radio frequency
energy and, if not installed and used in
accordance with the instructions, may
cause harmful interfer ence to radio
communications. However, there is no
guarantee that interference will not occur
in a particul ar ins tal la ti o n.
If this equipment does cause harmful
interference to radio or television reception,
which can be determined by turning the
equipment off and on, the user is
encouraged to try to correct the interference
by one or more of the following measures:
• Reo rie nt or rel oc ate the receiv in g
antenna.
• Incre ase th e se para tio n betw e en the
equipme nt and receiver.
• Connect the equipment into an outlet on
a circuit different from that to which the
receiver is connected.
• Consult t he dealer or an experienced
radio/TV technician for help.

1
What’s in the Box?
Your Sma rtphone comes with:
• This welcome guide
• A booklet containing safety inf ormati on, your
warranty, and your terms and conditions of
service with Nextel.
• A Standard Lithium Ion Battery
• A rapid travel charger
• A holster
• A Subscribe Identity Module (SIM) card
• The i9 30 Sync Cradle
• A mini USB cable
• A companion CD containing a user guide and
Microsoft Activ eS ync.
Note: For more information on your i930
Smartphone, ref er to the i930 User’s
Guide on the companion CD.
Setting Up Your Smartphone
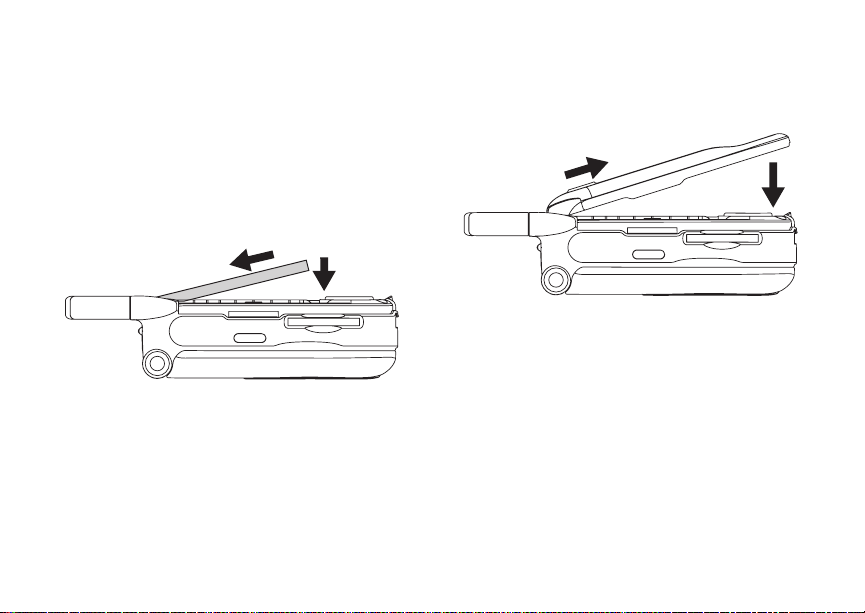
Remove the Battery Door
1 Slide t h e re le as e b ut ton ba ck un ti l it r ele as es t he
battery door.
release
button

2
Setting Up Your Smartphone
2 Allow the ba tt e ry do or to po p up , sli de it forw ar d,
and remove it from the back of your
Smartphone.
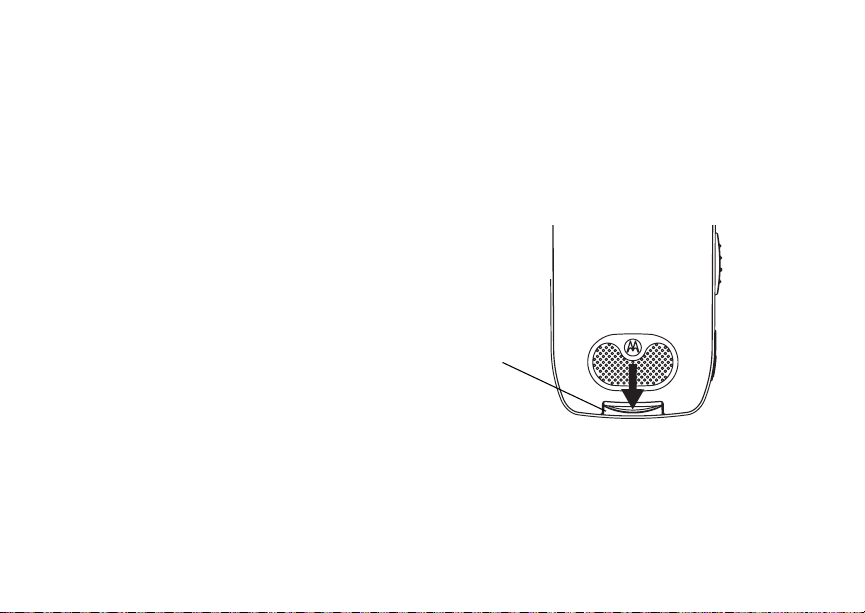
Locate Your SIM Card
Your SIM (Subscriber Identity Module) card is a
small piece of plastic located in the SIM card
holder in the back of your Smartphone, underneath
the battery.
SIM card
If ther e is no SI M car d i n your Sma r tpho ne , c onta ct
Nextel Customer Care at 1-800-639-6111.
3
Setting Up Your Smartphone
If want to use a SIM card other than the one that is
in your Smartphone, please contact Nextel
Customer Care to verify that the SIM card you want
to use is compatible with your Smartphone.
Insert the Battery
1 Remove th e ba ttery door.
2 Insert the top of the battery into the battery area.
Press the bottom of the battery to secure it.
3 Replac e t he batt e ry do or a nd pr e ss i t ge nt ly un til
you hear a cl ic k.
Charge the Battery
Your Sma rtphone comes with a rapid travel
charger.
1 Plug the charger into an e lectrical outlet.
4
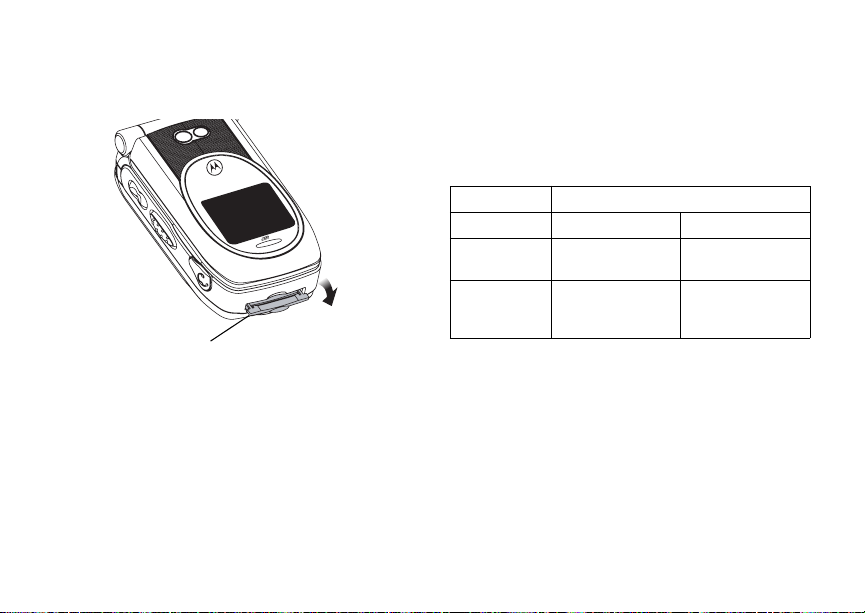
Setting Up Your Smartphone
2 Open the connector cover.Open the connector
cover.
connector
cover
Plug the other end of the ch arger into the
access ory connec tor.
Tip: To remove the charger from the accessory
connector: Press the butto ns on the sid es
of the plug. Pull the plug straight out.
3 If you have pur c ha s ed option al ba tteries or
chargers, see “Charging Times”.
Charging Times
Check your battery and charg er type against the
below grid to determine appropriate charging
times.
Recommended charging times:
Battery Charger
Rapid Standard
Standard
Lithium Ion
Extended
Capacity
Lithium Ion
For best resu lts , charg e the batt eri es withi n the
tempe rature rang e of 50 °F to 10 4° F (1 0 °C to
2 hours 4 hours
2.5 hours 5.5 hours
40°C).
Prolonged charging is not recommended.
Battery Use and Maintenance
• The Motorola iDEN Approved Lithium Ion
chargers provide optimum performance. Other
chargers may not fully charge the iDEN Lithium
Ion battery or may yield a reduced number of
lifetime charge cycles.
5
Turning On Your Smartphone and Activating Service
• Extreme temperatures degrade battery
performance. Do not store the battery where
temperatures exceed 140°F (60°C) or fall below
4°F (-20°C).
• Lithium Ion batteries have a self discharge rate
and without use, lose about 1% of their charge
per day.
• The battery capacity is degraded if the battery is
stored for long periods while fully charged. If
long term storage is required, store at half
capacity.
Turning On Your
Smartphone and
Activating Service
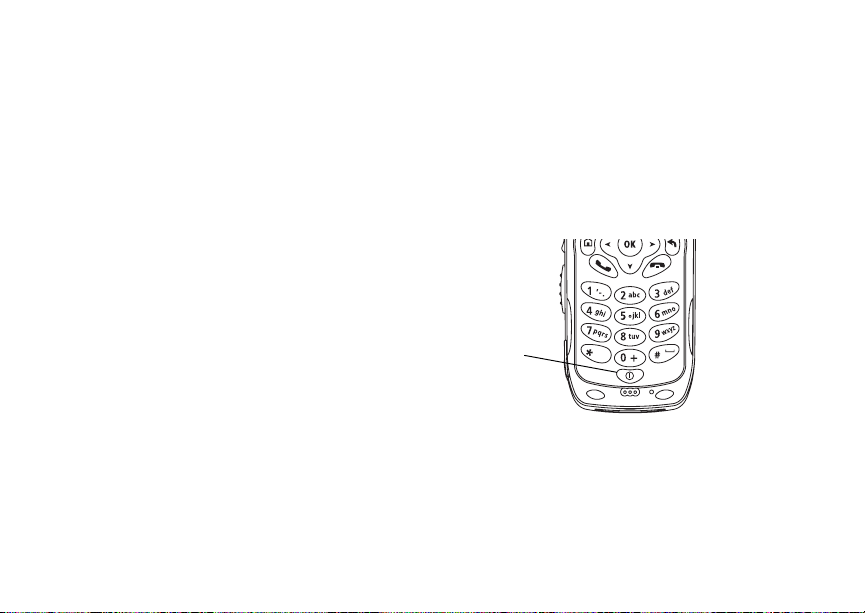
Turn On Your Smartphone
Press and hold the power button for 2 or 3
seconds.
power
button

6
Making the Nextel Customer Care Number Easy to Find
Activate Service
As your Smartphone connects to the network, you
will see a connecting messa g e. Wh en th e idle
screen appears, the Smartphone is ready to use.
[Graphic showing
Home screen
here. I need to
know what Nextel
is shipping as
the default Home
screen style.]
[All service activation, enabling
security, and phone programming
instructions needed from Nextel.]
Turn Off Your Smartp ho ne
Press and hold the power button for 2 or 3
seconds.
Backlight Dimming
To save power, your Smartphon e’s display screen
dims after 10 seconds of inactivity. At short time
after that, if there is still no activity, the screen goes
complete dark.
To bring the screen back to full brightness, press
any key.
Making the Nextel
Customer Care Number
Easy to Find
The number your call to speak to Nextel Customer
Care is stored on your SIM card wh en you receive
your Smar tphone.
To make this number easier to access, when you
start using you Smar tphone, copy the contacts on
you SIM card to Cont acts in your Smartp hone:
1 On the Home screen, select Start.
2 Select SIM Manager and then Copy to
Contacts.
3 Select Menu and then Select.
4 Select All.
5 Select Copy.

7
Making and Rece ivi ng Cal ls
Making and Receiving
Calls
Your Sma rtphone makes two types of calls: digital
cellul ar phone calls and Direct Conne ct calls.
Direct Connect c alls let you use your phone as a
long-range, digital walkie-talkie.
Make a Phone Call
1 On the Home screen, begin entering the phone
number by pressing the numbers on the keypad.
2 Press s to place t he cal l.
3 Press e to end the cal l.
Receiving Phone Call
When you receive a call on your Smartphone, the
Smartphone rings, and number of the caller are
displa yed on the screen.
• To answer the call, press s or select Accept.
• To reject the call, press e or select Reject.
Note: Selecting Reject will connect the caller to
your voice mail if you subscribe to this
service.
Make a Direct Connect Call
1 On the Home screen, begin en tering the Direct
Connect number by pressing the numbers on
the keypad.
2 Press and hold the PTT button on the side of
your Smartphone.
Push-to-talk
(PTT) button
3 Begin talking after your Smartphone emits a
chirping sound.
4 Release the PTT button to listen .
5 To end the call, press e.
A Direct Connect call ends automatically if there is
no activit y on the ca ll for a few secon ds .

8
Making and Receiving Calls
Dialing Direct Connect® Numbers
Every Direct Connect number has 3 pa rts — an
area ID, a network ID, and a member ID — with an
asterisk between each of these parts. For example:
999*999*9999.
When you place a Direct Connect call, you must
enter the whole Direct Conn ect number including
the aster isks.
Receiving a Direct Connect Call
When you receive a Direct Connect call , your
Smartphone emits a chirping sound or vibrates.
The number of the caller are displaye d on the
screen.
You can recieve a Direct Connect call with the
Smartphone’s flip open or closed.
To answer a Direct Connect call:
1 Wait for the caller to finish speaking.
2 Press and hold the PTT button on the side of
your Smartphone. Begi n talking after your
Smartphone emits a chirping sound.
3 Release the PTT button to listen .
4 To end the call:
• Press e.
• If the flip is closed, press ..
Contacts and Recent Calls on the Home Screen
When you begin pressing keys while on the Home
screen, your Smar tphone displays the names and
numbers from your Contacts and recent call list
whose name or phone number match the keys you
press. You can then select the name or number to
call without having to enter the entire name or
number.
Making Emergency Phone Calls
Your phone supports emergency calli ng.
Emergency phone calls can be made even when
your SIM ca rd is blocked or not in your phone.
Dial 911 to be connected to an emergency
response center. If you are on an active c all, you
must en d it be f ore cal ling 911.
When you make an emergency call, your phone’s
GPS Enabled feature can help emergency service
personnel find you, if you are in a location where
your phon e' s GP S ant en na ha s est a blis he d a cl e ar
view of t he open sky and your local emerg ency
response center has the equipment to process

9
Synchronizing Outlook
location information. See “GPS Enabled” in the
i930 User’s Guide for more information on the
limita tions of thi s fe at u re. Becaus e of th e
limitations of this feature, always p rovide yo ur best
knowledge of your location to the emergency
response center when you make an emergency
call.
Important: Emergency calls cannot be placed
Important: If you have not registered on the
Important: If you are bring ing your phone number
while the keypad is locked.
network, emergency calls cannot be
placed while your SIM card is in your
phone.
to Nextel from your previous carrier,
you may receive a temporary telephone
number while your Nextel phone is
being programmed with your
permanent ph one number . If you make
a call to 911 and the call fails, the 911
emergency response center will not be
able to call you back on your Nextel
phone if in the meantime, your Nextel
phone has been programmed with your
permanent telep hone nu mbe r . I f the ca ll
is disconnected before location and
details have been provided, call 911
again and advise that you were
disconnected.
Synchronizing Outlook
If you use Outlook on a desktop computer, you can
synchronize email, Contacts, Calendar, and Tasks
with your Smartphone.
You use the i930 Sync Cradle and mini-USB cable
to connect your Smartphone to your computer.
Insta ll A c t ive Sync on th e Computer
Do not conn ec t your Smar t pho ne to yo ur co mpu ter
until yo u ha ve installed Activ eSync on you r
computer.
1 Insert the CD that came with your CD into your
comput er. The CD screen opens.
2 Click the yello w arrow.
3 Click Start Here.
4 Follow the instructions.
10
Synchronizing Outlook
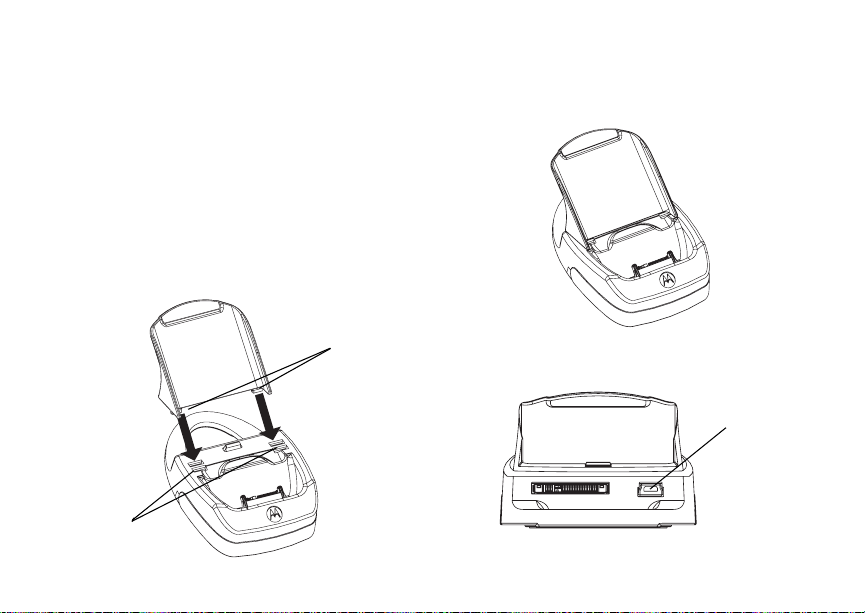
Assemble the i930 Sync Cradle and Connect
1 Place the tabs of the phone support into the
slots in the base of the cradle.
If you are using a Standard Lithium Ion battery,
place the tabs in the slots closest to the front of
the base.
If you a r e usi ng a Ext en de d Ca pa city Li t hium I on
battery, place the tabs in the slots just behind
the slots closest to the front.
slots
tabs
2 Press the phone support downward on to the
base of the cradle, until it cannot easily be
removed.
3 Insert the cable’s small er connec tor into the
cradle’s USB port.
USB port

11
Synchronizing Outlook
4 Insert the cable’s large connector into your
deskto p co mputer’s USB por t .
5 Open the connector cover.
connector
cover
6 Place the Smartphone into the cradle, inserting
the connector in the base of the cradle into the
Smartp hone’s accessory connector.

12
Synchronizing Outlook
Set Up a Partnership
After you assemble the i930 Sync Cr ad le a nd u se i t
to connect your Smartphone to your desktop
comp ute r , yo u ar e ready to set up a partners hi p
between your Smartphone and your desktop
computer.
1 Make sur e yo ur Sm ar tp h one is powere d on and
is sitting securely in the i930 Sy nc Cra dl e.
2 When your desktop computer detects the USB
connection, it will start the ActiveSync New
Partnership Wizard. Follow the instructions on
the screen.
After you finish using the wizard, your data will
begin to synchronize between your desktop
computer and your Smartphone.
13
Getting to Know Your
t
Smart Phone
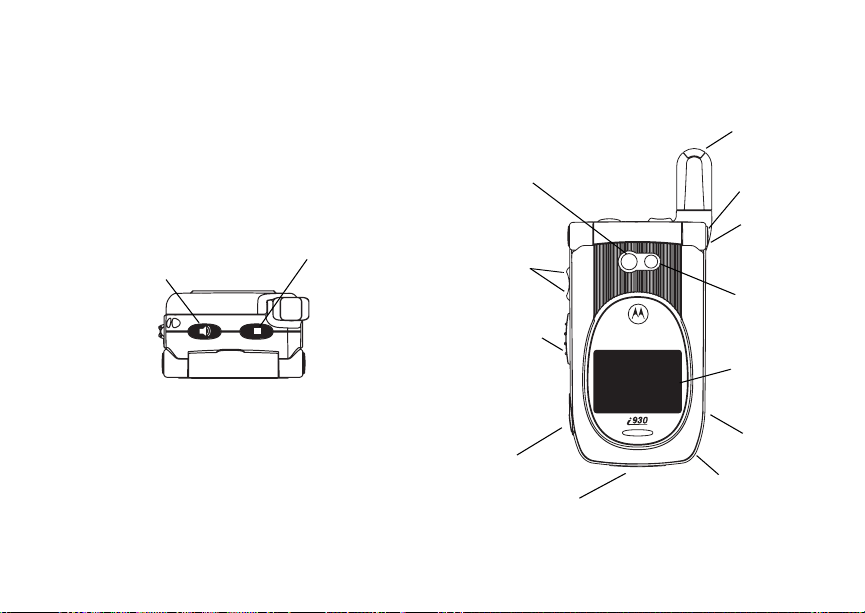
Flip-Closed Features
smart key
speaker key
camera
lens
volume
controls
Push-to-talk
(PTT) button
Getting to Know Your Smart Phone
retractable
antenna
status light
flip open
button
camera
short-range
spotlight
external
display
stereo
audio port
accessory connector
SD card slo
speaker
(in back)

14
Getting to Know Your Smar t Phone
Retractable Antenna
The retractable antenna on your Smartphone is
design ed to be exte nded duri ng calls.
To extend the antenna, pull gently on the rounded
tip unt il the a nt enna i s fu lly ex te nd ed a nd cl i cks int o
position.
When finished with a call, retract the antenna by
pushing gently on the rounded ti p until the antenna
clicks into place.
To optim ize your Sm ar t ph one’s per formanc e ,
extend the anten na when you m ake or receive a
call, and avo i d to uch ing t he an ten na w ith any bo dy
part.
Important: Failure to fully extend or retract the
antenna until the antenna clicks into
place causes severely degraded
performance, which may result in
missed calls, dropped calls, or garbled
audio.
Flip Open Button
Press this to open your Smartphone’s flip easily.
Camera Sh ort - Ra n ge Sp otli gh t
St atus Light
The status light appears as a ring around the flip
open button.
Status Light Meaning
Flashing gree n In service. N/A
Solid red No service. Connected to
Solid green N/A Connected to
.
when phone
is on
Meaning wh en
phone is off
the charger and
charging.
the charger,
and ful ly
charged.
SD Card Slot
You can use a secure disk flash memory card (SD
card) with the Smartphone. Insert your SD card
here.
Camera Lens
Lets you take pictures with your Smartphone.
Helps light the pictures you take with your
Smartphone.

15
Getting to Know Your Smart Phone
Volume Controls
Sets the volume of the sound coming out the
earpiece and speaker. When your Smartphone is
in a call, the volume controls set the volume of
calls. When your Smartphone is not en gaged in
any activity, the volume controls set the volume of
the ringer.
The volume controls can also by used to s c roll
through lists that appear on the external display.
Push-to-Talk (PTT) Button
Lets you make Direct Connect calls and Group
Connect call s.
External Display
Shows a shortened version of the internal display.
To see more information, open the flip.
Speaker
Sound comes out of your Smartphone here when
you have the speaker turned on.
Stereo Audio Port
Insert in a headset connector here.
Accessory Connector
Insert the connect of accessories such as a
charger, ActiveSync cradle connector, data cable
here.
Speaker Key
The speaker key (t):
• Acts like the s when your S ma rtphone’s f li p is
closed.
• Turns D irect Connect
speak er on and of f.
• Used with voice names and voice records.
• Used to navigate through recent calls and Java
applications when the flip is closed.
®
/ Group ConnectSM
Smart Key
The smart key (.):
• Acts like e when your Smartphone’s flip is
closed.
• Access es recent calls when the flip is closed.
• Used to navigate through recent calls and Java
applications when the flip is closed.

16
Getting to Know Your Smar t Phone
Flip-Open Features
soft keys
earpiece
navigation
area
keypad
power key
internal
display
microphone
light sensor
home key
send key
navigation pad
back key
end key
OK key

17
Getting to Know Your Smart Phone
Earpiece
Sound comes out of the earpiece when the
speaker is off.
Power Key
When the Smartphone is tur ned off:
• Press and hold the Power key (p) for 2 to 3
seconds to turn on the Smartphone.
• Press and hold p for 4 or more seconds to
turn on the Smartphone in Flight Mode, which
turns off all the Smartp hone’s w ireless
capability.
• When the Smartphone is on:
• Press p to display the Quick List, a fast way
to chan ge your profile set ting or lock the
Smartphone.
• Press and hold p to turn off the Smartphone.
Internal Display
The inter nal display shows the following
information:
• At the top of the sc ree n ar e statu s indicator s
about the current mode, or the name of the
curre nt ac ti vity or activ e pr og r am .
• In the center of the screen is the active menu or
program.
• At the bottom of the scree n are menus or
commands related to the active program.
Navigation Area
This area contai ns the keys and control used to:
• Naviga te thr o ugh y ou r phon es , men us , li sts, and
screens.
• Perform commands.
• Begin phone calls, end phone calls, and put
phone ca ll s on hold.
Navigation Pad
Use the nav ig at ion pa d t o mo ve th e s el ec tion f oc us
up, down, left, or right. This is called “scrolling.” In a
text field, use the navigation pad to move the
cursor right or left, character by character.
OK Key
Press the OK key (O) to open a highlighted item, or
to select or clear a check box. The OK key works
much lik e the ENTER key on a keyboard, and is
sometimes referred to as the Action key or the “Do
It” key.

18
Getting to Know Your Smar t Phone
Soft Keys
Press a soft key (A or B) to open th e me nu or
perfor m the command shown on the screen
immediately above the key.
Send Key
Press the send key (s) to:
• Dial a phone number that yo u entered or
selected.
• Answer an incoming call.
• Place a call on hold to answer a second
incoming call (call wa iting).
• Change between an active call and a call that is
on hold.
End Key
Press the end key (e) to:
• End a call when 1 party is on the line, and end
the active call when multiple parties are
connected.
• Return to the Home screen.
Press and hold e to lock the keypad.
Home Key
Press the home key (h) to view the Home screen.
Back Key
Press the ba ck key (m) to go t o th e p r ev ious scr e en.
In a text field:
• Press m to backspace over 1 or more characters.
• Press and hold m to d elete the ent i re con tents o f
the field.
Keypad
Press keys on the keypad to enter number s and
characters.
* Key
Press * to change between upper c ase and
lower c as e in tex t in pu t mod e.
Press and hold * to change between text and
numeric input modes.
# Key
• Press and hold # to view a list of symbols that
you can en ter as text.
• On the Home screen, press and hold # to
switch be t ween phone lin es. This fe atu r e is
availa bl e if yo ur phone supp or ts 2 phon e lin es .

19
Using Nextel® Voice Mail
Using Nextel® Voice Mail
Note: To receive voice mail messages, you
must firs t set up your voice mail box.
Note: If you are br ing in g yo ur ph on e number
from another carrier, we suggest you s et
up your voice mail box after the number
you brought to Nextel is active on your
Nextel phone and your temporary phone
number is deactivated. If you set up your
voice mail box prior to this, all messages
and all settings (including your greeting
and password) will be lost when the
number you have brought to Ne xtel
becomes active.
Setting Up Your Voice Mail Box
Using yo ur i930 phone, dial your 10-digit Nextel
Personal Telephone Number (PTN). For example:
703555 7777. Follow the system instructions to
create a new 4- to 7-digit password, record your
name, and record a greeting. When the system
says, “Thank you for using Nextel Voice Mail,” your
mailbox is set up.
If you are calling from a phone other than your
i930, dial your 10-digit Nextel PTN. When you hear
the greet ing, press the star ke y to access your
voice mail box. The system will prompt you to enter
your passw ord. Enter the las t seven digi ts of your
Nextel PTN. For example: 5557777. This is your
tempo r ary passw ord.
You are in the main voice mail me nu when you
hear the options listed below.
• To play your messages, press 1. (This option
plays only if you have new or saved messages.)
• To reco rd a messag e, press 2.
• To change your greeting, press 3.
• To access your pe rsonal op tions, press 4.
If you pre s s * while you are in a sub-menu, you
will go to the previous menu. If you press **,
you will go to the main voice mail menu. From the
main voice mail menu, press # to ex it voice mail.
At any time, you may end the call by pressing e.
Receiving a Voice Mail Message
When you receive a new voice mail messag e, the
new voic e ma il icon [icon] appears at the top of
the display.

20
Setting up an Email Account
Retrieving a Voice Mail Message
You have 2 ways to retrieve your voice mail
messages:
• Highlight the voice mail message area on the
Home screen and press O.
[This depends on what
Home screen style
Nextel ships as the
default. If you ship
one that shows a voice
mail message area,
we’ll show a graphic
and point out where to
highlight.]
• Press and hold 1, which is the speed dial
number reserved for your voice mail number.
This calls your voice mail number.
Follow the instructions to retrieve your messages.
Setting up an Email
Account
If you have an email account with an Internet
servic e provide r, you can send and rec ieve email
directly from your Smartphone.
[Here we will have instructions on how
to set up an email account -- possible
just a URL. The Microsoft Smartphone
guideline discuss creating a new
account for the Smartphone or setting
up for an existing account. Nextel
users will probably also want to know
how to set up for a web-based email
account or a corporate account, (e.g.,
eer016@email.mot.com). I need
Nextel’s inputs.]
Using Web-Based Email
If you have an emai l acco unt t hat is acce sse d f rom
a webpage on yo u desk t op c omp ute r , you can al so
access this account on your Smartphone.
Start Pocket Internet Explorer
1 On the Home screen, select Start.

21
Understanding Status Indicators
2 Highlight Internet Explorer and press O.
Access Your Email
1 On the Internet Explorer screen, select Menu.
2 Highlight Address Bar and press O.
3 Enter the URL for your email service (for
example, www.myemailservice.com).
4 Select Go.
5 On your email provider’s web page, select the
email icon, just as you do on your desktop
computer.
6 Log in to your email account, just as you do on
your desktop computer.
Understanding St atu s
Indicators
Status indicators appear at the top of the
Smartphone screen. The following table lists
common status indicators and their me anings.
Indicator Meaning
New email or text message (SMS)
New voice mail on line 1
New voice mail on line 2
New voice mail on line 1 and line 2
New instant message
Voic e c all in progress
Data call in progress
Incoming voice calls are being
forwa rded to an other number

22
Understa ndi ng Stat us Ind ica tor s
Indicator Meaning
Call on hold
Missed call
Line 1
Line 2
Battery level
Low battery
Battery chargi ng
No battery
Signal strength
No signal
Gener al Packet Radio Services
(GPRS) available
Indicator Meaning
Gener al Packet Radio Services
(GPRS) in use
Roaming
Sync error
Radio off
Ringer off
Speakerphone on — phone cal l
sound s come through the speaker.
Speakerphone off — phone call
sounds come through the earpiece.
Speaker on — Direct Connect and
Group Connect sounds com e through
the speaker.
Speaker off — Dir ect Connect and
Group Connect sounds com e through
the ea rpiece.
Multipr es s tex t in put mode, low er ca se

23
Entering Text, Numbers, and Symbols
Indicator Meaning
Multipress text input mode, uppercase
1 letter
Multipr es s tex t in put mode, cap s lo ck
T9 text input mode , lowe rca se
T9 text input mo de, upperc ase 1 letter
T9 text input mode , caps lo ck
Numeric input mode
Entering Text, Numbers,
and Symbols
Start a New Line
• Press O.
Delete Characters
• Press m to delete character to the left of the
cursor.
• Press and hold m to delete all the characters in a
line.
Enter a Symb ol
• Press and hold # and select a symbol.
Understanding Input Modes
Your Sma rtphone s upports 3 input mode s for
entering text and numbers: Multipress, T9,
Numeric, and Symbols. Multipress and T9 modes
are used for entering text, Numeric mode is used
for ente ring numbers, and Symbols is use d for
entering symbols.
Choose or Cha n ge Your Input Mode
• Press and hold * until the status indicator for
the input mode you want appears on the top of
the display.
Multi press Mode
To enter the first letter on the number key, press
the key once. To enter the second letter, press the
key twice, and so on.

24
Customizi ng Features
T9 Mode
Press the number keys that co ntain the letters to
form a word, and T9 will complete the word with
suggestions matching your entries character by
character. If a suggestion does not match the word
you are looking fo r, keep pressing th e number
keys.
Numeric Mode
Press a number key, press *, or press #.
Customizing Features
You can c ontrol many featur es of your phone,
includ ing the whether your phone rings or vibrates
and soun d it makes when it rings, the sound your
phone m akes when you press the keypa d, and the
time and date.
Set Vibrate All
You can set your Smartphone to vibrate for all
phone ca lls, Dire ct Connect calls, Group Connect
calls, m essag e not i fic at io ns , an d call ale rts , ev en if
you want your Smartphone to ring for other
features.
1 On the Home screen, select Start.
2 Select Settings and then Vibrate All.
3 Select Use Vibrate All.
4 Select Done.
5 Select Done again to exit the Setting screen.
Set Ring Tones
1 On the Home screen, select Start.
2 Select Settings and then Notifications.
3 Scroll to the item that you want to specify a ring
tone for:
• To specify the sound made when you receive
calls on line 1 or li ne 2, select Ring tone line
1 or Ring tone line 2.
• To specify the sound made when you receive
call alerts, select Call alert.
• To specify the sound made when you receive
reminders from the Calendar, select
Reminders.
• To specify the sound made when you receive
each type of message, select New e-mail,
New text message, New voice message,
New instant message, or New chann el
message.
• To specify the sound made by the alarm,
select Alarm clock.

25
Securing Your Smartphone
• To specify th e sound made when your
Smartph one displays certain types of
infor m at io n, se le ct SIM toolkit messages,
Exclamation, Question, or Warnings.
4 Scroll rig ht or l ef t t o se le ct a so un d. Sel ec t None
if you do not want to hear a sound.
5 Select Done.
6 Select Done again to exit the Setting screen.
Tip: When you select a sound, the sound plays.
To hear the sound again, select Menu and
then Play.
Set Keypad Tone
1 On the Home screen, select Start.
2 Select Settings and then Notifications.
3 In Keypad control, select the option you want:
Tone, Click, or None.
4 Select Done.
5 Select Done again to exit the Setting screen.
Note: Your Smartphone sends tones across the
network, and the y are audible to devices
or people on the other end of the line,
even if you choose Click or None.
Set Tim e an d D a t e
1 On the Home screen, select Start
2 Select Settings and then Date and Time.
3 In Time Zone, select your tim e zon e.
4 In Date, select the month, day, or year and edit
the information.
5 In Time, select a numb er and edit it.
6 Select Done.
7 Select Done again to exit the Setting screen.\
Securing Your
Smartphone
Lock the Keypad
• On the Home screen, press and hold e. When
the Smartphone is locked, the left soft key
command displays Unlock.
Unlock the Keypad
• On the Home screen, select Unlock and p ress
#.
Note: You can still receive calls and make
emergency calls when the ke ypad is
locked.

26
Securing Your Smartphone
Using the SIM Card PIN
To preve nt unauth orized use of yo ur Sm ar t ph one,
your SIM card is protected by a PIN that you enter
each tim e the S mart p ho ne is powe red on. You ca n
change t he PIN or turn off the requirement that it
be entered.
When the SIM PIN requirement is off, your
Smartphone can be used without entering a PIN.
Important: When the SIM PIN requirement is off,
When the SIM PIN requirement is on, you are
prompted to enter your PIN each time you power
on your Smartphone.
Note: If a SIM PIN is required, your Smartphone
Turn the PIN Requirement On or Off
1 On the Home screen, select Start.
2 Select Settings then Security.
3 Select Enable SIM Lock or Disable SIM Lock.
4 Enter yo ur P IN an d se lec t Done.
the personal data on your SIM card is
not protected. Anyone can use your
Smartphone and access your personal
data.
will not function until the SIM PIN is
entered, except for making emergency
calls.
Note: The default SIM PIN is 0000. Change your
PIN to prevent f raudulent use of the SIM
card (see “Change the PIN”).
5 Select Ok.
Enter the PIN
1 When the Enter PIN screen appears after you
power o n your Smart phone, enter your SIM PIN.
2 Select Done.
Note: If you en ter yo ur PIN inco rr ec tl y 3 ti m es ,
your SIM card is blocked. To unblock your
SIM card, you must contact Nextel
Costumer Care.
Change the PIN
Note: The SIM PIN requirement must be turned
on in o rder to access thi s feature.
1 On the Home screen, select Start.
2 Select Settings and then Security.
3 Select Change SIM Password.
4 In Old PIN, enter the current PIN number.
5 In New PIN, enter the new PIN number.
6 In Confirm new PIN, enter the new PIN number
again, and select Done.

27
Wireless Local Number Portability: Bringing Your Phone Number From Another Carrier
Important: Be sure to make a note of your PIN.
When the SIM lock is enabled, you must
provide th is PIN when you turn on your
Smartphone t o make calls.
Turn Off Phone Calls, Direct Connect Calls, and All Data Transfers
1 Press th e po w er ke y.
2 Highlight Flight Mode.
3 Press O.
Wireless Local Number
Portability: Bringing
Your Phone Number
From Another Carrier
If you are bringing your phone number from
another carrier , your new phone will be acti ve as
soon as you receive it. Next el will provide you with
a temporary phone number so that you can begin
using your phone immediately. Once the number
you have brought to N extel is activated, your
temporary phone number will be deactivated and
service with your previous carrier will be cancelled
automatically. You will receive a text message on
your Nextel phone letting you know that activation
is complete. Simply turn yo ur phone off and back
on again to complete activation.
Here is additional information you need to be
aware of until th e number you have brought to
Nextel is active on the Nextel network:
Nextel® Vo ice Mail
We suggest you set up your voice mail box after
the number you brought to Nextel is active on your
Nextel phone and your temporary phone number is
deactivated. If you set up your voice mail box prior
to this, all messages and all settings (including
your greeting and password) will be lost when the
number you have brought to Nextel becomes
active.
Text Messaging
During the a ct ivat i on pr oce ss , i t i s p os sibl e t hat t ext
messages may not be properl y routed to your
Nextel phone.

28
Nextel Worldwide® Service
911 Calls
Nextel continues to make effo rts to ensure that all
911 calls are minimally impacted by this process. If
you make a call to 911 from your temporary phone
number and the cal l fails, the 911 emergency
response cen ter wi ll no t be a bl e t o cal l yo u b ac k on
your Nextel phone if in the meantime your Nextel
phone ha s been pr o gram med w ith y our p erma ne nt
phone nu mber. As wi th any wireless 911 call, if
your call is disconnected before location an d
details have been provided, be sure to call 911
again an d advise th at you were disconnected.
Go to nextel.com/wlnp for more details.
Nextel Worldwid e®
Service
You can us e yo ur phone to ma k e ca lls
internationally in select cities using other iDEN®
networks by calling Nextel Customer Care to
activa te internationa l dialing on your account.
Countrie s i n wh ic h yo u c an use your ph on e inc lu de
Argentina, Brazil, Canada, Israel, Jordan, Mexico,
Peru, the Philippines, Singapore, and South
Korea*.
* Credit approval may be required. Other conditions may apply.
Accessories
Various accessories are available for use with your
i930 phone, including cases, vehicle power
charger , dat a ca bl es , Han ds- Fre e ac ces so rie s an d
more.
To order additional accessories, go to nextel.com
or call 1-800-Ne xtel6. You can also contact your
Nextel Authorized Sales Representative or stop by
any Nextel-owned Retail Store. For information on
Nextel retail store locations, go to nextel.com.
Need Help?
Nextel® Customer Care
Nextel Cu st om er C are : 1-80 0- 639 - 61 11 or di a l 611
from your i930 phone.
Nextel Worldwide Customer C are:
+1-360-662-5202 (toll-free from your i930 phon e).

29
Need Help?
Finding More Information
Information about Source
Makin g a phone call The i930 User’s Guide on
Making a Direct
Connect call
Entering text The i930 User’s Guide on
Messages The i930 User’s Guide on
Pictur es and videos The i930 User’s Guide on
the com panion C D:
“Phone Calls”.
The i930 User’s Guide on
the com panion C D:
“Direct Connect Calls, Call
Alerts, and Group Calls”.
the com panion C D:
“Entering Text and
Numbers”.
the com panion C D:
“Messaging Features”.
the com panion C D:
“Camcorder”.
Information about Source
SIM card The i930 User’s Guide on
Customizing your
Smartphone’s features
Setting up a voice mail
box
Progr ams on the
Smartphone
Using your
Smartphone, service
and rate plans,
purchasing a
Smartphone, an d
customer suppor t.
Motorola warranty
servi c e or othe r
information.
the com panion C D:
“Securing Your
Smartphone” and “SIM
Manager”.
The i930 User’s Guide on
the com panion C D:
“Settings”.
The i930 User’s Guide on
the com panion C D:
“Setting Up Your Voice
Mail Box” .
The i930 User’s Guide on
the companion CD: “Using
the Start Menu”.
http://www.nextel.com
http://www.motorola.com/i
den/support

30
Need Help?
Information about Source
Last-minute updates
and de tailed te chnical
information
Up-to-date information
on your Smartphone
Readme files, located in
the Microsoft ActiveSync
folder on the desktop
computer
http://www.microsoft.com/
mobile

31
ALL MODELS WITH FCC ID AZ489FT5843 MEET THE
GOVERNMENT’S REQUIREMENTS FOR EXPOSURE
TO RADIO WAVES.
Your wireless phone is a radio transmitter and receiver. It
is designed and manufactured not to exceed the emission
limits for exposure to radiofrequency (RF) energy set by
the Federal Communications Commission of the U.S.
Government. These limits are part of comprehensive
guidelines and establish permitted levels of RF energy for
the general population. The guidelines are based on
standards that were developed by independent scientific
organizations through periodic and thorough evaluation of
scientific studies. The standards include a substantial
safety margin designed to assure the safety of all persons,
regardless of age and health.
The exposure standard for wireless mobile phones
employs a unit of measurement known as the Specific
Absorption Rate, or SAR. The SAR limit set by the FCC is
1
Tests for SAR are conducted using standard
1.6W/kg.
operating positions reviewed by the FCC with the phone
transmitting at its highest certified power level in all tested
frequency bands. Although the SAR is determined at the
highest certified power level, the actual SAR level of the
phone while operating can be well below the maximum
value. This is because the phone is designed to operate at
multiple power levels so as to use only the power required
to reach the network. In general, the closer you are to a
wireless base station antenna, the lower the power output.
Before a phone model is available for sale to the public, it
must be tested and certified to the FCC that is does not
exceed the limit established by the government-adopted
requirement for safe exposure. The tests are performed in
positions and locations (e.g., at the ear and worn on the
body) as required by the FCC for each model. The highest
SAR value for this model phone when tested for use at the
ear is 0.87 W/kg and when tested on the body, as
described in this user guide, is 1.21 W/kg during packet
data transmission. (Body-worn measurements differ
among phone models, depending upon available
accessories and FCC requirements.)
While there may be differences between the SAR levels of
various phones and at various positions, they all meet the
government requirement for safe exposure.
The FCC has granted an Equipment Authorization for this
model phone with all reported SAR levels evaluated as in
compliance with the FCC RF exposure guidelines. SAR
information on this model phone is on file with the FCC
and can be found under the Display Grant section of
http://www.fcc.gov/oet/fccid after searching on FCC ID
AZ489FT5843.
Additional information on Specific Absorption Rates (SAR)
can be found on the Cellular Telecommunications Industry
Association (CTIA) web-site at http://www.wow-com.com.
1
In the United States and Canada, the SAR limit for
mobile phones used by the public is 1.6 watts/kg (W/kg)
averaged over one gram of tissue. The standard
incorporates a substantial margin of safety to give
additional protection for the public and to account for any
variations in measurements.
2
The SAR information reported to the FCC includes the
FCC-accepted Motorola testing protocol, assessment
procedure, and measurement uncertainty range for this
product.
2

32
Patent and Trademark Information
© 2005 Nextel Commun ications, Inc. Copying,
distri bution, or use w ith out permi ss i on is strictly
prohibited. NEXTEL
NEXTEL. Done.
CONNECTSM, INTERNATIONAL DIRECT
CONNECTSM, NATIONWIDE DIRECT
CONNECT
NEXTEL WORLDWIDE® are service marks,
trademarks, and/or registered trademarks owned
by Nextel Communications, I nc.
MOTOROLA, the Stylized M Logo and all other
trademarks indicated as such herein are
trademarks of Motorola, Inc. ® Reg. U.S. Pat. &
Tm. Off. © 2005 Motorola, Inc. All rights reserved.
Microsoft and Mic rosoft Internet Explorer are
registered trademarks of Microsoft Corporation.
T9 is a trademark owned by Tegic
Communications.
®
T9
This product is covered by U.S. Pat. 5,818,437,
U.S. Pat . 5,95 3, 54 1, U . S. P at. 6, 01 1,5 54 a nd othe r
patents pending.
SM
Text Input Patent and Trademark Information
®
, the NEXTEL logo®,
TM
, DIRECT CONNECT®, GROUP
, NEXTEL DIRECT SENDSM and
Java and all other Java-based marks are
trademarks or registered trademarks of Sun
Microsystems, Inc. in the U.S. and other countries.
All other product names or services mentioned in
this manual are the propert y of their respective
tradem ark owner s .
Information in this document, including URL and
other Internet Web site references, is subject to
change wit hout notice . Unles s other wise noted , the
example companies, organizations, product s,
domain names, emai l addresse s, logos, people,
places and events depicte d herein are fictitious,
and no association with any real compan y,
organization, product, domain name, email
address, logo, person, place or event is intended or
should be inferred. Complying with all appl icable
copyright laws is the responsibility of the u ser.
Without limiting the rights under copyright, no part
of this document may be reproduced, stored in or
introduced into a retrieval system, or transmitted in
any form or by any means ( electronic, mech anical,
photoc opying, r ecording, or otherwise), or for any
purpose, without the express written permission of
Microsoft Corporation.
Microsoft may have patents, patent applications,
trademarks, copyrights, or other intellectual
property rights covering subject matter in this
document. Except as expressly provided in any

33
Patent and Trademark Information
written lic e nse ag ree m en t from Micros o ft, the
furnishing of this document does not give you any
licens e to these pate nts, tr adem arks, copyr ights, or
other intellectual property.
© 2003 Microsoft Corporation. All rights reserved.
Microsoft products are licensed to OEMs by
Microsof t Lic ensi ng Inc., a wholl y owned subsid iar y
of Microsoft Corporation.
Microsoft, ActiveSync, MSN, Outlook, Windows,
the Windows logo, and Window s Media are either
registered trad emarks or trademarks of Microsoft
Corporation in the United States and/or other
countries.
The names of actual companies and products
mentioned herei n may be the trademarks of their
respective owners.
Software Copyright Notice
The Motor ola products descr ibed in this manual
may include copyrighted Motorola and third party
software stored in semicon ductor mem ories or
other media. Laws in the United States and other
count r ie s preserve f or Motorol a an d t hi rd p ar t y
software providers certain exclusive rights for
copyrighted software, su ch as the exclusive r ights
to dis tri bu te o r re pr od uc e th e c op yr igh te d soft w are .
Accordi ngly , an y co pyr ig hted s of twar e con tai ne d i n
the Motor ola products may not be modified,
reverse-engineered, distributed, or reproduced in
any manne r to the extent all owed by law.
Furthermore, the purchase of the Motorola
products shall not be deemed to grant either
directly or by implication, estoppel, or otherwis e,
any lice nse under the copyrig hts, patent s, or pa tent
applications of Motorola or any third party sof tware
provider, except for the normal, non-exclusive,
royalty-free license to use that a rises by operation
of law in th e sa le of a pro duct.
 Loading...