

Motorola 89FT5838 Users manual

Digital Multi-service Data-capable Phone
APPROVAL DRAFT
@NNTN6007A@
NNTN6007A
Motorola
iDEN
i605 Phone User’s Guide


i
Contents
Getti ng Sta rted.... ... ......... ........................... 1
Locating Your SIM Card....................................2
Battery...............................................................3
Activating Service..............................................5
Powering On and Off.........................................6
Enabling Ove r- th e-A ir S ecuri ty... .... ...................6
Phone Programming .........................................7
Finding Your Phone Number and Private ID.....7
Phone Basics ....................................................7
SIM Card Security ...........................................12
Antenna...........................................................15
Accessories.....................................................16
For More Information.......................................16
Maki ng C a lls...... .. ... .................................. 17
Phone Calls.....................................................17
Private Calls ....................................................17
Receiving Calls................................................17
Choosing a Num ber to Call .............................18
Missed Phone Calls..... .... .... ... .........................1 9
Using Speakerphone.......................................19
Using Mute......................................................20
Making Emergency Phone Calls .....................20
Call Alerts..................................................21
Sending Call Alerts..........................................21
Receiving Call Alerts.......................................21
Using the Call Alert Queue..............................21
Recent Calls..............................................23
Calls and Call Alerts........................................23
My Info From Other Phones............................23
Contact Information From Other Phones ........24
Viewing the Recent Calls List..........................24
Storing Items to Contacts................................25
Deleting Items .................................................25
Making Calls From the Recent Calls List ........25
Contacts ....................................................27
Accessing Contacts.........................................28
Creating Entries ..............................................28
Storing Numbe rs From the Idle Scre e n.... .... ... 3 0
Editing Entries.................................................30

ii
Viewing Entr ie s................................................31
Deleting Entries...............................................33
Checking Capacity ..........................................33
Creating Pauses and Waits.............................33
International Numbers.....................................34
Making Call s From Con ta cts ...........................34
Accessing Contacts with GSM Phones...........35
Call Forwarding........................................ 36
Forwardin g All Calls ............ ............................36
Turning Off Call Forwarding ............................36
Forwardin g Miss e d Call s........ .........................3 7
Viewing Call Forwarding Settings....................37
Advan c ed C al li n g Fe at u re s ..................... 38
Call Waiting.....................................................38
Switching Bet w een C all s........ .... .....................38
Putting a Call on Hold .. .... ................................3 9
Calling 2 People ..............................................39
Creating Pauses and Waits While Dialing.......40
Making International Calls...............................40
One Touch PTT...............................................40
Call Timers......................................................41
Using Your Phone as a Modem ......................42
Making TTY Calls............................................43
Group Calls and Selective
Dynamic Group Calls .. .. .. ............. .. .. ....46
Group Calls ............ .... .... ... ..............................46
Selective Dynamic Group (SDG) Calls ...........47
Memo .........................................................53
Ring Tones............. .............. ............. .. .. ....54
Setting Your Phone to Vibrate.........................54
Ring and Vibrate ........ .... ... ....................... .... ...55
Assigning Ring Tones to Contacts..................55
Viewing Rin g Tone As sign me nt s .......... ... .... ...55
Download in g Mor e Ring Tone s......... .... ... .......56
Managing Memory ..........................................56
Deleting Custom Ring Tones ..........................56
About DRM Items............................................56
Enter in g Te x t ............................................57
Using Word Mode ...........................................57
Special Function Keys.....................................58

iii
Messages ................................................. 59
Message Notifications .....................................59
Message Center..............................................60
Voice M a il M e s sag e s.... .. ......................... 61
Receiving a Message......................................61
Accessing Voice Mail From
the Message Center ...................................61
Sending Unanswered Calls to
Voice Mail...................................................61
MOSMS Messages................. .. .. .............. 62
Setting Up........................................................6 2
Receiving a Message......................................62
Reading from the Message Center .................63
Creating and Sending Messages....................63
Sorting Messa ge s .... .... .... ................................6 6
Managing Memory...........................................66
Medi a Ce n te r ............ ................................ 67
Viewing the Media Center ...............................67
Forward Locked Items.....................................68
DRM Items ......................................................69
Pictures ...........................................................69
Audio Recordings............................................70
Renaming Items ..............................................71
Locking Items..................................................71
Deleting Items .................................................71
Managing Memory ..........................................72
Using S e nd v ia PTT..... .. ... ........................73
Receiving a Picture .........................................73
Sending My Info and Contact
Information..................................................73
My Info...... .................................................76
Viewing My Info...............................................76
Editing My Info ................................................76
Setting Sending Options .................................77
Voice R ec o r d s . .........................................78
Viewing Voice Rec ord s ...................................78
Creating Voice Records ..................................78
Playing Voice Records....................................79
Labeling Voice Records ..................................79
Locking Voice Records ...................................79
Deleting Voice Records...................................80
Managing Memory ..........................................80

iv
Java Applications......................... .. .. ....... 81
Installing Applications......................................81
Running Applications.......................................81
Suspending Applications.................................81
Resuming Applications....................................82
Ending Applica ti ons. .... ........................... .........82
Download in g Appli ca tio n s ...............................82
Deleting Applications.......................................82
Managing Memory...........................................83
Shortcuts on the Ma in Menu .............. .... .........8 3
Java Applications and GPS Enabled...............84
Bluetooth® ..... .......... .......... ....... .......... ..... 87
Understanding Bluetooth® Access
Settings.......................................................87
Setting Your Phone for Bluetooth®..................87
Accessing Bl uetooth® ......... ....... ........ ........ .....8 8
Making a Bluetooth® Connection ....................89
Setting Devic e Detai ls . .... .... ............................91
Sending Contacts, Datebook Events and
Pictures.......................................................92
Receiving Items...............................................93
GPS En abled. ... .........................................95
IMPORTANT: Things to Keep in Mind ............95
Making an Emergency Call .............................96
Viewing Your App roxim a te Lo ca tio n ............ ... 9 7
Enhancing GPS Performance.........................98
Updating Satellite Almanac Data ..................100
Setting Privacy Options.................................101
Using GPS with Map Software......................102
Datebook.................................................104
Viewing Dat eb ook .........................................10 4
Creating Events.............................................105
Editing Events ...............................................107
Deleting Events.............................................107
Receiving Reminders....................................108
Making Call s From Datebook........................108
Customizing Datebook Setup........................109
Customizing Your Phone.......................110
Setting the Volume........................................110
Setting Your Phone to Vibrate.......................110
Changing the Loo k of Your Pho ne ................110
Temporarily Turning Off Calls .......................113

v
Using Settings...............................................113
Understanding Status Messages..........126
Profiles ................................................... 118
Viewing Prof il es.............................................11 8
Switching Prof ile s ........ .... .... ..........................118
How Changing Set tin gs Affec ts Pr ofile s. .... ... 11 8
Temporary Profiles........................................119
Creating Profiles............................................120
Editing Profiles ..............................................120
Deleting Profiles ............................................120
Setting Call Fil teri ng .... ..................................121
Shortcuts................................................ 123
Creating a Shortcut .......................................123
Using a Shortcut............................................123
Editing a Shortcut..........................................124
Deleting Shortcuts.........................................124
Using a He a dse t..................................... 125
Using a Bluetooth Headset............................125
Attaching a Headset......................................125
Using a Remote PTT Button .........................125
Safety and General Information ............129
RF Operational Characteristics.....................129
Portable Radio Product Operation and
EME Exposure..........................................129
Electr omagnetic Interf erence/
Compatibility.............................................132
Medical Devices ............................................132
Operational Warnings ...................................133
Operational Cautions ....................................134
Accessory Saf et y Inform at io n ........... .... ........135
MOTOROLA LIMITED WARRANTY.......137
Limited Warranty
Motorola Communicatio n Products
(International)......................................141
Patent and Trademark Information.......145
Index ........................................................146

DECLARATION OF CONFORMITY
Per FCC CFR 47 Part 2 Section 2.1077(a)
Responsible Party Name: Motorola, Inc.
Address: 8000 West Sunrise Boule v ard
Plantation, FL 33322 USA
Phone Number: 1 (800) 453-0920
Hereby d eclares that the pr oduct:
Product Name: i605
Model Number: H58XAN6RR4AN
Conforms to the following regulations:
FCC Part 15, subpart B, section 15.107(a),
15.107(d) and section 15.109(a)
Class B Digital Device
As a personal computer peripheral , this devi ce
complies with Part 15 of the FCC Rules. Operation
is subject to the following two conditions: (1) this
device may not cau se ha rmf ul int er fer e nce, an d (2 )
this device must accept any interference received,
includ ing interference that may ca use undesired
operation.
Note: This equipment has been tested and
found to comply with the limits for a Class
B digital device, pursuant to part 15 of the
FCC Rul es. These limits are design ed to
provide reasonable protection against
harmful interference in a resid ential
inst allation. This equipment gener ates,
uses and can radiate radio frequency
energy and, if not installed and used in
accordance with the instructions, may
cause harmful interference to radio
communications. However, there is no
guarantee that interference will not occur
in a particul ar ins tal la ti o n.
If this equipment does cause harmful
interference to radio or television reception,
which can be determined by turning the
equipment off and on, the user is
encouraged to try to correct the interference
by one or more of the following measures:
• Reo rie nt or rel oc ate the receiv ing
antenna.
• Incr e as e th e separatio n be t we en the
equipme nt and receiver.
• Connect the equipment into an outlet on
a circuit different from that to which the
receiver is connected.
• Consult t he dealer or an experience d
radio/TV technician for help.
1
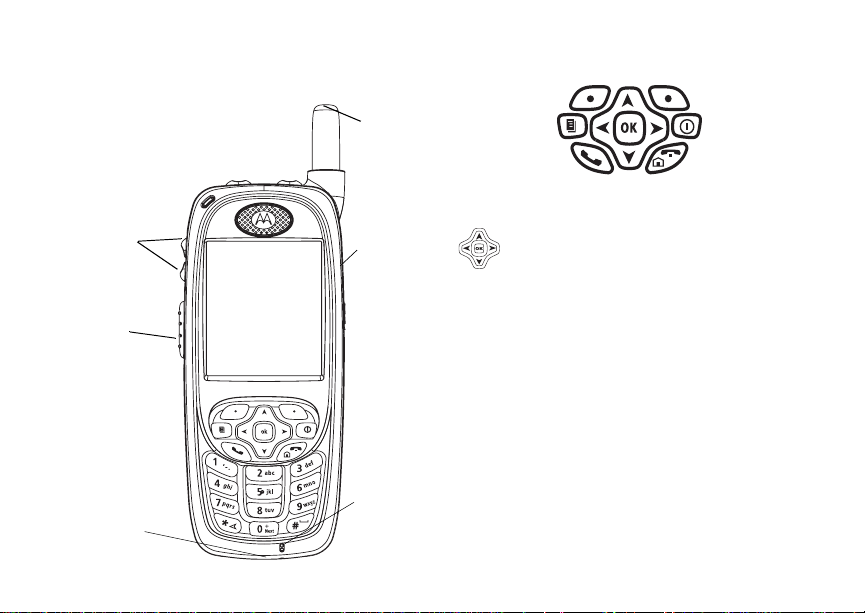
Getting Started
k
le
volume
controls
Push-To-Talk
(PTT) button
accessory
connector
retractab
antenna
audio jac
microphone
p Power button.
Navigation key — press the arrows to
scroll through menus and lists.
O OK key — selects highlighted item;
answers calls.
m Menu key — accesses c ontext-sensitive
menus.
A Option key — select s the option
appea rin g above it on th e dis p lay .
s Send key — p laces phone calls.
e End key — ends phone calls; returns to
idle screen.

2
Getting Started
t
.
t Turns Private/group / SD G ca ll sp ea k er on
and off; used with voice na mes and voice
records.
. Accesses recent calls; sends incoming
calls to voice mail.
To start using your i605 phone:
• Make sure your SIM card is in place.
• Charge th e batter y.
• Activate your service.
• Enable over-the-air security if you are prompted
to.
Locating Your SIM Card
Your SIM (Subscriber Identity Module) card is a
small piece of plastic located in the SIM card
holder in the back of your phone, underneath the
battery.
SIM card
SIM card
If your SIM card is not in the SIM card holder, it
may be in the box your phone came in, attached to
a piece of plastic about the size of a credit car d. If
this is the case, carefully detach your SIM card
from the surrounding plastic and insert it as
described in “Inserting Your SIM Card ” on page 14.
If there is no SIM card in your phone or the box,
contac t your service provider.
holder
3
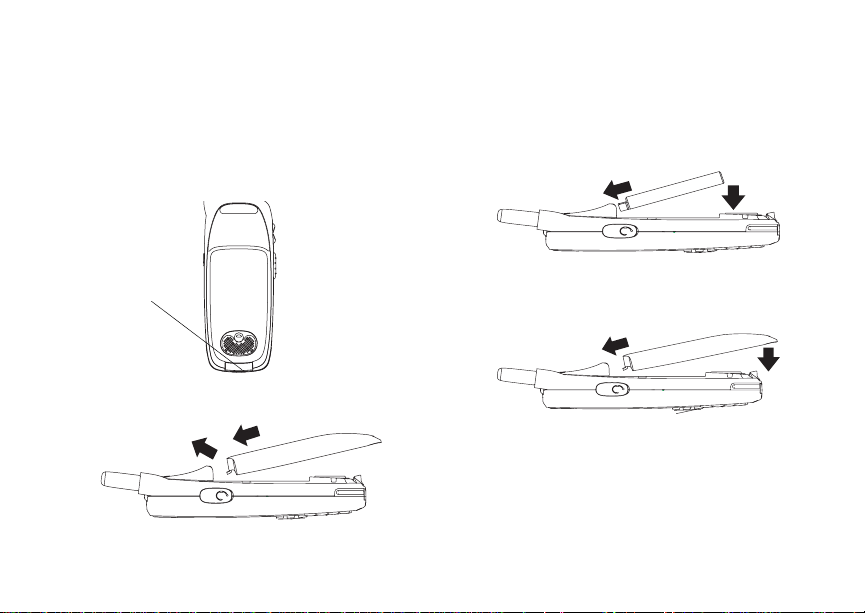
Battery
Battery
Removing the Battery Door
1 Make sure the phone is power ed off.
2 Slide t h e re le as e b ut ton ba ck un ti l i t r ele as es t he
battery door.
release
button
3 Allow the ba tt e ry do or to po p up , sli de it forw ar d,
and remove it from the back of your phone.
Inserting the Battery
1 Remove the battery door.
2 Insert the top of the battery into the battery area.
Press the bottom of the battery to secure it.
3 Replac e t he batt e ry do or and pr e ss it ge nt ly unti l
you hear a cl ic k.
Charging the Battery
Your phone comes with a batter y charger.
1 Plug the charger into an electrical outlet.

4
Getting Started
2 Open the connector cover.
connector
cover
3 Plug the other end of the charger into the
access ory connector.
Charger Attached or Device Attached appears
on the display.
Tip: To remove the charger from the accessory
connector: Press the buttons on the sides
of the plug. Pull the plug straight out.
4 When charging the battery for the first time,
charge for 30 minutes longer than the time
shown in “Charging Times”.
Charging Times
Check your battery and charger type against the
grid below to determine appropriate char ging
times.
Battery Charger
Rapid Standard
High
Performance
Maximum
Capacity
For best resu lts , charg e the batt eri es withi n the
tempe rature rang e of 50 °F to 10 4° F (10 °C to
40°C).
Prolonged charging is not recommended.
2 hours 4 hours
3.5 ho urs 7.5 hours

5
Activating Servic e
Removing the Battery
1 With your phone po were d off, rem ove the
battery door.
2 Remove the battery by pushing it toward the
antenna and lifting it out.
Battery Use and Maintenance
• The Motorola iDEN Approved Lithium Ion
chargers provide optimum performance. Other
chargers may not fully charge the iDEN Lithium
Ion battery or may yield a reduced number of
lifetime charge cycles.
• Extreme temperatures degrade battery
performance. Do not store the battery where
temperatures exceed 140°F (60°C) or fall below
4°F (-20°C).
• Lithium Ion bat teries have a self discharge rate
and without use, lose about 1% of their charge
per day.
• The battery capacity is degraded if the battery is
stored for long periods while fully charged. If
long term storage is required, store at half
capacity.
Sleep Mode
Your phone uses Sleep mode to conser ve battery
power . With Sleep mode, after yo ur phone has
been idle for a specified interval, the display on
your phone will turn off.
You can s et your phone to enter Sleep mode after
1 minute, 3 minutes, 5 minute s or 15 minutes of
inacti vity. See “D ispl ay/In fo Fe atur es” on pa ge 11 3.
Sleep mode turns off when you either press a key
or receive a call alert or phone call.
Holster
When you pl ac e yo ur i605 ph one i n t he hol ste r that
ships with your phone, your phone will go into
Sleep mo de.
Activating Service
The first time you power your phone on, you mus t
be in your local calling area. This activates your
service.
6
Getting Started
A screen t he n a pp ears pr om ptin g y ou to sel ec t Ok
to update your browser information. This screen
will only appear during initial activation. See
“Enabling Over-the-Air Security” on page 6.
Powering On and Off
The first time you power your phone on, a screen
may appear asking you to update your br owser
information. This means you must enable security.
To power your phone on, press p.
To power your phone off, press and hold p .
When You Power On For the First Time
If the Enter SIM PIN Code screen appears, enter
your SIM PIN. See “Entering the PIN” on page 12.
Press A under Ok.
When you receive your phone, the SIM PI N is
0000. Change your PIN to prevent fraudulent use
of the SIM card (see “Changi ng the PIN” on page
12).
As your phone connects to the network, you will
see a welcome message and a connecting
message. When the idle scr een appears, the
phone is ready to use.
Enabling Over-the-Air Security
If you are set up to receive over-the -air
programming from your service provider, you must
enable s ecurity the first time you power on your
phone or within 10 days of first activation of your
phone:
1 When you power on your phone for the first time,
after the idle screen appears, you will be
prompted to select Ok to update your browser
information.

7
Phone Programming
Note: If yo u pr e ss A under Later, you will be
prompted to enable security each time
you power on your phone until you press
A under Ok.
2 Press A under Ok.
3 You are prompted to en ab le sec ur i ty. Press A
under Yes. A series of screens appears. If you
subsc rib e t o yo ur servic e pro vider’s pla n, your
home page appears.
4 Press e to return to the idle screen.
Phone Pr og ra mmi ng
Within 24 hours of enabling security, you may
receive an alert notification containing your Private
ID and Tal k group lists for Private calls.
To accept programming:
1 When you receive an alert notification saying
New Browser Message - Receive
Programming Info, press O or pre ss A under
Goto.
2 You are prompted to accept changes to your
lists. Press O or press A under Ok.
3 If you are pr om pt ed again to ac c ep t cha ng es t o
your lists, press O or press A under Ok.
4 A confirmation screen disp lays. Press O or
press A unde r Ok.
5 Press e to return to the idle screen.
Findi ng Your Phone Nu mb e r and Private ID
My Info lets you view your phone number, Private
ID, and other phone informatio n:
1 Press m to access the main menu.
2 Scroll to My Info.
3 Press O.
4 Scroll to see your information.
Line 1 and Line 2 are your phon e nu mbers.
Private is your Private ID, the number that others
use to co ntact you using Private se rvice. These
numbers appear when you receive your alert
notification after enabling security on your phone.
See “My Info” on page 76 for more information
about this feature.
Phone Basics
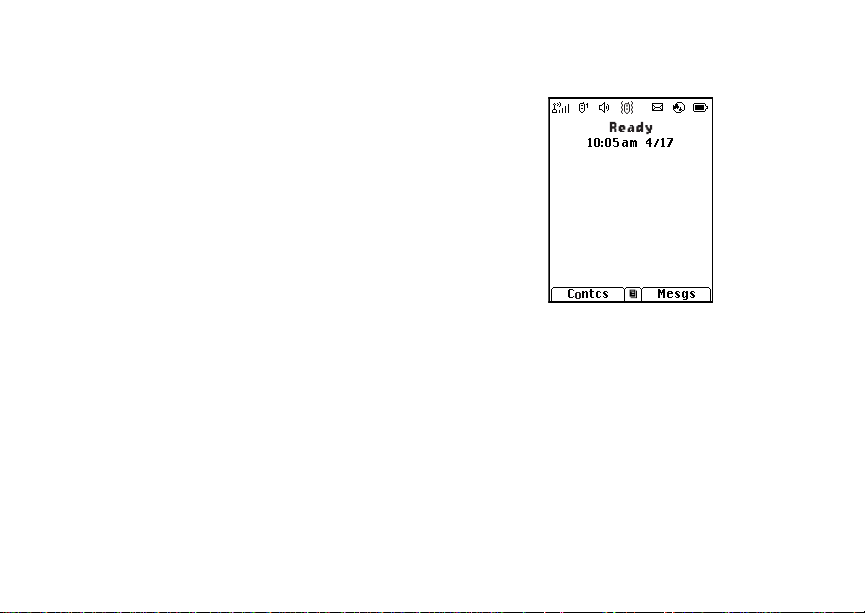
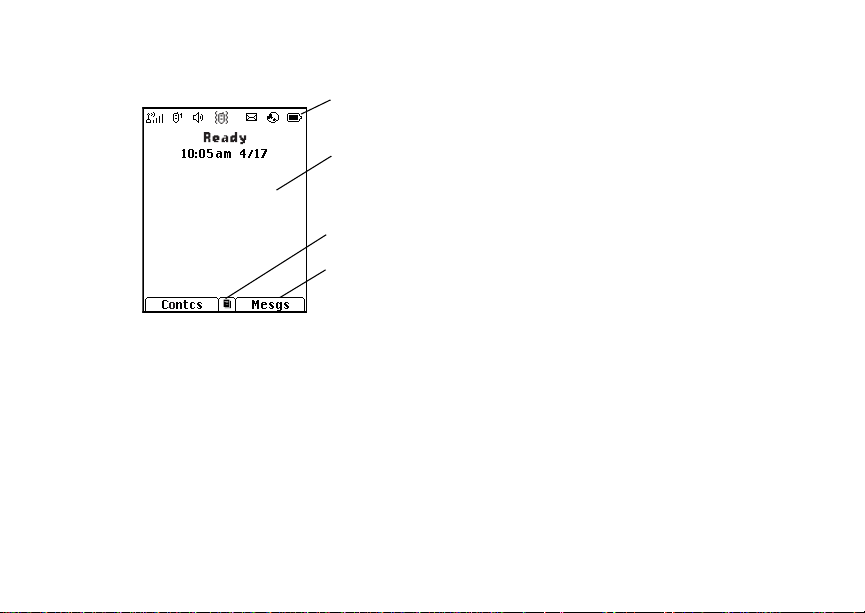
Display
Any time your phone is powered on, the display
provides you with information and options.
8
Getting Started
The screen shown is the idle screen. The text that
appears on your idle screen depends on your
service provider. The idle screen appears when
your phone is on, but not engaged in any activity.
Text Area
This area displa ys menus, messages, names,
phone nu mbers, and other information.
status icons
text area
menu icon
display options
Display Options
Two display options appear at the bot tom of most
screens. You select a displa y option by pressi ng
the option key below it.
Menus and Lists
Your phone’s features are arrang ed in menus,
submenus, and lists.
To acces s the items in a menu or list, scroll using
the navigation key at the top of your keypad. This
key lets you scroll up, down, left, or right. Holding
down the appropriate part of the navigation key
speeds up scrolling.
In this guide, this symbol > tells you to sele ct a
menu or list item. For example, Settings >
Security means:
1 Scroll to Settings on the ma in menu.
2 Press O to see the Settings screen.
3 Scroll to Security.
4 Press O to see the Security screen.
OK Key
Pressing O:
• Selects the hi ghlighted menu it em or list item
• Sets options

9
Phone Basics
• Confirms actions
• Places and answer calls
Menu Key
Many features provide context-sensitive menus
that let you access related features and actions.
This icon
menu is availabl e. Press m to access the menu.
S appears any time a context-sensiti ve
Main Menu
All your phone’s features can be accessed through
the main menu. You can set the main menu to
appear as a list or as large icons.
Browser Browse the Web.
a
Java Apps Java applications on your
q
Settings Custo m iz e yo ur phone.
b
Ring Tones Assign ring tones and turn
m
m Media Center Access stored pictures
phone. See page 81.
See page 110.
ringer off. See page 54.
and au dio recordings. See
page 67.
VoiceRecord Record and play audio
c
My Info Acces s pe r so n al ph on e
j
GPS Find your approximate
l
Contacts View, s tore, edit contacts.
d
Messages Access messages. See
e
Call Forward Set call forwarding
f
Datebook Schedule appointments.
o
Memo Store a number to access
g
Call Timers Phone us ag e in f orm a tion.
h
Recent Calls Lists recen t calls. See
i
messages. See page 78.
information, including
phone num be r an d Pr i vat e
ID. See page 76.
geograp hica l loca tion. See
page 95.
See page 27.
page 59.
optio ns. See page 36.
See page 104.
later. See page 53.
See page 41.
page 23.

10
Getting Started
Shortcuts Create short cu t s to
s
Profiles Groups of setting s you
p
Call Alert Lists call alerts. See
k
Bluetooth Connect to a device with
B
screens. See page 123.
apply together. See
page 118.
page 21.
Blueto oth. See pag e 87.
Quick Access to Main Menu Items
Each arrow in the navigation key and O can be
used to access a main menu item from the idle
screen. Each of these keys is assigned to a main
menu item when you receive your phone. To
assign d iffere nt mai n men u items, see “P ersona lize
Features” on pa ge 115.
Status Ico ns
Status i co ns appea r at t he t op of t he di spl a y. Some
appear at all times. Others appear only when your
phone is engaged in certain activities or when you
have activated certain features.
abcd
efgd
o p q r
s
A
B
C
S SDG Call In Use— Your phone is
1 2
Battery Strength — A fuller battery
indicates a greater charge.
Signal Strength — More bars next
to the antenna indicate a stronger
signal.
Phone In Use — Your phone is
active on a phone call.
Private In Use — Your phone is
active on a Private call.
Talkg rou p In Use — Y our phon e is
active on a group call.
active on a SDG call.
Active Phone Line — 1 indicates
phone line 1 is ready to make calls;
2 indica tes phone line 2 is ready to
make calls.

11
Phone Basics
G J
H K
L
I
Q R M
u
w xT
yz
DE
c
U
Call Forwa rd — Your phone is s et
to forw ard calls. See page 36.
Ringer Off — Your ph on e is s et no t
to ring. See page 54.
Speaker Off — Sounds a sso ci ate d
with Pr iv a t e ca ll s and group calls
are set to come through the
earpiece rather than through the
speaker.
Messages — You have one or
more mess ages. See page 59.
Internet — You are re ad y to
browse the internet.
Voice Record — You have one or
more voice records stored. See
page 78.
Airplane Mo de — Your phone i s
set to airplane m ode. See
page 113.
Y Z
N O
t
Packet D ata — You are ready to
transfer packet data or are
transferring packet data. See
page 42.
TTY — You are re ad y to us e yo ur
phone to make calls using a
teletypewriter device. See page 43.
Roaming — You are using your
phone outside your carrier's
network.
Entering Numbers From the Keypad
To enter numbers at the idle screen or any screen
that requires you to enter numbers, press the
numbers on the keyp ad.
If you make a mistake:
• To clear a digit, press A under Delete.
• To clear all digits, press and hold A under
Delete.
• To insert or delete a digit anywhere in the string
of digits you have entered, scroll left or right.
• To cancel, press e.

12
Getting Started
SIM Card Security
Your SIM card stores all your Contacts and
protects your personal information. Since this
information is stored on your SIM card, not in your
phone, you can remove the information by
removing your SIM card.
Note: Except for making emergency calls, your
phone will not fu nctio n w ith out the SIM
card.
To preve nt unauth orized use of yo ur ph on e, your
SIM card may be protected by a PIN that you enter
each tim e the ph on e i s po wer e d on . Y ou can
change t he PIN or t urn off the requirement that it
be entered.
Entering the PIN
You may be required to enter a SIM PIN when you
first use your phone.
When you receive your phone, the SIM PI N is
0000. Change your PIN to prevent fraudulent use
of the SI M card.
Important: If you enter your PIN incorrectly 3
1 When the Enter SIM PIN Code screen ap pe ar s,
enter you r SI M PIN . A n as te r is k ap pe ars for
each character entered.
2 Press A under Ok.
times, your SIM card is blocked. To
unblock your SIM card, you must
contact your service provider. See
“Unblocking the PIN” on page 13.
Changing the PIN
1 From the main menu, select Settings >
Security > Change Password > SIM PIN.
2 At the Enter Old SIM PIN screen, enter the
current SIM PIN.
3 Press A under Ok.
4 At the Enter New SIM PIN screen, enter the
new 4- to 8-digit SIM PIN.
5 Press A under Ok.
6 At the Re-enter New SIM PIN screen, re-enter
the new SIM PIN to confirm.
7 Press A under Ok.

13
SIM Card Security
Turning the PIN Requirement On and Off
When the SIM PIN requirement is on, you are
prompted to enter your PIN each time you turn on
your phone.
Note: If a SI M PIN is requ ir e d, yo ur ph on e w ill
not function until the SIM PIN is entered,
except for making emergency calls.
When the PIN requirement is off, your pho ne can
be used without entering a PIN.
Important: When the SIM PIN requirement is off,
the personal data on your SIM card is
not protected. Anyone can use your
phone and access your personal data.
1 From the main menu, select Settings >
Security > SIM PIN.
2 Select On or Off.
3 Enter the current SIM PIN.
4 Press A under Ok.
Unbl ocking the PIN
If you enter your PIN incorrectly 3 tim es, your SIM
card is blocked. T o unblock your SIM card, you
must contact your service provider to get a PIN
Unblock Code (PUK).
Important: If you unsuccessfully enter the PUK
code 10 times, your SIM card is
permanently blocked and must be
replaced. If this happens, all data is
lost. You will get a message to contact
your service provider. Except for
making emergency calls, your phone
will not function with a blocked SIM
card.
To unblock the PIN:
1 Press * # m 1.
2 At your service provider representative’s
request, provide the information needed to give
you a PUK cod e.
3 Select Unblock PIN.
4 Enter the PUK code.
5 Enter a new 4- to 8-digit SIM PIN.
6 Re-en ter yo ur S IM PI N .
If you entered the codes properly, SIM Unlocked
appears on the display.
Inserting and Removing Your SIM Card
Important: Do not touch the gold-colored areas of
your SIM card.

14
Getting Started
Switching SIM Cards
Moving your SIM card from one phone to another
moves all your Contacts information, but erases
other in f orma ti on. If you r e mov e y our S IM c ar d and
use it wit h an othe r pho ne, or use anoth er SIM card
with your phone, the following information is
erased:
• The recent calls list
• Call forwarding settings
• Net alerts
• MOSMS drafts, outbox messages, and
custom ized quick notes
• Options set using the MMS Setup menu
• Pictures and au dio recordings in the media
center, except those that are forward locked
• Voice records
• Voice names
• Datebook events
• Options set using the Personalize menu
• Informat io n st ore d in Mem o
• 3 most recent GPS Enabled locations
Note: In some cases, Contacts may not be
access ible if you move your SIM card to
another phone. Contacts entries created
with your i605 phone are not readable by
an older iDEN SIM-based phone.
Inserting Your SIM Card
1 With your phone po were d off, rem o ve the
battery door and battery.
2 Hold your SIM car d as shown. Do not touch the
gold-colored area.
cut corner
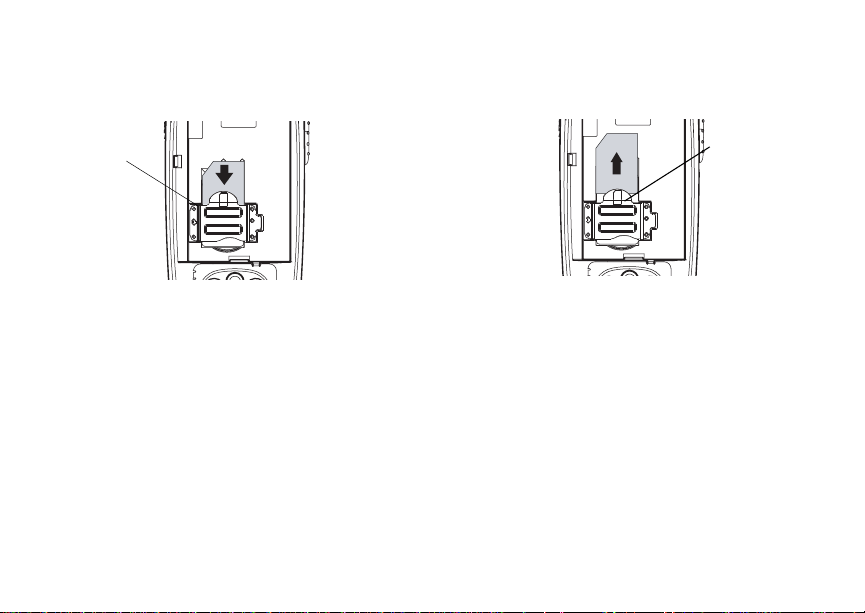
15
Antenna
3 Carefully slide your SIM card into your phone,
until it lies flat in the SIM card holder.
SIM card
holder
Removing Your SIM Card
Important: To avoid loss or damage, do not
1 With your phone po were d off, rem ove the
battery door and battery.
remove your SIM card from your phone
unless absolutely necessary.
2 While hol di ng the tab down, slide your SIM card
out of the SIM card holder.
SIM card
holder
Note: Protect your SIM card as you would any
delicate object. Store it carefully.
Antenna
The retractable antenna on your i605 phone is
design ed to be extended during calls.
To extend the antenna, pull gently on the rounded
tip until the antenna is fully extended and clicks into
position.
When finished with a call, retract the antenna by
pushing gently on the rounded tip until the antenna
clicks into place.
To optimize your phone’s performance, extend the
antenna when you make or receive a call, and
avoid t ouching the antenna with any body part.

16
Getting Started
Important: Failure to fully extend or retract the
antenna until the antenna clicks into
place causes severely degraded
performance, which may result in
missed calls, dropped calls, or garbled
audio.
Accessories
To order accessories, log on to our Web site at
www.motorola.com/store/iden or contact your
Motorola Authorized Retailer.
Note: When you place your i605 phone into the
holst er, your phone goes into Sl eep
mode.
For Mo re I nf o rmat i on
If you have questi ons about your i605 phone,
contac t your sales representative or your service
provider.

17
Making Calls
Your i605 phone makes two types of calls: digital
cellular phone calls and Private calls. With Private
calls, you use your phone as a long-ra nge, digital
walkie-talkie.
Phone Calls
1 Enter the number you want to call.
2 To place the c all:
Press s. -or-
If you enter e d th e num ber from th e idle scr een,
press O.
3 To end the call, press e.
Private Calls
1 Enter the Private ID you want to call.
2 Press and hold th e PTT button on the side of
your phon e. Beg in talk ing af ter you r phon e emits
a chirpin g sound.
3 Release the PTT button to listen.
4 To end the call, press e. -or-
Press A under Exit.
A Private call ends automatically if there is no
activity on the call for a few seconds.
Tip: To let someone know you want to talk to
him or her on a Privat e call, send a call
alert. See “Cal l Alerts” on page 21.
Receiving Calls
Phone Calls
When you receive a phone cal l, your phone rings,
vibrates, or lights up its backlight.
Answering
Press s. -or-
Press O. -or-
Press A under Yes. -or-
Press any number key.
Sending to Voice Mail
Press e. -or-
Press A under No.
Ending
Press e.
Private Calls
When you receive a Private call, your phone emits
a chirping sound or vibrates.

18
Making Calls
Answering
1 Wait for the caller to finish speaking.
2 Press and hold th e PTT button on the side of
your phon e. Beg in talk ing af ter you r phon e emits
a chirping sound.
3 Release the PTT button to listen.
Ending
Press e. -or-
Press A under Exit.
A Private call ends automatically if there is no
activity on the call for a few seconds.
Choosing a Number to Call
You can choose the number you want to call in
many ways:
• Enter the number on the keypad. See “Entering
Numbers From the Keypad” on page 11.
• Say a voi ce n ame in to yo ur pho ne. See “Usi ng a
Voice Na me”.
• Use Speed Dial or Turbo Dial
call. See “Using Speed Dial and Turbo Dial®” on
page 19.
• Redial the last phone number call ed. See
“Redialing the Last Number” on page 19.
®
to make a ph one
• Select the number from the recent calls list. See
“Making Calls From the Recent Calls List” on
page 25.
• Select the number from Contacts. See “Making
Calls From Contacts” on page 34.
• Select a number stored in Datebook. See
“Making Calls From Datebook” on page 108.
• Use One Touch PTT to make a Private call. See
“One Touch PTT” on page 40.
• Use the number in Memo. See “Memo” on page
53.
• Select the number in a text message you have
received. See “Receiving a Message” on page
62.
Using a Voice Name
If you have created a voice name in Contacts for
the number you want to call, say the voice name
into your phone to enter the number. See page 28
for information on voice names.
You can us e a voice name to enter a number with
the flip open or closed.
1 Press and hold t unt il a prompt appears
telling you to say the voice name.
2 Speaking into the microphone, say the voice
name assigned to the number you want to call.

19
Missed Phone Calls
Your phone plays the name back to you.
If you are making a phone cal l, the call is placed
automatically.
Tip: To stop a phone call fro m be in g complet e d,
press . if the flip is closed or press e.
If you are making a Private call, press and hold the
PTT button to place the call.
Using Speed Dial and Turbo Dial
Each phone number stored in Contacts is assigned
a Speed D i al n umb er w hic h you c an us e t o ca ll t ha t
number.
Speed Dial
1 From the idle screen, use the keypad to enter
the Speed Dial number assign ed to the phone
number you want to call.
2 Press #.
3 Press s.
Turbo Dial
From the idle scr een, press and hold the Speed
Dial n umb er ( 1 thr o ug h 9) as si gned to t he p ho ne
number you want to call.
Redialing the Last Number
Press and hold s to place a call to the last phone
number you called.
Missed Phone Calls
When you mi ss a ca ll , t hi s ic on V and the number
®
of phone calls you have missed appear briefly.
If you want to dismiss the missed call message,
press A under Back. -or-
If you want to view the missed call on the recent
calls lis t , pr es s A under View.
Usin g Spea ke r phon e
Turning on speake rphone makes incoming sound
come out of the phon e’s speaker instead of the
earpiece . Spea ker phone is avai labl e whene ver you
are on an active phone call.
To turn speakerphone on or off:
Press A under Spkr. -or-
Press t.

20
Making Calls
Using Mute
Muting calls lets you listen to incoming sound
without transmitting sound. Mute is available
whenever you are on an active call.
To turn mute o n:
Press A under Mute.
While mu te is on, Unmute appears as a display
option.
To turn mute off:
Press A under Unmute.
Making Emergency Phone Calls
Your phone supports emergency calling.
Emergency phone calls can be made even when
your SIM card is blocked or not in your phone.
Dial 911 to be connected to an emergency
response center. If you are o n an active call, you
must end it before calling 911.
When you make an emergency call, your phone’s
GPS Enabled feature can help emergency service
personnel find you, if you are in a location where
your phon e' s GP S ant en na ha s est a blis he d a cl e ar
view of t he open sky and your lo cal emergency
response center has the equi pment to process
location information. See “GPS Enabled” on page
95, and particularly “IMPORTANT: Things to Keep
in Mind” on page 95 and “Making an Emergency
Call” on page 96, for more information on the
limitations of this feature. Because of the
limitations of this feature, alway s provide your best
knowledge of your location to the emergency
response center w hen you make an emerge ncy
call.
Important: Emergency calls cannot be placed while
Important: If you have not registered on the
the keypad is locked.
network, emergency calls cann ot be
placed while your SIM card is in your
phone.

21
Call Alerts
Sendin g a call alert let s the rec ipient kn ow yo u
want to talk to him or her on a Private call.
When you s end a call alert, the recipient’s phone
emits a series of beeps, or vibrates, and displays
your name or Private ID.
The recipient can:
• Answer — begin a Private call with the sender
• Queue — store the call alert to the call alert
queue, which is a list of call alerts
• Clear — dismiss and delete the cal l alert
Sending Call Alerts
1 Enter the Private ID you want to send to, as you
would when making a Private call.
2 Press A under Alert. Ready to Alert appears
on the display.
3 Press the PTT button until Alert Successful
appears on the display.
Note: If the alert is not successful, this may
mean the person you are trying to reach is
on a call or has the phone turned off.
Receiving Call Alerts
When you receive a call alert, you must answer,
queue, or clear it. You cannot receive phone calls
or Private calls until you do.
To answer a call alert:
Press the PTT button to make a Private call to
the sender.
To queue a call alert:
Press A under Queue.
To clear a call alert:
Press O. -or-
Press A under Clear. -or-
Note: The recent calls list also stores c all alerts
you have received. They appear as
Private calls. Call alerts remain in your
recent calls list until you delete them or
until they reach the end of the list.
Using the Call Alert Queue
When you queue a call alert, it remains in the call
alert queue until you make a Private call to the
sender or delete it.

22
Call Alerts
Viewing Call Alerts
1 From the main menu, select Call Alert.
2 Scroll through the list.
Viewing Date and Time
To view the date and time a call alert was received:
1 From the main menu, select Call Alert.
2 Select the call alert you want inf ormatio n on.
Responding to Call Alerts in the Queue
After you queue a call alert, you can respond to it
by making a Private call to the se nder or sending a
call alert to the sender.
Making a Private Call to the Sender
1 From the main menu, select Call Alert.
2 Scroll to the call alert you want to respond to.
3 Press the PTT button to begin the call.
This removes the call alert from the queue.
Sending a Call Alert to the Sender
1 From the main menu, select Call Alert.
2 Scroll to the call alert you want to respond to.
3 Press A under Alert. Ready to Alert appears
on the display.
4 Press the PTT button until Aler t Successful
appears on the display.
Deleting Call Alerts
To delete a call alert from the queue:
1 From the call alert queue, scroll to the call alert
you want to delete.
2 Press m.
3 Select Delete.
4 Press O or press A under Yes to confirm.
To delete all call alerts from the queue:
1 From the call alert queue, press m.
2 From the call alert menu, select Delete All.
3 Press O or press A under Yes to confirm.
Sor t ing Call Aler ts
Tip: You must have at least one call alert in the
queue t o access this feature.
To sort call alerts by the or der they were rec eived:
1 From the main menu, select Call Alert.
2 Press m.
3 Select Sort By.
4 Select First on Top or Last on Top.
 Loading...