


Digital Multi-service Data-capable Phone
i315 Phone User’s Guide
@NNTN5504A@
NNTN5504A
Motorola
iDEN
BETA DRAFT


IMPORTANT NOTICE: PLEASE READ
PRIOR TO USING YOUR PHONE
The SIM card provided in this kit is intended for use with
the phone provided in this package.
Loss of certain features will result when using a SIM
card from one of the following models: i30sx, i35s,
i50sx, i55sr, i58sr, i60c, i80s, i85s, i88s, i90c, i95cl
series, and the i2000 series.
For more information on SIM card compatibility, go to
www.motorola.com/iden/support.
Defects or damage to your Motorola phone that result
from the use of non-Motorola branded or certified
Accessories, including but not limited to replacement
housings and or other peripheral accessories, are
excluded from warranty coverage. Please refer to the
text of Motorola's Limited One Year warranty in this
user’s guide for complete details.


Contents
Getti ng Sta rted.... ... .................................... 1
Locating Your SIM Card....................................2
Activating Service..............................................5
Powering On and Off.........................................5
Enabling Ove r- th e-A ir S ecuri ty... .... ................... 6
Phone Programming .........................................6
Finding Your Phone Number.............................7
Phone Basics ....................................................7
SIM Card Security ...........................................11
Locking the Keypad.........................................14
Accessories.....................................................15
For More Information.......................................15
Maki ng C a lls........... .. ................................ 16
Phone Calls.....................................................16
Private Calls ..... ... .... .... ....................................1 6
Receiving Calls................................................16
Call Icons.........................................................17
Ways to Enter Calls.........................................17
Using Speakerphone.......................................19
Using Mute......................................................20
Making Emergency Phone Calls .....................20
MOTOtalk ..................................................21
Using MOTOtalk..............................................21
Switching to MOTOtalk .. ... ............ .... .... ... .... ...22
Setup Options .................................................22
MOTOtalk Icons ..............................................23
Channels and Codes.......................................23
MOTOtalk Private Calls...................................25
Making a MOTOtalk Call.................................26
Receiving a MOTOtalk Call.............................26
Assigning a MOTOtalk Number in Contacts ...26
Recent Calls................... ... .... .... ......................26
Making Emergency Calls from MOTOtalk.......26
Call Alerts..................................................27
Sending Call Alerts..........................................27
Receiving Call Alerts.......................................27
Using the Call Alert Queue..............................27
Recent Calls..............................................29
Storing Recen t Call s to Con ta ct s ...... .... ... .......2 9
i

Deleting Recent Calls......................................30
Contacts ................................................... 31
Viewing Con ta cts. ............................................ 3 2
Creating Entries...............................................33
Storing Numbe rs Fast er ......... .... .... .... .............34
Editing Entries.................................................35
Deleting Entries...............................................35
Checking Capacity ..........................................35
Creating Pauses and Waits.............................36
International Numbers.....................................36
Accessing Contacts with GSM Phones...........37
Call Forwarding........................................ 38
Forwardin g All Calls ........................................38
Turning Off Call Forwarding ............................39
Forwardin g Miss e d Call s.................................39
Viewing Call Forwarding Settings....................40
Advan c ed C al li n g Fe at u re s ..................... 41
Call Waiting.....................................................41
Call Hold..........................................................42
3-Way Calling..................................................42
ii
Creating Pauses and Waits While Dialing.......43
Making International Calls...............................43
Setting One Touch PTT ..................................43
Group Calls .... ............ .... ... .... .... ......................4 4
Call Timers......................................................45
Using Your Phone as a Modem ......................46
Making TTY Calls............................................47
Memo .........................................................49
Ring Tones............. .. ......................... .. .. ....50
Setting Your Phone to Vibrate.........................50
Turning Ring To ne s Off.. ... .... ............ .... ... .... ...50
Ring and Vibrate ............ ... .............................. 5 1
Assigning Ring Tones to Contacts..................51
Viewing Rin g Tone As sign me nt s ............. .... ...52
Download in g Mor e Ring Tones ............. ... .... ...52
Managing Memory ..........................................52
Deleting Custom Ring Tones ..........................52
Enter in g Te x t .......... .. ... .............................54
Using Alpha Mode...........................................54
Using Word Mode ...........................................54

Special Function Keys.....................................55
Using Numeric Mode.......................................56
Using Symbols Mode ......................................56
Messages ................................................. 57
Message Notifications .....................................57
Message Center..............................................58
Voice M a il M e s sag e s......... .. .................... 59
Receiving a Message......................................59
Accessing Voice Mail from
the Message Center ...................................59
Sending Unanswered Calls to Voice Mail .......59
MOSMS Messages................ ...................60
Setting Up........................................................6 0
Receiving a Message......................................60
Reading from the Message Center .................61
Creating and Sending Messages....................61
Managing Memory...........................................65
GPS En abled ....... ... .................................. 66
IMPORTANT: Things to Keep in Mind ............66
Making an Emergency Call .............................67
Viewing Your App roxim a te Lo ca tio n . .... ... .... ... 6 8
Enhancing GPS Performance.........................69
Updating Satellite Almanac Data ....................71
Setting Privacy Options...................................71
Using GPS with Map Software........................72
Voice R ec o r d s ... ...................... .. ... ............75
Creating Voice Records ..................................75
Playing Voice Records....................................75
Labelling Voice Records .................................76
Deleting Voice Records...................................76
Locking Voice Records ...................................76
Managing Memory ..........................................76
Customizing Your Phone.........................78
Setting the Volume..........................................78
Setting Your Phone to Not Ring......................78
Seeing the Display Better................................79
Using Settings.................................................79
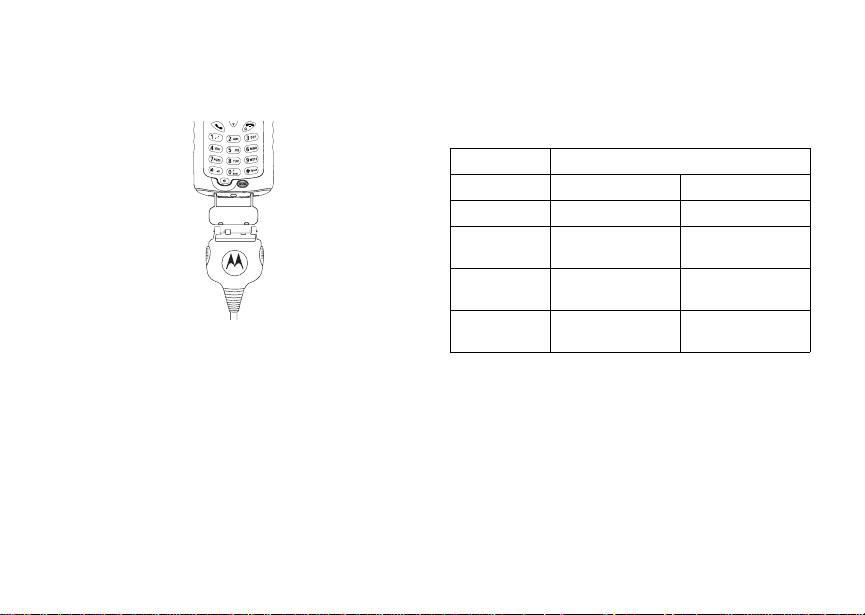
Using a He a d set ... .. .. ........ .. ... ...................82
Attaching a Headset........................................82
Using a Remote PTT Button ...........................82
iii

Understanding Status Messages........... 83
Safety and General Information ............. 85
RF Operational Characteristics.......................85
Portable Radio Product Operation and EME
Exposure.....................................................85
Electro Magnetic Interference/Compatibility....88
Medical Devices ..............................................88
Operational Warnings......................................89
Operational Cautions.......................................90
Accessory Saf ety Info rm at io n. .... .... .................91
MOTOROLA LIMITED WARRANTY ........ 93
Limited Warranty
Motorola Communicati on Products
(International) ....................................... 97
Patent and Trademark Information ...... 101
Index ....................................................... 102
Drivi ng Saf e ty Ti p s ..... .. ....... ... .. ............. 1 07
iv

DECLARATION OF CONFORMITY
Per FCC CFR 47 Part 2 Section 2.1077(a)
Responsible Party Name: Motorola, Inc.
Address: 8000 West Sunrise Boule v ard
Plantation, FL 33322 USA
Phone Number: 1 (800) 453-0920
Hereby d eclares that the pr oduct:
Product Name: i315
Model Number: H69XAH6RR1AN
Conforms to the following regulations:
FCC Part 15, subpart B, section 15.107(a),
15.107(d) and section 15.109(a)
Class B Digital Device
Note: This equipment has been tested and
found to comply with the limits for a Class
B digital device, pursuant to part 15 of the
FCC Rul es. These limits are design ed to
provide reasonable protection against
harmful interference in a resid ential
inst allation. This equipment gener ates,
uses and can radiate radio frequency
energy and, if not installed and used in
accordance with the instructions, may
cause harmful interference to radio
communications. However, there is no
guarantee that interference will not occur
in a particul ar ins tal la ti o n.
If this equipment does cause harmful
interference to radio or television reception,
which can be determined by turning the
equipment off and on, the user is
encouraged to try to correct the interference
by one or more of the following measures:
• Reo rie nt or rel oc ate the receiv ing
antenna.
• Incr e as e the separa tio n be t ween the
equipme nt and receiver.
• Connect the equipment into an outlet on
a circuit different from that to which the
receiver is connected.
• Consult t he dealer or an experience d
radio/TV technician for help.
v

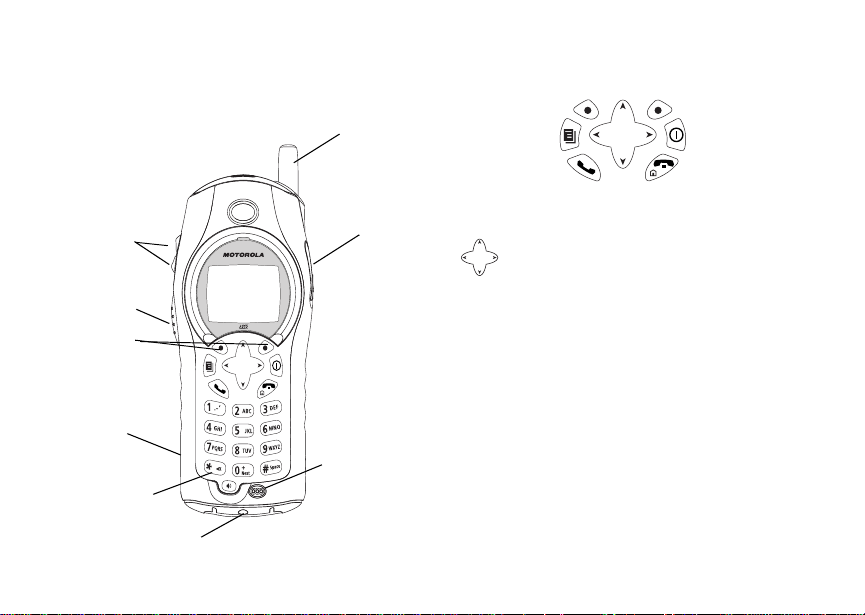
Getting Started
antenna
volume
controls
Push-To-Talk
(PTT) button
option keys
speaker
(in back)
back ke y
accessory connector
audio jack
microphone
p Power button.
Navigation key — p ress the arr ows to
scroll throug h menus and lists.
m Menu key — a ccesses cont ext-sensitive
menus.
A Option key — selects the option
appea ring above it on the display.
Note: Throughout this User Guide, the
option keys will be repres ented
by A.
s Send key — pl aces phone calls.
e End key — ends phone calls; returns to
idle screen; in browser mode, returns to
Net main menu.
1

Getting Started
To start using your i315 phone:
• Make sure your SIM card is in place.
• Charge the battery.
• Activate your service.
• Enable ov er-the-a ir sec u rit y.
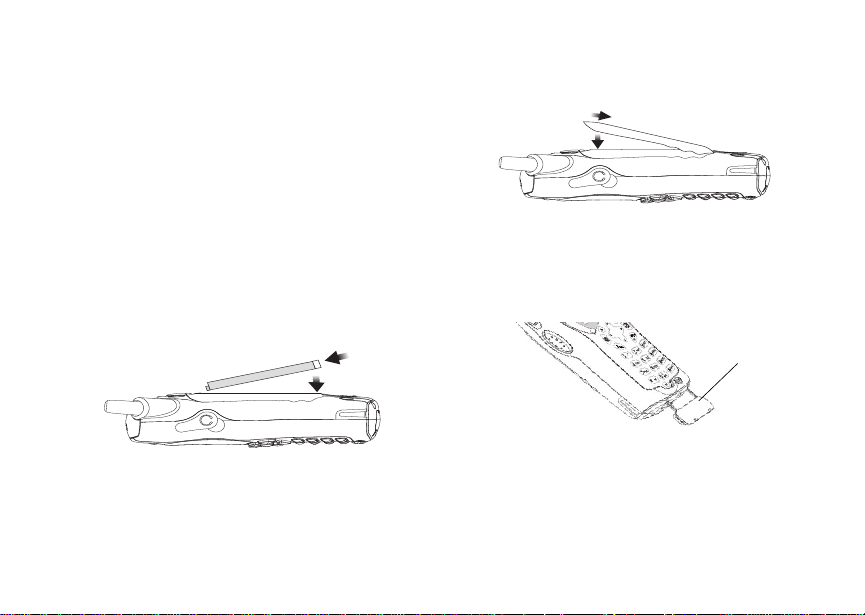
Removing the Battery Door
1 Make sure the phone is power ed off.
2 Slide the release but ton forward until it rele ases
the ba ttery do or.
2
3 Remove the battery door from the back of your
phone.
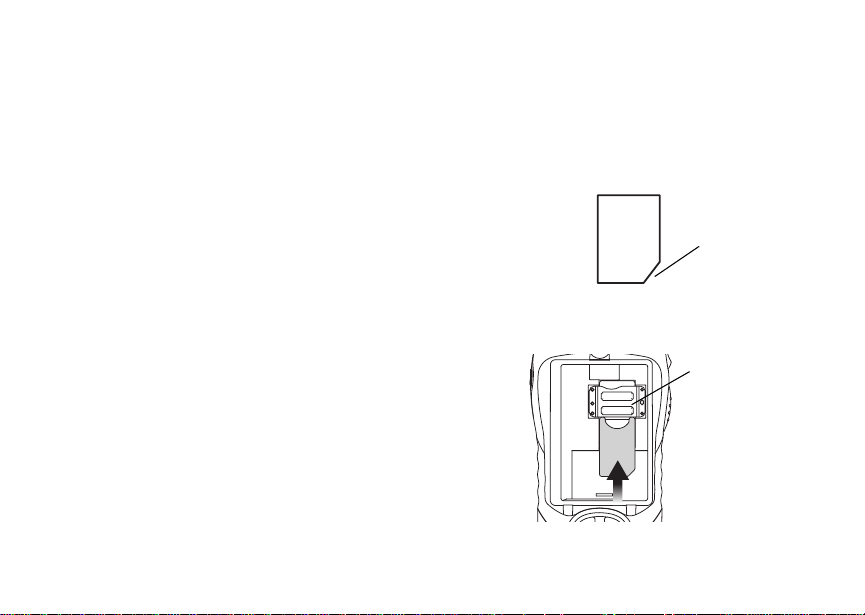
Locating Your SIM Card
Your SIM (Subscriber Identity Module) card is a
small piece of plastic located in the SIM card
holder in the back of your phone, underneath the
battery.
SIM card
SIM card
holder
Locating Y our SIM Card
If your SIM card is not in the SIM card holder, it
may be in the box your phone came in, attached to
a piece of white plastic about the size of a credit
card. If this is the case, carefully detach your SIM
card from the surrounding plastic and insert it as
described in “Inserting Your S IM Card” on page 13.
If there is no SIM card in your phone or the box,
contac t your service provider.
Battery
Inserting the Battery
1 Remove th e ba ttery door.
2 Insert the top of the battery into the battery area.
Press the bottom of the battery to secure it.
3 Replac e t he batt e ry do or and pr e ss it ge nt ly unti l
you hear a cl ic k.
Charging the Battery
Your pho ne comes with a standard travel charger.
1 Plug the charger into an electrical outlet.
2 Open the connector cover.
connector
cover
3
Getting Started
3 Plug the other end of the charger into the
access ory connector.
Charger Attached appears on the display.
Tip: To remove the charger from the accessory
connector: Press the buttons on the sides
of the plug. Pull the plug straight out.
4 When charging the battery for the first time,
charge for 30 minutes longer than the time
shown in “Charging Times”.
4
Charging Times
See your battery and charger to determine the
appropriate charging time.
Battery Charger
Rapid Mid-Rate
Slim 2 hours 3 hours
High
Performance
Extra
Capacity
Maximum
Capacity
For best resu lts , charg e the batt eri es withi n the
tempe rature rang e of 50 °F to 10 4° F (10 °C to
40°C).
Prolonged charging is not recommended.
2 hours 4 hours
2.5 ho urs 5.5 hours
3.5 ho urs 7.5 hours
Removing the Battery
1 With the phone powered off, remove the bat tery
door.
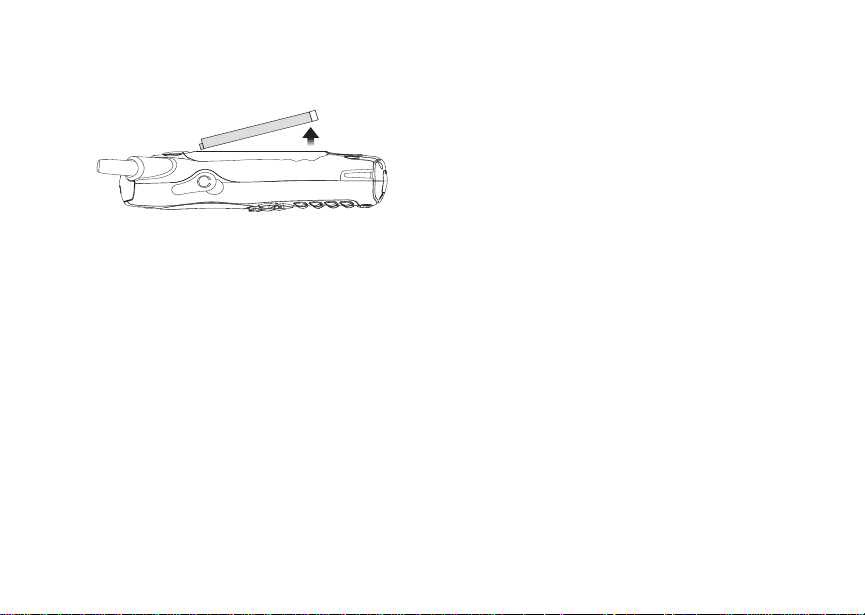
Activat ing Service
2 Remove the battery by pushing the battery
toward the antenna and lifting it out.
Battery Use and Maintenance
• The Motorola iDEN Approved Lithium Ion
chargers provide optimum performance. Other
chargers may not fully charge the iDEN Lithium
Ion battery or may yield a reduced number of
lifetime charge cycles.
• Extreme temperatures degrade battery
performance. Do not store the battery where
temperatures exceed 140°F (60°C) or fall below
4°F (-20°C).
• Lithium Ion batteries have a self discharge rate
and without use, lose about 1% of their charge
per day.
• The battery capacity is degraded if the batter y is
stored for long periods while fully charged. If
long term storage is required, store at half
capacity.
Activating Service
The first time you power on your phone, you must
be in your local calling area. This activates your
service.
Powering On and Off
To power your phone on:
Press p.
To power your phone off:
Press and hold p.
When You Power On for the First Time
The first time you power your phone on, screen
may appear asking you to update your br owser
information. Th is means you must enabl e security.
If the Enter SIM PIN Code screen appears, enter
your SIM PIN. See “Entering the PIN” on page 11.
Press A under Ok.
When you receive your phone, the SIM PI N is
0000. Change your PIN to prevent fraudulent use
of the SIM card (see “Changi ng the PIN” on page
11).
5

Getting Started
As your phone connects to the network, you will
see a conn ecting message. When the idle screen
appea rs , the ph on e is re ad y to us e.
s
Contcs
S
d1
Enabling Over-the-Air Security
If you are set up to receive over-the -air
programming from your service provider, you must
enable s ecurity the first time you power on your
phone or within 20 days of first activation of your
phone:
1 When you power on your phone for the first time,
after the idle screen appears, you will be
prompte d t o sele c t Ok to update your browser
information.
Note: If you pre ss A under Later, you will be
prompted to enable security each time
you power on your phone until you press
A under Ok.
6
2 Press A under Ok.
3 You are prompted to en ab le sec ur i ty. Press A
under Yes. A series of screens appears. If you
subscribe to your service provider’s plan, your
home page appears.
4 Press e to return to the idle screen.
Phone Pr og ra mmi ng
Within 24 hours of enabling security, you will
receive a Net alert containing your Private ID and
Talkgroup lists for Private calls.
To accept programming:
1 When you receive a Net alert saying Ne w
Browser Message - Receive Programming
Info, press A under Goto.
2 You are prompted to accept changes to your
lists. Press A under Ok.
3 If you are prom pt ed again to ac c ep t cha nges to
your lists, pre ss A under Ok.
4 A confirmation screen disp lays. Press A under
Ok.
5 Press e to return to the idle screen.
Finding Your Phone Number
Findi ng Your Phone Nu mb e r
My Info lets you view your phone number, Private
ID, and other phone informatio n:
1 Press m to access the main men u .
2 Scroll to My Info.
3 Press A under Select.
4 Scroll to see your information:
•Name — Enter your name. See “Entering
T ext” on page 54.
•Line1 and Line 2 — your phone numbers for
phone lines 1 and 2. These are filled in when
you receive your first Private call after
enabli ng over-the-air security on your phone.
•Private — Your Private ID is the number that
others use to contact you using Private ID
calls. It is filled in when you receive your first
Private call.
• Group ID — the number of the Talkgroup you
have jo in ed .
• Carrier IP — the IP address assigned to your
service provider. It is filled in when you
register for pack et da ta services.
• IP1 Address and IP2 Address — the IP
addresse s yo u u se to ac ce ss the I nter net wit h
your phone.
•Ckt — Your circuit data number is the number
you use if you want to use your phone to
transfer circuit data. See “Using Your Phone
as a Mode m” on page 46. You receive th is
number from your service provider.
Note: The context-sensitive menu under My Info
contains information that may be used by
your s ervice provider if there is a problem
with your phone.
Phone Basics
Any time your phone is powered on, the display
provides you with information and options.
s
Contcs
S
status icons
d1
text area
menu icon
display options
7

Getting Started
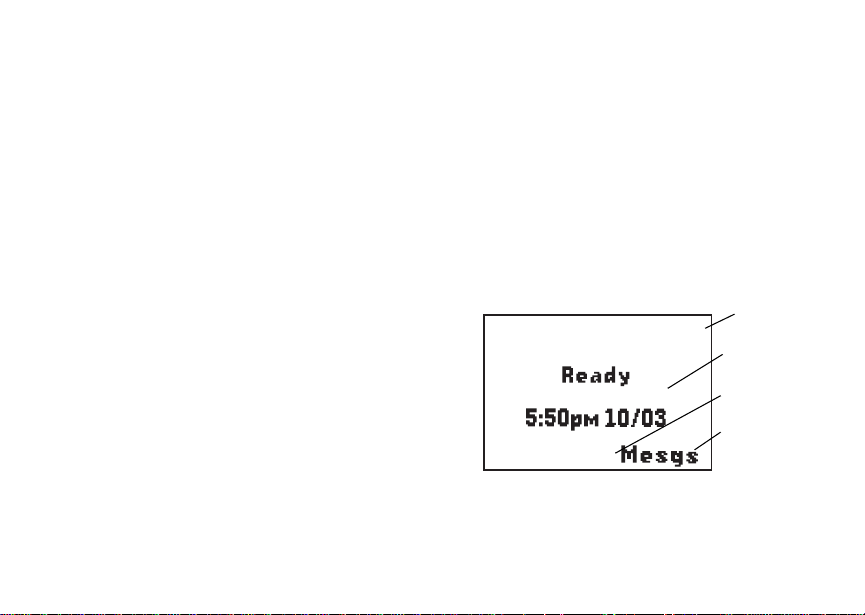
The scre en sho w n ab ov e is th e id le sc reen. The
text that appears on your i dle screen depends on
your service pro vider. The idle screen appears
when your phone is on, but not engaged in any
activity.
Text Area
This area displa ys menus, messages, names,
phone nu mbers, and other information.
Display Options
Two displ ay options appear at the bottom of most
screens. You select a displa y option by pressing
the option key below it.
Menus and Lists
Your phone’s features are arrang ed in menus,
submenus, and lists.
To acces s the items i n a menu or list, scro ll using
the navigation key at the top of your keypad. This
key lets you scroll up, down, left, or right. Holding
down the appropriate part of the navigation key
speeds up scrolli ng.
In this guid e, this symbol > tells you to select a
menu or list item. For example, Settings >
Security means:
1 Scroll to Settings on the ma in menu.
8
2 Press A under Select to see the Settings
screen.
3 Scroll to Security.
4 Press A under Select to see the Security
screen.
Menu Key
Many fea tures provide context-s ensitive menus
that let you access related features and actions.
This S i c on appears any time a context-sensitive
menu is available. Press m to access the menu.
Main Menu
All your phone’s features can be accessed through
the main menu. When you are using a feature, the
icon fo r that feature appears in the upper left
corner of the display.
a Browser Browse the Web.
MOTOtalk/MT
Options
Go to/Exit
MOTOtalk
Setup
Help
Launch/Exit MOTOtalk
Access MOTOtalk Setup
and Help. See page 21.

Phone Basics
b Settings
Display/Info
Phone Calls
2-Way Radio
Volume
Security
Advanced
Customize your phone.
See page 78.
c VoiceRecord Record and play au dio
messages. See page 75.
d Contacts
new contact form
list of contacts
Contacts menu
e Messages Access messages. See
f Call Forward Set ca ll forwar d ing
g Memo Store a number to access
h Call Timers Phone us age information.
i Recent Calls
list of call s
recent calls me nu
Call Setup menu
View , sto r e, ed it contac ts .
See page 31.
page 57.
options. See page 38.
later. See page 49.
See page 45.
Lists recent calls. See
page 29.
j My Info View personal phone
inform ation, in cl ud ing
phone nu mber a nd Pri va te
ID. See page 7.
k Call Alert
list of call alerts
Call Alerts menu
Lists call alerts. See
page 27.
l GPS Find your approx imate
geograph ic al l oc at ion . Se e
page 66.
m Ring Tones
Vibrate All
list of ring tones
Ring Tones menu
Assign ring tones and turn
ringer off. See page 50.
9

Getting Started
Status Icons
Status icons appear in the two rows at the top of
the display. Some appear at all times. Others
appear o nl y whe n y ou r p hone is e ng ag ed in c ert ai n
activities or when you have activate d certain
features.
a b c d
e f g d
o p q r sSignal Strength — More bars
A Phone In Use — Your phone is
B Private In Use — Your phone is
C Talkgroup In Use — Your
1 2 Active Phone Line — 1
10
Battery Strength — More bars
on the battery indicate a greater
charge.
next to the antenna indicate a
stronger signal.
acti ve on a phone call.
acti ve on a Private call.
phone is active on a group call.
indi cates phone line1 is ready
to mak e cal ls ; 2 i ndi cat e s phon e
line 2 is ready to make calls.
MOTOtalk In Use — Your
phone is active, on a MOTOtalk
call.
No Signal — You are
off-ne tw o rk and in MOTO talk
mode.
GHI
J K L
Call Forward — Your phone is
set to forward ca lls. See “Ca l l
Forwa rding” on page 38 .
uvM Ringer Off — Your phone i s se t
wy x
not to ring. See “Turning Ring
Tones Of f” on pa ge 50.
Messages — You have one or
more messages. See
“Messages” on page 57.
D Internet — You are ready to
browse the inter net.
YZ Packet Data — You are ready
to transfer packet data or are
transferring packet data. See
“Using Your Phone as a
Modem” on page 46.
P Roaming — Y ou are usi n g y our
phone outside your carrier's
network.

SIM Card Security
SIM Card Security
Your SIM card protects your personal information.
The SIM card stores all your Contacts information.
Since this information is stored on your SIM card,
not in y our phone, you can remove the information
by removing your SIM card.
Note: Except for making emergency calls, your
phone will not fu nctio n w ith out the SIM
card.
To preve nt unauth orized use of your phon e, you r
SIM card is protected by a PIN that you enter each
time the phone is powered on. You can change the
PIN or turn off the requirement that it be entered.
Entering the PIN
You may be required to enter a SIM PIN when you
first use your phone.
When you receive your phone, the SIM PI N is
0000. Change your PIN to prevent fraudulent use
of the SI M card.
Important: If you enter your PIN incorrectly 3 times,
1 When the Enter SIM PIN Code screen ap pe ars,
enter you r SI M PIN . A n as te r is k ap pe ars for
each character entered.
2 Press A under Ok.
your SIM card is blocked. To unblock
your SIM card, you must contact your
service provider. See “Unblocking the
PIN”.
Changing the PIN
1 From the main menu, select Settings >
Security > Change Password > SIM PIN.
2 At the Enter Old SIM PIN Code screen, enter
the current SIM PIN.
3 Press A under Ok.
4 At the Enter New SIM PIN Code screen, enter
the new 4- to 8-d igit SIM PI N.
5 Press A under Ok.
6 At the Re-enter New SIM PIN Code screen,
re-ent er the new SIM PIN to confirm.
7 Press A under Ok.
11

Getting Started
Turning the PIN Requirement On and Off
When the SIM PIN requirement is on, you are
prompted to enter your PIN each time you turn on
your phone.
Note: If a SIM PIN is re qu ir e d, yo ur ph on e w ill
not function until the SIM PIN is entered,
except for making emergency calls.
When the PIN requirement is off, your pho ne can
be used without entering a PIN.
Important: When the SIM PIN requirement is off,
the personal data on your SIM card is
not protected. Anyone can use your
phone and access your personal data.
1 From the main menu, select Settings >
Security > SIM PIN.
2 Select On or Off.
3 Enter the current SIM PIN.
4 Press A under Ok.
Unblocking the PIN
If you enter your PIN incorrectly 3 tim es, your SIM
card is blocked. T o unblock your SIM card, you
must contact your service provider to get a PIN
Unblock Code (PUK).
12
Important: If you unsuccessfully enter the PUK
code 10 times, your SIM card is
permanently blocked and must be
replaced. If this happens, all data is
lost. You will get a message to contact
your service provider. Except for
making emergency calls, your phone
will not function with a blocked SIM
card.
To unblock the PIN:
1 Press * # m 1.
2 At your service provider representative’s
request, provide the information needed to give
you a PUK cod e.
3 Select Unblock PIN.
4 Enter the PUK code.
5 Enter a new 4- to 8-digit SIM PIN.
6 Re-en ter yo ur S IM PI N .
If you entered the codes properly, SIM Unlocked
appears on the display.
SIM Card Security
Inserting and Removing Your SIM Card
Important: Do not touch the gold-colored areas of
Switching SIM Cards
Moving your SIM card from one phone to another
moves all your Contacts information, but erases
other in f orma ti on. If you r e mov e y our S IM c ar d and
use it wit h an othe r pho ne, or use anoth er SIM card
with your phone, the following information is
erased:
• The recent calls list
• Call forwarding settings
• Net alerts
• Mobil e originated text messages, drafts, and
quick notes
• Informat io n st ore d in Mem o
• 3 most recent GPS Enabled locations
• Voice records
• Voice names
your SIM card.
Inserting Your SIM Card
With your phone powered off, remove the battery
door and battery. See “Removing the Battery” on
page 4.
1 Hold your SIM car d as shown. Do not touch the
gold-colored area.
cut corner
2 Carefully slide your SIM card into your phone,
until it lies flat in the SIM card holder.
SIM card
holder
13
Getting Started
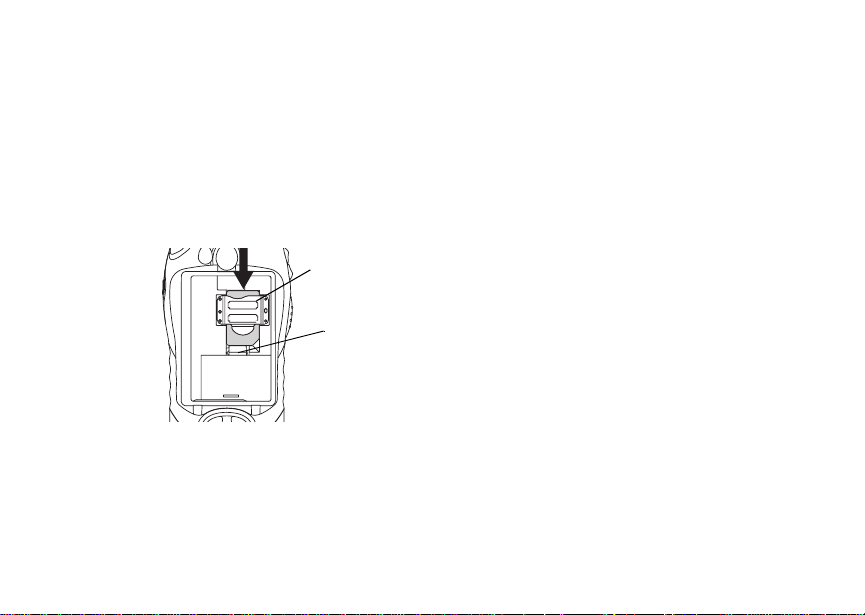
Removing Your SIM Card
Important : To avoid loss or da mage, d o not rem ove
your SIM card from your phone unless
absolutely necessary.
1 With your phone po were d off, rem ove the
battery door and battery.
2 While hol ding the tab do w n, slid e your SIM car d
out of the SIM card holder.
SIM card
holder
tab
Note: Protect your SIM card as you would any
delicate object. Store it carefully.
14
Locking the Keypad
Locking the phone’s keypad prevents its buttons
from being pressed. When the keypad is locked,
you can on ly:
• Power the phone on and off
• Unlock t he keypad
• Respond to incoming calls, messages, and
alerts
Important: Emergency calls cannot be placed while
To lock the keypad:
1 From the idle screen, press m.
2 Press *.
If you pre ss a key while the keypad is locked,
instructions for unlocking the keypad display
briefly.
To unlock the keypad:
1 From the idle screen, press m.
2 Press *.
While the keypad is locked, you can respond to
incomin g calls, messages, and alerts just as you
do when the keypad is not locked. When finished,
press e to return to the idle screen . The keypa d
remains locked.
the keypad is locked.

Accessories
To order accessories, log on to our Web site at
www.motorola.com/store/iden or contact your
Motorola Authorized Retailer.
For Mo re I nf o rmat i on
If you have questi ons about your i315 phon e,
contac t your sales representative or your service
provider.
Accessories
15

Making Calls
Your i315 phone makes two types of calls: digital
cellular phone calls and Private calls. With Private
calls, you use your phone as a long-ra nge, digital
walkie-talkie.
Phone Calls
1 Enter the number you want to call.
2 Press s to place the call.
3 Press e to end the call.
Private Calls
1 Enter the Private ID you want to call.
2 Press and hold th e PTT button on the side of
your phon e. Beg in talk ing af ter you r phon e emits
a chirpin g sound.
3 Release the PTT button to listen.
Tip: To let someone know you want to talk to
him or her on a Private call, send a call
alert. See “Cal l Alerts” on page 27.
16
Receiving Calls
Phone Calls
When you receive a phone cal l, your phone rings,
vibrates, or lights up its backlight.
Answering
Press s. -or-
Press A under Yes. -or-
Press any number key.
To answer a call by pressing any number ke y, you
must have the Any Key Ans feature turned on (see
“Phone Calls Features” on page 84).
Sending to Voice Mail
Press e. -or-
Press A under No.
Ending
Press e.
Private Calls
When you receive a Private call, your phone emits
a chirping sound or vibrates.
Answering
1 Wait for the caller to finish speaking.

Call Icons
2 Press and hold th e PTT button on the side of
your phon e. Beg in talk ing af ter you r phon e emits
a chirpin g sound.
3 Release the PTT button to listen.
Call Icons
When you make a call, call icons appear in the text
area of the phone’s display.
X Placing a phone call.
W Receiving a phone call.
Y Phone call is active.
Z Phone call is on hold.
U Phone call ended.
When you miss a call, this icon appears in the text
area:
V You missed a phone call.
Ways to En te r C all s
To enter the number you want to call, you can:
• Use the numbers on the keypad
• Select the number from the recent calls list
• Select the number from Contacts
• Redial the last phone number call ed
• Use Speed Dial or Turbo Dial
• Use One Touch PTT to make a Private call
• Use a TTY device — see “Making TTY Calls” on
page 47
®
From the Keypad
To enter the number you want to call, press the
numbers on the keypad.
If you make a mistake:
• To clear a digit, press A under Delete.
• To clear all digits, press and hold A under
Delete.
• To insert or delete a digit anywhere in the string
of digits you have entered, scroll left or right.
• To cancel, press e.
From the Recent Calls List
The re ce nt calls lis t st or e s th e las t 20 ca lls you
made or received.
To select a number from the recent calls list as the
number you want to call:
1 From the idle screen, scroll down. -or-
17

Making Calls
From the main menu, select Recent Calls.
2 Scroll to the name or number you want to call.
From Contacts
If you have numbers stored in Contacts, you can
use these numbers to make cal ls. For information
on entering numbers into Contacts, see “Creating
Entries” on page 33.
Calling from the Contacts List
1 From the main menu, select Contacts.
2 Scroll to the name or number you want to call.
Tip: To find Contacts entries faster, use the
keypad to enter the first lett er of the name.
3 Place the call now. -or-
Scroll le f t or ri gh t t o di spl ay th e Co nt a cts ty pe fo r
the number you want to call.
If you are maki ng a Private call, your phone places
the cal l to the Private ID stored in the Contacts
entry, even if th e Private icon is not displayed.
If you are making a phone call:
• Your phone places the call to the phone number
assign ed to the Contacts type displayed.
• If the Contacts type displayed is not a phone
number, your phone places the call to the phone
number stored in the Contacts entry.
18
• If the Contacts type displayed is not a phone
number and you have more than one phone
number stored in the Contacts entry, your phone
prompts you to select the phone number you
want to place the call to.
Calling from a Contacts Entry
1 From the main menu, select Contacts.
2 Scroll to the name or number you want to call.
3 Press A under View. -or-
If View is not one of your options: Press m.
Select View.
4 Place the call no w. -or-
Scroll to view more numbers. When you place
the call, it is made to the number displayed.
Redialing the Last Number
Press and hold s to place a call to the last phone
number you called.
Using a Voice Name
Note: This i s an optional feature. Contact your
servi c e provider about its availability for
purchase.

Using Speakerphone
If you have created a voice name in Contacts for
the number you want to call, say the voice n ame
into your phone to enter the number. See page32
for information on voice names.
1 Press an d ho ld t until a pr o mp t ap pear s tel lin g
you to say the voice name.
2 Speaking into the microphone, say the voice
name assigned to the number you want to call.
Your phone plays the name back to you.
If you are making a Private call, press the PTT
button to place the call.
If you are making a phone cal l, the call is placed
automatically.
Tip: To stop a phone call from be in g complet e d,
press e.
Using Speed Dial and Turbo Dial
Each phone number stored in Contacts is assigned
a Speed Di al number which you can use to enter
that number.
Speed Dial
1 From the idle screen, use the keypad to enter
the Speed Dial number assign ed to the phone
number you want to call.
2 Press #.
®
3 Press s. Turbo Dial
From the idle screen, press and hold the Speed
Dial n umb er ( 1 thr o ug h 9) as si gned to t he p ho ne
number you want to call.
Using One Touch PTT
One Touch PTT sets your phone to call the most
recent Private ID on the recent calls list, or a
Private ID you choose, every time you press the
PTT but ton. S e e “S ett in g One To uc h PT T” o n pa ge
43.
Usin g Spea ke r phon e
Note: This i s an optional feature. Contact your
servi c e provider about its availability for
purchase.
Turning on speake rphone makes incoming sound
come out of the phon e’s speaker instead of the
earpiece . Spea ker phone is avai labl e whene ver you
are on an active phone call.
To turn speakerphone on or off:
Press A under Spkr. -or-
Press t.
19

Making Calls
Using Mute
Muting calls lets you listen to incoming sound
without transmitting sound. Mute is available
whenever you are on an active call.
To turn mute o n:
Press A under Mute.
While mu te is on, Unmute appears as a display
option.
To turn mute off:
Press A under Unmute.
Making Emergency Phone Calls
Your phone supports emergency calling.
Emergency phone calls can be made even when
your SIM card is blocked or not in your phone.
Dial 911 to be connected to an emergency
response center. If you are o n an active call, you
must end it before calling 911.
When you make an emergency call, your phone’s
GPS Enabled feature can help emergency service
personnel find you, if you are in a location where
your phon e' s GP S ant en na ha s est a blis he d a cl e ar
view of t he open sky and your lo cal emergency
20
response center has the equi pment to process
location information. See “GPS Enabled” on page
66, and particularly “IMPORTANT: Things to Keep
in Mind” on page 66 and “Making an Emergency
Call” on page 67, for more information on the
limitations of this feature. Because of the
limitations of this feature, alway s provide your best
knowledge of your location to the emergency
response center w hen you make an emerge ncy
call.
Important: Emergency calls cannot be placed while
Important: If you have not registered on the
the keypad is locked.
network, emergency calls cann ot be
placed while your SIM card is in your
phone.

MOTOtalk
The MOTOtalk feature allows direct two-way
phone-to-phone communications between two or
more phones equipped for MOTOtalk. You can
make and receive MOTOtalk calls when network
service is not available. You can talk to anyone on
your code and channel within your range.
MOTOtalk allows you to:
• use code or private mode operation
• select from 10 channels and 15 codes
• communicate with standalone MOTOtalk r adios
Note: MOTOtalk is a new digital service and is
not compatible with older Family Radio
Services products such as Talkabout
radios.
Usin g MOTO talk
To set your phone to MOTOtalk:
1 From the main men u, scro ll to MOTOtalk and
press A under Select.
2 Select Go to MOTOtalk.
Switching to MOTOtalk Please Wait displays.
After a few seconds, the MOTOtalk idle screen
appears. MT Ready appears on the first line of the
display. The current code appears on the second
line o f the display. The current channel appears on
the third line of the display.
Note: When switching from network to
MOTOtalk, the last Channel and Code
that were set will appear on the id le
screen.
d
MT Ready
Code:1
status icons
text area
menu icon
Channel:1
Edit
While in MOTOtalk, this icon appears on the
display, indicating there is not network signal and
MOTOtalk is active.
To make a code using MOTOtalk:
Contcs
S
display options
21

MOTOtalk
Proceed as if making Direct Connect call. MT:
Transmit appears on the first line of the display.
To answer a code call using MOTOtalk:
Proceed as if answering a Direct Connect call. MT:
Receive appears on the first lin e of the display.
The talk pe r mi t to ne em it ted fr o m y our ph on e wh en
using MOTOtalk is 4 beeps and is longer than the
standard tone heard with on-network Direct
Connect and Group Connect calls.
Note: If you receive an error message when
making a call using MOTOtalk, there may
be no parties on your channel and code or
you are out of range.
To set your phone to network mode when
MOTOtalk is active:
1 From the main men u, scro ll to MT Options and
press A under Select.
2 Select Exit MOTOtalk.
Switching to Network Please Wait disp lays.
After a few seconds, the network idle screen
appears.
Switching to MOTOtalk
1 Scroll to MOTOtalk on the main menu.
22
2 Select Go to MOTOtalk, you’ll see on the
display: Switching to MOTOtalk please wait.
You’ll be on MOTOtalk screen.
Setup Options
MOTOtalk setup options are availa ble in the MT
Options screen both in network and MOTOtalk
modes.
To access MT Options in network:
1 From the main menu, select MOTOtalk.
2 Select Setup.
To access MT Options in MOTOtalk:
1 From the main menu, select MT Options.
2 Select Setup.
You can set your phone to launch directly into
MOTOtalk when you select MOTOtalk from the
main menu . You can al so set your phone to notify
you periodically with a tone that you are in
MOTOtalk mode.
Direct Launch
To set your phone to launch MOTOtalk when you
select MOTOtalk from the main menu:
1 From the MT Options screen, select Setup.

MOTOtalk Icons
2 Scroll to Dire ct Launch and press A under
Change.
3 Select On.
Note: If Direct Launch is set to On, you will not
see the MT Options screen. In order to
have access to your setup options, Direct
Launch must be set to Off. Or you ca n
access setup options while in MOTOtalk
by pressing A, the n DT Options.
To turn off Direct Launch
Select Off. Your phone now displays MT Options
when you se lect MOTOtalk from the main menu.
State Tone
To set your phone to notify you with a tone that you
are in MOTOtalk mode:
1 From the main menu, select MOTOtalk.
2 Select Setup.
3 Scroll to State Tone and press A under
Change.
4 Select the time fr ame during which you want to
be notified that you are in MOTOtalk mode.
For example, if you select 1 hour, you will be
notified that you are in MOTOtalk mode.
To turn off State Tone Select Off.
MOTOtalk Icons
MOTOtalk Options
(intermediate screen):
-Go To MOTOtalk (launch
MOTOtalk)
-Setup
-Help
MOTOtalk Type
-Code
-Channel
MOTOtalk In Use
No Signal - Indicates yo u are
off-network and in MOTOtalk
mode.
Channels and Codes
Your phone has 10 channels and 15 codes.
Channels and codes are divided into frequencies
that allow you to make and receive pho ne calls.
Other parties may be taking on the same channel.
23

MOTOtalk
Codes help minimize interference fr om unwanted
messages and other disturbances when you are on
the same channel as others. To have a
conversation, all parties must be on the same
channel and code.
Note: All parties wh o are on your code and
chann el ca n hear your conver sa t io n .
To set a channel:
1 From the idle screen, press A un der Edit.
2 Scroll to Ch an ne l.
3 Press A under Edit.
4 Select a Ch an n el.
To set a code:
1 From the idle screen, press A un der Edit.
2 Scroll to Co de.
3 Press A under Edit.
4 Select a Co de .
24
status icons
d
MT Ready
Code:Receive All
text area
menu icon
Channel:4
Edit
Receive All
1 You can also set your phone w ith Code set to
Receive All. Your ph on e w ill re ce iv e ca ll s f rom
any phone that has been set to the same
Channel regardless of the Code (1-15).
2 If you receive a call while in Receive All, your
phone di sp la y w ill cha n g e fr o m Receive All to
the Code on which the transmission was
received.
3 Y o u may reply to that code within 6 seconds
after the cal ler finishes talking by pressing and
holding PTT. After the 6 seconds expire, the
code reverts back to Receive All.
Note: You cannot initiate a call when the code is
set to Receive All. If you press the PTT
button w he n in Receive All it will ask you
to enter a code.
Contcs
S
display options

MOTOtalk Private Calls
To set the Code to Receive All:
1 From the idle screen, press A un der Edit.
2 Scroll to Co de.
3 Press A under Edit.
4 Select Receive All.
MOTOtalk Private Calls
You can have a private conversation with another
person using MOTOtalk. When on a Private Ca ll,
no other parties can hear your conversation. In
order to make a Private Call, you must use the
valid 10 -digit Nextel PTN of the person you are
calling. The person you are calling must be in
MOTOtalk mode and set to the same Channel to
receive your call.
Note: If you r ec eive an e rr or mes sag e, you r ma y
not be using a valid PTN. Or, the person
you are trying to reach may not be in
MOTOtalk mod e, is set to a different
channel or is out of range.
Private Only
In this mode you can only make or receive Private
Calls. This feature allows you to ignore other
people ’s code calls, keeping your phone quieter
and increasing battery life.
To set the code to Private Only:
1 From the idle screen, press A un der Edit.
2 Scroll to Co de.
3 Press A under Edit.
4 Select Private Only.
Making a Private Call
1 Enter the 10 -d i git P T N of the pe r son you want to
call on your channel. -or-
Scroll to a number or name in Contacts. -or-
Scroll to a number in the recent calls list.
2 Press and hold th e PTT button on the side of
your ph on e. Beg in t alk in g a f ter you r ph on e emit s
the MOTOtalk tone.
3 Release the PTT button to listen.
The number or name of the person you are calling
will appear in the first line of the display.
Receiving a Private Call
Proceed as if answering a Private call.
The number or name of the pers on who initiated
the call will appear in the first line of the display.
25

MOTOtalk
Ending a Private Call
A Private Call will end if there is no communication
for 6 seconds. The display will return to the idle
screen.
Making a MOTOtalk Call
1 If you want to make a Private call, enter the
name or 10-digit number (for examp le,
9545555555) you want to call on your channel.
To make a code call, enter the desired code if
not already displayed. For code calls skip to step
2.
2 Press and hold th e PTT button on the side of
your phon e. Beg in talk ing af ter you r phon e emits
the MOTOtalk tone.
3 Release the PTT button to listen.
Note: If you get a bad ke y pre s s ton e ,
immedi ately fol lowin g the talk per mit to ne,
it means that nobody is in MOTO tal k
mode, or the y are in a di f fe r ent ch an ne l or
out-of-range.
Receiving a MOTOtalk Call
1 When a call comes in, an incoming tone (2
beeps) play first and when the caller finishes
talking a single beep plays.
2 Wait for the caller to finish speaking.
26
3 If you want to respond, press and hold the PTT
button on the side of your phone. Begin talking
after your phone emits the MOTOtalk tone.
4 Release the PTT button to listen.
Assigning a MOTOtalk Number in Contacts
For inf orm a tion on assigning a MOTOtalk nu m ber
to an existing entry in Contacts, see “Contacts” on
page 31.
Recent Calls
For infor m a tio n on viewing , sto r in g or deletin g
recent calls, see “Recent Calls” on page 29.
Maki ng Emergency Calls from MOTOtalk
Your phone supports emerg ency calling.
Emergency phone ca lls can be made even when
you are not connect ed to the network as long as
there is a network to connect to.
Dial 911 to be connected to an emergency
response center. If you are o n an active call, you
must en d it be f ore cal ling 911.

Call Alerts
Sendin g a call alert let s the rec i p ie nt know you
want to talk to him or her on a Private call.
When you s end a call alert, the recipient’s phone
emits a series of beeps, or vibrates, and displays
your name or Private ID.
The recipient can:
• Answer — begin a Private call with the sender
• Queue — store the call alert to the call alert
queue, which is a list of call alerts
• Clear — dismiss and delete the cal l alert
Sending Call Alerts
1 Enter the Private ID you want to send to, as you
would when making a Private call.
2 Press A under Alert. Read y to Alert appears
on the display.
3 Press the PTT button until Alert Successful
appears on the display.
Note: If the alert is not successful, this may
mean the person you are trying to reach is
on a call or has the phone turned off.
Receiving Call Alerts
When you receive a call alert, you must answer,
queue, or clear it. You cannot receive phone calls
or Private calls until you do.
To answer a call alert, press the PTT button to
make a Pri v ate call to the sender.
To queue a call alert, press A under Qu eue.
To clear a call al ert, press A under Clear.
Note: The rece nt calls list also stores call alerts
you have received. They appear as
Private calls. Call alerts remain in your
recent calls list until you delete them or
until they reach the end of the list.
Using the Call Alert Queue
When you queue a call alert, it remains in the call
alert queue until you make a Private call to the
sender or delete it.
Viewing Call Alerts
1 From the main menu, select Call Alert.
2 Scroll through the list.
27

Call Alerts
Viewing Date and Time
To view the date and time a call alert was received:
1 From the main menu, select Call Alert.
2 Scroll to the call alert you want information on.
3 Press m.
4 Select View.
Responding to Call Alerts in the Queue
After you queue a call alert, you can respond to it
by making a Private call to the se nder or sending a
call alert to the sender.
Making a Private Call to the Sender
1 From the main menu, select Call Alert.
2 Scroll to the call alert you want to respond to.
3 Press the PTT button to begin the c all.
This removes the call alert from the queue.
Sending a Call Alert to the Sender
1 From the main menu, select Call Alert.
2 Scroll to the call alert you want to respond to.
3 Press A under Alert. Read y to Alert appears
on the display.
4 Press the PTT button until Alert Successful
appears on the display.
28
Deleting Call Alerts
To delete a call alert from the queue:
1 From the call alert queue, scroll to the call alert
you want to delete.
2 Press m.
3 Select Delete.
4 Press A under Yes to confirm.
To delete all call alerts from the queue:
1 From the call alert queue, press m.
2 From the call alert menu, select Delete All.
3 Press A under Yes to confirm.
Sor t ing Call Aler ts
Tip: You must have at least one call alert in the
queue t o access this feature.
To sort call alerts by the or der they were rec eived:
1 From the main menu, select Call Alert.
2 Press m.
3 Select Sort By.
4 Scroll to First on Top or Last on Top.
5 Press A under Select.

Recent Calls
The recent calls list stores the nu mbers of the 20
most recent calls you have made and received.
To view the recent calls list:
1 From the idle screen, press the down arrow on
the navigation key. -or-
From the main menu, select Recent Calls.
2 Scroll through the list.
If the number of a recent call is stored in Contacts,
the name associated with the number appears on
the rece nt calls list.
An icon appears beside the name or number
indica ting the Contacts type of t he number used in
the cal l. See “Con tacts” on page 31.
For phone calls, an icon ap pears to the left of the
name or numb er givi ng mor e inf o rm atio n a bo ut th e
call:
X A call yo u ma d e.
W A ca ll yo u rec e ived.
V A missed call. Missed calls appear on the
recent calls list only if you have Caller ID.
Note: The rece nt calls list also stores call alerts
you have received. They appear as
Private calls. Call alerts remain in your
recent calls list until you delete them or
until they reach the end of the list.
To get more information on a recent ca ll:
1 From the recent calls list, scroll to the call you
want informa tion on.
2 Press A under View. -or-
If View is not one of your options: Press m.
Select View.
This displays information such as the name
associated with the call, the number, the date,
time, and duration of the call.
Storing Recent Calls to Contacts
1 From the recent calls list, scroll to the number
you want to store.
2 Press A under Store. -or-
If Store is not one of your options: Press m.
Select Store.
Tip: If Store is not on this menu, the number is
already stored in Contacts.
29

Recent Calls
3 To store the numb er as a ne w entr y, select [New
Contact]. -or-
To store the number to an existing entry, select
the entry.
4 With the Contacts type field highlighted, scroll
left or right to display the Contacts type you want
to assign to the number. For information on
Contact s typ e s, se e page 31.
5 If you want to add more information to the entry,
follow the applicable instructions in “Creating
Entries” on page 33.
6 Press A under Done.
Deleting Recent Calls
To delete a call:
1 From the recent calls list, scr oll to the call you
want to delete .
2 Press m.
3 Select Delete.
4 Press A under Yes to confirm.
To delete all calls:
1 From the recent calls list, press m.
2 Select Delete All.
3 Press A under Yes to confirm.
30

Contacts
Contacts stores up to 600 numbers or addresses.
Each Contacts entry can store several numbers or
addresses.
Information stored in Contacts is saved on your
SIM card.
A Contacts entry contains:
• A name — A n ame is required if you are storing
more than one number or address to the entry;
otherwise, it is optional. Typically, this is the
name of the person whose contact information is
stored in the entry.
• A ring t one — You can assign a ri ng tone to
each entry. This is the sound your phone makes
when you receiv e phone calls or cal l alerts from
any of the numbers stored in the entry.
• A Contacts type — Each number or address
stored must be assigned a Contacts type:
A Mobile phon e number
B Private Private ID
C Work1 phone number
D Work2 phone number
E Home phone number
F Email email addre ss
G Fax phone number
H Pager phone numbe r
I Talkgroup Talkgroup number
J IP IP address
K Other phone number
• A number or address — Each Contacts entry
must contain a number or address. This ma y be
any ty pe o f ph on e nu mb er, Private I D, Talkgro up
number, email address, or IP address .
Note: You can store numbers up to 64 digits
long, but every 20 digits must be
separated by a pause or wait. See
“Creating Pauses and Waits” on page 36.
31

Contacts
• A Speed Dial number — When you store a
phone number, it is assigned a Speed Dial
number. You can accept the def ault Speed Dial
number or change it.
• A voice na me — If yo u c rea te a voice na me f or a
number, you can then dial that number by saying
the voic e name into your phone. This icon
appears P to the left of the Contacts type icon if
a voice na me is as si gned.
Note: This is an optional feature. Contact your
servi c e provider about its availability for
purchase.
Viewin g Co ntacts
To access Contacts:
Press A under Contcs. -or-
From the main menu, select Contacts. -or-
If you are on a call: Press m. Select Contacts.
To view entries:
1 From the Contacts list, scroll to the entry you
want to view.
2 If an entry has more than one number or
address stored, <> surrounds the Contacts type
icon. Scroll left or right to view the icon for each
number stored in the entry.
32
3 When the icon for the number or address you
want to view is displayed, press A un de r View.
-or-
If View is not one of your options: Press m.
Select View.
4 Scroll to view t he other numbers and addresses
stored for the entry.
Tip: To view more entries, c ontinue scrolling.
Searching for a Name
To search for a name in Contacts:
1 From the Contacts list, press m.
2 Select Search.
3 Enter the name y ou want to see. See “Ent ering
Text” on page 54.
4 Press A under Ok.
Your phone finds the name you enter ed or the
nearest match.
Showing Only Pr ivate IDs and Talkgroups
To set Contacts to show only entries that contain
Private IDs and Talkgroup entries:
1 From the Contacts list, press m.
2 Select Filter.

Creating Entries
3 With Show Prvt/Gr p highligh ted, press A
under Select.
To set Contacts to show all entries:
1 From the Contacts list, press m.
2 Select Filter.
3 With Show All highlighted, press A under
Select.
Creating Entries
A number or address and a Contacts type are
required for all Contacts entries. Other information
is optional. You may enter the information in any
order by scrolling through the entry details.
After you have entered the number or address,
Contacts type, and any other information you want,
you can press A under Done to save the entry to
Contacts.
To cancel a Contacts entry at any time press, e to
return to the idle sc ree n.
Tip: In some fields that require you to enter
inform ation, yo u ca n begin ent eri ng the
information from the keypad instead of
pressing A under Change.
To create a Contacts entry:
1 To access the entry details screen:
Select Contacts > [New Contact] . -or-
From the Contacts list, press m. Scroll to New.
Press A under Select.
2 If you want to assign a name to the entry:
With the Name field hi ghlighted, press A under
Change.
Enter the name. See “Entering Text” on page
54. When you are finished, press A under Ok.
3 If you want to assign a ring tone to the name:
With the Ringer field highlighted, press A
under Change.
Scroll to the ring tone you want to assign. Press
A under Select.
4 To assign a Contacts type to the number or
addres s be ing stored :
With the Contacts type field highlighted, press
A under Change.
Scroll to the Contacts type you want to assign.
Press A under Select.
5 To store a number or address:
With the # field hi ghlighted (or ID for an email
address, or IP for an IP address), press A
under Change.
33

Contacts
Enter the number or address. For pho ne
numbers, use the 10-di git format. For email
addresses, see “Entering Text” on page 54.
Tip: Press A under Brows e to select a number
or address from Contacts, the recent calls
list, or Memo.
When you are finished, press A under Ok.
6 If you want to assign more opti on s to the
number, press A under Change with the
[Options] field highlighted. See “Assig ning
Options”.
7 If you wa nt to add more number s or addresses
to the entry:
Scroll past the information yo u already entered.
Enter the additional information for the entry
using st ep 2 throu gh st ep 6. You mu s t ass ig n a
name to the entry, if you have not already.
8 Press A under Done.
Assigning Option s
1 If you have not already, press A under Change
with the [Options] field highlighted
2 The default Speed Dial number assigned to a
phone number is displayed in the Speed # field.
This i s always the next av ailable Speed Dial
location.
34
If you want to assign the phone number to a
different Speed Dial locati on:
With the Speed # field highlighted, press A
under Change.
Press and hold A under Delete to delete the
current Speed D ial number.
Enter the new Sp eed Dial number using the
keypad.
When you are finished, press A under Ok.
3 When you are finished, press A under Back.
Storing Numbers Faster
To store numbers to Contacts from the r ecent call
list, se e “Sto rin g Rece nt Ca lls to Co nt ac ts ” o n pag e
29.
To store numbers to Contacts from Memo, see
“Memo” on page 49.
To store numbers to Contact s from the idle screen:
1 Use the keypad to enter the number you want to
store.
2 Press m.
3 Select Store Number.
4 To store the numb er as a new en try, select [New
Contact]. -or-

Editing Entries
To store the number to an existing entry, select
the entry.
5 With the Contacts type field highlighted, scroll
left or right to display the Contacts type you want
to assign to the number.
6 If you want to add more information to the entry,
follow the applicable instructions in “Creating
Entries” on page 33.
7 Press A under Done.
Editing Entries
1 From the Contacts list, scroll to the entry you
want to edit.
2 Press m.
3 Select Edit. The entry details screen displays.
4 Follow the applicable instructions in “Creating
Entries” on page 33 to edit the various fields.
Deleting Entries
Delete an Entry
1 From the Contacts list, scroll to the entry you
want to delete .
2 Press m.
3 To delete the entire entry, scroll to Delete
Contact.
4 Press A under Select.
5 Press A under Yes to confirm.
Delete a Number or Address
1 From the Contacts list, scroll to the entry that
cont ains the number or address you want to
delete.
2 Scroll le f t or ri gh t t o d is play th e C ont a ct s ty pe for
the number you want to delete.
3 Press m.
4 Scroll to Delete Number.
5 Press A under Select.
6 Press A under Yes to confirm.
Note: If an entry contains only one number or
address, deleting the number or address
delet es the entry.
Checking Capacity
To see how many numbers are stored in Contacts:
1 From the Contacts list, press m.
2 Select Capacity.
35

Contacts
Creating Pauses and Waits
When storing a number, you can program your
phone t o pause or wait betw een digits while
diali ng. A pause makes your phone pause for 3
seconds before dialing further. A wait makes your
phone wait for your response befor e dialing further.
This feature is useful when using voice mail or
other automated phone systems that require you to
dial a ph one number and the n enter an access
number.
To progr am a pause:
Press and hold * until the letter P ap pears.
The P represents a 3-second pause.
If you store 17035551235P1234, when you select
this number and make a call, your phone dials the
first 11 digits , pauses for 3 seconds, then dials the
last 4 digits.
If you wan t a pause longer than 3 seconds, press
and hold * more than once. Each P represents a
3-sec on d pa us e.
To program a wait:
Press and hold * until the le tter W appears.
The W means your phone waits before dialing
further.
36
If you store 17035551235W1234, whe n you select
this number and make a call, your phone dials the
first 11 digits and then waits. A message appears
asking if you want to send the rest of the digits.
Press A under Yes to dial the last 4 digits.
Tip: You can create pau se s and w ai ts while
dialin g a number f rom the ke ypad. See
“Crea tin g P au se s and Waits Wh ile Di al ing”
on page 43 .
International Numbers
Note: This feature may not be offered by your
servic e provide r.
When storing a number that you plan to use for
international calls, use Plus Dialing:
1 Press and hold 0 for two seconds. A “0”
appea rs, then c hanges to a “+”.
Note: The network translates the “+” into the
appropriate international access code
needed to place the call.
2 Enter the country code , ci ty code or area code,
and phon e nu mb er.
For infor m a tio n ab ou t mak i ng internatio na l ca ll s,
see “Makin g International Calls ” on page 43.

Accessing Con tacts with GSM Phones
If you plan to use the information stored in
Contacts with an i2000, i2000plus, or any other
GSM phone, download iDEN Phonebook Manager.
Go to idenphones.motorola.com/iden/support for
more information.
You can use iDEN Phonebook Manager to make
the Contacts information saved to your i315
phone’s SIM ca rd accessible in this type of phone.
Accessing Contacts with GSM Phones
37

Call Forwarding
Call forwarding sends calls to the phone numbers
you specify. You can forward all calls to one
number or forward missed calls to different
numbers depending on the reason you missed the
call.
You can forward phone lin es1 and 2
independently.
Forwarding All Calls
When you s et your phone to forward all calls, an
icon ap pe ars in t he top row of the display :
G Phone line 1 is active; calls to phone line 1
are being forwarded.
H Phone line 1 is active; calls to phone line 2
are being forwarded.
I Phone line 1 is active; calls to phone lines 1
and 2 are being forwarded.
J Phone line 2 is active; calls to phone line 1
are being forwarded.
K Phone line 2 is active; calls to phone line 2
are being forwarded.
38
L Phone line 2 is active; calls to phone lines 1
and 2 are bein g forward ed .
To forward all calls:
1 From the main menu, select Call Forward.
2 Press A under Change.
3 Select All Calls.
4 Scroll to To.
5 Press A under Change.
6 If you specified a forwarding number for all calls
before, this number displays.
To forward calls to this number, press A under
Back. -or-
To delete this number, press A under Change,
then press and hold A unde r Delete.
To enter the number you want to forward calls
to:
Enter the number using your keypad. -or-
Press A under Search. Select Contacts,
Recent Calls, or Memo. Select the number you
want to enter.
7 Press A under Ok.
All your cal ls are no w for wa rde d t o th e numb er you
specified.

Turning Off Call Forwarding
Tip: In some fields, you can select an option by
scrolling left or right instead of pressing A
under Change.
Turning Off Call Forwarding
If you don’t want all your calls forwarded, turn the
feature off:
1 From the main menu, select Call Forward.
2 Press A under Change.
3 Select All Calls.
4 Scroll to To.
5 Press A under Change.
6 Scroll to Off.
7 Press A under Select.
All your calls are now sent to your phone.
Calls you miss a re forward ed acc or d in g t o the
options set for missed calls. By default, missed
calls are forwarded to voice mail.
Forwarding Missed Calls
You can sp eci f y a fo r wardi ng nu mb er f or ea ch ty pe
of missed call:
•If Busy — Your phone is on a call or transferring
data.
• If No Answer — You do not answer on the first
4 rings.
• If Unreachable — Your phone is out of
coverage or powered off.
Note: If you want a type of missed call sent to
voice mail, the call forwarding number for
that type of missed call must be your
voice mail acces s number.
To forward missed calls:
1 From the main menu, select Call Forward.
2 Press A under Change.
3 Select Detailed.
4 Scroll to If Busy to specify a forwarding number
for calls received when your phone is busy.
5 Press A under Change.
6 If you speci fie d a forwar din g number for this type
of call before, this number displays.
To forward calls to this number, press A under
Back and go to step 9. -or-
To delete this number, press A under Change,
then press and hold A unde r Delete.
7 To enter the number you want to forward this
type of call to:
Enter the number using your keypad. -or-
39

Call Forwa rdin g
Press A under Search. Select Contacts,
Recent Calls, or Memo. Select the number you
want to enter.
8 Press A under Ok.
9 Repeat step 4 through step 8 for If N o An swe r
and If Unreachable.
When yo u ar e finis h ed, press A under Back.
Viewing Call Forwarding Settings
1 From the main menu, select Call Forward.
2 Press A under Change.
3 Select All Calls.
4 Scroll to To.
5 Press m.
6 Select Retrieve Status.
40

Advanced Calling Features
Call Waiting
Call Waiting lets you receive a second call while on
an active call. Call Waiting is always available,
unless you turn it off for a specific call.
If you are on a call and receiv e a second call, your
phone emi ts a tone an d displ ays a mess age say ing
you are receivin g a second call.
To acce pt t he sec ond c al l a nd put th e act i ve cal l on
hold:
Press A under Yes.
To accept the second call and end the active call:
1 Press e.
Your phone rings with the second call.
2 Answer the second call.
To decline the second call:
Press A under No. If you subscribe to voice
mail, the call is forwarded to your voice mail box,
unless you set Call Forward for If Busy to a
different number.
Switching Between Calls
When you accept a second call, the display s hows
the name or number of each call, with an icon
indicating which call is active:
Y Phone call is active.
Z Phone call is on hold.
To make the call on hold active and put the active
call on hold :
Press A under Switch.
Turn Off Call Waiting
To turn off Call Waiting during a call:
1 Press m.
2 Select In Call Setup > Ca ll Waiting.
3 Press A under Change.
4 Scroll to Off.
Tip: T o turn Call Waiting back on while still on
the call: Scroll to On.
5 Press A under Select.
41

Advan c ed C al li ng Features
To turn off Call Waiting for the next call you make
or receive:
1 From the main menu, select Setting s > Phon e
Calls > Call Waiting.
2 Press A under Change.
3 Scroll to Off.
4 Press A under Select.
Call Waiting is turned back on when yo u end the
call.
Call Hold
Call Hold lets you put an active call on hold and
make a second call.
To put a c all on hold:
1 While on an active call, press m.
2 Scroll to Ho ld.
3 Press A under Select.
4 If you want to make the call active again, press
A under Resum.
To make a second call while a c all is on hold:
1 Enter the number you want to call.
Tip: To enter the number from Contacts: Press
m. Select Contacts.
2 Press s to place the call.
42
To end the second call and make the call on hold
activ e ag ai n:
Press e.
To make the call on hold active and put the active
call on hold :
Press A under Switch.
3-Way Calling
Note: This feature may not be offered by your
servic e provide r.
3-way cal ling lets you combine 2 phone calls int o
one. All 3 people in the call can speak to and hear
each other.
To make a 3-way call:
1 Place or receive a phone call.
2 While the call is active, press A under 3-Way.
This puts the c all on hold.
3 Enter the second p hone number you want to
call.
Tip: To enter the number from Contacts: Press
m. Select Contacts.
4 Press s to place the call.
5 While the second call is active, press m.
6 Scroll to 3 Way.

Creating Pauses and Waits While Dialing
7 Press A under Select.
Both calls are now active and appear on the
display.
Creating Pauses and Waits
While Dialing
You can enter a pause or wait while dialing a
number. For more information on pauses and
waits, s ee “Creat ing Pauses and Waits” on page
36.
To create a pause while dialing a phone number:
1 From the keypad, enter the digits you want to
occur before the pause.
2 Press m.
3 Select Insert Pause .
4 Enter the digits you want to occ ur after the
pause.
To create a wait while dialing a phone number:
1 From the keypad, enter the digits you want to
occur before the wait.
2 Press m.
3 Select Insert Wait.
4 Enter the digits you want to occ ur after the wait.
Making International Calls
Note: This feature may not be offered by your
servic e provide r.
Plus Dialing lets you place an international call to
most countries without entering the local
international access c ode.
1 Press and hold 0 for two seconds. A “0”
appea rs, then c hanges to a “+”.
Note: The network translates the “+” into the
appropriate international access code
needed to place the call.
2 Enter the country code , ci ty code or area code,
and phon e nu mb er.
Setting One Touch PTT
One Touch PTT sets your phone to call the most
recent Private ID on the recent calls list, or a
Private ID you choose, every time you press the
PTT button.
To set your ph one to cal l the mo st recen t Priva te ID
on the recent calls list:
1 From the main menu, select Settings > 2-Way
Radio > One Touch PTT.
2 Scroll to Last Call.
3 Press A under Select.
43

Advan c ed C al li ng Features
To set your phone to call a Private ID y ou choose:
1 From the main menu, select Setti ng s > 2- Way
Radio > One Touch PTT > Assigned Number.
2 To enter the Private ID you want your phone to
call every time you press the PTT button:
Enter the number using your keypad. -or-
Press A under Search. Select Contacts,
Recent Calls, or Memo. Select the number you
want to enter.
Tip: If you are entering a Talkgroup number,
enter # before the number.
3 Press A under Ok.
To turn off One Touch PTT:
1 From the main menu, select Setti ng s > 2- Way
Radio > One Touch PTT.
2 Scroll to Off.
3 Press A under Select.
Group Calls
A group call is a cal l made to all members of a
Talkgroup at once. A Talkgroup is a predetermined
group of up to 25 Priv ate IDs.
Before you can make or receive group calls, a
Talkgroup must be established. After the Talkgroup
is esta bli s he d, yo u mu s t join the Talk gro up.
44
Joining a Talkgroup
Your sales repres entative or your service provider
establ ishes Talkgroup s for you and assign s each
Talkgroup a Talkgroup number. You can choose a
name for e ac h o f y our Ta lkgr ou ps whe n yo u c rea te
entrie s for them in Contacts.
To receive group calls mad e to a Talkgroup, you
must join the Talkgroup. You can belong to only
one Talkgroup at a time. When you join a new
Talkgroup, you no longer belong to your previous
Talkgroup.
To join a Talkgroup:
1 Press #. Then enter the Talkgroup number
using the key pa d. -or-
Choose the Talkgroup name from Contacts or
the recent calls list.
2 Press A under Join.
Making Group Calls
1 Press #. Then enter the Talkgroup number
using the key pa d. -or-
Choose the Talkgroup name from Contacts or
recent call s lis t.
2 Proceed as if making a Private call.

Call Timers
Rec e iving G r oup Ca l ls
To answer a group call:
Proceed as if answering a Private call. Only one
person at a time may speak on a group call.
The Private ID or name of the person who is
speaking will appear on the display below the
Talkg roup number.
Turning off Group Calls
To control whether you hear group calls to your
Talkgroup:
1 From the main menu, select Setti ng s > 2- Way
Radi o > Tkgrp Silent.
2 Press A under Change.
3 Scroll to On if you don’t want to hear group calls
to your Talkgroup. -or-
Scroll to Off if you want to hear group calls to
your Talkgroup.
4 Press A under Select.
Call Timers
Call timers meas ure the du ration of your phone
calls, Private or group calls, and circuit data use,
as well as the number of Kilobytes sent and
received by your phone:
•Last Call — displays the duration of your most
recent ph one call.
• Phone Reset — keeps a running total of your
phone call minutes, until you reset it.
• Phone Lifetime — displays the total minutes of
all your phone ca lls.
•Prvt/Grp Reset — keeps a running total of all of
your Pr ivate and group ca ll minutes, unti l you
reset it.
• Prvt/Grp Lifetime — displays the total minutes
of all your Private and group calls.
• Circuit Res et — keeps a running total of all of
your circuit data use, until you reset it.
• Circuit Lifetime — displays the total minutes of
all of your circuit data use.
•Kbytes Reset — keeps a running total of the
number of Kilobytes sent and received by your
phone, until you reset it.
To view or reset a timer:
1 From the main menu, select Call Timers.
2 Select the feature you wan t to view or reset.
3 To view a feature withou t resetting: Press A
under Done when you are finished viewing.
-or-
To reset a f eatu r e: Pre ss A un de r Reset. P ress
A under Yes to confirm.
45

Advan c ed C al li ng Features
Note: The values displayed by Call Timers
should not be used for billing. Call timers
are estimates only.
Using Your Phone as a Modem
Note: This feature may not be offered by your
servic e provide r.
To use your phone as a modem with a lapto p,
handhe ld device, or desktop computer:
1 Open the connector cover.
connector
cover
46
2 With the phone’s display facing up, insert a data
cable ’s connector into the acces sory conne c tor,
until you hear a click.
3 Insert the data plug into the COM port of the
other device.
When used as a modem, your phone has these
data transfer modes:
• Circuit data — used for sending and recei v ing
faxes and for trans fe rr ing larg e fil es
• Packet data — used for small file transfers such
as email
To use these services, you must install the iDEN
Wireless Data Services software (available
separately). For more informatio n on setting up
your comput er an d you r i315 phone for packet and
circuit da ta call s, refer to the Wireless Data
Services User’s Guide or contact your service
provider.

Making TTY Cal ls
Making TTY Calls
Note: This feature may not be offered by your
servic e provide r.
To use your phone to make phone calls using a
teletypewriter ( TTY ) devic e:
1 Connec t one end of a 2.5 m m ca bl e into the
audio jack on your phone. Connect the other
end of the cable t o your TTY device.
2 Make sure that your phone’s TTY fea ture is on
and select the TTY mode you want to use.
3 Use your phone to enter phone numbe rs and
make calls.
When you make a TTY call, these icons appear on
the phone’s display:
N Phone call is active.
O Phone call is on hold.
TTY device features suc h as Turbo-Code,
High-Speed, and Interrupti on are not supported by
your phone. These featur es must be turned off or
disabled to use your TTY device with your phone.
Turning On the TTY Feature
Your pho ne’s TTY feature must be on if you want
to make TTY calls, set the TTY mode, or change
the TTY baud rate. To make sure the TTY feature
is on:
From the main menu, select Setting s > Phon e
Calls > TTY. This field must say On.
Choosing a Mode
Your phone supports these TTY modes:
•TTY — You type and read text on your TTY
device.
•VCO (Voice-Carry-Over) — You speak into your
phone and read text replies on your TTY device.
• HCO (Hearing-Carry-Over) — Yo u type text on
your TTY device and listen to voice replies on
your phone speaker.
To change mode while not in a call:
1 From the main menu, select Setting s > Phon e
Calls > TTY > Type.
2 Press A under Change.
3 Scroll to the TTY mode you want.
4 Press A under Select.
When you make a TTY call, the call begins in the
TTY mode you last selected.
47

Advan c ed C al li ng Features
To change mode during a call using your phone:
1 Press m.
2 Select in Call Setup > TTY > Type.
3 Select the mode y ou want.
To change mode during a call using your TTY
device, issue one of the following commands:
• “VCO pl ease” — to select VCO mode
• “HCO please” — to select HCO mode
• “HCO off please” — to turn off HCO mode
Important: When you are using HCO, the sound
coming from your phone speaker may
be uncomfortably loud. Use caution
when putting the phone to your ear.
(For information on setting the volume
of your phone speaker, see “Setting the
Volume” on page 78.)
Changing the TTY Baud Rate
By default, your phone’s TTY baud ra te is set to
45.45, the baud rate required for TTY calls within
the U.S. To make calls outside the U.S., se t y our
TTY baud r ate to 50.0.
To change the TTY baud rate:
1 From the main menu, select Setting s > Phon e
Calls > TTY > Baud .
48
2 Press A under Change
3 Scroll to the baud rate for your location.
4 Press A under Select.

Memo
Memo lets you store a number, make a call to that
number, and save it to Contacts.
To create a memo:
1 From the main menu, select Memo.
2 Enter the number using your keypad.
3 Press A under Store.
To view the memo later:
1 From the main menu, select Memo.
To delete the memo:
1 From the main menu, select Memo.
2 Press and hold A under Delete.
3 Press A under Store.
To edit the memo:
1 From the main menu, select Memo.
2 Enter the new number.
3 Press A under Store.
To make a call to the memo number:
1 From the main menu, select Memo.
2 To make a phone call, press s. -or-
To make a Private call, press the PTT button.
3
To store the memo number to Contacts:
1 From the main menu, select Memo.
2 Press m.
3 Press A under Select.
4 To store the numb er as a new en try, select [New
Contact]. -or-
To store the number to an existing entry, select
the entry.
5 With the Contacts type field highlighted, scroll
left or right to display the Contacts type you want
to assign to the number.
6 If you want to add more information to the entry,
follow the applicable instructions in “Creating
Entries” on page 33.
7 Press A under Done.
49

Ring Tones
To set the ring tone your phone makes when you
receive phone calls, message notifications, or call
alerts:
1 From the main menu, select Ring Tones.
2 Make sure Vibrate All is set to Off.
3 Scroll t hr oug h the l is t of r i ng t o nes a nd se l ect the
one you want to assign . Vibrate sets your ph on e
to vib rat e i ns tea d of ma king a s oun d; Silent sets
your phone to neither vibrate nor make a sound.
Tip: Highlighting a ring tone lets you hear it.
4 Press A under Assign.
5 Scroll to the feature you want to assign the ring
tone to.
6 Press A under Select.
Tip: A checkmark next to a feature means the
current ri ng to ne h as be en a ssi gned t o i t. To
remove the ass ig nme nt : Scro ll to the
feature. Press A under Select.
7 To assign the ring tone to other feature s , repeat
step 5 through ste p6.
8 When you are finished, press A under Done.
50
Setti ng Your Phone t o Vibr at e
If your phone includes a vibrate feature, you can
set your phone to vibrate when you receive phone
calls, Pr ivate calls and group calls, messages
notifica tio n s, or ca ll alert s.
Note: This i s an optional feature. Contact your
servi c e provider about its availability for
purchase.
Turning Ring Tones Off
You can s et your phone to make no sound when
you receive phone calls, Private ca lls and group
calls, messages notifications, or call alerts.
These icons indicate how the ringe r is set.
u The phone never rings.
v The phone always vibrates instead of ringing.
M Th e phon e do es n ot ring for phon e ca lls.
These ic ons may appear at the same time.
Never Ring
1 From the main menu, select Ring Tones >
SilentAll.
2 Scroll left or right to set SilentAll to On.

Ring and Vibrate
Always Vibra te Instea d of Ri n ging
If your phone includes a vibrate feature:
1 From the main menu, select Ring Tones >
Vibrate All.
2 Scroll left or right to set Vibrat e All to On.
Tip: Pressing the volume controls to turn down
the volume as far as possible sets Vibrate
All to On.
Do Not Ring for Some Features
To set individual ring options for phone calls,
messages notifications, or call alerts:
1 From the main menu, select Ring Tones.
2 Make sure Vibrate All or SilentAll is set to Off.
3 Scroll through the list of ring tones to Silent. -or-
If your phone includes the vibrate feature, scroll
through the lis t of rin g ton es to Vibrate.
4 Press A under Assign.
5 Scroll to the feature you want to set to make no
sound.
6 Press A under Select.
7 To assign Vibrate or S ilent to anothe r feature,
repeat step 5 through step 6.
8 When you are finished, press A under Done.
Note: To set ring options for Private calls and
group calls, see “Setting Your Phone to
Not Ring” on page 78.
Ring and Vibrate
To set your phone to ring and vibrate when you
receive phone calls or call alerts:
1 From the main menu, select Ring Tones.
2 Make sure Vibrate All is set to Off.
3 Scroll t hro ug h the l is t of r ing t on es and se l ect th e
one you want to assi gn .
4 Press m.
5 Select Assign w/Vibe.
6 Select the feature you want to set to ring an d
vibrate.
7 When you are finished, press A under Done.
This icon S appears on the display.
Assigning Ring Tones to Contacts
You can set the ring tone your phone makes when
you receive phone calls or call alerts from
someone you have stored in Contacts.
1 From the main menu, select Ring Tones.
2 Make sure Vibrate All or SilentAll is set to Off.
51

Ring Tones
3 Scroll through the list of ring tones to the one
you want to assign. Highlighting a ring tone lets
you hear it.
4 Press A under Assign.
5 Select A Contact.
6 Scroll to the Contacts entry you want to assign
the ring tone to.
7 Press A under Select.
Viewing Ring Tone Assignments
1 From the main menu, select Ring Tones.
2 Make sure Vibrate All or SilentAll is set to Off.
3 Highlight any ring tone.
4 Press m.
5 Select Overview.
6 Scroll to view ring tones assigned to features
and Contact entries.
Downloading More Ring Tones
If you wa nt to us e ot h er ring tones , yo u ca n
download them into your phone for a fee. Go to
www.motorola.com/idenupdate for a selection of
custom ring tones and downloading instructions.
52
Note: Ring tones may be downloaded only
once. If you delete a ring tone from your
phone, you must purchase it to downlo ad
it again.
Managing Memory
To view th e amount of memory availab le for
custom ring tones:
1 From the main menu, select Ring Tones.
2 Make sure Vibrate All or SilentAll is set to Off.
3 Highlight any ring tone.
4 Press m.
5 Select Mem o r y U sa ge.
Deleting custom ring tones frees memory.
Note: Ring tones are stored in your phone using
the same memory space used to store
voice records. Deleting voice records
frees memory space for ring tones.
Deleting Custom Ring Tones
To delete a custom ring tone:
1 From the main menu, select Ring Tones.
2 Make sure Vibrate All or SilentAll is set to Off.
3 Scroll to the ring tone you want to delete.
4 Press m.

5 Select Delete.
6 Press A under Yes to confirm.
Deleting Custom Ring Tones
53

Entering Text
You can enter text into your phone us ing the
traditional method of pressing a key several times
for each character, or by pressing a k ey once for
each letter while words likely to be the one you
want are chosen from a database. You can also
enter symbols and numbers into a text field.
In screens that require you to enter text, you see
the follo win g i con s ne ar th e t op righ t co rne r. Th es e
icons te ll you which text input mode y ou are usin g:
Alpha — Press a key several times for each
l
character.
Word — Press a key once for each letter
j
while words likely to be the one you want are
chosen from a database.
Symbols — Enter punctuation and other
i
symbols.
Numeric — Enter numbers.
k
When you access a screen that requires you to
enter t ex t, you start in Al ph a mo de.
To choose a text input mode:
1 At a screen that requires you to enter text, press
m.
54
2 A checkmark appears next to the current text
input mode. Scroll to the text input mode you
want to use.
3 Press A under Select.
Using Alpha Mode
• Press any key on the keypad to enter the letters,
numbers , and sy mbols on that ke y . For exampl e,
to enter the letter Y, press 9 three times.
• Type a letter then scroll up to make that letter
uppercase, or type a letter then scroll down to
make that letter lowercase.
• See “Special Function Keys” on page 55 for
more information on adding spaces,
capit alization, and punctuation.
Usin g Word Mo de
In Word mode, T9 Text Input analyzes the letters
on the ke ypa d b utt on yo u pr es s a nd ar ra ng es th em
to create words. As you type, T9 Text Input
matches your keystrokes to words in its database
and disp lays the most commonly used mat ching
word. You can add you own words to this
database.
Entering a Word
1 Select Word as your text input mode.

Special Function Keys
2 Ty pe a word by pressing one key for each lett er.
For example, to type “test” press 8 3 7
8.
The displayed word may change as you type it.
Do not try to correct the word as you go. Type to
the en d of the word before editing.
3 If the w ord that appears is not the desired word,
press 0 to change the word on the display to
the next most likely word in the database.
Repeat until the desired word ap pears.
If the desi red wo rd do es not app ea r, yo u ca n ad d it
to the database.
Adding Words to the Database
1 Select Alpha as your text input mode.
2 Type the word using Alpha mode.
3 Select Word as yo ur text input mode.
4 Press #.
The word you typed in Alpha text entry mode is
now in the database.
Note: You cannot store alphanumeric
combi nations , such as Y2K.
Choosing a Language
To change the language of the database:
1 At a scree n that r equi r es you to ent er tex t, pr es s
m.
2 Select Languages.
3 Scroll to the language you want for your
database.
4 Press A under Select.
Special Function Keys
Some of the phone’s keys assume different
functions while in Alpha or Word mode.
Spaces
Press # for a space.
Capitalization
When you press and hold #, it acts as a 3-way
toggle. Press and hold # to make the next letter
typed up percase (shift), to make all subsequent
letters typed up percase (caps lock), or to go back
to lowercase letters.
55

Entering Te xt
These i cons appear in the top row of your display:
Shift is on.
m
Caps lock is on.
n
When ne ither of thes e ic on s appear, le tt e rs ty ped
are low erc as e .
Note: Your phone automatically makes the first
letter of a sentence uppercase.
Punctuation
Press 1 or 0 to insert punctuation. Continue to
press the key to view t he lis t of sy mb ols available
through that key. Pause to select the symbol you
want.
Note: Additional pu nctuation symbols are
availa bl e in S y mb ol s mode.
Using Numeric Mode
1 Select Numeric as your text in put mode.
2 Press the number buttons on your keypad to
enter numbers.
56
Using Symbols Mode
1 Select Symbols as your text input mode.
A row of symbols appears along the bottom of
your phon e’s disp la y. Sc roll right t o vi ew the
complete row.
2 Scroll l eft or r i gh t to ch oose t h e s ymb ol you w an t
to enter.
3 Press A under Select.

Messages
You can receive the following types of messages
on your ph one:
• Voice mail mes sa ge s
• Short Message Service (SMS) text messages
• Depending on your service provider, you may
have the option to receive fax mail and Net
alerts.
You have 2 ways to ac cess the messages you
receive:
• Respond to the message notification that
appears when the message is received.
• Dismiss the message notification and access
the mes sage later through the message center.
You can listen to or view these messages, del ete
them, or continue to store them in the message
center.
Message Notifications
When yo u r ec ei ve a mes s age, your ph on e notifies
you with text on the disp la y an d a notific a tio n ton e
or vibration. You can access the message or
dismis s the noti fic a tio n.
If you dismiss the notification, the message is not
deleted. It can be accesse d through the message
center.
If you are not on a phone call when you receive a
message, your phone sounds a notification tone
every 30 seconds until you acce ss the message,
dismiss the notificati on, or the alert ti me-out
expires.
Setting Notification Options
To control whether your phone sounds message
notification tones while you are on phon e calls:
1 From the main menu, select Setting s > Phon e
Calls > Notifications.
2 Choose the option you want:
• Receive All — Tones sound during calls for
all types of messages.
• Msg Mail Only — Tones sound during calls
for SMS messages; tones for all other types
of messages are held until you end ca lls.
• Delay All — Tones for all types of messages
are held until you end calls.
3 Press A under Select.
Tip: To set notification options during a call:
Press m. Select In Call Setup >
Notifications.
57

Messages
Message Center
The message center manages your messages.
All your messages are stored in the message
center. The message center shows how man y
messages you have of each type.
To access your messages through the message
center:
1 Press A under Mesgs. -or-
From the main menu, select Messages.
2 Scroll to the type of message you want to
access.
3 Press A under the display op tion on the left.
58

Voice Ma il M e ss a g e s
Note: T o r eceive vo ice ma il mes sages , you must
first set up a voice mail account with your
servic e provide r.
Receiving a Message
When you receive a voice mail message , New
Voice Mail Message appears on the display.
To call your service provider’s voice mail system
and listen to the message:
Press A under Call.
To dismiss the message notification:
Press A under Back. This icon
on the display, reminding you that you have a
new message.
Accessing Voice Mail from the Message Center
1 From the main menu, select Messages > Voice
Mail.
2 Press A under Call to call your service
provider’s voice mail system.
y appear s
Sending Unanswered Calls to Voice Mail
To send a phone call to voice mail instead of
answering it:
Press e. -or-
Press A under No.
If the caller leaves a message, this icon
appears on the display, reminding you that you
have a new message.
y
59

MOSMS Messages
Note: This feature may not be offered by your
servic e provide r.
If your service provider offers MOSMS, your phone
sends SMS messages using MOSMS and receives
SMS messages from other phones that are using
MOSMS.
Setting Up
Befor e yo u be gin using MO S M S, you ma y need to
set up your signature, service center number, and
expir ation information:
1 From the main menu, select Messages.
2 Scroll to Text In box .
3 Press m.
4 Select Text Msg Setup.
5 With the Signature field highlighted, press A
under Change.
Enter your signature. It may be up to 11
charac ters long. See “Entering Text” on page
54. When you are finished, press A under Ok.
6 With the Srvc Cntr No field highli ghted, press
A under Change.
60
Enter the phone number of your service cent er.
If you do not know this number, contact your
servic e provide r.
When you are finished, press A under Ok.
7 With the Expire After field highlighted, press A
under Change.
This i s the amount of time messages you send
are saved if they cannot be delivered. After this
period, they are discarded.
Scroll or press A under Q to change fi eld.
When you are finished, press A under Done.
8 Press A under Back to save the informati on
you ente r ed .
Receiving a Message
When you receive a text message, New Text
Message appears on the display.
To view the message:
1 Press A under Read.
2 If the message fills more than one screen, scroll
to read it.
3 To keep the message, scroll to the end of the
message and press A under Save. -or-

Reading from the Message Center
To delete the message, scroll to the end of the
message and press A unde r Delete.
To dismiss the message notification:
Press A under Exit. This icon w appears on
the display, reminding you that you have a new
message.
If your phone is powered off when you receive a
text message, your phone notifies you the next
time you power it on. If you are out of your
coverage area, your phone alerts you when you
retu rn to your cove r a ge ar ea .
Tip: While reading a text and numeric message
that contains a phone number, you can
press s to call that number.
Reading from the Message
Center
1 From the main menu, select Message > Text
Inbox.
2 Scroll to the message you want to read.
3 Press A under Read.
4 If the message fills more than one screen, scroll
to read it.
5 T o keep the message, press A under Save. -or-
To delete the message, scroll to the end of the
message and press A under Delete.
Tip: To see more choices, including replying to
the message, press m.
Creating and Sending Messages
1 From the main menu, select Messages > Text
Inbox > [Create Msg]. -or-
From the main menu, select Messages > Text
Outbox > [Create Msg].
2 Press A under Create.
3 To address the message:
Use the keypad to enter the phone number of
the person you want to send the message to.
-orPress A under Browse. Select Contacts,
Recent Calls, or Memo. Enter the number from
Contacts, the r ecent calls list, or Memo, as you
would when making a call.
When you are finished, press A under Ok.
4 Enter the text of the message. See “E ntering
Text” on page 54. -or-
To use a quick note: Press A under Browse.
Scroll to the quick note yo u want. Press A
61

MOSMS Messages
under Select. For more information on quick
notes, see “Using Quick Notes” on page 63.
If you wa nt to add your signature: Press m.
Select Add Signatu r e .
When you are finished, press A under Ok.
5 If you want to send the message, press A
under Yes. -or-
If you want to request confirmation of delivery,
specify the type of message you want to send,
save the message as a draft, or delete the
message withou t sending it, press A under No.
6 If you want to request confirmation of delivery:
With the Report field hi ghlighted, press A
under Change. Select Yes.
7 If you want to specify the type of message you
want to send:
With the Send As field highlighted, press A
under Change. Scroll to the message type you
want. Press A under Select.
8 To send the message: Pres s s. Press A under
Yes. -or-
To sav e the message as a draft without sending
it: Press m. Scroll to Save As Draft. Press A
under Select. -or-
62
To delet e th e mes sa ge wi thou t se nd ing it : Pre ss
m. Scroll to Delete. Press A under Select.
Tip: In some fields, you can select an option by
scrolling left or right instead of pressing A
under Change.
Beginning Messages From the Recent Calls List
1 From the recent calls list, scroll to the name you
want to send a message to.
2 If the entr y ha s mo r e tha n one phone number
stored , view th e phon e numbe r you wan t to send
the message to.
3 Press m.
4 Select Compos e SMS. The message is
autom atically addressed to the phone number
you chos e .
5 Follow st e p 4 throug h ste p 8 of “Crea t i ng and
Sending Messages” on page 61.
Beginning Messages From the Idle Screen
1 Using the keypad, enter the number you want to
send a message to.
2 Press m.

Creating a nd Sendin g Messages
3 Select Compos e SMS. The message is
autom atically addressed to the phone numb er
you chos e .
4 Follow st e p 4 throug h ste p 8 of “Crea t i ng and
Sending Messages” on page 61.
Using Quick Notes
Quick notes are short, pre- written text messages
that you can create, edit, and send. You can store
up to 20 quick notes. A quick note may be up to 30
characters long.
To create a quick note:
1 From the main menu, select Messages > Quick
Notes > [New Quick Note].
2 Press A under Create.
Enter text. See “E ntering Text” on page 54. -or-
To choose from pre-installed notes: Press A
under Browse. Scroll to the note you want.
Press A under Select.
3 Press A under Store.
Tip: For more options, including sending the
quick note, press m.
Using Drafts
When you s ave a mes sa ge as a dr aft , it is save d i n
the drafts folder. You must have a draft saved to
have a drafts folder.
To edit a draft:
1 From th e m ain me nu , selec t Messages > Drafts
Folder.
2 Press A under Change.
3 To edit the fields you want to change, follow
step 3 through step 8 in “Creating and Sending
Messages” on page 61.
If you have a draft saved, you can create more
drafts in the drafts folder:
1 From th e m ain me nu , selec t Messages > Drafts
Folder > [Create Msg].
2 Press A under Create.
3 Follow step 3 through step 7 in “Creating and
Sending Messages” on page 61.
4 Scroll to Save As Draft.
Using the Outbox
Messages you have sent are stored in the outbox.
63

MOSMS Messages
These i c ons appear next to messages in the
outbox:
5 Sent and confi r m ed .
9 Send attempted.
0 Forwarded.
4 Received by addresse e.
6 Not r eceived by addressee.
8 Send failed.
7 Re-sent.
R Locked.
Resending Messages
To resend a message:
1 From the main menu, select Messages > Text
Outbox.
2 Scroll to the message you want to resend.
3 Press m.
4 Select Re-send.
5 Press A under Yes to confirm.
64
Deleting Sent Messages
To delete a sent message:
1 From the main menu, select Messages > Text
Outbox.
2 Scroll to the message you want to delete.
3 Press m.
4 Select Delete.
5 Press A under Yes to confirm.
To delete all unlocked sent messages:
1 From the main menu, select Messages > Text
Outbox.
2 Press m.
3 Select Delete All.
4 Press A under Yes to confirm.
Locking Sent Messages
When you lock a message, it cannot be deleted
until yo u un lo ck it.
1 From the main menu, select Messages > Text
Outbox.
2 Scroll to the message you want to lock or
unlock.
3 Press m.
4 Scroll to Lock to lock the message. -or-

Managing Memory
Scroll to Un lock to unlock t he message.
5 Press A under Select.
Managing Memory
Your text inbox, outbox, and drafts folder have a
set amount of memory available for storing
messages.
The text i nb ox hol ds 2 0 mes sa ges . If the te xt inbo x
is full, you cann ot re ce iv e me ssage s un til you
delete some.
The outbox and drafts folder share memory space.
Togethe r the y ca n h ol d 30 mes sag es . If the ou t bo x
and drafts fold er memory i s full, you cannot send
messages or save drafts until you delete some.
To view th e amount of memory availab le in your
text inbox:
1 From the main menu, select Messages > Text
Inbox.
2 Press m.
3 Select Memo r y Meter.
To view th e amount of memory availab le in your
outbox and drafts folde r:
1 From the main menu, select Messages > Text
Outbox.
2 Press m.
3 Select Mem o r y Me t e r.
65

GPS Enable d
Your phone’s GPS Enabled f eature uses
information from Global Positioning System (GPS)
satellites orbiting the Earth to determine the
approximate geographical location of your phone,
expres sed as latitude and longit ude. The
availability and accuracy of this location
information (and the amount of time that it takes to
calcul ate it) will va ry de pendin g on the enviro nment
in which you are using the GPS featu re. For
example , GPS location fixes are ofte n difficult to
obtain indoors, in covered locations, between high
buildi ngs, or in ot he r si tu ati on s w here you have not
establ ished a clear broad view of the sky. SEE:
“IMPORTANT: Things to Keep in Mind”.
When you m ake a 911 emergency ca ll, the GPS
feature of your phone can help emergency
personnel locate you if your phone has adequate
access to GPS satel lite signals and yo ur
emergenc y res ponse center is eq uipp ed to pr oces s
such information.
You can also use the GPS feature to view your
approximate location. Location information
appears on the phone’s display.
66
If your phone is connected to a laptop computer or
similar de vi ce, so ftw a re runn in g on that de vi ce can
request your location. To protect your pri v acy, you
can control whether these request s are granted.
IMPORTANT: Things to Keep in Mind
If you are using the G PS feature of your phone
while driving, please give full attention to driving
and to the road.
Where adequate signals from multiple satellites
are not av ailable (usually because your GPS
antenn a cannot establish a view of a wide area of
open sky), the GPS feature of your phone WILL
NOT WORK. Such situations include but are
not limited to:
• In underground locations
• Inside of buildings, trains, or other covered
vehicles
• Under any other metal or concrete roof or
structure
• Between tall buildings or under dense
tree-cover
• Near a powerful radio or television tower

Making an Emergency Call
• When your GPS antenna is covered (for
example, by your hand or other obje ct) or
facing the ground
• In temperature extremes outside the
operating limits of your phone
Walking or driving very slowly may also
substantially reduce GPS performance.
Even where location inf ormation can be
calculated in such si tuations, it may take much
longer to do so, and your location estimate may
not be as accurat e. Therefore, in any 911 call,
always report the location to the emergency
response center if you can and if you cannot,
remain on your phone for as long as the
emergency response center instructs you.
Even where adequate signals from multiple
satellites are available, your GPS feat ure will
only provide an approximate location, often
within 150 feet (45 meters) but sometimes
much further from your actual location. Advice
on how to improve GPS performance is
provided in “Enhancing GPS Performance” on
page 69.
While the GPS feature of yo ur phone can be a
valuable navigational aid, it does not replace the
need for careful navigating and good judgment.
Never rely solely on one device for navigation.
Remember that the accuracy of the location
information and the ti me needed to obtain it will
vary depending on circumstances, particularly the
ability to r ecei ve si gn al s fr om ad equa te nu mber s o f
satellites.
On emergency calls, your phone uses assistance
information f rom the phone network to improv e the
speed and accuracy of your phone’s location
calculation: if such assistance information
becomes un avai la bl e, it m ay r educe t he spee d a nd
accuracy of the location calculation.
The satellites u sed by the GPS featur e of your
phone are contro lled by the U.S. government and
are subj ec t to c han ge s imp leme nt ed in acc or dan ce
with the Departme nt of D efense GPS us er policy
and the Federal Radionavigation Plan. These
changes may affect the performance of the GPS
feature of your phone.
Making an Emergency Call
Dial 911 to be connected to an emergency
response center. If you are o n an active call, you
must en d it be f ore cal ling 911.
When you make an emergency 911 call, the GPS
featur e of your p ho ne be gi ns to se ek inf o rm ati on to
calcul ate your approximate location. It will take
the GPS feature of your phone some time to
determine your approximate location. Even
where yo ur phone has good access to sufficient
67

GPS Enabled
GPS satellite signals and n etwork assist data, it
may take 30 seconds or more to determine the
approxi mate lo cati on. Thi s time wil l incre ase wher e
there is reduced access to satellite signals. When
your approximate location is determined, it is made
available to the appropriate emergency response
center.
In some cases, your local 911 emergency
response center may not be equipped to
receive GPS location information. For this
reason, and because the GPS location information
reported is onl y approximate or may not be
available in your location (see “IMPORTANT:
Things to Keep in Mi nd” on page 66), always
report your location to the 911 operator you
speak to wh en making an emerge ncy call, if able,
just as you would when using a phone without GPS
capabilities.
Note: If you are con ce rne d about whether you r
local 911 emergency response center is
equipped to receive GPS location
information, contact your local authorities.
In general, if your phone has access to signals
from more GPS satellites, your location will be
determined faster and more accurately than if your
phone ha s access to signals from fewer GPS
satellites.
68
If your phone does not have ade quate access to
GPS satellites signals, the location of the nearest
cell tower in co nta c t with your ph on e is
automatically ma de available to the emergency
response center, if the center has the capability to
receive such information.
See “Enhancing GPS Performance” on page 69 for
information on how to help your phone determine
your location.
Viewin g Your Approx i mat e Location
1 From the main menu, select GPS > Position.
2 Scroll to view the entire screen.
This disp la ys the follo w in g inf orm a tio n ab ou t the
last time your location was calculated:
• The time (as Greenw ich Mean Time) and date
that the location was last calculated.
• The approximate location, expressed as latitude
and long itu de .
• The estimated accuracy of the calcu lated
location. This estimate of accuracy is only a very
rough estimate and may vary substantially from
the actual accuracy of the approximate location
info rmation reported.

Enhancing GPS Perfo rma nc e
• The number of satellites used to calculate the
location. In general, more satellites make for
better accuracy.
To calculate your location again:
Press A under Rfrsh.
It may take your phone several minutes to
complete the process of determining your location.
During this time, a message usually appears on
your phone’s display saying your phone is
scanning for satellites. For tips on getting the best
location calculation, see “Enhancing GPS
Performance”.
The Position screen displays the updated
information.
To cancel a location calculation before it is
completed:
Press A under Cancel to return to the Position
screen. -or-
Press e to return to the idle screen.
Each time approximate location of your phone is
calculated, the latest location information is stored
in your phone and remains there even when your
phone is powered off. You will see this information
the next time you view the Position screen.
If you received a phone call or alert w hile
attempting to determine your location, the Position
screen will dis appear, but your phone will continue
attempting to determine its location. If it is
successful, the new location information will be
displayed the next time you view the Position
screen.
Enhancing GPS Performance
Sometimes the GPS feature of your phone may be
unable to complete a location calculation
successfully. If this happens when yo u are making
an emergency call, the location o f the nearest cell
tower in contact with your phone is ma de available
to the appropriate emergency response center if
the center has the capability to receive such
information. If this happens when you are trying to
view your location on the phone’s display, you will
see a messa ge indicating that your phone cannot
access satellites.
To improve accuracy and increase your chances of
a successful calculation, do the following while
your phone is determining your approxima te
location:
69

GPS Enabled
• Stay in the open. T he GPS feat ure works best
where the re is nothing between yo ur ph on e and
a large amount of open sky. If possi ble, go
outside, away from tall buildings and foliage.
While performa nc e in a bu ild in g is imp r ov ed by
moving clo ser to w ind ow s , gl ass wi th c ert a in su n
shielding films may block satellite signals.
• Hold your ph on e t o en ha nc e r ec ep ti o n . Signals
from GPS satellites are transmitted to your GPS
anten na, which is insid e the back of your phone,
opposite the earpiece, above the label with your
servic e provider’s nam e on it. Hol d yo ur ph on e
away from your body, giving the antenna clear
access to satellite signals. Do not cover the
antenna area with your fingers or an ything else.
GPS antenna area
70
• Stand still. If possible, stand still until your phone
is finished determining your location. Moving
your phone at a walking pace while your phone
is calculating your approximate location may
substantially decrease GPS performance.
• In a car. When using the GPS Enabled feature in
a car, positio n yo ur ph on e so that the GPS
antenna has good access to GPS signals
through the car’s windows. Typically, t he GPS
antenna has best access to GPS signals in a car
when placed near a window.
Note: Although moving your phone at a walking
pace decreases GPS performance,
moving it at the speed of a moving car
does not.
• Stay in network covera ge . De pe nd ing on who
your service provider is, the network will provide
your phone with information that helps
determine your location more quickly and
accurately.

Updating Satellite Almanac Data
Updating Satellite Almanac
Data
Another way to keep the GPS feature of your
phone working well is to keep your satellite
almana c data up to date.
The Unit ed States government maintains an
almana c of da ta abo ut w her e GP S sat el l ites ar e a s
they orbit the Earth. This information is available t o
your phone. Keeping your satellite almanac up to
date helps your phone det ermine your location
more quickly.
The almanac contains info rmation about the
location of satellite s , their operational status, and
other sa te ll ite in f orma ti o n. Ke ep i ng th is in fo rmat i on
update d enhances the performance of your GPS
feature. In most cases, your phone will be able to
get a fix in strong satellite signal conditions with
outdated almana c data, but it may take longer.
Note: When you make an emergency call, your
phone do es not r el y up on the alm anac to
determine your location.
If your satellite almanac data is out of date, your
phone ma y prompt you to update it. Follow the
instructions that appear on the phone’s display.
You may be asked to go to a web site or call a
custo m er ca re number .
Setting Privacy Options
Your phone’s GPS privacy options control whether
software ap pl ic atio ns may vi ew t he lo cati on of you r
phone.You may set your phone to one of these
GPS privacy options:
• Restricted — No softwa re applications may
view the locati on of your phone. However,
location information may still be available to the
phone’s owner, fleet manager, or account
administrator.
• Unrestricted — All applications may view the
locat ion of your phone, w ithout notifying you.
• By Permi s si on — When an application
attempts to view the location of your phone, you
will be prompted to give permission. However,
location information may still be available to the
phone’s owner, fleet manager, or account
administrator.
Note: Privacy options do not apply to the
transmission of location information
during em ergenc y 911 calls .
To set your GPS privacy options:
1 From the main menu, select GPS > Privacy.
2 If your GPS PIN security feature is enabled,
enter your GPS PIN. (See “Setting the GPS PIN
Security Featu r e” for more info rma ti on .)
71

GPS Enabled
3 Scroll to the privacy setting you want.
4 Press A under Select.
Setting the GPS PIN Security Feature
To prevent your GPS privacy settings from being
altered without your knowledge, your GPS privacy
option can be protected by a PIN.
When you receive your phone, the GPS security
feature is turned off, so you do not have to enter a
GPS PIN to access your GPS privacy options. If
you turn this feature on, you will be required to
enter a GPS PIN to access your GPS privacy
options.
To turn the GPS Enabled security feature on or off:
1 From the main menu, select Settings >
Security > GPS PIN.
2 Scroll to On or Off.
3 Press A under Select.
4 Enter the current GPS PIN.
Note: When you receive your phone, your GPS
PIN is 0000 .
5 Press A under Ok.
To change your GPS PIN:
1 From the main menu, select Settings >
Security > Change Password > GPS PIN.
72
2 Enter the current GPS PIN.
Note: When you receive your phone, your GPS
PIN is 0000 .
3 Press A under Ok.
4 Enter the new 4- to 8-digit GPS PIN.
5 Press A under Ok.
6 Enter the new 4- to 8-digit GPS PIN to confirm.
7 Press A under Ok.
Using GPS with Map Software
You can us e the GPS feature of your phone to
provide approximate location data to a la ptop
computer or similar device that is running
interactive map software such as that made by
DeLorme or Microsoft. This way, if your phone has
good access to GPS signals, your approximate
position on a map can be made available as you
travel in a vehicle.
To do this, connect your phone to your laptop (or
other device) with a data cable and set your phone
to transmit data (see “Getting Started” on page 73).
Your phone then provides your approximate
location to the device running the map software,
which displays your location on a map. Your phone
provides a n u pd ate d l o cat ion ev er y seco nd an d the
map softw are displays your changing locati on on
its map.
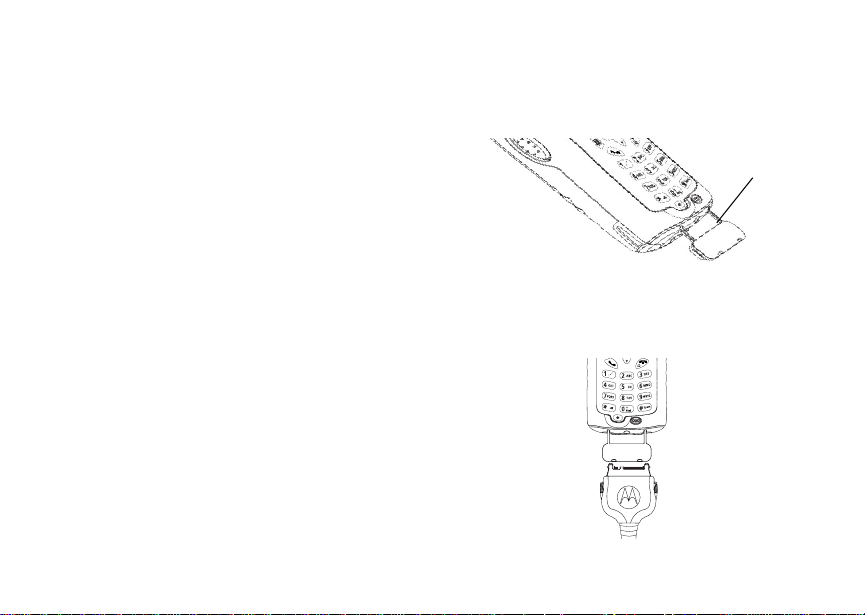
See “Enhancing GPS Performance” on page 69 for
more details on obtaining good location
information.
Note: Becaus e yo ur ph on e is con t in uo us ly
determining your location, using the GPS
feature of your phone with map software
uses th e phone’s battery power quickly.
Software Compatibility
Your phone sends l ocation information to your
laptop or other device using the st andard National
Marine Electronics Association (NMEA) format.
Your phone supports output messages in
NMEA-0183 format and supports the following
NMEA-0183 sentences: GGA, GLL, GSA, GS V,
RMC, and VTG.
The map software running on your laptop or other
device must support NMEA 3.0.
Getting Started
To connec t your phone to your laptop or other
device:
Using GPS with Map Software
1 Open the connector cover.
connector
cover
2 With the phone’s di spla y fac ing up , ins ert the
data cable’s connector into the accessory
connector, until you hear a click.
73

GPS Enabled
3 Insert the data plug into the COM port of your
laptop or other device.
Make sure no other application is using the COM
port sel ected.
Make sure the COM port settings of your laptop or
other device are set to the following:
• Bits per second: 4800
• Data bits: 8
• Parity: None
• Stop bits: 1
• Flow control: Hardware
To set your phone to send location information to
your laptop or other device:
1 From the main menu, select GPS > Interface.
2 With NMEA OUT hi gh lighted , pres s A under
Change.
3 Scroll to On.
4 Press A under Select. Your phone is now
sending locat ion data to your laptop or other
device.
To stop your phone from sending location data to
your laptop or other device:
Set NMEA OUT to Off.
74
Each tim e you power your phon e on , NMEA OUT
is automatically set to Off.

Voice Re cords
Note: This is an optional feature. Contact your
servi c e provider about its availability for
purchase.
A voice record is a recording you make with your
phone a nd can play back. You can r ecord notes to
yourself or phone calls.
Your phone can store up to 20 voice records, with
a total time of 3 minutes or more, depending on
available memory.
Creating Voice Records
To record a note to yourself:
1 From the main menu, select VoiceRecd > [New
VoiceRec].
2 Press A under Record. Say the message you
want to record into the microphone.
3 When you are finished recording, press A
under Stop.
To add to the end of voice record:
1 From the main menu, select VoiceRecd.
2 Scroll to the vo ice record you want to add t o.
3 Press m.
4 Scroll to Add To.
5 Press A under Select. Say the message you
want to add into the microphone.
6 When you are finished recording, press A
under Stop.
To recor d a phone call:
1 While on an active call, press m.
2 Scroll to Reco rd.
3 Press A under Select to start recording.
4 When you are finished recording, press A
under Stop.
Note: Record ing of phone calls is subject to
applicable laws regarding privacy and
recording of phone conversations.
Playing Voice Records
1 From the main menu, select VoiceRecd.
2 Scroll to the vo ice record you want to play.
3 Press A under Play.
4 To stop the voic e rec or d whi l e it i s pl ayi n g, pr es s
A under Back.
Tip: T o fast forward, scroll right. T o rewind, scroll
left. To pause or resume, press any key.
75

Voice R ecords
Labelling Voice Records
When you c reate a voice record, it is labeled with
the time and date it was recorded. You can then
rename it with a custom label.
1 From the main menu, select VoiceRecd.
2 Scroll to the vo ice record you want to label.
3 Press m.
4 Select Label.
5 Enter the label you want to assign. See
“Entering Text” on page 54.
6 Press A under Ok.
Deleting Voice Records
To delete a voice record:
1 From the main menu, select VoiceRecd.
2 Scroll to the vo ice record you want to delete.
3 Press m.
4 Select Delete.
5 Press A under Yes to confirm.
To delete all voice records:
1 From the main menu, select VoiceRecd.
2 Press m.
3 Select Delete All.
76
4 Press A under Yes to confirm.
Locking Voice Records
When you lock a message, it cannot be deleted
until yo u un lo ck it.
1 From the main menu, select VoiceRecd.
2 Scroll to the message you want to lock or
unlock.
3 Press m.
4 Scroll to Lock to lock the message. -or-
Scroll to Un lock to unlock the message.
5 Press A under Select.
When a voice record is locked, this icon R appears
next to it.
Managing Memory
To view th e amount of memory availab le for voi c e
records:
1 From the main menu, select VoiceRecd.
2 Press m.
3 Select Memory.
To free more memory by deleting all unlocked
voice records:
1 From the main menu, select VoiceRecd.

2 Press m.
3 Select Memory.
4 Press A under Delete.
5 Press A under Yes to confirm.
Note: Voice records are stored in yo ur phone
using the same memory spac e used to
store ring tones. Deleting ring tones frees
memory space for voice records.
Managing Memory
77

Customizing Your Phone
Setting the Volume
To set the volume of the sound co ming from the
phone’ s earpiece or speaker:
1 From the main menu, select Settings > Volume.
2 Scroll to Earpiece to set the earpiece volume.
-or-
Scroll to Speaker to set the speaker vol ume.
3 Press A under Change.
4 To select the volume:
Scroll left or right. -or-
Press t he volume controls.
5 Press A under Ok.
To set the volume of the phone’s ring:
Press t he volume controls.
For another way to set the volume of the phone’s
ring, or the volume of many ot her sounds your
phone ma kes:
1 From the main menu, select Settings > Volume.
2 Scroll to the option you want and make the
change. Choose Line 1 or Line 2 to set the
78
volume of the phone’s ring when you get a call
on that line.
See “Vol ume Features” on page 80.
Setting Your Phone to Not Ring
To set your phone to make no sound when you
receive phone calls, Private calls, group calls,
message notifications, and call alerts, see “Turning
Ring Tones Off” on page 50.
To set your phone to vibrate instead of making a
sound when you rec eive Private cal ls and group
calls, even if you want your phone to ring for other
features:
1 From the main menu, select Settings > 2-Way
Radio > Alert Type.
Tip: If Alert Type does not appear: From the
main menu, select Ring Tones. Make sure
Vibr ate All or SilentAll is set to Off.
Repeat step 1.
2 Press A under Change.
3 Scroll to Vibrate.
4 Press A under Select.
Note: This i s an optional feature. Contact your
servi c e provider about its availability for
purchase.

Seeing the Display Better
If your phone does not include a vibrate feature,
you can still set your phone to make no sound.
Scroll to Silent in step 3.
Seeing the Display Better
To set the contrast of the display:
1 From the main menu, select Settings >
Display/Info > Contrast.
2 Press A under Change.
3 Scroll left or right to set the contrast.
4 Press A under Ok.
Using Settings
Settin gs contains many subm enus that let you
customize your phone.
Display/Info Features
The Display/Info menu cont rols how the keypad
and disp lay appear:
• Backlight — controls how long the backlight
stay s on after you make or receive a call.
•Clock — con trols whet he r the tim e an d date
appea rs on the idle screen, sets the format of
the time and date, and sets the year.
•Contrast — sets the contrast on the display.
See “Seeing the Display Better”.
• Language — sets the language that your phone
displays.
Phone Calls Features
The Phone Calls menu controls how your phone
handle s phone calls:
• Set Line — sets phone line 1 or phone line 2 as
the active line for outgoing calls.
• Any Key Ans — If this feature is on, you can
answer calls by pressing any number key on the
keypad.
• Auto Redial — sets your phone to automatically
redial calls you make when the system is busy.
• Call Waiting — See “Call Waiting” on page 41.
•Auto Ans — sets your phone to au tomatically
answer an incoming call after a specified
number of rings. When this feature is on, the
phone answers by connecting you to the caller;
it does not send the call to voice mail, unless
you are out of coverage or on the line.
• Minute Beep — causes a bee p to sound ev er y
minute of an active call.
•Call Duration — causes the duration of a call to
appear on the phone’s display when the call
ends.
79

Customizing Your Phone
• TTY — lets you use your phone with a TTY
device. See “Making TTY Calls” on page 47.
• Notifications — See “Setting Notification
Options” on page 57.
2-Way Radio Features
The 2-Way Radio menu controls how your phone
handle s Private calls and group calls:
• Tkgrp Silent — controls whe ther you hear
group calls to your Talkgroup. See “Receiving
Group Calls” on page 45.
•Tkgrp Area — lets you define your Talkgroup
area.
• One Touch PTT — See “Setting O ne Touch
PTT” on page 43 .
• Alert Type — controls how your phone noti fies
you when you receive Private calls and group
calls. Se e “S et ting Your Phone to Not Rin g ” on
page 78.
Vo lume Features
The Volume menu sets the volume of sounds your
phone ma kes:
•Line 1 — sets ring v olume for phone li ne1.
•Line 2 — sets ring v olume for phone li ne2.
80
•Messages — sets the volume of message
notifications.
• Earpiece — sets the volum e of so und com in g
out of the earpiece.
• Speaker — set s the volume of sound coming
out of the speake r.
•Keypad — sets the vo lume of sou nd associ at e d
with pressing keys and bu ttons.
•Data — sets the volume of sounds that notify
you that yo u ar e re ce iv in g a cir c u it data call.
Security Features
The Security menu lets you turn security features
on and off and change passw or d s:
• Phone Lock — turns on a feature that locks
your phone, either immediately or automatically
after a set period of inactivity. An unlock code is
required to enable this feature, to unlock the
phone, and to set a new unlock code. Contact
your service provider for your default unlock
code.
•Keypad Lock — locks the p hone’s keypad,
either immediately or automatically after a set
period of inact i vi ty. See “Lockin g the Ke ypa d” on
page 14 for more information on locking and
unlocking the keypad.

Using Settings
• SIM PIN — enables and disables your phone’s
SIM PIN security feature. See “Turning the PIN
Requirement On and Off” on page 12.
• GPS PIN — enables and disables you r pho ne ’s
GPS PIN security feature. See “Setting the GPS
PIN Secur it y Fea tur e ” on page 72.
• Change Passwords — changes your phone
unlock code, security code, SIM PIN, and GPS
PIN.
Advanced Features
The Adva nc ed me nu co nt ai ns adva nc ed an d rar ely
used Settings features.
• Alert Timeout — controls the amo u nt of time a
tone continues to sound when you receive a
message notification or call alert.
• Headset/Spker — sets headset option. See
“Using a Headset” on page 82.
• Connectivity — Network ID sets the phone’s
network ID s and t he ir r oa mi ng opt i on s unde r the
direct io n of your se rv ic e prov id er; Mast er Reset
lets your service provider reset your service in
the event of a security or provisioning problem.
• Reset Defaults — Reset Settings returns all
settings to their original defaults; Reset All
returns all settings to their orig inal defaults and
erases all stored lists. Use only under the
direction of your service provider.
•Return to Home — controls how long the recent
calls list disp lays after ca l l s.
• Phone Only — prevents your phone from
making or receiving Private calls or group calls.
•Baud Rate — sets the baud rate at which your
phone communicates with a laptop computer,
PC, or similar device.
81

Using a Headset
If you use a headset or similar d evice with your
phone, you can set your phone to send incoming
sound to the headset only, or to the headset and
the speaker at the same time:
1 From the main menu, select Settings >
Advanced > Headset/Spkr.
2 Press A under Change.
3 Scroll to Hd setOnly to send incomi ng sound to
the he adset only. -or-
Select Hdset&Spkr to send inc om i n g so un d t o
the headset and ring tones to the speaker.
4 Press A under Select.
Note: When you are using a headset, the PTT
button on your ph one wor ks the sa me way
as when you are not using a headset.
Private call and group call sounds will be
heard through the headset.
Attaching a Headset
1 Lift the audio jack cover.
2 Insert the headset connector firmly into the
audio jack. You may have to rotate the headset
jack until it fits securely into the audio jack.
82
Using a Remote PTT Button
If you are using a headset or other accessory with
a remote PTT button, you can use the rem ote PTT
button for phone calls and Private calls.
For phone calls, use the remote PTT button to
answer ca lls, switch between calls, and end calls.
Hold the remo te PTT bu tto n for less tha n 2
seconds to answer ca lls and switch between calls.
Hold the remo te PTT bu tto n for more than 2
seco nd s to en d calls.
For Private calls, use the remote PTT button as
you would the PTT button on your phone.

Understanding Status Messages
You may receive status messages under certain
conditio ns . B efo r e cont act i ng Cu stom er Car e, no t e
the mess age, numeric code, and the conditions
under which it ap peared. The following table lists
and describes the status messages.
Stat us Messages Message Description
Number Not in
Service
User Not Available
User Not
Authorized
Please Try Later
Service Restricted
Service Not
Available
The number that you entered is not
valid.
The phone that you called is either
busy, out of coverage, or turned off.
Please try again later.
The person that you called has not
purchased this service.
This service is temporarily not
available. Please try again later.
This service was restricted by your
service provider, or this service was
not purchased.
You are either out of coverage or
having problems with provisioning.
Stat us Messages Message Description
System Busy
Please Try Again
Self Check Error +
Number Code
Self Check Fail +
Number Code
PIN Blocked
Call Your Provider
Insert SIM
Check SIM Card
Wrong PIN
The system is experiencing heavy
traffic. Please try again later.
An error occurred. Please try again.
A fault was detected with your
phone. If this error recurs, note the
error code and contact Customer
Care.
An operational fault was detected
with your phone. Note the numeric
code, turn your phone off, and
contact Customer Care.
The incorrect PIN was entered 3
consecutive times. You will be
unable to place or receive calls on
your phone. Contact Customer
Care to have them obtain the PIN
Unblocking Key (PUK) code.
Your SIM card is not being
detected. Please check to ensure
that you hav e ins e rte d th e SI M car d
correctly into your phone.
Please check your SIM card to
make sure it has been inserted
properly.
You have entered an incorrect PIN
number.
83

Understa ndi ng Stat us Me ssa ges
Status Messages Message Description
Enter SIM PIN
Enter Unlock Code
New Browser
Message Memory
Full!
Scanning for
Satellites
Unable to Locate
Sats
Tec hnica l Erro r
84
Please enter your 4- to 8- digit SIM
PIN code.
Auto Phone Lock is activated.
Enter you unlock code.
Warns of low memory for Net
Alerts.
Searching for GPS satellites.
Could not find GPS satellites.
A problem occurred in your phone’s
GPS circuitry. If this error occurs,
contact Customer Care

Safety and General Information
IMPORTANT INFORMATION ON SAFE AND
EFFICIENT OPER AT ION .
READ THIS INFORMATION BEFORE USING
YOUR INTEGRATED MULTI-SERVICE
PORTABLE RADIO.
RF Operational Characteristics
Your ra dio product contains a radio frequency
transmitter to convey the information you wish to
send as well as occasional automatic signals used
to sustain connect ion to the wireless network, and
a receiver which enables you to receive
communication and connection information from
the network.
This de vice complies wit h part 15 of the FCC
Rules. Operation is subject to the following tw o
conditions: (1) This devi ce may not cause harmful
inter fe r en c e, and (2) thi s de vi ce mus t ac ce pt any
interference received, including interference that
may cause undesired operation.
Portable Radio Product Operati o n an d EM E Exp osu re
Your Motorola radio product is designed to comply
with the follo wing national and international
standards and guidelines regarding exposure of
human beings to radio frequency electromagneti c
energy (EME):
• United States Federal Communications
Commission, Code of Federa l Regulations; 47
CFR part 2 su b-part J.
• American National Standards Institute (ANSI) /
Institute of Electrical and Electronics Engineers
(IEEE). C95. 1-1992.
• Institute of Electrical and Electronics Engineers
(IEEE). C95. 1-1999 Edition.
• International Commission on Non-Ionizing
Radiation Protection (ICNIRP) 1998.
• Ministry of Health (Canada). Safety Code 6.
Limits of Human Exposure to Radiofrequency
Electromagne tic Fields in the Frequency Range
from 3 kH z to 300 GHz, 1999.
• Australian Communications Authority
Radiocommunications (Electromagnetic
Radiation - Human Exposure) Standard 2003.
85

Safety and General Information
• ANATEL, Brasil Regulatory Authority, Resolution
256 (April 11, 2001) “additional requirements for
SMR, cellular and PCS product certification.”
To assure optimal radio product performance
and make sure human exposure to radio
frequency electromagnetic energy is within the
guidelines set forth in the above standards,
always adhere to the following procedures:
Phone Operation
When placing or receiving a phone call, hold your
radio product as you would a wireline telephone.
Speak directly into the microphone.
Two-way radio operat i on
When usi ng your radio product as a
traditional t wo-way radio, hold t he
radio product in a vertical position
with the microphone one to two
inches (2.5 to 5 cm) away from the lips.
Body-worn operation
To maintain compliance with FCC RF exposure
guidel ines, if you wear a radio product on your
body when transm itting, always place the radio
produc t in a Mo tor ola appr ov ed clip, hol de r,
holster, case or body harness for this product.
Use of non-Motorola-approved accessories may
86
exceed FCC RF exposure guidelines. If you do
not use a Motorola approved body-worn
acces sory and are not using the radio prod uct
in the intended use positions along side the
head in the phone mode or in front of the face
in the two-way radio mode, then ensure the
antenna and the radio product are kept the
following minimum distances from the body
when transmitting
• Phone or Two-way radio mode: one inch (2.5
cm)
• Data operation using any data feature with or
without an accessory cable: one inch (2.5
cm)
Antenna Care
Use only the supplied or an approved
replacement ant enna. Unauthor ized antennas,
modifications, or attachments could damage the
radio pr oduct and may violate FCC reg ulations.
DO NOT hol d the antenna when the radio
product is “IN USE”. Holding the antenna affects
call quality and may cause the radio pr oduct to
operate at a higher power level than needed.

Portable Radio Product Operation and EME Exposure
Approved Accessories
For a list of approved Motorola accessories call
1-800-453-0920, or visit our website at
www.motorola.com/iden.
ALL MODELS WITH FCC ID AZ489FT5832 MEE T THE
GOVERNMENT’S REQUIREMENTS FOR EXPOSURE
TO RADIO WAVES.
Your wireless phone is a radio transmitter and receiver. It
is designed and manufactured not to exceed the emission
limits for exposure to radiofrequency (RF) energy set by
the Federal Communications Commission of the U.S.
Government. These limits are part of comprehensive
guidelines and establish permitted levels of RF energy for
the general population. The guidelines are based on
standards that were developed by independent scientific
organizations through periodic and thorough evaluation of
scientific studies. The standards include a substantial
safety margin designed to assure the safety of all persons,
regardless of age and health.
The exposure standard for wireless mobile phones
employs a unit of measurement known as the Specific
Absorption Rate, or SAR. The SAR limit set by the FCC is
1
Tests for SAR are conducted using standard
1.6W/kg.
operating positions reviewed by the FCC with the phone
transmitting at its highest certified power level in all tested
frequency bands. Although the SAR is determined at the
highest certified power level, the actual SAR level of the
phone while operating can be well below the maximum
value. This is because the phone is designed to operate at
multiple power levels so as to use only the power required
to reach the network. In general, the closer you are to a
wireless base station antenna, the lower the power output.
Before a phone model is available for sale to the public, it
must be tested and certified to the FCC that is does not
exceed the limit established by the government-adopted
requirement for safe exposure. The tests are performed in
positions and locations (e.g., at the ear and worn on the
body) as required by the FCC for each model. The highest
SAR value for this model phone when tested for use at the
ear is 1.410 W/kg and when tested on the body, as
described in this user guide, is 0.779 W/kg during packet
data transmission. (Body-worn measurements differ
among phone models, depending upon available
accessories and FCC requirements.)
While there may be differences between the SAR levels of
various phones and at various positions, they all meet the
government requirement for safe exposure.
The FCC has granted an Equipment Authorization for this
model phone with all reported SAR levels evaluated as in
compliance with the FCC RF exposure guidelines. SAR
information on this model phone is on file with the FCC
and can be found under the Display Grant section of
http://www.fcc.gov/oet/fccid after searching on FCC ID
AZ489FT5832.
Additional information on Specific Absorption Rates (SAR)
can be found on the Cellular Telecommunications Industry
Association (CTIA) web-site at http://www.wow-com.com.
1
In the United States and Canada, the SAR limit for
mobile phones used by the public is 1.6 watts/kg (W/kg)
averaged over one gram of tissue. The standard
incorporates a substantial margin of safety to give
additional protection for the public and to account for any
variations in measurements.
2
87

Safety and General Information
2
The SAR information reported to the FCC includes the
FCC-accepted Motorola testing protocol, assessment
procedure, and measurement uncertainty range for this
product.
Electro Magnetic Interference/Compatibility
Note: Nearly every electronic device is
susceptible to electromagnetic
interference (EMI) if inadequately
shielded, designed or otherwise
configured for electromagnetic
compatibility.
Facilities
To avoid electromagnetic interference and/or
compatibility conflicts, turn off your radio product in
any facility where posted notice s instruct you to do
so. Hospi tals or health care facilities may be using
equipment that is sensitive to ex ternal RF energy .
Aircraft
When instructed to do so, turn off your radio
produc t w he n on boar d an ai r cra f t. An y us e of a
radio product must be in accordance with
applicable regulations per airline crew instructions.
88
Medical Devices
Pacemakers
The Advanced Medical Technology Association
(AdvaMed) recommends that a minimum
separation of 6 i nches (15 cm) be maintained
between a handheld wireless rad io product and a
pacemaker. These recommendations are
consistent with those of the U.S. Food and Drug
Administration.
Persons with pacemakers should:
• ALWAYS keep the radio product more than 6
inches (15 cm) from their pacemaker when the
radio product is turned ON.
• Not carry the radio product in a breast pocket.
• Use the ear opposite the pacemaker to minimize
the potentia l for interfere nce .
• Turn the radio product OFF immediately if you
have any reason to suspect that interference is
taking place.
Hearing Aids
Some digital wireless radio products may interfere
with some hearing aids. In the event of such
interference, you may want t o consult your hearing
aid manufacturer to discuss alternatives.

Operational Warnings
Other Medical Devices
If you use any other personal medical device,
consult the manufacturer of your device to
determine if it is adequately shielded from RF
energy. Your physician may be able to assist you
in obtaining t his information.
Use While Driving
Check the l aws an d r eg ulat io ns on the us e of ra dio
products in the area where you drive. Always obey
them.
When using the radio produc t while driving, please:
• Give full attention to driving and to the road
• Use hands-free operation, if available.
• Pull off the road and park before making or
answering a call if driving conditions so require.
.
Operational Warnings
For Vehicles with an Air Bag
Do not place a portable radio product in the area
over the air bag or in the air bag deployment area.
Air bags inflat e with great forc e. If a portable radio
is plac ed i n th e a ir bag d ep lo yme nt a r ea and th e a i r
bag inf lates, the radio product may be propelled
with great force and cause serious injury to
occupan ts of the vehicle.
Potentially Explosive Atmospheres
Turn off your radio product prior to entering any
area wi th a po t en ti ally explos iv e atmos ph ere,
unless i t is a ra di o pro du ct typ e es peci al ly qua li fie d
for use in such areas as “Intrinsically Safe” (for
example, Factory Mutual, CSA, or U L approved).
Do not remove, install, or charge batteries in such
areas. Sparks in a potentially ex plosive
atmosphere can cause an explosion or fire
resulting in bodily injury or even death.
Note: The areas with potentially explosive
atmospheres referred to above include
fueling areas such as below decks on
boats, fuel or chemical transfer or
storage facilities, areas where the air
contains chemicals or particles, such
!!
89

Safety and General Information
as grain, dust or metal powders, and
any other area where you would
normally be advised to turn off your
vehicle engine. Areas with potentially
explosive atmospheres are often but
not always posted.
Blasting Caps and Areas
To avoid possible interference with blasting
operations, turn off your radio product when you
are near el ectr i cal blas ti ng ca ps, in a bl as t ing ar e a,
or in areas posted: “Turn off two-way radio”. Obey
all signs and instructions.
Operational Cautions
Batteries
All batt e ries can caus e pr o pe r ty dam age and/ or
bodily injury, such as burns if a conductive material
such as jewelry, keys, or beaded chai ns touches
exposed terminals. The conductive material may
complete an electrical circuit (short circuit) and
become quite hot. Exercise care in handling any
charged battery, parti c ularly when placing it inside
a pocket, purse, or other container with metal
objects. To reduce the risk of injury, batteries
shoul d no t be ex po se d t o fir e, di sassembled, or
crushed.
90
!
Cleaning and Drying Considerations
Using a leather ca r ry cas e ma y help prote c t the
surfaces and help prevent liquids (e.g., rain) from
entering into the inte rior of the radio product. This
product is not water proof, and exposing the unit to
liquid s may resul t in per man en t dama ge t o the un it .
If your radio product interior gets wet, then do not
try to accelerate drying with the use of an oven or a
dryer as this will damage the radio product and
void the warrant y. Instea d, do the following:
1 Immediately power off the radio product.
2 Remove Battery and SIM card (if so equipped)
from radio product.
3 Shake excess liquid from radio product.
4 Place the radio product and battery in an area
that is at room temperature and has good air
flow.
5 Let the radio product, battery, and SIM card dry
for 72 hours befor e reconn ecting the batter y
and/or powering on the radio product.
If the radio product does not work after following
the steps listed above, contact your dealer for
servicing inf ormation.
 Loading...