

Page 1

Motorola
®
iDEN
Digital Multi-Service Data-Capable Phone
®
i3000plus™ Phone User’s Guide
@NTN9468A@
NTN9468-A
Page 2
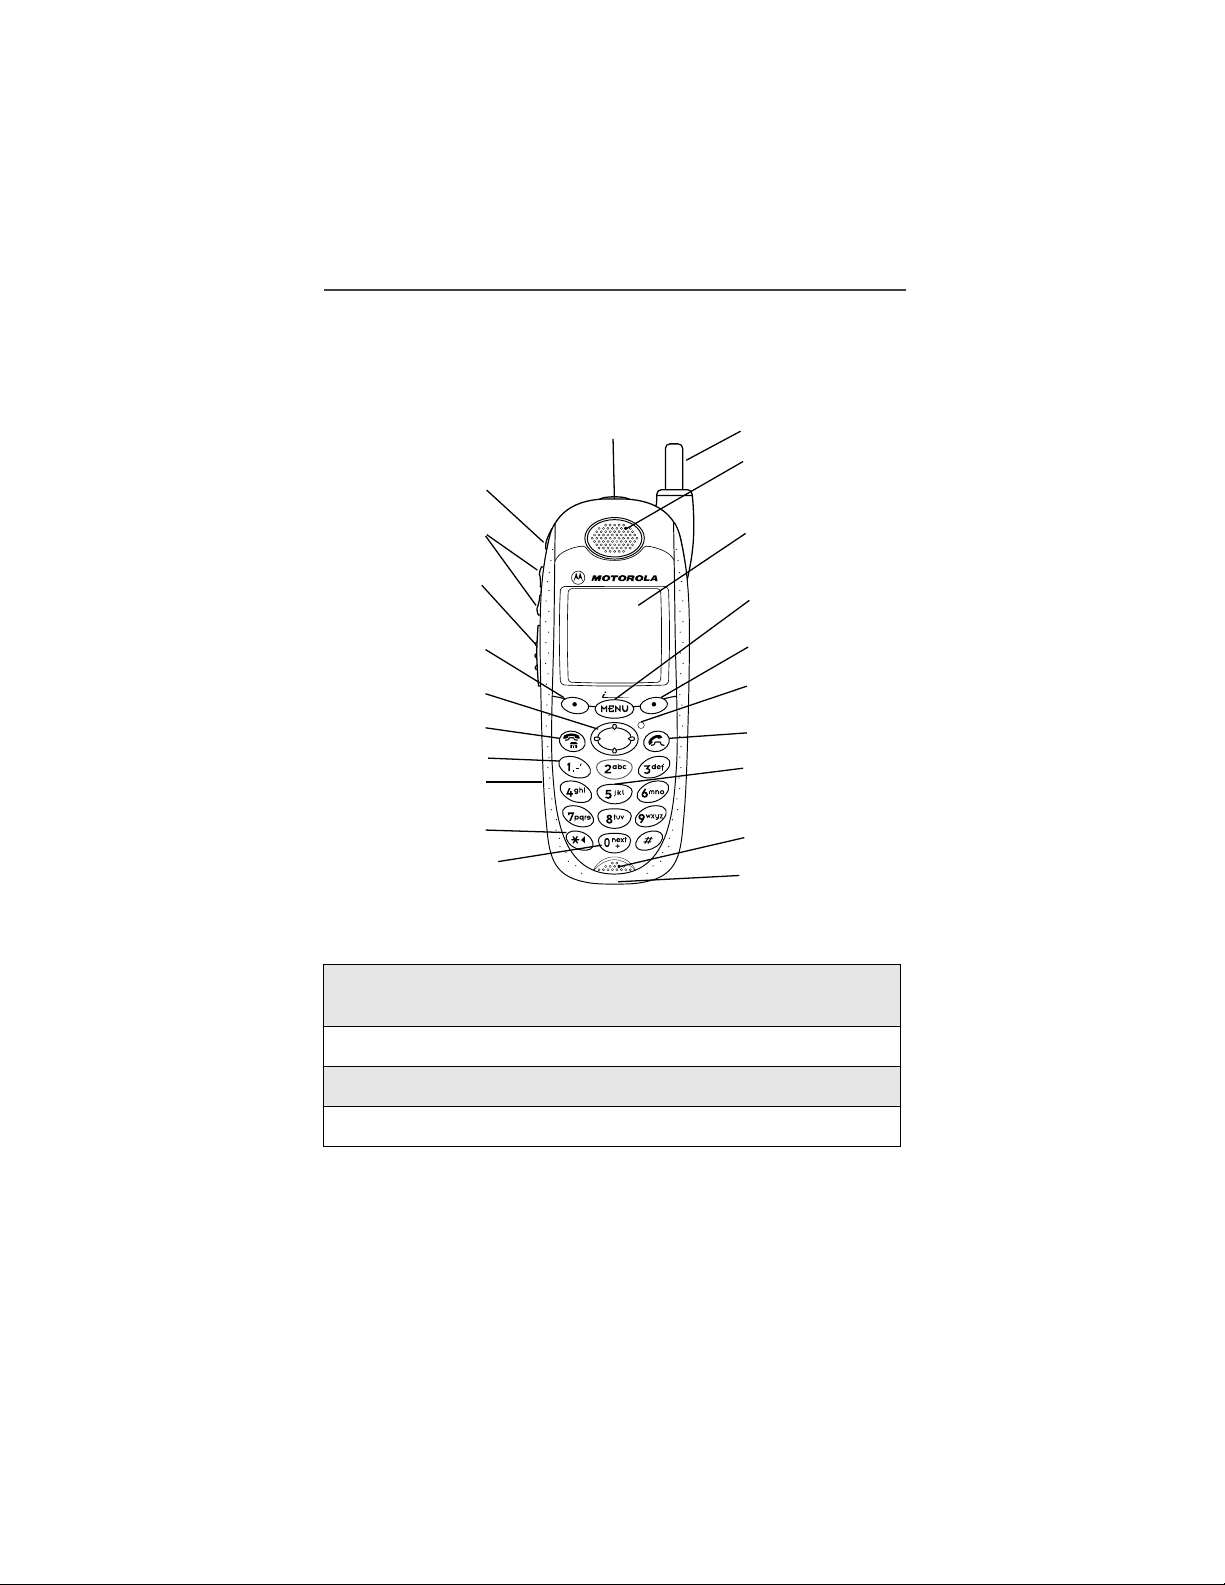
i3000plus Phone Features Bookmark
You can use this fold-out diagram as a bookmark, ma king it easy to refer to
while you learn to use your i3000plus phone.
Power Button
Status Light
Audio Speaker Key
Antenna
Earpiece
Volume Control
Buttons
Push-To-Talk
(PTT) Button
Option Key
4-Way Navigation Key
End/Home Key
Punctuation Key
Headset Jack
Back Key/
Pause Dialing
Next Word Key/
International Plus Dialing
3000plus
Accessory Connector
Learning to Use Your i3000plus Phone
1
Tear off the Quick Reference Card located on the back
cover, complete the information and keep it handy.
2
Read Safety and General Information.
3
Familiarize yourself with the Table of Contents.
Display
Menu Key
Option Key
Photosensor
Send Key
Alphanumeric
Keypad
Microphone/
Speaker
4
Use the i3000plus Phone CD included in the box.
NOTE: Remove the plastic film le ns pr ot e c tor from the display.
NOTE: The display backlight is activated by pressing any key.
Page 3

Table of Contents
Table of Contents .................................................................................3
Introduction ...........................................................................9
Driving Safety Tips...................................................................................... 10
Getting Started................................................................................... 11
Getting Started.............................................................................................. 11
i3000plus Phone Essentials.................... .... ... ............................................... 11
Batteries........................................................................................................ 14
Attaching the Battery............................................................................ 14
Detaching the Battery............................................................................ 15
Charging the Battery............................................................................. 15
Activating Your i3000plus Phone................................................................ 16
Powering On the Phone.......................... .... ........................................... 16
Powering Off the Phone ........................................................................17
Security Features of the i3000plus Phone.................................................... 17
SIM Card Personal Identification Number (PIN)................................. 17
Entering the PIN............................................................................... 17
Changing the PIN..................................... .... ...................... ... .... ....... 18
Unblocking the PIN.......................................................................... 19
Disabling/Enabling the PIN Requirement........................................ 20
Removing/Inserting the SIM Card..................................... .............. 21
Keypad Lock......................................................................................... 22
Activating Keypad Lock .................................................................. 23
Receiving Incoming Calls................................................................ 23
Receiving New Message Mail ......................................................... 23
Receiving Voice Mail .................... ... .... ........................................... 24
Receiving Private Calls.....................................................................24
Deactivating Keypad Lock............. ... .... ........................................... 24
Status of Your i3000plus Phone................................................................... 24
My Information............................................................................................ 25
Viewing/Editing My Information.......................................................... 25
Display Essentials.............................................................................. 27
Desktop Essentials........................................................................................ 27
Ready Screen ............... .... .............................................................................27
Status and Application Icons................................................................. 27
Text Display Area................................................................................. 27
Menu Icon .............................................................................................28
Display Options..................................................................................... 28
3
Page 4

Navigating Menus and Lists........................................................................ 28
Main Menu Options..................................................................................... 29
Digital Cellular................................................................................... 31
Making Phone Calls..................................................................................... 31
Using Direct Dial.................................................................................. 32
Making Calls from the Phonebook....................................................... 32
Making Calls from the Recent Calls List ............................................. 33
Using Speed Dial.................................................................................. 33
Using Turbo Dial.................................................................................. 33
Voice Tags............................................................................................ 34
Automatic Redial.................................................................................. 34
Placing International Phone Calls......................................................... 34
Plus Dialing..................................................................................... 34
Emergency Calling...................................................................................... 35
Special Dialing Codes........................................................................... 35
Receiving a Phone Call................................................................................ 35
Ending a Phone Call.................................................................................... 35
Recent Calls................................................................................................. 35
Viewing Recent Calls........................................................................... 35
Getting Detailed Information About Recent Calls............................... 36
Storing a Number From the Recent Call List....................................... 36
Calling From the Recent Call List.................................... .................... 36
Deleting Recent Calls ...........................................................................36
Call Timers .............................. ... .................................................................37
Hands-Free Speakerphone........................................................................... 37
Call Waiting............... .......................... ........................................................ 37
Accepting Calls..................................................................................... 38
Switching Between Calls...................................................................... 38
Declining Calls........................................ ... .... ...................................... 38
Ending the Active Call.......................................................................... 38
Turning Off Call Waiting..................................................................... 38
Call Hold ............ .... ......................................................................................39
Three-Way Calling ...................................................................................... 39
Call Forwarding........................ ... .......................... ...................................... 40
Turning On Call Forwarding................................................................ 41
Turning Off Call Forwarding................................................................ 42
Additional Phone Services........................................................................... 43
Caller ID ............................................................................................... 43
Displaying the Caller’s Name......... .... ... .......................................... 43
Alternate Line Service.......................................................................... 43
Selecting the Alternate Line............................................................ 44
Receiving Calls on Your Alternate Line......................................... 44
4
www.motorola.com
Page 5

Accepting Calls................................................................................ 45
Declining Calls............................... .................................................. 45
Call Restrictions.................................................................................... 45
White Page Listings......................................................................... 45
Yellow Page Listings ....................................................................... 45
Nationwide Call Completion............................... ............................. 45
Private Calls....................................................................................... 49
Private Calls ................................................................................................. 49
Private Calls ................................................................................................. 49
Making Private Calls from the Keypad................................................. 49
Making a Private Calls from the Phonebook........................................ 50
Making Private Calls from the Recent Call List................................... 50
Receiving a Private Call........................................................................ 51
Call Alerts .....................................................................................................51
Placing a Call Alert from the Keypad.................................................. 51
Placing a Call Alert from the Phonebook.............................................. 51
Ready to Alert Screen........................................................................... 51
Receiving Call Alerts............................................................................ 52
Call Alert Queue.................................................................................... 52
Accessing the Call Alert Queue....................................................... 52
Sending a Call Alert From the Queue.............................................. 52
Deleting a Call Alert From the Queue............................................. 52
Group Calls ...................................................................................................53
Naming a Talkgroup......... ..................................................................... 53
Making Talkgroup Calls from the Keypad........................................... 53
Making a Talkgroup Call from the Phonebook..................................... 53
Making a Talkgroup Call from the Recent Call List............................. 54
Receiving Talkgroup Calls.................................................................... 54
Group-Silent Programming ..................................... .... ..........................54
Turning Group-Silent On/Off .................................... ......................54
Mail Services...................................................................................... 57
Messaging..................................................................................................... 57
Phonebook......................................................................................... 59
Your Phonebook........................................................................................... 59
Phonebook Lists........................................................................................... 59
Speed Dial Numbers.............................................................................. 60
Expanded List........................................................................................ 60
Simple List ................... .........................................................................60
Phonebook Icons.......................................................................................... 61
Voice Tags.................................................................................................... 62
5
Page 6

Accessing Your Phonebook ....................... .... ..............................................62
About Phonebook Entries............................................................................ 62
Viewing Phonebook Entries................................................................. 63
Sorting Phonebook Entries................................................................... 63
Adding Phonebook Entries................................................................... 64
Editing Phonebook Entries................................................................... 69
Deleting Phonebook Entries..................................................................69
Pause Digit Entry ......................................................................................... 69
Plus Dialing................................................................................................... 70
Address Book............................................................................................... 70
PIM Tools ...........................................................................................71
Datebook ...................................................................................................... 71
Datebook Icons..................................................................................... 71
Viewing Your Datebook....................................................................... 72
Viewing a Week.............................................................................. 72
Viewing a Day ................................................................................. 72
Viewing Event Details ..................................................................... 73
Viewing Today.................................................................................73
About Datebook Events........................................................................ 73
Adding New Event ............................................................................... 74
Editing Events....................... ................................................................ 77
Deleting Events..................................................................................... 77
Memo........................................................................................................... 78
Adding a New Memo............................................................................ 78
Viewing Memos.................................................................................... 78
Editing Memos............... .... ... ...................... .... ... ................................... 78
Deleting Memos.................................................................................... 79
VoiceNotes................................................................................................... 79
Recording a New VoiceNote................................................................ 80
Playing a VoiceNote............................................................................. 80
Deleting a VoiceNote........................................................................... 80
Locking/Unlocking a VoiceN ot e ............... .... ... ...........................................80
Synchronizing .............................................................................................. 80
K-Java................................................................................................. 83
Calculator.............................................................................................. 83
Customizing the i3000plus Phone.................................................... 85
Changing the Display Language.................................................................. 85
Setting the Time and Date ........................................................................... 86
Backlight Timer........................................................................................... 87
www.motorola.com
6
Page 7

Setting the Ringer Volume........................................................................... 88
Selecting a Ring Style ..................................................................................88
Setting the VibraCall® Feature................................ .... ................................ 90
Shortcuts....................................................................................................... 90
Creating a Shortcut................................................................................ 90
Using Shortcuts..................................................................................... 91
Shortcut Menu ....................................................................................... 92
Editing Shortcuts.............................................................................. 92
Deleting Shortcuts............................................................................ 93
Styles............................................................................................................ 94
Accessing Styles.................................................................................... 94
Creating/Editing a Style........................................................................ 94
Accessories.......................................................................................... 97
Leather Carry Case................................................................................ 97
Swivel Carry Clip................................ ... .......................... ..................... 98
Hands-Free Car Kit............................................................................. 106
Using the Hands-Free Car Kit........................................................ 106
Removing the Hands-Free Car Kit................... ......................... ..... 107
Data Accessories........................................ ... .... ... ...................................... 108
Y-Cable ...............................................................................................109
Palm Converter Plugs.......................................................................... 110
Other Important Information.......................... .............................. 111
Understanding Status Messages................................................................. 111
Safety and General Information.................................................... 113
RF Operational Characteristics .................................................................. 113
Exposure To Radio Frequency Energy ...................................................... 113
Portable Radio Product Operation and EME Exposure ............................. 114
Antenna Care....................................................................................... 114
Phone Operation ..................................................................................114
Two-way radio operation.....................................................................114
Body-worn operation..... ...................... ... .... ......................................... 114
Data operation......................................................................................114
Approved Accessories......................................................................... 115
Electro Magnetic Interference/Compatibility............................................. 115
Facilities.............................................................................................. 116
Aircraft................................................................................................ 116
Medical Devices ................................................................................... .... ..116
Pacemakers...........................................................................................116
Hearing Aids .................... ............................................ .... ... ................ 116
Other Medical Devices........................................................................ 116
7
Page 8

Use While Driving...................................... .... ... ..................................117
Operational Warnings................................................................................ 118
For Vehicles Equipped with an Air Bag............................................. 118
Potentially Explosive Atmospheres 118
Blasting Caps and Areas..................................................................... 118
Operational Cautions ................................................................................. 119
Antennas............................................................................................. 119
Batteries.............................................................................................. 119
Cleaning and Drying Considerations.................................................. 119
Accessory Safety Information ................................................................... 121
Limited Warranty Motorola Communication Products............................. 123
Limited Warranty Motorola Communication Products (international)..... 127
Patent and Trademark Information............................................................ 131
8
www.motorola.com
Page 9

Introduction
Congratulations on the purchase of your i3000plus Phone. Before you
get started, please refer to the “i3000plus Phone Features Bookmark”,
attached to the front cover of this guide, which you can use as a
placeholder. It has a picture of the i3000plus phone with all of the
components clearly labeled. Also, the back of this guide includes a topic
Index to help you look up specific information throughout the guide.
This guide contains all the information you need to take full advantage
of your i3000plus phone, including:
Phone Mode—includes features such as Call Hold,
Call Forwarding, Call Waiting, and Three-Way
Calling. Find out more about placing calls in this
section.
Private Mode/Group Mode—An innovative feature
for communicating instantly with one or more coworkers at a fraction of the cost of cellular.
Text and Numeric Messages—Lets you receive
numeric pages and important, short messages right
over the phone. Learn more about Messages in this
section.
Voice Mail—Takes messages 24 hours a day and
includes Message Forwarding, Automatic Playback
and more. Read more about Voice Mail in this
section.
Additional Phone Services—Includes Alternate
Line Service, Call Restrictions, Caller ID, and
Enhanced Directory Assistance. Find out more in
this section.
Net Mode
9
Page 10

Driving Safety Tips
Safe driving is far more important than anything else. So please follow
these tips for using your wireless phone when you’re behind the wheel.
1
Give driving your full attention. Don’t let anything interfere with
your concentration.
2
Assess road conditions before making or taking a call.
3
Let Voice Mail pick up when you’re in heavy traffic or hazardous
road conditions.
4
Program your most frequently dialed numbers into your phone
for Speed Dialing. When dialing manually without the Turbo
Dial™ (one-touch dialing) feature, dial only when your vehicle is
stopped—or have a passenger dial for you.
5
Position your phone where it is easy to see and reach.
6
Keep your eyes on the road. Never take notes while driving.
7
Consider using a hands-free speakerphone,
which allows you to keep both hands on the
wheel when speaking. .
8
Be a Good Samaritan. Dial 9-1-1 in emergencies to report accidents, impaired or aggr essive
drivers, crimes or fires. It’s a free call.
NOTE: You can set your phone to display text in
three size: Standard view , Compress view ,
and Zoom view. Zoom view is the best
view to use while driving. See [xxxxx] for
information on setting your view.
10
www.motorola.com
Page 11

Getting Started
Getting Started
In this section, you will learn everything you need to know to begin using yo ur
i3000plus phone.
This section includes instructions for the following tasks:
i3000plus Phone Essentials Page 11
Batteries Page 14
Activating Your i3000plus Phone Page 16
Security Features of the i3000plus Phone Page 17
Status of Your i3000plus Phone
NOTE: Your phone must be activated before you
can place or receive a call.
Status of Your i3000plus Phone Page 24
My Information Page 25
i3000plus Phone Essentials
Audio Speaker Key
Volume Control
Buttons
Push-To-Talk
(PTT) Button
Option Key
4-Way Navigation Key
End/Home Key
Punctuation Key
Headset Jack
Back Key/
Pause Dialing
Next Word Key/
International Plus Dialing
Power Button
Status Light
3000plus
Antenna
Earpiece
Display
Menu Key
Option Key
Photosensor
Send Key
Alphanumeric
Keypad
Microphone/
Speaker
Accessory Connector
Page 24
11
Page 12
Table 1: i3000plus Phone Essentials
Feature Description
Power Button /
Status Light
Power Button: Press and hold
to turn the phone on or off.
Status Light: Glows GREEN
when connected to network;
RED when searching for network
or not connected.
Speaker Key Activates or mutes the speaker
Volume
Controls (Up/
Down)
Push-To-Talk
(PTT) Button
Option Keys
(Left and Right)
End/Home Key End: Press to end the call in
Headset Jack Accepts 2.5-mm. Motorola
when sending or receiving
Group/Privat e C al l s .
Press to raise or lower the ear
piece volume.
Press to send private or group
calls.
Activates the left and right menu
options in the Display.
progress.
Home: Return to the Ready
screen or return to the home
page.
headset accessory.
12
Microphone Speak into during calls and
recordings.
Antenna Enables optimum signal
reception when fully extended.
Earpiece Listen to calls without disturbi ng
others.
www.motorola.com
Page 13
i3000plus Phone Essentials
Table 1: i3000plus Phone Essentials (Continued)
Feature Description
Display A multi-line screen (standard,
Menu Key Press to activate the Display
Back Key Press to go back.
Photosensor Turns on backlig ht au tomati cally
Speaker Key Allows for hands-free calls.
Punctuation
Key
Next Word/
International
Plus Dialing
zoom, compressed) for viewing
call information, messages,
applications , and other phone
information.
menu.
in low-light situations.
Press to add punctuation to text
messages.
Next Word: Use to display
additional wor d s w h en using T-9
text input.
International Plus Dialing:
Use to set up international calls.
4-Way
Navigation Key
S Pressing the upper or lower
edge scrolls a menu or list of
item.
T Pressing the l eft or ri ght e dge
moves the cursor while entering
text, or scrolls the display menu
options.
Send Key Press to initiate a call.
Alphanumeric
Keypad
Accessory
Connector
Enter numbers or letters.
Enables connection o f charger
and other accessories.
13
Page 14
Batteries
Your i3000plus phone comes with a standard Motorola iDEN Lithium Ion
battery and a Motorola iDEN approved Lithium Ion battery charger. Remove
the battery from the protective case provided in the original packaging. After
attaching the battery, charge it (while the phone is off) for at least three hours
before you use it for the first time. After the initial charging, the battery can be
charged more qui ckly.
When the battery is not attached to the phone store it in this case.
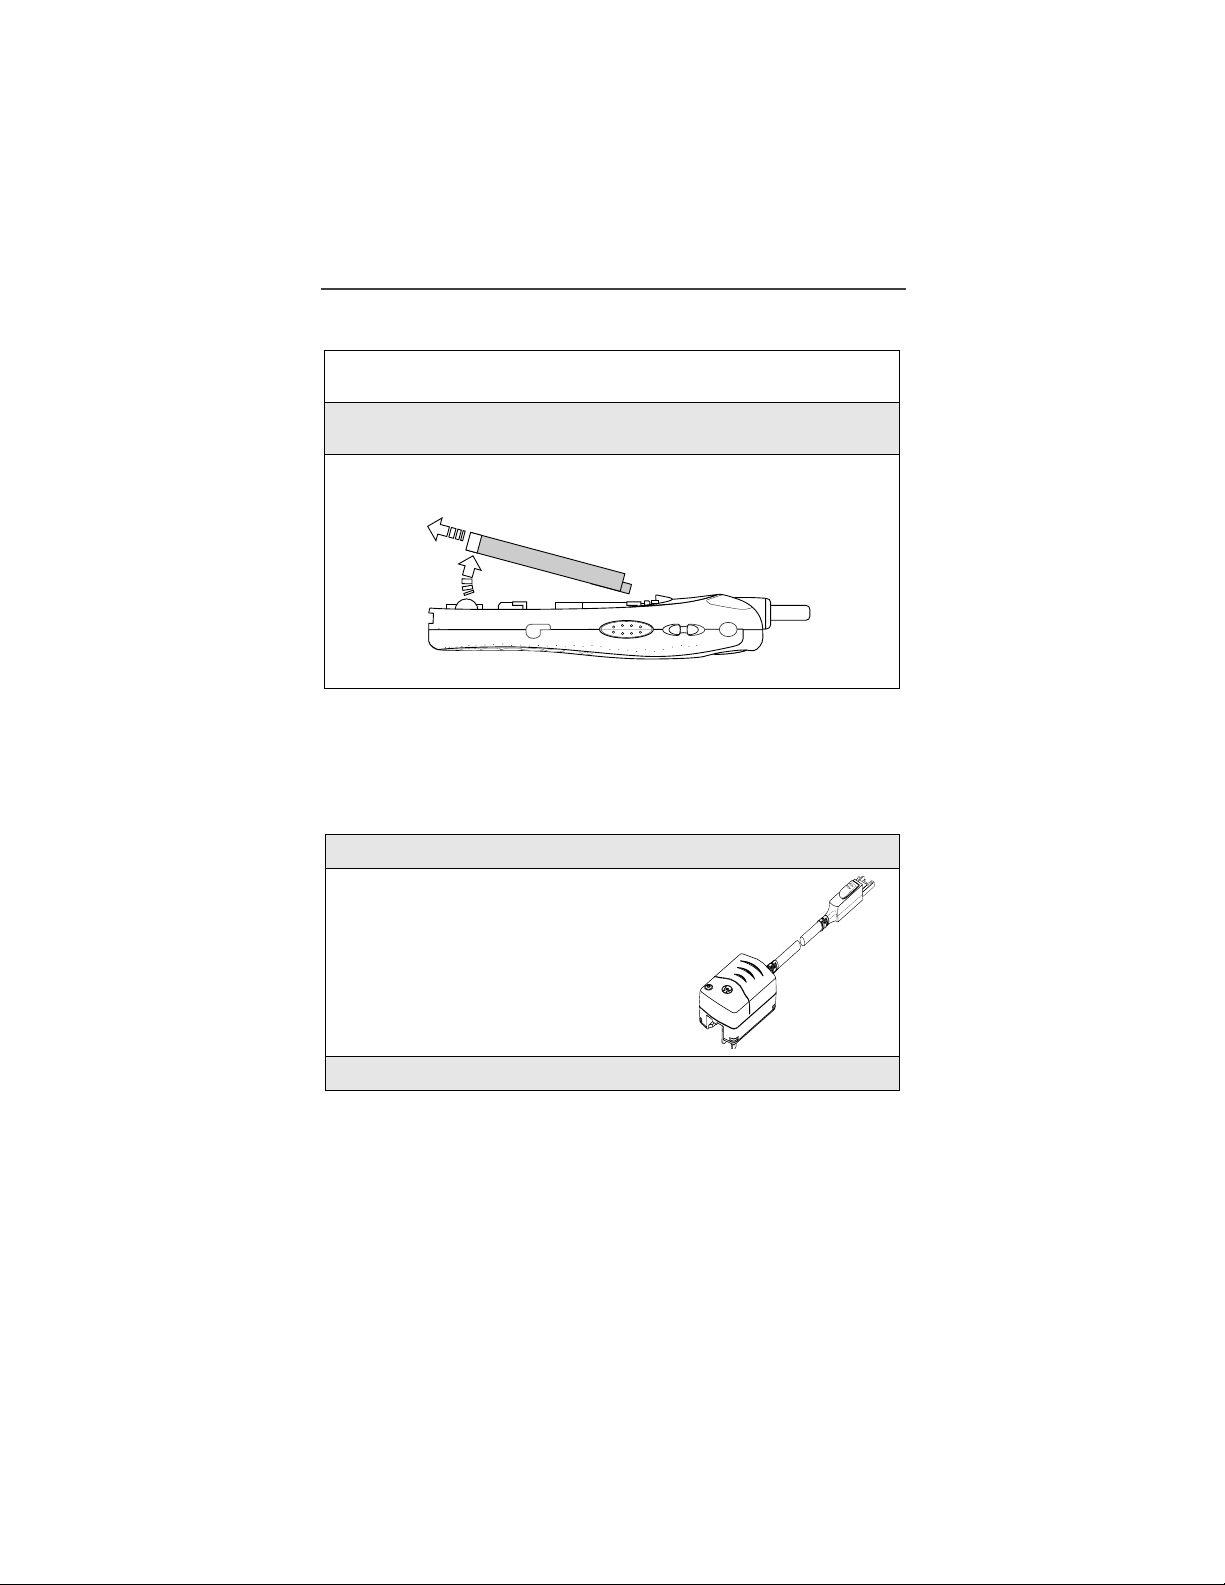
Attaching the Battery
1
Remove the battery co ver located on the back of the phone by pressing
the battery cover release button and, sliding the battery cover away
from the antenna.
Release Button
2
Insert the top of the battery into the ba ttery area . Press down on the bottom of the battery to secure it.
3
Replace the battery cover and push forward until you hear a click.
www.motorola.com
14
Page 15
Detaching the Battery
1
Ensure that the phone is powered off before attemp ting to detach the
battery.
2
Press the battery cover release button and slide the battery cover away
from the antenna.
3
Remove the battery by pushing the battery toward the antenna and lifting out of the phone.
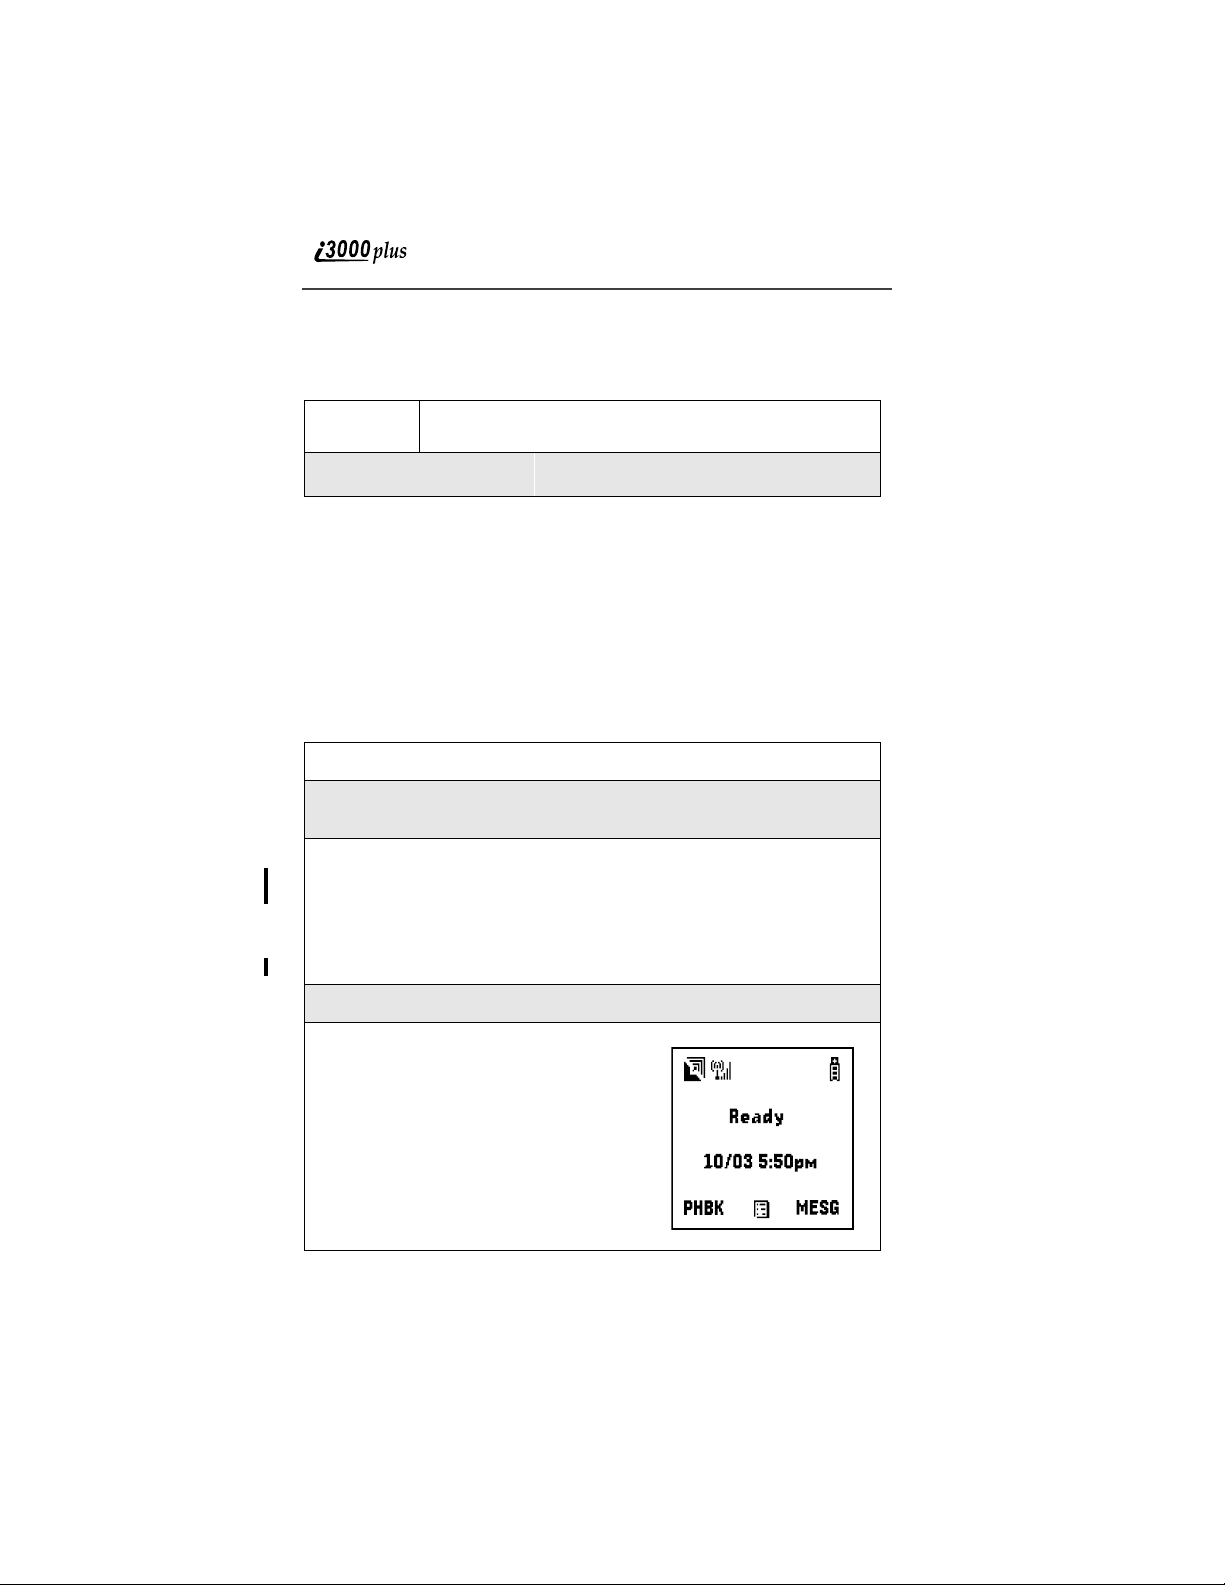
Charging the Battery
NOTE: Before you use the i3000plus phone for the first time, charge
the battery for at least three hours with the phone powered off.
After the initial charging, the battery can be charged more
quickly.
Batteries
1
Make sure your i3000plus phone’s keypad is facing up.
2
Plug the accessory connector into the bot tom of the i3000plus phone.
3
Flip open the prongs and plug the charger into an electrical outlet.
15
Page 16
Battery Charging Status
The battery strength indi c at or ic on , fo un d on you r pho ne ’s display screen,
shows the charge amount remaining in the battery.
Icon Display
Charge
Strength
A short, chirp-like sound indicates a low battery. T his indic a tes tha t yo u have
approximately 5 minutes of talk time remaining.
3456
Low Battery 40% 70% Fully Charged
Activating Your i3000plus Phone
Before you can beg in using your i3000plus phone, it needs to be activated.
If your display rea ds No Service or doesn’t change to the Ready screen when
you turn on your phone, Turning Your i3000plus Phone On/Off
Powering On the Phone
1
Extend the antenna.
2
Press and hold at the top of the p ho ne u nt il th e stat us li gh t g lows re d
and a tone briefly sounds.
3
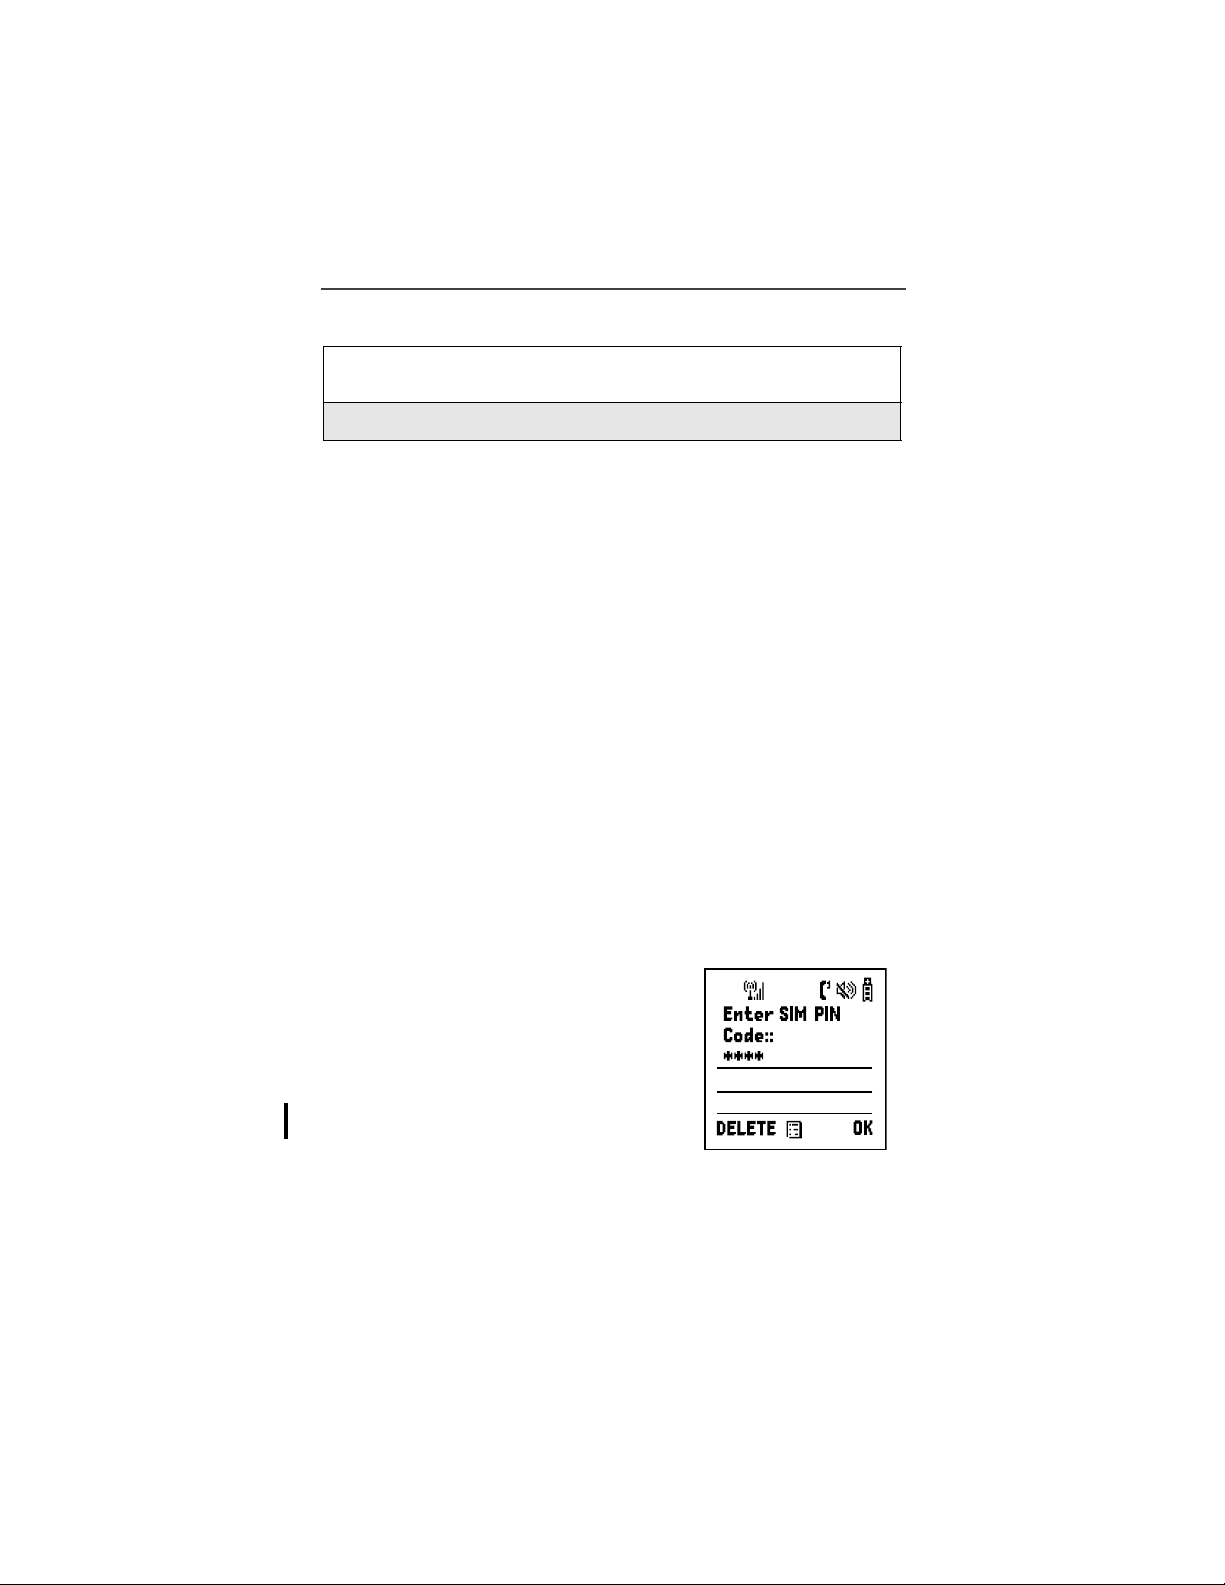
When the Enter SIM PIN screen displays, enter your SIM PIN. (For
more information see “SIM Card Personal Identification Number
(PIN)” on page 17.)
NOTE: The default SIM card PIN is 0000. It is recommended that you
change your PIN to prevent fraudulent use of the SIM card
“Changing the PIN” on page 18).
(see
4
Press A under “OK”.
5
As your phone connects to and registers
with the network, you will see a welcome message. When the Ready screen
appears on the display, you are ready to
use your i3000plus phone!
16
www.motorola.com
Page 17
Security Features of the i3000plus Phone
Powering Off the Phone
1
Press and hold on the top of the phone until you see the message
Powering Off.
2
Push in the antenna.
Security Features of the i3000plus Phone
The i3000plus phone comes with two levels of security protection:
1. SIM Card
2. Keypad Lock
Your i3000plus phone comes with a built-in level of security protection through
the use of the SIM (Subscriber Identity Module) card. The SIM card is located
in the SIM Card Holder on the back of the phone, behind the battery. You can
verify that the SIM card is in place by viewing the SIM card through the SIM
card holder.
NOTE: Except for making emergency calls, your phone will not
function without the SIM card.
NOTE: If there is no SIM card present, notify your sales representative.
SIM Card Personal Identification Number (PIN)
To prevent unauth orized use of your phone, your SIM card is protected by a
PIN. Each time the i3000plus phone is powered on, you must enter your PIN.
You can change or disable your PIN if desired.
NOTE: Disabling your PIN enable s an y one to use your phone. If you
disable your PIN, you still must keep the SIM card in the phone
to make calls.
Entering the PIN
By default your phone is automatically set to ask
for a PIN.
NOTE: Your default SIM card PIN is: 0000.
It is recommended that you
change your PIN to prevent
fraudulent use of the SIM card
“Changing the PIN” on page
(see
18).
17
Page 18
Incorrectly entering your PIN three
times causes the SIM to be blocked. To
unblock your SIM, you must contact
Customer Care. For more
information, see
“Unblocking the PIN”
on page 19.
1
From the Enter SIM PIN screen, enter your PIN. An asterisk appears
for each character entered.
NOTE: Other than emergency dialing, you will be unable to use any
of the phone functi ons, incl uding receivin g phone c alls, un til
you enter the PIN.
2
Press B under “OK”.
If you enter an incorrect PIN, the message Wrong PIN appears. After three
consecutive incorrect attempts, even if you turn your phone off and on again, the
SIM card blocks any additional tries. If this happens, see the following section
titled “Unblocking the PIN” on page 19.
Changing the PIN
1
Press m and then press R to scroll to
Settings.
2
Press B under “SELECT”. The Settings screen appears.
www.motorola.com
18
Page 19
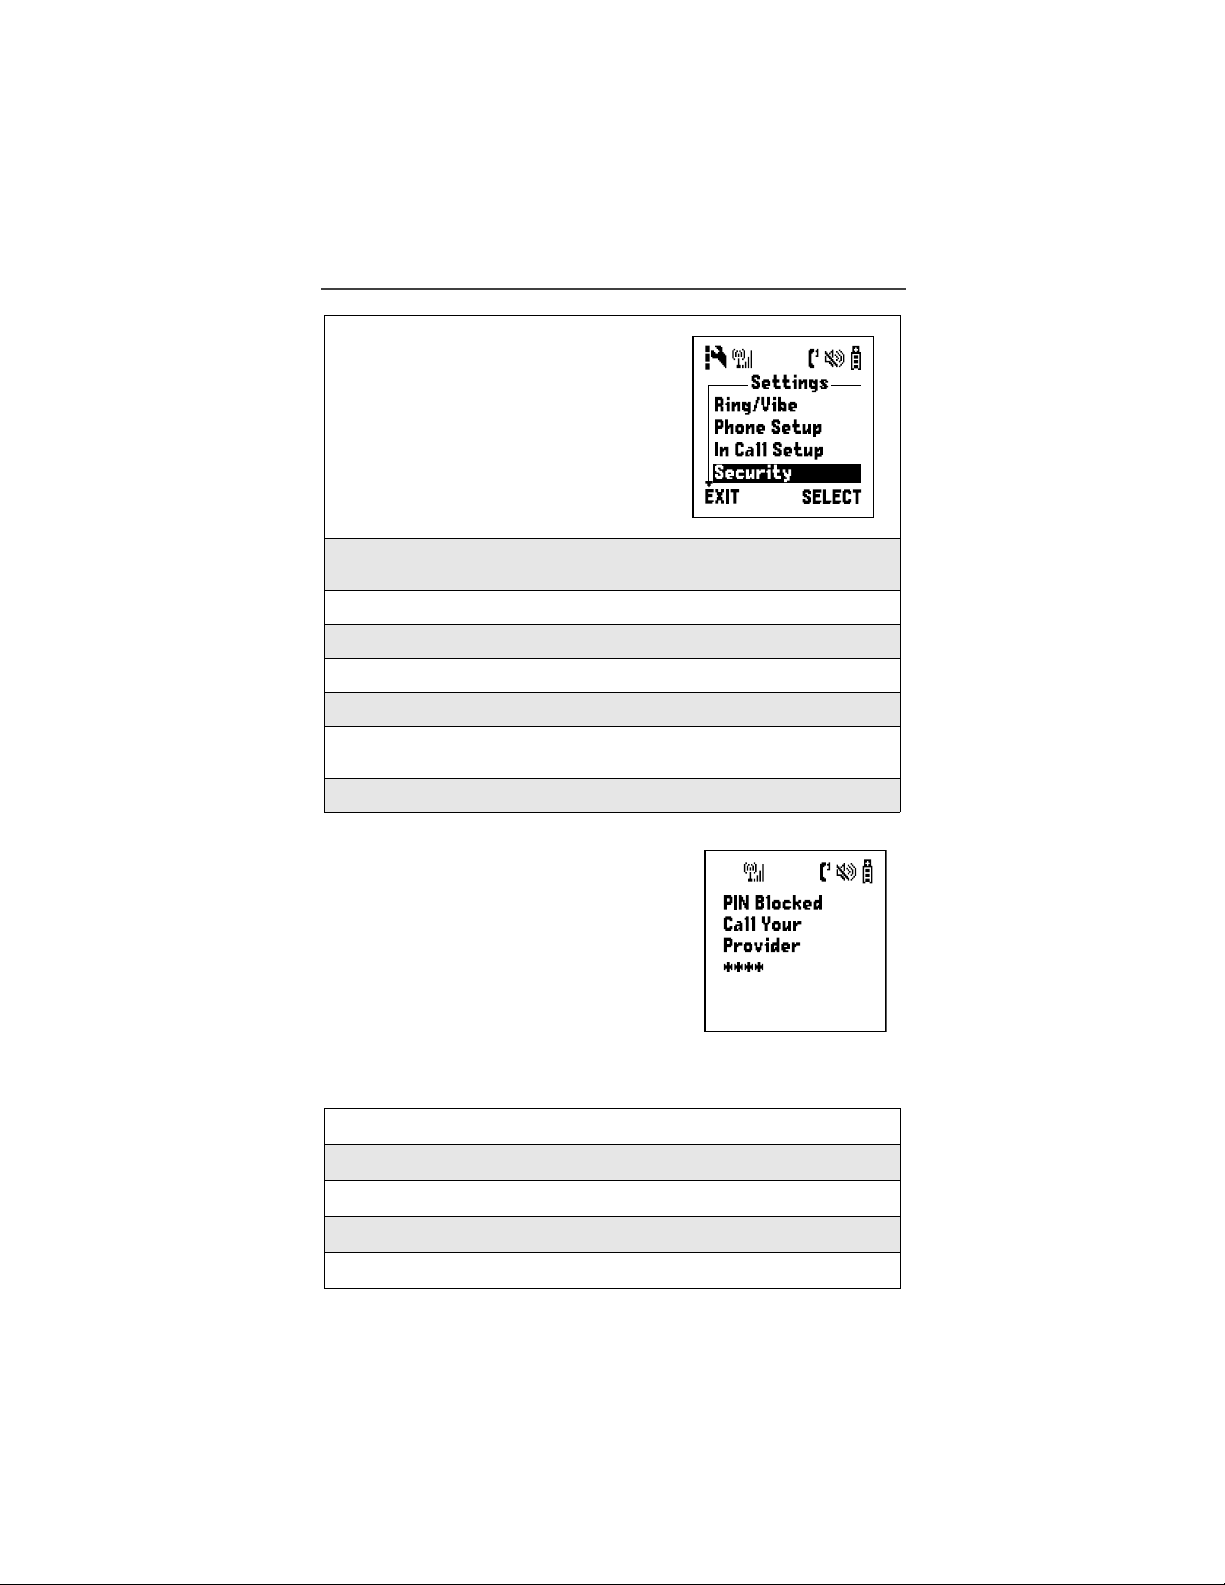
Security Features of the i3000plus Phone
3
Press R to scroll to Security.
4
Press B under “SELECT”. The Security screen appears. Press R to
scroll to New Password.
5
Press B under “SELECT”. The SIM PIN Editor screen displays.
6
Press R to scroll to SIM PIN code.
7
Enter the current SIM PIN.
8
At the Enter New SIM PIN screen, enter the new SIM PIN.
9
At the Re-Enter New SIM PIN screen, re-enter the new SIM PIN to
confirm.
10
Press A under “OK”.
Unblocking the PIN
If you forget your PIN and unsuccessfully enter
it three times, access to your i3000plus phone
will be blocked. To unblock the PIN:
NOTE: Before you begin, obtain the PIN
Unblocking Key (PUK) code from
Customer Care, then read and
understand the entire PIN
unblocking sequence. In en tering
the key press sequence, each
must occur within 2 seconds of
the prior key press.
1
Press *, *, 0, 5.
2
Enter the PUK code.
3
Press s.
4
Enter a new SIM PIN and press s.
5
Re-enter your SIM PI N an d pr e s s s.
Enter
SIM PIN
19
Page 20
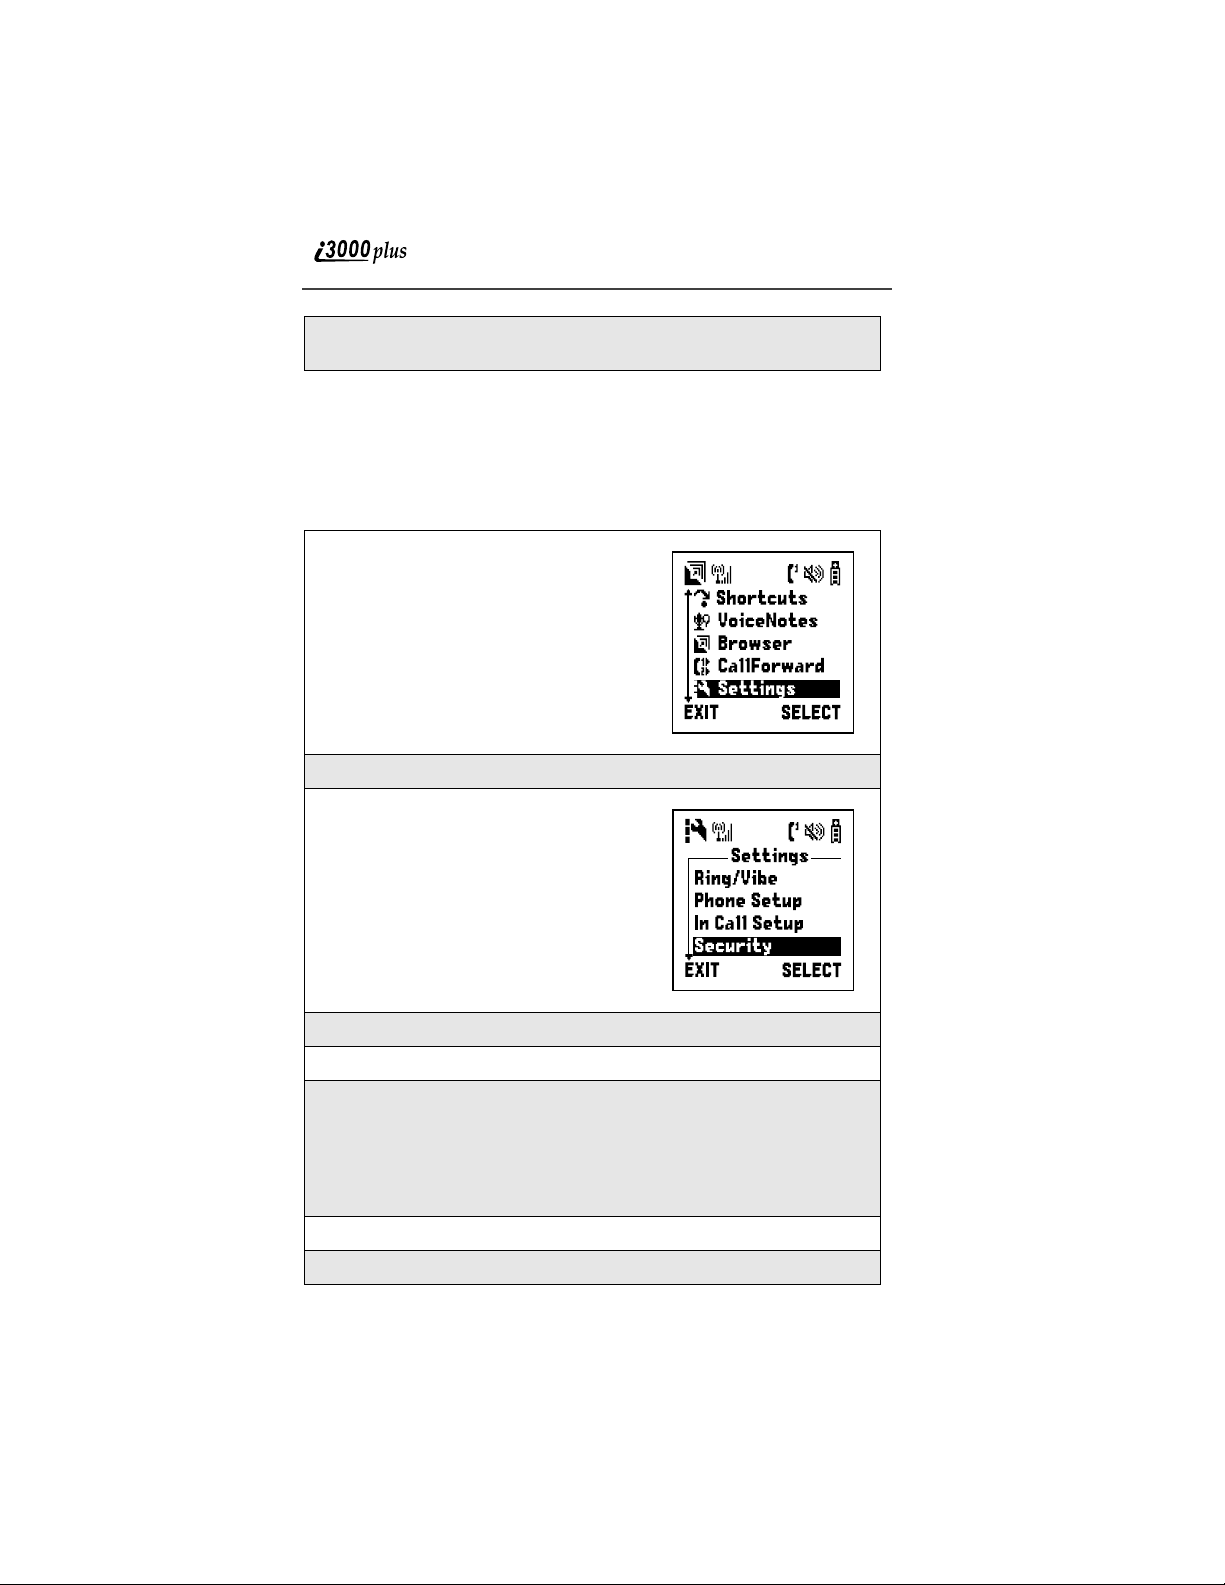
6
If you entered the SIM PIN codes properly, the SIM: Unlocked screen
displays.
NOTE: IMPORTANT! If you unsuccessfully enter the PUK code ten
times, the SIM card is permanently blocked and must be
replaced. If this happens, all data will be lost. You will get a
message to call your service provider. If the SIM is blocked, the
i3000plus phone only allows outgoing Emergency calls .
Disabling/Enabling the PIN Requirement
1
Press m and then press R to scroll to
Settings.
2
Press B under “SELECT”. The Settings screen appears.
3
Press R to scroll to Security.
4
Press B under “SELECT”. The Security screen appears.
5
Press R to scroll to SIM PIN.
6
Press A unde r “SELECT”. At the SIM PIN on/off screen, press R to
scroll to On to enable.
Or
Scroll to Off to disable. (If you select this feature, you will be taken
back to the previous screen).
7
Press B under “SELECT”. The SIM PIN editor screen appears.
8
Enter the SIM PIN (4- to 8-digit) code at the Verify S I M PIN screen.
www.motorola.com
20
Page 21
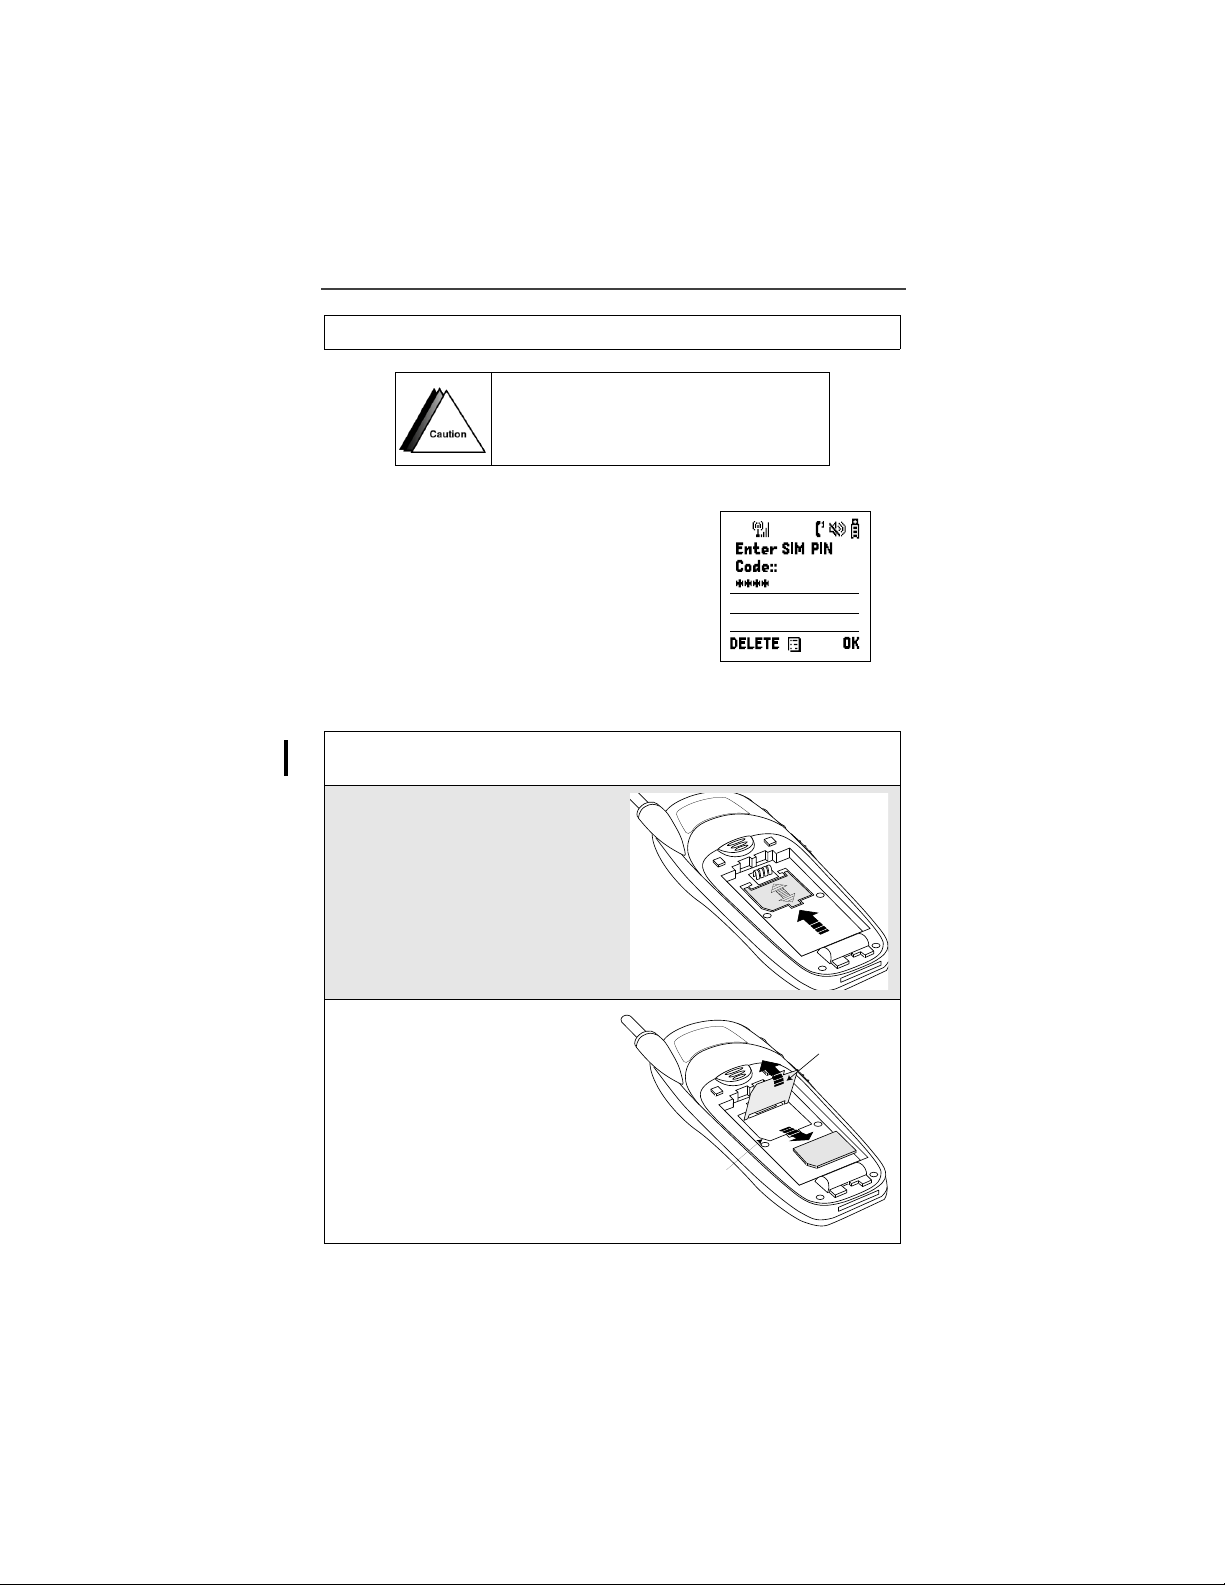
Security Features of the i3000plus Phone
9
Press A under “OK”.
If you disable the PIN requirement, you
remove protectio n of pe rs on al data on your
SIM card. Anyone can then use your phone
and access your personal data.
When the PIN is enabled, you are prompted to
enter your PIN each time you turn on your
i3000plus phone. Until a valid PIN is entered,
you can use the phone only to make emergency
calls depending on the network.
After the PIN is accepted, the Ready screen
displays.
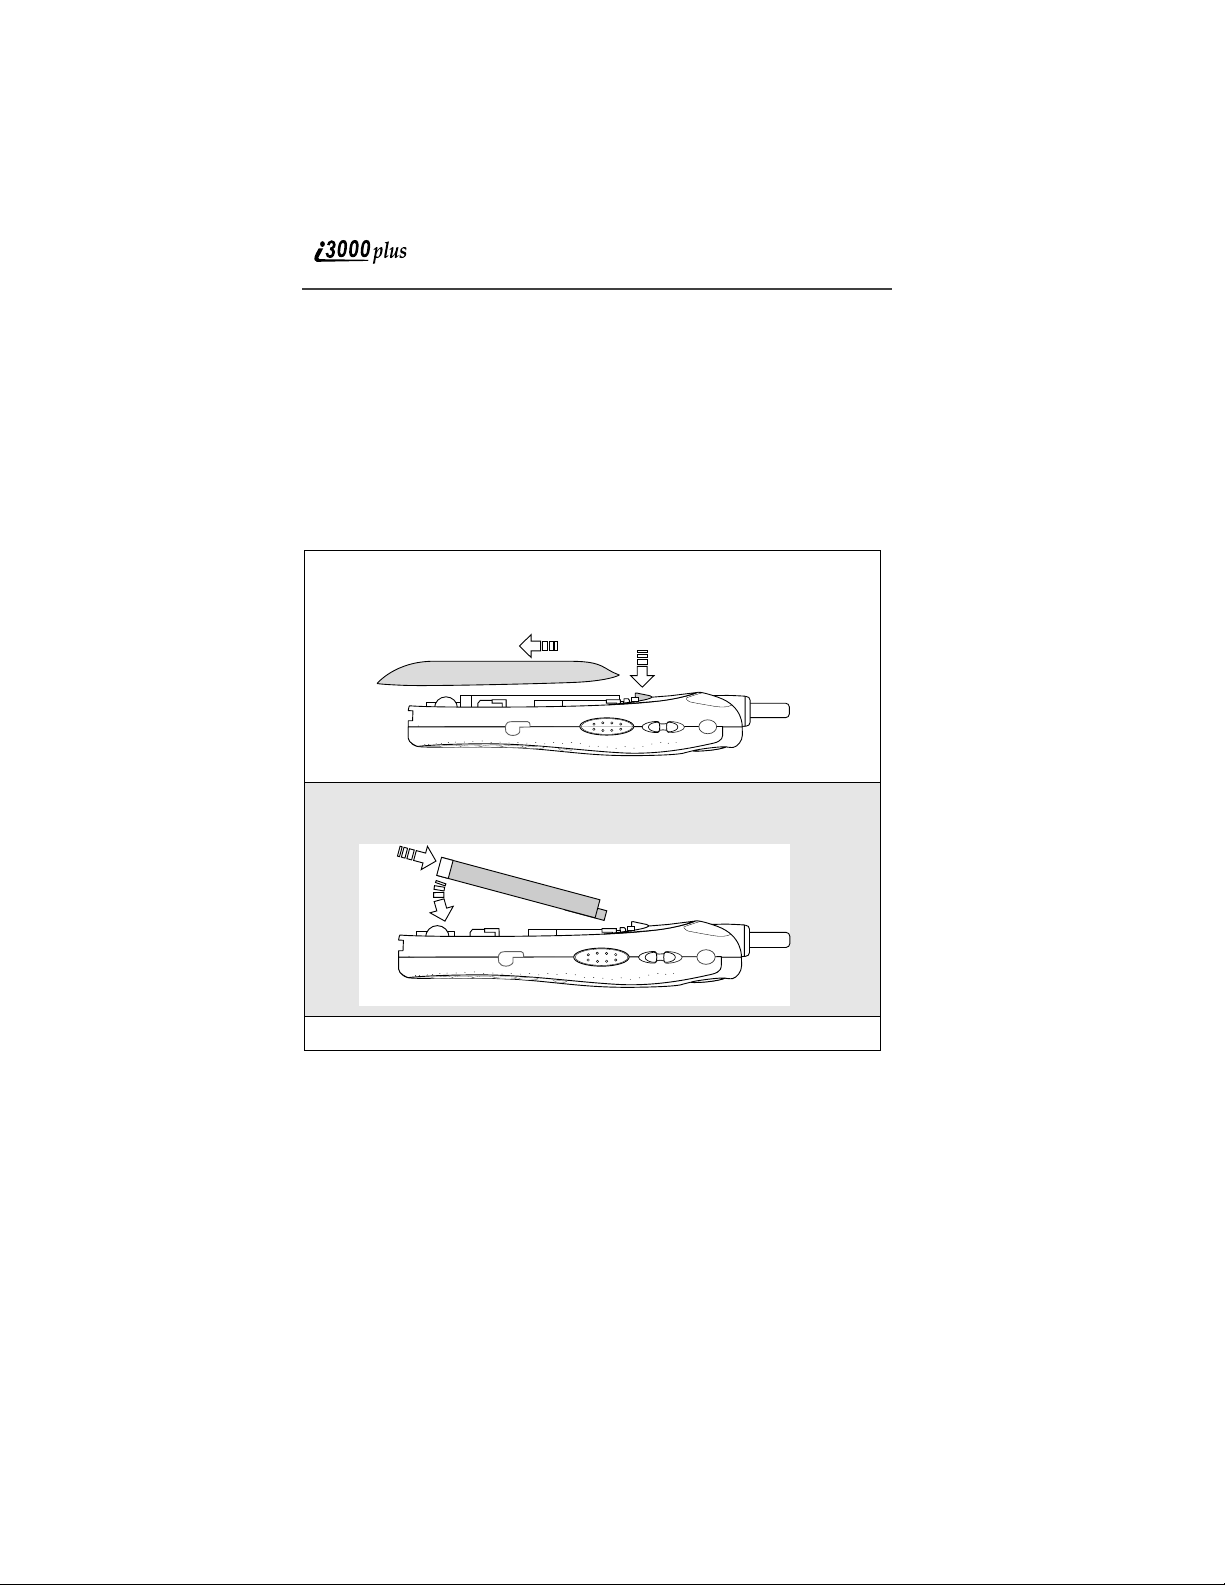
Removing/Inserting the SIM Card
1
Remove the battery co ver and battery. See “Detaching the Battery” on
page 15.
2
With the antenna facing away
from you, and the back of the
i3000plus phone exposed and facing up, locate the SI M cover and
gently push it forward.
3
Lift the SIM cover up.
Missing Corner
SIM Door
000800137866150
21
Page 22
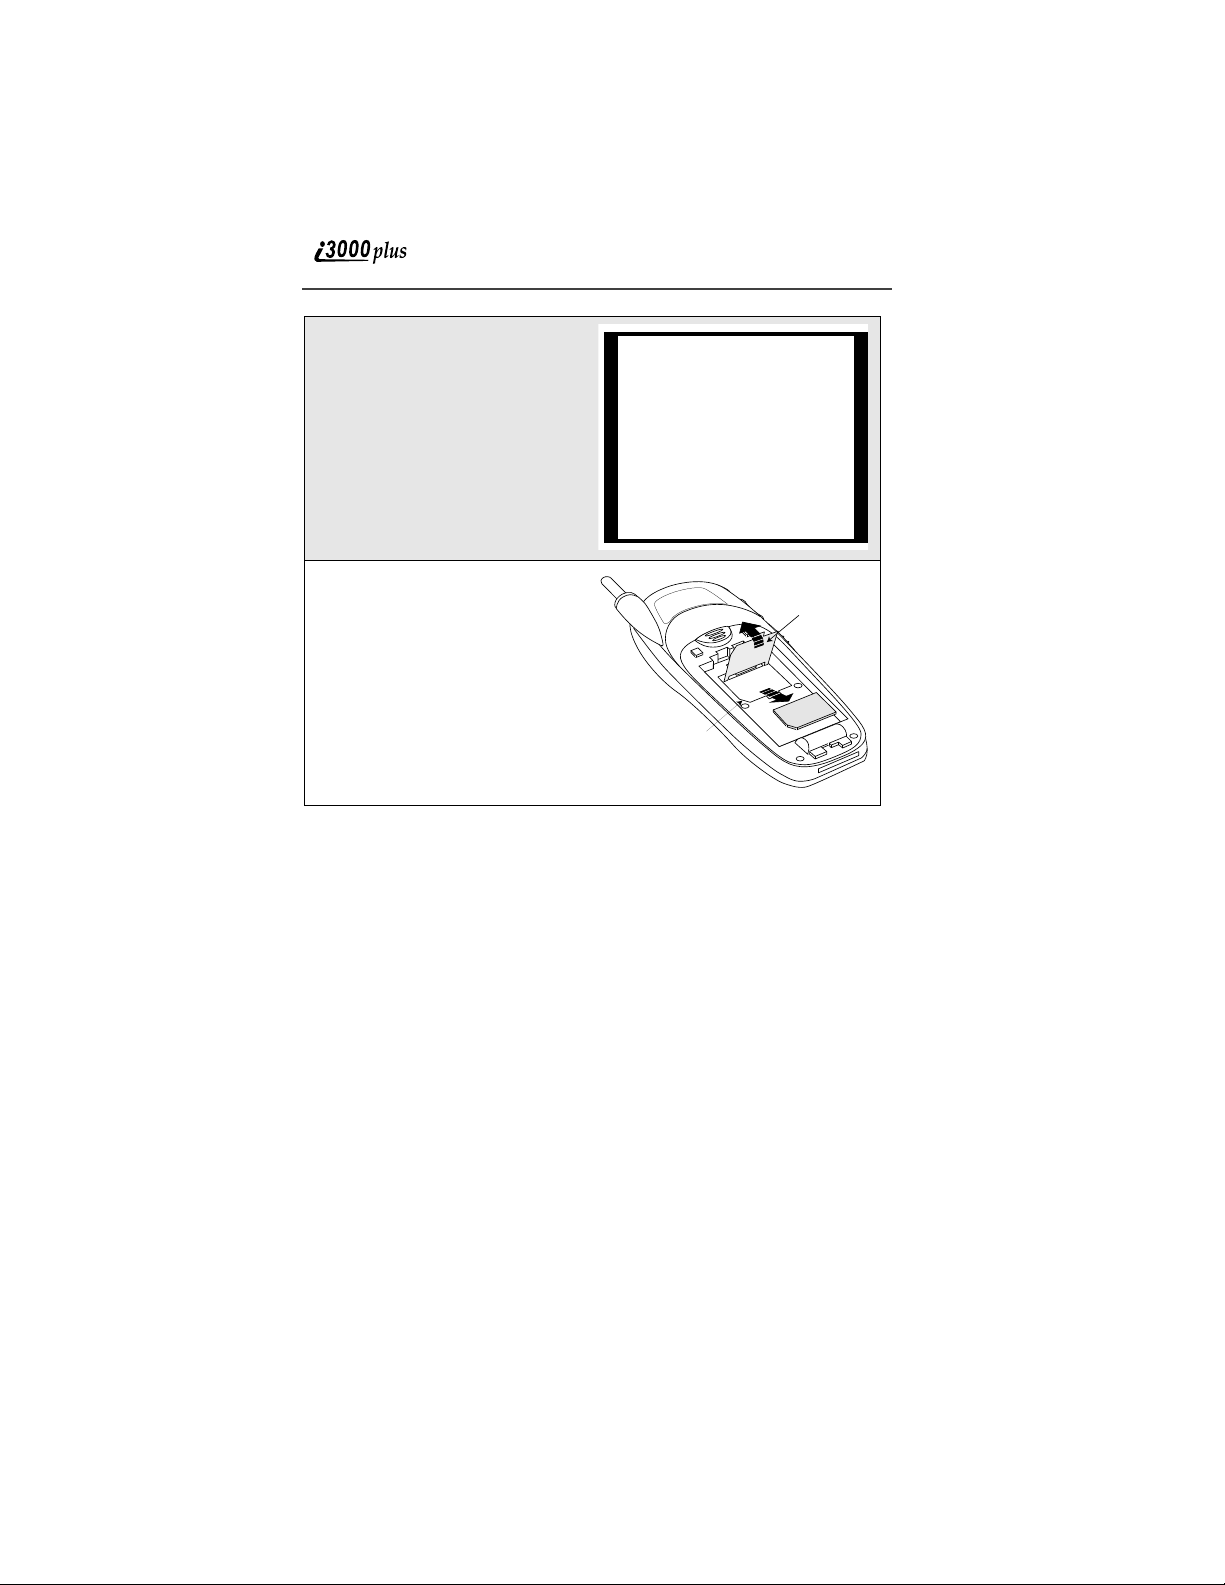
4
To remove the SIM card, very
carefully slide it out of its
holder. Do not touch the goldcolored areas.
NOTE: Protect the SIM card as
you would any delicate
object. When the SIM
card is not in the
phone, you should
store it in something
protective like a mailing envelope.
5
To insert the SIM card, very
carefully place it in its holder
with the contact side facing
SIM Door
down and the missing corner on
the card properly aligned with
the missing corner of the holder.
Do not touch the gold-colored
areas.
000800137866150
Close the SIM card cover and
Missing Corner
slide it down unti l you hear a
click.
Keypad Lock
The i3000plus phone includes a Keypad Lock feature that enables you to
quickly lock the phone’s keypa d to a void inadverte ntly pressing ke ys o r p lac ing
calls. Once Keypad Lock is acti vate d, yo u c an o nl y per f orm th e follo win g ta sks:
• Turn your phone On/Off
• Unlock the keypad
• Receive incoming calls, messages, and alerts.
NOTE: Before locking your phone’s keypad, you may want to read this
entire section to learn how to respond to incoming calls,
messages, and alerts.
22
www.motorola.com
Page 23
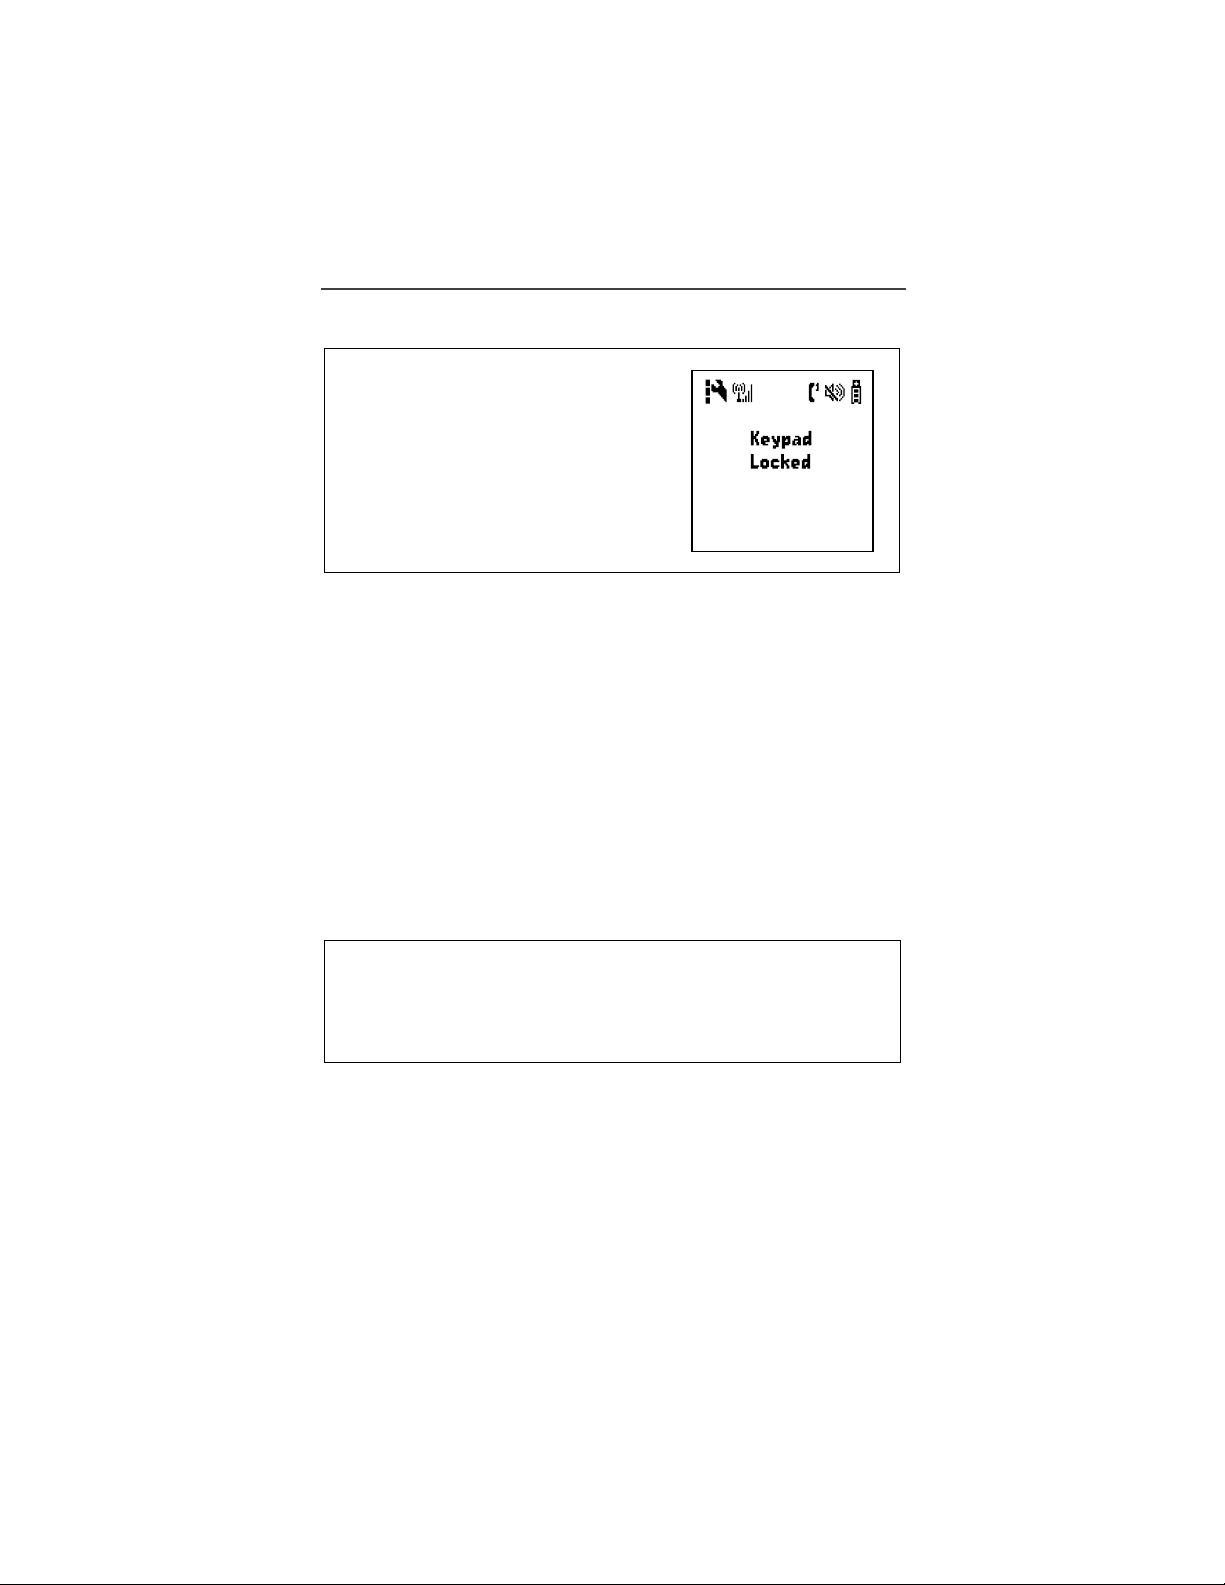
Security Features of the i3000plus Phone
Activating Keypad Lock
From the Ready screen, press m, then
*. The message Keypad Locked
displays on your phon e .
NOTE: Whenever a key is pressed while in Keypad Lock mode, the
Keypad Locked message displays as a reminder.
NOTE: If you have enabled the Keypad Lock feature, you must unlock
the phone’s keypad before any call can be made, including 911
emergency calls. For more information please contact your service provider.
Receiving Incoming Calls
When you receive an incoming phone call (see “Digital Cellular” on page xx),
Keypad Lock is temporarily disabled. Press s to answer th e ca l l, or press A
under “Ignore” to send the call to Voice Mail and reactivate Keypad Lock.
Receiving New Message Mail
When you receiv e new Mes s a ge Mai l (se e “Text and Num e ri c Me s sa ging” on
page xx), the Keypad Lock is temporarily disabled. You may perform the
following:
Press A under “EXIT” to return to the Ready screen and reactivate
Keypad Lock. Or,
Press B under “READ” to read the message. Press A under “SAVE”
or “DELETE”. Once you have finished, press A un der “EXIT” to
return to the Ready screen and reactivate Keypad Lock.
NOTE: If you have disabled the Message Mail notification, only U
displays. You will not receive the read “EXIT” or “READ”
options.
23
Page 24
Receiving Voice Mail
When you receive a new Voice Mail (see “Receiving Voice Mail Messages” on
page xx), Keypad Lock will be temporarily disabled. You may perform the
following:
When New Voice Mail Waiting displays, press A under “EXIT” to
return to the Ready screen and reactivate Keypad Lock. Or,
Press A
under “CALL” to access Voice Mail. Once you have finished,
press # to exit Voice Mail, return to the Ready to reactivate Keypad
Lock.
NOTE: If you have disabled Voice Mail notification, only the displays.
Receiving Private Calls
When you receive an incoming Private or Talkgroup call (See “Receiving a
Private Ca ll” on page xx and “Receiving Talkgroup Calls” on page xx) , K eyp ad
Lock will be temporarily disabled. Once the call is terminated, the phone will
return to the Ready screen and reactivate Keypad Lock.
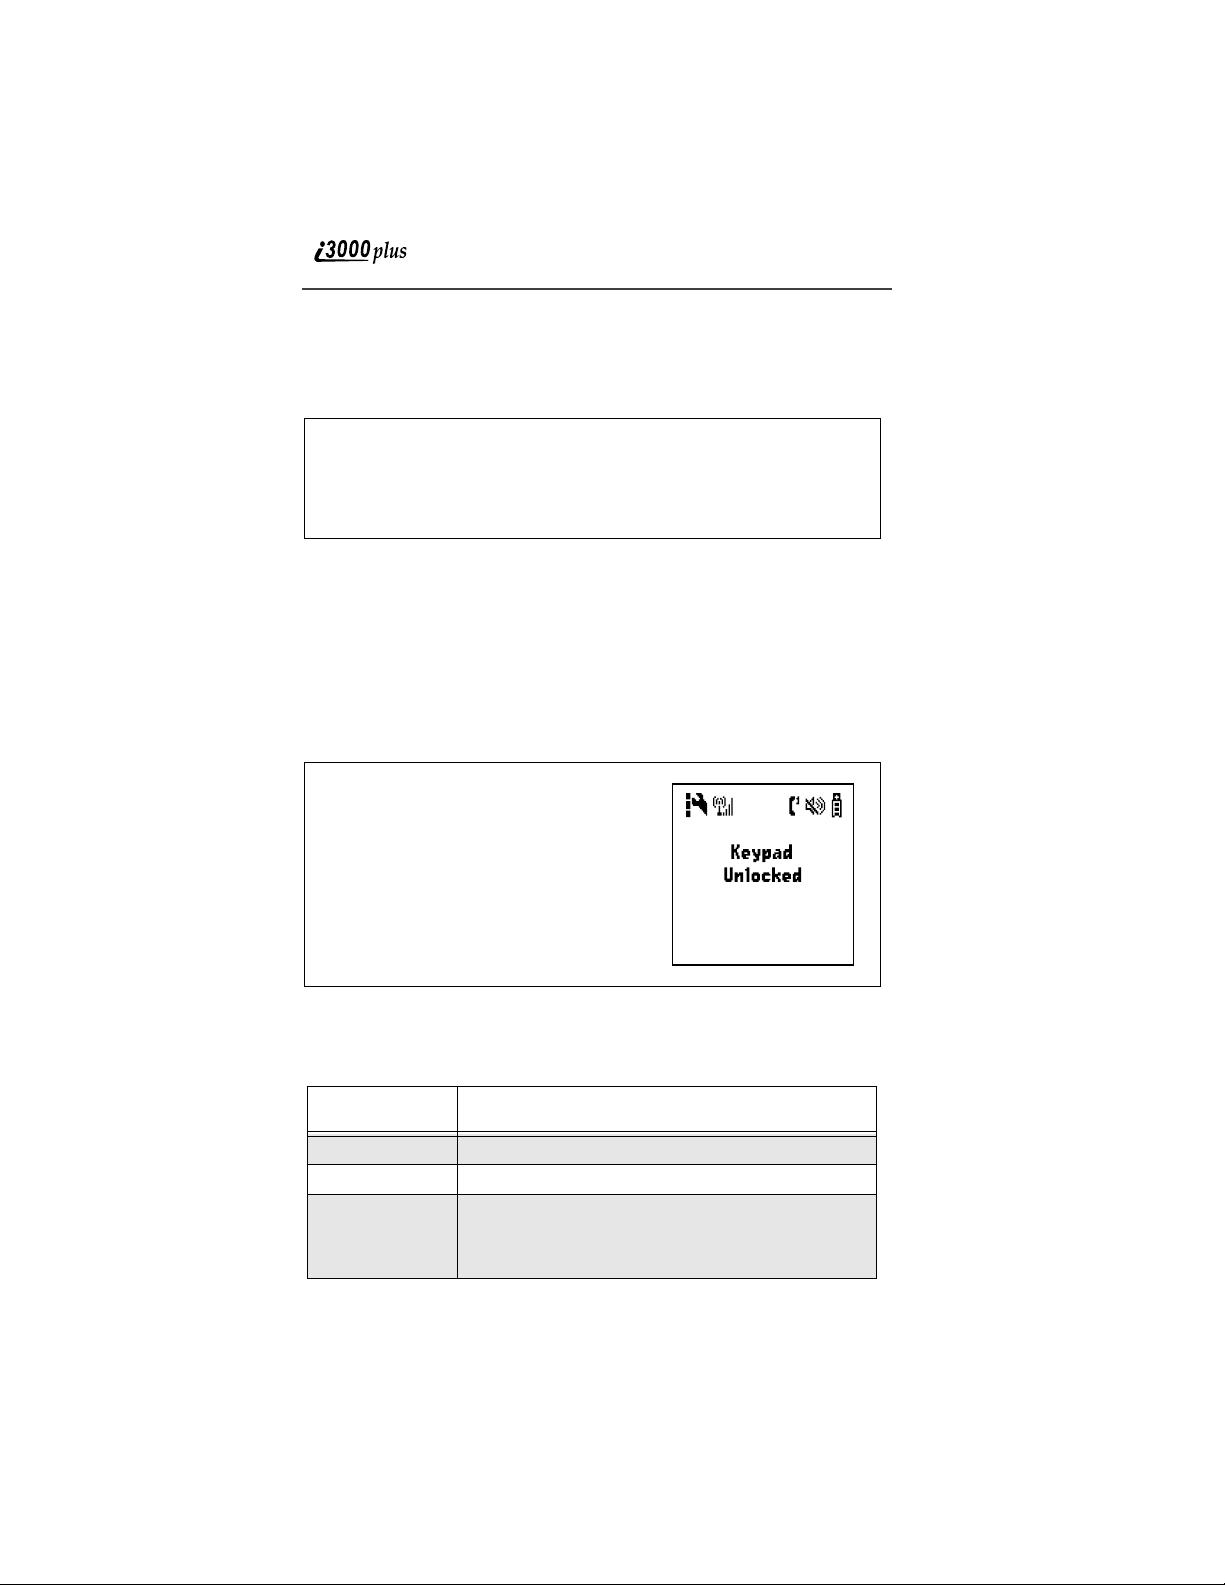
Deactivating Keypad Lock
From the Ready screen, press m, then
*. The message Keypad Unlocked
displays.
Status of Your i3000plus Phone
Your i3000plus phone has a Status Light that displays around the power button.
The Status Light shows you, at a glance, the status of your connection.
Status Light
Indicator
Flashing Red Signing on to the network. Please wait.
Solid Red No service or out of coverage area.
Flashing
Green
24
i3000plus phone status
In service/Ready to use.
NOTE: Private calls are not available outside of
your home market area.
www.motorola.com
Page 25

My Information
Solid Green In use.
My Information
You can select My Information from the main menu to display or edit the
following:
• Name — enter your name in this field.
• Private ID — enter your private ID is this field. Your private ID is the
number that others use to contact you using the Private feature.
• Phone Numbers of Lines 1 and 2 — your i3000plus phone’s numbers are
displayed in these fi elds. You can edit the phone number displayed in My
Information, but this does not change your i3000plus phone’s numbers.
• IP Addresses — these fields display the IP address you use to access the
internet with your i3000plus phone.
• Circuit Data Number — [user-editable???]
Viewing/Editing My Information
1
From the Ready screen, press m.
2
Press R to scroll to MY INFO. Press A under “SELECT”. The My
Information screen displays.
3
Use S to scroll through the fields.
4
To edit th e displaye d informa tio n, press A under “CHANGE”. Edit
information as desi red.
To return to the Ready screen, press A under “EXIT”.
25
Page 26

26
www.motorola.com
Page 27
Display Essentials
Desktop Essentials
This section includes the following topics:
Ready Screen Page 27
Navigating Menus and Lists Page 28
Main Menu Options Page 29
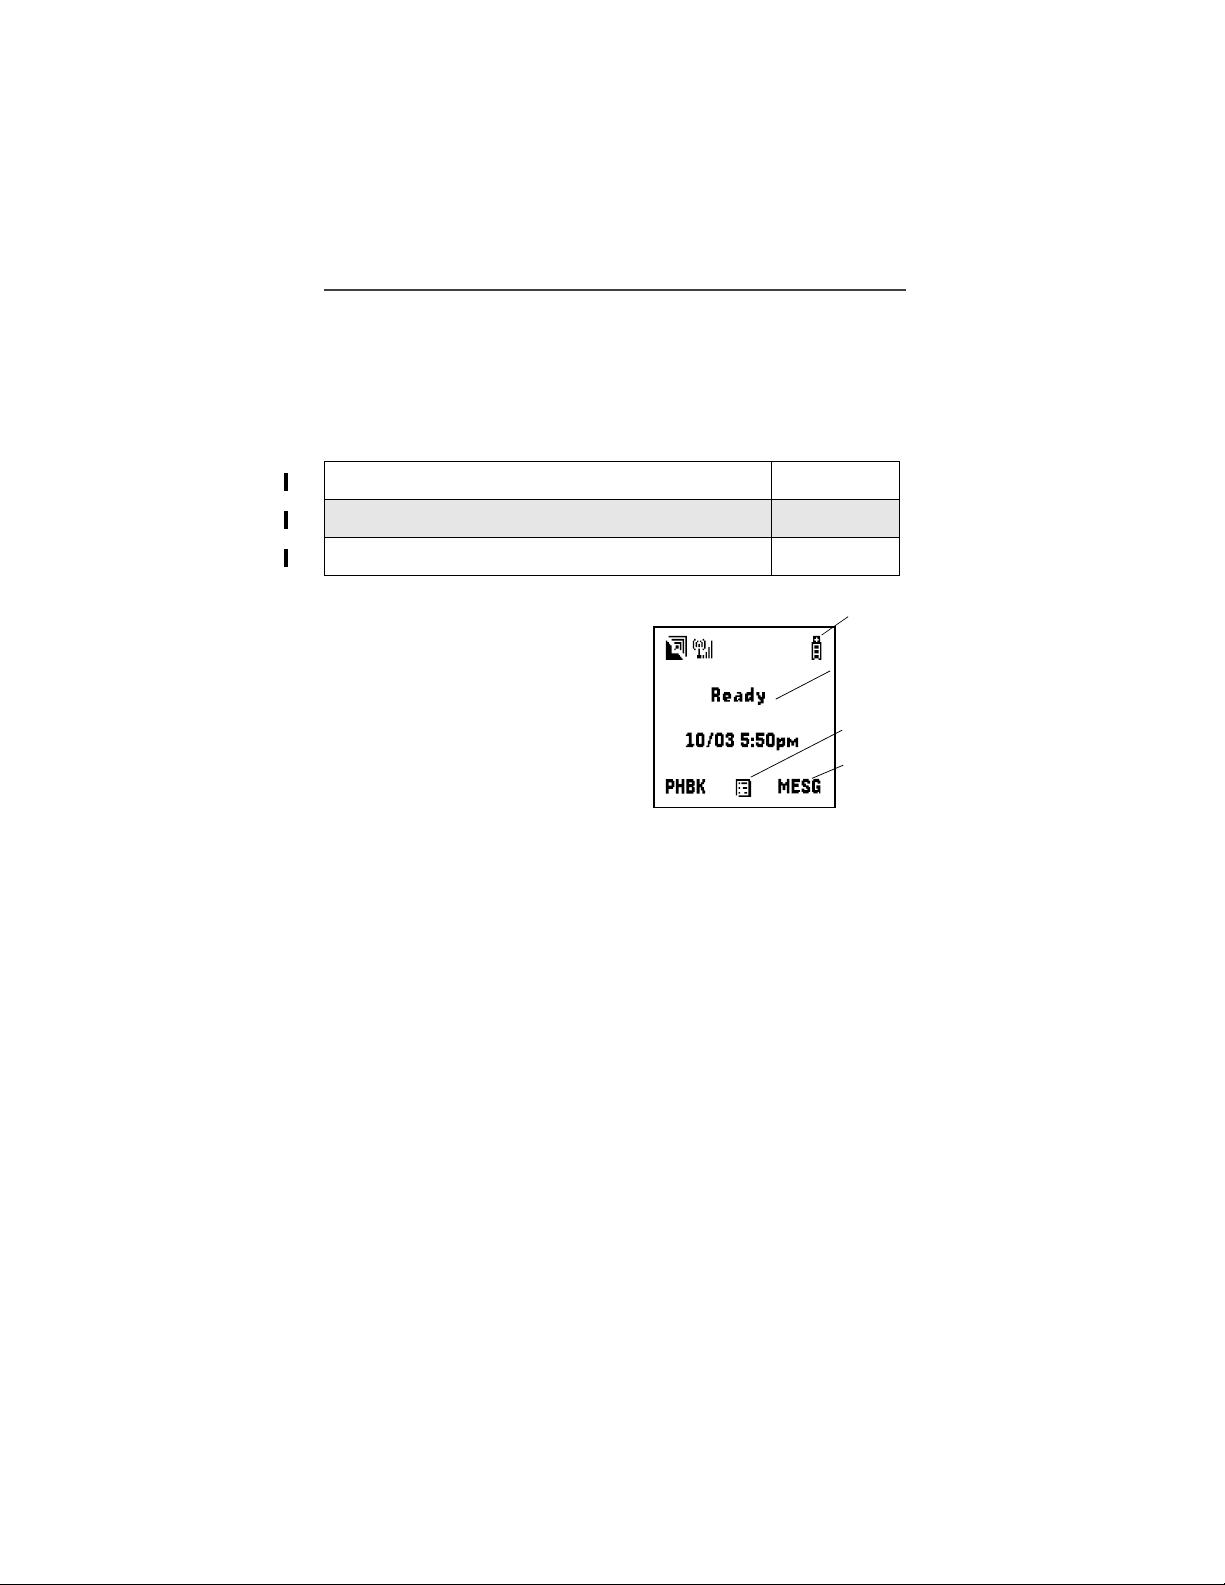
Ready Screen
After powering on the phone, the
Ready screen displays.
The Ready screen’s display consists
of:
• status and application ic on r ow s
• text display area
• menu icon
S
Status
Icon
Rows
Text
Display
Area
Menu
Icon
Display
Options
• display options
Status and Application Icons
Status and application icons provide you with information about your i3000plus
phone and its functions. These icons are context sensitive; meaning, the icons
that appear depend on the task you are performing.
Text Display Area
In the Ready screen, the text displayed in this area is det e rmined by your
wireless communications provider. When you access other screens, this area
displays menu options, messages, names, phone numbers, and other
information.
This number of lines of text displayed in the text display area at one time
depends on which view is selected — Standard view, Compress view, and Zoom
view. In Standard view, seven lines of text ar e displayed.
NOTE: Unless otherwise noted, illustrations in this User’s Guide depict
Standard view.
27
Page 28
Menu Icon
This menu icon S appears on any screen from whic h a menu can be accessed.
To access a menu, press the menu key on your i3000plus phone’s keypad. This
key has the menu icon printed on it.
The menu that appears depends on the screen you access it from. Pressing the
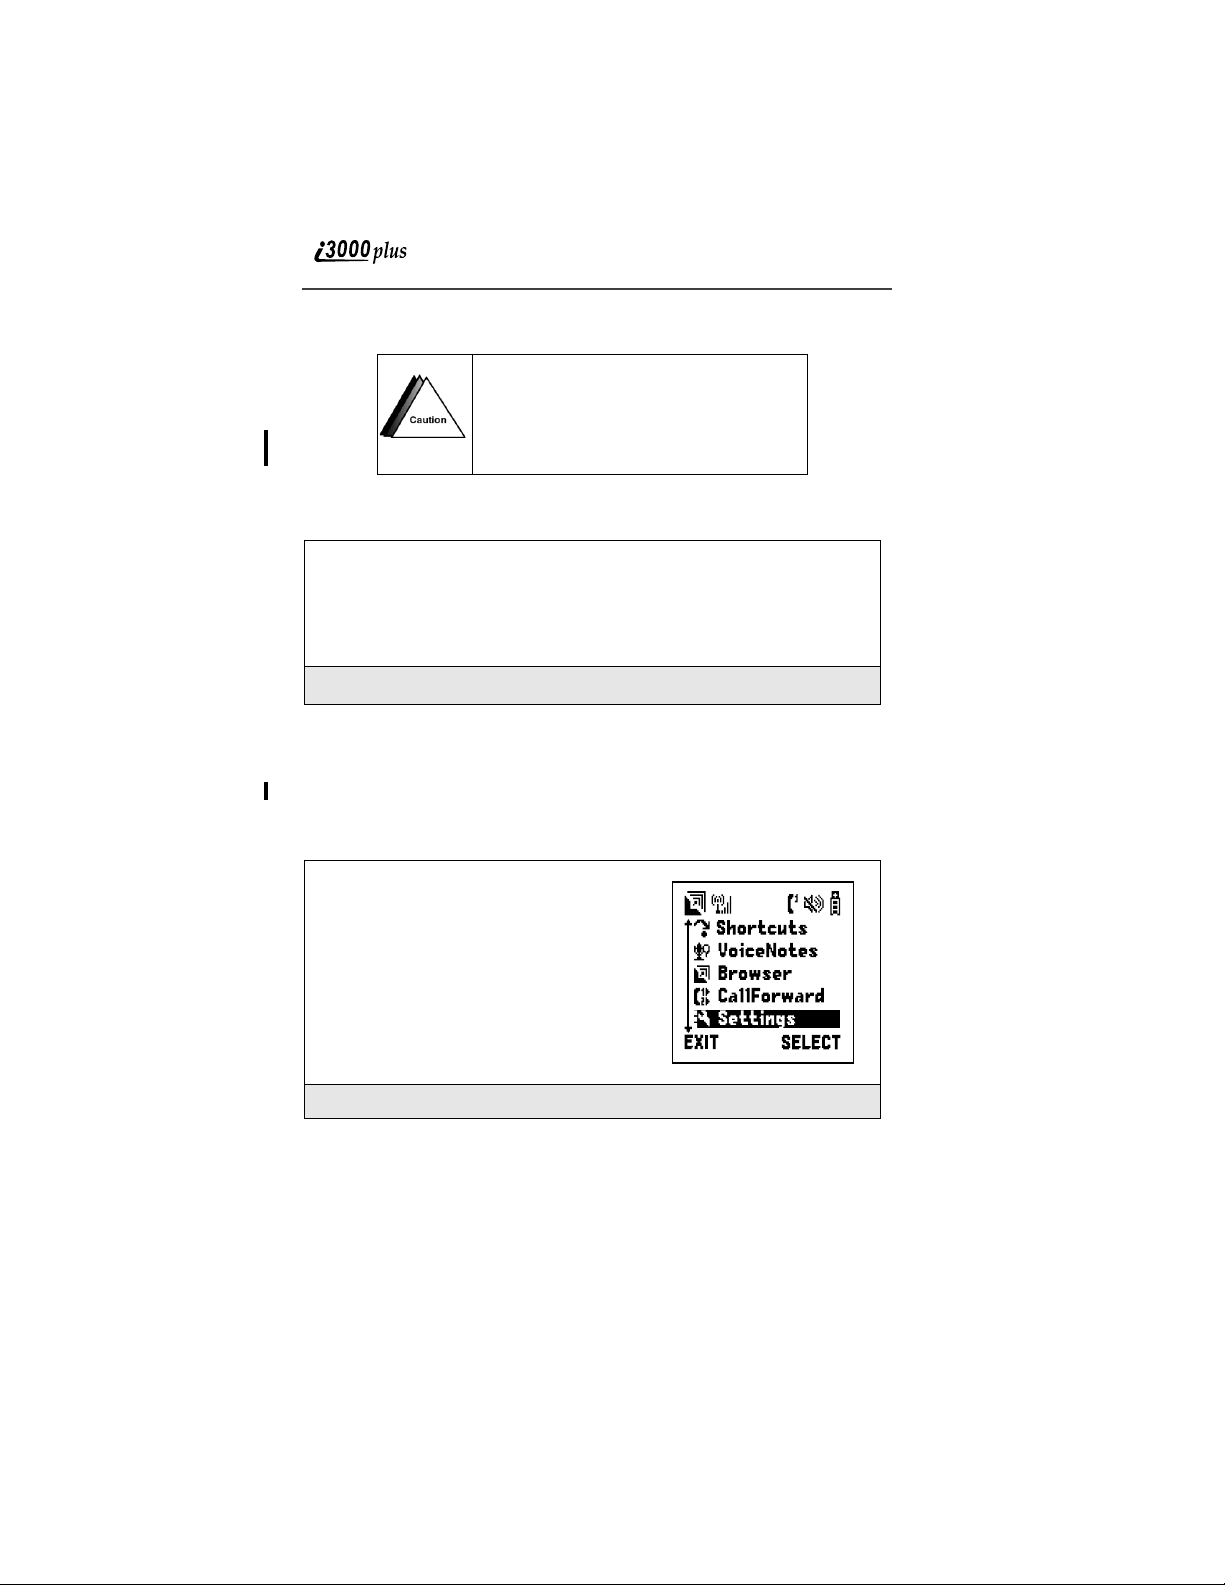
menu key from the Ready screen acce ss th e main menu.
Display Options
Two display options appear at the bottom of the Ready screen. You activate
these option by pressing the option keys adjacent to them. By default, the
Phonebook (PHBK) and Messag es (MESG) disp lay option appear on the
Ready screen. You can control which display options appear on the Ready
screen using the i3000plus phone’s Personalize feature (see xxxx on page xxx).
Navigating Menus and Lists
The i3000plus phone is menu driven. By navi ga tin g a ma s te r menu “tree,” you
access submenus which le ad to all of the functions and rich features that are
built into your i3000plus phone. Use the menus to store calls, locate and launch
the built-in Personal Information Manager (PIM) applications such as
Datebook, c h ange your i3000plus phone settings, browse the Internet, and more.
Some features of th e phone includes list of names, numbers, or other
information. These list items can be accessed the same way menu options are.
To access the items in a menu or list, scroll through it using the four-way
navigation key ne a r th e c en te r o f y our phone’s keypad. Scroll down by pressing
the lower edge of the navigation key R. Scroll up by pressing the up edge of
the navigation ke y Q. Holding down the appropriate part of the navigation key
speeds up scrolling.
If more items appear in a menu or list than can be displayed in the text area, a
down arrow or up arrow appears in the left side of the scre en i ndicating that
more option may be accessed by scrolling up or down.
Down Arrow Up Arrow
To exit the Main Menu (and return to the Ready screen), press A un der
“EXIT”. To ch oose the Main Menu selection, press B under “SELECT”.
www.motorola.com
28
Page 29

Main Menu Options
Main Menu Options
By default, the main menu options appear in the order shown in this table. You
can change the order in which the y appear by using the i3000plus phone’s
Personalize featur e (see xxxx on page xxx).
Menu Item Use to ...
i Recent Calls Access a list of numbers that you recently sent
F Call Forward Settings for forwarding calls in various
c Phonebook Store and retrieve a list of stored entries for
H Datebook Schedule and organize event s , by the day or
U Messages Receive, store, access and manage Voice
k Settings Access and manage: Ring/Vibrate; Phone
R Memo Input and store digits or text for later use.
o Voice Notes Record perso nal messages or incoming voice
O Java Download and integrate new applications to
B Browser Browse the internet.
calls to or received calls from. These numbers
can be used to make calls.
situations.
calling, editing, vie w in g an d de le tin g.
the month, such as appointments and
meetings.
Mail; Message Mail; and Net Mail message.
Setup; Voice Volume; Talkgroup Settings; InCall Setup; Security; Personalize, and Initial
Setup.
calls (phone, private, talkgroup) to p lay back
at a later time.
the phone menu.
X My Information View the private ID, phone number for lines 1
l Shortcuts Associate a main menu option with a number
m Styles Create or edit a group of settings and save
and 2, IP address, and circuit data number of
your phone.
on the alphanumeric keypad for easy access.
them as one.
29
Page 30

D Call Timers Display the length of time spent on the last
phone call, phone timer, dispatch timer, life
timer, circuit data timer and Kilobytes sent
and received.
30
www.motorola.com
Page 31

Making Phone Calls
Digital Cellular
The i3000plus phone ena bles you to make
and receive domestic and international
phone calls, make emergency calls, and be
notified of a missed call.
This section includes the following:
Making Phone Cal l s Page 31
Emergency Calling Page 35
Receiving a Phone Call Page 3 5
Ending a Phone Call Page 35
Recent Calls Page 35
Call Timers Page 37
Hands-Free Speakerphone Page 3 7
Call Waiting Page 37
Call Hold Page 39
Three-W ay Calling Page 39
Call Forwarding Page 40
Additional Phone Services Page 43
Making Phone Calls
Your i3000plus phone provides the following featu res for making pho ne
calls:
• Direct dial
• Phonebook
• Recent Calls
• Speed dial
• Turbo dial
31
Page 32

• Voice tags
• Automatic redail
Using Direct Dial
1
From the Ready screen, use the keypad to enter the number you want to
call.
2
Press s to place the call.
3
Press e to end the call.
If you make a mistake:
To Clear One Digit To Clear All Digits To Cancel
Press A under
“DELETE” one
time
Press and hold A
under “DELETE”
Press e
Making Calls from the Phonebook
After you have entered phone numbers in to your Phonebook, you can
use these number to make phone calls. For information on entering
numbers into your phonebook, see xxxxx on Page xx.
When making calls for the Phonebook, you can scroll through all the
names in your Phonebook to the name associate with the number you
want to call, or search for the name associate with the number y ou wan t
to call.
1
From Ready screen, press m, then press R to scroll to Phonebook.
Press A under “SELECT”.
2
Press R to scroll through all the name s in your Ph on e bo ok , or use the
alphanumeric keypad to enter a letter and press R to scroll through all
the names beginning with that letter. Stop when the name of the person
you want to call is highlighted.
3
If more than one number is stored for the person you want to call, < >
appears around the icon to the right of the person’s name. Press T to
scroll through the icons representing the numb er’s stored for that per-
son, or press A under VIEW to view all the numbers stored for this
person and then press R to scroll to the number you want to call. (For
more information and assigning more than one number to one person,
see xxxxx on page xx.)
32
www.motorola.com
Page 33

Making Phone Calls
4
Press s to place the call.
5
Press e to end the call.
Making Calls from the Recent Calls List
Your i3000plus phone stores the numbers of the last 20 calls you
received or sent in the Recent Calls list.
1
From Ready screen, press m. If Recent Calls is not the first item on
the list, press S to scroll to it. Press A under SELECT.
2
Press S to scroll the list of recent calls.
3
Click B under VIEW.
4
Press s to place the call.
5
Press e to end the call.
Using Speed Dial
The Speed Dial feature assigns a number to each phone number stored
in your Phonebook (see xxx on page xx). You can then dial the phone
number using its Speed Dial number.
1
From the Ready screen, enter th e Spee d Dia l n um ber as si gne d to pho ne
number you want to call.
2
Press #.
3
Press s to place the call.
4
Press e to end the call.
Using Turbo Dial
Turbo Dial allows you to call any of the first nine entries in your
Phonebook (see xxx on page xx) by pressing and holding the
corresponding numeric key.
Press and hold a number (keys 1 through 9). The phone chirps before
dialing the pre-set phone numb er.
33
Page 34

NOTE: Turbo Dial can not be accessed while the browser is active, nor
while Keypad Lock or SIM Lock is active.
Voice Tags
After you a voice tag for a phone number in your Phonebook, you can
use this voice tag to call the number.
1
From Ready screen, press and hold .
2
Speaking into the microphone, say the voice tag assigned to the phone
number you want to call.
3
Your phone will play the name back to you. If no key is pressed within
five seconds of this, the call will be made.
Automatic Redial
Press s to redial the last number you called.
Placing International Phone Calls
When dialing internationally, you can either enter the international
access code directly (011 in the United States) or use “Plus Dialing”.
NOTE: Y our phone’s default is “International Calls Restricted.”
Therefore, you must call Customer Care at 1-800-639-6111 to
obtain international dialing access.
Plus Dialing
This feature enables you to place an international call from most
countries—without entering the local international access code.
1
Press and hold 0 for two seconds. A “0” appears, then changes
to a “+”.
NOTE: The network translates the “+” into the appropriate
2
Enter the country code, city code, and phone number.
3
Press s.
international access code needed to place the call.
www.motorola.com
34
Page 35

Emergency Calling
Emergency Calling
Your i3000plus phone fully supports emergency calling. Emergency
calls can be made even when the SIM card is blocked.
To place a call in an emergency, dial 911. You will be connected to the
nearest emergency dispatch center. If you are on an active call, you must
end it before calling 911.
NOTE: If you have enabled the Keypad Lock feature, you must unlock
the phone’s keypad before any call can be made, including 911
emergency calls. For more information please contact your
service provider.
Special Dialing Codes
Receiving a Phone Call
When you receive an incoming call indicated by a ring, vibration
or backlight illumination. Press
s to answer the call.
Ending a Phone Call
Press e to hang up.
Recent Calls
The Recent Calls feature stores the phone n umbers of the 20 most recent
calls you have made and received, including private calls. You can
access the recent call list to:
• view your recent calls
• store numbers on the Recent Calls list to the Ph onebook
• delete some or all recent calls
• call numbers on the Recent Calls list
Viewing Recent Calls
To view your Recent Call list:
1
From Ready screen, press m. If Recent Calls is not the first item on
the list, press S to scroll to it. Press A under SELECT.
35
Page 36

2
Press S to scroll the list of recent calls.
If the phone number of the recent call is stored in your Phonebook, the
name associated with the phone number appears on the Recent Call list.
A letter appears to the rig ht of the n ame or number indicating the type of
recent call: the letter i indicates an incoming call; the letter o indicates;
the letter m indicates a missed call. Missed calls appear on your Recent
Calls list only if you have Caller ID.
Getting Detailed Information About Recent Calls
To get more information about a recent call:
1
With the ca ll yo u want more in formation about highlig hted, press m
to access the Calls Menu.
2
Press A under VIEW.
The screen that appears displays information such as the name oscillated
with the phone number of the recent call and the date, time , and duration
of the call.
Storing a Number From the Recent Call List
To store a number from the Recent Call list to the Phonebook:
1
From the screen showing detailed information about the recent call
whose number you want to store, press
2
Press A under STORE.
m to access the Calls Menu.
Calling From the Recent Call List
See
“Making Calls from the Recent Calls List” on page 33.
Deleting Recent Calls
[?????????]
www.motorola.com
36
Page 37

Call Timers
Call Timers
Call Timers provide you with the timers for the last phone, private, or
group call, total of all phone calls, private calls, and/or group calls, a
odometer of all calls, circuit data timer and Kilobytes sent/received.
To view timers:
1
From the Ready screen, press m.
2
Press R to scroll to Call Timers.
3
Press A under SELECT .
Hands-Free Speakerphone
The i3000plus phone provides the convenience of a hands-free
speakerphone for holding impromptu meetings or placing safer phone
calls.
During speakerphone operation , you may ei t her speak or l ist en , but y ou
cannot do both at the same time.
To use the speakerphone:
Press
A under SPKR. The SPKR option flashes while the
speakerphone is on.
NOTE: The SPKR option is available whenever you are on an active
call.
NOTE: If there is background noise in your area, you may have
HINT: To listen only, press
difficulty hearing a caller’s voice or messages.
A under “Mute”. The display shows
“Phone MUTE”, indicating that the microphone is muted.
While the microphone is muted, you can hear incoming audio,
but a caller cannot hear any speech coming from your
i3000plus phone.
To speak, press
longer displays, indicating that the microphone is on.
A under “MUTE” again. “Phone Mute” no
Call Waiting
Call Waiting allows you to receive a second call while you are talking
on the phone. With the i3000plus phone you can switch between call s so
37
Page 38

you never have to miss a call. By default, Call Waiting is always ON
unless you turn it OFF for a specific call.
If you’re on a call and you receive a second
call, you:
• Hear a tone; and
• See a message on your dis p la y i nfo r m ing
you of another incoming call.
At that point, select one of the following
options and follow the related instructions.
Accepting Calls
Press B under YES.
Switching Between Calls
Press B under HOLD. Your phone will refer to the first call as Call-1
and the second call as Call-2 . If call 1 is on ho ld, yo ur disp lay wi ll read:
Call 1 - Hold 7035551234.
Declining Calls
Press
B under NO. If you subscribe to Voice Mail, the call will be
forwarded to your Voice Mailbox.
Ending the Active Call
Press
e.
Turning Off Call Waiting
If you do not want to be interrupted during a call, you can turn Call
Waiting off prior to making/receiving a call.
1
From the Ready screen, press m. Press R to scroll to Settings, and
press B under SELECT.
2
Press R to scroll to In Call Setup and press B under SELECT.
3
Press R to scroll to Call Wai ting and press B under CHANGE.
www.motorola.com
38
Page 39

Call Hold
4
Press R to scroll to Off and press B under SELECT.
Call W aiting is now disable d for the next call. It will automatic ally reset
to On when you hang up.
Call Hold
When you are on an active call, you can place th e call on hold and make
a second call from your second line. The options 3WAY and HOLD
appear only when you are on an active call.
1
To place the active call on hold, press B under HOLD.
2
Place the second call.
3
Press B under HOLD to toggle between calls.
Three-Way Calling
Using Three-Way Calling, you can combine two ongoing phone calls
into one conversation. This option is available only when you initiate
the second call. When you place or receive a phone call, a 3WAY option
appears in the bottom left-hand corner of the display screen.
To make a three-way call:
1
Place or receive a phone call.
2
Press A under “3WAY” to place the
first call on hold.
3
Enter the phone number for the second individual yo u want to call and
s.
press
4
After you reach the second individual, press A under “3WAY”. Both
numbers will appear on your display.
39
Page 40

Call Forwarding
Nextel’s Call Forwarding features forward calls to the number you
designate. The following Call Forwarding options are available:
• All Calls — When this option is turned on, all calls will be sent
automatically to a number you specify.
• Detailed — Choosing this opti on enables you to forwar d c all s yo u missed
to different numbers depending on why you missed each call:
• Busy — Sends c alls made t o your phone when your ph one is engag ed
in other activities to a number you specify.
• No Answer — Sends calls you do not answer to a number you
specify. The phone will ring 4 times before forwarding the call.
• Unreachable — Sends calls made to your phone when your phone is
not on the network to number a specify. This includes calls made
when the phone is powered off.
• Off — No calls are forwarded.
40
www.motorola.com
Page 41

Turning On Call Forwarding
1
Press m, then press R to scroll to
Call Forward.
2
Press B under SELECT.
3
In the Call Forward screen, press B
under CHANGE.
Call Forwarding
4
If you want to forward all calls, press R
to scroll to All Calls and pres s A under
SELECT.
If you want to forward calls when only
Busy, No Answer, or Unreachable,
press R to scroll to Detailed and press
A under SELECT.
5
In the Call Forward screen, press R to
scroll to the appropriate field and enter
the call-forward number. When finished,
press A under DONE.
41
Page 42

Your calls will now be forwarded to the number that you selected and
you will see the Call Forward icon (U or X) with the forwarded line
number on your screen. You can forward Line 1 and Line 2
independently.
Turning Off Call Forwarding
1
Press m, then press N to scroll to
Call Forward.
2
Press B under SELECT.
3
In the Call Forward screen, press B
under CHANGE.
4
Press R to scroll to Off and press B
under SELECT.
42
www.motorola.com
Page 43

Additional Phone Services
Additional Phone Services
In addition to the Standard Features that are included for all Digital
Cellular Subscribers, there are also several features that are available at
an additio nal monthly or p er-use fee
Caller ID
If you subscribe to Caller ID, your i3000plus phone automatically
displays the phone number an d/or name of the person calling (unless
blocked by the caller), enabling you to decide wheth er to take th e call or
forward it to Voice Mail.
NOTE: Caller ID is not available in all areas.
Displaying the Caller’s Name
A caller’s name is displayed if you have entered the person’s number
into your Phonebook (see Phonebook on page xx). Otherwise, the
caller’s phone number will be displayed.
Alternate Line Service
If you are an Alternate Line customer, you will be given a unique phone
number for each line. With alternate lines, you can separate business
and personal calls, or designate one as a priority line.
• Line 2 shares the same Voice Mailbox with Line 1; there is only one
monthly charge.
• You cannot forward Line 2 to Line 1 and have the phone ri ng; the call
transfers to Voice Mail.
• Text and Numeric Messaging is not available on L ine 2.
The following settings are independent for each phone line. When you
enable a setting, it applies only to the active line:
• Call Forwarding
• Ring/Vibe
• In Call Setup
• Call Timers
43
Page 44

Selecting the Alternate Line
At the Carrier Ready screen:
1
Press m, then press R to scroll to
Settings. Press B under SELECT.
2
Press R to scroll to Phone Setup. Press A under SELECT.
3
With the current line highlighted, press A under CHANGE.
4
Press R to scroll to the desired line and press A under SELECT.
5
Press A under BACK.
Line2
Receiving Calls on Your Alternate Line
You can receive calls on either line, regardless of the active line setting.
• If the call is on the same line as the currently active line, the Active Line
Indicator flashes.
• If the call is on the line that is not currently active, the Active Line
Indicator remains lit and the other line number ico n flashe s.
44
www.motorola.com
Page 45

Additional Phone Services
Accepting Calls
Press A under YES to answer the call on the other line. Your
original call will be placed on hold.
Press A under “HOLD” to toggle between calls. When both ca lls end ,
the phone remains active in the last line selected.
Declining Calls
Press A under “NO”. If you are a Voice Mail customer, the call
will be forwarded to your Voice Mailbox.
Call Restrictions
You can prevent your phone f rom m aki ng or receiving specific types of
calls. Directory Assistance
Nationwide White Page Listings, Yellow Page Listings and Call
Completion are available by dialing 411 or (area code)-555-1212.
White Page Listings
You can request the telephone number for any person, business or
government agency in the Continental United States plus Hawaii.
Yellow Page Listings
By providing basic information such as city and type of business, you
can find a company anywhere in the Continental United States plus
Hawaii.
Nationwide Call Completion
Operators will connect you to the listing you requested. There are no
additional charges beyond normal airtime costs for this service (airtime
will count against your bucket of minutes; overage charges will apply if
the bucket of minutes has been exhausted). If you prefer, the operator
will stay on the line while connecting to the number.
In the event you need another listing, you can return to an operator at
any time during the call by pressing
*. By pressing # you can hear
the phone number dialed.
45
Page 46

46
www.motorola.com
Page 47

Private Calls
Private Calls
Private Calls
Private Calls are a way to communicate with your co-workers and clients...for a
fraction of the cost of traditional cellular calls.
You may want to talk to a co-worker right away, but you don’t want to page that
person or leave a lengthy message. With the Private Call feature, you can find
them wherever they are in your home coverage area.
Or, maybe you need to communi cate a last-minute schedule change to your
sales people... all 100 of them. It’s easy with Private Calls’s Group Call. This
digital two-way radio feature lets you contact all of them at once!
NOTE: Private Calls® will only work in your home market area.
This section includes everything you will need to know to take advantage of
Private Calls (two-way radio) service:
Private Calls Page 49
Call Alerts Page 51
Group Calls Page 53
Private Calls
There are two ways to reach an individual using Private Calls. You can enter the
person’s Private ID number then press the Push-To-Talk (PTT) button. Or, you
can store the person’s name and private ID number, then recall the number from
your Phonebook. Whether you dial the person’s Private ID directly or store it in
your Phonebook — you must have the individual’s Private ID to use Private
Calls. To learn how to store names and numbers, see “Phonebook” on page xx.
Making Private Calls from the Keypad
1
Enter the Private ID of the person you are trying to call.
2
Press and hold the PTT button on the si de of the phone. Begin talking
after the phone emits a chirpin g sound.
3
Release the P TT button to listen.
49
Page 48

Making a Private Calls from the Phonebook
1
From the Ready screen, press m.
2
Press R to scroll to the Phonebook. Press A under SELECT.
3
From the Phonebook screen, press Q or R to scroll through the
names until the desired name is highlighted.
4
Press and hold the PTT button on the side of the phone. Begin talking
after the phone emits a chirping sound.
5
Release the PTT button to listen.
Making Private Calls from the Recent Call List
1
From the Ready screen, press m.
2
Press R to scroll to the Recent Calls. Press A under SELECT”.
3
From the Recent Calls screen, press Q or R to scroll through the
names and numbe rs until the de s ir ed na m e is high lig hte d .
4
Press and hold the PTT button on the side of the phone. Begin talking
after the phone emits a chirping sound.
5
Release the PTT button to listen.
50
www.motorola.com
Page 49

Call Alerts
Receiving a Privat e Call
When you receive a private call, your phone emits a chirping sound and Private
in Use appears on the screen. The private ID and the name of the caller (if stored
in your Phonebook) displays. Pres s and hold the PTT button to ta lk and rel eas e
it to listen.
Call Alerts
You can send a call alert, which lets recipients know that you would like to talk
with them. When you send an alert, the recip ient will receive a series of beeps
and your name or private ID will appear on the display.
Placing a Call Alert from the Keypad
1
Enter the private ID of the person you want to call.
2
Press B under ALERT.
3
Press and hold the PTT button until Alert-Sent Successful displays.
The receiving phone will alert intermittently until the user of the phone
clears it.
Placing a Call Alert from the Phonebook
1
From the Ready screen, press m.
2
Press R to scroll down to the Phonebook menu. Press A under
SELECT.
3
From the Phonebook screen, press R to scroll to the Phonebook entry
for the person you want to alert.
4
Press B under ALERT.
5
Press and hold the PTT button until Alert-Sent Successful displays.
The alert plays intermittently until the individual clears it.
Ready to Alert Screen
Ready to Aler t is used to confirm the alert and prompt you to push the PTT
button.
• If you press A under CANCEL, the phone returns to the Dial screen with
the previously entered number displayed.
• If you press the PTT button, the call alert is sent, and the phone display
goes to Recent Calls screen.
51
Page 50

• If you do nothing, the phone will revert to the Ready screen after five
seconds.
Receiving Call Alerts
When you receive a call alert, your phone emits a chirp and displays the name or
number of the caller. You can answe r , queu e, or clear the call alert.
• To answer a call alert, press the PTT button.
• To queue a call alert, press A under QUEUE.
• To clear the call alert, press A under CLEAR.
Call Alert Queue
Call alert queuing enables you to save call alerts in a queue or list.
Accessing the Call Alert Queue
1
From the Ready screen, press m.
2
Press R to scroll to Call Alert Queue.
3
Press A under SELECT.
Sending a Call Alert From the Queue
1
From the Call Alert Queue screen, press R to scroll down to the
desired entry.
2
Press A under ALERT.
Deleting a Call Alert From the Queue
1
From the Call Alert Queue screen, press m.
2
Press R to scroll to DELETE.
3
Press A to SELECT.
4
When the confirmation screen appears, press A under YES to delete
the entry.
www.motorola.com
52
Page 51

Group Calls
Group Calls
In a Group call, you can communicate instantly with a group of people that you
have previously set up as a Talkgroup. Your Service Provider must set up your
Talkgroup by providing you with a Talkgroup number for each Talkgroup. After
you have the number, you can assign each Talkgroup number a name and store
it in your i3000plus phone (see “Naming a Talkgroup” on page xx).
Talkgroups appear on your display as numbers or progr a mmed names such as
SALES TEAM or Talkgrp 5. Your i3000plus Phone can stor e up to 30
Talkgroups. You can receive Group calls only in the Talkgroups that you have
been provisione d for the sys te m.
Naming a Talkgroup
1
From the Ready screen, press m.
2
Press R to scroll to Phonebook.
3
Press A under SELECT.
4
Press R to scroll to New Entry. The Entry Details scr e e n dis p la ys .
5
Press A under SELECT.
6
Enter the information as you would any other Phonebook entry. (See
Phonebook on page xx.) When you get to Type, make sure that you
select Talkgroup.
7
Enter the Talkgroup number, for example: 127.
8
When you have comp le te d the Entry Details, press A under DONE.
Making Talkgroup Calls from the Keypad
1
Press # key and then the Talkgroup number of the group that you want
to call.
2
Press and hold the PTT button on the side of the phone and speak. The
phones of the people in the Talkgroup will emit a chirping sound to alert
them that someone is calling.
3
Release the P TT button to listen.
Making a Talkgroup Call from the Phonebook
1
From the Phonebook screen, press R to scroll to the name of the Talkgroup to call.
53
Page 52

2
Press and hold the PTT button on the side o f the phone and speak. The
phones of the people in th e Talkgroup will e mit a chirping sound to al ert
them that someone is calling.
3
Release the PTT button to listen.
Making a Talkgroup Call from the Recent Call List
1
From the Recent Call screen, press R to scroll to the name of the
Talkgroup to call.
2
Press and hold the PTT button on the side o f the phone and speak. The
phones of the people in th e Talkgroup will e mit a chirping sound to al ert
them that someone is calling.
3
Release the PTT button to listen.
Receiving Talkgroup Calls
When you receive an incoming Talkgroup Call, you will hear a chirp.
1
Wait for the caller to finish speaking.
2
Press and hold the PTT button to talk. Release the PTT button to listen.
Group-Silent Programming
Group-Silent Programming enables you to silence incoming Group alerts and
communication.
T urning Group-Silent On/Off
1
From the Ready screen, press m.
2
Press R to scroll to Setting. Press A under SELECT.
3
Press R to scroll to Tkgrp Settings. Press A under SELECT.
4
With the Silent field highlighted, press A under CHANGE.
5
Press S to scroll to on or off.
6
Press A under SELECT.
www.motorola.com
54
Page 53

7
Press A under BACK.
Group Calls
55
Page 54

56
www.motorola.com
Page 55

Messaging
Mail Services
Messaging
Your i3000plus phone offers two choices in Messaging Services -- Voice Mail,
Text and Numeric Paging, and Net Mail.
The main topics covered in this section are listed below:
Message Center page xx
Voice Mail page xx
Net Mail page xx
Message Mail page xx
Message Center
The message center consists of all the Messaging Services and is broken down
by folders such as Voice mail, Net Mail, and Message Mail (Text and Numeric
Paging).
57
Page 56

58
www.motorola.com
Page 57

Phonebook
Your Phonebook
The Phonebook allows yo u to store to
350 frequently used names an d
numbers.
When you store information in your
Phonebook, it is saved on your SIM
card. If you move your SIM card to
another SIM-compatible GSM/iDEN
phone, you then access information in
your Phonebook from that phone.
This section includes:
Your Phonebook Page 59
Phonebook Lists Page 59
Phonebook Icon s Page 61
Voice Tags Page 62
Accessing Your Phonebook Page 62
About Phonebook Entries Page 62
Viewing Phonebook Entrie s Page 63
Sorting Phoneb ook Entries Page 63
Adding Phonebook Entries Page 64
Editing Phonebook Entries Page 69
Deleting Phonebook Entries Page 69
Pause Digit Entry Page 69
Plus Dial ing Page 70
Address Book Page 70
Phonebook Lists
The information in your Ph onebo ok is stored in two lists: t he Expan ded List and
the Simple List. Each list stores information differently.
59
Page 58

Together, these lists stor e up to 350 phone numbers. Each number has a Speed
Dial number associated with it according to its location in the Phonebook.
Speed Dial Numbers
Each number stored in y our Phonebook is automatically as signed a Speed Dial
number that corresponds to its location in your Phonebook. Your Phonebook
has locations for 350 phone number. The phone number stored in location 1 is
assigned Speed Dial num ber 1, the phone number stored in location 2 is
assigned Speed Dial number 2, and so forth to location 350.
Expanded List
Your Phonebook’s Expanded List can store multiple phone numbers to a single
name. For example, you can en ter someone’s name into you P ho ne b ook once
and then assign that person’s home, office, and fax numbers to the name.
The information on your Phonebook’s Expanded List can be ac cesse d from your
SIM card using other i3000plus phones.
Your Phonebook’s Expanded List stores up to 250 entries using with Speed Dial
location 1 through 250. Each phone number uses one Speed Dial location, even
if it is assigned to the same name as other phone numbers.
Simple List
Your Phonebook’s Simple List stores one phone number to each name on the
list. To store mul tiple phone nu mber fo r a sin gle na me, yo u must e nter that nam e
for each number.
The informa tion on your Phonebook’s Simple List can be accessed from your
SIM card using any SIM-compatible GSM/iDEN phone.
Your Phonebook’s Simple List stores up to 100 entries using Speed Dial
locations 251 through 350.
60
www.motorola.com
Page 59

Phonebook Icons
Phonebook Icons
Icons that appear to the right of entries in your Phonebook convey information
about those entries.
Most Phonebook ic on s indic a te d a ph on e num be r’s type. When you enter a
phone number in your P honebook, you can designate the phone number’s type
using any of the following icons:
Q Main
L Home
h Private
q Work
W Mobile
K Fax
b Pager
n Talkgroup
Chat
Z Other Phone
NOTE:The Main icon automatically appears to the right of the first
phone number assigned to a name unless you choose another
icon.
For more information on entering phone numbers into you Phonebook, see xxxx
on page xx.
This icon, called a “picker,” appearing to the right or on both sides of one the
phone number type icons above indicates multiple phone numbers stored under
one name:
f one picker
ef two pickers
See xxxx on page xx for more information on storing more than one phone
number under one name.
61
Page 60

This icon appea ring to the left of one of the phone number type icons indicates
that a voice tag is associated with the Phonebook entry:
p voice tag
See xxxx on page xx for more information on voice tags.
Voi ce Tags
A voice tag is a audio recording you make by speaking into your i3000plus
phone and assign to a Pho nebook entry. You can then access the Phonebook
entry by speaking the words you recording in to the phone.
Your phone can store up to 20 voice tags.
Accessing Your Phonebook
To access your Phonebook:
1
From the Ready screen, press m.
2
Press R to scroll to Phonebook.
3
Press A under SELECT.
Or, if PHBK is one of your display options (t his is the factory default ):
1
From the Ready screen, press B under SELECT.
This brings you to the Phonebook screen. From this screen, you can vie w , s ort,
add, edit, and delete Phonebook entries.
About Phonebook Entries
Each Phonebook entry may contain the following information:
• The name associated with the entry. Typically, this is the name of the
person whose phon e number you are storing in the Phonebook.
• The type of number to be stored: Main, Private, Home, Work, Mobile,
Fax, Pager, Talkgroup, Chat, and Other. If you don’t choose a type, the
number is assigned type Main, unless a Main number has already been
assigned to the name.
• The phone number (may be a Private ID or Talkgroup number) to be
stored. Every Phonebook entry must contain a phone number.
• A Speed Dial number. You may accept the default Speed Dial Number or
assign a different on e.
www.motorola.com
62
Page 61

About Phonebook Entries
• A voice tag audio r ecording. This field is optional.
Viewing Phonebook Entries
1
From the Phonebook screen, press S to scroll through the Phonebook entries.
2
To view the highlighted number, press A under VIEW.
Names with more than one number assigned to them appear with f to the right
of the icon or ef surrounding the icon to the right of the name. For example,
the entry for Joe Smith’s home phone number would look like this:
Joe Smith eLf
When the name is highlig hted, pre ssing T (the left or right side of the four-way
navigation key) displays the icons representing each of the numbers assigned to
that name.
To view any of the phone numbers assign to a name:
1
From the Phonebook screen, press S to scroll to the n ame associated
with the phone number you want to see.
2
Press T view the icons representing the phone numbers assigned to
that name.
3
When the icon representing the number you wa nt to view is disp la ye d,
press A under VIEW.
Sorting Phonebook Entries
You can sort your Phonebook entries by:
• Name — the name you entered for the entry.
• Speed No. — the Speed Dial location of the entry.
• Voice Name — [????????????]
63
Page 62

To sort your Phonebook list:
1
From the Phonebook screen,
Press m to view the Phone-
book Menu screen.
2
Press R to scroll to Sort By.
3
Press A under SELECT.
4
Press R to scroll to desired sorting method: Name, Speed No., or
Voice Name.
5
Press A under SELECT.
Adding Phonebook Entries
Using the following instructions, you will enter the information in the order the
items appear on the Phonebook’s Entry Details screen. However, you can enter
this information in any order by pressing S to scroll through the items on the
Entry Details screen.
You can leave any item any item blank or unchanged by press ing S to scroll
past it on the Entry Details screen. Only a phone number is required for a valid
Phonebook entry.
After you have ente red a phone number and any other information you wish to
include, you can pre s s B under DONE to complete the Phonebook entry.
64
www.motorola.com
Page 63

To add a Phonebook entry:
1
Access the Entry Details
screen:.
From the Phonebook screen,
press R to scroll to [New
Entry] and press B un de r
SELECT
Or,
From the Phonebook screen,
press m. Then press R to
scroll to NEW and press B
under SELECT.
2
If you want to assign a nam e to
your Phonebook entry:.
With the Name: field
highlighted, pres s B unde r
CHANGE
From the Name: screen, enter
the name using the
alphanumeric keypad .
About Phonebook Entries
As you type, you can delete a
letter by pressing A under
DELETE. To create a space,
press R once.
When you are finished, press B under OK.
The Entry Details screen returns with the Type: field highlighted.
65
Page 64

3
If you want to assign a phone
number type other than Main
to your Phonebook entry:
With the Type: field
highlighted, pr ess B under
CHANGE.
From the Type Editor screen,
press R to scroll to the ty pe of
phone number you want to
assign to the Phonebook entry.
Press A under S EL ECT.
The Entry Details screen returns with the No. field highli ghted.
4
Assign a phone number to your
Phonebook ent ry:.
With the No.: field
highlighted, press A under
CHANGE.
Type the number using the
alphanumeric key pad.
To delete a number press A
under DELETE.
When you are fini sh e d , pre s s
B under OK.
The Entry Details screen returns with the Speed No. field highlighted.
www.motorola.com
66
Page 65

About Phonebook Entries
5
The default Speed Dial number
assigned to the Phonebook
entry is displayed in the Speed
No. field. This is always the
next available Speed Dial location in the Extended List.
If you want to assign the phone
number to a different Speed
Dial location:
With the Speed No.: field
highlighted, pres s A under
CHANGE.
Type the number using the alphanumeric keypad. To delete a number
press A under DELETE.
Choose a number between 1 and 250 to assign the phone number to a
Speed Dial location on the Extended List. Choose a number between
250 and 350 to assign the phone number to a Speed Dial location on the
Simple List.
When you are finished, press B under OK.
6
If you want to assign a voice
tag to the phone book entry:
With the Voice Name: field
highlighted, pres s B under
RECORD.
As directed by the screen
prompts, the say and repeat
name you want to assign to the
Phonebook entry . Speak
clearly into the phone
microphone.
An o icon appears in the Voice Name: field indicating that the Voice
Name has been recorded.
7
If you want to store more phone numbers with the name associated with
this Phonebook entry:
Press R to scroll to MORE at the bottom of the Entry Details screen
and then press B under SELECT.
Enter the information for the add itional p hone num ber , start ing with the
phone number type.
67
Page 66

8
When you have enter all the
information you wanted in
this Phonebook entry, press
A under DONE.
68
www.motorola.com
Page 67

Pause Digit Entry
Editing Phonebook Entries
1
From the Phonebook screen, press R to scroll to the entry you want to
edit.
2
Press m to view the Phonebook Menu for that entry.
3
Press R to scroll to Edit.
4
Press A under SELECT. The Entry Details screen displays.
5
Follow the instructions in “Adding Phonebook Entries” on page 64,
omitting step 1, to edit the various fields.
Deleting Phonebook Entries
1
From the Phonebook screen, press R to scroll to the entry you want to
delete.
2
Press m to view the Phonebook Menu for that entry.
3
Press R to scroll to Delete Name or Delete Number.
Delete Name deletes the name and all numbers associated with that
name.
Delete Number deletes the number associated with the icon that is
currently displayed in the Phonebook list for the name. Press P to
scroll through the icons.
4
Press A under SELECT. A warning screen displays requiring
you to confirm the deletion.
Pause Digit Entry
When storing a number, you c an program you r phone so that it will not on ly dial
a number but also pause and enter another series of numbers such as a personal
identification number (PIN) or password. This feature is particularly useful for
automated services such as voice mail and ban kin g syste m s.
Here’s how it works. Let’s say you have a compan y voic e mail ac co unt tha t you
frequently check while travelling. And, to access that account you must do the
following:
• Dial your work number;
• Press # while the voice mail greeting is being played; and
• Enter your PIN to access your messages.
69
Page 68

You can program your i3000plus phone to enter all of the above information for
you. All you have to do is separate each entry with a pause. If you were to
program your phone to automatically input the above information, the stored
data would look like this 17035551234p#p1234. In this example, the first eleven
digits represent the number that must be dialed to access your voice mail. The P
represents a 3 second pause. The # interrupts your greeting. The second P
represents another 3 second pause. The last four digi ts represent your PIN.
You can use this feature not only to enter PINs and passwords but also to have
the phone automatically select menu options (i.e., press 1 to hear messages).
To create a three-second paus e fol l ow t he st eps below:
Press and hold * for two seconds. The pause sy mbol (p) wi ll appear o n
the display screen.
NOTE: You can enter up to 20 numbers/characters in a single entry,
NOTE: If you use a system that will not let you enter an option until
stored or dialed.
the automated message has played in its entirety, you can program your phone to pause for more than 3 seconds. For example, performing the above step twice will program two pauses
and cause your phone to wait 6 seconds before entering the
next set of numbers.
Plus Di a lin g
This feature enables you to place an international call from most countries—
without entering the local international access code. First you must store a
Phonebook list entry. Begin by follo wing the instructions for “Adding
Phonebook Entries” on page 64. Before you type the phone number to be
stored:
1
Press and hold 0 key for two seconds. A “0” appears, then
changes to a “+”.
NOTE: The network translates the “+” into the appropriate interna-
2
Enter the country code, city code, and phone number.
3
Follow the re st of the instructions for Adding Phonebook
tional access code needed to place the call.
Entries.
Address Book
70
www.motorola.com
Page 69

Datebook
PIM Tools
With your i3000plus phone’s Personal Information Management (PIM) Tools,
you don’t have to worry about missing appointments or losing important notes.
Your phone can synchroniz e with certain software applications to ensure that
you always stay on top of your appointments.
This section includes:
Datebook Page 71
Locking/Unlocking a VoiceNote Page 80
VoiceNotes Page 79
Datebook
The Datebook is a calender that en ables you to schedule and organize events,
such as appointments and me etings. Schedules can be created and vi ewed for
specific days, and reminder alarms can be set so that you never miss important
events.
You can view upcoming events by week or by day. The Datebook stores and
manages 250 events over a 13-month period (12 mont hs ahead and 1 month
back).
Datebook Icons
There are several ico ns commonly used in the Datebook a pplication:
Symbol Alarm Set
C Event without a time
of day
f More options are
available
j Recurring
Appointment
I Datebook Alarm
71
Page 70

Viewing Your Datebook
To access your Datebook:
1
From the Ready screen, press m.
2
Press R to scroll to Datebook.
3
Press A under SELECT.
Information in your Datebook can be viewed in three ways: by the week, by the
month, or by the event.
This information is structured hi erarchically. When you access the Datebook, it
displays a week . You can sel ect a da y to v iew an d displa y t he eve nts of t hat d ay.
When they events of a day are displayed, you can select an event t o view and
display details of that event.
Viewing a Week
When you access your
Datebook, the current week is
displayed.
Displayed week
Days of week
The dates of the displayed
week appear at the top of the
text area of your phones
Events
screen.
Below the dates are letters
indicating the da ys of the
week. When you access your
Datebook, the current day is
highlighted. You can scroll to other days and other weeks by pressing T.
Below each letter is a 12-hour time window for each day. A small bar between
the letter and the time window indicates an event on that day that does not have
a time of day associated with it, such as a birthday. Scheduled events are shown
within the time window in black.
Viewing a Day
To view a day in your Datebook:
1
With a week displayed, select the day you want to view by pressing T
until the letter for that day is highlighted.
2
Press A under VIEW.
72
www.motorola.com
Page 71

Datebook
The day and date appear at the top of the text display area. Titles of the events
for the day selected are listed by time. Events without times are displayed at the
top of the list with a bullet to the left of them.
Viewing Event Details
To view the details of an event:
1
Select and view the day containing the event you want to view.
2
Press N to scroll to the event.
3
Press A under VIEW.
This displays event details such as day of we ek, time, t itle, d uration, al arm time,
and repeat cycle. For more info rmation about events, see xxxxx.
Viewing Today
You can easily go to the current day when viewing your Datebook:
1
While viewing any week, da y, or event, press m. This displays the
Datebook Menu with Go to Today highlig hted.
2
Press A under VIEW.
If you were previously viewing a day or event, the screen displays the current
day. If you were previously viewing a week, the screen displays the current
week with today highlighted.
About Datebook Events
Each Datebook event may contain the following information:
• The title you assign to the event. You can enter a title using the phone’s
alphanumeric keypad or cho ose fro m a list of c o mmonly u sed ti tle s. A t itle
is required for every event.
• Addition text of any kind following the event’s title.
• The start time and duration of the event.
• An option to repeat the event in your Datebook.
• An alarm to notify you of the event before it begins.
• [Style???????]
73
Page 72

Adding New Events
Using the following instructions, you will enter the information in the order the
items appear on the Event Details screen. However, you can enter this
information in any order by pressing S to scroll through the items on the Event
Details screen. You can leave any item blank or unchanged by pressing S to
scroll past it on the Event Details screen. Only a title and a date required for a
valid event; a date is supplied by default.
To add a Datebook event:
1
Access the Event Details screen:
While viewing the Datebook,
press m to view the Datebook
Menu screen.
Press R to scroll to New.
Press A under S EL ECT.
The Event Details screen displays
with the Title: field highlighted.
2
With the Title: field highlighted, press B under CHANGE to access
the Title: screen.
3
Assign a title to the event:
Press
A under BROWS E to choose from a list commonly used event
titles.
Or,
Type the title using the alphanumeric keypad.
You also type a description of the appointment of any other text. You
can view this text later by accessing the event’s Title: screen.
As you type, you can delete a letter by pressing A unde r DEL ETE. To
create a space, press R once.
When you are f inished, press B under OK.
The Event Details screen returns with the Start: field highlighted.
www.motorola.com
74
Page 73

4
If you want to assign a time of day to the event:
With the Start: field highlighted, press A under CHANGE.
From the Start: screen, enter the time the event will begin.
Type in the start time, or press S to scroll through the hours, minutes,
and am, pm, or 24 hour clock. Press the A under the insert icon to
move through the fields.
Press A under DONE.
The Event Details screen returns with the Duration: field highlighted.
5
After you have assigned a start time to the event, you can specify the
duration of the event:
With the Duration: field highlighted, press A under CHANGE.
From the Duration: screen, press R to scroll to the desired duration. If
you select None, the event will have a duration of zero minutes.
Press B under SELECT.
The Event Details screen returns with the Date: field highlighted.
6
The default date assign to an event is the day selected when you
accessed the Event Details screen to add the event to the Datebook.
Datebook
With the Date: field highlighted, press A under CHANGE.
From the Date: screen, enter the date of the event.
Type in the date, or press S to scroll through the months, days, and
years. Press the A under the insert icon to move through the fields.
Press A under DONE.
The Event Details screen returns with the Repeat: field highlighted.
75
Page 74

7
If you want the event to recur in your Datebook, assign a repeat cycle to
it:
With the Repeat: field highlighted, press A under CHANGE.
From the Repeat: screen, press S to scroll to the desired repeat cycle.
Press A under DONE.
The Event Details screen returns with the RepeatEnd: field
highlighted.
Press A under CHANGE. and enter the date on which you want to
event to stop repeati ng. When you have finished, press A under
DONE.
The Event Details screen returns with the Alarm: field highlighted.
8
If you want to set an alarm to
remind you that the event is
approaching:
With the Alarm: field is
highlighted, pr ess A under
CHANGE.
From the Alarm: screen, press
S to scroll to the desired
alarm option.
Press A under S EL ECT.
From the Alarm: screen, press S to scroll to the desired alarm option.
Press A under DONE.
NOTE:The alarm will only work wit h phones t hat have the “Ti me and
Date” feature. This is not available in all areas.
9
When you have enter all the
desired information about
the event, press A under
DONE.
www.motorola.com
76
Page 75

Editing Events
1
Select the even you want to edit:
View the day containing the even and highlig ht the event.
Or,
View the details of the event you want to edit.
2
Press m to display the Datebook Menu.
3
Press R to scroll to Edit and press A under SELECT.
4
Follow the instructions in “Adding New Event s” on page 74, omitting
step 1, to edit the various fields.
Deleting Events
1
Select the even you want to delete:
View the day containing the even and highlig ht the event.
Or,
Datebook
View the details of the event you want to delete.
2
Press m. The Datebook Menu displays.
3
Press R to scroll to Delete and press A under SELECT.
4
A confirmation screen appears. Press A under YES to confirm.
77
Page 76

Memo
The Memo application provides you with a place to store numeric notes.
Adding a New Memo
1
From the Ready screen, press m.
2
Press R to scroll to Memo.
3
Press A under “SELECT”.
4
Type in your memo using the phone’s keypad
5
Press A under “STORE”.
Viewing Memos
1
From the Ready screen, press m.
2
Press R to scroll to Memo.
3
Press A under “SELECT”.
4
Press m to view the Memo Menu sc reen.
Editing Memos
1
From the Ready screen, press m.
2
Press R to scroll to Memo.
3
Press A under “SELECT”.
4
Type the new number.
5
Press A under “STORE”.
78
www.motorola.com
Page 77

VoiceNotes
Deleting Memos
1
From the Ready screen, press m.
2
Press R to scroll to Memo.
3
Press A under “SELECT”.
4
Press A under “DELETE”.
VoiceNotes
The VoiceNotes feature enables you to record personal messages or incoming
voice calls to play back at a later t ime. VoiceNotes are stored by the time and
date that the VoiceNote is created. A VoiceNote is a type of Voice Tag. Your
phone can store up to 20 Voice Tags.
To access the VoiceNotes feature:
1
From the Ready screen, press m.
2
Press R to scroll to VoiceNotes.
3
Press A under SELECT.
79
Page 78

Recording a New VoiceNote
1
From the VoiceNotes screen, press R to scroll to [New VoiceNote].
2
Press A under RECORD and speak the message you want to record
into the microphone.
3
When you are finished recording your Voice Note, press A under
STOP.
Playing a VoiceNote
1
From the VoiceNotes screen, press R to scroll to VoiceNote you want
to play.
2
Press A under PLAY.
Deleting a VoiceNote
1
From the VoiceNotes screen, press R to scroll to VoiceNote you want
to delete.
2
Press m to view the VoiceNotes Menu.
3
Press R to scroll to Delete and press A under SELECT.
4
A confirmation screen appears. Press A under YES to confirm.
Locking/Unlocking a VoiceNote
1
From the VoiceNotes screen, press R to scroll to VoiceNote you want
to lock or unlock.
2
Press m to view the VoiceNotes Menu.
3
Press R to scroll to Lock or Unlock.
4
Press A to SELECT. A confirmation screen displays.
Synchronizing
Your phone can synchronize wi t h certain software applications to ensure that
you always stay on top of your appointments. Synchronizing refers to your
www.motorola.com
80
Page 79

Synchronizing
phones ability to exchange data with a personal computer (PC) application. The
ability to synchronize ensures that all your various calendar programs always
have the most up-to-date scheduled events.
81
Page 80

82
www.motorola.com
Page 81

K-Java
This section includes:
K-Java Page 83
Calculator
The Calculator application enables you to calculate simple arithmetic
expressions. The Calculator application supports standard add/subtract/multiply/
divide functions, and also Clear, Delete, Plus/Minus, and Invert.
1
From the Ready screen, press m, then press R to scroll to “K-Java”.
Press A under “SELECT”.
2
Press R to scroll to “Calculator”. Press A under “SELECT”.
3
Press N to highlight numbers and the built-in functi on s. Press A to
“SELECT”.
83
Page 82

84
www.motorola.com
Page 83

Customizing the i3000plus
Phone
This section includes everything you will need to know to customize your
i3000plus phone:
Changing the Displa y Language Page 85
Setting the Time and Date Page 86
Backlight Timer Page 87
Setting the Ringer Volume Page 88
Selecting a Ring Style Page 88
Setting the VibraCall® Feature Page 90
Shortcuts Page 90
Styles Page94
Changing the Display Language
You can customize the i3000plus phone to display menus in English, Spanish,
French, or Portuguese. The default language is English. To change the display
language:
1
From the Ready screen, press m.
2
Press R to scroll to “Settings”.
3
Press A under “SELECT”.
4
Press R to scroll to “Initial Setup”.
5
Press A under “SELECT”.
6
Press R to scroll to “Language”.
7
Press A under “CHANGE”.
85
Page 84

8
Press R to scroll to highlight the desired language.
9
Press A under “SELECT”.
10
A confirmation scre en displays.
Setting the Time and Date
NOTE: The Time and Date may not be available in your area and may
not appear on your display. Please contact your Service Provider. Once this feature becomes available, your i3000plus
phone will automatically display the local time and date.
You have a choice of a 12- or a 24-hour clock format, as shown in the
table below:
12-Hour Display 12 : 00 am 6:25 am 12:00 pm 10:25 pm
24-Hour Display 00:00 06:25 12:00 22:25
You have a choice of either a MM/DD (month/day) or a DD/MM (day/
month) date format as shown in the table below.
Date
Month/Day Format
(MM/DD)
Day/Month Format
(DD/MM)
January 2nd 01/02 02/01
December 31st 12/31 31/12
To set the time and date format once this feature is activated, follow the
steps below:
1
From the Ready screen, press m.
2
Press R to scroll to “Settings”.
3
Press A under “SELECT”.
4
Press R to scroll to “Initial Setup”.
www.motorola.com
86
Page 85

Backlight Timer
5
Press A under “SELECT”.
“Time/Date Format” is the first line item of the Initial Setup menu.
6
Press A under “SELECT”.
7
Press R to scroll to either:
• Time Format -- Enables you to change the Time format
• Date Format -- Enables you to change the Date forma t
• Display: On -- Enables you to disabl e/enable the Time/Date display
8
Press A under “CHANGE”.
9
Press R to scroll to the desired Time/Date/Display option.
10
Press A under “SELECT”.
11
A confirmation screen displays.
Backlight Timer
Your phone’s backlight is what illuminates the display when you, for
example, first receive or make calls. You can customize the amount of
time that your backlight remains illuminated, either 5, 10, 20, or 30
seconds. Additionally, you can set your backlight to remain illuminated
continuously or turn it off completely.
1
From the Ready screen, press m.
2
Press R to scroll to “Settings”.
3
Press A under “SELECT”.
4
Press R to scroll to “Initial Setup”.
5
Press A under “SELECT”.
6
Press R to scroll to “Backlight”.
87
Page 86

7
Press A under “CHANGE”.
8
Press R to scroll to t he d e si red a m ou n t o f ti me that your backl igh t wi ll
remain illuminated after any given activity.
9
Press A under “SELECT”.
10
A confirmation scre en displays.
Setting the Ringer Volume
You can adjust the ringer volume for all your incoming alerts.
1
From the Ready screen, press m.
2
Press R to scroll to “Settings”.
3
Press A under “SELECT”.
“Ring/Vibrate” is the first line item of the Settings menu.
4
Press A under “SELECT”.
“Ring Volume” is the first line item of the Ring/Vibe menu.
5
Press A under “CHANGE”.
6
Press T to select a volume level. Or, use the Volume Control keys on
the side of your phone or press the number key representing the desired
volume level.
7
Press A under “OK”.
8
A confirmation scre en displays.
Selecting a Ring Style
With your i3000plus phone, you have a choice on how you’d like to be
notified of incoming phone calls, direct connect calls, text and numeric
pages, etc... Your phone has nine (pre-set) selectable ring styles, plus
vibrate and silent notification. You can set up each type of incoming
notification to a different style. Users with Alternate Line Service can
www.motorola.com
88
Page 87

Selecting a Ring Style
use the same ring style or different ring styles for each phone line, so
you can tell which line is ringing.
1
From the Ready screen, press m.
2
Press R to scroll to “Settings”.
3
Press A under “SELECT”.
“Ring/Vibrate” is the first line item of the Settings menu.
4
Press R to scroll to the “Style” optio n.
5
Press A under “CHANGE”.
6
Press R to scroll to the desired ring style.
7
Press A under “SELECT”.
8
A confirmation screen displays.
89
Page 88

Setting the VibraCall® Feature
The VibraCall® alert is a vibration alert system that notif ies you of incoming
Phone, Private, or Group calls and messages by a repetitive vibration rather than
a ring. You can select this alert system for all incoming calls/messages, or
individual services.
NOTE: When you set vibration alerts, they are set only for the current
VibraCall Settings What this setting does
line. If you have a second phone line, you must select “Line 2”
and repeat the procedure for selecting all services or individual services to vibrate.
Vibrate Alert Vibrates for all incoming calls and
messages.
—Vibrate All appears on the display.
—Speaker Off appears on the display to
remind you that the audio will be heard
through the earpiece instead of the speaker.
Phone Vibrate Vibrates only for incoming phone and data
calls.
Phone Vibrate/
Ring
Vibrates and rings for phone calls and onl ine
data calls.
Mail Vibe Vibrates for Message Mail and Net alerts.
Group/Prvt
Vibe
Vibrates for incoming group and private
calls.
Shortcuts
Shortcuts are a way you “mark” frequently-used menus for quick and easy
access. For example, if you set th e ri nger style often, marking the “Ring/Vibe”
setting as a Shortcut allows you to quickly navigate to that menu.
Creating a Shortcut
1
Navigate to the menu item to which you want to create a shortcut. For
example, if you wanted to create a shortcut to Datebook, from the
Ready screen press m, then press R to scroll to “Datebook”.
2
Press and hold m for about 2 seconds.
www.motorola.com
90
Page 89

3
A screen displays showing the assigned shortcut number.
If you want to change the shortcut number, press the desired number on
your keypad.
4
Press A under “OK”.
5
A confirmation screen displays.
Using Shortcuts
1
From the Ready screen, press m.
2
Press the assigned Shortcut number within 2 seconds.
Shortcuts
91
Page 90

Shortcut Menu
The Shortcut Menu enables you to manage your shor tcuts with the following
options.
New Displays the text file describing how to assign a
Edit Displays Shortcut Editor to edit a Shortcut name and
Delete T o delete any highlighted Shortcut.
Delete
All
To access the Shortcut menu:
1
From the Ready screen, press m.
2
Press R to scroll to “Shortcuts”.
3
Press A under “SELECT”.
4
Press m.
The Shortcut Menu displays.
Shortcut.
key number.
To delete all stored Shortcuts.
Editing Shortcuts
1
From the Ready screen, press m.
2
Press R to scroll to “Shortcuts”.
3
Press A under “SELECT”.
4
Press R to scroll to desired shortcut.
5
Press m.
The Shortcut Menu displays.
6
Press R to scroll to “Edit”.
92
www.motorola.com
Page 91

7
Press A under “SELECT”.
Change Shortcut information as desire d.
Deleting Shortcuts
1
From the Ready screen, press m.
2
Press R to scroll to “Shortcuts”.
3
Press A under “SELECT”.
4
Press R to scroll to desired shortcut.
5
Press m.
The Shortcut Menu displays.
6
Press R to scroll to “DELETE” if just deleting the selected shortcu t.
Scroll to “DELETE ALL” if deleting ALL shortcuts.
7
Press A under “YES” to confirm.
8
A confirmation screen displays.
Shortcuts
93
Page 92

Styles
The “Styles” menu lets you create or edit a group of settings and save them as
one. Use the Styles Menu manage the following:
Ring/Vibe Ring options for incoming calls -- ring style, vibrate
Backlight Duration that display remains illuminated -- 5, 10,
Font Size Disp lay font -- standard, zoom, or compressed.
Auto
Answer
options, and silent al er t s.
20, or 30 seconds, continuous, or off.
Automatic answer of incoming phone calls.
Accessing Styles
1
From the Ready screen, press m.
2
Press R to scroll to “Styles”.
3
Press A under “SELECT”.
4
Press m.
The Styles Menu displays all stored Styles.
Creating/Editing a Style
1
From the Ready screen, press m.
2
Press R to scroll to “Styles”.
3
Press A under “SELECT”.
4
Press m.
The Styles Menu displays all stored Styles.
5
Press R to scroll to desired Style. Or, scroll to “New Style” to create a
new style.
www.motorola.com
94
Page 93

6
Press A under “SELECT”.
If creating a New Style, you must first name it before going to the next
step. Use your keypad to na me the style and press A under “OK”
when finished.
7
Press R to scroll to the various Style options.
8
Press A under “CHANGE” to edit the highlighted Style option.
9
After all Style options are selected, press A under “DONE” to store
the style.
10
A confirmation menu displays.
Styles
95
Page 94

96
www.motorola.com
Page 95

Accessories
This section includes the following topics:
Wearable Carrying Solutions page 97
Batteries page 99
Travel Chargers page 100
Vehicle Power Adapter (Car Charger) page 102
Dual-Pocket Desktop Charger page 103
Headsets page 104
Car Kits page 104
Data Accessories page 108
Wearable Carrying Solutions
Leather Carry Case
The NTN9478 (or NTN9479) Leather Carry Case with belt clip allows for easy
attachment to a belt or purse. This case accommodates i3000plus phone travel
chargers, audio accessories, car accessories, and all battery types.
97
Page 96

Swivel Carry Clip
The NTN9475 Carry Clip provides a convenient means by which to carry your
i3000plus phone with you. It consists of the Phone Clip and the Belt Clip.
Phone Clip
Belt Clip
Using the Carry Clip
1
Attach the Phone Clip to the i3000plus phone.
2
Attach the Belt Clip to the Phone Clip as illustrated in th e pi cture abov e
3
Attach the Carry Clip (Phone Clip and Belt Clip) to your belt
4
To release phone from belt clip, push the button on the top of the belt
clip.
www.motorola.com
98
Page 97

Batteries
NOTE: For best results, charge the batteries within the temperature
range of 10
NOTE: Prolonged charging is not recommended. For battery charging
guidelines, see Table below.
Charging Lithium Ion Batteries
Table 1 provides the approximate time to fully charge a battery using a
Motorola iDEN Approved Lithium Ion battery charger.
MOTOROLA BATTERIES Charging Time to 100%
Kit
Number
SNN5704A Slim Li Ion Polymer 2 hour
SNN5705A High Performance Li
SNN5706A Extra Capacity Li Ion 2 Hours
SNN5716A Maximum Capacity
NOTE: Charging times are based on a fully discharged battery.
For optimal battery life, use a Motorola iDEN Approved Lithium Ion battery
charger with your Motorola iDEN Lithium Ion battery. Other chargers may not
fully charge your Lithium Ion battery.
o
C to 40oC (50oF to 104oF).
Table 1: Batter y Charging T imes
Description/
Chemistry
Ion
Li Ion
Rapid
Charger
Mid-Rate
Charger
4 hours
10 minutes
20 minutes
2 Hours 6 hours
7 hours
20 Minutes
50 minutes
3 Hours 9 hours
30 minutes
Battery Operating Instructions
• Extreme temperatures will degrade battery performance. Do not store your
battery where temperatures exceed 60°C (140°F) or fall below -20°C (4°F).
• This Lithium Ion battery ha s a self disch arge ra te and with out use, will lose
about 1% of its charge per day.
• The battery capacity will be degra ded if store d for lon g per iod s while fully
charged. If long term storage is required, store at half capacit y.
• The Motorola iDEN Approved Lithi um Ion c har gers will pro vide op timum
performance. Other chargers may not fully charge your iDEN Lithium Ion
battery or may yield reduced num ber of l ifetime charge cycles.
• If the battery appears inoperative, the internal protection circuitry may
have been activated . Remo ve th e b at ter y from th e pho ne a nd pu t it int o th e
charger for several minutes to reset the circuitry.
• When batteries are not in use, always store them in the plastic safety tray.
99
Page 98

Travel Chargers
Using one of Travel Chargers listed below, you can charge a battery from an AC
outlet. On one end of the Travel Charger, an accessory connector attaches to the
bottom of the phone. At the other (AC outlet) end of the device, there is a
compact housing that contains the plug-in power supply.
TRAVEL CHARGERS
Kit Number Description
SPN4940 Mid-Rate Multi-Voltage Travel Charger
SPN4716 Rapid Multi-Voltage Travel Charger
SPN4808 Mid-Rate Economy Travel Charger
NOTE:Additional adaptor plugs to accommodate various International
power outlets can be purchased separately (SYN7456, SYN7455,
SYN8127, SYN7461, SYN7460).
100
www.motorola.com
Page 99

Using the Travel Charger
1
While holding the i3000plus phone with its keypad facing up, insert
the accessory connector (with the Motorola logo facing you) into
the bottom of the i3000plus phone until you hear a click.
2
If you have either the Mid-Rate Multi-Voltage Travel Charger or the
Rapid Multi-Voltage Travel Charger, flip open the prongs, and plug the
Travel Charger transformer into an AC wall outlet.
Or
If you have the Mid-Rate Economy Travel Charger, plug the Travel
Charger transformer into an AC wall outlet.
Multi-Voltage Travel Charger Operating Specifications
Input voltage range: 90-264 VAC @ 50/60 Hz.
Operating temperature range: 0°C to +50°C
Economy Travel Charger (U.S. Only)
Input voltage range: 90-120 VAC @60Hz.
Operati ng te m perature ran ge: 0°C to +50°C
101
Page 100

Vehicle Power Adapter
The SYN7818 Vehicle Power Adapter (Car Charger) provid es power to the
phone and charges the phone’s Lithium Ion battery.
The power light (green LED) will light when the adaptor is receiving power.
Using the Vehicle Power Adapter
1
While holding th e i3000plus phone with its keypad faci ng up, inse rt the
accessory connector (with the Motorola logo facing you) into the bottom of the i3000plus phone until you hear a click.
2
Plug the vehicle power adapter into the cigarette lighter/power receptacle. The power light (green LED) will come on.
3
The i3000plus phone may be turned off, turned on, or in use.
Removing the Vehicle Power Adapter
1
Unplug the vehicle power adapter from the vehicle’s cigarette lighter/
power receptacle.
2
Press the button on the accessory connector.
3
Pull the accessory connector from the bottom of the i3000plus phone.
www.motorola.com
102
 Loading...