

Page 1
@6864110R05@
6864110R05-O
Model T6400
Page 2

2
Page 3
Contents
Safety General Information . . . i
FCC License . . . . . . . . . . . . . . 1
Getting Started . . . . . . . . . . . .2
Installing Batteries . . . . . . . . . . . 3
CommPort™ Charging Dock . . 6
Basic Operation of Radio . . . . 9
Belt Clip . . . . . . . . . . . . . . . . 10
Backlight . . . . . . . . . . . . . . . . . 14
Talking . . . . . . . . . . . . . . . . . . 15
Before You Can Talk . . . . . . . . 15
To Talk . . . . . . . . . . . . . . . . . .17
Call Tone and Call Display . . . 19
Alerts . . . . . . . . . . . . . . . . . . . 20
VibraCall® Alert . . . . . . . . . . . 20
Keeping Time . . . . . . . . . . . . . 21
Setting the Time . . . . . . . . . . . 21
Setting the Alarm . . . . . . . . . . . 22
Stopwatch . . . . . . . . . . . . . . . . 23
Hands-Free Use (VOX) . . . . . 24
Privacy . . . . . . . . . . . . . . . . . .25
Eavesdrop Reducer . . . . . . . . .25
QuieT6000™ . . . . . . . . . . . . . .26
Advanced Two-Way . . . . . . .27
Lock . . . . . . . . . . . . . . . . . . . . .26
LockPlus . . . . . . . . . . . . . . . . .26
Channel Scanning . . . . . . . . . .27
Talk Confirmation Tone . . . . . .28
Button Beeps . . . . . . . . . . . . . . 28
Automatic Power Off . . . . . . . .29
Monitor . . . . . . . . . . . . . . . . . .29
Reset . . . . . . . . . . . . . . . . . . . .30
Setting the Battery Type . . . .30
Use and Care . . . . . . . . . . . . .31
Frequency and Code Charts 33
Troubleshooting . . . . . . . . . .36
Motorola Limited Warranty . . 39
PRELIMINARY
Page 4

SAFETY AND GENERAL INFORMATION
IMPORTANT INFORMATION ON SAFE AND EFFICIENT OPERATION
READ THIS INFORMATION BEFORE USING YOUR RADIO.
The information provided in this document supersedes the general safety
information contained in user guides published prior to July 2000. For information
regarding radio use in a hazardous atmosphere please refer to the Factory Mutual
(FM) Approval Manual Supplement or Instruction Card, which is included with radio
models that offer this capability.
RF Operational Characteristics
Your radio contains a transmitter and a receiver. When it is ON, it receives and
transmits radio frequency(RF) energy. The radio operates in the frequency range of
462 MHz to 467 MHz and employs analogue modulation techniques.The output
power level typically may vary over a range from 0.5 watts to 1.0 watt.
Exposure To Radio Frequency Energy
Your Motorola radio is designed to comply with the following national and
international standards and guidelines regarding exposure of human beings to radio
frequency electromagnetic energy:
• United States Federal Communications Commission, Code of Federal
Regulations; 47 CFR part 2 sub-part J
• American National Standards Institute (ANSI) / Institute of Electrical and
Electronic Engineers (IEEE) C95. 1-1992
• Institute of Electrical and Electronic Engineers (IEEE) C95.1-1999 Edition
• National Council on Radiation Protection and Measurements (NCRP) of the
United States, Report 86, 1986
PRELIMINARY
SAFETY AND GENERAL INFORMATION
i
Page 5
• International Commission on Non-Ionizing Radiation Protection (ICNIRP)
1998
• Ministry of Health (Canada) Safety Code 6. Limits of Human Exposure to
Radiofrequency Electromagnetic Fields in the Frequency Range from 3 kHz
to 300 GHz, 1999
• Australian Communications Authority Radiocommunications
(Electromagnetic Radiation - Human Exposure) Standard 1999 (applicable
to wireless phones only)
To assure optimal radio performance and make sure human exposure to radio
frequency electromagnetic energy is within the guidelines set forth in the above
standards, always adhere to the following procedures:
PORTABLE RADIO OPERATION AND EME EXPOSURE
Antenna Care
Use only the supplied or an approved replacement antenna. Unauthorized
antennas, modifications, or attachments could damage the radio and may violate
FCC regulations.
DO NOT hold the antenna when the radio is “IN USE.” Holding the antenna
affects call quality and may cause the radio to operate at a higher power level than
needed.
Two-way Radio Operation
When using your radio as a traditional two-way radio, hold the radio in a vertical
position with the microphone one to two inches (2.5 to 5 cm) away from the
lips.
SAFETY AND GENERAL INFORMATION
ii
PRELIMINARY
Page 6

Body-worn Operation
To maintain compliance with FCC/Health Canada RF exposure guidelines, if you
wear a radio on your body when transmitting, always place the radio in a Motorola
supplied or approved clip, holder, holster, case, or body harness for this
product. Use of non-Motorola-approved accessories may exceed FCC/Health
Canada RF exposure guidelines. If you do not use a body-worn accessory, and
are not using the radio held in the normal use position at the ear, ensure the radio
and its antenna are at least one inch (2.5 cm) from your body when
transmitting.
Data operation
When using any data feature of the radio, with or without an accessory cable,
position the radio and its antenna at least one inch (2.5 cm) from the body.
Approved Accessories
For a list of approved Motorola accessories visit our website at www.mot.com.
ELECTROMAGNETIC INTERFERENCE/COMPATIBILITY
Note: Nearly every electronic device is susceptible to electromagnetic interference
(EMI) if inadequately shielded, designed or otherwise configured for
electromagnetic compatibility.
• FACILITIES
To avoid electromagnetic interference and/or compatibility conflicts, turn off your
radio in any facility where posted notices instruct you to do so. Hospitals or
health care facilities may be using equipment that is sensitive to external RF
energy.
PRELIMINARY
SAFETY AND GENERAL INFORMATION
iii
Page 7

• AIRCRAFT
When instructed to do so, turn off your radio when on board an aircraft. Any use
of a radio must be in accordance with applicable regulations per airline crew
instructions.
• MEDICAL DEVICES
Pacemakers
The Advanced Medical Technology Association recommends that a minimum
separation of 6 inches (15 centimeters) be maintained between a handheld
wireless radio and a pacemaker.These recommendations are consistent with
the independent research by, and recommendations of, the United States Food
and Drug Administration.
Persons with pacemakers should:
• ALWAYS keep the radio more than six inches (15 centimeters) from their
pacemaker when the radio is turned ON.
• not carry the radio in the breast pocket.
• use the ear opposite the pacemaker to minimize the potential for
interference.
• turn the radio OFF immediately if you have any reason to suspect that
interference is taking place.
Hearing Aids
Some analogue wireless radios may interfere with some hearing aids. In the
event of such interference, you may want to consult your hearing aid manufac-
SAFETY AND GENERAL INFORMATION
iv
turer to discuss alternatives.
PRELIMINARY
Page 8

Other Medical Devices
If you use any other personal medical device, consult the manufacturer of your
device to determine if it is adequately shielded from RF energy. Your physician
may be able to assist you in obtaining this information.
SAFETY AND GENERAL
• USE WHILE DRIVING
Check the laws and regulations on the use of radio in the area where you drive.
Always obey them.
When using your radio while driving, please:
• Give full attention to driving and to the road.
• Use hands-free operation, if available.
• Pull off the road and park before making or answering a call if driving
condtions so require.
OPERATIONAL WARNINGS
• FOR VEHICLES WITH AN AIR BAG
Do not place a portable radio in the area over an air bag or in the air bag deployment area. Air bags inflate with great force. If a portable radio is placed in the air
bag deployment area and the air bag inflates, the radio may be propelled with
great force and cause serious injury to occupants of the vehicle.
• POTENTIALLY EXPLOSIVE ATMOSPHERES
Turn off your radio prior to entering any area with a potentially explosive atmosphere, unless it is a radio type especially qualified for use in such areas as
"Intrinsically Safe." Do not remove, install, or charge batteries in such areas.
PRELIMINARY
SAFETY AND GENERAL INFORMATION
v
Page 9

Sparks in a potentially explosive atmosphere can cause an explosion or fire
resulting in bodily injury or even death.
Note: The areas with potentially explosive atmospheres referred to above include
fueling areas such as below decks on boats, fuel or chemical transfer or
storage facilities, areas where the air contains chemicals or particles, such
as grain, dust or metal powders, and any other area where you would
normally be advised to turn off your vehicle engine. Areas with potentially
explosive atmospheres are often but not always posted.
• BLASTING CAPS AND AREAS
To avoid possible interference with blasting operations, turn off your radio when
you are near electrical blasting caps, in a blasting area, or in areas posted: “Tur n
off two-way radio.” Obey all signs and instructions.
OPERATIONAL CAUTIONS
• ANTENNAS
Do not use any portable radio that has a damaged antenna. If a damaged
antenna comes into contact with your skin, a minor burn can result.
• BATTERIES
All batteries can cause property damage and/or bodily injury such as burns if a
conductive material such as jewelry, keys, or beaded chains touch exposed terminals. The conductive material may complete an electrical circuit (short circuit)
and become quite hot. Exercise care in handling any charged battery, particularly when placing it inside a pocket, purse, or other container with metal
SAFETY AND GENERAL INFORMATION
vi
objects.
PRELIMINARY
Page 10
DCharging Safety Instructions
Before using the battery charger, read all instructions and cautionary markings on
the:
1. battery
2. battery charger, and
3. radio using the battery.
Caution
To reduce the risk of injury, charge only the rechargeable batteries listed. Other
types of batteries may burst, causing personal injury and damage.
Single-Unit Charger
Kit Number Description
NTN9393 110V - NiMH Charging Adapter
Batteries
Kit Number
NTN9395 550 mAH T6000-Series NiMH
Save these Instructions
1. Do not expose the charger to rain or snow.
2. Do not operate the charger if it has received a sharp blow, or has been dropped
or damaged in any way.
Capacity in
milliampere-hour mAH
Description Composition
PRELIMINARY
SAFETY AND GENERAL INFORMATION
vii
Page 11

3. Do not disassemble the charger if it has received a sharp blow, or has been
dropped or damaged in any way.
4. Never alter the AC cord or plug provided with the unit. If plug will not fit the outlet, have proper outlet installed by a qualified electrician. An improper condition
can result in a risk of electric shock.
5. To reduce risk of damage to cord or plug, pull the plug rather than the cord when
disconnecting charger from AC receptacle.
6. To reduce the risk of electric shock, unplug the charger from the outlet before
attempting any maintenance or cleaning.
7. Use of an attachment not recommended or sold by Motorola may result in a risk
of fire, electric shock, or personal injury.
8. Make sure that the cord is located so that it will not be stepped on, tripped over,
or subjected to damage or stress.
9. An extension cord should not be used unless absolutely necessary. Use of an
improper extension cord could result in a risk of fire and/or electric shock. If an
extension cord must be used, make sure:
• That the pins on the plug of the extension cord are the same number, size and shape
as those on the plug of the charger.
• That the extension cord is properly wired and in good electrical condition, and
• That the cord size is18 AWG for lengths up to 100 feet, and 16 AWG for lengths up to
10. The supply cord of this charger cannot be replaced. If the cord is damaged, the
150 feet.
charger should be discarded or returned to the point of purchase if within 90
days of purchase.
SAFETY AND GENERAL INFORMATION
viii
PRELIMINARY
Page 12

FCC Licensing Information
T6400 radios operate on General Mobile Radio Service (GMRS) frequencies
which require a Federal Communications Commission (FCC) License. GMRS
frequencies have been allocated by the FCC for recreational use such as camping,
hunting, and skiing.
There are no FCC licensing requirements necessary for the Family Radio Service
(FRS) frequencies.
For licensing information and applications (ask for Form 605) call the FCC forms
hotline at:
1-800-418-FORM
(1-800-418-3676)
Or visit the FCC on the web:
http://www.fcc.gov
For questions concerning the license application, contact the FCC at:
1-888-CALL-FCC
(1-800-225-5322)
PRELIMINARY
FCC Licensing Information
1
Page 13

Getting Started
Hi, I’m QuickStart and I’m going to help you get
started!
The Motorola
two-way radio that allows you to stay connected to
family, friends, and companions. The T6400 operates
on Family Radio Service (FRS) frequencies and
General Mobile Radio Service (GMRS) frequencies;
FRS requires no service fee or license, and can be
used anywhere in the United States and other areas
as listed by the FCC, but GMRS are subject to FCC
licensing requirements.
But these radios offer more than just a way of keeping
in touch. They also help you and your group stay on
schedule because a clock, alarm, and stopwatch are
Getting Started
A detachable Quick Reference Card is included.
Please read this manual to aid in understanding how your radio works.
built into each model.
2
Talkabout® T6400 radio is a durable
Page 14
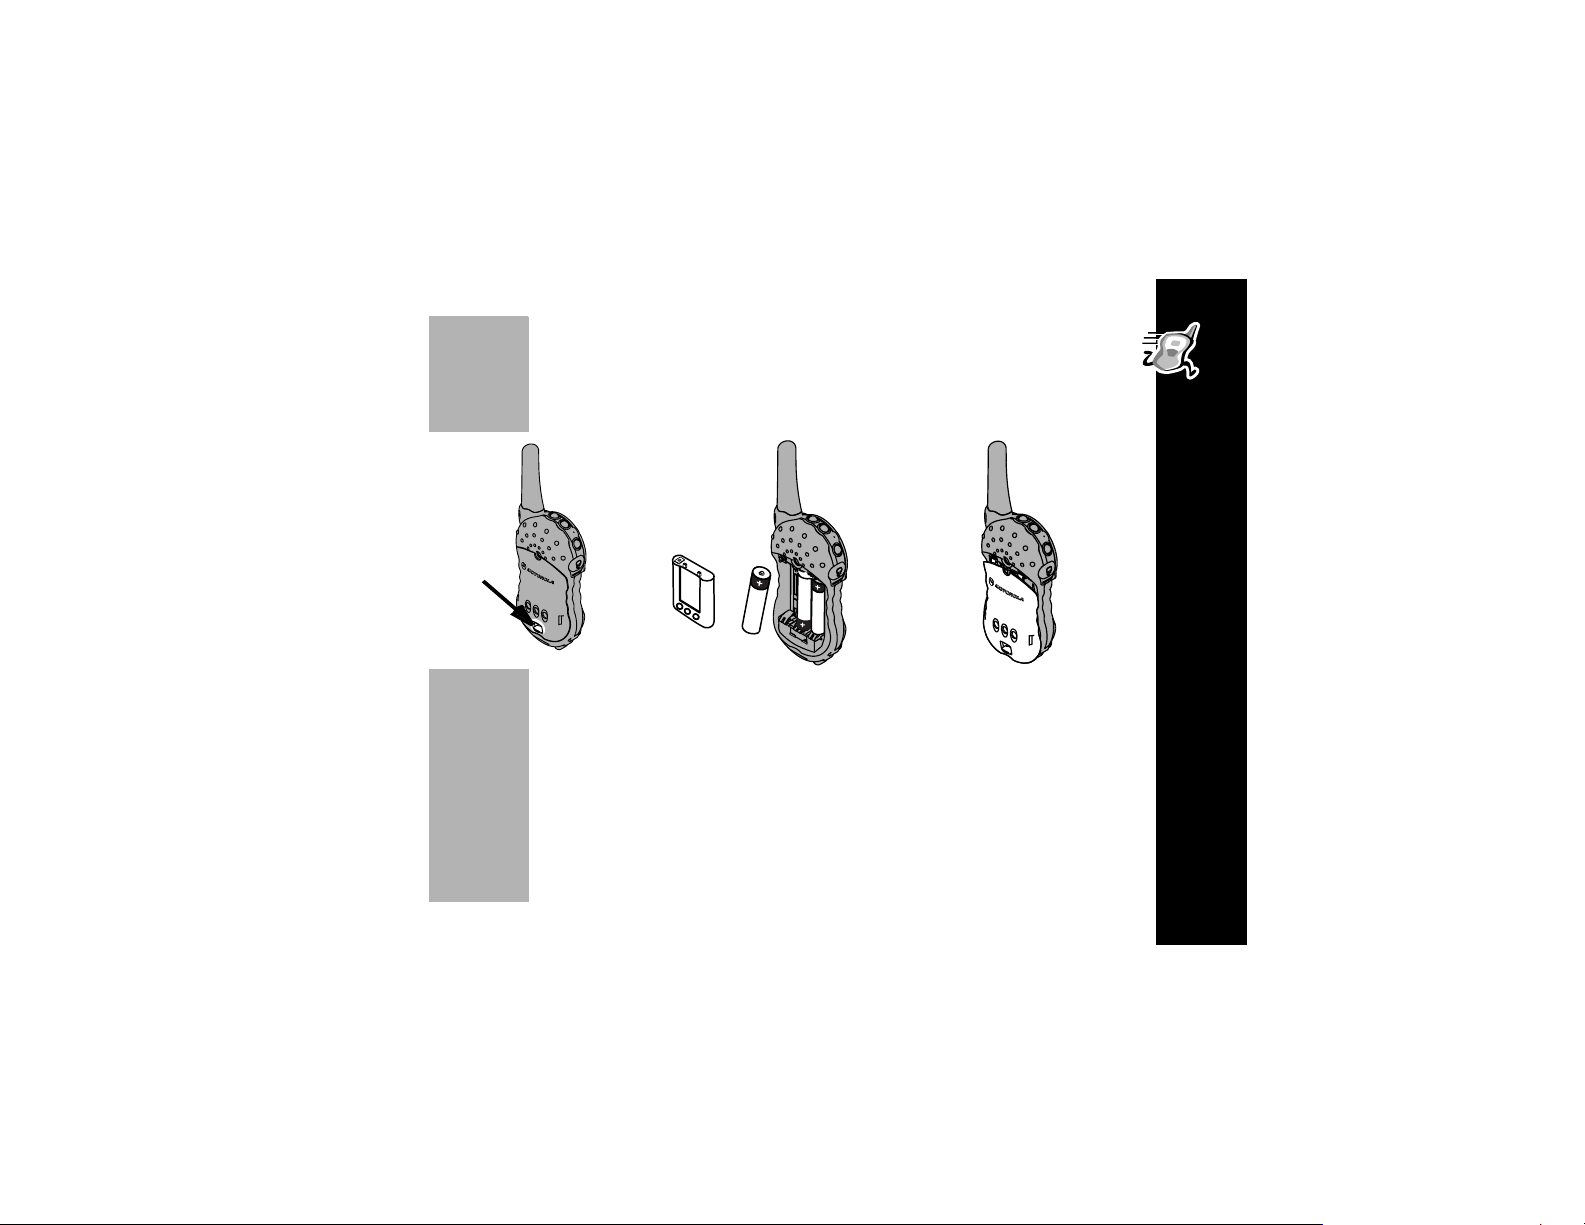
Installing Batteries
Your radio uses three AA batteries or a rechargeable Nickel-Metal Hydride (NiMH)
battery.
Latch
• Turn off the radio
(see page 12).
• Push latch up until it
clicks.
• Lift back cover off.
Note: The radio keeps the clock settings if battery changes are made in less than
20 seconds. Try replacing one battery at a time.
• Remove and replace
batteries so the + and markings match the ones in
the compartment or the
NiMH charge contacts are
facing out.
• Hook back cover on the
hinges.
• Align tabs.
• Close battery door,
pressing lightly until latch
clicks.
PRELIMINARY
Getting Started
3
Page 15
The battery meter on the top-left corner of the display shows how
much battery power you have. It shows d(full), b(two-thirds
full), c(one-third full) and a(almost empty). When it’s c,
the radio beeps every ten minutes. So, change or charge those
batteries!
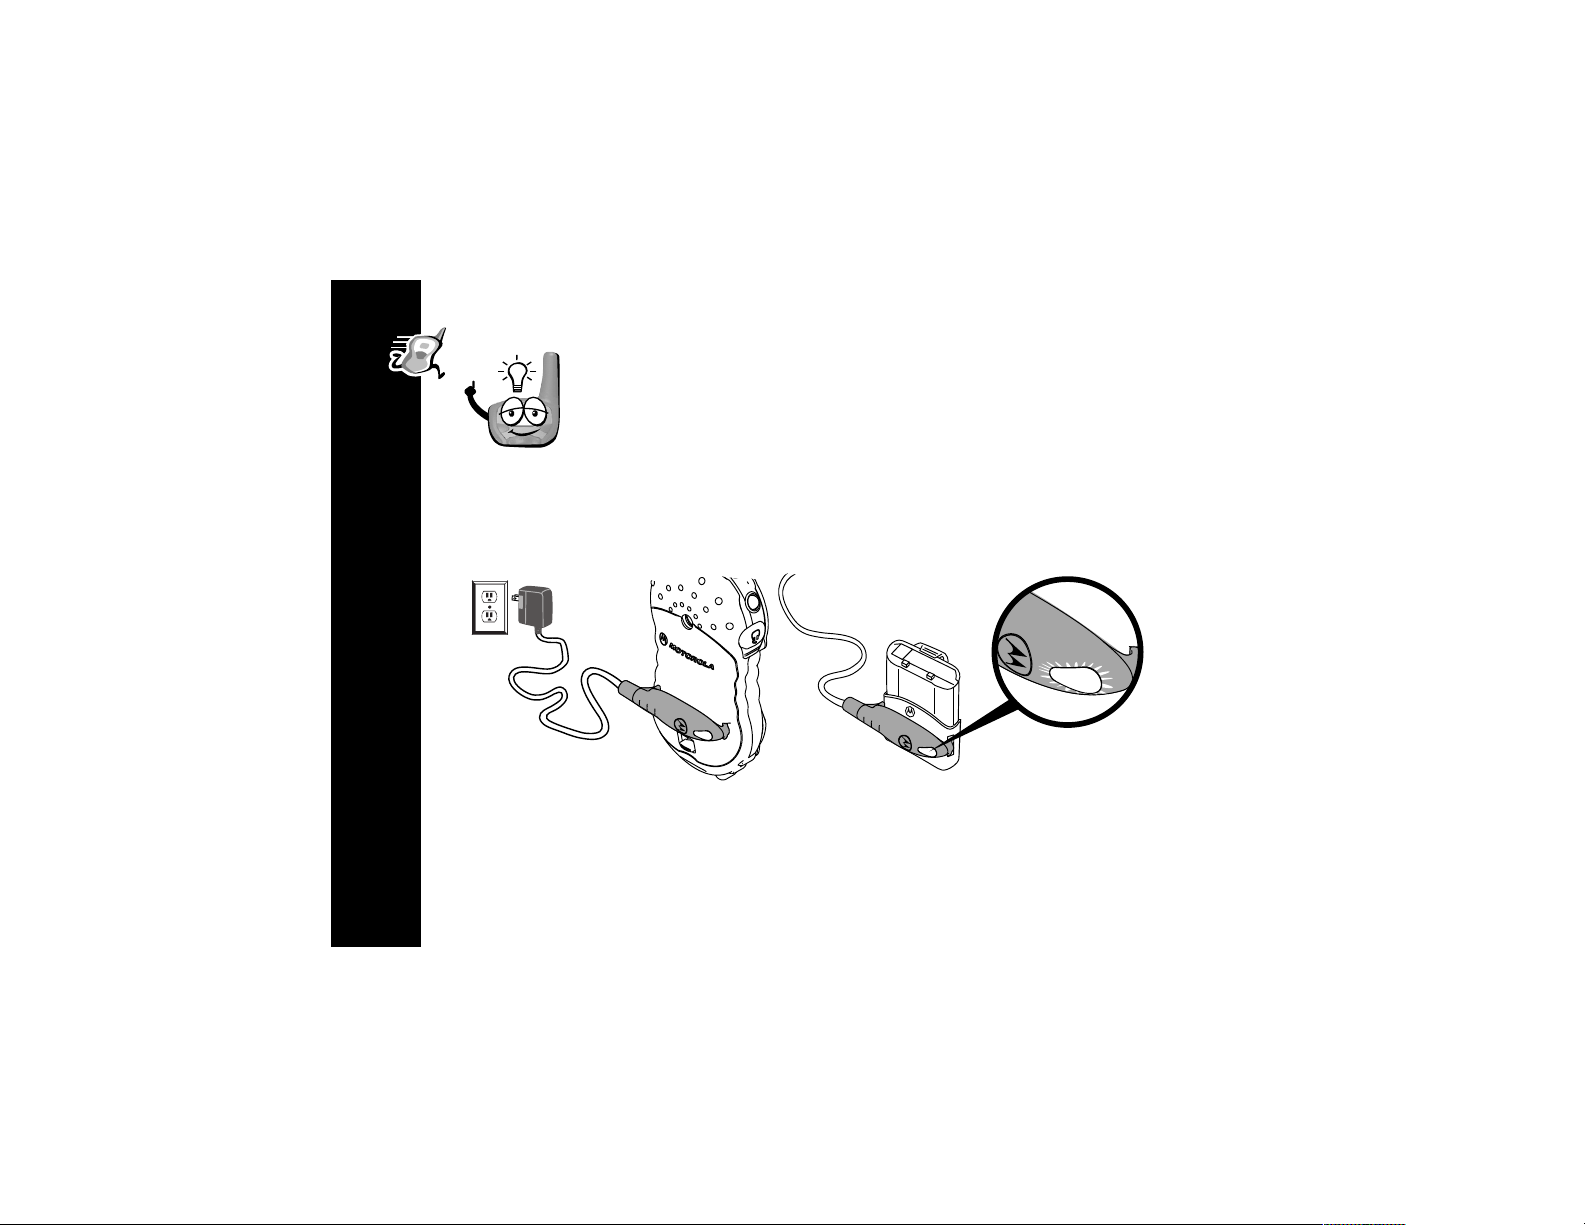
Charging the NiMH battery (Optional Accessory, part #56319)
Charge the NiMH overnight (12 to 16 hours) before using it for the first time, it will
only need up to four hours of charging thereafter.
Getting Started
4
Page 16

• Turn off the radio (see page 12) or place the NiMH battery in the charger
adapter cover.
• Plug in the charger.
• At the contacts on the back of the radio, or if charging just the battery, at the
battery contacts:
• Position the charger with the hook on the LED end of the charger placed over
the larger slot.
• Snap the hook on the cord end into the smaller slot.
Note: If you notice the LED flashing red for more than a minute while clamping the
charger onto the charger adapter cover, the battery is faulty and must be
replaced.
• When the LED turns solid green, the battery is fully charged.
Note: When charging the battery by itself, remove the charger from the charger
adapter cover before removing the battery.
PRELIMINARY
Getting Started
5
Page 17
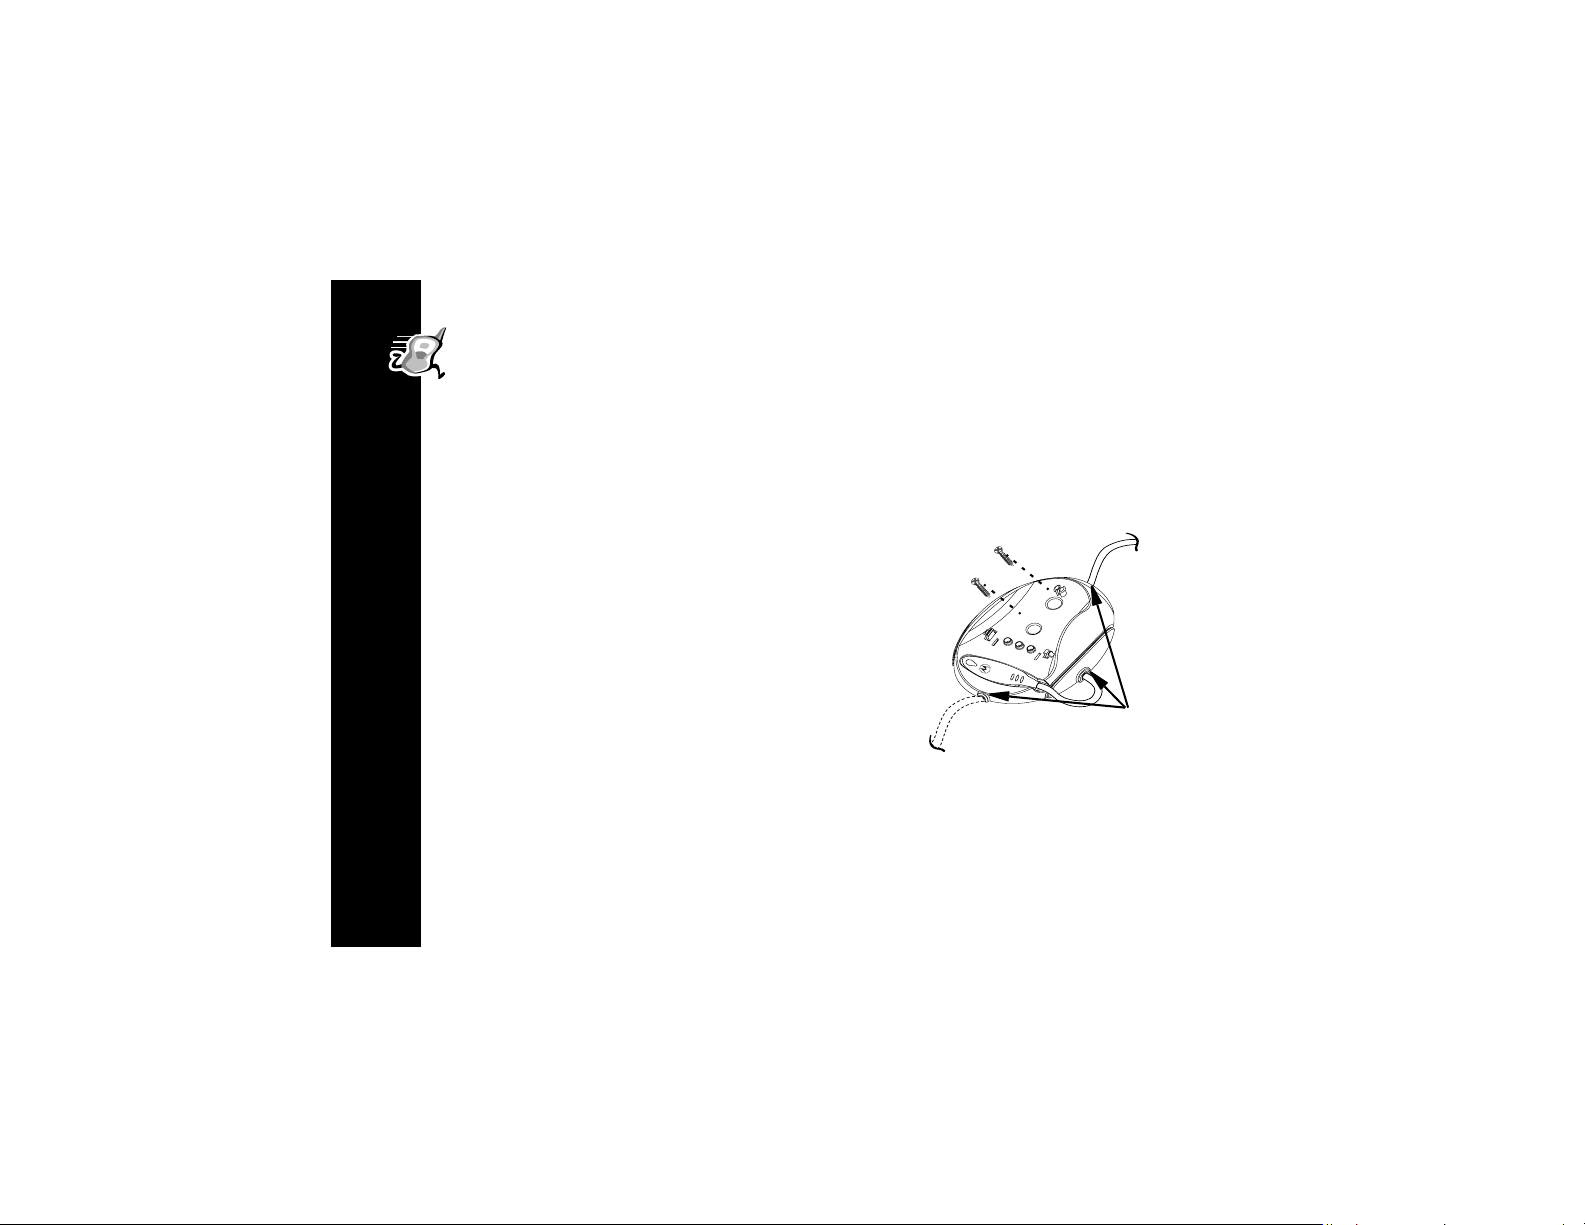
CommPort™ Charging Dock (Included with Optional
Accessory, part# 56319)
The CommPort™ charging dock provides drop-in charging convenience. The
charging dock can be mounted or placed on any flat surface (such as a wall or
workbench) and turns your radio into a stationary intercom while keeping it charged
and ready for any adventure.
To mount the charging dock:
• Wrap the power cord under the charging dock.
Use the cutouts to hold the cord in place.
• Attach using two #6 x ¾” screws appropriate for
the mounting surface.
Getting Started
6
Cutouts
Page 18
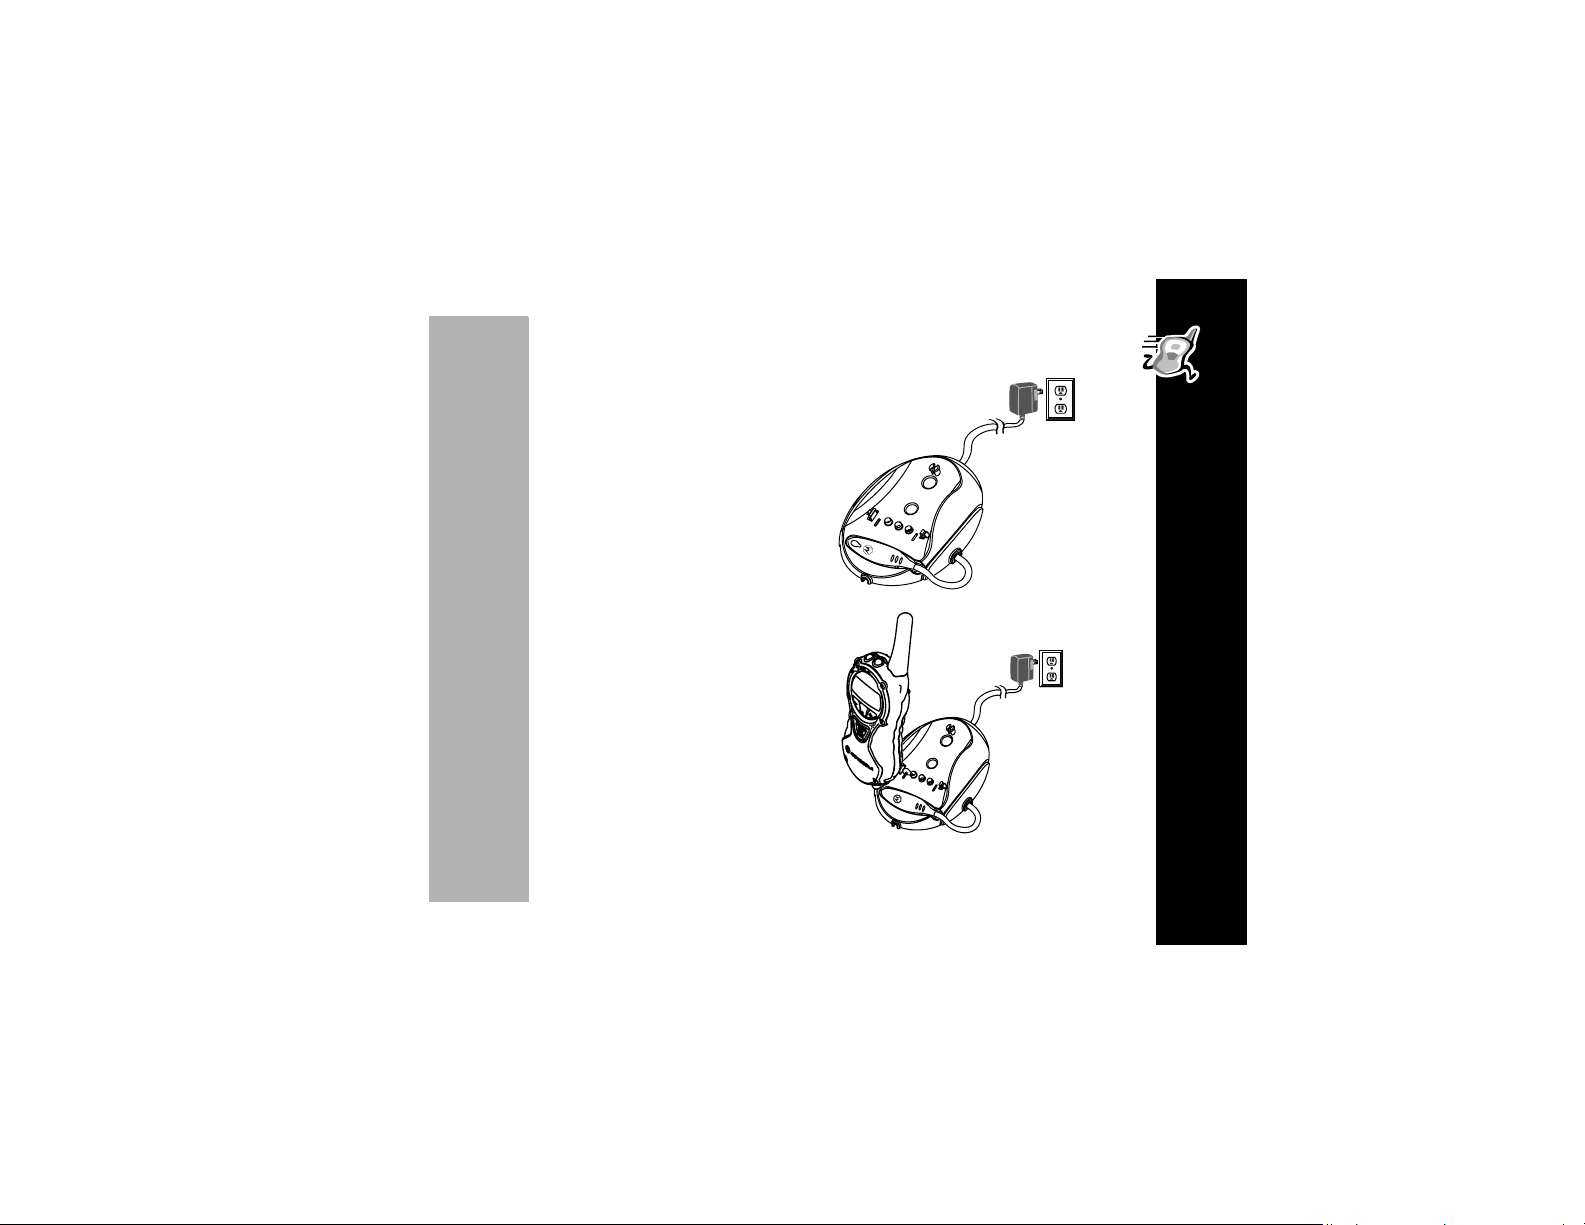
• Position the charger with the hook on the
LED end over the left slot.
• Snap the hook on the cord end into the
right slot, clamping the charger onto the
charging dock contacts
• Plug in the charger.
• Place the radio, or the NiMH battery in the
charger adapter cover, into the CommPort
charging dock.
• When the LED turns solid green, the
battery is fully charged.
PRELIMINARY
Getting Started
7
Page 19

Charging Status
The LED charger indicates charging status when the charger is connected to the
radio, the NiMH battery, or the CommPort™ charging dock.
Color
Solid Red Rapid charging Up to 90%
Flashing Green Top-off charging 90% to 100%
Solid Green Charging complete 100%
Flashing Red
Getting Started
Flashing Yellow
Charging Status and
Description
Battery faulty
If flashing red persists for more than
one minute, the battery is faulty and
should be replaced.
Standby
Battery waiting to charge.
Temperature out of range for charging;
must be between 5
o
F
104
o
to 40o C or 41o to
Charging Level
Complete
-
-
8
Page 20
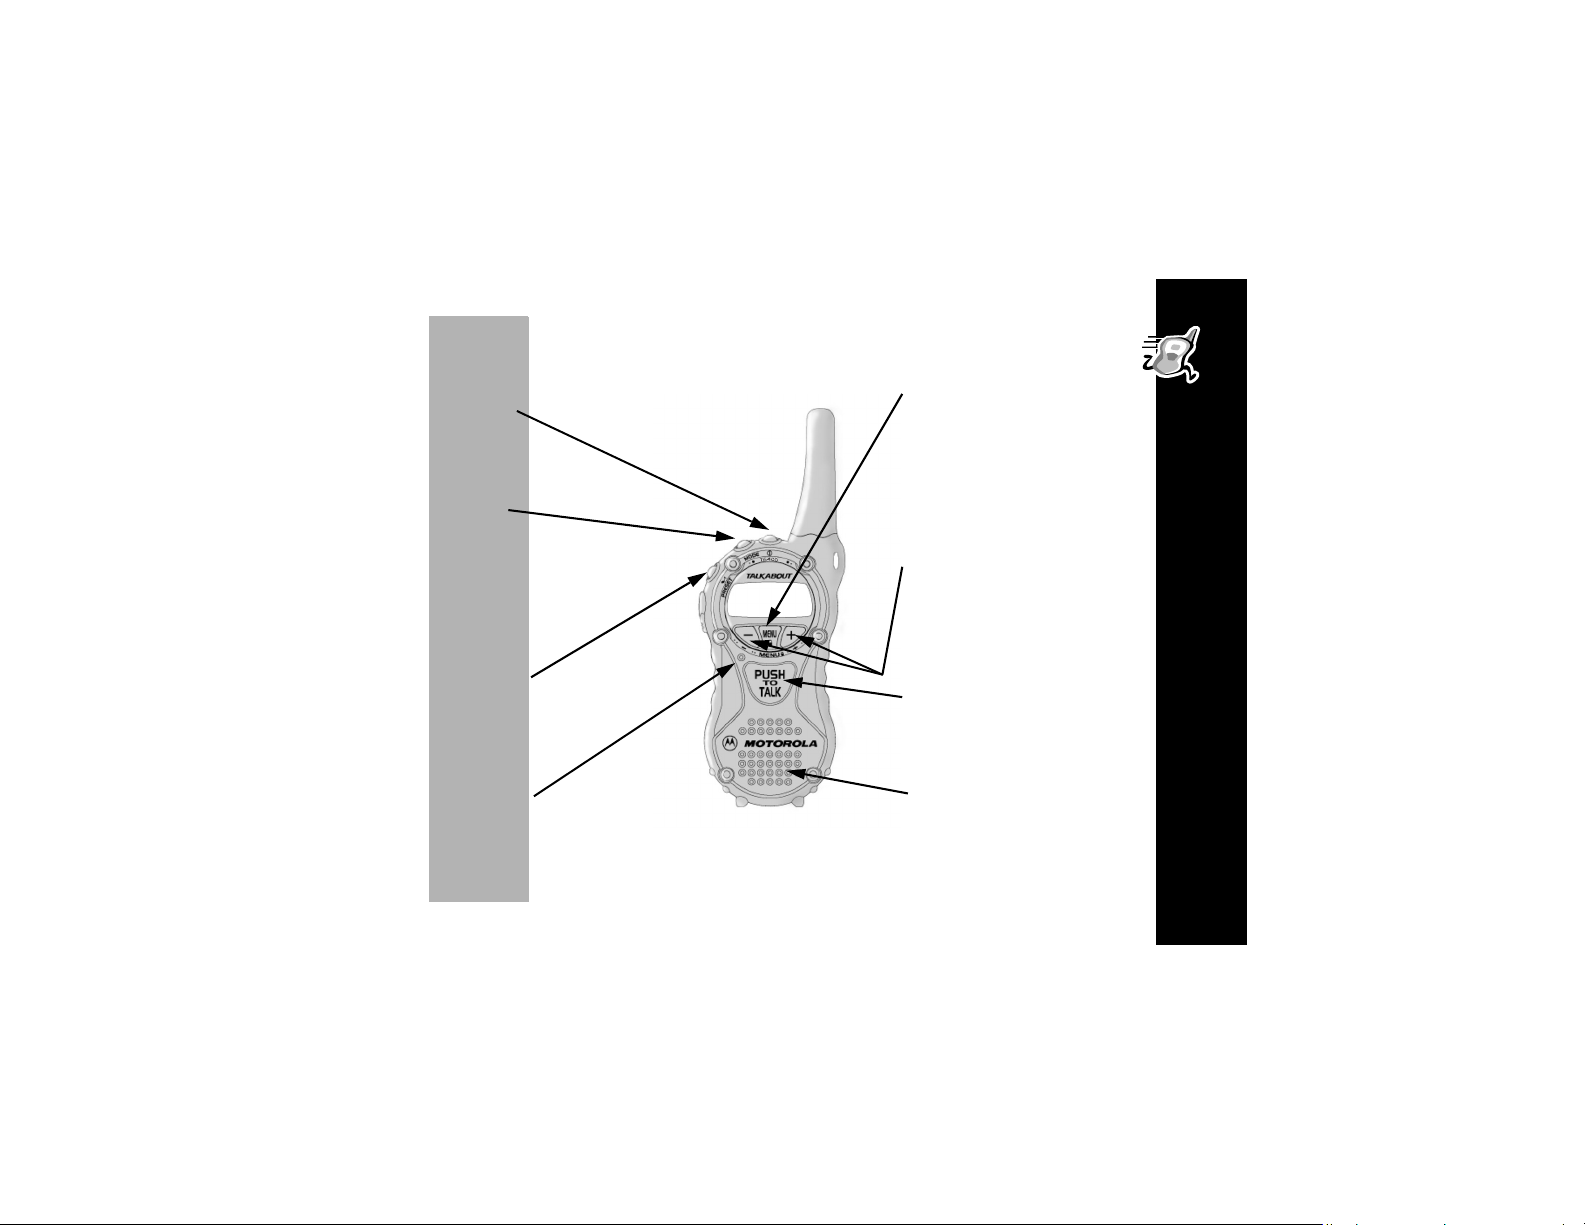
Basic Operation of Your Radio
Use | to --
• Tu r n p ower
on/off
Use ~ to --
• Scroll through
mode selections
• Return to two-way mode
(when held down)
Use
‰
to --
• Transmit call tone
• Start and stop
stopwatch
y
Use
• Scroll through menus
• Lock the keypad (when
• Exit the menu (when held
Use
• Change the volume
• Scroll through and select
Use
• Talk on the radio
• Save a setting
to --
held down and not in a
menu)
down while in a menu)
x and z
settings
{
to --
to --
Getting Started
Microphone --
PRELIMINARY
Speaker --
9
Page 21

Belt Clip
• Squeeze the top and bottom of the clip to attach
or detach the clip from the radio.
Note: The belt clip holds the radio while being
NiMH Battery Charging Contacts
• When using audio accessories with your radio,
Belt Clip
Accessory Connector
• For audio accessories, such as speaker/
Note: Connector(s) shown with the cover plug in
Check out the Accessory Brochure for other cool stuff available from Motorola.
10
worn on your belt. It was designed for your
convenience and is not meant to secure
your radio under all circumstances.
Motorola recommends that the volume level be
kept at a comfortable listening level.
microphone and flexible ear receiver.
place. Both connectors cannot be used at
the same time.
Page 22

Using your radio is easier than
catching a wave!
Turning On Your Radio
Press To Display Then
|
The radio beeps and | flashes
every three seconds.
PRELIMINARY
Belt Clip
11
Page 23

Your Radio’s Display
Lock Set
Eavesdrop Reducer
Battery Meter
VOX On
Channel Scan On
VibraCall® Alert On
Automatic Power Off
MOTOROLA
Channel Indicator
Channel In Use
Alarm On
Code Indicator
Ring Alert
Belt Clip
Turning Off Your Radio
To turn off your radio, press and hold | until the radio beeps and the display goes
blank.
Modes
Your radio can transmit and receive in all modes. The T6400, standard modes are:
TWO WAY, TIME, STPWATCH, and SETTINGS.
12
Page 24

Key Sequence
Almost everything you can do with your radio is done using the same basic key
sequence! Use your radio’s mode and menu screens to select options and set
features the way you want them. All the features that work using this key sequence
are described on the following pages.
Press To Display Then Press
~
y
x
or
the mode you want
the menu you want
z
the setting you want
y
to display the associated menus
x
or z to select the menu
{
or wait ten seconds to save the setting or
press and hold
y
Backlight
Being in the dark is never a problem. Your radio has a backlight that
turns on automatically any time you press a button, except
‰
. The backlight turns out when you’re talking on the radio and
turns itself off automatically after five seconds.
PRELIMINARY
Backlight
{ and
13
Page 25

Talking
Before You Can Talk
Have you ever tried to talk to someone who’s on a “different
wavelength?” It’s not easy, is it? Well, you can’t talk with someone
else on your two-way radio unless you ARE BOTH on the same
channel and using the same interference eliminator code. The
24
interference eliminator codes help minimize interference by
providing you with a choice of code combinations.
The channel is the radio frequency wave your radio uses to
transmit. The interference eliminator code filters out static, noise,
and unwanted messages. Refer to the Frequency and Code
Charts beginning on page 33 for channel and code choices.
Tal k i n g
Your T6400 two-way radio has 22 channels:
Channel Numbers Description Transmit Power
Channels 1-7 GMRS 1-7 also FRS 1-7 1 watt
Channels 8-14 FRS 8-14 0.5 watt
Channels 15-22 GMRS 8-15 1 watt
14
Page 26

Your T6400 is compatible with both General Mobile Radio Service (GMRS) and
Family Radio Service (FRS) channels. You can talk to FRS radios on channels 1-
14. Remember that FRS radios operate at 0.5 watt of transmit power. On channels
1-7, the T6400 operates at 1 watt. In certain situations when talking to FRS radios
on channels 1-7, it is possible that they will be able to hear you, but you will not be
able to hear them. This is because you are transmitting with more power (1 watt)
than the FRS radio (0.5 watt). If this occurs, you must move closer to the other
person to have clear, two-way communication.
Setting the Channel
Remember that basic key sequence? Use it now!
To set the channel, select the
Setting the Code
To set the code, select the
Your radio displays p whenever the channel frequency
is in use. Keep scrolling until you get a clear one.
Your radio can save a specific code for each channel. Set the channel and code and
while operating, press
settings.
y and then scroll between selected channel and code
TWO WAY mode and the SET CHAN menu.
TWO WAY mode and the SET CODE menu.
Channel Frequency in Use
b e f g h i
14 1 5
k lmnop
PRELIMINARY
Tal k i n g
15
Page 27

Radio Volume
Can we talk yet?
Sure, but you should adjust the volume first. Press
just right. If you want to, sound your call tone by pressing
x or z until it’s
To Talk
Press and hold { and talk two-to-three inches away from the microphone. When
you’re finished, just let
Talking Range
{ go. While transmitting, | glows red.
Tal k i n g
Optimal Range
• Flat, open areas from five
feet up to four miles on
GMRS channels, and two
miles on FRS channels.
Medium Range
• Buildings or trees
Minimal Range
• Dense foliage or
mountains
16
‰.
Page 28

Using Accessories
Make sure the radio is turned off before plugging audio accessories into the
accessory port. Before you place an accessory on your head or in your ear, turn the
volume down. After placing the accessory on your head or in your ear, adjust the
volume by pressing
Signal Strength Indicator
The signal strength indicator can help you determine when
a radio is moving out of range. It is a number displayed
when you’re receiving on the same channel and code as
another transmitting radio and it indicates the relative signal
strength of the transmitting radio:
farthest away) and
Note: Obstacles that block the signal path may affect the signal strength indicator
function.
x to z.
1
is weakest (usually
6
is strongest (usually closest).
Signal Strength
b e f g h i
1 4 1 5
k lmnop
Signal Strength Indicator
PRELIMINARY
Tal k i n g
17
Page 29

Call Tone and Call Display
Don’t you hate it when you miss a call?
I mean it could be someone really important. A call you need to take
right away. Or worse, someone you’re trying to reach may not know
that you’ve called because their surroundings are too noisy.
Your radio can transmit ten different call tones. To set your call tone, select the
mode and the SET CALL menu.The radio plays a sample of each tone as you
WAY
scroll through them. To use your call tone, just press
You can always tell if someone using a T6000-Series radio is
trying to reach you when your radio displays the call received
Tal k i n g
‰ to transmit it to others.
b e f g h i
screen...
k lmnop
18
TWO
CALLRCVD
Page 30

Alerts
You can determine how your radio will alert you when you’re receiving: vibrate,
ring, or both. Your radio will notify you with your selected alert if 30 seconds have
passed since your last transmission or incoming call.
VibraCall® Alert
Your radio features VibraCall® alert, a vibrating alert to notify you of two-way radio
reception in noisy environments.
OFF -- your radio doesn’t sound an alert except for the audio reception when
receiving.
VIB+RING
To set VibraCall
-- your radio vibrates and rings your call tone when receiving.
PRELIMINARY
VIB ON
vibrates to alert you.
®
--
your radio
alert, select the SETTINGS mode and the SET VIB menu.
RING
-- your radio RINGS
your call tone when receiving.
Alerts
19
Page 31

Keeping Time
Your radio has several features to help you keep track of time: stopwatch, alarm,
and the clock display can be set as your standby screen.
Setting the Time
Setting the time is easy! Use the basic key sequence to select the TIME mode and
the
SET TIME menu, then ...
Press To Display Then Press
.
.
x
and z to set hours and
minutes
Keeping Time
Setting the Clock Display
To display the clock, select the
b e f g h i
3:00 PM
k lmnop
TIME mode and the SET DISP menu.
y
to move between hours
and minutes
If you choose to display the clock, the time screen becomes your two-way radio’s
standby screen. It appears whenever the radio is on and nothing else is happening.
20
Page 32

Setting the Alarm
To set the time the alarm will sound, select
and set the alarm time the same way you set the clock time.
The alarm volume is the same as the radio volume, so make sure it’s loud
enough.
the TIME mode and the ALARMTME menu,
To set the alarm, select the
x
and z to select
“I’m all shook up.”
Your alarm will now sound
your call tone at the set
time every day.
Turni n g Off the Al a rm
When the alarm rings and lflashes, turn it off by pressing any button. If you don’t
turn off the alarm, it rings and lflashes every ten seconds for up to one minute.
If your radio is turned off, it turns on automatically at the same time every day when
the alarm sounds. And, the radio stays on if you don’t turn off the alarm. So turn it off
and save your batteries!
ALARM ON
TIME mode and the SET ALARM menu. Press
(or
ALARM OFF
Alarm Turned On
b e f g h i
14 1
k lmnop
).
Alarm On Indicator
PRELIMINARY
Keeping Time
21
Page 33

Stopwatch
If you’re running laps, or just feel like you are, you can use the stopwatch to time
yourself.
Press To Display Then Press
~
until
appears
STPWATCH
b e f ggh i
STPWATCH
k lmnop
b e f ggh i
b e f ggh i
00:00:00
k lmnop
b e f ggh i
‰
to start or stop
timing
y
to reset
stopwatch when it
00:00:45
k lmnop
Your stopwatch has a lap timer function too. While the stopwatch is running, press
Keeping Time
y to obtain the lap time. Press y again to switch back to stopwatch.
05:30:00
k lmnop
is stopped
Note: If you turn off the radio or take it out of stopwatch mode, the stopwatch time
resets.
22
Page 34

Hands-Free Use (VOX)
LOOK, NO HANDS!!
Your radio has built-in Voice Operated Transmission (VOX), which
allows you to transmit “hands-free” just by talking or using VOX
24
To turn on VOX, quickly press and release
will now transmit every time you talk. Press
regular way of transmitting. The gwill stop flashing. To reset VOX use, select
OFF
.
The VOX sensitivity level allows you to compensate for backgroundnoise. This
minimizes the chance of unintended noises triggering a transmission.
To set the VOX sensitivity level, select the
menu, then select high (
noisy environments.
may need to experiment until you get the right setting.
When you connect a VOX accessory, the radio will automatically set to
g will begin to flash, indicating that the radio is ready to transmit each time you talk.
When you transmit using a VOX headset, you’ll hear yourself talking through the
accessory speaker. This feature lets you know VOX is working.
accessories. After VOX has been set and turned on, you can use it
anytime you want your hands free for other things.
To set VOX, select the
select
VOX ON. When VOX is set to ON, your display shows g.
HI) for quiet environments, medium (MED), or low (LO) for
VOX MED is recommended for most situations, although you
SETTINGS mode and the SET VOX menu,
{ and g will begin to flash. Your radio
{ to turn off VOX and return to the
VOX
SETTINGS mode and the SET SENS
VOX ON and
PRELIMINARY
Hands-Free Use (VOX)
23
Page 35
Privacy
Eavesdrop Reducer
Just between you and me, there are many things we need to keep
under wraps ...
Your radio has the Eavesdrop Reducer feature, a scramble code that
makes your transmissions sound garbled to anyone listening. It
doesn’t guarantee secrecy, but it adds an extra layer of privacy. Don’t
forget -- all the radios have to be set to the same scramble code for
the transmissions to be clear.
To set the scramble code, select the
select code
scramble code off, select
Privacy
24
SCRM 1, SCRM 2
TWO WAY mode and the SETSCRAM menu, then
or
SCRM 3. Your display will now show
SCRM OFF.
e
. To turn
Page 36

QuieT6000™
The QuieT6000™ function helps ensure uninterrupted communication between
Motorola Talkabout T6000-series radios - it helps to prevent you from hearing
transmissions from anything other than these radios. If you and your companions
use only the MotorolaTalkabout T6000-series radios with QuieT6000 on, you’ll
minimize the chance of being interrupted by others (but they can hear you).
To turn the QuieT6000 function on or off, select the
SETQUIET menu. All the radios have to be set to QUIET ON to avoid interruptions.
You need to transmit a call tone before talking, other radios on your channel and
code can then receive and transmit until 30 seconds of inactivity occurs which resets
the QuieT6000 function.
mode display to indicate that the QuieT6000 function is on, and it flashes while on a
call with another MotorolaTalkabout T6000-series radio.
* is displayed in the signal strength area of the two-way
SETTINGS mode and the
PRELIMINARY
Privacy
25
Page 37

Advanced Two-Way
Lock
You can make sure your menu settings
won’t be changed accidentally.
Just turn on the menu lock by pressing
for three seconds. Now you’ll see a fon
y
the display like this--
Locked Screen
b e f g h i
14 1 .
k lmnop
Lock only locks ysettings. You can turn off the menu lock by pressing
seconds again. f disappears from your display when it’s turned off.
LockPlus
The LockPlus feature locks all the buttons except |, ‰ and {. Meaning that you
can only turn the two-way radio on and off and transmit.
Advanced Two-Way
Turn on the LockPlus feature by pressing yfor six seconds, the display will show a
flashing f. You can turn off the LockPlus feature by pressing
for six seconds
y
again.
26
for three
y
Page 38

Channel Scanning
By using SCAN, you can monitor channels and codes for transmissions
and lock in on the one that interests you.You don’t have to set a new
channel or code, the radio just resets itself temporarily to that channel
and code and you can start talking. However, if no transmissions take
place for five seconds, scanning resumes.
After you turn on
one and locks on to it. If you do not begin talking or no one else transmits within a
short time, it will resume scanning.
If you want to scan channel frequencies without interference eliminator codes,
change your code to
Turning on Channel Scanning
To set channel scanning, select the
channel/code screen displays
on.
SCAN, your radio scans channels and codes until it finds an active
0.
TWO WAY mode and the SET SCAN menu.
h
and scrolls through channels when scanning is turned
Yo u r
PRELIMINARY
Advanced Two-Way
27
Page 39

Scan List
You can select which channels are to be scanned by putting them in a list. To set
your scan list after you turn on
SCANLIST menu. Your radio displays IN or OUT and a channel number. Use x
to change the
IN or OUT setting and z to scroll to the next channel. Select IN to
SCAN, select the TWO WAY mode and the
add the channel to your scan list, if you don’t wish to scan a certain channel
select
OUT.
Talk Confirmation Tone
Whenever you turn on the talk confirmation tone feature, your two-way
radio transmits a unique tone when you finish transmitting. It’s like saying
“Roger” or ”Over” and lets others know when to begin talking.
To set this feature, select the
SETTINGS mode and the SETROGER menu.
Button Beeps
The button beeps feature allows you to control whether the radio beeps every time
you press a button. Turn it off if you want quiet radio operation. To set the button
Advanced Two-Way
beeps feature, select the
button beeps feature, select
BEEPS ON. For a shortcut method of turning off the button beeps feature, press and
SETTINGS mode and the SETBEEPS menu. To turn off the
BEEPSOFF; to turn on the button beeps feature, select
hold x when turning on the radio.
Call Tones are not heard on the transmitting radio when button beeps are off.
28
Page 40

Automatic Power Off
You can program your radio to turn itself off after a certain period of inactivity. This
helps save battery life.
To set the automatic power off feature, select the
SETPWRDWN menu. Choose the number of hours HOURS 1 -- 8, after which, power
shuts off. Choose
on the screen when the automatic power off feature is set.
HOURS -- to turn off the automatic power off feature. jdisplays
SETTINGS mode and the
Monitor
Using the monitor feature helps to improve the reception of your radio if you’re
frequently almost out of range. It also allows you to listen to a channel frequency
without codes (carrier squelch) to tell whether or not it’s currently in use. To use the
monitor, select the
TWO WAY mode and the SET MON menu.
Your channel and code screen will look like this.
Yo u ’ll hear static if the channel frequency is unused.
Changing from two-way mode will turn monitor off.
PRELIMINARY
Monitor On
b e f g h i
14 MON 1
k lmno p
Advanced Two-Way
29
Page 41

Reset
You can reset your menu settings to the default settings by turning your radio off
and then pressing |, {, and y at the same time.
Setting the Battery Type
The SET BATT feature allows the battery meter to recognize and properly display
the power usage for either alkaline or aftermarket rechargeable single-cell nickel
cadmium (NiCd) batteries. To set the battery type feature, select the
mode and then SET BATT. Press x or z until your choice of ALKALINE or
RECYCLE appears, then press { to set.
SETTINGS
Advanced Two-Way
30
Page 42

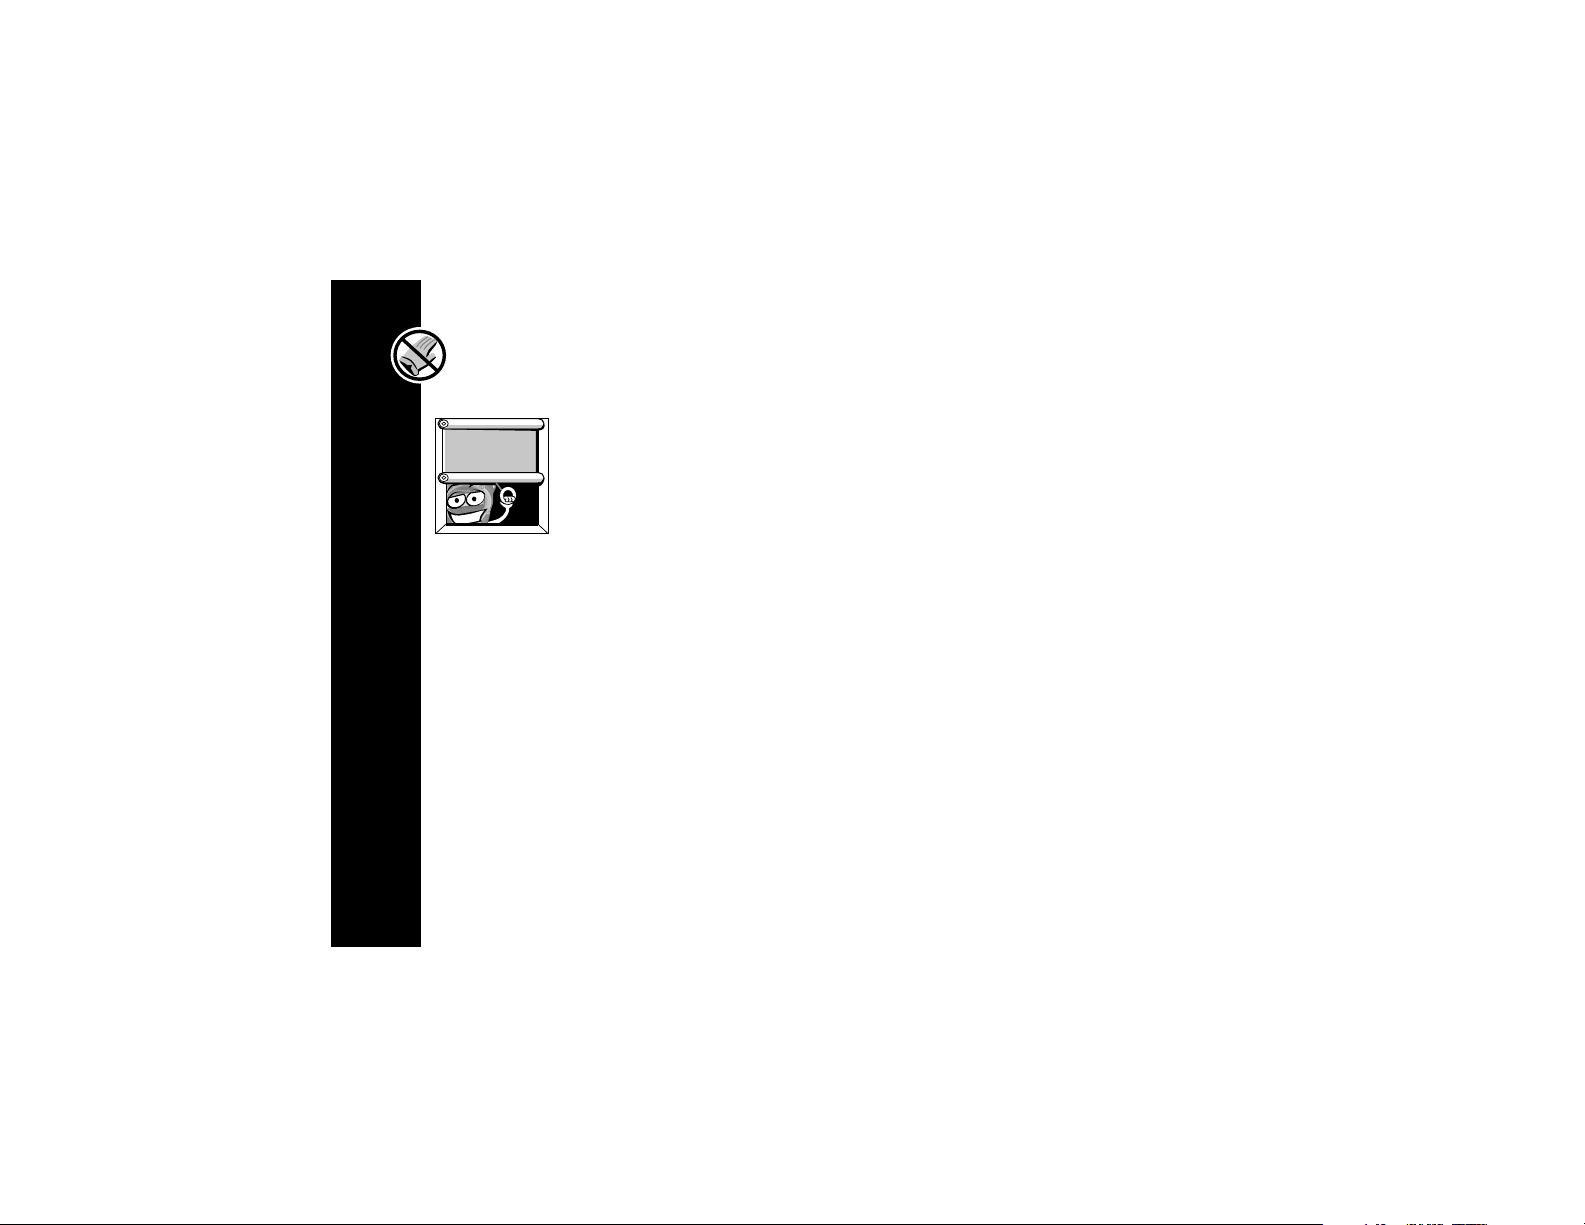
Use and Care
glub
Use a soft cloth moistened with
soap and water to clean the exterior.
If the radio gets wet...
Turn it off and remove batteries. Dry with soft cloth.
Do not immerse
in water.
PRELIMINARY
Do not use alcohol or
cleaning solutions.
Use and Care
Do not use until
completely dry.
31
Page 43

Contact Information
Repairs Warranty Questions
1-800-353-2729 (U.S.) 1-800-739-7834 (TTY)
Use and Care
1-800-461-4575 (Canada)
Warranty
32
On the web, please refer to the Two-Way Radio section of
www.motorola.com/store
Page 44

Frequency and Code Charts
The charts on these pages provide frequency and code compatibility information.
These charts are useful when using Motorola Talkabout two-way radios with other
two-way radios.
T6400 Frequency Chart
Channel
Display
1 1 GMRS/FRS 462.5625 1
2 2 GMRS/FRS 462.5875 1
3 3 GMRS/FRS 462.6125 1
4 4 GMRS/FRS 462.6375 1
5 5 GMRS/FRS 462.6625 1
6 6 GMRS/FRS 462.6875 1
7 7 GMRS/FRS 462.7125 1
8 FRS 467.5625 0.5
9 FRS 467.5875 0.5
10 FRS 467.6125 0.5
11 FRS 467.6375 0.5
TalkAbout
Distance
Channel
Channel
Type
Frequency
(MHz)
Power
(Watts)
PRELIMINARY
Frequency and Code Charts
33
Page 45

34
Frequency and Code Charts
T6400 Frequency Chart
Channel
Display
12 FRS 467.6625 0.5
13 FRS 467.6875 0.5
14 FRS 467.7125 0.5
15 GMRS 462.5500 1
16 A GMRS 462.5750 1
17 GMRS 462.6000 1
18 B GMRS 462.6250 1
19 GMRS 462.6500 1
20 C GMRS 462.6750 1
21 GMRS 462.7000 1
22 GMRS 462.7250 1
TalkAbout
Distance
Channel
Channel
Type
Frequency
(MHz)
Power
(Watts)
Page 46

Carrier squelch (0) disables interference eliminator codes. The interference eliminator
codes help minimize interference by providing you with a choice of code combinations.
This allows you to monitor all activity on the channel you are using.
Interference Eliminator Codes
Talkabout Code Hz Freq Talkabout Code Hz Freq Talkabout Code Hz Freq
1 67.0 14 107.2 27 167.9
2 71.9 15 110.9 28 173.8
3 74.4 16 114.8 29 179.9
4 77.0 17 118.8 30 186.2
5 79.7 18 123.0 31 192.8
6 82.5 19 127.3 32 203.5
7 85.4 20 131.8 33 210.7
8 88.5 21 136.5 34 218.1
9 91.5 22 141.3 35 225.7
10 94.8 23 146.2 36 233.6
11 97.4 24 151.4 37 241.8
12 100.0 25 156.7 38 250.3
13 103.5 26 162.2
PRELIMINARY
Frequency and Code Charts
35
Page 47

Troubleshooting
No Power
Message not transmitted
Reposition or replace alkaline batteries.
Recharge or replace NiMH battery.
{
Make sure
Reposition, replace, or recharge batteries.
Confirm radios have the same channel and interference
eliminator code settings.
is completely pressed as you transmit.
36
Troubleshooting
Message not received
Make sure
Reposition, replace, or recharge batteries.
QuieT6000 feature is on, transmit call tone before talking.
Obstructions and operating indoors, or in vehicles, may
interfere -- change location.
{
is not being pressed.
Page 48

Others hear you but you
can’t hear them
Hearing other noises or
conversation on a channel
Message scrambled
Limited talk range
If others are using FRS radios, move closer.
When Closer, use channels 8-14 to communicate.
Confirm interference eliminator code is set.
Shared channel or interference eliminator code may be in
use, try another.
Eavesdrop
doesn’t match other radios; all radios must use the same
scramble code.
Steel and/or concrete structures, heavy foliage, use in
buildings or vehicles decrease range. Check for clear line
of sight to improve transmission.
Wearing radio close to body such as in a pocket or on a
belt decreases range. Change location of radio.
Radios are too close, they must be at least five feet apart.
Reducer
scramble code is on or setting
Troubleshooting
Heavy static or interference
PRELIMINARY
Radios are too far apart or obstacles interfering with
transmission.
37
Page 49

Channel and/or code locked Make sure radio is unlocked. See page 26.
Low batteries
Charger LED double flashing
Cannot activate VOX Feature not set and on. See page 23.
Replace alkaline batteries. Recharge or replace NiMH
battery. Extreme operating temperatures affect battery life.
Charger not properly positioned. Reposition charger and
ensure it is firmly clamped to the radio, battery, or charging
dock.
Battery power is very low; battery is charging up slowly
before it starts to quick charge.
Troubleshooting
38
Page 50

Motorola Limited Warranty
I. What This Warranty Covers
• Products. Defects in materials and workmanship in wireless cellular telephones,
pagers, and/or two-way radios, and certain accessories that are sold with them,
such as the battery, battery charger and holster manufactured and/or sold by
Motorola (Products).
• Batteries
tured by Motorola and/or sold with Products are covered by this warranty only if
the fully-charged capacity falls below 80% of rated capacity or they leak.
• Software
software supplied with the Products.
II. What the Period of Coverage Is
From the date the Products are purchased by the first end-user:
• Products.
series and Talkabout series two-way radio accessories is for 90 days.
• Software.
• Repairs / Replacements.
or for 90 days from the date you receive it, whichever is longer.
III. Who is Covered
This warranty extends to the first end-user purchaser, only.
. Defects in materials and workmanship in batteries that are manufac-
. Physical defects in the media that tangibly embodies each copy of any
The warranty is for one year. Exception: The warranty for Spirit GT
The warranty is for 90 days.
The warranty is for the balance of the original warranty
PRELIMINARY
Motorola Limited Warranty
39
Page 51

IV. What We Will Do to Correct Warranty Problems
At no charge to you, we have the option to repair or replace the Products or software
that do not conform to the warranty, or to refund the Products’ purchase price. We
may use functionally equivalent reconditioned/refurbished/pre-owned or new
Products or parts. No software updates are provided.
V. How to Get Warranty Service
Please call:
USA
Cellular 1-800-331-6456 All Products 1-800-461-4575
Paging 1-800-548-9954 TTY 1-888-390-6456
Two-Way 1-800-353-2729
TTY 1-888-390-6456
(Text Telephone)
Canada
(Text Telephone)
Motorola Limited Warranty
40
Page 52

You will receive instructions on how to ship the Products to Motorola. You must ship
the Products to us with freight, duties and insurance prepaid. Along with the
Products you must include: (a) a copy of your receipt, bill of sale or other
comparable proof of purchase; (b) a written description of the problem; (c) the name
of your service provider (if this Product requires subscription service); (d) the name
and location of the installation facility (if applicable) and, most importantly; (e) your
address and telephone number. If requested, you must also return all detachable
parts such as antennas, batteries and chargers. RETAIN YOUR ORIGINAL PROOF
OF PURCHASE.
We will ship repaired or replacement Products at our expense for the freight and
insurance, but at your expense for any duties. If additional information is needed,
please contact us at the telephone number listed above.
VI. What This Warranty Does Not Cover
• Products that are operated in combination with ancillary or peripheral equipment
or software not furnished by Motorola for use with the Products (“ancillary equipment”), or any damage to the Products or ancillary equipment as a result of
such use. Among other things, “ancillary equipment” includes batteries, chargers, adaptors, and power supplies not manufactured or supplied by Motorola.
Any of these voids the warranty.
• Someone other than Motorola (or its authorized service centers) tests, adjusts,
installs, maintains, alters, modifies or services the Products in any way. Any of
these voids the warranty.
PRELIMINARY
Motorola Limited Warranty
41
Page 53

• Rechargeable batteries that: (a) are charged by other than the Motorolaapproved battery charger specified for charging such batteries; (b) have any
broken seals or show evidence of tampering; (c) are used in equipment other
than the Product for which they are specified; or (d) are charged and stored at
temperatures greater than 60 degrees centigrade. Any of these voids the warranty.
• Products that have: (a) serial numbers or date tags that have been removed,
altered or obliterated; (b) board serial numbers that do not match each other, or
board serial numbers that do not match the housing; or (c) nonconforming or
non-Motorola housings or parts. Any of these voids the warranty.
• Defects or damage that result from: (a) use of the Products in a manner that is
not normal or customary; (b) improper operation or misuse; (c) accident or
neglect such as dropping the Products onto hard surfaces; (d) contact with
water, rain, extreme humidity or heavy perspiration; (e) contact with sand, dirt or
the like; or (f) contact with extreme heat, or spills of food or liquid.
• Physical damage to the surface of the Products, including scratches, cracks or
other damage to a display screen, lens or other externally exposed parts.
• Failure of Products that is due primarily to any communication service or signal
you may subscribe to or use with the Products.
• Coil cords that are stretched or that have any broken modular tabs.
Motorola Limited Warranty
• Products that are leased.
42
Page 54

Flat-rate repair rates may apply to Products not covered by this warranty. To obtain
information about Products needing repairs that are not covered by this warranty,
please call the telephone number previously listed. We will provide information on
repair availability, rates, methods of payment, where to send the Products, etc.
VII. Some Other Limitations
This is Motorola’s complete warranty for the Products, and states your
exclusive remedies. This warranty is given in lieu of all other express
warranties. Implied warranties, including without limitation, the implied
warranties of merchantability and fitness for a particular purpose, are given
only if specifically required by applicable law. Otherwise, they are specifically
excluded.
No warranty is made as to coverage, availability, or grade of service provided
by the Products, whether through a service provider or otherwise.
No warranty is made that the software will meet your requirements or will
work in combination with any hardware or applications software products
provided by third parties, that the operation of the software products will be
uninterrupted or error free, or that all defects in the software products will be
corrected.
PRELIMINARY
Motorola Limited Warranty
43
Page 55

In no event shall Motorola be liable, whether in contract or tort (including
negligence) for damages in excess of the purchase price of the Product, or for
any indirect, incidental, special or consequential damages of any kind, or loss
of revenue or profits, loss of business, loss of information or data, or other
financial loss arising out of or in connection with the ability or inability to use
the Products, to the full extent these damages may be disclaimed by law.
VIII. Patent and Software Provisions
At Motorola’s expense, we will defend you, and pay costs and damages that may be
finally awarded against you, to the extent that a lawsuit is based on a claim that the
Products directly infringe a United States patent. Our obligation is conditioned on:
(a) you notifying us promptly in writing when you receive notice of the claim; (b) you
giving us sole control of the defense of the suit and all negotiations for its settlement
or compromise; and (c) should the Products become, or in Motorola's opinion be
likely to become, the subject of a claim of infringement of a United States patent,
you permit us, at our option and expense, either to: procure for you the right to
continue using the Products; replace or modify them so that they become noninfringing; or grant you a credit for such Products, as depreciated, and accept their
Motorola Limited Warranty
return. The depreciation will be an equal amount per year over the lifetime of the
Products, as established by Motorola.
44
Page 56

Motorola will have no liability to you with respect to any claim of patent infringement
that is based upon the combination of the Products or parts furnished under this
limited warranty with ancillary equipment, as defined in VI., above.
This is Motorola’s entire liability with respect to infringement of patents by the
Products.
Laws in the United States and other countries preserve for Motorola and other third
party software providers certain exclusive rights for copyrighted software, such as
the exclusive rights to reproduce in copies and distribute copies of such software.
The software may be copied into, used in and redistributed with only those Products
that are associated with such software. No other use, including without limitation,
disassembly or reverse engineering of such software or exercise of exclusive rights
in such software is permitted.
IX. IX.State Law and Other Jurisdiction Rights
Some states and other jurisdictions do not allow the exclusion or limitation of
incidental or consequential damages, or limitation on the length of an implied
warranty, so the above limitations or exclusions may not apply to you.
This warranty gives you specific legal rights, and you may also have other rights,
which vary from jurisdiction to jurisdiction.
PRELIMINARY
Motorola Limited Warranty
45
Page 57

To obtain information on Motorola Personal Communications Products, including
warranty service, accessories and optional Extended Warranties on selected
Products, please call:
USA
Cellular 1-800-331-6456 All Products 1-800-461-4575
Paging 1-800-548-9954 TTY 1-888-390-6456
Two-Way 1-800-353-2729
TTY 1-888-390-6456
(Text Telephone)
To correspond with Motorola about the Products, please write us at
http://www.motorola.com or at:
In the USA: In Canada:
Motorola, Inc. Motorola Canada Limited
600 North U.S. Highway 45 5875 Whittle Road
Motorola Limited Warranty
Libertyville, IL 60048 Mississauga, ON L4Z 2H4
Canada
(Text Telephone)
46
Page 58

Motorola® Talkabout® T6400-Series
Radio Quick Reference Card:
Icons:
b
e
f
g
h
Battery meter
Eavesdrop Eliminator™ on
Lock set
VOX on
Channel scan on
i
k
l
m
n
p
j
VibraCall® alert on
One of 22 channels
Alarm on
One of 38 codes
Ring alert
Channel in use
Automatic power off
Page 59

Standard Features
Modes
Menus
Buttons
• Turn power on/off
|
• Scroll through mode
selections
~
• Return to two-way mode
(when held down while in
a menu)
• Transmit call tone
‰
• Start and stop stopwatch
STPWATCH
TWO WAY TIME SETTINGS
SET CHAN SET TIME SETQUIET
SET CODE SETALARM SET VIB
SETSCRAM ALARMTME SETROGER
SET CALL SET DISP SETWRDN
SET MON SETBEEPS
SET SCAN SET VOX
SCANLIST
• Talk on the radio
{
• Save a setting
• Scroll through menus
• Lock the keypad (when
y
held down and not in a
menu)
• Change the volume
x
or
• Scroll through and
z
select settings
Page 60

Software Copyright Notice
The Motorola products described in this manual may include copyrighted Motorola and
third party software stored in semiconductor memories or other media. Laws in the
United States and other countries preserve for Motorola and third party software providers certain exclusive rights for copyrighted software, such as the exclusive rights to
distribute or reproduce the copyrighted software. Accordingly, any copyrighted software
contained in the Motorola products may not be modified, reverse-engineered, distributed, or reproduced in any manner to the extent allowed by law. Furthermore, the purchase of the Motorola products shall not be deemed to grant either directly or by
implication, estoppel, or otherwise, any license under the copyrights, patents, or patent
applications of Motorola or any third party software provider, except for the normal,
non-exclusive, royalty-free license to use that arises by operation of law in the sale of a
product.
FCC License Required
Your Motorola radio operates on FM radio communication frequencies and is subject to
the Rules and Regulations of the Federal Communications Commission (FCC). The
FCC requires that all operators using Private Land Mobile frequencies obtain a radio
license before operating their equipment. To have the forms faxed to you, call the FCC
forms hotline.
Fax-On-Demand system at: 1-202-418-0177 from your fax machine and request document 000600 for all forms and instructions.
To have the forms mailed to you, call the FCC forms hotline at:
1-800-418-FORM
(1-800-418-3676)
For questions about the license application, contact the FCC at:
Page 61

1-888-CALL-FCC
(1-888-225-5322)
Or: http://www.fcc.gov
Before filling out your application, you must decide which frequency(ies) you can oper-
ate on. See “Frequency Chart” on page TBD. For questions on determining your radio
frequency, please call Motorola Product Services at: 1-800-448-6686
Changes or modifications not expressly approved by Motorola may void the user’s
authority granted by the FCC to operate this radio and should not be made. To comply
with FCC requirements, transmitter adjustments should be made only by or under the
supervision of a person certified as technically qualified to perform transmitter maintenance and repairs in the private land mobile and fixed services as certified by an organization representative of the user of those services. Replacement of any transmitter
component (crystal, semiconductor, etc.) not authorized by the FCC equipment authorization for this radio could violate FCC rules.
More specifically, changes or modifications not expressly approved by Motorola may
void the user’s authority granted by the FCC to operate this radio and should not be
made. To comply with FCC requirements, transmitter adjustments should be made only
by or under the supervision of a person certified as technically qualified to perform
transmitter maintenance and repairs in the private land mobile and fixed services as
certified by an organization representative of the user of those services. Replacement
of any transmitter component (crystal, semiconductor, etc.) not authorized by the FCC
equipment authorization for this radio could violate FCC rules.
Note: Use of this radio outside the country where it was intended to be distributed is
subject to government regulations and may be prohibited.
Page 62

Patent Notice
This product is covered by one or more of the following United States patents.
5896277 5894292 5864752 5699006 5742484 D408396 D399821 D387758
D389158 5894592 5893027 5789098 5734975 5861850 D395882 D383745
D389827 D389139 5929825 5926514 5953640 6071640 D413022 D416252
D416893
Export Law Assurances
EXPORT LAW ASSURANCES: This product is controlled under the export regulations
of the United States of America and Canada. The Governments of the United States of
America and Canada may restrict the exportation or re-exportation of this product to
certain destinations. For further information contact the U.S. Department of Commerce
or the Canadian Department of Foreign Affairs and International Trade.
Page 63

Page 64

• 1 Watt of Power
gives up to 4 mile range*
*Depending on terrain and
conditions (GMRS channels only)
• 22 Channels
8 GMRS 1-watt channels;
7 GMRS/FRS 1-watt channels;
7 FRS 0.5 watt channels
• 38 Interference Eliminater Codes
Privacy feature that helps minimize
interference from other groups
• QuieT6000™
Minimizes unwanted chatter through
an exclusive noise filter
• Automatic Power Off
Program your radio to turn off
after a period of inactivity saving your
battery
• Keypad Lock
Prevents your settings from being
accidentally changed
• Durable Fixed Antenna
Maximizes talk range
• Weather-resistant
• 10 Selectable Call Tones
Know which person from the
group is calling by the tone
• “Roger” Beep
Signals others you’re done talking
• VibraCall® Alert
Great for noisy environments,
the T6400 can vibrate to notify
you of incoming calls
• Programmable Scan List
Allows selective scanning of
channels
• Eavesdrop Reducer
Helps reduce eavesdropping
by scrambling private
conversations
• Built-in Clock, Alarm, and
Stopwatch
Keep track of time with a
special alarm feature that
functions even when the radio
is turned off
TM
• Quick Release Swivel Belt Clip
included
• Illuminated display
Easy to read settings in dark places
• Built-in Hands-free Capability
(VOX) Talk Hands-Free
Advanced voice activation (VOX)
with multiple sensitivity levels
(no additional accessory required)
• Low Battery Alert
Audible tone and visual display tell
you your battery is running down
• Signal Strength Indicator
Visual indicator lets you know when
other radios are heading out of range
while you’re communicating
• Batteries (not included)
Requires 3 AA Alkaline batteries or
one NiMH rechargeable battery
• 1 Year Limited Warranty
For warranty details call
1-800-353-2729
• User’s guide included
• Accessories for T6400 series - Convenient headphones, some with hands-free talk capabilities, mesh and
waterproof carry cases, and rechargeable battery packs available from your retailer or www.motorola.com
MOTOROLA, the Stylized M Logo, TALKABOUT, and all other trademarks indicated as such herein are trademarks of
Motorola, Inc. ® Reg. U.S. Pat. & Tm. Off. All other product or service names are the property of their respective
owners. © 2001 Motorola, Inc. All rights reserved. Printed in the U.S.A. FCC/GMRS License required.
Motorola® Talkabout® T6400
@T6400@
Proof of Purchase
PWARNING CHOKING HAZARD
SMALL PARTS
Not for children under 3 years.
This product is not intended to be used
as a toy or plaything.
 Loading...