

Page 1

Copyright Information
The Motorola products described in this manual may include copyrighted Motorola computer programs stored in
semiconductor memories or other mediums. Laws in the United States and other countries preserve for Motorola
certain exclusive rights for copyrighted computer programs, including the exclusive right to copy or reproduce in
any form the copyrighted computer program. Accordingly, any copyrighted Motorola computer programs contained in the Motorola products described in this instruction manual may not be copied or reproduced in any manner without the express written permission of Motorola. Furthermore, the purchase of Motorola products shall not
be deemed to grant either directly or by implication, estoppel, or otherwise, any license under the copyrights, patents, or patent applications of Motorola, except for the normal non-exclusive, royalty free license to use that arises
by operation of law in the sale of a product.
© 1998 by Motorola, Inc.
All Rights Reserved.
Motorola Malaysia Sdn. Bhd. (Company No. 12631DE),
Bayan Lepas Free Industrial Zone, Phase 3,
11900 Penang, Malaysia.
Printed in Malaysia.
, Motorola, Call Alert and MDC are trademarks of Motorola, Inc.
1
Page 2
Deleting a Nuisance Channel
1. While radio is on a Nuisance Channel, press and
hold Scan button until a tone is sounded.
2. Release Scan button.
For Keypad Radios only
Making a Phone Call
1. Press Phone button.
2. Send access code if needed.
3. Send phone number by
•pressing and releasing PTT to send last dialed number, or
•press Speed Dial button followed by keypad keys ‘1’
to ‘9’ to access first nine numbers in your phone list
(press PTT if buffered dial), or
•press the numbered keys to send out phone number
(press PTT if buffered dial).
Ending a Phone Call
1. Send de-access code if needed.
2. Press Phone button.
GP328 Quick Reference Card
Channel Selector Knob
On/Off/Volume Knob
SP:
1
LP:
SP:
2
LP:
SP:
3
LP:
SP:
4
LP:
NOTE: • Enter the functions for your radio’s 7 program-
mable buttons in the boxes provided above.
• In the boxes above, SP represents
Press
, while LP represent
LED Indicator
Microphone
SP:
5
LP:
SP:
6
LP:
SP:
7
LP:
Short
Long Press
.
Page 3
Turning On the Radio
• Turn On-Off/Volume Control knob clockwise. Self
Test Pass Tone will sound and green LED will light up
if radio powers up successfully. If radio fails power up,
the Self Test Fail Tone will sound.
Turning Off the Radio
• Turn On-Off/Volume Control knob counter-clockwise ,
until click is heard.
Adjusting the Radio’s Volume
1. Press and hold Volume Set key; until continuous
tone is sounded.
2. Turn On-Off/Volume Control knob to adjust volume
level.
3. Release Volume Set key when desired level is
achieved.
Selecting a Radio Channel
• Turn Channel Selector knob clockwise or counterclockwise to reach desired channel.
Sending a Call
1. Use Channel Selector knob to change to required
channel.
2. Press PTT, and speak clearly with mouth about 2.5
to 5 cm (one to two inches) away from microphone.
3. Release PTT when call is completed.
Receiving a Call
1. Turn radio on.
2. Adjust volume level.
3. Switch to desired channel.
4. If at any time a call comes through, it will be heard at
the volume level set.
Emergency Siren
1. Press programmed Emergency button to initiate
Emergency Siren
2. Press and hold Emergency button to cancel
gency Siren
.
Emer-
.
3. Press and release Emergency button to restart
Emergency sequence.
Programmable Buttons’ Audio Indicators
Programmable
Buttons
Scan
Tx Power
Squelch
Option Board
Keypad Lock
Repeater/
Talkaround
Positive
Indicator Tone
Start Scan oper-
ation
Radio transmits
at low power
Radio operates in
tight squelch
Activates radio’s
option board
Radio’s keypad
is locked
Radio DOES
NOT use the
repeater
Negative
Indicator Tone
Stop Scan oper-
ation
Radio transmits
at high power
Radio operates in
normal squelch
Deactivates
radio’s option
board
Radio’s keypad
is unlocked
Radio uses the
repeater
Page 4

LIMITED WARRANTY & LIABILITY
MOTOROLA COMMUNICATION PRODUCTS
I. WHAT THIS WARRANTY COVERS AND FOR HOW LONG:
MOTOROLA ELECTRONICS PTE LTD ("MOTOROLA") warrants the MOTOROLA manufactured TWO-WAY RADIO Products
listed below ("Product") against defects in material and workmanship under normal use and service for a period of time from the
date of purchase as scheduled below:
TWO-WAY RADIO Mobile and Portable Units Two (2) Years
Product Accessories (including battery, antenna, charger, belt clip etc.) One (1) Year
Motorola, at its option, will at no charge either repair the Product (with new or reconditioned parts), replace it (with a new or
reconditioned Product), or refund the purchase price of the Product during the warranty period provided it is returned in accordance
with the terms of this warranty. Replaced parts or boards are warranted for the balance of the original applicable warranty period.
All replaced parts of Product shall become the property of MOTOROLA.
This express limited warranty is extended by MOTOROLA to the original end user purchaser only and is not assignable or
transferable to any other party. This is the complete warranty for the Product manufactured by MOTOROLA. MOTOROLA assumes
no obligations or liability for additions or modifications to this warranty unless made in writing and signed by an officer of
MOTOROLA. Unless made in a separate agreement between MOTOROLA and the original end user purchaser, MOT OR OLA does
not warrant the installation, maintenance or service of the Product.
MOTOROLA cannot be responsible in any way for any ancillary equipment not furnished by MOTOROLA which is attached to or
used in connection with the Product, or for operation of the Product with any ancillary equipment, and all such equipment is
expressly excluded from this warranty. Because each system which may use the Product is unique, MOTOROLA disclaims liability
for range, coverage, or operation of the system as a whole under this warranty.
II. GENERAL PROVISIONS:
This warranty sets forth the full extent of MOTOROLA'S responsibilities regarding the Product. Repair, replacement or refund of the
purchase price, at MOTOROLA'S option, is the exclusive remedy. THIS WARRANTY IS GIVEN IN LIEU OF ALL OTHER
EXPRESS WARRANTIES. IMPLIED WARRANTIES, INCLUDING WITHOUT LIMITATION, IMPLIED WARRANTIES OF
MERCHANTABILITY AND FITNESS FOR A PARTICULAR PURPOSE, ARE LIMITED TO THE DURATION OF THIS LIMITED
WARRANTY. IN NO EVENT SHALL MOTOROLA BE LIABLE FOR DAMAGES IN EXCESS OF THE PURCHASE PRICE OF THE
PRODUCT, FOR ANY LOSS OF USE, LOSS OF TIME, INCONVENIENCE, COMMERCIAL LOSS, LOST PROFITS OR SAVINGS
OR OTHER INCIDENTAL, SPECIAL OR CONSEQUENTIAL DAMAGES ARISING OUT OF THE USE OR INABILITY TO USE
SUCH PRODUCT, TO THE FULL EXTENT SUCH MAY BE DISCLAIMED BY LAW.
III. HOW TO GET WARRANTY SERVICE:
You must provide proof of purchase (bearing the date of purchase and Product item serial number) in order to receive warranty
service and, also, deliver or send the Product item, transportation and insurance prepaid, to an authorized warranty service
location. Warranty service will be provided by Motorola through one of its authorized warranty service locations. If you first contact
the company which sold you the Product (e.g., dealer or communication service provider), it can facilitate your obtaining warranty
i
English
Page 5

service. You can also call Motorola Service centres at 65-4867167 (Singapore), 8610-6843722(China), 822-3440-7400(Korea),
9180-6657676/7/8/9(India), 613-9213-7809(Australia), 649-579-2378(New Zealand), or Asia Pacific Help Desk 65-4855333(Singapore).
IV. WHAT THIS WARRANTY DOES NOT COVER:
A) Defects or damage resulting from use of the Product in other than its normal and customary manner.
B) Defects or damage from misuse, accident, water, or neglect.
C) Defects or damage from improper testing, operation, maintenance, installation, alteration, modification, or adjustment.
D) Breakage or damage to antennas unless caused directly by defects in material workmanship.
E) A Product subjected to unauthorized Product modifications, disassemblies or repairs (including, without limitation, the addition
to the Product of non-Motorola supplied equipment) which adversely affect performance of the Product or interfere with Motor-
ola's normal warranty inspection and testing of the Product to verify any warranty claim.
F) Product which has had the serial number removed or made illegible.
G) Rechargeable batteries if:
1) any of the seals on the battery enclosure of cells are broken or show evidence of tampering.
2) the damage or defect is caused by charging or using the battery in equipment or service other than the Product for which
it is specified.
H) Freight costs to the repair depot.
I) A Product which, due to illegal or unauthorized alteration of the software/firmware in the Product, does not function in accor-
dance with MOTOR OLA’S pub lished specifications or the FCC type acceptance labeling in eff ect f or the Product at the time the
Product was initially distributed from MOTOROLA.
J) Scratches or other cosmetic damage to Product surfaces that does not effect the operation of the Product.
K) Normal and customary wear and tear.
V. PATENT AND SOFTWARE PROVISIONS:
MOTOROLA will have no liability with respect to any claim of patent infringement which is based upon the combination of the
Product or parts furnished hereunder with software, apparatus or devices not furnished by MOTOR OLA, nor will MOTOROLA ha v e
any liability for the use of ancillary equipment or software not furnished by MOTOROLA which is attached to or used in connection
with the Product. The foregoing states the entire liability of MOTOROLA with respect to infringement of patents by the Product or
any parts thereof.
Laws in the United States and other countries preserve for MOTOROLA certain exclusive rights for copyrighted MOTOROLA
software such as the exclusive rights to reproduce in copies and distribute copies of such Motorola software. MOTOROLA software
may be used in only the Product in which the software was originally embodied and such software in such Product may not be
replaced, copied, distributed, modified in any way, or used to produce any derivative thereof. No other use including, without
limitation, alteration, modification, reproduction, distribution, or reverse engineering of such MOTOROLA software or exercise of
rights in such MOTOROLA software is permitted. No license is granted by implication, estoppel or otherwise under MOTOROLA
patent rights or copyrights.
English
ii
Page 6

Contents
CONTENTS
Radio Overview . . . . . . . . . . . . . . . . . . . . 1
Parts of the Radio. . . . . . . . . . . . . . . . . . . . . . . . 1
On/Off/Volume Knob . . . . . . . . . . . . . . . . . 2
Channel Selector Knob. . . . . . . . . . . . . . . . . 2
Push-to-Talk (PTT) Button . . . . . . . . . . . . . 2
Microphone . . . . . . . . . . . . . . . . . . . . . . . . . 2
LED Indicator. . . . . . . . . . . . . . . . . . . . . . . . 2
Keypad Keys (for keypad radios only) . . . . 2
Programmable Buttons. . . . . . . . . . . . . . . . . 2
Indicator Tones . . . . . . . . . . . . . . . . . . . . . . . . . 5
Programmable Buttons’ Audio Indicators. . . . . 5
Improved Audio Features . . . . . . . . . . . . . . . . . 6
Low Level Expansion (LLE) . . . . . . . . . . . . 6
Companding. . . . . . . . . . . . . . . . . . . . . . . . . 6
Getting Started. . . . . . . . . . . . . . . . . . . . . 7
Battery Information . . . . . . . . . . . . . . . . . . . . . . 7
Battery Status . . . . . . . . . . . . . . . . . . . . . . . . 7
Charging your Battery . . . . . . . . . . . . . . . . . 7
Accessory Information. . . . . . . . . . . . . . . . . . . . 8
Attaching the Battery . . . . . . . . . . . . . . . . . . 8
Removing the Battery . . . . . . . . . . . . . . . . . 8
Attaching the Antenna . . . . . . . . . . . . . . . . . 9
Removing the Antenna . . . . . . . . . . . . . . . . .9
Attaching the Belt Clip . . . . . . . . . . . . . . . . 10
Removing the Belt Clip . . . . . . . . . . . . . . .10
Turning the Radio On or Off . . . . . . . . . . . . . .11
Adjusting the Radio’s Volume. . . . . . . . . . . . . 11
Selecting a Radio Channel . . . . . . . . . . . . . . . . 11
Sending a Call. . . . . . . . . . . . . . . . . . . . . . . . . . 11
Receiving a Call . . . . . . . . . . . . . . . . . . . . . . . .12
Radio Call Information . . . . . . . . . . . . . .13
Emergency Siren. . . . . . . . . . . . . . . . . . . . . . . .13
Talkaround . . . . . . . . . . . . . . . . . . . . . . . . . . . . 13
Squelch . . . . . . . . . . . . . . . . . . . . . . . . . . . . . . . 13
Power Level . . . . . . . . . . . . . . . . . . . . . . . . . . . 14
Scan . . . . . . . . . . . . . . . . . . . . . . . . . . . . .15
Starting or Stopping a Scan Operation. . . . . . . 15
Talkback . . . . . . . . . . . . . . . . . . . . . . . . . . . . . . 15
Deleting a Nuisance Channel . . . . . . . . . . . . . .15
Adding a Deleted Nuisance Channel back to the
Scan List. . . . . . . . . . . . . . . . . . . . . . . . . . . . . . 15
Scan Channel Discovery Alert . . . . . . . . . . . . .16
Scan List Member Priority . . . . . . . . . . . . . . . .16
Phone . . . . . . . . . . . . . . . . . . . . . . . . . . . .20
CONTENTS
iii
English
Page 7

Contents
Making a Phone Call . . . . . . . . . . . . . . . . . . . . 20
Entering the Phone Mode. . . . . . . . . . . . . . 20
Sending the Access Code. . . . . . . . . . . . . . 20
Sending the Phone Number . . . . . . . . . . . . 20
The Phone Conversation . . . . . . . . . . . . . . 22
Ending the Phone Call . . . . . . . . . . . . . . . . 22
CONTENTS
Safety Information . . . . . . . . . . . . . . . . . 23
Safe And Efficient Operation Of Motorola Two-
Way Radios . . . . . . . . . . . . . . . . . . . . . . . . . . . 23
Exposure To Radio Frequency Energy . . . 23
Portable Radio Operation
and EME Exposure . . . . . . . . . . . . . . . . . . 24
Electromagnetic
Interference/Compatibility. . . . . . . . . . . . . 24
Operational Warnings . . . . . . . . . . . . . . . . 24
Operational Cautions . . . . . . . . . . . . . . . . . 25
Recycling / Disposal of NiCd Batteries. . . . . . 26
English
iv
Page 8
RADIO OVERVIEW
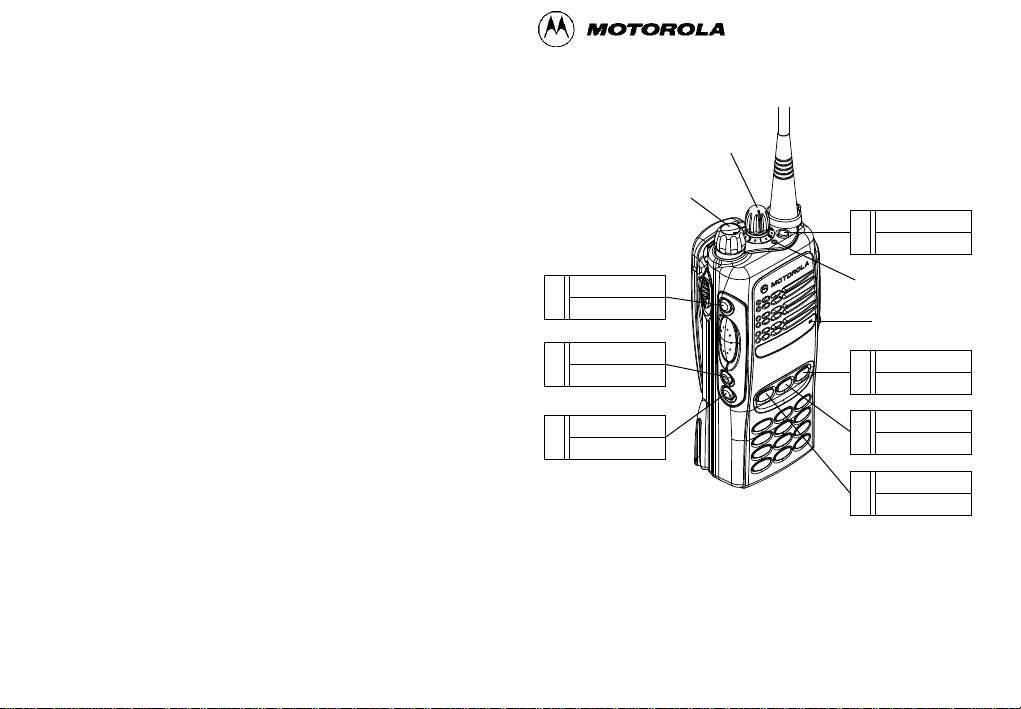
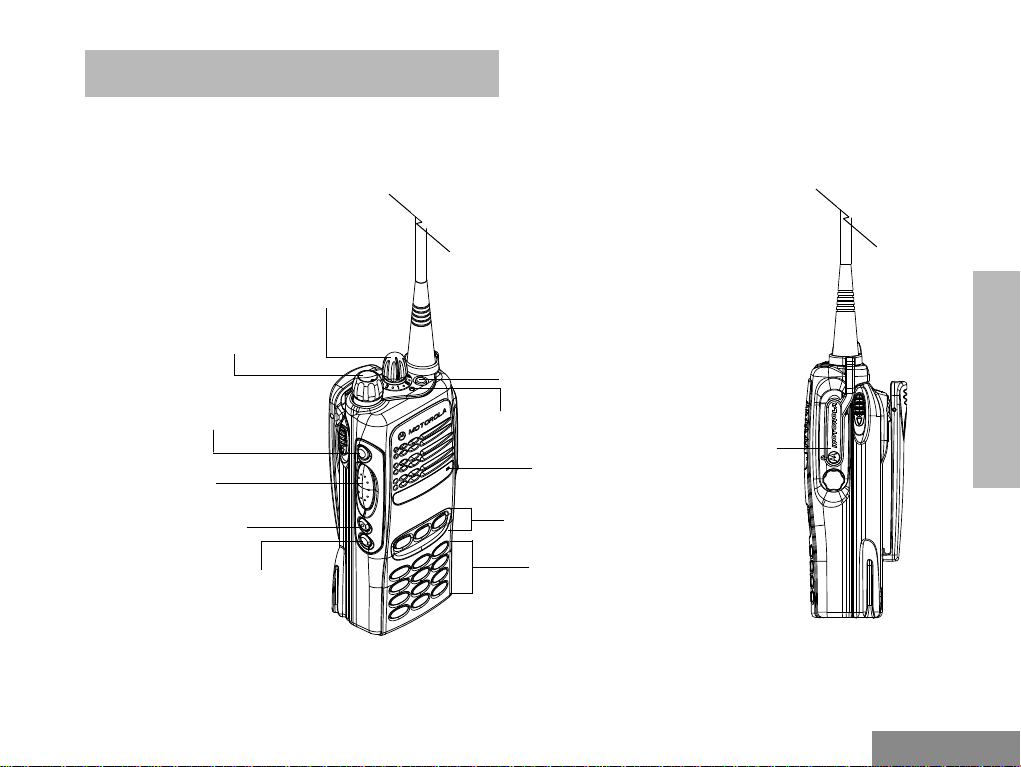
PARTS OF THE RADIO
Radio Overview
On/Off/Volume
Knob
Side Button 1
(programmable)
Push-to-Talk
(PTT) Button
Side Button 2
(programmable)
Side Button 3
(programmable)
Channel Selector
Knob
Top Button
(programmable)
LED Indicator
Microphone
Front Buttons
(programmable)
Keypad
Dust Cover
covering the
Accessories
Pot
RADIO OVERVIEW
1
English
Page 9

Radio Overview
RADIO OVERVIEW
On/Off/Volume Knob
Used to turn the radio on or off, and to adjust the
radio’s volume.
Channel Selector Knob
Used to switch the radio to different channels.
Push-to-Talk (PTT) Button
Press and hold down this button to talk, release
it to listen.
Microphone
Speak clearly into the microphone when sending
a message.
LED Indicator
Used to give battery status, power-up status,
radio call information and scan status.
Keypad Keys (for keypad radios only)
1 2 3
4 5 6
7 8 9
* 0 #
These keys are used when dialing a phone
number.
Programmable Buttons
Several of the radio’s buttons can be
programmed as short-cut buttons for many of
the radio’s features. Programmable buttons are
the:
• Top button,
• three side buttons, and
• three front buttons (for keypad radios).
, / .
Check with your dealer for a complete list of the
functions your radio’s programmable buttons
support.
The following table sho ws the functions av ailable
by
• quickly pressing and releasing the programmable buttons (short press), or by
• pressing and holding the programmable buttons for a period of time (at least 1.5 seconds) before releasing (long press), or by
• pressing and holding down the programmable buttons while checking the status or making adjustments.
English
2
Page 10

Radio Overview
Button Short Press Long Press Press and Hold
Emergency
Monitor/Permanent Monitor
*
To initiate an Emergency Siren.
—
To cancel your radio’s Emergency
status.
To continually monitor the selected
channel.
Volume Set — —
Battery Gauge — —
Scan/Nuisance Channel Delete
Tx Power
Keypad Lock —
Repeater/
Talkaround
Squelch
To toggle between the start/stop of
the Scan operation.
To toggle your radio’s transmit
power level betw een High and Low
†
power.
To choose to/not to transmit
through the repeater.
†
To toggle your radio’s squelch level
between tight/normal squelch.
†
To delete a nuisance channel while
scanning.
To toggle your radio’s transmit
power level betw een High and Low
†
power.
To toggle between locking/unlock-
ing your radio’s keypad.
To choose to/not to transmit
through the repeater.
To toggle your radio’s squelch level
between tight/normal squelch.
—
To monitor the selected
channel for any activity.
To sound a tone for
adjusting the radio’s volume level.
RADIO OVERVIEW
To check the battery’s
status.
—
—
—
†
†
—
—
3
English
Page 11

Radio Overview
Button Short Press Long Press Press and Hold
RADIO OVERVIEW
To toggle the activation/deactiva-
Option Board
Phone
Speed Dial
Light
*
If Emergency function is required, it can ONLY be programmed to the Top Button.
†
Depending on how your radio has been programmed by your dealer, these functions are activated EITHER through short press OR
long press, but not both.
tion of your radio’s option board (if
one is installed).
To make a Phone Call.
†
†
To easily access the phone numbers in your phone list.
†
To turn on your radio’s backlight.
To toggle the activation/deactivation of your radio’s option board (if
one is installed).
†
To make a Phone Call.
To easily access the phone num-
bers in your phone list.
†
To turn on your radio’s backlight.
—
†
†
†
—
—
—
English
4
Page 12

INDICATOR TONES
Radio Overview
High pitched tone Low pitched tone
Self Test Pass Tone
Self Test Fail Tone
Positive Indicator Tone
Negative Indicator Tone
PROGRAMMABLE BUTTONS’ AUDIO INDICATORS
Some programmable keys function as toggles
(alternating between two different choices).
These keys use audio indicators to indicate the
change.
Programmable
Buttons
Scan
Tx Power
Squelch
Option Board
Keypad Lock
Repeater/Talkaround
Positive
Indicator
Tone
Start Scan
operation
Radio trans-
mits at low
power
Radio operates in tight
squelch
Activates
radio’s option
board
Radio’s keypad is locked
Radio DOES
NOT use the
repeater
Negative
Indicator
Tone
Stop Scan
operation
Radio trans-
mits at high
power
Radio operates in normal
squelch
Deactivates
radio’s option
board
Radio’s keypad is
unlocked
Radio uses
the repeater
RADIO OVERVIEW
5
English
Page 13

Radio Overview
IMPROVED AUDIO FEATURES
Low Level Expansion (LLE)
The LLE feature of your radio improves voice
quality by reducing unwanted background noise
when receiving a message. It is compatible with
most major types of audio processing systems
available today.
Companding
Companding is a feature that allows further
improvement of voice quality. It compresses your
voice at transmission, and expands it when
receiving while simultaneously reducing
extraneous noise. However, to enjoy this benefit,
ALL transmitting and receiving radios must hav e
RADIO OVERVIEW
this feature activated.
NOTE: Contact your dealer for your radio’s current
companding settings or to change the settings.
English
6
Page 14

Getting Started
GETTING STARTED
BATTERY INFORMATION
Battery Status
You can check your radio’s battery status by
pressing the programmed Battery Gauge button
(battery status is shown by the LED indicator).
Battery
Level
High Green
Satisfactory Yellow
Low Flashing Red
Very Low None
NOTE: If the Battery Gauge indicator does NOT
appear, this indicates that the battery may not be
a genuine Motorola product.
Charging your Battery
When the battery level is very low, you need to
recharge the battery before you can continue to
use your radio.
LED Indicator
1. Place the radio with the battery attached or the
battery alone in the charger.
2. The charger’s LED would indicate the charging
progress.
NOTE: Because new batteries or batteries that
have not been used for several months could
prematurely indicate full charge (solid green
LED), charge the batteries for 14 to 16 hours
prior to initial use to achieve optimal performance.
LED color Status
Single flash of Green Successful charger power-up.
Flashing Red* Battery is unchargeable.
Flashing Yellow
Red Battery is charging.
Flashing Green
Green Battery is fully charged.
*
Remove the battery from charger and use a pencil eraser to
clean the four metal contacts on the bottom of the battery.
Place the battery back into the charger. If the LED indicator
continues to flash red, replace the battery.
†
A standard battery may require one hour to charge to 90%
capacity.
†
Charger is getting ready to
charge.
Battery is 90% charged.
GETTING STARTED
7
English
Page 15

Getting Started
battery latches
1
2
ACCESSORY INFORMATION
GETTING STARTED
Attaching the Battery
2
1
slots
1. Fit the extensions at the bottom of the battery
into the slots at the bottom of the radio’s body.
2. Press the top part of the battery towards the
radio until a click is heard.
Removing the Battery
1. Turn off the radio, if it is turned on.
2. Slide the battery latches, on both sides of the
battery, downwards.
3. Pull the top part of the battery away from the
radio’s body, and lift the battery from the radio’s
body.
English
8
Page 16

Getting Started
Attaching the Antenna
attaching
1. Align the threaded end of the antenna with the
radio’s antenna connector.
2. Turn the antenna clockwise to fasten it.
Removing the Antenna
removing
Turn the antenna counter-clockwise until you
can remove it.
GETTING STARTED
9
English
Page 17

Getting Started
belt clip tab
1
2
Attaching the Belt Clip
1. Align the grooves of the belt clip with those of
the battery.
2. Press the belt clip downwards until a click is
heard.
Removing the Belt Clip
1. Use a key to press the belt clip tab away from
the battery.
2. Slide the belt clip upwards to remove it.
GETTING STARTED
English
10
Page 18

Getting Started
TURNING THE RADIO ON OR OFF
ON OFF
• Turn the On-Off/Volume Control knob
clockwise to turn on the radio. You will hear
the Self Test Pass Tone and see a green LED
if the radio powers up successfully. If the
radio fails its self test, you will hear the Self
Test Fail Tone.
• Turn the On-Off/Volume Control knob
counter-clockwise, until a click is heard, to
turn off the radio.
ADJUSTING THE RADIO’S VOLUME
1. Press and hold the Volume Set key; you will
hear a continuous tone.
2. Turn the On-Off/Volume Control knob and
adjust the volume level.
3. Release the Volume Set key.
SELECTING A RADIO CHANNEL
Your radio offers sixteen (16) channels for easy
access to required conventional channels. Some
channels on your radio may not be progr ammed.
Check with your dealer for more information.
Turn the Channel Selector knob clockwise or
counter-clockwise until you reach the desired
channel.
SENDING A CALL
GETTING STARTED
1. Use the Channel Selector knob to change to
the required channel.
2. Press the PTT, and speak clearly with your
mouth about 2.5 to 5 cm (one to two inches)
away from the microphone.
3. Release the PTT when you finish speaking.
11
English
Page 19

Getting Started
RECEIVING A CALL
1. Turn your radio on.
2. Adjust its volume level.
3. Switch to the desired channel.
4. If at any time a call comes through, you will
hear the call at the volume level you have set.
GETTING STARTED
English
12
Page 20

Radio Call Information
RADIO CALL INFORMATION
EMERGENCY SIREN
Your radio can be programmed to emit an
emergency siren. The Emergency Siren will
cause the radio to sound a repetitive tone at the
maximum volume.
1. Press and release the Emergency button to initiate an Emergency Siren.
2. Press and hold the Emergency button to cancel the Emergency Siren.
3. Press and release the Emergency button to
restart the Emergency sequence.
TALKAROUND
In your communications network, you may be
using a repeater to cover a larger area than what
is possible with your radio. However, you can
communicate with another radio within your
radio’s range without going through the repeater
by using the
especially useful when the repeater is down.
Talkaround
feature. This is
Press the programmed Repeater/Talkaround
button to toggle between the options of making
or not making a call through the repeater. A
positive indicator tone indicates that the radio is
in talkaround mode, while a negative indicator
tone indicates that the radio is in repeater mode.
SQUELCH
If a particular channel receives many unwanted
calls coming from radios that do not belong to
your communications group and are some
distance away, or the “background noise” is
excessive, you can try to filter these
transmissions out by tightening the channel’s
squelch. However, tightening squelch could
cause calls from members of your
communications group that are farther away to
be filtered out as well. To set the squelch level:
Press the programmed Squelch button to toggle
between the options of having normal squelch or
tightening the squelch of your radio. A positive
indicator tone indicates that the radio is
operating in tight squelch, while a negative
indicator tone indicates that the radio is
operating in normal squelch.
INFORMATION
RADIO CALL
13
English
Page 21

Radio Call Information
POWER LEVEL
You can transmit your calls at different transmit
power levels. A higher level means you can
reach a radio that is farther away. Lower power
level conserves battery power. You are advised
to transmit as frequently as possible on low
RADIO CALL
INFORMATION
power, and use high power only when needed.
Press the programmed Tx Power button to
toggle between the options for High or Low
power transmit level. A positive indicator tone
indicates that the radio is operating in low power
mode, while a negative indicator tone indicates
that the radio is operating in high power mode.
English
14
Page 22

Scan
SCAN
You can monitor several channels in order to
receive any call that is transmitted on any of
these channels. Sixteen different channels can
be programmed into a scan list. Each channel
can share the same scan list or have different
scan lists assigned to them.
Once the radio’s scan operation is activated and
the radio detects a call coming through a
channel in its scan list, it switches to that
channel for you to receive the call.
STARTING OR STOPPING A SCAN OPERATION
The LED Indicator will blink (green) during a
scan operation. It will stop blinking when the
radio switches to a channel.
1. Press the Scan key to start a scan operation.
2. Press the Scan key again to stop the scan
operation.
TALKBACK
If the programmable Talkback option is set, you
can respond to any calls received during the
scan operation by pressing the PTT before the
programmed hang-time ends. Check with your
dealer for details.
DELETING A NUISANCE CHANNEL
If a channel continually generates unwanted
calls/noise, you can temporarily remove it from
the scan list by performing a
Delete
operation.
1. While the radio is on the Nuisance Channel,
press and hold the Scan key until you hear a
tone.
2. Release the Scan key.
NOTE: You cannot perform a
Delete
on a priority channel or if there is only
one remaining channel in the scan list.
Nuisance Channel
Nuisance Channel
ADDING A DELETED NUISANCE
CHANNEL BACK TO THE SCAN
LIST
1. Press the Scan key to stop the scan opera-
tion.
2. Press the Scan key again to re-start the scan
operation.
SCAN
15
English
Page 23

Scan
SCAN CHANNEL DISCOVERY ALERT
Sometimes you need to know which channel the
radio has switched to during a scan operation.
The Scan Channel Discovery Alert gives you this
information.
After you have stopped a scan operation, this
feature gives you audio feedback when you
select the last channel that was switched to by
the scan operation. To do this:
1. Stop the scan operation.
2. Turn the Channel Selector to change the
channels.
SCAN
3. When you reach the last channel the scan
operation switched to, the radio sounds an
alert tone.
SCAN LIST MEMBER PRIORITY
A channel in your scan list may be prioritized
(check with your dealer for details). In such a
case, the radio will check that prioritized channel
more frequently than the other non-prioritized
channels.
Assuming a scan list with 6 channels, if all your
channels are non-prioritized, the normal scan
operation would check for activity in the f ollowing
sequence:
h
.
1
C
C
6
.
h
C
5
.
h
C
C
4
.
h
h
.
2
C
h
.
3
If Channel 2 is prioritized, the scan operation
would change to
h
.
2
C
6
.
h
C
2
.
h
C
5
.
h
C
2
.
h
C
C
h
.
1
C
h
.
2
C
h
.
3
C
h
.
2
C
4
h
.
NOTE: Even though your radio has switched to a
non-priority channel, your radio will still check for
activity on the priority channel. If some activity is
detected there, the radio will switch to that priority channel.
English
16
Page 24

Scan
SCAN
17
English
Page 25

SCAN
Scan
English
18
Page 26

Scan
SCAN
19
English
Page 27

Phone
PHONE
You can use your radio to connect to a phone
line to make a phone call. You need a radio with
a keypad to do this.
To do this, your radio must send an access code
to a station that connects it to a phone line. After
you have finished y our call, the radio has to send
a deaccess code to shutdown the connection to
the phone line.
MAKING A PHONE CALL
A complete phone session consists of
• entering the Phone mode
• sending the access code
• sending the phone number
• having the phone conversation
• ending the phone call.
Entering the Phone Mode
Before you can make a phone call, you must
enter the radio’s Phone mode.
PHONE
1. Press the Phone button.
Sending the Access Code
Your radio can be programmed to send the
access code in any of the following ways:
• manual
• automatic delayed
• automatic immediate.
Check with your dealer for more details.
Method Steps to Take
Manual Dial the access code from the keypad.
Automatic
Delayed
Automatic
Immediate
Press and release the PTT; the radio
automatically sends the preprogrammed access code.
You do not have to do anything; the
radio immediately sends the access
code when it enters phone mode.
Sending the Phone Number
After the access code is sent, you should wait for
a dialing tone before sending your phone
number.
You can send
• a phone number that is stored in the radio, or
• a new number.
English
20
Page 28

Phone
Additionally, depending on how your radio is
programmed, if you use the keypad to send a
number, the radio can send the numbers in one
of the following ways:
• live dial
• buffered dial.
Check with your dealer for details.
Sending a Stored Phone Number
You can access the stored phone numbers by
• recalling the last number dialed,
• using the speed dial feature.
Method Steps to Take
Last Number Redial
Press and release the PTT; the radio
*
sends the last number dialed.
Method Steps to Take
1. Press and release the programmed Speed Dial button.
2. Press the numbered keys
(1-9) corresponding to the first
Speed
‡
Dial
*
The method described is not applicable for radios which
manually send the access code; these radios can access
this number from the phone list or the speed dial.
nine phone numbers in the
phone list. Press “0” if you want
the last number dialed.
3. If your radio uses buffered dial,
press and release the PTT.
4. The radio sends out the phone
number.
PHONE
21
English
Page 29

Phone
PHONE
Sending a New Number (for radios
with keypad only)
You enter the phone number by pressing the
relevant keys on the keypad.
Method Steps to Take
Enter the phone number by using the
Live Dial
Buffered
Dial
keypad; the radio sends out the numbers
as the keys are pressed.
1. Enter the phone number by using
the keypad; the radio saves the
selected numbers in a buffer.
2. Press and release the PTT; the
radio sends out the numbers in its
buffer.
The Phone Conversation
Once the radio has connected to the intended
party, you can begin the conversation. Even
though this is a phone call, your conversation
mimics a radio call (that is, both parties speak in
turn).
1. Press and hold the PTT, while talking into the
microphone.
2. Release the PTT when you finish what you
want to say, and wait for the response.
3. Repeat steps 1 and 2 until the conversation
ends.
NOTE: The radio starts a programmable Time-Out-
Timer the moment both parties stop transmitting
(talking). If the Time-Out-Timer expires, the radio
will end the phone call.
Ending the Phone Call
Just as the radio needs to send the access code
when starting a phone call, the radio needs to
send the deaccess code to end the phone call.
The radio can send the deaccess code in any of
the following ways:
• manual, and
• automatic.
Check with your dealer for details.
1. If your radio sends the deaccess code manually, dial the deaccess code from the keypad.
2. Press the Phone button to exit phone mode.
NOTE: Radios using the automatic method
will send the deaccess code automatically.
English
22
Page 30

Safety Information
SAFETY INFORMATION
SAFE AND EFFICIENT OPERATION
OF MOTOROLA TWO-WAY RADIOS
This document provides information and
instructions for the safe and efficient operation of
Motorola Portable Two-Way Radios.
For information regarding radio use in hazardous
areas, please refer to the Factory Mutual (FM)
approval manual supplement or Instruction Card
which is included with radio models that offer this
capability .
Exposure To Radio Frequency Energy
Your Motorola Two-Way Radio, which generates
and radiates radio frequency (RF)
electromagnetic energy (EME) is designed to
comply with the following National and
International Standards and Guidelines
regarding exposure of human beings to radio
frequency electromagnetic energy:
• Federal Communications Commission
Report and Order No. FCC 96-326
(August 1996)
• American National Standards Institute
(C95.1 - 1992)
• National Council on Radiation Protection
and Measurements (NCRP-1986)
• International Commission on Non-Ionizing Radiation Protection (ICNRP- 1986)
• European Committee for Electrotechnical
Standardisation (CENELEC):
ENV 50166-1
1995 E
ENV 50166-2
1995 E
Proceedings of
SC211/B 1996
To assure optimal radio performance and to
ensure that your exposure to radio frequency
electromagnetic energy is within the guidelines
in the above standards, always adhere to the
following procedures:
Human exposure to electromagnetic fields Low frequency (0 Hz to 10 kHz)
Human exposure to electromagnetic fields High frequency (10 kHz to 300 GHz)
“Safety Considerations for
Human Exposure to EMFs
from Mobile Telecommunication Equipment (MTE) in the
Frequency Range 30MHz - 6
GHz.”(EMF - Electro-Magnetic Fields)
INFORMATION
SAFETY
23
English
Page 31

Safety Information
Portable Radio Operation and EME Exposure
•When transmitting with a
portable radio, hold radio in a
vertical position with the
SAFETY
INFORMATION
• If you wear a portable Two-Way radio on
MAN WITH RADIO
microphone 2.5 to 5 centi-
meters (one or two inches)
away from the mouth. Keep antenna at
least 2.5 centimeters (one inch) from your
head or body when transmitting.
your body, ensure that the antenna is at
least 2.5 centimeters (one inch) from the
body when transmitting.
Electromagnetic Interference/Compatibility
Note: Nearly every electronic device is susceptible
to electromagnetic interference (EMI) if inadequately shielded, designed or otherwise
configured for electromagnetic compatibility.
• To avoid electromagnetic interference
and/or compatibility conflicts, turn off your
radio in any facility where posted notices
instruct you to do so. Hospital or health
facilities may be using equipment that is
sensitive to external RF energy.
• When instructed to do so, turn off your
radio when on board an aircraft. Any use
of a radio must be in accordance with airline regulations or crew instructions.
Operational Warnings
Vehicles with an air bag
• Do not place a portable radio
in the area over an airbag or in the air
bag deployment area. Air bags inflate
with great force. If a portable radio is
placed in the air bag deployment area
and the air bag inflates, the radio may be
propelled with great force and cause serious injury to occupants of vehicle.
!
!
W A R N I N G
English
24
Page 32

Safety Information
Potentially explosive atmospheres
• Turn off your Two-Way radio when you
are in any area with a potentially explosive atmosphere, unless it is a radio type
especially qualified for use in such areas
(e.g. FM or Cenelec approved). Sparks in
a potentially explosive atmosphere can
cause an explosion or fire resulting in
bodily injury or even death.
Batteries
• Do not replace or recharge batteries in a
potentially explosive atmosphere. Contact sparking may occur while installing or
removing batteries and cause an explosion.
Blasting caps and areas
• To avoid possible interference with blasting operations, turn off your radio when
you are near electrical blasting caps. In a
“
blasting area
two-way radio
instructions.
Note: The areas with potentially explosive atmo-
spheres referred to above include fuelling
areas such as: below decks on boats; fuel or
chemical transfer or storage facilities; areas
” or in areas posted “
”, obey all signs and
turn off
where the air contains chemicals or particles,
such as grain, dust or metal powders; and
any other area where you would normally be
advised to turn off your vehicle engine. Areas
with potentially explosive atmospheres are
often but not always posted.
Operational Cautions
Damaged antennas
• Do not use any portable twoway radio that has a damaged antenna. If
a damaged antenna comes into contact
with your skin, a minor burn can result.
Batteries
• All batteries can cause property damage
and/or bodily injury such as burns if a
conductive material such as jewellery,
keys or beaded chains touch exposed
terminals. The conductive material may
complete an electrical circuit (short circuit) and become quite hot. Ex ercise care
in handling any charged battery, particularly when placing it inside a pocket,
purse or other container with metal
objects.
INFORMATION
SAFETY
!
C a u t i o n
25
English
Page 33

Safety Information
RECYCLING / DISPOSAL OF NICD BATTERIES
The Basel Convention classifies used NiCd batteries as hazardous waste, unless certain
exemptions apply.
SAFETY
INFORMATION
At the end of your battery’s useful life, it can be
recycled. However, recycling facilities may not be
available in all areas. Under various state or local
laws, such batteries must be recycled or disposed of properly, and cannot be dumped in
landfills or incinerators.
Motorola fully endorses and encourages the
recycling of NiCd batteries. The following is a list
of recycling facilities around the world, where you
can ship your NiCd batteries to be recycled:
United States
I
NMETCO
P.O. Box 720
245 Porteville Road
Ellwood City, PA 16117
Tel:(412) 758-5515
Fax:(412) 758-9311
Europe
S.N.A.M.
Rue de la Garenne
Z.I. Chesnes Tharabie -BP733
Saint Quentin Fallavier
38297 La Verpilliere Cedex,
France
Tel: 033-74-94-59-85
Fax: 033-74-94-13-18
Asia
Hanil Metal Recycle Co. Ltd.
2404 Palryong-dong
Changwon-Shi
Kyongsangnam-Do, Korea
Tel: 082-551-93-1911
Fax: 082-551-96-0050
Japan
Onahama Refinery of Toho Zinc Co., Ltd.,
10 Aza-Yoshihama,
Onahama,
Iwaki-City Fukushima Prefecture,
Japan
Marubeni Co.
Head Office/Attn. B6B2
4-2 Ohtemachi 1-Choma
Ciyoda-Ku, Tokyo, Japan
Nippon Recycle Ctr., Corp.
6-3-19, Nishitamma, Kita-Ku
Osaka, 530, Japan
Tel: 081-6-311-9071
Fax: 081-311-0949
You should consider the methods of collecting,
labeling, and shipping used NiCd batteries. Consult your federal, state, or local enviromental
authority for specific legal requirements and for
recycling options in your area.
Motorola, as a responsible corporate citizen, has
always been concerned with the protection of the
environment. Please feel free to call our toll-free
number,1-800-422-4210, for further battery information.
English
26
 Loading...