

Page 1

Motorola Inc. FCC ID: AZ489FT4826
GP328
Prof essional Two-W a y Radio
EXHIBIT 12
Page 2
2-YEAR LIMITED WARRANTY
FOR RADIOS
We thank you for purchasing our Motorola radios.
These radios are manufactured according to the
highest quality standards set and are backed by
Motorola’s two (2) year warranty. The rechargeable
Motorola supplied batteries have a one (1) year
warranty. Kindly approach your dealer for more
information.
Motorola warrants its radios and batteries against
defects in material and workmanship under normal
use and service for the period stated above.
Motorola recommends that you use Motorola supplied
accessories and batteries in connection with the radio.
We would also advise you against attempting any
modifications or repairs or any other form of
unauthorised service to your radio.
Should you have any queries, please contact:
Singapore - Telephone/Fax: (65) 3810408&9/2871068
Beijing - Telephone/Fax: (86-10) 68437222/68438195
Please see next page for more information.
Fill in the details of your radio below for your own
reference:
Model Name/No.:
Serial Number:
Date of Purchase:
Dealer Name:
Address:
Telephone:
English
Page 3

LIMITED WARRANTY
MOTOROLA RADIO PRODUCTS
Limited Warranty
This express limited warranty covers the Product manufactured by MOTOROLA Radio Products Group and applies to any warranty already
mentioned. MOTOROLA assumes no obligations or liability for additions or modifications to this warranty unless specifically made in writing
and signed by an authorised officer of MOTOROLA.
MOTOROLA cannot be responsible in any way for any ancillary equipment not furnished by MOTOROLA which is attached to or used in
connection with the Product, or for operation of the Product with any ancillary equipment, and all such equipment is expressly excluded from
this warranty. Because each system which may use the Product is unique, MOTOROLA disclaims liability for range, coverage, or operation
of the system as a whole under this warranty.
This warranty sets forth the full extent of MOTOROLA’S responsibilities regarding the Product. Repair, replacement or refund of the
purchase price, at MOTOROLA’S option, is the sole and exclusive remedy of purchaser/user of the Product. THIS WARRANTY IS GIVEN
IN LIEU OF ALL OTHER EXPRESS WARRANTIES. IMPLIED WARRANTIES, INCLUDING WITHOUT LIMITATION, IMPLIED
WARRANTIES OF MERCHANTABILITY AND FITNESS FOR A PARTICULAR PURPOSE, ARE
SHALL MOTOROLA BE LIABLE FOR DAMAGES IN EXCESS OF THE PURCHASE PRICE OF THE PRODUCT, FOR ANY LOSS OF
USE, LOSS OF TIME, INCONVENIENCE, COMMERCIAL LOSS, LOST PROFITS OR SAVINGS OR OTHER INCIDENTAL, SPECIAL OR
CONSEQUENTIAL DAMAGES ARISING OUT OF THE USE OR INABILITY TO USE SUCH PRODUCT, TO THE FULL EXTENT SUCH
MAY BE DISCLAIMED BY LAW.
Notwithstanding anything contained herein, MOTOROLA shall not be liable for any of the following situations:
A) Defects or damage resulting from use of the Product in other than its normal and customary manner.
B) Defects or damage from misuse, accident, water, liquid or neglect.
C) Defects or damage from improper or unauthorised testing, operation, maintenance, service, repair, installation, alteration, modification,
or adjustment.
D) Product which has had the serial number removed or made illegible.
E) A Product which, due to illegal or unauthorized alteration of the software/firmware in the Product, does not function in accordance with
Motorola’s published specifications or the FCC type acceptance labeling in effect for the Product at the time the Product was initially
distributed from Motorola.
F) Scratches or other cosmetic damage to Product surfaces that does not affect the operation of the Product.
MOTOROLA shall have no liability whatsoever with respect to any claim of patent infringement which is based upon the combination of the
Product or parts furnished hereunder with software, apparatus or devices not furnished by MOTOROLA, nor will MOTOROLA have any
liability
whatsoever
with the Product.
HOW TO GET WARRANTY SERVICE: Provide proof of purchase and deliver or send the Product item, transportation and insurance
prepaid to an authorized warranty service location. Warranty service will be provided by Motorola through one of its authorized warranty
service locations. If you contact the company that sold you the Product, it can facilitate your obtaining warranty service. You can also call
Motorola for assistance:
65-3810408/9 (Singapore) or 86-10-68437222 (Beijing).
for the use of ancillary equipment or software not furnished by MOTOROLA which is attached to or used in connection
HEREBY EXCLUDED
. IN NO EVENT
English
Page 4

Contents
CONTENTS
Radio Overview . . . . . . . . . . . . . . . . . . . . 3
Parts of the Radio. . . . . . . . . . . . . . . . . . . . . . . . 3
On/Off/Volume Knob . . . . . . . . . . . . . . . . . 4
Channel Selector Knob. . . . . . . . . . . . . . . . . 4
Programmable Buttons. . . . . . . . . . . . . . . . . 4
Push-to-Talk (PTT) Button . . . . . . . . . . . . . 6
Microphone . . . . . . . . . . . . . . . . . . . . . . . . . 6
Keypad Keys (for keypad radios only) . . . . 7
Programmable Buttons Audio Indicators. . . 7
Getting Started. . . . . . . . . . . . . . . . . . . . . 9
Battery Information . . . . . . . . . . . . . . . . . . . . . . 9
Battery Status . . . . . . . . . . . . . . . . . . . . . . . . 9
Charging your Battery . . . . . . . . . . . . . . . . . 9
Accessory Information. . . . . . . . . . . . . . . . . . . 10
Attaching the Battery . . . . . . . . . . . . . . . . . 10
Removing the Battery . . . . . . . . . . . . . . . . 10
Attaching the Antenna . . . . . . . . . . . . . . . . 11
Removing the Antenna. . . . . . . . . . . . . . . . 11
Attaching the Belt Clip. . . . . . . . . . . . . . . . 11
Removing the Belt Clip . . . . . . . . . . . . . . . 12
Turning the Radio On or Off . . . . . . . . . . . . . . 12
Adjusting the Radio’s Volume. . . . . . . . . . . . . 12
Selecting a Radio Channel. . . . . . . . . . . . . . . . 13
Sending a Call. . . . . . . . . . . . . . . . . . . . . . . . . . 13
Receiving a Call . . . . . . . . . . . . . . . . . . . . . . . .13
Radio Call Information . . . . . . . . . . . . . .15
Talkaround . . . . . . . . . . . . . . . . . . . . . . . . . . . . 15
Squelch . . . . . . . . . . . . . . . . . . . . . . . . . . . . . . . 15
Power Level . . . . . . . . . . . . . . . . . . . . . . . . . . .15
Scan . . . . . . . . . . . . . . . . . . . . . . . . . . . . .17
Starting or Stopping a Scan Operation. . . . . . .17
Talkback . . . . . . . . . . . . . . . . . . . . . . . . . . . . . . 17
Deleting a Nuisance Channel . . . . . . . . . . . . . . 17
Adding a Deleted Nuisance Channel back to the
Scan List. . . . . . . . . . . . . . . . . . . . . . . . . . . . . .18
Scan Channel Discovery Alert . . . . . . . . . . . . . 18
Scan List Member Priority . . . . . . . . . . . . . . . . 18
Phone . . . . . . . . . . . . . . . . . . . . . . . . . . . .19
Making a Phone Call . . . . . . . . . . . . . . . . . . . . 19
Entering the Phone Mode . . . . . . . . . . . . . .19
Sending the Access Code . . . . . . . . . . . . . . 19
Sending the Phone Number . . . . . . . . . . . . 20
The Phone Conversation. . . . . . . . . . . . . . . 22
Ending the Phone Call . . . . . . . . . . . . . . . . 22
CONTENTS
1
English
Page 5

Contents
Safety Information . . . . . . . . . . . . . . . . . 23
Safe And Efficient Operation Of Motorola Two-
Way Radios . . . . . . . . . . . . . . . . . . . . . . . . . . . 23
Exposure To Radio Frequency Energy . . . 23
Portable Radio Operation
And EME Exposure . . . . . . . . . . . . . . . . . . 24
CONTENTS
Electromagnetic
Interference/Compatibility. . . . . . . . . . . . . 24
Operational Warnings . . . . . . . . . . . . . . . . 25
Operational Cautions . . . . . . . . . . . . . . . . . 25
English
2
Page 6
RADIO OVERVIEW
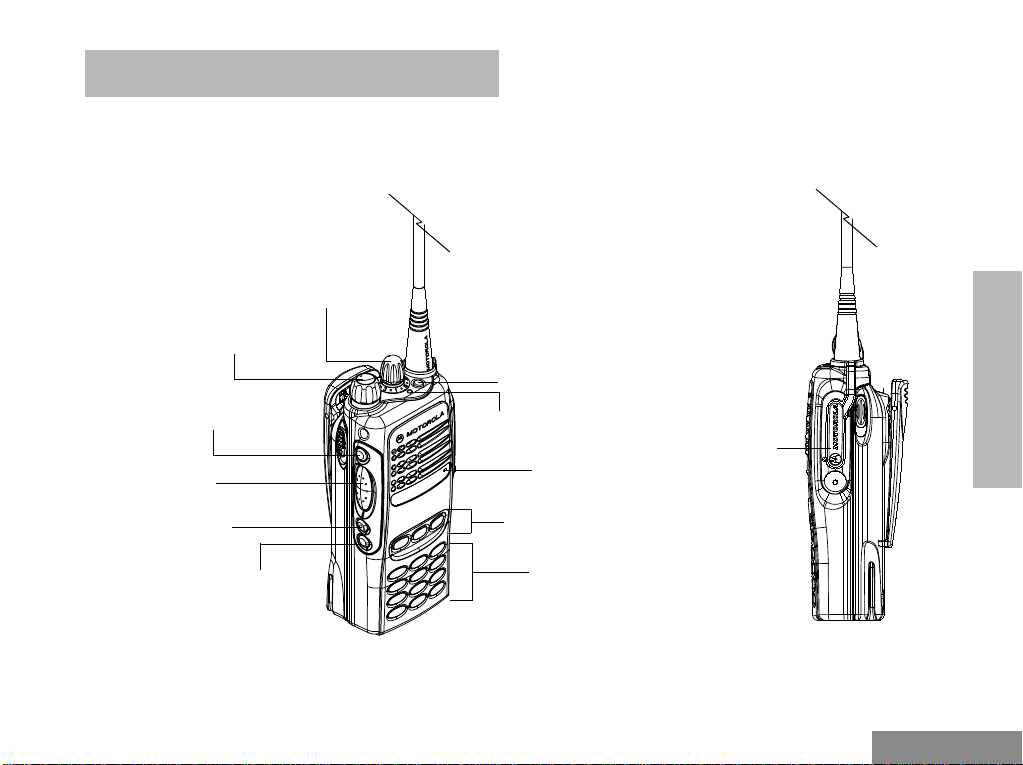
PARTS OF THE RADIO
Radio Overview
On/Off/Volume
Side Button 1
(programmable)
Push-to-Talk
(PTT) Button
Side Button 2
(programmable)
Side Button 3
(programmable)
Channel Selector
Knob
Knob
Top Button
(programmable)
LED Indicator
Microphone
Front Buttons
(programmable)
Keypad
Dust Cover
covering the
Accessories
Port
RADIO OVERVIEW
3
English
Page 7

Radio Overview
RADIO OVERVIEW
On/Off/Volume Knob
Used to turn the radio on or off, and to increase
the radio’s volume.
Channel Selector Knob
Used to switch the radio to different channels.
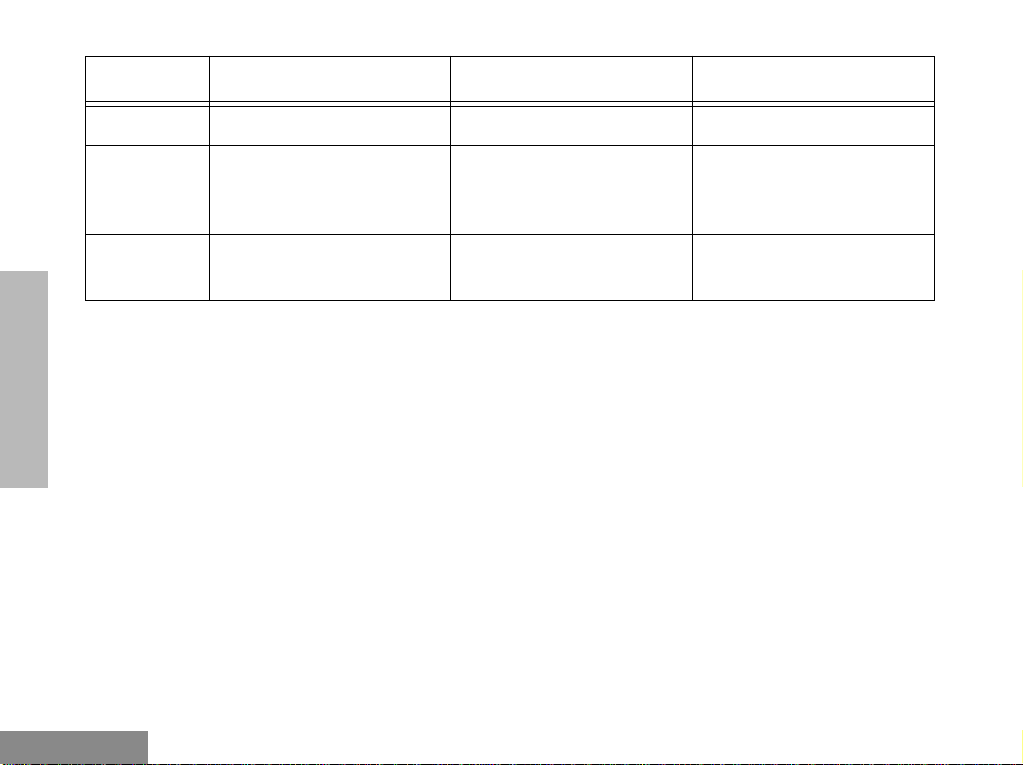
Programmable Buttons
, / .
Key Short Press Long Press Press and Hold
Monitor/
Permanent
Monitor
Volume Set
To monitor the selected
channel for any activity.
--
To continually monitor the
selected channel. -
The three Front Buttons (not available for radios
without the keypad), as shown, the top button
and the three side buttons can be programmed as
short-cut buttons for many of the radio’s
features.
The following table shows the functions
available by pressing the programmable buttons
(short press) and by pressing and holding the
programmable buttons for a period of time (long
press).
Check with your dealer for a complete list of the
functions your radio’s programmable buttons
support.
You can use to adjust your
radio’s volume level.
English
Battery
Gauge
--
4
To check the battery’s status.
Page 8

Radio Overview
Key Short Press Long Press Press and Hold
Scan/Nuisance Channel Delete
To toggle between the
start/stop of the Scan operation.
Tx Power To toggle your radio’s
transmit power level
between High and Low
†
power.
Keypad
Lock -
Repeater/
Talkaround
To choose to make/not to
make a radio call through
the repeater.
†
Squelch To toggle your radio’s
squelch level between
tight/normal squelch.
Option
Board
To toggle the activation/
deactivation of your
radio’s option board (if one
is installed).
†
To delete a nuisance channel while scanning. -
To toggle your radio’s
transmit power level
between High and Low
†
power.
-
RADIO OVERVIEW
To toggle between locking/
unlocking your radio’s
-
keypad.
To choose to make/not to
make a radio call through
the repeater.
†
-
To toggle your radio’s
squelch level between
†
tight/normal squelch.
†
-
To toggle the activation/
deactivation of your
radio’s option board (if one
is installed).
†
-
5
English
Page 9
Radio Overview
Key Short Press Long Press Press and Hold
RADIO OVERVIEW
Phone
To make a Phone Call.
Speed Dial To easily access the phone
numbers in your phone
†
list.
Light To activate your radio’s
backlight.
†
Depending on how your radio has been programmed by your dealer, these functions are activated
through short press OR long press, but not both.
†
Push-to-Talk (PTT) Button
Press and hold down this button to talk, release
†
To make a Phone Call.
To easily access the phone
numbers in your phone
†
list.
To activate your radio’s
backlight.
†
Microphone
Speak clearly into it when sending a message.
†
to listen.
-
-
-
EITHER
English
6
Page 10

Radio Overview
Keypad Keys (for keypad radios only)
123
456
789
*0#
These keys are used when dialing a phone
number.
INDICATOR T ONES
High pitched tone Medium pitched tone
Positive Indicator
Tone
Negative Indicator
Tone
Programmable Buttons Audio Indicators
Some programmable keys function as toggles.
These keys use audio indicators to indicate the
change.
Programmable
Buttons
Scan
Tx Power Radio trans-
Squelch
Option Board
Positive
Indicator
Tone
Start
Scan
operation
mits at
high
power
Radio oper-
ates in
tight
squelch
Activates
radio’s
option board
Negative
Indicator
Stop
operation
Radio trans-
mits at
power
Radio operates in
mal
Deactivates
radio’s
option board
Tone
Scan
low
nor-
squelch
RADIO OVERVIEW
7
English
Page 11

Radio Overview
RADIO OVERVIEW
Programmable
Buttons
Positive
Indicator
Tone
Keypad Lock Radio’s key-
pad is
locked
Repeater/
Talkaround
Radio
DOES
NOT
use
the repeater
Negative
Indicator
Tone
Radio’s keypad is
unlocked
Radio uses
the repeater
English
8
Page 12

Getting Started
GETTING STARTED
BATTERY INFORMATION
Battery Status
You can check your radio’s battery status by
pressing the programmed Battery Gauge button
(battery status is shown by the LED indicator).
Battery
Level
High Green
Satisfactory Y ello w
Low Flashing Red
Very Low None
LED
Indicator
Charging your Battery
When the battery level is very low, you need to
recharge the battery before you can continue to
use your radio.
1. Place the radio with the battery attached or the
battery alone in the charger.
2. The charger’s LED would indicate the char ging
progress.
LED color Status
Flashing Red
*
Battery is unchargeable.
Flashing Yellow Charger is getting ready
to charge.
Red Battery is charging.
Flashing Green Battery is 90% charged.
Green Battery is fully charged.
*
Battery is damaged. Please contact your dealer.
GETTING STARTED
9
English
Page 13

Getting Started
battery latches
1
2
ACCESSORY INFORMATION
Attaching the Battery
2
1
slots
1. Fit the extensions at the bottom of the battery
into the slots at the bottom of the radio’s body.
2. Press the top part of the battery towards the
radio until a click is heard.
Removing the Battery
1. Turn off the radio, if it is turned on.
2. Slide the battery latches, on both sides of the
battery, downwards.
3. Pull the top part of the battery away from the
radio’s body, and lift the battery from the
radio’s body.
GETTING STARTED
English
10
Page 14

Getting Started
Attaching the Antenna
attaching
1. Align the threaded end of the antenna with the
radio’s antenna connector.
2. Turn the antenna clockwise to fasten it.
Removing the Antenna
Turn the antenna counter-clockwise until you
can remove it.
Attaching the Belt Clip
1. Align the grooves of the belt clip with those of
the battery.
2. Press the belt clip downwards until a click is
heard.
GETTING STARTED
11
English
Page 15

Getting Started
Removing the Belt Clip
belt clip tab
1
2
1. Use a key to press the belt clip tab away from
the battery.
2. Slide the belt clip upwards to remove it.
GETTING STARTED
TURNING THE RADIO ON OR OFF
ON OFF
• Turn the
clockwise to turn on the radio.
• Turn the
counter-clockwise, until a click is heard,
to turn off the radio.
On-Off/Volume Control
On-Off/Volume Control
knob
knob
ADJUSTING THE RADIO’S VOLUME
1. Press and hold the
hear a continuous tone.
2. Turn the
On-Off/Volume Control
adjust the volume level.
3. Release the
Volume Set key; you will
Volume Set
key.
knob and
English
12
Page 16

SELECTING A RADIO CHANNEL
Your radio offers sixteen (16) channels for easy
access to required conventional channels. Some
channels on your radio may not programmed.
Check with your dealer for more information.
Turn the
counter-clockwise until you reach the desired
channel.
Channel Selector
knob clockwise or
SENDING A CALL
Getting Started
1. Use the
the required channel.
2. Press the
mouth about 2.5 to 5 cm (one to two inches)
away from the microphone.
3. Release the
Channel Selector
PTT
, and speak clearly with your
PTT
when you finish speaking.
knob to change to
RECEIVING A CALL
1. Turn your radio on.
2. Adjust its volume level.
3. Switch to the desired channel.
4. If at any time a call comes through, you will
hear the call at the volume level set.
13
GETTING STARTED
English
Page 17

Getting Started
GETTING STARTED
English
14
Page 18

Radio Call Information
RADIO CALL INFORMATION
TALKAROUND
In your communications network, you may be
using a repeater to cover a larger area than what
is possible with your radio. However, you can
communicate with another radio within your
radio’s range without going through the repeater
by using the
especially useful when the repeater is down.
Press the programmed
button to toggle between the options of making
or not making a call through the repeater. A
positive indicator tone indicates that the radio is
in repeater mode, while a negative indicator
tone indicates that the radio is in talkaround
mode.
SQUELCH
If a particular channel receives many unwanted
calls coming from radios that do not belong to
your communications group and some distance
away, or the “background noise” is excessive,
you can try to filter these transmissions out by
Talkaround
feature. This is
Repeater/Talkaround
tightening the channel’s squelch. However,
tightening squelch could cause calls from
members of your communications group that
are farther away to be filtered out as well.
Press the programmed
between the options of having normal squelch
or tightening the squelch of your radio. A
positive indicator tone indicates that the radio is
operating in tight squelch, while a negative
indicator tone indicates that the radio is
operating in normal squelch.
POWER LEVEL
You can transmit your calls at different transmit
power levels. A higher level means you can
reach a radio that is farther away. Lower power
level conserves battery power. You are advised
to transmit as frequently as possible on low
power, and use high power only when needed.
Press the programmed
toggle between the options for High or Low
power transmit level. A positive indicator tone
indicates that the radio is operating in high
power mode, while a negative indicator tone
Squelch
Tx Power
button to toggle
button to
INFORMATION
RADIO CALL
15
English
Page 19

Radio Call Information
indicates that the radio is operating in low
power mode.
RADIO CALL
INFORMATION
English
16
Page 20

Scan
SCAN
You can monitor several channels in order to
receive any call that is transmitted on any of
these channels. Sixteen different channels can
be programmed into a scan list. Each channel
can share the same scan list or have different
scan lists assigned to them.
Once the radio’s scan operation is activated and
the radio detects a call coming through a
channel in its scan list, it switches to that
channel for you to receive the call.
STARTING OR STOPPING A SCAN OPERATION
The LED Indicator will blink (yellow) during a
scan operation. It will stop blinking when the
radio switches to a channel.
1. Press the
2. Press the
ation.
Scan
key to start a scan operation.
Scan
key again to stop the scan oper-
TALKBACK
If the programmable Talkback option is set, you
can respond to any calls received during the
scan operation by pressing the PTT before the
programmed hang-time ends. Check with your
dealer for details.
DELETING A NUISANCE CHANNEL
If a channel continually generates unwanted
calls/noise, you can temporarily remove it from
the scan list by performing a
Delete
operation.
1. While the radio is on the Nuisance Channel,
press and hold the
tone.
2. Release the
Note:
Scan
Scan
key.
You cannot perform a
sance Channel Delete
ority channel or if there is only
one remaining channel in the
scan list.
Nuisance Channel
key until you hear a
Nui-
on a pri-
SCAN
17
English
Page 21

Scan
ADDING A DELETED NUISANCE
CHANNEL BACK TO THE SCAN
LIST
1. Press the
2. Press the
operation.
Scan
key to stop the scan operation.
Scan
key again to re-start the scan
SCAN CHANNEL DISCOVERY ALERT
Sometimes you need to know which channel the
radio has switched to during a scan operation.
The Scan Channel Discovery Alert gives you
SCAN
this information.
This feature gives you audio feedback, after you
have stopped a scan operation, when you
change to the last channel that was switched to
by the scan operation.
1. Stop the scan operation.
2. Turn the
nels.
3. When you reach the last channel the scan operation switched to, the radio will give an alert
tone.
Channel Selector
to change the chan-
SCAN LIST MEMBER PRIORITY
A channel in your scan list may be prioritized
(check with your dealer for details). In such a
case, the radio will check that prioritized
channel more frequently than the other nonprioritized channels.
Note:
Even though your radio has
switched to a non-priority
channel, your radio will still
check for activity on the priority channel. If some activity is
detected there, the radio will
switch to that priority channel.
English
18
Page 22

Phone
PHONE
You can use your radio to connect to a phone
line to make a phone call. You need a radio with
a keypad to do this.
To do this, your radio must send an access code
to a station that connects it to a phone line. After
you have finished your call, the radio has to
send a deaccess code to shutdown the
connection to the phone line.
MAKING A PHONE CALL
A complete phone session consists of
• entering the phone mode
• sending the access code
• sending the phone number
• having the phone conversation
• ending the phone call.
Entering the Phone Mode
Before you can make a phone call, you must
enter the radio’s phone mode.
1. Press the Phone button.
Sending the Access Code
Your radio can be programmed to send the
access code in any of the following three ways:
• manual (for radios with keypad only)
• automatic delay
• automatic immediate.
Check with your dealer for more details.
Method
Used
Manual Dial the access code from the
keypad.
Automatic
Delay
Press and release the PTT; the
radio automatically sends the
preprogrammed access code.
Steps to Take
PHONE
19
English
Page 23

Phone
Method
Used
Automatic
Immediate
Sending the Phone Number
After the access code is sent, you should wait
for a dialing tone before sending your phone
number.
You can send
• a phone number that is stored in the
radio, or
• a new number (for radios with keypad
only).
PHONE
Additionally, depending on how your radio is
programmed, if you use the keypad to send a
number, the radio can send the numbers in one
of the following ways:
Steps to Take
You do not have to do anything;
the radio immediately sends the
access code when it enters phone
mode.
• live dial
• buffered dial.
Check with your dealer for details.
Sending a Stored Phone Number
You can access the stored phone numbers by
• recalling the last number dialed,
• using the speed dial feature.
Method
Used
Last
Number
*
Redial
Press and release the PTT again;
the radio sends the last number
dialed.
Steps to Take
English
20
Page 24

Phone
Method
Used
Speed
Dial
1. Press and release the pro-
Steps to Take
grammed Speed Dial button.
2. Press the numbered keys
(1-9) corresponding to the
first nine phone numbers in
the phone list. Press “0” if
you want the last number
dialed.
3. If your radio uses buffered
dial, press and release the
PTT.
4. The radio sends out the relevant phone number.
*
The method described is not applicable for radios
which manually send the access code; these radios
can access this number from the speed dial.
Sending a New Number (for radios with
keypad only)
You enter the phone number by pressing the
relevant keys on the keypad.
Method
Used
Steps to Take
Live Dial Enter the phone number by using
the keypad; the radio sends out the
numbers as the keys are pressed.
Buffered
Dial
1. Enter the phone number by
using the keypad; the radio
saves the numbers selected in a
buffer .
2. Press and release the PTT; the
radio sends out the numbers in
its buffer.
PHONE
21
English
Page 25

Phone
The Phone Conversation
Once the radio has connected to the intended
party, you can begin the conversation. Even
though, this is a phone call, your conversation
mimics a radio call (i.e. both parties speak in
turn).
1. Press and hold the PTT, while talking into the
microphone.
2. Release the PTT when you finish what you
want to say, and wait for the response.
3. Continue in like manner until the conversation
ends.
Note: The radio starts a programma-
ble Time-Out-Timer the
moment both parties stop
transmitting (talking). If the
Time-Out-Timer expires, the
radio will end the phone call.
Ending the Phone Call
PHONE
Just as the radio needs to send the access code
when starting a phone call, the radio needs to
send the deaccess code to end the phone call.
The radio can send the deaccess code in any of
the following ways:
• manual (for radios with keypad only)
• automatic.
Check with your dealer for details.
1. If your radio sends the deaccess code manually,
dial the deaccess code from the keypad.
2. Press the Phone button to exit phone mode
(radios using the automatic method will send
the code automatically).
English
22
Page 26

Safety Information
SAFETY INFORMATION
SAFE AND EFFICIENT OPERATION
OF MOTOROLA TWO-WAY RADIOS
This document provides information and
instructions for the safe and efficient operation
of Motorola Portable and Mobile Two-Way
Radios.
The information provided in this document
supersedes the general safety information
contained in user guides published prior to 1st.
January 1998.
For information regarding radio use in
hazardous areas, please refer to the Factory
Mutual (FM) approval manual supplement or
Instruction Card which is included with radio
models that offer this capability.
Exposure To Radio Frequency Energy
Your Motorola Two-Way Radio, which
generates and radiates radio frequency (RF)
electromagnetic energy (EME) is designed to
comply with the following National and
International Standards and Guidelines
regarding exposure of human beings to radio
frequency electromagnetic energy:
• Federal Communications Commission
Report and Order No. FCC 96-326
(August 1996)
• American National Standards Institute
(C95.1 - 1992)
• National Council on Radiation Protection and Measurements (NCRP-1986)
• International Commission on Non-Ionizing Radiation Protection (ICNRP- 1986)
• European Committee for Electrotechnical Standardisation (CENELEC):
•ENV 50166-1
1995 E
•ENV 50166-2
1995 E
Human exposure to electromagnetic fields Low frequency (0 Hz to 10 kHz)
Human exposure to electromagnetic fields High frequency (10 kHz to 300 GHz)
INFORMATION
SAFETY
23
English
Page 27

Safety Information
SAFETY
INFORMATION
•Proceedings of
SC211/B 1996
“Safety Considerations for
Human Exposure to EMFs
from Mobile Telecommunication Equipment (MTE) in
the Frequency Range
30MHz - 6 GHz.”(EMF Electro-Magnetic Fields)
To assure optimal radio performance and to
ensure that your exposure to radio frequency
electromagnetic energy is within the guidelines
in the above standards, always adhere to the
following procedures:
Portable Radio Operation And EME Exposure
•When transmitting with a
portable radio, hold radio in
a vertical position with the
MAN WITH RADIO
microphone 2.5 to 5 centimeters (one or two inches)
away from the mouth. Keep
antenna at least 2.5 centimeters (one inch) from your
head or body when transmitting.
• If you wear a portable Two-Way radio on
your body, ensure that the antenna is at
least 2.5 centimeters (one inch) from the
body when transmitting.
Electromagnetic Interference/Compatibility
Note:Nearly every electronic device is susceptible
to electromagnetic interference (EMI) if
inadequately shielded, designed or otherwise
configured for electromagnetic compatibility.
• To avoid electromagnetic interference
and/or compatibility conflicts, turn off
your radio in any facility where posted
notices instruct you to do so. Hospital or
health facilities may be using equipment
that is sensitive to external RF energy.
• When instructed to do so, turn off your
radio when on board an aircraft. An y use
of a radio must be in accordance with
airline regulations or crew instructions.
English
24
Page 28

Safety Information
Operational Warnings
Vehicles with an air bag
• Do not place a portable radio
in the area over an airbag or in the air bag
deployment area. Air bags inflate with
great force. If a portable radio is placed
in the air bag deployment area and the air
bag inflates, the radio may be propelled
with great force and cause serious injury
to occupants of vehicle.
Potentially explosive atmospheres
• Turn off your Two-Way radio when you
are in any area with a potentially explosive atmosphere, unless it is a radio type
especially qualified for use in such areas
(e.g. FM or Cenelec approved). Sparks in
a potentially explosive atmosphere can
cause an explosion or fire resulting in
bodily injury or even death.
Batteries
• Do not replace or recharge batteries in a
potentially explosive atmosphere. Contact sparking may occur while installing
!
!
W A R N I N G
or removing batteries and cause an
explosion.
Blasting caps and areas
• To av oid possible interference with blasting operations, turn off your radio when
you are near electrical blasting caps. In a
“blasting area” or in areas posted “turn
off two-way radio”, obey all signs and
instructions.
Note: The areas with potentially explosive atmo-
spheres referred to above include fuelling
areas such as: below decks on boats; fuel or
chemical transfer or storage facilities; areas
where the air contains chemicals or particles,
such as grain, dust or metal powders; and
any other area where you would normally be
advised to turn off your vehicle engine.
Areas with potentially explosive atmospheres are often but not always posted.
Operational Cautions
!
Damaged antennas
• Do not use any portable twoway radio that has a damaged antenna. If
C a u t i o n
INFORMATION
SAFETY
25
English
Page 29

Safety Information
SAFETY
INFORMATION
a damaged antenna comes into contact
with your skin, a minor burn can result.
Batteries
• All batteries can cause property damage
and/or bodily injury such as burns if a
conductive material such as jewellery,
keys or beaded chains touch exposed terminals. The conductive material may
complete an electrical circuit (short circuit) and become quite hot. Exercise care
in handling any charged battery, particularly when placing it inside a pocket,
purse or other container with metal
objects.
English
26
Page 30

Motorola Penang
Bayan Lepas Free Industrial Zone
Phase III
11900 Penang
Malaysia
May, 1998
 Loading...