

Page 1
ELB Series
Two-Way Radio's User Guide
Page 2

Page 3

Contents
FCC Licensing Information .......... 2
Product Safety and RF Exposure
Compliance............................... 4
Introduction................................... 5
Radio Controls .............................. 6
Reading the Display .................... 7
Getting Started .............................. 8
Installing the Nickel-Metal Hydride
Battery...................................... 9
Charging using the 53xxx Drop-In
Charging Tray......................... 10
Battery Meter............................. 11
Attaching the Belt Clip............... 11
Turning the Radio On and Off ... 12
Adjusting the Volume................. 12
Talking and Receiving................ 13
Basic Radio Operation............... 13
Signal Strength Indicator........... 13
Programming Mode .................... 14
Entering Programming Mode..... 14
Features........................................17
Call Tone....................................17
Hands-Free Use/VOX (ELB1210
Only).......................................18
Locking the Keypad ...................19
End-of-Transmission Tone.........19
Time-Out Timer..........................19
Frequency and Code Charts.......20
Troubleshooting ......................... 26
Limited Warranty .........................29
1
Page 4

FCC Licensing Information
ELB Series professiona l t w o-way radios operate on radio frequencies that are regu lated by the Federal
Communications Commission (FCC). In order to transmit on these freq uencies, you are required to have a
license issued by the FCC.
Application is made available on FCC Forms 601, schedules D and H, and remittance form 159. If ordering the
forms by mail, phone, or from the FCC website, please request document number
forms and instructions. If using the FCC Fax-on-Demand system, use the 7-digit order number s listed below.
To obtain the required forms, please use the following contact information:
Faxed
contact the Fax-On-Demand
system at:
1-202-418-0177
Request forms 3060001,
FCC Licensing Information
2
3060003, and 3060006
Before filling out your applicatio n, you must decide which frequency(ies) you can operate on. See Frequency
and Code Charts on p age 2 0. Fo r ques tion s on de termin ing y our ra di o freq uen cy, please ca ll Motor ol a Pro duct
Services at 1-800-448-6686.
Changes or modifications not expressly approved by Motor ola may void the user’s authority granted by the
FCC to operate this radio and should not be made. To comply with FCC requirements, transmitter adjustments
call the FCC forms hotline
Request document 000601 Request document 000601
Mailed
at:
1-800-418-FORM
1-800-418-3676
000601
, which includes all
By Phone or Web
or for questions
regarding FCC license
contact the FCC at:
1-888-CALL-FCC
1-888-225-5322
or: http://www.fcc.gov
Page 5

should be made only by or under the supervision of a person certified as technically qualified to perform
transmitter maintenance an d repair s in the privat e land mobile and fi xed service s as certified by an organizatio n
representative of the user of those services. Replacement of any transmitter component (crystal,
semiconductor, etc.) not authorized by the FCC equipment authorization for this radio could violate FCC rules.
Note:
Use of this radio outside the countr y where it was intended to be distributed is subject to governme nt
regulations and may be prohib ited.
FCC Licensing Information
3
Page 6

Product Safety and RF Exposure Compliance
!
Before using this product, read the operating instructions for safe
usage contained in the Product Safety and RF Exposure booklet
C a u t i o n
This radio is restricted to occupational use only to satisfy FCC RF energy
exposure requirements. Before using this product, read the RF energy
awareness information and operating instructions in the Product Safety and RF
Exposure booklet enclosed with your radio (Motorola Publication part number
68P81095C98) to ensure compliance with RF energy exposure limits.
For a list of Motorola-approved antennas, ba tteries, and other accessories, visit the
following web site which lists approved accessories: http://www.motorola.com/
cgiss/index.shtml.
Product Safety and RF Exposure Compli-
4
enclosed with your radio.
ATTENTION!
Page 7

Introduction
Thank you for purchasing a Motorola ELB Series two-way radio product. The
Motorola ELB Series two-way radio models are products of Motorola’s 75-plus
years of experience as a world leader in designing and manufacturing
communications equipment.
The ELB Series two-way radios are a perfect cost-effective communications
solution for all of today’s fast-paced businesses and industries.
Product registration is an important step. Registering helps facilitate warranty
service and permits us to contact you should your Motorola product require an
update or other service.
To register your product on-line, visit www.motorola.com/warranty/radios
retain your original dated sales receipt for your records. For warranty service of
your Motorola product, you will need to provide a copy of your dated sales receipt
to confirm warranty status. Registration is not required for warranty coverage.
Note: Please be sure to save this programming instructions for further reference.
. Please
Introduction
5
Page 8
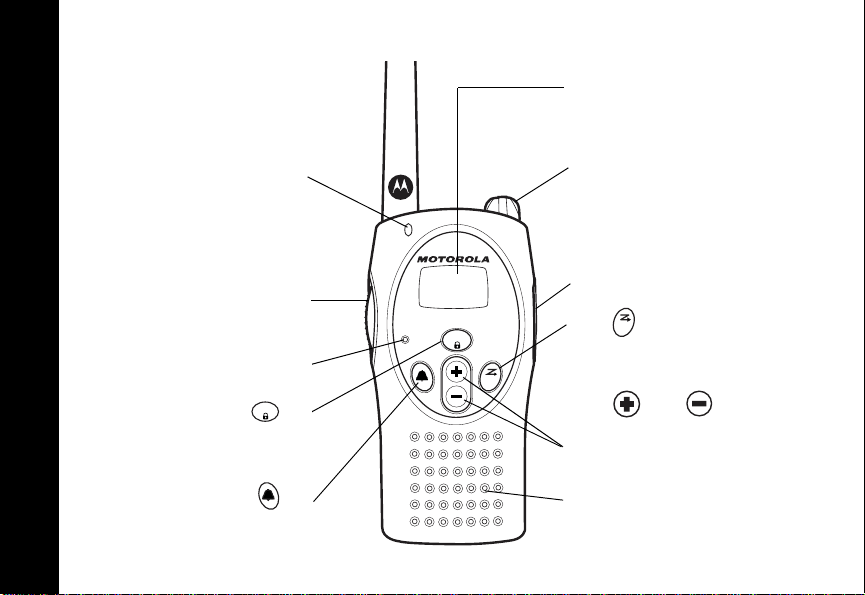
Radio Controls
Display
LED
Use P to:
Turn radio on/off
Adjust radio volume
Accessory Jack
MON
Use to:
Monitor the frequency
Use and to:
Change channels
Change menu settings
Speaker
Radio Controls
Use Push to Talk to:
Talk
Exit a menu
Microphone
MENU
Use to:
Lock the keypad
Scroll through menus
Use to:
ELB1210
MENU
MIC
MON
Transmit a Call Tone
6
Page 9
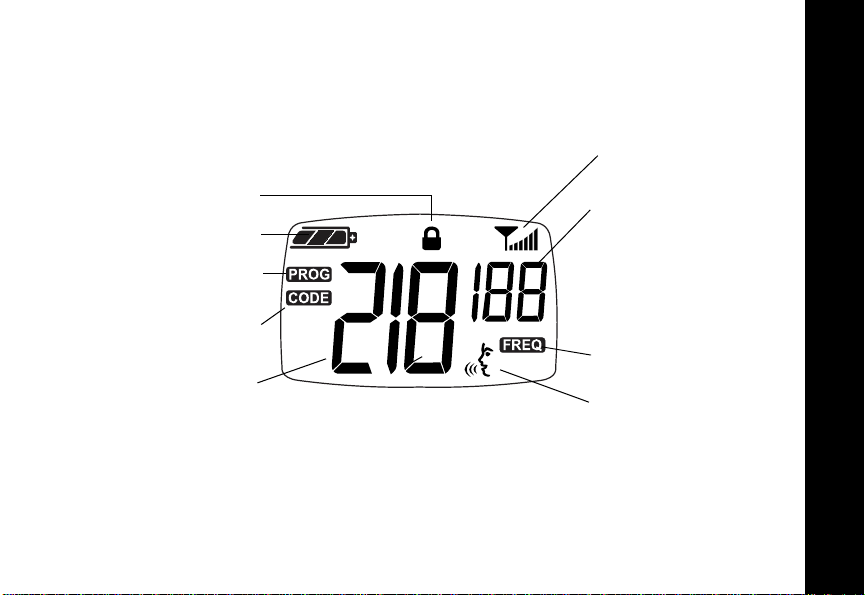
Reading the Display
Note: The radio display shown here is for icon location only. Each radio display may appear
different (channel and code) based on the pre-programmed radio defaults.
Signal Strength and Channel Busy Indicator
Keypad Lock
Battery Meter
Programming Mode
Interference Eliminator
Code Indicator
Channel
Frequency and
Interference
Eliminator Code
Frequency Indicator
VOX
Radio Controls
7
Page 10
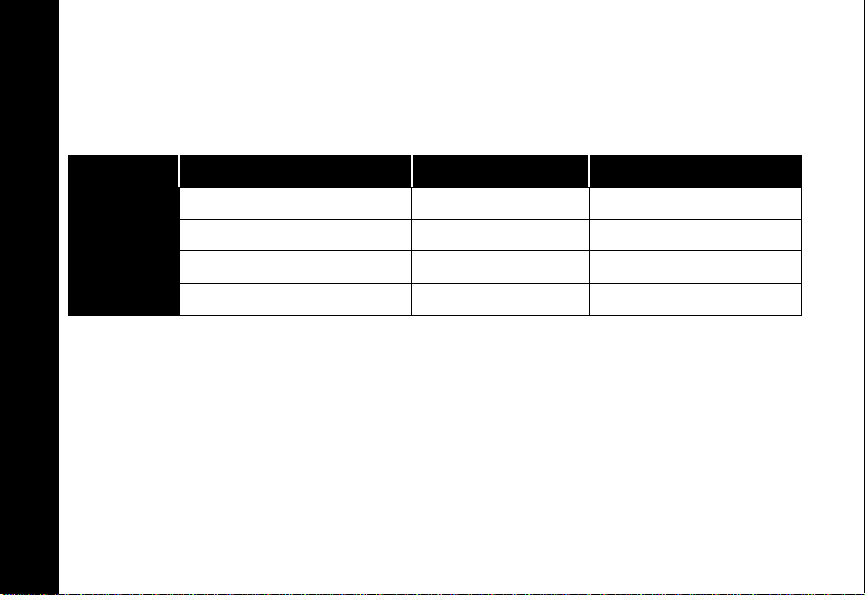
Getting Started
This user’s guide covers multiple ELB Series models, and may detail some features
your radio does not have. Your model number is shown on the front of the radio
below the radio display, and informs you of the following information.
Model Frequency Band Watts Number of Channels
ELB1110 UHF 1 1
ELB1110 VHF 1 1
ELB1210 UHF 1 2
ELB1210 VHF 1 2
Getting Started
8
Page 11
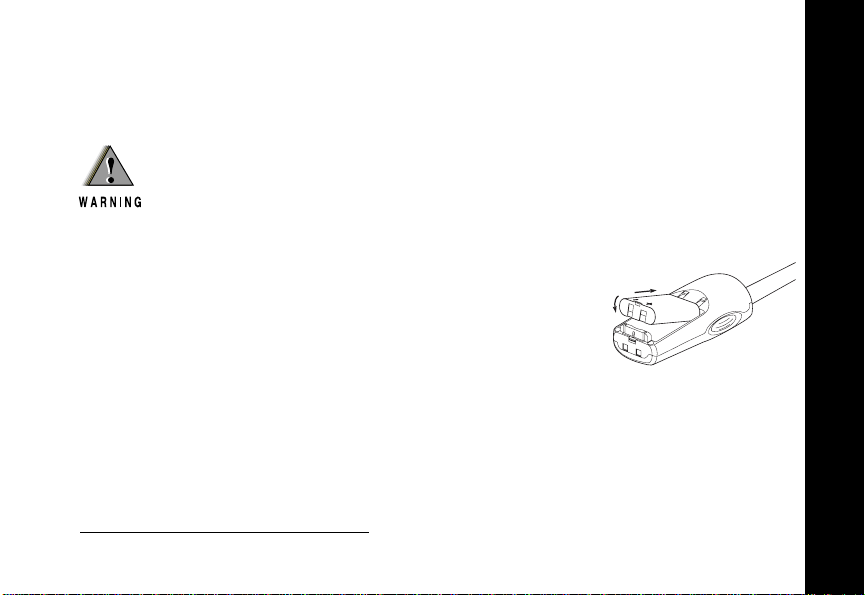
Installing the Nickel-Metal Hydride Battery
The ELB Series radio operates using a Nickel-Metal Hydride (NiMH) rechargeable
battery pack, which proves up to 9 hours
1
of usage. A battery, transformer, and drop-
in charger tray are supplied with your radio.
DO NOT disassemble the NiMH battery pack.
1. Make sure your radio is turned off, by turning the
volume knob counterclockwise.
2. Remove the belt clip, if necessary (see page 11).
3. With the radio back facing you, push the latch on the
1
2
bottom of the radio away from you and slide the battery
cover downward, toward you.
4. Insert the NiMH battery. Read battery pack installation
instructions for appropriate fit.
5. Slide and snap the battery cover into place.
Note: Remove batteries before storing your radio for extended periods. Batteries corrode
over time and may cause permanent damage to your radio. Exercise caution when
handling batteries that are leaking. Dispose of exhausted batteries at a designated
battery disposal unit and not in the household waste.
Getting Started
1. Based on a standard duty cycle of 5% Transmit, 5% Receive, and 90% Standby.
9
Page 12
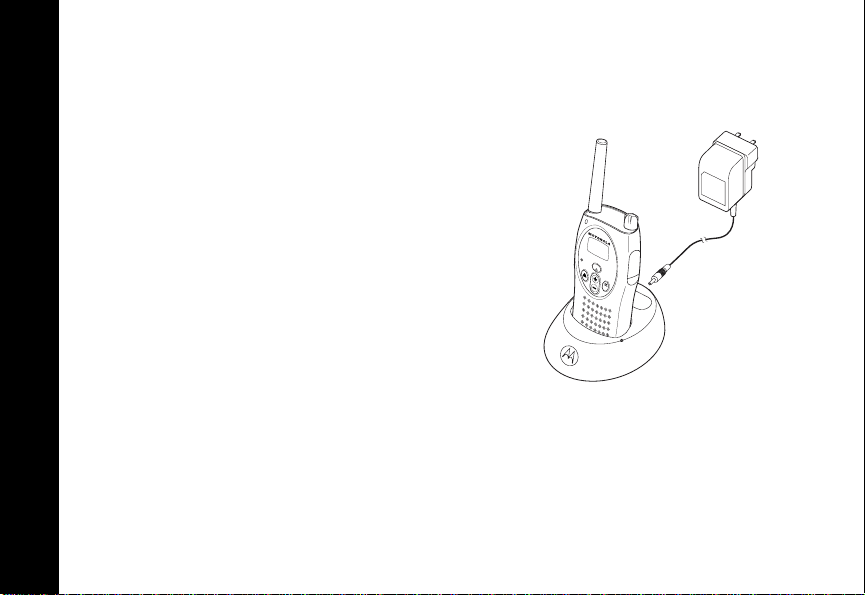
Charging using the 53xxx Drop-In Charging Tray
The Drop-in Charging Tray can be placed on any flat surface and provides drop-in
charging convenience. The battery must be charged while inside of the radio.
1. Connect the transformer and the drop-in tray
by inserting the plug of the transformer into
the rear jack of the drop-in charging tra y.
2. Plug the transformer into an AC outlet.
3. Turn the radio off. If the radio is on while
charging, it will take longer to fully charge.
4. Insert the radio (with battery installed) into
the charging tray pocket with the radio front
ELB1210
MIC
MENU
MON
facing the front of the charger.
Getting Started
10
Page 13

Battery Meter
The battery meter in the upper left corner of the display shows how much battery
power is remaining.
Battery Type 3 Bars 2 Bars 1 Bar Flashing
db c m
NiMH 100%–85% 85%–25% 25%–10% Final 10%
Attaching the Belt Clip
Your radio includes a belt clip for your convenience.
1. To attach the belt clip, slide the belt clip into the
grooves on the top of the radio and slide it down
until it clicks into place.
2. To remove, pull back the release latch on the top
of the belt clip and slide the belt clip up and away
from the radio.
Note: In case of loss, please contact your point-of-sales
or call 1-800-353-2729 and request a replacement
part number (53xxx for the ELB1110 or 53xxx for
the ELB1210).
Getting Started
11
Page 14

Turning the Radio On and Off
See “Radio Controls” on page 6 for a basic radio diagram.
Turn P clockwise to turn the radio ON, and counterclockwise to turn the radio OFF.
When you turn the radio on, the radio chirps and the display briefly shows a ll features
and display segments. The LED on the front left of the radio flashes every three
seconds when the radio is ON.
The radio then displays the current channel (larger number) and the
frequency assigned to that channel (on the right indicated by l).
The Interference Eliminator Code displays briefly (indicated by
y). The code will then disappear and the current channel remains
displayed.
Getting Started
Adjusting the Volume
Turn P clockwise to increase the volume, and counterclockwise to
decrease the volume.
Note: Do not hold the radio too close to your ear when adjusting the volume.
12
Page 15

Talking and Receiving
Basic Radio Operation
It is good radio practice to monitor the channel you intend to use before transmitting.
This practice ensures that you do not interrupt other users already on that same channel.
To check for Channel activity, press and listen. If you hear static, then the channel
is free for use. If someone is already speaking on that channel do not transmit. Press
MON
again to stop monitoring.
1. To talk, press and hold the
To maximize clarity, hold the radio 2 to 3 inches away from your mouth.
2. To listen, release the
Note: The LED on the front left of the radio lights a steady red when transmitting.
Push to Talk
Signal Strength Indicator
When there is activity on a frequency, the radio displays w and the
LED flashes once per second.
When there is activity on the same frequency and code as your radio
(your radio is receiving), the radio displays w and a signal strength
from 1 (weakest) to 6 (strongest). T his can he lp de te rm in e wh en a rad io is mo ving
out of range.
Note: Obstacles that block the signal path may affect the strength of the incoming signal.
MON
Push to Talk
button
button and speak into the microphone.
.
Talking and Receiving
13
Page 16

Programming Mode
In order to speak with someone on your two-way radios, the following features must
be set to the exact settings on all radios:
• Channel: The current channel that the radio is using to transmit.
• Frequency: The frequency your radio is using to transmit or receive (see page
XX).
• Interference Eliminator Code: These codes help to minimize interference by
providing you with a choice of code combinations (see page XX).
Entering Programming Mode
To Do This
Channel
Programming Mode
Frequency
Interference Eliminator Code
Press These Buttons While Turning
Push to Talk button and
Push to Talk button and
(this will disable “End of Transmission Tone”
Once in Programming Mode, the radio beeps and displays k.
Note: If you press and release the
14
Programming Mode.
Push to Talk
button when programming, you will exit
the Radio ON
MON
MENU
Page 17

Make sure kis displayed. See Entering Programming Mode for instructions on
how to access.
Channel
1. The Channel number flashes and the land y indicators display
alternately.
2. Press or until the desired Channel is selected.
3. Press the Push to Talk button to exit.
Frequency
1. Press once, the lindicator displays and the Frequency flashes.
MENU
2. Press or to choose the desired Frequency.
3. Press the Push to Talk button to exit.
Interference Eliminator Code
1. Select the channel on which you wish to change the Code.
2. To set the Code, press until the Code number display begins to flash.
MENU
3. Press or to select the desired Code.
4. Press the Push to Talk button to exit.
Note: To hear everyone on your frequency, select Interference Eliminator Code 0.
Programming Mode
15
Page 18

To Specify a Different Code for Each Channel (ELB1210 Only)
1. Press and then press or to select the Channel.
MON
2. Press again and then press or to select the desired Code.
MON
3. Press the Push to Talk button to set and exit.
Programming Mode
16
Page 19

Features
Call Tone
Your radio can transmit Call Tones to other radios in your group so you can alert
them that you are about to talk. Once the Call Tone is set, press to transmit the
Call Tone to others. The number of Call Tones supporte d by your radio is based on
model:
ELB1110 1 Call Tone plus Off
ELB1210 2 Call Tones plus Off
To Set the Call Tones
1. Press until Edisplays.
2. Press or hear and select a Call Tone.
3. Setting the Call Tone to 0 sets the Call Tones to OFF.
4. Press to exit
Note: The default is set to 0, Call Tones are OFF.
MENU
MENU
Features
17
Page 20

Hands-Free Use/VOX (ELB1210 Only)
This feature allows you to activate the radio trans m itte r with your v oic e by using a
Motorola authorized audio accessory, instead of having to press the Push to Talk
button.
It is recommended that the radio volume level be kept to a minimum until the audio
accessory is put in place and your radio is turned on to adjust the volume to a user's
volume preference.
1. Turn the radio OFF.
2. Open the accessory cover.
3. Insert the audio accessory plug firmly into the accessory jack.
4. Turn the radio ON. The g icon will display. If flashing, press the Push to Talk
Features
button to re-enable VOX.
5. To transmit, speak into the accessory microphone. To receive, stop talking.
6. To disable VOX operation, press the Push to Talk button or simply remove the
audio accessory.
Note: There is a short delay between the start of a voice transmission and when the radio
transmits.
18
Page 21

Locking the Keypad
You can lock the keypad buttons to avoid accidentally changing your radio settings.
1. To lock the keypad, press and hold for 3 seconds.
Note: The f icon will display.
2. To unlock, press and hold for 3 seconds.
MENU
MENU
End-of-Transmission Tone
If enabled, your two-way radio transmits a tone when you finish transmitting. It is like
saying Roger or Over.
1. To enable, press and hold as you turn the radio ON.
2. To disable, simply turn your radio OFF and press and hold as you turn the
radio ON.
Time-Out Timer
The radio will emit a warning tone and will stop transmitting if the Push to Talk
button is pressed for more than 60 seconds continuously.
Features
19
Page 22

Frequency and Code Charts
The charts on the following pages provide Frequency and Code information . These
charts are useful when using Motorola ELB Series two-way radios with other
business radios. Frequency position is identical to Spirit M, GT, S, and XTN Series
Frequencies (where applicable).
VHF Frequencies
Frequency (MHz) Bandwidth Frequency (MHz) Bandwidth
1 151.6250 25.0 16 151.8650 25.0
20
2 151.9550 25.0
3 154.5700 25.0
4 154.6000 25.0
5 151.7000 12.5/25.0
6 151.7600 12.5/25.0
7 151.8200 12.5/25.0
8 151.8800 12.5/25.0
Frequency and Code Charts
9 151.9400 25.0
10 151.5125 25.0
11 151.6550 25.0
12 151.6850 125.0
13 151.7150 25.0
14 151.7450 25.0
15 151.7750 25.0
17 151.8950 25.0
18 151.9250 25.0
19 152.7000 25.0
20 154.4900 25.0
21 154.5150 25.0
22 154.5275 25.0
23 154.5400 25.0
24 154.6000 25.0
25 154.6550 25.0
26 158.4000 25.0
27 158.4075 25.0
Page 23

UHF Frequencies
Frequency (MHz) Bandwidth Frequency (MHz) Bandwidth
1 464.5000 12.5/25.0 20 461.3125 12.5
2 464.5500 12.5/25.0
3 467.7625 12.5 22 461.3625 12.5
4 467.8125 12.5 23 462.7625 12.5
5 467.8500 12.5/25.0
6 467.8750 12.5/25.0 25 462.8125 12.5
7 467.9000 12.5/25.0 26 462.8375 12.5
8 467.9250 12.5/25.0
9 461.0375 12.5 28 462.8875 12.5
10 461.0625 12.5 29 462.9125 12.5
11 461.0875 12.5
12 461.1125 12.5 31 464.5125 12.5
13 461.1375 12.5 32 464.5375 12.5
14 461.1625 12.5
15 461.1875 12.5 34 466.0375 12.5
16 461.2125 12.5 35 466.0625 12.5
17 461.2375 12.5
18 461.2625 12.5 37 466.1125 12.5
19 461.2875 12.5 38 466.1375 12.5
21 461.3375 12.5
24 462.7875 12.5
27 462.8625 12.5
30 464.4875 12.5
33 464.5625 12.5
36 466.0875 12.5
Frequency and Code Charts
21
Page 24

22
UHF Frequencies (Continued)
Frequency (MHz) Bandwidth Frequency (MHz) Bandwidth
39 466.1625 12.5 48 467.7875 12.5
40 466.1875 12.5
41 466.2125 12.5 50 467.8625 12.5
42 466.2375 12.5 51 467.8875 12.5
43 466.2625 12.5
44 466.2875 12.5 53 469.4875 12.5
45 466.3125 12.5 54 469.5125 12.5
46 466.3375 12.5
47 466.3625 12.5 56 469.5625 12.5
49 467.8375 12.5
52 467.9125 12.5
55 469.5375 12.5
Frequency and Code Charts
Page 25

Interference Eliminator Codes
Code Hz Code Hz Code Hz
1 67.0 14 107.2 27 167.9
2 71.9 15 110.9 28 173.8
3 74.4 16 114.8 29 179.9
4 77.0 17 118.8 30 186.2
5 79.7 18 123.0 31 192.8
6 82.5 19 127.3 32 203.5
7 85.4 20 131.8 33 210.7
8 88.5 21 136.5 34 218.1
9 91.5 22 141.3 35 225.7
10 94.8 23 146.2 36 233.6
11 97.4 24 151.4 37 241.8
12 100.0 25 156.7 38 250.3
13 103.5 26 162.2
Frequency and Code Charts
23
Page 26

24
Digital Interference Eliminator Codes
Code Hz Code Hz Code Hz
39 023 58 132 77 265
40 025 59 134 78 271
41 026 60 143 79 306
42 031 61 152 80 311
43 032 62 155 81 315
44 043 63 156 82 331
45 047 64 162 83 343
46 051 65 165 84 346
47 054 66 172 85 351
48 065 67 174 86 364
49 071 68 205 87 365
50 072 69 223 88 371
51 073 70 226 89 411
Frequency and Code Charts
52 074 71 243 90 412
53 114 72 244 91 413
54 115 73 245 92 423
55 116 74 251 93 431
56 125 75 261 94 432
57 131 76 263 95 445
Page 27

Digital Interference Eliminator Codes (Continued)
Code Hz Code Hz Code Hz
96 464 105 606 114 703
97 465 106 612 115 712
98 466 107 624 116 723
99 503 108 627 117 731
100 506 109 631 118 732
101 516 110 632 119 734
102 532 111 654 120 743
103 546 112 662 121 754
104 565 113 664
Frequency and Code Charts
25
Page 28

T roubleshooting
Symptom Try This:
No Power
Message not
transmitting
Message not
received
Troubleshooting
Hearing
conversation or
noise on a
channel
26
Reposition, recharge or replace NiMH battery pack.
Make sure the
transmitting.
Reposition, recharge, replace the NiMH batt er y pack.
Confirm that all radios have the same channel, frequency, and
interference eliminator code settings.
Make sure that the Push to Talk button is not inadvertently
being pressed. Reposition, recharge, or replace the NiMH
battery pack.
Obstructions and operating indoors or in vehicles may interfere change location.
Check that the Interference Eliminator Code setting is not set to
0. A shared channel may be in use, try another.
Push to Talk
button is completely pressed while
Page 29

Symptom Try This:
Steel and/or concrete structures, heavy folia ge, buildings, or
Limited talk
range
vehicles decrease range. Check for a clear line of sight to
improve transmission.
Wearing the radio close to the body such as in a pocket or on a
belt decreases range. Change location of the radio.
Heavy static or
interference
Keypad locked
Low batteries
Charger light
does not come
on
Radios are too close to one another. They must be at least
5 feet apart.
Obstacles are interfering with transmission.
Make sure menu us unlocked. Unlock by holding for
MENU
3 seconds.
Recharge or replace NiMH battery pack. Extreme operating
temperatures affect battery life.
Check that radio/battery is properly inserted and check battery/
charger contacts to be sure they are clean.
Verify that the charging pin is inserted correctly.
Troubleshooting
27
Page 30

28
Troubleshooting
Page 31

Limited Warranty
MOTOROLA COMMUNICATIONS PRODUCTS
Purchased in the United States and Canada
Warra nty
I. What This Warranty Covers
• Products. Defects in materials and workmanship in wireless cellular
telephones, pagers, and/or two-way radios, and certain accessories that are
sold with them, such as the battery, battery charger, and holster manufactured
and/or sold by MOTOROLA.
• Batteries. Defects in materials and workmanship in batteries that ar e
manufactured by MOTOROLA and/or sold with Products are covered by this
warranty only if the fully-charged capacity falls below 80% of rated capacity or
they leak.
• Software. Physical defects in the media that tangibly embodies each copy of
any software supplied with the Products.
II. What the Period of Coverage Is
From the date the Products are purchased by the first end-user:
• Products. The warranty is for one year.
• Software. The warranty is for 90 days.
Limited Warranty
29
Page 32

• Repairs/Replacements. The warranty is for the balance of the original warranty
or for 90 days from the date you receive it, whichever is longer.
III. Who is Covered
This warranty extends to the first end-user pur c hase r on ly.
IV. What We Will Do to Correct Warranty Problems
At no charge to you, we have the option to repair or replace the Products or software
that do not conform to the warranty, or to refund the Products’ purchase price. We
may use functionally equivalent reconditioned/refurbished/pre-owned or new
Products or parts. No software updates are pro vide d .
V. How to Obtain Warranty Service or Other Information
USA Two-Way Radios 1-800-448-6686
Canada All Products 1-800-461-4575
Limited Warranty
TTY TTY 1-888-390-6456
For Accessories and Software, please call the telephone number designated
above.
You will receive instructions on how to ship the Products to MOTOROLA. You must
ship the Products to us with freight, duties and insurance prepaid. Along with the
Products you must include: (a) a copy of your receipt, bill of sale or other comparable
30
Page 33

proof of purchase; (b) a written description of the problem; (c) the name of your
service provider (if this Product requires subscription service); (d) the name and
location of the installation facility (if applicable) and, most importantly; (e) your
address and telephone number. If requested, you must also return all detachable
parts such as antennas, batteries and chargers. RETAIN YOUR ORIGINAL PROOF
OF PURCHASE.
We will ship repaired or replacement Products at our expense for the freight and
insurance, but at your expense for any duties. If additional information is needed,
please contact us at the telephone number listed on page 30.
VI. What This Warranty Does Not Cover
• Products that are operated in combination with ancillary or peripheral equipment
or software not furnished by MOTOROLA for use with the Products (“ancillary
equipment”), or any damage to the Products or ancillary equipment as a result
of such use. Among other things, “ancillary equipment” includes batteries,
chargers, adaptors, and power supplies not manufactured or supplied by
MOTOROLA. Any of these voids the warranty.
• Someone other than MOTOROLA (or its authorized service centers) tests,
adjusts, installs, maintains, alters, modifies, or services the Product s in any way.
Any of these voids the warranty.
• Rechargeable batteries that: (a) are charged by other than the MOTOROLA
approved battery charger specified for charging such batteries; (b) have any
broken seals or show evidence of tampering; (c) are used in equipment other
Limited Warranty
31
Page 34

than the Product for which they are specified; or (d) are charged and stored at
temperatures greater than 60 degrees centigrade. Any of these voids the
warranty.
• Products that have: (a) serial numbers or date t ags that have been removed,
altered, or obliterated; (b) board serial numbers that do not match each other, or
board serial numbers that do not match the housing; or (c) nonconforming or
non-MOTOROLA housings or parts. Any of these voids the warranty.
• Defects or damage that result from: (a) use of the Products in a manner that is
not normal or customary; (b) improper operation or misuse; (c) accident or
neglect such as dropping the Products onto h ard surfaces; (d) contact with
water, rain, e xtreme humidity, or heavy perspiration; (e) contact with sand, dirt or
the like; or (f) contact with extreme heat, or spills of food or liquid.
• Physical damage to the surface of the Products, including scratches, cracks, or
other damage to a display screen, lens, or other externally exposed parts.
Limited Warranty
• Failure of Products that is due primarily to any communication service or signal
you may subscribe to or use with the Products.
• Coil cords that are stretched or that have any broken modular tabs.
• Products that are leased.
Flat-rate repair rates may apply to Products not covered by this wa rranty. To obtain
information about Products needing repairs that are not covered by this warranty,
32
Page 35

please call the telephone number previously listed. We will provide information on
repair availability, rates, methods of payment, where to send the Products, etc.
VII. Some Other Limitations
This is MOTOROLA ’s complete warranty fo r the Products, and states your exclusive
remedies. This warranty is given in lieu of all other express warranties. Implied
warranties, including without limitation, the implied warranties of merchantability and
fitness for a particular purpose, are given only if specifically required by applicable
law. Otherwise, they are specifically excluded.
No warranty is made as to coverage, availability , or grade of service provided by the
Products, whether through a service provider or oth erwise .
No warranty is made that the software will meet your requirements or will work in
combination with any hardware or applications software products provided by third
parties, that the operation of the software products will be uninterrupted or error free,
or that all defects in the software products will be corrected.
In no event shall MOTOROLA be liable, whether in contract or tort (including
negligence) for damages in excess of the purchase price of the Product, or for any
indirect, incidental, special or consequen tial damages of any kind, or loss of revenue
or profits, loss of business, loss of information or data, or other financial loss arising
out of or in connection with the ability or inability to use the Products, to the full extent
these damages may be disclaimed by law .
Limited Warranty
33
Page 36

VIII. Patent and Software Provisions
At MOTOROLA’s expense, we will defend you, and pay costs and damages that
may be finally awarded against you, to the extent that a lawsuit is based o n a claim
that the Products directly infringe a United States patent. Our obligation is
conditioned on:
A. you notifying us promptly in writing when you receive notice of the claim;
B. you giving us sole control of the defense of the suit and all negotiations for its
settlement or compromise; and
C. should the Products become, or in Motorola's opinion be likely to become, the
subject of a claim of infringement of a United S tates p atent, you permit us, at our
option and expense, either to: procure for you the right to continue using the
Products; replace or modify them so that they become non-infringing; or grant
you a credit for such Products, as depreciated, and accept their return. The
Limited Warranty
depreciation will be an equal amount per year over the lifetime of the Products,
as established by MOTOROLA.
MOTOROLA will have no liability to you with respect to any claim of patent
infringement that is based upon the combination of the Products or parts furnished
under this limited warranty with ancillary equipment, as defined in VI.
This is MOTOROLA’s entire liability with respect to infringement of patents by the
Products.
34
Page 37

Laws in the United States and other countries preserve for MOTOROLA and other
third party software providers certain exclusive rights for copyrighted software, such
as the exclusive rights to reproduce in copies and distribute copies of such software.
The software may be copied into, used in and redistributed with only those Products
that are associated with such software. No other use, including without limitation,
disassembly or reverse engineering of such software or exercise of exclusive rights
in such software is permitted.
Some states and other jurisdictions do not allow the exclusion or limitation of
incidental or consequential damages, or limitation on the length of an implied
warranty, so the above limitations or exclusions may not apply to you. This warranty
gives you specific legal rights, and you may also have other righ ts, which var y from
jurisdiction to jurisdiction.
Limited Warranty
35
Page 38

Limited Warranty
36
Page 39

Page 40

MOTOROLA and the Stylized M Logo are registered in the
U.S. Patent and Trademark Office. All other product or
service names are the property of their respective owners.
© Motorola, Inc. 2005.
*6880309S90*
6880309S90-O
 Loading...