

Page 1

English
Phone Book
Menu
Quick Access
Menu
Options Menu
Quick Reference
Page 2

English
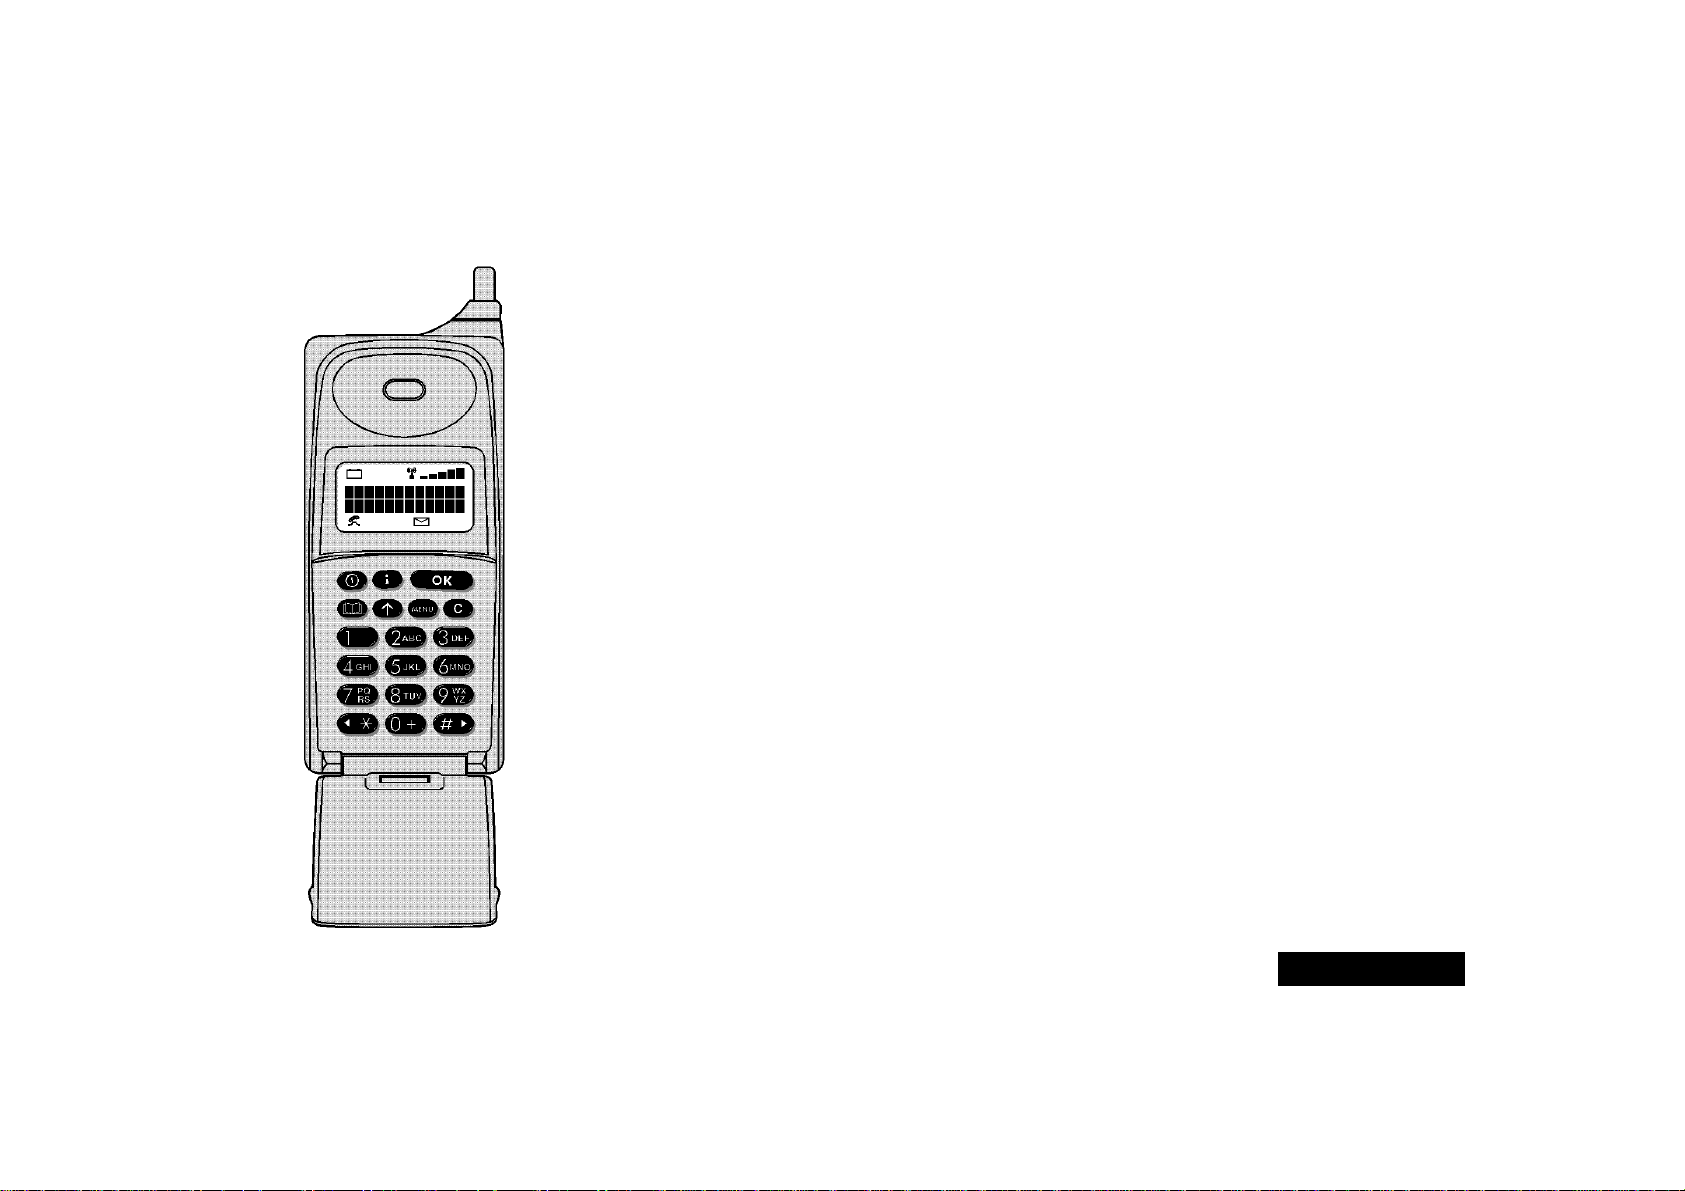
Special Keys
S Press to turn phone on and off.
I Press to see more information on the
operation currently displayed.
O Press to accept call, setting, option,...
Q Press to access the Phone Book menu.
E Press to access the Quick Access features.
M Press to access the Options menu.
C Press to reject call, setting, option,...
Making a Call
Enter CO.
Receiving a Call
Press O or open the flip.
Ending a Call
Press O or close the flip.
Making an Emergency Call
Enter 112O. The call will be directed to
a central emergency operator.
Muting the Phone
When in a call, press the mute button on the left hand
side of the phone.
Redialling the Last Number Called
1 Press O to display the last number dialled.
2 Press O to call the number.
One-Touch Dialling
Quick Reference
Press and hold the appropriate digit key 1 to 9.
Storing Numbers in the Phone Book
1 Press and hold Q to access the Phone Book.
2 Press O to select phone memory, or
MO to select SIM card memory.
3 Enter
C, then H, then G.
Dialling Phone Book Numbers
Press G#O
Quick Access Features
E1 Find by Name - prompts you to Enter
Name.
E2 Find by Location - prompts you to Enter
E3 Add Entry to Phone - prompts you to enter a
E4 Add Entry to SIM - prompts you to enter a
E5 Call Voicemail - dials your voicemail number.
E6 Divert All On or Off - switches unconditional
E7 Battery Meter - displays the battery charge
E8 VibraCall On or Off - switches VibraCall on or
E9 Read Messages - displays your newest
E0 Ring Volume - prompts you to select a ring
Location.
phone number and name.
phone number and name.
call diversion on or off.
level.
off.
message.
volume, High, Medium or Low.
Page 3
English
Introduction
Congratulations on your purchase of a cellular telephone from Motorola, the world leader in cellular
technology.
All Motorola cellular telephones are manufactured to exacting specifications and world-class quality
standards, and are designed to withstand the harshest environmental conditions. Our commitment to
Total Customer Satisfaction and over sixty five years of experience in personal communications mean you
can depend upon the quality of this Motorola product.
This cellular telephone incorporates Personality™. Unique to Motorola, Personality™ removes the
complexity of cellular communications by guiding you through the features and presenting you with
simple choices every step of the way. Personality™ also allows you to personalise the way you use your
phone - for example, different ringer tones, a phone book and network selection preferences - all
presented with clarity and simplicity. In this manual, each of the Personality™ features is identified with
an O symbol to indicate that it is customisable to meet your requirements.
This cellular telephone has been designed for use with the worldwide GSM (Global System for Mobile
communications) network. By using digital communications methods, your phone provides a number of
advantages over traditional cellular systems:
• Superior speech quality is attained without the usual background noises and interference.
• Your conversation may be encrypted for security. Conversations cannot be eavesdropped using
scanning equipment when the signal is encrypted.
• You are not restricted to use within one country.
Your subscriber number is not contained within the phone as with other systems. Instead, a 'Smart Card'
known as a SIM (Subscriber Identity Module) is supplied by your Cellular Service Provider. All call billing is
made to the subscriber number on the card whether it is used in this or any other GSM unit.
!Before you use your phone, please see the ‘Your Battery’ section for important information on
charging a new battery.
Introduction
1
Page 4

English
Understanding this Manual
Many of your phone options are accessed by a simple menu
system. A full description of the menus and how to move around
them is covered in the later section
manual describes the use of each menu item, it will be assumed
that you are familiar with the menu system.
Menu Navigation. When the
Key Presses
Key presses are represented in this manual using symbols so that
you may locate and use the required sequence quickly. A
sequence of key presses may be shown as follows:
MOC
This means that you should press the M key followed by the
O key and then the C key, in sequence, not
simultaneously.
Multiple Key Presses
Symbols, such as the following, will appear in this manual. They
are not keys on the phone, but they represent multiple key
presses. For example:
C - enter the required telephone number.
A - enter your Personal Identification Number.
B - enter your unlock code.
G - enter the Phone Book location number.
Prompts and Messages
Your phone responds to key presses by displaying either easy to
understand prompts that guide you to the next action, or simple
messages confirming that your action is complete. Prompts and
messages are represented in this manual in LCD style, for
example:
Enter PIN or Completed.
Other Symbols
You will find the following symbols used throughout this manual:
AA Note contains additional information which is relevant to
the feature/item.
! A Caution contains important additional information which
is relevant to the efficient and/or safe usage of your phone.
O This symbol indicates that the feature is a Personality™
feature that can be customised to meet your requirements.
L This symbol indicates a short key sequence for the feature.
2
Introduction
Page 5

English
Contents
Safety
Important information for the efficient and safe operation of your phone................................................................................5
About Your Phone, Battery and SIM Card
Introduces your phone, explains how to charge and maintain batteries and explains about your SIM Card ..........................9
Making and Receiving Phone Calls
Explains how to call a number, how to redial and how to accept a call.....................................................................................17
Menu Navigation
Explains how to access and use the phone’s menus ....................................................................................................................23
Using The Phone Book Menu
Provides an explanation of the Phone Book Menu and how to use it .......................................................................................27
Using The Options Menu
Provides an explanation of the Options Menu and how to use it..............................................................................................35
Using the Quick Access Menu
Provides an explanation of the Quick Access Menu and how to use it......................................................................................61
Accessories
Details the accessories available for use with your phone..........................................................................................................63
What To Do If...
Helps you to solve any problems that may occur.........................................................................................................................65
Index
A comprehensive index .................................................................................................................................................................69
The Manufacturer reserves the right to make changes in technical and product specifications without prior notice.
Contents
3
Page 6

English
4
Contents
Page 7

English
Safety
IMPORTANT
For the efficient and safe operation of
your GSM Cellular Telephone,
Read this information before use.
Your GSM cellular telephone is one of the most exciting and innovative
electronic products ever developed. With it you can stay in contact with your
office, your home, emergency services, and others, wherever service is
provided.
General
Your cellular telephone utilizes the GSM standard for cellular technology. GSM
is a newer radio frequency (“RF”) technology than the current FM technology
that has been used for radio communications for decades. The GSM standard
has been established for use in the European Community and elsewhere.
Your cellular telephone is actually a low power radio transmitter and receiver.
It sends out and receives radio frequency energy. When you use your cellular
telephone, the cellular system handling your call controls both the radio
frequency and the power level of your cellular telephone.
Exposure To RF Energy
There has been some public concern about possible health effects of using
cellular telephones. Although research on health effects from RF energy has
focused for many years on the current RF technology, scientists have begun
research regarding newer radio technologies such as GSM. After existing
research had been reviewed, and after compliance to all applicable safety
standards had been tested, it has been concluded that the product is fit for
use.
If you are concerned about exposure to RF energy there are things you can do
to minimize exposure. Obviously, limiting the duration of your calls will reduce
your exposure to RF energy. In addition, you can reduce RF exposure by
operating your cellular telephone efficiently by following the below guidelines.
Efficient Phone Operation
For your phone to operate at the lowest power level, consistent with
satisfactory call quality:
If your phone has an extendable antenna, extend it fully. Some models allow
you to place a call with the antenna retracted. However, your phone operates
more efficiently with the antenna fully extended.
Hold the phone as you would any other telephone. While speaking directly
into the mouthpiece, position the antenna up and over your shoulder.
Do not hold the antenna when the phone is “IN USE”. Holding the antenna
affects call quality and may cause the phone to operate at a higher power level
than needed.
Antenna Care and Replacement
Do not use the phone with a damaged antenna. If a damaged antenna comes
into contact with the skin, a minor burn may result. Replace a damaged
antenna immediately. Consult your manual to see if you may change the
antenna yourself. If so, use only a manufacturer-approved antenna.
Otherwise, have your antenna repaired by a qualified technician.
Use only the supplied or approved antenna. Unauthorised antennas,
modifications or attachments could damage the phone and may contravene
local RF emission regulations or invalidate type approval.
Driving
Check the laws and regulations on the use of cellular telephones in the areas
where you drive. Always obey them. Also, when using your phone while
driving, please:
• give full attention to driving,
• use hands-free operation, if available, and
• pull off the road and park before making or answering a call if driving
conditions so require.
Safety
5
Page 8

English
Electronic Devices
Most electronic equipment, for example in hospitals and motor vehicles, is
shielded from RF energy. However, RF energy may affect some malfunctioning
or improperly shielded electronic equipment.
Blasting Areas
To avoid interfering with blasting operations, turn your unit OFF when in a
“blasting area” or in areas posted: “turn off two-way radio”. Construction
crews often use remote control RF devices to set off explosives.
Vehicle Electronic Equipment
Check with your vehicle manufacturer's representative to determine if any on
board electronic equipment is adequately shielded from RF energy.
Medical Electronic Equipment
Consult the manufacturer of any personal medical devices (such as
pacemakers, hearing aids, etc.) to determine if they are adequately shielded
from external RF energy.
Turn your phone OFF
the area instruct you to do so. Hospitals or health care facilities may be using
RF monitoring equipment.
in health care facilities when any regulations posted in
Aircraft
Turn your phone OFF before boarding any aircraft.
• Use it on the ground only with crew permission.
• Do not use in the air.
To prevent possible interference with aircraft systems, Federal Aviation
Administration (FAA) regulations require you to have permission from a crew
member to use your phone while the plane is on the ground. To prevent
interference with cellular systems, local RF regulations prohibit using your
phone whilst airborne.
Children
Do not allow children to play with your phone. It is not a toy. Children could
hurt themselves or others (by poking themselves or others in the eye with the
antenna, for example). Children could damage the phone, or make calls that
increase your telephone bills.
Potentially Explosive Atmospheres
Turn your phone OFF when in any area with a potentially explosive
atmosphere. It is rare, but your phone or its accessories could generate sparks.
Sparks in such areas could cause an explosion or fire resulting in bodily injury
or even death.
Areas with a potentially explosive atmosphere are often, but not always,
clearly marked. They include fuelling areas such as petrol stations; below decks
on boats; fuel or chemical transfer or storage facilities; and areas where the air
contains chemicals or particles, such as grain, dust, or metal powders.
Do not transport or store flammable gas, liquid, or explosives, in the
compartment of your vehicle which contains your phone or accessories.
Before using your phone in a vehicle powered by liquefied petroleum gas
(such as propane or butane) ensure that the vehicle complies with the relevant
fire and safety regulations of the country in which the vehicle is to be used.
Safety
6
Page 9

English
Safety Standards
Battery Safety
This Cellular Telephone complies with
all applicable RF safety standards.
This cellular telephone meets the standards and recommendations for the
protection of public exposure to RF electromagnetic energy established by
governmental bodies and other qualified organisations, such as the following:
• Verband Deutscher Elektroingenieure (VDE) DIN-0848
• Directives of the European Community, Directorate General V in
Matters of Radio Frequency Electromagnetic Energy
• National Radiological Protection Board of the United Kingdom. GS-
11, 1988.
• American National Standards Institute (ANSI)/IEEE. C95. 1-1992
• National Council on Radiation Protection and Measurements
(NCRP). Report 86
• Department of Health and Welfare Canada, Safety Code 6.
• To prevent injury or burns, do not allow metal objects to contact or short
circuit the battery terminals.
• Make sure that the battery terminals do not touch greasy objects.
• Do not immerse the battery in water, or dispose of in a fire.
• Ensure that the battery is disposed of using the proper facilities.
• If you need to replace the battery, make sure that you use only the
approved battery type.
• The use of other types of batteries might affect your phone and in such
cases the manufacturer assumes no liability.
Safety
7
Page 10

English
European Union Directives
Conformance Statement
This product is in conformance with the requirements
of the applicable EU Council Directives.
Declarations of Conformance with the requirements
are located at:
Motorola Ltd.
European Cellular Subscriber Division
Midpoint, Alençon Link
Basingstoke, Hampshire RG21 7PL
United Kingdom
Safety
8
Page 11
English
About Your Phone, Battery and SIM Card
Special Keys
S Turns the phone on
and off.
I Press to see more
information on the
operation currently
displayed.
O Accept call, setting,
option.
Q Access the Phone Book
menu.
E Access the Quick
Access menu.
M Access the Options
menu.
C Reject call, setting,
option.
<# Move backward and
forward through the
entries.
The Flip
Opening the flip answers a call;
closing the flip ends a call.
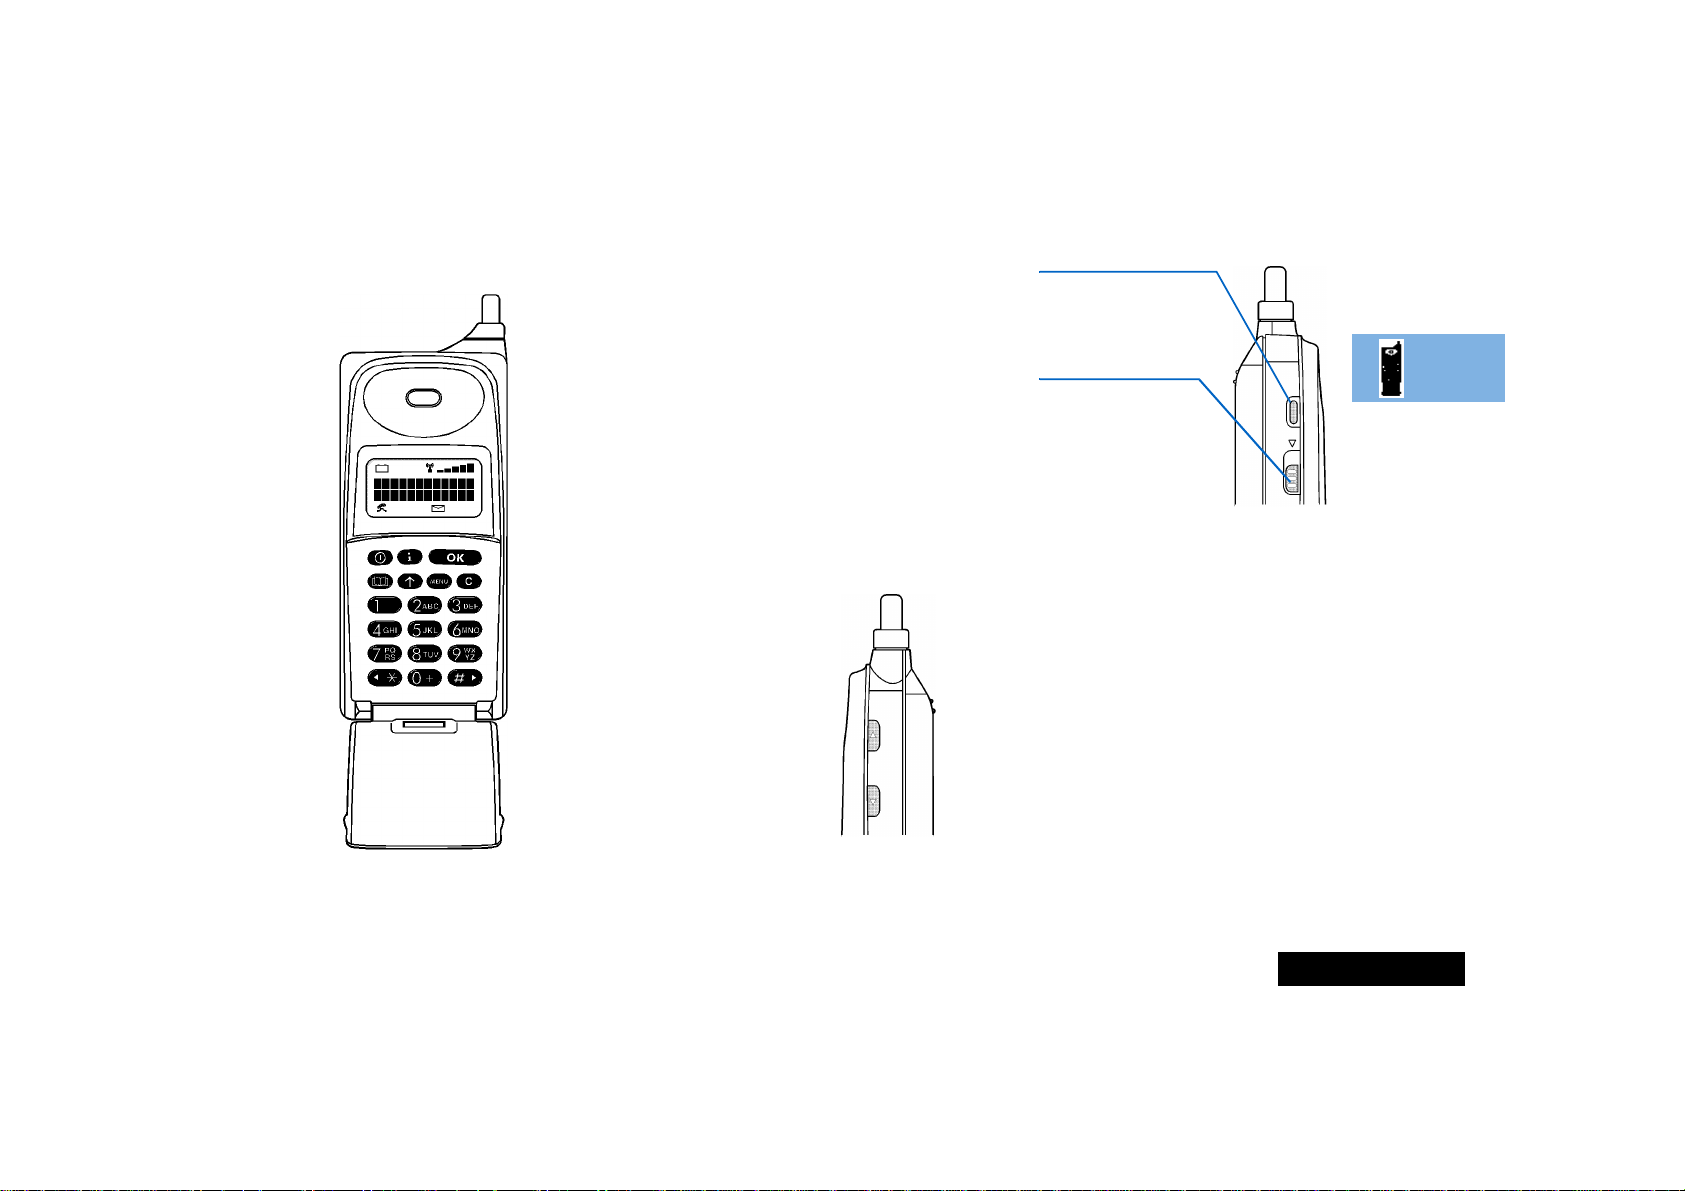
The Mute Button
The Mute button is on the left hand side of your
phone. Press to switch privacy mute on and off
during a call.
SIM Card Release
The SIM card release button is on the left hand
side of your phone. To remove the SIM card, slide
this button down toward the base of the phone
and pull the SIM card out.
Volume Buttons
The buttons on the right hand side of your phone
adjust the earpiece and keypad tone volume
levels. Volume is increased with the upper button
and decreased with the lower button.
About Your Phone, Battery and SIM Card
9
Page 12
English
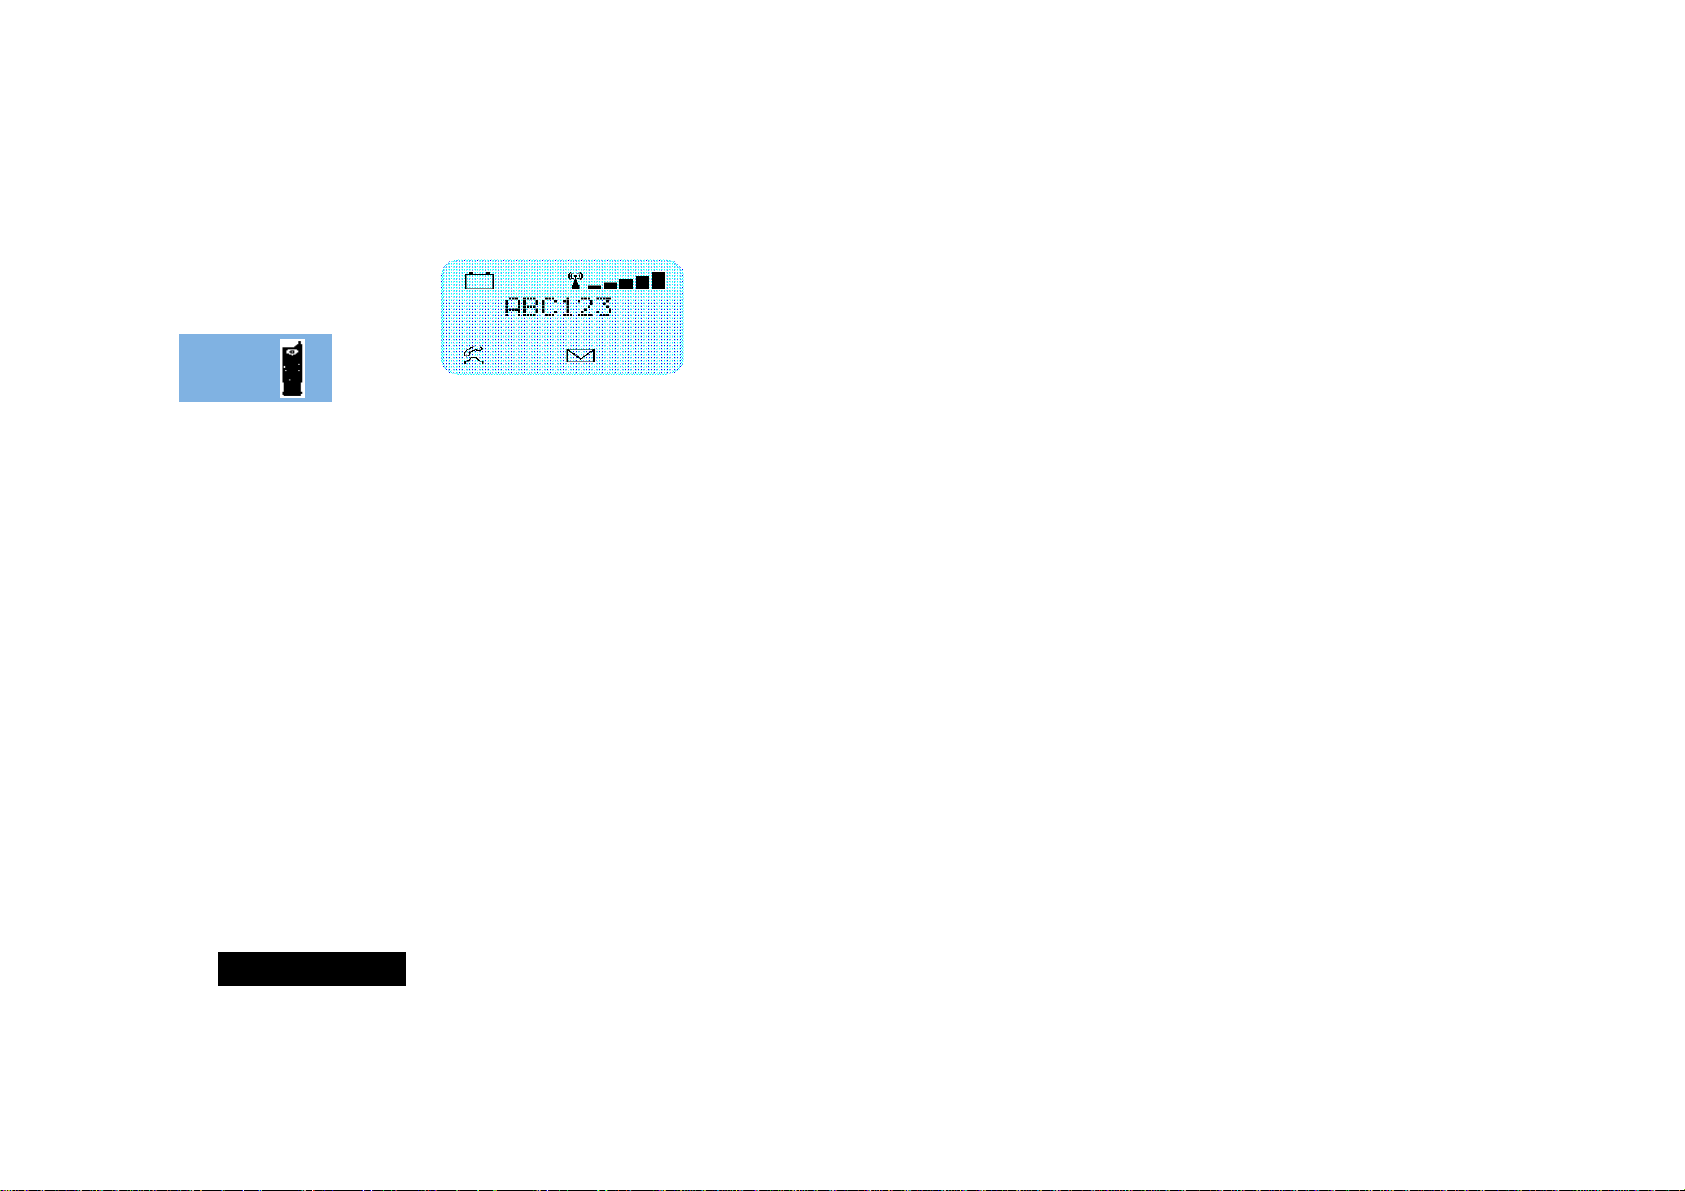
The Display
The Liquid Crystal Display (LCD) on your phone can display two
rows of twelve alphanumeric characters as well as useful
information symbols.
The various elements of the display are as follows:
ABC123 Characters are used to display messages and
telephone numbers.
q Battery Charge Indicator.
rxSignal Strength. The more segments displayed in
the bar graph, the better the signal strength.
k In Use. Displayed when a call is in progress.
o Short Message Service. Displayed when the phone
has received a message. The symbol will flash when
your message storage area is full.
Low Temperature Use
The liquid crystal display screen used in your phone will behave
differently at extremely low temperatures. You may notice that
the display responds slowly to key presses; this is to be expected
and does not affect the phone operation in any way.
Low Battery Warning
When the battery level is low and only a a few minutes of talk
time remain, a warning signal (two double beeps) will sound, the
battery symbol q will begin to flash slowly, and Low Battery
will be displayed.
When the battery is completely discharged, your phone will turn
off.
Looking After Your Phone
• Never leave your phone or battery in extreme temperatures
(over 60°C), for example behind glass in very hot, direct
sunlight.
• To clean your phone, use a moistened or antistatic cloth. Do
not use a dry or electrostatically charged cloth.
About Your Phone, Battery and SIM Card
10
Page 13

English
Your Battery
Charging a New Battery
To ensure maximum battery performance, it is recommended
that a new battery (or battery that has not been used for several
months) be charged for at least 14 hours before use.
A A new battery will require several f ull charge/discharge cycles
in order to achieve its optimum performance.
A A new battery, or a battery that has not been used for several
months, may cause a premature fully charged indication on
the charger. Ignore this indication and let the battery charge
for several more hours, remove and re-insert the battery into
the charger, and charge for an additional 14 hours.
Important Battery Information
To ensure that you enjoy maximum battery life and use your
battery to it's fullest capacity:
• Always use Motorola approved battery chargers.
• For the best results, Li-Ion batteries should be charged using
the E•P Desktop Charger.
• The battery should be at or near room temperature when
charging.
• Once a week, allow your battery to discharge completely
before recharging (to fully discharge, leave your phone on
until it turns itself off).
!Do not leave the battery connected to any charger (except the
E•P Desktop Charger) for longer than 24 hours.
Battery Performance and Maintenance
Your phone may have come with one or more of the following
battery types. The talk time and standby times given are typical
performance figures:
Battery Type Talk
Time
Slim 600 mAh NiMH 105 min. 17 hours
Slim 400 mAh Li-Ion 60 min. 10 hours
Extra Capacity 1300 mAh NiMH 225 min. 36 hours
Extra Capacity 1200 mAh Li-Ion 180 min. 31 hours
• Best battery performance will be achieved when you regularly
charge and discharge batteries as instructed in this manual.
• Battery performance is greatly affected by the coverage of the
GSM network.
• Set Battery Saving Mode to On (see ‘Phone Setup Menu’)
and/or Frequency of Search to Slow or Medium (see
‘Network Selection Menu’).
• Keep the antenna fully extended whenever possible to ensure
maximum signal strength.
• The performance of your batteries will gradually reduce if used
substantially.
• If left unused, a fully charged battery will discharge itself in
approximately one month.
• When not in use, store your battery uncharged in a cool, dark
and dry place.
Standby
Time
About Your Phone, Battery and SIM Card
11
Page 14
English
Desktop Charging of Your Battery
Typical charge times for achieving a 90% charge level using the
E•P Desktop Charger are:
Battery Type Charge Time
Slim 600 mAh NiMH 1.5 hours
Slim 400 mAh Li-Ion 4 hours
Extra Capacity 1300 mAh NiMH 1.5 hours
Extra Capacity 1200 mAh Li-Ion 4 hours
AThe battery will continue to slow charge until fully charged.
AFor maximum NiMH battery charging, you should double the
charge time.
Desktop Charger Power Supply
The E•P Desktop Charger uses the travel charger as its wall
adapter. The travel charger can be plugged into a standard mains
socket and the lead then plugged into the socket at the rear of
the desktop charger.
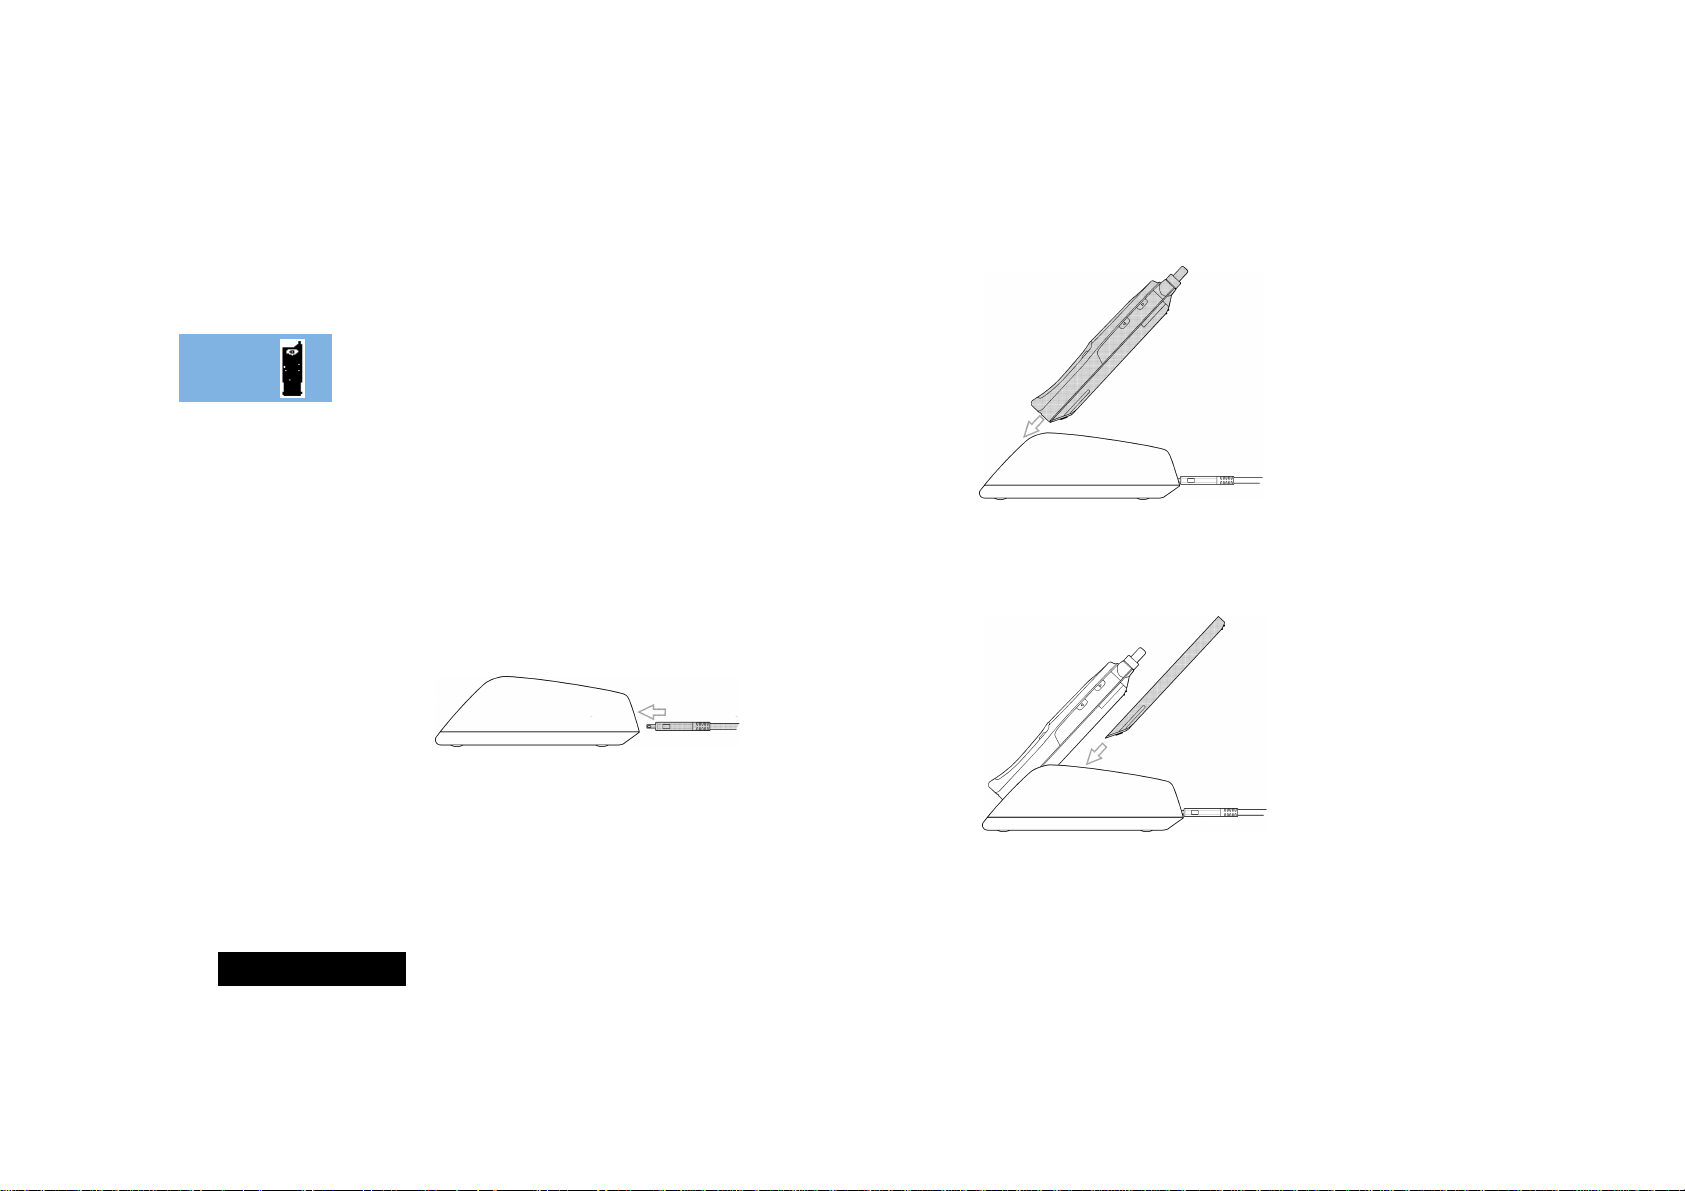
Inserting Your Phone into the Charger
Tilt your phone back until it rests at the same angle as the cut
away front panel of the charger. Next, guide your phone into
place in the front slot, until the lower indicator lights up.
Inserting a Spare Battery into the Charger
If you wish to insert a spare battery at the same time as charging
your phone, slide the battery into the rear slot, at the angle
shown, until the upper indicator lights up.
A It is normal for batteries to become warm during charging.
About Your Phone, Battery and SIM Card
12
Page 15
English
Charger Indicators
Red
The E•P Desktop Charger has two sets of indicators at the front
to provide charging status information. The lower indicators
represent the front slot, while the upper indicators show charge
status for the rear slot.
When both slots are being used, the front slot will always charge
first.
Each indicator consists of three coloured LEDs:
Green
Yellow
As explained on the bottom of your E•P Desktop Charger, the
approximate charge level is indicated as follows:
95% - 100% 90% - 95% 50% - 90%
10% - 50% 0-10%
A rapid flashing of a red indicator shows a faulty battery
that will not charge.
A rapid flashing of a yellow indicator shows the battery is
out of rapid charge range. Rapid charge will automatically
begin or continue when the battery is in range.
A slow flashing of the upper indicators shows that the front
slot has priority. Charging will not begin until the front slot
is fully charged.
About Your Phone, Battery and SIM Card
13
Page 16
English
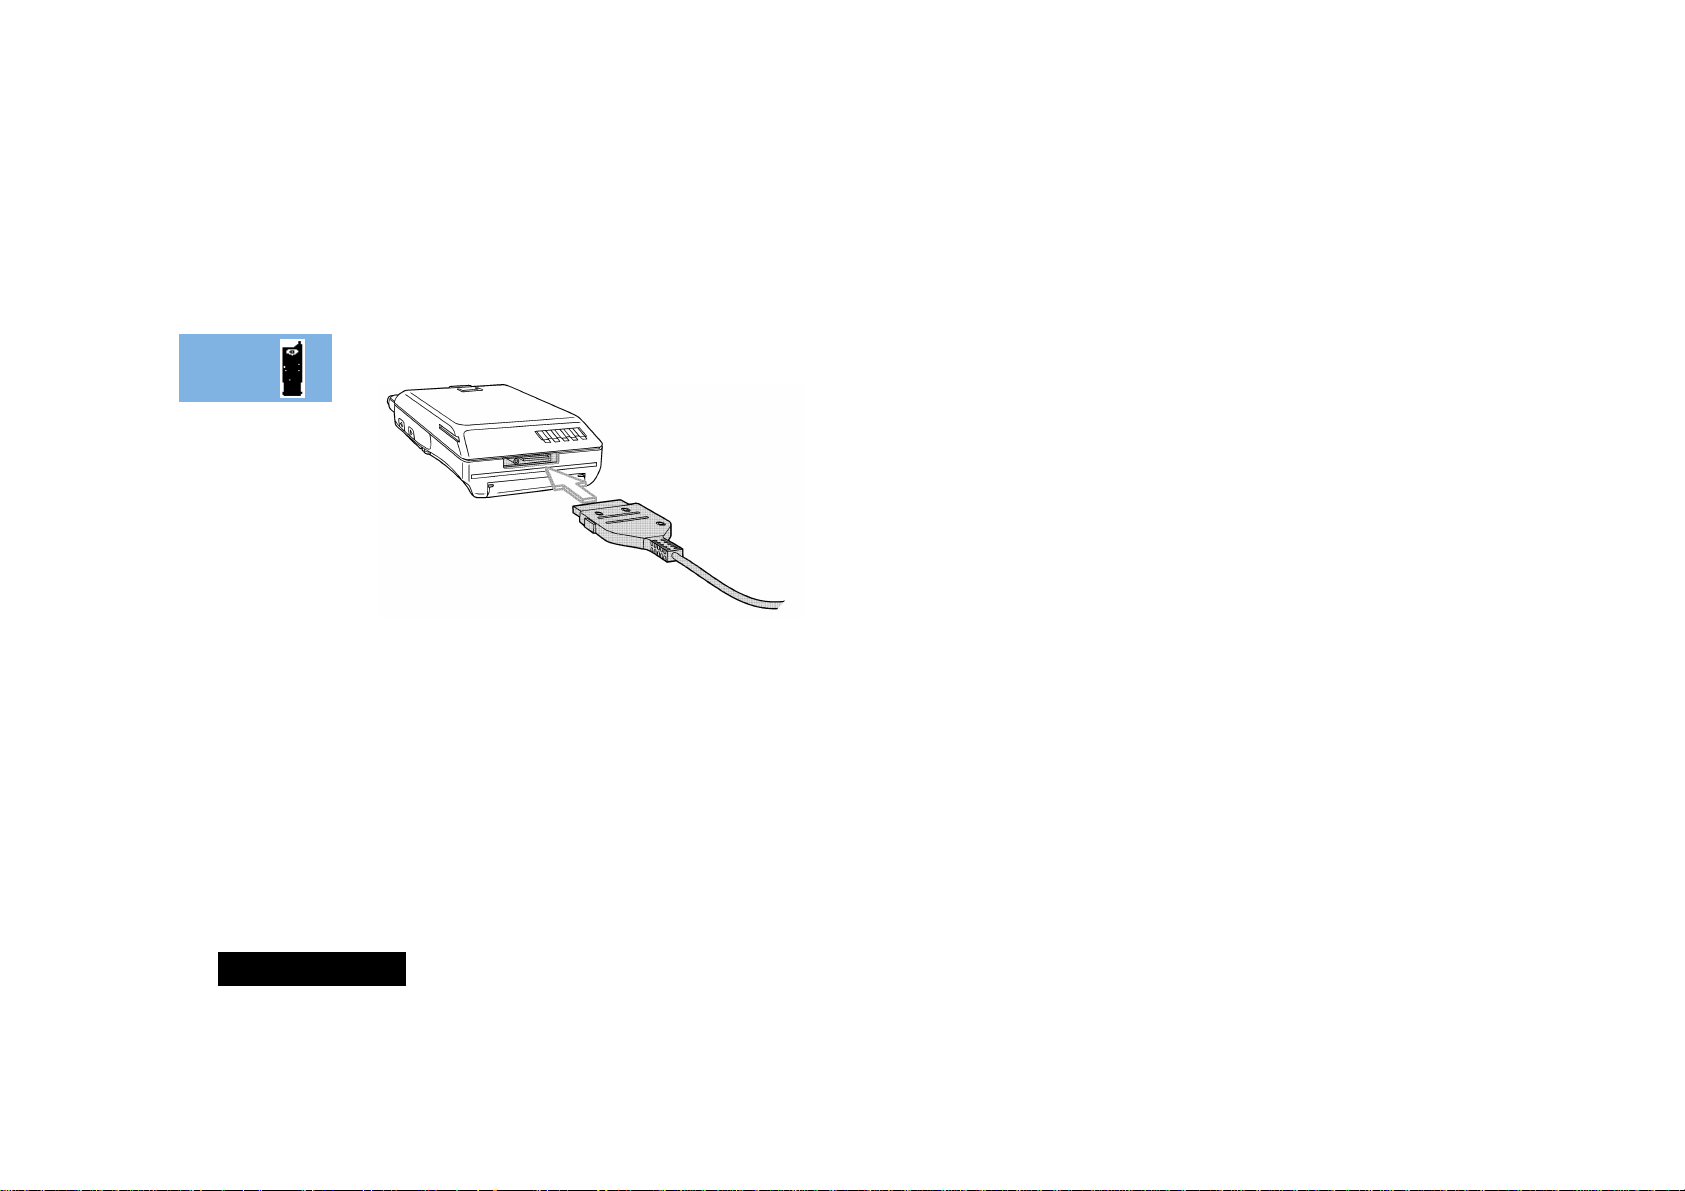
Charging Your Battery While Travelling
Your travel charger can be connected directly to your phone for
convenient battery charging while travelling.
!You must ensure that the mains voltage of the country to
which you are travelling matches your travel charger ratings.
1 Fit the battery to your phone.
2 Switch off your phone.
3 Connect the travel charger to the base of your phone (see
diagram). This switches the phone on and begins charging the
battery. The q symbol will not be displayed as your phone is
not operating on battery power.
You can display the current charging status by pressing E7
or by pressing the power key. Note that if you switch the phone
back on, the charging information will disappear, but you can
redisplay it by pressing E7.
When the battery is about 90% charged, the message Fast
Charge Complete will be displayed.
A If the display is completely blank when the travel charger is
connected, the battery is not being charged.
Typical charge times for achieving a 90% charge level using the
travel charger are:
Battery Type Charge Time
Slim 600 mAh NiMH 1.5 hours
Slim 400 mAh Li-Ion 4 hours
Extra Capacity 1300 mAh NiMH 2.5 hours
Extra Capacity 1200 mAh Li-Ion 4 hours
!The battery will continue to slow charge until fully charged.
Do not leave the battery connected to the travel charger for
more than 24 hours.
A For maximum NiMH battery charging, you should double the
charge time.
A Charge times will increase if you make or receive phone calls
while charging.
About Your Phone, Battery and SIM Card
14
Page 17
English
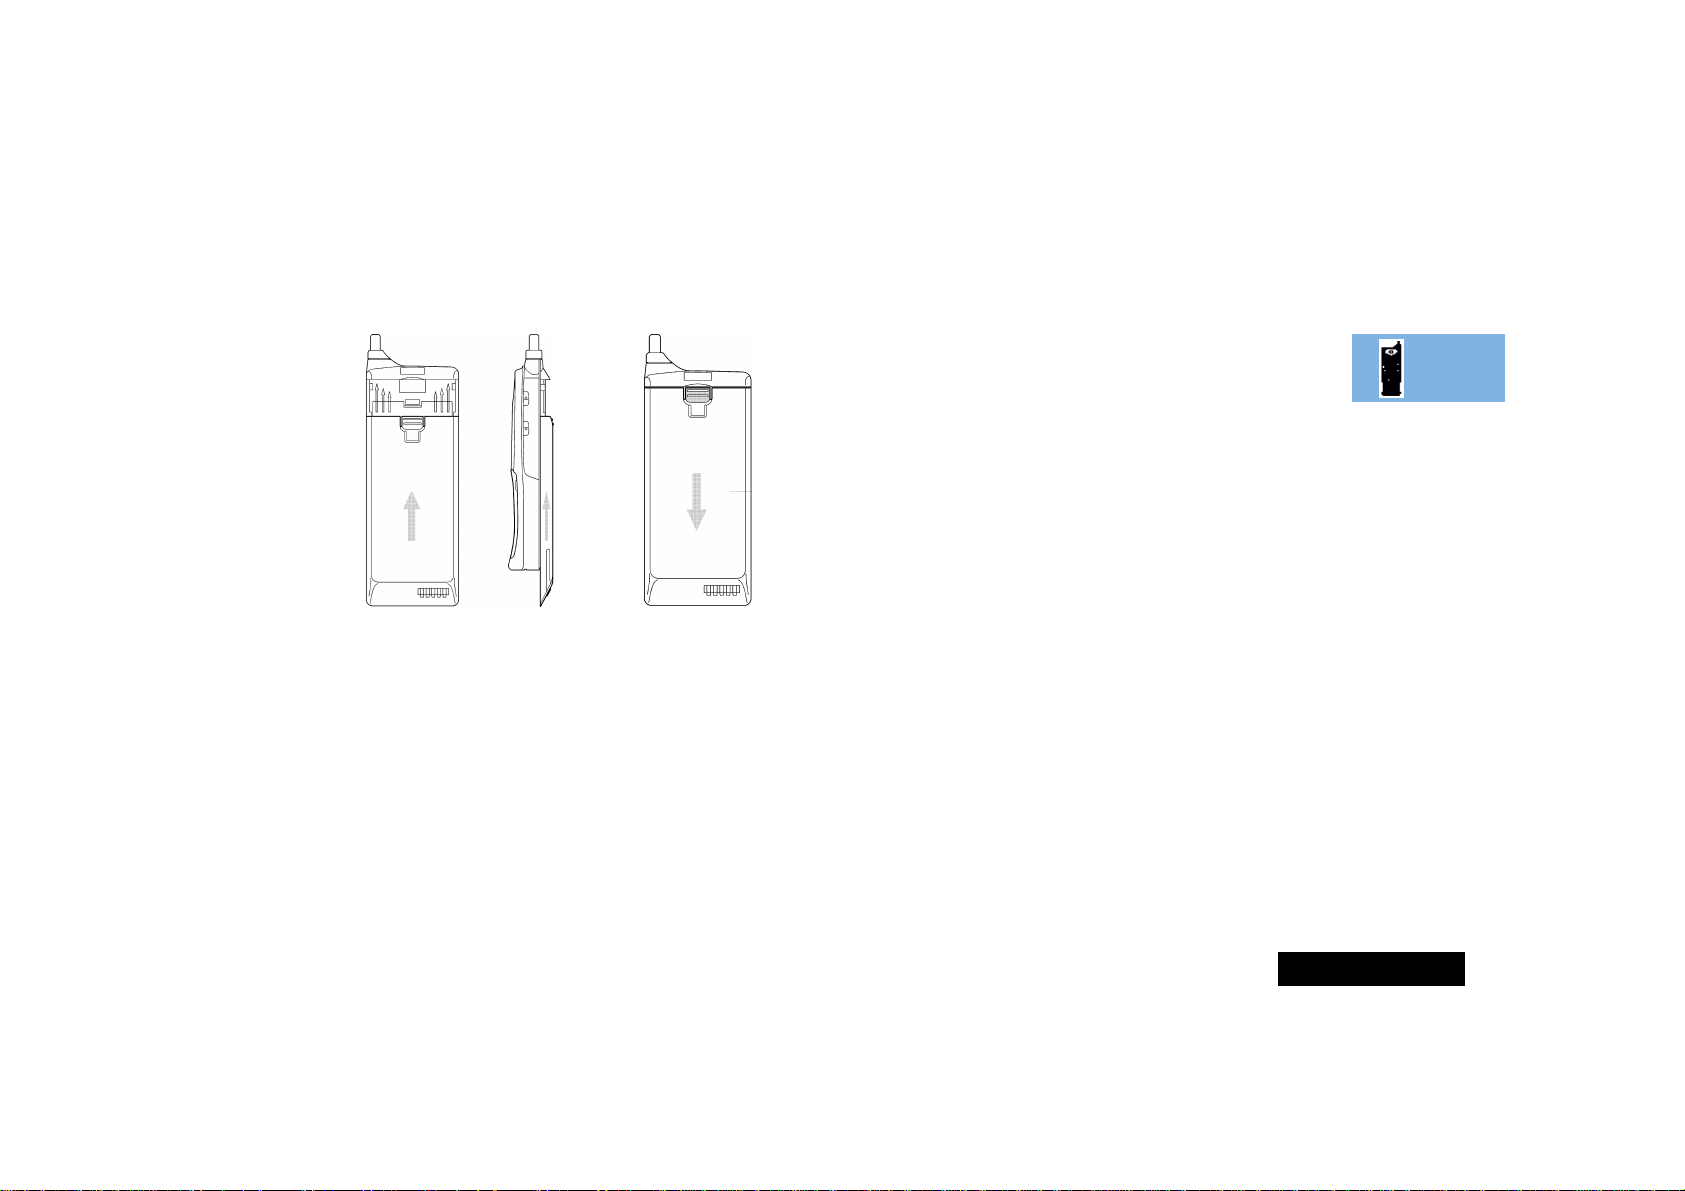
Fitting Your Battery
Place the battery onto the rear of the phone just below the
marked arrow indicators. Next, slide the battery upwards on the
phone's moulded runners, until it locks into place.
Removing Your Battery
!Switch off your phone before removing the battery. Failure to
do so may damage your phone memory.
Press the release catch inwards and simultaneously slide the
battery downwards, until it reaches the end of it's travel. Next,
pull the battery away from the rear of the phone.
About Your Phone, Battery and SIM Card
15
Page 18

English
Your SIM Card
Your credit card sized SIM (Subscriber Identity Module) card was
supplied by your Cellular Service Provider when you bought your
phone. You will not be able to make or receive calls if you do not
have a SIM card inserted in your phone.
ASome networks allow you to make emergency calls without a
SIM card inserted.
The SIM card is a ‘Smart Card’ that contains your phone number,
service details and memory for storing Phone Book numbers and
messages. You can therefore use your SIM card in someone else’s
GSM phone and you will be charged for the call.
Like a bank or credit card, you should keep your SIM card secure.
Do not bend or scratch your card and avoid exposure to static
electricity or water.
AThe use of a plug-in SIM card or small SIM card adapter is not
covered under warranty.
!Switch off your phone before inserting or removing the SIM
card. Failure to do so may damage the memory on your SIM
card.
SIM Card Insertion
Switch off your phone by pressing the S key and insert the
SIM card into the slot in the base of the phone, as shown.
If the SIM card is inserted the wrong way round, or damaged, the
Check Card message may be displayed. Remove the SIM card,
check that it is the right way round and then re-insert it into the
phone.
If either of the Bad Card See Supplier or Blocked See
Supplier messages are displayed, then you will need to contact
your Cellular Service Provider.
SIM Card Removal
Switch off your phone and push the release button towards the
base of the phone. Pull the SIM card out.
About Your Phone, Battery and SIM Card
16
Page 19

English
Making and Receiving Phone Calls
Switching the Phone On and Off
To switch the phone on or off press the S key. If VibraCall is
selected, the phone will vibrate when it is switched on.
If you switch the phone on and there is no SIM card inserted, you
will be asked to insert one. Once inserted, the phone will check
that the SIM card is valid.
A number of messages will then be displayed:
• A greeting message - which can be changed by you.
• Enter PIN - a request to enter the SIM card PIN code (if
required).
• Enter Phone Unlock Code - a request to enter the phone
unlock code (if required).
• Searching... followed by a network name - as the phone
searches and then finds a suitable network to connect to.
Entering Your SIM Card PIN Code
To enter the PIN code, press AO.
As you type in each digit of the PIN code a * character will be
displayed.
If you make a mistake, press and release the C key to remove
the last digit. Holding the C key down will remove the entire
entry.
When the PIN code is complete press the O key.
If the PIN code entered is incorrect, the warning message Wrong
PIN will be displayed, followed by Enter PIN.
!If the PIN number is entered incorrectly three times in a row,
your phone will automatically lock-up and the Blocked
message will be displayed. See ‘Unblocking Your Phone’ for
details on unblocking your phone.
The PIN code can be changed, see ‘Change SIM PIN Code’ in the
Using the Options Menu section for more details.
OEntering Your Unlock Code
If your phone displays the message Enter Phone Unlock
Code you must enter your unlocking code by pressing
BO.
The unlock code is a four digit number which is set at
manufacture to 1234. The code can be changed, see ‘Change
Unlock Code’ in the
details.
If you forget your unlock code, press the M key. This will
display the ‘Change Unlock Code’ option. Press
OD, enter a new unlock code, and press
O.
Using the Options Menu section for more
Making and Receiving Phone Calls
17
Page 20

English
Making a Phone Call
To make a phone call, your phone must be switched on,
unlocked and have the antenna fully extended.
It will not be possible to make a phone call unless you are in an
area where there is a GSM service. When a service has been
found, a series of rising bars, x, will show the signal
strength.
There are a number of different ways to make a phone call:
• Using the digit keys.
• Using automatic redial.
• Redialling the last number called.
• One-touch dialling a Phone Book entry*.
• Dialling a Phone Book entry*.
• Calling an embedded number in a message.
A*Your phone contains a 'phone book' that can be used to
store names and telephone numbers. See
Book Menu for further details.
Using The Phone
The simplest method of making a phone call is to enter the
number using the digit keys then press O.
A If you make a mistake, press and release the C key to
remove the last digit. Holding the C key down will remove
the entire number.
Your phone will then attempt to make the phone call. The display
will show Calling to show the call attempt is being made. If
the call is not answered, pressing O, or closing the flip, at
this point will end the attempt.
When the phone call is answered, the display will change to
Connected for a few seconds, followed by End Call?.
To end your call press O, or close the flip.
Automatic Redial
If your call attempt does not succeed, the message Redial? will
be displayed for five seconds. Pressing O at this point will
automatically redial the phone number.
When the call is answered, you will hear a short ring tone.
The maximum number of redial attempts is set by your Cellular
Service Provider. If the phone call cannot be connected within
this maximum, the message Redial Failed will be shown.
Making and Receiving Phone Calls
18
Page 21

English
Redialling the Last Number Called
L When in standby mode, press OO.
Alternatively, you can retrieve the last number dialled using the
‘Last Ten Calls’ feature in the Phone Book menu.
OOne-Touch Dialling Phone Book Numbers
To quickly retrieve and dial a number stored in the first nine
locations of your Phone Book
1
, press and hold the appropriate
digit key. For example, pressing and holding 2 will dial the
phone number stored in location 2 of your Phone Book.
A You do not need to press O to call the number.
ODialling Phone Book Numbers
L G#O
Alternatively you can:
1 Press QG. For example Q23 will retrieve
the phone number stored in location 23 of your Phone Book.
If you don’t know the exact location, you can enter a random
location and then use the < and > keys to scroll to the
number you want.
2 Press O to call the number.
Calling an Embedded Number in a Message
Details on how to call a number embedded in a message are
given in the
Messages Menu section.
International Phone Calls
To make an international phone call press and hold the 0 key.
After a couple of seconds the international dialling prefix + will
appear in the display, this allows you to call from any country
without knowing the local international access code.
Now enter the country code, followed by the phone number. The
country code follows the conventional format, 49 for Germany,
44 for the UK, 46 for Sweden, etc.
Just like a conventional international call, remove the leading '0'
of the area code when you dial.
The
What to do if... section at the end of this manual contains a
list of the more commonly used international dial codes.
Inserting Pauses Into Phone Numbers
To obtain a three second 'pause' character in a phone number,
press and hold the * key for a couple of seconds, the pause
symbol Ü will appear.
The pause character produces a three second delay whenever it is
used. However, the first pause character in a phone number is a
special case, it will not begin its delay until the call is answered.
1. The Phone Book entries that you are able to access will depend on the
One-Touch Dial Setting option in the Phone Book menu.
Making and Receiving Phone Calls
19
Page 22

English
Pause - A Working Example.
If, for example, you have a tone-based voicemail system on
555-6911, with a mailbox number 1066 and password 2001.
Then you may dial the following number:
5556911Ü1066Ü2001O.
The first part of the number would be used to call the voicemail
system.
When the call is answered the first pause will produce a delay of
three seconds before the tones for 1066 are sent to select the
mailbox.
There will be a second pause of three seconds before the tones
for 2001 are sent as the password.
GSM Emergency Calls
The worldwide GSM network provides a standard number, 112,
to dial in cases of emergency.
Provided that your phone has found a network, you will be able
to make an emergency call. The call can be made regardless of
any security codes and, depending on the network, with or
without a SIM card inserted.
The emergency call will be directed to a central emergency
operator.
To dial the GSM emergency number, press
112O.
While the emergency call is being made and connected, the
display will show Emergency.
Making and Receiving Phone Calls
20
Page 23

English
Receiving a Phone Call
To receive a phone call:
• Your phone must be switched on and unlocked.
• You must be in an area where there is GSM service.
• Your Call Diversion and Call Barring settings should not be set
to divert or bar incoming calls.
When your phone receives a call, it will ring or vibrate and the
display will show the Call message (if you have Caller Line
Identification, the caller’s number will be displayed instead).
To answer the call, press O or open the flip. If the signal
strength is weak then extend your antenna.
If you do not wish to answer a call you can either:
Press and release the C key. If you have enabled the
'Detailed Diverting - If Busy' option in the Options Menu, the
caller will be diverted to the forwarding number, otherwise
the caller will hear the busy tone.
or
Press and hold the C key. This will reject the incoming call.
No call divert option will be offered.
If your phone rings and you do not answer it, the message
Unanswered Call will be displayed to show you that a call
attempt was received.
Ending a Phone Call
To end a phone call, press O or close the flip.
Making and Receiving Phone Calls
21
Page 24

English
Making and Receiving Phone Calls
22
Page 25

English
Menu Navigation
A large number of your phone's options are accessed by using
menus which use a common approach for selection, change and
cancellation.
Please read this section carefully before attempting to access a
menu option. When you understand the common approach to
menu navigation and how the menus are shown on the page,
you will be able to access and change options with ease.
The menus described here can only be accessed when the phone
is in the standby mode. Menu operation is not possible when you
are making or answering a phone call.
Entering the Menus
Three different keys are used to access each of the three menus:
Q accesses the Phone Book menu
M accesses the Options menu
E accesses the Quick Access menu
Once entered, the menus use the M, O and C keys in
a common manner to access and change individual options.
Leaving the Menus
To leave any of the menus, you can either press and hold the C
key or repeatedly press the C key. Both of these actions will
return your phone to the standby mode.
A Alternatively, a quicker way to leave the menus is to press
EC.
Menus and Sub-menus
A menu is a simple list of options. Some of these options provide
access to a further list of options called a sub-menu. When
navigating through the menus you may find it is helpful to think
in terms of menu levels - the ‘parent’ menu being on one level
and its sub-menus being on a lower level.
Moving to and Selecting a Menu Option
To move from one option to another on the same level, use the
scroll keys: the M and > keys scroll forwards and the <
key scrolls backwards. When you find the option you want, press
the O key to select it.
Depending on the option you select, one of three things will
happen:
• either a brief message will be displayed confirming an action,
for example Completed.
• or a prompt will be displayed requesting you to enter
information, for example Enter PIN or Enter Name.
• or the first option of a sub-menu will be displayed. You can
select this option using the O key or browse through
the other options using the scroll keys.
To leave an option or sub-menu, press the C key. This will take
you back to the parent menu item.
Menu Options with Security Codes
Some options are protected from misuse by requiring you to
enter one of the security codes. In order to use these options, you
must enter the requested code before proceeding.
Menu Navigation
23
Page 26

English
Menu Navigation - A Working Example
The following steps will take you through how to switch the
Extended Menus option on:
1 When the phone is in the standby mode, press the M key.
This will access the Options menu and Menu Options will be
displayed.
2 Press M to display the first item, Call Related
Features.
3 Press the M key twice to go to the Phone Setup menu
item.
4 Press the O key to select the sub-menu. The display will
now show the Adjust Ring Volume menu option.
5 Press the M key seven times to go to the Extended Menus
sub-menu item.
6 Press the O key to select this item. You can now select
between On or Off, the current setting will be shown with a ß
character. If the ß character is next to Off, press M and
then O to switch on the Extended Menus. If the ß
character is next to On, press C to leave the setting as it is.
Menu Navigation
24
Page 27

English
OShort, Extended and Personalised Menus
With Personality™ you can personalise the menus by choosing
which features you want readily available. The features that are
less frequently used can be stored out of sight.
The menu diagrams in this manual show the condition of the
menu settings when you first receive your phone. Some features
are in the Short Menu and are shown in bold type. Other
features are in the Extended Menu and appear in shaded italics these features do not appear when you first scroll through the
menus.
You can change which features appear in the Short and
Extended Menus, and therefore personalise the menus, to suit
your requirements.
If you want to move a feature from the Short Menu to the
Extended Menu (or from the Extended Menu to the Short Menu),
go to the feature and then hold down the O key until a
prompt appears offering the following choices:
• Add the current feature to the Short Menu/Extended Menu.
• Leave the current feature in the Short/Extended Menu.
Select the option you want by pressing the O key.
A The settings for some menu features cannot be changed.
Menu Navigation
25
Page 28

English
Menu Navigation
26
Page 29

English
OWhat is the Phone Book?
Using The Phone Book Menu
You can store names and telephone numbers as entries in an
electronic 'Phone Book'. These entries are stored in the Personal
Numbers list in your phone or SIM card's memory, and in the
Fixed Dial list
quickly retrieved and dialled.
Your phone can store 100 entries and the SIM card can store up
to 155 entries in the Personal Numbers list. The number of SIM
card entries will vary depending upon the type of SIM card issued
by your Cellular Service Provider.
You can also store up to 20 entries in a Fixed Dialling list if you
have this feature. Fixed Dialling allows you to limit use of your
phone to particular numbers, or, if you wish, to country codes,
area codes, or other prefixes of your choosing.
Each Phone Book entry comprises:
• A telephone number. Up to 32 digits can be stored, but this is
reduced to 20 digits for SIM card locations.
• A name. Up to 16 characters for phone locations. Up to 50
characters for SIM card locations, but typically 10 or less.
• A location label - from 1 to 255 in your Personal Numbers list,
or 1 to 20 in your Fixed Dial list.
1
on your SIM card. Once stored, a number can be
To access the Phone Book menu press the Q key. Phone
Book Options will appear. Press the M key to display the
Personal Numbers menu item. Use the navigation keys M,
O and C to select the Phone Book option you wish to
use.
Postscripting
This allows you to make use of area codes and other prefixes
previously stored in your Phone Book when making a call.
To use postscripting, select the Phone Book entry containing the
prefix and then simply enter the rest of the number and press
O to make the call.
You can also use postscripting if you want to call a number
similar to one you have stored in your Phone Book. Retrieve the
number from the Phone Book, delete the relevant digits and then
enter the new number.
APostscripting a number does not overwrite the entry in the
Phone Book.
1. Availability of the Fixed Dialling feature depends on the type of SIM
card you have.
Using The Phone Book Menu
27
Page 30

English
How to Enter Alphabetic Characters
The 0, 1,... ...,8 and 9 keys are used to enter
alphabetic characters, for example when storing names in the
Phone Book or when creating messages.
For example, if you press the 5 key, the first displayed
character will be J. If this is not the required character, then you
can press the same key again to show K. Another press will
display L, another... ...will display 5. Your phone will continue to
scroll through the characters available on the selected key with
each new key press.
A long press of any of the keys will switch all the characters to
lower case, a second long press will switch back to upper case.
To enter the next character press the appropriate key. If,
however, the next character is on the same key as the previous
character you will first need to press the # key. Pressing the
# key a second time will produce a space.
If a mistake has been made, you can go back to the incorrect
character by pressing *.
Characters can be removed from the display by pressing the C
key.
The character before the cursor (Ö) is the character which will be
deleted.
Press the O key to store the information.
Available Characters
Press the appropriate keys to get the following characters:
1 Space . ? ! , Ÿ & : " ( ) ' ` @ % ¡ ¢ 1
Space . ? ! , Ÿ & : " ( ) ' ` @ % ¡ ¢ 1
2 A B C [ ® ± ¼ ¾ © 2
a b c { ¯ ± ½ ¾ © 2
3 D E F ° ¿ ¤ ² 3
d e f ° ¥ ¤ ² 3
4 G H I À § 4
g h i À § 4
5 J K L Á 5
j k l Á 5
6 M N O ] \ « ¨ µ 6
m n o } | ¬ ¨ µ 6
7 P Q R S Â ¾ ¸ 7
p q r s  ¾ ¸ 7
8 T U V ¹ ^ ¦ 8
t u v ¹ ~ ¦ 8
9 W X Y Z º · 9
w x y z º · 9
0 + - x * / = > < # 0
+ - x * / = > < # 0
The top line(s) for each key show the upper case characters, the
lower line(s) show the lower case.
Using The Phone Book Menu
28
Page 31

English
The Phone Book Menu
Using The Phone Book Menu
29
Page 32

English
Personal Numbers
The Personal Numbers sub-menu is used for creating and
managing your list of personal numbers.
Find Entry By Name
L Press E1.
This option is used to select a telephone number from a list of
alphabetically sorted Phone Book names.
Once selected, this option will display the message Enter Name.
You can enter the first three characters of a name. You do not
need to enter all three characters, but a longer entry will result in
a more accurate search.
The Phone Book entries will be searched and the first matching
entry will be displayed.
If there isn’t a name matching your entry, the nearest matching
entry will be displayed.
If you do not enter any name information, the first alphabetical
entry will be displayed.
If there are no names stored, No Names Stored will be
displayed.
To display adjacent Phone Book entries use the * and #
keys. When the desired name is displayed press the O key
to select it. The phone will now enter the 'Call Number', 'Modify
Name Or Number' or 'Erase Name And Number' options submenu.
Find Entry By Location
L Press QG.
This option is used to select a telephone number from a list of
numerically sorted Phone Book locations.
Once selected, this option will display the message Enter
Location. You can now enter a location number. If the entered
location is not valid, a timed message Range 1-XXX will be
displayed and the phone will return to the Enter Location
menu item.
The Phone Book entries will be searched and an entry will be
displayed.
If you enter a location number for which there is no entry,
Location Empty will be displayed and the nearest non-empty
location will be selected instead.
If you did not enter a location, the first numerical entry will be
displayed.
If there are no numbers stored, No Numbers Stored will be
displayed.
To display adjacent Phone Book entries use the * and #
keys. When the desired name is displayed press the O key
to select it. The phone will now enter the 'Call Number', 'Modify
Name Or Number' or 'Erase Name And Number' options submenu.
Using The Phone Book Menu
30
Page 33

English
Call Number, Modify Name Or Number or Erase Name
And Number Options
Once a Phone Book entry has been selected, it can be called,
modified or deleted.
Call Number
This option is used to call the selected Phone Book telephone
number.
Modify Name Or Number
This option is used to change the selected Phone Book entry.
The entry’s current telephone number and name will be
presented, in turn, for modification. You can accept the current
settings or modify as required.
Erase Name And Number
This option is used to erase the selected Phone Book entry.
Simply press the O key when the phone displays the
message Erase Name And Number. The option will display the
timed message Erased XXX and then return to the Find
Entry menu item.
Add Entry
This option is used to add (store) entries to the Phone Book. You
can choose to add the new entry to either the phone or SIM card
memory locations.
Add To Phone Memory, Add To SIM Card Memory
L Press E3 to add to phone memory
L Press E4 to add to SIM memory
Once you have selected the destination of the new entry, you will
be asked to enter the telephone number, name and location
number of the new entry.
The last telephone number displayed will be presented by
default; it can be used or discarded as required.
If the entered location is not valid, a timed message Range
YYY-ZZZ will be displayed and the phone will return to the
Enter Location prompt. If the chosen location is currently
used by another entry, you will be asked for confirmation that
the location can be overwritten.
If you do not supply a location number, the next available
location will be used.
When the new entry has been entered, a timed message Stored
At XXX will be displayed and the phone will return to the Add
Entry menu item.
Using The Phone Book Menu
31
Page 34

English
Check Capacity
This option is used to check the number of free Phone Book
entries in the phone or SIM card memory areas.
Check Phone Capacity, Check SIM Capacity
Once selected, a timed message XX Unused Locations
displays the requested information. The phone will return to the
Check Capacity menu item.
Prevent Access
This option enables you to prevent access to the Personal
Numbers list.
To SIM Card Memory, To Phone Memory, To Phone &
SIM Memory, No Memory Restrictions
You can prevent access to all entries in the SIM card memory, the
phone memory or both the phone and SIM card memory. To
cancel all access restrictions use the No Memory Restrictions
option.
When you change the restrictions, you will be requested to enter
the Security Code before the change is made.
Last Ten Calls
These options can be used to call the most recently used phone
numbers.
Once an option has been selected, use the < and > keys
to scroll through the list of phone numbers. Press the O
key to call the displayed number.
A You can use postscripting to modify a number once you have
retrieved it from either of the Last Ten Calls lists.
Last Calls Made
This option can be used to redial the phone number of any one
of the last ten calls made.
Last Calls Received
This option can be used to redial the phone number of any one
of the last ten calls received.
A You will only see numbers in the Last Calls Received list if you
have Caller Line Identification.
Erase All Numbers
This option erases all the numbers stored in your Last Ten Calls
Made and Last Ten Calls Received lists.
Using The Phone Book Menu
32
Page 35

English
My Phone Number(s)
This option allows you to access your cellular phone, fax and data
numbers so that you can retrieve or modify them when required.
For example, if you have difficulty remembering your cellular
phone number, store it with the name My Phone and then you
will be able to retrieve the number as required.
The My Phone Number(s) list is stored on your SIM card.
When you select this item, the first location will be displayed. Use
the < and > keys to scroll through the phone numbers
stored.
To enter or change a number, scroll to the location and press
O. You will be prompted to enter a phone number and
then a name. Press O to store the information.
A Depending on your Cellular Service Provider, you may find that
one or more of the entries in the My Phone Number(s) list will
have been defined. You may not be able to change these
predefined entries.
Fixed Dialling
AAvailability of the Fixed Dialling menu depends on the type of
SIM card.
This feature allows you to limit use (typically third-party use) of
your phone to a predefined list of telephone numbers or, if you
wish, to a list of country codes, area codes, or other prefixes of
your choosing.
When Fixed Dialling is switched on, the only numbers that can be
dialled from your phone are those stored (or whose prefix is
stored) in the Fixed Dial list. If you attempt to dial any other
number (apart from an emergency number), the message
Restricted will be displayed. You will not be able to make fax
or data calls.
To make a call when Fixed Dialling is switched on, either dial the
number manually, or select it from the Fixed Dial list and press
O.
Up to 20 entries can be stored in the Fixed Dial list. The list is
stored on your SIM card.
!This option may be affected by the Call Barring setting.
View Fixed Dial List
This option allows you to scroll through the numbers in the Fixed
Dial list. When you find the number you want, press O to
make the call.
Using The Phone Book Menu
33
Page 36

English
Setup Fixed Dialling
This option allows you to switch Fixed Dialling on or off and to
enter or change entries in the Fixed Dial list.
You will be prompted to enter your PIN2 security code when you
select this option.
On
Switches fixed dialling on.
Off
Switches fixed dialling off.
Edit Entry
Modifies or clears an entry in the Fixed Dial list. When you select
this option, the first non-empty location in the list will be
displayed. Scroll to the entry you want to change and press
O. You will be prompted to edit the phone number and
the name. To erase the entry, press C.
Add Entry
Adds a phone number and name to the Fixed Dial list. When you
select this option you will be prompted to enter the phone
number, name and a location number. If you do not specify a
location number, it will be stored in the next available location.
AWhen setting up your Fixed Dial list, you may want to reserve
the first nine locations for phone numbers you wish to OneTouch Dial. See also ‘One-Touch Dial Setting’.
One-Touch Dial Setting
This option allows you to specify which Phone Book list can be
One-Touch Dialled.
To Phone Memory
Switches One-Touch Dialling to your Personal Numbers list stored
in phone memory (locations 1 to 9).
To SIM Memory
Switches One-Touch Dialling to your Personal Numbers list stored
on your SIM card (locations 101 to 109).
To Fixed Dial list
A This option is only available if you have Fixed Dialling.
Switches One-Touch Dialling to your Fixed Dial list
(locations 1 to 9).
Using The Phone Book Menu
34
Page 37

English
Using the Options Menu
Using the Options Menu
35
Page 38

English
Call Related Features Menu
Show Battery Meter
L E7
This option displays the approximate amount of battery capacity
remaining, for example:
Using the Options Menu
36
Number of
Bars
1 less than 5%
3 less than 20%
5 less than 60%
7 greater than 60%
Approximate
Charge Level
(recharging needed)
Page 39

English
Restrict My Phone Number
'Restrict My Phone Number' is a network feature. You will need
to subscribe to one of the two Caller Line Identification restriction
features with your Cellular Service Provider.
Show ID On Next Call
Your phone number is sent with the next attempted call, after
this your phone number will not be sent until you re-select this
option.
Restrict ID On Next Call
Your phone number will not be sent with the next attempted
call, after this your phone number will be sent with calls until you
re-select this option.
OCall Diverting
Call diverting is a network feature. If your phone is unavailable,
or you do not wish to receive calls, incoming calls can be diverted
to other phone numbers.
This option can be used to:
• Divert all incoming calls unconditionally.
• Divert incoming calls whenever your phone is unavailable.
Using the Options Menu
37
Page 40

English
• Divert calls to different numbers, depending on the call type
and the current status of your phone.
• Reset all diversion options to off.
AYou cannot change the call divert settings when you are out
of GSM coverage.
After selecting any of the call divert options there will be a short
delay while the phone asks the network for the current setting.
Divert When Unavailable
This option will enable you to divert all incoming calls to a single
number, whenever your phone is unavailable.
The option has two settings, On or Off.
If you change the setting to On, you will be asked to enter a
diversion phone number using the digit keys.
AWhen On, Divert When Unavailable takes priority over detailed
diversion settings.
Divert All Calls
L E6
This option will enable you to unconditionally divert all incoming
calls to a single number.
The option has two settings, On or Off.
If you change the setting to On, you will be asked to enter a
diversion phone number using the digit keys.
AWhen On, Divert All Calls takes priority over all other diversion
settings.
Detailed Diverting
These options will enable you to divert calls to different numbers,
depending upon the call type and the current status of your
phone.
Each of the following detailed diverting options operate in the
same way.
Each option has two settings, On or Off.
If you change the setting to On, you will be asked to enter a
diversion phone number using the digit keys.
A Detailed diversion settings are ignored while Divert All Calls or
Divert When Unavailable are On.
Divert Voice Calls
Divert All Voice Calls
When selected, this option will unconditionally divert all
incoming calls. You will have no opportunity to answer an
incoming call.
If Busy
This option will divert incoming calls if your phone is busy.
If No Answer
This option will divert incoming calls if you do not answer the
call.
If Not Reachable
This option will divert incoming calls if your phone cannot be
contacted by the network.
Using the Options Menu
38
Page 41

English
Divert Fax Calls, Divert Data Calls
When selected, these options will divert incoming 'Fax' and
'Data' calls.
Cancel All Diverting
This option will enable you to cancel the diversion of incoming
calls.
!This option resets all diversion settings to Off and removes all
diversion numbers.
Talk and Fax
This is a network feature that allows you to speak and then send
or receive a fax during the course of a single call.
A Your phone supports a data and fax transmission speed of up
to 9600 bps.
Before making a Talk and Fax call, ensure that:
• Your phone is “fax-ready” (it has been switched off,
connected to the fax, then switched back on). Connecting
your phone to the fax in the middle of the call will not work.
• The Talk and Fax mode is set to On.
A Talk and Fax call automatically switches to fax mode when you
start sending the fax. While the fax is being transmitted, the
message Fax in progress will be displayed. The call
automatically ends when the fax transmission is complete. You
cannot switch back to voice mode in the same call.
A While a Talk and Fax call is active, incoming call services like
Call Waiting and Call Holding are suspended.
If you receive a Talk and Fax call when:
• Your phone is not fax-ready - you can only talk.
• Your phone is fax-ready but Talk and Fax mode is off - the call
is automatically routed to your fax (you cannot talk).
On
Switches Talk and Fax mode on for the next and all subsequent
calls.
Off
Switches Talk and Fax mode off for the next and all subsequent
calls.
Using the Options Menu
39
Page 42

English
OCall Holding and Call Waiting
Your phone supports the GSM network options of Call Holding
and Call Waiting. Using these options you can place a current
phone call on hold and accept an incoming call or start a second
call.
The Call Waiting menu item has two settings On or Off. If you
select Off, you will be not be notified of waiting calls. The person
trying to contact you will either receive the busy tone, or be
diverted by the ‘Detailed Diverting - If Busy’ option.
If Call Waiting is On, you will be notified of a waiting call by an
audible alert and by the message Call Waiting - Answer?.
You can press the O key to accept the waiting call, or use
the M key to scroll to an alternative option and then press
O.
AIf you have Caller Line Identification, the caller’s number is
displayed instead of the Call Waiting message.
Call Holding and Call Waiting Scenarios
The display will automatically change according to the status of
your current call (or calls) and will propose the option that you
are most likely to want. Press O to accept this option or
press M to scroll through the alternative options. By following
this procedure you will find that even the triple combination of
an active call, a held call, and a call waiting is easy to manage.
The following points summarise the more common situations:
• To end the active call, press O. If you have a call on
hold it is automatically connected.
• To put the active call on hold and make another call, press
M and select the Hold Call option, then press M again
and select the Make New Call option
1
.
• To put the active call on hold and reconnect a held call, press
M and then select the Switch Calls option.
• To accept a waiting call, press O. The active call will be
placed on hold. If you prefer to end the active call before
accepting the waiting call, press M and select the End
Active Call option, or End Held Call option as
appropriate.
• To reject a waiting call, press M and select the Reject
Call Waiting option (or simply press the C key).
A If you have an active call, a call on hold and a call waiting, you
cannot accept the waiting call until you end either the active
call or the held call.
Using the Options Menu
40
1. A quicker method of making another call is to enter the number to be
called directly. As soon as you press the first digit, the display will
change to Call?. This will disappear three seconds after the last key
press, but if you press O before then, your phone will place the
current call on hold and attempt to call the number entered.
Page 43

English
Call Holding and Call Waiting Messages
During Call Holding and/or Call Waiting operations, your phone
may display one or more of the following messages:
Trying
A request to hold the active call, or swap the active call with a
held call, has been made.
or
A request to reconnect the held call has been made.
Hold Failed
The request to hold a call has been unsuccessful.
Cannot Hold Second Call
A call is already on hold, you cannot place two calls on hold at
the same time.
Reconnect Failed
The held call could not be made active again.
Busy Try Later
Your phone is still working on a previous command. Wait a
short time before repeating the command.
Anonymous
The person who is calling you has blocked their number from
appearing on your phone.
Unavailable
The network is unable to provide the caller’s number.
OCall Barring
Call barring is a network feature which can be used to selectively
bar outgoing and incoming calls.
If you change the barring setting, you may be asked to enter your
barring password. There will be a short delay while the phone
notifies the network of the new setting. When the change has
been made by the network, the phone will display a confirmation
message.
The initial password will be supplied to you by your Cellular
Service Provider when you subscribe to this service.
AThis option may be affected by the Fixed Dialling setting.
Bar Outgoing Calls
After selecting this option, there will be a short delay while the
phone asks the network for the current setting.
Int'l Calls
When selected, this option will bar outgoing international calls.
Int'l Calls Except Home
When selected, this option will bar outgoing international calls,
except those to your home country.
All Calls
When selected, this option will bar all outgoing calls, except
emergency calls.
Off
When selected, this option will disable all call barring for
outgoing calls.
Using the Options Menu
41
Page 44

English
Bar Incoming Calls
After selecting this option, there will be a short delay while the
phone asks the network for the current setting.
When Roaming
When selected, this option will bar incoming calls when you are
roaming.
You may wish to select this option, as some Cellular Service
Providers charge an additional fee for receiving calls when you
are roaming.
All Calls
When selected, this option will bar all incoming calls.
Off
When selected, this option will disable all call barring for
incoming calls.
Change Bar Password
This option can be used to change the call barring password.
After selecting this option, you will be asked to enter the current
password.
You will then be asked to enter, and then re-enter, your new, 4
digit, barring password. When the change has been made by the
network, the phone will display a confirmation message.
Using the Options Menu
42
Page 45

English
Messages Menu
Your phone supports the two GSM message features: Short
Message Services (SMS) and Cell Broadcast.
SMS Messages
These are text messages that are sent specifically to and from
your phone number.
When an SMS message is received, your phone:
1 Makes three short alert tones (depending on the ‘Ring or
Vibrate’ setting).
2 Displays the o (messages) icon.
3 Stores the message for later viewing, if there is space. If there
is not enough space, the o icon will flash. One or more
messages must be removed before the message can be
stored.
Your Cellular Service Provider will transmit a message for a
limited amount of time. If a memory location is not made
available before the message is removed from the network, then
you will not be able to receive or read it.
Using the Options Menu
43
Page 46

English
Cell Broadcast Messages
These are general messages, broadcast to a group of phones and
can only be received when your phone is in standby mode.
These messages are broadcast in numbered 'channels' and, in
general, each channel will tend to carry one particular type of
information.
Typical cell broadcast channels could have information on local
weather conditions, traffic reports or stock market prices. Please
contact your network operator for a list of available channels and
the information they supply.
When the message has scrolled across the display, the beginning
of the message will be shown until you either remove it or a new
message arrives.
How to Read SMS Messages
You can use the scroll keys (M, < and >) to scroll
through messages in either the Received Messages or Outgoing
Messages lists.
To display a specific message, enter the message number, for
example press 5 to display the 5th message. If the message
does not exist, Invalid Msg Number will be displayed.
Alternatively, to display the next message, press O and
select Go To Next Message.
How to Create and Edit SMS Messages
Use the Message Editor to create or modify text messages. When
you enter the editor, the last message that was edited will be
displayed. Press and hold C to clear the message and start a
new one, or modify the message displayed. For an explanation of
how to enter text, see ‘How to Enter Alphabetic Characters’ in
the
Using The Phone Book Menu section.
Press O once you have completed your message. You will
then be presented with the following options:
Send Message - If you select this option you will be
prompted for a phone number, enter the number and then
press O to send the message.
Store Message - Select this option to store your edited
message in your Outgoing Messages list.
A If you don’t store the message after it has been edited, you
will lose all your changes as soon as you select another
message to be edited.
OCall Voicemail
L E5
Once selected, this option will leave the Messages menu and
automatically make a phone call to the current voicemail number.
The display will show Calling and standard call operations can
be performed.
The voicemail phone number can be entered by selecting the
'Voicemail Number' option in the 'Message Settings' sub-menu.
Using the Options Menu
44
Page 47

English
Received Messages
L E9
This option is used to view and manage any SMS messages that
have been sent to your phone number.
When selected, this option will display a message indicating the
total number of messages and how many of these are new. If
there are no messages No Messages will be displayed.
If there are messages, the new messages will be displayed first,
followed by the old. Repeated presses of the M key will display
the whole message, when it was sent and the phone number
who sent it (if available).
Once you have read a new message it will automatically become
old.
See ‘How to Read SMS Messages’ for more information on
navigating through the messages.
Press the O key, when viewing any message, to enter the
‘Go to Next Message‘, ‘Delete Message‘, ‘Return Call' and ‘Edit
Message’ sub-menu.
Go to Next Message
This option will display the next received message.
If you are currently reading the last message in your list then this
option will take you back to the top of the list.
Delete Message
This option will delete the currently viewed message
Return Call
This option can be used to call the person who sent you the
message, if their number has been included by the network, or a
number that has been included in quotes “” in the message.
Edit Message
This option allows you to use the Message Editor to edit the
selected message and then to either send the modified message
and/or store it in your Outgoing Messages list. See ‘How to
Create and Edit SMS Messages’ for more information on using
the Message Editor.
Outgoing Messages
This option is used to view and manage any outgoing messages.
These messages will be stored on your SIM card. When you select
this option, the total number of messages will be displayed
followed by the first message in the list.
AYou cannot send an outgoing message until the Message
Service Centre number has been set. See ‘Message Settings’.
Press the O key, when viewing any message, to enter the
‘Go to Next Message‘, ‘Send Message‘, ‘Edit Message’ and
‘Delete Message’ sub-menu. See ‘How to Read SMS Messages’
for more information on navigating through the messages.
Go to Next Message
This option will display the next outgoing message.
Send Message
If you select this option you will be prompted for a phone
number, enter the number and then press O to send the
message.
Using the Options Menu
45
Page 48

English
Edit Message
This option allows you to use the Message Editor to edit the
selected message and then to either send the modified message
or store it in your Outgoing Messages list. See ‘How to Create
and Edit SMS Messages’ for more information on using the
Message Editor.
Delete Message
This option will delete the currently viewed message.
Message Editor
The Message Editor is used to edit the currently selected message
and then to either send the modified message or store it in your
Outgoing Messages list. See ‘How to Create and Edit SMS
Messages’ for more information on using the Message Editor.
Cell Broadcast
This option is used to set the cell broadcast settings. The option
has two settings On or Off.
If you change the setting to On, you will be asked to enter the
channel you wish to receive information from.
Please contact your Cellular Service Provider for a list of available
channels and the information they provide.
While a broadcast message is scrolling across the display you can
stop and start it by pressing *. Press # to restart the
message from the beginning. If you want to remove the message
from the display, press C followed by O.
AIf you need to use the * and # keys for their normal
functions while you are receiving a cell broadcast message,
you must first remove the message.
Message Settings
Voicemail Number
This option is used to enter a phone number which will be used
by the ‘Call Voicemail’ option.
If there is already a Voicemail Number, this will be shown in the
display. This can be used, modified or deleted as desired.
Service Centre
Before you can send any messages you must use this option to
enter your Message Service Centre number. This number is
obtained from your Cellular Service Provider.
Expiry Period
You can use this option to specify the maximum time, in hours,
that your unforwarded messages are to remain with the Message
Service Centre before being deleted. When you select this option,
the current expiry period will be displayed (the default is 24
hours).
The maximum value you can enter is 10584, though the real limit
will depend on your Message Service Centre.
Outgoing Message Type
This option is network dependent and can be used to specify the
format of your outgoing messages. You can select from the
following message types: Text (default), Fax, X400, Paging,
E-Mail, ERMES or Voice.
A You do not need to select Voice to send messages to
Voicemail boxes.
Using the Options Menu
46
Page 49

English
Phone Setup Menu
Adjust Ring Volume
L E0
This option is used to set the incoming call ring tone volume.
The option has three settings, High, Medium or Low.
Ring or Vibrate
L E8
This option sets the way your phone alerts you to an incoming
call. The options are:
• Ring Only - the phone will ring with the tone specified by
the Set Ringer Tone option.
• Vibrate Only - the phone will vibrate using VibraCall™.
• Vibrate Then Ring - the phone will vibrate twice and then
ring.
• No Ring or Vibrate - the phone will just display the Call
message.
AThe setting you choose also defines the type of alert for an
incoming SMS message (except that if you select Vibrate Then
Ring, your phone will just vibrate).
Using the Options Menu
47
Page 50

English
OSet Ringer Tone
This option sets the tone your phone will make when an
incoming call is received.
Standard Tone
Your phone makes a standard ringing tone.
Single Ring Tone - Music Tone
When selected, your phone will produce one of these alternative
ringer tones.
AIf you select the Single Ring Tone option, the phone will only
ring once when a call is received.
OPhone Lock
This option is used to set, and change, the unlock code.
The unlock code can be set to protect your phone from
unauthorised use. It can be set to automatically lock your phone
each time it is switched on.
The unlock code is a four digit number which is set at
manufacture to 1234. This can be changed at any time by using
the 'change unlock code' option.
Automatic Lock
This option can be used to automatically lock your phone each
time it is switched on.
The option has two settings, On or Off.
Lock Now
This option can be used to immediately lock your phone. Once
selected, your phone will be unusable until the unlock code is
entered.
Change Unlock Code
This option is used to change the unlock code.
After selecting this option, you will be asked to enter the current
security code before you can proceed.
You can now enter a four digit code to replace the old code.
A By pressing the M key, you can access this option even
when the phone is locked.
Require SIM Card PIN
This option is used to set, and change, the PIN code.
The PIN code can be set to protect your SIM card from
unauthorised use. If set to On, access to your SIM card will be
restricted each time it is inserted or the phone is turned on.
The option has two settings, On or Off.
A If the SIM card does not support PIN code disabling, these
items will not appear.
Using the Options Menu
48
Page 51

English
Change SIM PIN Code
This option is used to change the SIM card PIN code.
The 'Require SIM Card PIN' option must be set to On and you
must enter the old PIN code before you can proceed.
You will be asked to enter a new, four to eight digit code to
replace the old PIN code. The new PIN code must be entered
again as confirmation.
!If the PIN number is entered incorrectly three times in a row,
your SIM card will automatically lock-up and the Blocked
message will be displayed.
Unblocking Your Phone
If you receive the Blocked message you will need to enter an
unblock code and key sequence before you can use the phone.
A The 8 digit PIN unblocking code will have been provided with
your SIM card by your Cellular Service Provider.
Enter the following key sequence to unblock your phone:
* * 0 5 * EO
F O F O
The new PIN code must contain four to eight digits.
!If this operation is performed incorrectly 10 times in a row,
your SIM card will become permanently blocked.
Change SIM PIN2 Code
This option is used to change your PIN2 security code.
When you select this option you must enter the old PIN2 security
code before you can proceed.
You will be asked to enter a new, four to eight digit code to
replace the old PIN2 security code. The new PIN2 security code
must be entered again as confirmation.
!If the PIN2 security code is entered incorrectly three times in a
row, the Blocked message will be displayed.
When the Blocked message is displayed, you are not allowed
access to menu items that require you to enter the PIN2 code, for
example ‘Setup Fixed Dialling’ and ‘Call Charge Settings’.
If you receive the Blocked message when you try to enter your
PIN2 code, you will need to unblock and change the code using
the following key sequence:
* * 0 5 2 * EO
J O J O
AThe 8-digit unblocking code will have been provided with your
SIM card by your Cellular Service Provider.
!If the PIN2 unblocking operation is performed incorrectly 10
times in a row, your PIN2 code will become permanently
blocked.
Using the Options Menu
49
Page 52

English
ONew Security Code
The security code is used to control access to security and other
options within the menus.
This option is used to change the security code, which is set at
manufacture to 000000.
Once selected, you will be asked to enter the current security
code before you can proceed.
You will then be asked to enter a new, six digit code to replace
the old security code.
AIn order to safeguard your phone, you should change your
security code from the factory setting as soon as possible.
OExtended Menus
L Press and hold M. Extended Menus will be temporarily
activated until you exit the Options menu.
This option is used to switch the extended menus on or off.
If the extended menu option is switched off, you will not be able
to access any of the extended features.
The option has two settings, On or Off.
OLanguage Selection
This option is used to change the language for display messages.
The option has multiple settings.
When you select a language, all further display prompts and help
messages will be in the selected language.
OChange Greeting
This option is used to change the message displayed when you
switch on your phone.
Once selected, you will be able to enter a new greeting of up to
24 characters. See ‘How to Enter Alphabetic Characters’ in the
Using The Phone Book Menu section for more information.
The new greeting will be displayed when your phone is next
switched on.
Battery Saving Mode
This option can help you to conserve battery power. Also known
as DTX (Discontinuous Transmission), this feature will cause your
phone to operate at reduced power when you are not talking.
The option has two settings, On or Off.
OSelect Keypad Tones
This option allows you to change or disable tones you hear when
you press a key.
The option has three settings, Normal Tones, Single Tone
or No Tones.
Using the Options Menu
50
Page 53

English
Phone Status
Status Review
This option can be used to view the current setting of menu
options.
When selected, your phone will display a list of menu items
which have been changed from the default setting. Press the
M key to view the next item.
Master Reset
!This option should be used with caution.
This option is used to restore certain phone options to their
original settings.
When selected, you will be asked to enter the security code.
Once entered, the master reset option will perform the following
operations:
• Cancel Automatic Answer, Audible Call Timers, In-Call Display
Meter, Battery Save (DTX), Auxiliary Alert, Automatic
Handsfree, Automatic Lock, Cell Broadcast and Talk and Fax
Mode.
• Return Language Selection to Original.
• Restore Keypad Tones to Normal, Ringer Tones to Standard,
Volume Level to Medium and Network Search frequency to
Medium.
• Reset the expiry period for SMS messages to 24 hours and the
Message Type to Text.
Master Clear
!This option should be used with extreme caution, for example
it will clear all the Phone Book entries from your phone
memory.
This option is used to restore certain phone options to their
original settings.
When selected, you will be asked to enter the security code.
Once entered, the master clear option will perform the same
operations as 'Master Reset', plus the following operations:
• Clear the Phone Book entries from phone memory (not from
SIM memory)
• Clear the Last Calls Made and Last Calls received list
• Clear the Message Editor.
• Reset the Resettable Call Timers.
Master Clear does not clear the:
• Fixed Dial list
• My Number(s) list
• Charge Meters
• Received and Outgoing Messages list.
Using the Options Menu
51
Page 54

English
Network Selection Menu
Network Selection
In order for the phone to make and receive phone calls, it must
register with one of the available networks.
Your phone automatically searches for the last network used. If,
for any reason, this network is unavailable, your phone will
attempt to register with a new network.
When your phone needs to register with a new network, it will
generate a sorted list of networks.The network list is sorted in the
following order:
• The Home network.
• Networks from a preferred list.
• A random list of other networks found above a certain signal
strength.
• All remaining networks in descending order of signal strength.
Any forbidden networks, stored in the SIM card, will not be
included in the sorted list.
Available Networks
When selected, this option will scan to see which networks are
operating in your current location. When the scan is complete,
press the M key to scroll through the list. When you see a
network you wish to register with or store in your preferred list,
press the O key. You will now enter the 'Register Now'
and 'Make Preferred' sub-menu.
Using the Options Menu
52
Page 55

English
Register Now
Once selected, your phone will try to register with the selected
network. If the registration fails, your phone will try to register in
the normal way.
Make Preferred
Once selected, you will be asked where the selected network is to
be located in the preferred list.
Network Search
These options determine how often your phone tries to register
with a network and how the attempt is made.
Registration Preferences
This option determines how the phone tries to register with a
network.
The option has two settings, Automatic Search or Manual
Search.
Automatic Search Mode
In the automatic mode, the phone will try to register with the
first network in the sorted list. If this is successful, your phone will
display the network name and then enter the standby mode.
If registration is unsuccessful with one network in the list, your
phone will try the next listed network. If your phone fails to
register with any of the listed networks, it will start at the
beginning of the list after a preset period. The preset period is
determined by the 'Frequency Of Search' option.
Manual Search Mode
In the manual mode, the phone will present you with the sorted
list of networks. Use the *, # and O keys to select
one network from the list. Your phone will try to register with the
selected network. If this is successful, the phone will display the
network name and then enter the standby mode.
If registration is unsuccessful, your phone will present the list
again after a preset period. The preset period is determined by
the 'Frequency Of Search' option.
AIf the phone is turned off and then on again, it will revert to
Automatic Search mode and register with a network in the
order of the sorted list.
Frequency Of Search
This option is used to determine how long your phone waits
before attempting to re-register after a registration attempt has
failed.
The option has the following settings: Slow Search, Medium
Search, Fast Search or Continuous Search.
!Fast and Continuous Search may use up a significant amount
of battery power.
Using the Options Menu
53
Page 56

English
OPreferred Networks
Add Network To List
This option enables you to add networks to your preferred list.
When selected, the 'Choose From Available' option will scan to
see which networks are operating in your current location. When
the scan is complete, press the M key to scroll through the list.
When you see a network you wish to store in your preferred list,
press the O key. You will be asked where the selected
network is to be located in the preferred list.
The 'Choose From Known' option will, when selected, present
you with a preset list of networks. Press the M key to scroll
through the list. When you see a network you wish to store in
your preferred list, press the O key. You will be asked
where the selected network is to be located in the preferred list.
Select the 'Add New Network Code' option to enter network
codes directly. Once entered, you will be asked where the
network is to be located in the preferred list.
Show List Of Networks
This option is used to display the networks you have stored in
your preferred list. In addition, pressing the O key will
select the currently displayed entry and enter a move/delete submenu.
When 'Move to New Location' is selected you will be asked to
enter a new location for the selected network.
When selected, 'Delete Selection' will remove the selected
network from the preferred list.
Find New Network
When selected, the phone will try to register with a network in
the normal manner, with one exception. When the registration
attempt is made, your current network will be excluded from the
list of those available. If the attempt fails, your phone will then try
to re-register with the previous network.
Using the Options Menu
54
Page 57

English
Call Meters Menu
Call Metering
Your phone has an internal metering system which can be used
to provide you with individual and total call times or costs.
ACall cost information is only available if you receive the Advice
of Charge service. If you do not receive this service, then only
time meters are available.
The meter can be displayed during a phone call and audible
tones can be generated to indicate the passage of call time.
Your phone can handle values up to 21 digits long, although
during calls it can only display the last 12 digits. If the value
exceeds 21 digits, then Too Large is displayed.
In addition, you can set a maximum charge limit so that your
phone will monitor either the number of units used or the call
cost, and then not allow the limit to be exceeded.
Show Call Charges
This feature allows you to display the cost of your calls or the
amount of credit remaining. The figures are in phone units or
currency depending on the setting of the Set Charge Type
option.
AShow Call Charges is only available if you receive the Advice of
Charge service.
Show Last Call
Displays the cost of your last chargeable call.
Using the Options Menu
55
Page 58

English
Total For All Calls
Displays the cost of all your chargeable calls since the charge
meters were reset to zero using the ‘Reset Call Charges’ option.
Credit Remaining
Displays the difference between your total call costs and the limit
specified by the ‘Set Total Charge Limit’ option. If there is no
limit, No Charge Limit Set will be displayed.
Show Call Timers
This feature allows you to display the duration of your calls and
to reset your time meters to zero.
If you receive the Advice of Charge service then all calls are
timed. If you do not receive the Advice of Charge service then,
depending on the model, either all calls or only outgoing calls are
timed.
Show Last Call
Displays the duration of your last call.
Total For All Calls
Displays the duration of all your calls since the time meter was
reset to zero using the ‘Reset All Timers’ option.
Reset All Timers
Sets the resettable time meters to zero. The Lifetime Meter is not
resettable.
OSet Audible Call Timers
Your phone provides two programmable audible call timers:
• The 'Single Alert Timer' will sound a beep just once during a
call, after a preset time has elapsed.
• The 'Repetitive Timer' will sound regular beeps during a call,
at preset intervals.
In both cases, the timers will sound their beeps ten seconds
before the end of the programmed time.
Set In-Call Display
This feature allows you to specify whether the time or charge
meters are displayed during a call. If you do not have the Advice
of Charge service, then only the time meter is available.
A If a total charge limit has been set, then the in-call display
always shows your remaining credit.
Show Time Per Call
This option is used to display the time meter during calls. If you
receive the Advice of Charge service, only the chargeable calls
will be displayed.
Show Charge Per Call, Show Total Call Charges
A These menu items are only available if you receive the Advice
of Charge service.
These options are used to display the call charges meter during
and after chargeable calls. The meter shows phone units or
currency depending on the setting of the ‘Set Charge Type’
option.
Using the Options Menu
56
Page 59

English
No In-Call Display
This option switches off in-call display of the charge/time meter.
Call Charge Settings
This feature allows you to customise your Advice of Charge
settings. You will be prompted to enter your PIN2 security code
before you can access the options.
A This menu item is only available if you receive the Advice of
Charge service.
Reset Call Charges
This option resets your charge meters to zero.
Set Total Charge Limit
This option sets the maximum limit for call charges; once this
limit has been reached, the network will refuse any further
chargeable calls.
If you switch the charge limit On, you will be prompted to enter a
new limit. Enter the amount as either units or currency
depending on the setting of the Set Charge Type option.
Units must be entered as whole numbers.
A When the charge limit is On , you will not be able to make fax
or data calls.
Once a limit is set, the in-call display will show the remaining
credit. When you reach your last two minutes, the warning
message Approaching Charge Limit will be displayed and a
warning alert will sound. The sound will be repeated when one
minute remains. When the limit is reached the message Charge
Limit Reached will be displayed and you will not be able to
make any more chargeable calls.
Once the limit is reached the Total Charge Limit will need to be
reset or switched off before any chargeable calls can be made.
Select Off to switch off the charge limit.
Set Charge Type
This option defines whether charge information is displayed as
either phone units or currency.
Units
Sets the charge type to phone units.
Currency
Sets the charge type to currency. You will be prompted to enter
the Currency Name. Enter a 3-character notation, for example
GBP for the UK, DEM for Germany or FFR for France. You will
then be prompted for the Charge Per Unit. Enter the amount
and press O.
Lifetime Timer
This option is used to display the total time of all calls made on
your phone.
This meter can not be reset, the 'Reset All Timers', 'Master Reset'
or 'Master Clear' options have no effect.
Using the Options Menu
57
Page 60

English
Accessory Setup Menu
Car kits can provide charging facilities and some provide
connection to an external antenna for better reception. Your
phone can also be linked to external microphones and speakers
for hands free operation.
Your phone provides several options to complement the use of
car kits.
OMute Car Radio
This option can be used to mute your car radio when you make,
or receive, a call when your phone is attached to the car kit. It
must be enabled by your local dealer.
This option has two settings, On or Off.
A This option will have no effect if your car radio does not have
a mute feature, or if the car kit installation does not support
this option.
This option and the 'Auxiliary Alert' option are mutually exclusive.
Only one of the two can be on at any time.
† These options are mutually exclusive and can only be enabled
by your local dealer.
‡ Availability depends on the type of car kit installed.
You will only be able to access this menu when your phone is
mounted in a car kit.
Using the Options Menu
58
Automatic Answer
This option allows your phone to automatically answer an
incoming call after two rings.
This option has two settings, On or Off.
A If this option is On, we recommend that the 'Ring or Vibrate'
option be set to Ring Only.
This option will not work in conjunction with the Simple Micro
Car Kit.
Page 61

English
Automatic Handsfree
This option is used in conjunction with the 'Automatic Answer'
option and a car kit, to transfer call conversation to external
microphones and speakers. It is available only with selected car
kits. Contact your Motorola representative for further details.
This option has two settings, On or Off.
Safety Timer
This option can be used to keep the phone on for a set period
after the vehicle ignition has been turned off. This prevents the
vehicle's battery from becoming drained and saves you from
having to re-enter PIN and Unlock codes after every short stop.
As standard the 'Safety Timer' is set to 60 minutes. Once
selected, this option can be adjusted to any value between zero
and 999 minutes. When set to zero, this option is effectively
switched off.
Auxiliary Alert
This option allows your phone to alert you of an incoming call by
flashing your vehicle lights, or by sounding the horn. It must be
enabled by your local dealer.
A Some local regulations prevent the use of this option and,
accordingly, this option may not be present on your phone.
This option and the 'Mute Car Radio' option are mutually
exclusive. Only one of the two can be on at any time.
Using the Options Menu
59
Page 62

English
Using the Options Menu
60
Page 63

English
Using the Quick Access Menu
Although the features in your phone are available through easy
access menus, the following most commonly used features are
also available by pressing the quick access key followed by the
relevant number:
Find by Name E1
You will be prompted to Enter Name. Enter the first three
characters of the name and press O. The first matching
entry in the Phone Book will be displayed. Press O to call
the number.
Find by Location E2
You will be prompted to Enter Location. Enter the location
number and press O. The first matching entry in the
Phone Book will be displayed. Press O to call the number.
Add Entry to Phone E3
You will be prompted to enter a phone number and then a
name.
AIf you already had a number displayed, it will automatically be
re-displayed when you select this feature.
The number will be stored in the next available phone memory
location. See ‘Add Entry’ for more information.
Using the Quick Access Menu
61
Page 64

English
Add Entry to SIM E4
You will be prompted to enter a phone number and then a
name.
AIf you already had a number displayed, it will automatically be
re-displayed when you select this feature.
The number will be stored in the next available SIM card location.
See ‘Add Entry’ for more information.
Call Voicemail E5
Your phone will make a call to your voicemail number.
AYou must have defined a Voicemail number in order to use
this feature.
See ‘Call Voicemail’ for more information.
Divert All On or Off E6
Unconditional call diversion will be switched either on or off
depending on the current setting.
AYou must have defined a diversion number using the ‘Divert
All Calls’ option in the Call diverting menu in order to use this
feature.
AYou cannot switch call diverting on or off if you are outside
GSM coverage.
Battery Meter E7
A bar graph indicating the approximate battery charge level will
be displayed. The more bars displayed, the greater the charge
level.
See ‘Show Battery Meter’ for more information.
A If your phone is connected to the travel charger, the battery
meter is replaced by charging status information. See
‘Charging Your Battery While Travelling’.
VibraCall On or Off E8
VibraCall™ will be switched either on or off depending on the
current setting. If VibraCall is switched on, the ‘Ring or Vibrate’
setting changes to Vibrate Only. If VibraCall is switched off,
the ‘Ring or Vibrate’ setting changes to Ringer Only. See ‘Ring
or Vibrate’ for more information.
Read Messages E9
Your newest message will be displayed; you can then read,
delete and edit messages as normal. See ‘Received Messages’ for
more information.
Ring Volume E0
You will be prompted to select the required ring volume: High,
Medium or Low. As you scroll through the options a sample of
the standard ring tone at this volume will be heard. See ‘Adjust
Ring Volume’ for more information.
Using the Quick Access Menu
62
Page 65

English
Accessories
The following accessories have been designed to work with your
cellular phone. Additional accessories may be available and are
packaged separately. Please refer to your local service provider or
retail outlet for more information.
Desktop E•P Charger (SPN4216)
The Desktop E•P Charger allows you to charge a phone with a
battery attached and a spare battery at the same time. The
charging status for each battery is indicated by LEDs at the front
of the charger.
A The Desktop E•P Charger must be used with the Travel Battery
Charger - Wall Adapter (SPN4221 or SPN4222).
Travel Battery Charger - Wall Adapter
(SPN4221 - UK or SPN4222 - Euro)
The Travel Battery Charger connects to the Desktop Rapid
Charger or directly to the phone. When connected directly to the
phone, it charges the battery and also provides dead battery
operation.
Cigarette Lighter Adapter (SLN9933)
The Cigarette Lighter Adapter connects to your phone and allows
you to charge your phone's battery when driving. When the
phone is in use, the adapter overrides the battery therefore
preserving battery life. The adapter also provides dead battery
operation.
The Cigarette Lighter Adapter is also available with a connection
to an external antenna (SLN9934).
Passive Hang-up Cup (SYN4932)
The Passive Hang-up Cup is a simple holder for mounting your
phone in the car.
Handsfree Car Kit (S4386)
The Handsfree Car Kit allows you to safely operate your phone
while driving. The car kit provides a responsive directional
microphone and direct antenna connection. While connected to
the phone, the car kit also charges the battery.
PC Cards
CELLect™1 (S4154)
CELLect™2 (S5253-UK, S5254-Germany)
Both PC Cards allow you to send and receive data and fax calls
using your phone and a computer with a PCMCIA Type II slot.
The CELLect™2 card also contains a landline modem for
connection to the conventional telephone network. This gives
you both wired and wireless connection options in a single PC
card.
Accessories
63
Page 66

English
Compatible Accessories
If you already have existing accessories for a MicroTAC phone,
the following accessories are recommended for use with this
phone:
Simple Micro Car Kit (no hands free)
Rapid Charger Base SLN9347
Transformer (UK) SPN4111
Transformer (Euro) SPN4112
*
S3060
*Requires a new connector cable (SKN4636).
Other MicroTAC accessories may work with your phone but with
some limitations. Please contact your Motorola representative for
details.
64
Accessories
Page 67

English
What to do if...
You can’t switch your phone on Check the battery. Is it charged, properly fitted and are the contacts clean and dry? See ‘Important Battery
Information’.
You can’t make calls Check the antenna. Is it fully extended?
Check the signal strength meter in the display. If the signal is weak, move to an open space or, if you are in
a building, move closer to a window.
Check the Network Selection settings. Try Manual Selection, or try another network. See ‘Network Search’.
Check your Operator coverage map.
Is Restricted displayed? Check the Call Barring and Fixed Dialling settings.
Has the call charge limit been reached? Use your PIN2 code to reset the limit or contact your Service
Provider. See ‘Set Total Charge Limit’.
Has a new SIM card been inserted? Check that no new restrictions have been imposed.
You can’t receive calls Check the antenna. Is it fully extended?
Check the signal strength meter in the display. If the signal is weak, move to an open space or, if you are in
a building, move closer to a window.
Check the Call Diversion and Call Barring settings.
Check the Ringer and VibraCall settings. If both are off, there is no audible alert. See ‘Ring or Vibrate’.
Your phone won’t unlock Have you inserted a new SIM card? Enter the new PIN code. See ‘Entering Your SIM Card PIN Code’.
Do you have a replacement phone? Enter the default phone unlock code - 1234.
Have you forgotten the unlock code? Press M to change the unlock code (you will need your security
code).
Your PIN is blocked Enter the PIN unblocking code supplied with your SIM card (see ‘Unblocking Your Phone’).
Your PIN2 is blocked Enter the PIN2 unblocking code supplied with your SIM card (see ‘Change SIM PIN2 Code’).
Your SIM card won’t work Is the card inserted the right way round? See ‘SIM Card Insertion’.
Is the gold chip visibly damaged or scratched? Return the card to your Service Provider.
Check the SIM and phone contacts. If they are dirty, clean them with an antistatic cloth.
What to do if...
65
Page 68

English
The battery won’t charge Check the charger. Is it properly connected? Are its contacts clean and dry? See ‘Your Battery’.
Check the battery contacts. Are they clean and dry?
Check the battery temperature. If it is warm, let it cool before recharging.
Is it an old battery? Battery performance will decline after several years use. Replace the battery.
The battery drains faster than
normal
You can’t cancel Call Diverting
or Call Barring
o symbol is flashing
The
I can’t make international calls Some Service Providers automatically bar the ability to make international calls. Contact your Service
Are you in an area of variable coverage? This uses extra battery power.
Is your antenna fully extended? This helps use less battery power.
Is it a new battery? A new battery will need two to three charge/discharge cycles to attain normal
performance. See ‘Charging a New Battery’
Is it an old battery? Battery performance will decline after several years use. Replace the battery.
Is it a battery that hasn’t been completely discharged? Allow the battery to fully discharge (until the phone
turns itself off) and then charge the battery overnight.
Check that the Frequency Of Search feature in the Network Selection menu has not been set to Fast or
Continuous. See ‘Network Search’.
Check that the Battery Saving Mode feature has not been set to Off.
Are you using your phone in extreme temperatures? At extreme hot or cold temperatures, battery
performance is significantly reduced.
Wait until you are in an area with good network coverage and try again.
There is not enough memory available to store another SMS message. Use the Messages menu to delete
one or more existing messages.
Provider.
Have you included the relevant codes? Press and hold the 0 key to display the international dialling
prefix (+) and then enter the appropriate country code followed by the phone number. The table over page
lists some of the more commonly used country codes.
What to do if...
66
Page 69

English
International Country Codes
The following table summarises some of the more commonly
used international dial codes. Remember to press and hold 0
before you enter the code so that the international dialling prefix
+ is displayed.
Country Country Code
Argentina 54
Australia 61
Austria 43
Bahrain 973
Belgium 32
Brazil 55
Canada 1
China 86
Denmark 45
Egypt 20
Finland 358
France 33
Germany 49
Gibraltar 350
Greece 30
Hong Kong 852
Hungary 36
India 91
Italy 39
Japan 81
Kuwait 965
Luxembourg 352
Country Country Code
Malta 356
Mexico 52
Monaco 33
Morocco 212
Netherlands 31
New Zealand 64
Norway 47
Pakistan 92
Poland 48
Portugal 351
Russia 7
Saudi Arabia 966
Singapore 65
South Africa 27
Spain 34
Sweden 46
Switzerland 41
Turkey 90
UAE 971
USA 1
UK 44
What to do if...
67
Page 70

English
What to do if...
68
Page 71

English
Index
A
Accessories ..........................................63
Accessory setup menu
Add entry
To phone memory
To SIM card memory
Adjust ring volume
Automatic answer
Automatic handsfree
Automatic lock
Automatic redial
Auxiliary alert
Available networks
.......................................59
..........................58
....................31, 61
.................31, 62
...............................47
................................58
............................59
.....................................48
..................................18
...............................52
B
Bar incoming calls ................................42
Bar outgoing calls
Batteries
Charging
Charging while travelling
Desktop charging
Fitting
..............................................15
Low battery warning
Maintaining
Removing
Battery charge indicator
Battery meter
Battery saving mode
Blocked message
Buttons
mute
.................................................9
SIM card release
volume
................................41
.........................................11
.................14
............................12
.......................10
.....................................11
........................................15
.......................10
................................ 36, 62
.............................50
...........................17, 49
................................9
..............................................9
C
Call barring ..........................................41
Call charge settings
Call diverting
Call holding
Call metering
Call meters menu
Call related features menu
Call timers
Call voicemail
Call waiting
Calling a number
Calling an embedded number
Cancel all diverting
Capacity
Cell broadcast
Change bar password
Change greeting
Change SIM PIN2 code
Change unlock code
Characters
Charge meters
Charger indicators
Check capacity (of the Phone Book)
...........................................56
Checking battery capacity
Checking Phone Book capacity
Messages
...........................................28
Resetting
..............................57
................................37, 62
.........................................40
.......................................55
.................................55
...................36
................................ 44, 62
.........................................40
.................................18
..............45
.......................39, 62
................36
........32
......................................46
........................................44
..........................42
..................................50
........................49
............................48
.........................................57
...............................13
.....32
Index
69
Page 72

English
D
Data calls
Accessories
Diverting
Delete
Last ten calls
Message
Phone book entries
Desktop charging of your battery
Detailed diverting
Dialling phone book numbers
Display
Display characters
Displaying your own phone number
Divert
All calls
Cancelling
Data calls
Fax calls
Voice calls
When unavailable
DTX
..................................................... 50
..................................... 63
......................................... 39
................................... 32
...................................45, 46
......................... 31
........ 12
................................ 38
.............. 19
................................................ 10
................................ 28
.... 33
........................................... 38
...................................... 39
........................................ 39
.......................................... 39
....................................... 38
........................... 38
E
Editing messages ................................. 44
Emergency calls
Ending a phone call
Entering characters
Erase name and number
Extended menus
................................... 20
............................. 21
.............................. 28
...................... 31
............................25, 50
F
Fault finding .........................................65
Fax calls
Accessories
Diverting
Find entry by location
Find entry by name
Find new network
Fitting your battery
Fixed dialling
Calling numbers
Setting
Flip
.........................................................9
......................................63
..........................................39
....................30, 61
........................30, 61
................................54
...............................15
........................................33
..............................33
.............................................34
I
In use symbol .......................................10
International country codes
International phone calls
..................67
......................19
K
Keypad tones
Selecting
..........................................50
L
Language selection ...............................50
Last ten calls
Lifetime timer
Lock now
Low battery warning
.........................................32
.......................................57
.............................................48
............................10
M
Making a phone call .............................18
Master clear
Master reset
Menu navigation
Menus
Accessory setup menu
Call meters menu
Call related features menu
Extended menu
Messages menu
Network selection menu
Options menu
Personalised menus
Phone book menu
Phone setup menu
Quick Access menu
Short menu
Message editor
Message settings
Messages
Call holding/call waiting messages
Calling an embedded number
Cell broadcast messages
Creating and editing
Reading SMS messages
Sending SMS messages
Messages menu
Mute button
Mute car radio
My phone number(s)
.........................................51
.........................................51
..................................23
.....................58
............................55
...............36
...............................25
...............................43
..................52
.................................35
.........................25
...........................27
..........................47
..........................61
.....................................25
....................................46
..................................46
.............................................43
...41
..........45
..................44
........................44
...................44
...................45
...................................43
..........................................9
.....................................58
............................33
70
Index
Page 73

English
N
Names
Entering
Network search
Network selection menu
Networks
Automatic search
Finding new networks
Manual search
New security code
..........................................28
....................................53
......................52
.............................53
.....................54
.................................53
................................50
O
One-touch dial setting ..........................34
One-touch dialling
Options menu
Outgoing messages
...............................19
......................................35
..............................45
P
Pauses
Inserting into phone numbers
Personal numbers
Personalised menu
Phone book
Call number
Capacity
Deleting/erasing entries
Dialling phone book numbers
Modify name or number
Preventing access to
Storing numbers - see Add Entry
Phone book menu
Phone calls
Automatic redial
Dialling phone book numbers
Emergency calls
Ending
.............................................21
International
Making
One-touch dialling
Receiving
Phone setup menu
Phone status
PIN code
Entering
Setting and changing
PIN2 code
Postscripting
Preferred networks
Prevent access (to Phone Book)
.................................30
...............................25
....................................31
..........................................27
...................31
..................31
........................32
................................27
..............................18
...............................20
....................................19
............................................18
...........................19
.........................................21
...............................47
........................................51
..........................................17
......................48
............................................49
........................................27
...............................54
..........19
..........19
.....31
..........19
............32
Q
Quick access menu ..............................61
R
Reading SMS messages ........................44
Received messages
Receiving a phone call
Redialling the last number called
Removing your battery
Require SIM card PIN
Restrict my phone number
Return call
Ring or vibrate
Ring tones
...........................................45
...........................................48
...............................45
..........................21
..........19
.........................15
............................48
...................37
.....................................47
Index
71
Page 74

English
S
Safety timer ......................................... 59
Security code
Changing
Select keypad tones
Sending SMS messages
Service centre
Set audible call timers
Set in-call display
Set ringer tone
Setup fixed dialling
Short menu
Short message service symbol
Short Message Services (SMS)
Show battery meter
Show call charges
Show call timers
Signal strength symbol
SIM card
Insertion
PIN code
PIN2 code
Release button
Removal
SMS messages
Special keys
Status review
Symbols
....................................... 50
............................. 50
....................... 45
...................................... 46
.......................... 56
................................. 56
.................................... 48
.............................. 34
......................................... 25
.............. 10
.............. 43
.......................36, 62
................................ 55
.................................. 56
........................ 10
......................................... 16
...................................17, 48
....................................... 49
.................................. 9
......................................... 16
..................................... 43
........................................... 9
....................................... 51
.............................................. 10
T
Talk and fax .........................................39
Timers
..................................................56
Tones
Selecting keypad tones
Setting ringer tones
Transmission rate
Travel charger
Troubleshooting
.................................39
......................................14
...................................65
....................50
.........................48
U
Unblocking your phone ........................49
Unconditional call diversion
Unlock code
Entering
Setting and changing
...........................................17
...........38, 62
.......................48
V
VibraCall .......................................47, 62
Voicemail
Calling
.............................................44
Number
Volume
Adjusting the earpiece
Adjusting the ringer volume
Buttons
...........................................46
and keypad volume
.........................9
..............................................9
.............47
W
What to do if... ....................................65
72
Index
 Loading...