

Page 1

Introduction 1
1Introduction
Welcome to the w or ld of Mo torola digital wireless
communications! We are pleased that you have
chosen the Vodafone 702MO 3G mobile phone.
This model was designed using Vodafone Group's
global standard specification based on the standards
set by 3GPP (3rd Generation Partnership Project).
Therefore, some operating procedures and functions
may differ from those of previous Vodafone models.
• MOTOROLA and the Stylised M Logo are
registered in the US Patent & Trademark Office.
• Java and all other Java-based marks are
trademarks or registered trademarks of Sun
Microsystems, Inc. in the U.S. and other countries.
• V-appli and Chaku-video are trademarks of
Vodafone K.K.
• Chaku-uta
®
is a trademark of Sony Music
Entertainment (Japan) Inc.
All other product or service names are the property of
their respective owners.
© Motorola, Inc., 2004.
Software Copyright Notice
The Motorola products described in this manual may
include copyrighted Motorola and third-party software
stored in semiconductor memories or other media.
Laws in the United States and other countries preserve
for Motorola and third-party software providers certain
exclusive rights for copyrighted software, such as the
exclusive rights to distribute or reproduce the
copyrighted software. Accordingly, any copyrighted
software contained in the Motorola products may not be
modified, reverse-engineered, distributed, or
reproduced in any manner to the extent allowed by law.
Furthermore, the purchase of the Motorola products
shall not be deemed to grant either directly or by
implication, estoppel, or otherwise, any licence under
the copyrights, patents, or patent applications of
Motorola or any third-party software provider, except for
the normal, non-exclusive, royalty-free licence to use
that arises by operation of law in the sale of a product.
While Products specifications and features may be
subject to change without notice, we are making
every possible effort to ensure that user manuals are
updated on a regular basis to reflect product
functionality revisions. However, in the unlikely event
that your manual version does not fully reflect the
core functionality of your product, please let us know.
Introduction 1
Page 2

2 Contents
2Contents
Introduction. . . . . . . . . . . . . . . . . . . . . . . . . . . . . . 1
Safety and General Information . . . . . . . . . . . . . 7
Safety Precautions . . . . . . . . . . . . . . . . . . . . . . . 7
General Notes. . . . . . . . . . . . . . . . . . . . . . . . . . 19
Basic Operations
Basics . . . . . . . . . . . . . . . . . . . . . . . . . . . . . . . . . 21
About This Manual . . . . . . . . . . . . . . . . . . . . . . 21
Symbols Used In This Manual . . . . . . . . . . . . . 21
Installing the USIM Card. . . . . . . . . . . . . . . . . . 22
Memory Card . . . . . . . . . . . . . . . . . . . . . . . . . . 23
Battery Tips . . . . . . . . . . . . . . . . . . . . . . . . . . . 23
Installing the Battery. . . . . . . . . . . . . . . . . . . . . 24
Charging the Battery . . . . . . . . . . . . . . . . . . . . 25
Handset Parts and Functions . . . . . . . . . . . . . . 26
Navigation Guide . . . . . . . . . . . . . . . . . . . . . . . 31
Turning Your Phone On. . . . . . . . . . . . . . . . . . . 34
Setting the Display Language. . . . . . . . . . . . . . 34
Adjusting Volume . . . . . . . . . . . . . . . . . . . . . . . 34
Making a Call . . . . . . . . . . . . . . . . . . . . . . . . . . 35
Answering a Call. . . . . . . . . . . . . . . . . . . . . . . . 35
2Contents
Changing the Call Alert . . . . . . . . . . . . . . . . . . . 36
Viewing Your Phone Number . . . . . . . . . . . . . . 36
Entering Text . . . . . . . . . . . . . . . . . . . . . . . . . . . . 37
Setting the Initial Text Entry Mode . . . . . . . . . . 37
Assignment of Keypad Keys. . . . . . . . . . . . . . . 37
Entering Characters . . . . . . . . . . . . . . . . . . . . . 41
Predictive Conversion. . . . . . . . . . . . . . . . . . . . 45
Editing Text . . . . . . . . . . . . . . . . . . . . . . . . . . . . 47
Phone Book . . . . . . . . . . . . . . . . . . . . . . . . . . . . . 50
Storing Phone Book Entries . . . . . . . . . . . . . . . 50
Options when Storing Phone Book Entries . . . 56
Using Phone Book Category Views . . . . . . . . . 61
Using the Phone Book . . . . . . . . . . . . . . . . . . . 64
Camera . . . . . . . . . . . . . . . . . . . . . . . . . . . . . . . . 70
Taking and Sending a Photo . . . . . . . . . . . . . . . 70
Using Photos and Pictures . . . . . . . . . . . . . . . . 72
Recording Video Clips . . . . . . . . . . . . . . . . . . . 74
Using Video Clips . . . . . . . . . . . . . . . . . . . . . . . 76
Making Video Calls . . . . . . . . . . . . . . . . . . . . . . 77
Learning to Use Your Phone . . . . . . . . . . . . . . . 80
Using the Display . . . . . . . . . . . . . . . . . . . . . . . 80
Using Menus. . . . . . . . . . . . . . . . . . . . . . . . . . . 81
Page 3

Contents 2
Using the External Display . . . . . . . . . . . . . . . . 82
Using the Handsfree Speaker. . . . . . . . . . . . . . 82
Changing a Code, PIN, or Password . . . . . . . . 83
Locking and Unlocking Your Phone . . . . . . . . . 83
Setting Up Your Phone . . . . . . . . . . . . . . . . . . . . 85
Setting the Time and Date . . . . . . . . . . . . . . . . 85
Setting a Ring Style . . . . . . . . . . . . . . . . . . . . . 85
Setting Answer Options . . . . . . . . . . . . . . . . . . 85
Setting a Wallpaper Image . . . . . . . . . . . . . . . . 86
Setting a Screen Saver Image . . . . . . . . . . . . . 86
Setting Display Brightness . . . . . . . . . . . . . . . . 87
Adjusting the Backlight. . . . . . . . . . . . . . . . . . . 87
Setting Display Timeout . . . . . . . . . . . . . . . . . . 87
Personalising Your Phone . . . . . . . . . . . . . . . . . 88
Personalising a Ring Style . . . . . . . . . . . . . . . . 88
Activating Ringer IDs . . . . . . . . . . . . . . . . . . . . 88
Setting Ringer or Keypad Volume . . . . . . . . . . 89
Setting Reminders . . . . . . . . . . . . . . . . . . . . . . 89
Setting a Personal Greeting . . . . . . . . . . . . . . . 89
Personalising Home Screen Icons . . . . . . . . . . 89
Setting the Menu View . . . . . . . . . . . . . . . . . . . 90
Personalising the Menu . . . . . . . . . . . . . . . . . . 90
Setting Menu Scroll Behaviour . . . . . . . . . . . . . 91
Resetting All Options . . . . . . . . . . . . . . . . . . . . 91
Clearing All Stored Information. . . . . . . . . . . . . 91
Creating and Using Shortcuts . . . . . . . . . . . . . 92
Calling Features . . . . . . . . . . . . . . . . . . . . . . . . . 94
Redialling a Number . . . . . . . . . . . . . . . . . . . . . 94
Using Caller ID . . . . . . . . . . . . . . . . . . . . . . . . . 94
Turning Off a Call Alert . . . . . . . . . . . . . . . . . . . 94
Dialling International Numbers . . . . . . . . . . . . . 95
Viewing Recent Calls . . . . . . . . . . . . . . . . . . . . 95
Returning an Unanswered Call . . . . . . . . . . . . . 97
Using the Notepad . . . . . . . . . . . . . . . . . . . . . . 97
Attaching a Number . . . . . . . . . . . . . . . . . . . . . 97
Calling with Speed Dial. . . . . . . . . . . . . . . . . . . 98
Calling with 1-Touch Dial . . . . . . . . . . . . . . . . . 98
Using Voicemail . . . . . . . . . . . . . . . . . . . . . . . . 98
Using Call Waiting. . . . . . . . . . . . . . . . . . . . . . 100
Putting a Call On Hold . . . . . . . . . . . . . . . . . . 100
Transferring a Call (Not Available in Japan) . . 100
Getting More Out of Your Phone . . . . . . . . . . . 102
Camera . . . . . . . . . . . . . . . . . . . . . . . . . . . . . . 102
Calendar . . . . . . . . . . . . . . . . . . . . . . . . . . . . . 103
Contents 3
Page 4

2 Contents
Alarm Clock . . . . . . . . . . . . . . . . . . . . . . . . . . 107
Calculator . . . . . . . . . . . . . . . . . . . . . . . . . . . . 109
Making a Conference Call . . . . . . . . . . . . . . . 110
Diverting Calls. . . . . . . . . . . . . . . . . . . . . . . . . 111
Barring Calls . . . . . . . . . . . . . . . . . . . . . . . . . . 112
Using DTMF Tones . . . . . . . . . . . . . . . . . . . . . 113
Monitoring Phone Use . . . . . . . . . . . . . . . . . . 114
Using Handsfree Features . . . . . . . . . . . . . . . 115
Using Applications During a Call . . . . . . . . . . 116
Making Data Calls . . . . . . . . . . . . . . . . . . . . . 117
Sending Files from Your Phone . . . . . . . . . . . 118
Adjusting Network Settings . . . . . . . . . . . . . . 118
Monitoring Battery Charge . . . . . . . . . . . . . . . 120
Viewing Phone Specifications . . . . . . . . . . . . 120
Connecting Your Phone to Another Device . . 120
USIM Applications . . . . . . . . . . . . . . . . . . . . . 121
Security . . . . . . . . . . . . . . . . . . . . . . . . . . . . . . . 122
Locking the USIM Card . . . . . . . . . . . . . . . . . 122
Locking and Unlocking Applications . . . . . . . 124
Security Code. . . . . . . . . . . . . . . . . . . . . . . . . 124
Centre Access Code. . . . . . . . . . . . . . . . . . . . 125
Private Entries Code. . . . . . . . . . . . . . . . . . . . 125
4Contents
Call Barring Password . . . . . . . . . . . . . . . . . . 126
Vodafone live!
Vodafone live! . . . . . . . . . . . . . . . . . . . . . . . . . . 128
Messaging . . . . . . . . . . . . . . . . . . . . . . . . . . . 129
Web. . . . . . . . . . . . . . . . . . . . . . . . . . . . . . . . . 130
V-appli. . . . . . . . . . . . . . . . . . . . . . . . . . . . . . . 130
Changing Handset Address . . . . . . . . . . . . . . 130
Checking Amount of Memory Used . . . . . . . . 131
Locking/Unlocking Vodafone live! . . . . . . . . . 132
Messaging . . . . . . . . . . . . . . . . . . . . . . . . . . . . . 133
Checking for New Messages . . . . . . . . . . . . . 133
Retrieving MMS Messages from the Centre. . 134
Using Received Messages . . . . . . . . . . . . . . . 135
Sending a Message . . . . . . . . . . . . . . . . . . . . 136
Attaching Image/Sound Files (MMS Only) . . . 144
Setting Outgoing Message Options
(MMS Only) . . . . . . . . . . . . . . . . . . . . . . . . . . . 147
Saving a Message in the Draft Folder. . . . . . . 150
Message Centre . . . . . . . . . . . . . . . . . . . . . . . 150
Checking Message Contents . . . . . . . . . . . . . 151
Page 5

Contents 2
Reordering the Message Centre Menu View
(Messaging Top Menu) . . . . . . . . . . . . . . . . . . 152
Replying to a Message . . . . . . . . . . . . . . . . . . 153
Forwarding a Message . . . . . . . . . . . . . . . . . . 153
Delivery Report . . . . . . . . . . . . . . . . . . . . . . . . 154
Sending a Message from the Draft Folder . . . 154
Locking a Message . . . . . . . . . . . . . . . . . . . . 155
Deleting a Message . . . . . . . . . . . . . . . . . . . . 156
Phone Numbers/E-mail Addresses
in a Message . . . . . . . . . . . . . . . . . . . . . . . . . 158
Using Attachments . . . . . . . . . . . . . . . . . . . . . 159
Received Messages List Operations . . . . . . . 160
MMS Settings. . . . . . . . . . . . . . . . . . . . . . . . . 161
SMS Settings . . . . . . . . . . . . . . . . . . . . . . . . . 161
Storing Quick Notes . . . . . . . . . . . . . . . . . . . . 163
Resetting Messaging . . . . . . . . . . . . . . . . . . . 163
Web . . . . . . . . . . . . . . . . . . . . . . . . . . . . . . . . . . 164
Accessing Mobile Internet Sites. . . . . . . . . . . 165
Mobile Internet Site Operations . . . . . . . . . . . 167
Using Pictures . . . . . . . . . . . . . . . . . . . . . . . . 169
Using Video Clips . . . . . . . . . . . . . . . . . . . . . . 170
Using Sound Files. . . . . . . . . . . . . . . . . . . . . . 171
My Saved Page. . . . . . . . . . . . . . . . . . . . . . . . 172
Bookmarks . . . . . . . . . . . . . . . . . . . . . . . . . . . 173
History. . . . . . . . . . . . . . . . . . . . . . . . . . . . . . . 175
Refreshing/Reloading to Receive New Data. . 175
Restricting Image and Sound Downloads . . . 175
Resetting Web. . . . . . . . . . . . . . . . . . . . . . . . . 176
Functions While Using Web . . . . . . . . . . . . . . 177
Confirming the URL of a Mobile Internet Site. 177
V-appli . . . . . . . . . . . . . . . . . . . . . . . . . . . . . . . . 178
Using a Memory Card. . . . . . . . . . . . . . . . . . . 178
Downloading V-appli. . . . . . . . . . . . . . . . . . . . 178
Launching V-appli. . . . . . . . . . . . . . . . . . . . . . 179
Ending/Pausing/Deleting V-appli . . . . . . . . . . 179
V-appli Home Screen Settings . . . . . . . . . . . . 180
Setting Phone Actions for
When V-appli is Running. . . . . . . . . . . . . . . . . 180
Adjusting V-appli Volume . . . . . . . . . . . . . . . . 182
Setting the Display Backlight for V-appli . . . . 183
Resetting V-appli. . . . . . . . . . . . . . . . . . . . . . . 183
Viewing Java™ Version and
Available Memory . . . . . . . . . . . . . . . . . . . . . . 184
Troubleshooting . . . . . . . . . . . . . . . . . . . . . . . . 185
Contents 5
Page 6

2 Contents
Specific Absorption Rate (SAR). . . . . . . . . . . . 192
Pictographs . . . . . . . . . . . . . . . . . . . . . . . . . . . . 194
Specifications . . . . . . . . . . . . . . . . . . . . . . . . . . 196
Warranty and After-sales Services . . . . . . . . . 197
Customer Service . . . . . . . . . . . . . . . . . . . . . . . 198
Index . . . . . . . . . . . . . . . . . . . . . . . . . . . . . . . . . 199
6Contents
Page 7
Safety and General Information 3
3Safety and General Information
3.1 Safety Precautions
IMPORTANT INFORMATION ON SAFE AND
EFFICIENT OPERATION.
READ THIS INFORMATION BEFORE USING YOUR
HANDSET.
Keep this manual in a convenient location for future
reference.
Observe precautions to avoid injury to self or others
or damage to property.
Vodafone is not liable for any damages resulting from
use of this product.
To assure optimal phone performance and make sure
human exposure to RF energy is within the guidelines
set forth in the relevant standards, always adhere to
the following procedures.
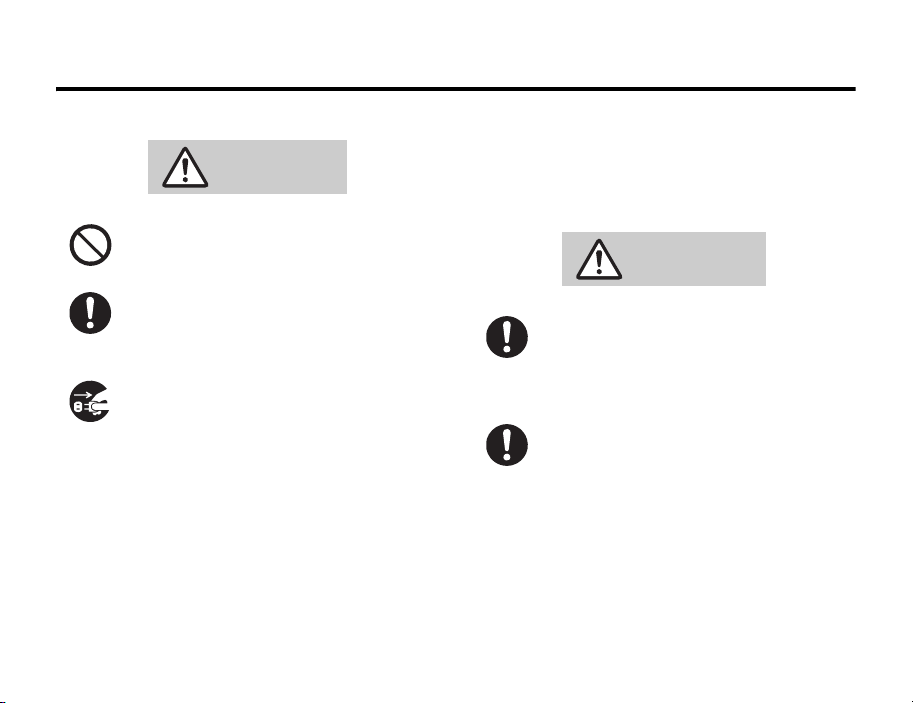
• The following symbols indicate the different
degrees of injury or damage that may occur if
information provided is not observed.
DANGER
WARNING
CAUTION
Great risk of death or serious
injury from improper use
Risk of death or serious injury
from improper use
Risk of injury or damage to
property from improper use
Safety and General Information 7
Page 8
3.1.1 Handset, Battery & Charger
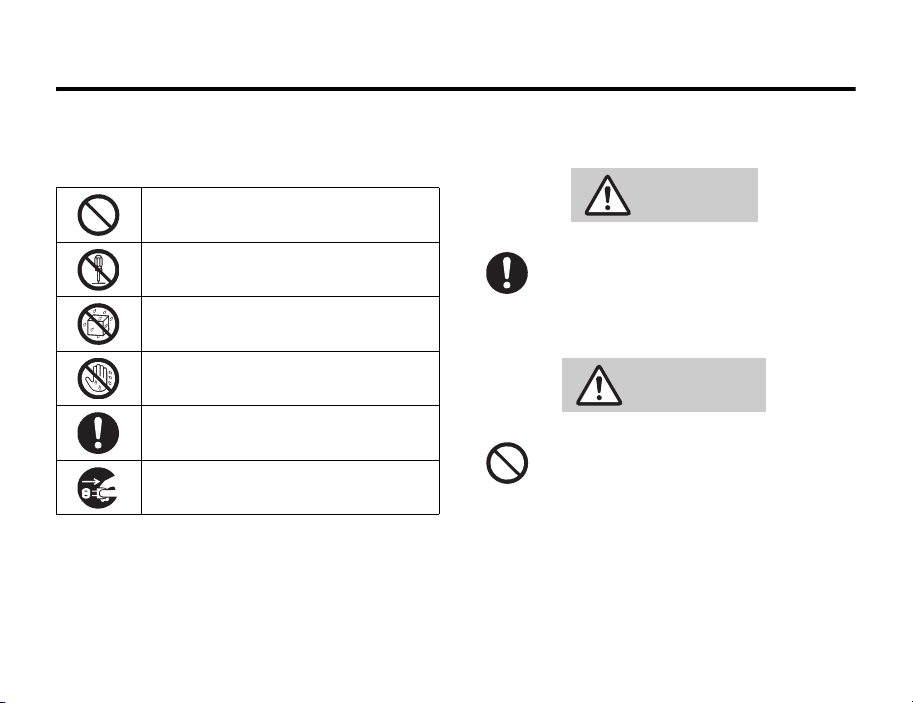
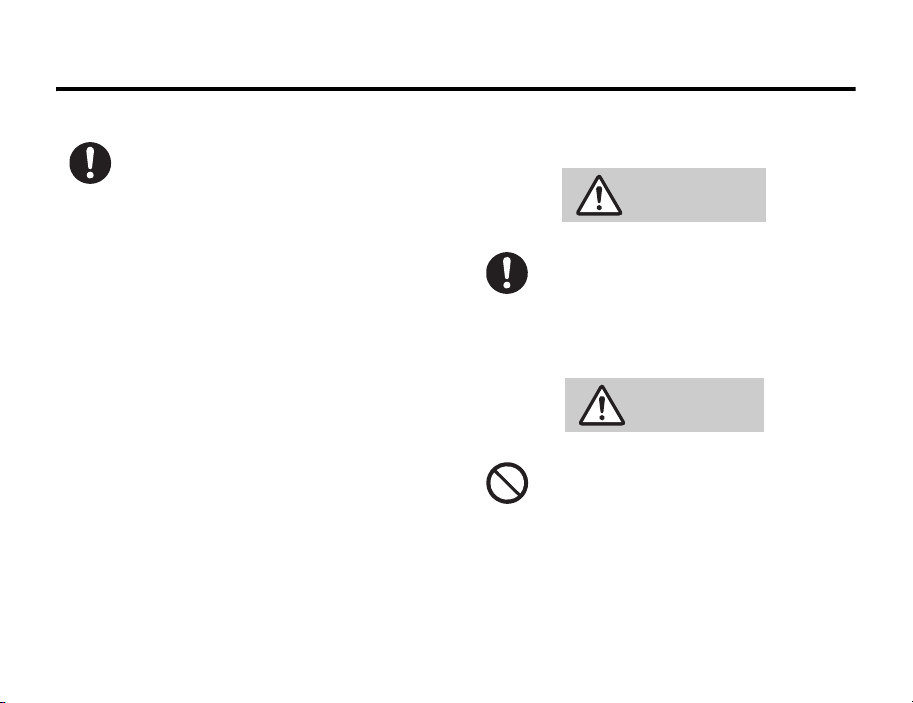
• The following icons are categorised to describe
terms that must be followed.
Indicates a prohibited action.
Indicates not to disassemble the device.
Indicates not to use the device near
water or get it wet.
Indicates not to handle the device with
wet hands.
Indicates that instructions specified are
compulsory (must be followed).
Indicates that the power cord must be
unplugged from the power outlet.
8 Safety and General Information
3.1.1 Handset, Battery & Charger
DANGER
• Use only the specified battery, charger or
holder.
The battery may leak, overheat, explode
or catch fire.
WARNING
• Do not throw or otherwise subject to
strong force or impacts.
The battery may leak, overheat, explode
or catch fire. Other devices may also be
damaged or catch fire.
Page 9
Handset, Battery & Charger 3.1.1
• Do not use the handset in locations such
as gas stations where there is a risk of
explosion or fire.
Use of the handset in dusty
environments or in locations where there
are propane, gasoline or other flammable
gases may cause an explosion or fire.
• Do not place the handset, battery, or
charger inside cooking appliances such
as microwave ovens or pressure
cookers.
The battery may leak, overheat, explode
or catch fire, and the handset or charger
may overheat, emit smoke or catch fire.
The internal circuitry may also be
damaged.
• Do not use or leave the handset in
locations subject to high temperatures,
such as in direct sunlight or inside a car
on a hot day.
The battery may leak, overheat, explode,
catch fire. Other devices may also be
damaged and cause malfunction. Part of
the casing may also become hot and
cause burns.
CAUTION
• Do not store the handset in humid, dusty
or hot locations.
May cause malfunction or injury.
• Do not leave the handset on unstable
surfaces, such as on a wobbling table or
sloped surface.
The handset may fall and cause injury or
be damaged.
Safety and General Information 9
Page 10
3.1.2 Handset
• If a child is using the handset, have a
guardian teach them the proper handling
procedures. In addition, check that the
child is using the handset as directed.
May result in bodily injury.
• Keep the handset out of the reach of
young children.
A young child may swallow or suffer
other bodily injury.
3.1.2 Handset
WARNING
• Do not disassemble or modify handset.
Fire, injury or electric shock may result.
10 Safety and General Information
• When instructed to do so, turn OFF the
handset when aboard aircraft.
Any use of a handset must be in
accordance with applicable regulations
per airline crew instructions.
• Turn OFF the handset prior to entering
any area with a potentially explosive
atmosphere. Do not remove, install or
charge batteries in such areas.
Sparks in a potentially explosive
atmosphere can cause an explosion or
fire resulting in bodily injury or even
death.
Note: The areas with potentially explosive
atmospheres referred to above include
fuelling areas such as below decks on
boats, fuel or chemical transfer or storage
facilities, areas where the air contains
chemicals or particles, such as grain, dust
or metal powders. Areas with potentially
explosive atmospheres are often but not
always posted.
Page 11
Handset 3.1.2
• To avoid possible interference with
blasting operations, turn OFF the
handset when you are near electrical
blasting caps, in a blasting area or in
areas posted “Turn off electronic
devices.”
Obey all signs and instructions.
• Turn OFF the handset around precision
instruments.
Instruments may malfunction.
Note: Example of such devices includes
hearing aids, implanted pacemakers and
defibrillators, other electronic medical
devices, smoke detectors, automated
doors and other automated devices.
Confirm with the manufacturer or retailer
before using the handset if using an
implanted pacemaker or defibrillator.
• Turn OFF the handset in any facility
where posted notices instruct you to do
so.
These facilities may include hospitals or
health care facilities that may be using
equipment that is sensitive to external
RF energy.
• Persons with pacemakers should NOT
carry the handset in the breast pocket.
The handset may interfere with the
operation of sensitive electronic
equipment.
• If you have a weak heart, take extra
precautions when setting functions such
as the vibrator and ring tone volume for
incoming calls.
Various settings may have effects on
your heart.
• Pull off the road and park before making
or answering a call if driving conditions
so require.
Safety and General Information 11
Page 12

3.1.2 Handset
• Do not place a handset in the area over
an air bag or in the air bag deployment
area.
Air bags inflate with great force. If a
handset is placed in the air bag
deployment area and the air bag inflates,
the handset may be propelled with great
force and cause serious injury to
occupants of the vehicle.
CAUTION
• The handset may sometimes affect car
mechanisms when used in a car.
For safe driving, check that steps to
protect the car from electromagnetic
waves have been implemented with the
automobile retailer before using.
12 Safety and General Information
• The materials used in this handset may
cause an allergic reaction in some
people.
If you have a reaction while using the
handset, immediately stop the use and
consult a doctor.
• Do not expose to water.
May cause overheating, electric shock,
malfunctions or bodily injury. Be attentive
to where and how you use your handset.
• If you hear thunder while using the
handset outdoors, immediately turn it
OFF and move to a safe location.
There is a risk of being struck by
lightning and suffering electric shock.
• Keep the handset away from credit
cards, phone cards and floppy disks to
avoid data loss.
• Do not subject display to shocks.
The display is made of glass and may
cause injury if broken.
Page 13
Handset 3.1.2
• Do not use the handset if the antenna is
damaged.
The broken antenna may cause burns or
other injuries if in contact with skin.
• Do not swing the handset by the antenna
or strap.
May result in injury or breakage.
• Do not use in crowded areas.
The antenna may strike others and
cause injury.
• Turn handset power OFF in crowded
areas.
• Do not attach metal objects such as
speaker pins.
May result in injury.
• Do not use the flash except as a simple
light or when taking photos.
May result in injury or vision impairment.
• While charging, do not cover with paper,
cloth, or blankets, or allow your skin to
come into contact for a long period of
time.
May result in burns or malfunction.
• Do not turn up the volume too high when
using the stereo earphone microphone
(optional).
Loud volume may result in hearing
impairment. Additionally, loud volume
causes surrounding sounds to be
inaudible and may result in an accident.
• Be sure to not close the handset on your
fingers or objects. Additionally, be sure
to not get your fingers caught in the
hinge when opening the handset.
May result in injury or damage to the
display.
Safety and General Information 13
Page 14

3.1.3 Battery
3.1.3 Battery
DANGER
• Do not disassemble or modify the
battery. In addition, do not solder directly
to the handset.
The battery may leak, overheat, explode
or catch fire.
• Do not use or store near fire, heat source
or in extreme heat.
The battery may leak, overheat, explode
or catch fire.
• Do not expose to fire.
The battery may leak, overheat, explode
or catch fire.
• Do not connect wires and other metal
objects to connector terminals.
Keep away from metal necklaces and
other objects when carrying or storing.
14 Safety and General Information
• Do not nail, hammer or step on the
battery.
The battery may leak, overheat, explode
or catch fire.
• Keep the battery out of rain or extreme
humidity.
Fire, electric shock or malfunction may
occur. Be aware of surroundings when
using.
• Do not force the battery when
connecting to the charger.
The battery may leak, overheat, explode
or catch fire.
• If battery fluid gets into eyes, do not rub
them. Rinse with clean water and
consult a doctor immediately.
Eyes may be severely damaged.
Page 15
Charger 3.1.4
WARNING
• If battery does not charge properly, stop
charging.
The battery may leak, overheat, explode
or catch fire.
• If there is abnormal odour, excessive
heat, discoloration or distortion, remove
battery from handset.
The battery may leak, overheat, explode
or catch fire.
• If there is leakage or abnormal odour,
avoid fire sources.
May catch fire/burst.
• If battery fluid gets on skin or clothes,
rinse with clean water immediately.
Failure to do so may result in rashes.
• Keep handset away from direct sunlight
(inside cars, etc.) or heat sources.
The battery may leak, overheat, explode
or catch fire.
3.1.4 Charger
CAUTION
• Do not charge a wet battery.
The battery may leak, overheat, explode
or catch fire.
WARNING
• Do not use a damaged charger or In-Car
Charger cord.
Continued use may result in fire,
overheat or electric shock.
Safety and General Information 15
Page 16
3.1.4 Charger
• Do not short-circuit the charger terminal
when the adapter or charger is
connected to a power outlet. Also, do
not allow any part of your body to come
into contact with the charger terminal.
May result in a fire, electric shock,
equipment malfunction or bodily injury.
• Keep the charger dry.
Charger may heat or cause electric
shock if exposed to water or other fluids.
Be aware of surroundings when using.
• Do not disassemble or modify handset.
Fire, electric shock or malfunction may
occur.
• Keep the handset out of rain or extreme
humidity.
Electric shock may occur.
• Avoid wires and other metal objects and
secure the plug when inserting the
power cord into an outlet.
Electric shock may occur.
16 Safety and General Information
• Do not touch plug with wet hands.
Electric shock may occur.
• Be sure to unplug charger or In-Car
Charger before a long period of disuse.
Fire, electric shock or malfunction may
occur.
• Use only the specified voltage.
Non-specified voltage may cause fire or
electric shock.
Rapid Charger: 100 V to 240 V AC
• Keep the charger clean.
Excessive dust may prevent heat release
and cause burnout or fire.
• If water or foreign matter should get
inside handset, unplug the charger.
May result in a fire or electric shock, or
emit smoke.
Page 17
Handset Use & Electronic Medical Equipment 3.1.5
of the Effects of Radio Waves on Medical Equipment,
CAUTION
• Do not place heavy objects on the
charger cord.
Fire or electric shock may occur.
• Grasp plug (not cord) to unplug Rapid
Charger.
Pulling on the cord may damage the
cord and cause an electric shock or fire.
• When cleaning the handset, unplug the
charger/In-Car Charger.
Electric shock may occur.
3.1.5 Handset Use & Electronic Medical
Equipment
This section is based on “Guidelines on the Use of
Radio Communications Equipment such as Cellular
Telephones and Safeguards for Electronic Medical
Equipment” (Electromagnetic Compatibility
Conference April, 1997) and “Report of Investigation
etc.” (Association of Radio Industries and
Businesses, March 2001).
WARNING
•Persons with implanted pacemakers or
defibrillators should keep handset more
than 22 cm away.
Implanted pacemakers or defibrillators
may malfunction due to radio waves.
• Turn handset power OFF in crowded
places such as trains. People with
implanted pacemakers or defibrillators
may be near.
Implanted pacemakers or defibrillators
may malfunction due to radio waves.
Safety and General Information 17
Page 18
3.1.6 Memory Card
• Observe these rules when visiting
medical institutions:
• Do not take handset into operating
rooms, Intensive or Coronary Care
Units.
• Keep handset OFF in hospitals.
• Keep handset OFF in hospital lobbies.
Electronic equipment may be near.
• Obey rules regarding mobile phone
use in medical institutions.
• If function to automatically turn power
on is set, cancel settings before
turning power OFF.
• Consult manufacturer for radio wave
effects on electronic equipment if
devices other than implanted
pacemakers and defibrillators are
used outside of medical institutions.
18 Safety and General Information
3.1.6 Memory Card
WARNING
• Keep Memory Card out of the reach of
children.
It may be accidentally swallowed. If
swallowed, consult a doctor
immediately.
CAUTION
• Do not insert objects other than Memory
Card into the memory card slot.
Fire, electric shock or malfunction may
occur.
Page 19

General Notes 3.2
• When saving or loading memory card
data, do not turn off your phone, shake
or subject to shock, or remove the
memory card.
May result in data loss or malfunction.
• Use only the specified Memory Card.
May result in data loss or malfunction.
For details on specified equipment,
contact the Vodafone Customer Centre
(see page 198) or your nearest Vodafone
dealer.
3.2 General Notes
3.2.1 General Use
• Handset transmissions may be disrupted inside
buildings, tunnels or underground or when moving
into/out of such places.
• Use handset without disturbing others.
• Handsets are radios as stipulated by the Radio
Law. Under the Radio Law, handsets must be
submitted for inspection upon request.
• Handset use near landlines, TVs or radios may
cause interference.
• Vodafone is not liable for any damages resulting
from accidental loss/alteration of data. Please keep
separate records of Phone Book data, etc.
• Japan Mode (3G mode) is only available in Japan.
3.2.2 In Automobiles
• Do not use the handset while driving. Doing so is
dangerous.
• Do not park illegally to use handset.
• Handset use may affect an automobile’s electronic
equipment.
3.2.3 Aboard Aircraft
• Never use handset aboard aircraft. (Keep power
OFF.)
Safety and General Information 19
Page 20

3.2.4 Handset Care
3.2.4 Handset Care
• If handset is left with no battery or an exhausted
one, data may be altered/lost. Vodafone is not
liable for any resulting damages.
• Avoid extreme temperatures/direct sunlight.
• Do not drop or subject the handset to shocks.
• Clean handset with dry, soft cloth.
Using alcohol, thinner, etc. may damage it.
• Handset is not waterproof. Keep it away from fluids
and high humidity.
• Never disassemble or modify handset.
• Avoid scratching handset displays.
• Make sure the handset power is turned OFF when
inserting/removing Memory Card.
• Do not attach other labels or stickers. Damage to
Memory Card slot or card contents may result.
• Use an oil-based felt-tip pen to write on Memory
Card. Do not use a pencil or ballpoint pen. Damage
to Memory Card or contents may result.
20 Safety and General Information
• Do not touch the terminals with your hands or
metal objects.
• Memory Cards have limited product life span. After
long usage, data may not be savable.
3.2.5 Copyrights
Copyright laws protect sounds, images, computer
programs, databases, other materials and copyright
holders. Duplicated material is limited to private use
only. Use of materials beyond this limit or without
permission of copyright holders may constitute
copyright infringement, and be subject to criminal
punishment. Comply with copyright laws when using
images captured with handset camera. In addition,
materials recorded using this product are also subject
to the above defined restrictions.
Page 21
Basics 4
4Basics
4.1 About This Manual
This manual describes the basic features and
Vodafone live! services of your Motorola mobile
phone.
• In this manual, “abroad” stands for “out of
Japan”.
4.2 Symbols Used In This Manual
4.2.1 Menu Key
Press the Menu Key to open the menu when
appears at the bottom centre of the screen.
For example, “press M” means “press the menu key
to open the menu” in this manual.
4.2.2 5-way Navigation Key & Select Key
Use the 5-way Navigation Key (g) to select menu
items, move cursor and scroll, etc.
Press the Select Key (h) to make selection.
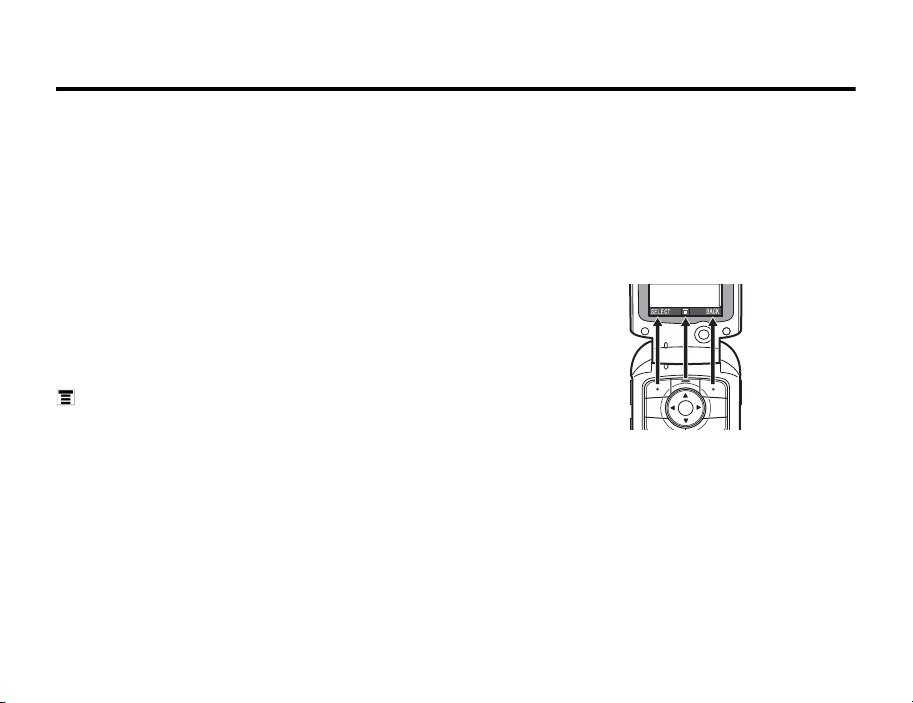
4.2.3 Soft Key
Press the Soft Keys to operate functions that appear
on the bottom right and left of the screen.
For example, “press SELECT” or “press the BACK key”
means “press the corresponding key shown in the
figure below” in this manual.
Basics 21
Page 22
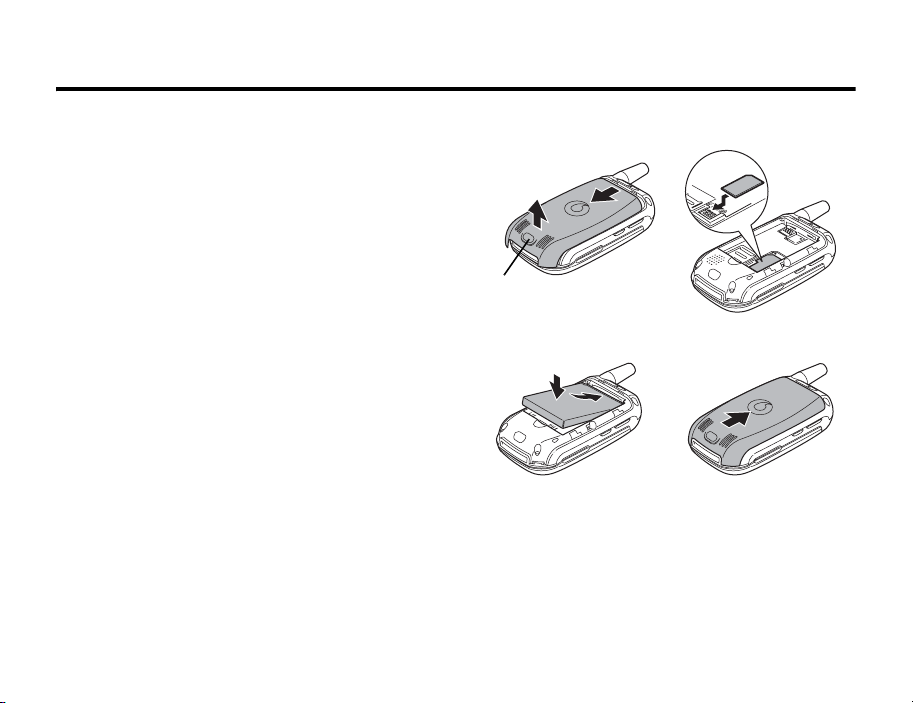
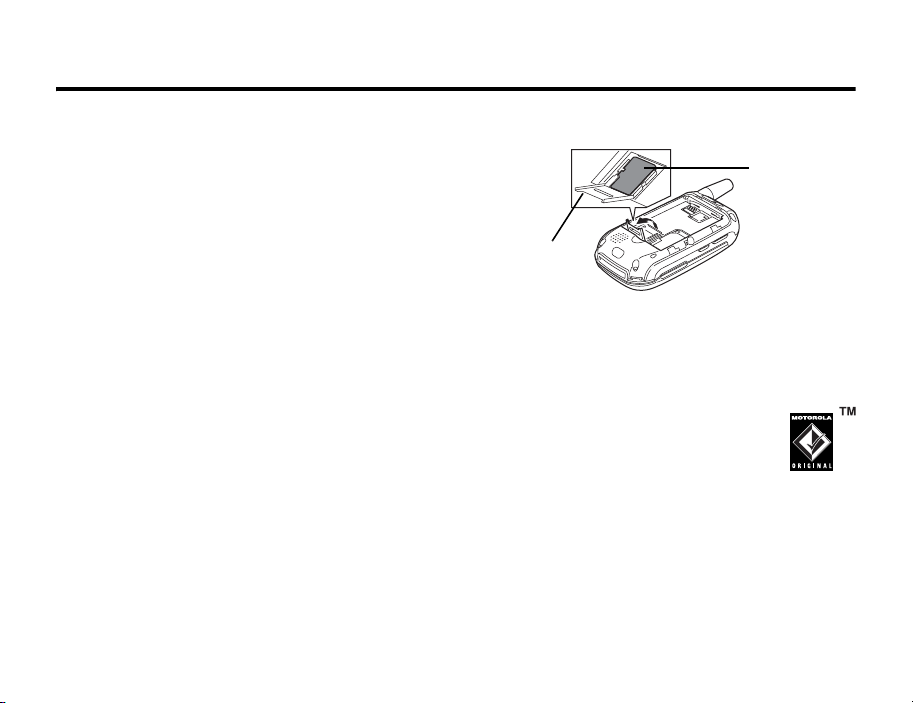
4.3 Installing the USIM Card
4.3 Installing the USIM Card
Your 3G USIM (Universal IC Card) contains your
phone number, service details, and Phone Book/
message memory.
Caution: Do not bend or scratch your card. Avoid
exposing your card to static electricity, water, or dirt.
22 Basics
③
①
Battery Cover Remove Button
12
34
②
②
①
Page 23
Memory Card 4.4
4.4 Memory Card
Insert the Memory Card next to the USIM card (see
right) underneath the phone battery.
The Memory Card provides you with a larger storage
capacity than the Phone Memory. When you
download for example pictures, sounds, video clips
or V-appli, they will be saved to the Memory Card.
To view a list of what is saved to either the Memory
Card or the Phone Memory, press
Memory Card/Phone Memory. See “Viewing and Managing
Pictures” on page 72.
A TransFlash™ removable memory card and SD
adapter are included with your phone. Using the SD
adapter allows you to use the memory card with other
SD memory card-compatible devices (for example,
digital cameras, laptops, and mp3 players).
M and select
Memory Card
Slot Cover
4.5 Battery Tips
Battery life depends on the network, signal strength,
temperature, features, and accessories you use.
• Always use Motorola Original™
batteries and battery chargers. The
warranty does not cover damage
caused by non-Motorola batteries
and/or chargers.
• New batteries or batteries stored for a long time
may take more time to charge.
• When charging your battery, keep it near room
temperature.
Memory Card
Basics 23
Page 24
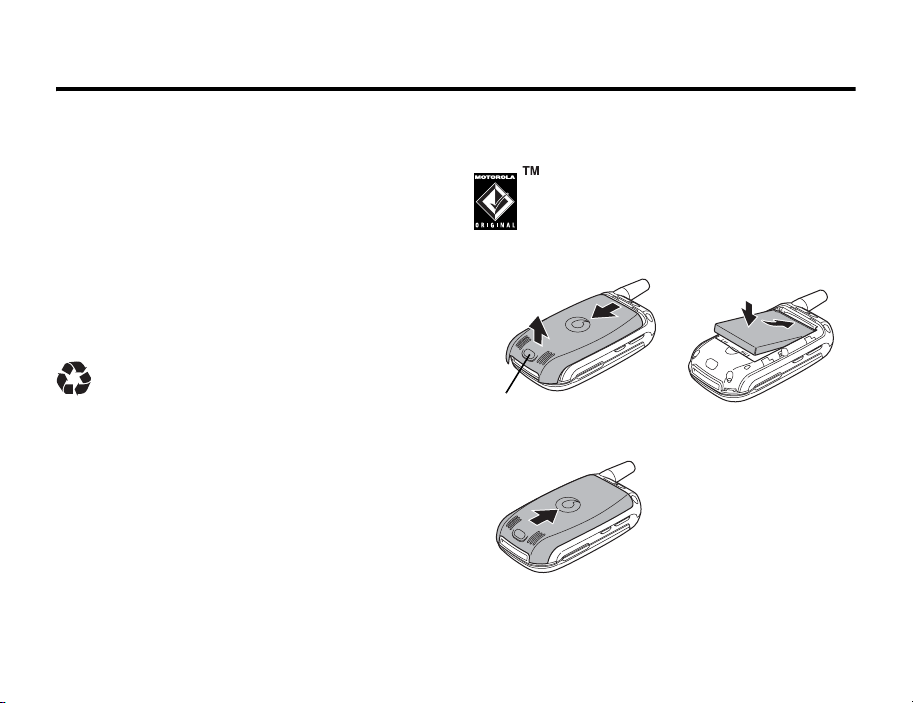
4.6 Installing the Battery
• When storing your battery, keep it uncharged in
a cool, dark, dry place, such as a refrigerator.
• Never expose batteries to temperatures below
-10°C (14°F) or above 45°C (113°F). Always take
your phone with you when you leave your
vehicle.
• It is normal for batteries to gradually wear down
and require longer charging times. If you notice a
change in your battery life, it is probably time to
purchase a new battery.
Contact your local recycling centre for proper
battery disposal.
Warning: Never dispose of batteries in a fire
because they may explode.
Before using your phone, please read the battery
safety information in the Safety and General
Information section included in this manual.
24 Basics
4.6 Installing the Battery
Your phone is designed to use only
Motorola Original™ batteries and
accessories.
②
③
①
Battery Cover Remove Button
12
3
②
①
Page 25
Charging the Battery 4.7
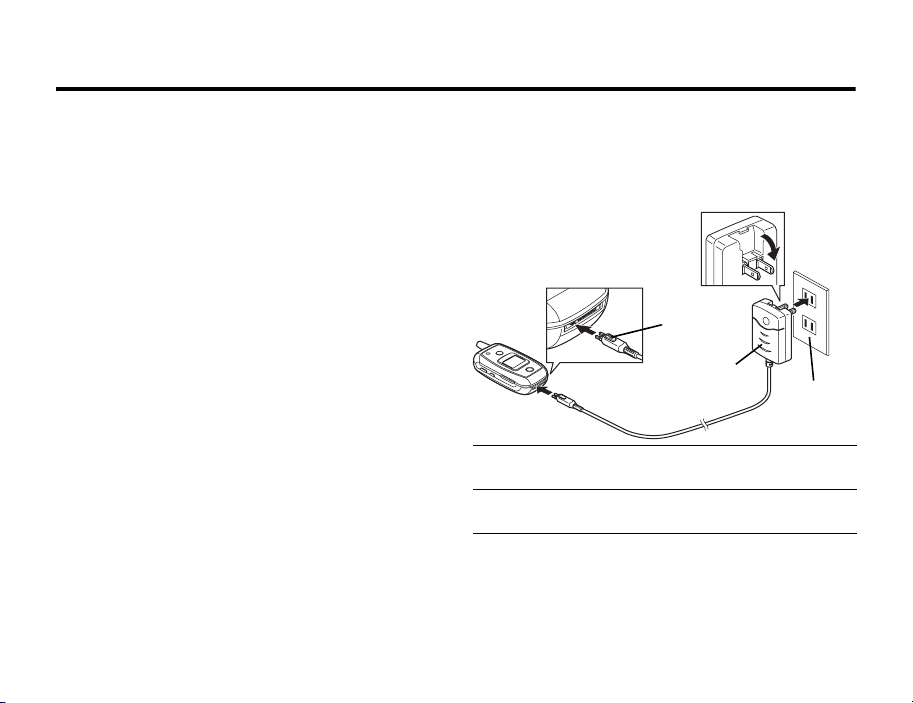
4.7 Charging the Battery
New batteries are shipped partially charged. Before
you can use your phone, you need to charge the
battery as described right. Some batteries perform
best after several full charge/discharge cycles.
Action
1 Plug the rapid charger into your phone with the
release tab facing up.
②
Release
Ta b
Plug
①
2 Plug the other end of the rapid charger into the
appropriate electrical outlet.
3 When your phone indicates Charge Complete, press
the release tab and remove the rapid charger.
Tip: You can safely leave the rapid charger connected
to your phone after charging is complete. This will not
damage the battery.
Household
Socket
Basics 25
Page 26
4.8 Handset Parts and Functions
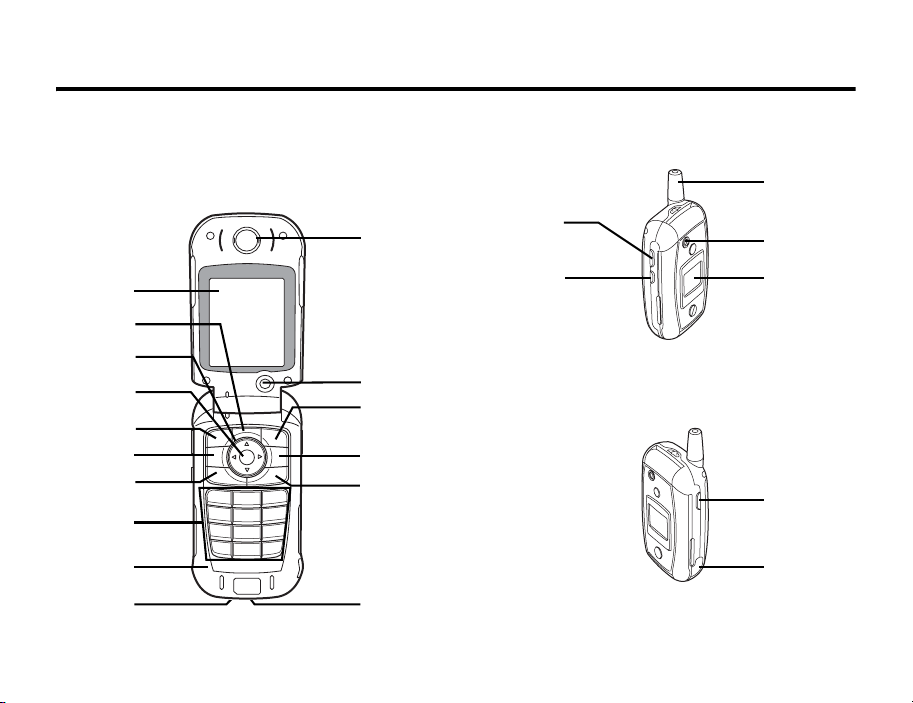
4.8 Handset Parts and Functions
4.8.1 Handset
1
2
3
4
5
6
7
8
9
ag
26 Basics
j
b
c
d
e
f
h
i
k
l
m
n
Page 27

Handset 4.8.1
1 Display
2 Menu KeyM
Open Main Menu and sub menus.
3 5-way Navigation Keyg
Select menus and items, move cursor during text
entry, scroll, etc.
4 Select Keyh
Centre of the Navigation Key. Select items.
5 Left Soft Key
Initiate function that appears on the bottom left
guide of the display. (See page 21)
6 Video Call KeyS
Make or receive Video Call.
7 Voice Ca ll Ke yD
Make or receive Voice Call.
8 Keypad
Dial phone numbers or enter numbers and
characters.
9 Microphone
a Charger Terminals
b Earpiece
c Internal Camera
d Right Soft Key
Initiate function that appears on the bottom right
guide of the display. (See page 21)
e Clear/Back KeyU
Delete characters or return to the previous screen.
f Power & End KeyF
Turn power On/Off, end calls or exit menus.
g Accessory Connector
h Vol um e K ey sVW
Adjust speaker volume during calls or ring tone
volume.
i Smart KeyX
Set various functions. Phone Book is opened by
default.
j Antenna
k External Camera
l External Display
m Camera KeyY
Activate camera or take pictures.
n Headphone ConnectorP
Connect Stereo Earphone Microphone.
The connector cover on the bottom of the handset
is not provided.
Basics 27
Page 28
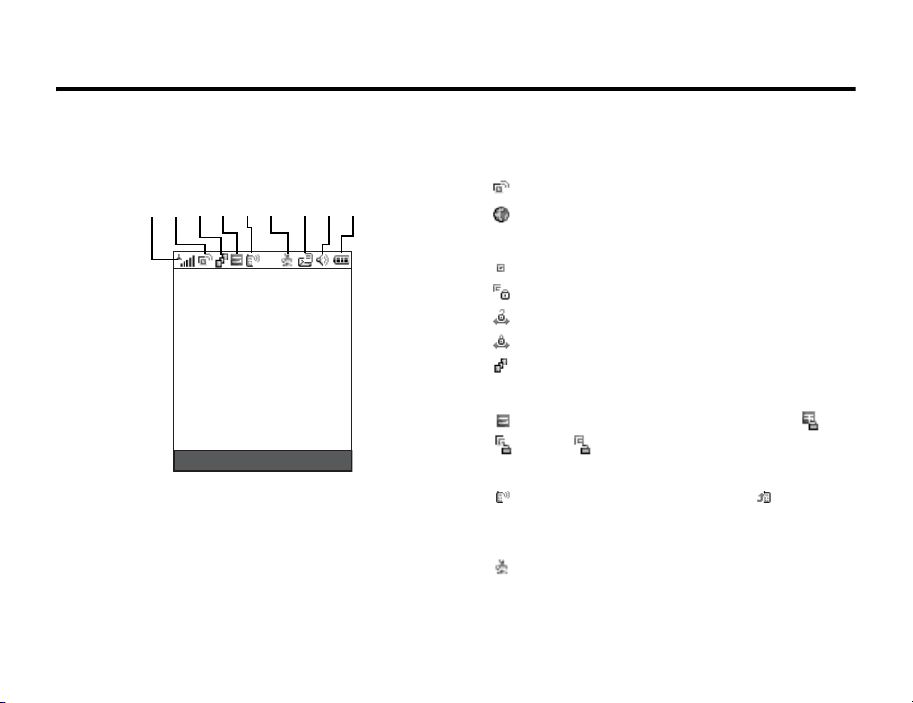
4.8.2 Display
4.8.2 Display
123456 789
Note: Actual screens may differ from those depicted
in this manual.
1 Signal Strength Indicator
Shows signal strength with vertical bars.
28 Basics
2 Network Indicators
Shows the status of network.
:Packet communication area
:Packet communication supported
3 Data Transmission Indicator
:Normal circuit connection
:Secure circuit connection
:Normal packet communication to sites
:Secure packet communication to sites
:Packet communication
4 Roam Indicator
(3G) appears in Japan. The network in use ( : 3G,
: GPRS, : GSM) appears when using abroad.
5 Call Status Indicators
appears during calling and talking. appears
when set to forward all incoming calls (Voicemail, etc.).
6 Java Run Status Indicator
appears when Java is running.
Page 29
External Display 4.8.3
7 Message Indicator
Shows the status of Received Message.
:Unread SMS or MMS
:Unread MMS
:Message forwarded to Voicemail
:Message forwarded to Voicemail and unread
SMS or MMS
:Received Message memory full
8 Ring Style Indicator
:Silent set
:Vibrate set
:Vibrate & Ring set
:Loud Ring set
:Soft Ring set
9 Battery Level Indicator
Shows battery strength with vertical bars.
Tip: If Low Battery appears and Battery Alarm sounds,
charge the battery.
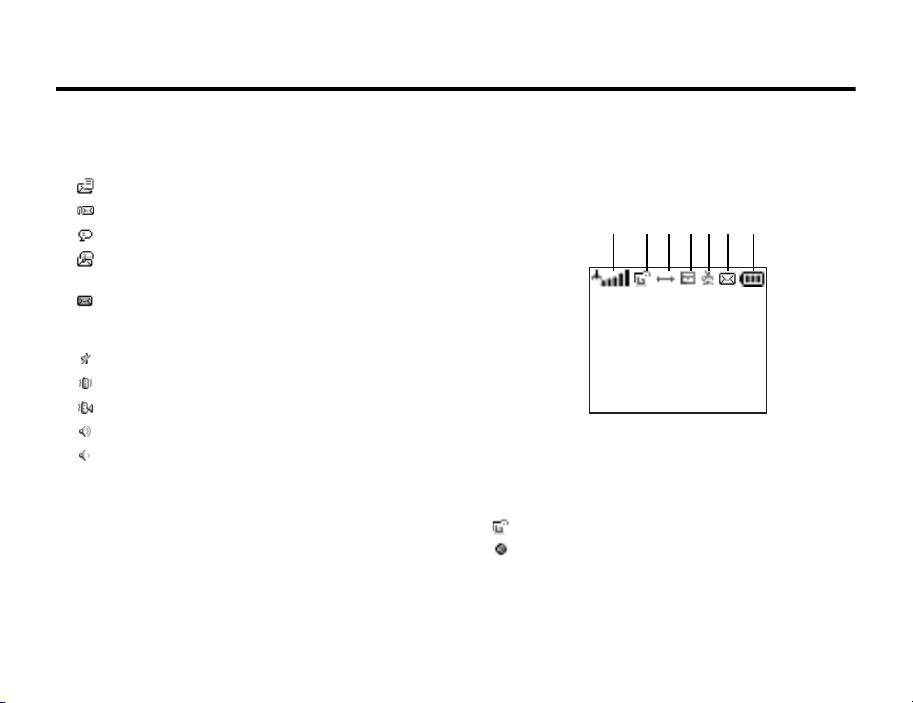
4.8.3 External Display
The time and phone status appear on the external
display when the handset is closed.
12345 76
1 Signal Strength Indicator
Shows signal strength with vertical bars.
2 Network Indicators
Shows the status of network.
:Packet communication area
:Packet communication supported
Basics 29
Page 30
4.8.3 External Display
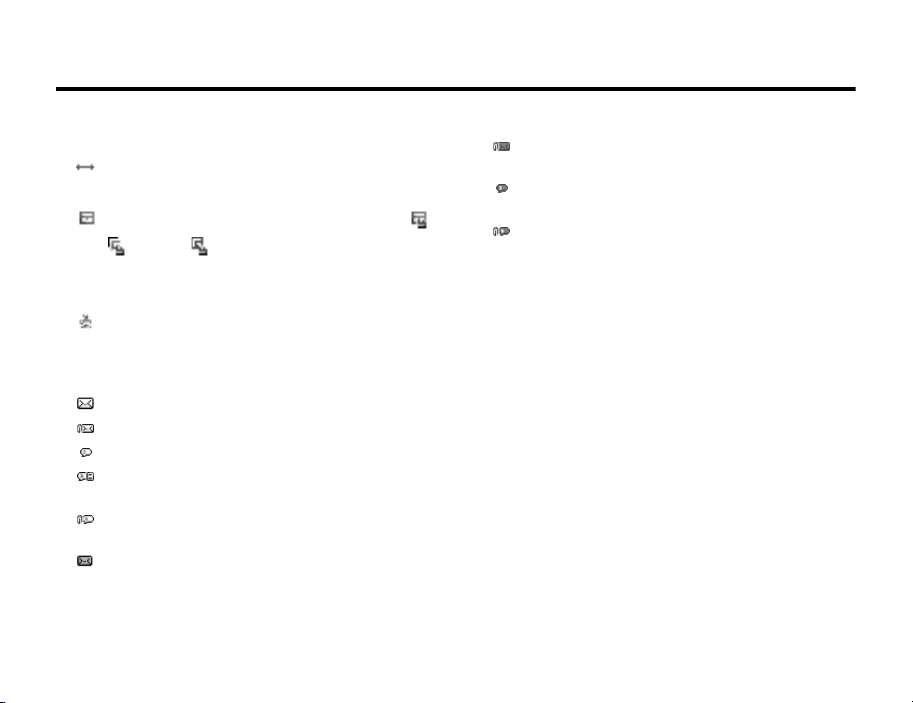
3 Data Transmission Indicator
:Packet communication
4 Roam Indicator
(3G) appears in Japan. The network in use ( :
3G, : GPRS, : GSM) appears when using
abroad.
5 JAVA Run Status Indicator
appears when JAVA is running.
6 Message Indicator
Shows the status of Inbox.
:Unread SMS or MMS
:Unread MMS
:Message forwarded to Voicemail
:Message forwarded to Voicemail and unread
SMS or MMS
:Message forwarded to Voicemail and unread
MMS
:Received Message memory full
30 Basics
:Received Message memory is full with unread
MMS
:Received Message memory full. Message
forwarded to Voicemail
:Received Message memory is full with unread
MMS. Message forwarded to Voicemail
7 Battery Level Indicator
Shows battery strength with vertical bars.
Page 31

Navigation Guide 4.9
4.9 Navigation Guide
Main Menu
V-appli
•Vアプリ ダウンロード
(Downloading V-appli)
• Football
• Skipping Stones
Vodafone live!
• Vodafone live!
•Bookmarks
•Enter URL
•Browser Set
• History
•Web Sessions
•My Saved Page
Media Player
•Camera
• Record Video
•Pictures
•Videos
• Sound&Ringtone
This is the standard main menu layout.
Menu organisation and feature names
may vary on your phone. Not all features
may be available on your phone.
Messaging
• Create Message
•New SMS
•New MMS
•MMS Templates
• Voicemail
• Received Message
•Quick Notes
• Sent Messages
• Draft Messages
•MMS Templates
Camera
•Go To Pictures
• Phone Memory
• Internal View
• Auto-Timed Capture
•Light On
• Adjust Brightness
• Pictures Setup
• View Free Space
• Send in Message
•Store Only
• Apply as Wallpaper
• Apply as Screen Saver
• Apply as Phone Book Entry
Data Folder
•Pictures
• Sound&Ringtone
•Videos
To ol s
•Alarms
•Calculator
•Calendar
• SIM-appli
•Content Key
Phone Book
Record Video
• Go To Videos
•Phone Memory
• Internal View
•Light On
• Videos Setup
• View Free Space
• Send in Message
•Store Only
Basics 31
Page 32

4.9 Navigation Guide
Main Menu (cont.)
Shortcuts
•[New Shortcut]
• メロディダウンロード
(Downloading Melody)
• ピクチャーダウンロード
(Downloading Picture)
• Vアプリダウンロード
(Downloading V-appli)
• ムービーダウ ン ロー ド
(Downloading Video Clip)
Call Logs
• Received Calls
• Dialled Calls
•Notepad
•Call Times
Settings
(see page 33)
32 Basics
Page 33

Navigation Guide 4.9
Settings Menu
Personalise
• Watch&Key
• Main Menu
•Greeting
• Wallpaper
• Screen Saver
Ring Styles
•Style
• (current ring style) Detail
Diverts
•Voice Calls
• Video Calls
• Cancel All
•Divert Status
In-Call Setup
• In-Call Timer
•My Caller ID
• Answer options
• Call Waiting
•MSG Alert
Initial Setup
• Time and Date
•1-Touch Dial
• Display Timeout
• Backlight
•Scroll
• Language
• Battery save
•Brightness
•DTMF
• Master Reset
• Master Clear
Phone Status
• My Contact Details
• Battery Meter
• User Accounts
• Memory Setting
• Other Information
Shortcuts
Headset
•Auto Answer
• Receive Setting
• Voice Dial
Car Settings
•Auto Answer
• Auto Handsfree
•Power-off Delay
•Charger time
Network Set
•Select Network
•Network Setup
• Available Networks
• My Network List
•Service Tone
•Call Drop Tone
Security Set
• Phone Lock
• Lock Application
• Show Private Entries
• Call Barring
•USIM PIN
•USIM PIN2
•New Passwords
V-appli Set
• Java System
• Delete all apps
• App Vibration
• App Volume
• App Priority
• App Backlight
• Set Standby App
Basics 33
Page 34

4.10 Turning Your Phone On
4.10 Turning Your Phone On
Action
1 Press and hold F for 2 seconds to turn on the
phone.
2 If necessary, enter your USIM card PIN code
and press the OK key to unlock the USIM card.
Caution: If you enter an incorrect PIN code
3 times in a row, your USIM card is disabled
and your phone displays SIM Blocked.
3 If necessary, enter your four-digit unlock code
and press OK key to unlock the phone.
Tip: The unlock code is originally set to 1234.
4.11 Setting the Display Language
Find the Feature M > Settings > Initial Setup
> Language
Press To
1 g up or down
2 SELECT set the language
34 Basics
scroll to English or 日本語
4.12 Adjusting Volume
Press the up or down volume keys to:
• increase or decrease earpiece volume during a
call
• increase or decrease speakerphone volume
during a call
• turn off an incoming call alert
• increase or decrease the ringer volume setting
when the home screen is visible
Tip: At the lowest volume setting, press the
down volume key once to switch to vibrate alert.
Press it again to switch to silent alert. Press the
up volume key to cycle back to vibrate alert,
then ring alert.
Page 35

Making a Call 4.13
4.13 Making a Call
To make video calls, see page 77.
Press To
1 keypad dial the phone number
2 D make the call
3 F end the call and “hang up”
the phone when you are
finished
Tip: You can also close the phone to end the call.
Note:
• When making a voice/video call to an ISDN
(Integrated Services Digital Network) fixed line or
a mobile phone other than Vodafone 3G, a series
of long beeps will be heard.
• When the other party disconnects a call, no
beeps or sound will be heard.
4.14 Answering a Call
When you receive a call, your phone rings and/or
vibrates and displays an incoming call message.
When Open To Answer is On, open the phone to answer the
call. To set Open To Answer, press
> Answer options > Open To Answer.
If Open To Answer is Off:
Press To
1 D
or
DIVERT divert the call to your voicemail or
2 F end the call and “hang up” the
answer the call
call divert number, a s t h o ugh
your line was busy
phone when you are finished
M > Settings > In-Call Setup
Basics 35
Page 36

4.15 Changing the Call Alert
4.15 Changing the Call Alert
In the home screen, press the down volume key to
switch the alert for incoming calls and other events to
vibrate alert, then silent alert. Press the up volume key
to reset ring alert.
4.16 Viewing Your Phone Number
To view your phone number from the home screen,
press
M#.
While you are on a call, press M > My Tel. Number.
36 Basics
Page 37

Entering Text 5
5Entering Text
Press the Mode key in a text entry screen to change the
text entry mode. The mode you select remains active
until you select another mode.
• You can press the Mode key to cycle through the
text entry modes in the following order.
Katakana mode – alphabet mode – numeric
mode – hiragana mode
• To enter a pictograph, press * in hiragana
mode or alphabet mode and choose a
pictograph from the list.
• To enter a symbol, press # in hiragana mode,
katakana mode, or alphabet mode and choose a
symbol from the list.
The following icons indicate the current text entry
mode.
: Hiragana mode
: Katakana mode
: Alphabet mode
: Numeric mode
Tip: You can select a text entry mode in any text entry
screen by pressing M > Entry Mode.
5.1 Setting the Initial Text Entry
Mode
You can change the text entry mode when a text entry
screen appears.
• The text entry mode is originally set to Hiragana.
Press M > Entry Setup from any text entry screen. Select
Default, and choose a text entry mode.
5.2 Assignment of Keypad Keys
You can enter characters by pressing the keypad, *,
or #. Available characters are different for each text
entry mode. In hiragana mode, katakana mode, and
alphabet mode, the character varies according to the
number of times you press the keypad, *, or #.
• When entering text in numeric mode, press 1
to 9 for 1 second to switch to alphabet mode.
Entering Text 37
Page 38

5.2 Assignment of Keypad Keys
• When entering text in alphabet mode, press 1
to 0 for 1 second to switch to numeric mode.
Te xt
Kanji/
entry
Hiragana
mode
mode
key
1
あい う えお
ぁぃぅ ぇぉ
2
かき く けこ カキクケコ
3
さしすせそ サシスセソ
4
たちつてとっタチツテ ト
5
なにぬねの ナニヌネノ
6
はひふへほ ハ ヒ フヘホ
7
まみむめも マ ミ ム メ モ
8
やゆよ
ゃゅょ
9
らりるれろ ラリルレロ
38 Entering Text
Katakana
mode
(single-byte)
アイウエオ
ァィゥェォ
ッ
ヤユヨ
ャュョ
Alphabet
mode
. - @ / : ~ 11
a b c 2 2
d e f 3 3
g h i 4 4
j k l 5 5
m n o 6 6
p q r s 7 7
t u v 8 8
w x y z 9 9
Numeric
mode
Te xt
entry
mode
key
0
*
#
Kanji/
Hiragana
mode
わをん
ゎ 、 。?
!ー ・
Pictographs
(Before
confirming
character:
Add
゙/゚
)
、 。
(Press after
confirming
character to
enter
symbols)
Katakana
mode
(single-byte)
ワヲン
、 。?!ー・
*
Enter
symbols
Alphabet
mode
0
Pictographs
(Before
confirming
character:
Add
゙/゚
Enter
symbols
Numeric
mode
0
(press for
1
second
to enter
+)
*
)
#
Page 39

Assignment of Keypad Keys 5.2
Te xt
Kanji/
entry
Hiragana
mode
mode
key
g up Move
cursor up
(Before
confirming
character:
Default
conversion
(reverse
order))
(When
converting
text: Show
conversion
list)
Katakana
mode
(single-byte)
Moves cursor up
Alphabet
mode
Numeric
mode
Te xt
entry
mode
key
g
down
Kanji/
Hiragana
mode
Move
cursor
down
(Before
confirming
character:
Default
conversion
(priority
order)) (End
of text: Line
break)
(When
converting
text: Show
conversion
list)
Katakana
mode
(single-byte)
Move cursor down
(After confirming character:
Line break)
Alphabet
mode
Entering Text 39
Numeric
mode
Page 40

5.2 Assignment of Keypad Keys
Te xt
Kanji/
entry
Hiragana
mode
mode
key
g left Move
cursor left
(When
converting
text:
Change
characterselection to
convert)
g
Move
right
cursor right
(When
converting
text:
Change
characterselection to
convert)
40 Entering Text
Katakana
mode
(single-byte)
Moves cursor left
Moves cursor right
Alphabet
mode
Numeric
mode
Te xt
Kanji/
entry
Hiragana
mode
mode
key
U Erase one character left of cursor
(Press for 1 second: Erase all text being
edited)
D Line break
S Enter a space
(Press for 1 second: Enter multiple spaces)
Switch between normal
S
and small characters
(when
(only for characters that
enter-
can be converted to
ing
small characters)
text)
Katakana
mode
(single-byte)
Alphabet
mode
Switch
between
upper
and
lower
case
Numeric
mode
Enter a
space
Page 41

Entering Characters 5.3
5.3 Entering Characters
Entering Kanji/Hiragana
In a text entry screen, press the keypad repeatedly to
cycle through its characters.
Press To
1 Mode
(multiple times)
2 keypad enter text
Example: To enter “ やまも と じ ろ う ”
1 Press 8 one time. “ や ” appears.
2 Press 7 one time. “ ま ” appears.
3 Press g right. Cursor moves right.
4 Press 7 five times. “ も ” appears.
5 Press 4 five times. “ と ” appears.
6 Press 3 two times and press *. “ じ ” appears.
7 Press 9 five times. “ ろ ” appears.
8 Press 1 three times. “ う ” appears.
switch to hiragana mode
Press To
Note:
• To enter dakuten or handakuten marks, press
* after entering a character without the mark.
• To enter another character assigned to the
same key, press g right after entering the first
letter.
• For keypad key assignments, see page 37.
3 PREDICT
show the conversion list
or
g down
߆ࠊ
Ꮉޓᤨޓᣣ
ಽޓ߆ࠊ
ᄌࠊߞߚ
5'.'%6 %#0%'.
2.4
1 / 1
If PREDICT is pressed
Entering Text 41
Page 42

5.3 Entering Characters
Press To
4 g up or down select a character or word
Conversion predictions
appear in the following
order: kanji, hiragana,
double-byte katakana and
romaji.
5 SELECT enter the highlighted
character
Note:
• Press g down to set the default conversion.
Because kanji conversion is the default setting,
use this function instead of the PREDICT key. Press
g up to convert in reverse order.
• Press the CANCEL key or U to close the conversion
list.
Tip: To convert hiragana into katakana, alphabet, or
numbers, press the KANA-EI-SU key after entering
hiragana, select the desired text, and press the SELECT
key.
42 Entering Text
Entering Small Characters (っ , ッ , etc.)
Small characters are assigned to keys just like normal
characters (see page 37).
Entering Dakuten/Handakuten Marks
In a text entry screen:
Press To
1 keypad enter a character without
dakuten (゙) or handakuten (゚)
marks
2 * enter text
Press * repeatedly until the
desired character is entered.
Page 43

Entering Characters 5.3
Entering Katakana
In a text entry screen:
Press To
1 Mode
(multiple times)
2 keypad enter a character assigned
Note: For keypad key assignments, see page 37.
Tip: To convert hiragana into katakana, press the
KANA-EI-SU key after entering hiragana, select the desired
text, and press the SELECT key.
switch to katakana mode
to the key
Entering Alphabet
In a text entry screen:
Press To
1 Mode
(multiple times)
2 keypad enter a character assigned
Note: For keypad key assignments, see page 37.
switch to alphabet mode
to the key
Entering Text 43
Page 44

5.3 Entering Characters
Entering Numbers
In a text entry screen:
Press To
1 Mode
(multiple times)
2 keypad enter a number
switch to numeric mode
To enter a pictograph, press
* in hiragana mode or
alphabet mode and choose
a pictograph from the list.
Entering Symbols
Switch to hiragana mode, katakana mode, or
alphabet mode and enter symbols.
Press To
1 # show the symbol list
2 g select a symbol
3 SELECT enter the symbol
44 Entering Text
Entering Pictographs
Switch to hiragana mode or alphabet mode and enter
pictographs.
Press To
1 * open the pictograph list
2 g select a pictograph
If you press * when viewing
the list, you can quickly
cycle through the pages.
3 SELECT enter the pictograph
Entering Emoticons
In a text entry screen:
Press To
1 M open the Message Menu
2 g up or down scroll to Entry Mode
3 SELECT show the entry mode list
4 g up or down scroll to Emoticon
Page 45

Predictive Conversion 5.4
Press To
5 SELECT show the emoticon list
6 g up or down select an emoticon
7 SELECT enter the emoticon
Entering Spaces
In a text entry screen:
Press To
g right
or
S
enter a space
Entering Line Breaks
In a text entry screen:
Press To
D enter a line break
5.4 Predictive Conversion
By using predictive conversion, kanji conversion
candidates automatically appear every time you press
the keypad, allowing for more effective text entry.
5.4.1 Setting Predictive Conversion
Mode
You can enable or disable predictive conversion in
hiragana mode.
Note: Predictive conversion is originally set to Off.
In a text entry screen:
Press To
1 M open the Message Menu
2 g up or down scroll to Entry Setup
3 SELECT show the input settings
screen
4 g up or down scroll to Prediction
Entering Text 45
Page 46

5.4.2 Entering Text Using Predictive Conversion
Press To
5 h
or
CHANGE
6 g up or down select On
7 SELECT
Note: Set to Off to not use predictive conversion.
46 Entering Text
show the predictive
conversion settings screen
set predictive conversion to
5.4.2 Entering Text Using Predictive
Conversion
In a text entry screen:
Press To
On
1 Mode
(multiple times)
2 keypad enter text
switch to hiragana mode
The predictive conversion
list automatically appears.
Note: For keypad key
assignments, see page 37.
Page 47

Editing Text 5.5
Press To
3 g select a conversion
candidate
4 SELECT enter the conversion
candidate
Press the PREDICT key to show
the cursor on the predictive
conversion list. The
predictive conversion list
does not appear if there are
no appropriate conversion
candidates.
5.5 Editing Text
5.5.1 Correcting an Entered Character
To correct an entered character immediately, delete it
and enter new one.
In a text entry screen:
Press To
1 U delete one character already
entered
2 keypad enter the correct one
5.5.2 Deleting Letters and Words
Place the cursor to the right of the text you want to
delete, and then:
Action
Press U to delete one letter at a time.
Press and hold U to delete the entire text.
Entering Text 47
Page 48

5.5.3 Copying, Cutting, and Pasting Text
5.5.3 Copying, Cutting, and Pasting Text
Press M from a text entry screen to display these
options:
Option Description
Copy Text
Copy All Text Copy all text in the editor.
Cut Text Cut the text you are about to
Cut All Text Cut all text in the editor.
Paste Paste the text you cut or
Undo Undo the last copy, cut, or
48 Entering Text
Copy the text you are about
to highlight (see the following
“Highlighting Text”).
highlight (see the following
“Highlighting Text”).
copied.
paste in the current text
editor.
Note: Copy All Text also appears in the menu (press M)
when you are viewing details for a Phone Book entry,
Calendar event, Browser page, text message, or
Recent Calls entry.
Highlighting Text
In a text editor, to highlight and copy or cut text:
Find the Feature M > Copy Text or Cut Text
Press To
1 g scroll to the beginning of the
text you want to copy or cut
2 START
3 g scroll to the end of the text
4 COPY
or
CUT
turn on the highlighting marker
you want to copy or cut
copy or cut the text you
selected
You can now paste the text
in another location or file.
Page 49

Copying, Cutting, and Pasting Text 5.5.3
Pasting Text
In a text entry screen:
Press To
1 g move the cursor to the
2 M open the menu
3 g up or down scroll to Paste
4 SELECT paste the text
Inserting Text
In a text entry screen:
Press To
1 g move the cursor to the
2 keypad enter text
position to paste text
position to insert text
Entering Text 49
Page 50

6 Phone Book
6Phone Book
6.1 Storing Phone Book Entries
6.1.1 Phone Book Entry Items
Option
Name Kanji, hiragana,
Yomigana Kanji, hiragana,
No. Maximum 40 digits Maximum 40 digits
Type Seven types
50 Phone Book
Description
Handset USIM Card
Kanji, hiragana,
katakana, alphabet,
numbers, symbols,
pictographs
(maximum 24
single- or doublebyte characters)
katakana, alphabet,
numbers, symbols,
pictographs
(maximum 24
single- or doublebyte characters)
katakana, alphabet,
numbers, symbols,
pictographs
(maximum 24
single- or double-
byte characters)
Kanji, hiragana,
katakana, alphabet,
numbers, symbols,
pictographs
(maximum 24
single- or double-
byte characters)
-
Option
Store To Handset or USIM
Voice Name Record a voice
Speed No. 1 to 500 501 to 550
Category Four categories Four categories
Street 1,
Street 2
City Maximum 30 single-
County Maximum 20 single-
Description
Handset USIM Card
card
name
Maximum 30 singleor double-byte
characters
or double-byte
characters
or double-byte
characters
Handset or USIM
card
-
-
-
-
Page 51

Storing a Phone Book Entry 6.1.2
Option
Zip/Postal
Description
Handset USIM Card
Seven digits
Code
Country Maximum 30 single-
or double-byte
characters
Birthday Enter month, day,
and year
Ringer ID Select from list
Picture Select from list
Private -
Email 50 single-byte
characters
-
-
-
-
-
Set to Yes or No
50 single-byte
characters
6.1.2 Storing a Phone Book Entry
You can enter data such as name, phone number, and
e-mail address in a Phone Book entry.
'PVT[&GVCKNU
0COG
0Q
9QTM
6[RG
2JQPG
5VQTGVQ
8QKEG0COG
5RGGF0Q
%CVGIQT[
)GPGTCN
&10'
Storing Name and Phone Number
Find the Feature M > Phone Book
Tip: The new Phone Book entry screen appears when
no entries are stored in the Phone Book. Press h and
go to the following step 2.
%#0%'.
Phone Book 51
Page 52

6.1.2 Storing a Phone Book Entry
Press To
1 New show the new Phone Book
entry screen
If the search method is set to
Jump To, press M on the
Phone Book list, and select
New with g.
2 g up or down scroll to Phone Number
3 SELECT select Phone Number
4 g up or down scroll to Name
5 h select Name
6 keypad enter a name
7 OK store the name
Tip: When correcting
yomigana, select Yomigana,
press h, and enter new
yomigana with the keypad.
8 g up or down scroll to No.
9 h select No.
52 Phone Book
Press To
10 keypad enter a phone number
11 OK store the phone number
12 g up or down scroll to Type
13 h select Type
14 g up or down select a type
Select from Work, Home, Main,
Mobile, Video, Fax, and Pager.
15 SELECT store the type
16 DONE store the Phone Book entry
Tip: To select a location to
store to, select Store To from
the Phone Book entry
screen, press h, and select
Phone or USIM.
Page 53

Storing a Phone Book Entry 6.1.2
Storing Name and E-mail Address
Find the Feature M > Phone Book
Tip: The new Phone Book entry screen appears when
no entries are stored in the Phone Book. Press h and
go to the following step 2.
Press To
1 New show the new Phone Book
entry screen
Note: If the search method is
set to Jump To, press M on the
Phone Book list, and select
New with g.
2 g up or down scroll to Email Address
3 SELECT select Email Address
4 g up or down scroll to Name
5 h select Name
6 keypad enter a name
Press To
7 OK store the name
8 g up or down scroll to Email
9 h select Email
10 keypad enter an e-mail address
11 OK store the e-mail address
12 DONE store the Phone Book entry
Entering Special Code into a Phone Number
You can enter p (pause), w (wait), or n (number) when
entering a phone number that requires timing different
from that of standard phone calls (such as
international calls).
You can use this function when sending touch-tone
(DTMF) signals (see page 113).
Phone Book 53
Page 54

6.1.2 Storing a Phone Book Entry
While entering a phone number:
Press To
M > Insert Pause insert a p (pause) character
Your phone dials the
preceding digits, waits for
the call to connect, then
dials the remaining digit(s).
Note: If your phone does not
recognise the first pause
character, try inserting two
(pp).
M > Insert Wait insert a w (wait) character
Your phone dials the
preceding digits, waits for
the call to connect, then
prompts you for confirmation
before it dials the remaining
digit(s).
54 Phone Book
Press To
M > Insert ’n’ insert an n (number)
character
Your phone prompts you for
a number before dialling the
call. The number you enter is
inserted into the dialling
sequence in place of the n
character.
Note: You cannot store a number that contains a w or
n character on the USIM card.
Creating a Category Mailing List
Find the Feature M > Phone Book
M > New Entry
Press To
1 g up or down scroll to Mailing List
2 SELECT select Mailing List
Page 55

Storing Phone Numbers from Dialled/Received Calls
6.1.3
Press To
3 g up or down scroll to Name
4 h select Name
5 keypad enter a list name
6 OK store the list name
7 g up or down scroll to Members
8 h select Members
9 g up or down select the Phone Book entry
of the member to store
10 h select the entry
A check appears next to the
selected Phone Book entry.
You can select additional
entries.
11 OK set selected members
12 DONE store the mailing list
Edit Voice Name, Speed No., and Category if necessary.
6.1.3 Storing Phone Numbers from
Dialled/Received Calls
Find the Feature M > Call Logs
> Received Calls or Dialled Calls
Press To
1 g up or down scroll to the phone number
2 M > Store select Store
The Phone Book entry
screen with the selected
phone number entered
appears.
3 Enter the other items in the entry and store the
data.
Phone Book 55
Page 56

6.1.4 Checking Phone Book Capacity
6.1.4 Checking Phone Book Capacity
You can see how much memory space remains for
storing Phone Book and calendar entries on the
phone and USIM card.
Find the Feature M > Phone Book
> Phone Capacity or SIM Capacity
6.2 Options when Storing Phone
Book Entries
6.2.1 Recording a Voice Name for a
Phone Book Entry
You can record a voice name for a new or existing
Phone Book entry. A voice name lets you call the
Phone Book entry using voice dial.
Note: You cannot record a voice name for an entry
stored on the USIM card.
56 Phone Book
Tip: Make your recording in a quiet location. Hold the
phone about 4 inches (10 centimetres) from your
mouth, and speak directly into the phone in a normal
tone.
Find the Feature M > Phone Book
Action
1 Press g to scroll to the entry.
2 Press h to view entry details.
3 Press the EDIT key to edit the entry.
4 Select Voice Name with g and press h.
5 Press the RECORD key to begin recording.
6 Press the RECORD key again and say the entry’s
name (within 2 seconds) to record the voice
name.
7 When prompted, press the RECORD key and
repeat name.
8 Press the DONE key to store the voice name.
Page 57

Changing Speed Dial Number 6.2.2
6.2.2 Changing Speed Dial Number
Speed dial numbers are automatically assigned.
Alternatively, you can assign a speed dial number to
an entry.
Find the Feature M > Phone Book
Action
1 Press g to scroll to the entry.
2 Press h to view entry details.
3 Press the EDIT key to edit the entry.
4 Select Speed No. with g and press h.
5 Enter the desired speed dial number and press
the OK key.
6.2.3 Setting Categories
Find the Feature M > Phone Book
Action
1 Press g to scroll to the entry.
2 Press h to view entry details.
3 Press the EDIT key to edit the entry.
4 Select Category with g and press h.
5 Select a category with g and press the SELECT
key.
You can select General, Business, Personal, VIP, or
another category that you created.
Phone Book 57
Page 58

6.2.4 Storing an Address
6.2.4 Storing an Address
Postal address is entered/displayed in the following
order: street, city, prefecture (county), postal code,
and country.
Find the Feature M > Phone Book
Action
1 Press g to scroll to the entry.
2 Press h to view entry details.
3 Press the EDIT key to edit the entry.
4 Select Street 1 with g and press h.
5 Enter an address and press the OK key.
6 Enter Street 2, City, County, Zip/Postal Code, and Country in
the same way.
58 Phone Book
6.2.5 Storing a Birthday
Find the Feature M > Phone Book
Action
1 Press g to scroll to the entry.
2 Press h to view entry details.
3 Press the EDIT key to edit the entry.
4 Select Birthday with g and press h.
5 Enter birthday and press the OK key.
Tip: The format is originally set to month/day/
year. You can change the format from the time
and date settings menu (see page 85).
6.2.6 Setting Ringer ID
You can set a distinctive ring tone for each Phone
Book entry.
Find the Feature M > Phone Book
Page 59

Setting Pictures 6.2.7
Action
1 Press g to scroll to the entry.
2 Press h to view entry details.
3 Press the EDIT key to edit the entry.
4 Select Ringer ID with g and press h.
5 Select a ringer ID with g and press the SELECT
key.
Note: You cannot set a ringer ID for an entry
stored on the USIM card.
6.2.7 Setting Pictures
Find the Feature M > Phone Book
Action
1 Press g to scroll to the entry.
2 Press h to view entry details.
3 Press the EDIT key to edit the entry.
Action
4 Select Picture with g and press h.
5 Select a picture with g and press the SELECT key.
Note: You cannot set a picture for an entry
stored on the USIM card.
6.2.8 Adding Phone Numbers
You cannot store more than one phone number for a
Phone Book entry. However, you can store more
phone numbers by adding more entries.
Follow the steps below to easily add Phone Book
entries.
Find the Feature M > Phone Book
Action
1 Press g to scroll to the entry.
2 Press h to view entry details.
3 Press the EDIT key to edit the entry.
Phone Book 59
Page 60

6.2.9 Adding E-mail Addresses
Action
4 Select MORE with g and press h.
5 Select Phone Number with g and press the SELECT
key.
6 Select No. with g and press h.
7 Enter the desired phone number and press the
OK key.
6.2.9 Adding E-mail Addresses
Find the Feature M > Phone Book
Action
1 Press g to scroll to the entry.
2 Press h to view entry details.
3 Press the EDIT key to edit the entry.
4 Select MORE with g and press h.
5 Select Email Address with g and press the SELECT
key.
60 Phone Book
Action
6 Select Email with g and press h.
7 Enter an e-mail address and press the OK key.
6.2.10 Setting the Primary Number for a
Phone Book Entry
When you enter multiple phone numbers for the same
name, you can specify the primary number.
Find the Feature M > Phone Book
Press To
1 g up or down scroll to the entry
2 M open the Phonebook Menu
3 g up or down scroll to Set Primary
4 SELECT select Set Primary
5 g up or down scroll to the number you
want to set as the primary
number
6 SELECT set the primary number
Page 61

Using Phone Book Category Views 6.3
Note:
• Depending on how the Phone Book list is sorted,
the primary number is listed first, or is the only
number that appears for a Phone Book entry.
To show only the primary number, press M >
•
View
>
Primary Contacts
>
verify other phone numbers, press
6.3
Using Phone Book Category Views
on the Phone Book list. To
g
Setup
left or right.
6.3.1 Creating a New Category
Your phone includes several predefined Phone Book
categories. You can create additional categories, and
customise the way your phone notifies you of
incoming calls from entries in different categories.
Find the Feature M > Phone Book > g down
M > Categories
M > New
A name is required for the category. All other
information is optional. You can enter the following
information for a category.
Option Description
Name Enter the category name.
Members Open the list of Phone Book
Ringer ID Set a distinctive ringer alert
Press M to select a text
entry mode (see page 37).
entries that you can add or
remove from the category.
for the category.
Your phone uses the alert to
notify you when you receive
a call from an entry in this
category. To activate ringer
IDs, see page 88.
A ringer ID for an individual
entry overrides the category
alert.
Phone Book 61
Page 62

6.3.2 Editing a Category
6.3.2 Editing a Category
Find the Feature M > Phone Book > g down
M > Categories
Press To
1 g up or down scroll to the category
2 M open the Category Menu
3 g up or down scroll to Edit
4 SELECT edit the category
Edit the category information as described in the
previous section.
Note:
• You cannot edit the All category.
• You cannot edit the name of the General category.
62 Phone Book
6.3.3 Deleting a Category
Find the Feature M > Phone Book > g down
M > Categories
Press To
1 g up or down scroll to the category
2 M open the Category Menu
3 g up or down scroll to Delete
4 SELECT delete the category
Note:
• You cannot delete the All and General categories.
• When you delete a category, all entries in the
category revert to General.
Page 63

Setting Ringer Alerts for Categories 6.3.4
6.3.4 Setting Ringer Alerts for
Categories
You can set your phone to use ringer alerts to notify
you when you receive a call from an entry in a
category.
Find the Feature M > Phone Book > g down
M > Categories
Press To
1 g up or down scroll to the category
2 M open the Category Menu
3 g up or down scroll to Edit
4 SELECT select Edit
5 g up or down scroll to Ringer ID
6 h select Ringer ID
7 g up or down select a ringer ID
8 SELECT set the ringer ID
6.3.5 Setting the Phone Book Category
View
You can view all entries in the Phone Book list, or view
only the entries in the category you specify.
Find the Feature M > Phone Book > g down
M > Categories
Press To
1 g up or down scroll to All, Business, Personal,
General, VIPs, or another
category that you created
2 SELECT select the category view
Note: The Phone Book category view is reset to All
each time you turn the phone on.
Phone Book 63
Page 64

6.4 Using the Phone Book
6.4 Using the Phone Book
6.4.1 Dialling a Phone Book Entry
You can call the entry stored in the Phone Book.
Find the Feature M > Phone Book
Press To
1 g down show the Phone Book list
Names appear in Japanese
alphabetical order by
yomigana.
Tip:
The Phone Book appears
in the following order.
1. Kana
2. Alphabet
3. Numbers
4. Symbols
5. Pictographs
64 Phone Book
Press To
2 g up or down scroll to the entry
3 D make the call
To make a video call, press
S. The stored number is
called.
Note: You can call with speed dial or 1-touch dial
(see page 98).
Voice Dial
Press and hold D, then say the name when
prompted.
Page 65

Searching the Phone Book 6.4.2
6.4.2 Searching the Phone Book
• Yomigana search sc reen
Enter characters and press the SEARCH key to
show the matching entry.
(KPF;QOKICPC
ࠕ
0
ޓ
0GY /QFG
• Speed dial search screen
Enter speed dial number and press the SEARCH key
to show the matching entry.
(KPF5RGGF
123
0
&KCN
0GY
Note: Follow the steps below to switch to the speed
dial search screen.
• On the yomigana entry screen, press M and
select Find Speed Dial.
• Follow the same steps to switch back to the
yomigana search screen.
Changing the Search Method
You can set the Phone Book list to show entries in
Japanese alphabetical order when Phone Book is
selected.
Find the Feature M > Phone Book
Press To
1 g up or down scroll to the entry
2 M open the Phonebook Menu
3 g up or down scroll to Setup
4 SELECT select Setup
5 g up or down scroll to Search Method
6 CHANGE select Search Method
Phone Book 65
Page 66

6.4.3 Sorting the Phone Book List
Press To
7 g up or down scroll to Jump To
8 SELECT select Jump To
Note: If Find is set, the yomigana entry screen appears
when Phone Book is selected and h is pressed.
6.4.3 Sorting the Phone Book List
You can sort your Phone Book list by name (the
standard), speed dial number, voice name, or e-mail
address.
Note: The voice name sort is identical to the name
sort, except that the entries with voice name tags are
listed first.
Find the Feature M > Phone Book
> Setup > Sort by
66 Phone Book
Press To
1 g up or down scroll to Name, Speed No., Voice
Name, or Email
Tip: Select Name to sort
entries in Japanese
alphabetical order by
yomigana.
2 SELECT select the sort order
6.4.4 Copying Phone Book Entries
You can copy one or more Phone Book entries to a
new speed dial location on the phone or USIM card.
This procedure does not delete the original entry.
The USIM card cannot store Type, Voice Name, Ringer ID, or
Picture information. When you copy an entry from the
phone to the USIM card, your phone prompts you for
confirmation before dropping this information and
copying the entry.
Find the Feature M > Phone Book
Page 67

Sending Messages from the Phone Book 6.4.5
Press To
1 g up or down scroll to the entry
2 M open the Phonebook Menu
3 g up or down scroll to Copy
4 SELECT select Copy
5 g up or down scroll to a copy option
6 SELECT select the copy option
If you select All To SIM or All To
Phone, your phone copies the
entries and the procedure is
complete.
If you select Entries, continue
to the next step.
7 h select Entries
8 g up or down scroll to entries you want to
copy
Press h to add an entry to
the copy list.
Press To
9 OK store the list of entries to
copy
10 g up or down scroll to To
11 g left or right change the target memory
12 DONE copy the entries
6.4.5 Sending Messages from the Phone
Book
Find the Feature M > Phone Book
Press To
1 g up or down scroll to the entry
2 M open the Phonebook Menu
3 g up or down scroll to Send Message
4 SELECT select Send Message
5 g up or down scroll to New SMS or New MMS
Phone Book 67
Page 68

6.4.6
Sending Phone Book Entry Contents as SMS Messages
Press To
6 SELECT select the option
7 Enter message text and recipient’s e-mail
address/phone number, and send the
message.
Note: Creating Messages (see page 138)
6.4.6 Sending Phone Book Entry
Contents as SMS Messages
Find the Feature M > Phone Book
Press To
1 g up or down scroll to the entry
2 M open the Phonebook Menu
3 g up or down scroll to Send Contact
4 SELECT select Send Contact
5 g up or down scroll to New SMS
68 Phone Book
Press To
6 SELECT select New SMS
Name, phone number, and
other information are inserted
into the message text.
7 Enter message text and recipient’s e-mail
address/phone number, a n d s end t h e
message.
Note: Creating Messages (see page 138)
6.4.7 Editing a Phone Book Entry
Find the Feature M > Phone Book
Press To
1 g up or down scroll to the entry
2 M open the Phonebook Menu
Page 69

Deleting a Phone Book Entry 6.4.8
Press To 4 SELECT select the option
3 g scroll to Edit
4 SELECT select the menu
Edit the options on the entry.
6.4.8 Deleting a Phone Book Entry
You can delete one or all Phone Book entries.
Find the Feature M > Phone Book
Press To
1 g up or down scroll to the entry
2 M open the Phonebook Menu
3 g up or down
scroll to
Delete
To delete all entries, select
Delete All
, press the
select
From Phone
press the
SELECT
or
key.
SELECT
From SIM
key,
, and
5 YES delete the entry or entries
Phone Book 69
Page 70

7 Camera
7Camera
You can do much more with your phone than make
and receive calls! This section describes some of your
phone’s highlight features.
7.1 Taking and Sending a Photo
Note: You can send pictures, videos, sounds,
shortcuts, bookmarks, events, and Phone Book
entries to a connected computer (see page 118).
To activate your phone’s camera, press the camera
key on the right side of your phone.
70 Camera
The active viewfinder image appears.
Press g
left or right
to switch
cameras.
2JQVQ8KGY
485
4GOCKPKPI
%#2674' $#%-
Press
M to
open Pictures Menu.
Take a photo.
Remaining
pictures
you can
take at this
resolution.
Return to
previous
screen.
Page 71

Taking and Sending a Photo 7.1
Point the camera lens at the photo subject, then:
Press To
1 CAPTURE take a photo
Tip: Press
light on or off
2 OPTIONS view storage options
If you choose to store the
photo, continue to step 3.
or
DISCARD delete the photo and return
to active viewfinder
3
up or down scroll to an option
g
4 SELECT select the option
M to open the Pictures Menu when the camera is
Press
active. The menu can include the following options:
* to turn the
Option Description
Go To Pictures View pictures and photos
stored on your phone.
Memory Card/Phone Memory Select the memory card or
the phone memory as
storage location (only
present when memory card
is inserted).
Internal / External View Switch between the internal
Auto-Timed Capture Set a timer for the camera to
Light
Adjust Brightness Change the image
Pictures Setup Open the setup menu to
View Free Space See how much memory
(self-portrait) and external
cameras.
take a photo.
Turn the camera light on or off.
brightness.
adjust picture and video
settings (see page 102).
remains for storing pictures.
Camera 71
Page 72

7.2 Using Photos and Pictures
You cannot assign pictures to entries stored on your
USIM card.
7.2 Using Photos and Pictures
You can send your photos to other mobile phone
users or e-mail addresses, assign photos to specific
Phone Book entries, and use them as wallpaper or
screen saver images.
7.2.1 Downloading Pictures
Your phone may contain predefined photos, pictures,
and animations. You can download and store
additional images on your phone.
If you are unable to establish a network connection
with Vodafone live!, contact Vodafone Customer
Centre (see page 198).
Note: The files that you download or receive as
attachments might have a lock that keeps you from
saving them on external memory, forwarding them, or
editing them.
72 Camera
To download a picture from Vodafone live!, see
page 169.
7.2.2 Viewing and Managing Pictures
To view a photo, picture, or animation stored on your
phone:
Find the Feature
Press To
1 g up or down scroll to the picture
2 VIEW view the picture
3 g
or
M
Tip: To assign a stored picture to a Phone Book entry,
open the entry and press
> Data Folder > Pictures
M
view the next/previous
picture
open the Pictures Menu to
perform other options
M > Edit > Picture.
Page 73

Viewing and Managing Pictures 7.2.2
M to open the Pictures Menu from the picture list.
Press
The menu can include the following options:
Option Description
Send in Message Insert selected picture in a new
message.
Memory Card/Phone
Memory
Apply as Set the picture as your phone's
Zoom Zoom in or out on the video.
New Capture a new picture or create
Details View picture information.
Rename Rename the picture.
Delete Delete the selected picture or
Switch between the phone memory
or the memory card (only present
when memory card is inserted).
Wallpaper/Screen Saver image or
Phonebook Entry.
an album of stored pictures.
marked picture(s).
Option Description
Move Move pictures from the phone
memory to the memory card, or
from the memory card to the
phone memory (only present
when memory card is inserted).
Copy Copy pictures from the phone
memory to the memory card, or
from the memory card to the
phone memory (only present
when memory card is inserted).
Mark Mark the picture to move, copy,
send or delete it.
Mark All Mark all pictures to move, copy,
send, or delete them.
Category Change category of the picture
list.
Assign to Category Assign the picture to a defined
category.
Camera 73
Page 74

7.3 Recording Video Clips
Option Description
Pictures Setup Change the way your picture list
appears.
View Free Space View memory space available for
storing pictures.
Note: When copying/moving encrypted content files,
select files one at a time. If multiple files are selected,
some files may not be copied/moved.
To adjust your phone’s wallpaper and screen saver
images, see page 86.
74 Camera
7.3 Recording Video Clips
Note: You can send pictures, videos, sounds,
shortcuts, bookmarks, events, and Phone Book
entries to a connected computer (see page 118).
To record a video on your phone:
Find the Feature
The active viewfinder image appears.
Press g up
or down to
pause or
play the
video clip.
Press
g
left or right
to switch
cameras.
Start video capture.
M
> Record Video
Remaining
clips you can
capture
Return to
previous
screen.
Press
M to
open Videos Menu.
Page 75

Recording Video Clips 7.3
Point the camera lens at the video subject, then:
Press To
1 CAPTURE start the video
Tip: You can press PAUSE to
pause video capture.
2 STOP stop the video
3 OPTIONS view storage options
If you choose to store the
video, continue to step 4.
or
DISCARD delete the video and return
to active viewfinder
4 g up or down scroll to an option
5 SELECT select the option
M to open the Videos Menu when the camera is
Press
active. The menu can include the following options:
Option Description
Go To Videos View videos stored on your
phone.
Memory Card/Phone
Memory
Internal / External
View
Light Tur n the c a m era light on or off.
Video Setup Open the setup menu to adjust
View Free Space See how much memory remains
Switch between the phone
memory or the memory card
(only present when memory card
is inserted).
Switch between the internal (selfportrait) and external cameras.
picture and video settings (see
page 102).
for storing videos.
Camera 75
Page 76

7.4 Using Video Clips
7.4 Using Video Clips
You can download video clips with Vodafone live!,
and receive video clips in MMS messages.
7.4.1 Downloading Video Clips
To download a video clip with Vodafone live!, see
page 170.
7.4.2 Viewing and Managing Video Clips
To play a video clip stored on your phone:
Find the Feature
Press To
1 g up or down scroll to the video clip
2 PLAY start video clip playback
76 Camera
> Data Folder > Videos
M
During video clip playback, press
Videos Menu to perform various operation on the video:
Option Description
Play Full Screen
Send in Message Insert selected video in a new
New Capture a new video.
Details View video information.
Delete Delete the selected video.
Move Move videos from the phone
Copy Copy videos from the phone
Mark Mark the video to move, copy,
Stretch the video to fill the display.
message.
memory to the memory card, or
from the memory card to the
phone memory (only present
when memory card is inserted).
memory to the memory card, or
from the memory card to the
phone memory (only present
when memory card is inserted).
send or delete it.
M to open the
Page 77

Making Video Calls 7.5
Option Description
Mark All Mark all video to move, copy,
send, or delete them.
Assign to Category Assign the video to a defined
category.
Videos Setup Open the setup menu to adjust
video settings.
View Free Space View memory space available for
storing videos.
Note:
• Video clips downloaded from Mobile Internet
sites cannot be set as Chaku-video.
Furthermore, on-screen text is unavailable when
playing videos.
• File property for Chaku-video can show up to 34
single-byte characters (17 double-byte
characters).
7.5 Making Video Calls
With your phone you can make a video call to
someone else who has a video phone and see each
other while you talk. Please note that both
participating in the video call have to be on the 3G
network and in the 3G coverage area.
7.5.1 Making a Video Call
A quick guide to making a video call:
Press To
1 keypad dial the phone number
2 S make the call
3 F end the call and “hang up”
the phone when you are
finished
Camera 77
Page 78

7.5.1 Making a Video Call
Options During an Active Video Call
Swapping Views
Press To
M > Swap View swap between the primary
and the secondary video
area during a video call
During an active video call, there are two video areas
on your phone display. The primary video area shows
your image (or the selected “Camera Off” Image) and the
secondary video area shows your recipient’s image.
You can swap between the video areas to place your
image onto the secondary video area, and the
recipient’s image onto the primary video area.
Selecting Applications
Press To
SELECT APP access other applications
during a video call
During an active video call, you can access other
applications, such as Phone Book, Calendar, Media Player, or the
78 Camera
Vodafone live!. You can also send and receive messages
during a video call, or start a new video call.
Video Call Menu
Find the Feature
Some of the options accessed from the Video Call Menu
during an active call include the following:
Option Description
Select Application access applications during an
Camera On/Camera Off change whether you want the
External View/
Internal View
Hold/Resume Video call is placed on hold.
M
active call, such as Phone
Book, Calendar or Vodafone
live!
Camera to be on or off.
If the Camera is on, select the
view from which the image is
captured.
Video and sound are not sent
until call is resumed. Select
Resume from the Video Call Menu to
resume the call.
Page 79

Making a Video Call 7.5.1
Option Description
Mute Audio/Unmute
Swap View change between the primary
Brightness adjust the brightness/contrast
Setup set up camera settings:
stop sending audio temporarily.
Select
Unmute
audio.
and secondary video area on
your phone display.
level of the display. This does
not affect the outgoing video
image.
- select Mirror so that the
camera captures a “mirror”
image (only applicable in Internal
View)
- select Status Icons to turn status
icons On/Off in the viewfinder
- select Lightning Conditions to setup
the display: Automatic, Sunny, Cloudy,
Indoor(Home), Indoor(Office), or Night
to resume sending
Camera 79
Page 80

8 Learning to Use Your Phone
8Learning to Use Your Phone
See page 26 for a basic phone diagram.
8.1 Using the Display
The home screen is displayed when you are not on a
call or using the menu. You must be in the home
screen to dial a phone number.
ޓޓޓVodafone
Date
ޓޓޓ 11/18/04
Messaging
Phone Book
Left Soft
Key Label
/GUUCIKPI
Menu Indicator
80 Learning to Use Your Phone
Shortcuts
Call Logs
Clock
Right Soft
Key Label
Press the 5-way navigation key (
) left, right, up, or
g
down to select one of the menu feature icons. If you
select a menu icon by mistake, press F to return to
the home screen.
Note:
•
Your phone returns to the home screen if the
handset is closed while viewing a site, composing
a message, or storing a Phone Book entry.
• Your home screen may look different from the
display shown left. For example, the menu
feature icons may be hidden to allow a better
view of the wallpaper image. You can still select
the menu icons when they are hidden from view.
• The number of characters for some menus and
messages may not fit in the display area, and ...
will appear at the end of the text.
The (menu) indicator indicates that you can press
the menu key (
M) to enter the main menu.
Labels at the bottom corners of the display show the
current soft key functions. Press the left soft key or
right soft key to perform the function indicated by the
left or right soft key label.
Page 81

Using Menus 8.2
8.2 Using Menus
From the home screen, press M to enter the main menu.
%COGTC
5'.'%6
Press g to scroll to and highlight a menu feature
icon in the main menu. The following icons may
display in the main menu.
Icon Feature Icon Feature
V-appli Vodafone live!
Media Player Messaging
Camera Data Folder
Tools Phone Book
Record Video Shortcuts
Call Logs Settings
'ZKV
8.2.1 Selecting a Menu Feature
To select a menu feature, starting from the home
screen:
Find the Feature
This example shows that from the home screen, you
must press
main menu, then scroll to and select Dialled Calls. Press
M, scroll to and select Call Logs from the
g to scroll to and select items. Press the left/right
soft keys to select the functions listed in the bottom
left and right corners of the display.
Learning to Use Your Phone 81
> Call Logs> Dialled Calls
M
Page 82

8.2.2 Selecting a Feature Option
8.2.2 Selecting a Feature Option
Some features require you to select an option from a
list:
Press VIEW to
view details of
highlighted
option.
• Press
g to scroll up or down to highlight the
option you want.
&KCNNGF%CNNU
3) 03XXXXXXXX
2) ,QJP5OKVJ
1) 090XXXXXXXX
8+'9 $#%-
Press
M to
open sub-menu.
Highlighted
Option
Press BACK
to go back
to previous
screen.
8.3 Using the External Display
When the flip is closed, the external display shows
time and phone status information. It also shows
82 Learning to Use Your Phone
messages to notify you of incoming calls and other
events. See page 29 for descriptions of the status
indicators that may appear in the external display.
Note: You cannot make or receive calls when the
phone is closed unless you attach a optional Motorola
Original™ stereo earphone microphone.
8.4 Using the Handsfree Speaker
When you activate your phone’s integrated handsfree
speaker, you can talk to the other party without
holding the phone to your ear.
Press the SPEAKER key to turn the handsfree speaker on
or off during a call.
When you turn the handsfree speaker on, your phone
displays Speaker On in the home screen. The handsfree
speaker remains on until you press the SPEAKER key
again or turn the phone off.
Note: The handsfree speaker is disabled when you
connect your phone to a optional Motorola Original™
stereo earphone microphone.
Page 83

Changing a Code, PIN, or Password 8.5
8.5 Changing a Code, PIN, or
Password
Your phone’s 4-digit unlock code is originally set to
1234, and the 6-digit security code is originally set to
000000.
We recommend that you change them to prevent
others from accessing your personal information. The
unlock code must contain 4 digits, and the security
code must contain 6 digits.
You can also reset your USIM card PIN code or PIN2
code, if necessary.
To change a code or password:
Find the Feature
> Settings > Security Set
M
> New Passwords
8.6 Locking and Unlocking Your
Phone
You can lock your phone manually or set the phone to
lock automatically whenever you turn it off.
To use a locked phone, you must enter the unlock
code. A locked phone still rings or vibrates for
incoming calls or messages, but you must unlock it to
answer.
You cannot make emergency calls on your phone
when it is locked.
8.6.1 Locking Your Phone Manually
Find the Feature
Press To
1 keypad enter your unlock code
2 OK lock the phone
Learning to Use Your Phone 83
> Settings > Security Set
M
> Phone Lock > Lock Now
Page 84

8.6.2 Unlocking Your Phone
8.6.2 Unlocking Your Phone
Your phone’s unlock code is originally set to 1234.
At the Enter Unlock Code prompt:
Press To
1 keypad enter your unlock code
2 OK unlock your phone
8.6.3 Setting Your Phone to Lock
Automatically
You can set your phone to lock every time you turn it
off.
Find the Feature
Press To
1 keypad enter your unlock code
2 OK activate automatic lock
84 Learning to Use Your Phone
> Settings > Security Set
M
> Phone Lock > Automatic > On
8.6.4 If You Forget a Code, PIN, or
Password
Your phone’s 4-digit unlock code is originally set to
1234, and the 6-digit security code is originally set to
000000.
If you forget your unlock code, at the Enter Unlock Code
prompt:
Press To
M open the unlock code bypass
1
2 keypad enter your
3 OK submit your security code
If you forget your security code, USIM card PIN code,
or PIN2 code, contact Vodafone Customer Centre
(see page 198).
screen
security code
Page 85

Setting Up Your Phone 9
9Setting Up Your Phone
9.1 Setting the Time and Date
Your phone uses the time and date for the Calendar.
Find the Feature
> Settings > Initial Setup
M
> Time and Date
9.2 Setting a Ring Style
Your phone rings or vibrates to notify you of an
incoming call or other event. This ring or vibration is
called an alert.
You can select one of five different ring styles. The
ring style indicator in the display shows the current
ring style (see page 29).
To set a ring style:
Find the Feature
Press To
1
g up or down scroll to the ring style
2 SELECT select the ring style
> Settings > Ring Styles
M
> Style
Each ring style contains settings for specific event alerts,
ringer ID, and ringer and keypad volume. To change
these settings, press
• If you select the Silent ring style, your phone will
not use Auto Answer (see page 116).
• To turn off alerts for messages that arrive during
a call, select
> MSG Alert > Not in Call.
M
>
Settings >Ring Styles>style
M > Settings > In-Call Setup
Detail
9.3 Setting Answer Options
You can use additional methods to answer an
incoming call.
Multi-key answer by pressing any key
Open To Answer answer by opening the phone
To activate or deactivate an answer option:
Find the Feature
> Settings > In-Call Setup
M
> Answer options
Setting Up Your Phone 85
.
Page 86

9.4 Setting a Wallpaper Image
Press To
g up or down scroll to Multi-key or
1
Open To Answer
2 CHANGE select the option
3
up or down scroll to On or Off
g
4 SELECT confirm the setting
9.4 Setting a Wallpaper Image
You can set a photo, picture, or animation as a
wallpaper (background) image in your phone’s home
screen.
Find the Feature
Setting Description
Picture Select the picture or animation for
the background image in your
home screen.
Layout Select Centre, Tile, or Fit-to-screen.
86 Setting Up Your Phone
> Settings > Personalise
M
> Wallpaper
9.5 Setting a Screen Saver Image
You can set a photo, picture, or animation as a screen
saver image.
The screen saver image appears when the phone is
on and no activity is detected for a specified time
period. The image shrinks to fill the display, if
necessary. An animation repeats for one minute, then
the first frame of the animation appears.
Tip: Turn off the screen saver to extend battery life.
Find the Feature
Setting Description
Picture select the picture or animation for
your screen saver
Delay select how long your phone must
be inactive before the screen saver
picture appears
Note: If this setting is longer than
your Display Timeout setting, then your
display will turn off before you see
the screen saver.
> Settings > Personalise
M
> Screen Saver
Page 87

Setting Display Brightness 9.6
9.6 Setting Display Brightness
Find the Feature
> Settings > Initial Setup
M
> Brightness
9.7 Adjusting the Backlight
You can set the amount of time that the display and
keypad backlights remain on, or turn off backlights to
extend battery life.
Caution: The Continuous setting can decrease battery
life.
Find the Feature
> Settings > Initial Setup
M
> Backlight
9.8 Setting Display Timeout
You can set the display to turn itself off when no
activity is detected for a specified time period.
Find the Feature
> Settings > Initial Setup
M
> Display Timeout
Setting Up Your Phone 87
Page 88

10 Personalising Your Phone
10Personalising Your Phone
10.1 Personalising a Ring Style
You can change the alerts that notify you of the
following events: incoming calls, SMS messages,
voicemail messages, data calls, alarms, and
reminders. Any changes you make are applied to the
current ring style.
Find the Feature
Note: style represents the current ring style.
Press To
1
g up or down scroll to the event
2 CHANGE select the event
3
up or down scroll to the alert you want
g
4 SELECT select the alert
• To turn off alerts for messages that arrive during
a call, select
> MSG Alert > Not in Call.
88 Personalising Your Phone
M > Settings > In-Call Setup
> Settings > Ring Styles
M
> style Detail
10.2 Activating Ringer IDs
When ringer IDs are turned on, your phone uses
distinctive ring tones to notify you of incoming calls or
messages from specific entries in your Phone Book or
specific categories of entries in your Phone Book.
Note: To assign a ringer ID to a new or existing Phone
Book entry, see page 58.
Find the Feature
Note: style represents the current alert style.
Press To
g up or down scroll to On or Off
1
2 SELECT select the option
> Settings > Ring Styles
M
> style Detail > Ringer IDs
Page 89

Setting Ringer or Keypad Volume 10.3
10.3 Setting Ringer or Keypad
Vol ume
Find the Feature
Note: style represents the current alert style.
Press To
1
g up or down scroll to Ring Volume or Key Volume
2
left or right scroll to the desired volume
g
3 OK store the setting
> Settings > Ring Styles
M
> style Detail
10.4 Setting Reminders
A reminder is an alert that rings or vibrates at regular
intervals to notify you about a message that you have
received, or a calendar event you have scheduled.
Find the Feature
Note: style represents the current alert style.
> Settings > Ring Styles
M
> style Detail > Reminders
Press To
g up or down scroll to Beep or Vibrate to set
1
2 SELECT select the reminder alert
the reminder alert type, or Off
to turn off all reminders
10.5 Setting a Personal Greeting
Set a personal greeting that appears when you turn
on your phone.
Find the Feature
> Settings > Personalise
M
> Greeting
10.6 Personalising Home Screen
Icons
You can change the features that your navigation key
selects in the home screen.
Find the Feature
Personalising Your Phone 89
> Settings > Personalise
M
> Watch&Key > Key Assign
Page 90

10.7 Setting the Menu View
Press To
g up or down scroll to Up, Down, Left, or Right
1
2 CHANGE select the action
3
up or down scroll to a menu feature
g
4 SELECT confirm the menu feature
10.7 Setting the Menu View
Set your phone to display the main menu as graphic
icons (the default setting) or as a text-based list.
Find the Feature
Press To
1
g up or down scroll to Icons or List
2 SELECT select the menu view
90 Personalising Your Phone
> Settings > Personalise
M
> Main Menu > View
10.8 Personalising the Menu
You can reorder the items in your phone’s main menu.
Find the Feature
Press To
g up or down scroll to a menu item
1
2 GRAB key grab the menu item
3
up or down move the item to a new
g
4 INSERT insert the menu item
> Settings > Personalise
M
> Main Menu > Reorder
location in the menu
Page 91

Setting Menu Scroll Behaviour 10.9
10.9 Setting Menu Scroll Behaviour
Set the highlight bar to stop or wrap around when you
reach the top or bottom of a menu list.
Find the Feature
> Settings > Initial Setup
M
> Scroll
10.10 Resetting All Options
Reset all options back to their original factory
settings, except for the unlock code, security code,
and lifetime timer.
Find the Feature
> Settings > Initial Setup
M
> Master Reset
10.11 Clearing All Stored Information
Reset all options back to their original factory
settings, except for the unlock code, security code,
and lifetime timer, erase all downloaded pictures,
animations and sound files, and clear all user settings
and entries, except for information stored on the
USIM card.
Caution: Master Clear erases all user-downloaded
content and user-entered information stored in your
phone’s memory, including Phone Book and calendar
entries. After you erase the information, you cannot
recover it. Master Clear does not delete any information
stored on the USIM card.
Find the Feature
Personalising Your Phone 91
> Settings > Initial Setup
M
> Master Clear
Page 92

10.12 Creating and Using Shortcuts
10.12 Creating and Using Shortcuts
Your phone includes several standard shortcuts. You
can create additional custom shortcuts to frequently
used menu items.
10.12.1 Standard Shortcuts
The following shortcuts are preprogrammed on your
phone. You cannot edit or delete these shortcuts.
Ta sk S ho rtc ut
Change your
phone’s ringer
alert setting
Lock your
keypad
Display your
phone number
92 Personalising Your Phone
Press the down volume key (at
lowest volume setting) to switch
to vibrate call alert. Press again to
switch to silent call alert.
Press the up volume key to cycle
back to vibrate alert, then ring
alert.
From the home screen, press
M*.
From the home screen, press
M#.
Ta sk S ho r tc ut
Go to the
dialled calls list
Exit the menu
system
From the home screen, press D.
Press F.
Preconfigured Vodafone shortcuts
On your phone there are preconfigured Vodafone
shortcuts, which enable you to quickly access the
Vodafone live! services.
10.12.2 Creating a Shortcut
Action
1 Press
2 Press
3 Press and hold
M to enter the menu system.
up or down to scroll to the menu item.
g
M to open the shortcut editor.
Page 93

Using a Keypad Shortcut 10.12.3
Action
4 Press the YES key to view shortcut options.
To change the keypad shortcut number:
a Press
b Press keypad to enter the new key
c Press OK to store the new key
5 Press the DONE key to store the shortcut.
g up or down to scroll to Key
10.12.3 Using a Keypad Shortcut
Press To
1
M open the main menu
2 a number key go to the menu item with that
shortcut number
10.12.4 Selecting a Shortcut From the
List
Find the Feature
> Shortcuts
M
> shortcut name
10.12.5 Editing or Deleting a Shortcut
The shortcut list is sorted by key. If you change a
shortcut’s key, you change its place in the list.
Find the Feature
Press To
g up or down scroll to the shortcut
1
2
M open the Shortcut Menu to
The Shortcut Menu can include the following options:
Option Description
New Read instructions on how to
create a new shortcut.
Edit Edit the shortcut.
Reorder List Change the shortcut list order.
Delete Delete the shortcut.
Delete All Delete all shortcuts.
Personalising Your Phone 93
> Shortcuts
M
perform various options on
the shortcut
Page 94

11 Calling Features
11Calling Features
For basic instructions on how to make and answer
calls, see page 35.
11.1 Redialling a Number
Press To
1 D view the dialled calls list
up or down scroll to the entry you want
2
g
3 D redial the number
to call
11.2 Using Caller ID
11.2.1 Incoming Calls
Calling line identification (Caller ID) displays the
phone number for incoming calls.
The phone displays the caller’s name (and picture, if
available) if the name is stored in your Phone Book, or
Incoming Call when caller ID information is not available.
94 Calling Features
You can also set your phone to play a distinctive
Ringer ID for specific entries stored in your Phone Book.
For more information, see page 58.
11.2.2 Outgoing Calls
You can show or hide your phone number as an ID for
the calls that you make.
While dialling (with digits visible in the display), press
M > Hide ID/Show ID.
11.3 Turning Off a Call Alert
You can turn off your phone’s incoming call alert
before answering the call.
Press To
either volume key turn off the alert
Page 95

Dialling International Numbers 11.4
11.4 Dialling International Numbers
• In Japan
You can make an international call by entering
the Vodafone international access code
(0046010) + the country code + the other party’s
phone number (excluding the 0 in the area code).
Note: A separate subscription to the international call
service is required.
• Abroad
Press and hold 0 to insert the local
international access code (+) from which you are
calling.
Note: When using your phone abroad, calls made to
emergency numbers may not connect in every
country depending on wireless networks, wireless
signals, or handset settings.
11.5 Viewing Recent Calls
Your phone keeps lists of the calls you recently
received and dialled, even if the calls did not connect.
The lists are sorted from newest to oldest entries. The
oldest entries are deleted as new entries are added.
Shortcut: Press D from the home sc reen to view the
Dialled Calls list.
Find the Feature
Press To
g up or down scroll to Received Calls or
1
2 SELECT select the list
3
up or down scroll to an entry
g
4 D call the entry’s number
or
> Call Logs
M
Dialled Calls
Tip: Press and hold D for
two seconds to send the
number as DTMF tones
during a call.
Calling Features 95
Page 96

11.5 Viewing Recent Calls
Press To
S make a video call to the
entry’s number
or
View / Store if View appears above the left
or
M
The Last Calls Menu can include the following options:
Option Description
Store Create a Phone Book entry with
Delete Delete the entry.
96 Calling Features
soft key, this displays entry
details
if Store appears above the left
soft key, this stores the entry
in the Phone Book
open the Last Calls Menu to
perform various operations
on the entry
the number in the No. field.
Option Description
Delete All Delete all entries in the list.
Hide ID/Show ID Hide or show your caller ID for
the next call.
Send Message Open a new SMS message with
the number in the To field.
Add Digits Add digits after the number.
Attach Number Attach a number from the Phone
Book or recent calls lists.
Send Tones Send the number to the network
as DTMF tones.
This option appears only during a
call.
Page 97

Returning an Unanswered Call 11.6
11.6 Returning an Unanswered Call
Your phone keeps a record of your unanswered calls,
and displays X Missed Calls, where X is the number of
missed calls.
Press To
1 VIEW see the received calls list
2
up or down select a call to return
g
3 D make the call
11.7 Using the Notepad
The most recent set of digits entered on the keypad
are stored in your phone’s notepad memory. This can
be a phone number that you called, or a number that
you entered but did not call.
To retrieve the number stored in the notepad:
Find the Feature
> Call Logs > Notepad
M
Press To
D call the number
or
M
or
STORE create a Phone Book entry
open the Dialling Menu to attach
a number or insert a special
character
with the number in the No.
field
11.8 Attaching a Number
While dialling (with digits visible in the display):
Press To
M > Attach Number
attach a number from the
Phone Book or recent calls
lists
Calling Features 97
Page 98

11.9 Calling with Speed Dial
11.9 Calling with Speed Dial
Each entry you store in your Phone Book is assigned
a unique speed dial number.
To see an entry’s speed dial number, press
> Phone Book, scroll to the entry, and press the VIEW key.
To speed dial a Phone Book entry:
Press To
1 keypad enter the speed dial number
2
# submit the number
3 D call the entry
for the entry you want to call
M
11.10 Calling with 1-Touch Dial
To call Phone Book entries 2 to 9, press and hold the
single-digit speed dial number for one second.
Press and hold
store your voicemail number, see page 99.
98 Calling Features
1 to dial your voicemail number. To
11.10.1 Setting 1-Touch Dial Preference
You can set 1-touch dial to call the entries in your
phone memory Phone Book or the USIM card Phone
Book.
Find the Feature
Press To
1 g up or down scroll to the list you want
2 SELECT select the list
> Settings > Initial Setup
M
> 1-Touch Dial
11.11 Using Voicemail
Voicemail messages that you receive are stored on
the network. To listen to your messages, you must
call your voicemail phone number.
• A separate subscription is required to use this
service.
Page 99

Listening to Voicemail Messages 11.11.1
11.11.1 Listening to Voicemail Messages
Find the Feature
Shortcut: Press and hold 1 in the home screen.
The phone calls your voicemail phone number. If no
voicemail number is stored, your phone prompts you
to store a number.
> Messaging > Voicemail
M
11.11.2 Receiving a Voicemail Message
When you receive a voicemail message, your phone
displays New Voicemail.
Press To
CALL listen to the message
The phone calls your voicemail phone number. If no
voicemail number is stored, your phone prompts you
to store a number.
11.11.3 Storing Your Voicemail Number
If necessary, use the following procedure to store
your voicemail phone number on your phone.
Find the Feature
Press To
1 g up or down scroll to Voicemail No.
2 CHANGE select Voicemail No.
3 keypad enter “1416”
4 OK store the number
You cannot store a p (pause), w (wait), or n (number)
character in this number. If you want to store a
voicemail number with these characters, create a
Phone Book entry for it. Then, you can use the entry
to call your voicemail. To store these characters in a
number, see page 53.
> Messaging
M
> Voicemail Setup
M
Calling Features 99
Page 100

11.12 Using Call Waiting
11.12 Using Call Waiting
When you are on a call or downloading a file, an alert
tone sounds to indicate that you have received a
second call.
• A separate subscription is required to use this
service.
Press To
1 D answer the new call
2 SWITCH switch between calls
or
LINK connect the 2 calls
or
M > EndCallOnHold end the call on hold
You must turn on call waiting to use the feature. To
turn call waiting on or off:
Find the Feature
100 Calling Features
> Settings > In-Call Setup
M
> Call Waiting
11.13 Putting a Call On Hold
Press To
M > HOLD
put the call on hold
11.14 Transferring a Call
(Not Available in Japan)
You can announce that you are transferring an active
call to another party, or you can directly transfer the
call. This service is available abroad only.
11.14.1 Announce the Call Transfer
Find the Feature
Press To
1 keypad dial the number where you
2 D call the number and speak to
3
M open the menu
> HOLD
M
are transferring the call
the person who answers
 Loading...