

Page 1
To Turn On
1.Insert SIM Card.
2.Turn on:
3.If prompted: PIN Code & Unlock Code
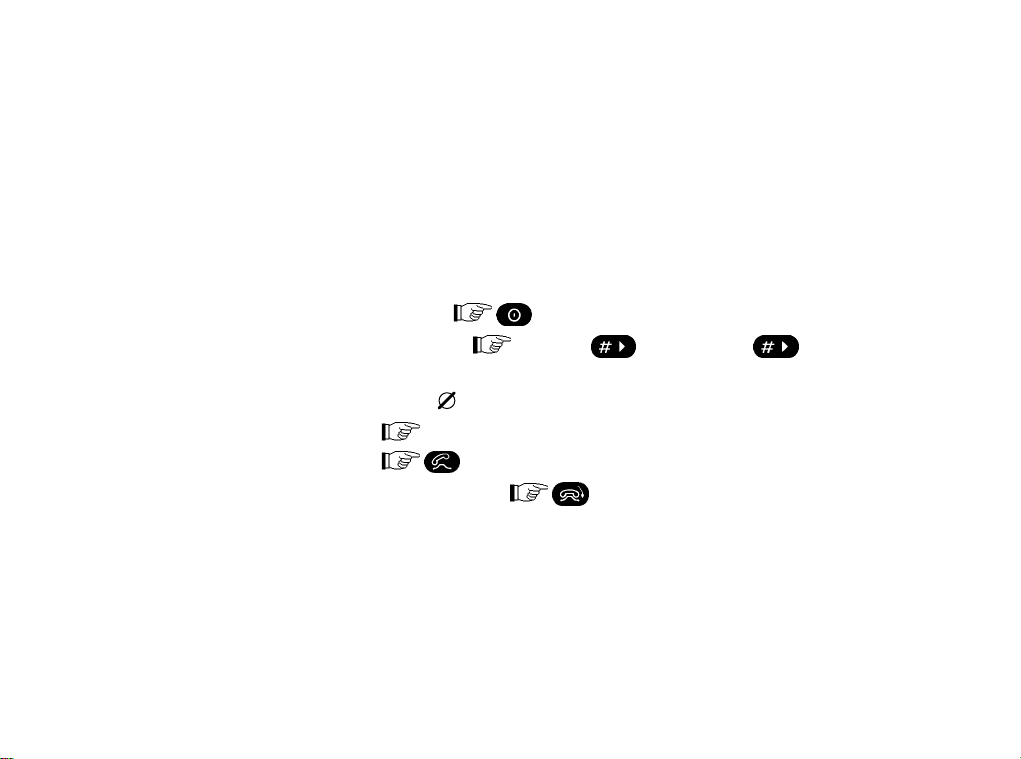
To Make a Call
1.Check
2.
3.
4.To end the call:
is off.
Telephone number (No dial tone).
Quick User Guide
Page 2
To Answer a Call:
or open the flip
To End a call:
or close the flip
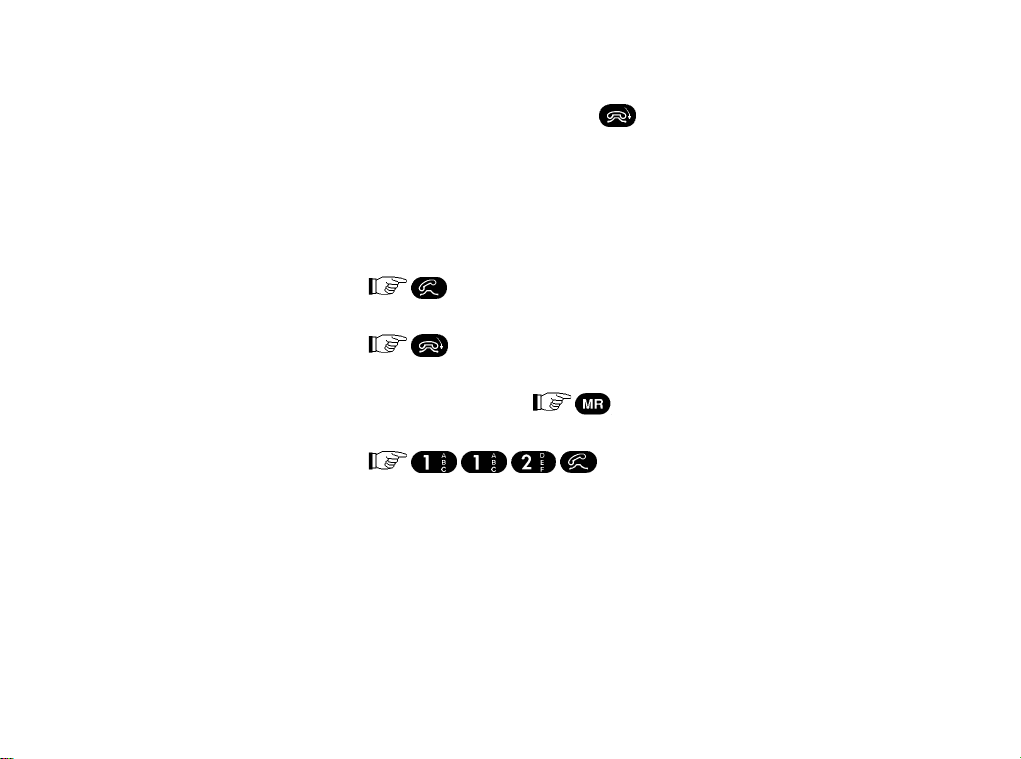
To Recall a phone number from memory
By location number:
Inform operator about your subscriber number, position
and the type of emergency. Stay by the telephone.
location number
Emergency Call
Quick User Guide
Page 3
1
1
2
2
Page 4
2
10
12
13
3
4
7
8
1
9
5
6
11
12
Page 5

SIM Card Data
Subscriber number:
PIN Code * (4 to 8 digits):
Unblocking Code (8 digits):
Barring Password * (4 digits):
* Changeable
Press out and keep in a secure place
Page 6

Telephone Data
Serial number:
Unlock Code * (3 digits):
Security Code ** (6 digits):
* Changeable, upon delivery = 1 2 3
** Changeable, upon delivery = 0 0 0 0 0 0
Press out and keep in a secure place
Page 7

MANUAL UPDATES
No user manual updates at this time.
Page 8

MANUAL UPDATES
Page 9

RF SAFETY
IMPORTANT
For the efficient and safe operation of
your GSM Hand-Held Portable Cellular
Telephone,
Read this information before
use.
Your GSM hand-held portable cellular
telephone is one of the most exciting and
innovative electronic products ever developed. With it you can stay in contact with
your office, your home, emergency services,
and others, wherever service is provided.
GENERAL
Your cellular telephone utilizes the GSM
standard for cellular technology. GSM is a
newer radio frequency ("RF") technology than
the current FM technology that has been used
for radio communications for decades. The
GSM standard has been established for use
in the European Community and elsewhere.
Your cellular telephone is actually a low
power radio transmitter and receiver. It sends
out and receives radio frequency energy.
When you use your cellular telephone, the
cellular system handling your call controls
both the radio frequency and the power level
of your cellular telephone.
Page 10

RF SAFETY
EXPOSURE TO RF ENERGY
There has been some public concern about
possible health effects of using portable handheld cellular telephones. Although research
on health effects from RF energy has focused
for many years on the current RF technology,
scientists have begun research regarding
newer radio technologies such as GSM. After
existing research had been reviewed, and
after compliance to all applicable safety
standards had been tested, it has been
concluded that the product is fit for use.
If you are concerned about exposure to RF
energy there are things you can do to minimize exposure. Obviously, limiting the
duration of your calls will reduce your exposure to RF energy. In addition, you can
reduce RF exposure by operating your
cellular telephone efficiently by following the
below guidelines.
Page 11

RF SAFETY
EFFICIENT CELLULAR TELEPHONE
OPERATION
For your cellular telephone to operate at the
lowest power level consistent with satisfactory
call quality, you should:
Extend The Antenna Fully.
If your antenna is retractable, be sure the
antenna is extended fully. Your cellular
telephone operates efficiently with the
antenna extended.
Hold Your Cellular Telephone As You
Would Any Other Telephone.
Do Not Hold or Touch The Antenna When
Your Cellular Telephone Is In Use.
Holding the antenna affects call quality
and may cause the cellular telephone to
operate at a higher power level than
otherwise needed.
Page 12

RF SAFETY
ANTENNA CARE AND REPLACEMENT
Do Not Use The Cellular Telephone With
A Damaged Antenna.
Electricity from an exposed metal inner
conductor may cause a minor burn.
Replace a damaged antenna immediately.
Consult your manual to see if you may
change the antenna yourself. If so, use
only a manufacturer-approved antenna.
Otherwise, take your cellular telephone to
a qualified service centre.
Use Only The Supplied Or Approved
Antenna.
Unauthorized antennas, modifications or
attachments could damage your cellular
telephone and substantially affect its
efficient operation.
Following these guidelines will help assure
the efficient and safe use of your cellular
telephone.
Page 13

RF SAFETY
This Cellular Telephone Complies With
All Applicable "RF" Safety Standards
This cellular telephone meets the standards
and recommendations for the protection of
public exposure to "RF" electromagnetic
energy established by governmental bodies
and other qualified organizations, such as the
following:
Verband Deutscher Elektroingenieure
(VDE) DIN-0848
Directives of the European Community,
Directorate General V in Matters of
Radio Frequency Electromagnetic
Energy
National Radiological Protection Board
of the United Kingdom. GS-11, 1988.
American National Standards Institute
(ANSI)/IEEE. C95.1-1992
National Council on Radiation
Protection and Measurements (NCRP).
Report 86
Page 14

RF SAFETY
Page 15

SAFETY FIRST
GENERAL
GENERAL
The following provides advisory and cautionary instructions to users of GSM mobile
stations regarding their own and third party
safety.
ELECTRICAL SAFETY
ELECTRICAL SAFETY
This apparatus is intended for use when
supplied with power from:
Battery Chargers:
SLN9347 + SPN4161A or SPN4069A
or SPN4038A or SPN4037A
SLN5039 + SPN4181A or SPN4030A
or SPN4026A or SPN4034A
SLN5262 + SPN4028A or SPN4037A
Battery Savers:
SKN4292, SKN4591
Car Kits/Vehicular Chargers:
S3060, S3285, S1759, S1758, S3512, S3717
Other usage will invalidate any approval given
to this apparatus and may be dangerous.
Page 16

SAFETY FIRST
AIRCRAFT SAFETY
AIRCRAFT SAFETY
Switch off your cellular telephone when in an
aircraft. The use of cellular telephones in an
aircraft may be dangerous to the operation of
the aircraft, disrupt the cellular network and is
illegal. Failure to observe this instruction may
lead to suspension or denial of cellular
telephone services to the offender, or legal
action or both.
EXPLOSIVE ATMOSPHERES
EXPLOSIVE ATMOSPHERES
Users are advised not to use the
•
equipment when at a refuelling point.
Users are reminded of the need to observe
•
restrictions on the use of radio equipment
in fuel depots, chemical plants or where
blasting operations are in progress.
ROAD SAFETY
ROAD SAFETY
The use of the Alert device to operate a
•
vehicle's lights or horn on public roads is
not permitted.
It is advised that a hand-held microphone
•
or telephone handset should not be used
by the driver while the vehicle is moving,
except in an emergency. Speak only into
a fixed, neck slung or clipped-on microphone when it would not distract your
attention from the road.
Page 17

SAFETY FIRST
USAGE INSIDE A VEHICLE
USAGE INSIDE A VEHICLE
If operating a cellular telephone inside the
vehicle without utilizing an external antenna,
the functionality of inadequately shielded
equipment (such as antilock braking and fuel
injection systems, etc.) in your vehicle may be
impaired.
Consult your vehicle owner's manual or ask
your automobile dealer if you have questions
about your vehicle.
MEDICAL ELECTRONICS
MEDICAL ELECTRONICS
Operation of any radio transmitting equipment, including cellular telephones, may
interfere with the functionality of inadequately
shielded medical devices (such as pacemakers, hearing aids, etc.) Consult your physician or ask the manufacturer of the medical
device if you have questions.
Page 18

SAFETY FIRST
Page 19

CONTENTS
ESSENTIAL INFORMATION
INTRODUCTION...........................................7
Telephone Overview................................8
Display .....................................................8
Volume Keys..........................................10
SIM Card Release .................................10
Keypad...................................................10
BASIC OPERATION ...................................12
Inserting the SIM Card...........................13
Switch Phone On/Off .............................14
Entering the PIN Code...........................15
Making Calls ..........................................16
Dialling Errors ........................................16
Ending Calls...........................................16
Receiving Calls ......................................16
Call in Absence......................................17
Automatic Redial....................................17
International Calls ..................................18
GSM Emergency Calls ..........................18
Storing Telephone Nos. into Memory ....19
Recalling Telephone Nos. from
Memory..................................................21
Speed Dial .............................................22
Clearing Numbers Stored in Memory ....22
1
Page 1
Page 20

CONTENTS
ADVANCED INFORMATION
FEATURE MENUS......................................23
STATUS REVIEW .......................................25
MASTER RESET ........................................26
MASTER CLEAR ........................................27
SYSTEM REGISTRATION..........................28
Automatic Roaming ...............................28
Manual Roaming....................................30
Displaying Preferred Operator List ........31
Changing Preferred Operator List..........32
MEMORY FEATURES ................................33
Notepad .................................................33
Recall Last Number 'Called'...................33
Memory Linking .....................................34
INTERFACE FEATURES............................34
Electronic Lock ......................................34
Automatic Lock ......................................35
Changing the Unlock Code....................35
Ringer On/Off.........................................35
Keypad Tones On/Off ............................36
Tone Signalling Features.......................36
Notepad Tones On/Off...........................36
Pauses in Memory .................................37
DTMF Signalling ....................................38
Long Tone DTMF...................................39
Language Selection ...............................39
PIN Code Enable/Disable ......................40
Changing the PIN Code.........................41
Unblocking SIM Card.............................42
Changing the Security Code..................43
Page 2
2
Page 21

CONTENTS
ADVANCED INFORMATION
CALL MONITORING ...................................43
One Minute Audible Call Timer..............43
Programmable Audible Call Timer.........44
Visual Call Timers & Meters ..................45
Displaying Call Timers ...........................46
Displaying Call Meters ...........................46
Programming Rates...............................47
Automatic Monitor Displays ...................47
CALL RESTRICTIONS................................48
Restrict Keypad Dialling.........................48
Restrict Memory Access ........................49
Restrict Incoming Calls ..........................49
Restrict Phone Number Length .............50
Full Service ............................................50
CALL BARRING ..........................................51
Activating Call Barring ...........................52
Cancelling Call Barring ..........................52
Call Barring Status.................................53
Changing Call Barring Password...........53
Special Call Barring Messages..............54
CALL FORWARDING .................................54
Activating Call Forwarding .....................55
Cancelling Call Forwarding....................56
Call Forwarding Status .........................56
Special Call Forwarding Messages .......57
2
Page 3
Page 22

CONTENTS
ADVANCED INFORMATION
SHORT MESSAGE SERVICE (SMS) .........58
Automatic Cell Broadcast........................58
Point to Point Messages .........................60
Receiving Point to Point Messages ........60
Storage of Point to Point Messages........61
Reading Point to Point Messages...........61
Clearing Messages From Memory..........62
Embedded Callback Numbers ................63
Short Message Alert Tone ......................63
CALL WAITING AND CALL HOLDING .......64
Call Waiting.............................................64
Call Holding.............................................65
Call Hold and Waiting Combinations ......65
Call Hold and Making New calls .............68
Call Holding and Call Waiting Messages.68
Emergency Calls and Call Hold/Wait......69
2
Page 4
Page 23

CONTENTS
ACCESSORIES AND OPTIONS
BATTERY OPERATION..............................70
Low Battery Warning .............................70
Battery Saving Feature (DTX) ...............70
Replacing Battery ..................................71
Important Charging Information .............71
Overnight Desktop Battery Charger.......72
Rapid Desktop Battery Charger.............72
BATTERY SAVER.......................................73
ULTRA SAVER ...........................................73
CAR KIT FEATURES ..................................74
Automatic Answer..................................74
Entertainment Mute / Auxiliary Alert ......75
Entertainment Mute..........................75
Auxiliary Alert ...................................75
Safety Timer ..........................................76
MICRO CAR KITS.......................................77
Simple Micro Car Kit ..............................77
Coupled Micro Car Kit............................77
Micro Car Kit Operation .........................78
Micro Car Kit Vehicular Charger ............79
Switching Phone On/Off ........................80
Adjusting Volume...................................81
Automatic Hands Free ...........................81
Standard Hands Free ............................82
Micro Car Kit Rear Panel .......................82
3
Page 5
Page 24

CONTENTS
ACCESSORIES AND OPTIONS
BASIC CAR KIT ..........................................83
Basic Car Kit Operation .........................83
Basic Car Kit Vehicular Charger ............84
Switching Phone On/Off ........................85
Adjusting Volume...................................85
Automatic Hands Free ...........................86
Switching Between Hands Free and
Handset .................................................87
INDEX .........................................................88
The Manufacturer reserves the right to
make changes in technical and product
specifications without prior notice.
3
Page 6
Page 25
ESSENTIAL INFORMATION
1
INTRODUCTION
INTRODUCTION
This cellular telephone is designed for the
GSM System. Using this phone makes it
possible to contact any phone in the world,
provided you are in an area covered by the
GSM system.
The cellular telephone does not contain your
GSM-subscriber number, this information is
contained on your SIM card supplied by your
local network operator. All billing will be
registered, when the conversation takes
place, to the subscriber number on the SIM
card which is inserted in the phone.
Instruction sequences shown in this manual
are presented in the following format:
This format indicates that you should press
the
then the other, not simultaneously).
For your protection, some features require a
6-digit security code.
•
key and then the key (one,
Your security code is initially set to
'000000'. To program a unique security
code, please see section, 'Changing the
Security Code.'
CAUTION
This phone contains a magnet. Do not
place the phone next to magnetic storage
media such as computer diskettes.
Page 7
Page 26

ESSENTIAL INFORMATION
1
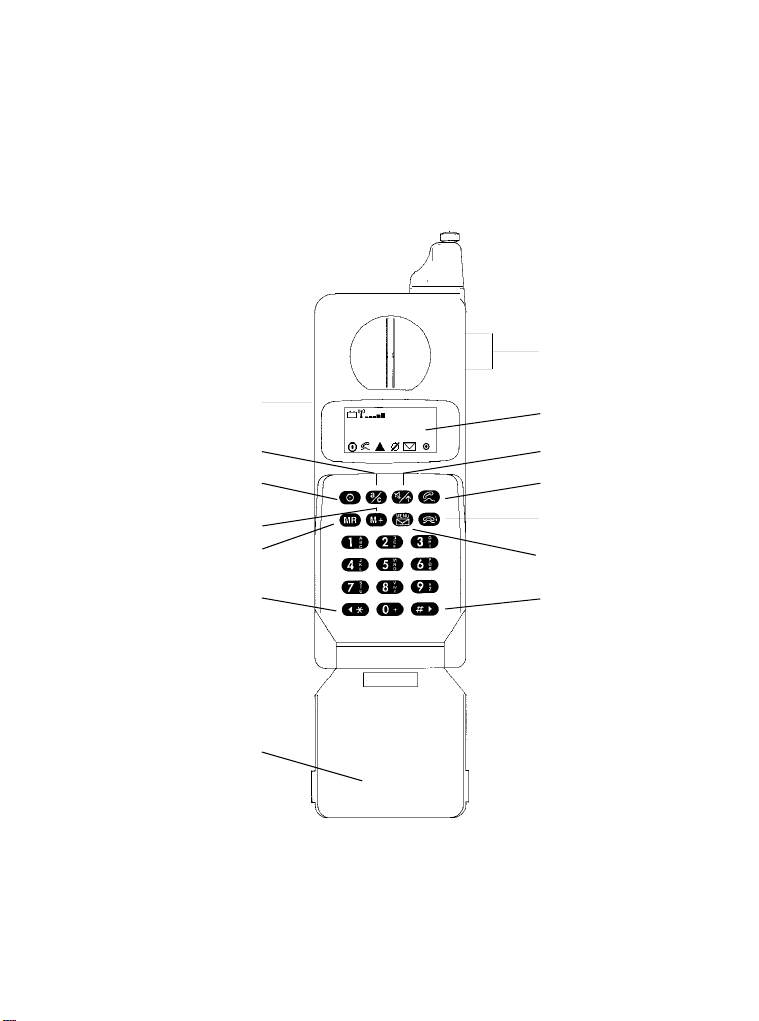
Telephone Overview
Telephone Overview
See flap at the front page.
Display
Display
The display and keypad are back lit whenever the
telephone is switched on. After several seconds,
the back lighting will turn off.
Pressing any key will return the back lighting.
1. Displays the entered telephone number or
alpha message. The following indicators may
also appear in the display:
Power on
Stays lit while the phone is on.
In Use
Symbol lights when a call is in progress.
No Service
Fixed symbol:
coverage and cannot make calls.
Flashing:
but not registered on the system. You can
make emergency calls using the special GSM
emergency number, 112, but cannot make/
receive ordinary calls.
Roam
Fixed Symbol:
preferred system different from your home
system.
Flashing:
preferred system.
You are out of cellular system
You are in an area with coverage
You are registered on a
You are registered on a non-
Page 8
Page 27

ESSENTIAL INFORMATION
1
Signal Strength
The more segments displayed in the bar
graph, the better the signal strength and call
quality.
Battery Level
Fixed symbol:
sufficient for normal operation.
Slow flash:
becoming low.
Rapid flash:
depleted. Replace or recharge battery.
Short Message Service
This icon is used to support various SMS
features.
This phone is equipped with the latest in display
technology. This "supertwist" liquid crystal display
(LCD) provides superior performance, viewing
angle and viewing contrast over previous LCD
technologies. At extremely cold temperatures, it is
normal for the display to respond more slowly to
key presses.
these circumstances, the audible tones will
still indicate that a key has been depressed
and the visual indication will follow shortly.
Battery charge level is
Warning! Battery charge level
Battery charge level is nearly
Cold Temperature Note
When entering numbers under
Page 9
Page 28
ESSENTIAL INFORMATION
1
Volume Keys
Volume Keys
2. The push buttons on the right side of
the phone adjust the earpiece and
ringer volume levels. Press the top
button to increase, or the bottom button
to decrease the volume level.
To adjust earpiece volume:
Operate the volume buttons with the phone
held to your ear.
To adjust ring alert volume:
Operate the volume buttons to the
desired volume level for the ring tone of
incoming calls.
SIM Card Release
SIM Card Slide
3. To remove SIM card, slide button down,
then pull SIM card out.
Keypad
Keypad
4. Press to turn phone on or off.
5. Press to make and receive calls.
6.
7.
8.
Press to end calls.
Use to store numbers and names
into memory.
Use to recall numbers and names
from memory.
Page 10
Page 29
ESSENTIAL INFORMATION
1
9.
10.
11.
12.
Microphone mute
Switches microphone off/on during
conversation.
Select by pressing
Secondary features
Use in sequence with other keys to
initiate features.
Letter entry
Use to store and recall phone numbers
with names.
Clear
(c):
Clears the display. Press and release
to clear last digit. Press and hold to
clear entire display.
Menu:
Use to initiate menu features
Short Message Service
Use to initiate SMS features.
Press to move forward and
backward through memory locations
and feature menus.
(a):
( ):
13. Flip The flip can be used to answer
and end calls.
Page 11
Page 30

ESSENTIAL INFORMATION
1
BASIC OPERATION
BASIC OPERATION
Your network operator supplied you with a
subscription card known as a Subscriber Identitiy
Module card or SIM card. The SIM card is your
key to accessing GSM services and contains the
following personal data:
subscriber number
•
home system
•
services subscribed to
•
PIN and unblocking codes
•
Your valid SIM card must be correctly inserted
into the phone's card reader to access
services.
Page 12
Page 31

ESSENTIAL INFORMATION
1
Inserting the SIM Card
Inserting the SIM Card
Insert the SIM card into the phone's card
reader either before or after turning the phone
on.
If the SIM card is missing, 'Insert Card'
will appear in the phone's display.
If the SIM card is damaged or not correctly inserted, (e.g. inserted upside down
or backwards) 'Check Card' will appear in the
display. Check for proper orientation and reinsert the SIM card.
To remove SIM card, slide SIM card release
button down, then pull SIM card out.
Page 13
Page 32

ESSENTIAL INFORMATION
1
Switch Phone On/Off
Switch Phone On/Off
Switch on:
If the SIM card is not inserted the display will
prompt you to do so. The telephone then
checks the validity of the SIM card.
If 'Enter PIN' appears in the display, the SIM
card is protected by a PIN code.
PIN code
For more information on PIN codes, see section,
"Entering the PIN Code".
If 'Enter Unlock Code' appears in the display, the
phone is protected by an electronic lock.
unlock code
For more information on lock features, see
section, "Electronic Lock".
If 'Blocked' appears in the display, your SIM
card is blocked from use. Please see section,
"Unblocking the SIM card".
If 'Bad Card' or 'Blocked' then 'See Supplier'
appears in the display, a problem exists with your
SIM card. Please seek help from your network
operator.
Switch off:
Page 14
Page 33

ESSENTIAL INFORMATION
1
Entering the PIN Code
Entering the PIN Code
Your Personal Identification Number (PIN) is a 4-8
digit code that protects your SIM card from
unauthorised use.
The first PIN code is selected by the SIM provider.
To change or disable the PIN code, see sections,
"Changing the PIN Code" or "PIN Code Enable/
Disable".
When the SIM card is protected by a PIN code,
'Enter PIN' appears in the display whenever the
phone is switched on or the SIM card is inserted.
PIN code
The PIN code will appear as
If you make a mistake while entering the PIN
code,
If the PIN code is accepted, 'OK' will appear
in the display.
If the PIN code is not accepted, 'Wrong PIN'
then 'Enter PIN' will appear in the display.
Re-enter PIN code.
If you do not succeed after three attempts,
'Blocked' will appear in the display. The SIM
card is blocked from further use. To unblock
the SIM card, see section, "Unblocking the
SIM card".
Page 15
* * * * * *
Page 34

ESSENTIAL INFORMATION
1
Making Calls
Making Calls
The indicator must be off.
Telephone number
Phone numbers up to 20 digits long may be
dialled.
If a call is temporarily interrupted, 'Retrying'
may appear in the display. The system will
automatically reconnect the call if possible.
Dialling Errors
Dialling Errors
To erase last digit:
To erase entire display:
Ending Calls
Ending Calls
Either
or close the "flip".
To retry if number is busy:
Receiving Calls
Receiving Calls
Your phone must be on, unlocked, and in
service.
To answer calls:
or open the "flip".
To stop alert signal without answering:
Page 16
and hold
Page 35

ESSENTIAL INFORMATION
1
Call in Absence
Call in Absence
When a call has been received but the phone
has not been answered, the message
"*CALL*" will be displayed. If the phone is
locked the message "LOCKED" will appear
after pressing the
"*CALL*" message from the display.
Automatic Redial
Automatic Redial
Before ending an unsuccessful call attempt:
'Redial' will appear in the display.
Your phone will continuously attempt to
complete the call until the redial procedure
times out. When the call is successful, your
phone will ring once to alert you.
To cancel:
or turn the phone off.
button to clear the
Page 17
Page 36

ESSENTIAL INFORMATION
1
International Calls
International Calls
Just like the ordinary telephone system, you must
add an international prefix before dialling the
country prefix and the telephone number. This
feature automatically adds the international prefix.
To select:
(display shows '+')
country prefix, telephone number
It is possible to store the sequence into memory and still have the
maximum of 20 digits.
GSM Emergency Calls
GSM Emergency Calls
To dial the GSM emergency number, 112:
This call may be initiated with or without a
SIM card inserted and despite electronic lock
activation or PIN protection. The call is
directed to a central emergency operator as
long as the
off.
indicator is either flashing or
Page 18
Page 37

ESSENTIAL INFORMATION
1
Storing Telephone Nos. into Memory
Storing Telephone Nos. into Memory
Your phone can store up to 100 telephone
numbers and names. Each memory location can
hold a number up to 20 digits long and a name up
to 16 characters long. The phone's memory
locations are labelled from 1 to 100.
Additionally, your SIM card may also store
telephone numbers. Please contact your card
provider for details. SIM card memory locations
are labelled 101 and up.
To store phone number with name:
Enter person's name.
To enter names, the characters on the
number keys are used.
For example,
to enter character 'N'.
and hold down.
Display shows: M-N-0-5-M-N
Release key when desired character
appears.
To advance to the next position, either
press a new key or press
Repeat procedure for the next character.
You could have also selected the character
'N' by pressing
repeatedly.
To correct mistakes:
When name is complete:
Page 19
Page 38

ESSENTIAL INFORMATION
1
Next,
phone number
memory location number
(1-100 or 101 and up for SIM card
locations)
To store phone number without name:
phone number
number (1-100 or 101 and up for SIM
card locations)
The name (if entered) and phone number will
be stored in the selected memory location. If
the selected memory location is already
occupied, 'In Use' will appear in the display;
new memory location number.
If all memory locations are filled, 'Full' will
appear in the display.
If you have no preference for a memory
location number:
as the memory location number.
The phone number and name will be stored in
the next available memory location.
memory location
If you desire a memory location in a particular
decade like 50-59:
as memory location
number.
Page 20
Page 39

ESSENTIAL INFORMATION
1
Recalling Telephone Nos. from Memory
Recalling Telephone Nos. from Memory
To recall by memory location number:
memory location number
The name (if any), memory location number,
and phone number will appear in the display.
To review name (if any) and entire phone
number:
and hold
To scroll through directory:
or
To call number:
To exit and clear display:
and hold
To recall by persons name:
Enter the digit key having the first letter
of the person's name.
For example;
to recall a name
beginning with letter "E"
Page 21
Page 40

ESSENTIAL INFORMATION
1
The name, memory location number, and last
digits of the phone number will appear in the
display.
To review name and entire phone number:
and hold
To scroll through directory:
or
To call number:
To exit and clear display:
and hold
Speed Dial
Speed Dial
memory location number
The called number is displayed.
Clearing Numbers Stored in Memory
Clearing Numbers Stored in Memory
Recall the number from memory first.
'Clear?' will appear in the display.
to confirm deletion
or
if you do not want to clear
Page 22
Page 41

ADVANCED INFORMATION
2
FEATURE MENUS
FEATURE MENUS
Feature menus allow you to select and cancel
features by following prompts in the display.
To enter feature menus:
At the Menu prompt, either
or
to scroll through all menus,
or
enter the menu number for direct
access.
The following is an overview of all menus:
Menu 1 - General Features
Status Review +
Automatic Answer +
Manual Roaming (Select Service)+
Preferred Provider List
Display/Change +
Auxiliary Alert
1
+
Menu 2 - Interface Features
Ringer On/Off +
Keypad Tones On/Off +
Notepad Tones On/Off +
Long Tone DTMF +
PIN Code Enable/Disable +
Language Selection +
Page 23
Page 42

ADVANCED INFORMATION
2
Safety Timer Setting
Menu 3 - Call Monitor Features
1 Minute Audible Timer +
'Repeat' Audible Timer +
Once Only Audible Timer +
Automatic Monitor Displays +
Display Call Timers +
Display Call Meters +
Rate Programming +
Reset Timers/Meters +
Menu 4 - Call Restriction Features
Restrict Keypad Dialling +
Restrict Memory Access +
Restrict Incoming Calls +
Restrict Phone Number Length +
No Restrictions, Full Service +
Menu 5 - Secure Features
Change/Display Unlock Code+
Master Reset +
Master Clear +
Change Security Code +
Automatic Lock +
Menu 6 - Other Features
Battery Save Feature (DTX) 2+
Automatic Hands Free
1
3
+
+
Menu 7 - SMS Features
Automatic Cell Broadcast +
Page 24
Page 43

ADVANCED INFORMATION
2
Note
1. Only displayed when used with the GSM Micro Car Kits.
2. Not displayed when used with Car Kits.
3. Only displayed when used with the Basic Car Kit
To access features within a menu:
Enter feature number (or 1 to review features
from beginning)
To scroll through features:
or
The display will show the feature name, number
and status (if applicable).
Once the desired feature is displayed:
and follow the prompts.
Menu features are simply toggled on/off using
the key. Some features will prompt for
more information, such as the security code.
To exit menu operation:
or
.
STATUS REVIEW
STATUS REVIEW
Status review allows you to review any
features changed from their original settings.
To review these features:
or to move through the
messages.
to exit status review.
Page 25
Page 44

ADVANCED INFORMATION
2
If 'Standard' appears in the display, no
default settings have been changed.
MASTER RESET
MASTER RESET
USE THIS FEATURE WITH CAUTION.
You can reset all features that you may have
changed back to their original settings.
Cancels the following:
Automatic Answer
•
Long Tone DTMF
•
Safety Timer
•
All Audible Call Timers
•
Automatic Call Monitor Display
•
Battery Saving Feature (DTX)
•
Selected Language
•
Auxiliary Alert
•
Auto Hands Free
•
Electronic Lock
•
Restricted Calls
•
Auto Cell Broadcast
•
Restores the following:
Keypad tones
•
Ringer
•
Notepad tones
•
Volume level to medium
•
To select:
security code
'Reset Complete' will appear in the display.
Page 26
Page 45

ADVANCED INFORMATION
2
MASTER CLEAR
MASTER CLEAR
USE THIS FEATURE WITH CAUTION.
Performs the same function as 'Master Reset'
plus these additional functions;
Clears:
Resets:
To select:
security code
'Clear Complete' will appear in the display.
Note
*
SIM card memory locations are not cleared
All 100 memory locations*
•
Notepad
•
Last Number Called
•
Home Charge Rate
•
Roam Charge Rate
•
Resettable Call Timers
•
Resettable Call Meters
•
Page 27
Page 46

ADVANCED INFORMATION
2
SYSTEM REGISTRATION
SYSTEM REGISTRATION
Automatic Roaming
Automatic Roaming
The SIM card memory contains space for a
list of "preferred" network operators.
If coverage on your home system becomes
unavailable, the telephone will automatically
try to establish contact with one of the
preferred network operator locations on this
list. This is done in the order that they are
listed.
If automatic roaming is successful the
indicator will light up indicating that you are
registered on a preferred system different
from your home system.
If service from one of the preferred network
operators is not available, 'Select Service'
will appear in the display.
To defer service selection:
To see a list of network operators available in
your immediate area:
The display shows the first network
operator on the list.
Example:
Position on list (1-9, A-W)
Star = Preferred Operater
Blank = Non-Preferred Operater
Network operator Code
Page 28
1 234-01
Page 47

ADVANCED INFORMATION
2
Operators are listed in order of decreasing signal strength.
To scroll through operator list:
or
To select displayed network operator:
If you are accepted by the system, the display
will show the operator code and the
indicator will start flashing, indicating that you
are registered on a non-preferred system.
If you are not accepted by the system, the
indicator will flash. To select a different
network operator, continue as described in
the section, "Manual Roaming".
Page 29
Page 48

ADVANCED INFORMATION
2
Manual Roaming
Manual Roaming
You may manually select a network operator
from a list of those providing coverage at your
immediate location.
To see the list of available network operators:
The display shows the first network operator
on the list.
Example:
Position on list (1-9, A-W)
Star = Preferred Operator
Blank = Non-Preferred Operator
Network operator Code
The display may also show the network
operator name or the country abbreviation
with the network number.
Operators are listed in order of decreasing
signal strength.
To scroll through operator list:
or
To select displayed network operator:
1 234-01
Page 30
Page 49

ADVANCED INFORMATION
2
Displaying Preferred Operator List
To see the list of preferred network operators:
The display shows the first network operator
on the list.
Example:
Position on list (1-9, A-W)
Preferred Operator
Network operator Code
To scroll through operator ist:
or
Where no network operator has been programmed, e.g. position 7, the display will
show: 7*
To exit preferred provider list:
To programme a network operator, see the
section, "Changing Preferred Operator List".
1* 234-01
Page 31
Page 50

ADVANCED INFORMATION
2
Changing Preferred Operator List
A list of international network operators and their
codes may be obtained from your network
operator.
Enter the preferred list and scroll to the
position you want to change as described in the
section, "Displaying Preferred Operator List".
To change the displayed network operator:
Network Operator Code
Example:
Network Operator Code = 234-01
To access preferred list:
To scroll to position
To enter new network operator code:
To clear the displayed network operator:
Check that it is the network operator that you
want to clear.
If OK,
(If not,
:
)
If
is pressed, 'Clear?' will appear in the
display.
Confirm by
(
otherwise
To exit preferred operator list:
)
Page 32
Page 51

ADVANCED INFORMATION
2
MEMORY FEATURES
MEMORY FEATURES
Notepad
Notepad
During a call, if you need to record a phone
number, you can enter it into the display as a
form of electronic notepad. Once you have
ended the call, this number can then either be
called by:
or stored into memory by:
memory location number.
Recall the number by:
Recall Last Number 'Called'
Recall Last Number 'Called'
The last number called will appear.
For security reasons, you may wish to clear
the last number called. You can do so by
entering any invalid number, and then:
and hold
Page 33
Page 52

ADVANCED INFORMATION
2
Memory Linking
Memory Linking
Memory linking allows you to "link" a number
from memory to a number already in the
display.
To link numbers:
digits memory location
number.
INTERFACE FEATURES
INTERFACE FEATURES
Electronic Lock
Electronic Lock
Protects your phone from unauthorised use.
To lock:
To unlock:
3 or 4 digit unlock code
Upon delivery, the unlock code is set to 123.
If you forget the unlock code, you can still
access the "Change Unlock Code" feature to
display the current unlock code. Your security
code will be required.
Page 34
Page 53

ADVANCED INFORMATION
2
Automatic Lock
Automatic Lock
The phone can be set to automatically lock
every time the phone is turned off.
To enable/disable automatic lock:
To toggle the function on/off:
Changing the Unlock Code
Changing the Unlock Code
To change the unlock code:
security code.
Display shows current unlock code.
New Unlock Code (3 or 4 digits)
Your new unlock code will display for six
seconds.
Avoid using the GSM emergency number as
your unlock code.
Ringer On/Off
Ringer On/Off
To mute the ring tone of incoming calls and
replace with the word 'Call' in the display:
to toggle ringer on/off.
If "Automatic Answer" has been selected, then
muting the ring tone is not recommended.
Page 35
Page 54

ADVANCED INFORMATION
2
Keypad Tones On/Off
Keypad Tones On/Off
To mute the tones heard when pressing keys:
to toggle tones on/off.
Tone Signalling Features
Tone Signalling Features
Tone signalling features allow you to communicate with external devices that respond to
Dual Tone Multi-Frequency (DTMF) tones.
Notepad Tones On/Off
Notepad Tones On/Off
If you use the "Notepad" feature often, the
DTMF tones heard while pressing keys may
irritate the called party. To avoid this, you can
mute these tones:
to toggle tones on/off.
With the notepad tones muted, you will still
hear a feedback tone whenever you press a
key, but the called party will not. If you wish
to transmit DTMF tones while the notepad
tones are muted, simply:
digits
Page 36
Page 55

ADVANCED INFORMATION
2
Pauses in Memory
Pauses in Memory
This feature makes two part calling more
convenient by allowing you to dial sequences
of numbers separated by pauses. The pause
in the number sequence will stop transmission
at that point to allow for a system response,
such as a second dial tone.
To construct sequences:
Enter the first numbers you wish to send, or
recall them from memory by:
memory location number.
1. Then to insert a pause:
A small square will appear after the
number to represent the pause.
2. Enter the next number, or recall from
memory by:
memory location number.
Repeat steps 1 and 2 for a maximum of 32 digits.
An additional 12 digits may be appended to the
standard 20 digits. The international prefix (+) and
a pause each count as 1 digit.
You can store this number sequence in
memory locations 1-100. Number sequences
containing pauses cannot be stored to your
SIM card.
Page 37
Page 56

ADVANCED INFORMATION
2
To make calls using number sequences:
Construct or recall sequence first.
Digits prior to pause are transmitted.
1. Await system response.
2.
Digits prior to next pause are transmitted.
Repeat the steps 1 and 2 until all digits have
been transmitted.
DTMF Signalling
DTMF tones used to signal pagers, access
computers, etc., can be sent using your
phone.
DTMF dialling from keypad:
Once the call is established, press the keypad
digit keys to transmit DTMF tones. Do not
use the
DTMF dialling from memory:
1. Establish the call.
2. Recall from memory the number you wish
3.
DTMF Signalling
key.
to transmit as DTMF digits.
Page 38
Page 57

ADVANCED INFORMATION
2
Repeat steps 2 and 3 as necessary, to send
separate groups of numbers.
Actual DTMF tone sent over the air lasts
about a tenth of a second. If you require
longer tones use the "Long Tone DTMF"
feature.
Long Tone DTMF
Long Tone DTMF
Certain electronic devices require longer
tones e.g. answering machines. This feature
allows you to transmit a DTMF tone for as
long as the key is depressed.
To select/cancel:
to toggle feature on/off.
Language Selection
Language Selection
You can select the language in which the
prompts are displayed.
To select language:
To scroll to preferred language:
or
to make language selection.
Page 39
Page 58

ADVANCED INFORMATION
2
PIN Code Enable/Disable
PIN Code Enable/Disable
You may enable or disable (if the SIM card
allows) the PIN code. When disabled, you do
not have to enter the PIN Code when the
phone is turned on.
To enable/disable PIN code:
PIN code or
If the display shows;
'Not Allowed', disabling the PIN code is not
allowed by the network operator.
'Wrong PIN', the PIN code was wrong. You
must start over. If you have forgotten your
PIN code, you may choose a new PIN code
by using the procedure described in the
section, "Unblocking the SIM Card".
'Blocked', three unsuccessful attempts at
entering the PIN code have been tried. See
section, "Unblocking the SIM Card".
Page 40
Page 59

ADVANCED INFORMATION
2
Changing the PIN Code
Changing the PIN Code
The first PIN code is selected by the SIM card
provider. The PIN code must be enabled
before it may be changed.
To change the PIN code:
original PIN code
new PIN code (4-8 digits)
new PIN code again
If the display shows:
'OK' the PIN code has been changed.
'Matching Error', the two new PIN codes did
not match. You must start over.
'Wrong PIN', the original PIN code was
wrong. You must start over.
If you have forgotten your PIN code, you may
choose a new PIN Code by using the procedure described in the section, "Unblocking the
SIM Card".
'Blocked', three unsuccessful attempts at
entering the PIN code have been tried. See
section, "Unblocking the SIM Card".
Page 41
Page 60

ADVANCED INFORMATION
2
Unblocking SIM Card
Unblocking SIM Card
The SIM card is blocked from use upon three
unsuccessful attempts at entering the PIN code.
To unblock the SIM card, you must choose a new
PIN code following the procedure below. Use the
unblock code supplied by the SIM card provider.
To unblock SIM card:
When 'Blocked' appears in the display,
unblock code
new PIN code (4-8 digits)
new PIN code again
If the display shows;
'OK', you have unblocked the SIM card and
entered a new PIN code.
'Matching Error,' the two new PIN codes did
not match. You must start over.
'Wrong Code,' your unblock code was
wrong. You must start over.
If you do not succeed after 10 attempts, the
SIM card is permanently blocked. 'Blocked,
See Supplier' will appear in the display. You
must then seek help from your network
operator .
Page 42
Page 61

ADVANCED INFORMATION
2
Changing the Security Code
Changing the Security Code
Upon delivery, your security code is "000000".
To change the security code:
security code
Display shows current security code
Enter new security code
In case you have forgotten the programmed
security code, please contact your telephone
dealer's service centre.
CALL MONITORING
CALL MONITORING
The phone has a variety of features to help
you monitor time and costs accumulated
when making calls.
These features provide both audible and
visual call monitoring.
Note: Depending upon your model, the phone
will monitor either all calls or only outgoing
calls.
One Minute Audible Call Timer
One Minute Audible Call Timer
You can programme the phone to emit a beep
10 seconds before the end of each minute of
a call.
To select/cancel:
to toggle feature on/off.
Page 43
Page 62

ADVANCED INFORMATION
2
Programmable Audible Call Timer
Programmable Audible Call Timer
You can programme the phone to signal you two
different ways:
1. Every X seconds during a call.
2. Once after Y seconds during a call.
The value of X and Y are programmed by
you. The phone will emit a beep ten seconds
before the interval X or Y is reached.
Option 1
To select/cancel:
time period in seconds (011-999)
to toggle feature on/off.
Option 2
To select/cancel:
time period in seconds (011-999)
to toggle feature on/off.
Page 44
Page 63

ADVANCED INFORMATION
2
Visual Call Timers & Meters
Visual Call Timers & Meters
The visual call monitors consist of seven call
timers and seven call meters. To use the call
meters you must programme a rate-perminute into the phone, using either charge
units or currency.
Note: Depending upon your model, the phone
will monitor either all calls or only outgoing
calls.
Descriptions of the various call timers/meters
are as follows:
Individual
the most recent call made. Automatically
returns to zero before each call.
Resettable
calls made since last reset. There are three
types of resettable call timers/meters:
- Accumulates time and charge for
- Accumulates time and charge for
Home
Roam
Total
To reset all resettable call timers/meters:
Accumulates time and charge for
calls made on your home system,
since last reset.
Accumulates time and charge for
calls made while roaming, since
last reset.
Sum of Home and Roam call
timers/meters.
Page 45
Page 64

ADVANCED INFORMATION
2
Cumulative -
charge for all calls made and cannot be reset.
There are three types of cumulative call
timers/meters:
Accumulates the total time and
Home
Roam
Total
Displaying Call Timers
Displaying Call Timers
Displaying Call Meters
Displaying Call Meters
A rate-per-minute (either currency or charge
unit) must be programmed into the phone.
See the section, "Programming Rates".
Accumulates time and charge for
all calls made on your home
system.
Accumulates time and charge for
all calls made while roaming.
Sum of Home and Roam call
timers/meters.
or to scroll through all
call timers.
to exit call timers.
or to scroll through all
call meters.
to exit call meters.
Page 46
Page 65

ADVANCED INFORMATION
2
Programming Rates
Programming Rates
Call meter rates can be programmed as either
currency-per-minute or charge units-perminute. In either case, the minimum time
interval increment is 30 seconds.
To programme rates:
Security Code
Home Rate
Roam Rate
The roam rate is initially set to the home rate
to prevent you from setting it to zero by
mistake.
Automatic Monitor Displays
Automatic Monitor Displays
You can automatically display the time or
charge of each outgoing call both during and
after the call.
To select/cancel:
To toggle feature on:
Select either 'Auto Timer' or
'Auto Meter' using the scroll keys.
to confirm selection.
To toggle feature off:
Page 47
Page 66

ADVANCED INFORMATION
2
CALL RESTRICTIONS
CALL RESTRICTIONS
Call restriction settings are stored in the
phone, but may affect SIM card usage.
The following restrictions are available:
Keypad Dialling
•
Memory Access
•
Incoming Calls
•
Phone Number Length
•
These may be selected/cancelled independently to suit your needs.
Restrict Keypad Dialling
Restrict Keypad Dialling
Prevents any keypad dialling except for '112'
emergency calls and recall from memory.
To select/cancel:
To toggle feature on/off:
security code
Page 48
Page 67

ADVANCED INFORMATION
2
Restrict Memory Access
Restrict Memory Access
Only those memory locations selected by you
are accessible for storing and recalling.
Memory locations outside this range are
programmed as either:
Protect: Storing and recalling are barred.
Recall Only: Only recalling is allowed.
To select/cancel:
To toggle feature on:
security code
Select either 'Protect' or 'Recall
Only' using the scroll keys.
to confirm selection.
Enter low limit
Enter high limit
To toggle feature off:
security code.
Restrict Incoming Calls
Restrict Incoming Calls
Only outgoing calls are allowed.
To select/cancel:
To toggle feature on/off:
security code.
Page 49
Page 68

ADVANCED INFORMATION
2
Restrict Phone Number Length
Restrict Phone Number Length
This can be done to prevent long distance
and international calls.
DTMF signalling is also disabled.
To select/cancel:
To toggle feature on:
security code.
Display will show maximum number of
digits that can be sent.
To change this maximum:
Enter new maximum number (up to 20)
To toggle feature off:
security code.
'112' emergency calls are still possible.
Digits after pauses in phone numbers do not
count toward length limit.
Full Service
Full Service
Permits full keypad and memory usage.
To select:
security code.
If selected, this service will remove all call
restrictions previously selected.
Page 50
'
Page 69

ADVANCED INFORMATION
2
CALL BARRING
CALL BARRING
Call barring is a SIM card feature. If you
subscribe to call barring, you may bar incoming and/or outgoing calls by entering a special
key sequence. The key sequence includes a
"barring code" and a password.
The first password is supplied by the network
operator.
Common types of barring:
all outgoing calls barring code: 33
all outgoing international
calls barring code: 331
all outgoing international
calls except those to home
network operator barring code: 332
all incoming calls barring code: 35
all incoming calls when
roaming barring code: 351
Additional call barring services may be
provided. Consult your network operator for
further information.
Page 51
Page 70

ADVANCED INFORMATION
2
Activating Call Barring
Activating Call Barring
barring code
password
If display shows;
'Please Wait', your request is being processed.
'Barring On', barring has been enabled.
Example
Bar all incoming calls.
barring code: 35
password: 2468
Cancelling Call Barring
Cancelling Call Barring
To cancel a single type of call barring:
barring code
password
To cancel all types of call barring:
password
'Barring Off' will appear in the display.
Page 52
Page 71

ADVANCED INFORMATION
2
Call Barring Status
Call Barring Status
To check whether call barring is on or off:
barring code
If display shows;
'Barring On', call barring is on.
'Barring Off' call barring is off.
Each call bar type must be checked individually.
Example
Check status of 'barring all incoming calls'.
barring code: 35
Changing Call Barring Password
Changing Call Barring Password
old password
new password
new password
I
f display shows;
'Password Changed', password changing
was successful.
'Matching Error', the two entries of the new
passwords did not match. Try again.
Page 53
Page 72

ADVANCED INFORMATION
2
Special Call Barring Messages
Special Call Barring Messages
While call barring is active, the following
messages may appear in the display;
'Outgoing Call Barred', you have tried to
make a call while outgoing calls are barred.
'Wrong Password', you have entered the
wrong call barring password. Try again.
'Call Barred', you have made a call to
someone who has barred incoming calls.
CALL FORWARDING
CALL FORWARDING
Call forwarding is a SIM card feature. If you
subscribe to call forwarding, you may forward
incoming calls to another phone number by
entering a special key sequence. The key
sequence includes a "forwarding code".
Common types of call forwarding:
unconditionally
Forwards all incoming
calls.
no answer
Forwards calls which
you do not answer.
not reachable
Forwards calls which
you cannot answer.
For example:
-
your phone is out of coverage.
- your phone is switched off.
- your SIM card is not inserted.
forwarding code: 21
forwarding code: 61
forwarding code: 62
Page 54
Page 73

ADVANCED INFORMATION
2
busy
Forwards calls received
while your phone number
is busy.
Additional call forwarding services may be
provided. Consult your network operator for
further information.
Activating Call Forwarding
Activating Call Forwarding
forwarding code
phone no.
If display shows,
'Please Wait', your request is being processed.
'Forward On', forwarding has been enabled.
This message also appears each time you
make a call if call forwarding is on.
'Invalid Number', The phone number you
have chosen to receive your calls is invalid.
You may use a different phone number for
each call forwarding type.
Example
Forward calls if busy.
forwarding code: 67
phone no. to receive calls: 13579246
forwarding code: 67
Page 55
Page 74

ADVANCED INFORMATION
2
Cancelling Call Forwarding
Cancelling Call Forwarding
To cancel a single type of call forwarding:
forwarding code
To cancel all types of call forwarding:
'
Forward Off' will appear in the display. This
message also appears if the network cancels
call forwarding.
Example
Cancel call forwarding if busy.
forwarding code: 67
Call Forwarding Status
Call Forwarding Status
To check whether call forwarding is on or off:
forwarding code
If display shows;
'Forward On, 13579246', call forwarding is
on to number shown.
'Forward Off', call forwarding is off.
Each call forwarding type must be checked
individually.
Page 56
Page 75

ADVANCED INFORMATION
2
Example
Check status of 'call forwarding if busy'.
forwarding code: 67
Special Call Forwarding Messages
Special Call Forwarding Messages
While call forwarding is active, the following
messages may appear in the display;
'Call Forward', either a call made to you or
a call you have made has
been forwarded.
'Busy the network is processing
Try Later', your earlier request. Please
try again later.
'Not Allowed', you cannot activate this
service.
'Network communication with the
Problem', network failed. Please try
again.
'Invalid either a key sequence
Command', failure or an unsuccessful
attempt. If the message
appears after repeated
attempts, please consult
your network operator.
'Not Available', this service is not available.
Page 57
Page 76

ADVANCED INFORMATION
2
SHORT MESSAGE SERVICE (SMS)
The Short Message Service (SMS) is
comprised of a set of features which enables
your GSM phone to send and receive
messages to and from the network. This
model phone is designed to support both the
Cell Broadcast and Point to Point Mobile
Terminated portions of the SMS feature set.
Automatic Cell Broadcast
Your Network Operator may wish to send
you important messages using a GSM
feature called 'Cell Broadcast.' The Network
Operator sends the information to your
phone over a 'broadcast channel' (similar to
television or entertainment radio
transmissions. This channel may also be
referred to as a 'Message Identifier' by some
publications). By selecting 'Auto Cell
Broadcast' and entering the appropriate
broadcast channel number, these messages
will scroll across your phone's display
whenever you are not in a call.
There may be multiple broadcast channels in
your service area. Please contact your
Network Operator for a list of available
channels and the information they supply.
To select:
cell broadcast channel
( can be used to correct undesired
channel number entries)
Page 58
Page 77

ADVANCED INFORMATION
2
The phone will display the selected channel
for a few seconds and then revert back to the
ON/OFF menu heading.
To select/cancel:
to toggle feature on/off
To change broadcast channel:
First ensure that the feature is turned off,
using the cancel sequence as shown above.
Then:
new cell broadcast channel
To exit Cell Broadcast menu:
To scroll through complete message (when
not in a call):
Page 59
Page 78

ADVANCED INFORMATION
2
Point to Point Short Messages
Your phone can also receive Point to Point
Short Messages. These messages are not
the same as the Cell Broadcast messages,
as they are transmitted to your phone only.
The received messages are stored on your
SIM card and they can be retrieved at a later
date.
Receiving Point to Point Messages
When your phone receives a message, it will
follow the procedure below.
1 There will be an alert signal of three
short tones.
2. The Short Message Service icon will light.
3. The display will show 'Message' if the
phone is not in a call.
4. The message will be stored in the SIM
card. Up to a maximum of 35 messages
may be stored this way. The maximum
number of messages stored will also
depend upon the SIM card, since some
SIM cards will have a lower capacity.
If the display shows 'Message', when you are
using the feature menu, pressing the key
will return you to the feature menu, but
pressing will display the new message.
Page 60
Page 79

ADVANCED INFORMATION
2
Storage of Point to Point Messages
When a message is received, the phone will
check to see if there is a location available,
for storing the message, in the SIM card.
If the SIM card is full then the icon will
flash. No more messages can be stored in
the SIM card, until one or more of the stored
messages are removed.
The new messages may be saved by your
Network Operator and sent, at a later date,
when a location becomes available in the
SIM card. If a message location is not made
available within a set time period, the
Network Operator may remove the new
messages.
Reading Point to Point Messages
Pressing the key will show the number
of messages you have at present. The top
line shows the number of new messages and
the bottom line indicates the number of older
messages. This display will go out after two
seconds.
Up to 35 messages can be stored, depending
upon the SIM card capacity. These messages
will be identified by a number between 1 and
35. The oldest unread message will be in
location 1.
The bottom line of the display will display the
message. The message will automatically
scroll twice from right to left.
Page 61
Page 80

ADVANCED INFORMATION
2
To stop the message scrolling:
To start the message scrolling again:
To view other messages:
or
To delete the message:
The next message will be displayed, if there
is one, or the menu will exit if there are no
further messages.
All messages have the date, time and caller's
phone number printed at the end in the
following format:
<Day/Month/Time><Caller's Phone Number>.
Note the availability of the caller's number is
controlled by the Network Operator.
Clearing Messages From Memory
To remove a message from memory:
The phone will show the following message -
'Clear?'
To confirm the deletion:
or
to cancel.
When a message has been deleted the next
message will be displayed, if there is one. If
there are no further messages the menu will
be exited.
Page 62
Page 81

ADVANCED INFORMATION
2
Embedded Callback Numbers
If a phone number is included in the message,
within quotation marks, the phone has the
ability to call the number by simply pressing
the key.
For example the following message would
permit the callback feature.
Phone "MCSG" on "0555 444 333" by 12:00
The first section within quotation marks would
be ignored, because it does not start with a
number.
Be warned, however, in the event of
receiving the following message:
Phone "1st National" on "0555 666 777"
The callback feature would attempt to call 1!
If there is no phone number in quotation
marks, then the call back feature will call the
<caller's phone number> at the end of the
message, if it is supported by the Network
Operator.
Short Message Alert Tone
You have the option to turn the Short
Message Alert Tone on or off.
To turn the alert tone on or off:
to toggle feature on/off.
Page 63
Page 82

ADVANCED INFORMATION
2
CALL WAITING AND CALL HOLDING
This model phone supports the GSM ‘Call
Hold’ and ‘Call Waiting’ features.
In order to use these features the following
conditions must be met. Firstly, the Network
Operator has made the feature available and
secondly, you have subscribed to the feature.
Using these features you may place a current
call on hold and either accept an incoming
call or start a second call.
Call Waiting
You have the option to turn the call waiting
feature on or off, for future calls.
To turn call waiting on:
The display will show ‘Call Waiting On’ if the
activation is successful.
To turn call waiting off:
The display will show ‘Call Waiting Off’ if the
deactivation is successful.
To check call waiting status:
The display will show ‘Call Waiting On’ or
‘Call Waiting Off’.
Page 64
Page 83

ADVANCED INFORMATION
2
When the Call Waiting feature is on and a
call is in progress, a second caller to your
phone will hear the ring tone. Your phone will
produce a single beep, followed by a double
beep every eight seconds and the display will
show ‘Call Waiting’.
If however the feature is off, a second caller
will hear the busy tone.
Call Holding
This feature is controlled by your Network
Operator and is used in conjunction with the
call waiting feature to produce several
different results.
Call Hold and Waiting Combinations
If a call is active and there is no call waiting:
The active call will be placed on hold and
the display will show ‘Holding’ to indicate
that the hold request is in progress. The
display will show ‘Call Holding’ when the
process is complete.
or
The active call will end and the phone will
be available for further calls.
Page 65
Page 84

ADVANCED INFORMATION
2
If a call is active and there is a call waiting:
The active call will be placed on hold and
the display will show ‘Holding’ to indicate
that the hold request is in progress. When
the call has been held, the display will
show ‘Accepting’ to show that the
waiting call is being connected. ‘Call
Holding’ will be shown when the process
is complete.
or
The display will show ‘Please Wait’ while
the active call is ending. When the call
has been ended, the display will show
‘Accepting’ to show that the waiting call
is being connected.
If a call is active and there is a held call:
The display will show ‘Switching’ as the
held call becomes active and the
previously active call is held. ‘Call
Holding’ will be shown when the process
is complete.
or
The active call will end and the currently
held call will become active.
Page 66
Page 85

ADVANCED INFORMATION
2
If a call is held and there is no call waiting:
The display will change from ‘Call
Holding’ to ‘Connecting’ as the held call
becomes active.
or
The held call will end and the phone will
be available for further calls.
If a call is held and there is a call waiting:
The display will show ‘Accepting’ to
show that the waiting call is being
connected. The currently held call will
remain held and ‘Call Holding’ will be
shown when the process is complete.
or
The display will show ‘Please Wait’ while
the held call ends. When the call has
been ended, the display will show
‘Accepting’ to show that the waiting call
is being connected.
Page 67
Page 86

ADVANCED INFORMATION
2
Call Hold and Making New calls
If a call is active and there is no call waiting:
Place the call on hold as described above
and then:
Telephone number
The ‘Dialling’ message will be shown, to
indicate that the new call is being
attempted. The display will show ‘Call
Holding’ when the process is complete.
Call Hold and Call Waiting Messages
There are several messages which may
appear during call hold and call waiting
operations.
‘Hold Failed’: an active call could not be put
on hold.
‘Connect Fail’: a held call could not be made
active again.
‘Answer Waiting Call’: an attempt to make a
new call was made whilst a call is waiting.
The waiting call must be answered first.
‘Cannot Hold Second Call': a call is already
on hold, you cannot place two calls on hold at
the same time.
‘Busy Try Later’: the phone is still working
on a previous command. Wait for a short
time before repeating the command.
Page 68
Page 87

ADVANCED INFORMATION
2
Emergency Calls and Call Hold/Wait
If you make a call to the GSM emergency
number, then any currently active, held or
waiting calls will end.
You cannot use the hold or waiting features
when you are making an emergency call.
Page 69
Page 88

ACCESSORIES AND OPTIONS
3
BATTERY OPERATION
BATTERY OPERATION
The only maintenance required for the
batteries is to keep them charged and the
contacts clean (a pencil eraser works well).
The battery pack should be near room
temperature when charging.
WARNING !
Batteries may explode if disposed of in fire.
Low Battery Warning
Low Battery Warning
When the battery level becomes too low for
normal operation, a warning signal (two
double beeps) will sound. 'Low Battery' will
appear in the display. When the battery is
almost completely discharged, the phone will
turn off.
Battery Saving Feature (DTX)
Battery Saving Feature (DTX)
The Battery Saving Feature, also known as
Discontinuous Transmission (DTX), allows the
phone to operate at reduced power when you
are not talking.
To select/cancel:
to toggle feature on/off.
Page 70
Page 89

ACCESSORIES AND OPTIONS
3
Replacing Battery
Replacing Battery
To remove battery:
Grasp the phone in one hand, push the
thumb catch on the back of the phone,
and slide the battery down and off.
To attach battery:
Line up the top of the battery with the horizontal line on the back of the phone. Place the
battery on the guides and push up until the
battery locks into place.
Important Charging Information
Important Charging Information
Both NiCAD and NiMH batteries can be used
•
with your phone.
It is normal for the battery to become warm
•
during charging.
Do not leave batteries charging for more than
•
24 hours.
NiMH batteries have a high rate of self-
•
discharge compared to NiCAD batteries.
Battery capacity can be restored by
recharging.
Page 71
Page 90

ACCESSORIES AND OPTIONS
3
Overnight Desktop Battery Charger
Overnight Desktop Battery Charger
The charger's front pocket accepts batteries
either alone or while attached to the phone.
The charger's rear pocket accepts batteries
alone.
Slow charging will typically take 10 to 15
hours depending on the type of battery being
charged.
The yellow lamps indicate that the phone or
batteries are properly inserted and charging.
When charging a battery attached to the
phone, turn the phone off. Leaving your
phone on while charging could extend the
recharge time.
Rapid Desktop Battery Charger
Rapid Desktop Battery Charger
The charger's front pocket accepts batteries
either alone or while attached to the phone.
The charger's rear pocket accepts batteries
alone.
Rapid charging will typically take approximately 90 minutes for all battery types. Small
batteries will be charged simultaneously in the
charger. Larger batteries are charged
sequentially, front pocket first followed by the
rear pocket.
Each pocket has its own three-colour lamp to
indicate that the phone or battery is properly
inserted in the charger pocket and either rapid
charging (red), finished charging (green), or
trickle charging (flashing yellow).
Page 72
Page 91

ACCESSORIES AND OPTIONS
3
BATTERY SAVER
BATTERY SAVER
The Battery Saver requires no installation and
allows you to power your phone from the car's
electrical system. The Battery Saver does not
charge the phone's battery, but saves it from
use.
Attach the Battery Saver by sliding the flat
end of the Battery Saver connector into the
connector slot on the back of the phone. You
will hear a click when proper connection is
made. Plug the cigarette lighter adaptor into
the car's cigarette lighter socket.
To unplug the Battery Saver from the phone,
squeeze both sides of the connector until the
tabs release, then remove the connector from
the phone.
ULTRA SAVER
ULTRA SAVER
The Ultra Saver requires no installation and
allows you to power your phone from the car's
electrical system. The Ultra Saver also
charges the phone's battery in addition to
saving it from use.
Attach the Ultra Saver by sliding the flat end
of the Ultra Saver connector into the connector slot on the back of the phone. You will
hear a click when proper connection is made.
Plug the cigarette lighter adaptor into the car's
cigarette lighter socket.
To unplug the Ultra Saver from the phone,
squeeze both sides of the connector until the
tabs release, then remove the connector from
the phone.
Page 73
Page 92

ACCESSORIES AND OPTIONS
3
CAR KIT FEATURES
CAR KIT FEATURES
The following features are only available
when your phone is used with the optional car
kits.
Automatic Answer
Automatic Answer
When using your phone with a Car Kit this
feature allows your phone to automatically
answer calls (no keypress required). An
incoming call will ring twice, then simply talk
into either the telephone mouthpiece or the
hands free microphone.
Automatic answer will not operate with the
Simple Micro Car Kit.
To select/cancel automatic answer:
If you are using the Coupled
make sure the phone is resting in the cradle
for automatic answer to work properly.
If you are using the
automatic hands free feature before selecting
automatic answer.
If automatic answer is selected while the
phone's ringer has been switched off, incoming calls will only be announced by the
message 'Call' flashing in the display. The
ring tone will not be heard.
Basic Car Kit,
Page 74
Micro Car Kit
select the
,
Page 93

ACCESSORIES AND OPTIONS
3
Entertainment Mute / Auxiliary Alert
Entertainment Mute / Auxiliary Alert
Depending on the option selected for your
phone, only ONE of these two features will be
supported. Also, the
is required to use either of these features.
Entertainment Mute
Entertainment Mute
If your phone has this feature and your car
installation supports it, the car stereo will mute
whenever a call is made or received. Also
note that this feature CANNOT be disabled.
Auxiliary Alert
Auxiliary Alert
If your phone has this feature, Auxiliary Alert
informs you of an incoming call when outside
your car by activating an external alerting
device (horn, lights).
To select/cancel:
to toggle feature on/off.
Coupled Micro Car Kit
Note: With Auxiliary Alert enabled you will not
turn off the telephone by switching off the
vehicle's ignition.
Instead the display shows: "Alert"
Turning the car ignition back on will cancel
Auxiliary Alert.
Page 75
Page 94

ACCESSORIES AND OPTIONS
3
Safety Timer
Safety Timer
The safety timer allows the phone to remain
on for a specified period of time after the
vehicle's ignition has been turned off. To
prevent draining the vehicle's battery, the
saftey timer will turn the phone off after the
time period has expired. If you are in a call
when the timer expires, it will power down
after the call is completed. This feature
prevents the user from having to re-enter the
electronic unlock code and the PIN number
for the SIM card every time the vehicle's
ignition is turned off. At the time of purchase,
the timer is set for one hour. You can, however, adjust the length of the safety timer from
zero (0) minutes to 999 minutes. When set for
zero (0) minutes, this feature is effectively
disabled and the phone powers off with the
ignition.
To select:
The current time period will appear in the
display. If no keys are pressed within 6
seconds, this time will be retained.
To change time:
Enter new time period (up to 999).
Page 76
Page 95

ACCESSORIES AND OPTIONS
3
MICRO CAR KITS
MICRO CAR KITS
Simple Micro Car Kit
Simple Micro Car Kit
The
Simple Micro Car Kit
A holder (cradle) for the phone.
•
Charging of the phone's battery while the
•
phone is mounted in the holder.
Charging of the phone's battery while
•
separated from the phone.
When used along with the optional Battery
Saver accessory, this kit also provides:
Power to the phone from the car battery.
•
Immediate communications regardless of
•
the phone battery charge level.
Coupled Micro Car Kit
Coupled Micro Car Kit
In addition to the above features, the Coupled
Micro Car Kit provides:
Connection to an outside cellular antenna
•
during hands free calls.
Automatic Hands Free operation.
•
Built-in hands free speaker.
•
Automatic car stereo muting (entertainment
•
mute) when receiving incoming calls.
Note:
This feature is compatible with only certain car
stereos. Your phone must also be programmed to support this feature. If your
phone does support this feature, you will not
be able to activate 'auxiliary alert'.
Page 77
provides:
Page 96

ACCESSORIES AND OPTIONS
3
Micro Car Kit Operation
Micro Car Kit Operation
Turn off your phone before attaching or
detaching the car kit coil cord (or optional
Battery Saver
Micro Car Kit
the flat end of the connector into the connector slot on the back of the phone. You will
hear a click when proper connection is made.
To unplug the coil cord, squeeze both sides of
the connector until the tabs release, then
remove from phone. When not in use, place
the coil cord connector into the storage slot
located on the top surface of the telephone
holder.
Place your phone (bottom end first) into the
holder,1 then pivot the phone's top backwards
until it clicks into place as shown in figure 1.
coil cord if using the
). Attach the coil cord by sliding
Simple
2
1
release button
Figure 1. Insertion of Pocket Telephone into Car Kit
Charger/Holder
Page 78
2
Page 97

ACCESSORIES AND OPTIONS
3
The phone's flip can be opened and closed while
in the holder. To release the phone, press the
button(s) on the side(s) of the holder. Pivot the top
of the phone towards you and slide it upwards out
of the holder.
Micro Car Kit Vehicular Charger
Micro Car Kit Vehicular Charger
Your Car Kit includes a rapid vehicular charger.
The charger will fast charge all approved pocket
phone batteries whenever either the battery alone,
or the battery connected to the phone is placed in
the holder. The LED light located next to the
holder button will light up to indicate the following:
flashing red: "Alert" - charging problem!
Check to ensure that the metal
contacts on the battery and on
the holder are clean. Then reinsert your phone or battery back
into the holder. If there is still no
change, try a different battery, or
contact your dealer.
steady red: rapid charging
green: done charging
yellow: "Waiting" to charge (battery
too hot/too cold).
Charge times will vary depending on the type
of battery used and the vehicle's electrical
system. Note that charging stops in most
permanent installations when the vehicle's
ignition is turned off.
Page 79
Page 98

ACCESSORIES AND OPTIONS
3
Switching Phone On/Off
Switching Phone On/Off
Simple Micro Car Kit:
The phone must be turned on or off manually by
Coupled Micro Car Kit:
If your car kit has been installed with
Sense Activation,
with the car's ignition switch, as long as the
phone was powered on before the ignition
was last turned off.
If you turn your car ignition off during a call,
the phone will remain on until you end the
call.
If you have purposely or unintentionally left
your phone on while connected to the Car Kit,
the safety timer will turn the phone off after a
user selected time period (or four hours if no
time period has been selected) to prevent
draining the car's battery.
the phone will turn on or off
Ignition
Page 80
Page 99

ACCESSORIES AND OPTIONS
3
Adjusting Volume
Adjusting Volume
To adjust hands free speaker volume:
Operate the phone's volume buttons with the
phone in the cradle. If your are not in a call, a
representative tone will be heard.
To adjust earpiece volume:
Operate the volume buttons with the phone
held to your ear.
Automatic Hands Free
Automatic Hands Free
Hands Free operation is enabled or disabled
automatically by the phone holder (not
applicable for the Simple Micro Car Kit).
When your phone is inserted into the holder,
and the coil cord is attached to the phone,
your phone will automatically operate in
hands free mode. When the phone is removed from the holder the phone will revert to
normal handset mode.
For the 'Coupled' Micro Car Kit, the phone will
only operate with the outside cellular antenna
while the phone is mounted in the holder.
Page 81
Page 100

ACCESSORIES AND OPTIONS
3
Standard Hands Free
Standard Hands Free
This feature is available when you need to
enter and exit hands free without the use of
the cradle. For example, you may want to
use the cradle to charge a second battery
while still communicating in hands free mode.
To select/cancel hands free while your phone
is out of the cradle and in a call:
Either
Close and then open the phone's flip within
one second.
or
Micro Car Kit Rear Panel
Micro Car Kit Rear Panel
The Coupled Micro Car Kits come with a rear
panel as shown below:
Indicates the car kit microphone. All
Coupled Micro Car Kits come standard with a
microphone, which is plugged into the car kit
in this panel and mounted above your front
windshield.
Page 82
 Loading...