

Page 1

A
USER’S GUIDE
™
Page 2

Contents
Introduction
Numeric Codes................................... 2
Control Buttons................................... 3
Getting Started
Turning Your Pager On........................ 4
Turning Your Pager Off........................ 5
Backlight............................................. 5
Receiving/Reading Messages............ 6
Sending a Test Page to Yourself .........8
Time
Setting the Time.................................. 9
Alerts
Setting the Incoming
Locking Messages................................... 15
Unlocking Messages ............................... 18
Deleting Messages ..................................19
Message Alert ...........................12
Features
Duplicate Messages......................... 20
Errored Data Messages.................... 22
Message Storing............................... 24
Automatic Message Deletion
(Overflow).................................. 24
Out of Range.................................... 25
Use and Care
Cleaning Y our Pager......................... 25
Functionality and Use of
Your Pager................................. 25
Care and Maintenance..................... 26
Removing and Replacing
Your Beltclip............................... 27
Battery
Battery Information........................... 28
Page 3

Congratulations on purchasing the Motorola DigitzTM pager. The Digitz
pager incorporates the latest in paging technology. FLEX™ technology
extends battery life up to four times longer than ordinary pagers and
improves the ability to receive pages.
This compact pager integrates messaging and time keeping functions in a
package that is convenient to carry. Full understanding of what this
product offers begins with reading this user’s guide . This user’s guide
includes a detachable quick reference card on the bac k cov er.
Effective Use of Your Pager
Y our pager can help y ou keep in contact with e veryone important to you. By
giving your pager number to your business associates , f amily, and friends,
you can be contacted when necessary .
If you have a cellular phone, giv e y our pager number instead of y our
cellular number. Then you can decide who to call back on your cellular
phone without paying for incoming calls.
INTRODUCTION
1
Page 4

Numeric Codes
Most pages you receive are display ed phone numbers f or y ou to call. But
you can give numeric codes to your friends, f amily , and associates that they
can use to send you a message. F or e xample , you might use the f ollo wing
codes as messages:
911 Important message
411 I’ve got the information
180 I love you
222 Pick me up after school
32 Pick up bread and milk
4 Let’s play golf
INTRODUCTION
2
Page 5
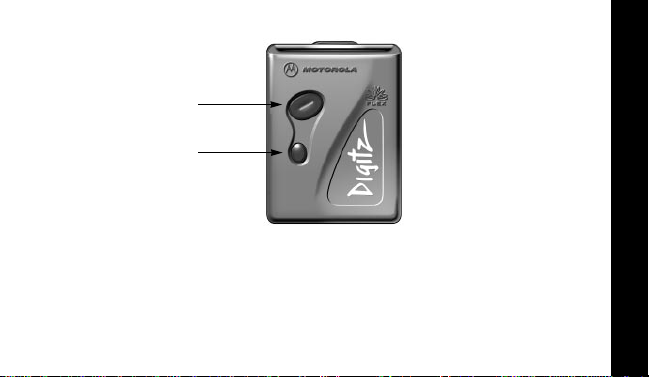
Control Buttons
On/Read/
Select
Button
Menu Button
On/Read/
S
Select
Menu Used to scroll through the menu.
V
Note:
Used to turn on the pager, to read a message, and
to select pager settings.
Either button turns on the backlight.
INTRODUCTION
3
Page 6

Turning Your Pager On
R
vvvvvvvvvvvv
D
Off screen
R
vvvvvvvvvvvv
D
Start-up screen
R
vvv12:00a88v
D
Standby screen
GETTING STARTED
4
➊
L
B
L
B
L
B
Press S to turn your pager on.
A start-up message is momentarily
displayed and your pager activates
the currently selected alert.
Note:
Press either button to stop the
start-up alert.
While the pager is on and no
activity is taking place, the Standby
screen is displayed.
In this example, the Standby
screen displays the alert mode (D)
and the time setting (
12:00a
).
Page 7

Turning Your Pager Off
From the Standby screen, press and
R
vvv12:00a88v
D
Standby screen
R
vv8off8?8vvv
D
Off prompt
R
vvvvvvvvvvvv
D
The pager is off.
L
B
L
B
L
B
➊
release
➋
Press S to turn the pager off.
The Off screen is displayed without
any icons.
V
until
off ?
is displayed.
Backlight
Press either button to turn on the backlight. When you have finished
reading your messages and the Standby screen is display ed, the backlight
remains on for four seconds bef ore automatically turning off.
GETTING STARTED
5
Page 8

Receiving/Reading Messages
Your pager can receive up to sixteen 20-character numeric messages.
Messages are stored in a stack, with the most recent message received on
top. When a message is receiv ed, y our pager either alerts audibly or it
vibrates. A message indicator (f or e xample
many messages you have receiv ed.
R
vvv11:35pvvv
D
Standby screen
R
vvv1vpagevvv
D
Message Indicator screen
➊
L
B
➋
L
B
➌
GETTING STARTED
6
1 page, 2 pages
The pager is in standby mode. When a
message is received, the pager alerts
for eight seconds.
Press any button to stop the alert.
A message indicator shows how
many messages you have received
(for example,
Press S to display the most recent
message.
1 page
) shows how
).
Page 9

R
v555-1212vvv
D
Message screen with
continuous message
indicator
R
v1881:45p8vv
D
Last Message screen
with message slot number
and message time stamp
L
B
L
B
When the message is longer than 12
characters, the remainder of the
message is displayed on one or
more additional screen(s) (indicated
by
in the example).
B
➍
Press S to view the next screen.
The next screen is
Note:
automatically displayed after 12
seconds, even if
The last screen shows the message
slot number (
the time at which this message was
received (
S
is not pressed.
1
in this example) and
1:45p
in this example).
GETTING STARTED
7
Page 10

➎
Y ou can contin ue to scroll through all of
your messages by pressing S.
Whenever you w ant to return to the
Standby screen, press and release
until
escape ?
➏
R
v8escape8?vv
D
Escape prompt
If any message has not been read, your pager emits a reminder
Note:
chirp every two minutes for 30 minutes, or until all of the messages are
read. A message is considered to have been read if any part of the
message is displayed.
L
B
Press S to return to the Standby
screen.
is displayed.
Sending a Test Page to Yourself
After you have read this guide and y our pager has been activated b y y our
GETTING STARTED
service provider, send yourself a test page. If you have any problems, ref er
to “Functionality and Use of Your Pager” on page 25.
8
V
Page 11

Setting the Time
R
vvv12:00a88v
D
Standby screen
From the Standby screen, press and
L
B
➊
release
displayed.
V
until
setT tTime
is
R
vsetTvtTime8
D
Set Time prompt
R
vvv12:00a888
D
Set Time screen
L
B
L
B
➋ Press S.
The hour field flashes.
➌ Press and release V to adjust the
hour. (In this example,
changing to
1.)
12 is
TIME
➍ Press S to move to the first minute
digit.
9
Page 12

R
vvv81:00a8vv
D
The hour has been adjusted.
R
vvvv1:30a8vv
D
The first minute digit has
been adjusted.
TIME
10
L
B
➎ Press and release V to adjust the
first minute digit. (In this e xample ,
is changing to
3.)
0
➏ Press S to mo ve to the second
minute digit.
L
B
➐ Press and release V to adjust the
second minute digit. (In this
example,
0 is changing to 5.)
➑ Press S to move to the AM/PM
character.
Page 13

R
vvvv1:35a8vv
D
The second minute digit has
been adjusted.
L
B
➒ Press and release V to select either
AM (
a) or PM (p). (In this e xample, a
is changing to
p.)
R
vvvv1:35p8vv
D
The AM/PM digit has been
adjusted.
L
B
➓ Press S to save the time setting
and return to the Standby screen.
TIME
11
Page 14

Setting the Incoming Message Alert
You can set your pager to alert with either an audible or silent alert
(vibration with no alert tone).
Note:
You can switch between these two alert modes depending upon
the prompt displayed. The Standby screen displays
starting in audible mode. In silent mode,
D is not displayed.
Switching from Audible to Silent Alert Mode
If D is not display ed (indicating that you are in silent mode) and y ou want to
switch to audible mode, go to “Switching from Silent to A udible Alert Mode”
on page 14.
R
ALERTS
vvvv1:35p8vv
D
Standby screen
L
B
➊ From the Standby screen, press and
release
displayed.
12
D when the pager is
V until silentT ? is
Page 15

R
vsilentT8?88
D
Audible Alert prompt
L
B
➋ T o change to a vibrating (silent) alert,
press
S. The pager vibr ates and
returns to the Standby screen.
R
vvvv1:35pvv8
D
Standby screen
(Vibrate alert mode)
L
B
The pager is now in vibrate alert
mode.
Note:
D is no longer displayed.
ALERTS
13
Page 16

Switching from Silent to Audible Alert Mode
If D is displayed (indicating the pager is in the audib le mode) and y ou want
to switch to the silent mode, go to “Switching from Audib le to Silent Alert
Mode” on page 12.
R
vvvv1:35pvv8
D
Standby screen
L
B
➊ From the Standby screen, press and
release
V until audible ? is
displayed.
R
v8audible8?8
D
Silent Alert prompt
ALERTS
R
vvvv1:35p8vv
D
Standby screen
(Audible alert mode)
14
L
B
L
B
➋ To change to the audible alert, press
S.
An alert sounds and the Standby
screen displays with
is now in audible alert mode.
D. The pager
Page 17

Locking (Protecting) Messages
By locking messages, you can protect them against either being replaced
when memory is full or from being deleted when you use
Note:
You can only lock a message while you are reading it. However, it
does not matter whether you are reading it for the first or an additional
time.
Hint:
R
88882:15p888
D
Standby screen
L
B
If you are locking a message you
have just received, start here. If you have
recalled a message from memory and
want to lock it, skip to Step 3.
erase all.
➊ The pager has received a message
and alerts for eight seconds. Press
either button to stop the alert.
A message indicator shows how
many messages you have
received. (In this example, this is
the third page received.)
LOCKING MESSAGES
15
Page 18

R
88838pages88
D
Message Indicator screen
R
333-333-3333
D
Message screen
L
B
L
B
➋ Press S to display the message.
➌ Press V until protTectT is
displayed.
R
8protTectT88
D
Protect prompt
L
B
➍ Press S to lock the message.
LOCKING MESSAGES
16
Note:
You must first unlock a
locked message to delete it.
Page 19

R
333-333-3333
D
Message screen
with locked message
Note:
A maximum of eight messages may be locked at one time. If you
attempt to lock a ninth message,
unlock at least one locked message.
L
B
L is displayed in the upper right
corner, indicating that this
message is now locked.
full is displayed. You must then
LOCKING MESSAGES
17
Page 20

Unlocking Messages
R
88882:15p888
D
Standby screen
L
B
➊ Press and release S until the
message you want to unlock is
displayed.
R
333-333-3333
D
Message screen
with locked message
R
unprotTectT8
D
Unprotect prompt
Note:
This unlocked message can now be erased (when erase all is
used). An unlocked message might be overwritten if an overflow
condition occurs. (For more information about overflow, go to page 24.)
UNLOCKING MESSAGES
L
B
L
B
➋ Press and release V until
unprotTectT is displayed.
➌ Press S to unlock the message.
The message is now displayed
without
L.
18
Page 21

Deleting Messages
erase all deletes all unlocked and previously read messages . Lock ed or
unread messages are not deleted.
Note:
Make sure you lock all of the messages you want to keep before
continuing with this procedure.
R
vvv11:15pvvv
D
Standby screen
R
verase8allvv
D
Erase All prompt
L
B
L
B
➊ From the Standby screen, press and
release
V until erase all is
displayed.
Note:
This prompt is only available
when your pager has unlocked
messages you have already read.
➋ Press S. All read, unlocked
messages are deleted. The pager
returns to the Standby screen.
19
DELETING MESSAGES
Page 22

Duplicate Messages
R
vvv11:15pvvv
D
Standby screen
R
88828pages88
D
Message Indicator screen
R
vduplicatTev
D
FEATURES
Duplicate prompt
R
v55512128vvv
D
Message screen with
continuous message indicator
20
L
B
L
B
L
B
L
B
➊ When a duplicate message is first
received, it looks like any other
message. (The Message Indicator
screen is displayed.)
➋ Press and release S to display the
message.
duplicate is displayed.
➌ Press and release S again. The
original message is displayed.
➍ Press and release S until B is
displayed.
Page 23

R
v1881:50p8vv
D
Last Message screen
with message slot number and
message time stamp
R
v8escape8?vv
D
Escape prompt
L
B
L
B
➎ Press and release V until escape is
displayed.
Note:
After you have read this
message,
displayed again with this message
(unless another duplicate message
is sent).
duplicate will not be
➏ Press and release S to return to the
Standby screen.
FEATURES
21
Page 24

Errored Data Messages
R
vvv11:15pvvv
D
Standby screen
R
88828pages88
D
Message Indicator screen
FEATURES
R
v55u12128vvv
D
Error Example
22
L
B
L
B
L
B
➊ When an errored data message is
received, the Message Indicator
screen is displayed.
➋ Press and release S to display the
message. The errored message is
displayed.
Note:
The message may appear to
be correct. How ev er ,
only indication that errored data
has been received.
errors is the
➌ Press and release S. errors is
displayed.
Page 25

R
v8v8verrorsv
D
Errors prompt
R
v1881:50p8vv
D
Last Message screen
R
v8escape8?vv
D
Escape prompt
L
B
L
B
L
B
➍ Press and release S to advance to
the next screen.
➎ Press and release V until escape is
displayed.
Note:
An errored data message is
not automatically deleted.
➏ Press and release S to return to the
Standby screen.
Note:
For information about
deleting messages, refer to
“Deleting Messages” on page 19.
23
FEATURES
Page 26

Message Storing
Your pager can store up to 16 personal messages in memory. Each stored
message is assigned a number which is displayed when you read the
message. The first message received is 1, the second is 2, and so on.
Note:
Stored messages differ from locked messages in that the y can be
overwritten (when the stack is full and a new message comes in) or
deleted.
Automatic Message Deletion (Overflow)
If all 16 message slots are full (that is, you have receiv ed 16 messages)
and a new message is received, this creates an ov erflow condition. When
an overflow condition occurs, the oldest, unloc ked, previously read
message is automatically deleted.
When the message memory is full and a new message is received,
FEATURES
ouerflo@j is displayed. Press either b utton to return to the Standby
screen.
Hint:
To prevent specific messages from being deleted, lock them. Then
you can delete all of your stored messages to prevent the overflow
condition and message display.
24
Page 27

Out of Range
If your pager is equipped with this feature, and if y ou are outside your
paging coverage area,
pager cannot receive messages.
R is displayed. As long as R is displayed, your
Cleaning Y our Pager
To clean smudges and grime from the exterior of your pager, use a soft,
non-abrasive cloth moistened in a mild soap and water solution. Use a
second cloth moistened in clean water to wipe the surface clean. Do not
immerse in water. Do not use alcohol or other cleaning solutions.
Functionality and Use of Your Pager
For questions pertaining to the functions and use of your Motorola pager,
please visit our web site at www.mot.com/pagers or in the U .S ., call 1-800548-9954. F or questions pertaining to your paging service, contact your
paging service provider.
25
FEATURES/USE AND CARE
Page 28

Care and Maintenance
Digitz pagers are durable, reliable, and can pro vide y ears of dependable
service; howev er, they are precision electronic products. W ater and
moisture, excessive heat, and e xtreme shoc k ma y damage the pager. Do
not expose your pager to these conditions. If repair is required, the
Motorola Service Organization, staffed with specially trained technicians,
offers repair and maintenance facilities throughout the world.
You can protect your pager purchase with an optional extended warranty
covering parts and labor. F or more inf ormation about warranties , please
contact either your paging service provider, retailer , or Motorola, Inc. at
1-800-548-9954. F or repairs, call Motorola, Inc. at 1-800-548-9954 in the
U.S. or 1-800-323-9685 in Canada. In the U.S., to contact Motorola, Inc. on
your TDD, call 1-800-793-7834.
USE AND CARE
26
Page 29

Removing and Replacing Your Beltclip
Removing the Beltclip
➊ Hold the pager and beltclip
in the position shown.
➋ Locate the small black
release tab as shown.
➌ Press down on the release
tab with the tip of a ballpoint
pen.
Release tab
➍ While holding the release
tab down, slide the beltclip
towards the tab until the beltclip is free from the pager body.
USE AND CARE
27
Page 30

Replacing the Beltclip
➊ Hold the pager and beltclip in
the position shown.
➋ Align the beltclip with the
pager as shown.
➌ Slide the beltclip onto the
body until it snaps into place.
Battery Information
Your Digitz pager operates with one AAA-size alkaline battery. When the
battery is low,
seconds in length. Change your battery within five da ys after receiving a
low-battery indication.
Note:
The alert mode, time, and all messages (locked or unlocked) are
not
retained when replacing the battery.
USE AND CARE/BATTERY
28
lo battery is displayed. All pager alerts change to two
Page 31

Replacing the Battery
➊ Turn your pager off.
➋ To remove the old battery,
slide the battery door in the
direction shown to unlock
the battery door.
➌ Lift the battery door so that
you can access the battery .
➍ Remove the battery .
➎ Align the new battery so that
the positive (+) and negative
(-) markings match the
diagram next to the battery
compartment.
➏ Insert the battery.
➐ Press down on the battery
door and slide it closed until
it locks into place.
Slide to
open
BATTERY
29
Page 32

Patent Information
This Motorola product is manufactured under one or more Motorola U.S .
patents. These patent numbers are listed inside the housing of this
product. Other U .S . patents for this product are pending.
are trademarks or registered trademarks of Motorola, Inc.
1500 Gateway Blvd., Boynton Beach, FL 33426-8292
t, Motorola, Digitz, and F
© 1997 by Motorola, Inc. All Rights Reserved.
Paging Products Group
Printed in U.S.A. 5/97
@6881029B15@
6881029B15-A
Page 33

Digitz™ Quick Reference Card
Indicators and Icons Control Buttons
Out of range
R
Audible alert
D
B
Message continuation
Locked message
L
Locking and Unlocking Messages
While reading a message, press V to display either
➊
unprotTectT
Press S.
➋
.
SILENT/
AUDIBLE
Digitz Prompts Map
ERASE ALL
S
V
Standby
On/Read/Select
Menu
protTectT
SET TIME
or
OFF
 Loading...