

Page 1

Page 2
1
1
2
2
Page 3

WELCOME
Congratulations on your purchase of a cellular
telephone from
cellular technology.
All Motorola cellular telephones are designed
and manufactured to meet Motorola's exacting
specifications and world-class quality standards.
This product is no exception.
This cellular telephone has been manufactured
to withstand rigorous durability tests including
temperature, humidity, shock, dust, vibration
and a drop test.
Motorola
, the world leader in
Our testing standards, our commitment to
Customer Satisfaction
of experience in personal communications
means you can depend upon the quality of this
Motorola product.
and over sixty five years
Total
Page 4

WELCOME
Page 5
3.
4.To end the call:
1.Check
2. Telephone number (No dial tone).
is off.
Quick User Guide
1.Insert SIM Card.
2.Turn on:
3.If prompted: PIN Code & Unlock Code
To Make a Call
To Turn On
Page 6
Inform operator about your subscriber number, position
and the type of emergency. Stay by the telephone.
By short-number:
By name:
Quick User Guide
Emergency Call
To end the call:
To Recall a Short-number
First letter
To Answer a Call
Short-number
Page 7

Press out and keep in a secure place
* Changeable
Unblocking Code (8 digits):
Barring Password * (4 digits):
Subscriber number:
PIN Code * (4 to 8 digits):
SIM Card Data
Page 8

Press out and keep in a secure place
** Changeable, upon delivery = 0 0 0 0 0 0
Serial number:
Unlock Code * (3 or 4 digits):
Security Code ** (6 digits):
* Changeable, upon delivery = 1 2 3
Telephone Data
Page 9

SAFETY
IMPORTANT
READ THIS INFORMATION BEFORE USING
YOUR
PORTABLE/PERSONAL
CELLULAR TELEPHONE
First introduced in 1984, the portable cellular
telephone is one of the most exciting and
innovative electronic products ever
developed. With it you can stay in contact with
your office, your home, emergency services,
and others.
General
For the safe and efficient operation of your
phone, observe these guidelines.
Your portable/personal cellular telephone is a
radio transmitter and receiver. When the
phone is ON, it sends out and receives radio
frequency (RF) energy. The phone operates
in the GSM frequency range of 890MHz to
960MHz (or DCS 1800 frequency range of
1710MHz and 1880MHz) and employs
commonly used Time Division Multiple
Access (TDMA) digital modulation techniques.
When you use your phone, the cellular
system handling your call controls the power
level at which your phone transmits. The
pulsed power level can range from 0.02 of a
watt to 2 watts.
i
Page 10

SAFETY
Exposure to Radio Frequency Energy
Research on health effects from RF energy
has focused for many years on FM radio
technology. That research and studies
regarding newer radio technologies, such as
TDMA, have found no credible scientific
evidence that adverse health effects result
from the use of a portable cellular telephone.
In 1991 the Institute of Electrical and
Electronic Engineers (IEEE), and 1992 the
American National Standards Institute (ANSI)
adopted the 1982 ANSI Standard for safety
levels with respect to human exposure to RF
energy.
Over 120 scientists, engineers, and
physicians from universities, government
health agencies, and industry, after reviewing
the available body of research, developed this
updated Standard. In March, 1993 the
Federal Communications Commission (FCC)
of N. America proposed the adoption of this
updated Standard. The design of your phone
complies with this updated Standard. Of
course, if you want to limit RF exposure even
further than the updated ANSI Standard, you
may choose to control the duration of your
calls and operate your phone in the most
power efficient manner.
ii
Page 11

SAFETY
Efficient Phone Operation
For your phone to operate at the lowest power
level, consistent with satisfactory call quality:
If your phone has an extendable antenna,
extend it fully. Some models allow you to
place a call with the antenna retracted.
However, your phone operates more
efficiently with the antenna fully extended.
Hold the phone as you would any other
telephone. While speaking directly into the
mouthpiece, position the antenna up and over
your shoulder.
Do not hold the antenna when the phone is
"IN USE". Holding the antenna affects call
quality and may cause the phone to operate
at a higher power level than needed.
Antenna Care and Replacement
Do not use the phone with a damaged
antenna. If a damaged antenna comes into
contact with the skin, a minor burn may result.
Replace a damaged antenna immediately.
Consult your manual to see if you may
change the antenna yourself. If so, use only a
manufacturer-approved antenna. Otherwise,
have your antenna repaired by a qualified
technician.
Use only the supplied or approved antenna.
Unauthorised antennas, modifications or
attachments could damage the phone and
may contravene local RF emission regulations
or invalidate type approval.
iii
Page 12

SAFETY
Driving
Check the laws and regulations on the use of
cellular telephones in the areas where you
drive. Always obey them. Also, when using
your phone while driving, please:
• give full attention to driving,
• use hands-free operation,
if available, and
• pull off the road and park before
making or answering a call if driving
conditions so require.
Electronic Devices
Most electronic equipment, for example in
hospitals and motor vehicles is shielded from
RF energy. However, RF energy may effect
some malfunctioning or improperly shielded
electronic equipment.
Vehicle Electronic Equipment
Check with your vehicle manufacturer's
representative to determine if any on board
electronic equipment is adequately shielded
from RF energy.
Medical Electronic Equipment
Consult the manufacturer of any personal
medical devices (such as pacemakers,
hearing aids, etc) to determine if they are
adequately shielded from external RF energy.
iv
Page 13

SAFETY
Turn your phone OFF in health care facilities
when any regulations posted in the area
instruct you to do so. Hospitals or health care
facilities may be using RF monitoring
equipment.
Aircraft
Turn your phone OFF before boarding any
aircraft.
• Use it on the ground only with crew
permission.
• Do not use in the air.
To prevent possible interference with aircraft
systems, Federal Aviation Administration
(FAA) regulations require you to have
permission from a crew member to use your
phone while the plane is on the ground. To
prevent interference with cellular systems,
local RF regulations prohibit using your phone
whilst airborne.
Children
Do not allow children to play with your phone.
It is not a toy. Children could hurt themselves
or others (by poking themselves or others in
the eye with the antenna, for example).
Children could damage the phone, or make
calls that increase your telephone bills.
v
Page 14

SAFETY
Blasting Areas
To avoid interfering with blasting operations,
turn your unit OFF when in a "blasting area"
or in areas posted: "turn off two-way radio".
Construction crews often use remote control
RF devices to set off explosives.
Potentially Explosive Atmospheres
Turn your phone OFF when in any area with a
potentially explosive atmosphere. It is rare,
but your phone or its accessories could
generate sparks. Sparks in such areas could
cause an explosion or fire resulting in bodily
injury or even death.
Areas with a potentially explosive atmosphere
are often, but not always, clearly marked.
They include fuelling areas such as petrol
stations; below decks on boats; fuel or
chemical transfer or storage facilities; and
areas where the air contains chemicals or
particles, such as grain, dust, or metal
powders.
Do not transport or store flammable gas,
liquid, or explosives, in the compartment of
your vehicle which contains your phone or
accessories.
Before using your phone in a vehicle powered
by liquefied petroleum gas (such as propane
or butane) ensure that the vehicle complies
with the relevant fire and safety regulations of
the country in which the vehicle is to be used.
vi
Page 15

SAFETY
This Cellular Telephone complies with
all applicable RF safety standards.
This cellular telephone meets the standards
and recommendations for the protection of
public exposure to RF elctromagnetic energy
established by governmental bodies and other
qualified organisations, such as the following:
• Verband Deutscher Elektroingenieure
(VDE) DIN-0848
• Directives of the European
Community, Directorate General V in
Matters of Radio Frequency
Electromagnetic Energy
• National Radiological Protection
Board of the United Kingdom.
GS-11, 1988.
• American National Standards Institute
(ANSI)/IEEE. C95. 1-1992
• National Council on Radiation
Protection and Measurements
(NCRP). Report 86
• Department of Health and Welfare
Canada, Safety Code 6.
vii
Page 16

MANUAL UPDATES
Overnight Charger
The charger's slot accepts batteries alone or
while attached to the telephone.
Please see table for approximate recharge
times.
Approx. Recharge Time.Battery Type
700 mAh
1500 mAh
5 hours
10 hours
The yellow lamp on the charger indicates that
the telephone or battery is properly inserted
and charging.
Page 17

CONTENTS
ESSENTIAL INFORMATION
INTRODUCTION...........................................5
DISPLAY, INDICATORS AND KEYPAD.......5
Display .....................................................5
Indicators .................................................5
Keypad ....................................................6
Volume Control ........................................8
BASIC OPERATION .....................................9
About the SIM Card .................................9
Inserting the SIM Card.............................9
On/Off ....................................................11
Entering the PIN Code...........................12
Electronic Lock ......................................13
Automatic Lock ......................................14
Placing a Call.........................................14
Receiving a Call .....................................14
Call in Absence......................................15
ADVANCED CALL PLACEMENTS .............15
Automatic Redial....................................15
International Calls ..................................16
Emergency Calls....................................16
SHORT-NUMBERS.....................................17
Short-number Programming ..................17
Entering a Name....................................18
Entering the Short-number ....................18
Programming Examples ........................19
Short-number Recalling/Dialling ............20
Speed Dialling........................................22
Short-number Clearing ..........................22
Last Number Entered.............................22
1
Page 1
Page 18

CONTENTS
ADVANCED INFORMATION
MEMORY FEATURES ................................23
Notepad .................................................23
Last Number Dialled ..............................23
SYSTEM REGISTRATION..........................24
Automatic Roaming ...............................24
Manual Roaming....................................25
Displaying the Preferred List..................26
Changing the Preferred List...................26
MENU OPERATION....................................27
Overview Menu Headings and Features28
Status Review........................................30
Master Reset .........................................31
Master Clear ..........................................31
INTERFACE FEATURES............................32
Silent Ringer ..........................................32
Silent Keypad.........................................33
Tone Signalling Features.......................33
Silent Notepad .......................................33
Memory Linking .....................................34
Pauses in Memory .................................34
DTMF Signalling ....................................35
Long Tone DTMF...................................36
PIN Code Enable/Disable ......................36
Language Selection ...............................37
CALL MONITORING ...................................37
One Minute Audible Call Timer..............37
Programmable Audible Call Timer.........38
One Time - Prog. Audible Call Timer.....38
Visual Call Timers and Meters...............38
To Display Call Timers...........................40
To Display Call Meters...........................40
Programming of Rates...........................41
Automatic Monitor Displays ...................41
2
Page 2
Page 19

CONTENTS
ADVANCED INFORMATION
CALL RESTRICTIONS................................42
Restricted Keypad Dialling.....................42
Restricted Memory Access ....................43
Restricted Incoming Calls ......................43
Restricted Phone Number Length .........44
Full Service ............................................44
CALL BARRING ..........................................45
Activating Call Barring ...........................46
Cancelling Call Barring ..........................47
Status of Call Barring.............................47
Changing Call Barring Password...........48
Special Call Barring Messages..............48
CALL FORWARDING .................................49
Activating Call Forwarding .....................50
Cancelling Call Forwarding ....................51
Status of Call Forwarding ......................51
Special Call Forwarding Messages .......52
DISPLAY SIGNAL STRENGTH ..................53
CHANGING THE UNLOCK CODE..............53
CHANGING THE PIN CODE ......................54
UNBLOCKING THE SIM CARD..................55
CHANGING THE SECURITY CODE ..........56
SHORT MESSAGE SERVICE (SMS) .........57
Automatic Cell Broadcast ......................57
Point to Point Short Messages ..............59
Receiving Point to Point Messages .......59
Storage of Point to Point Messages ......60
Reading Point to Point Messages..........60
Clearing Messages From Memory.........61
Embedded Callback Numbers ...............62
Short Message Alert Tone .....................62
2
Page 3
Page 20

CONTENTS
ADVANCED INFORMATION
CALL WAITING AND CALL HOLDING .......63
Call Waiting............................................63
Call Holding ...........................................64
Call Hold and Waiting Combinations .....64
Call Hold and Making New calls ............66
Call Hold and Call Waiting Messages....66
Emergency Calls and Call Hold/Wait.....67
ACCESSORIES AND OPTIONS
BATTERY OPERATION..............................69
Battery Maintenance..............................69
Replacing the Battery ............................69
Battery Meter .........................................70
Battery Saving Feature (DTX) ...............70
BATTERY CHARGING ...............................71
Overnight Internal Charger ....................71
Single Pocket Desktop Rapid Charger ..72
BATTERY SAVER.......................................72
HANDS FREE CAR KIT ..............................73
Insertion / Removal................................74
Car Kit Functions ...................................75
Handsfree Calls .....................................75
Automatic Answer..................................76
Safety Timer ..........................................77
INDEX .........................................................79
2
3
Page 4
Page 21

ESSENTIAL INFORMATION
1
INTRODUCTION
INTRODUCTION
This cellular telephone is designed for the
GSM System. Using this telephone makes it
possible to contact any telephone in the
world, provided you are in an area covered by
the GSM system.
The cellular telephone does not contain your
GSM-subscriber number, this information is
contained on your SIM card supplied by your
local network operator. All billing will be
registered, when the conversation takes
place, to the subscriber number on the
SIM card which is inserted in the telephone.
DISPLAY, INDICATORS AND KEYPAD
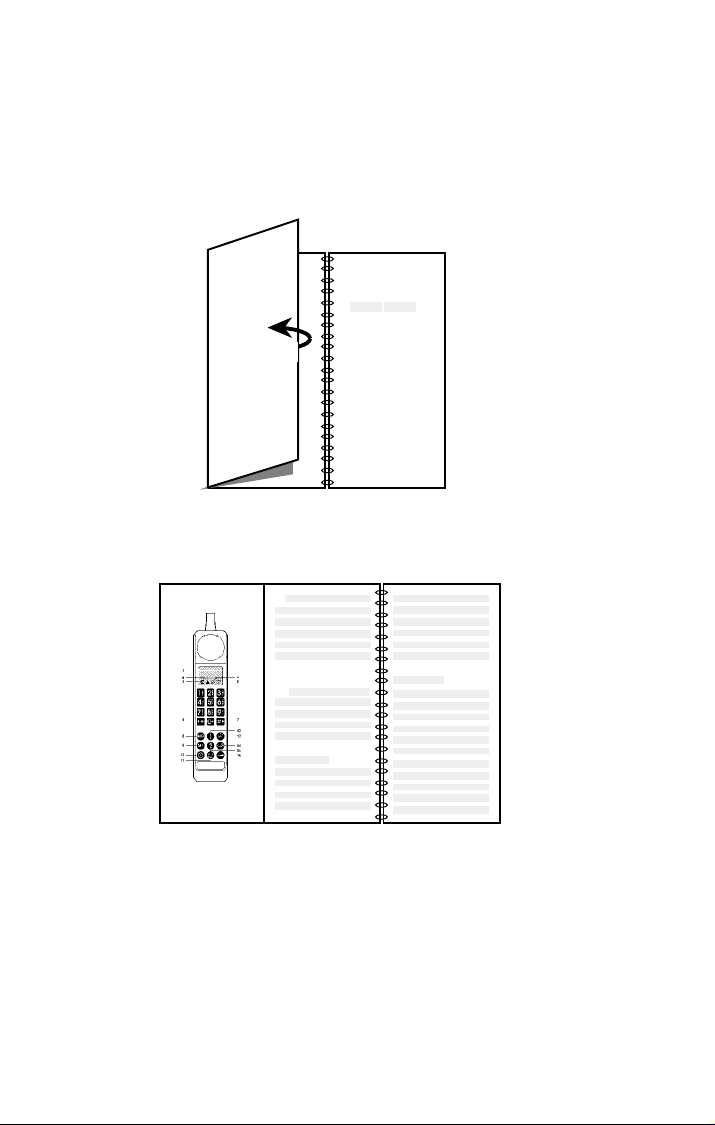
DISPLAY, INDICATORS AND KEYPAD
See flap at the front cover.
Display
Display
1. The 16-character display is used to show
telephone numbers, short-numbers and
messages which inform you of the operation of the telephone. When the display
is not in use for other purposes it will show
the country code and the identity of the
network operator.
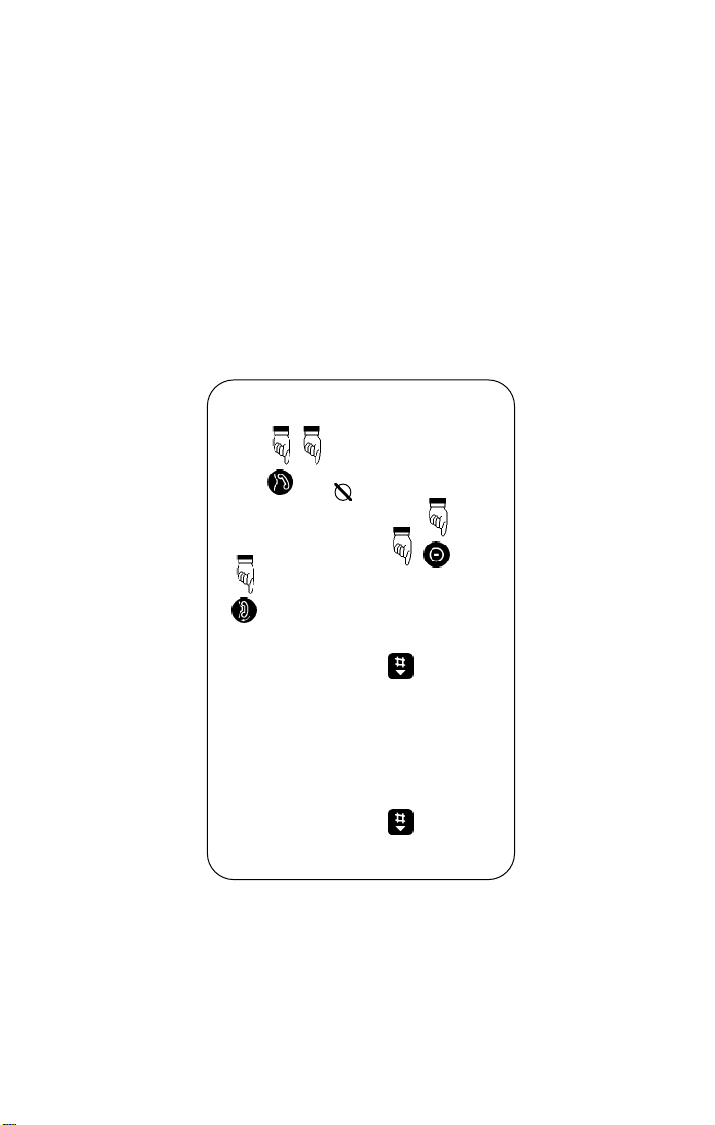
Indicators
Indicators
2. Roam
Steady symbol:
preferred system different from your home
system.
Flashing symbol:
non-preferred system.
You are registered on a
You are registered on a
Page 5
Page 22

ESSENTIAL INFORMATION
1
3. In Use
Shown whenever a call is in progress.
4. No Service
Steady symbol:
phone is outside any system coverage.
Flashing symbol:
phone is in an area with coverage, but is
notregistered with the system. You are
able to place emegency calls using the
special GSM emergency number 112, but
you are unable to place/receive ordinary
calls.
Short Message
5.
This icon is used to support various SMS
features.
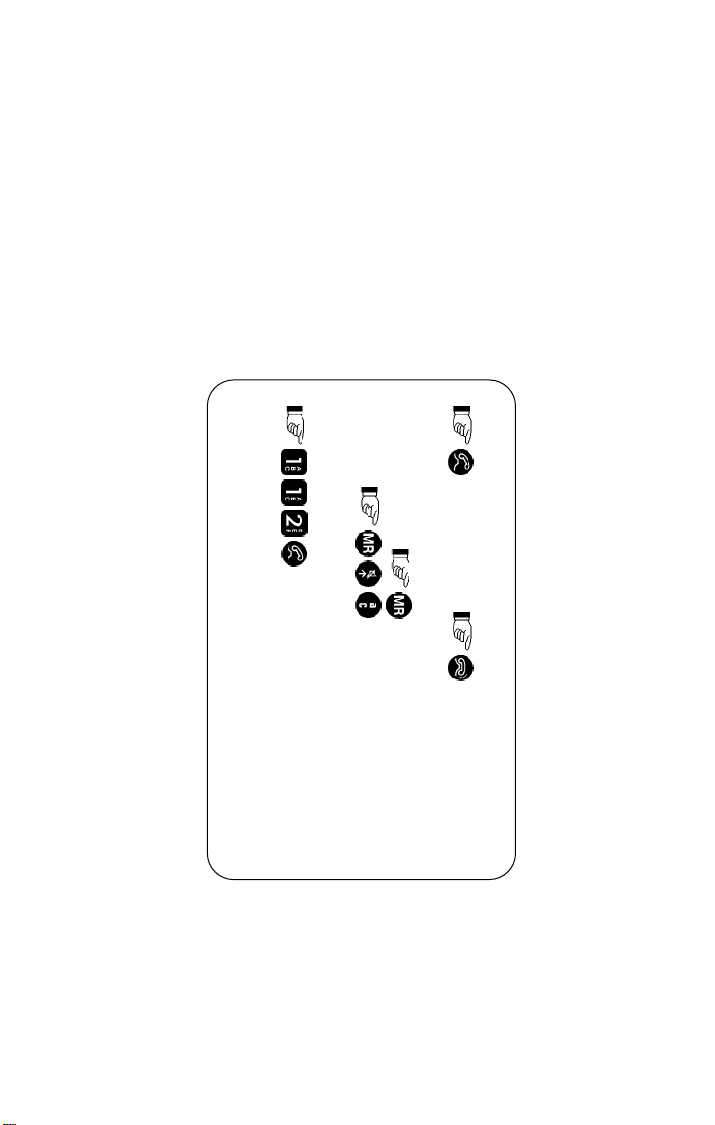
Keypad
Keypad
The keypad and the display are back lit
whenever the telephone is switched on.
If no key is pressed within 6 seconds the light
will turn off. Pressing any key will turn the
lighting back on.
The upper portion of the keypad (12 keys) is
used for telephone number and letter entries.
The lower portion (9 keys) is used to enable
specific functions.
The following paragraphs describe the major
uses of these keys.
Indicates that the tele-
Indicates that the tele-
6.
Scroll Backward in memory / menus.
7. Scroll Forward in memory / menus.
Page 6
Page 23

ESSENTIAL INFORMATION
8. Memory Recall
Press and hold to recall last number
entered.
Press followed by the short number
you want to recall from memory.
9. Store
Used when storing telephone numbers
into the memory and to confirm choices in
menus.
10.
On-Off
Menu / SMS
11.
Menu.
Initiates selection of features in the menus.
Selected by pressing .
Short Message Service (SMS).
Use to initiate SMS features.
12.
Letter entry / Clear
Letter entry:
Letter entry is used when programming
and recalling names with short-numbers.
Enabled by pressing
Clear:
Short press on clears last digit.
Long press on
clears entire display.
1
13. Send
Initiates call to the entered number.
Answers incoming calls.
14. End
Terminates calls.
Page 7
Page 24
ESSENTIAL INFORMATION
1
15.
Mute / Secondary functions.
Mute:
Switches the microphone off/on during
conversation.
Selected by pressing
Secondary functions:
Initiates the following functions:
Mute, menu, letter entry, adjustment of
ringer volume and adding of international
prefix.
Volume Control
Volume Control
16. Volume
The volume key adjusts the earpiece and
ringer volume levels. Holding down the
volume key will either increase or decrease the volume until the key is released.
To reverse the direction of adjustment,
release and press the volume key again.
To adjust earpiece volume:
To adjust ringer volume:
Page 8
Page 25

ESSENTIAL INFORMATION
1
BASIC OPERATION
BASIC OPERATION
About the SIM Card
About the SIM Card
Your network operator has provided you with
a subscription card generally known as a
Subscriber Identity Module Card or SIM Card.
The SIM Card is your personal key to accessing GSM services and contains all of your
personal data including:
subscriber number,
home system,
services subscribed to,
PIN and Unblocking codes.
Your valid SIM Card must be correctly inserted
into the card reader to access services.
Inserting the SIM Card
Inserting the SIM Card
Remove the battery as shown below.
Removing the battery.
Page 9
Page 26

ESSENTIAL INFORMATION
1
Insert the SIM card in the card reader located
behind the battery as shown below.
Inserting the SIM Card
Removing the SIM Card
When the SIM Card is inserted slide the
battery back on.
If the SIM card is missing or not correctly
inserted, e.g. inserted upside down or backwards, the display reads:
‘Check Card’: Check for proper orientation
and re-insert the SIM Card
Page 10
Page 27
ESSENTIAL INFORMATION
1
On/Off
On/Off
Switch-on
If the SIM card is not already inserted the
display will prompt you to do so.
The telephone then checks the validity of the
SIM card.
If the validation is OK,
‘Enter PIN’: This indicates that the SIM Card
is protected by a PIN Code. See the section,
"Entering the PIN Code".
‘Enter Unlock Code’: This indicates that the
telephone is protected by an electronic lock.
See the section, "Electronic Lock".
If a problem exists with the SIM Card,
display shows one of the following messages:
‘Blocked’: See the section, "Unblocking the
SIM Card".
‘Bad Card’ or ‘Blocked’, then ‘See Supplier’
Please seek help from your network operator.
:
To unlock:
the display may show:
Unlock Code
the
Switch-off
After switch-off there may be a 2-3 second
delay before it is possible to switch-on again.
:
Page 11
Page 28
ESSENTIAL INFORMATION
1
Entering the PIN Code
Entering the PIN Code
PIN is an abbreviation of Personal Identification Number. The PIN Code is a 4 to 8 digit
code which protects your SIM card from
unauthorized use.
The first PIN Code is selected by the SIM
card provider. It may be changed or disabled.
See the sections, "Changing the PIN Code" or
"PIN Code Enable/disable".
If the SIM card is protected by a PIN Code,
the display shows:
‘Enter PIN’
Each time the telephone is switched on or the
SIM card is inserted, you must enter:
PIN Code
The PIN Code will be displayed as stars.
If you make a mistake while entering the PIN
Code, you may correct it by
If the PIN Code is accepted
If the PIN Code is not accepted,
shows:
‘Wrong PIN’ followed by ‘Enter PIN’ and you
must re-enter the PIN Code.
If you do not succeed after three attempts the
display shows:
‘Blocked’
Page 12
, the display shows:
‘OK’
the display
Page 29

ESSENTIAL INFORMATION
1
and the SIM card is blocked from further use
until it has been unblocked by a special
unblocking procedure. See the section,
"Unblocking the SIM Card".
Electronic Lock
Electronic Lock
The electronic lock protects your phone from
unauthorized use. If locked, a three digit
unlock code must be entered before the
telephone can be used. If the display shows:
‘Enter Unlock Code’
the telephone is protected by the electronic
lock.
To unlock:
To lock:
If you want to change the unlock code see the
section, "Changing the Unlock Code".
Note: Upon delivery the unlock code is set to
123. If you forget the unlock code, the
electronic lock will not prevent you from
entering menu mode to access the display/
change unlock code option. Your security
code will be required to change the unlock
code.
Unlock Code
Page 13
Page 30
ESSENTIAL INFORMATION
1
Automatic Lock
The phone can be set to automatically lock
every time the phone is turned off.
To enable/disable automatic lock:
To toggle the function on/off:
To toggle the function on/off
Placing a Call
Placing a Call
When the indicator is off, you may place a
call as follows:
Telephone no. (max. 20 digits)
Converse when answered.
End the conversation by:
If a call is temporarily interrupted, the display
may show:
‘Retrying’
The GSM system will automatically reconnect the call if possible.
Receiving a Call
Receiving a Call
When the telephone is called, the alert signal
for incoming calls is heard.
Answer by:
Page 14
Page 31

ESSENTIAL INFORMATION
1
End the conversation by:
To stop alert signal without answering:
Call in Absence
When a call has been received but the phone
has not been answered, the message
“*CALL*” will be displayed. If the phone is
locked the message “LOCKED” will appear
after pressing the
“*CALL*” message from the display.
ADVANCED CALL PLACEMENTS
ADVANCED CALL PLACEMENTS
Automatic Redial
Automatic Redial
If a call attempt is unsuccessful, you may
enable an automatic redial procedure.
The telephone will then initiate multiple redial
attempts until the call is connected, a call is
received, or the redial procedure times out.
How to operate:
After a failed attempt, such as subscriber busy,
button to clear the
Before ending the call
The display will show: ‘Redial’ as long
as the automatic redial procedure is active.
When the redial is successful, your phone
will ring once to alert you.
Page 15
Page 32

ESSENTIAL INFORMATION
1
To cancel the automatic redial procedure:
International Calls
International Calls
Just like using the ordinary telephone system,
you must add an international prefix before
dialling the country prefix and the telephone
number. The international prefix will automatically be added if you use this feature.
How to operate:
(display shows: + )
country prefix, telephone number
Note that it is possible to store the
sequence in the short-number memory and
still have the maximum of 20 digits.
Emergency Calls
Emergency Calls
Emergency calls may be placed in two ways.
To dial the GSM emergency number, 1 1 2,
This call may be initiated with or without a
SIM card inserted and despite electronic lock
activation. The call is directed to a central
emergency operator if the indicator is either
flashing or off.
To dial the local emergency number
ordinary telephone system,
Local emergency number
Page 16
of the
Page 33

ESSENTIAL INFORMATION
1
The SIM card must be inserted and the
indicator switched off.
This call is completed like any ordinary call.
SHORT-NUMBERS
SHORT-NUMBERS
The telephone has storage locations (referred
to as short-numbers) for 100 telephone
numbers and names which can be used to
quickly dial frequently called telephone
numbers. Each location can hold a telephone
number up to 20 digits in length and a name
up to 16 characters long.
Short-numbers stored in the telephone are
labelled from 1 through 100.
The SIM card may be capable of storing
additional short-numbers. Your card provider
will inform you of your card's capacity for
storing short-numbers. SIM card shortnumbers are labelled from 101 and up.
For convenient recall, you may store your
own telephone number into a short-number,
which is easy to remember e.g. (1 or 101).
Short-number Programming
Short-number Programming
Programming a name and number:
Name
Telephone number Short-number
Programming a number without a name:
Telephone number Short-number
Page 17
Page 34

ESSENTIAL INFORMATION
1
Below you will find a more detailed explanation and examples of the short-number
programming.
Entering a Name
Entering a Name
Enter first character (such as "N")
and hold down
Display will show: M - N - O - 5 - M - N -.......
Release key when wanted character is shown.
Pressing a new key will cause cursor to move
to next position.
Repeat the procedure for next character.
You may also select the character by pressing
the
key repeatedly.
To move the cursor.
To correct mistakes:
Entering the Short-number
Entering the Short-number
If you have no preference for a particular
short-number,
as the short-number.
The telephone number and name will then
automatically be stored in the next available
short-number location. This feature is most
often used when programming short-numbers
with names.
If you want the next available short-number
location in a particular decade like the fifties,
as the short-number.
Page 18
Page 35

ESSENTIAL INFORMATION
If you want a specific short-number like 2,
Programming Examples
Programming Examples
Example no. 1.
Short-number: Next available.
Name: Peter
Telephone no.: 1 3 5 7 9 2 4
This is what you do: Action:
Enter Letter mode
Select P
and hold Select E
and hold Select T
and hold Select E
and hold Select R
Leave Letter mode
Store
Next available *
1
* Entering
To confirm storage the display shows, for
short-number 1:
If the memory is completely full the display
shows:
will speed up storage.
‘Stored At 1’
‘Full’
Page 19
Page 36

ESSENTIAL INFORMATION
1
Example no. 2.
Short-number: 3.
Name: None
Telephone no.: 13 5 7 9 2 4
telephone number
store
short-number
If the selected short-number is unoccupied
the display shows:
‘Stored At 3’
If the selected short-number is occupied the
display shows:
‘3 In Use’
Choose another short-number by:
short-number
store
another short-number
Short-number Recalling/Dialling
Short-number Recalling/Dialling
Short-numbers can either be recalled by
name or by the short-number itself.
To recall by the short-number:
Short-number
The name (if any), short-number and telephone number will appear in the display.
Page 20
Page 37

ESSENTIAL INFORMATION
When the short-number is recalled you can:
Review the recalled short-number:
and hold
Scroll forward in short numbers:
Scroll backward in short-numbers:
Call the recalled short-number:
Exit short-numbers:
To recall by name:
First letter
recall
enter Letter mode
letter (e. g. T =
The name, short-number and telephone
number will appear in the display.
)
1
When recalled you can:
Review the recalled short-number:
and hold
Scroll forward in alphabetic order:
Scroll backward in alphabetic order:
Call the recalled short-number:
Page 21
Page 38

ESSENTIAL INFORMATION
1
Exit short-numbers:
Speed Dialling
Speed Dialling
It is possible to dial a short-number directly
from memory. This is done as follows:
short-number
The called number is displayed.
Short-number Clearing
Short-number Clearing
Recall the short-number. Check that it is the
number you want to clear.
If OK,
The display then shows:
Confirm by
Last Number Entered
To view the last number entered:
and hold.
(If not )
‘Clear?’
(otherwise )
Page 22
Page 39

ADVANCED INFORMATION
2
MEMORY FEATURES
MEMORY FEATURES
Notepad
Notepad
To store a telephone number during conversation, simply enter the number and end the
conversation the usual way.
You may next call the telephone number or
store it as a short-number.
Call the number by:
Store the number by:
short-number
Recall the number by
Last Number Dialled
Last Number Dialled
Recall the number by
Call the recalled number by:
For security reasons, you may wish to clear
the last number dialled by:
any invalid number
:
:
Page 23
Page 40

ADVANCED INFORMATION
2
SYSTEM REGISTRATION
SYSTEM REGISTRATION
Automatic Roaming
Automatic Roaming
The SIM Card memory contains space for a
list of "preferred" network operators.
If coverage on your home system becomes
unavailable, the telephone will automatically
try to establish contact with one of the
preferred network operators on this list.
This is done in the order that they are listed.
If automatic roaming is successful, the
indicator will light up indicating that you are
registered on a preferred system different
from your home system.
If service from one of the preferred network
operators is not available, the display shows:
‘Select Service’
To defer service selection:
To see a list of available network operators in
the area where you are located:
The display shows the first network
operator on the list. Operators are listed
in order of decreasing signal strength.
Scroll forward in the list:
Scroll backward in the list:
Select displayed network
operator:
Page 24
Page 41

ADVANCED INFORMATION
2
If you are accepted by the system, the display
will show the network operator code and the
indicator will start flashing indicating that
you are registered on a non-preferred system.
If you are not accepted by the system, the
indicator will flash.
You may then continue as described in the
section, "Manual Roaming".
Manual Roaming
Manual Roaming
You may manually select a network operator
from a list of those providing coverage at your
immediate location.
To see the list of available network operators:
Operators are listed in order of decreasing
signal strength. The display shows the first
network operator as:.
Position of list (1-9, A-W)
Star = Preferred Operator
Blank = Non-Preferred Operator
Network Operator Code
The lower line of the display may show the
name of the network operator or the country
abbreviation with the network number.
The procedure for scrolling/selecting is
described in the section "Automatic Roaming"
Page 25
Page 42

ADVANCED INFORMATION
2
Displaying the Preferred List
Displaying the Preferred List
To see the list of preferred network operators:
The display shows the first network operator
on the list.
Position on list
Scroll forward in the list:
Scroll backward in the list:
When network operators have not been
programmed, those positions will appear
empty.
To programme a network operatior see the
section, “Changing the Preferred List”.
Changing the Preferred List
Changing the Preferred List
Note: A list of international network operators
and their codes can be obtained from your
network operator.
Enter the preferred list and scroll to the
position you want to change as described in
the section, "Displaying the Preferred List".
To change the displayed network operator:
Network Operator Code
Network Operator Code
Page 26
Page 43

ADVANCED INFORMATION
2
Example:
Network Operator Code = 234-01
to scroll to position
To clear the displayed network operator:
Check that it is the network operator you want
to clear.
If OK,
The display then shows:
Confirm by
MENU OPERATION
MENU OPERATION
Menu operation allows you to select and
cancel features by following the prompts in
the display.
To enter menu mode:
The features are grouped under menu
headings.
Menu headings: Entered by:
General Features
Interface Features
Call Monitor Features
Call Restriction Features
Secure Features
Other Features
(If not )
‘Clear?’
(otherwise )
Page 27
Page 44

ADVANCED INFORMATION
2
To enter a feature from menu heading:
a digit between 1 and 8 *
* See the next pages for an overview
Once the desired feature is displayed:
and follow the prompts
Many features are simply toggled on/off using
the key. Some features will prompt for
further information such as the security code.
To scroll in the menu headings/features:
to go forward
to go backward
To return to menu headings:
To exit menu mode:
Overview Menu Headings and Features
Overview Menu Headings and Features
Key Press: Menu heading/Feature:
General Features
+ Status Review
+ Automatic Answer
+
+ Preferred List Display/Change
+
+
+ Silent Notepad
+ Long tone DTMF
+
Manual Roaming
Interface Features
Silent Ringer
Silent Keypad
PIN Code Enable/Disable
Page 28
Page 45

ADVANCED INFORMATION
Key Press: Menu heading/Feature:
2
+
+ Safety Timer Setting
+ 1 minute Audible Timer
+
+ Once Only Audible Timer
+ Automatic Monitor Displays
+
+
+ Rate Programming
+
+ Restrict Keypad Dialling
+
+
+
+
+ Change/Display Unlock Code
+
+ Master Clear
+ Change Security code
+
Language Selection
Call Monitor Features
Programmable Audible Timer
Display Call Timers
Display Call Meters
Timers/Meters Reset
Call Restriction Features
Restrict Memory Access
Restrict Incoming Calls
Restrict Phone No. Length
No Restrictions, Full Service
Secure Features
Master Reset
Automatic Lock
Page 29
Page 46

ADVANCED INFORMATION
2
Key Press: Menu heading/Feature:
Other Features
+
+
+
+ Automatic Cell Broadcast
+
* Not displayed when used with Hands Free Car Kit
Status Review
Status Review
The Status Review feature allows you to
review any features changed from their
default state.
To review the features selected:
To scroll:
Display Signal Strength
Battery Meter*
Battery Save Feature (DTX)*
SMS Features
Short Message Alert Tone
to go forward
to go backward
If the display shows:
‘Standard’: No default settings have been
changed
To exit status review:
Page 30
Page 47

ADVANCED INFORMATION
Master Reset
Master Reset
USE THIS FEATURE WITH CAUTION
Using this feature you can reset all of the
features back to their default settings.
Which means:
Cancellation of:
- Automatic Answer
- Long Tone DTMF
- Safety Timer
- All Audible Timers
- Automatic Call Monitor Display
- Battery Saving Feature (DTX)
- Selected Language (Default: English)
Restoring of:
- Ringer
- Notepad Tones
- No restrictions on calls
- Unlocks the telephone
- Volume Levels to medium
To carry out a Master Reset:
2
Security Code
The reset is confirmed in the display by:
‘Reset Complete’
Master Clear
Master Clear
USE THIS FEATURE WITH CAUTION
Using this feature you perform the same
function as Master Reset plus these additional
functions:
Page 31
Page 48

ADVANCED INFORMATION
2
Clears: - All 100 short-numbers
- Last number called
- Home Charge Rate
- Roam Charge Rate
Resets: - Resettable Call Timers
- Resettable Call Meters
To carry out a Master Clear:
Security Code
When a Master Clear is completed the display
shows:
‘Clear Complete’
INTERFACE FEATURES
INTERFACE FEATURES
The interface features allow you to customize
the telephone to meet your needs.
Silent Ringer
Silent Ringer
The ring tone heard in connection with
incoming calls can be muted.
To enable/disable the ring tone:
to toggle the function on/off.
With the ring tone muted an incoming call is
only announced by the normal display reading:
‘Call’
Note: It is not recommended to use "Silent
Ringer" and "Automatic Answer" features at
the same time.
Page 32
Page 49

ADVANCED INFORMATION
2
Silent Keypad
Silent Keypad
Mutes the tone heard when keys are pressed.
To enable/disable the keypad tone:
to toggle the function on/off.
Tone Signalling Features
Tone Signalling Features
The tone signalling features allow you to
communicate with external devices that
respond to DTMF tones.
Silent Notepad
Silent Notepad
If you regularly use the Notepad feature which
allows you to store a telephone number
during conversation, it might be irritating for
the other party to listen to the DTMF tones
when you press the keys. To avoid this you
may enable the silent notepad feature.
To enable/disable the silent notepad:
to toggle the function on/off
When "Silent Notepad" is enabled you will
hear a feed-back tone whereas the other
party will not hear anything.
If you want to transmit DTMF tones while
"Silent Notepad" is enabled you simply:
enter the digits
Page 33
Page 50

ADVANCED INFORMATION
2
Memory Linking
Memory Linking
Memory linking allows you to append a shortnumber from memory to a number already in
the display.
To link numbers:
enter digits short-number
Pauses in Memory
Pauses in Memory
This feature allows you to construct and dial
sequences of digits separated by pauses.
A pause in the number sequence will stop the
transmission at that point to allow for a
system response, such as a second dial tone.
An additional 12 digits may be appended to
the standard length of 20 digits for a total of
32 digits. The international prefix (+) and
pause(s) characters ( ) each represent one
digit.
To construct sequences:
enter digits
pause
enter digits
pause
Note: If you want to recall a short-number
instead of entering the digits after a pause
has already been inserted:
short-number
The sequence may be stored in short-number
1 through 100 like any ordinary telephone
number.
etc.
Page 34
Page 51

ADVANCED INFORMATION
2
Short-numbers above 100 (those on your SIM
Card) cannot be used to store sequences
containing pauses.
To make a call with a sequence:
Construct or recall sequence
Digits prior to pause are transmitted.
Await response (dial tone)
Digits prior to next pause are transmitted.
Repeat until all digits have been
transmitted.
DTMF Signalling
DTMF Signalling
DTMF signalling is used, for example, when
you want to use the public paging service.
See also the section "Long Tone DTMF".
DTMF dialling from the keypad:
1. Place the call and wait for the receiving
party to accept data.
2. Enter the digits you want to transmit on
the keypad. Each key press transmits the
digit as a DTMF tone.
Note: Do not use the
key
DTMF dialling from short-number memory:
1. Place the call and wait for the receiving
party to accept data.
2. Recall the desired short-number.
Page 35
Page 52

ADVANCED INFORMATION
2
3.
Repeat 2 and 3, if necessary, until all
data have been transmitted.
Long Tone DTMF
Long Tone DTMF
Some electronic equipment such as answering machines may require longer tones.
By enabling the long tone DTMF feature the
DTMF tone is transmitted as long as you
press the key.
To enable/disable the long tone DTMF:
to toggle the function on/off.
PIN Code Enable/Disable
PIN Code Enable/Disable
You may enable/disable the PIN Code if your
SIM Card allows it.
When disabled you do not have to enter the
PIN Code when the telephone is turned on.
To enable/disable the PIN Code:
PIN Code
The display may show;
‘Not Allowed’: Disabling the PIN Code is not
allowed by the network operator.
Wrong PIN’: The PIN Code was wrong and
you must start all over.
‘Blocked’: Three unsuccessful attempts of en-
tering the PIN Code have been carried out. See
the section, "UNBLOCKING THE SIM CARD".
Page 36
Page 53

ADVANCED INFORMATION
2
Language Selection
Language Selection
Using this feature it is possible to select the
language in which the prompts are to be
displayed.
To select language:
Scroll to preferred language:
to go forward
to go backward
to confirm the selection.
CALL MONITORING
CALL MONITORING
The telephone has a variety of features to
help you monitor time and costs accumulated
when using the telephone for outgoing calls.
Two types of call monitoring features are
available: audible and visual. They may be
active concurrently.
Note: Depending upon your model, the phone
will monitor either all calls or only outgoing
calls.
One Minute Audible Call Timer
One Minute Audible Call Timer
A beep is heard 10 seconds before the end of
each minute of a call.
To enable/disable:
to toggle the function on/off.
Page 37
Page 54

ADVANCED INFORMATION
2
Programmable Audible Call Timer
Programmable Audible Call Timer
A beep is heard 10 seconds before each
expiration of a time period (Up to 999 seconds), which you may programme.
To enable/disable:
time period in seconds
to toggle the function on/off.
One Time - Prog. Audible Call Timer
One Time - Prog. Audible Call Timer
A beep is heard 10 seconds before the first
expiration of a time period (Up to 999
seconds) which you may programme.
To enable/disable:
time period in seconds
to toggle the function on/off.
Visual Call Timers and Meters
Visual Call Timers and Meters
The visual call monitors consist of seven call
timers and seven call meters (see Note, CALL
MONITORING). To utilize the seven call
meters you must programme a rate-perminute into your phone, using charge units or
currency.
Page 38
Page 55

ADVANCED INFORMATION
2
Three types of timers and meters are available.
Individual call timers/meters:
Shows call time and charge for the most
recently made call. They are automatically
reset before each call.
To see time/charge for a call see the section,
“Automatic Monitor Displays”.
Resettable call timers/meters:
Shows call time and charge for the period
since you last reset the timers.
You will find the following resettable call
timers/meters in the telephone:
Home: Shows time and charge for home
system since last reset.
Roam: Shows time and charge for other
systems since last reset.
Total: Shows the sum of Home and Roam.
To reset all resettable call timers/meters:
Cumulative call timers/meters:
Shows the total time and charge for the life of
the telephone.
You will find the following cumulative call
timers/meters in the telephone:
Home: Shows time and charge for home
system since the telephone was put
into service.
Roam: Shows time and charge for other
systems since the telephone was put
into service.
Total: Shows the sum of Home and Roam.
Page 39
Page 56

ADVANCED INFORMATION
2
To Display Call Timers
Select by scrolling to the desired
timer in the list of call timers:
- Individual Call Timer
- Total Resettable Call Timer
- Home Resettable Call Timer
- Roam Resettable Call Timer
- Total Cumulative Call Timer
- Home Cumulative Call Timer
- Roam Cumulative Call Timer
to go forward
to go backward
To Display Call Meters
Displaying meters requires that the telephone
is programmed with a home and roam rate.
See the section, “Programming of Rates”.
Select by scrolling to the desired
meter in the list of call meters:
- Individual Call Meter
- Total Resettable Call Meter
- Home Resettable Call Meter
- Roam Resettable Call Meter
- Total Cumulative Call Meter
- Home Cumulative Call Meter
- Roam Cumulative Call Meter
to go forward
to go backward
Page 40
Page 57

ADVANCED INFORMATION
2
Programming of Rates
To display call meters, the home and the
roam rate must be programmed. The rates
can be entered in either currency per minute
or charge units per minute.
To programme the rates:
Security Code
Home Rate
Note: The roam rate initially defaults to the
home rate to prevent you from setting it to
zero by mistake.
Automatic Monitor Displays
This feature can be used to automatically
display the time or charge for a call during
and after each call (see note, CALL MONITORING).
To enable/disable:
Roam Rate
Select auto timer or auto meter
using the scroll keys.
to confirm the selection.
to toggle the function on/off.
Page 41
Page 58

ADVANCED INFORMATION
2
CALL RESTRICTIONS
Call restriction settings are stored in the
telephone, but may affect usage of the SIM
card.
Four types of restrictions are available.
- Restricted Keypad Dialling
- Restricted Memory Access
- Restricted Incoming Calls
- Restricted Phone Number Length
They may be enabled/disabled independently
to suit your needs.
Restricted Keypad Dialling
Prevents any keypad dialling except for “112”
emergency dialling. Short-numbers, which
have not been prohibited by the Restricted
Memory Access feature, may be called but
not programmed.
To enable/disable:
To toggle the function on/off:
Security Code
Page 42
Page 59

ADVANCED INFORMATION
2
Restricted Memory Access
With restricted memory access you select a
range of short-numbers which should always
be accessible for storing and recalling.
For the short-numbers outside the range you
have the following alternatives:
Protect: Storing and recalling are not allowed.
Recall Only: Only recalling is allowed.
To enable/disable:
Security Code
Select “protect” or “recall only” using
the scroll keys and then
Lower limit Higher limit
Restricted Incoming Calls
Only outgoing calls are allowed.
To enable/disable:
To toggle the function on/off:
Security Code
Page 43
Page 60

ADVANCED INFORMATION
2
Restricted Phone Number Length
Among other uses, this feature can be used to
prevent international calls. Only phone
numbers less than or equal to the selected
maximum number of digits may be called.
To enable/disable:
Security Code
Display shows present maximum
To enter new maximum:
New maximum (1 to 20)
Note: DTMF signalling is disabled.
“112” emergency calls are still
possible. Digits after pauses in
telephone numbers do not count
towards length limit.
Full Service
Use of this feature removes all restrictions
previously selected.
Security Code
Page 44
Page 61

ADVANCED INFORMATION
2
CALL BARRING
Call barring applies only to the SIM Card, not
the telephone.
By subscribing to call barring, you may bar
incoming and/or outgoing calls by entering a
special key sequence. The key sequence
includes a “barring code” indicating which
calls should be barred and a password.
The first password is provided by the network
operator when you subscribe to the service.
The most common types of call barring are:
All outgoing calls Barring code: 33
Note: If barring of all outgoing calls is activated, activating other types of outgoing call
barring will not make sense.
All outgoing Barring code: 331
international calls
All outgoing Barring code: 332
international calls
except those to
home network operator
All incoming calls Barring code: 35
Note: If barring all incoming calls is activated,
activating other types of incoming call barring
will not make sense.
All incoming calls Barring code: 351
when roaming
Additional call barring services may be
provided. Consult your network operator for
further information.
Page 45
Page 62

ADVANCED INFORMATION
2
Call barring of all incoming calls is used in the
following examples. For other types of call
barring replace the barring code with the
appropriate code for the type in question.
Activating Call Barring
Barring code
Password
Possible display messages:
‘Please wait’: Your request is being processed.
‘Barring On’: Barring has been enabled.
Example:
Barring: All incoming calls (code: 35)
Password: 2468
Page 46
Page 63

ADVANCED INFORMATION
2
Cancelling Call Barring
To cancel a single type of call barring:
Barring code
Password
To cancel all types of call barring:
Password
Display message:
‘Barring Off’: Barring has been disabled.
Status of Call Barring
If you have forgotten whether call barring has
been activated you can check the status of
the different types of call barring.
Barring code
Possible display messages:
‘Barring On‘: Call barring activated.
‘Barring Off‘: Call barring not activated.
Example:
Check: Barring all incoming calls (code: 35)
Page 47
Page 64

ADVANCED INFORMATION
2
Changing Call Barring Password
Old Password
New Password
New Password
Possible Display messages:
‘Password Changed’: Password changing
was successful.
‘Matching Error’: The two entries of the new
passwords did not match. Try again.
Special Call Barring Messages
One or more of the following messages may
appear when operating call barring. Additional
special messages are described in the section
“Special Call Forward Messages”.
‘Outgoing Call Barred’: You have tried to
make a call with barring of outgoing calls
enabled.
‘Wrong Password’: Wrong barring password
entered. Try again.
‘Call Barred’: The number you dialled has
barred incoming calls.
Page 48
Page 65

ADVANCED INFORMATION
2
CALL FORWARDING
Call forwarding applies only to the SIM Card,
not the telephone. By subscribing to call
forwarding, you may forward incoming calls to
another telephone number by entering a
special key sequence. The key sequence
includes a “forwarding code” indicating when
an incoming call should be forwarded.
The most common types of call forwarding:
Unconditionally
Forwards all incoming calls.
Note: If Unconditional call forwarding is
activated, activating other types of call
forwarding will not make sense.
No answer
Forwards calls which you do not answer.
Not reachable
Forwards calls which you cannot answer.
For example:
- if your telephone is out of coverage
- if your telephone is switched off
- if your SIM Card is not inserted
Busy
Forwards calls received while your phone
number is busy.
Additional call forwarding services may be
provided. Consult your network operator for
further information.
Call forwarding “on busy” is used in the
following examples. For other types of call
forwarding replace the forwarding code with
the appropriate code for the type in question.
Forwarding code: 21
Forwarding code: 61
Forwarding code: 62
Forwarding code: 67
Page 49
Page 66

ADVANCED INFORMATION
2
Activating Call Forwarding
Forwarding code
Phone no.
Possible display messages:
‘Please Wait’: Your request is being processed.
‘Forward On’: Activation was successful.
Also displayed each time you place a call if
call forwarding is enabled.
‘Invalid Number’: The telephone number
entered to receive the call is invalid.
Note: You may use different phone numbers
for different types of call forwarding.
Example:
When: Forwarding, if busy (code: 67)
Telephone no. to receive call: 13579246
1 3 5 7 9 2 4 6
Telephone no.
Page 50
Page 67

ADVANCED INFORMATION
2
Cancelling Call Forwarding
To cancel a single type of call forwarding:
Forwarding code
To cancel all types of call forwarding:
Display message:
‘Forward Off’: Cancellation was successful.
Also displayed if the network cancels the call
forwarding.
Example:
Cancellation of: Forwarding, if busy (code: 67)
Status of Call Forwarding
If you have forgotten whether call forwarding
is active or to which phone number calls are
being forwarded, you can check the status of
the different types of call forwarding.
Forwarding code
Possible display messages:
‘Forward On 13579246’: Call forwarding
activated to the shown phone number.
‘Forward Off’: Call forwarding not activated.
Example:
Check: Call forwarding, if busy (code: 67)
Page 51
Page 68

ADVANCED INFORMATION
2
Special Call Forwarding Messages
One or more of the following messages may
appear when using call forwarding.
‘Call Forward’: A call placed to you has been
forwarded or a phone number you have called
has been forwarded.
‘Busy Try Later’: The network is currently
processing your earlier request. Try again
later.
‘Not Allowed’: You cannot activate this
service. Possible reasons:
Service subscription problems.
Incompatible service(s) activated, e.g. Call
barring for incoming calls prohibits call
forwarding.
‘Network Problem’: Communication with the
network failed. Try again.
‘Invalid Command’: Failure in key sequence.
Try again. May also indicate that the attempt
was unsuccessful. If the message appears
after repeated attempts consult your network
operator.
‘Not Available’: This service is not available.
Page 52
Page 69

ADVANCED INFORMATION
2
DISPLAY SIGNAL STRENGTH
The signal strength is shown as a relative
scale, from 1 to 8 segments. A long bar line
indicates good conditions for calls.
To display signal strength:
CHANGING THE UNLOCK CODE
To change the Unlock Code:
Security Code
Display shows current Unlock Code
New Unlock Code (3 or 4 digits)
Page 53
Page 70
ADVANCED INFORMATION
2
CHANGING THE PIN CODE
The first PIN Code is selected by the SIM
card provider. The PIN Code must be enabled
before it may be changed.
To change the PIN Code:
display shows: ‘Enter Old PIN’
Old PIN Code
display shows: ‘Enter New PIN’
New PIN Code (4 - 8 digits)
display shows: ‘Repeat New Pin’
New PIN Code again
If the display shows:
‘OK’: the PIN Code has been changed.
‘Matching Error’: the two new PIN codes did
not match and you must start all over.
‘Wrong PIN’: your old PIN Code was wrong
and you must start all over. If you do not
succeed after three attempts the SIM card is
blocked. See the section: “Unblocking the SIM
Card”.
Note: If you have forgotten your old PIN Code
you may choose a new PIN Code by using
the procedure described in the section,
“UNBLOCKING THE SIM CARD”.
Page 54
Page 71

ADVANCED INFORMATION
2
UNBLOCKING THE SIM CARD
The SIM card is blocked from use when three
unsuccessful attempts to enter the PIN Code
have been carried out.
To unblock the SIM card again you must
choose a new PIN Code by following the
procedure described below. Use the Unblock
Code supplied by the SIM card provider.
To unblock the SIM Card:
When display shows: ‘Blocked’
display shows: ‘Enter Unblock Code’
Unblock Code
display shows: ‘Enter New PIN’
New PIN Code (4 - 8 digits)
display shows: ‘Repeat New PIN’
New PIN Code again
If the display then shows:
‘OK’: you have unblocked the SIM card and
entered a new PIN Code.
‘Matching Error Blocked’: the two new PIN
codes did not match and you must start all
over.
‘Wrong Code Blocked’: your unblock code
was wrong and you must start all over.
Page 55
Page 72

ADVANCED INFORMATION
2
If you do not succeed after ten attempts the
SIM card is permanently blocked. The display
shows:
‘Blocked See Supplier’
You must then seek help from your network
operator.
CHANGING THE SECURITY CODE
Upon delivery, your security code is “000000”
To change the security code:
Security code
Display shows current security code
New security code
In case you have forgotten the programmed
security code please contact your telephone
dealer’s service center.
Page 56
Page 73

ADVANCED INFORMATION
2
SHORT MESSAGE SERVICE (SMS)
The Short Message Service (SMS) is
comprised of a set of features which enables
your GSM phone to send and receive
messages to and from the network. This
model phone is designed to support both the
Cell Broadcast and Point to Point Mobile
Terminated portions of the SMS feature set.
Automatic Cell Broadcast
Your Network Operator may wish to send
you important messages using a GSM
feature called 'Cell Broadcast.' The Network
Operator sends the information to your
phone over a 'broadcast channel' (similar to
television or entertainment radio
transmissions. This channel may also be
referred to as a 'Message Identifier' by some
publications). By selecting 'Auto Cell
Broadcast' and entering the appropriate
broadcast channel number, these messages
will scroll across your phone's display
whenever you are not in a call.
There may be multiple broadcast channels in
your service area. Please contact your
Network Operator for a list of available
channels and the information they supply.
To select:
cell broadcast channel
( can be used to correct undesired channel
number entries)
Page 57
Page 74

ADVANCED INFORMATION
2
The phone will display the selected channel
for a few seconds and then revert back to the
ON/OFF menu heading.
To select/cancel:
to toggle feature on/off
To change broadcast channel:
First ensure that the feature is turned off,
using the cancel sequence as shown above.
Then:
new cell broadcast channel
To exit Cell Broadcast menu:
To scroll through complete message (when
not in a call):
Page 58
Page 75

ADVANCED INFORMATION
2
Point to Point Short Messages
Your phone can also receive Point to Point
Short Messages. These messages are not
the same as the Cell Broadcast messages,
as they are transmitted to your phone only.
The received messages are stored on your
SIM card and they can be retrieved at a later
date.
Receiving Point to Point Messages
When your phone receives a message, it will
follow the procedure below.
1 There will be an alert signal of three
short tones.
2. The Short Message Service icon will light.
3. The display will show 'Message' if the
phone is not in a call.
4. The message will be stored in the SIM
card. Up to a maximum of 35 messages
may be stored this way. The maximum
number of messages stored will also
depend upon the SIM card, since some
SIM cards will have a lower capacity.
If the display shows 'Message', when you are
using the feature menu, pressing the
will return you to the feature menu, but
pressing will display the new message.
key
Page 59
Page 76

ADVANCED INFORMATION
2
Storage of Point to Point Messages
When a message is received, the phone will
check to see if there is a location available for
storing the message in the SIM card.
If the SIM card is full then the
flash. No more messages can be stored in the
SIM card, until one or more of the stored
messages are removed.
The new messages may be saved by your
Network Operator and sent, at a later date,
when a location becomes available in the SIM
card. If a message location is not made
available within a set time period, the Network
Operator may remove the new messages.
Reading Point to Point Messages
Pressing the key will show the number of
messages you have at present. The top line
shows the number of new messages and the
bottom line indicates the number of older
messages. This display will go out after two
seconds.
Up to 35 messages can be stored, depending
upon the SIM card capacity. These messages
will be identified by a number between 1 and
35. The oldest unread message will be in
location 1.
The bottom line of the display will display the
message. The message will automatically
scroll twice from right to left.
To stop the message scrolling:
icon will
Page 60
Page 77

ADVANCED INFORMATION
2
To start the message scrolling over again:
To view other messages:
or
To delete the message:
The next message will be displayed, if there is
one, or the menu will exit if there are no
further messages.
All messages have the date, time and caller’s
phone number printed at the end in the
following format:
<Day/Month/Time><Caller’s Phone Number>.
Note the availability of the caller’s phone
number is controlled by the Network Operator.
Clearing Messages From Memory
To remove a message from memory:
The phone will show the following message -
'Clear?'
To confirm the deletion:
or
to cancel.
When a message has been deleted the next
message will be displayed, if there is one. If
there are no further messages the menu will
be exited.
Page 61
Page 78

ADVANCED INFORMATION
2
Embedded Callback Numbers
If a phone number is included in the message,
within quotation marks, the phone has the
ability to call the number by simply pressing
the key.
For example the following message would
permit the callback feature.
Phone "MCSG" on "0555 444 333" by 12:00
The first section within quotation marks would
be ignored, because it does not start with a
number.
Be warned, however, in the event of receiving
the following message:
Phone "1st National" on "0555 666 777"
The callback feature would attempt to call 1!
If there is no phone number in quotation
marks, then the callback feature will call the
<caller’s phone number> at the end of the
message, if it is supported by the Network
Operator.
Short Message Alert Tone
You have the option to turn the Short
Message Alert Tone on or off.
To turn the alert tone on or off:
to toggle feature on/off.
Page 62
Page 79

ADVANCED INFORMATION
2
CALL WAITING AND CALL HOLDING
This model phone supports the GSM ‘Call
Hold’ and ‘Call Waiting’ features.
In order to use these features the following
conditions must be met. Firstly, the Network
Operator has made the feature available and
secondly, you have subscribed to the feature.
Using these features you may place a current
call on hold and either accept an incoming call
or start a second call.
Call Waiting
You have the option to turn the call waiting
feature on or off, for future calls.
To turn call waiting on:
The display will show ‘Call Waiting On’ if the
activation is successful.
To turn call waiting off:
The display will show ‘Call Waiting Off’ if the
deactivation is successful.
To check call waiting status:
The display will show ‘Call Waiting On’ or
‘Call Waiting Off’.
When the Call Waiting feature is on and a call
is in progress, a second caller to your phone
will hear the ring tone. Your phone will
produce a single beep, followed by a double
beep every eight seconds and the display will
show ‘Call Waiting’.
Page 63
Page 80

ADVANCED INFORMATION
2
If however the feature is off, a second caller
will hear the busy tone.
Call Holding
This feature is controlled by your Network
Operator and is used in conjunction with the
call waiting feature to produce several
different results.
Call Hold and Waiting Combinations
If a call is active and there is no call waiting:
The active call will be placed on hold and
the display will show ‘Holding’ to indicate
that the hold request is in progress. The
display will show ‘Call Holding’ when the
process is complete.
or
The active call will end and the phone will
be available for further calls.
If a call is active and there is a call waiting:
The active call will be placed on hold and
the display will show ‘Holding’ to indicate
that the hold request is in progress. When
the call has been held, the display will
show ‘Accepting’ to show that the waiting
call is being connected. ‘Call Holding’ will
be shown when the process is complete.
or
The display will show ‘Please Wait’ while
Page 64
Page 81

ADVANCED INFORMATION
2
the active call is ending. When the call has
been ended, the display will show
‘Accepting’ to show that the waiting call is
being connected.
If a call is active and there is a held call:
The display will show ‘Switching’ as the
held call becomes active and the
previously active call is held. ‘Call
Holding’ will be shown when the process
is complete.
or
The active call will end and the currently
held call will become active.
If a call is held and there is no call waiting:
The display will change from ‘Call
Holding’ to ‘Connecting’ as the held call
becomes active.
or
The held call will end and the phone will
be available for further calls.
If a call is held and there is a call waiting:
The display will show ‘Accepting’ to show
that the waiting call is being connected.
The currently held call will remain held and
‘Call Holding’ will be shown when the
process is complete.
Page 65
Page 82

ADVANCED INFORMATION
2
or
The display will show ‘Please Wait’ while
the held call ends. When the call has been
ended, the display will show ‘Accepting’
to show that the waiting call is being
connected.
Call Hold and Making New calls
If a call is active and there is no call waiting:
Place the call on hold as described above
and then:
Telephone number
The ‘Dialling’ message will be shown, to
indicate that the new call is being
attempted. The display will show ‘Call
Holding’ when the process is complete.
Call Hold and Call Waiting Messages
There are several messages which may
appear during call hold and call waiting
operations.
‘Hold Fail’: an active call could not be put on
hold.
‘Connect Fail’: a held call could not be made
active again.
‘Answer Waiting Call’: an attempt to make a
new call was made whilst a call is waiting.
The waiting call must be answered first.
Page 66
Page 83

ADVANCED INFORMATION
2
‘Cannot Hold Second Call': a call is already
on hold, you cannot place two calls on hold at
the same time.
‘Busy Try Later’: the phone is still working on
a previous command. Wait for a short time
before repeating the command.
Emergency Calls and Call Hold/Wait
If you make a call to the GSM emergency
number, then any currently active, held or
waiting calls will end.
You cannot use the hold or waiting features
when you are making an emergency call.
Page 67
Page 84

2
ADVANCED INFORMATION
Page 68
Page 85

ACCESSORIES AND OPTIONS
3
BATTERY OPERATION
BATTERY OPERATION
Battery Maintenance
Battery Maintenance
The only maintenance required for the
batteries is to keep them charged and the
contacts clean. A pencil eraser works well.
Warning!
Batteries may explode if disposed of in fire.
Replacing the Battery
Replacing the Battery
To remove a battery:
1) Switch off the telephone.
2) Press the battery lock on the bottom of
the telephone.
3) Slide the battery away from the
antenna.
To attach a battery:
1) Place the battery on the guides.
2) Slide the battery towards the antenna
until the battery locks.
Page 69
Page 86

ACCESSORIES AND OPTIONS
3
Battery Meter
Battery Meter
The battery meter is shown as a relative
scale, from 1 to 8 segments. A long bar line
indicates a long remaining operating time.
When the battery needs to be charged a
warning tone is heard and the display shows:
‘Low Battery’
When the battery strength drops below the
lowest level for normal operation, the telephone is switched off automatically.
To display the battery meter:
Battery Saving Feature (DTX)
Battery Saving Feature (DTX)
The Battery Saving Feature, also known as
Discontinous Transmission, allows the
telephone to operate at reduced power when
conversation is not taking place.
To enable/disable the DTX feature:
to toggle the feature on/off
Page 70
Page 87

ACCESSORIES AND OPTIONS
3
BATTERY CHARGING
BATTERY CHARGING
The telephone uses a rechargeable battery.
The life of a battery can be greatly affected by
the charging method as well as the use.
To maximise battery life:
-Charge new batteries before use.
-Turn the telephone off while charging.
-Charge at or near room temperature.
-Store batteries fully charged.
Overnight Internal Charger
Your telephone is equipped with an internal
charging unit which makes it possible to
charge the battery while it is fitted in place on
your telephone. To utilise this feature, insert
the transformer plug into the small socket on
the side of the telephone. The LED indicator
above it will illuminate to show correct
connection and will remain on until your
battery is fully charged.
Please see table for approximate recharge
times.
Battery Type: Approx. Recharge Time:
700 mAh 8 hours*
1500 mAh 17 hours
* The internal charger is equipped with a timer
which accommodates the 1500 mAh battery.
Consequently, the LED will remain lit to
indicate charging for approximately 17 hours,
even though the 700 mAh battery will be
charged in approximately 8 hours.
Page 71
Page 88

ACCESSORIES AND OPTIONS
3
Single Pocket Desktop Rapid Charger
The charger’s slot accepts batteries alone or
while attached to the telephone.
Please see table for approximate recharge
times.
Battery Type: Approx. Recharge Time:
700 mAh 1 hour
1500 mAh 2 hours
The tri-colour indicator lamps show the
charging status as follows:
Charging Status: Indicator Display:
Rapid Charge Mode Steady Red
Trickle Charge Mode Steady Green
Waiting to Rapid Charge Flashing Yellow
BATTERY SAVER
BATTERY SAVER
The Battery Saver requires no installation and
allows you to power the telephone and charge
the telephone’s battery from the car’s electrical system. One end of the battery saver
plugs into your phone and the other end
snaps into the vehicle’s cigarette lighter.
To attach the Battery Saver.
1. Always start by making sure that the
telephone is switched off.
2. Remove the protective cover on the base
of your telephone to reveal the connector
beneath.
Page 72
Page 89

ACCESSORIES AND OPTIONS
3
3. Orient the connector of the Battery Saver
coil cord so that it lines up correctly with
the connector of your phone and insert it
until the locking devices click into place.
4. Plug the other end of the Battery Saver
into your vehicle’s cigarette lighter socket.
An LED indicator on the Battery Saver
case indicates that the battery is being
charged and will remain on while the
battery is charging.
HANDS FREE CAR KIT
HANDS FREE CAR KIT
The Hands Free Car Kit provides:
• Full Duplex Hands Free operation.
• Power to the phone from the car’s battery.
• Connection to an outside antenna.
• Constant illumination of the keypad while
car ignition is on.
• In car battery charging.
Note: If your car kit has been installed with
Ignition Sense Activation, the telephone will
switch on and off with the car’s ignition switch,
as long as the telephone was switched on
before the ignition was last switched off.
Note: When your telephone is connected to
the Hands Free Car Kit, you cannot use the
battery strength indicator feature to check the
charge level of the battery.
Page 73
Page 90

ACCESSORIES AND OPTIONS
3
Insertion / Removal
Insertion / Removal
Insertion:
Your telephone connects to the Hands Free
Car Kit via a coil cord. This cord attaches to
the special connector at the base of your
telephone.
1. Always start by making sure that the
telephone is switched off and that the
battery is properly attached to the telephone (the Hands Free Car Kit will not
operate unless the battery is on the
telephone).
2. Remove the protective cover on the base
of your telephone to reveal the connector
beneath.
3. Orient the plug of the coil cord so that it
lines up correctly with the connector of
your telephone and insert it until the
locking devices click into place.
Release
Button
Holder
Page 74
Page 91

ACCESSORIES AND OPTIONS
3
4. Once the coil cord is attached, your
telephone can be placed into the Hands
Free Car Kit holder. To do this, place the
bottom of the phone in the holder and
push the phone back until it snaps into
place.
Removal:
1. Always start by making sure that the telephone is switched off.
2. To remove the telephone from the holder,
press the release buttons on the side of
the holder.
3. While your telephone is switched off, the
coil cord can be detached by squeezing
the two locking devices until they release.
4. Replace the protective cover on the base
of your telephone.
Car Kit Functions
Car Kit Functions
The car kit functions are comprised of:
• Handsfree Calls
• Automatic Answer
• Safety Timer
Handsfree Calls
Handsfree Calls
Outgoing calls:
The telephone must be in the hang-up cup.
When the
call as follows:
Direct conversation to the microphone.
End the conversation by:
indicator is off, you may place a
Telephone number
Page 75
Page 92

ACCESSORIES AND OPTIONS
3
Incoming calls:
The telephone must be in the hang-up cup.
When the telephone is called, the alert signal
for incoming calls is heard. Answer by:
or any of the 12 upper keys
Direct conversation to the microphone.
End the conversation by:
Switching from Hands Free to "Handset":
- Lift the telephone
Switching from "Handset" to Hands Free:
Place the telephone in hang-up cup,
which automatically enables Hands
Free operation.
Automatic Answer
Automatic Answer
This feature allows you to reply to an incoming
call without pressing any keys.
How to operate:
When the telephone is called, the alert signal
for incoming calls rings twice. Then simply
talk into the microphone to answer the call.
End the conversation by:
To enable/disable the feature
Page 76
:
Page 93

ACCESSORIES AND OPTIONS
3
Safety Timer
Safety Timer
The safety timer allows the phone to remain
on for a specified period of time after the
vehicle‘s ignition has been turned off. To
prevent draining the vehicle‘s battery, the
safety timer will turn the phone off after the
time period has expired. If you are in a call
when the timer expires, the phone will power
down after the call is completed. This feature
prevents the user from having to re-enter the
electronic unlock code and the PIN number
for the SIM card every time the vehicle‘s
ignition is turned off. At the time of purchase,
the timer is set for one hour. You can, however, adjust the length of the safety timer from
zero (0) minutes to 999 minutes. When set for
zero (0) minutes, this feature is effectively
disabled and the phone powers off with the
ignition. If, however, you switch the phone on
again whilst the ignition remains off, the safety
timer will reset to one hour.
To change the length of time of the safety
timer to 1 hour, select the safety timer feature:
The display shows the present time period.
To change the time period:
new period (up to 999)
Page 77
Page 94

3
ACCESSORIES AND OPTIONS
Page 78
Page 95

INDEX
A
Automatic Answer .......................................76
Automatic Cell Broadcast ............................57
Automatic Lock ............................................14
Automatic Redial .........................................15
Automatic Roaming .....................................24
B
Battery Charging .........................................71
Battery Meter ...............................................70
Battery Operation ........................................69
maintenance ................................................69
replacing......................................................69
Battery Saving Feature (DTX) .....................70
Battery Saver...............................................72
Billing.............................................................5
C
Call in Absence ...........................................15
Call Holding .................................................64
Call Hold and Call Waiting Messages .........66
Call Hold and Making New calls..................66
Call Hold and Waiting Combinations...........64
Call Monitoring.............................................37
Call Waiting .................................................63
Car Kit Functions .........................................75
Clearing Messages From Memory ..............61
D
Display...........................................................5
lighting ...........................................................6
Display Call Timers and Meters...................38
Display language .........................................37
DTMF Signalling..........................................35
DTMF tones.................................................33
long..............................................................36
See
on/off.
Silent Notepad
Page 79
Page 96

INDEX
E
Electronic Lock ............................................13
to lock ..........................................................13
to unlock ......................................................13
Embedded Callback Numbers.....................62
Emergency Calls .........................................16
GSM emergency number ............................16
local emergency number .............................16
Emergency Calls and Call Hold/Wait ..........67
Entering a Name .........................................18
Entering the Short-number ..........................18
H
Hands Free Car Kit......................................73
Handsfree
incoming calls..............................................75
outgoing calls ..............................................75
I
Indicators.......................................................5
In Use ............................................................6
No Service.....................................................6
Roam.............................................................5
Short Message ..............................................6
International Calls........................................16
K
Keypad ..........................................................6
keypad tone-on/off.......................................33
L
Language ....................................................37
Last Number Dialled....................................23
recalling .......................................................23
Long Tone DTMF ........................................36
M
Manual Roaming .........................................25
selecting a service provider.........................24
Page 80
Page 97

INDEX
Master Clear ................................................31
Master Reset ...............................................31
Memory Linking ...........................................34
Menu Operation...........................................27
Menu Overview ...........................................28
See
Microphone on/off.
Mute ..............................................................8
N
Notepad .......................................................23
tones-on/off..................................................33
O
One Minute Audible Call Timer ...................37
One Time - Prog. Audible Call Timer ..........38
Overnight Internal Charger ..........................71
P
Pauses in Memory.......................................34
PIN Code...............................................12, 36
actual code.
enable/disable .............................................36
entering .......................................................12
not accepted ................................................12
Placing a Call ..............................................14
Point to Point Short Messages ....................59
Preferred List of Service Providers..............26
changing......................................................26
clearing a service provider ..........................26
Programmable Audible Call Timer ..............38
R
Reading Point to Point Messages ...............60
Receiving a Call ..........................................14
Receiving Point to Point Messages .............59
Ring tone .....................................................32
on/off ...........................................................32
volume...........................................................8
See
Mute
Data card
Page 81
Page 98

INDEX
S
Safety Timer ................................................77
See
See
Data card
Data card
Security code.
Short Message Alert Tone...........................62
Short Message Service (SMS) ................7, 57
Short-numbers.............................................17
clearing..................................................22, 31
programming a name and number ........17, 19
programming a number without a name
..............................................................17, 20
recall by name .............................................21
recall by short-number.................................20
Silent Keypad ..............................................33
Silent Notepad.............................................33
Silent Ringer................................................32
Single Pocket Desktop Rapid Charger........72
SIM Card .......................................................9
inserting.........................................................9
problems with ..............................................11
Speed Dialling .............................................22
Status Review .............................................30
Storage of Point to Point Messages ............60
Storing number during conversation ...........23
Switching to Hands Free operation .............76
T
Tone Signalling Features ............................33
U
Unlock Code
actual code.
V
Visual Call Timers and Meters ....................38
Volume ..........................................................8
Page 82
Page 99

INDEX
Page 83
 Loading...