

Motormate BC-01210SCT, BC-01220SCT, BC-01215SCT, BC-01240SCT, BC-01225SCT Instructions Manual
...
BC-01210SCT‧BC-01215SCT
BC-01220SCT‧BC-01225SCT
BC-01230SCT‧BC-01240SCT
Switch Mode SMART BATTERY CHARGER
EN INSTRUCTION MANUAL – Page 2
Intelligentes Mehrstufen BATTERIELADEGERÄT
DE BEDIENUNGSANLEITUNG – Seite 9
Caricabatterie switching a quattro stadi
IT MANUALE ISTRUZIONI – Pagina 16
Switch Mode SMART BATTERI LADER
NO BRUKERVEILEDNING – Side 23
Switch Mode BATTERILADER
DK BRUGERVEJLEDNING – Side 30
Smart Charge
Switch Mode Multi-stage
Battery Charger
EN INSTRUCTION MANUAL
Important Information!
Thank you for purchasing the four-stage Smart Battery Charger.
Please read this instruction manual carefully before operating the
device. Keep this manual in a safe place for future reference. This
instruction manual is part of the product. It must be handed over
alon
g
with the device if it is passed on to a third party.
Introduction
This compact smart four-stage battery charger uses the latest
switch-mode technology and is designed particularly to charge
lead-acid batteries in dual battery system to their best level. The
four-stage charging algorithm delivers a much faster, efficiency and
full charge without the issue of voltage drops. Thanks to the
boost-charging feature, this helps activate the battery status and
wake up a weak or flat battery to a suitable recharging level. This
also improves the charge delivered to your battery, increasing battery
life and saving on premature battery failure.
This smart battery charger equipped with a selector which allows you
to set the charger for charging SLA / GEL / AGM / WET / Calcium
lead-acid batteries. The smart battery charger can be used as a
constant power supply to run accessories that require a stable and
clean DC voltage. For safety reasons, the input and output of the
charger are completely isolated and the batteries are protected for
overcharged.
The cooling fan is thermal controlled. It will switch on and off
automatically to control the internal temperature of the unit.
Warning!
Risk of electric shock! Do not open the device if it has been
connected to the AC power source.
This device has been CE tested and conforms to the applicable
directives and standards.
2
EN INSTRUCTION MANUAL
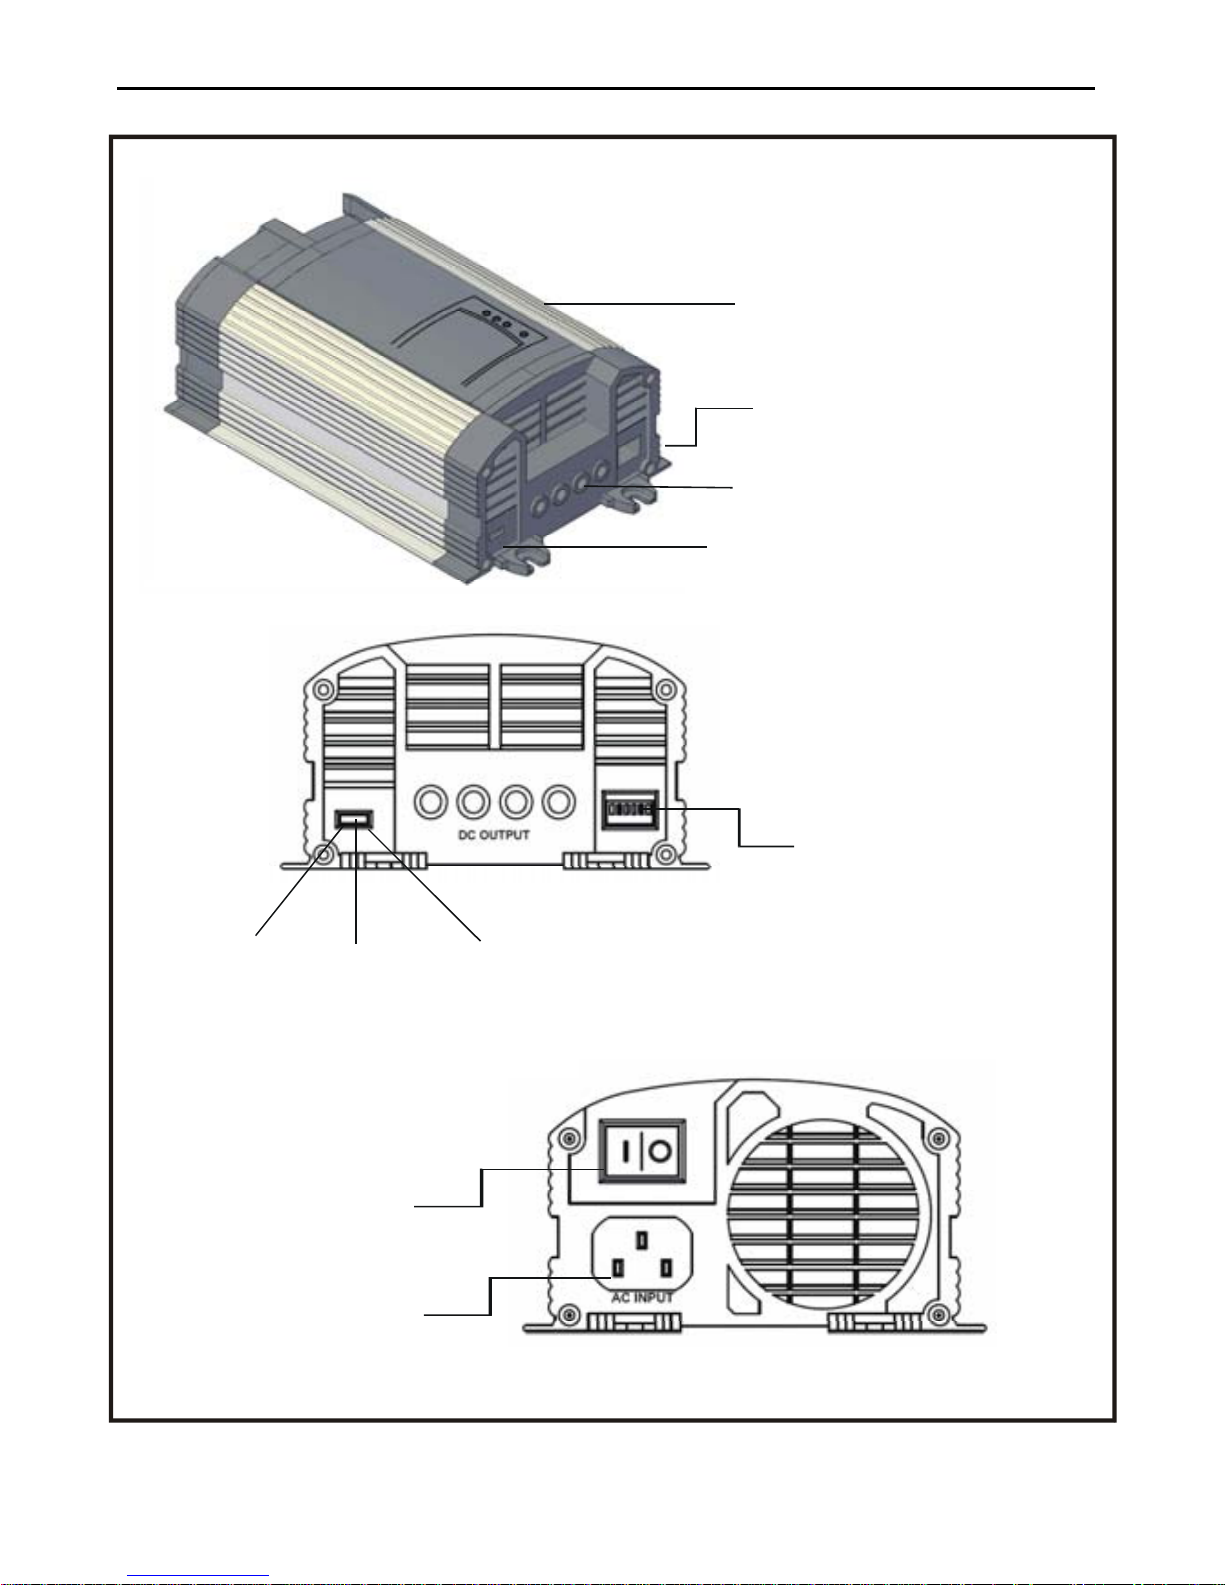
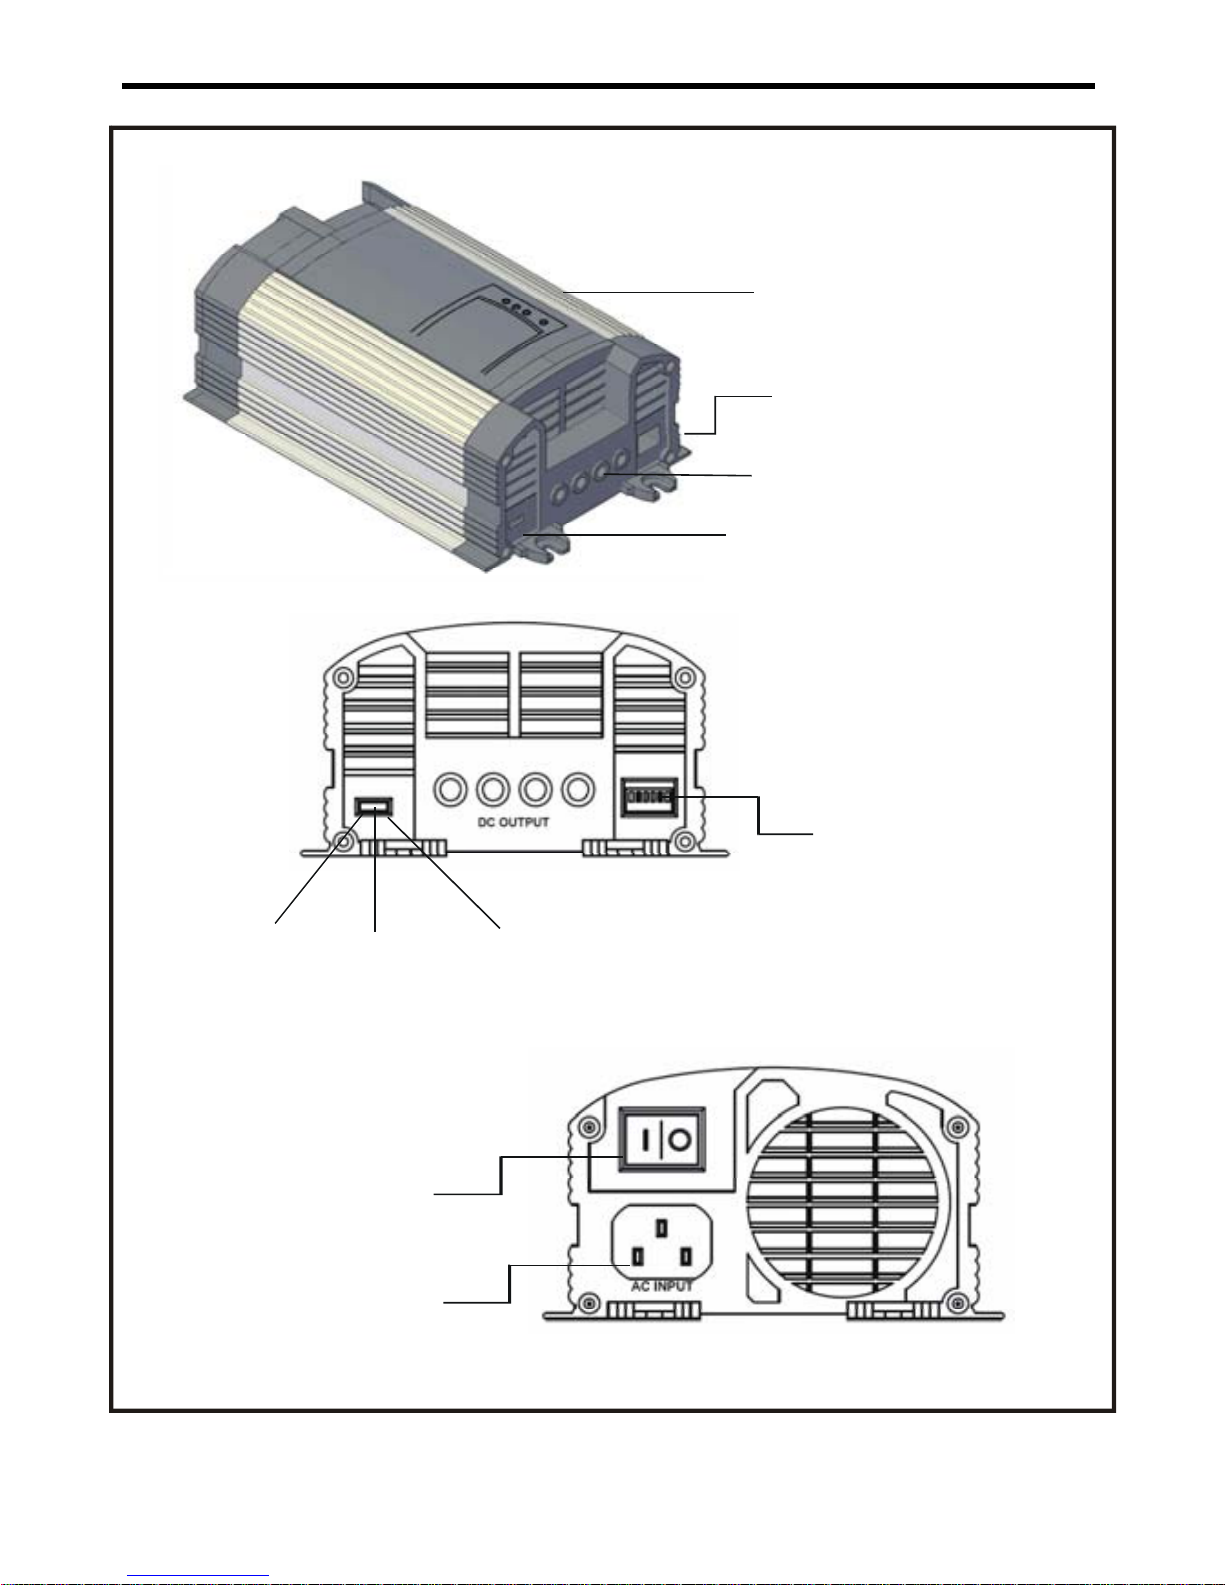
Battery Charging
Voltage Select
Battery Charging Output
Charging Mode Select
LED Charger Status
Power
ON/OFF
Switch
AC Input
Terminal
Batt ery type
Charging Voltage
Select
Boost
Charging
Mode
Power
Supply
Mode
Standard
Charging
Mode
3
EN INSTRUCTION MANUAL
Instruction and normal responses
Operation as Charger under standard charging mode
Adjust the battery type charging voltage select dipswitch No. 1,2 and 3 to get
the optimum charge to suit your battery specification. Connect the AC input
cable to the utility. Connect the battery to the DC output. Turn On the Power
switch, the “POWER ON” LED lights up. This indicates the device is ready for
charging. The “BULK” LED lights up. This means the battery charger is
beginning at the 1
st
stage of charging
The 1
st
stage is to ensure battery is
always charged at the maximum
charging condition. This is to boost
up the charging cycle and
particularly wake up a weak battery
to absorb energy.
After 10-20 mins, the charger will
switch to 2
nd
stage, the “BULK” LED
remains ON, the battery is charged
at the maximum current to the
battery.
At the 3
rd
stage, the charger will switch to “ABSORPTION” mode, the red LED
goes out and the yellow LED lights up. The charger is delivering constant
voltage to the battery with reduced current.
At the 4
th
stage, the battery has been charged to about 90% of its rated capacity.
The “ABSORPTION” LED goes out and the “FLOAT” LED lights up. The
charging current is decreased and the charging voltage is held at a constant
level. Battery is now under “FLOAT” constant charging. The “FLOAT” charging
voltage can be set by the dipswitch No. 4, 5 and 6.
Operation as Charger under Boost Charging Mode
The device can be set by the charging mode select for Boost charging. It is help
to wake up a low voltage battery to a suitable recharging level. At boost
charging mode, the charger is delivering maximum voltage to boost up the
battery and it will switch to “standard charging mode” automatically after 10-15
mins.
Operation as Power Supply
Set the charging mode select to Power Supply Mode, the device now operates
as a power supply unit. The Bulk and Absorption LED goes out. Switch No. 1,2
and 3 are now disabled. The Power Supply output voltage can be adjusted by
the dipswitch No. 4,5 and 6.
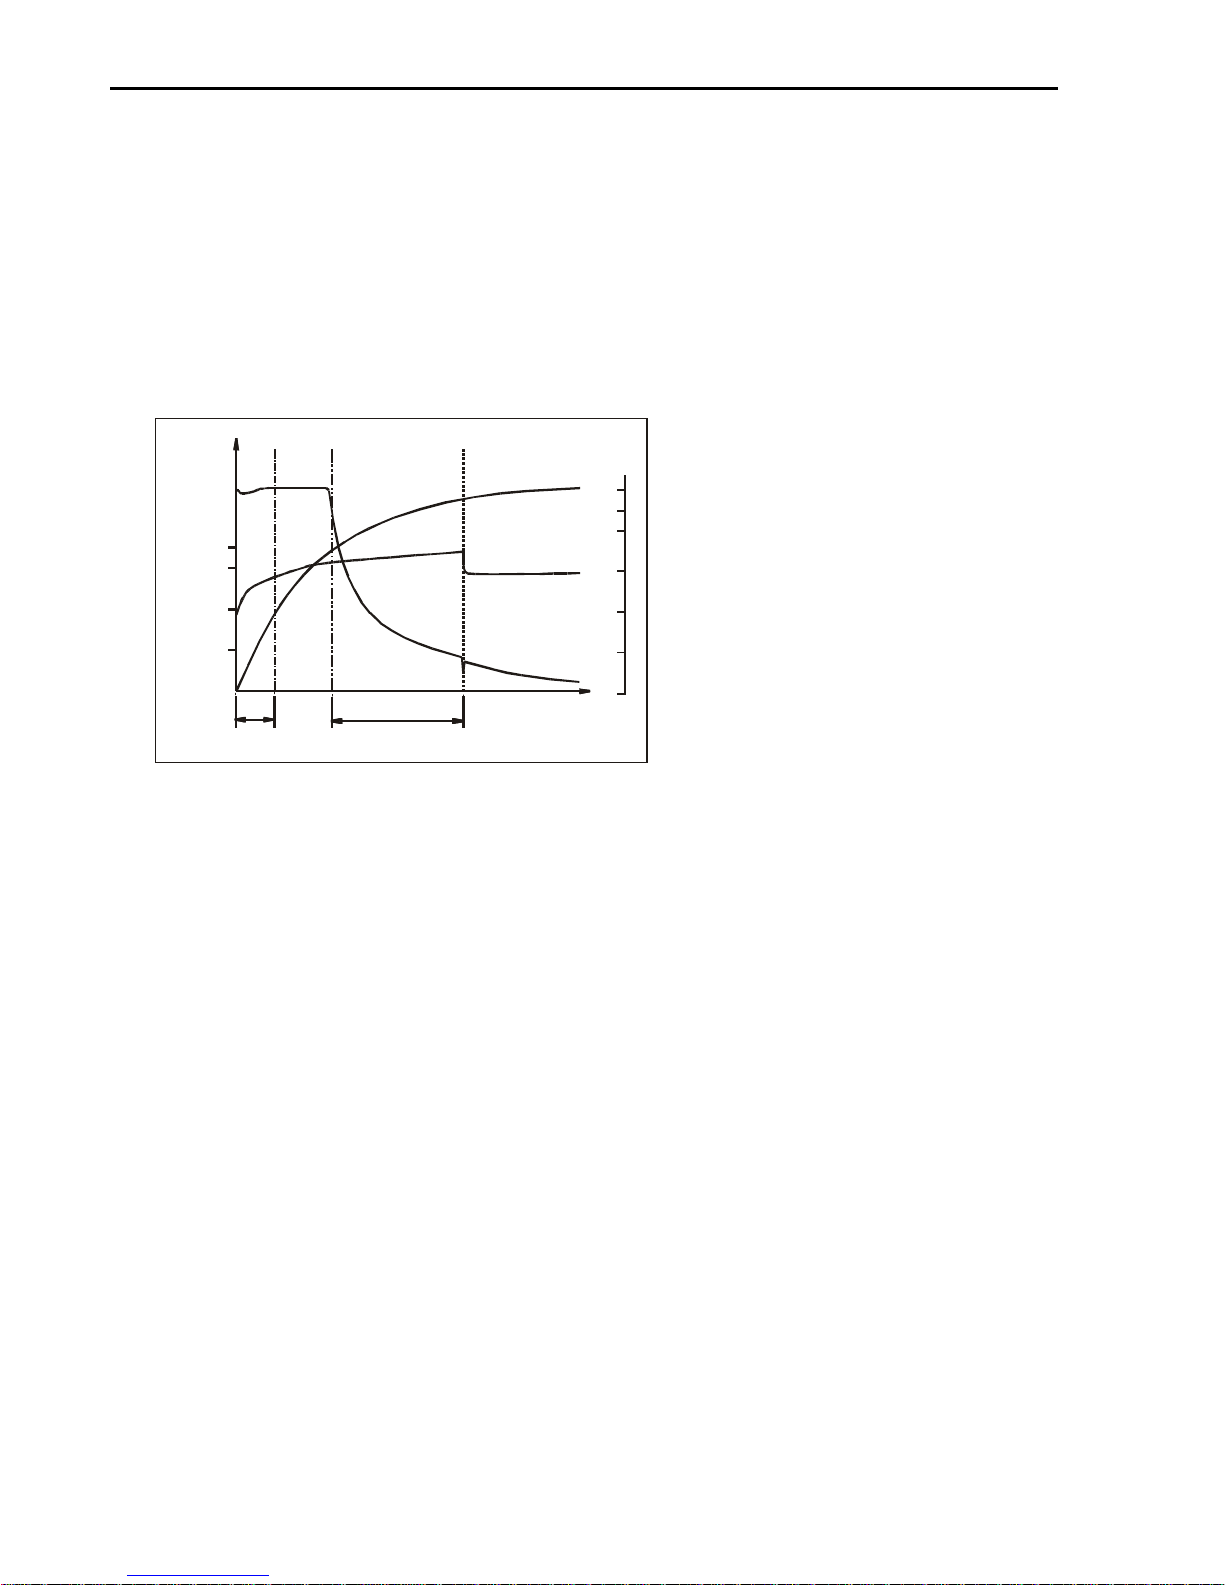
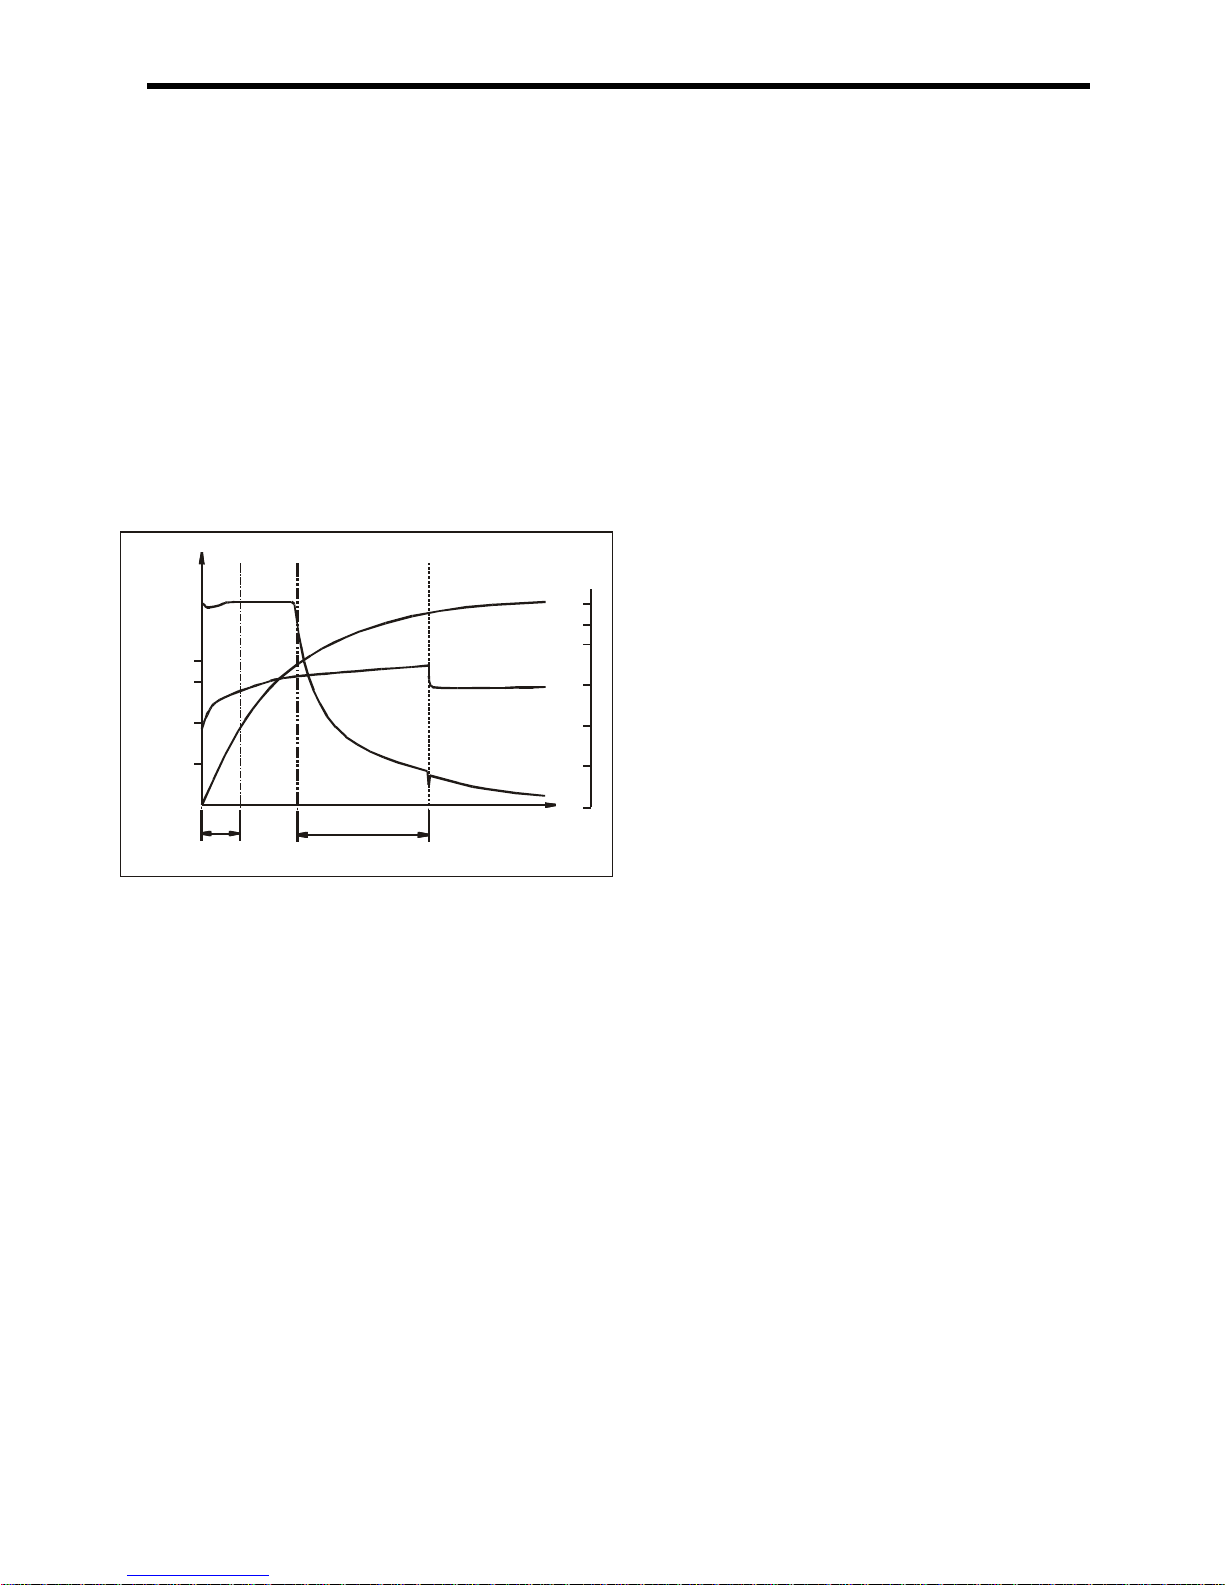
12V Charging Daigram
Charging
Current
Charging Time
Charging
Voltage
13.8V
14.0
12.0
10.0
20
40
60
Boost
Stage
10-20 mins
6 Hrs max.
Charging
Voltage
14.8V
15.0
90
80
100
3 stage
Absorption
4 stage
Float
2 st age
Bulk
(V)
(%)
Charging
Volume
4
EN INSTRUCTION MANUAL
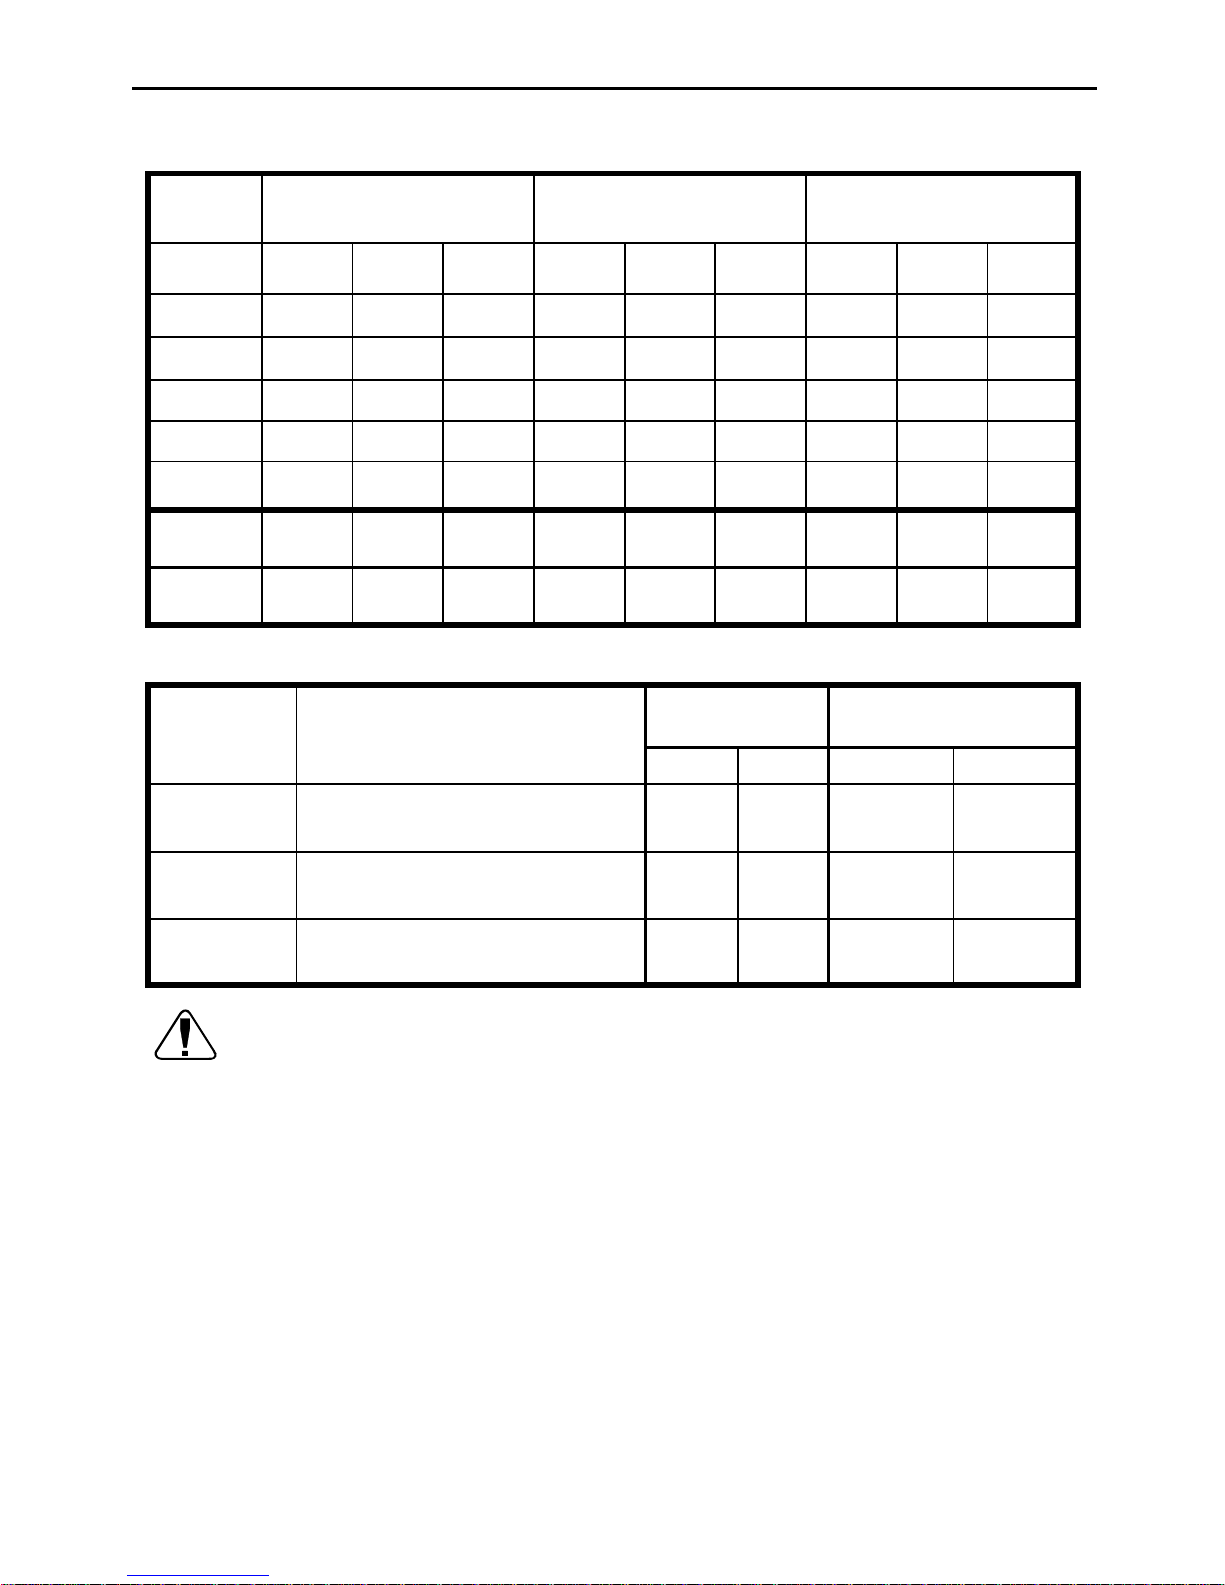
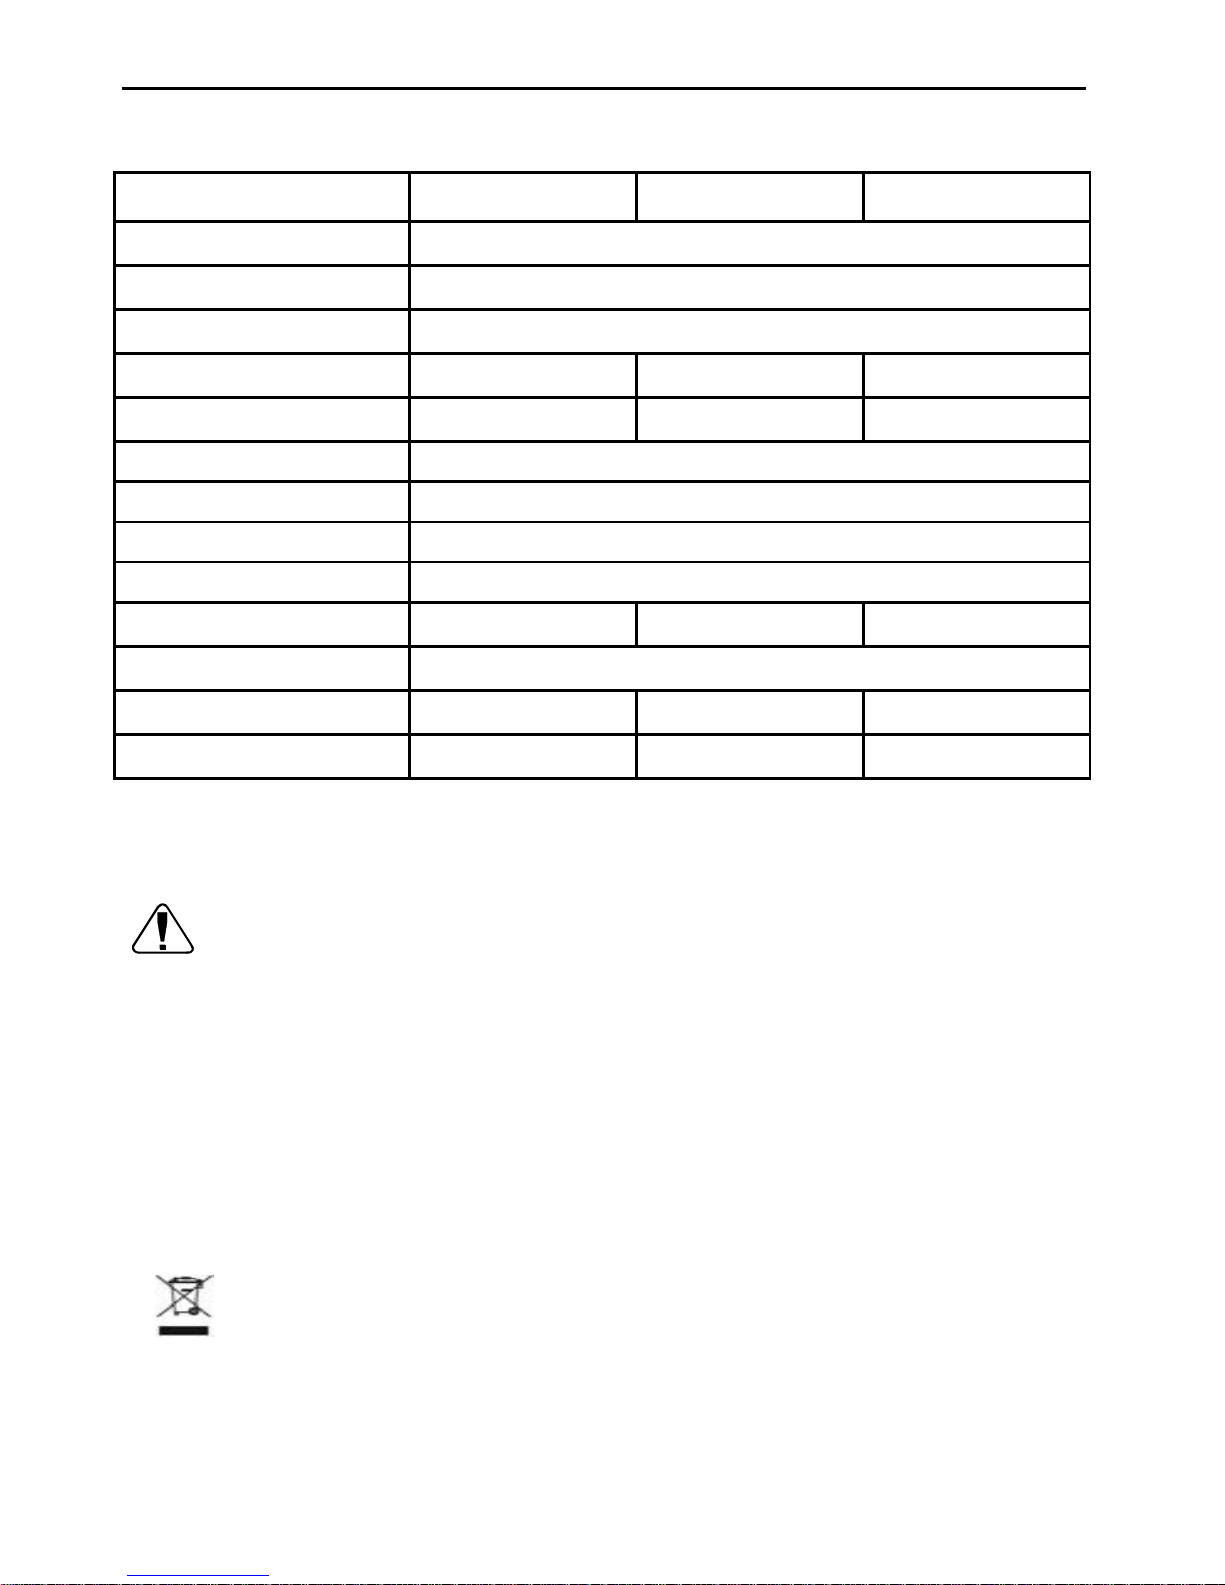
Battery Type and Charging Voltage Dipswitch Setting
Dip-SW
No.
Bulk / Absorption Float Charging Power Supply Mode
1
ON OFF OFF
2
*ONFF O
3
**ON
4
ON OFF OFF ON OFF OFF
5
OFF ON OFF OFF ON OFF
6
OFF OFF ON OFF OFF ON
12V
Output
14.8 14.6 14.2 13.8 13.5 13.2 13.8 13.5 13.2
24V
Output
29.6 29.2 28.4 27.6 27.0 26.4 27.6 27.0 26.4
Note: Dipswitch No. 1, 2 and 3 are switched off automatically (regardless it is on/off ) when device is selected
under Power Supply mode.
Float Charging
Bulk / Absorption
Charging
Battery
Type
Dip Switch Setting
12V 24V 12V 24V
SLA / GEL
SW 3, 6 ON, SW 1,2,4,5 Off 13.2 V 26.4V 14.2 V 28.4V
AGM
SW 2, 5 ON, SW 1,3,4,6 Off 13.5 V 27.0V 14.6 V 29.2V
Flooded /
Calcium
SW 1, 4 ON, SW 2,3,5,6 Off 13.8 V 27.6V 14.8 V 29.6V
Caution!
1) The device is for indoor use, do not use the device near flammable materials
or in any location that may accumulate flammable fumes or gasses.
2) Appliance shall only be used with rated voltage and frequency
3) Hot surface when operating, especially at full load condition.
4) Make sure the polarity is correct
5) Do not locate the device on the top of the battery. Especially Flooded, Wet
type battery. It may generate gas vapor while charging.
6) Do not charge non-rechargeable batteries.
7) Use the appliance only in the described manner.
8) Do not expose the device to a heat source, such as direct sunlight or
heating.
9) Store the device in a dry and cool place
10) Do not open, no user serviceable parts inside.
5
EN INSTRUCTION MANUAL
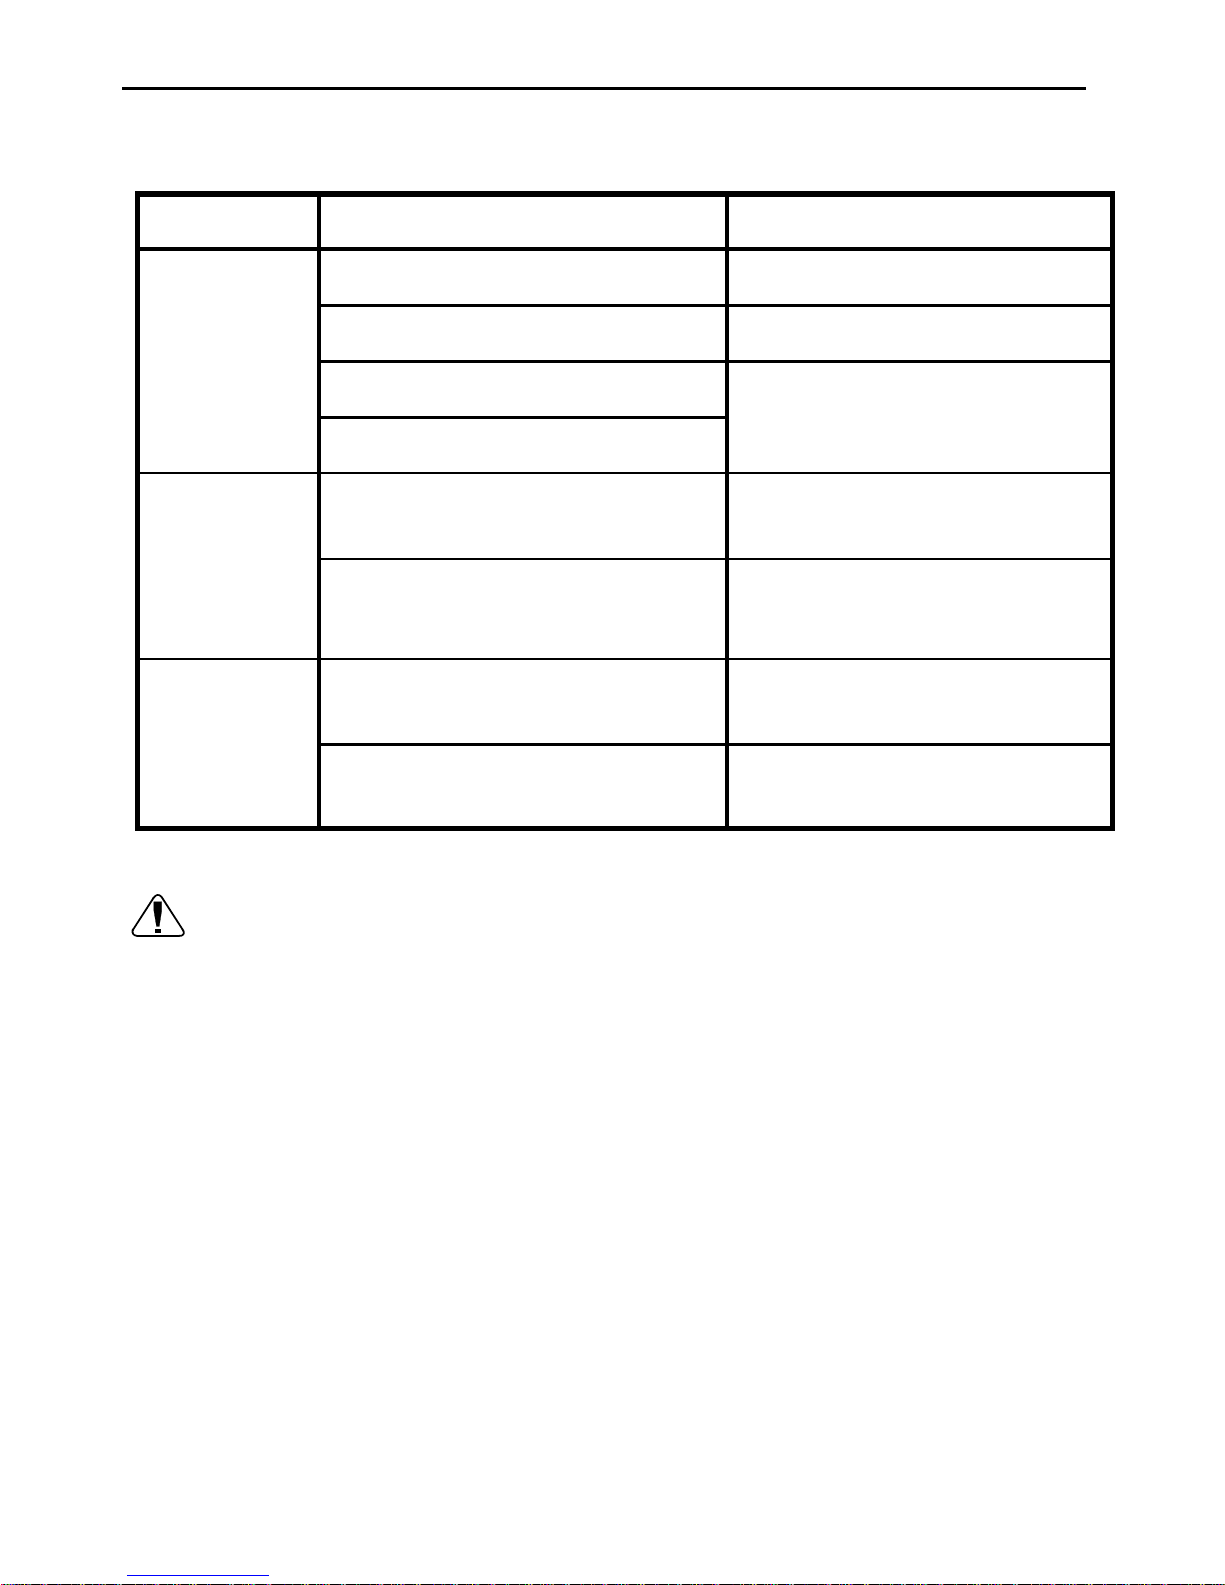
Trouble shooting
Status Possible cause Suggest remedy
No AC input. Check the AC power source.
Overheats shutdown. Allow the device to cool down
Bad contact of battery terminal.
No DC output
or charger
can’t startup
Output short circuit.
Check the connection between
charger and battery.
AC Input voltage is not stable.
Check input AC voltage if it is
within the input voltage range.
Battery
charging not
stable
Dip switch setting do not match
battery type.
Select suitable charging
voltage.
Battery cable connected to the
battery is too thin.
Change cable of proper size.
Charger
cannot
switch to
“FLOAT”.
Battery in poor condition. Replace new battery.
Safety operation!
A. If cables have to be fed through walls with sharp edges, always use tubes or
ducts to prevent damage.
B. Do not pull on the cable, fasten the device and cable securely. Lay the cable
so that it cannot be tripped over.
C. Ensure the device is standing firmly that it cannot tip over or fall down.
D. Children should be supervised to ensure that they do not play with the
device.
E. Do not allow water to drip or splash on the device.
F. Make sure the air inlets and outlets of the device are not covered.
G. Operate the device only if you are certain that the housing and the
connection cables are undamaged.
H. Do not reverse the polarity of the connection to the battery.
I. Disconnect the supply before making or breaking the connections to the
battery.
J. WARNING! Risk of Electric Shock! Do not open the device if connected to
AC power.
6

EN INSTRUCTION MANUAL
Specification
Model
BC-01210SCT BC-01215SCT BC-01220SCT
Input Voltage 200-260VAC ~50Hz
Bulk / Absorption Charging 14.2V / 14.6 V / 14.8VDC (selectable)
Float Charging 13.2V / 13.5V / 13.8 VDC (selectable)
Max. DC output current 10A 15A 20A
Suggest battery capacity 15-100AH 20-150AH 25-200AH
Output ripple < 50mA at full load
Efficiency up to 88%
Load regulation 1.5% at output current: no load to full load
Operating temperature
0 - 40°C
Isolated DC output 2 2 2
Ventilation Natural Cooling Fan, thermal controlled
Dimensions (mm) 176x145x80 176x145x80 206x145x80
Weight (kg) 0.9 1.0 1.1
Model
BC-01225SCT BC-01230SCT BC-01240SCT
Input Voltage 200-260VAC ~50Hz
Bulk / Absorption Charging 14.2V / 14.6 V / 14.8VDC (selectable)
Float Charging 13.2V / 13.5V / 13.8 VDC (selectable)
Max. DC output current 25A 30A 40A
Suggest battery capacity 30-250AH 40-300AH 50-400AH
Output ripple < 50mA at full load
Efficiency up to 88%
Load regulation 1.5% at output current: no load to full load
Operating temperature
0 - 40°C
Isolated DC output 2 2 2
Ventilation Cooling Fan, thermal controlled
Dimensions (mm)
206x145x80 256x145x80 266x145x80
Weight (kg) 1.2 1.4 1.7
Specifications subject to change without notice.
7
EN INSTRUCTION MANUAL
Specification
MODEL
BC-02410SCT BC-02415SCT BC-02420SCT
Input Voltage 200-260VAC ~50Hz
Bulk / Absorption Charging 28.4V / 29.2 V / 29.6VDC (selectable)
Float Charging 26.4V / 27.0V / 27.6VDC (selectable)
Max. DC output current 10A 15A 20A
Suggest battery capacity
10-100AH 15-150AH 20-200AH
Output ripple < 50mA at full load
Efficiency up to 88%
Load regulation 1.5% at output current: no load to full load
Operating temperature
0 - 40°C
Isolated DC output 2 2 2
Ventilation Cooling Fan, thermal controlled
Dimensions (mm)
206x145x80 256x145x80 266x145x80
Weight (kg) 1.1 1.4 1.7
Specifications subject to change without notice.
Warranty only covers the cost of parts and labor for the repair
service within the warranty period. Warranty will not apply where the device
has been misused, altered, neglected, improperly installed, or physically
damaged, either internally or externally or damaged from improper use or
use in an unsuitable environment. We shall not be liable for damages,
whether direct, incidental, special, or consequential, or economic loss even
though caused by negligence, or other fault. If the device requires warranty
service, please return it to the place of purchase along with a copy of the
receipt with purchasing date.
Disposal
When the device has become unusable, dispose of it in
accordance with the applicable disposal regulations.
8
DE BEDIENUNGSANLEITUNG
Garantie
Die Garantie verfällt in dem Moment, in dem das Gerät nicht seiner Bestimmung
nach verwendet wurde oder falsch in Betrieb genommen. Wird das Gerät
missbraucht, modifiziert, nicht ordnungsgemäß eingesetzt oder installiert,
physisch beschädigt, sowohl intern als auch extern beschädigt durch falsche
Anwendung an ungeeigneten Orten erlischt die Garantie ebenfalls Wir sind nicht
haftbar für Beschädigungen, weder direkt noch zufällig, speziell, wirtschaftlicheoder Folgeschäden hervorgerufen durch Fahrlässigkeit oder anderer Fehler. Falls
das Gerät Reparaturen auf Gewährleistung benötigt, bringen sie das Gerät an
den Ort an dem sie es erworben haben. Legen Sie eine Kopie der Rechnung
mit dem Kaufdatum bei.
Einführung
Die intelligenten Batterieladegeräte der SCT-Serie funktionieren mit einer
vierstufigen Ladefunktion mit Booster-Funktion und konstantem Ladestrom. Das
Ergebnis ist ein sehr viel schnellerer, effizienterer und präziserer Ladevorgang
bis auf 100 % der Kapazität der Batterie, ganz anders als bei konventionellen
Ladegeräten mit Strom-Spannungs-Charakteristik. Und zwar dank der 1. Phase
(zeitgeregelter Ladevorgang). Damit wird die geschwächte Batterie quasi
'aufgeweckt' und aktiviert und in einen optimalen Zustand für den eigentlichen
Ladevorgang gebracht. So wird die Lebenserwartung der Batterie
verlängert - und letztendlich die Umwelt geschont! Die Batterie wird vor
Überladung geschützt.
Das SmartBattery-Ladegerät kann für Bleibatterien, Gelakkus und
AGM-Batterien eingestellt werden. Das Gerät kann aber auch direkt als
"Netzgerät" verwendet werden. Aus Sicherheitsgründen sind Ein- und Ausgang
des Geräts vollständig isoliert.
Das Kühlgebläse ist mit einer Wärmesteuerung ausgestattet. Es wird autom. ein
und aus geschaltet, um so die Innentemperatur des Geräts zu regeln.
Warnung!
Gefahr von elektroschocks
, Das Gerät nicht öffnen, wenn es an die
steckdose angeschlossen ist!
Dieses Gerät besitzt das CE-Siegel und wurde Konformitätsprüfungen
unterzogen und entspricht dem entsprechenden Standard.
9
DE BEDIENUNGSANLEITUNG
Ladeanzeige
Netzteil
Modus
Boos tl aden
Modus
Standard
Lademodus
Ladegerat
Ausgangsklemme
..
Ladegerat-Spannung
Einstel lung
..
Ladegerat-Spannung
Einstellung
..
Ladegerateinstellungen
..
Hauptschalter
(Ein/Aus )
Netzanschluss
10
DE BEDIENUNGSANLEITUNG
Normalbetrieb
Betrieb als Ladegerät unter Standardbedingungen Lademodus
Stellen Sie die Akku-Typ Ladespannung select Dip Nr. 1,2 und 3, um die optimale
Ladung bekommen, um Ihre Batterie Spezifikation entsprechen. Eingangskabel an
geerdete Wechselstrombuchse anschließen. Hauptschalter einschalten; die LED
"POWER ON" geht an. Damit wird angezeigt, dass das Gerät für den Ladevorgang
bereit ist. Die LED "Bulk-Spannung" geht an. Das bedeutet, das Ladegerät beginnt
mit der 1. Phase des Ladevorgangs. Der Dip-Schalter für den Ladevorgang muss
hier je nach Batterietyp entspr. eingestellt werden, um ein optimales Ergebnis zu
erzielen.
Batterie an die Gleichstrom-Ausgangsklemme anschließen. Dieses intelligente
Ladegerät führt den Ladevorgang in 4 Phasen autom. aus.
Die 1. Phase stellt sicher, dass die
Batterie immer unter optimalen
Bedingungen geladen wird. Der
Ladevorgang wird optimiert, und insb.
wird die schwache Batterie
'aufgeweckt', um den Strom optimal
aufnehmen zu können.
Nach ca. 10-20 Min. schaltet das Gerät
in die 2. Phase; die LED
"Bulk-Spannung" leuchtet weiter, die
Batterie wird jetzt mit max. Spannung
geladen.
In der 3. Phase schaltet das Gerät in de Modus "ABSORPTION"; die rote LED geht
aus, die gelbe LED geht an. Das Ladegerät überträgt jetzt die max. Stromstärke an
die Batterie.
In der 4. Phase wird die Batterie auf ca. 90 % ihrer Kapazität gebracht. Die LED
"Absorptions-Spannung" geht aus, die LED für die "Float-Spannung" geht an. die
Batterie wird jetzt unter Erhaltungsspannung (= "Float") geladen. Die Spannung
kann mit den Dip-Schaltern SW 4 ,5 und 6 eingestellt werden.
Betrieb als Ladegerät unter Boost-Charging-Modus
Das Gerät kann durch das Ladegerät eingestellt werden soll für Boost-Laden. Es wird
helfen, aufzuwachen eine niedrige Spannung Batterie mit einem geeigneten Aufladen
Ebene. Am boost Lademodus ist das Ladegerät liefert maximalen Spannung zu steigern
bis die Batterie, und es wird auf "Standard-Ladung Modus" automatisch nach 10-15
Minuten.
Betrieb als Netzteil
Dieses Gerät kann auch als 'Netzteil' für ein Verbrauchergerät verwendet werden. Jetzt
funktioniert das Ladegerät wie ein Netzteil. Die LED "Absorptions- Spannung" gehen aus. Die
Dip-Schalter SW 1, 2 und 3 sind außer Funktion. Die LEDs "POWER ON" und "Float-Spannung
gehen" an. Die Spannungsabgabe kann mit den Dip-Schaltern SW 4, 5 und 6 geregelt werden.
12V Charging Daigram
Charging
Current
Charging Time
Charging
Voltage
13.8V
14.8V
15.0
14.0
12.0
10.0
20
90
40
60
80
Boost
Stage
(V)
10-20 mins
6 Hrs max.
Charging
Voltage
100
3 stage
Absorption
4 stage
Float
2 st age
Bulk
(%)
Charging
Volume
11
 Loading...