

MOTOmed viva2 Instruction Manual
– valid for Software-Version 4.3 and subsequent versions: Oct. 2007 –
Instruction manual
MOTOmed viva2
englisch

Please use the MOTOmed only after you have read the instruction manual.
If you should not understand the language of the present version, please request
the instruction manual in your national language.
Benutzen Sie das MOTOmed erst, nachdem Sie die Gebrauchsanweisung gelesen
haben. Sollten Sie die vorliegende Sprachversion nicht verstehen, fordern Sie
bitte eine Anleitung in Ihrer Landessprache an.
Avant de commencer votre entraînement MOTOmed, veuillez lire le mode d’emploi.
Si ce mode d'emploi ne correspond pas à votre langue, n'hésitez pas à nous
demander une autre traduction.
Utilize el MOTOmed sólo después de haber leído las instrucciones de uso.
Si no entiende el idioma de la presente versión, por favor exija un manual en su
lengua nacional.
Use o MOTOmed somente, depois que você leu a instrução se operando.
Se você compreender a versão disponível da língua, peça por favor uma ovient
açao em sua língua nacional.
Per un ottimo funzionamento del MOTOmed leggere le istruzioni per l'uso.
Se riscontrate qualche difficoltà riguardo la vostra lingua madre consultate il
vostro servizio assistenza.
Gebruikt alleen maar MOTOmed, nadat u de gebruiksaanwijzing hebt gelezen.
Als u deze taalkundige versie niet moet omvatten, een gids in uw nationale taal
zal willen vragen
Använd MOTOmeden endast, efter du har läst fungerande anvisningen.
Om dig bör inte förstå den tillgängliga språkversionen, förfrågan var god a
vägledning i ditt nationella språk.
MOTOmed må først anvendes, når brugsanvisningen er gennemlæst.
Forstår du ikke vedlagte brugsanvisning, rekvirer en dansk vejledning hos ProTerapi.
Przed skorzystaniem z urządzenia MOTOmed prosimy zapoznać się z
instrukcją obsługi. Jeśli instrukcja obsługi jest napisana w języku obcym
ządajcie Państwo instrukcji w języku przez Państwa znanym.
GB
D
F
E
P
I
NL
S
DK
PL
RUS
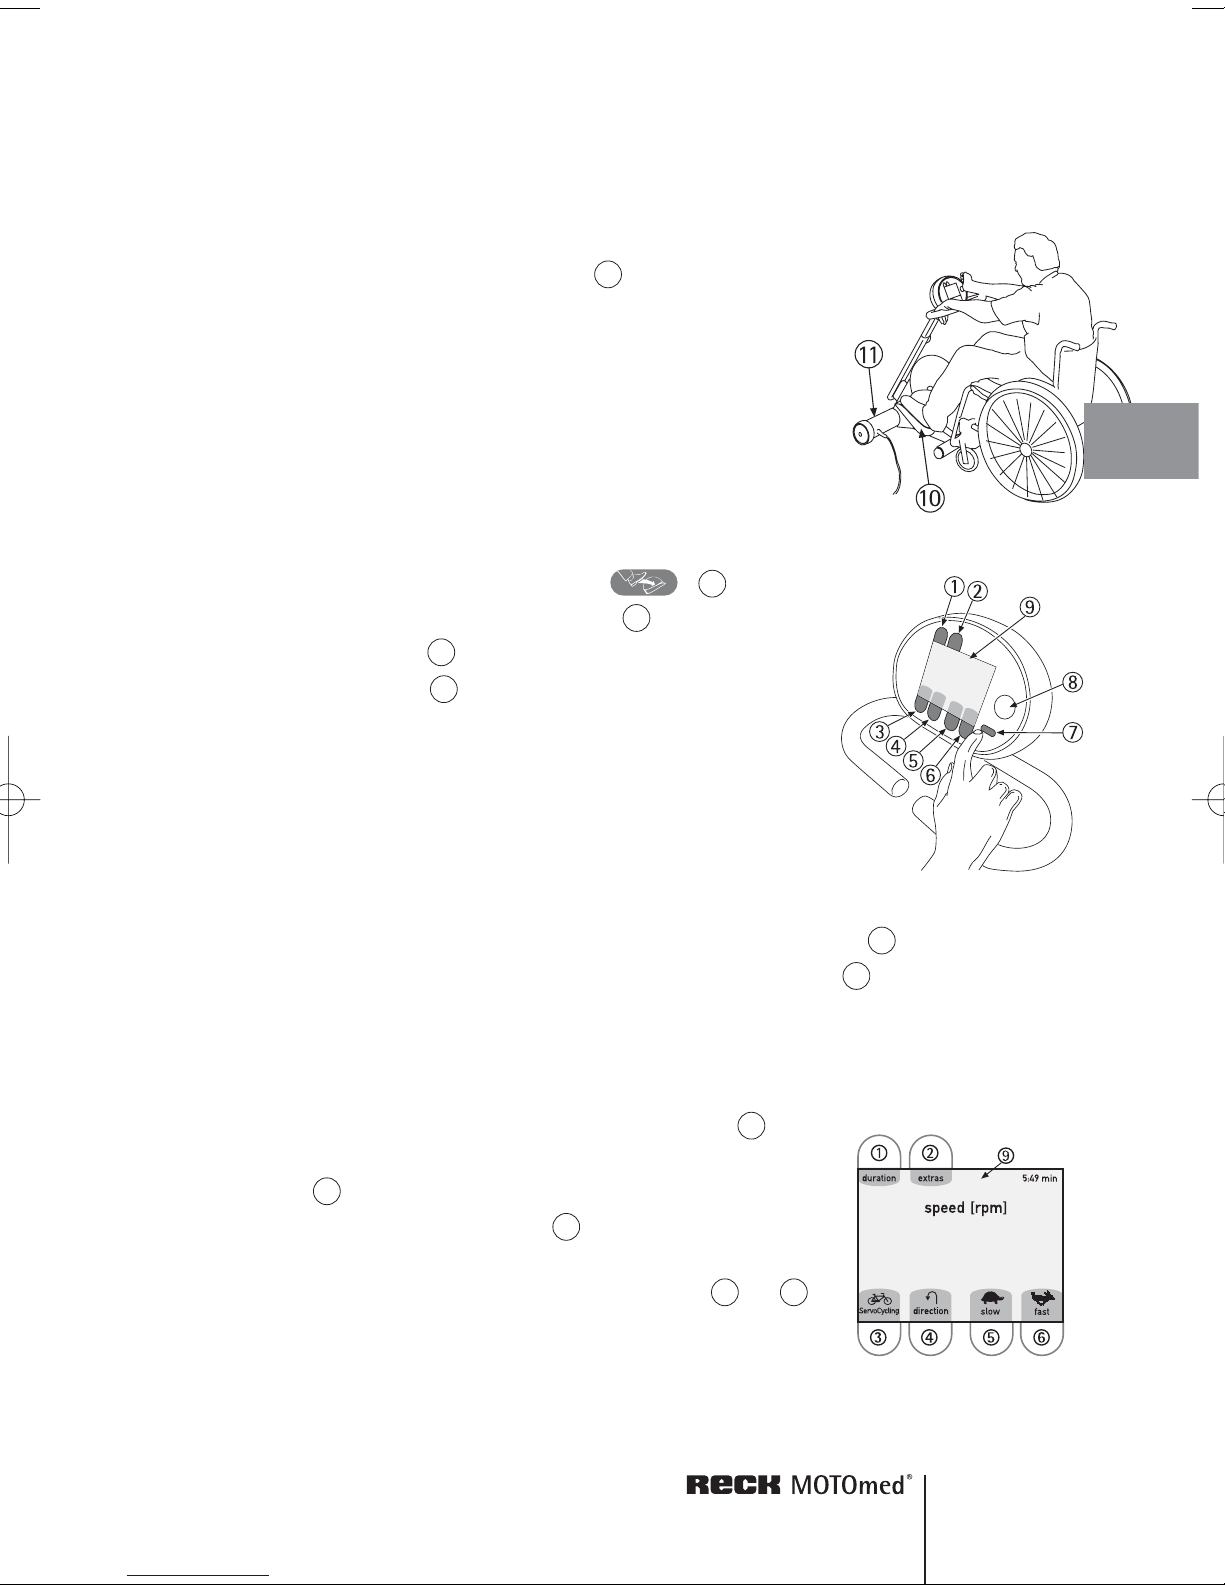
Please open
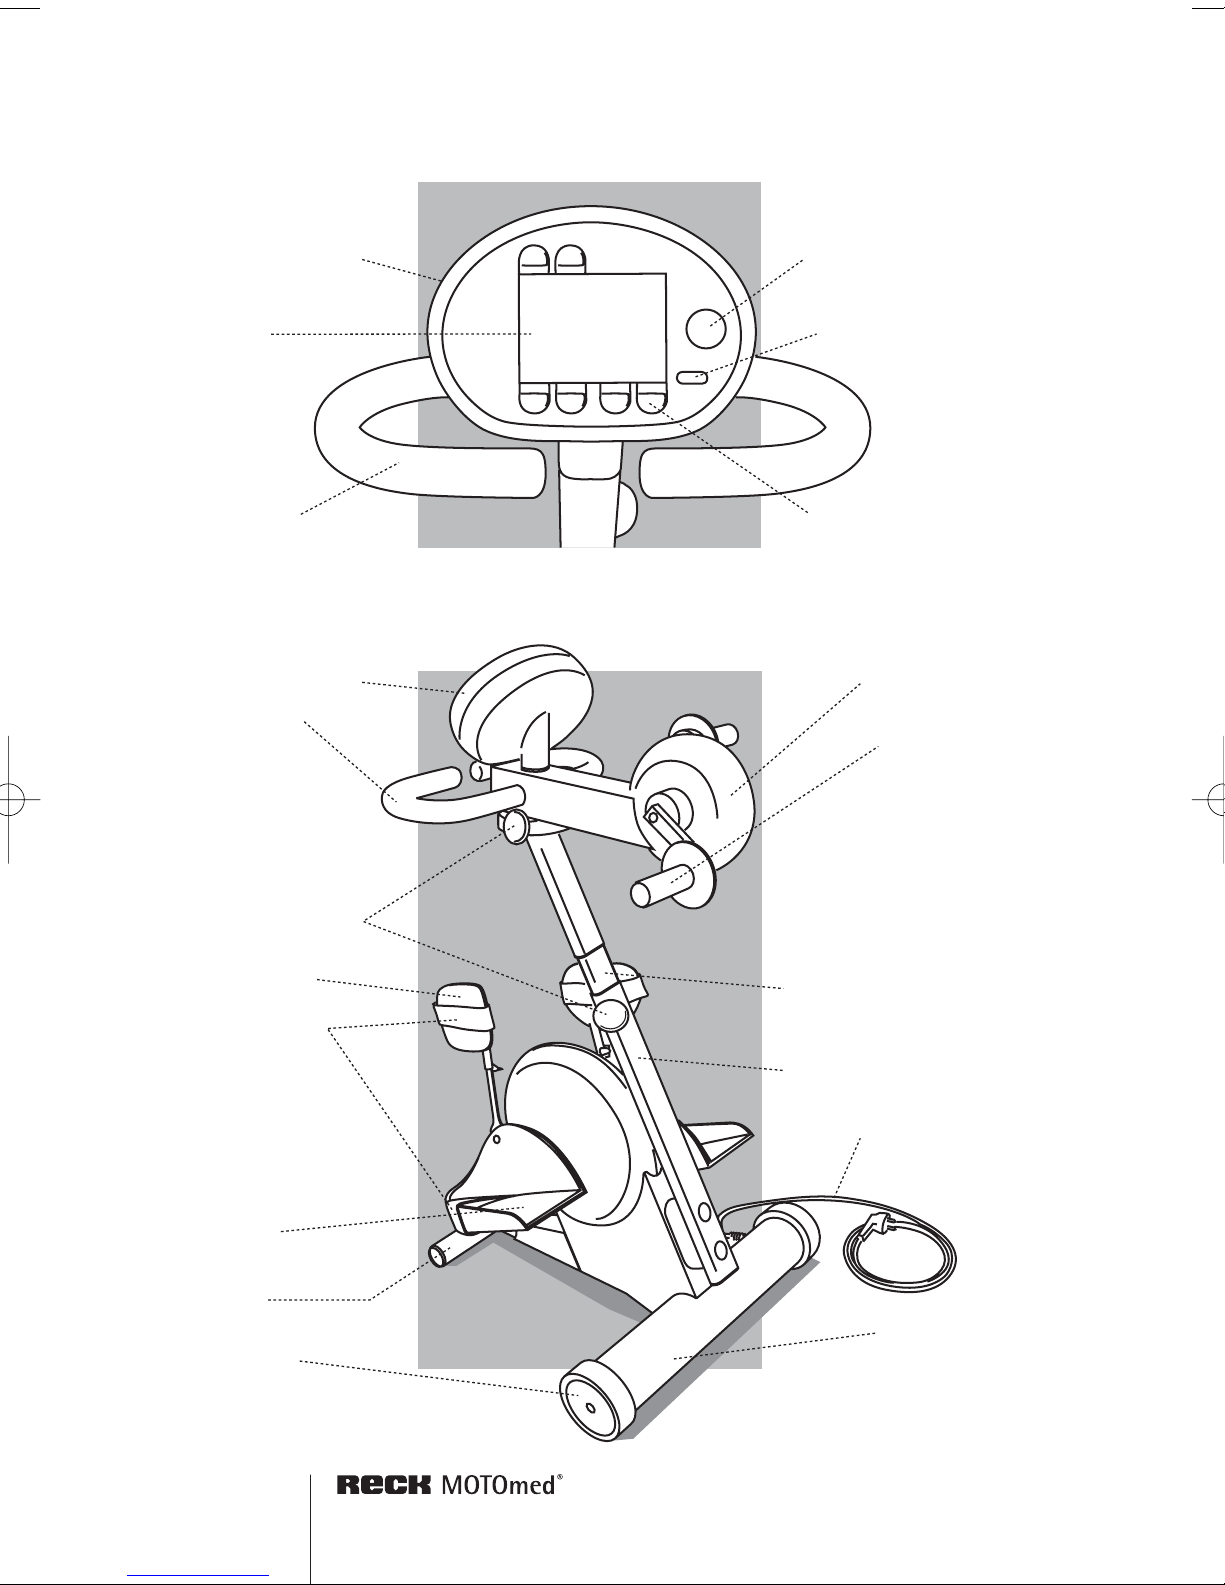
operating panel
Fig. 2
MOTOmed viva2
start/stop button
(red)
display
handlebar
operating panel
handlebar
leg insertion aid
(blue)
function buttons
(blue, 6 buttons)
arm/upper
body trainer
hand grip
big screw knobs
leg guide with
calf shells
Velcro straps
safety
foot shell
small
front leg
transport
rollers
height adjustment
supporting module
mains cable
large tube


gentle, attractive and intelligent…
Congratulations! You have made an excellent choice by purchasing
your MOTOmed viva2. This MovementTherapySystem provides
out-standing performance. Supported by the latest computer
technology it is an innovative quality product “made in Germany“ by
RECK.
The MOTOmed viva2 is a motor assisted MovementTherapySystem
that thinks with you. Enjoy the benefits every day.
This instruction manual will help you to get to know the MOTOmed
viva2. It will guide you through the functions and give some
suggestions and tips on how to use your new movement therapy
system so as to gain optimal benefit from the training. Before starting
the training, please follow the safety precautions listed in chapter 12.
If you have further questions or comments, please don’t hesitate to
call your MOTOmed representative or the RECK customer service
team. We are pleased to assist you.
Enjoy the training with your MOTOmed viva2!
see page 77
see page 75
INTRODUCTION3

4

Introduction
Therapy suggestions
Set Up, Transport
Operation
Accessories
Troubleshooting
Cleaning and Care
Technical Specifications, Symbols
Warranty
Service
Safety Precautions
EMC Information
Index
page 7
11
15
19
51
65
69
71
73
75
77
85
91
1
2
3
4
5
6
7
8
9
10
11
12
13
CONTENT 5

6

Introduction
Application
Normal Use
Restriction of Liability
page
8
8
9
1
INTRODUCTION 7

Application
The MOTOmed viva2 is suitable only for the active and passive
movement of a person’s lower and upper extremities. During the
training the MOTOmed viva2 can be operated with an operating panel.
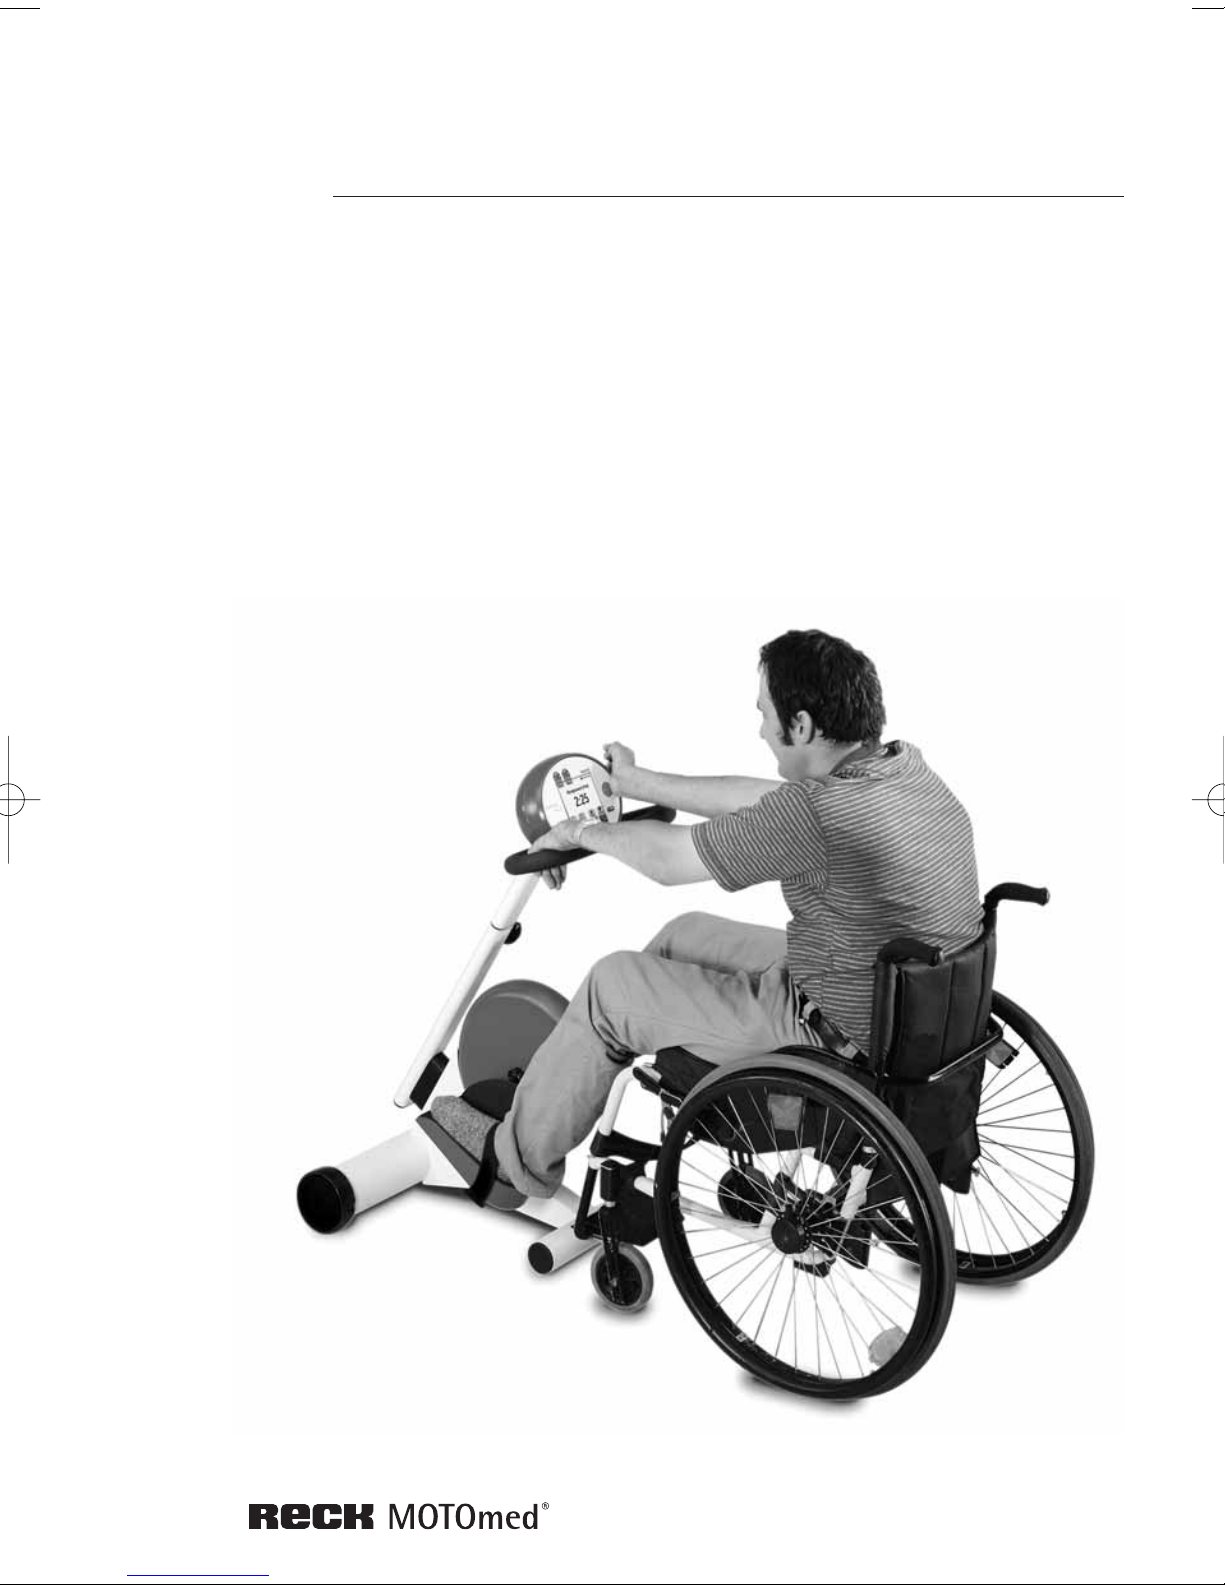
Normal Use
During the training the user is seated in front of the device in a
safe and sturdy wheelchair or in a stable chair (without castors) with
a sufficiently high back. Make sure to sit up straight and that the
wheelchair (or chair) is secured sufficiently in order to prevent
tipping over.
Some specific power wheelchairs, standing chairs and sport
wheelchairs with a large front or which don’t have stowable or
removable foot rests are not suitable.
On special occasions the MOTOmed viva2 can also be used being in
a lying position.
You are only allowed to use the MOTOmed viva2 following the
instructions and safety precautions in this manual and if no therapist
or doctor states any contraindication. Adjustments and changes can
only be carried out with the pedals not moving – except for the
operation via the operating panel.
INTRODUCTION8

Restriction of Liability
The manufacturer doesn’t assume liability for consequences of
- abuse and misuse
- neglect of this instruction manual
- wanton damage and reckless usage
- over intensive training
- use with an unsuitable wheelchair or chair
- use without prior consultation of the responsible doctor and
therapist
- attachment of unapproved accessories
- repair or other interference by any person non-approved by the
manufacturer
1
INTRODUCTION 9

10

Therapy Suggestions
Training Hints
How Do I Train Appropriately?
Instructions in Case of Spasms
In General
page
12
12
13
14
2
THERAPY SUGGESTIONS 11

Training Hints
Before using the MOTOmed viva2 please consult your doctor and
therapist in order to adjust your training program and the duration
of your training sessions to your individual state of health.
Regular training with the MOTOmed viva2 is important in order to
achieve therapy benefits. At the beginning, you should not train for
more than 10 to 15 minutes continuously. It is better to train two to
three times per day for approximately 5 to 10 minutes each period.
Please start at a slow speed and with a small pedal radius. After
about one week you should slowly increase the duration of your
training, the speed and - if necessary – the pedal radius, according to
your individual response to the MOTOmed viva2 training.
How Do I Train Appropriately?
Do you have any questions about the training with the MOTOmed
viva2? Any problem that occurred? Please call your MOTOmed
representative or the RECK company, phone +49 (0)73 74–1885.
We are pleased to assist you.
THERAPY SUGGESTIONS12
see page 75

Instructions in Case of Spasms
If you are affected by spasticity, slow and regular movement with
the MOTOmed viva2 is important. Just like in physiotherapy, it is
recommended to train legs or arms in a way that no spasm will
occur.
Particularly in the beginning it is recommended to train at a slow
speed. You will notice that through this way of training, you will
experience less tension.
The MovementProtector with SpasmControl should always be
switched on (ex work setting) in case a spasm might occur or in the
case of sensitive tendons, joints or ligaments. If a spasm or a
resistance occurs, the motor stops automatically by the
MovementProtector. After a few moments the pedals start rotating
slowly again in the opposite direction.
The SpasmControl changes the direction of pedal rotation according
to the therapeutic principle looking for the direction in which the
spasm can be eased (antagonistic inhibition). Therefore, muscles can
relax and tensions are being relieved. This process will be repeated
until the spasm is released.
During the training the integrated MovementProtector adapts
automatically to the condition of your muscles (muscle tone).
Therefore, the MovementProtector is always optimally sensitive.
In order to improve the support of the legs, leg guides with calf
shells (item no. 502) are an essential accessory in the case of
spasticity. They provide secure and firm support.
In case of strong spasticity it is recommended to use a
wheelchair
stabilizer (item no. 8)
or a
chair fixation with stabilizer (item
no. 511).
For special cases (e.g. osteoporosis, very strong spasticity) the
maximum motor power can be adjusted during passive training by
pressing the buttons “extras” and then “motor power”.
see page 37
see page 52
see page 58
see page 59
see page 40
2
THERAPY SUGGESTIONS 13

THERAPY SUGGESTIONS14
see page 52
see page 57
Low motor power: e.g. for osteoporosis
High motor power: e.g. for strong spasticity
Please consult your doctor and therapist before adjusting the motor
power.
In General
Pay attention to your seating position and posture when training –
especially when using the arm/upper body trainer. The wheelchair or
chair should be straight and in line with the MOTOmed viva2. You
should be sitting upright, back straight, resting on the back support
of the chair or wheelchair.
The degree of movement of the knee joint and hip joint depends on
the distance between the MOTOmed viva2 and the chair or weelchair.
Position your chair from the MOTOmed viva2 according to the
flexibility of your joints. Avoid at all times overstretching or locking
of the knee joints and start off sitting reasonably near the MOTOmed
viva2.
When using the arm/upper body trainer make sure that the elbow
joints are never fully stretched during the training. Adjust the
position of the arm/upper body trainer to your height.
If you lack support due to the effects of paralysis it is absolutely
essential that leg guides (item no. 502) and forearm shells (item
no. 556) are used. Always make sure that arms and legs are properly
secured in the forearm shells or foot shells.

page
16
17
18
Set Up, Transport
Set Up
Stand-by Mode
Transport
3
SET UP, TRANSPORT 15
Set Up
Unpack your MOTOmed viva2 and put it in an upright position. In
case the packaging or the MOTOmed viva2 got damaged through
transportation, please contact your MOTOmed representative.
Unpack the operating panel, as far as it is not mounted yet, and
place it onto the fixture, so that the plug interlocks. Fix the display
module with the two enclosed screws.
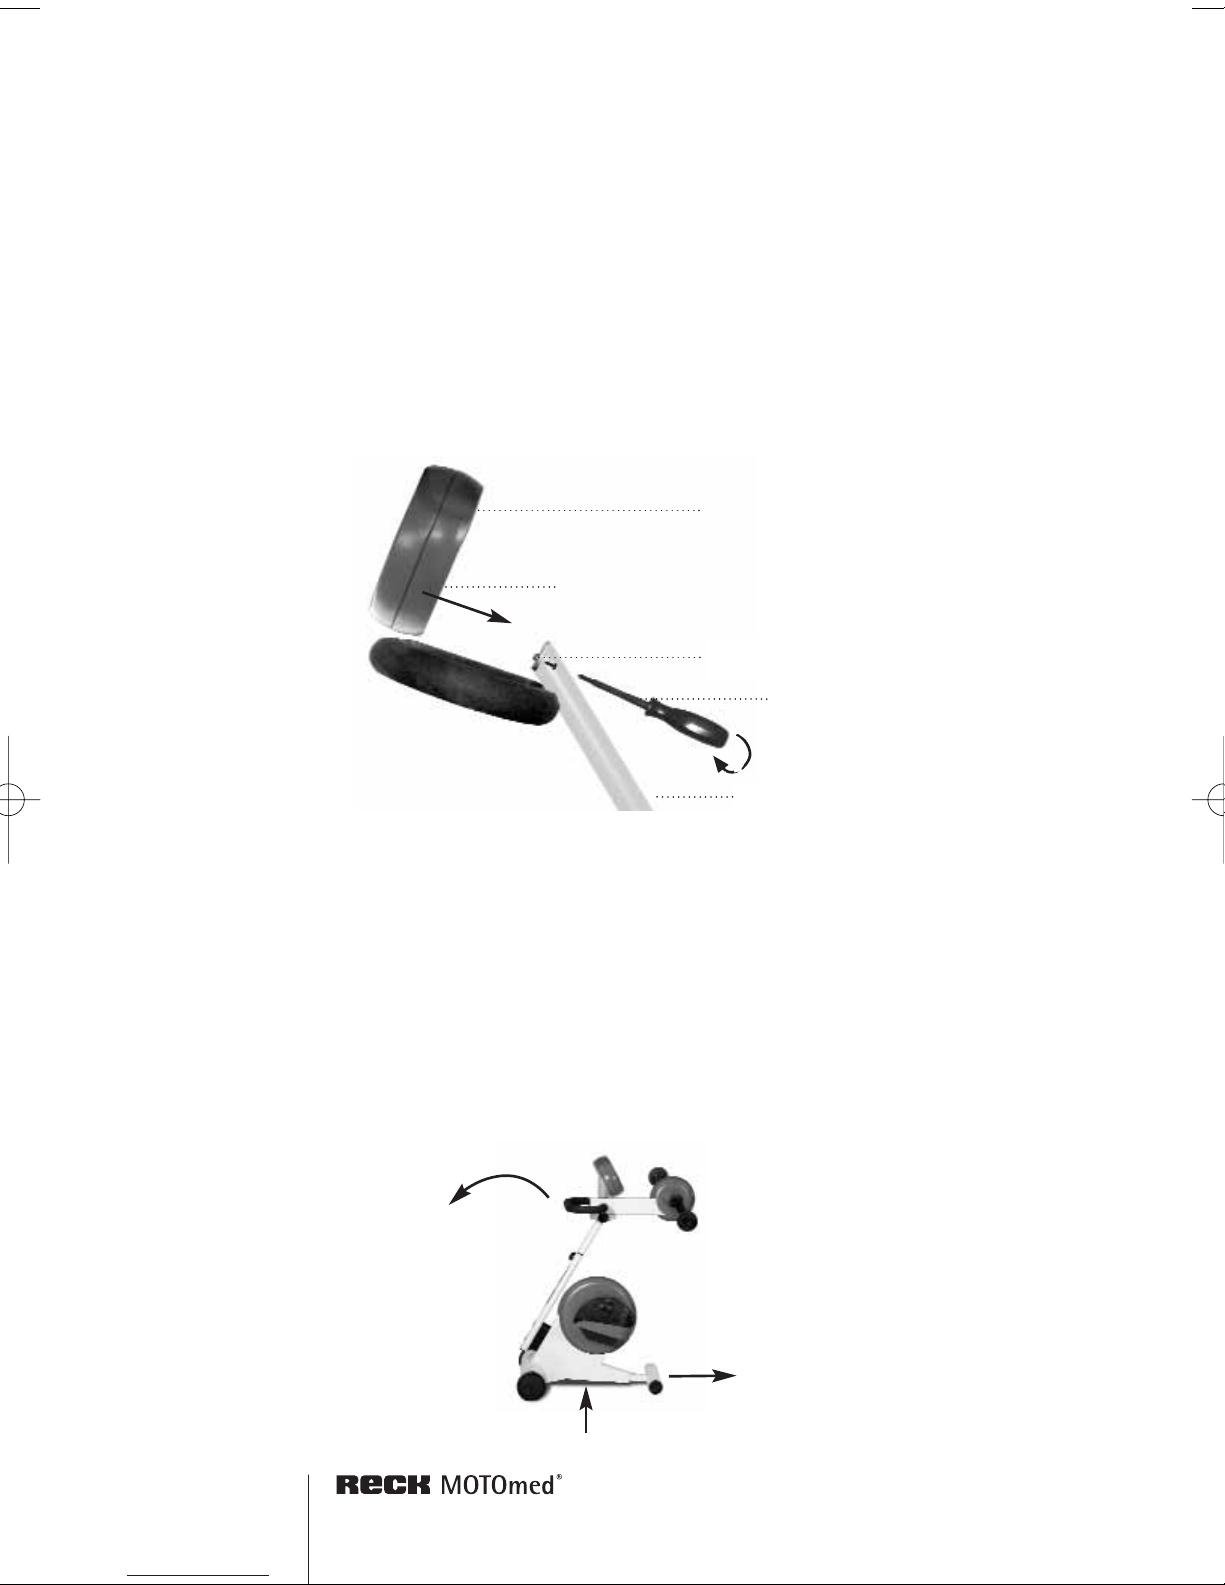
If an arm/upper body trainer (item no. 250 or 218) is fitted, you
should extend the front leg by approx. 15 cm/6 inches. However,
please keep a minimum insertion of the front leg of 10 cm/4 inches
for optimal stability of the MOTOmed. In order to adjust the front leg
of the device you have to tilt the MOTOmed backwards carefully,
open the two Allen screws at the bottom of the MOTOmed viva2 and
pull out the front leg of the device. After adjustment, please tighten
the Allen screws. You can find an Allen key at the bottom of the
device.
see page 75
see page 54
Important: pull out the
small front leg and tighten
the screws
Tilt the MOTOmed
viva2 backwards
Allen key
operating panel
plug
supporting module
plug
screwdriver and screw
SET UP, TRANSPORT16
Fig. 3
Fig. 4
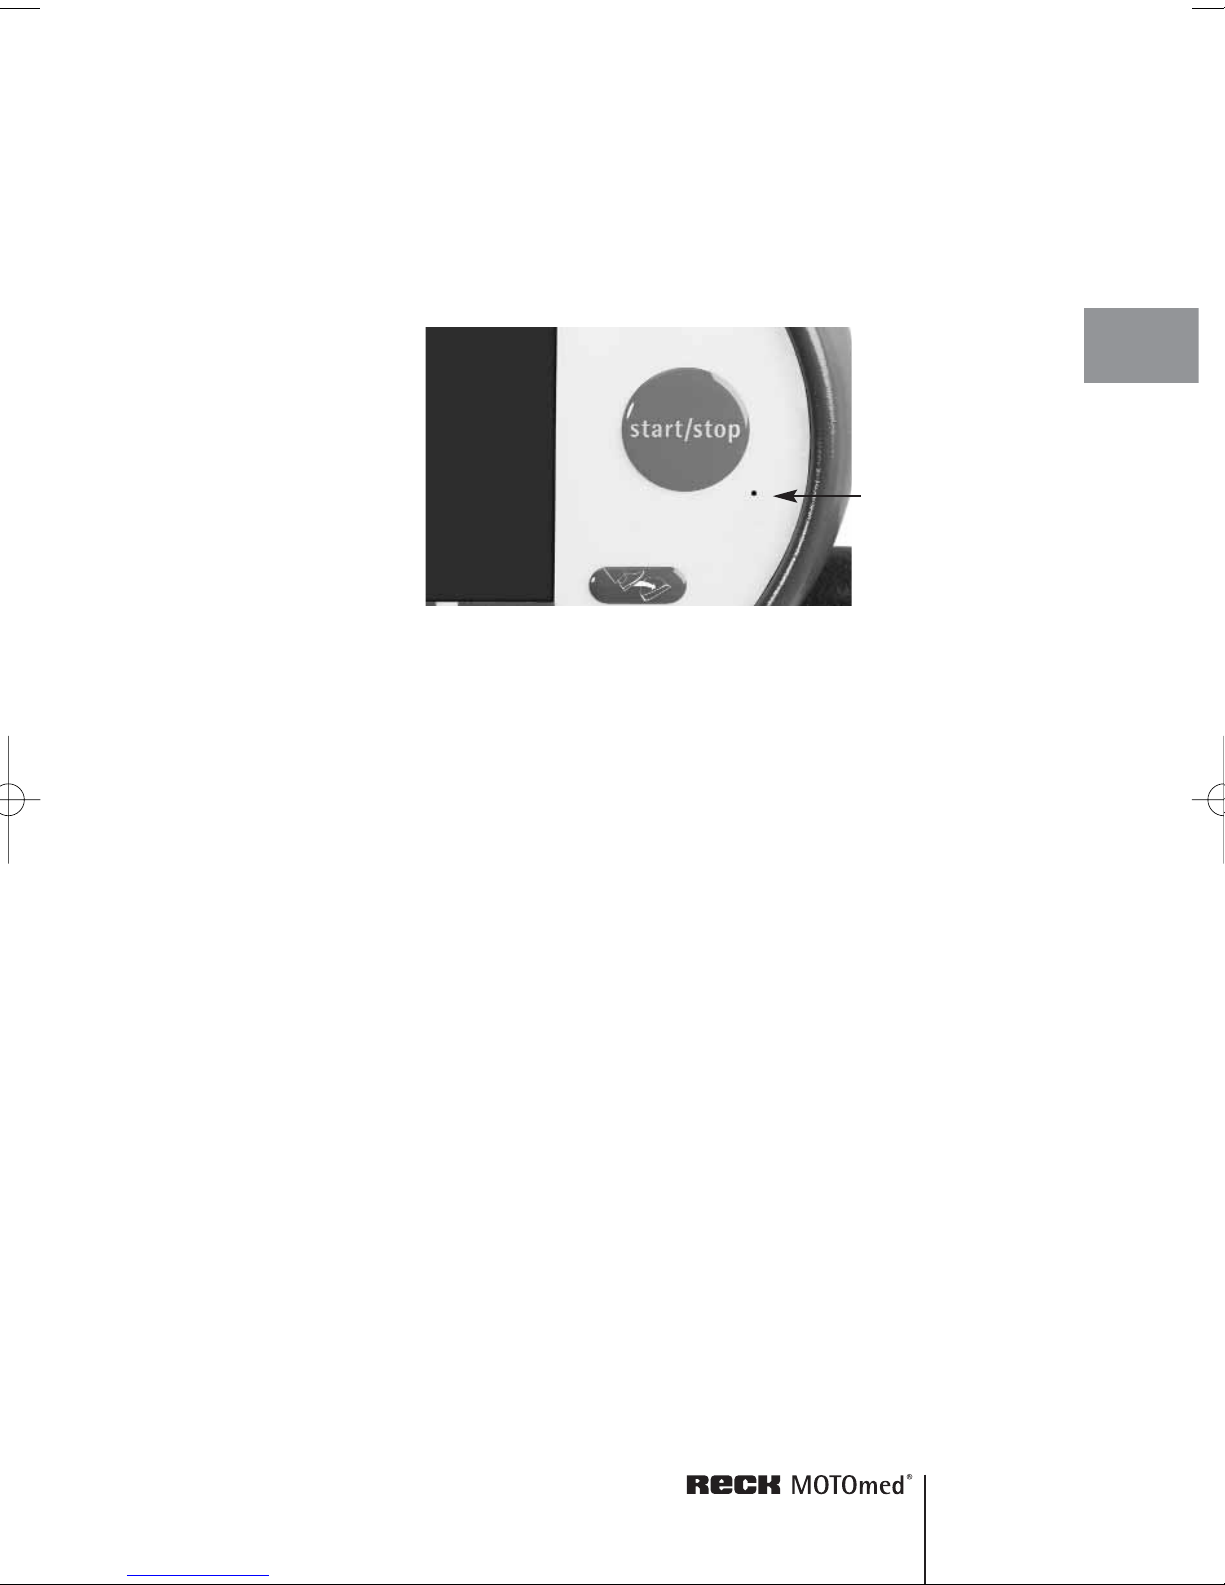
Stand-by Mode
Please plug the mains cable into the MOTOmed viva2 and the mains
plug into a wall socket.
The green light next to the “start/stop” button on the display module
is now blinking for 6 seconds. Then blinking changes to a continuous
light, the MOTOmed viva2 is now in stand-by mode. Only when the
“start/stop” button is pressed the MOTOmed will go into operation.
The MOTOmed viva2 is made for continuous stand-by mode.
For repair, cleaning or transportation of the MOTOmed, the mains
plug has to be unplugged.
In order to save energy, the MOTOmed viva2 switches into stand-by
mode a few minutes after the training. The energy usage in stand-by
mode is less than a television in stand-by mode. If the device is used
for training 1 hour daily and 23 hours in stand-by mode it will be
approximately 10 EUR in annual power costs (based on energy costs
in Germany).
green light
3
Fig. 5
SET UP, TRANSPORT 17

SET UP, TRANSPORT18
Moving/Transporting
The MOTOmed viva2 is equipped with two large transport rollers so
that it can be easily moved within a building.
To move the MOTOmed, please hold the handlebar or the arm trainer
of the MOTOmed viva2 and tilt it backwards until you can easily pull
or push the MOTOmed viva2 on its large transport rollers. The mains
cable has to be detached completely prior to the transport.
If you have to move the MOTOmed viva2 over any small bumps,
make sure that both transport rollers move simultaneously over the
bump. Don’t use the transport rollers to move the MOTOmed viva2
across uneven ground (e.g. cobblestones). In both cases damage to
the casing of the MOTOmed viva2 and the electronics inside could
result.
For longer distances on uneven ground you should use a handcart
(i. e. trolley) in order to protect the transport rollers.
Fig. 6

Operation
Introduction
What is ServoCycling?
SymmetryTraining
Short Instructions Leg Training
Short Instructions Arm/Upper Body Training
Settings
Leg insertion aid (insertion and securing of legs)
Start of training
Arm/upper body trainer
Adjustment of speed
Change of direction
Automatic direction change
Active cycling (with one’s own strength)
ServoCycling
How to shift gears when you cycle yourself
SymmetryTraining
Continuously changing display
End of training
Training analysis
Training suggestion
Leg removal aid
MovementProtector and SpasmControl
Duration of training
Change of motor power
Starting parameters
Adjust the contrast of the display
Adjust the volume
Freeze/continue displayed information
Duration of displayed information
Button lock on the operating panel
Maximum speed
Language option
page
20
20
20
21
23
25
25
26
26
27
27
28
29
29
30
31
33
34
34
36
36
37
39
40
42
44
45
46
47
48
49
50
4
OPERATION 19

see page 29
see page 31
Introduction
The following pages show how to operate the MOTOmed viva2.
First, short instructions will be given for the basic functions of the
“leg training” and the “arm/upper body training”. Chapter “settings”
offers a detailed explanation of the operation, step-by- step.
What is ServoCycling?
ServoCycling is a special function of the MOTOmed viva2 for users
with very little residual muscle strength. The MOTOmed ServoCycling
function has an effect similar to a servo-assisted steering system,
which could enable you to steer a truck by using one finger. Even
with minimal muscle strength, MOTOmed ServoCycling allows for
complete and even pedal movements. Active cycling increases
strength, coordination and motor activity.
The MOTOmed viva2 recognizes your active impulse and the
MOTOmed ServoCycling enforces it throughout one complete
cycle. The MOTOmed viva2 accelerates noticeably, so you see and
feel the effects of your own activity immediately.
As soon as you stop giving active impulses the speed decreases
gently. This increases the benefit of your therapy.
ServoCycling
is a
great experience!
SymmetryTraining
During active cycling with your own muscle strength, the
SymmetryTraining function shows how much each leg “is working“
at that moment. Due to this display you can practice to train and put
strain on both legs equally and apply your strength more deliberately.
The displayed values are not suitable for diagnostic purposes as the
MOTOmed viva2 is not a medical measuring equipment. Due to
spasticity and contractures, the displayed values are distorted.
We recommend relaxing the muscles by training passively before
starting active cycling with one’s own strength.
OPERATION20
1.
2.
see page 53
3.
4.
Short instructions leg training
Set up: Place the MOTOmed viva2 on a non slip
surface with the large tube against a wall
if possible. Sit in a wheelchair or in a stable chair
in front of the MOTOmed viva2 within a reasonable
distance to the trainer – the legs must be able
to turn freely but the knee joints must not be
stretched out completely at any time while training.
Important: Make sure the wheelchair or chair
is secure to avoid moving or slipping.
Insertion and securing aid (if needed):
Press the long blue button “ “ .
The buttons “pedals forward” and “pedals
backward” allow you now to move the
foot shells to the lower position to help
you inserting your legs one after the other
comfortably.
Hint: If your legs are not equally flexible,
we recommend inserting the stiffer one first.
Then fix your feet and legs with the Velcro straps
or the self-operating foot holders (item no. 506) in the foot shells.
Start the training: Press the red “start/stop” button . The foot shells
automatically start moving slowly and the display turns on. Have
your legs moved “passively” for a short warm-up of a few minutes.
Change speed/direction: With the “speed” buttons you can increase
or decrease the number of rounds of the foot shells per minute.
Upon pressing the button “slow” (turtle) you
reduce speed, pressing the button “fast” (rabbit)
you increase it.
The button “direction” allows you to switch
the direction of rotation from forward to
backward and vice versa. The buttons to
have several functions depending on whether
you are training with the assistance of the
motor or cycling actively, i.e. you pedal yourself.
63
4
6
5
9
8
10
6
5
7
11
p
ed
als
b
ac
kw
a
rd
s
Easier leg insertion:
K
ee
p bu
tton “p
eda
ls
fo
rw
ards
“ o
r
“p
ed
als back
w
ard
s“ p
res
se
d
u
ntil ped
als a
re in
a
s
uitab
le
position
for le
g in
sertion
.
p
e
d
a
ls
fo
rw
a
rd
s
22
4
Fig. 7
Fig. 8
Fig. 9
OPERATION 21
OPERATION22
5.
6.
7.
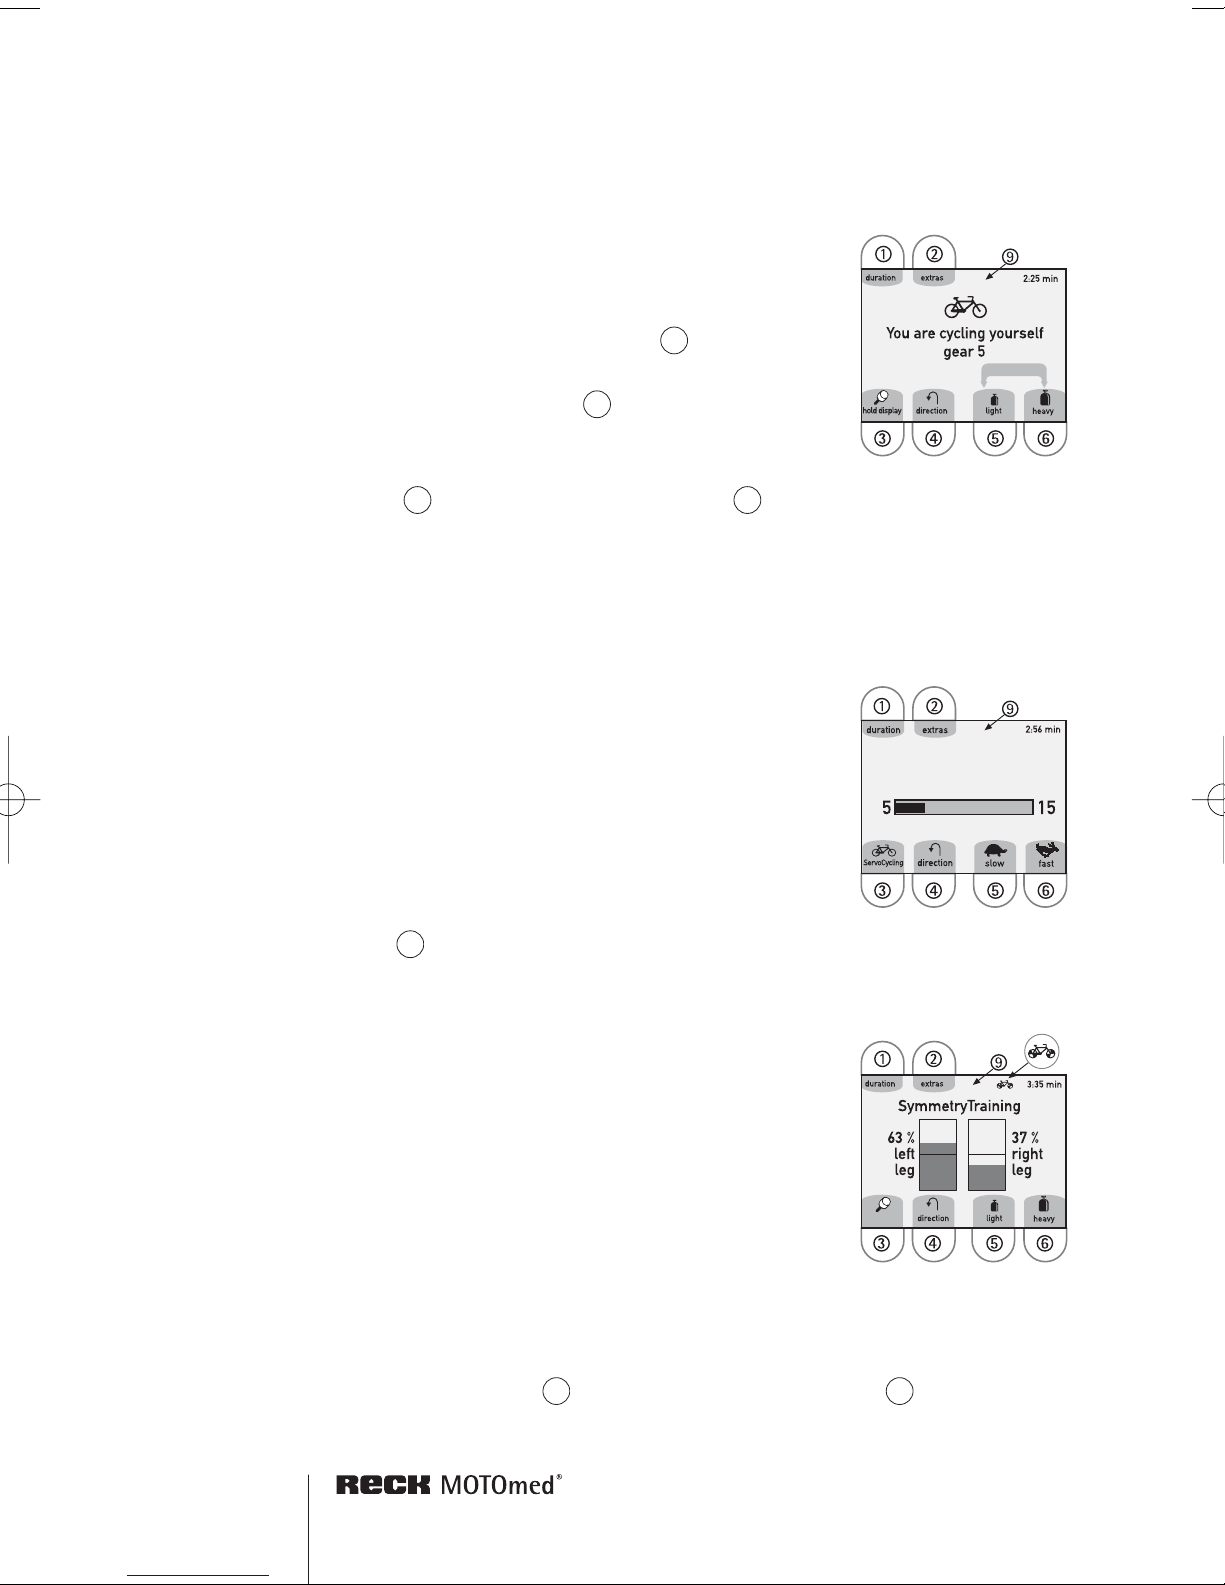
Cycling “actively” without motor: After
you’ve relaxed your muscles enough you can
start to cycle actively with your own strength.
Press the button “ServoCycling” (see figure 9).
Pedal yourself and the MOTOmed makes out your
own activity. The display gives you feedback
showing a bicycle icon and the remark “you are
cycling yourself”. With the buttons “light” (small
weight) and “heavy” (large weight) you
can change gears according to your muscle strength
(from gear 0 to 20). Please choose the appropriate gear that
allows you to cycle without intense strain.
It is recommended to cycle in the low gears for some time.
Pause: In case you get tired we advice you to
relax your legs. The MOTOmed viva2 will
recognize this and take over automatically,
moving your legs passively again. After a while
you can try cycling yourself again (but only if
you feel able to) – the MOTOmed will recognize
this input and switch automatically to active
mode again. The bicycle icon appears on the
display together with the feedback:
“you are cycling yourself” (see figure 10).
SymmetryTraining: The SymmetryTraining
function applies only while cycling actively when
the bicycle icon appears. SymmetryTraining is
supposed to help you training towards an even
force output of each leg by indicating the activity
of both legs in a graph. Whenever the display
shows 50% on both bars, both legs are equally
active, one bar showing more than 50% however
indicates that the corresponding leg is pedaling
with more strength. Try always to train both your legs equally. You can
freeze the SymmetryTraining bar graphs on the display by pressing the
button “hold display” . The button “change display” turns back
to other screenshots.
33
9
65
9
3
shift gear
motor is taking over again
speed [rpm]
Fig.10
Fig.11
Fig.12
hold display

8.
9.
End of training/analysis: Before you finish your
training you are advised to have your legs moved
passively again for a few minutes in order to loosen
up your muscles. In order to stop the training press
the red ”start/stop” button twice (see figure 8).
By pressing the red start/stop button only once you
activate the pause function. Press then the button
“analysis” before the display switches off.
The analysis will show you e.g. how long you have been training with the
assistance of the motor (passively) and with your own strength (actively).
Removing the legs: To remove your legs after training press the
button “removal aid” . Last, press again the red “start/stop” button
(see para. 2) to switch off the MOTOmed. Otherwise the MOTOmed
viva2 will automatically switch into stand-by after a while.
Short instructions arm/upper body training
8
6
93
8
4
arm/upper body trainer
supporting module
hand grips
screw knobs
to swivel the arm trainer
small front leg
14
17
13
12
16
screw knob
for height adjustment
15
Fig.13
Fig.14
OPERATION 23
Whenever you attach an arm/upper body trainer (item no. 250
or 218) to your MOTOmed viva2 you have to extend the front leg
by approx. 15 cm/6 inches. However, please keep a minimum
insertion of the front leg of 10 cm/4 inches for optimal stability
of the MOTOmed.
Open the two screw knobs located underneath the arm/upper
body trainer and swivel the arm/upper body
trainer clockwise by 180 degrees. After that,
tighten the screw knobs again.
Open the screw knob at the supporting
module and adjust it to the desired training
height (after consultation of the doctor and
therapist).
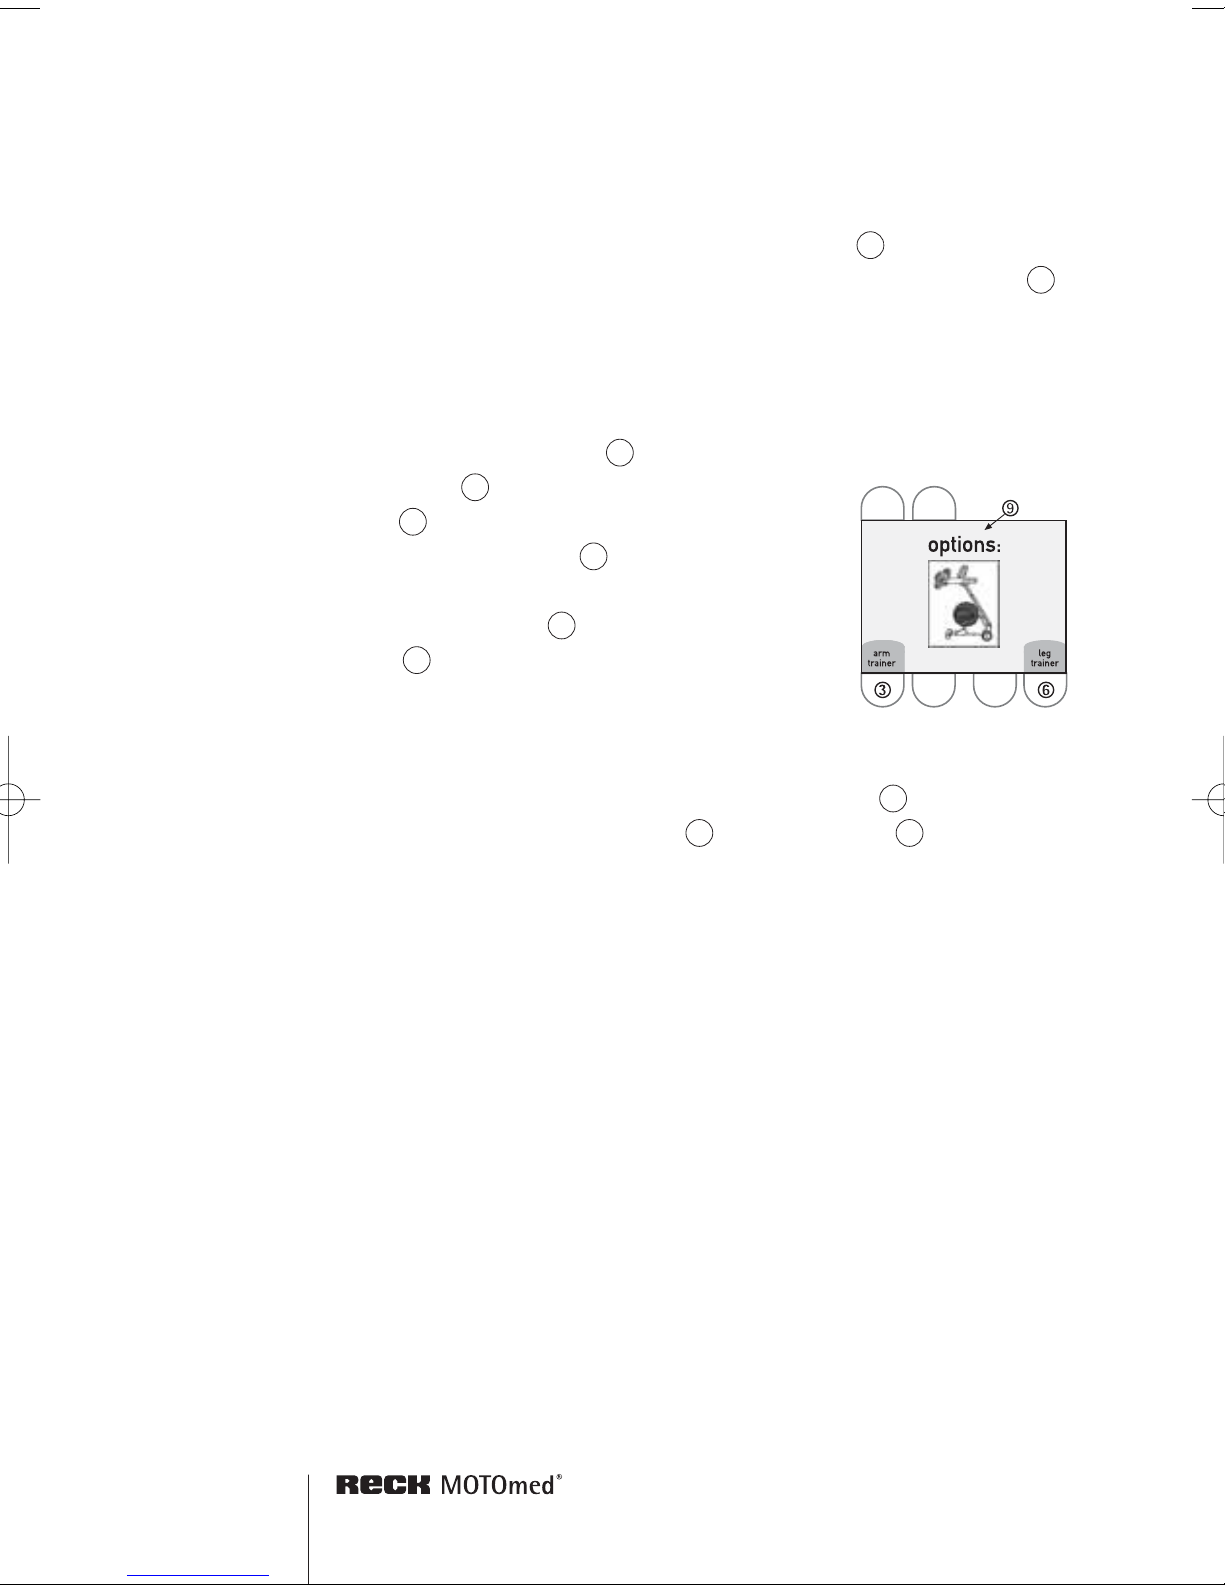
Start of training: Press the red “start/stop” button (see figure 8)
and then the button “arm trainer” . The hand grips begin to
move slowly. Let the motor move your arms passively in a short
“warm-up” phase first.
If the hands are fixed (e.g. in the forearm shells) training may only
be done under supervision.
Further instructions for arm training are very similar to the leg
training (see pages 21 – 23, para. 4 to 8).
Please note that the SymmetryTraining for the arm trainer is not
included in the standard version but can be ordered additionally
(item no. 201).
173
8
16
15
13
14
14
13
12
14
1.
2.
3.
4.
5.
6.
OPERATION24
Fig.15
see page 53
Settings
Leg insertion aid (insertion and securing of legs)
Before you start the training, you have to place your feet into the
foot shells and fix them with the Velcro straps. The leg insertion aid
of the MOTOmed viva2 offers the possibility to bring the foot shells
into a suitable position to help you inserting your legs more comfortably. Please press the blue button (leg insertion aid).
Press button “pedals forwards“ or “pedals backwards“ until the first foot
shell is at the desired position. As soon as you stop pressing the button
the pedals stop moving. Now you can insert and fix your first leg with
the Velcro straps or self-operating foot holders (item no. 506) in the
foot shell. After that you repeat this procedure with your other leg.
The training starts as soon as you press “start/stop“. Important: Only
start your training when both legs are inserted and fixed.
Suggestion: If your legs are not equally flexible, step in first with the
leg that is less flexible than the other.
For some types of wheelchairs it may be necessary to remove the
foot plate or to swivel it aside in order to allow sufficient access to
the MOTOmed viva2.
However, if you decide not to train, the MOTOmed viva2 goes into
stand-by mode after a few minutes.
pedals
backwards
Easier leg insertion:
Keep button “pedals forwards“ or
“pedals backwards“ pressed
until pedals are in a suitable
position for leg insertion.
pedals
forwards
pedals
backwards
pedals
forwards
4
Fig. 16
OPERATION 25

Start of training
Press button “start/stop“. The MOTOmed viva2 starts with a short and
gentle warm-up phase.
The speed of the leg trainer automatically increases up to 20 rpm,
arm/upper body trainer warms up to 5 rpm.
Without pressing any further buttons the motor of the MOTOmed
viva2 will gently move your legs in a safe way.
Arm/upper body trainer
If there is an arm/upper body trainer (item no. 250), you will be
asked to choose between arm or leg training before starting the
training (page 24, figure 15). If you choose arm/upper body training,
you will have about 10 seconds to place your hands onto the
handles, and then the training will start. In case you want to start
your training immediately, press the button “start now.”
Apart from that the functions and settings of the arm trainer are
similar to the leg trainer, (excluding the SymmetryTraining function
(item no. 201), which has to be ordered specifically with the arm
trainer).
warm-up
1:05 min
0
15
speed [rpm]
slow
direction
fast
ServoCycling
duration extras
see page 54
OPERATION26
Fig. 17

4
Adjustment of speed
With the buttons ”slow“ (turtle) and “fast“ (rabbit) you can easily
adjust the speed according to your needs. You can choose any speed
between 0 and 60 (rpm).
Change of direction
Upon pressing the button “direction“ the MOTOmed viva2 slowly
reduces the speed until it stops, changes the direction of movement
and finally accelerates back up to the previous speed.
change of direction
0
22
5:36 min
speed [rpm]
slow
direction
fast
ServoCycling
duration extras
direction
speed [rpm]
5
5:49 min
slow
direction
fast
ServoCycling
duration extras
slow
fast
Fig. 18
Fig. 19
OPERATION 27
OPERATION28
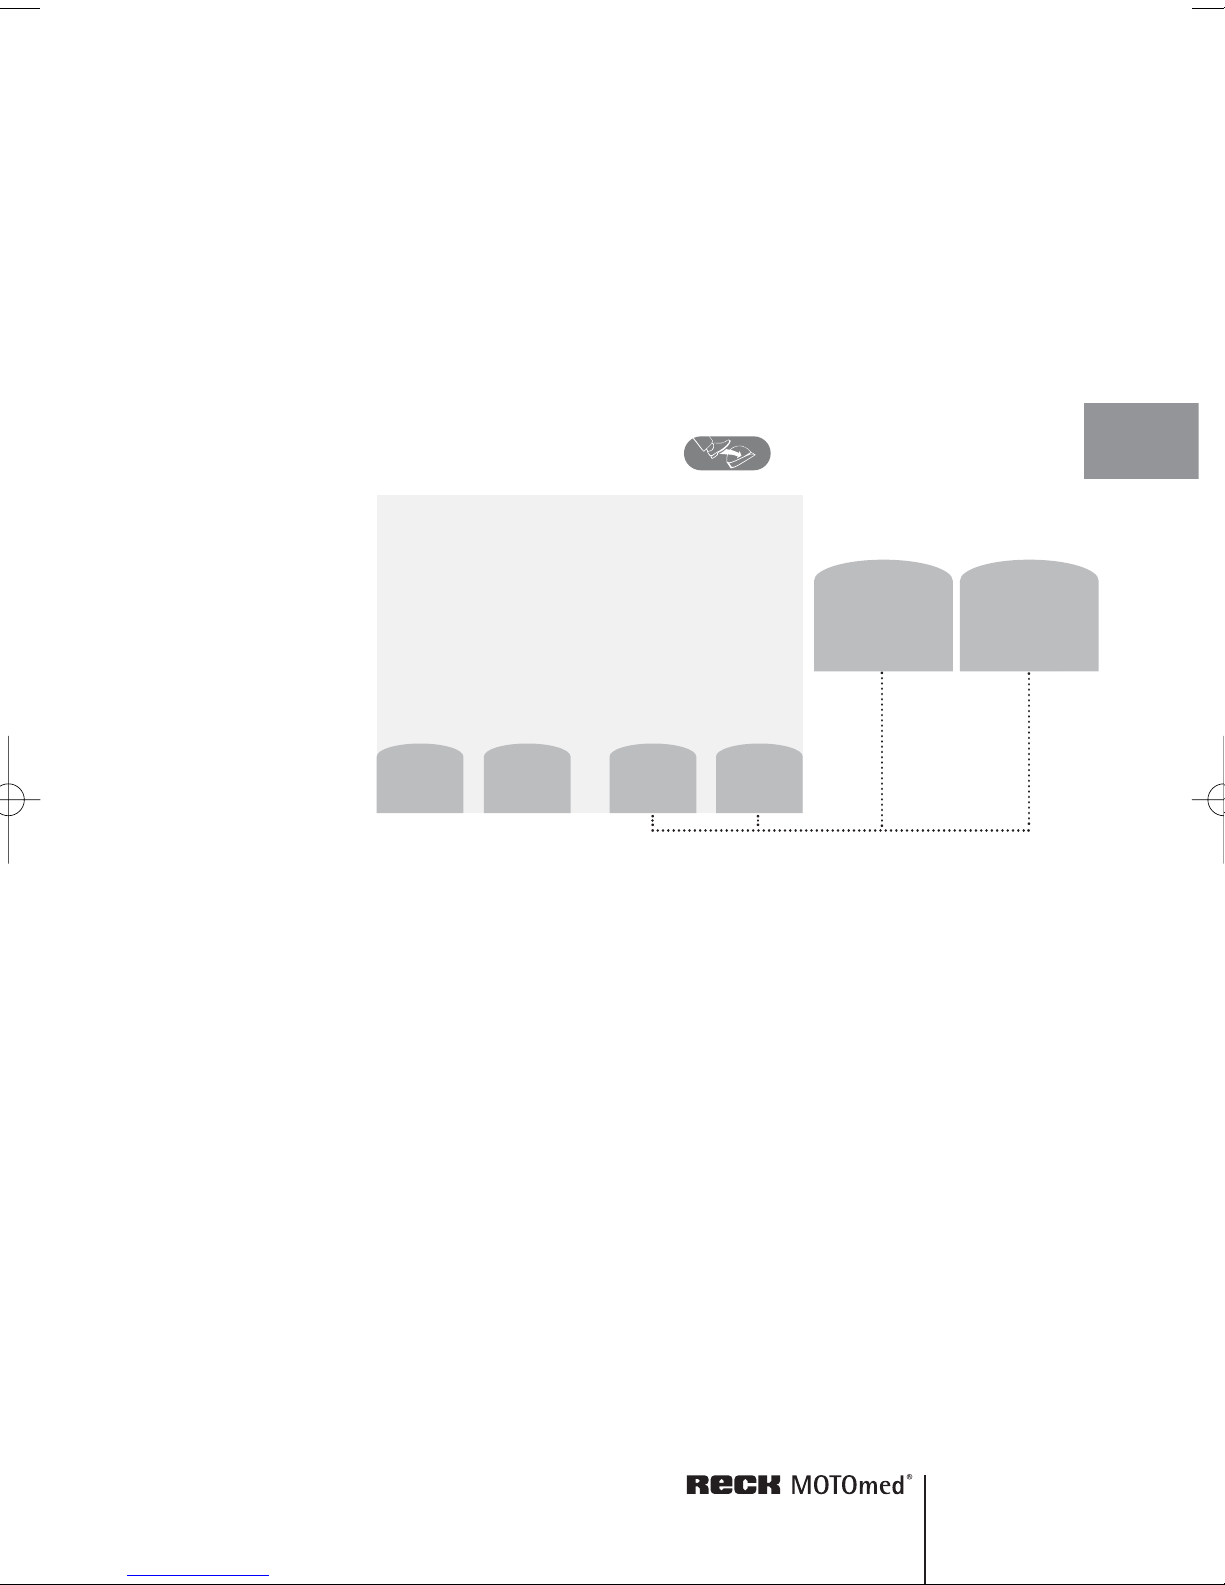
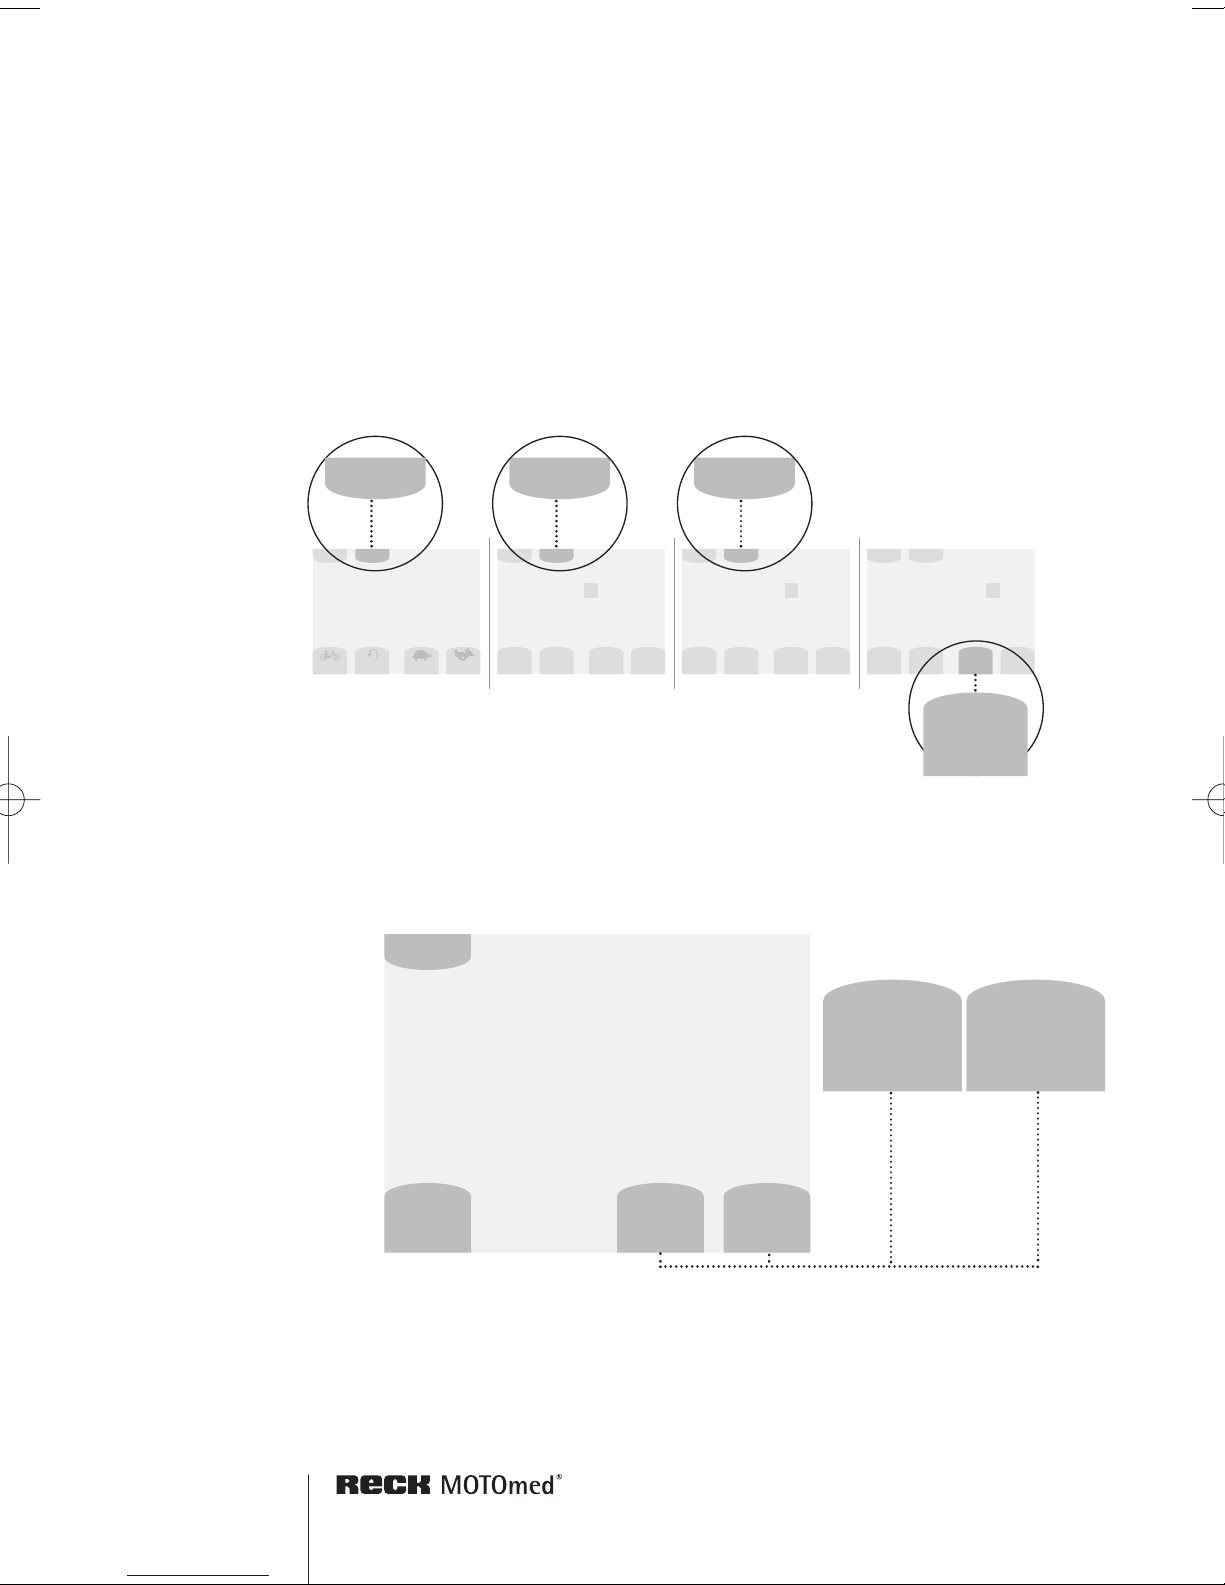
Automatic direction change
With the back + forth program you can set a period of time after
which the MOTOmed viva2 will change the direction automatically.
For this press at first the button “extras” (1.), then the button “extras”
(2.), once again the button “extras” (3.) and finally the button “back +
forth program” (4.).
Upon pressing the buttons “-“ and “+” (5.) you can set the time
period for the change of direction from 2 to 30 minutes.
If you want to go back to the standard operation please press
the button “switch off”. Accept your adjustment by pressing the
button ””.
autom. direction change [min]
10
please adjust with -/+
+
-
switch
off
8:34 min
+
-
5.
velocity [rpm]
5
5:49 min
slow
direction
fast
ServoCycling
duration extras
1.
motor
power
Spasm
Control
starting
parameters
infor-
mation
extras
4:54 min
extras 1 2 3
2.
adjust
contrast
adjust
volume
duration
display
extras
5:34 min
extras 1 2 3
language
options
3.
symmetry
display
softkey
position
back+forth
program
more...
6:11 min
extras 1 2 3
max
rpm
4.
Fig. 20
Fig. 21
extras
extras
extras
back+forth
program
 Loading...