

MOTO GUZZI California EV V1100 Service Station Manual
SERVICE STATION MANUAL
?????
California EV V1100

SERVICE STATION
MANUAL
California EV V1100
While the basic features as described and illustrated in this manual remain unchanged, Moto Guzzi
s.p.a. reserves the right to introduce changes to their own models at any time. All rights regarding
electronic data storage, total or partial reproduction or adaptation of this manual by any means are
reserved for all Countries. Third party products or services referred to in this manual should be considered
only informative and are not binding. Moto Guzzi s.p.a. shall not be liable for any functions or use of these
products.
SERVICE STATION MANUAL
California EV V1100
NOTE Provides key information to make the procedure easier to understand and carry out.
CAUTION Refers to specific procedures to carry out for preventing damages to the vehicle.
WARNING Refers to specific procedures to carry out to prevent injuries to the repairer.
Personal safety Failure to completely observe these instructions will result in serious risk of personal
injury.
Safeguarding the environment Sections marked with this symbol indicate the correct use of the vehicle
to prevent damaging the environment.
Vehicle intactness The incomplete or non-observance of these regulations leads to the risk of serious
damage to the vehicle and sometimes even the invalidity of the guarantee

INDEX OF TOPICS
CHARACTERISTICS CHAR
SPECIAL TOOLS S-TOOLS
MAINTENANCE MAIN
ELECTRICAL SYSTEM ELE SYS
ENGINE FROM VEHICLE ENG VE
ENGINE ENG
POWER SUPPLY P SUPP
SUSPENSIONS SUSP
CHASSIS CHAS
BRAKING SYSTEM BRAK SYS
CLUTCH SYSTEM CLU SYS
BODYWORK BODYW

INDEX OF TOPICS
CHARACTERISTICS CHAR

Rules
Safety rules
Carbon monoxide
If you need to keep the engine running while working on the vehicle, please ensure that you do so in
an open or very well ventilated area. Never run the engine in an enclosed area. If you do work in an
enclosed area, make sure to use a fume extraction system.
CAUTION
EXHAUST EMISSIONS CONTAIN CARBON MONOXIDE, A POISONOUS GAS WHICH CAN CAUSE
LOSS OF CONSCIOUSNESS AND EVEN DEATH.
Fuel
CAUTION
THE FUEL USED TO POWER INTERNAL COMBUSTION ENGINES IS HIGHLY FLAMMABLE AND
MAY BE EXPLOSIVE UNDER CERTAIN CONDITIONS. IT IS THEREFORE RECOMMENDED TO
CARRY OUT REFUELLING AND MAINTENANCE PROCEDURES IN A VENTILATED AREA WITH
THE ENGINE SWITCHED OFF. DO NOT SMOKE DURING REFUELLING AND NEAR FUEL VAPOURS, AVOIDING ANY CONTACT WITH NAKED FLAMES, SPARKS OR OTHER SOURCES
WHICH MAY CAUSE THEM TO IGNITE OR EXPLODE.
DO NOT DISPERSE FUEL IN THE ENVIRONMENT.
KEEP OUT OF THE REACH OF CHILDREN
Hot components
The engine and the exhaust system components become very hot and remain hot for some time after
the engine has been switched off. When handling these components, wear insulating gloves or wait
until the engine and the exhaust system have cooled down.
Used engine oil and transmission oil
CAUTION
IT IS ADVISABLE TO WEAR PROTECTIVE IMPERMEABLE GLOVES WHEN SERVICING THE VEHICLE.
THE ENGINE OR GEARBOX OIL MAY CAUSE SERIOUS INJURIES TO THE SKIN IF HANDLED
FOR PROLONGED PERIODS OF TIME AND ON A REGULAR BASIS.
WASH YOUR HANDS CAREFULLY AFTER HANDLING OIL.
HAND THE OIL OVER TO OR HAVE IT COLLECTED BY THE NEAREST USED OIL RECYCLING
COMPANY OR THE SUPPLIER.
DO NOT DISPOSE OF OIL IN THE ENVIRONMENT
KEEP OUT OF THE REACH OF CHILDREN
California EV V1100 Characteristics
CHAR - 7

Brake and clutch fluid
BRAKE AND CLUTCH FLUIDS CAN DAMAGE THE PLASTIC OR RUBBER PAINTED SURFACES.
WHEN SERVICING THE BRAKING SYSTEM OR THE CLUTCH SYSTEM, PROTECT THESE COMPONENTS WITH A CLEAN CLOTH. ALWAYS WEAR PROTECTIVE GOGGLES WHEN SERVICING
THESE SYSTEMS. BRAKE AND CLUTCH FLUIDS ARE EXTREMELY HARMFUL FOR YOUR
EYES. IN THE EVENT OF ACCIDENTAL CONTACT WITH THE EYES, RINSE THEM IMMEDIATELY
WITH ABUNDANT COLD, CLEAN WATER AND SEEK MEDICAL ADVICE.
KEEP OUT OF THE REACH OF CHILDREN
Battery electrolyte and hydrogen gas
CAUTION
THE BATTERY ELECTROLYTE IS TOXIC, CORROSIVE AND AS IT CONTAINS SULPHURIC ACID,
IT CAN CAUSE BURNS WHEN IN CONTACT WITH THE SKIN. WHEN HANDLING BATTERY
ELECTROLYTE, WEAR TIGHT-FITTING GLOVES AND PROTECTIVE APPAREL. IN THE EVENT
OF SKIN CONTACT WITH THE ELECTROLYTIC FLUID, RINSE WELL WITH PLENTY OF CLEAN
WATER. IT IS PARTICULARLY IMPORTANT TO PROTECT YOUR EYES BECAUSE EVEN TINY
AMOUNTS OF BATTERY ACID MAY CAUSE BLINDNESS. IF THE FLUID GETS IN CONTACT WITH
YOUR EYES, WASH WITH ABUNDANT WATER FOR FIFTEEN MINUTES AND CONSULT AN EYE
SPECIALIST IMMEDIATELY. THE BATTERY RELEASES EXPLOSIVE GASES; KEEP IT AWAY
FROM FLAMES, SPARKS, CIGARETTES OR ANY OTHER HEAT SOURCES. ENSURE ADEQUATE VENTILATION WHEN SERVICING OR RECHARGING THE BATTERY.
KEEP OUT OF THE REACH OF CHILDREN.
BATTERY LIQUID IS CORROSIVE. DO NOT POUR IT OR SPILL IT, PARTICULARLY ON PLASTIC
COMPONENTS. ENSURE THAT THE ELECTROLYTIC ACID IS COMPATIBLE WITH THE BATTERY TO BE ACTIVATED.
Maintenance rules
GENERAL PRECAUTIONS AND INFORMATION
When repairing, dismantling and reassembling the vehicle follow the recommendations reported below
carefully.
BEFORE REMOVING COMPONENTS
•
Before dismantling components, remove dirt, mud, dust and foreign bodies from the vehicle.
Use the special tools designed for this bike, as required.
COMPONENTS REMOVAL
•
Do not loosen and/or tighten screws and nuts using pliers or any other tools than the specific
wrench.
•
Mark the positions on all connection joints (pipes, cables, etc.) before separating them, and
identify them with different distinctive symbols.
•
Each component needs to be clearly marked to enable identification during reassembly.
•
Clean and wash the dismantled components carefully using a low-flammability detergent.
•
Keep mated parts together since they have "adjusted" to each other due to normal wear.
Characteristics California EV V1100
CHAR - 8

•
Some components must be used together or replaced altogether.
•
Keep away from heat sources.
REASSEMBLY OF COMPONENTS
CAUTION
BEARINGS MUST BE ABLE TO ROTATE FREELY, WITHOUT JAMMING AND/OR NOISE: OTHERWISE, THEY NEED TO BE REPLACED.
•
Only use ORIGINAL Moto Guzzi SPARE PARTS.
•
Comply with lubricant and consumables use guidelines.
•
Lubricate parts (whenever possible) before reassembling them.
•
When tightening nuts and screws, start from the ones with the largest section or from the
internal ones, moving diagonally. Tighten nuts and screws in successive steps before applying the tightening torque.
•
Always replace self-locking nuts, washers, sealing rings, circlips, O-rings (OR), cotter pins
and screws with new ones if their tread is damaged.
•
When assembling the bearings, make sure to lubricate them well.
•
Check that each component is assembled correctly.
•
After a repair or routine maintenance procedure, carry out pre-ride checks and test the vehicle on private grounds or in an area with low traffic density.
•
Clean all coupling surfaces, oil guard rims and gaskets before refitting them. Smear a light
layer of lithium-based grease on the oil guard rims. Reassemble oil guards and bearings
with the brand or lot number facing outward (visible side).
ELECTRIC CONNECTORS
Electric connectors must be disconnected as described below; failure to comply with this procedure
causes irreparable damage to both the connector and the cable harness:
Press the relevant safety hooks, if any.
•
Grip the two connectors and disconnect them by pulling them in opposite directions.
•
If any signs of dirt, rust, moisture, etc. are noted, clean the inside of the connector carefully
with a jet of compressed air.
•
Ensure that the cables are correctly fastened to the internal connector terminals.
•
Then connect the two connectors, ensuring that they couple correctly (if fitted with clips, you
will hear them "click" into place).
CAUTION
TO DISCONNECT THE TWO CONNECTORS, DO NOT PULL THE CABLES.
NOTE
THE TWO CONNECTORS CONNECT ONLY FROM ONE SIDE: CONNECT THEM THE RIGHT WAY
ROUND.
TIGHTENING TORQUES
CAUTION
DO NOT FORGET THAT THE TIGHTENING TORQUES OF ALL FASTENING ELEMENTS ON
WHEELS, BRAKES, WHEEL BOLTS AND ANY OTHER SUSPENSION COMPONENTS PLAY A
KEY ROLE IN ENSURING VEHICLE SAFETY AND MUST COMPLY WITH SPECIFIED VALUES.
California EV V1100 Characteristics
CHAR - 9
CHECK THE TIGHTENING TORQUES OF FASTENING PARTS ON A REGULAR BASIS AND ALWAYS USE A TORQUE WRENCH TO REASSEMBLE THESE COMPONENTS. FAILURE TO COMPLY WITH THESE RECOMMENDATIONS MAY CAUSE ONE OF THESE COMPONENTS TO GET
LOOSE AND EVEN DETACHED, THUS BLOCKING A WHEEL, OR OTHERWISE COMPROMISE
VEHICLE HANDLING. THIS CAN LEAD TO FALLS, WITH THE RISK OF SERIOUS INJURY OR
DEATH.
Running-in
Engine run-in is essential to ensure engine long life and correct operation. Twisty roads and gradients
are ideal to run in engine, brakes and suspensions effectively. Vary your riding speed during the runin. This ensures that components operate under both "loaded" and "unloaded" conditions, allowing the
engine components to cool.
CAUTION
THE CLUTCH MAY EMIT A SLIGHT BURNING SMELL WHEN FIRST USED. THIS PHENOMENON
SHOULD BE CONSIDERED NORMAL AND WILL DISAPPEAR AS SOON AS THE CLUTCH
PLATES GET ADAPTED.
IT IS IMPORTANT TO STRAIN ENGINE COMPONENTS DURING RUN-IN, HOWEVER, MAKE SURE
NOT TO OVERDO THIS.
CAUTION
THE FULL PERFORMANCE OF THE VEHICLE IS ONLY AVAILABLE AFTER THE SERVICE AT
THE END OF THE RUNNING IN PERIOD.
Follow these guidelines:
•
Do not twist the throttle grip abruptly and completely when the engine is working at a low
revs, either during or after run-in.
•
During the first 100 Km (62 miles) use the brakes gently, avoiding sudden or prolonged
braking. That is to permit the adequate adjustment of the pad friction material to the brake
discs.
AFTER THE SPECIFIED MILEAGE, TAKE THE VEHICLE TO AN OFFICIAL Moto Guzzi DEALER
FOR THE CHECKS INDICATED IN THE "AFTER RUN-IN" TABLE IN THE SCHEDULED MAINTENANCE SECTION TO AVOID INJURING YOURSELF, OTHERS AND /OR DAMAGING THE VEHICLE.
•
Between 1000 km (625 miles) and 2000 km (1250 miles) travelled, ride more vigourously,
vary speeds and twist throttle fully for some short periods for best coupling of the components; do not exceed 6000 rpm.
•
After 2000 km (1250 miles) a better engine performance may be expected, but without exceeding the engine maximum rpm allowed (7600 rpm).
Vehicle identification
SERIAL NUMBER LOCATION
These numbers are necessary for vehicle registration.
NOTE
Characteristics California EV V1100
CHAR - 10
ALTERING IDENTIFICATION NUMBERS MAY BE SERIOUSLY PUNISHABLE BY LAW. IN PARTICULAR, MODIFYING THE FRAME NUMBER IMMEDIATELY VOIDS THE WARRANTY.
This number consists of numbers and letters, as in
the example shown below.
ZGUKDBKDXMXXXXXX
KEY:
ZGU: WMI (World manufacturer identifier) code;
KD: model;
B: version variation;
KD: Version;
X: variable year of manufacture (Y - for 2000; 1 -
for 2001)
M: production plant (M= Mandello del Lario);
XXXXXX: serial number (6 digits);
FRAME NUMBER
The chassis number is stamped on the right side
of the headstock.
ENGINE NUMBER
The engine number is stamped on the left side,
close to the engine oil level check cap.
Dimensions and mass
WEIGHTS AND DIMENSIONS
Specification
Desc./Quantity
Length 2380 mm (93.7 in)
Width 815 mm (32.1 in)
Maximum height 1150 mm (45.3 in)
Saddle height 770 mm (30.3 in)
Minimum earth clearance 165 mm (6.5 in)
Wheelbase 1560 mm (61.4 in)
Kerb weight 251 kg (553 lb)
Transmission
TRANSMISSION
Specification
Desc./Quantity
Primary drive with coil gears, ratio: 17/21 = 1:1.2353
California EV V1100 Characteristics
CHAR - 11

Specification Desc./Quantity
Gearbox 5 speed mechanical gearbox with gears always engaged to the
front joint. Built-in flexible couplings. Foot gear shift lever on left
hand side of engine
Gear ratio 1st gear : 14/28 = 1:2.0000
2nd gear : 18/25 = 1:1.3889
3rd gear : 21/22 = 1:1.0476
4th gear : 23/20 = 1:0.8696
5th gear : 28/21 = 1:0.7500
Final drive with U-joint
Ratio 8/33 = 1:4.125
Capacities
CAPACITY
Specification Desc./Quantity
Fuel tank Approximately 19 litres (4 litres reserve)
Motor oil sump 3000 cm³ (183 cu.in)
Gearbox oil 0.75 litres
Gear case (bevel gear lubrication) 0.25 litres
Adjustable telescopic fork oil (per fork leg) 0.485 l (0.128 US gal)
Electrical system
ELECTRICAL SYSTEM
Specification
Desc./Quantity
Spark plug NGK BPR6ES
Electrode gap 0.6 - 0.7 mm (0.024 - 0.028 in)
Ignition coils 2 mounted on chassis
Generator - Alternator Output power: 350 W at 5000 rpm (14V - 25A)
Starter motor 12V - 1.2 kW
Frame and suspensions
CHASSIS
Specification
Desc./Quantity
Chassis Modular double cradle, high strength steel tubular chassis
Front suspension MARZOCCHI hydraulic telescopic fork, ∅ 45 mm (1.77 in) with
separate adjustment for rebound and compression damping.
Rear suspension Swingarm with 2 adjustable hydraulic shock absorbers in the
hydraulic rebound damping.
Brakes
BRAKES
Specification
Desc./Quantity
Right front brake Ø 320-mm (12.6 in) stainless steel semi-floating disc, calliper
with 4 different pins
Hand lever control placed on the right side of the handlebar.
Hydraulic transmission separate from the rear brake.
Braking cylinder diameter: 30 - 34 mm (1.18 - 1.34 in)
Pump diameter: 13 mm (0.51 in)
Left front brake Ø 320-mm (12.6 in) stainless steel semi-floating disc, calliper
with 4 different pins
Foot gear shift lever placed on the right side of the vehicle.
Hydraulic transmission connected to the rear brake.
Braking cylinder diameter: 30 - 34 mm (1.18 - 1.34 in)
Characteristics California EV V1100
CHAR - 12

Specification Desc./Quantity
Pump diameter: 13 mm (0.51 in)
Rear brake Integral braking system with braking corrector and delay valve
Ø 282-mm (11.1 in) stainless steel fixed disc, floating calliper
with 2 pins.
Foot gear shift lever placed on the right side of the vehicle.
Hydraulic transmission connected to the left front brake.
Braking cylinder diameter: 30 - 32 mm (1.18 - 1.26 in)
Pump diameter: 16 mm (0.63 in)
Tightening Torques
TIGHTENING TORQUES
Name Torque in Nm
Screws and stud bolts fixing head to crankcase 40 -42 Nm
Spark plugs 25 - 30 Nm
Hollow screw fixing the oil vapour recovery pipe 38 - 40 Nm
Screw fixing the rocker pins 6 - 8 Nm
Self-locking nuts for screws fixing the rod bearing caps 46 - 48 Nm
Flywheel to crankshaft fixing screw 25 - 30 Nm
Gear to camshaft fixing nut 140 - 150 Nm
Intake pipe fixing screws 5 - 8 Nm
Hollow screw fixing pipes that deliver oil to the heads 15 - 18 Nm
Nut for front and rear engine tie rod to chassis 75 - 80 Nm
Secondary shaft locking nut 55 - 60 Nm
Oil introduction cap in the gearbox 25 - 30 Nm
Oil level and drainage cap in the gearbox 22 - 25 Nm
Safety nut for secondary shaft 70 - 80 Nm
Nut locking bearing on bevel pinion 180 - 200 Nm
Screw fixing sprocket to drilled pin 25 - 30 Nm
Screws fastening cradle to frame 70 - 80 Nm
Nuts for screws fixing cradle to frame 70 - 80 Nm
Blind nuts for swingarm support pins 70 - 80 Nm
Nuts fixing gear case to the swingarm arm 25 - 30 Nm
Upper caps for front fork 120 - 150 Nm
Nut for front and rear wheel axle 140 - 150 Nm
Steering lock bushing 170 - 180 Nm
Screws and nuts diam. 4 mm (0.16 in) (standard value) 3 - 3.5 Nm
Screws and nuts diam. 5x0.8 mm (0.20x0.03 in) (standard val-
ue)
6 - 7 Nm
Screws and nuts diam. 6x1.0 mm (0.24x0.039 in) (standard
value)
8 - 12 Nm
Screws and nuts diam. 8x1.25 mm (0.31x0.049 in) (standard
value)
25 - 30 Nm
Screws and nuts diam. 10x1.5 mm (0.39x0.059 in) (standard
value)
45 - 50 Nm
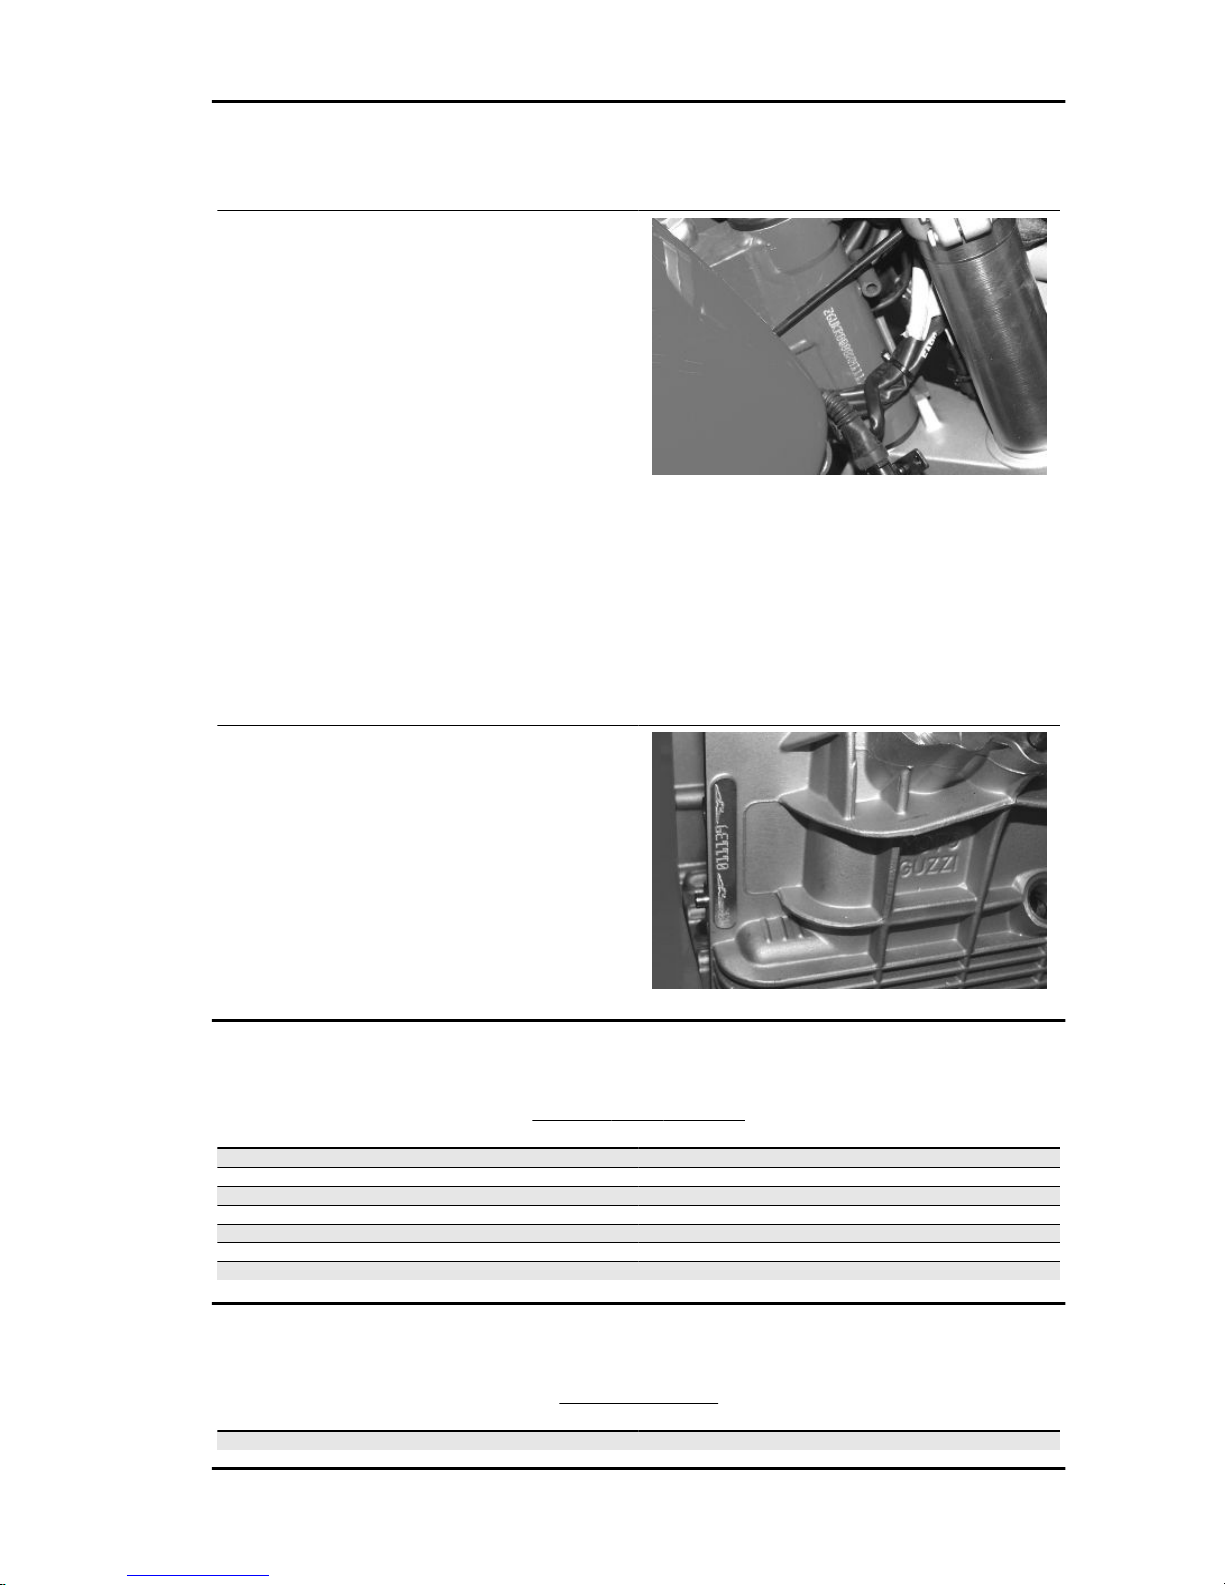
Overhaul data
Assembly clearances
Cylinder - piston assy.
Measurement of the cylinder diameter must be done at three heights, turning the dial gauge 90°.
Check that cylinders and pistons are of the same selection types (A,B,C - D,E,F).
Check clearance between cylinders and pistons on the selected diameter; if it exceeds the value specified, it is necessary to replace cylinders and pistons.
The pistons of an engine must be balanced; a weight difference of up to 1.5 (0.0033 lb) is admitted.
California EV V1100 Characteristics
CHAR - 13
SELECTED DIAMETER CYLINDERS UP TO ENGINE NO.KD030428
Specification Desc./Quantity
Selection class A 92.000 - 92.006 mm (3.62204 - 3.62227 in)
Selection class B 92.006 - 92.012 mm (3.62227 - 3.62250 in)
Selection class C 92.012 - 92.018 mm (3.62250 - 3.62275 in)
SELECTED DIAMETER PISTONS UP TO ENGINE NO.KD030428
Specification Desc./Quantity
Selection class A 91.966 - 91.972 mm (3.62069 - 3.62093 in)
Selection class B 91.972 - 91.978 mm (3.62093 - 3.62117 in)
Selection class C 91.978 - 91.984 mm (3.62117 - 3.62141 in)
SELECTED DIAMETER CYLINDERS FROM ENGINE NO.KD030429
Specification Desc./Quantity
Selection class D 92.000 - 92.010 mm (3.62204 - 3.62243 in)
Selection class E 92.010 - 92.020 mm (3.62243 - 3.62282 in)
Selection class F 92.020 - 92.030 mm (3.62282 - 3.62322 in)
SELECTED DIAMETER PISTONS FROM ENGINE NO.KD030429
Specification Desc./Quantity
Selection class D 91.953 - 91.963 mm (3.62019 - 3.62058 in)
Selection class E 91.963 - 91.973 mm (3.62058 - 3.62097 in)
Selection class F 91.973 - 91.983 mm (3.62097 - 3.62137 in)
PIN-PISTONS COUPLING DATA
Specification
Desc./Quantity
Pin diameter 1 21.994 mm (0.8659 in)
Piston holes 1 22.006 mm (0.8664 in)
Pin diameter 2 21.998 mm (0.8661 in)
Piston holes 2 22.011 mm (0.8666 in)
Clearance between pin and holes on piston 0.008 - 0.017 mm (0.000315 - 0.000669 in)
Characteristics California EV V1100
CHAR - 14

Piston rings
Check the sealing piston rings and the oil scraper.
On each piston there are:
1 top piston ring;
1 middle stepped piston ring;
1 oil scraper piston ring.
The ends of the fitted piston rings are out of phase.
Fitting backlash detected between the ring thickness and seats on the piston:
Sealing rings and oil scraper 0.030 - 0.065 mm (0.00118 - 0.00256 in)
Gap between the end of the piston rings inserted in the cylinder:
Upper sealing ring and stepped ring 0.40 - 0.65 mm (0.00158 - 0.00255 in)
Oil scraper ring 0.30 - 0.60 mm (0.00118 - 0.00236 in).
Turn the rings so that the coupling ends are 120 degrees from each other.
Crankcase - crankshaft - connecting rod
CAMSHAFT (CAM) SUPPORT DIAMETER AND THEIR SEATS ON THE CRANKCASE
(TIMING SYSTEM SIDE)
Specification
Desc./Quantity
Shaft support diameter 47.000 - 46.984 mm
(1.85039 - 1.84976 inch)
Seat diameter on crankcase 47.025 - 47.050 mm
(1.85137 - 1.85236 inch )
fitting clearance 0.025 - 0.066 mm
(0.00098 - 0.00260 inch)
CAMSHAFT (CAM) SUPPORT DIAMETER AND THEIR SEATS ON THE CRANKCASE
(FLYWHEEL SIDE)
Specification
Desc./Quantity
Shaft support diameter 32.000 - 31.984 mm
(1.25984 - 1.25921 inch)
Seat diameter on crankcase 32.025 - 32.050 mm
(1.26082 - 1.26181 inch)
fitting clearance 0.025 - 0.066 mm
(0.00098 - 0.00260 inch)
TAPPET-SEAT COUPLING ON CRANKCASE DATA (PRODUCTION)
Specification
Desc./Quantity
Seats diameter 22.021 - 22.000 mm
(0.86697 - 0.86614 inch)
Tappet external diameter 21.996 - 21.978 mm
(0.86598 - 0.86527 inch)
Fitting clearances 0.004 - 0.043 mm
(0.00016 - 0.00169 in.)
TAPPET-SEAT COUPLING ON CRANKCASE DATA (GREATER ON Ø 0.05 MM) (0.00197
IN)
Specification
Desc./Quantity
Seats diameter 22.071 - 22.050 mm
(0.86893 - 0.86811 inch)
California EV V1100 Characteristics
CHAR - 15

Specification Desc./Quantity
Tappet external diameter 22.046 - 22.028 mm
(0.86795 - 0.86724 inch)
Fitting clearances 0.004 - 0.043 mm
(0.00016 - 0.00169 in.)
TAPPET-SEAT COUPLING ON CRANKCASE DATA (GREATER ON Ø 0.10 MM) (0.0039
IN)
Specification Desc./Quantity
Seats diameter 22.121 - 22.100 mm
(0.87090 - 0.87008 inch)
Tappet external diameter 22.096 - 22.078 mm
(0.86992 - 0.86921 inch)
Fitting clearances 0.004 - 0.043 mm
(0.00016 - 0.00169 in.)
Recommended products chart
RECOMMENDED PRODUCTS TABLE
Product Description Specifications
eni i-Ride PG 5W-40 (Mandatory for hy-
draulic tappet)
Synthetic based lubricant for high-per-
formance four-stroke engines.
JASO MA, MA2 - API SL - ACEA A3
eni i-Ride Aprilia Racing 10W-60 (Rec-
ommended for "normal" tappets)
Engine oil Use branded oils with performance
equivalent to or exceeding API SG - JA-
SO MA, JASO MA2 specifications.
AGIP GEAR SAE 80 W 90 Transmission oil AGIP GEAR SAE 80 W 90 Gearbox oil -
- Oil for shock absorbers SAE 10
AGIP GREASE 30 Grease
Neutral grease or petroleum jelly. Battery poles
AGIP BRAKE 4 Brake fluid
Characteristics California EV V1100
CHAR - 16

INDEX OF TOPICS
SPECIAL TOOLS S-TOOLS

SPECIAL TOOLS
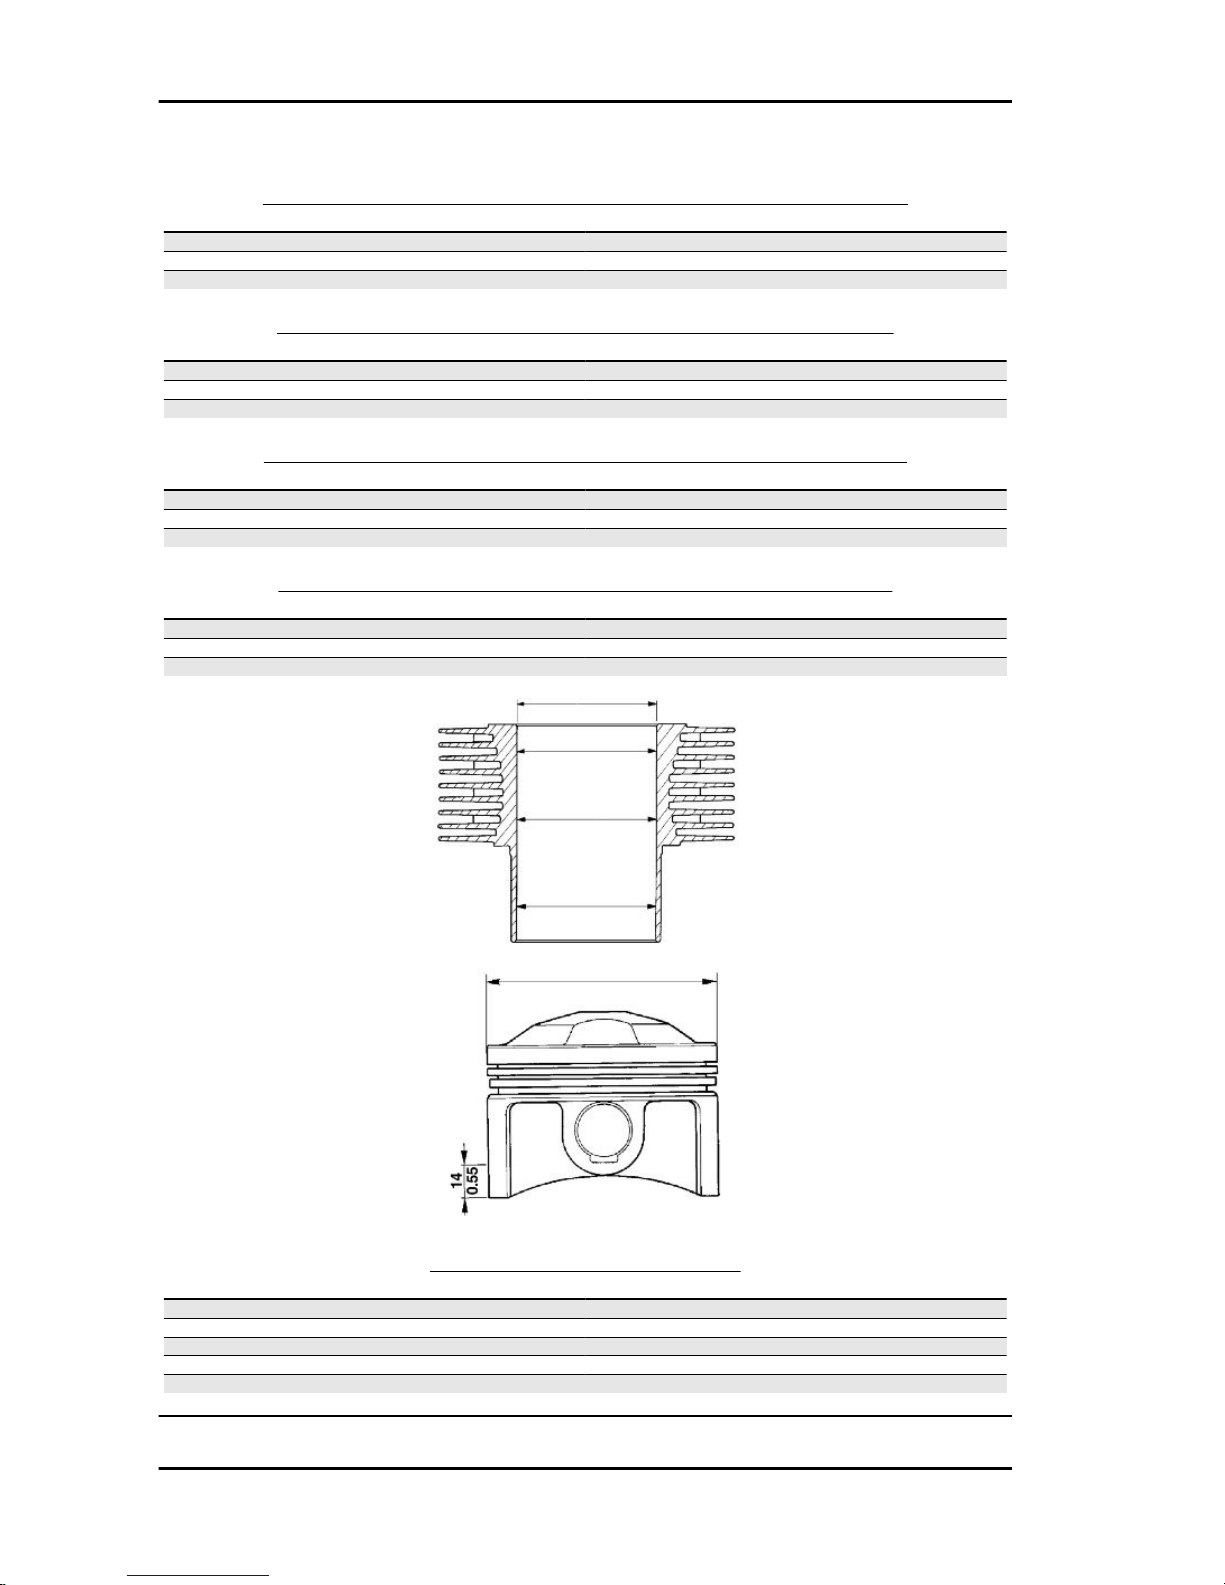
Stores code Description
65.92.84.00 Graduated dial hub
19.92.96.00 Graduated dial to control ignition timing
17.94.75.60 Arrow to control ignition timing
12.91.36.00 Tool to remove the flywheel-side flange
12.91.18.01 Tool to lock the flywheel and the starting
ring gear
10.90.72.00 Tool for valve removal and refitting
Special tools California EV V1100
S-TOOLS - 18
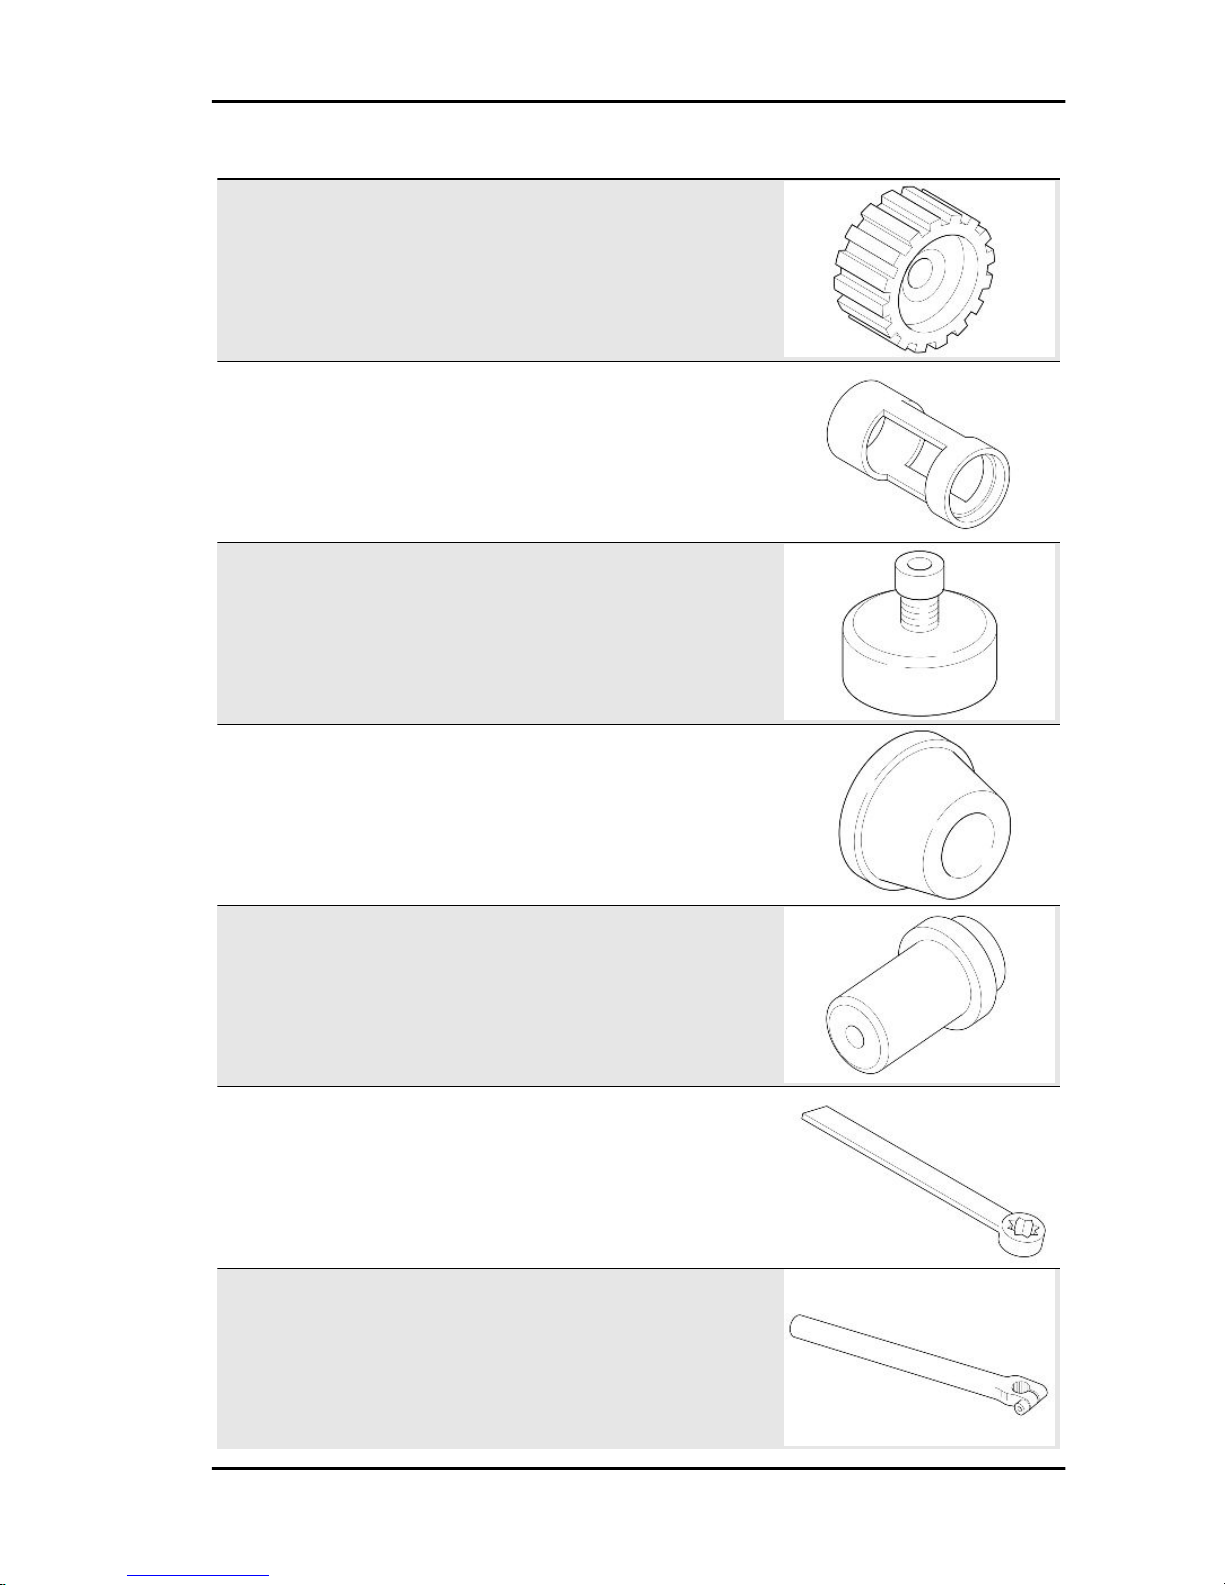
Stores code Description
03.90.65.55 Tool for clutch fitting
12.90.59.00 Clutch shaft removal
14.92.71.00 Tool to fit the sealing ring on the flywheelside flange
12.91.20.00 Tool to fit the flywheel-side flange togeth-
er with seal ring on the crankshaft
14.92.72.00 Tool for fitting seal ring on timing system
cover
12.90.71.00 Tool to lock the secondary shaft
14.92.87.00 Pre-selector start
California EV V1100 Special tools
S-TOOLS - 19
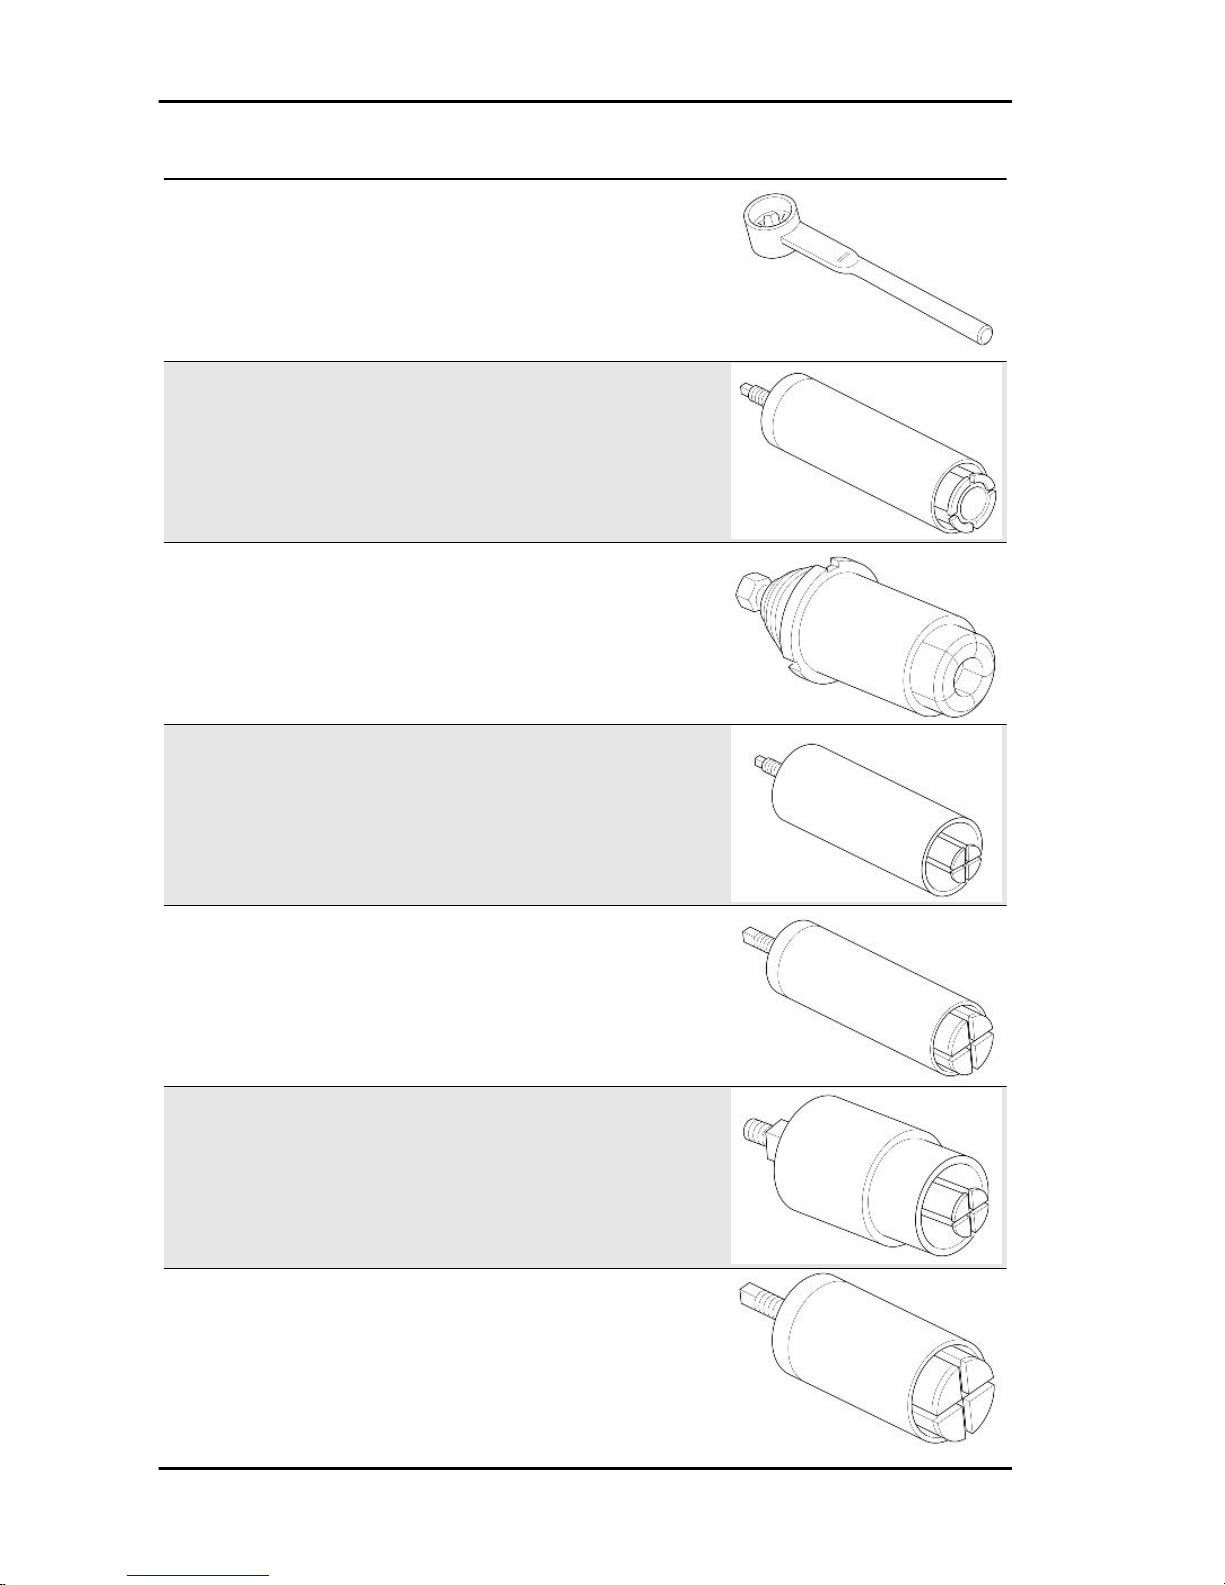
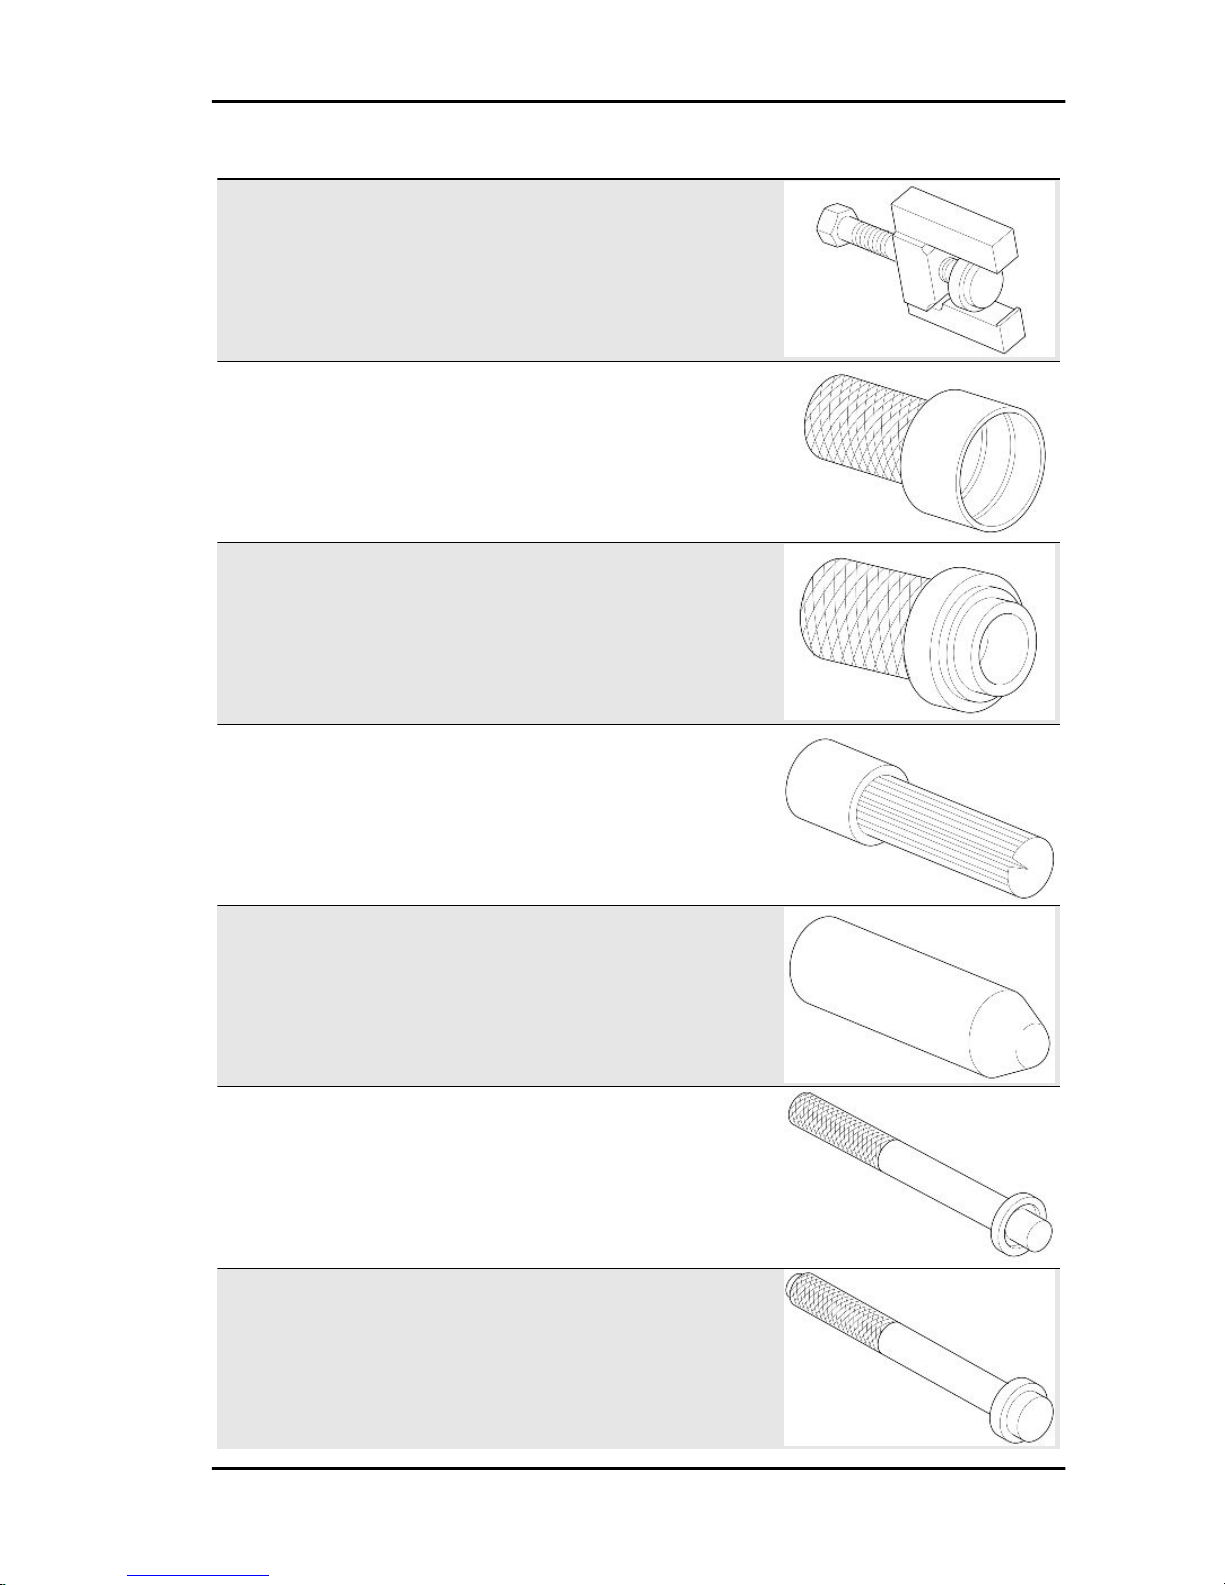
Stores code Description
14.90.54.00 Secondary shaft locking nut
14.91.31.00 Extractor for needle bearing for main
shaft on the box and for clutch shaft on
cover
14.92.85.00 Tool to slide off the inner track of the
clutch shaft bearing
17.94.92.60 Extractor for clutch shaft bearing on the
box and for the secondary shaft on the
cover
17.94.50.60 Extractor for outer track of the secondary
shaft roller bearing on the box and outer
track of the bearings on the case
14.90.70.00 Extractor for ball bearing for main shaft on
the cover
12.90.69.00 Extractor for roller bearing ring from the
gear case
Special tools California EV V1100
S-TOOLS - 20
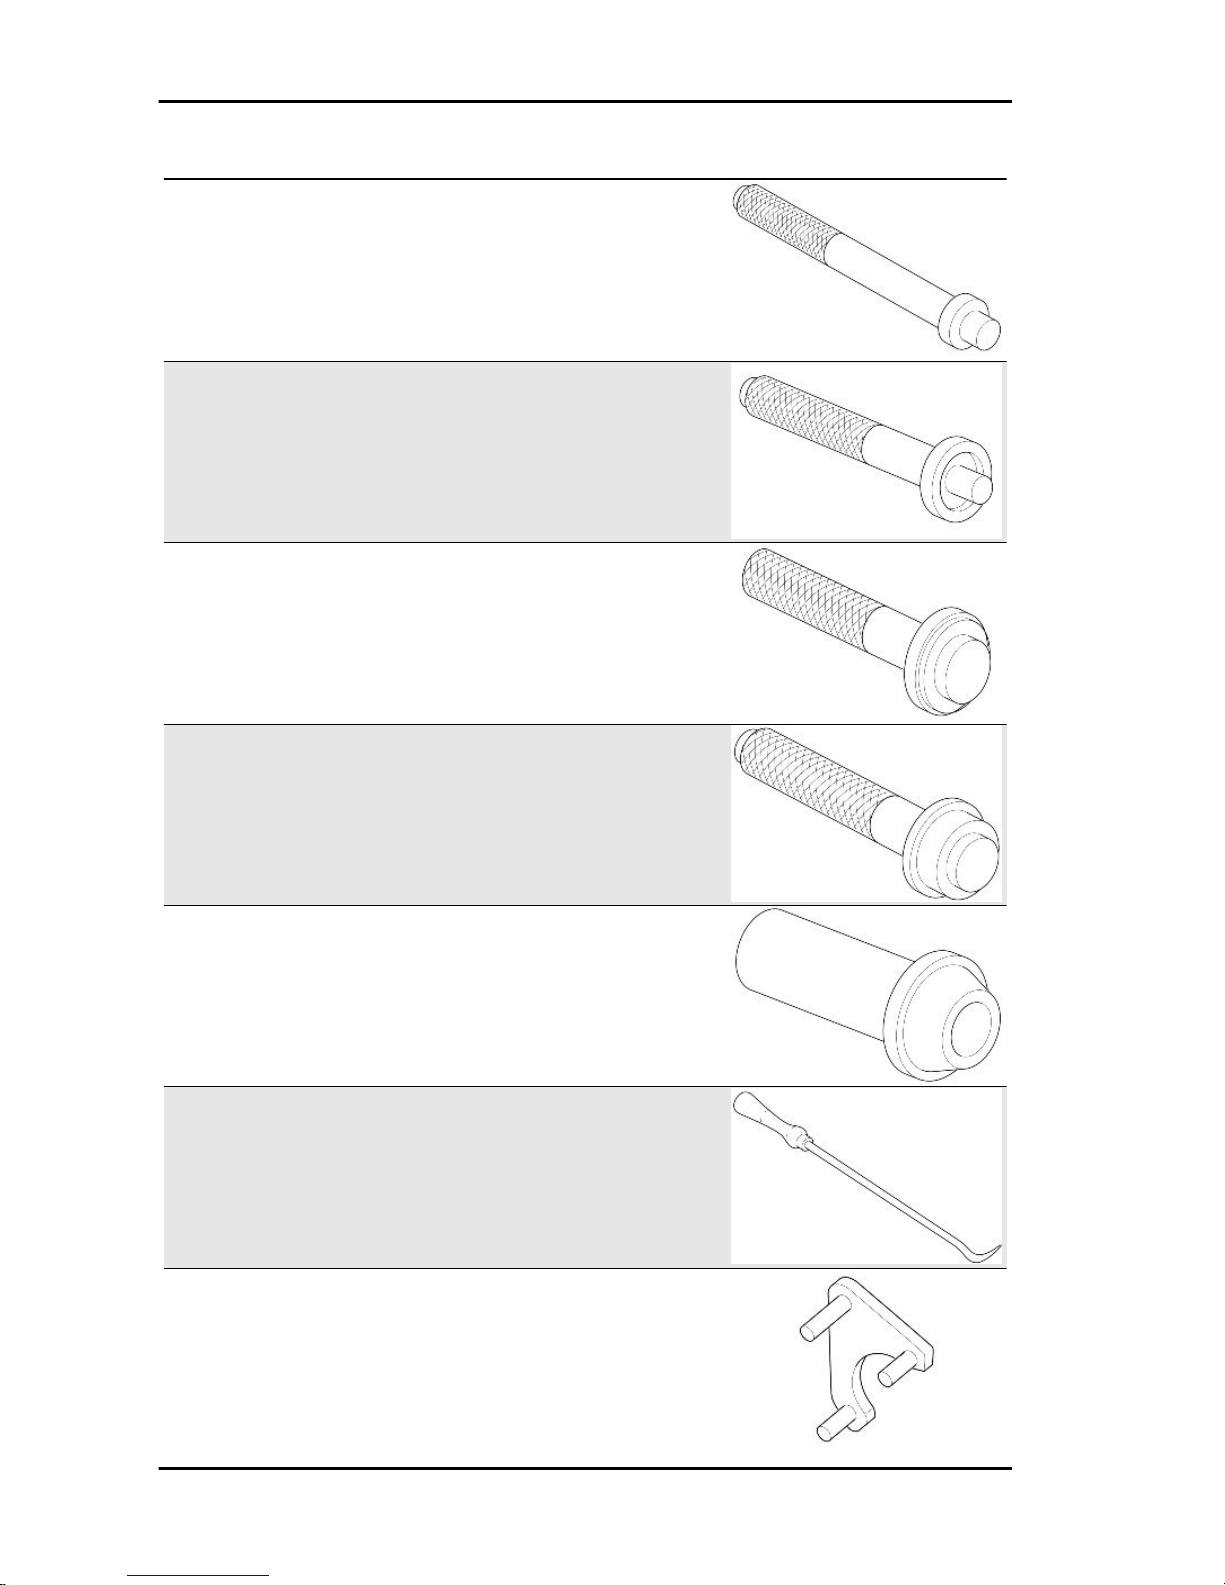
Stores code Description
17.94.83.60 Extractor for inner track of the roller bearing on the drilled pin on the box
17.94.84.60 Tool to press the inner track of the roller
bearing on the drilled pin on the gear case
17.94.88.60 Punch for outer track of bearing related to
the transmission box seal ring
17.94.54.60 Tool to drive the inner bearing ring on the
main shaft and on the clutch shaft
14.92.86.00 Tool to drive the inner bearing ring on the
secondary shaft
14.92.89.00 Punch to press the bearing for transmis-
sion shafts on the cover
14.92.91.00 Punch to press the sealing ring on the
front fork sleeve and gear case inner
sealing ring.
California EV V1100 Special tools
S-TOOLS - 21
Stores code Description
14.92.88.00 Punch to press the roller bearing for the
main shaft on the box and for clutch shaft
on the cover
14.92.90.00 Punch to press the ball bearing for main
shaft on the cover
14.92.94.00 Punch to press the sealing ring on the
gearbox for clutch shaft
14.92.95.00 Punch to press the sealing ring on the
cover for secondary shaft
17.94.51.60 Punch to press the outer track of the bear-
ings on the box
14.92.93.00 Positioning tool for sliding sleeves control
forks
14.92.73.00 Tool for camshaft gear sealing
Special tools California EV V1100
S-TOOLS - 22
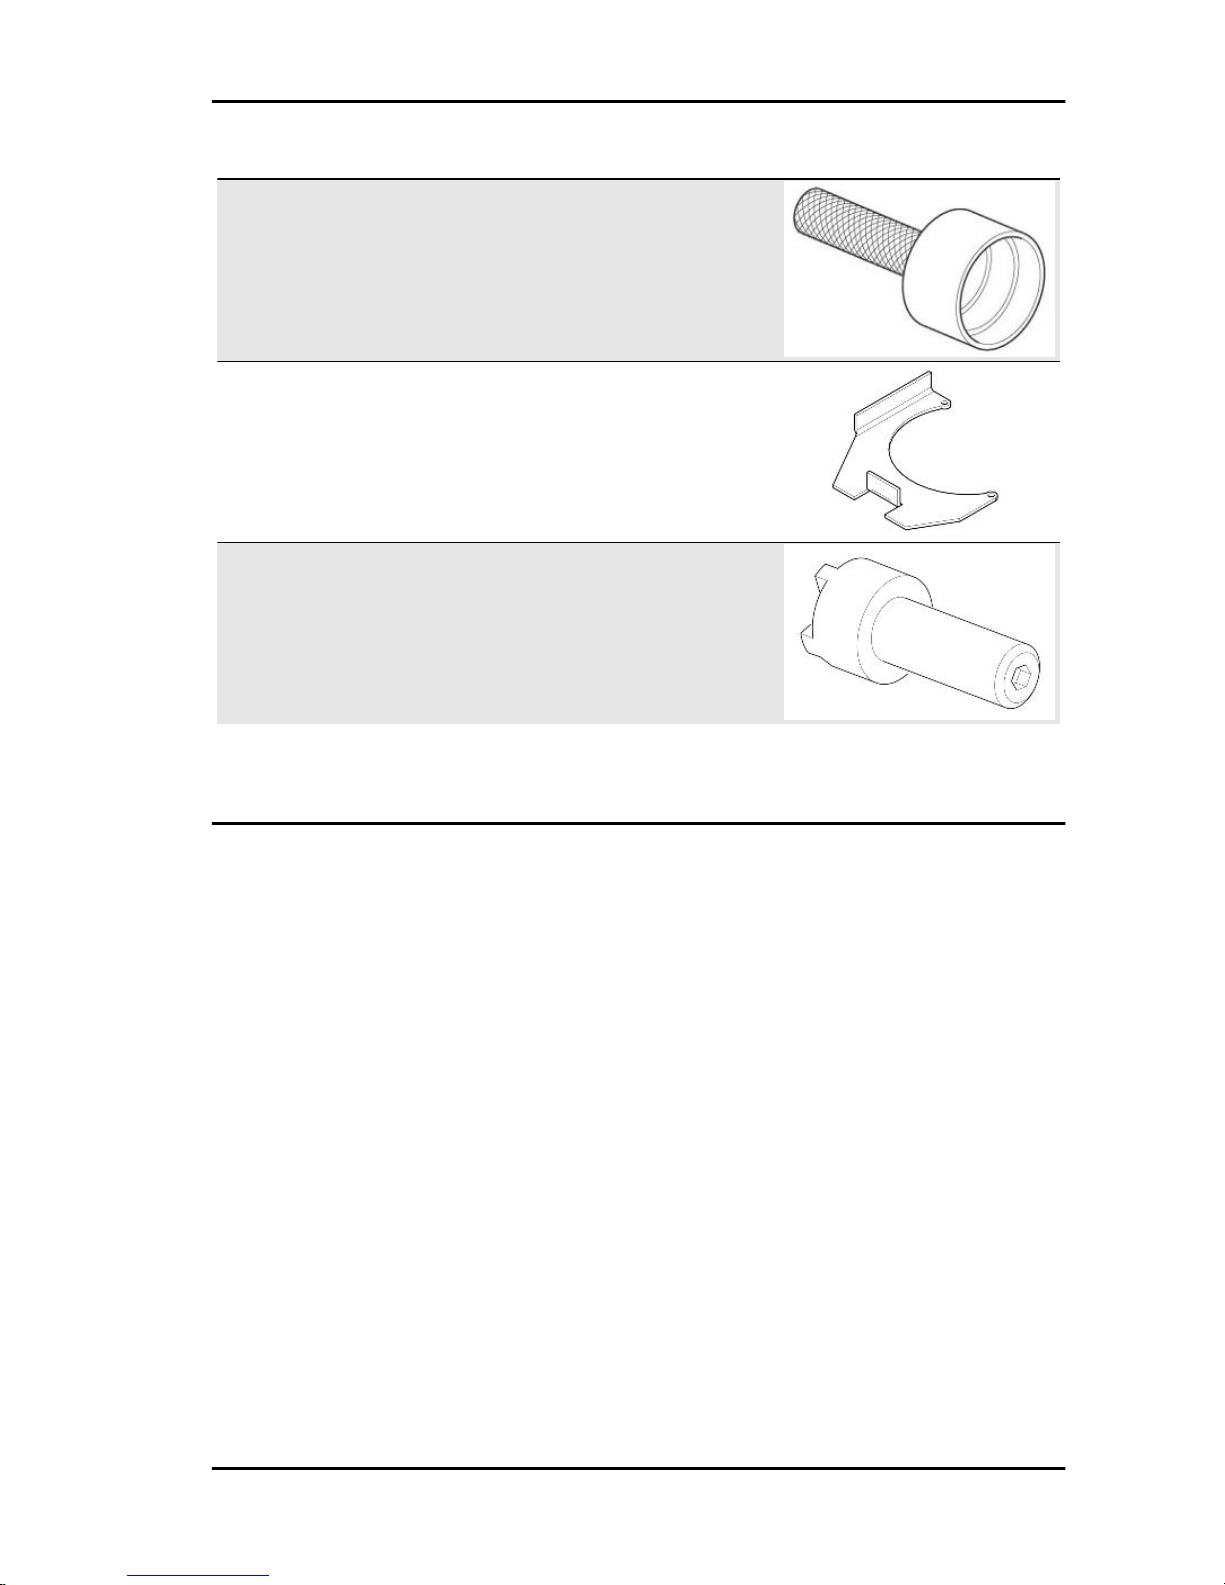
Stores code Description
19.92.71.00 Tool to fit the seal ring on the flywheelside flange
14.92.96.00 Gearbox support
GU14912603 Hook spanner for fixing ring nut of the
clutch shaft internal body
Special tools are necessary for correct removal and refitting and a good set-up. The use of special tools prevents possible
damages that could be caused by inadequate tools and/or improvised techniques. Here is a list of the special tools suitably
designed for this vehicle. If necessary, ask for generic special tools.
California EV V1100 Special tools
S-TOOLS - 23
INDEX OF TOPICS
MAINTENANCE MAIN
Maintenance chart
NOTE
特特特特特特特特特特特特特特特特特特特特特特特特特特特特特特特特特特特特特特特特特 1/2 特特特特特特特特特特
AT 1,000 KM (621 MI)
Action
Engine oil - check
AT 1,500 KM (932 MI)
Action
Engine oil - Change
Cartridge-type oil filter - Replace
Mesh oil filter - Clean
Spark plugs - Inspect, clean, adjust or replace if necessary
Carburetion - Inspect, clean, adjust or replace if necessary
Bolt, nut and screw tightening - Check and clean, adjust, grease or replace if necessary
Gearbox oil - Change
Final transmission oil - Change
Fork oil - Change
Brake system fluid - Check, clean, adjust or replace if necessary
Brake pad wear - Check and clean, adjust or replace if necessary
Cylinder head nuts tightening - Check, clean, adjust or replace if necessary
AT 10,000 KM (6213 MI)
Action
Engine oil - Change
Cartridge-type oil filter - Replace
Mesh oil filter - Clean
Air filter - Replace
Spark plugs - Inspect, clean, adjust or replace if necessary
Carburetion - Inspect, clean, adjust or replace if necessary
Bolt, nut and screw tightening - Check and clean, adjust, grease or replace if necessary
Fuel pipes - Check and clean, adjust, grease or replace if necessary
Gearbox oil - Change
Final transmission oil - Change
Brake system fluid - Check, clean, adjust or replace if necessary
Brake pad wear - Check and clean, adjust or replace if necessary
AT 20,000 KM (12427 MI)
Action
Engine oil - Change
Cartridge-type oil filter - Replace
Mesh oil filter - Clean
Air filter - Replace
Spark plugs - Inspect, clean, adjust or replace if necessary
Carburetion - Inspect, clean, adjust or replace if necessary
Fuel pipes - Check and clean, adjust, grease or replace if necessary
Gearbox oil - Change
Final transmission oil - Change
Steering bearings and steering clearance - Check and clean, adjust, grease or replace if necessary.
Wheel bearings - Check and clean, adjust, grease or replace if necessary
Fork oil - Change
Starter motor and generator - Check, clean, adjust or replace if necessary
Brake fluid - change
Brake pad wear - Check and clean, adjust or replace if necessary
AT 30,000 KM (18641 MI)
Action
Engine oil - Change
Cartridge-type oil filter - Replace
California EV V1100 Maintenance
MAIN - 25
Action
Mesh oil filter - Clean
Air filter - Replace
Spark plugs - Inspect, clean, adjust or replace if necessary
Carburetion - Inspect, clean, adjust or replace if necessary
Bolt, nut and screw tightening - Check and clean, adjust, grease or replace if necessary
Fuel pipes - Check and clean, adjust, grease or replace if necessary
Gearbox oil - Change
Final transmission oil - Change
Brake system fluid - Check, clean, adjust or replace if necessary
Brake pad wear - Check and clean, adjust or replace if necessary
AT 40,000 KM (24855 MI)
Action
Engine oil - Change
Cartridge-type oil filter - Replace
Mesh oil filter - Clean
Air filter - Replace
Spark plugs - Inspect, clean, adjust or replace if necessary
Carburetion - Inspect, clean, adjust or replace if necessary
Fuel pipes - Check and clean, adjust, grease or replace if necessary
Gearbox oil - Change
Final transmission oil - Change
Steering bearings and steering clearance - Check and clean, adjust, grease or replace if necessary.
Wheel bearings - Check and clean, adjust, grease or replace if necessary
Fork oil - Change
Starter motor and generator - Check, clean, adjust or replace if necessary
Brake fluid - change
Brake pad wear - Check and clean, adjust or replace if necessary
AT 50,000 KM (31069 MI)
Action
Engine oil - Change
Cartridge-type oil filter - Replace
Mesh oil filter - Clean
Air filter - Replace
Spark plugs - Inspect, clean, adjust or replace if necessary
Carburetion - Inspect, clean, adjust or replace if necessary
Bolt, nut and screw tightening - Check and clean, adjust, grease or replace if necessary
Fuel pipes - Check and clean, adjust, grease or replace if necessary
Gearbox oil - Change
Final transmission oil - Change
Brake system fluid - Check, clean, adjust or replace if necessary
Brake pad wear - Check and clean, adjust or replace if necessary
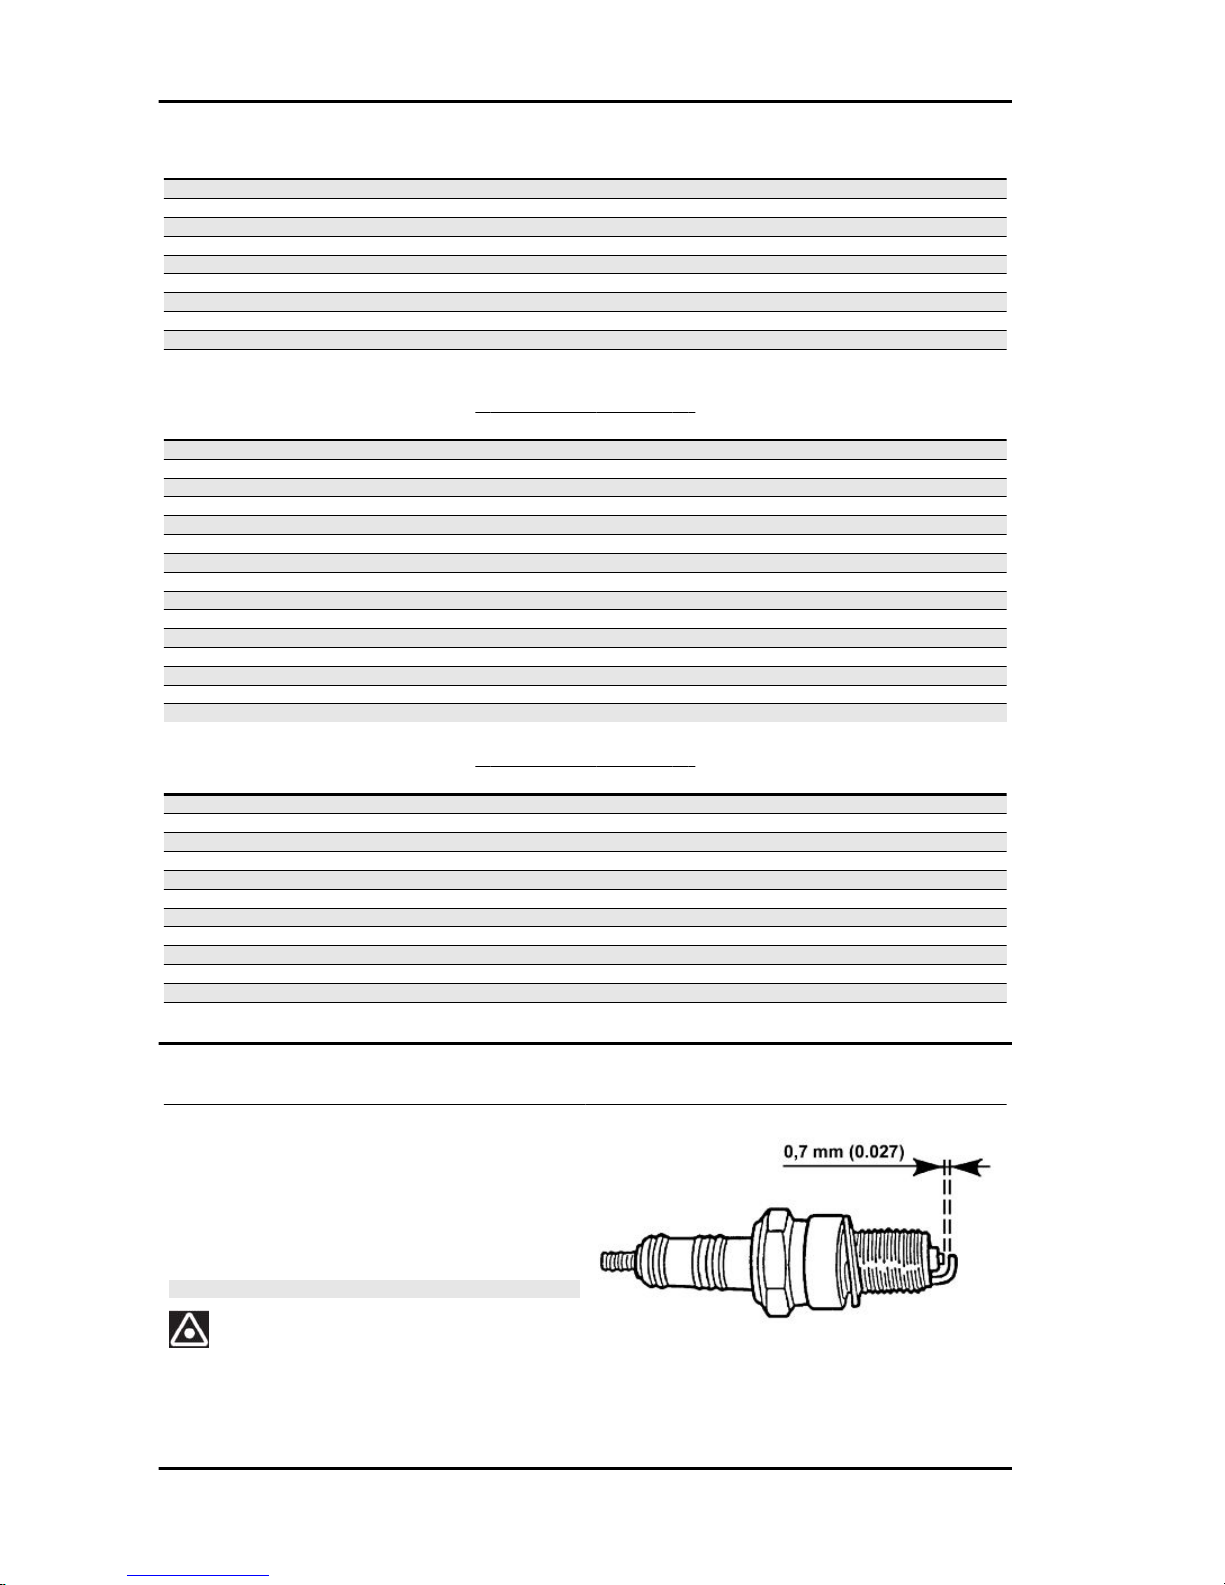
Spark plug
•
The motorcycle is equipped with spark
plugs NGK BPR 6 ES with an electrode
gap of 0.7 mm (0.275 in). The spark
plugs must be removed frequently to
clean and to check the electrode gap.
CAUTION
VALUES LESS THAN 0.7 mm (0.275 in) CAN COMPROMISE
THE ENGINE LIFE
Maintenance California EV V1100
MAIN - 26
•
Even if the spark plug appears to be in good condition, it will be replaced after approximately
10000 Km (6213 MI), as shown in the regular maintenance table.
CAUTION
IN ORDER TO AVOID CAUSING MALFUNCTIONS AND INEFFICIENCY IN THE IGNITION SYSTEM,
IT IS NECESSARY THAT THE SPARK PLUG CABLE CONNECTIONS (SPARK PLUG CAPS) AS
WELL AS THE SPARK PLUGS ARE THE PRESCRIBED TYPE (LIKE THE ONES ORIGINALLY
FITTED). DO NOT TEST THE CURRENT ON THE SPARK PLUGS WITHOUT INTERPOSING THE
ORIGINAL SPARK PLUG CAPS, GIVEN THAT THIS PROCEDURE COULD IRREPARABLY DAMAGE THE ECU.
•
When installing the spark plugs again, make sure that they are perfectly locked into place
and that they screw in easily; if badly inserted, it could ruin the cylinder head thread; it is
therefore recommended to tighten them with a few turns by hand and then, with the supplied
appropriate wrench, tighten it to the prescribed torque
ALWAYS PERFORM THE SPARK PLUG REMOVAL AND REFITTING OPERATIONS AT COLD
ENGINE
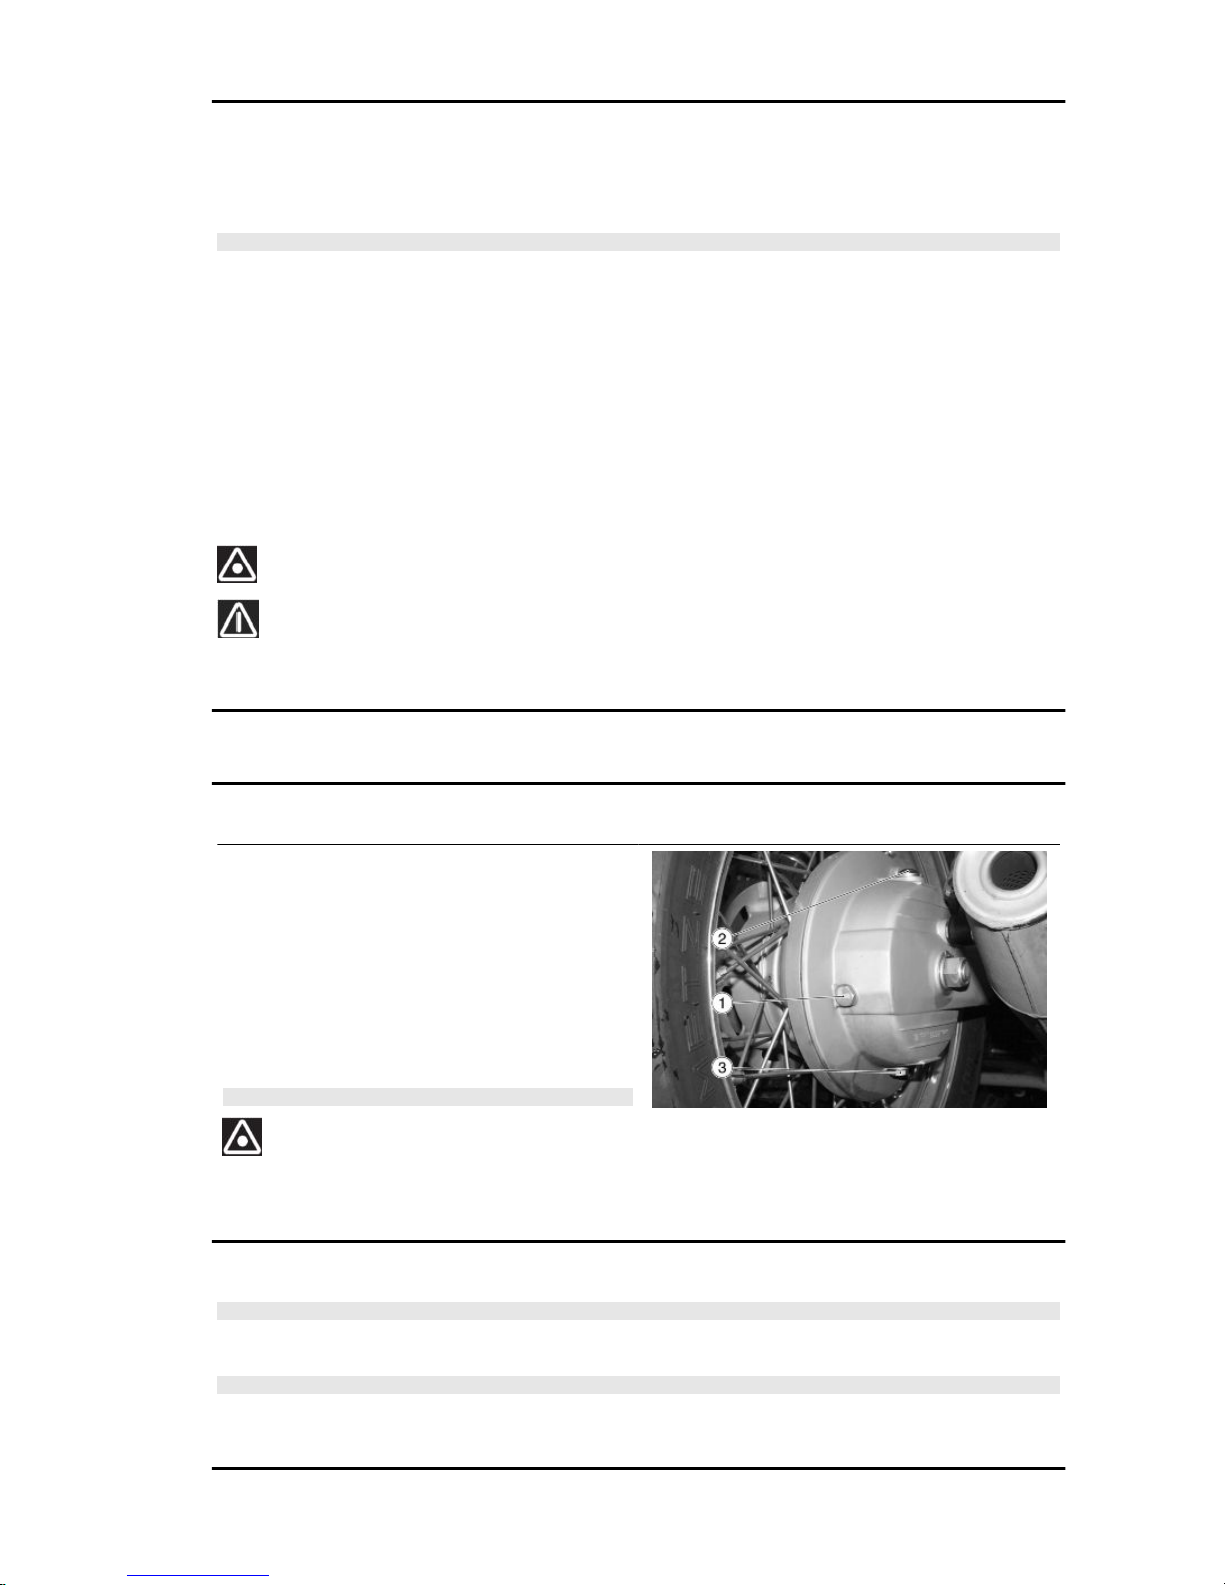
Transmission fluid
Check
• Keep the vehicle upright with both wheels on the
ground.
• Unscrew and remove the cap/dipstick (1).
• The level is correct if the oil is close to the hole
of the cap/dipstick (1).
• If the oil is lower than specified, top-up until it
reaches the cap/dipstick hole (1).
CAUTION
DO NOT ADD ADDITIVES OR OTHER SUBSTANCES TO
THE FLUID. WHEN USING A FUNNEL OR ANY OTHER ELEMENT, MAKE SURE IT IS PERFECTLY CLEAN.
Replacement
CAUTION
THE UNIT MUST BE HOT WHEN THE OIL IS CHANGED AS UNDER SUCH CONDITIONS OIL IS
FLUID AND THEREFORE EASY TO DRAIN.
NOTE
RIDE SOME km (miles) TO WARM UP ENGINE OIL
California EV V1100 Maintenance
MAIN - 27
•
Place a container with suitable capacity under the drainage plug (3).
•
Unscrew and remove the drainage plug (3).
•
Unscrew and remove the filling plug (2).
•
Drain the oil into the container; allow several minutes for oil to drain out completely.
•
Check and if necessary, replace the sealing washer of drainage plug (3).
•
Remove any metal scrap attached to the drainage plug (3) magnet.
•
Screw and tighten the drainage plug (3).
•
Unscrew and remove the level plug (1).
•
Pour new oil through the fill opening (2) until it reaches the level plug hole (1).
CAUTION
DO NOT ADD ADDITIVES OR OTHER SUBSTANCES TO THE FLUID. WHEN USING A FUNNEL
OR ANY OTHER ELEMENT, MAKE SURE IT IS PERFECTLY CLEAN.
•
Screw and tighten the caps (1 - 2).
Engine oil
Check
CAUTION
ENGINE MUST BE WARM TO CHECK ENGINE OIL LEVEL.
NOTE
DO NOT LET THE ENGINE IDLE WITH THE VEHICLE AT STANDSTILL TO WARM UP THE ENGINE
OIL AND REACH THE OPERATING TEMPERATURE OF ENGINE OIL. OIL IS BEST CHECKED
AFTER RUNNING FOR ABOUT 15 KM (10 miles).
•
Shut off the engine.
•
Keep the vehicle upright with both
wheels on the ground.
•
Unscrew and remove the cap with dipstick.
•
Clean dipstick.
•
Refit the cap with dipstick into its hole
without tightening.
•
Remove the cap with dipstick.
Maintenance California EV V1100
MAIN - 28

•
Check oil level by means of the oil dipstick.
•
The oil level is correct when it close to
the "MAX" mark.
MAX = maximum level
MIN = minimum level
Add engine oil if required:
•
Unscrew and remove the cap with dipstick.
•
Top-up with engine oil until it goes
above the minimum level marked
"MIN".
CAUTION
DO NOT ADD ADDITIVES OR ANY OTHER SUBSTANCE TO THE FLUID. WHEN USING A FUNNEL
OR ANY OTHER ELEMENT, MAKE SURE IT IS PERFECTLY CLEAN.
Replacement
Use an engine oil type with characteristics indicated in the table of recommended products.
The other viscosity levels indicated in this table can be used if the average temperature of the motorbike's area of use is within the indicated range.
NOTE
HOT OIL IS MORE FLUID AND WILL DRAIN OUT MORE EASILY AND COMPLETELY.
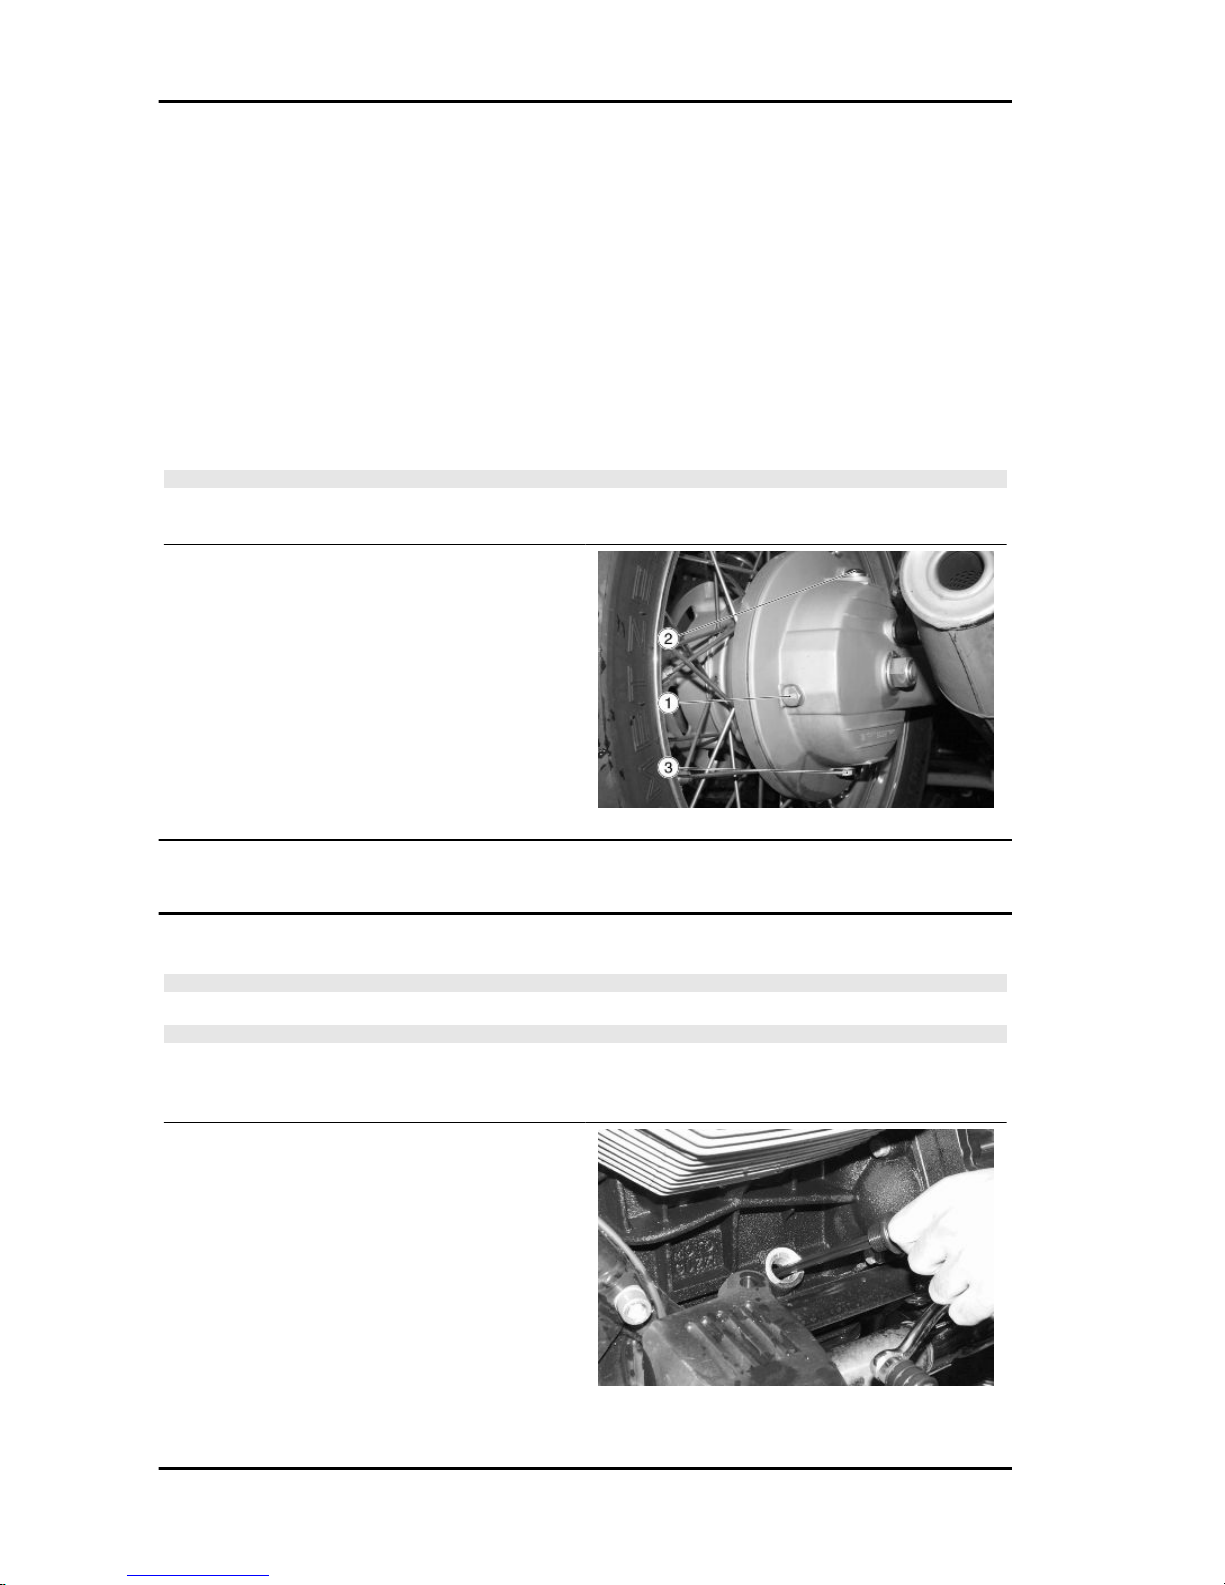
•
Place a container with 4000 cm³ (244
cu.in) capacity under the drainage
plug.
•
Unscrew and remove the drainage
plug.
California EV V1100 Maintenance
MAIN - 29
•
Unscrew and remove the filler plug with
dipstick.
•
Drain the oil into the container; allow
several minutes for oil to drain out completely.
•
Check and, if necessary, replace the
drainage plug sealing washers.
•
Remove any metal scrap attached to
the drainage plug magnet.
•
Screw and tighten the drainage plug.
•
Pour new oil until it goes above the
minimum level marked "MIN".
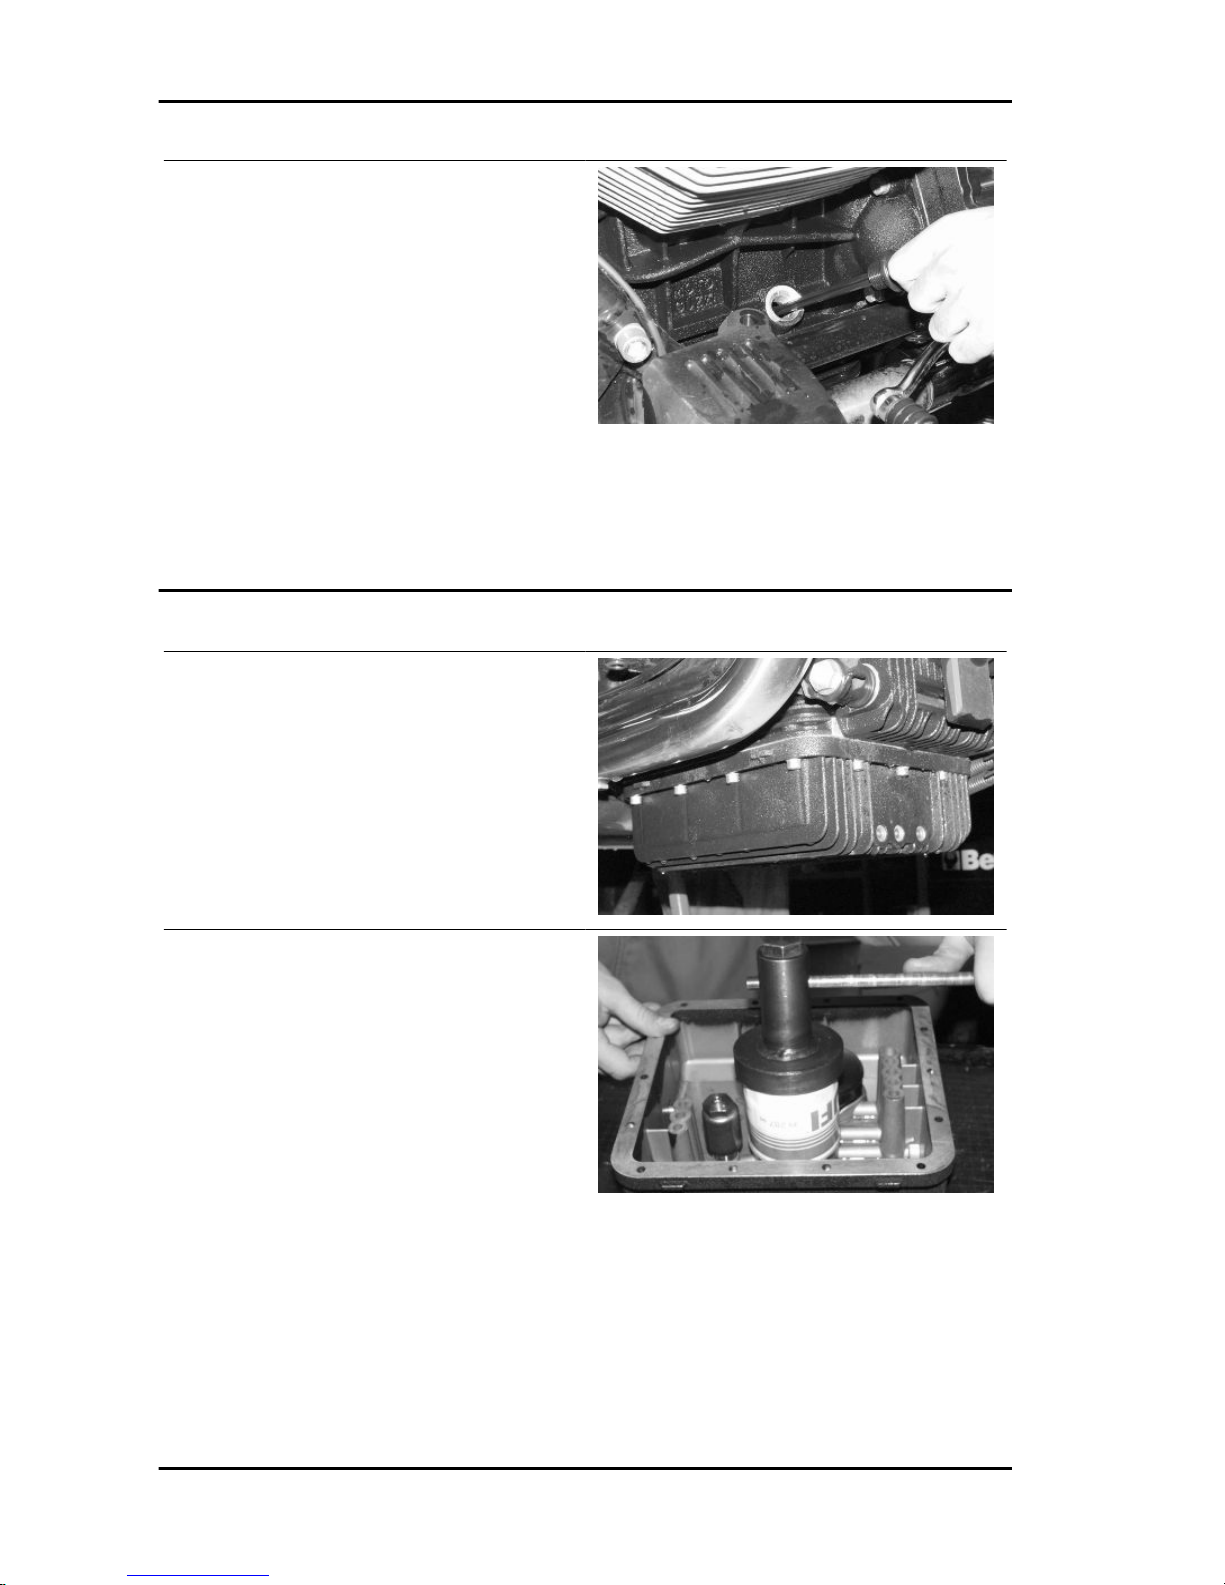
Engine oil filter
•
Drain the engine oil.
•
Unscrew and remove the eighteen
screws.
•
Remove the oil sump.
CARTRIDGE-TYPE ENGINE OIL FILTER
•
Unscrew the filtering cartridge.
•
Install a new original cartridge in the
appropriate seat tightening it by hand
to avoid an excessive tightening.
Maintenance California EV V1100
MAIN - 30
 Loading...