

Page 1

Instruction Manual
mo.hub
EN
V1.0
Page 2

Thank you very much for purchasing a high quality motogadget product - Made in Germany.
Please read the following information and recommendations thoroughly and follow these instructions during installation and use of the instrument. No liability shall be assumed by motogadget for damage or defects resulting from negligence or failure to follow the operating and
contact:
motogadget GmbH
Koepenicker Str. 145
D - 10997 Berlin
Tel. +49 (0)30-6900410-0
www.motogadget.de
info@motogadget.de
Copyright © 2009-2020 by motogadget GmbH, Berlin
motogadget and mo.hub are registered trademarks of
motogadget GmbH, Berlin, Germany.
Page 3

1 Review of Delivery
All products from motogadget are thoroughly checked to ensure they are completely fault-free
when dispatched. Please check the received goods immediately for possible transport damage. If you fi nd any damage or other defi ciencies, please contact us immediately.
In this regard, we refer to our General Terms of Business and Delivery, which are published
at www.motogadget.com. Should a return of the received delivery be agreed, please note that
we only take back goods in their original packaging. The mo.unit and its accessories must be
returned within the legal period of time and without any traces of use. We shall not assume any
liability for returns which are insuffi ciently insured or packed.
2 Exclusion of Liability
THE DEVICE AND ITS ACCESSORIES MUST BE INSTALLED BY A CERTIFIED MOTORCYCLE TECHNICAN AND IN AN AUTHORIZED SERVICE CENTER. REVERSE POLARITY
OR VOLTAGE ABOVE 25V MAY RESULT IN DAMAGE TO THE MO.HUB. THE DEVICE
THEN HAS TO BE REPLACED AND ALL CLAIMS OF WARRANTY ARE DELETED.
MOTOGADGET ACCEPTS NO LIABILITY FOR DIRECT OR INDIRECT DAMAGE OR
SUBSEQUENT DAMAGE OF ANY KIND RESULTING FROM THE USE, INSTALLATION OR CONNECTION OF THE DEVICE OR OTHER DELIVERED EQUIPMENT. THIS
EXCLUSION OF LIABILITY PARTICULARLY INCLUDES DAMAGE TO PERSONS,
MATERIAL LOSSES AND FINANCIAL DAMAGES. THE USE IN AREAS OF PUBLIC TRAFFIC ENSUES AT THE USER’S OWN RISK.
Page 4

DEVICE HOUSINGS AND ALL OTHER DELIVERED PARTS MUST NOT BE OPENED
OR DISMANTLED. IN CASE OF NON-COMPLIANCE, ALL WARRANTY CLAIMS
BECOMES INVALID. THE USE OF THE DELIVERED DEVICE AND ITS ACCESSORIES FOR RACING OR OTHER COMPETITIONS AS WELL AS FOR ANY USE NOT
CORRESPONDING TO THE RECOMMENDED APPLICATION ALL WARRANTY CLAIMS
SHALL BE INVALID.
3 Safety Instructions
• THE VEHICLE BATTERY MUST BE COMPLETELY DISCONNECTED PRIOR TO ANY
WORK ON THE VEHICLE’S ELECTRICAL SYSTEM. FIRST, DISCONNECT THE NEGA TIVE TERMINAL AND THEN THE POSITIVE TERMINAL. FOR RECONNECTION
PROCEED IN THE REVERSE ORDER.
• USING THE MO.HUB WITH PLUS POLE CONNECTED TO VEHICLE FRAME (OLDER
ENGLISH MOTORCYCLES) IS NOT POSSIBLE.
• INSTALLATION AND ELECTRICAL CONNECTION OF THE MO.HUB MAY ONLY BE
CARRIED OUT BY A CERTIFIED MOTORCYCLE TECHNICIAN.
• ALL CABLE DIAMETERS MUST BE DIMENSIONED ACCORDING TO THE CURRENT
FLOW (REFER TO CHAPTER 8.5).
Page 5

4 Application
The mo.hub is a universal data interface between vehicle and motogadget instrument or
smartphone.
Compatible vehicles with BUS or OBD interface are connected to the mo.hub by a supplied
vehicle-mounted plug (Plug & Ride).
For vehicles without interfaces, the required signals (tachometer, speed, control lights, etc.)
must be tapped individually and connected to the mo.hub.
The confi guration of the mo.hubs is done by our app m.ride.
For this, the vehicle and the connected instrument are selected.
In addition, m.ride offers comprehensive vehicle management with a logbook and a linked
vehicle database.
We are continually expanding the list of mo.hub compatible vehicles.
Page 6
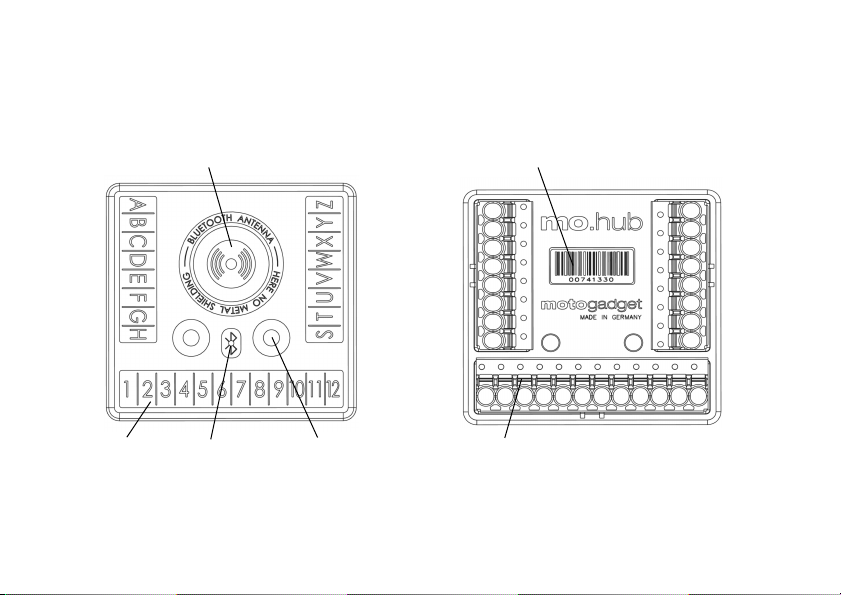
5 Overview
plug-in / relase connecting cabel by phusing
orange inserts with a screw driver blade
serial no.
(important for support requests)
angeben)
area of Bluetooth Antennado not cover with metal
mouning holes for
cable cover
terminal
marking
Status LED
Page 7

6 Mounting the cable cover & cable guide
M3x16 countersunk
cable ties
Page 8

7 Mounting options
cable ties M4 screws
Page 9

8. Connecting motogadget instruments to the mo.hub
8.1 motoscope mini and combi-frame or handle bar clamp
mo.hub motoscope mini combi-frame Lenkerklemme
Port Nr.
Kabelfarbe Kabelfarbe Kabelfarbe
3
schwarz
orange | gelb | violett
orange | blau
H
rot weiß rot
S
gelb
T
weiß
U
grün
V
schwarz gelb
W
braun grün
X
rot violett
Y
blau schwarz
Z
grün weiß
Page 10

8.2 motoscope tiny und motoscope classic
mo.hub motoscope tiny motoscope classic
Port Nr.
Kabelfarbe
Kabelfarbe
1
rot
2
3
schwarz schwarz | weiß-grün
H
braun
rot
S
lila
gelb
T
orange
weiß
U
grün
grün
V
weiß
grau
W
gelb weiß-orange
X
blau blau
Y
weiß-gelb
Page 11

9 Connecting the vehicle to the mo.hub
9.1 vehicles without data BUS
mo.hub
Port Nr.
1 Batterie +12V (über 1A Kabelsicherung)
2 Zündungsplus
3 Fahrzeugmasse (GND)
6 Menütaster (GND)
7 Fernlicht (+12V)
8 Error / MIL (GND)
9 Blinker L (+12V)
10 Blinker R (+12V)
11 Neutral (GND)
12 ABS (+12V)
A Öltemperatur Sensor (motogadget Artikel 9001005 / 9001007 / 9001002)
B Öldruckschalter (GND)
C Lufttemperatur Sensor (motogadget Artikel 1005090)
D Wassertemperatur Sensor (motogadget Artikel 9001005 / 9001007 / 9001002)
E Fahrzeug-Tanksensor (0-500 Ohm - GND)
S Drehzahlsignal (Primärkreis Zündspule)
T Tachosignal (alle Typen)
Fahrzeug
Page 12

9.2.2 Connecting the vehicle-specifi c plug and the battery cable to the mo.hub
BMW models from 2015 with a 6 pin instrument plug with dimensions of
approx. 9x10x22mm, are equipped with a LIN bus for communication between control unit and
instrument.
9.2 BMW modells with LIN Bus
9.2.1 Fahrzeugtyp Identifi zierung
mo.hub
Port Nr.
1 motogadget Batterieanschlusskabel (4005102) von Batterie Plus
3 motogadget Stecker (4005100) Kabel schwarz
4
motogadget Stecker (4005100) Kabel rot
motogadget BMW LIN Fahrzeugstecker
9.2.3 Installation
1) Jack up vehicle, remove seat and tank, disconnect battery (fi rst minus, then plus)
2) Unscrew OEM instrument, unplug connector, unscrew OEM instrument carrier.
3) attach the motogadget instrument to the vehicle-specifi c motogadget retaining plate and
connect the tail cable of the motogadget instrument to mo.hub
4) Connect motogadget vehicle-specifi c plug and battery cable to mo.hub
5) Screw the motogadget retaining plate with instrument to the fork bridge with the OEM screws.
6) Attach mo.hub to the upper frame tube with cable ties, avoiding collision
pay attention to mo.hub housing and tank.
7) motogadget battery connection cable, OEM instruments connector plug and motogadget
Instuments Lay the cable free of kinking and abrasion to the mo.hub and cable with cable ties
attach to the frame. Allow enough play for steering movements.
Page 13

BMW models from 2010 - 2014 a 6 pin instrument plug with the dimensions of
approx. 14.5x23.5x40mm, are equipped with a CAN bus for communication between control unit
and instrument.
9.3.1 Vehicletype identifi cation
9.3 BMW Modells with CAN Bus
8) Insert the plug of the OEM speedometer (not tachometer!) In the with motogadget
Insert vehicle plug. The second OEM instrument plug (if available) with
Protect heat shrink tubing from splash water.
9) The eyelet of the motogadget battery connection cable with the battery-plus connection terminal
connect
10) Connect the battery (fi rst plus, then minus)
11) Install the tank and seat
9.3.2 Connection of the vehicle-specifi c plug to the mo.hub
mo.hub
Port Nr.
1 rot
2 braun
3 schwarz
F
blau
G
lila
motogadget BMW CAN Fahrzeugstecker
(4005101)
Page 14

10 settings for motogadget instruments
1) Jack up the vehicle, remove seat and tank
2) Unscrew OEM instrument, unplug connector, unscrew OEM instrument carrier.
3) attach the motogadget instrument to the vehicle-specifi c motogadget retaining plate and
connect the tail cable of the motogadget instrument to mo.hub
4) Connect motogadget vehicle-specifi c plug and battery cable to mo.hub
5) Screw the motogadget retaining plate with instrument to the fork bridge with the OEM screws.
6) Attach mo.hub to the upper frame tube with cable ties, avoiding collision
pay attention to mo.hub housing and tank.
7) OEM instrument connector and motogadget instrument cable kink and scuff-free
Lay to the mo.hub and secure the cables to the frame with cable ties. Suffi cient
Allow game for steering movements.
8) Insert the plug of the OEM speedometer into the vehicle with motogadget plug.
9) Install the tank and seat
9.3.3 Installation
motoscope tiny and motoscope mini
Circ = 2000 / ImpW=1 / ImpE=1
motoscope classic
Circ=200 / ImpW=4 / ImpW=1
Page 15

11 Return and Complaint
Before sending your mo.hub to us for technical review, please contact Technical Support. Visit
our website and follow the instructions under “Support”. For support requests, we always need
the serial number (sticker top mo.hub, your smartphone model used, the app version (see
main menu under “About”).) To return the item, please follow the instructions under “Service”
on our website.
CE marking
The unit described in this document is in accordance with the offi cial European directives. A
copy of the declaration of conformity can be provided on request. This equipment complies
with the essential requirements of EU Directive 1999/5/EC. The vehicle body control module
integrated in this product has been pre-certifi ed separately and is marked with CE0168 R&TTE
directive.
Hereby, motogadget declares that motogadget products and accessories are in compliance
with the essential requirements and other relevant provisions of the EU Directive 1999/5/EC.
WEEE directive
The wheelie bin symbol on the product or its packaging indicates that this product shall not
be treated as household waste. In line with EU Directive 2002/96/EC for waste electrical and
electronic equipment (WEEE), this electrical product must not be disposed of as unsorted municipal waste. Please dispose of this product by returning it to the point of sale or to your local
municipal collection point for recycling. By doing this you will help conserve the environment.
Page 16

Regulations
PRODUCT INFORMATION:
Manufacturer: motogadget GmbH
Model: mo.unit blue
FCC ID: 2AIF8-4005000
IC: 21495-4005000
FCC COMPLIANCE STATEMENT:
This device complies with part 15 of the FCC Rules. Operation is subject to the following two
conditions:
(1)This device may not cause harmful interference, and (2) this device must accept any
interference received, including interference that may cause undesired operation.
INFORMATION TO USER:
This equipment has been tested and found to comply with the limits for a Class B digital device,
pursuant to Part 15 of FCC Rules. These limits are designed to provide reasonable protection
against harmful interference in a residential installation. This equipment generates, uses, and
can radiate radio frequency energy.
Page 17

If not installed and used in accordance with the instructions, it may cause harmful interference
to radio communications. However, there is no guarantee that interference will not occur in a
particular installation.
If this equipment does cause harmful interference to radio or television reception, which can
be determined by turning the equipment off and on, the user is encouraged to try and correct
the interference by one or more of the following measures:
• Reorient or relocate the receiving antenna
• Increase the distance between the equipment and the receiver
• Connect the equipment to outlet on a circuit different from that to which the receiver is
connected
• Consult the dealer or an experienced radio/TV technician for help.
Canada – Industry Canada (IC)
This device complies with Industry Canada license-exempt RSS Standard(s). Operation is
subject to the following two conditions:
(1) This device may not cause interference, and (2) this device must accept any interference,
including interference that may cause undesired operation of the device.
Cet appareil est conforme avec Industrie Canada exempts de licence standard RSS (s). Son
fonctionnement est soumis aux deux conditions suivantes:
(1) Cet appareil ne doit pas provoquer d’interférences et (2) cet appareil doit accepter toute
interference, y compris celles pouvant causer un mauvais fonctionnement de l’appereil.
Das motogadget Team wünscht Ihnen eine angenehme und sichere Fahrt sowie viel
Spaß mit Ihrem neuen mo.hub.
 Loading...