

MotoComm Ridercam 720HD Instruction Manual

InstructionDisclaimer
Dennis Kirk provides instructions to help our customers better understand how to install the
products we sell. The instructions are exact copies of what the manufacturer includes with the
product being sold.
That means the quality and accuracy of the instructions is solely dependent on what the
manufacturer produces. We do our best to make the text legible and the pictures viewable.
However, the end result depends largely on the quality of instructions the manufacturer
provides.
Therefore, you will find that some instructions are not of the highest quality. Sometimes text is
hard to read and pictures are not easy to see. At times you will find the overall look of the
instructions to be less than professional. However, we feel it is better to provide what we have
rather than provide nothing at all.
To the best of our knowledge the instructions and application information contained in the
instructions is accurate. However, Dennis Kirk assumes no liability related to any errors that
may be contained in the copy of the manufacturer’s instructions we provide. Buyers are solely
responsible to insure that product use is consistent with their application.
If you have any questions please contact us at customerservice@denniskirk.com
800-969-7501 so we can further assist you regarding additional product information or any other
business related questions.
Thank you for doing business with Dennis Kirk.
or

INSTRUCTION
MANUAL
Thank you
Handsfree Video Camera. The Ridercam720HD is a rugged, lightw eight
handsfree video camera
the action ,
CONTENTS
Your Ridercam720HD includes the items listed below. If
please contact MotoComm customer service at info@motocomm.com
free at 877-624-6869.
for
choosing the MotoComm Ridercam720HD High Definition
that
records all the action
in
HD.
without
taki
ng
an
item missing,
you
out
or
of
toll
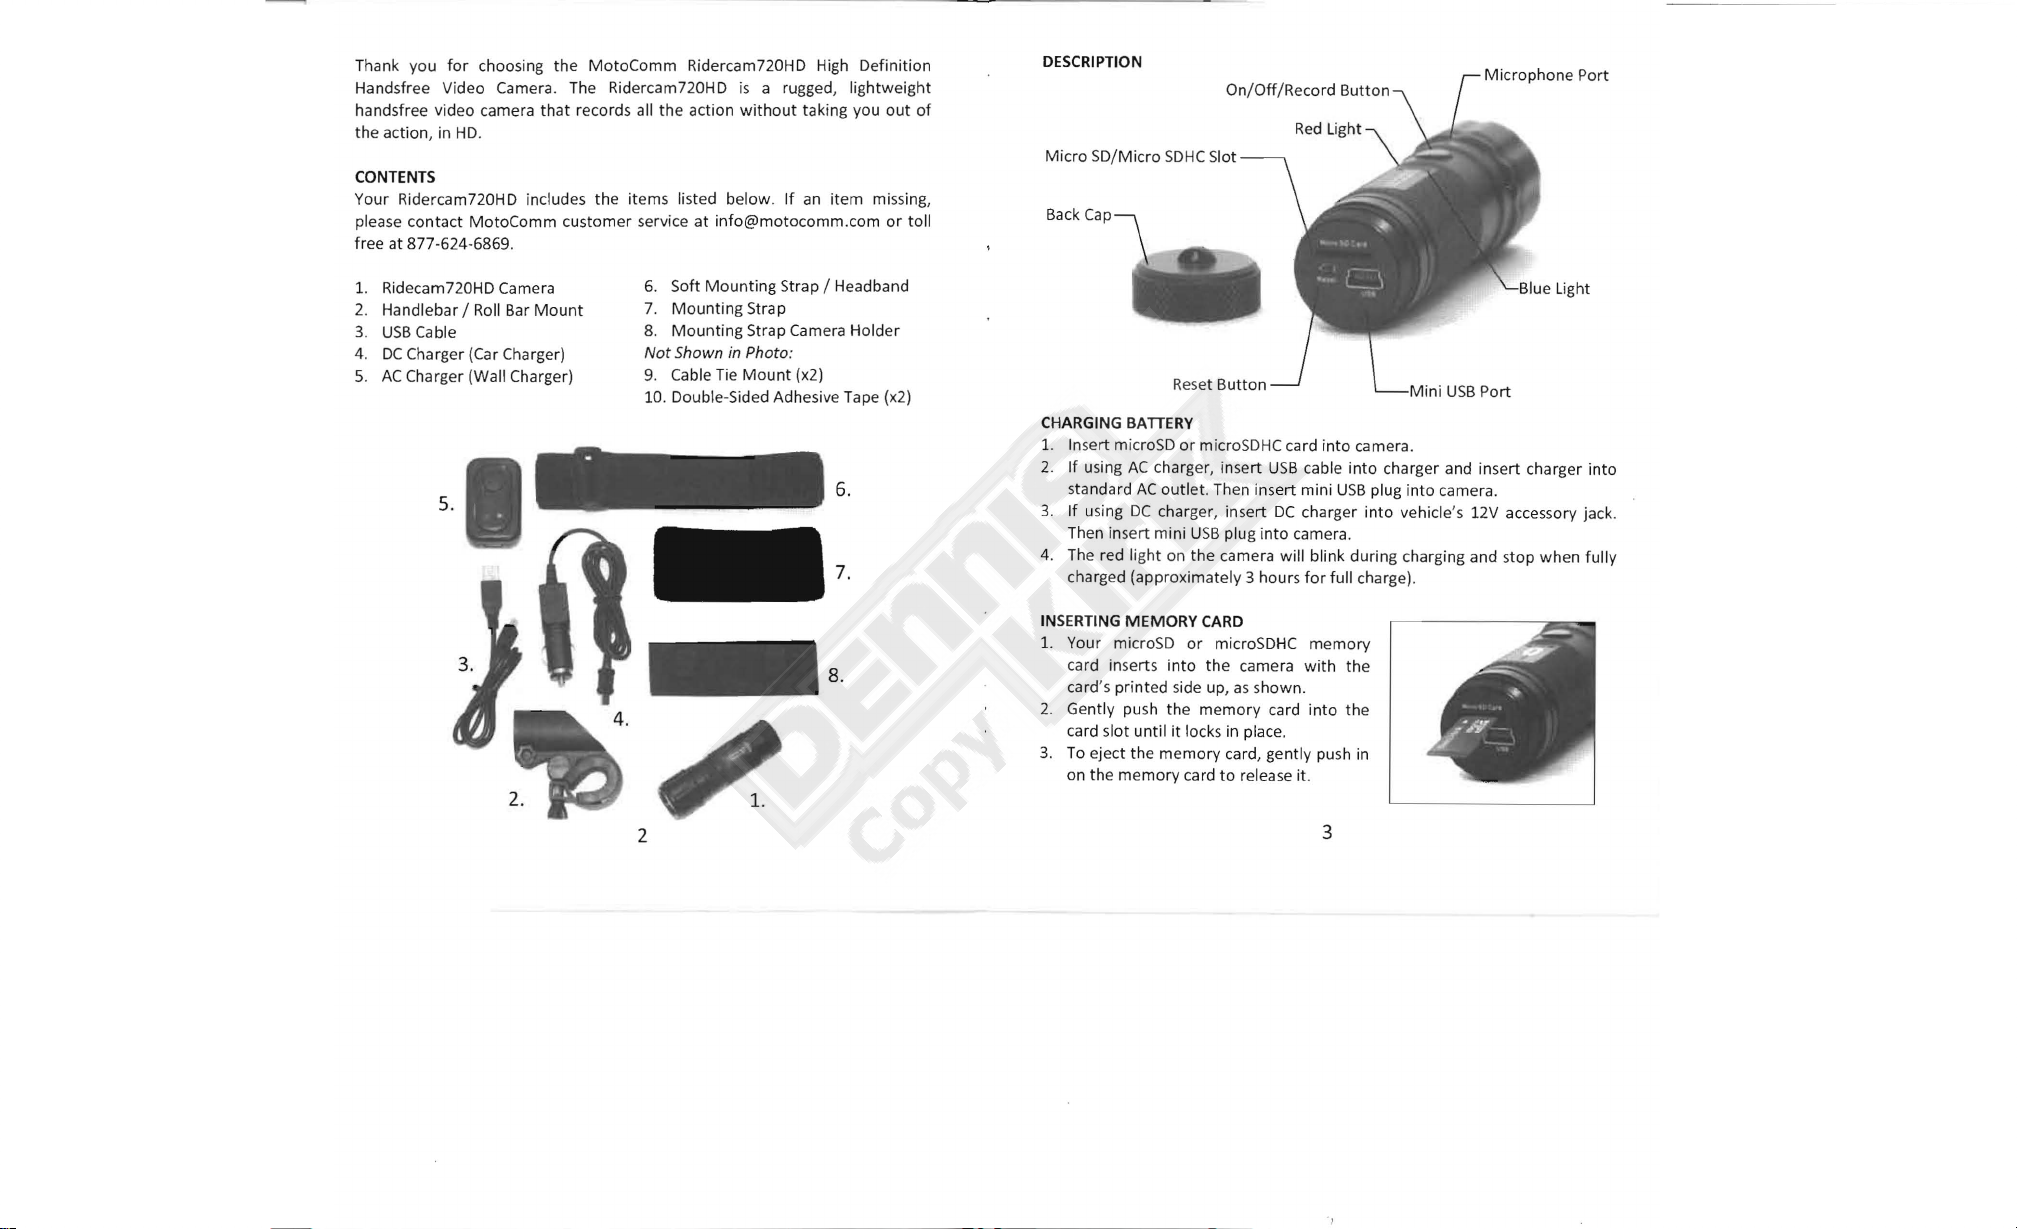
DESCRIPTION
Micro SD/Micro SDHC S
Back
Cap
On/Off/Record Button
lot
1.
Ridecam720HD Camera
2. Handlebar /
USB
3.
4.
DC
Charger (Car Charger)
AC
Charger (Wall Charger)
5.
Cable
5.
Roll
_
Bar
Mount
6. Soft
7.
8.
Not
9. Cable Tie
10. Double-Sided Adhesive Tape (x
Mounting
Mounting
Mounting
Shown in Photo:
Strap
Strap Camera Holder
Mount (x2)
Strap / Headband
6.
7.
8.
2
2)
CHARGING BATTERY
1.
Insert
microSD
2.
If
using
standard
3.
If using
Then
insert
4.
The red light on the camera will blink during charging and s
charged (appro ximately 3 hours
INSERTING
1.
Your microSD or microSDHC memory
in
card
card's printed side up,
2. Gently
card s
lot
To
eject the memory card, gently push
3.
on th e memory card
or microSDHC
AC
charger, ins
AC
outlet. Then insert mini USB plug into camera.
DC
charger, ins
mini
USB
MEMORY
serts into th e camera with the
pu
until
CARD
sh the memory card
it
locks
to
card into camera.
ert
USB
cable
ert
DC
charger into vehicle's 12V accessory jack.
plug into camera.
for
full charge).
as
shown.
into
in
place.
release it .
into
charger and insert charger into
the
in
3
Blue Light
top
when fully
 Loading...