

Page 1
US and Foreign Patents Granted and Pending. Fullpower®, MotionX®, TapTap®, and ShakeShake® are registered trademarks of Fullpower Technologies,
Inc.All other trademarks remain the property of their respective owners. © Copyright 2003-2013 Fullpower Technologies, Inc. All rights reserved.
1
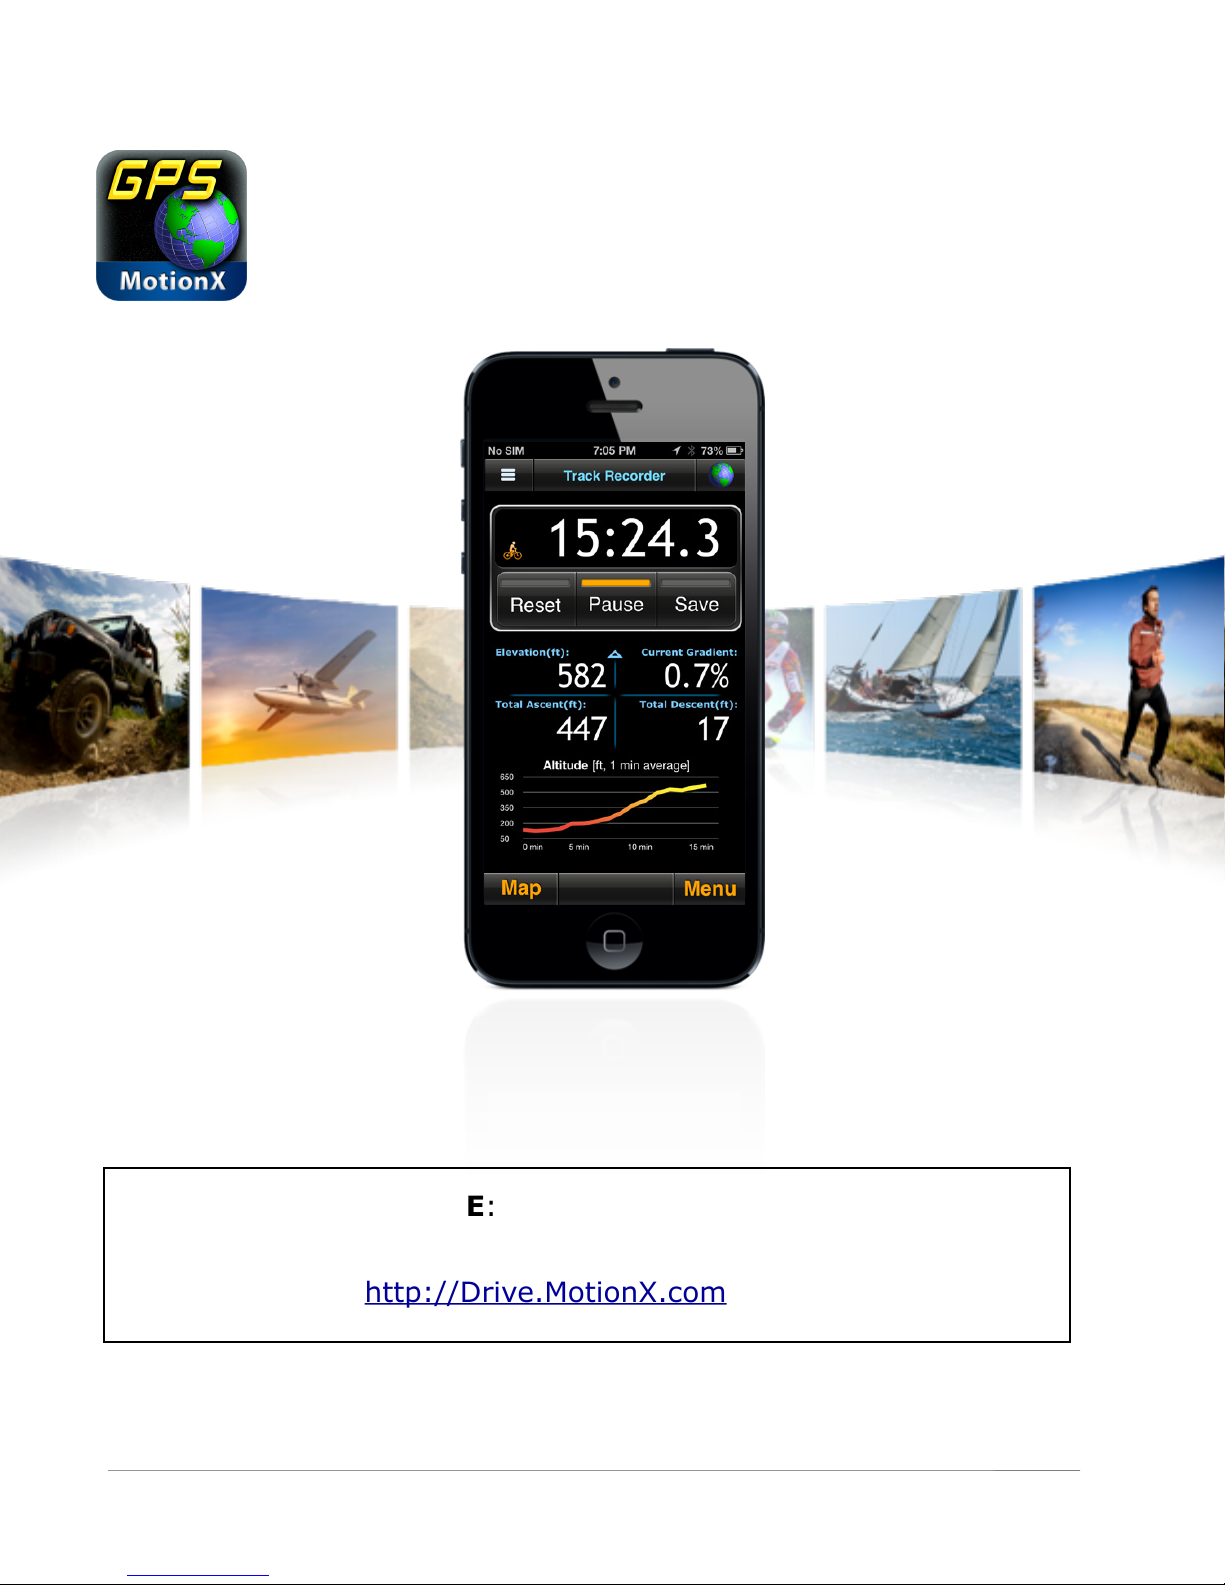
MotionX-GPS User Manual
http://Drive.MotionX.com
Revision 21.0, August 2013
IMPORTANT NOTE:
This is not the user manual for MotionX-GPS Drive.
Please visit
for this manual.
Page 2

Table of Contents
US and Foreign Patents Granted and Pending. Fullpower®, MotionX®, TapTap®, and ShakeShake® are registered trademarks of Fullpower Technologies,
Inc.All other trademarks remain the property of their respective owners. © Copyright 2003-2013 Fullpower Technologies, Inc. All rights reserved.
2
1. Overview 3
2. Menu 4
3. Go To 5
4. Record Track 6
5. Share 12
6. Live Updates 14
7. My Position 15
8. Map 16
9. Waypoints 21
10. Tracks 26
11. Compass 31
12. Map Downloads 33
13. Setup 37
Getting Started
•Video: http://gps.motionx.com/video/
•Tutorials: http://gps.motionx.com/iphone/tutorials/
•Quick Start Guide: http://gps.motionx.com/quick-start/
!
Page 3
1. Overview
US and Foreign Patents Granted and Pending. Fullpower®, MotionX®, TapTap®, and ShakeShake® are registered trademarks of Fullpower Technologies,
Inc.All other trademarks remain the property of their respective owners. © Copyright 2003-2013 Fullpower Technologies, Inc. All rights reserved.
3
The most accurate and reliable solution for the iPhone, MotionX-GPS embeds the
functionality of an advanced handheld GPS unit into a simple and intuitive iPhone
application. Use MotionX-GPS to track outdoor activities such as hiking, running,
biking, sailing, skiing, or any other activity where you want to track your route. It is
also ideal for geocaching and for sharing the coordinates of your favorite locations.
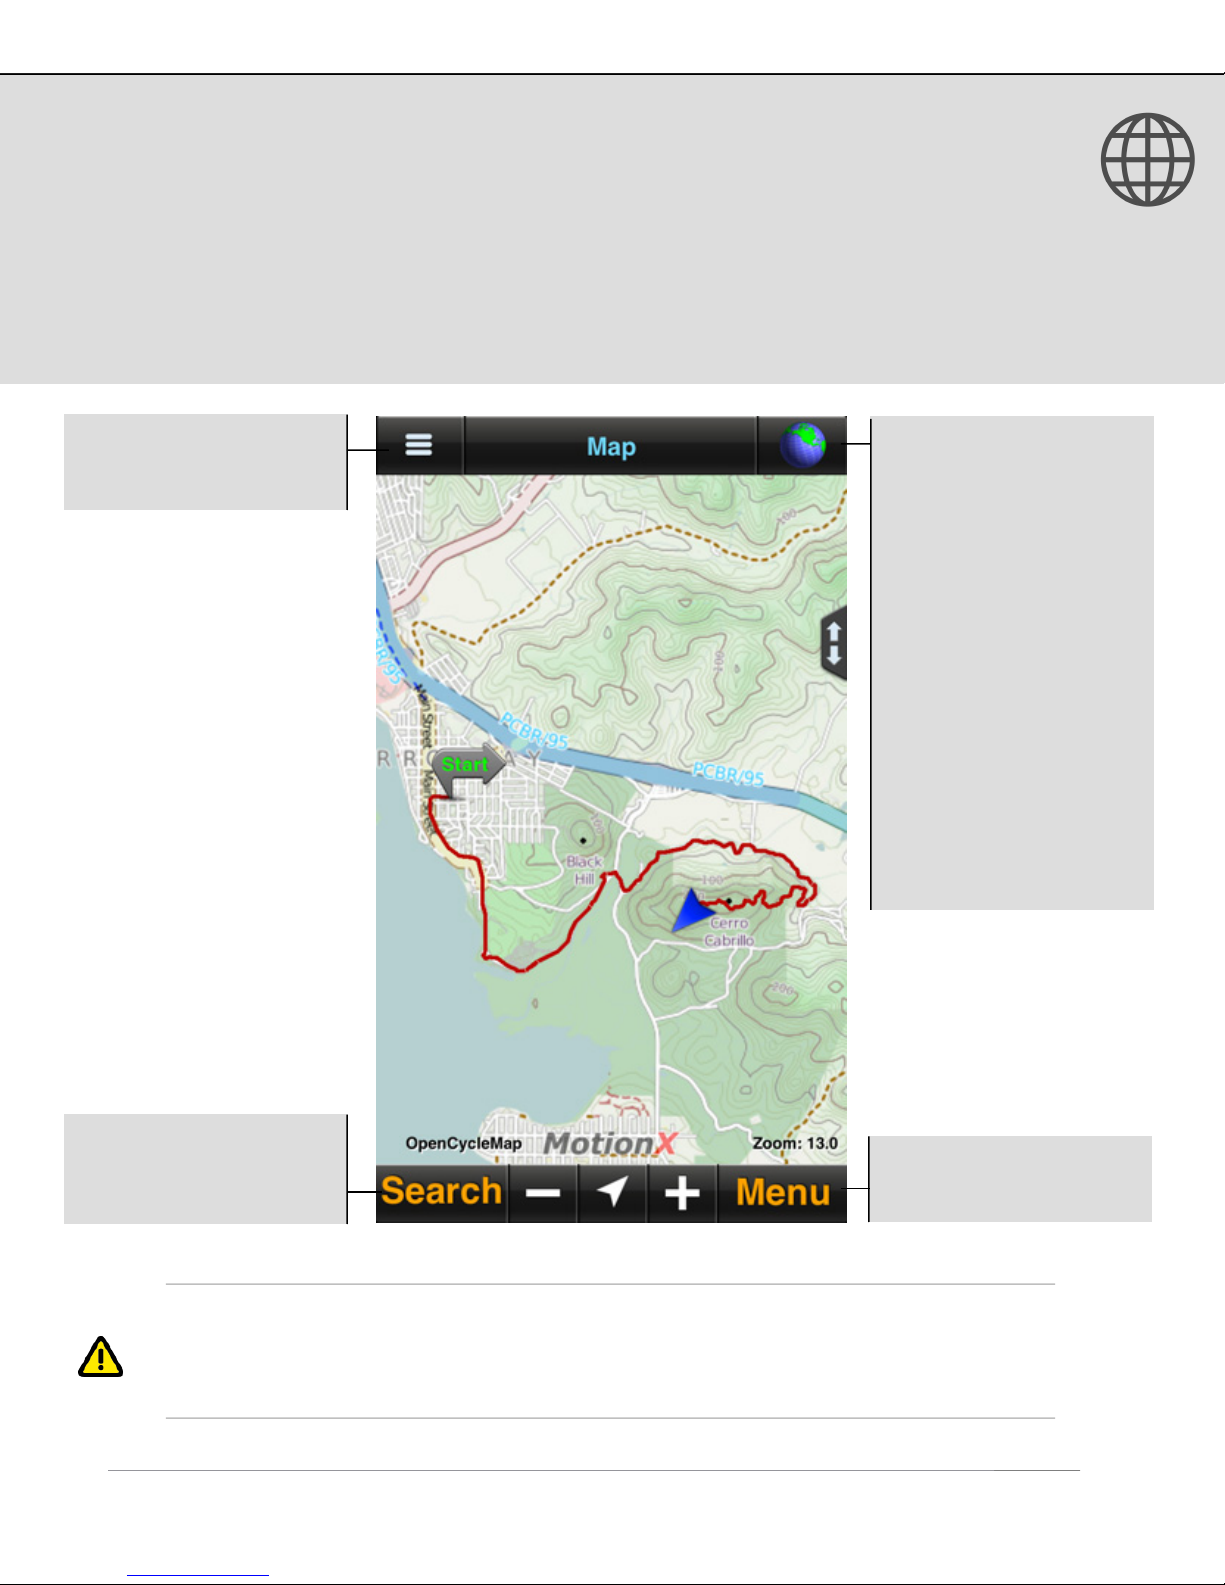
Options: View the
options for the page
currently being viewed
GPS signal indicator
Touch to toggle between
outdoor online and indoor
offline
Blue globe: Outdoor
GPS mode; good signal
Red globe: Unreliable
signal, trying to acquire
satellites
Wifi/Triangulation:
Uses location information
from nearby Wifi
hotspots to approximate
location
Manual: Offline; not
searching for satellites
Search: Quick access to
the MotionX Search
Wheel
GPS requires a direct “line-of-sight” to communicate with satellites. Your iPhone must
have a clear view of the sky to locate at least three satellites in order to give accurate
position information. If you are indoors, in a wooded area or surrounded by buildings,
you may be unable to acquire an accurate signal.
Menu: Access the menu
from any page
Page 4
2. Menu
US and Foreign Patents Granted and Pending. Fullpower®, MotionX®, TapTap®, and ShakeShake® are registered trademarks of Fullpower Technologies,
Inc.All other trademarks remain the property of their respective owners. © Copyright 2003-2013 Fullpower Technologies, Inc. All rights reserved.
4
a track
2
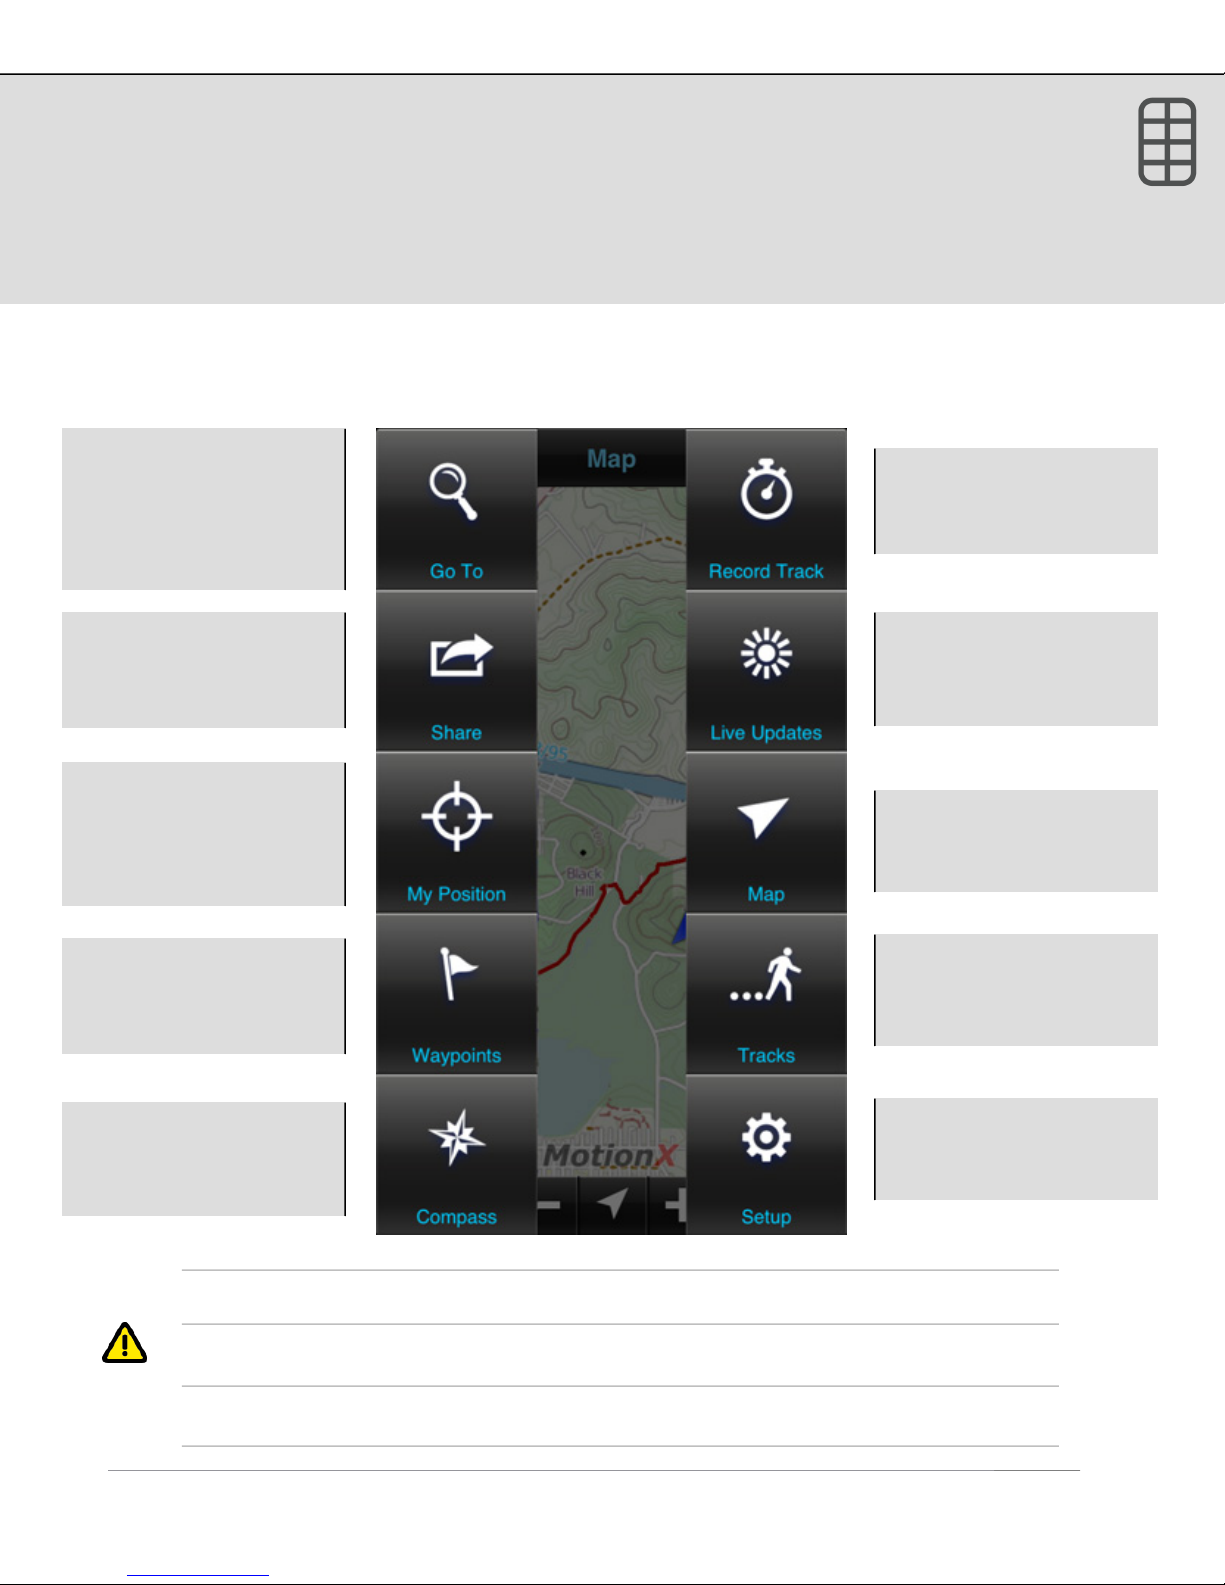
The MotionX Menu provides access to the various capabilities of MotionX-GPS. Go to
the track recorder, access the navigation/search wheel, view and share your current
position, access maps, set up live updates, access your saved tracks & waypoints, view
the compass, and access the Setup menu from this page.
Each menu button is explained here briefly. Additional details for each function are
outlined in the subsequent sections of this manual.
Go To: Access the
Search Wheel to select a
navigation point; function
changes to Stop Nav
while navigating
1
Record Track: Open the
GPS stopwatch to record
Share: Share your
current position, track or
waypoint via email,
Facebook, or Twitter
My Position: View/
share current position,
create a waypoint, take
a photo, view signal
strength
Waypoints: View a list
of your saved waypoints;
view GPX file import
instructions
Compass: Current
heading, speed, VMG,
ETA, waypoint distance
& bearing to wypt
Live Updates: Setup/
controls for sharing your
position with others in
real-time
Map: View maps, with
tracks, waypoints, and
optional gridlines overlaid
Tracks: View a list of
your saved tracks; view
GPX file import
instructions
Setup: Access the
various user-based
settings and controls
3
1
When navigating to a waypoint, the icon blinks between green and white.
2
While recording a track, the Record Track icon blinks between green and white.
3
With Live Updates active, the icon blinks between green and white.
Page 5
3. Go To
US and Foreign Patents Granted and Pending. Fullpower®, MotionX®, TapTap®, and ShakeShake® are registered trademarks of Fullpower Technologies,
Inc.All other trademarks remain the property of their respective owners. © Copyright 2003-2013 Fullpower Technologies, Inc. All rights reserved.
5
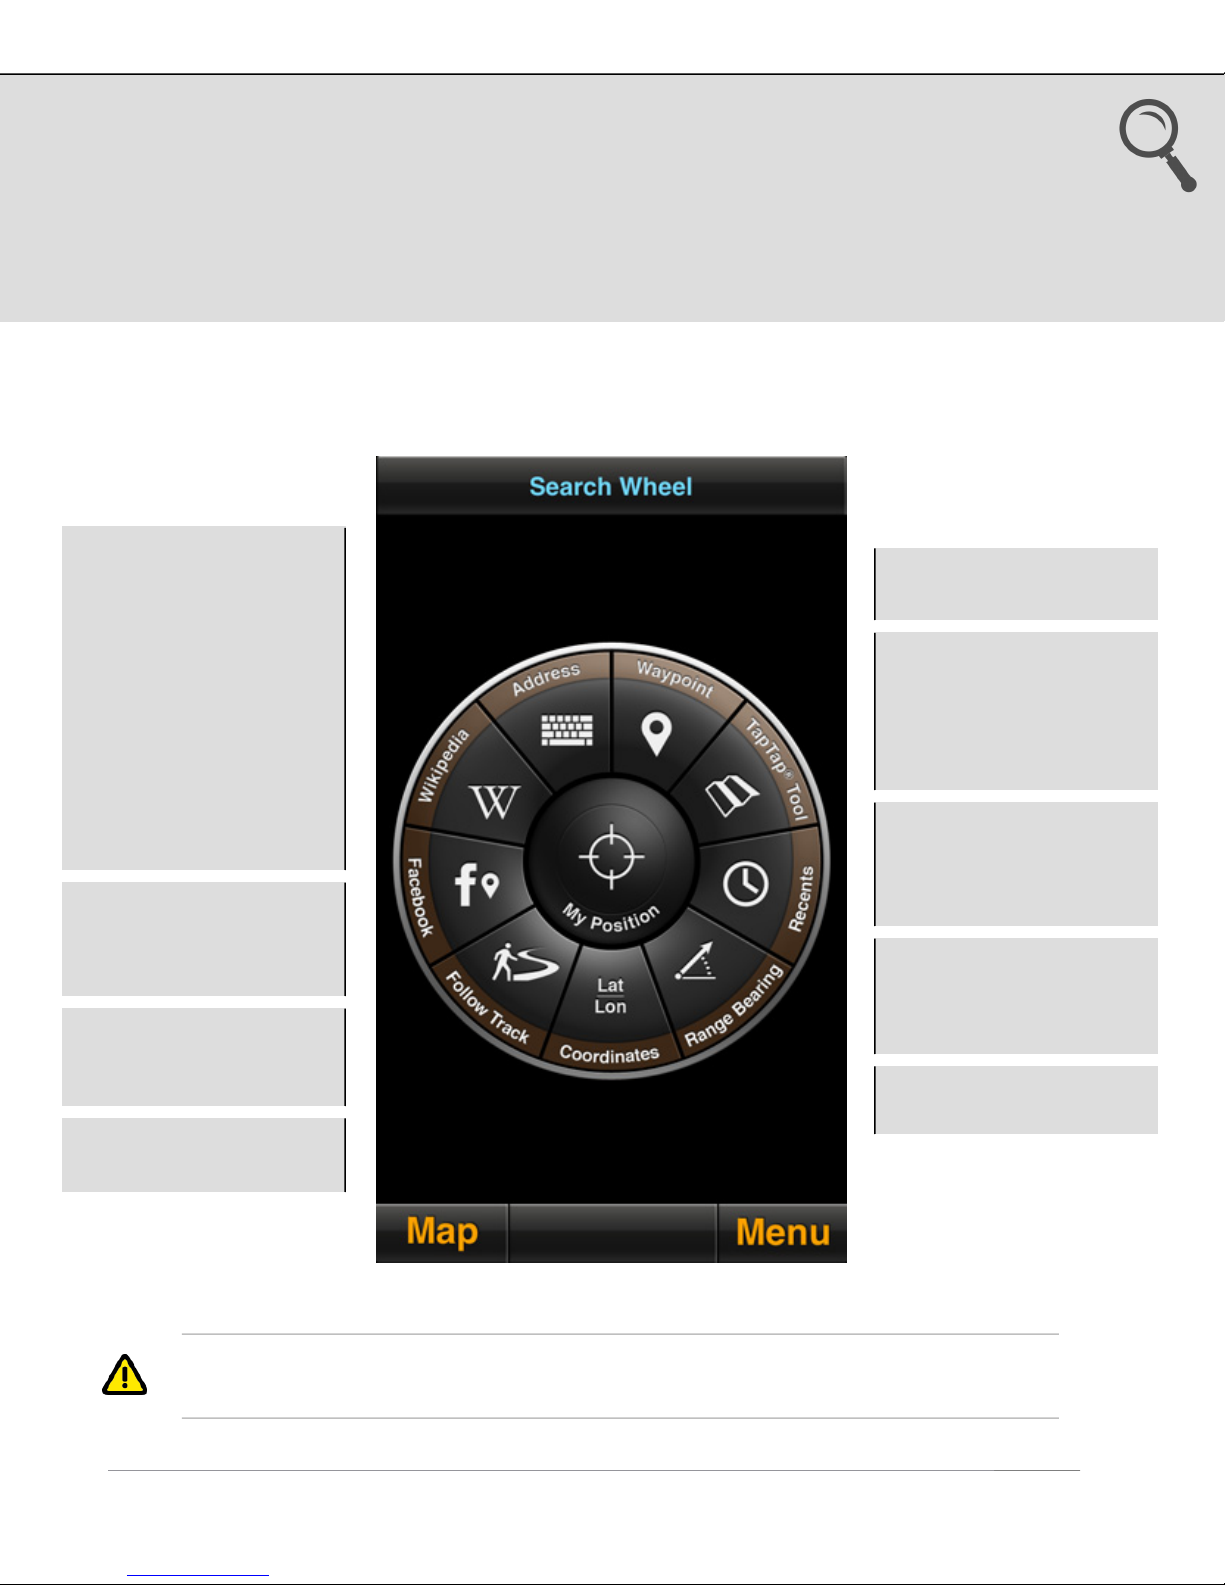
Select one of the search methods from the wheel to find a destination for navigation,
or a track to follow. Once a destination has been defined, the Compass screen displays
ETA, speed, VMG, distance and bearing to waypoint, etc, and the Map screen displays
the straight-line path between your current position and the waypoint.
MotionX Search Wheel
Address input:
•
Location or landmark,
e.g. “Mount Everest”
•
Address, options:
-
full address
-
city name
-
state/province
-
zip/postal code
•
Lat / Lon, for example
“41.89 N, 87.61 W”
•
Import from Address
Book contacts
•
Country name
Wikipedia: View POIs
around you or in a
specified location; read
the associated articles
Facebook: View and
navigate to your friends’
Facebook check-ins
Follow Track: Follow
one of your saved tracks
Waypoint: Select from
your saved waypoints
TapTap® Tool: Create a
new waypoint by picking
a point on the map. A
new waypoint will be
created and saved
Recents: View your
waypoints sorted by date
to quickly find recently
saved points
Range/Bearing: Enter a
range (distance) and
bearing (degrees) from
your current position
Lat/Lon: Define
waypoint coordinates
1
1
If UTM, MGRS, or OSGB is selected as the coordinate system, the input fields will
reflect the appropriate system.
Page 6
4. Record Track
US and Foreign Patents Granted and Pending. Fullpower®, MotionX®, TapTap®, and ShakeShake® are registered trademarks of Fullpower Technologies,
Inc.All other trademarks remain the property of their respective owners. © Copyright 2003-2013 Fullpower Technologies, Inc. All rights reserved.
6
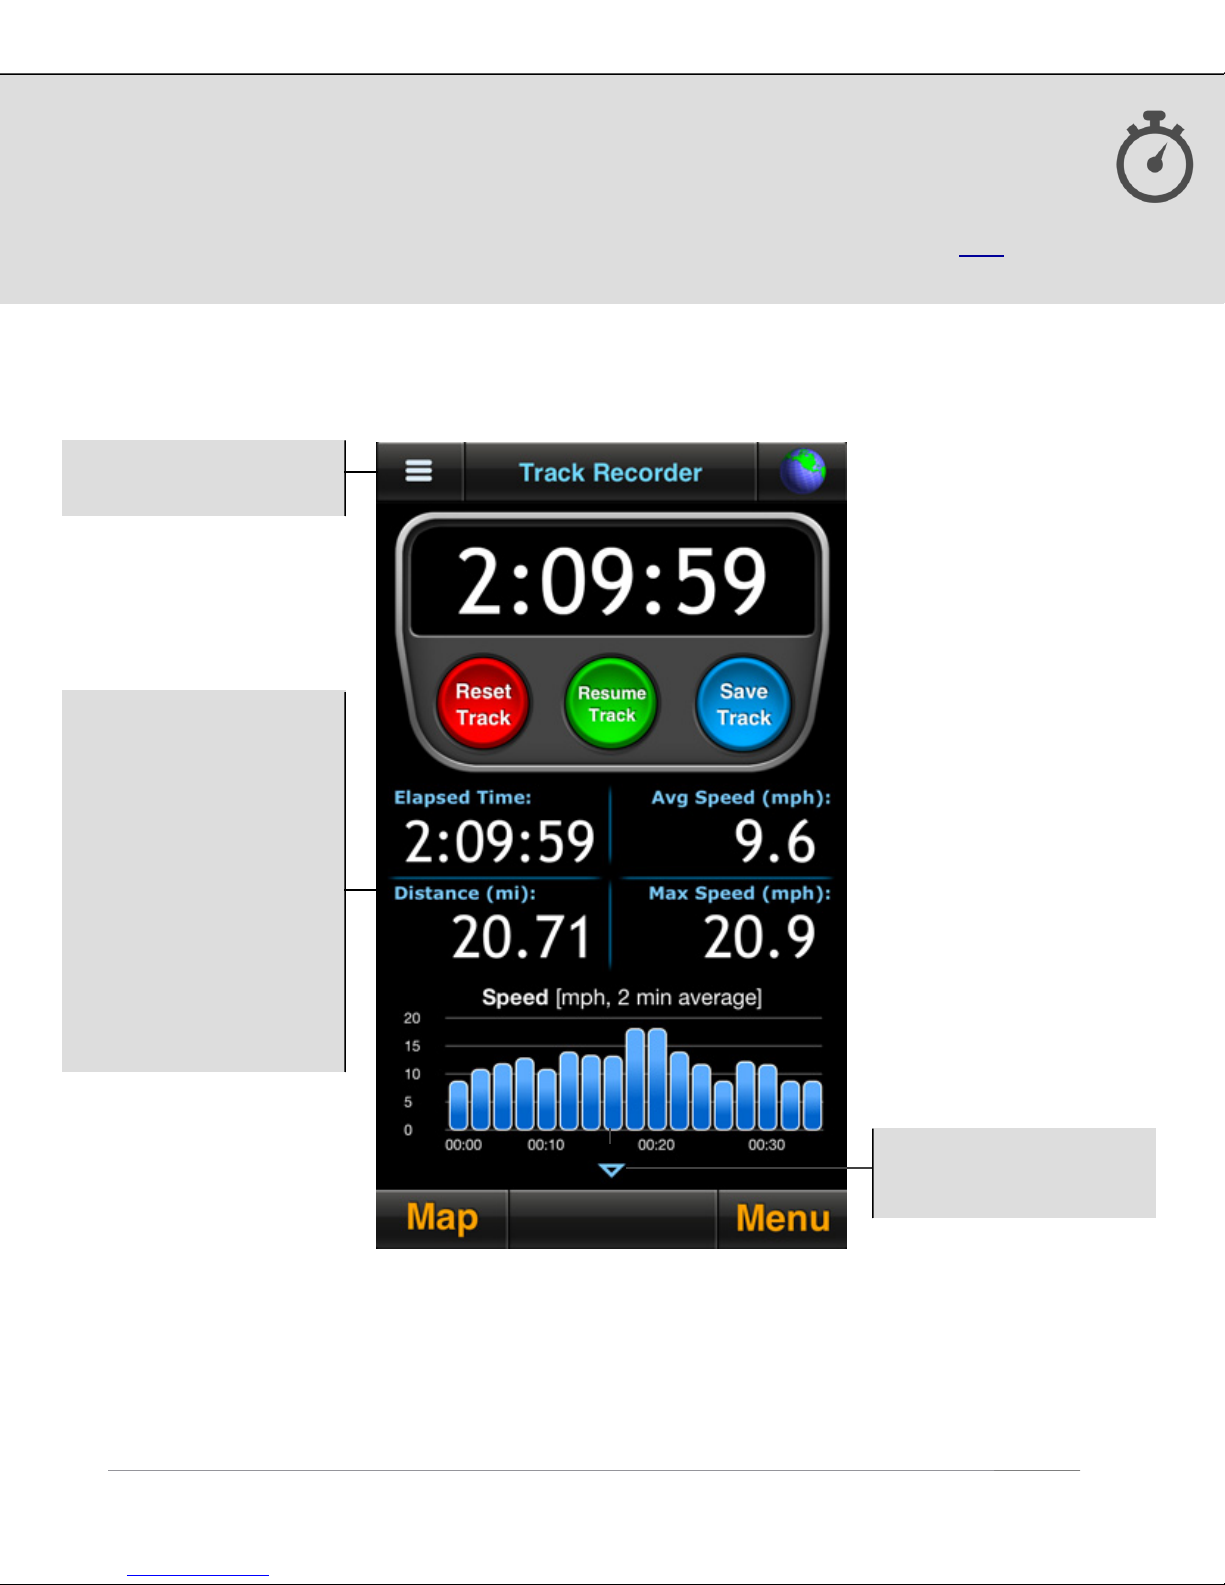
Record a track of your hikes, runs, bike rides, trips, or other outdoor activities. Once
saved, the track is added to the Tracks log. The track can be shared with others via
email, Facebook, or Twitter for viewing in Google Earth, Google Maps or any GPX-
capable application.
Options: see details on
next page of this manual
Customize the data
displayed on the track
recorder by pressing and
holding any of the lower
data fields. Select a
category (general,
navigation, sensor,
elevation), then use the
picker wheel to define the
field. Mix and match units
of your data fields if
desired. Enable or reset
custom fields from Menu
> Setup > Display >
Custom Fields.
Vertically swipe the lower
part of the display for
additional track metrics
Page 7
4. Record Track (continued)
US and Foreign Patents Granted and Pending. Fullpower®, MotionX®, TapTap®, and ShakeShake® are registered trademarks of Fullpower Technologies,
Inc.All other trademarks remain the property of their respective owners. © Copyright 2003-2013 Fullpower Technologies, Inc. All rights reserved.
7
Track Recorder Options:
Jumbo View: Select two two data fields to display in extra large font
Display: Select a preference for units, speed format, and skin style
Camera: Add a photo to your track using the built-in iPhone camera1, or from your
camera roll
Activity Mode: Select the appropriate Activity Mode (e.g. Biking, Flying, Hiking, etc.) to
optimize speed and distance accuracy
2
Settings:
• Track Recorder Stats Autoswipe: when set to ON, the track statistics and graphs at
the bottom of the Track Recorder page will automatically scroll between the four
available views. Configure the idle time (time the screen is idle before Autoswipe
begins) and the page view time.
• Track Recorder Auto Pause: when turned ON, will automatically pause the elapsed
time when you stop moving. When you start moving again, the elapsed time will
start again. This will keep your average speed and average pace accurate if you don’t
manually press Pause when stopped. If the Pause button is pressed, the Auto Pause
feature will not override this action.
Voice Coaching: Use voice coaching options to enable/customize audio updates while
recording a track
within MotionX-GPS. To prevent waypoints or tracks from losing their associated photos,
leave the photos in your camera roll. Share the waypoint or track via email to create a
backup.
results based on your activity. The Activity Mode selector also provides quick access to
various other track recorder preferences and settings.
!
1
Full resolution geotagged images are saved to the iPhone’s camera roll instead of
2
Accelerometrics, accuracy filtering and other parameters will be selected for optimal
Page 8

4. Record Track (continued)
US and Foreign Patents Granted and Pending. Fullpower®, MotionX®, TapTap®, and ShakeShake® are registered trademarks of Fullpower Technologies,
Inc.All other trademarks remain the property of their respective owners. © Copyright 2003-2013 Fullpower Technologies, Inc. All rights reserved.
8
Heart Rate:
Track your heart rate from MotionX using a ANT+ or Bluetooth Low Energy (BLE) chest
strap heart rate sensor.
ANT+
To setup an ANT+ heart rate monitor, wear the chest strap and connect the ANT+ receiver (dongle or
case) to your iPhone. Select Manage Sensor>Connect. Once connected, your heart rate will display on
the setup page and in the track recorder.
Bluetooth Low Energy (BLE)
Newer Bluetooth Low Energy heart rate monitors are supported on the iPhone 4S and iPhone 5 only as
BLE requires a specific Bluetooth chipset found only in these devices. No receiver dongle or case is
required and there is no need to pair the BLE HR monitor with your iPhone first. To set up, be sure
Bluetooth is turned on from iPhone Settings>General. Wear the chest strap, then from MotionX-GPS
select Menu>Setup>Heart Rate Sensor>Manage Sensor>Connect.
Manufacturers of Compatible Heart Rate Chest Straps
• Wahoo Fitness: ANT+ and BLE
• Polar: ANT+ and BLE
• Garmin: ANT+
• Timex: ANT+
• Adidas: ANT+
Manufacturers of compatible ANT+ iPhone Receiver Dongles and Cases
• Wahoo Fitness: Cases and dongles
Screen Lock: Lock the screen and change the display brightness
Flashlight: Turn on the iPhone’s camera flash LED
!
Page 9

4. Record Track (continued)
US and Foreign Patents Granted and Pending. Fullpower®, MotionX®, TapTap®, and ShakeShake® are registered trademarks of Fullpower Technologies,
Inc.All other trademarks remain the property of their respective owners. © Copyright 2003-2013 Fullpower Technologies, Inc. All rights reserved.
9
Display Options
Swipe the bottom half of the screen vertically to view additional information. Optionally
set up Autoswipe via Options > Settings to automatically toggle between views. Swipe
the graphs horizontally to slide the x-axis.
Customize the data displayed on the track recorder by pressing and holding any of the
lower data fields. Select a category (general, navigation, sensor, elevation), then use
the picker wheel to define the field. Mix and match units of your data fields if desired.
Enable or reset custom fields from Menu > Setup > Display > Custom Fields.
Each bar or data point on the speed and altitude bar charts represents a 1-minute
average.
!
Page 10
4. Record Track (continued)
US and Foreign Patents Granted and Pending. Fullpower®, MotionX®, TapTap®, and ShakeShake® are registered trademarks of Fullpower Technologies,
Inc.All other trademarks remain the property of their respective owners. © Copyright 2003-2013 Fullpower Technologies, Inc. All rights reserved.
10
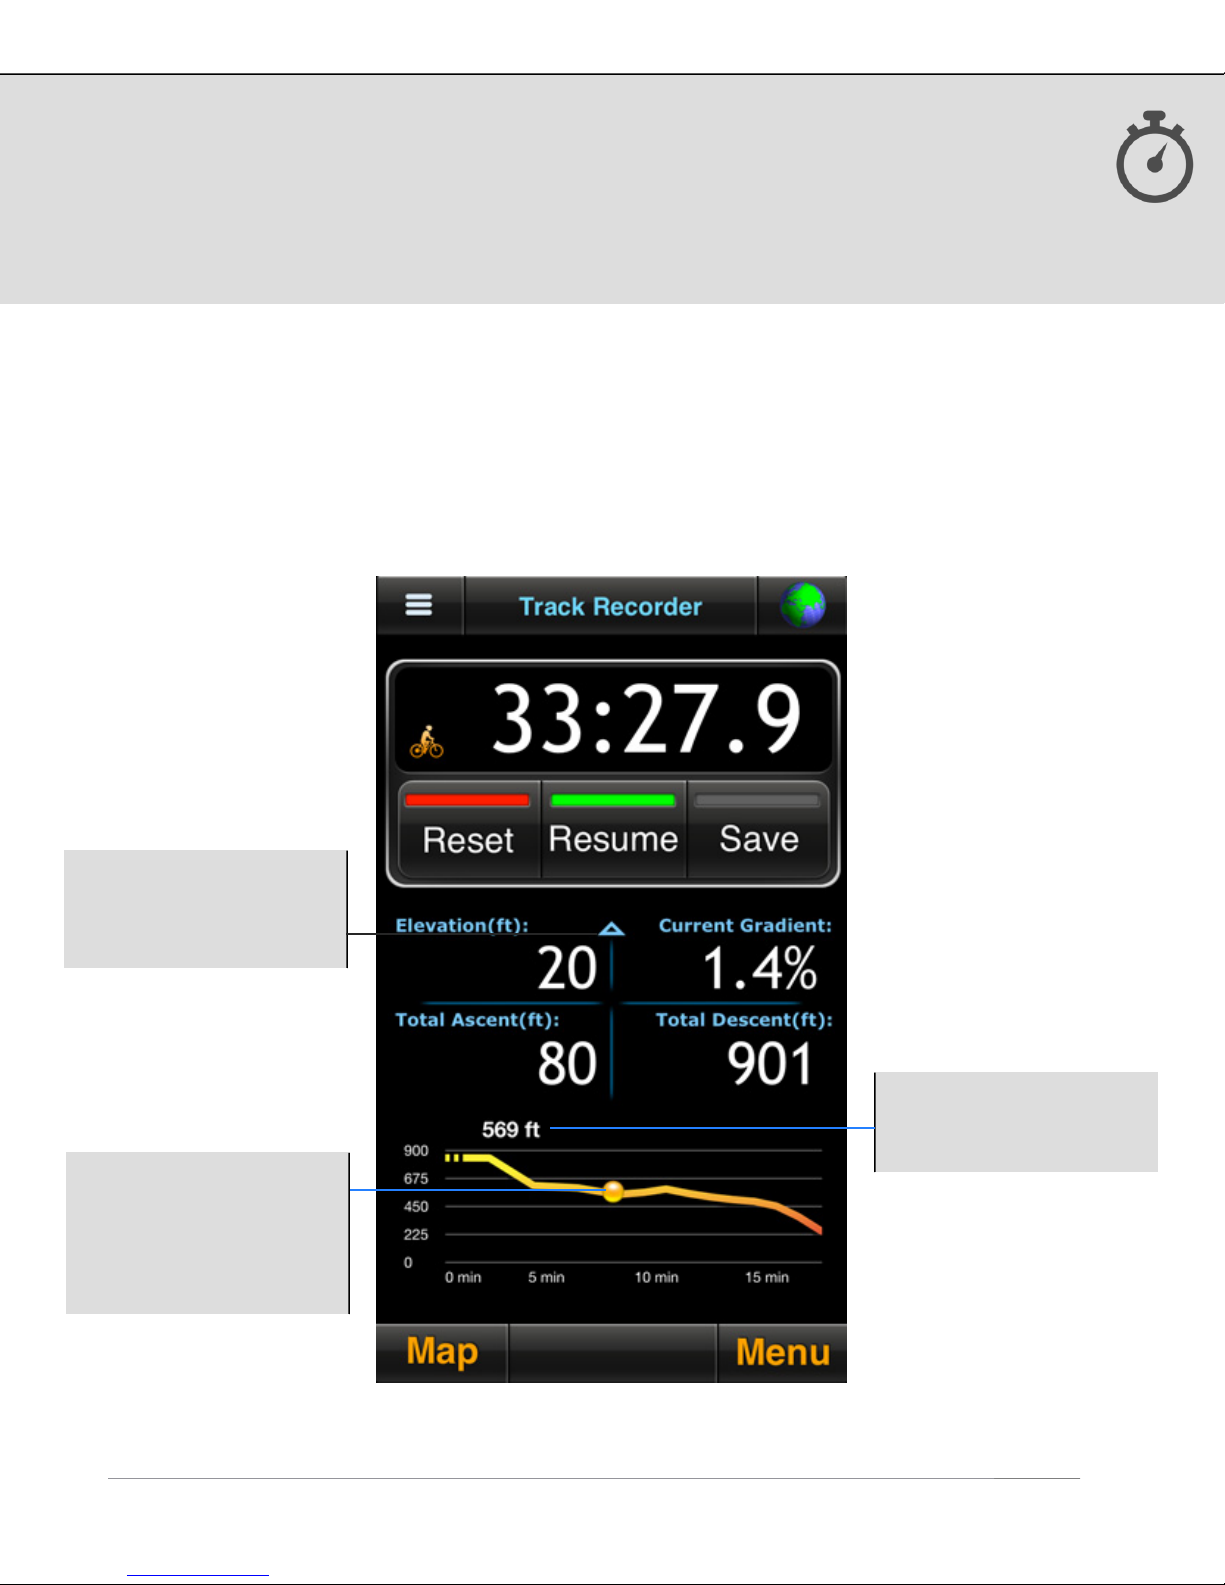
Tap and Hold
Tap and hold the speed or elevation graph to see precise data point values. A small
orange tracking ball appears -- slide your finger across the screen to see the
instantaneous value displayed at the top of the graph.
Arrow: Indicates you
may scroll up or down for
additional graphs and
track metrics
The tracking ball appears
when you tap and hold
the graph. Slide your
finger across the screen
to move the ball along
the graph
Altitude at the time
corresponding to the
tracking ball position
!
Page 11
4. Record Track (continued)
US and Foreign Patents Granted and Pending. Fullpower®, MotionX®, TapTap®, and ShakeShake® are registered trademarks of Fullpower Technologies,
Inc.All other trademarks remain the property of their respective owners. © Copyright 2003-2013 Fullpower Technologies, Inc. All rights reserved.
11
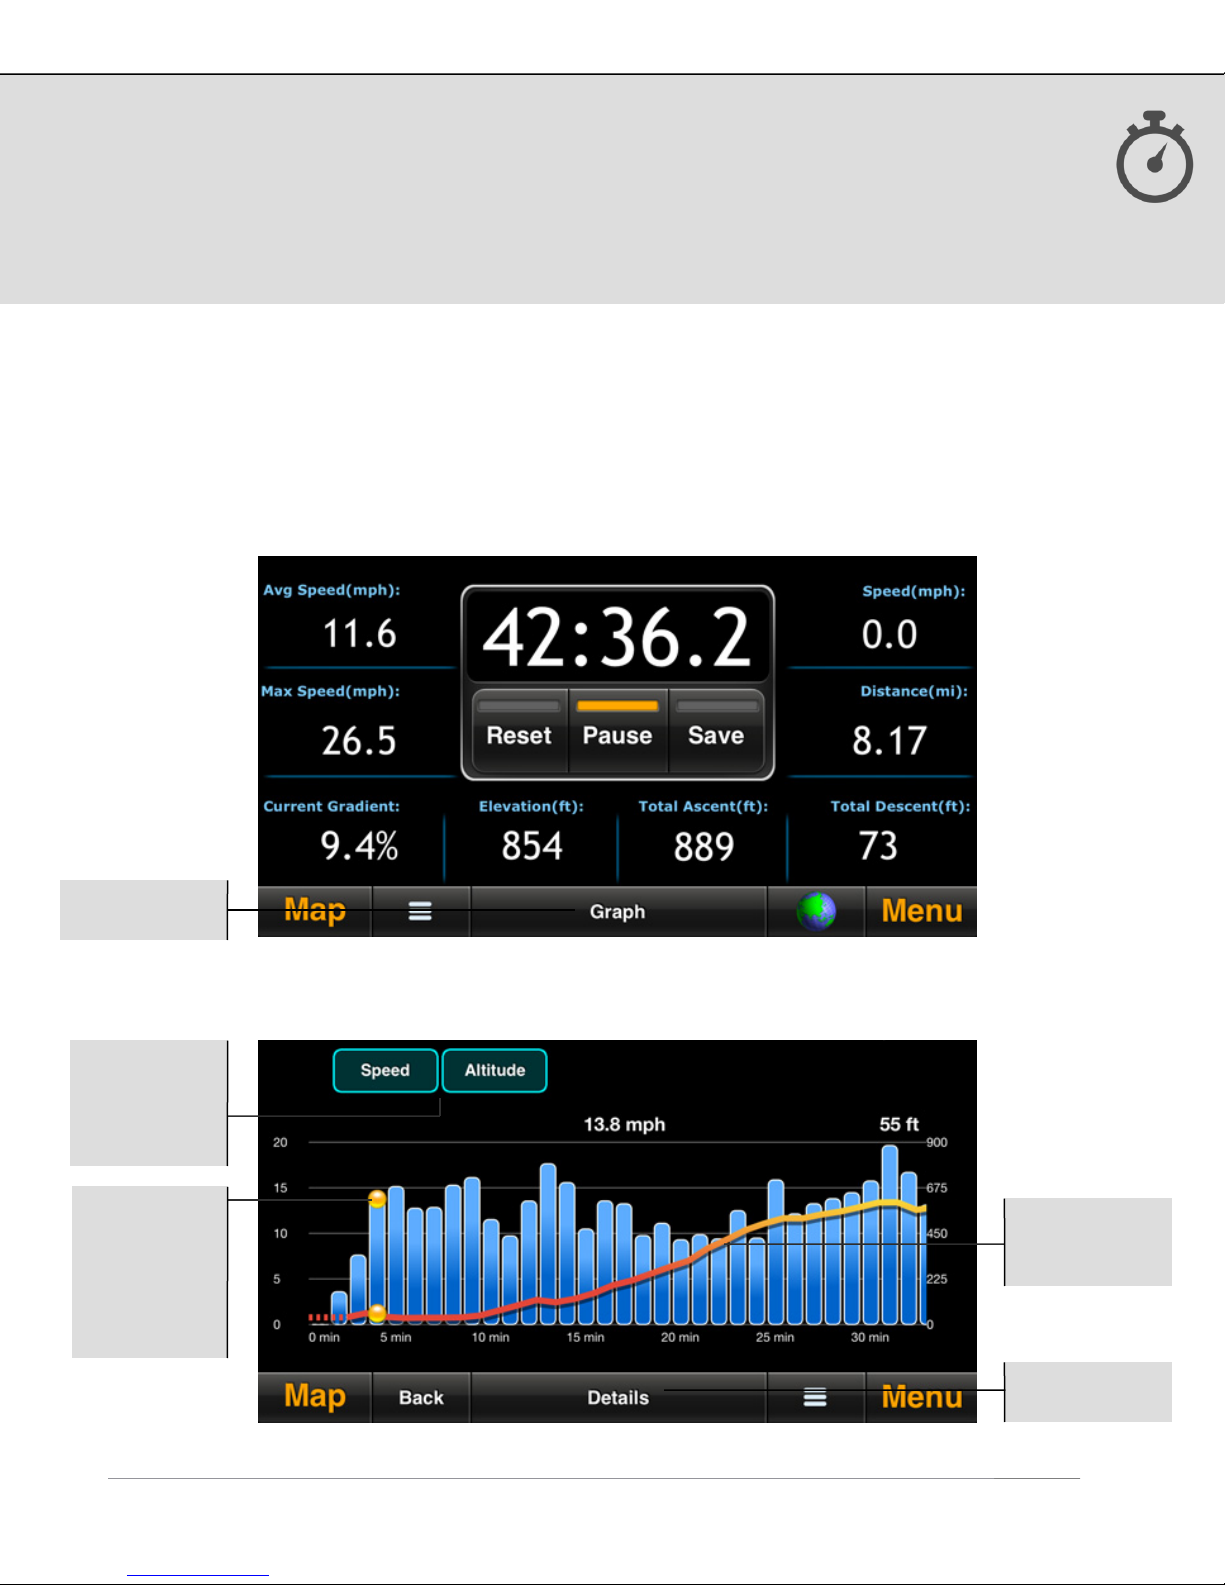
Full Screen Graphs
Rotate your phone to landscape and select the graph button to view real-time speed
and altitude graphs with optional overlay.
View graph
View realtime speed
and/or
altitude
Tap and hold
the graph for
tracking balls,
to view
instantaneous
values
The yellow/
red line shows
altitude
View stats
!
Page 12
5. Share
US and Foreign Patents Granted and Pending. Fullpower®, MotionX®, TapTap®, and ShakeShake® are registered trademarks of Fullpower Technologies,
Inc.All other trademarks remain the property of their respective owners. © Copyright 2003-2013 Fullpower Technologies, Inc. All rights reserved.
12
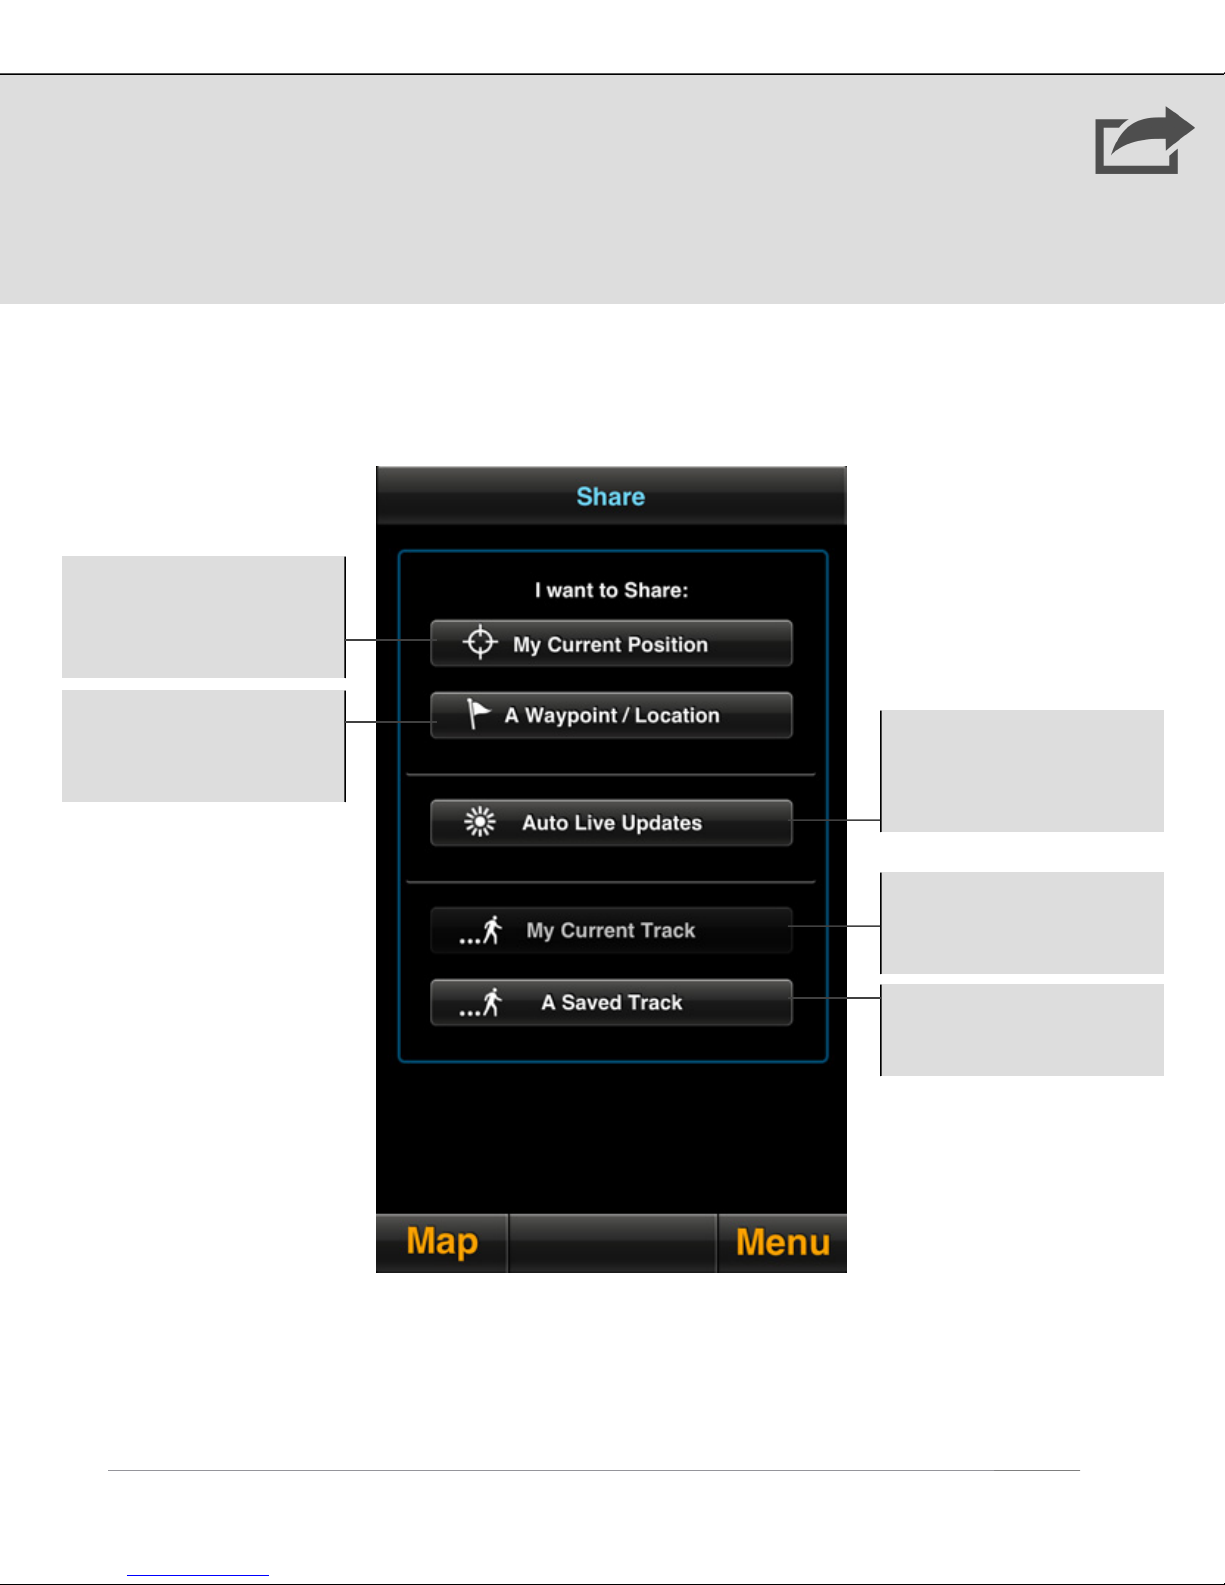
Select the Share button from the main menu to share your tracks, waypoints, or
current position via email, Facebook, or Twitter, and to access the Live Updates
feature. Go to Menu>Setup to configure your sharing preferences.
Share Options
My Current Position:
Create a new waypoint
and share the
coordinates
A Waypoint/Location:
Choose from your list of
saved waypoints
Auto Live Updates:
Access your preferences
for sharing automatic live
position updates
My Current Track:
Share the track currently
being recorded
A Saved Track: Choose
from your list of saved
tracks
Page 13
5. Share (continued)
US and Foreign Patents Granted and Pending. Fullpower®, MotionX®, TapTap®, and ShakeShake® are registered trademarks of Fullpower Technologies,
Inc.All other trademarks remain the property of their respective owners. © Copyright 2003-2013 Fullpower Technologies, Inc. All rights reserved.
13
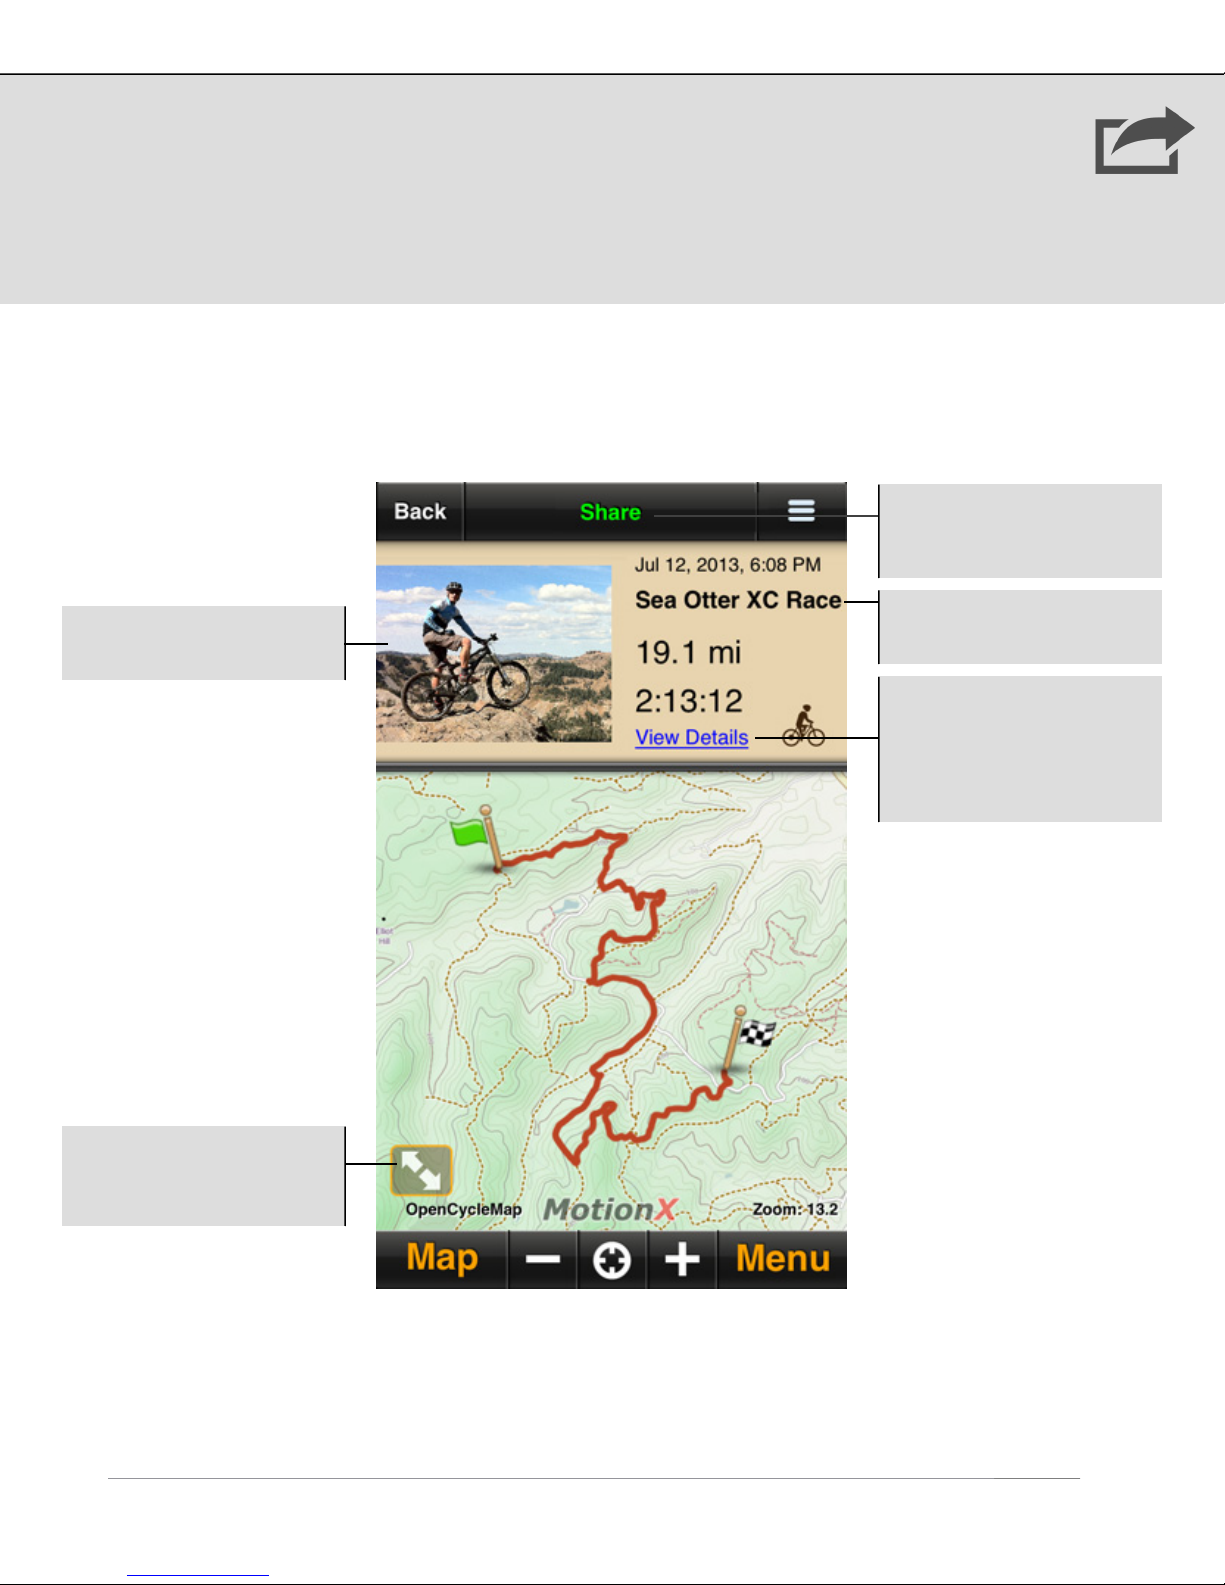
Share Summary
The share summary page is displayed after a track or waypoint is selected for sharing.
This page is skipped if one-click sharing is enabled (from Setup>Share).
Share: Touch when you
are ready to initiate
sharing
Track or waypoint photo
Expand to view full
screen map (takes you to
the Map page)
Track or waypoint name
View Details: Distance,
elapsed Time, average
speed, Max speed, heart
rate, ascent/descent,
graphs
!
Page 14

6. Live Updates
US and Foreign Patents Granted and Pending. Fullpower®, MotionX®, TapTap®, and ShakeShake® are registered trademarks of Fullpower Technologies,
Inc.All other trademarks remain the property of their respective owners. © Copyright 2003-2013 Fullpower Technologies, Inc. All rights reserved.
14
Share your real-time position automatically via Facebook, Twitter, email, or displayed
on the maps of friends who are also using MotionX-GPS. Live Updates will run (GPS
chipset remains active) when MotionX-GPS is backgrounded if Setup>Multitasking is
set to either Optimized or Always On. A data connection is required for this feature.
Auto Live Updates can
On/Off: Enable or
disable Automatic Live
Position Updates
also be viewed in any
web browser at the link
below:
http://gps.motionx.com/
iphone/liveupdates/
The share frequency and
next update time is
shown for each sharing
method
Map: Share your realtime position with friends
who are also using
MotionX-GPS. Go to the
Map page to see their
latest position update.
Your friends will see your
latest update on their
Map page.
1
• Edit your display name so your friends can identify you (default is “MotionX User”)
• Define a 5-digit channel. Share your channel with friends who want to see your location
• Define an interval for broadcasting your location (ranging from 30sec to 10min). Your friends’
• Select a radius within which you would like to display your friends’ locations
• Select a time interval to display your friends’ last known position updates. Choosing 12 hours,
• Share your channel selection with friends via email
• TapTap® a friend’s location sign on the Map to view the time of their last location update
1
Live Map Updates Setup:
latest known locations are updated at the interval they have selected.
for example, will allow you to see their last position for 12 hours after their last update.
Configure your live
updates sharing
preferences
1
Page 15

7. My Position
US and Foreign Patents Granted and Pending. Fullpower®, MotionX®, TapTap®, and ShakeShake® are registered trademarks of Fullpower Technologies,
Inc.All other trademarks remain the property of their respective owners. © Copyright 2003-2013 Fullpower Technologies, Inc. All rights reserved.
15
Quickly view your current position and altitude from the My Position page. The GPS
signal strength and approximate accuracy is shown, as well as the time elapsed since
the last valid location fix. You can also create a waypoint and access sharing options
with one click.
Lat/Lon: Current
location. Choose between
Lat/Lon, UTM, MGRS, and
OSGB coordinate system
Mark Wypt: Create a
new waypoint using your
current position
(Menu>Setup>Display)
Check in: Post your
location to Facebook
Share: Quickly access
sharing options
GPS Signal:
Green: Strong signal
Yellow: Average signal
Red: Weak signal;
position information
may be inaccurate/
unreliable
Camera: Create a
photo waypoint using
the built-in iPhone
camera
1
within MotionX-GPS. To prevent waypoints or tracks from losing their associated photos,
leave the photos in your camera roll. Share the waypoint or track via email to create a
backup.
1
Full resolution geotagged images are saved to the iPhone’s camera roll instead of
Page 16

8. Map
US and Foreign Patents Granted and Pending. Fullpower®, MotionX®, TapTap®, and ShakeShake® are registered trademarks of Fullpower Technologies,
Inc.All other trademarks remain the property of their respective owners. © Copyright 2003-2013 Fullpower Technologies, Inc. All rights reserved.
16
The MotionX Map view shows a track of your movement in relation to a map. Choose
from fourteen different map types, including road, aerial, hybrid, terrain, and marine.
Optionally display your waypoints, speed/heading, track history, and a coordinate grid
overlay.
Waypoint markers:
Start track
recording
End track
recording
Navigation to a
waypoint started
Waypoint to which
you are navigating
Initial position at
app launch
Waypoint
markers; shape
depends on the
number of
waypoints in the
current field of
1
view
TapTap® or zoom in
to see the individual
waypoints
Current position;
good GPS signal
“Headlight” indicates
direction up mode
Position estimated with
network triangulation
Weak GPS signal
(borderless blue circle)
Position estimated
using Wifi hotspots
Position unknown; no
GPS signal
1
If there are multiple waypoints in the same area, a group sign indicating the number of
waypoints will be shown if you select this option from Options>Signs. TapTap® the sign
or zoom to see the individual waypoints.
Use the MotionX TapTap® tool to create a new waypoint on the map. Move the map or
change zoom levels to position the marker. As the map is moved, the coordinates of the
waypoint as well as the range and bearing from your current location are displayed.
Page 17

8. Map (continued)
US and Foreign Patents Granted and Pending. Fullpower®, MotionX®, TapTap®, and ShakeShake® are registered trademarks of Fullpower Technologies,
Inc.All other trademarks remain the property of their respective owners. © Copyright 2003-2013 Fullpower Technologies, Inc. All rights reserved.
17
Map Buttons
Options: see details on
next page of this manual
Full screen: View the
map in full screen mode
Position will not
remain centered
Position remains
centered on map
Position centered;
course-up
Position centered;
direction-up
maintain an upward heading. Speed of travel must be more than a few mph (or km/h).
This feature is not available for Apple Maps.
Direction Up: rotates the underlying map to maintain an upward heading, using the
magnetic compass. Not available for Apple Maps.
1
Course Up: uses orderly changes in position from satellite data to rotate the map to
1
1
!
Page 18

8. Map (continued)
US and Foreign Patents Granted and Pending. Fullpower®, MotionX®, TapTap®, and ShakeShake® are registered trademarks of Fullpower Technologies,
Inc.All other trademarks remain the property of their respective owners. © Copyright 2003-2013 Fullpower Technologies, Inc. All rights reserved.
18
Map Options
Display: Select your preference for units, coordinates, compass, speed format, and skin style
Map types:
• MotionX: road, terrain (OpenStreetMap / OpenCycleMap data)
• Apple: road, aerial, hybrid
• Google: road, aerial, hybrid, terrain
• Bing: road, aerial, hybrid, terrain
• Marine: NOAA charts (US coastal areas)
Signs: View or hide waypoint and track signs, optionally group nearby signs
Recorded Tracks: View or hide tracks from specific track folders
Realtime Track: Hide, save or clear the blue real-time track
Layers: View or hide speed/heading; optionally view map overlays (gridlines, compass rose,
scale marker, Lat/Lon coordinates)
1
Map Downloads: Launches the map download interface (see the Download Maps section for
details)
Measure Tool: Measure the point-to-point distance and bearing between any two locations
Screen Lock: Lock the screen and adjust the display brightness
Flashlight: Turn on the camera flash LED
you still want to save your track.
2
1
Save the Realtime Track in the event that you forget to start the Track Recorder but
or stored onboard. By contrast, MotionX road and terrain maps and NOAA marine charts
may be cached and/or downloaded.
!
2
Due to Apple, Bing, and Google restrictions on maps, these map types can’t be cached
Page 19

8. Map (continued)
US and Foreign Patents Granted and Pending. Fullpower®, MotionX®, TapTap®, and ShakeShake® are registered trademarks of Fullpower Technologies,
Inc.All other trademarks remain the property of their respective owners. © Copyright 2003-2013 Fullpower Technologies, Inc. All rights reserved.
19
TapTap® Tool
• Use the MotionX TapTap® tool on the map to create, edit, share, and navigate to
waypoints.
• Use a TapTap® gesture on waypoint markers to quickly edit, share, navigate to, or
delete waypoints. The TapTap® gesture will also reveal all the waypoints marked by
a group sign marking multiple waypoints.
Create waypoints Edit waypoints Open grouped waypoints
!
Page 20

8. Map (continued)
US and Foreign Patents Granted and Pending. Fullpower®, MotionX®, TapTap®, and ShakeShake® are registered trademarks of Fullpower Technologies,
Inc.All other trademarks remain the property of their respective owners. © Copyright 2003-2013 Fullpower Technologies, Inc. All rights reserved.
20
Track Types
A solid red line represents your path while recording a track with the
Track Recorder. Use the "Start Track", "Pause Track" and "Save Track"
controls on the Record Track page to record and save your track. (In
MotionX-GPS v18.0 and above you may change the color of your recorded
track)
A dotted red line represents an interpolated path between two points
when signal has been lost while the Track Recorder was running.
A solid blue line traces your path when a GPS signal is active and the
Track Recorder is not in use. In the event that you forgot to start the
Track Recorder, you can save these blue tracks to the Logbook. Select
Realtime Track > Save in the Options menu on the Map page. All blue
tracks will be combined into a single track and saved.
A dotted blue line represents an interpolated path between two points
when signal has been lost and the Track Recorder was not running.
A dashed green line from the arrow indicates the path to the waypoint
you have chosen as your destination using the Go To or Start Nav
buttons.
A dashed orange line represents a previously recorded track that is being
followed. A green start flag indicates the start of the track and a
checkered end flag indicates the end.
!
Page 21

9. Waypoints
US and Foreign Patents Granted and Pending. Fullpower®, MotionX®, TapTap®, and ShakeShake® are registered trademarks of Fullpower Technologies,
Inc.All other trademarks remain the property of their respective owners. © Copyright 2003-2013 Fullpower Technologies, Inc. All rights reserved.
21
A waypoint is a set of coordinates that uniquely identifies a geographic location. From
this page you can access your saved waypoints, sorted by name, date, or proximity,
and view the Auto waypoints. You may store up to 2500 waypoints. Here you can also
find instructions for importing waypoints into MotionX-GPS.
Waypoint folders allow grouping of waypoints from a specific activity or trip together.
Create your own custom folders from Options>Add New Waypoint Folder.
New Waypoint:
• Enter Address
• Current location
• TapTap® tool on map
• Enter Lat/Lon
• Enter range/bearing
Home: Used as your
“current location” while
using Manual Mode
Import: View
instructions for importing
waypoints into MotionXGPS. Once the folder is
populated, instructions
are no longer visible.
Alternatively, iTunes Drag
& Drop may be used to
import GPX files. See the
Setup > iTunes Drag &
Drop section of this
manual for details.
1
Options:
• Create a new waypoint
folder
• Change folder order
• Delete waypoint folder
Auto Waypoints
created automatically by
MotionX-GPS:
•
Init (app launch)
• Start Nav
• Last Position
• Start/End Track Recorder
2
POIs: prominent points
of interest to help you
start exploring
Home location you’ve defined. To change your Home position, select the Home Waypoint
folder and edit the coordinates, or select “Set As Home Waypoint” from the Options
menu for any saved waypoint.
you launched the application) in case you get lost.
1
When navigating in Manual Mode (without GPS), the range and bearing start from the
2
Use the ‘Init’ automatic waypoint to find your way back to your starting point (where
Page 22

9. Waypoints (continued)
US and Foreign Patents Granted and Pending. Fullpower®, MotionX®, TapTap®, and ShakeShake® are registered trademarks of Fullpower Technologies,
Inc.All other trademarks remain the property of their respective owners. © Copyright 2003-2013 Fullpower Technologies, Inc. All rights reserved.
22
Folder View
Use the folder view interface to quickly view, search, move, export, or delete
waypoints. Select the Options button to view the waypoint management options.
Options:
Search: Search all
waypoints in the category
or folder you are currently
viewing; start typing and
the waypoint list will be
auto-populated
• Move waypoints to a
different folder
• Delete (also bulk delete)
• Export (email GPX)
Camera icon indicates a
photo is attached
Select a waypoint to see
details, notes, etc., and
to access edit and share
options
Indicates the waypoint is
an imported GPX file
!
Page 23

9. Waypoints (continued)
US and Foreign Patents Granted and Pending. Fullpower®, MotionX®, TapTap®, and ShakeShake® are registered trademarks of Fullpower Technologies,
Inc.All other trademarks remain the property of their respective owners. © Copyright 2003-2013 Fullpower Technologies, Inc. All rights reserved.
23
Waypoint Management
Export waypoints, move waypoints to a different folder, or delete waypoints individually
or in groups (access from Options>Move/Delete/Export Waypoints).
Select one or more
waypoints to include in
the action
!
Move/Export: Move or
export (export GPX file
via email) the selected
waypoints to a different
folder
Page 24

9. Waypoints (continued)
US and Foreign Patents Granted and Pending. Fullpower®, MotionX®, TapTap®, and ShakeShake® are registered trademarks of Fullpower Technologies,
Inc.All other trademarks remain the property of their respective owners. © Copyright 2003-2013 Fullpower Technologies, Inc. All rights reserved.
24
Waypoint Overview
Touch the photo field to
select or change the
photograph associated
with the waypoint
Options:
• Display
- Units
- Coordinate format
- Compass
- Skin style
• Map type
• Start navigation to this
waypoint
• Share
• Set as Home waypoint
• Open in MotionX-GPS
Drive
• Delete
View the waypoint on a
full-screen map (takes
you to the Map page)
!
Crosshairs: Auto-zoom
and center the map
around the waypoint
Page 25

9. Waypoints (continued)
US and Foreign Patents Granted and Pending. Fullpower®, MotionX®, TapTap®, and ShakeShake® are registered trademarks of Fullpower Technologies,
Inc.All other trademarks remain the property of their respective owners. © Copyright 2003-2013 Fullpower Technologies, Inc. All rights reserved.
25
Waypoint Details
Notes: Default text is the
creation time & date of
the waypoint; this field is
editable
Options: Choose from
the following waypoint
options:
• Start Navigation
• Share
• Add/edit photo
• View on Map
• Set as Home waypoint
• Open in MotionX-GPS
Drive (for driving route)
• Delete
Bearing and distance to
waypoint from your
current position
Lat/Lon: Waypoint
location; UTM, MGRS,
and OSGB coordinate
systems are also
available
Icons indicate whether a
photo is associated with
the waypoint, and/or it
was imported
!
Page 26
10. Tracks
US and Foreign Patents Granted and Pending. Fullpower®, MotionX®, TapTap®, and ShakeShake® are registered trademarks of Fullpower Technologies,
Inc.All other trademarks remain the property of their respective owners. © Copyright 2003-2013 Fullpower Technologies, Inc. All rights reserved.
26
Recorder
A track is a compilation of samples or “breadcrumbs” taken over a period of time. To
record and save your tracks, select Record Track from the main menu. You may store
up to 300 tracks. Here you can also find instructions for importing tracks into MotionXGPS.
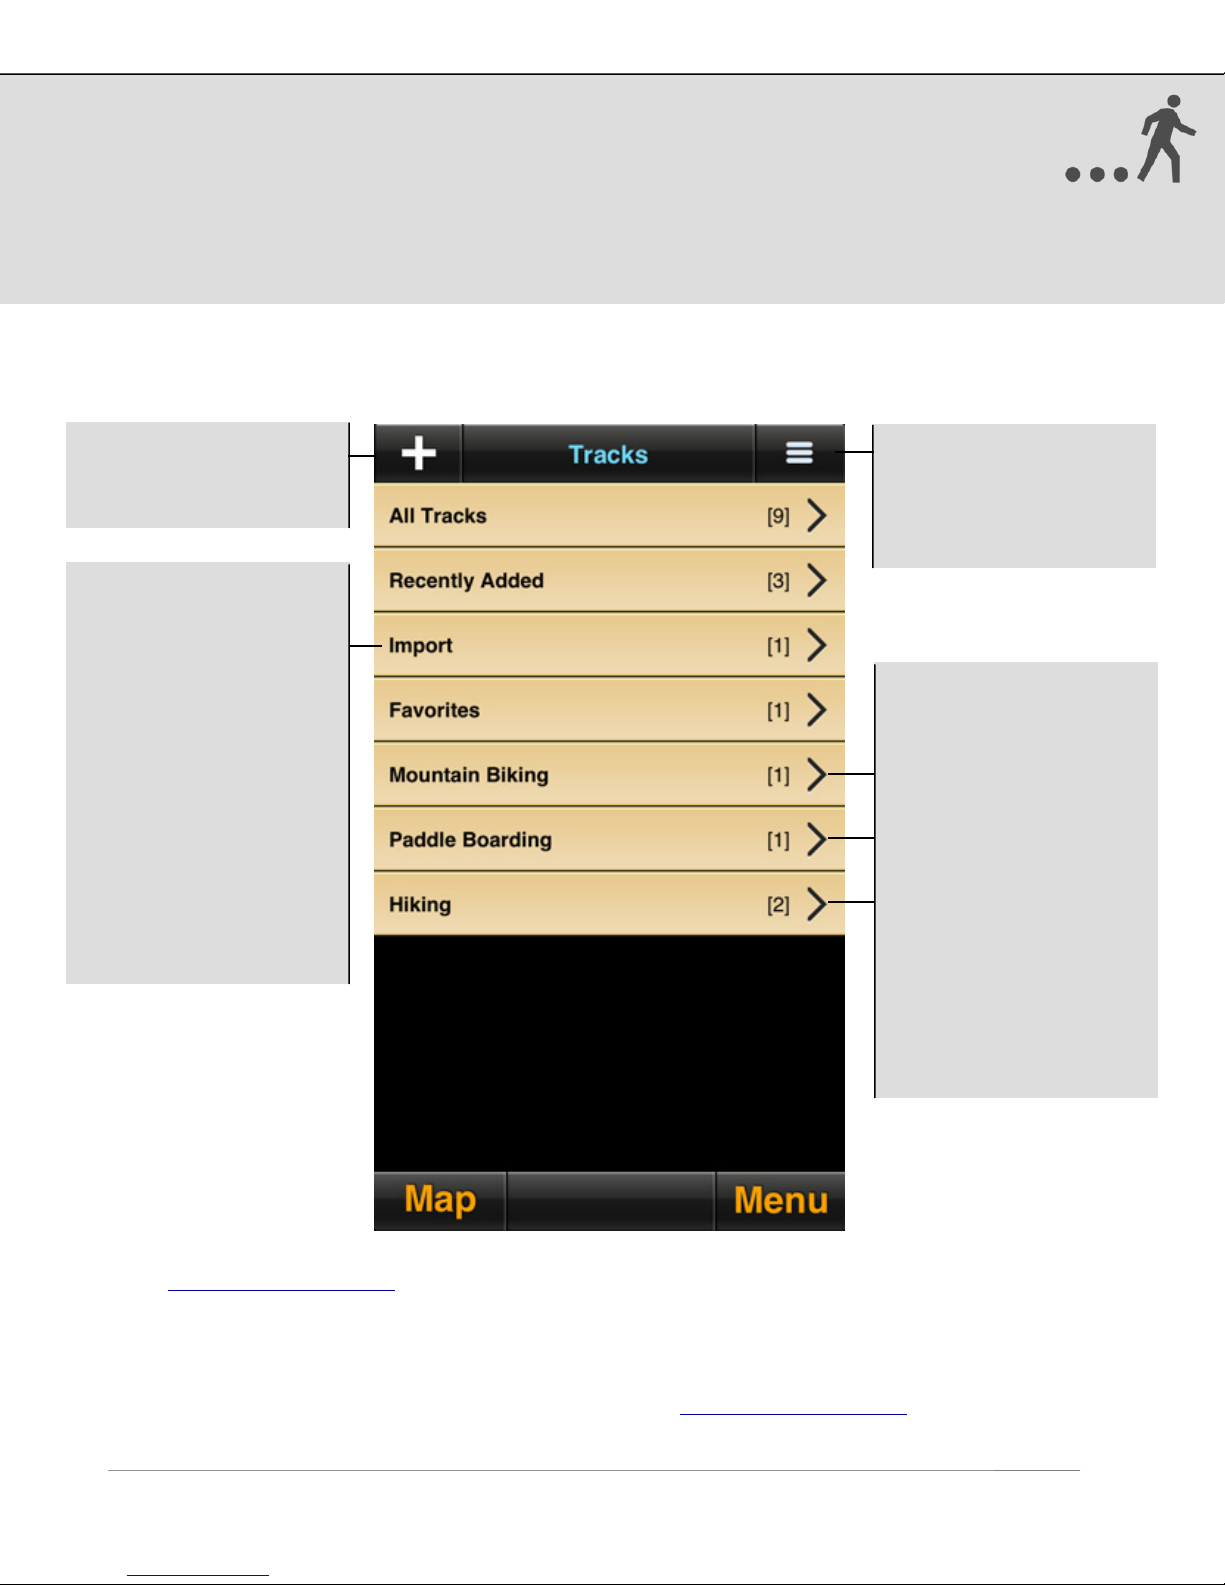
New track recordings are added to the All Tracks directory. Track folders allow you to
group tracks from a specific region, activity, or trip together. Create your own custom
folders from Options>Add New Track Folder.
New Track: Create a
new track; this button
brings up the Track
Import: Contains the
tracks you've imported
into MotionX-GPS. When
no tracks are present,
import instructions (listed
below) are displayed
describing how to import
waypoints or tracks into
MotionX-GPS.
Alternatively, iTunes Drag
& Drop may be used to
import GPX files. See the
Setup>iTunes Drag &
Drop section of this
manual for details.
Options:
• Create a new track
folder
• Change folder order
• Delete track folder
Custom Folders:
Create custom folders to
organize your tracks. To
move one or more tracks
between folders, choose
any folder then select the
Options button. Select
Move Tracks, add a
checkmark next to the
track(s) you'd like to
move, then select the
Move button. A list of the
available folders will
display. Select your
folder and when
prompted, confirm the
move.
1. To import waypoints or tracks, send an email from your Mac or PC with one or more GPX files attached
to gpsimport@motionx.com.
2. You will receive an email, which should be viewed from your iPhone Mail app.
3. Select the link in the email. MotionX-GPS will launch and provide a summary of the number of items
that will be imported.
4. Select "Import Now" and the waypoints or track will be imported.
Note: Forwarding an email with a GPX file from your iPhone to gpsimport@motionx.com is supported.
Import emails are limited to 12 waypoint GPX files or one track GPX file per email.
Page 27

10. Tracks (continued)
US and Foreign Patents Granted and Pending. Fullpower®, MotionX®, TapTap®, and ShakeShake® are registered trademarks of Fullpower Technologies,
Inc.All other trademarks remain the property of their respective owners. © Copyright 2003-2013 Fullpower Technologies, Inc. All rights reserved.
27
Folder View
Use the folder view interface to quickly search, move, export, or delete tracks. Select
the Edit button to view the track management options (export, move, delete).
Search: Search all tracks
in the category or folder
currently being viewed.
Start typing and the list
will be auto-populated.
Folder Summary: View
summary statistics for all
tracks in a particular
1
folder
Select a track to see
details, statistics, notes,
etc., and to access
additional options
Options:
• Sort by track date,
proximity, or name
• Edit folder name
• Move tracks to a
different folder
• Delete tracks
• Export tracks (email
GPX files)
Icons
• Activity mode: indicates
mode used during track
recording
• Camera: photo attached
• Import: the track was
imported from a GPX file
• Directional arrow: points
to the start of the track
useful for grouping tracks based on activity type, or a period of time while training. For
example, separate your biking tracks and your hiking tracks into different folders to see
summaries for each. Or create a folder for a particular month to see a summary of all
your activities for that month.
!
1
Viewing folder summary statistics (e.g. total distance, average speed, etc.) may be
Page 28

10. Tracks (continued)
US and Foreign Patents Granted and Pending. Fullpower®, MotionX®, TapTap®, and ShakeShake® are registered trademarks of Fullpower Technologies,
Inc.All other trademarks remain the property of their respective owners. © Copyright 2003-2013 Fullpower Technologies, Inc. All rights reserved.
28
Track Management
Move tracks to a different folder, delete tracks, or export tracks (GPX files) individually
or in groups. This feature is accessed using the Options button (upper right corner).
Select one or more tracks
to include in the action
!
Move/Delete/Export:
Move the selected tracks
to a different folder
Page 29

10. Tracks (continued)
US and Foreign Patents Granted and Pending. Fullpower®, MotionX®, TapTap®, and ShakeShake® are registered trademarks of Fullpower Technologies,
Inc.All other trademarks remain the property of their respective owners. © Copyright 2003-2013 Fullpower Technologies, Inc. All rights reserved.
29
Track Overview
Touch the photo field to
select or change the
photograph associated
with the track
Options:
• Display
- units
- speed/pace format
- skin style
• Map type
• Activity mode
• Line color
• Follow track
• Share (via email,
Facebook, or Twitter)
• Add/edit photo
• Delete
View the track on a fullscreen map (takes you to
the Map page)
View Details: track
metrics such as time,
distance, speed, ascent/
decent, graphs, etc.
Crosshairs: Auto-zoom
and center the map
around the completed
track
!
Page 30

10. Tracks (continued)
US and Foreign Patents Granted and Pending. Fullpower®, MotionX®, TapTap®, and ShakeShake® are registered trademarks of Fullpower Technologies,
Inc.All other trademarks remain the property of their respective owners. © Copyright 2003-2013 Fullpower Technologies, Inc. All rights reserved.
30
Track Details
Name: Touch this field to
edit the name of the
track
Options:
• Follow this track
• Share (via email,
facebook, or twitter)
• Select Activity
• Change line color
• Delete
Customize the track data
displayed by pressing and
holding any of the lower
data fields. Select a
category (general,
navigation, sensor,
elevation), then use the
picker wheel to define the
field. You may mix and
match units of your data
fields if desired. Enable
custom fields from
Menu>Setup>Display>
Custom Fields.
Notes: Default note is
start time & date of the
track; this field is editable
Swipe the bottom region
vertically to view
additional data:
• Elevation graph
• Total ascent / descent
• Maximum positive and
negative gradient
!
Page 31

11. Compass
US and Foreign Patents Granted and Pending. Fullpower®, MotionX®, TapTap®, and ShakeShake® are registered trademarks of Fullpower Technologies,
Inc.All other trademarks remain the property of their respective owners. © Copyright 2003-2013 Fullpower Technologies, Inc. All rights reserved.
31
The MotionX Compass shows such information as heading, SOG (speed over ground),
VMG (velocity made good), distance, bearing, and time to waypoint, and ETA during
active navigation.
VMG: Velocity made good
(effective speed at which
you are approaching your
waypoint)
Wypt Dist: Distance to
selected waypoint; select
unit preference (m, km,
mi, ft, yds, or nm) from
Menu>Setup>Display
Blue arrow: Indicates
the bearing to your
destination
Customize the Compass
display by pressing and
holding any data field.
Select a category
(general, navigation,
sensor, elevation), then
use the picker wheel to
define the field. You may
mix and match units of
your data fields if
desired. Enable custom
fields from
Menu>Setup>Display>
Custom Fields.
Page 32

11. Compass (continued)
US and Foreign Patents Granted and Pending. Fullpower®, MotionX®, TapTap®, and ShakeShake® are registered trademarks of Fullpower Technologies,
Inc.All other trademarks remain the property of their respective owners. © Copyright 2003-2013 Fullpower Technologies, Inc. All rights reserved.
32
Compass Button
Compass Modes
(touch to toggle):
Auto Mode: Uses the
magnetometer at speeds
below 5 mph and GPS
positional changes above
5 mph. The icon is a
sextant.
Inaccurate heading:
Heading accuracy is
<85%. Sustain a speed
of more than a few mph
(or km/h) for an
accurate heading.
Weak GPS signal: Red
compass button indicates
weak or no GPS signal
For the satellite-based compass (GPS mode) to provide an accurate heading, you should
be outdoors with a clear view of the sky and moving at least a few mph or km/h. The
magnetometer in the iPhone is susceptible to magnetic interference from electronics
and ferrous metals. If an accurate direction cannot be achieved due to interference, you
will be instructed to move away from the interference and re-calibrate the
magnetometer by moving your iPhone in a figure 8 pattern (turn off this warning in
Setup>General).
Magnetic Mode: Uses
the built-in digital
compass. The icon is a
compass rose (8-pointed
star).
GPS Mode: Heading is
determined using orderly
changes in position
!
Page 33

12. Map Downloads
US and Foreign Patents Granted and Pending. Fullpower®, MotionX®, TapTap®, and ShakeShake® are registered trademarks of Fullpower Technologies,
Inc.All other trademarks remain the property of their respective owners. © Copyright 2003-2013 Fullpower Technologies, Inc. All rights reserved.
33
Define an area of the map along with a range of zoom levels to pre-load onto your
iPhone for offline access. Once downloaded, these tiles will be saved in MotionX-GPS
permanently unless you choose to delete them. Map tile sets are not included in iTunes
backups unless you configure to do so in Setup>Maps.
Go to Setup>Map Downloads to access the map download interface. Downloaded maps
are defined by an area along with a range of zoom levels to download, for use when a
network connection is unavailable. Once downloaded, map tile sets are saved in
MotionX-GPS permanently unless you manually delete them. Map types available for
download include MotionX Terrain (based on OpenCycleMap), MotionX Road (based on
OpenStreetMap), and NOAA marine charts.
Maps are typically
downloaded faster via
Wifi
Icon indicates tile set type:
Road maps
Terrain maps
NOAA marine charts
Download status:
• Green: fully downloaded
• Red: partially
downloaded
Map downloads and map caching are similar but distinct features. Both improve map
performance and enable offline map viewing. Map caching automatically saves tiles
viewed on the Maps page as you pan and zoom. The cache limit is 250 MB; beyond this
limit the oldest cached tiles are overwritten as new tiles are cached. Cached maps are
not stored with iTunes backups, and my be cleared via Setup>Maps.
Page 34

12. Map Downloads (continued)
US and Foreign Patents Granted and Pending. Fullpower®, MotionX®, TapTap®, and ShakeShake® are registered trademarks of Fullpower Technologies,
Inc.All other trademarks remain the property of their respective owners. © Copyright 2003-2013 Fullpower Technologies, Inc. All rights reserved.
34
Area Definition
Touch and drag the red
square to adjust the
circumference
Select by Area: define a
circular area of map tiles
to be downloaded; useful
for large areas such as
national parks or cities
Select by Route: Use
this option to define a
longer, narrower area
instead of a circular area;
useful for pre-loading
map tiles along a hiking
trail, for example
Drag the map from
anywhere to adjust the
center of the download
area
Due to Apple, Bing, and Google restrictions on map storage, these maps types can’t be
cached or downloaded. By contrast, MotionX road and terrain maps and NOAA marine
charts may be cached and downloaded.
!
Arrow: Center the
selection area over your
current position
+/- : Use buttons or
multi-touch on the map
to change the zoom level
Page 35

12. Map Downloads (continued)
US and Foreign Patents Granted and Pending. Fullpower®, MotionX®, TapTap®, and ShakeShake® are registered trademarks of Fullpower Technologies,
Inc.All other trademarks remain the property of their respective owners. © Copyright 2003-2013 Fullpower Technologies, Inc. All rights reserved.
35
Downloading Options
Tile Set Name: Choose
a name for the tile set
(touch the field to edit)
Min/Max Zoom: Adjust
the min/max zoom levels
for which you'd like map
tiles downloaded. Higher
numbers represent a
more zoomed in view.
Thus the number of tiles
and total memory
required will be larger at
greater zoom level
numbers.
Memory display:
• Amount of used disk
space on your iPhone
• Estimated tile set size
• Total disk size of your
iPhone
Total Size: Estimated
size of the tile set you've
selected; this will adjust
as the tiles download
Terrain map tiles tend to be larger than road map tiles due to the contour data.
Tiles in urban areas also require more memory due to the density of street and
feature data.
!
Page 36

12. Map Downloads (continued)
US and Foreign Patents Granted and Pending. Fullpower®, MotionX®, TapTap®, and ShakeShake® are registered trademarks of Fullpower Technologies,
Inc.All other trademarks remain the property of their respective owners. © Copyright 2003-2013 Fullpower Technologies, Inc. All rights reserved.
36
Downloaded Map Details
View: View all
downloaded map tiles in
the selected tile set
1
Retry Missing Tiles:
Attempt to download
missing maps tiles that
were originally
unavailable (if applicable)
Delete: Delete the map
tile set
connection.
1
These tiles will always be viewable on all map pages, with our without a network
Refresh: Downloads the
latest map tiles for the
map set area and zoom
levels previously defined
By default, cached and downloaded maps are not backed up when syncing with iTunes,
to significantly decrease the iPhone-to-iTunes sync and backup times (optionally choose
to back up maps to iTunes from Menu > Setup > Maps).
!
Page 37

13. Setup
US and Foreign Patents Granted and Pending. Fullpower®, MotionX®, TapTap®, and ShakeShake® are registered trademarks of Fullpower Technologies,
Inc.All other trademarks remain the property of their respective owners. © Copyright 2003-2013 Fullpower Technologies, Inc. All rights reserved.
37
Configure MotionX-GPS application preferences from the Setup page.
Sounds: Turn global application sound effects on or off.
Accelerometrics Assisted GPS: Toggle Accelerometrics ON for greater low-speed
accuracy, or OFF for improved battery life.
Accuracy Filter: The Accuracy Filter is ON by default for the best GPS position
accuracy. You may wish to switch the Accuracy Filter OFF if you are having trouble
acquiring a signal or when traveling at very high speeds (over 150 mph or 240 km/h).
Disable Compass Interference Warning: Turn off the warning for inaccurate
compass reading due to magnetic interference.
Geocaching: Increases the frequency of position updates.
Navigation: Choose between Rhumb Line or Great Circle navigation.
Skin Styles: Choose either the default color scheme (dark background with orange
numbers) or a high-contrast scheme for improved visibility in day/sunlight.
Orientation: Choose between Portrait, Landscape, or Automatic.
Speed Format: Choose between displaying speed or pace on the Track Recorder page
and in saved tracks details.
Units: Select either kilometers, meters, miles, feet, yards, or nautical mile units.
Coordinate Format: Select a coordinate display format: Degrees/Minutes/Seconds
(DMS), Degrees / decimal Minutes (DM), Decimal (D), UTM, MGRS, or OSGB (UK grid).
Compass: Use either magnetic or true north as a reference.
Custom Fields: Enable the custom fields feature, which enables customizing data
fields displayed on various pages including the track recorder, my position, and track
summary, and compass pages.
Page 38

13. Setup (continued)
US and Foreign Patents Granted and Pending. Fullpower®, MotionX®, TapTap®, and ShakeShake® are registered trademarks of Fullpower Technologies,
Inc.All other trademarks remain the property of their respective owners. © Copyright 2003-2013 Fullpower Technologies, Inc. All rights reserved.
38
Map Data: When toggled off, new map data will not be downloaded (for those
concerned about data usage). Note this does not restrict Google (iOS 5) or Apple (iOS
6) map types. To disable those map tiles from being downloaded turn off cellular data
in your iPhone settings.
Backup Maps in iTunes: Enable the backup of your cached and downloaded maps in
iTunes during your next sync. Due to the very long sync times associated with backing
up map tiles in iTunes, we recommend only turning this option on if you plan on
restoring your device, to avoid having to re-download your maps.
Map Caching: Turn Map Caching ON to automatically cache MotionX Road or Terrain
map tiles, or NOAA marine chart tiles, so they can be viewed offline.
See the Map Downloads section of this user manual for details.
1. Enable iTunes Drag & Drop from Menu > Setup > iTunes Drag & Drop.
2. Connect your iPhone with your Mac or PC using your sync cable and launch iTunes.
3. From iTunes, select your iPhone, then select the Apps tab and scroll down to the
File Sharing section. Select MotionX-GPS, then add GPX files to the GPS Documents
window or save GPX files from your iPhone to your desktop via drag & drop.
Note: iTunes Drag & Drop is not supported on the iPhone 3G or 1st/2nd generation iPod touch.
!
Page 39

13. Setup (continued)
US and Foreign Patents Granted and Pending. Fullpower®, MotionX®, TapTap®, and ShakeShake® are registered trademarks of Fullpower Technologies,
Inc.All other trademarks remain the property of their respective owners. © Copyright 2003-2013 Fullpower Technologies, Inc. All rights reserved.
39
Use voice coaching options to enable/customize audio updates while recording a track.
• Turn voice coaching audio updates On/Off
• Turn Notifications On/Off (notifications appear when the track recorder is running
and the display is turned off)
• Choose whether you want a notification for lost GPS signal
Track Recorder
• Turn the Track Recorder “3,2,1, Go” countdown On/Off
• Choose Track Recorder metrics for which you want an update (elapsed time,
distance, speed/pace, elevation, heart rate)
Navigation
• Choose navigation update options (announced when actively navigating to a
waypoint), including distance, bearing, and time to waypoint
Settings
• Set the update trigger: choose either time or distance
• Select either current or average speed/pace and heart rate
• Adjust the Update Interval slider to increase or decrease the time between voice
coaching updates
• Control the sound level of voice coaching with the Voice Volume slider
• Tur n on Pause iPod for Voice to pause/resume your music during voice coaching
updates. When the switch is Off, music volume will fade during updates.
Track your heart rate from MotionX using a ANT+ or Bluetooth Low Energy (BLE) chest
strap heart rate sensor.
ANT+
To setup an ANT+ heart rate monitor, wear the chest strap and connect the ANT+
receiver (dongle or case) to your iPhone. Select Manage Sensor>Connect. Once
connected, your heart rate will display on the setup page and in the track recorder.
!
Page 40

13. Setup (continued)
US and Foreign Patents Granted and Pending. Fullpower®, MotionX®, TapTap®, and ShakeShake® are registered trademarks of Fullpower Technologies,
Inc.All other trademarks remain the property of their respective owners. © Copyright 2003-2013 Fullpower Technologies, Inc. All rights reserved.
40
Bluetooth Low Energy (BLE)
Newer Bluetooth Low Energy heart rate monitors are supported on the iPhone 4S and
iPhone 5 only as BLE requires a specific Bluetooth chipset found only in these devices.
No receiver dongle or case is required and there is no need to pair the BLE HR monitor
with your iPhone first. To set up, be sure Bluetooth is turned on from iPhone
Settings>General. Wear the chest strap, then from MotionX-GPS select
Menu>Setup>Heart Rate Sensor>Manage Sensor>Connect.
Manufacturers of Compatible Heart Rate Chest Straps
• Wahoo Fitness: ANT+ and BLE
• Polar: ANT+ and BLE
• Garmin: ANT+
• Timex: ANT+
• Adidas: ANT+
Manufacturers of compatible ANT+ iPhone Receiver Dongles and Cases
• Wahoo Fitness: Cases and dongles
• Define a 5-digit channel using the picker wheels. Share your channel with friends
who want to see your location.
• Define an interval for broadcasting your location (ranging from 30sec to 10min). Your
friends’ latest known locations are updated at the interval they have selected.
• Select a radius within which you would like to display your friends’ locations.
• Select a time interval to display your friends’ last known position updates. Choosing
12 hours, for example, will allow you to see their last position broadcast for 12 hours
after they have stopped sending updates.
Auto Live Position Updates will run (GPS chipset will remain active) when MotionX-GPS
is backgrounded if Setup>Multitasking is set to either Optimized or Always On.
TapTap® a friend’s location sign on the map to view the timestamp of their last
location update.
!
Page 41

13. Setup (continued)
US and Foreign Patents Granted and Pending. Fullpower®, MotionX®, TapTap®, and ShakeShake® are registered trademarks of Fullpower Technologies,
Inc.All other trademarks remain the property of their respective owners. © Copyright 2003-2013 Fullpower Technologies, Inc. All rights reserved.
41
Auto Share: Automatically share your saved tracks based on your settings and
defined preferences below.
Facebook: Log into Facebook and post tracks and waypoints directly to your Timeline
or Activity Log, to enable Check-ins, and to view your friends’ Check-ins.
Display Name: This name will be used to identify you to others when sharing.
Email: Share with up to six email addresses at once.
Twitter: Turn Twitter sharing on to post tweets with track or waypoint information.
Sign into your account from your iPhone Settings>Twitter, and ensure you have
enabled sharing with MotionX-GPS at the bottom of that settings page.
One-Click share: Turn ON one-click share to skip the Share screen each time you
share a track or waypoint.
• Select the appropriate Activity Mode (e.g. Biking, Flying, Hiking, etc.) to optimize
speed and distance accuracy.
• Turn the Track Recorder stats Autoswipe on or off, and configure settings. When set
to ON, the track statistics and graphs at the bottom of the Track Recorder page will
automatically scroll between the four available views (speed/pace & distance or
custom fields, speed/pace graph, altitude graph, and ascent/decent & gradient).
Configure the idle time (time the screen is idle before Autoswipe begins) and the
page view time.
• When turned ON, Track Recorder Auto Pause will automatically pause the elapsed
time when you stop moving. When you start moving again, the elapsed time will
start again. This will keep your average speed and average pace accurate if you don’t
manually press Pause when stopped. If the Pause button is pressed, the Auto Pause
feature will not override this action.
!
Page 42

13. Setup (continued)
US and Foreign Patents Granted and Pending. Fullpower®, MotionX®, TapTap®, and ShakeShake® are registered trademarks of Fullpower Technologies,
Inc.All other trademarks remain the property of their respective owners. © Copyright 2003-2013 Fullpower Technologies, Inc. All rights reserved.
42
Auto page cycle automatically cycles through the pages selected. When turned ON,
autocycling will initiate when any of these pages are viewed. Choose to include any
combination of the Track Recorder, My Position, Map or Compass pages in the rotation.
Initiate auto page cycle following an idle time ranging from 10 sec to 5 min. View each
page in the rotation from 5 sec up to 1 minute.
Configure how you would like MotionX-GPS to behave when you are running it in the
background while multitasking with other applications.
Optimized: Keep the GPS receiver on when MotionX-GPS is backgrounded with the
Track Recorder or Auto Live Updates running, or when actively navigating to a
waypoint.
Always On: Keep the GPS receiver on when MotionX-GPS is backgrounded. This
option consumes the most power.
Always Off: Turn the GPS receiver off when MotionX-GPS is backgrounded. This
option consumes the least power.
Outdoor GPS: Uses the GPS chipset to determine location. Horizontal accuracy: 30ft 300ft.
Wifi/Triangulation: Uses network triangulation or Wifi hotspot location to determine
position. Horizontal accuracy: 100ft to 3 miles.
Manual: Define your position manually. While navigating to a waypoint, range/bearing
is determined from the manually entered “Home” waypoint.
!
Page 43

13. Setup (continued)
US and Foreign Patents Granted and Pending. Fullpower®, MotionX®, TapTap®, and ShakeShake® are registered trademarks of Fullpower Technologies,
Inc.All other trademarks remain the property of their respective owners. © Copyright 2003-2013 Fullpower Technologies, Inc. All rights reserved.
43
Optionally purchase Custom Map URLs using in-app purchase to create and host your own
maps, or to use a map type not offered in MotionX. You must know and specify the map tile
server URL (this is not necessarily the same as the URL you use from your browser).
Added Custom Map types are available from the main map and from Map Downloads. Check the
map providers’ terms and conditions to ensure you are permitted to download their map tiles
for offline use.
Examples after purchasing include USGS base map and OpenCycleMap.
Restore to factory settings: Restore MotionX-GPS to its freshly installed state. All
data content, and settings will be erased.
Reset map tile sets only: Delete all downloaded map tile sets.
!
 Loading...