

Page 1
Motion Pro T-6 CHAIN TOOL Instructions Part Number 08-0358
Motion Pro is dedicated to producing the most versatile, unique and durable tools in the motorsport industry. The tools we design are made to exact
tolerances with the highest quality materials and workmanship. They are designed to withstand years of use when used properly. We stand behind our
tools 100% for material and workmanship. Please take the time to read the following instructions before using your T-6 Chain Tool, care should be taken
whenever working with or around any type of machinery.
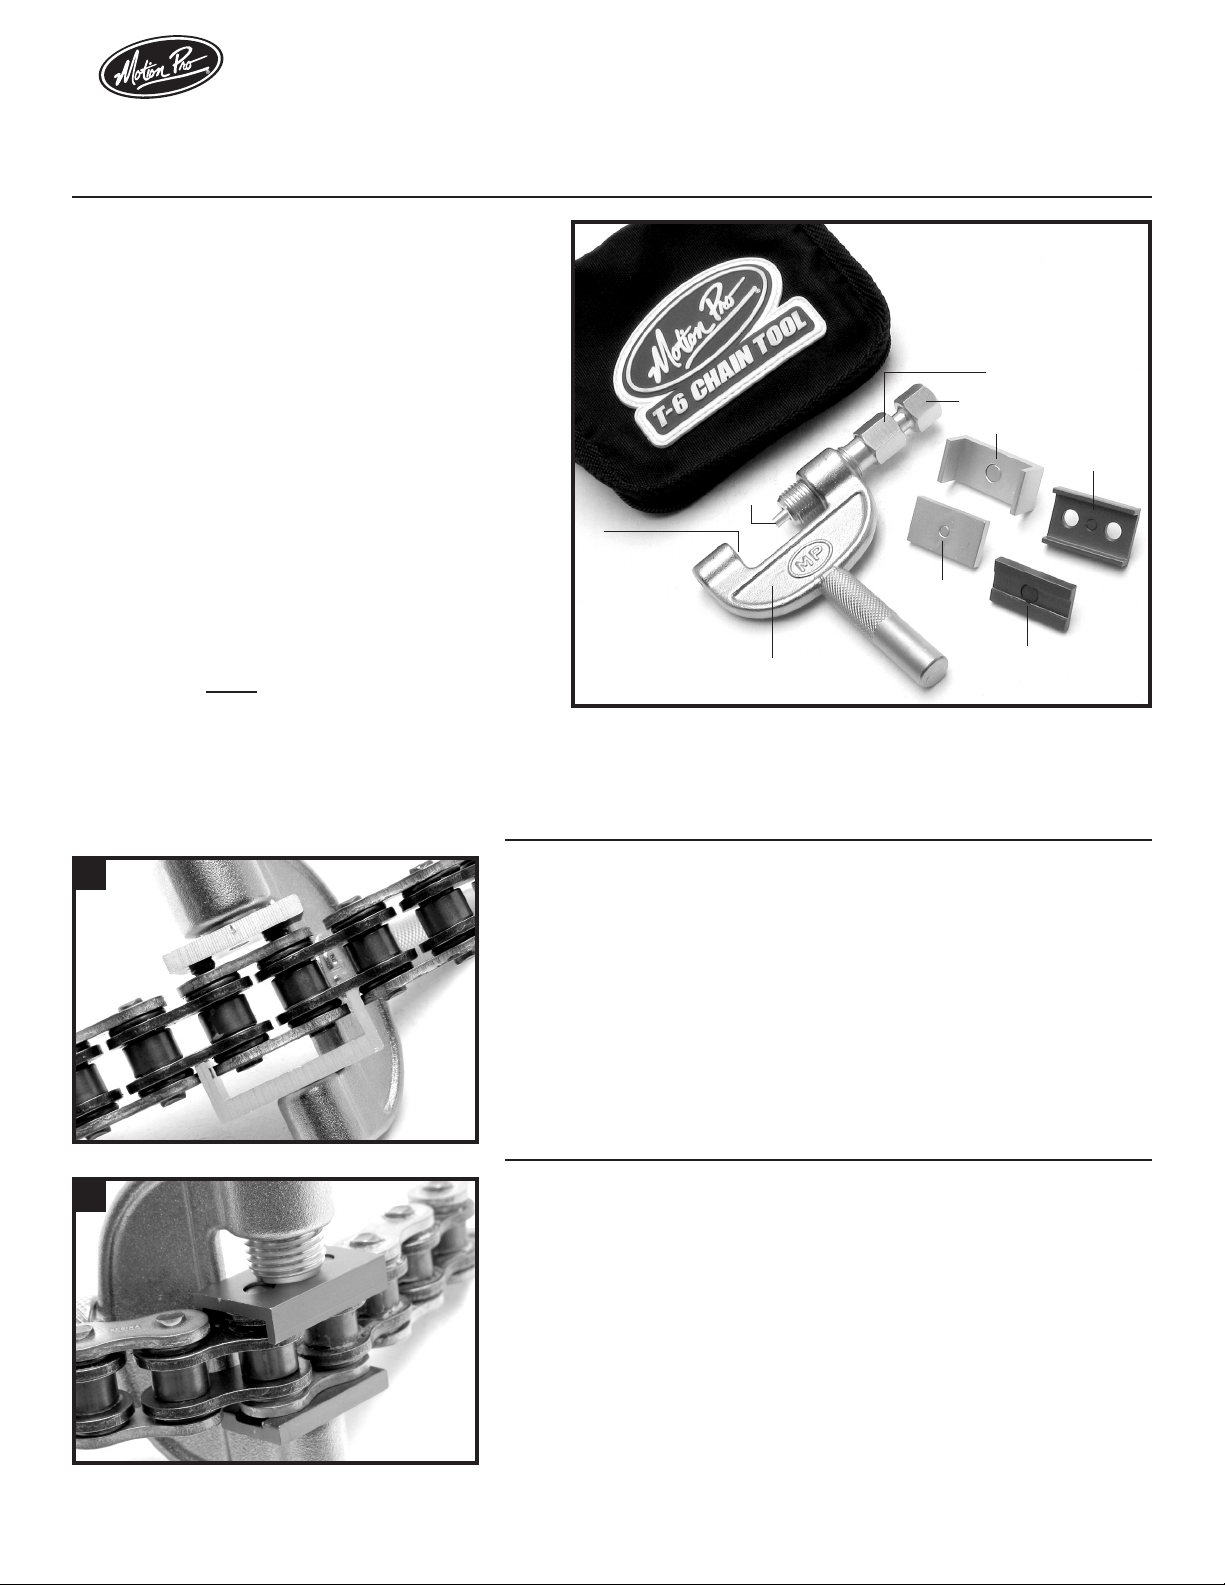
1. Anvil
2. Chain Tool Body
3. Slotted Back Plate (Blue)
4. Press Plate w/ Guide Holes (Blue)
5. Flat Press Plate (Silver)
6. Holding Back Plate (Silver)
7. Extractor Bolt
8. Body Bolt
9
1
8
7
6
4
9. Extractor Pin
5
Note: For clip type master links with
press t side plates.
Does NOT rivet chains
1) Chain breaking: In order to insure long life of your chain breaking extractor pin the following measures should be taken when breaking your chain.
a) Back out the extractor bolt #7 until the extractor pin #9 is recessed from the face of the body bolt #8, 1 to 2mm.
b) Tighten the body bolt #8, clamping the chain between the bolt and the anvil.
c) With the extractor pin and chain link pin in line, tighten the extractor bolt until the chain pin is pushed completely through the chain link.
2
2) For removing the master link plate: In many cases with today’s chains you’ll need to
press off the master link outer plate to remove your chain. You’ll be using the SILVER
plates (#5 & #6) marked “OFF” included with your T-6 Chain Tool, to perform this job.
Please use the following instructions to protect against damage to your chain or your
T-6 Chain Tool.
2
3
4.11.06
a) REMOVE the extractor bolt #7 and pin #9 from the body bolt #8 of the
chain tool prior to placing the at press plate #5 into the guide hole of
the body bolt.
b) Place the U-shaped back plate #6 into the guide hole of the chain tool body.
Use the body bolt #8 to push the at press plate against the chain link pins
until the plate has cleared the master link groove holes. The outer chain
plate should now be removable.
3
Motion Pro, Inc. • 867 American Street • San Carlos, CA 94070 • 650-594-9600 Fax: 650-594-9600 • www.motionpro.com
3) For installing the press plate: Many modern day chains require that the outer
master link plate be pressed into place prior to installing the master link spring clip.
You’ll be using the BLUE plates (#3 & #4) marked “ON” included with your T-6 Chain
Tool, to perform this job. Please use the following instructions to protect against
damage to your chain or your T-6 Chain Tool.
a) REMOVE the extractor bolt #7and pin #9 from the body bolt #8 of the chain
tool prior to placing the press plate with guide holes #4 into the guide hole of the
body bolt.
b) Place the slotted back plate #3 into the guide hole of the chain tool body. Use
the body bolt #8 to push the press plate with guide holes #4 against the master
link side plate. Be sure that the chain link pins are aligned with the holes on the
press plate before applying pressure, miss-alignment will cause damage to the
chain pins and/or the press plate.
c) The outer chain link plate should be pressed on until the master link grooves
are fully accessible allowing the spring clip to be securely placed.
I8-0358
 Loading...