

Page 1
EXPLORER
User Manual
v 1.3
Page 2

CONTENTS EXPLORER User Manual
Contents
Features 3
Overview 4
Vector Overview 4
Drone Overview 4
Goggles Overview 5
Charger Overview 5
Pre-Flight Procedure 6
Turning the Controller On/O 6
Controller Status Indicator Description 6
Calibration of the Controller 8
Choosing the Flight Mode 8
Charging the Controller 8
Charging the Drone Batteries 9
Installing the Battery on the Drone 9
Turning the Drone ON/OFF 9
Turning the Goggles ON/OFF 9
Choosing the Video Channel 9
Changing the Goggles Display Settings 9
In Flight Operation 10
Reading the On Scree Display (OSD) 10
Arming the Aircra and Setting the Control Position 11
Controlling the Drone with Vector and Choosing the Flight Mode 11
Disarming the Safety Timer Aer Flight 12
Troubleshooting 13
Drone Is Not Arming 13
Poor Goggles Video Range 13
Charger Is Not Functioning Properly 13
Resetting your Controller 13
Contacting Customer Support 13
c
2019 MotionPilot SA. All rights reserved.
2
Page 3

Features EXPLORER User Manual
Features
Motion Control
Vector is introducing motion control to the world of First Person View. A s you press on the arm button, Vector
precisely tracks the attitude of your hand in space. Each of the three control axis - yaw, pitch and roll – can be
controlled. The result is an intuitive and immersive piloting experience while zipping through the air.
Long Range Carbon Protocol
Flying a drone requires a radio link that works in every situation. For Vector, we started from a blank sheet. We
are using state-of-the-art technology for the Carbon protocol. The result is a strong and reliable link up to 1km.
Portable
We have been able to shrink the size of the Vector controller by using motion control and our own embedded
communication module. The result is a compact and sturdy remote control that you can toss in your back pack
and carry everywhere with you.
Sturdy Design
With our compact design and few moving pieces, Vector is extremely sturdy. We have tested the controller in
extreme conditions with great results. Vector can easily be carried in your backpack without havingto be afraid
of damaging it.
Refined User Interface
For vector, we have designed the user interface specifically for FPV aircra. The controller fits nicely in your
hand. Both buttons for changing flight mode and arming the drone are easily accessible.
c
2019 MotionPilot SA. All rights reserved.
3
Page 4
Overview EXPLORER User Manual
Overview
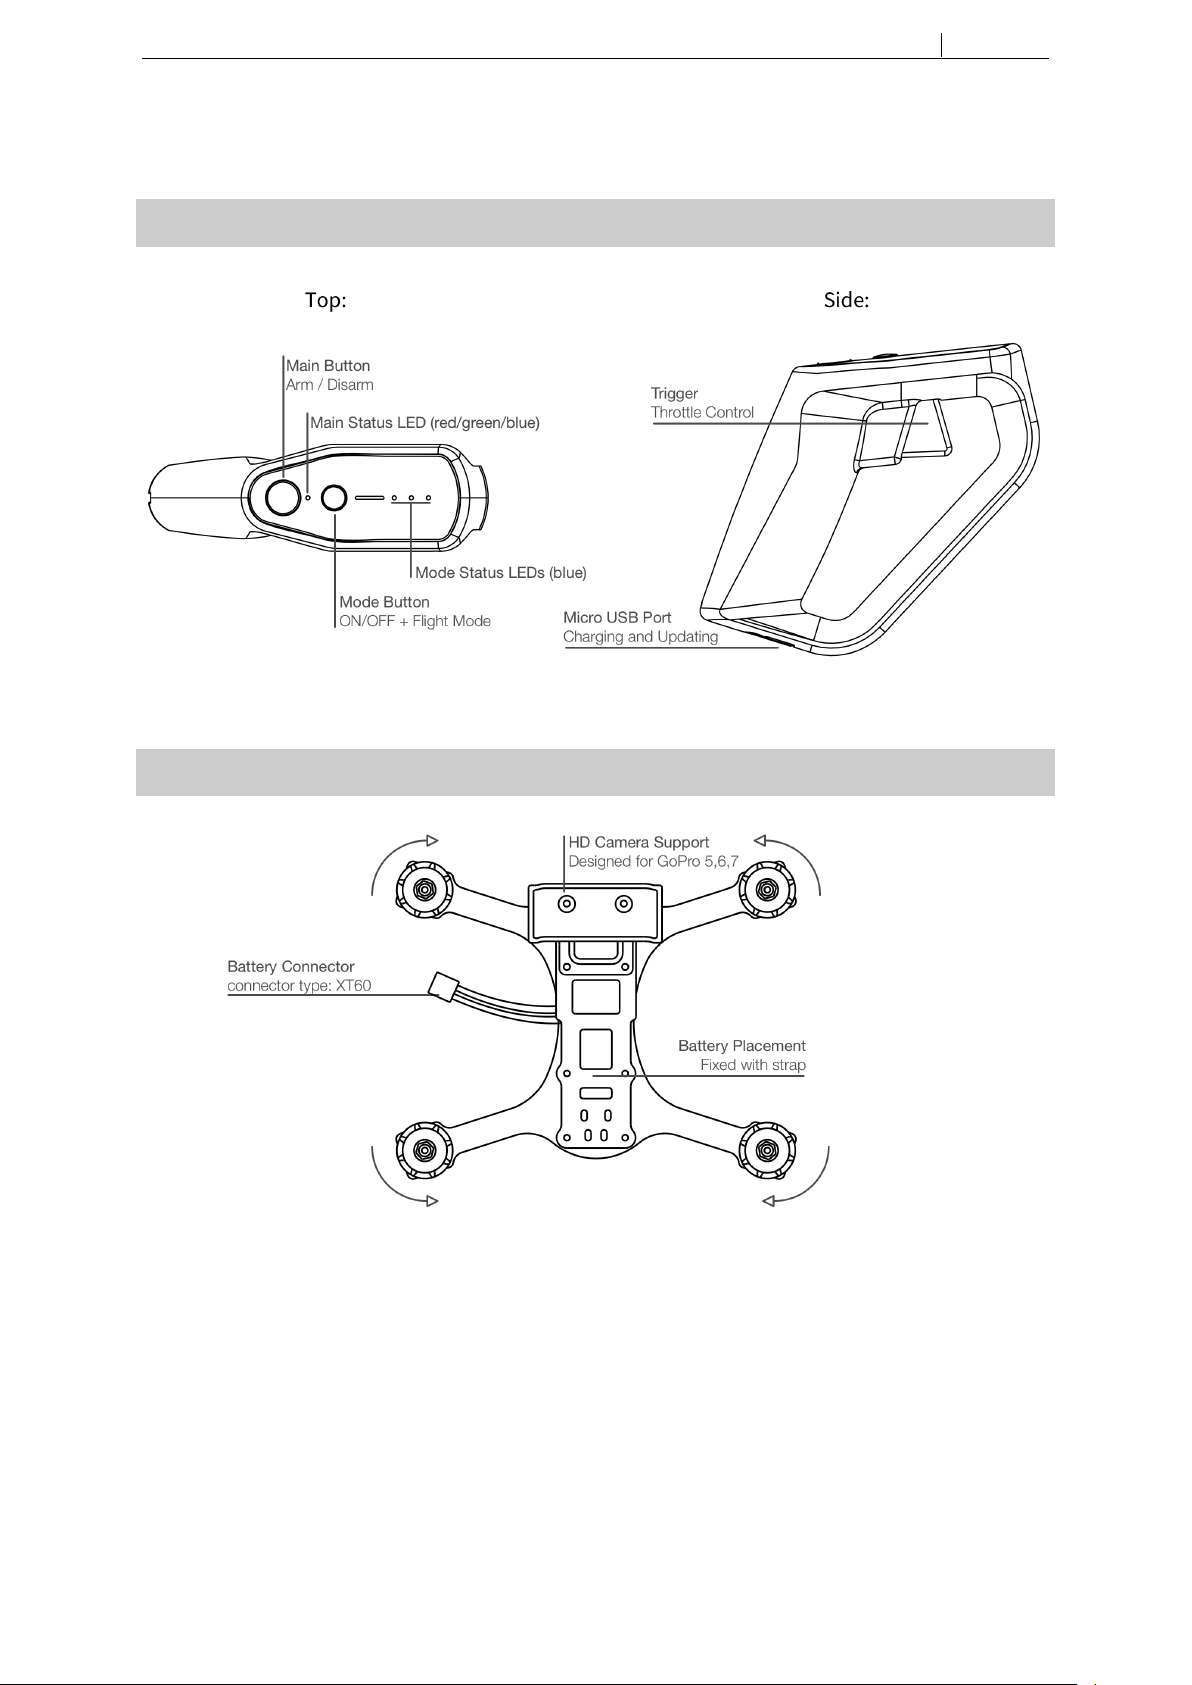
Vector Overview
Drone Overview
c
2019 MotionPilot SA. All rights reserved.
4
Page 5
Overview EXPLORER User Manual
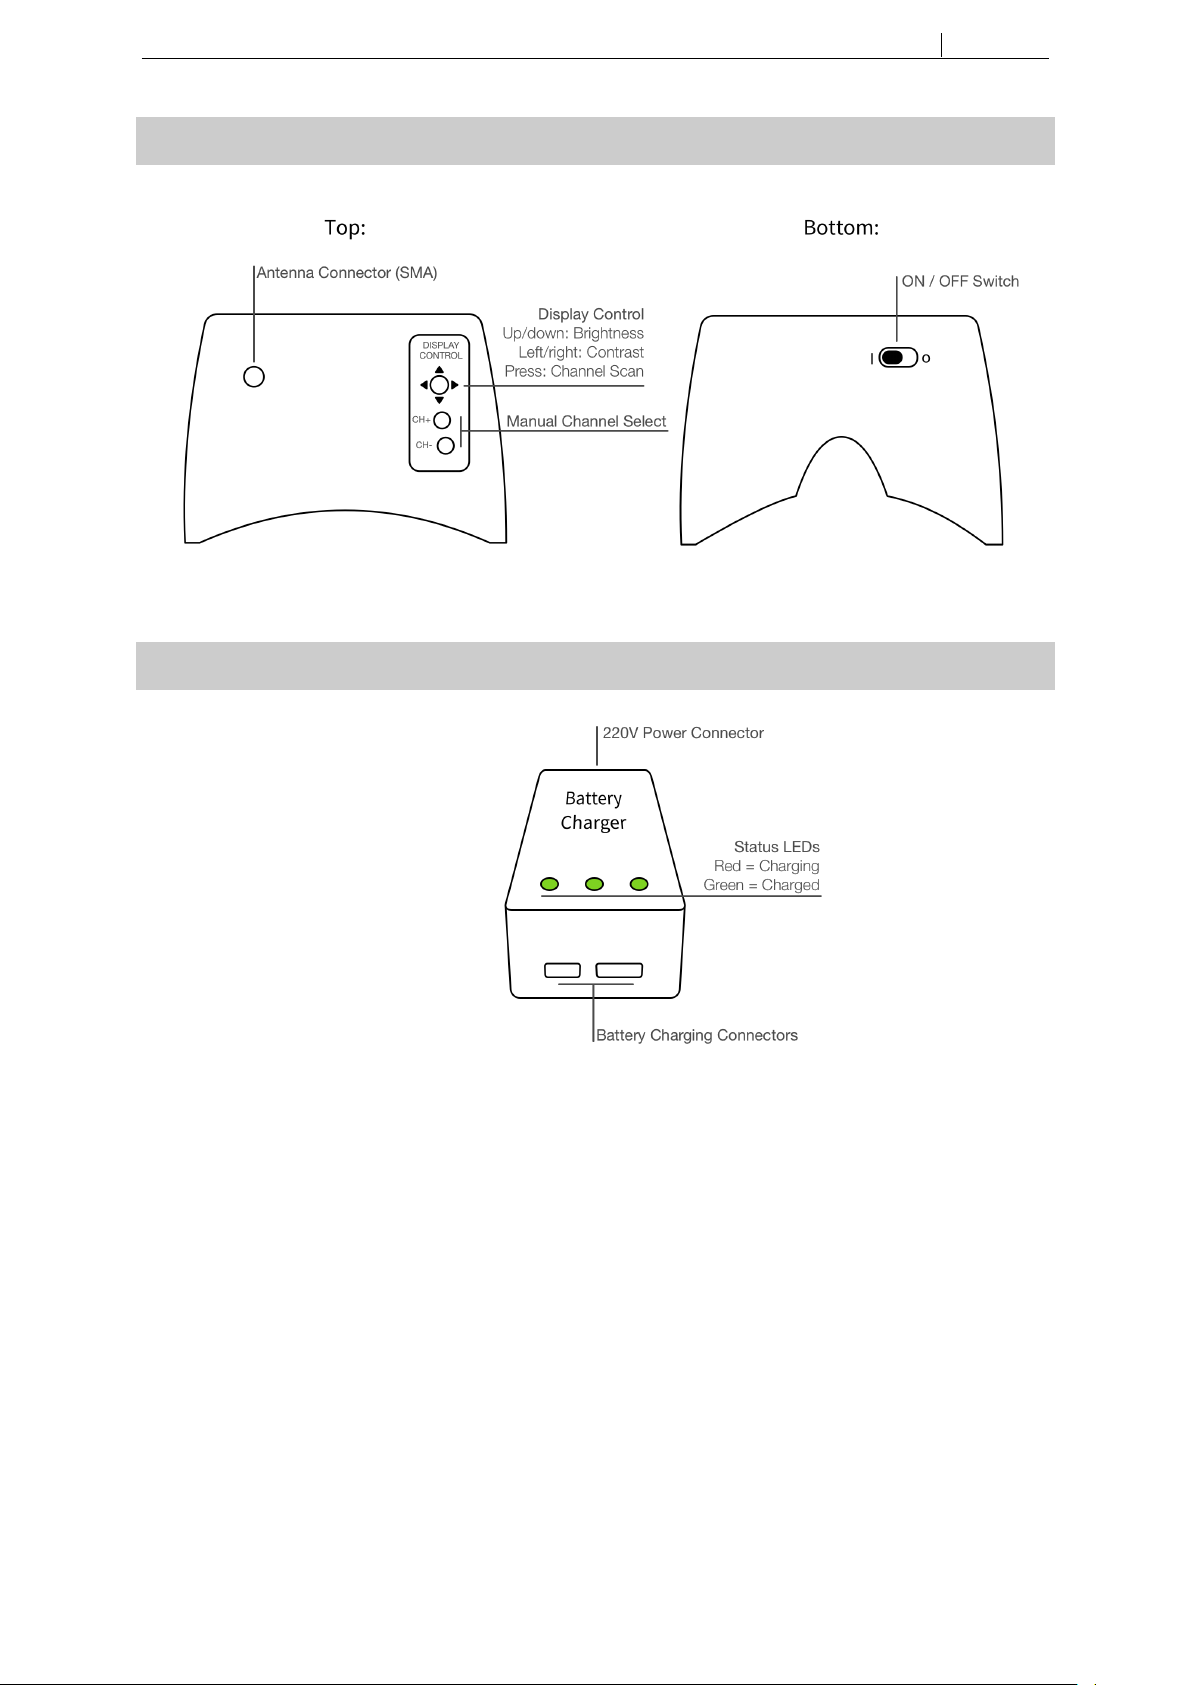
Goggles Overview
Charger Overview
c
2019 MotionPilot SA. All rights reserved.
5
Page 6
Pre-Flight Procedure EXPLORER User Manual
Pre-Flight Procedure
Turning the Controller On/O
To turn your controller on and o, simply press the mode button for two seconds. The LEDs will turn on or o.
If the controller is not turning on, try charging it.
Controller Status Indicator Description
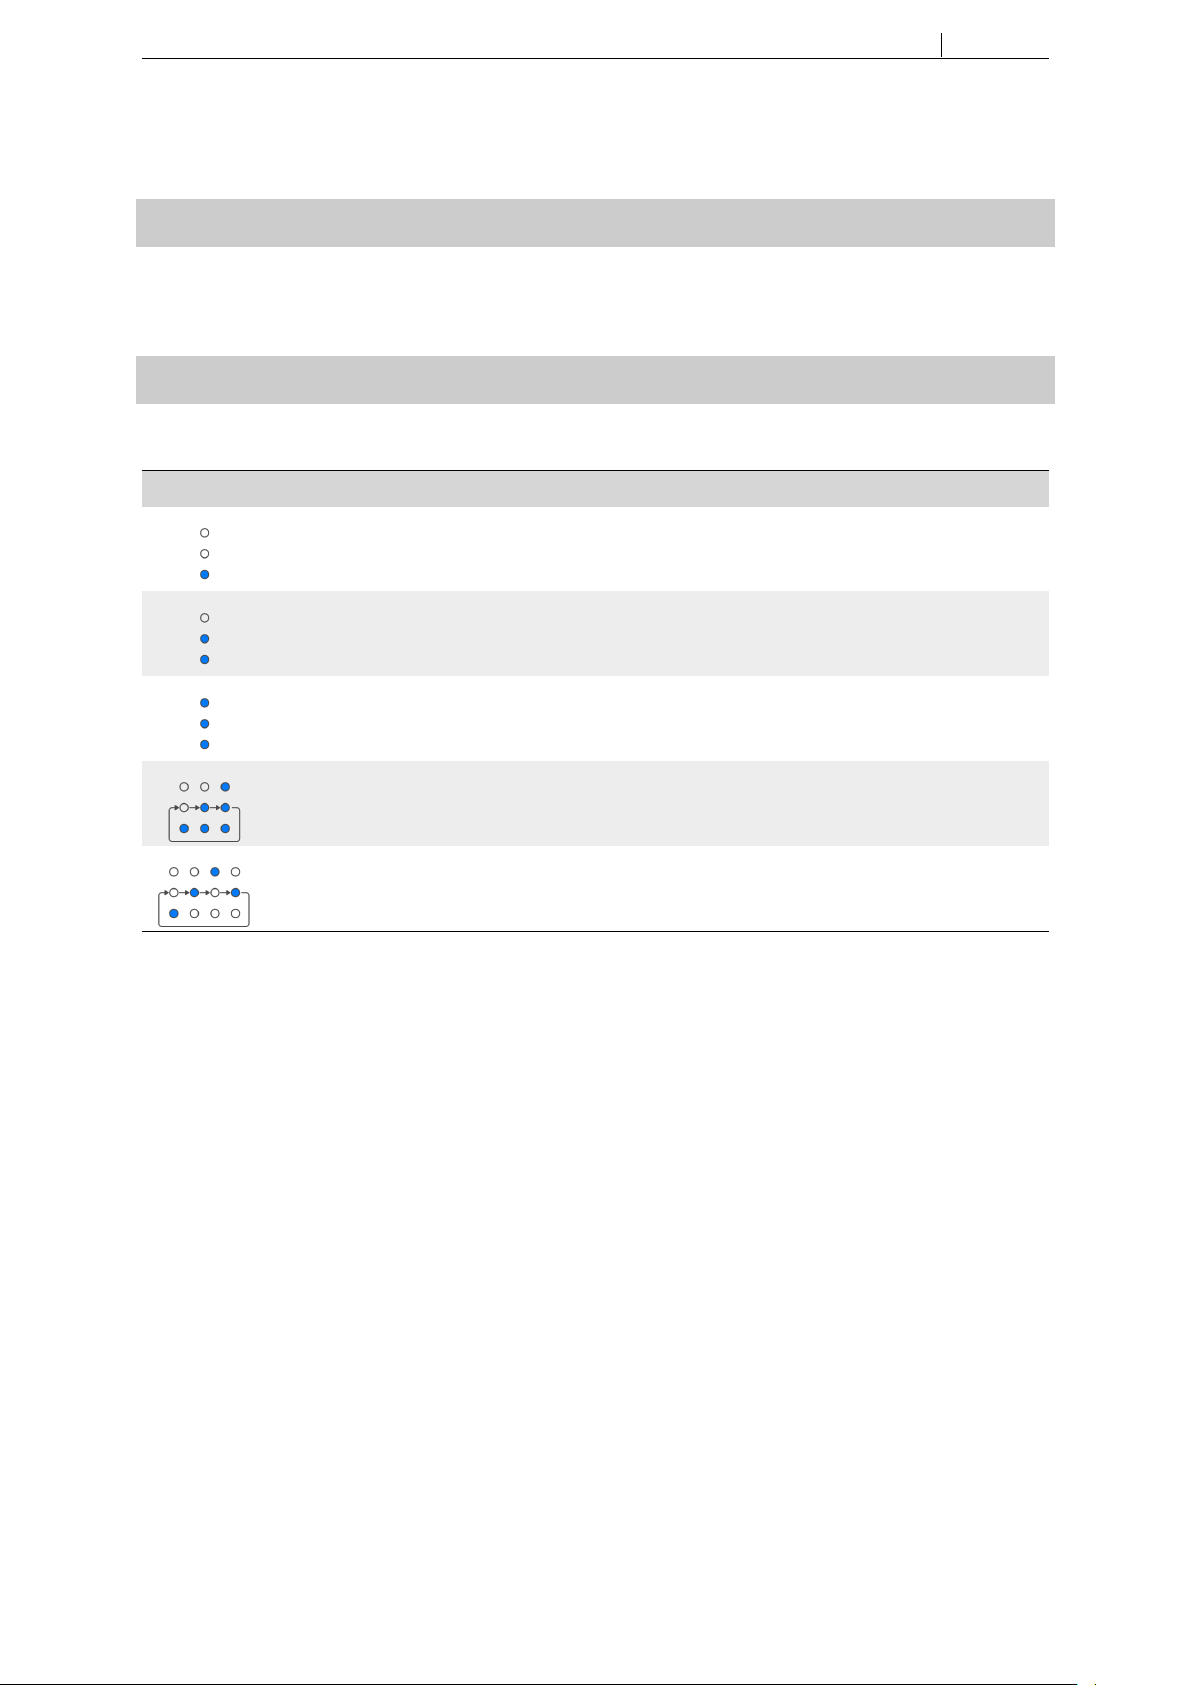
Mode Status Indicator Description
Mode LED Pattern Signification
One LED on Controller is on and flight mode 1 is selected
Two LEDs on Controller is on and flight mode 2 is selected
Three LEDs on Controller is on and flight mode 3 is selected
Increasing LEDs Pattern Controller is charging
Alternating LEDs Pattern Controller is in bind mode
c
2019 MotionPilot SA. All rights reserved.
6
Page 7
Pre-Flight Procedure EXPLORER User Manual
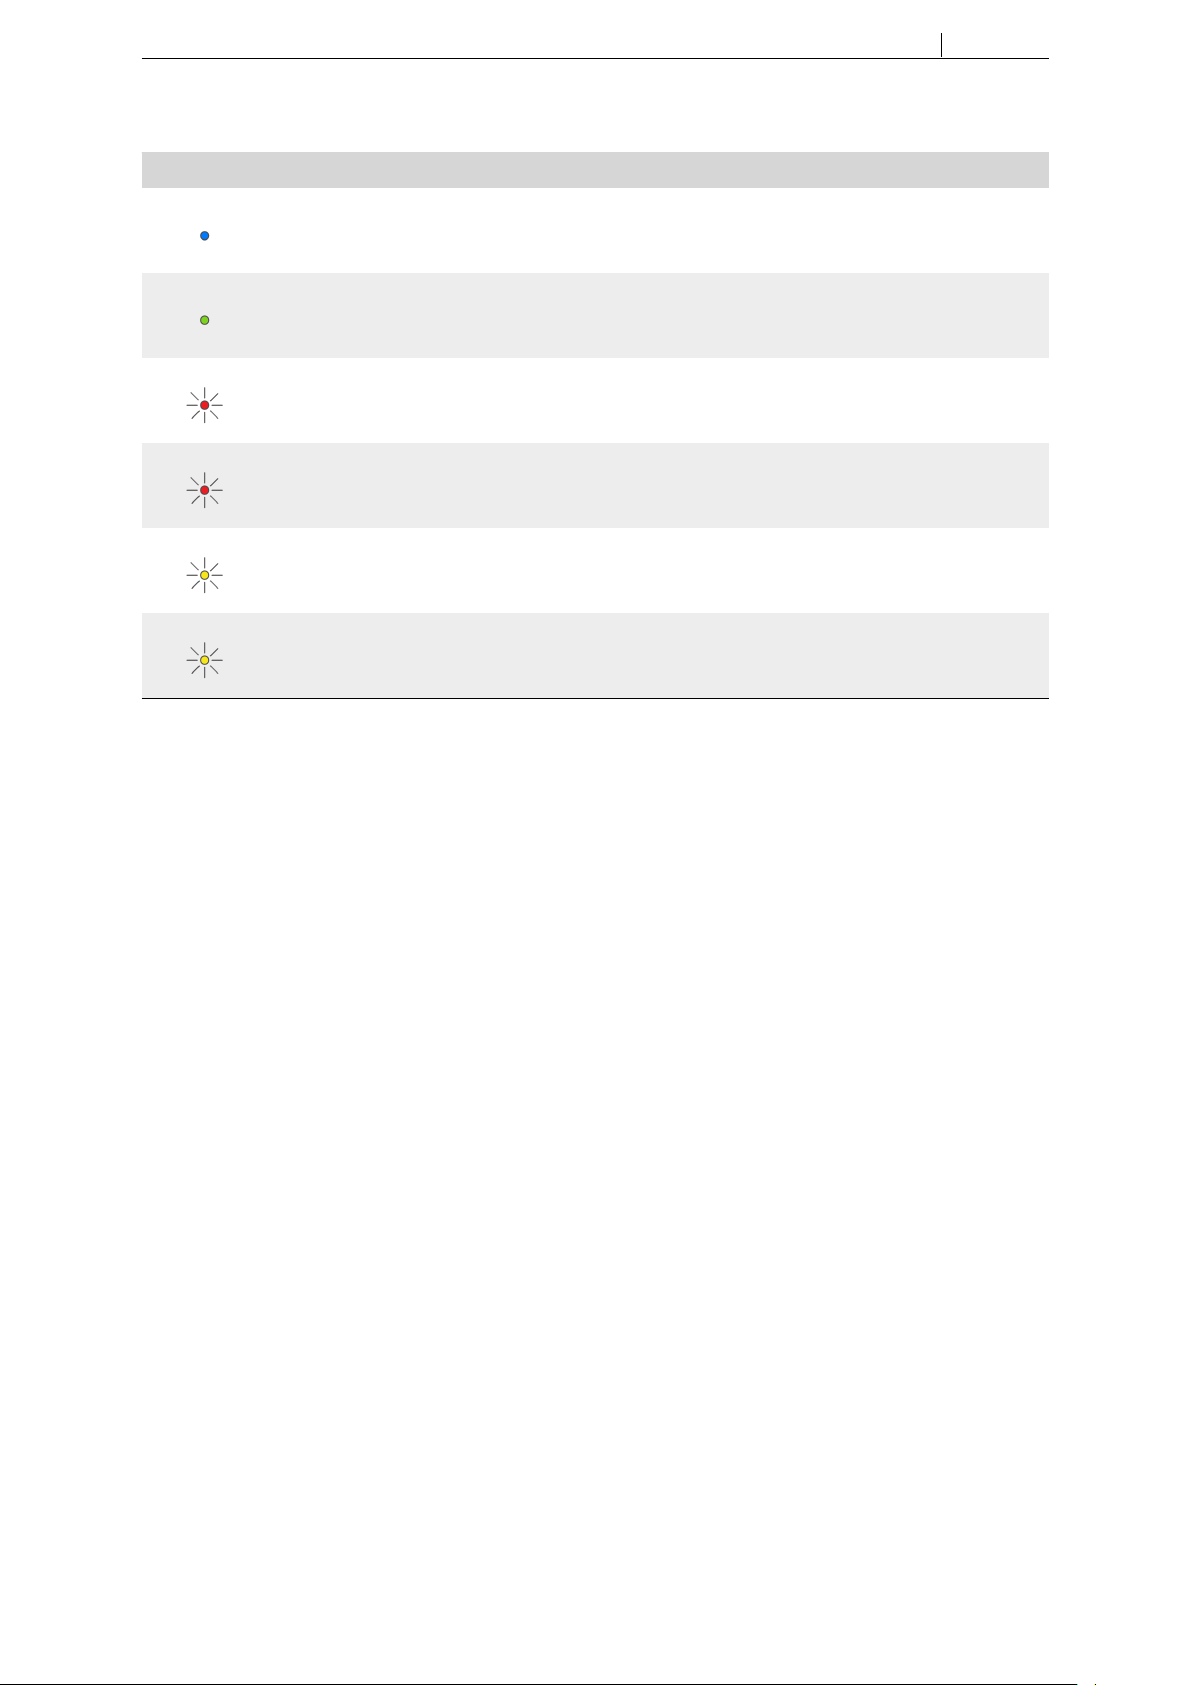
Main Status Indicator Description
Main LED Pattern Signification
Solid blue LED Aircra is armed
Solid green LED Controller is fully charged
Single red Flash LED Your battery is running low. Charge your controller.
Double red Flash LED Your battery is critically low. Land immediately and charge
your remote.
Fast Flashing yellow LED Leave Vector on a stable surface to perform calibration. If
you want to skip this step, you can shake your controller.
However, the control performance might not be as good.
Slow Flashing yellow LED Compass has been disabled because of a magnetic distur-
bance. You can continue to fly when this happens.
c
2019 MotionPilot SA. All rights reserved.
7
Page 8

Pre-Flight Procedure EXPLORER User Manual
Calibration of the Controller
Before flying, you should calibrate your Vector controller. The yellow LED is flashing indicating that the calibration should be performed.
To calibrate, place your controller on a stable surface aer turning it on. The controller will detect that it is
placed on a stable surface and start the calibration procedure. Once the calibration is performed, the yellow
LED will stop flashing indicating that you can start flying.
Choosing the Flight Mode
To choose the flight mode, press on the mode button. The controller will cycle through the three flight modes
and show the current mode on the mode status LEDs. You can also change flight mode during flight.
Charging the Controller
To charge your controller, plug the micro usb cable into an USB wall adapter. The controller will show that it
started charging. When the Vector is charged, the main LED will turn green. See Controller Status Indicator
Description.
c
2019 MotionPilot SA. All rights reserved.
8
Page 9
Pre-Flight Procedure EXPLORER User Manual
Charging the Drone Batteries
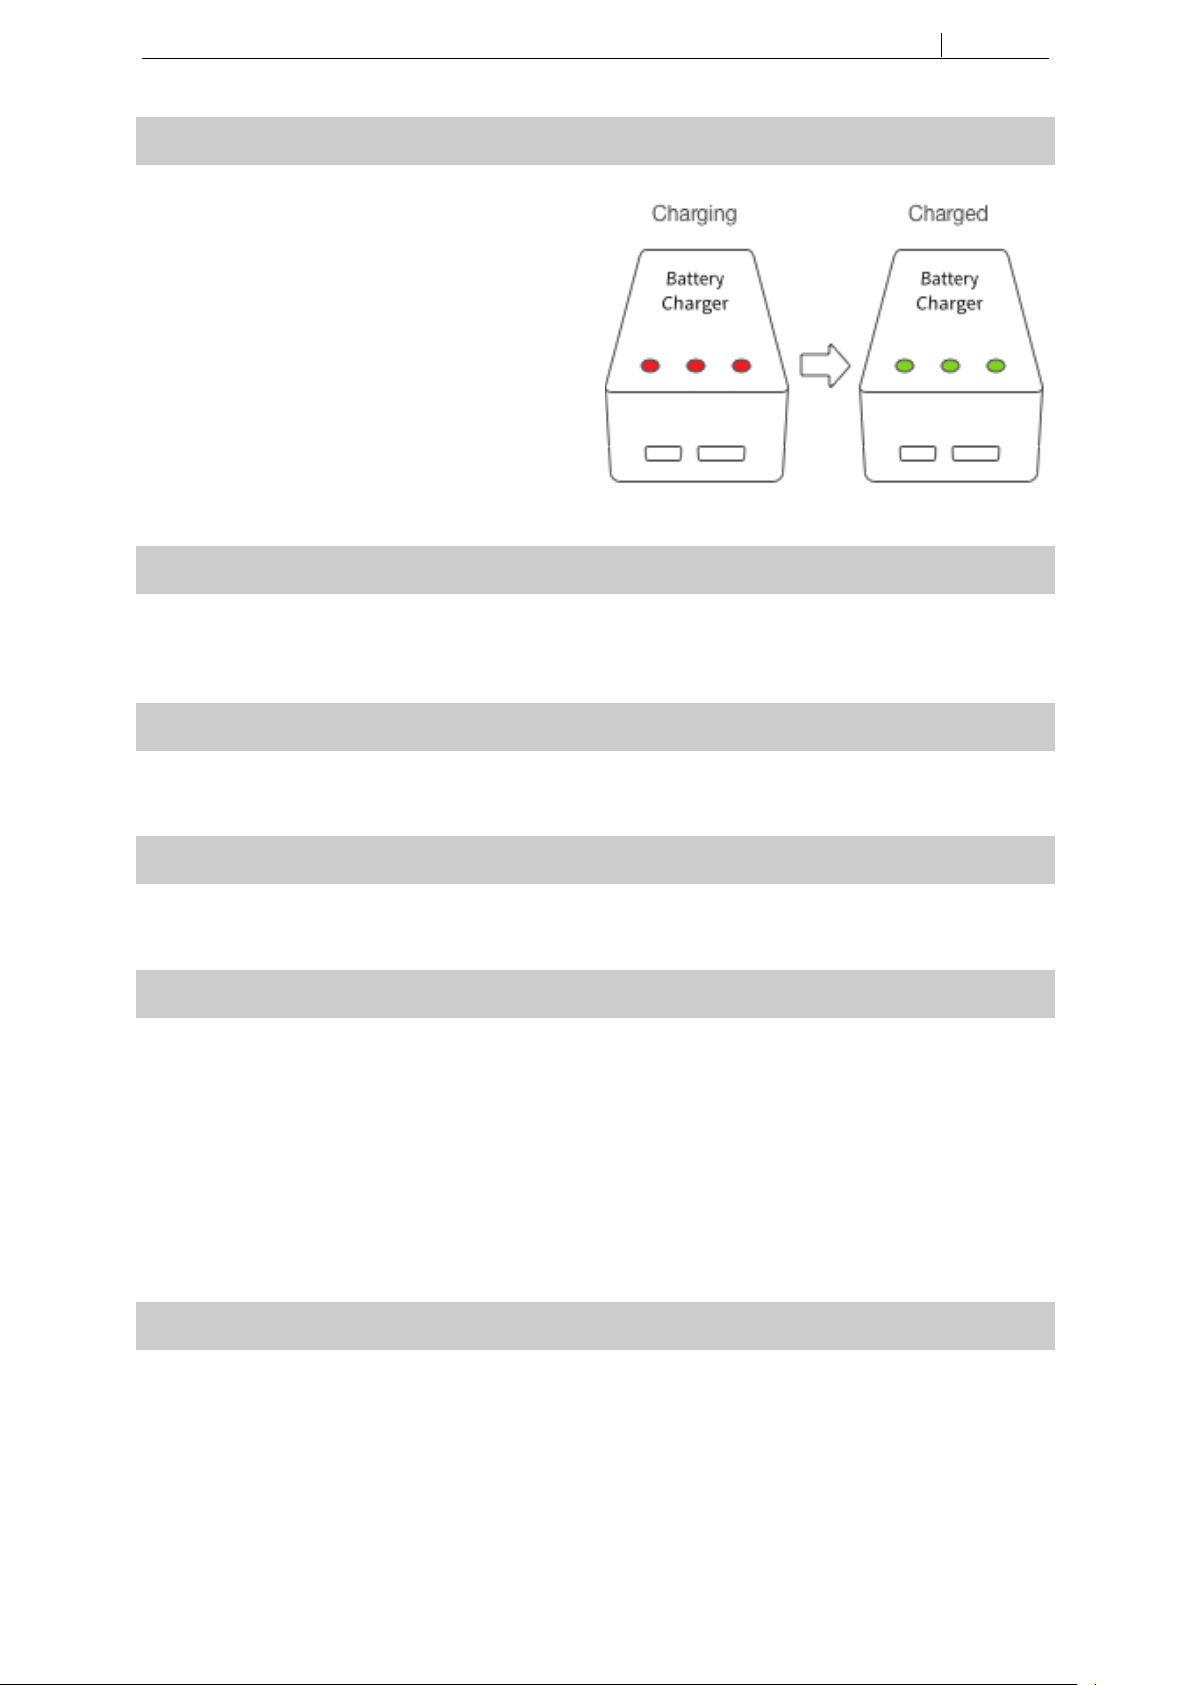
To charge the drone batteries, start by connecting the
charger to a power outlet. Then, plug the balance cable to your charger. If the battery is empty, the charger
will indicate that it is charging by turning the three
LEDs red. The charger has finished charging once
the three LEDs have turned green. Always leave the
charger plugged in until all three LEDs have turned
green, otherwise it might damage the battery.
Installing the Battery on the Drone
The battery must be installed on top of the drone with the strap thatcomes with it. Beforeflying, make surethat
the battery cable is tucked under the strap so that it can not get in contact with the propellers while in flight.
Turning the Drone ON/OFF
The drone is turned On and OFF by plugging the flight battery in or plugging it out.
Turning the Goggles ON/OFF
To turn the goggles On or OFF, use the switch situated on the underside of the goggles.
Choosing the Video Channel
The goggles can listen on five dierent bands: BandA, BandB, BandE, FS and RACE. Each band has 8 channels.
To see the video from your drone in your goggles, you have to make sure that the goggles are on the right
channel. There are two ways to do so:
1. Automatically: Press the joystick vertically. The goggles will automatically scan the whole spectrum to
find the channel on which your drone is emitting. We ship our drones on the band Race and the channel
5.
2. Manually: Move through the channels by using the two CH+ and CH- buttons. A long press on the button
will change band, a short press will change the channel.
Changing the Goggles Display Settings
You can change brightness and contrast of your goggles by moving the joystick "Display Control". Moving it up
and down will change the brightness and side to side will change the contrast.
c
2019 MotionPilot SA. All rights reserved.
9
Page 10
In Flight Operation EXPLORER User Manual
In Flight Operation
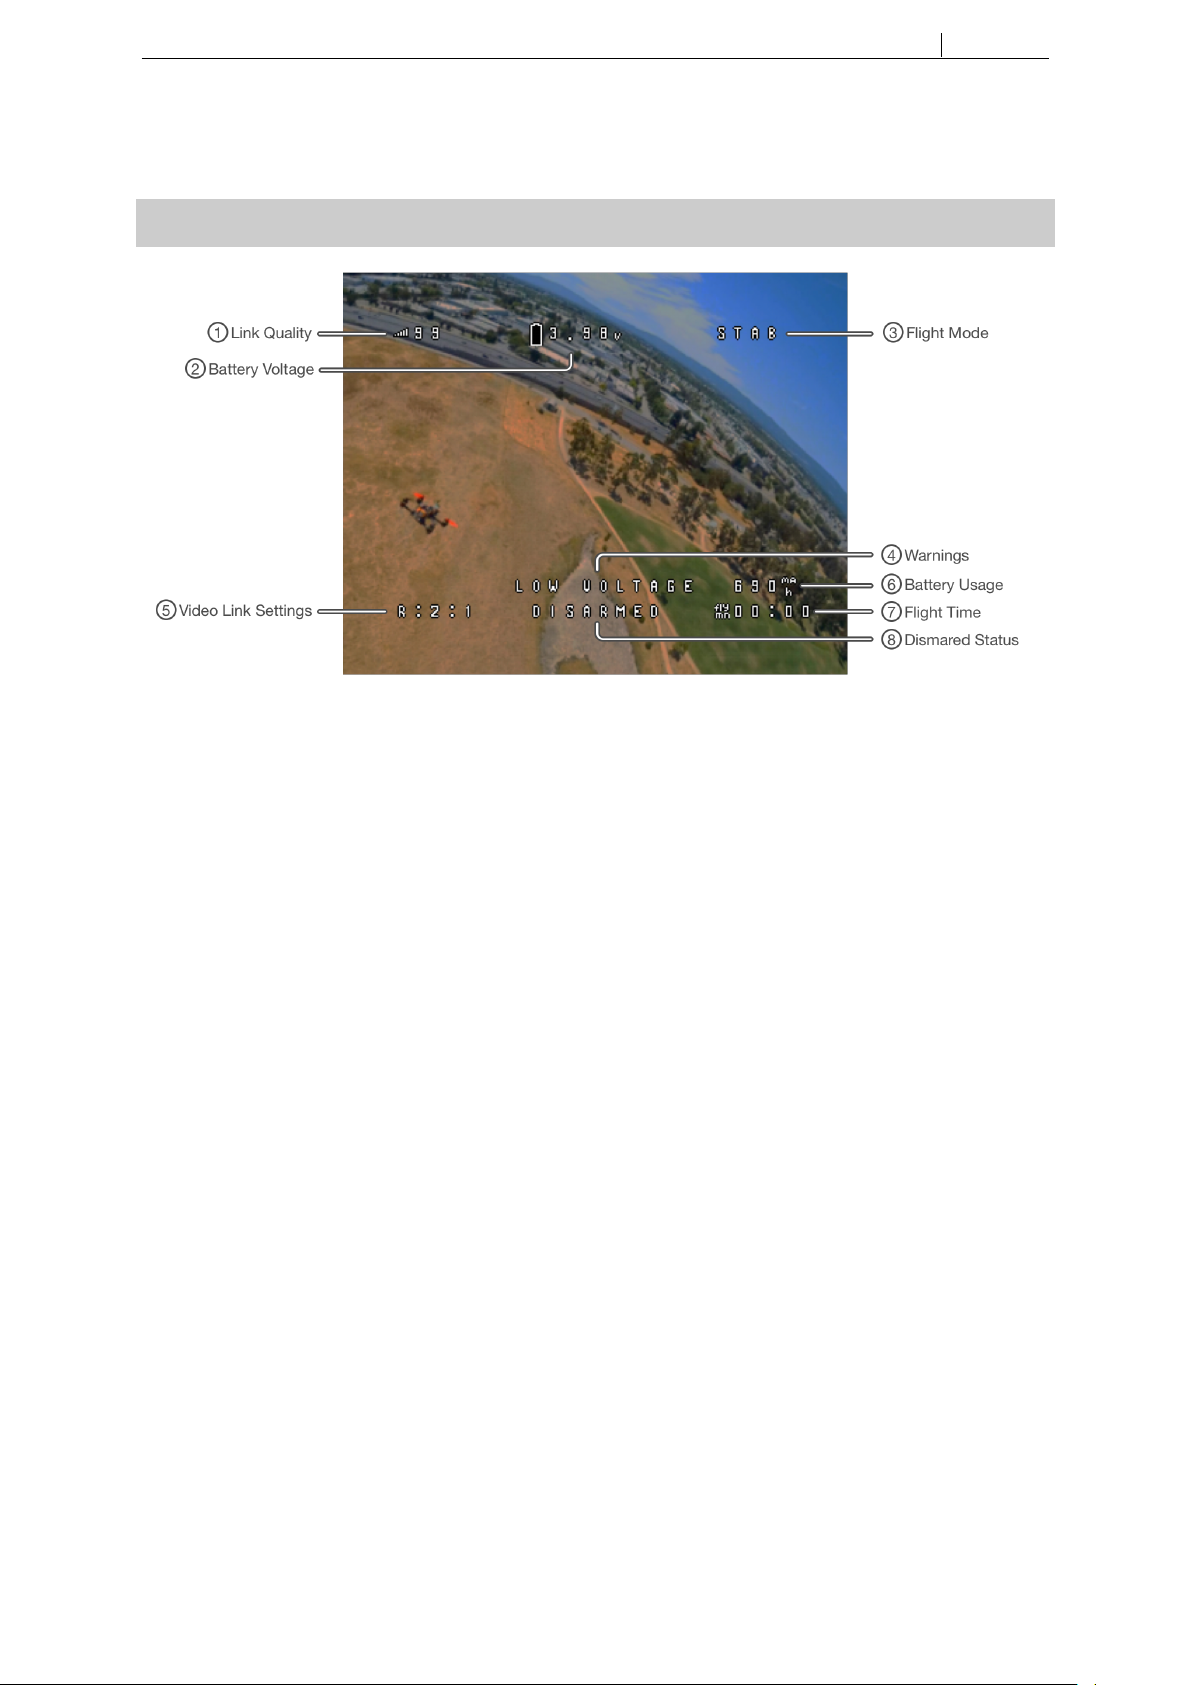
Reading the On Scree Display (OSD)
1) Link Quality
The link quality gives you an indication of the quality of the radio link between your Vector controller and the
drone. If the value of the link quality drops lower than 50%, it means that you should head back to where you
stand to improve the radio communication.
If the Link Quality drops to zero, the drone will initiate a failsafe and fall down to avoid flying away.
2) Battery Voltage
The battery voltage gives you an indication of how much power is still available in the battery. A fully charged
battery is at 4.2 V whilea fully depleted battery is at 3.5 V. Once your battery reaches that level, you should head
back and land.
3) Flight Mode
Here you will see the current selected flight mode.
4) Warnings
The OSD will show dierent warnings here such as low battery voltage for example.
5) Video Link Settings
This section shows your current video link settings. The interface shows the BAND : CHANNEL : POWER. You
should make sure that your goggles are on the same band and channel that your OSD is showing.
6) Battery Usage
This section shows the amount of mAh (milliampere * hour) consumed form the battery. Usually, you should
never consume more than 80% of the battery rated mAh.
7) Flight Time
This section shows the flight time since you last armed your aircra.
c
2019 MotionPilot SA. All rights reserved.
10
Page 11
In Flight Operation EXPLORER User Manual
8) Disarmed Status
This section shows if the aircra is armed or disarmed.
Arming the Aircra and Setting the Control Position
To control the aircra, the controller needs a neutral position around which you will be able to move your controller. This position is set once you press on the main arming button. This means that you can control your
aircra in any position you would like. However, we recommend keeping your forearm parallel to the ground
to have the best antenna radiation performances.
Controlling the Drone with Vector and Choosing the Flight Mode
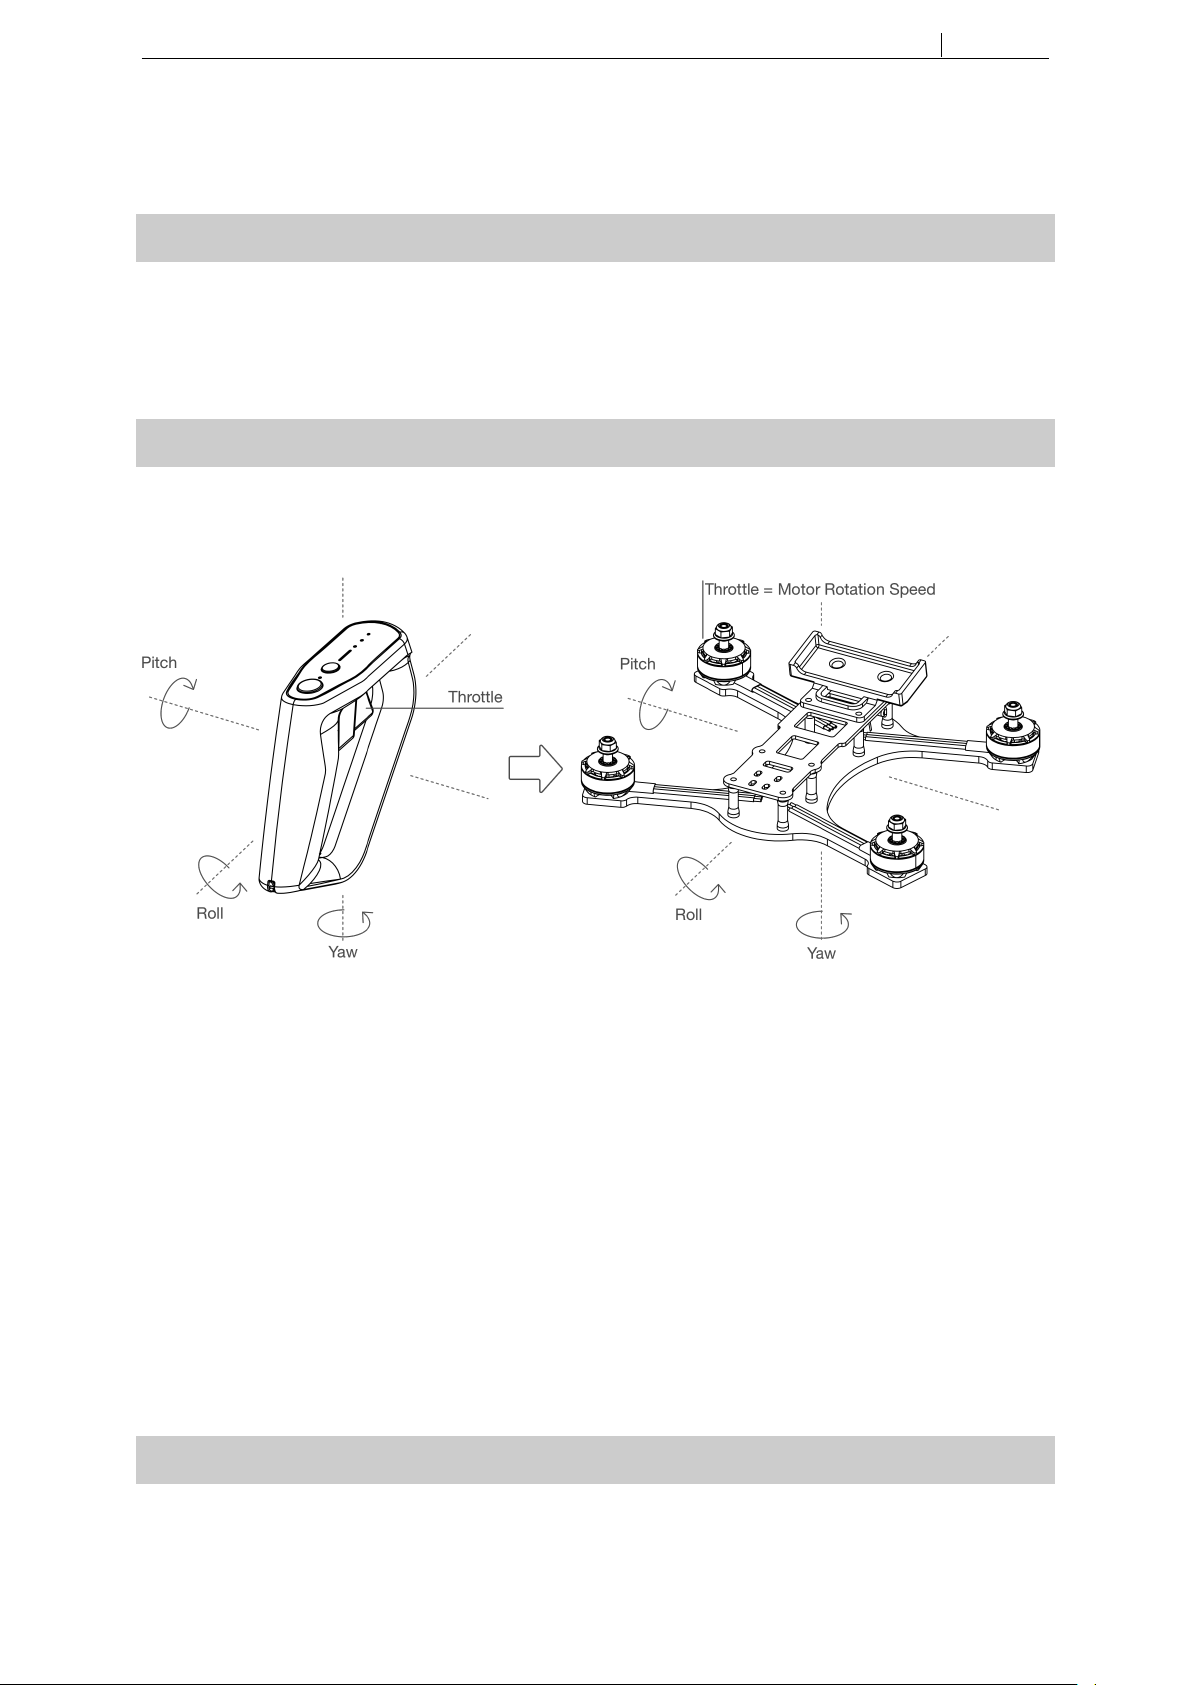
The drone is controlled according to the following diagram. There are three flight modes available as exposed
below. Flight modesonly have an influence on the pitch and roll control axis. Yaw andthrottle behave the same
in all flight modes.
Flight Mode 1: Angle Mode
In this flight mode, the drone follows the angle of your hand on both the roll and pitch axis. This means that if
you bring your hand back to the neutral position, the drone will always be leveled horizontally. This is a great
mode to start flying and understanding how to pilot your aircra.
Flight Mode 2: Acro Trainer Mode
This mode will help you understand how the Acro mode works. It works just like acro mode 3 except that the
drone is limited to a 30degrees bank angle on both the pitchand roll axis. This will helpyou avoid a crash while
learning to fly in acro mode.
Flight Mode 3: Acro Mode
In thismode, instead of controlling the angle of yourdrone, you control its angular velocity. This meansthat the
more control input you give, the faster the drone will rotate around this axis. This mode gives you full control
over your drone and allows doing impressive maneuvers.
Disarming the Safety Timer Aer Flight
c
2019 MotionPilot SA. All rights reserved.
11
Page 12

In Flight Operation EXPLORER User Manual
In order to avoid losing your drone if it gets lost aer a crash, the drone is equipped with a safety timer that
will initiate when the main battery gets depleted. When you turn o your drone, the safety timer will start
automatically. To disarm the timer, just plug the battery back in for 1 to 4 seconds and plug it out again.
c
2019 MotionPilot SA. All rights reserved.
12
Page 13

Troubleshooting EXPLORER User Manual
Troubleshooting
Drone Is Not Arming
There are several reasons that could prevent your drone from arming. Here are the most common ones:
• Drone angle: Your drone will not arm if his angle is higher than25◦. Make sure thatyour drone is on a flat
horizontal surface when arming.
• Calibration: Justlike Vector,the droneneeds tocalibratebefore flight. Place the droneon a stable surface
before flight for it to perform a calibration.
• Throttle too high: When arming, the throttle needs to be at the minimum. Make sure you don’t press the
trigger when arming.
If you are still not able to arm your drone, please contact MotionPilot’s customer support.
Poor Goggles Video Range
You should have about 700m of range with your video link. There are several reasons that may lead to a poor
video range. Here are the most common ones:
• Wrong Video Channel: Make sure that your goggles are on the same video band and channel as your
drone.
• Antenna not Properly Installed: Make sure that both the antenna on your drone and your goggles are
properly installed.
• Video Transmitter Damaged: Your videotransmitter mighthave been damagedduring a crashor if it got
in contact with water.
If you were not able to fix the range of your video transmitter, please contact MotionPilot’s customer support.
Charger Is Not Functioning Properly
If your charger is not functioning properly, please contact customer support.
Resetting your Controller
If yourcontroller isstuck and you can not turnit o, youcan perform a hard reset bypressing on the two buttons
at the same time for about four seconds. The controller will turn o and on again and should work properly
again.
If the controller is not turning on, it is likely that the battery is discharged. Simply plug the controller through
USB and it should turn on again.
Contacting Customer Support
To get some help from us, you can contact us directly at the email address: [email protected]
c
2019 MotionPilot SA. All rights reserved.
13
 Loading...