

MOTIONMEDIA mm215 User Manual

mm215 videophone
User Guide
Note: In common with most electrical and electronic equipment containing small parts,
children should not be allowed to play with this product or use it unsupervised as some
parts such as lens shrouds and cable connectors could be harmful if swallowed.
The videophone should only be used with the handset provided.

Motion Media Web Site
+
http://www.motion-media.com
Product Support
If you have a problem with your videophone:
+
First check the Troubleshooting chapter of this manual.
+
If you still have a problem, contact your Motion Media dealer.
+
If this is not possible, contact:
Motion Media Customer Services, UK:
!
Tel: +44 (0)1454 635555
Fax: +44 (0)1454 635572
support@motion-media.com
BT Customer Support:
!
0800 679 952
You willbe askedto supplythe followinginformation (found on the base
of your videophone):
Model number: .....................................................
Serial number: .....................................................
©1997-2001, Motion Media Technology Limited. All rights reserved.
Motion Media Technology Limited
Motion Media Technology Centre, Severn Bridge, Aust, Bristol, BS35 4BL, United Kingdom
Motion MediaTechnology Limited(Motion Media)retains copyrightin thismanual andassociated user
documentation (the Documentation). Motion Media and its suppliers retain all copyright and other
intellectual property rights in the software embedded in and associated with the product described in
the Documentation (the Software). Parts of the Software are copyright OMNITEL SA. All rights
reserved. BT Relate handset supplied under licence.
By purchasingthe productdescribed in the Documentation you are granted a limited licence touse the
Software, provided you do not copy, alter or adapt the Software in any way including decompiling,
disassembling or reverse-engineering.
The information provided in the Documentation is believed to be accurate and reliable. However,
Motion Mediaassumes noresponsibility for its use, and reserves the right to revise theDocumentation
without notice.
Motion Media and the mm logo are trademarks of Motion Media Technology Limited. All third party
trademarks are acknowledged.
Software version: 2.07.00, October 2001.
U - 0201 - 07005

IMPORTANT SAFETY INFORMATION.............1
1 Getting started
Unpacking ............................4
Connecting the equipment ....................4
Videophone set-up ........................6
2 Making Calls
Speech calls and video calls ....................7
Manual dialling ..........................9
Redialling ............................12
Answering calls .........................12
Ending calls ...........................12
Using the Phonebook ......................13
3 Features
The videophone’s components .................17
Menu Layout ..........................24
Mute Audio and Freeze Video .................25
Switching between handset and handsfree ...........25
Audio and video settings ....................26
Generating tones ........................27
Recall (Flash) ..........................27
Using external audio-visual equipment .............28
CONTENTS
4 Connecting other equipment
External connectors .......................29
Connecting a TV set.......................31
Connecting a second camera ..................32
Connecting a video recorder (VCR) ..............33

5 Getting the best from your videophone
6 Advanced Settings
Changing the set-up - Configuration menu ...........38
Installation menu ........................39
ISDN Profile menu .......................40
Preferences menu ........................42
The Main and Aux Audio/Video menus .............44
Miscellaneous menu .......................45
Centre Text menu .......................45
7 Troubleshooting
Preliminary checks .......................48
Message boxes .........................52
Status Bar messages .......................55
Restarting the videophone ...................55
Further assistance ........................55
8 Technical data
Power ..............................57
Operating environment .....................57
External connectors .......................58
Network support ........................59
ITU-T standards.........................60
Approvals and regulations ....................60
Regulatory notices........................61

IMPORTANT SAFETY INFORMATION
There are no user serviceable parts inside the videophone. Access to the
+
inside of this unit should only be carried out by approved service
personnel.
Keep the videophone away from water and other liquids (except when
+
cleaning, as directed below). If you suspect that liquid has entered the
equipment, immediately disconnect the unit from the ISDN and from the
mains supply, ensuring first that your hands and the mains outlet area are
dry. Do not use the videophone again until it is thoroughly dry.
Clean the case only with a soft, lint-free cloth, either dry or slightly
+
dampened with water. Disconnect thepower and the ISDNcables before
using a damp cloth to clean the videophone.
Before connecting any equipment that was not supplied with the
+
videophone, check the specification of the connectors for compatibility
(see page 61).
+ Do not use the videophone during a thunderstorm.There is a small riskof
electric shock from a lightning strike. To avoid possible damage to the
videophone, disconnect the power and ISDN cables during
thunderstorms.
+ Do not use the videophone if you suspect a gas leak. Operation of any
electrical equipment can generate sparks which may ignite the gas and
cause an explosion.
!
+ Do not let cables trail where they might cause someone to trip or pull the
videophone onto the floor.
+
Use only ona stable surface. The videophone may be damaged if it falls.
+
Do not place any part of this equipment in your mouth.
+
Keep the equipment and its packaging out of reach of small children.
+
Do not push objects into the ventilation slots.
+
Do not block the ventilation slots as this could cause the equipment to
overheat and malfunction. Do not use it on a soft surface such as a bed
which might block ventilation slots.
+
Do not place the videophone in direct sunlight. Do not point the camera
(or any external camera) directly at the sun as this is likely to cause
serious damage.
+
Do not use the videophone in a situation where failure to perform could
pose a threat to health or life.
+
The videophone will notfunction in the event ofa power cut. It shouldnot
be relied upon as the only means of contacting the emergency services.
1

Connection to the mains supply
Never overload mains power sockets.
+
In order to remove mains power from this product, you must disconnect
+
the power plug from the mains supply socket outlet. In order to safely
achieve this action, the product must be installed close to the mains
supply socket outlet and be positioned in such a way that user access to
the mains plug and socket connection is not restricted.
The product must only be used with the provided power supply. This
+
power supply has been extensively tested for use with the product, use of
an alternative power unit may invalidate any international type approval
relating to the product.
If the power unit, cable or plug becomes damaged, contact the dealer for
+
a suitable replacement. There are no serviceable parts inside. Disconnect
the mains supply before attempting to handle a damaged power supply
unit or damaged mains cable or plug. Any attemptto open the power unit
is likely to expose a potential electric shock hazard.
2

1
Getting started
Setting up your videophoneand making yourfirst calls arequick and easy.
This chapter describes very briefly how to connect up your videophone
and start making calls.
To get the best from your videophone you should also read the rest of
this User Guide as soon as you have time. To help you choose which bits
to read first, the final section of this chapter shows you where to find
information on specific topics.
1
3
Unpacking
Unpack the videophone, retaining the packaging for future use. Check
that you have received all the following items:
+
videophone, handset and handset cord
(The videophone is supplied with a protective plastic film over the
LCD screen. This should be peeled off and discarded.)
+
power supply unit and power cable
+
ISDN cable
+
service and warranty card
+
this User Guide
+
Quick Start Guide(s)
+
SCART to Phono adaptor and Phono lead
If anything is missing, contact the dealer who supplied the videophone.
Connecting the equipment
1. Read the Safety information in the front of this manual.
2. Connect the handset
Plug the handset cable into the handset socket on the base of your
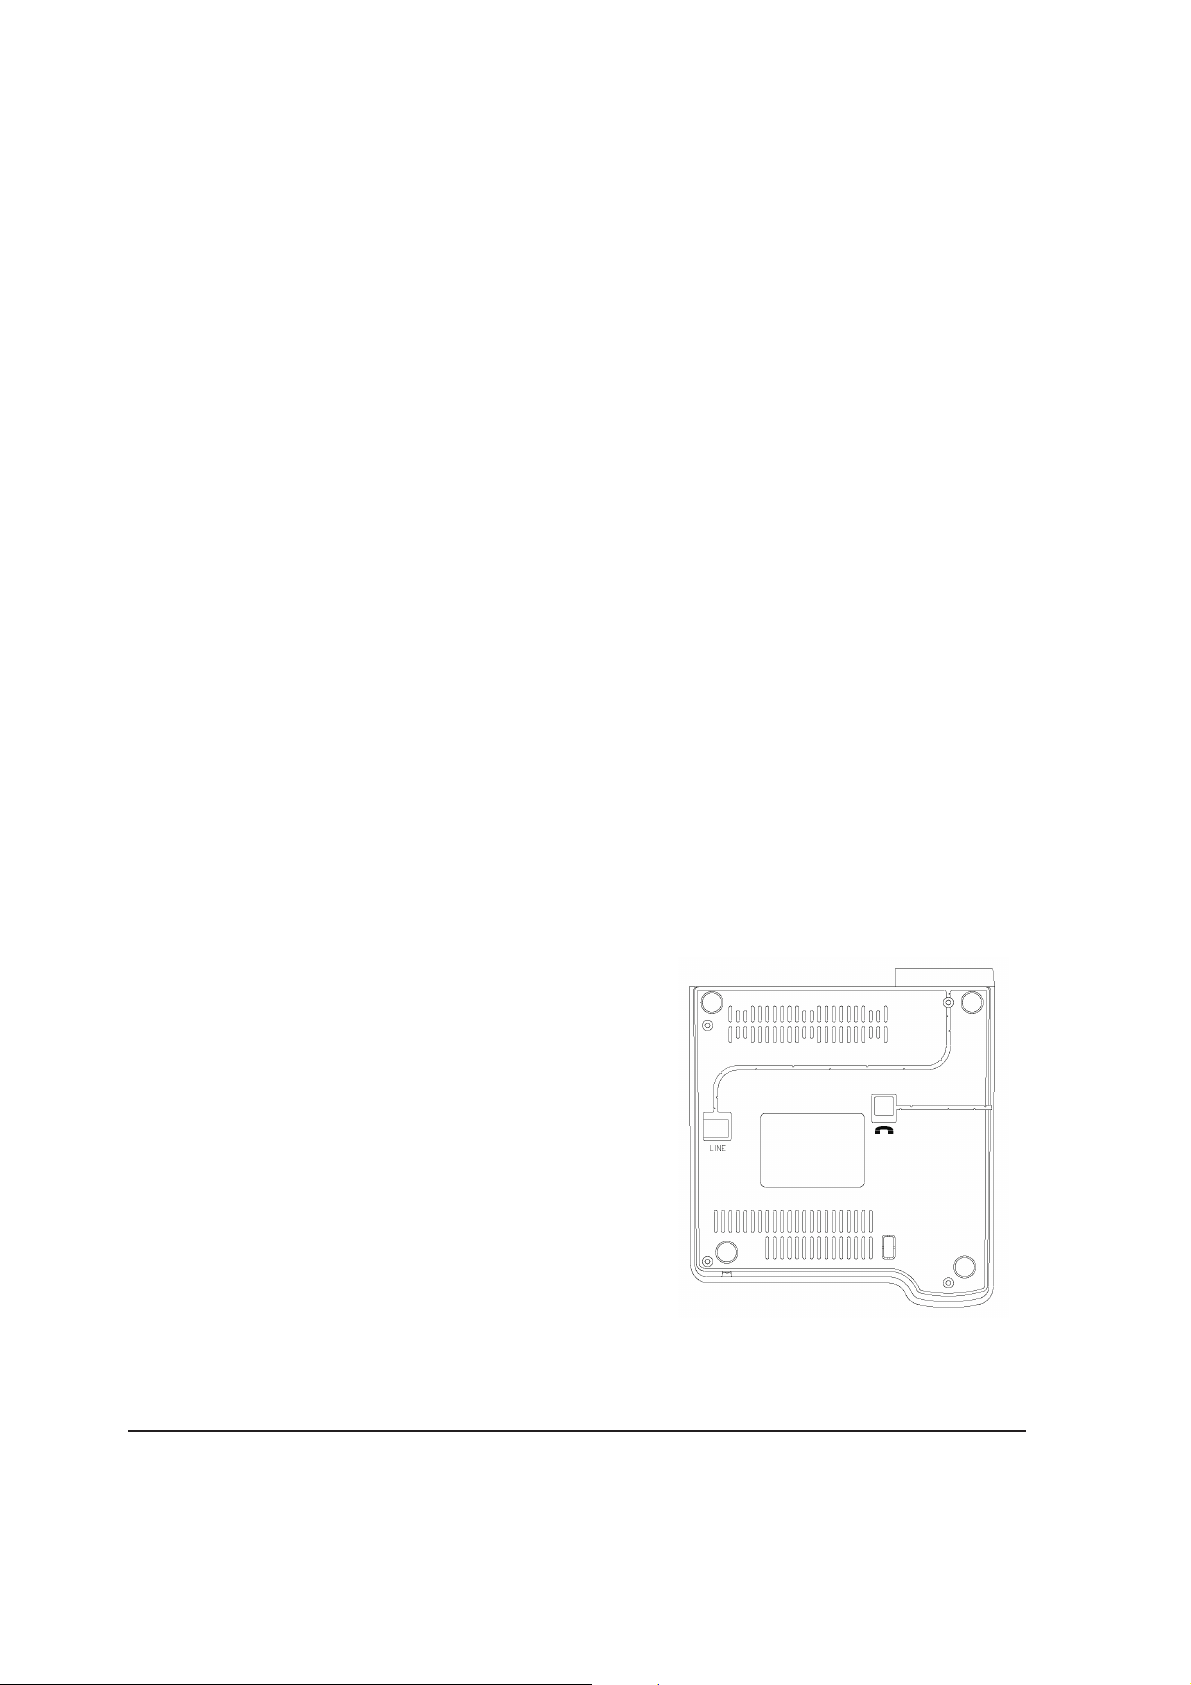
videophone (phone symbol in the diagram below).
3. Connect theISDN cable
Plug one end of the
ISDN cable into the
ISDN socket onthe base
of the videophone
(LINE, right), and clip
the cable into the
channelling to emerge
smoothly at the back.
Plug the other end into
your ISDN S-interface
socket.
4
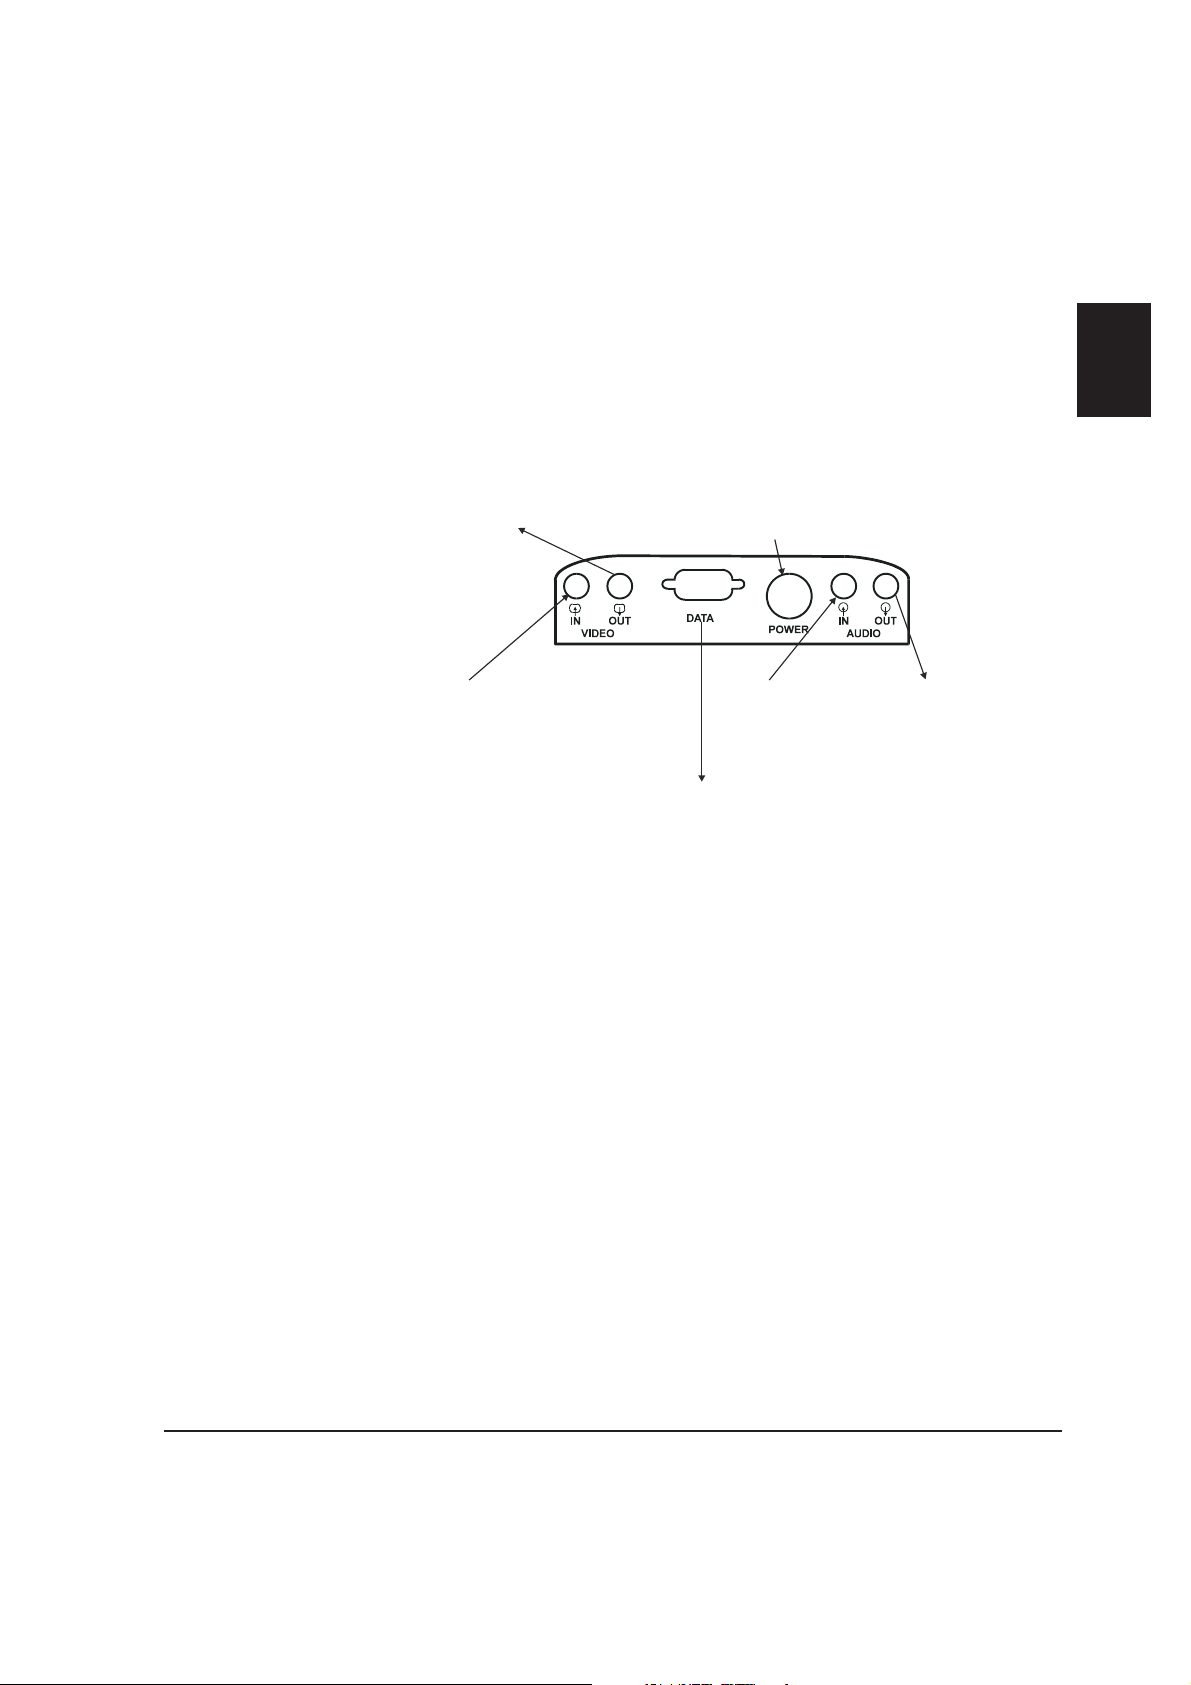
4. Connect the power supply
Plug the power supply cable into the POWER socket on the back of the
videophone. Then use the power cable to connect the power supply to
the mains. If the mains outlet has a switch, switch it on.
VIDEO OUT
TV or VCR
!
Set TV type using
AUX Audio/Video
- outputs to a
menu
POWER
Input from videophone
!
power supply
1
VIDEO IN
!
- inputs include
Camera or VCR
Configures automatically
for PAL and NTSC using
AUX Audio/Video
menu
AUDIO IN
!
!
DATA - for Service Centre use only
- inputs include
Lineaudio,
VCR, Camcorder, Microphone
Setup using
AUX Audio/Video
menu
AUDIO OUT -whenin
Handsfreemodeoutputstoa
TV, VCR or Amplifier!
Note that it is normal to leave the videophone switched on all the time.
However, if youdo wish to disconnect itfor any reason, always switchthe
power off at the mains before unplugging the power cable or the ISDN
cable from the phone.
When the indicator light on the videophone is green and the Status Bar (at
the bottom of the screen) shows ‘Ready’, the phone is ready to make and
receive calls.
5

Stand-by mode
✎
The videophone has a power-saving
stand-by mode in which the screen
is switched off after a few minutes
without activity. It will automatically
‘wake up’ if there is an incoming call,
if you lift the handset, or if you press
one of the buttons.
Videophone set-up
In most cases the videophone is ready to use without further set-up.
However you may need to make a few changes to the ISDN set-up or
choose a different language for the on-screen text.
+
ISDN set-up
You will not need to change the default ISDN settings unless you are
outside the UK.
If you need to change the ISDN settings, refer to page 39.
+
Changing the language
If you want to change the language used for on-screen prompts and
messages, refer to page 39.
6
Making Calls
Speech calls and video calls
This videophone can make and receive ordinary speech calls and various
types of video calls:
+
You make and receive ordinary telephone calls (speech calls) just as
you would on any normal telephone.
+
You can make a video call to (and receive calls from) virtually any
other ISDN or Highway videophones or video conferencing system.
This is almost as simple as making a speech call - just press the Video
Call button before dialling.
2
2
7
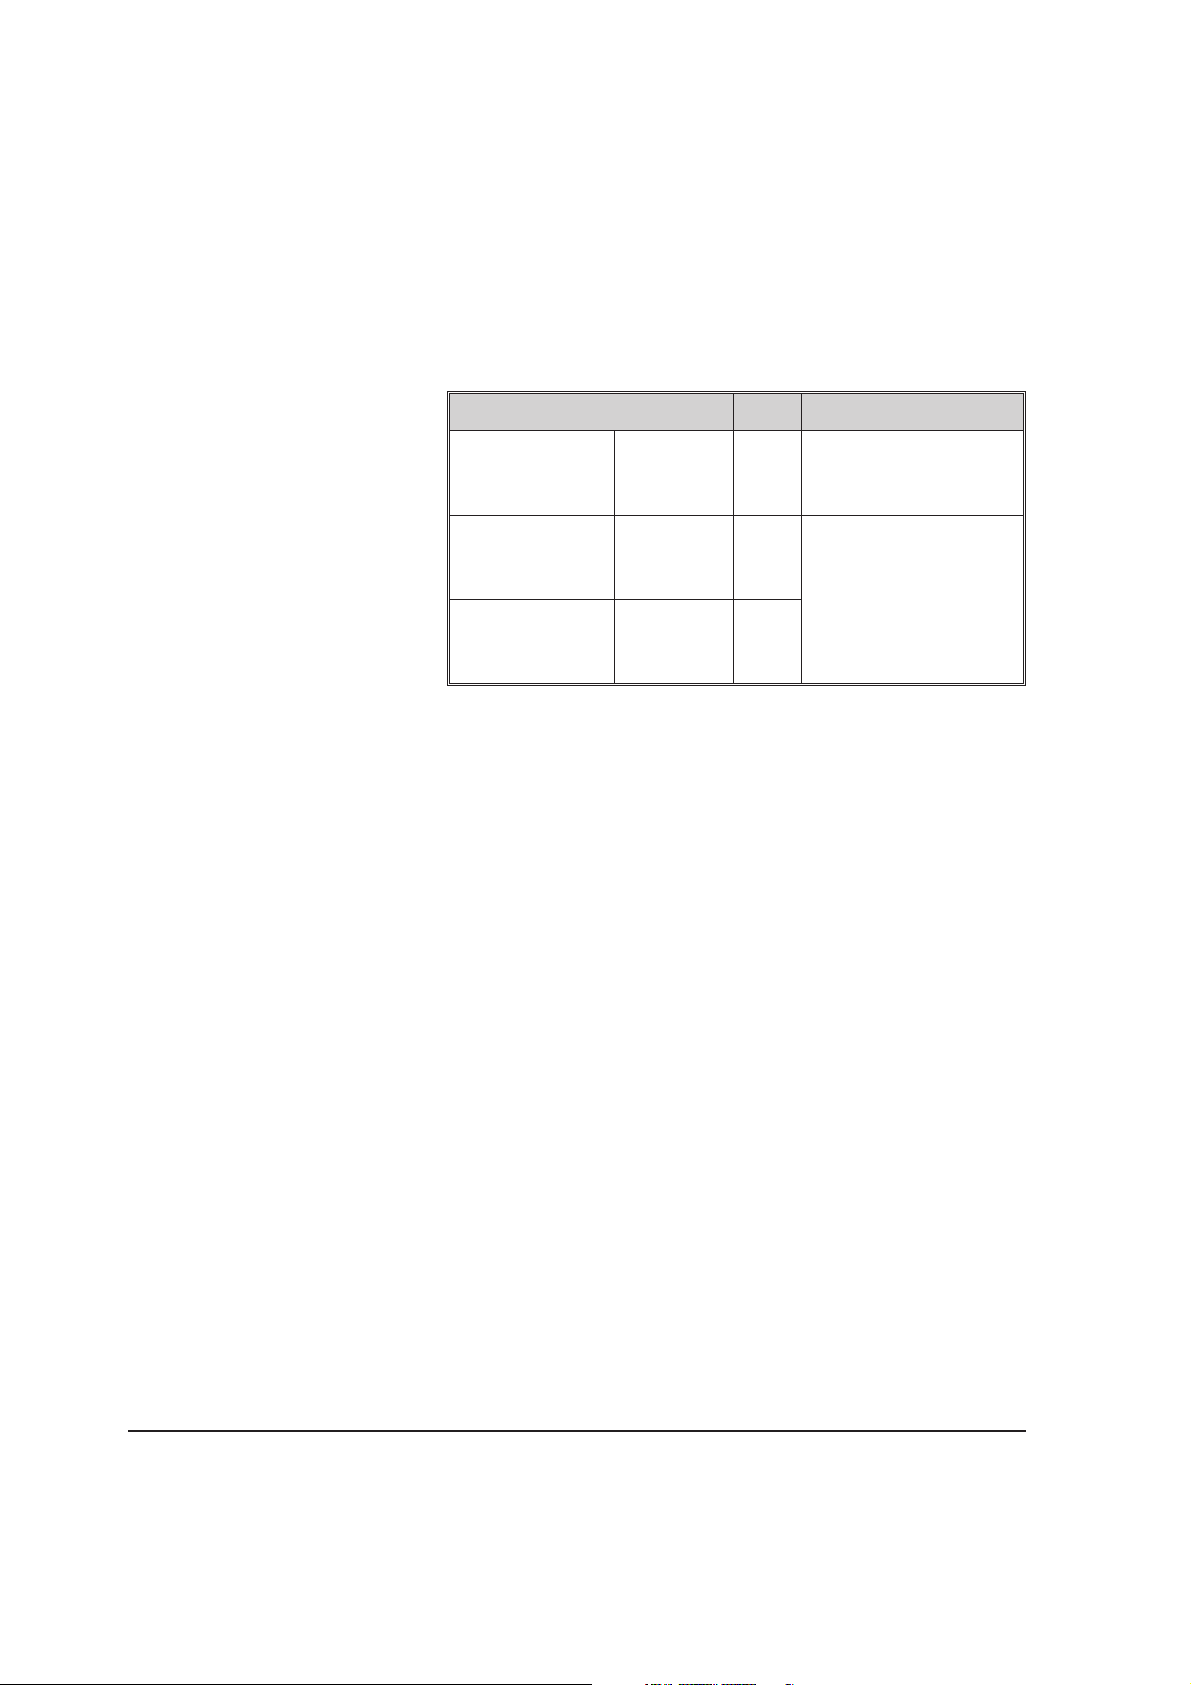
The following table shows the different types of calls you can make and
receive, and for each type indicates the number of ISDN B channels used
and the type of equipment that you can call.
Type of call Uses Calls to / from
Voice phones, including
Speech call Voice only 1B
ISDN and ordinary
analogue phones.
Standard digital (2
channel) video call
(H.320)
Half-rate digital (1
channel) video call
(H.320)
* Reduced quality video compared with 2B standard digital video calls.
Voice and
video (Best
quality)
Voice and
video *
2B
H.320 videophones or
video conferencing
equipment
1B
The videophone automatically detects the type of an incoming call and
handles it accordingly. See Answering calls on page 12 for details.
8
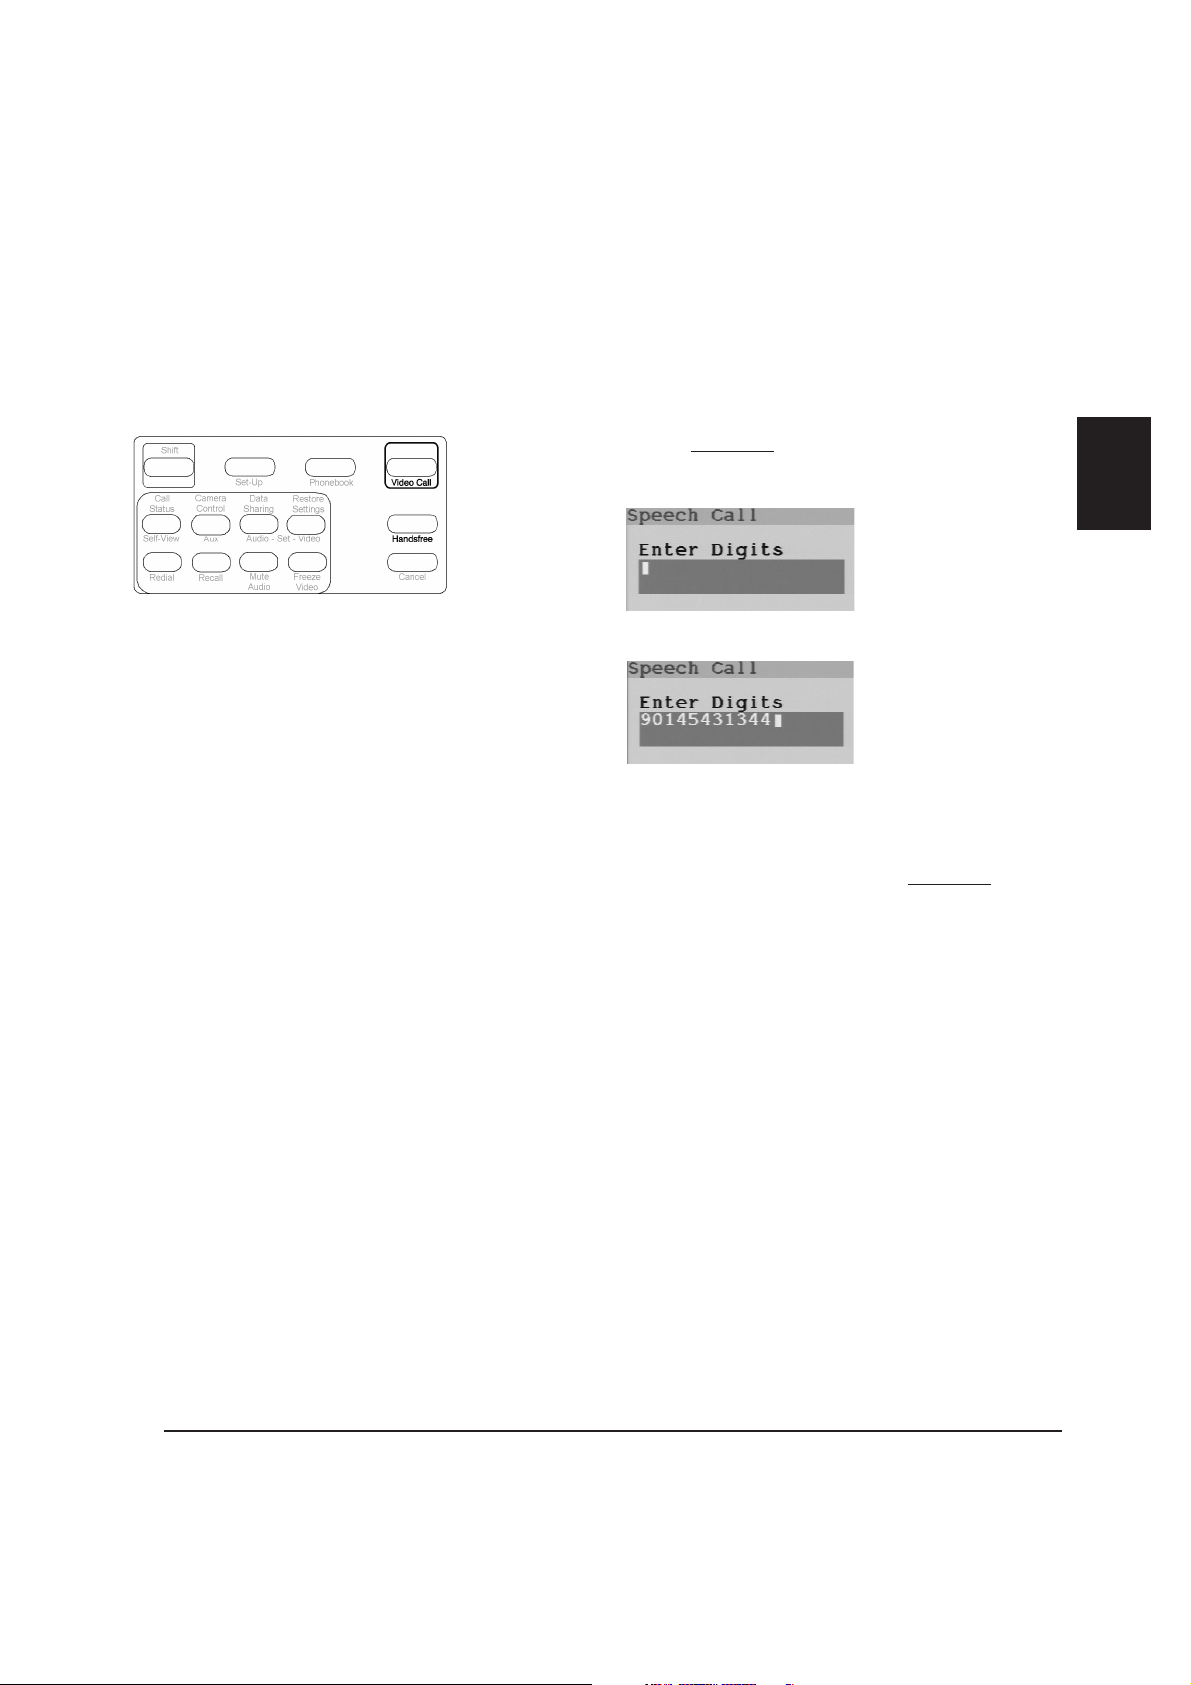
Manual dialling
Making a speech-only call
(ordinary telephone call)
1. Lift the handset or press Handsfree.
A dial tone is heard and the Speech Call screen appears:
2. Type in the number using the number buttons.
3. The Status Bar shows the progress of the call. When the far end phone is
answered you can talk to the other person, just like on a normal
telephone.
4. At the end of the call, replace the handset or press Handsfree
end the call.
As with any ordinary telephone it is essential that you end any speech call you
make. The call is not terminated when the other person hangs up, only when
you do.
again to
2
9

Making a video call
1. Press Video Call.
The Video Call screen appears:
2. Type in the first (or only) number:
If you make a mistake you can use the Left arrow button to go back and
correct it.
If you press OK at this stagethe videophone will dial a half-rate video call. To
dial a standard-rate video call you must fill in the second number.
10
3. Press the down arrow to move into the second box.
The first number is copied into the second box:
4. If necessary, change this number.
If the videophone youare callinguses thesame numberfor bothchannels
you do not need to change the second number. If it uses different
numbers for the two channels, use the Left arrow button to move back
and change the second number:
5. Press OK to dial.
The Status Bar messages show the first channel calling, and then, when
the far end answers, connecting. The second channel then automatically
calls and connects. You and the person you are calling can now see and
hear each other. It is common for this process to take 20 seconds.
6. At the end of the call, replace the handset or press Handsfree again to
end the call.
2
Making a half-rate (1B) video call
Proceed as for a standard video call but press OK after entering only one
number instead of two.
Don’t forget that the videoquality on a half-rate video call will not beas good
as on a normal video call.
11
Auto-answer and Privacy
✎
options
The videophone can be set to
answer incoming calls automatically,
so that you don’t have to press OK
You can also set up your
videophone so that video calls start
off in voice-only mode, allowing you
to decide when you wish to turn on
the video.
See the Preferences menu in
Chapter 6, Setting up your
videophone for details of both
options.
Redialling
The Redial buttonre-dials the last number you dialled, whether that was a
speech call or a video call, and whether you dialled it manually or via the
Phonebook. The number is briefly displayed for your information before
dialling.
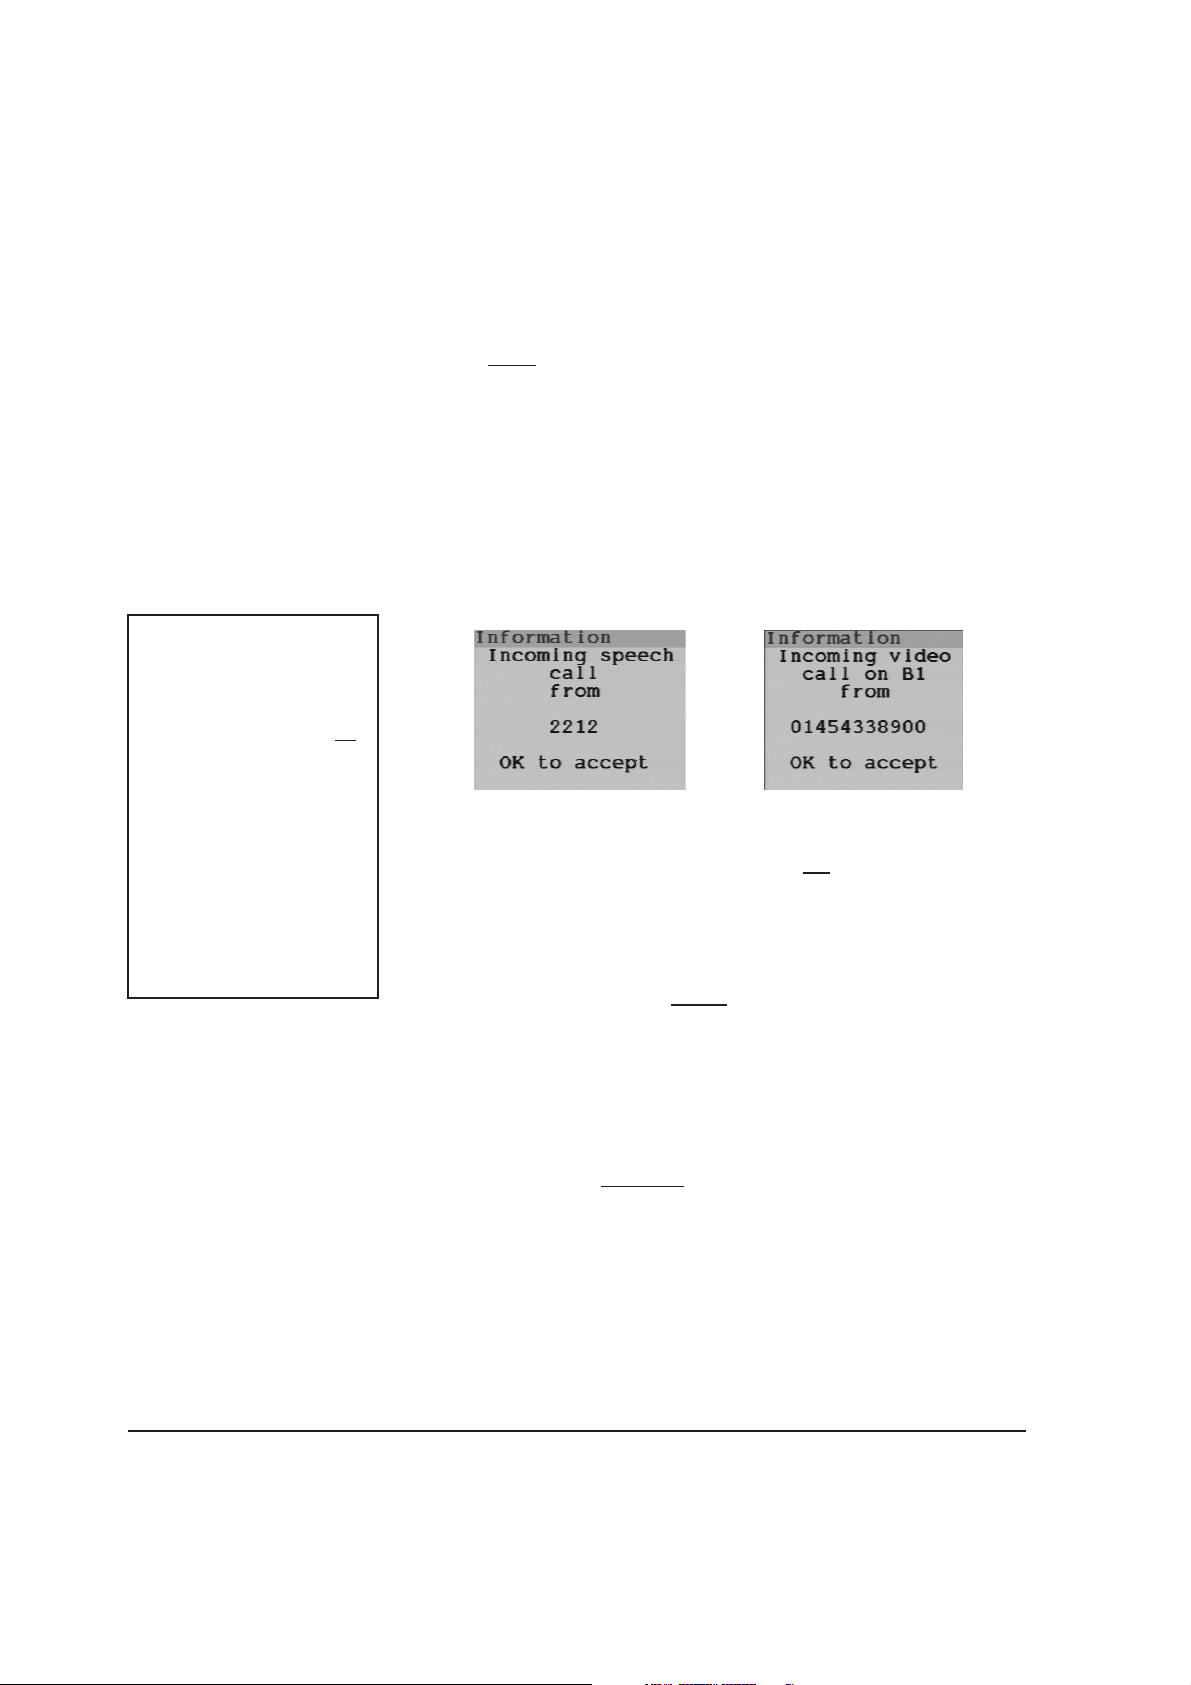
Answering calls
When a call arrives the videophone rings and displays the number on the
Incoming Call screen. If the incoming number is listed in the Phonebook,
the name is displayed on screen as well as the number.
.
(If in stand-by mode, the videophone will automatically “wake up”.)
1. Lift the handset or, to use handsfree, press OK to answer the call.
The Status Bar messagesshow thecall connectingand you areconnected
to your caller.
(If you don’t want to answer the call, you can either leave it to ring until
the caller hangsup, or press Cancel
or
to terminate thecall immediately.)
12
Ending calls
If you are using the handset, simply replace the handset.
If you are using the phone handsfree, make sure that the handset is in its
cradle, then press Handsfree
As with any ordinary telephone it is essential that you terminate any speech
call you make. A speech call dialled by you is not terminated when the other
person hangs up, only when you do.
Check for the ‘Ready’ message on the Status bar to be sure the call is
terminated.
.
✎
Speed dialling
You can dial one of the first 10
entries even quicker using the
Speed Dial facility, as long as you
know the which entry it is: Simply
hold down the digit (0 – 9) for a
couple of seconds and the
corresponding Phonebook entry will
be dialled automatically
Using the Phonebook
The Phonebook has100 memories for you to store your most frequently
used numbers so that you can dial them more easily. The memories are
indexed from 0 to 99.
You can store any kind of number (speech or video) in a Phonebook
memory, with a name to identify it.
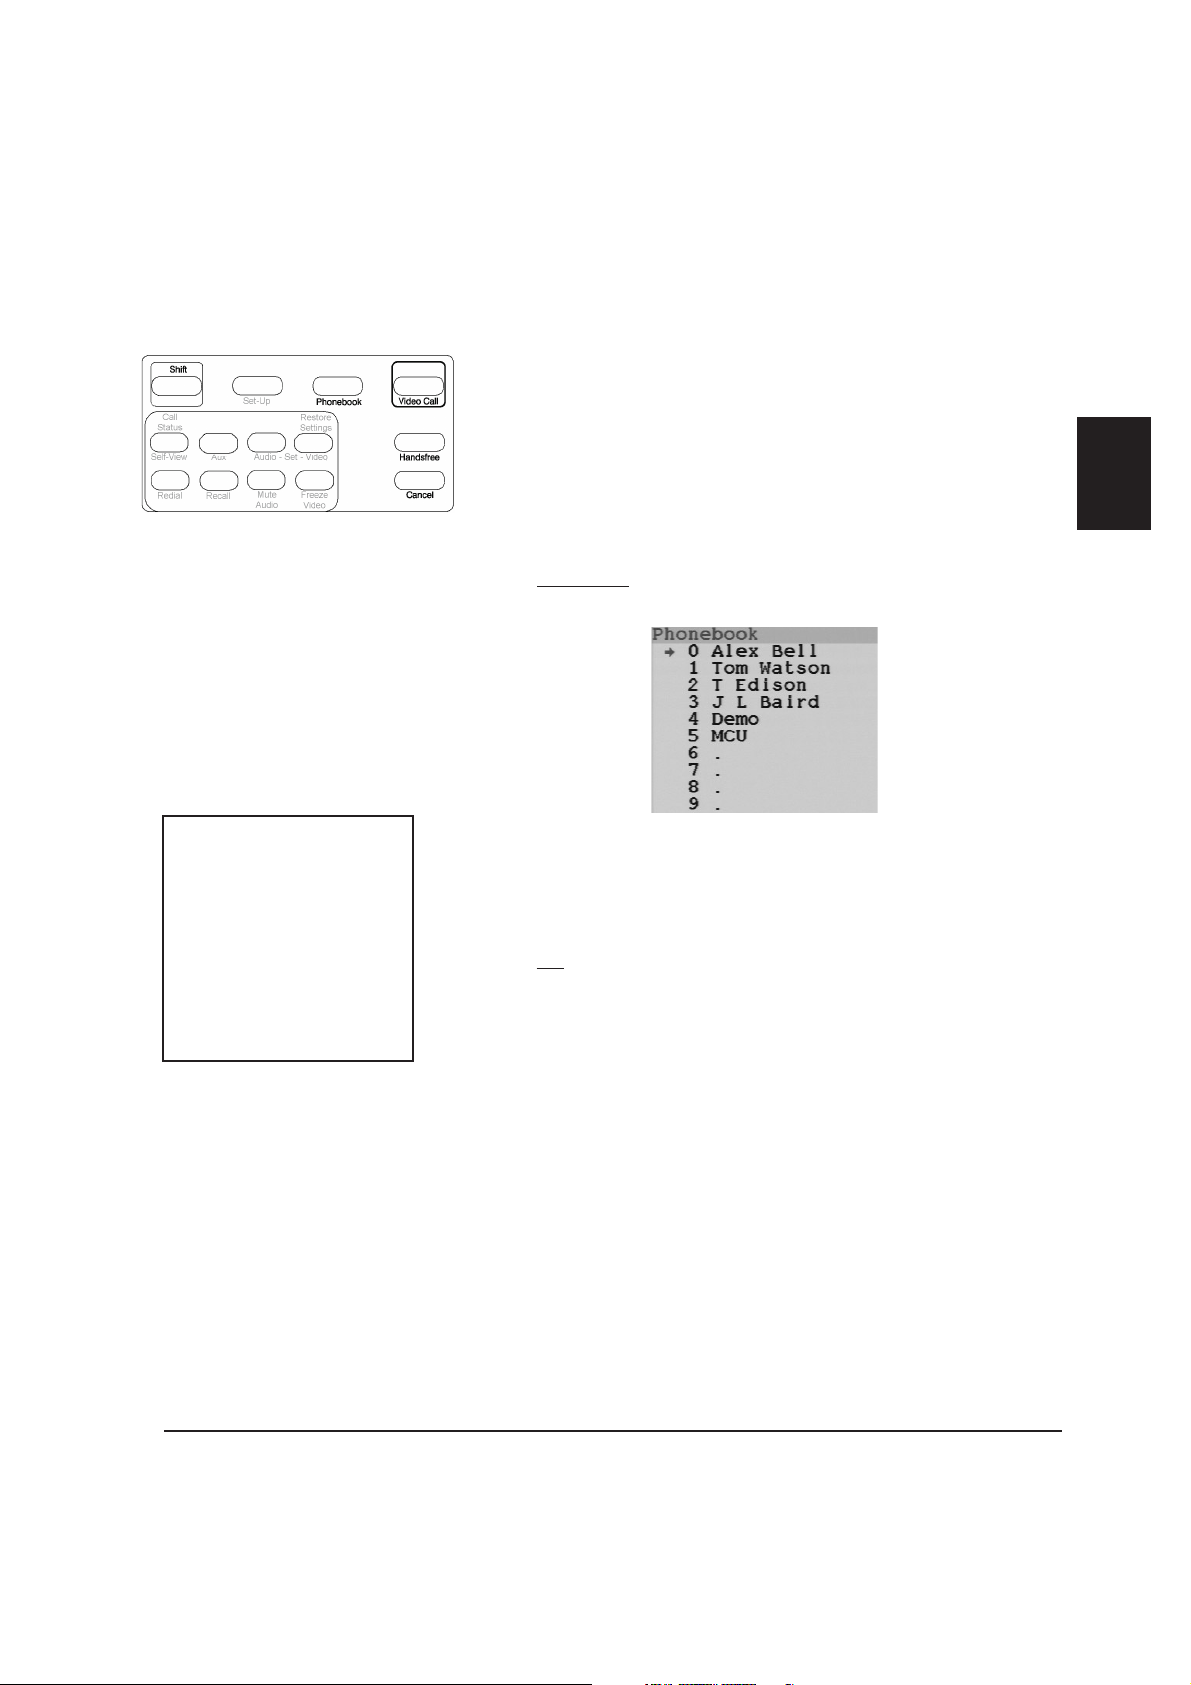
Dialling from the Phonebook
1. Press Phonebook to display the first 10 entries currently stored in the
Phonebook:
2. If the entry you want is not shown, use the Left and Right arrows to page
through the Phonebook, 10 entries at a time, to find the right page.
3. Use the Up and Down arrows to select the entry you want to dial.
4. Press OK
The call thenproceeds exactly as ifyou had dialled the numbermanually.
to dial the number.
2
13
Storing a number in the Phonebook
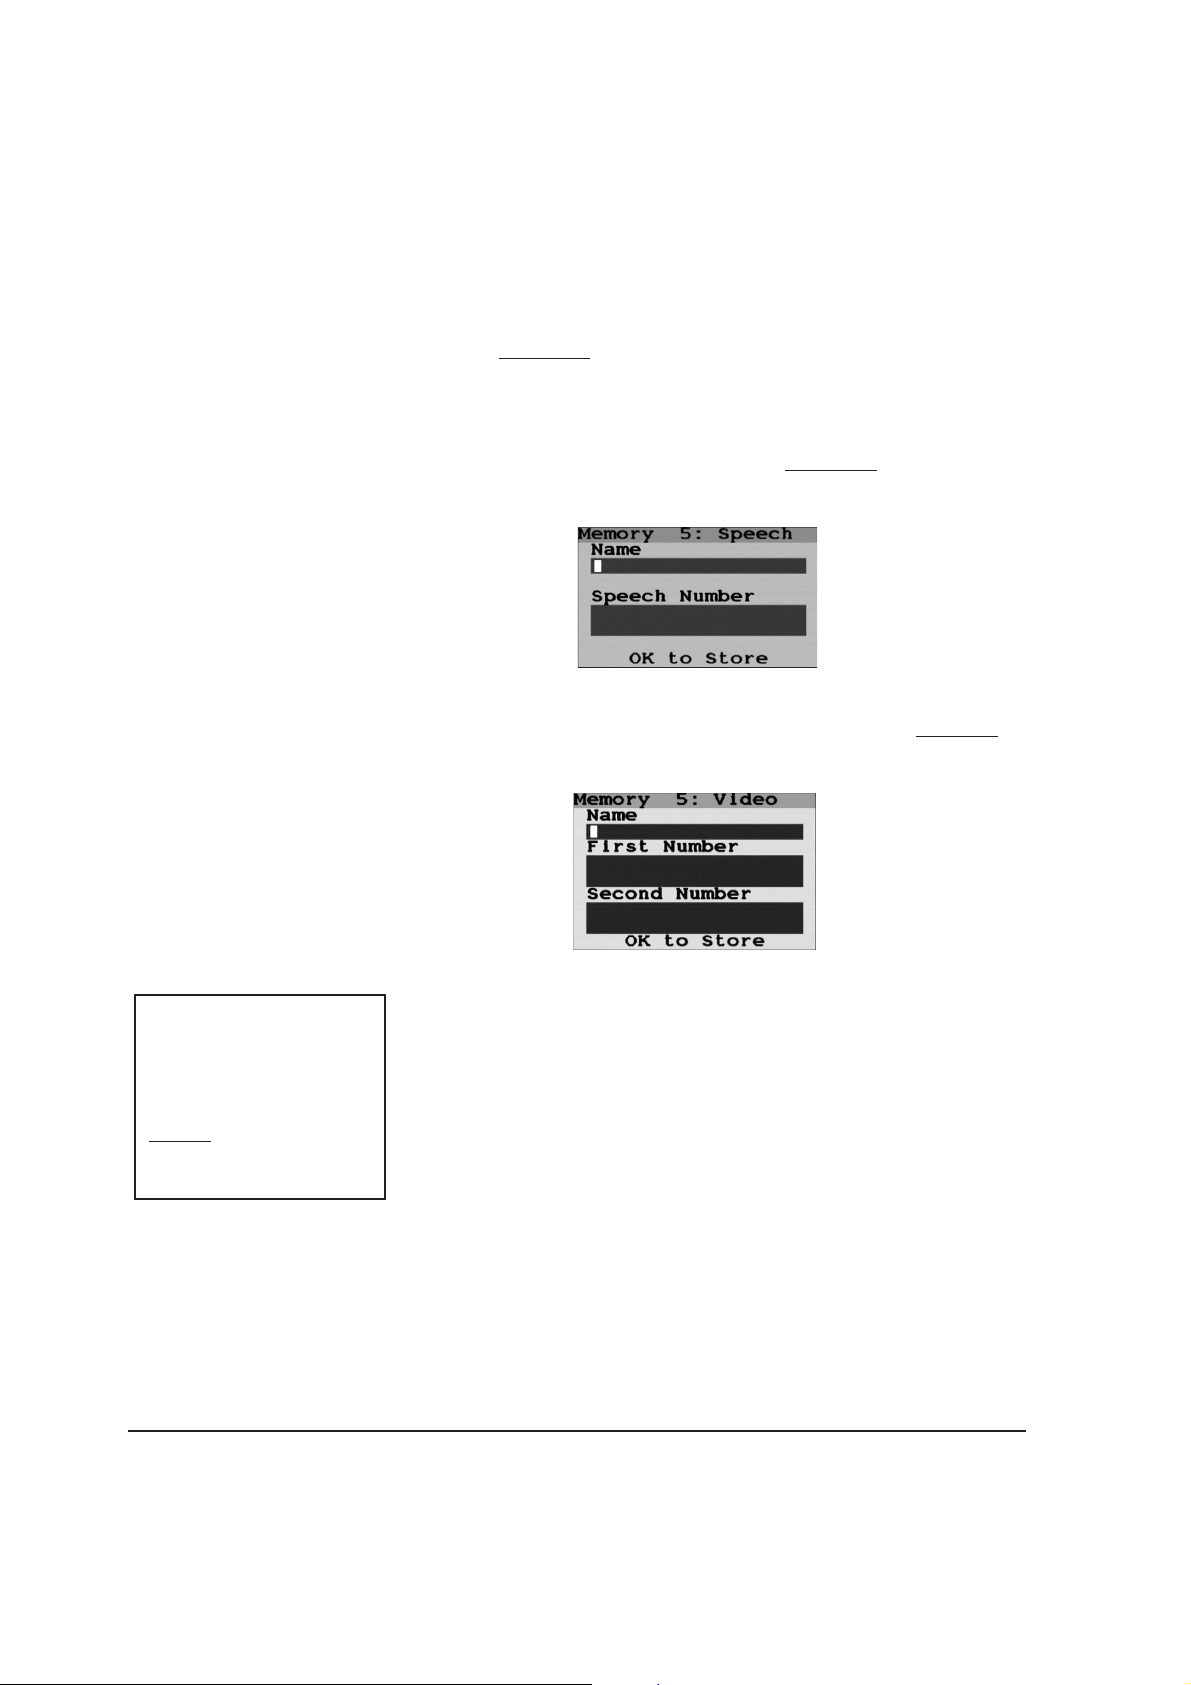
1. Press Phonebook to display the first page of 10entries currently stored in
the Phonebook.
2. If necessary, use the left and right arrow keys to move through the
Phonebook, a page at a time. Use the up and down arrow buttons to
select an empty memory slot, then press Phonebook
An empty screen for a speech call appears:
3. If you want to store a speech number or an analogue video number, go
straight to Step 4. To store a digital video number, press Video Call
The screen changes to one for a video call:
again.
.
✎
Wrong call type?
If you accidentally start entering a
video number into a Speech Call
screen, or a speech number into a
Video Call screen, simply press
Video Call
the one you want.
to change the call type to
14
4. Type in the name, using the letters on the number pad:
While you are typing in the Name box, the number buttons change their
behaviour so that you can enter letters:
+
When you press a particular button it enters the first of the letters
shown above the digit.
+
Each time you press the button, the character entered cycles
through the letters, first in upper case then in lower case, followed
by the digit on the button, then any accented letters.
The “1” button allows you to enter punctuation such as hyphens,
brackets, etc.
+
When you have selected the correct letter, press the Right arrow
to move on to the next position.
+
To enter a space, press the Right arrow.
+
If you make a mistake, use the Left arrow to go back and correct it.

5. When the name is complete, use the down arrow to move into the
number box(es) and enter the number(s).
Enter the numbers in the same way as for manual dialling, i.e. two
numbers (which may be the same) for a standard video call, or a single
number for a speech call, half-rate video call or analogue video call.
6. Press OK to store the entry, or Cancel if you want to discard it.
Once you have stored a new number, you return to the main list in the
Phonebook. From here you can either dial a number by selecting it, or
continue to enter or modify entries in the phonelist. Either press OK
dial the number, or press Cancel
if you don’t want to make a call.
to
Changing an entry in the Phonebook
Proceed exactly as for storing a new entry, but instead of an empty slot,
select the entry you wish to change. Then press Phonebook again.
To delete the existing information:
+
Use the Left arrow to delete backwards one character at a time
2
Use Shift
followed by the Left arrow to delete the whole line.
15

16
Features
This chapter introduces the different components of the videophone:
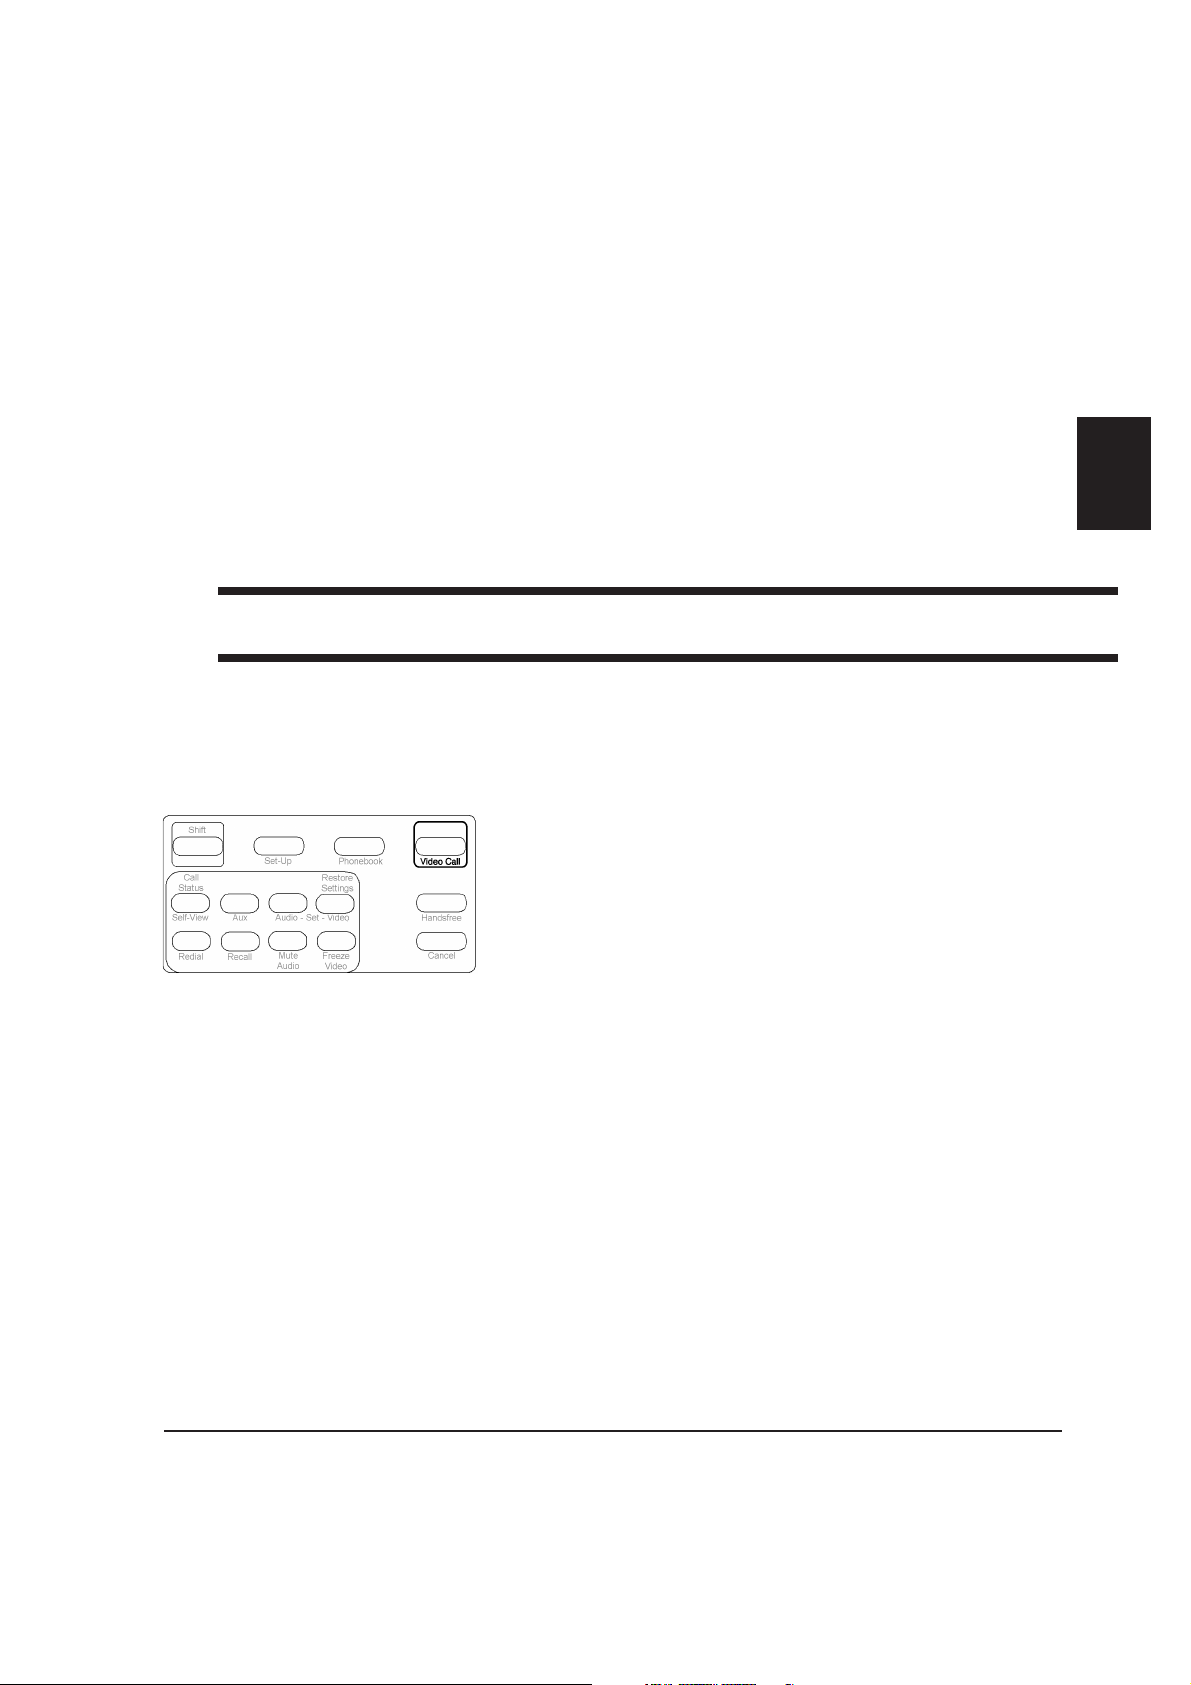
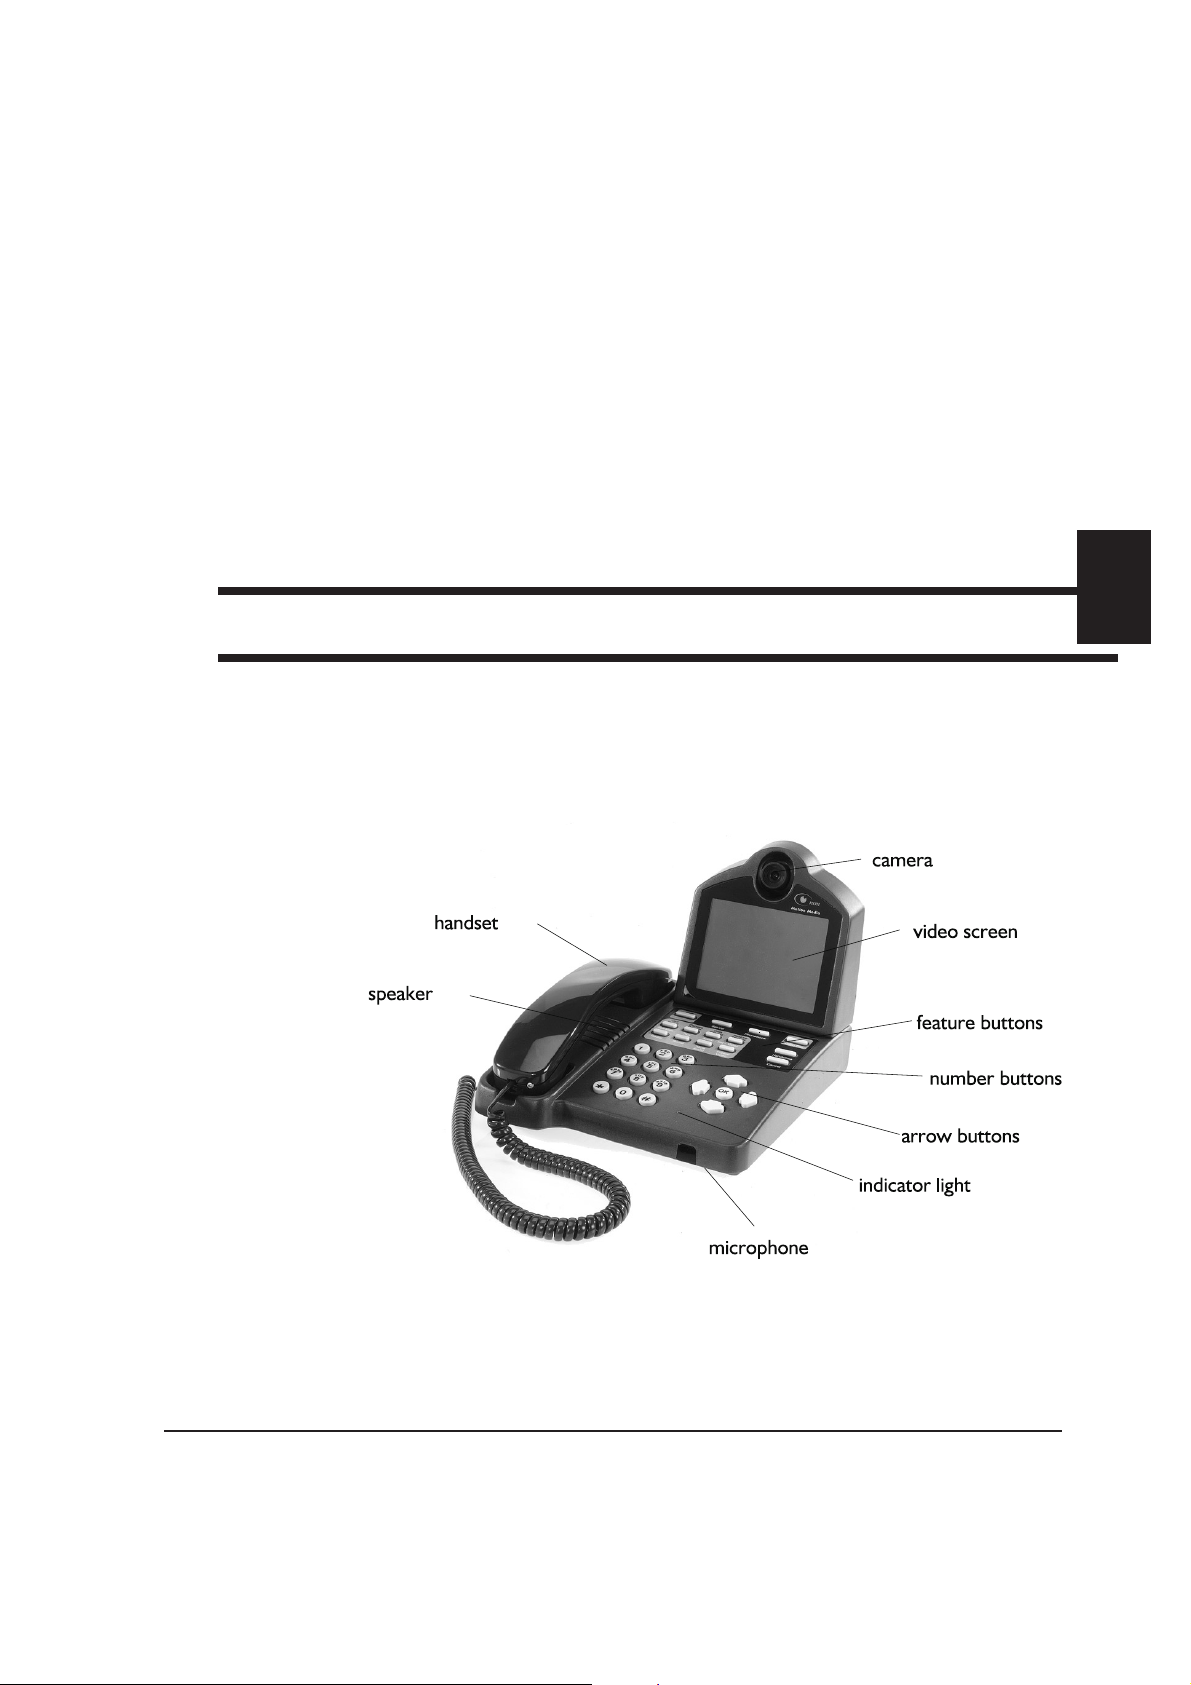
The videophone’s components
3
3
17
 Loading...