

Page 1
HIGH BACK
INSTALLATION MANUAL
TRD0227- MaTRx High Back Installation Manual- August 28, 2009
Page 2

- 2 -
Page 3

- 3 -
Table of Contents:
1.0 Hardware Kit and Sizing Information
2.0 Tools Required
3.0 Back Mounting Bracket Installation
4.0 Clamping Plate/ High Back Installation
MM
MMaaaaTTTTRRRRxxxx HHHHiiiigggghhhh BBBBaaaacccckkkk
Page 4
- 4 -
IMPORTANT!
The MaTRx High Back and installation hardware provided by Motion Concepts is intended for use with tilt-only
wheelchair systems. Due to the varying diameters of wheelchair backcanes, three unique hardware mounting
kits have been developed to allow proper mounting onto 1” dia., 7/8” dia., or 1” and 7/8” combined
backcanes. Please verify the correct sized hardware kit has been ordered prior to installation.
i
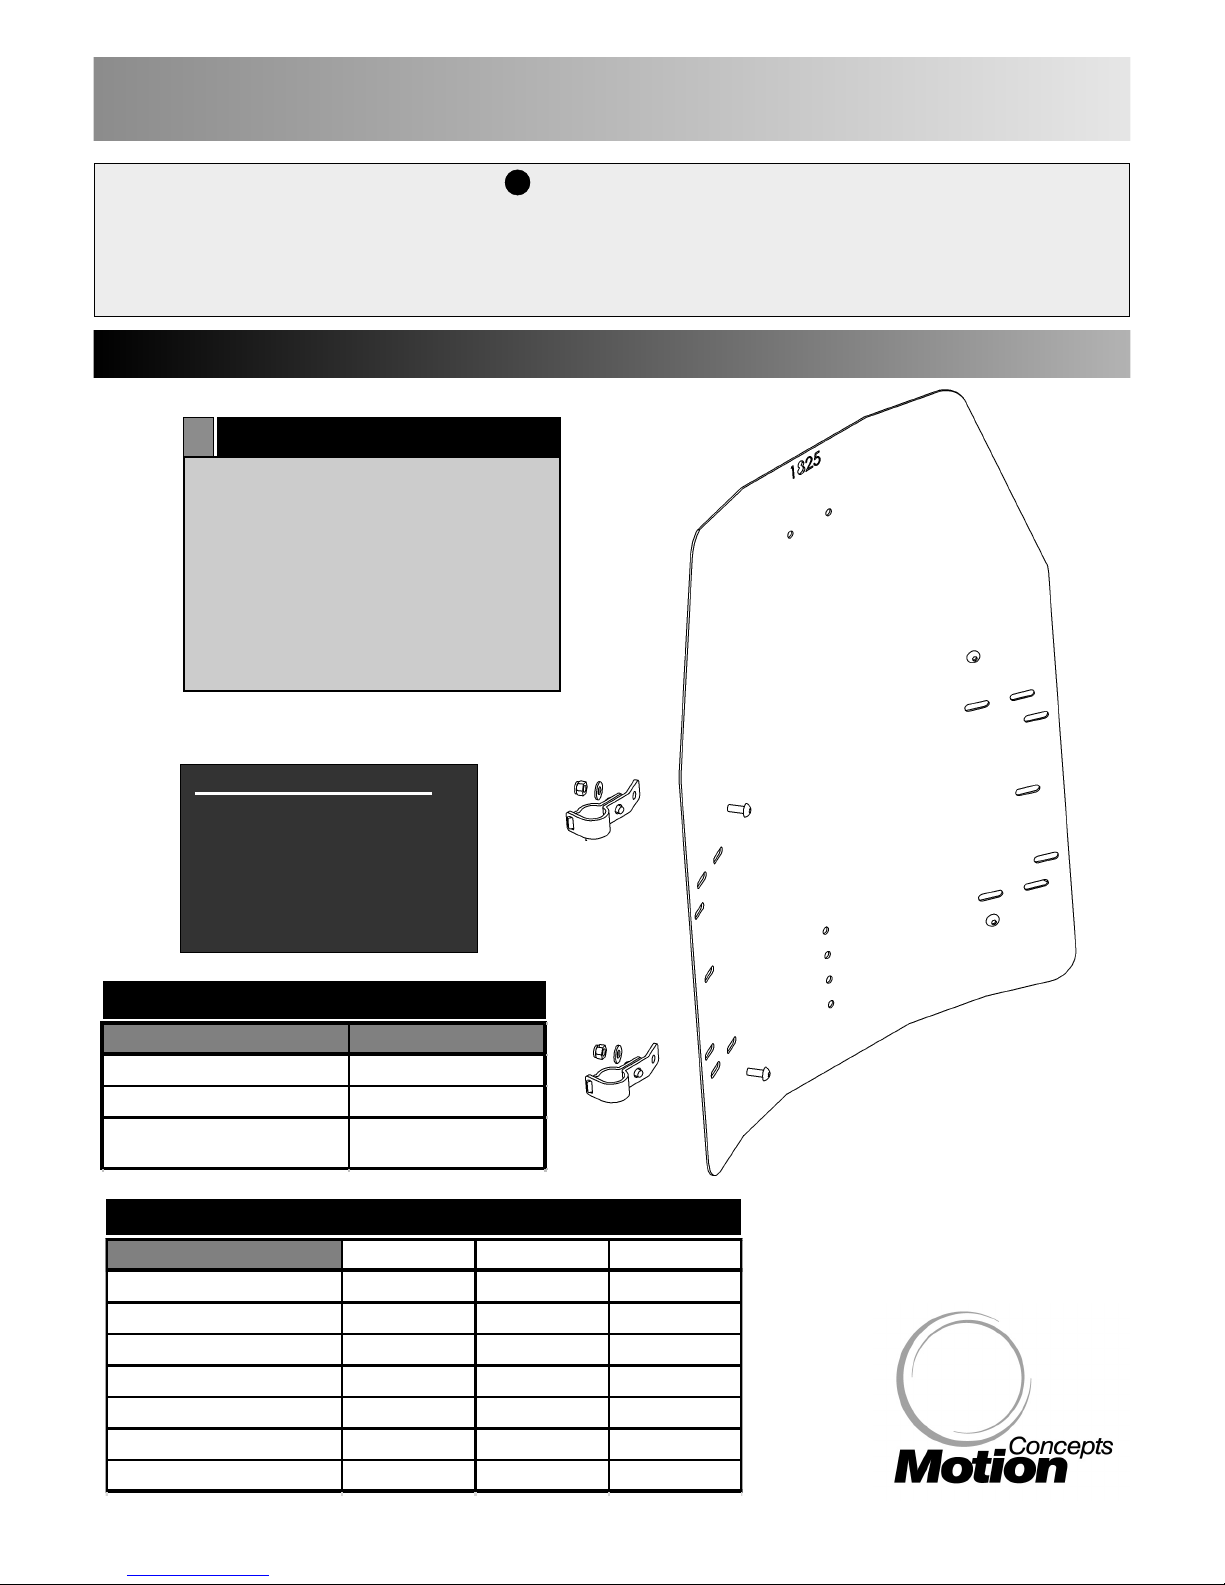
Hardware Kit Contents:
4 - mounting brackets
4 - clamping plates
8 - 1/4” flat washers
4 - 1/4-20 Nyloc Nut
4 - 1/4-20 x 5/8” cap screw
4 - 1/4-20 x 1/2” cap screw
MM
MMaaaaTTTTRRRRxxxx HHHHiiiigggghhhh BBBBaaaacccckkkk
Back Cane Diameter Hardware Kit
7/8" Back Canes TRC0671
1" Back Canes TRC0672
7/8" & 1" (Combined)
Back Canes
TRC0673
Hardware Kits:
High Back Dimensions 25" high 22" high 20" high
15" wide MHB1525 MHB1522 MHB1520
16" wide MHB1625 MHB1622 MHB1620
17" wide MHB1725 MHB1722 MHB1720
18" wide MHB1825 MHB1822 MHB1820
19" wide MHB1925 MHB1922 MHB1920
20" wide MHB2025 MHB2022 MHB2020
21" wide MHB2125 MHB2122 MHB2120
MaTRx High Back Sizing Chart:
1.0 Hardware Kit and Sizing Information
For information and/or assistance
regarding back sizing, installation
or missing components/ hardware,
please contact our Customer
Service Department for assistance.
Canada: 866-748-7943
USA: 888-433-6818
!
PLEASE NOTE
Page 5
- 5 -
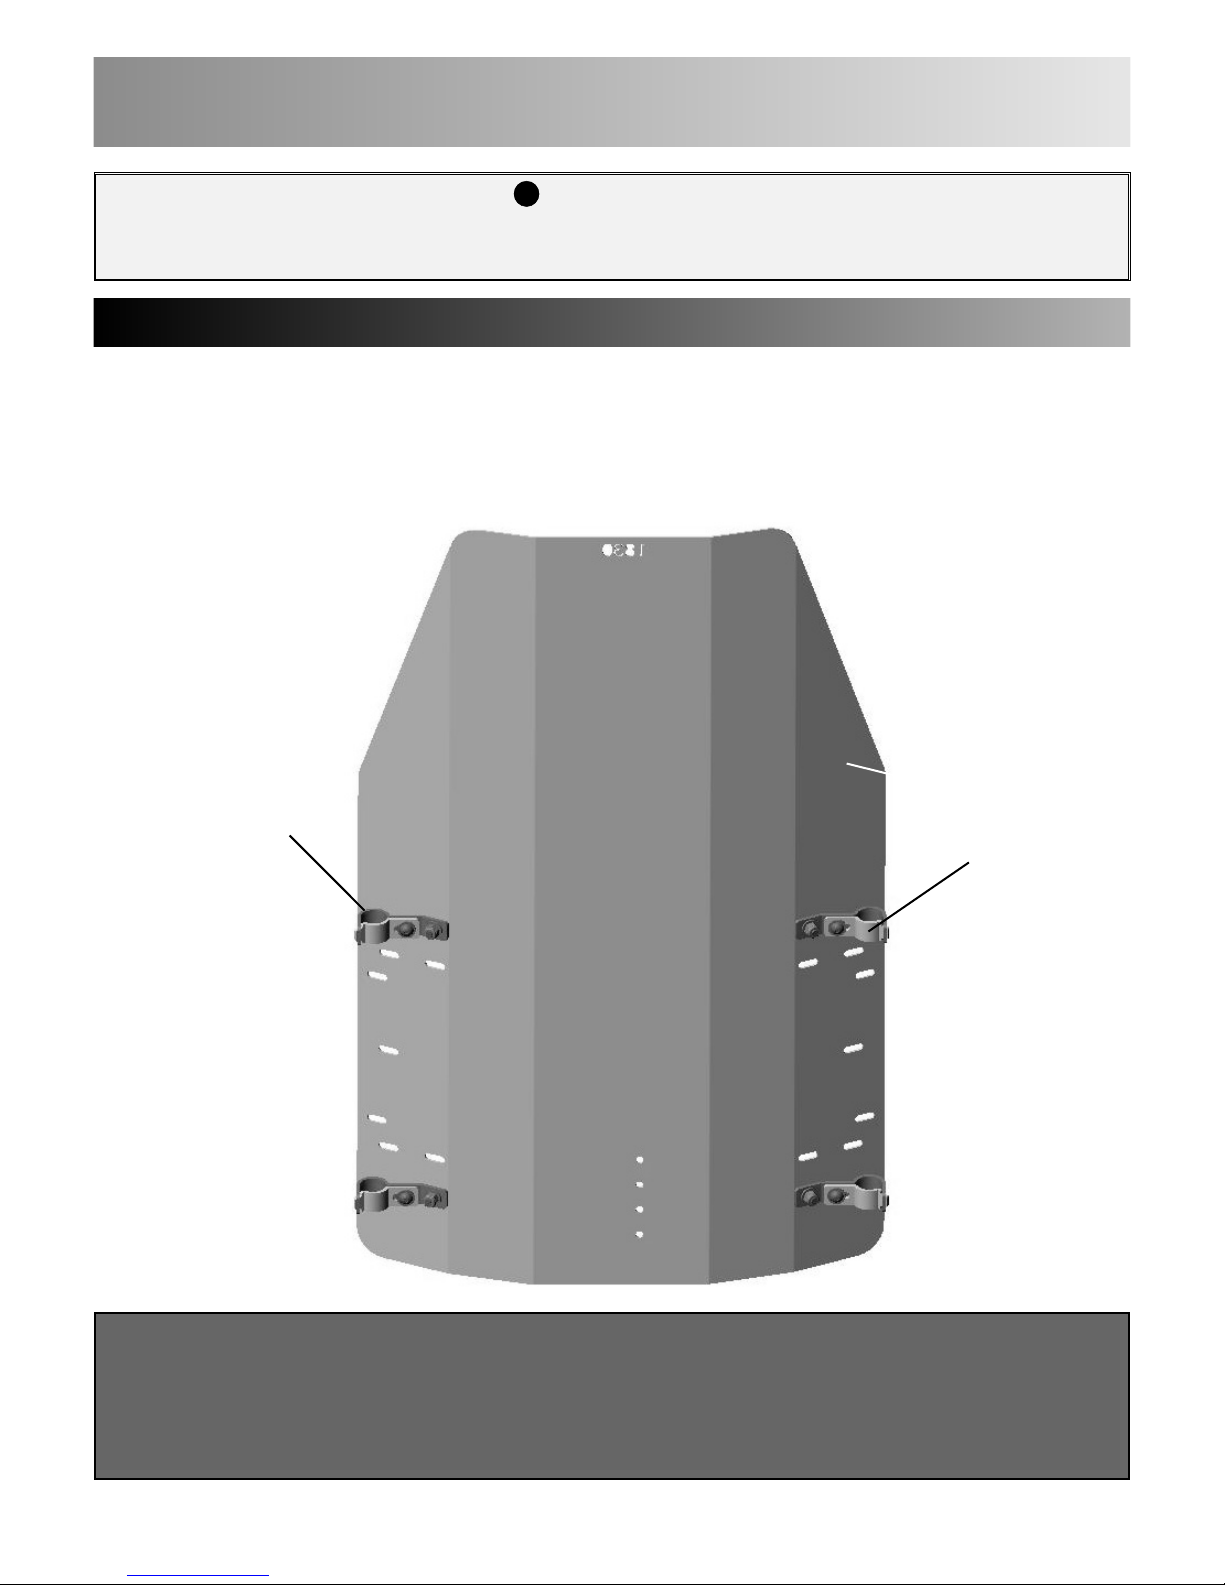
Back Mounting
Bracket (x4)
MaTRx High Back
(outer cover not shown)
Clamping
Plate (x4)
REAR VIEW
Note: Back Posts not shown
Wrenches: 1/4"
Allen Key: 3/16"
Small Hand-Clamps or Vice-Grips
Tape Measure/ Ruler
Spacer Blocks
(to support back pan during installation)
IMPORTANT!
Prior to installing the MaTRx High Back, remove the existing wheelchair back and all
associated mounting hardware (if present).
i
2.0 Tools Required
LaLater
ter
al Installa
al Installa
tion Kits
tion Kits
The MaTRx High Back is designed to accomodate Lateral Supports, if desired. A separate Lateral
Installation Kit may be ordered through our Customer Service Department. Each Lateral Kit will include
two Lateral Multi-Rails, the two Swing-Away Laterals
(size/configuration to be specified on order form), and
all associated mounting hardware.
MM
MMaaaaTTTTRRRRxxxx HHHHiiiigggghhhh BBBBaaaacccckkkk
Page 6
- 6 -
Back Mounting
Bracket
((xx44))
Mounting Bracket Installation:
BACKPAN
(inside view)
Lower
Mounting
Slots
Upper
Mounting
Slots
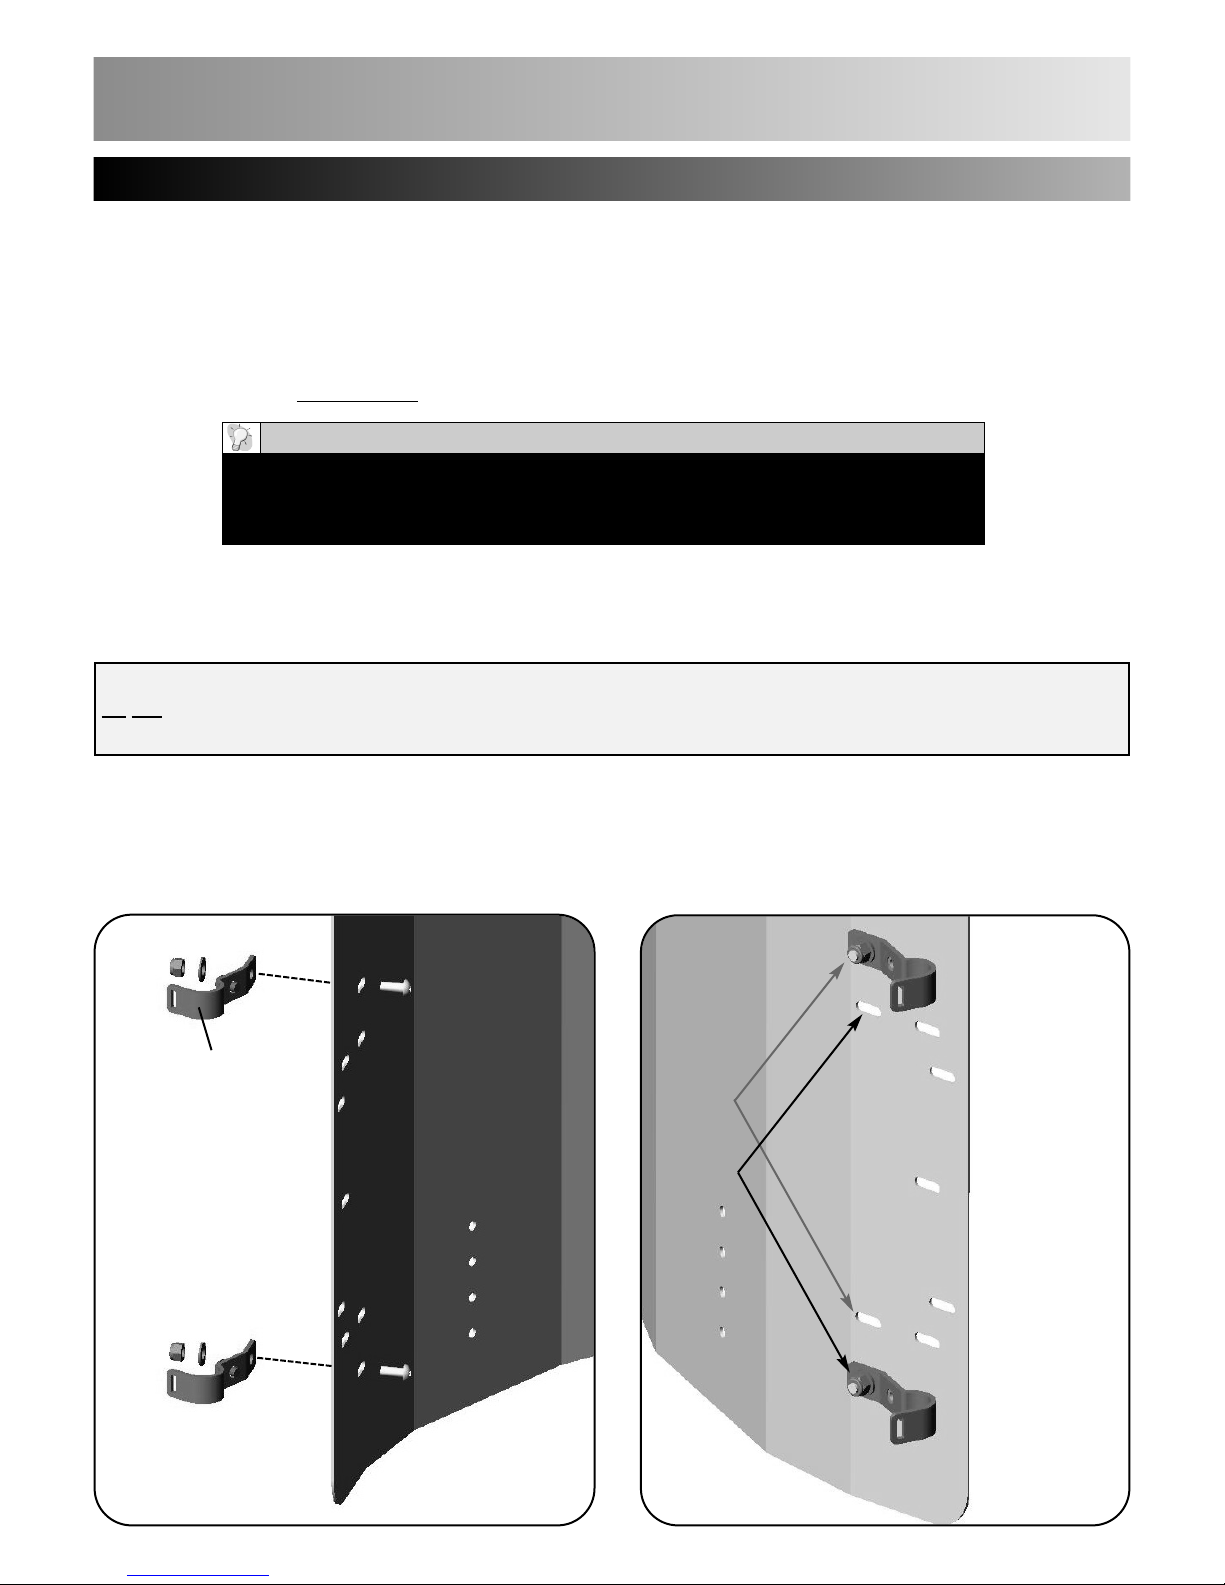
Figure 1.
Figure 2.
1
NOTE: the hardware for the back mounting brackets should be snug, however, for ease of installation
do
not fully tighten at this time. The slotted holes in the backpan are designed to allow fine tune adjustment
of the brackets & the backpan prior to final installation.
Mounting Brackets may be mounted into one of two optional sets of mounting holes (slots) along the height of
the backpan. The upper and lower mounting hole locations (see Figure 2. below) were designed to provide
optional mounting locations to prevent interference from crossbraces, pushbars or any other components/
hardware that may pre-exist on the back canes.
1. Determine the appropriate back ‘mounting height’ for the client. (note: the mounting height refers to the
desired mounting position/ height of the back - measured from the bottom edge of the back pan to the top
of the seat pan- see Help
ful Hint below ).
2. Determine which mounting hole locations (on the backpan) are most appropriate, and install the 4 back
mounting brackets onto the backpan using the hardware provided
1
. Ensure screws are inserted from the
inside of the backpan (refer to Figure 1. below for proper hardware orientation).
Due to the weight and size of the MaTRx High Back, spacer blocks (using foam
or wood) are recommended to help support the back pan during installation
and to position it at the desired mounting height.
HELPFUL HINT
(right side shown)
3.0 Back Mounting Bracket Installation
3 Place the MaTRx High Back (with mounting brackets) onto the wheelchair back canes, using the spacer
blocks and additional clamps (if necessary) to hold the back pan in place. Complete any fine tune adjustments
to the mounting bracket position and fully tighten hardware to secure all four brackets in place.
MM
MMaaaaTTTTRRRRxxxx HHHHiiiigggghhhh BBBBaaaacccckkkk
Page 7
- 7 -
Clamping Plate Installation Instructions:
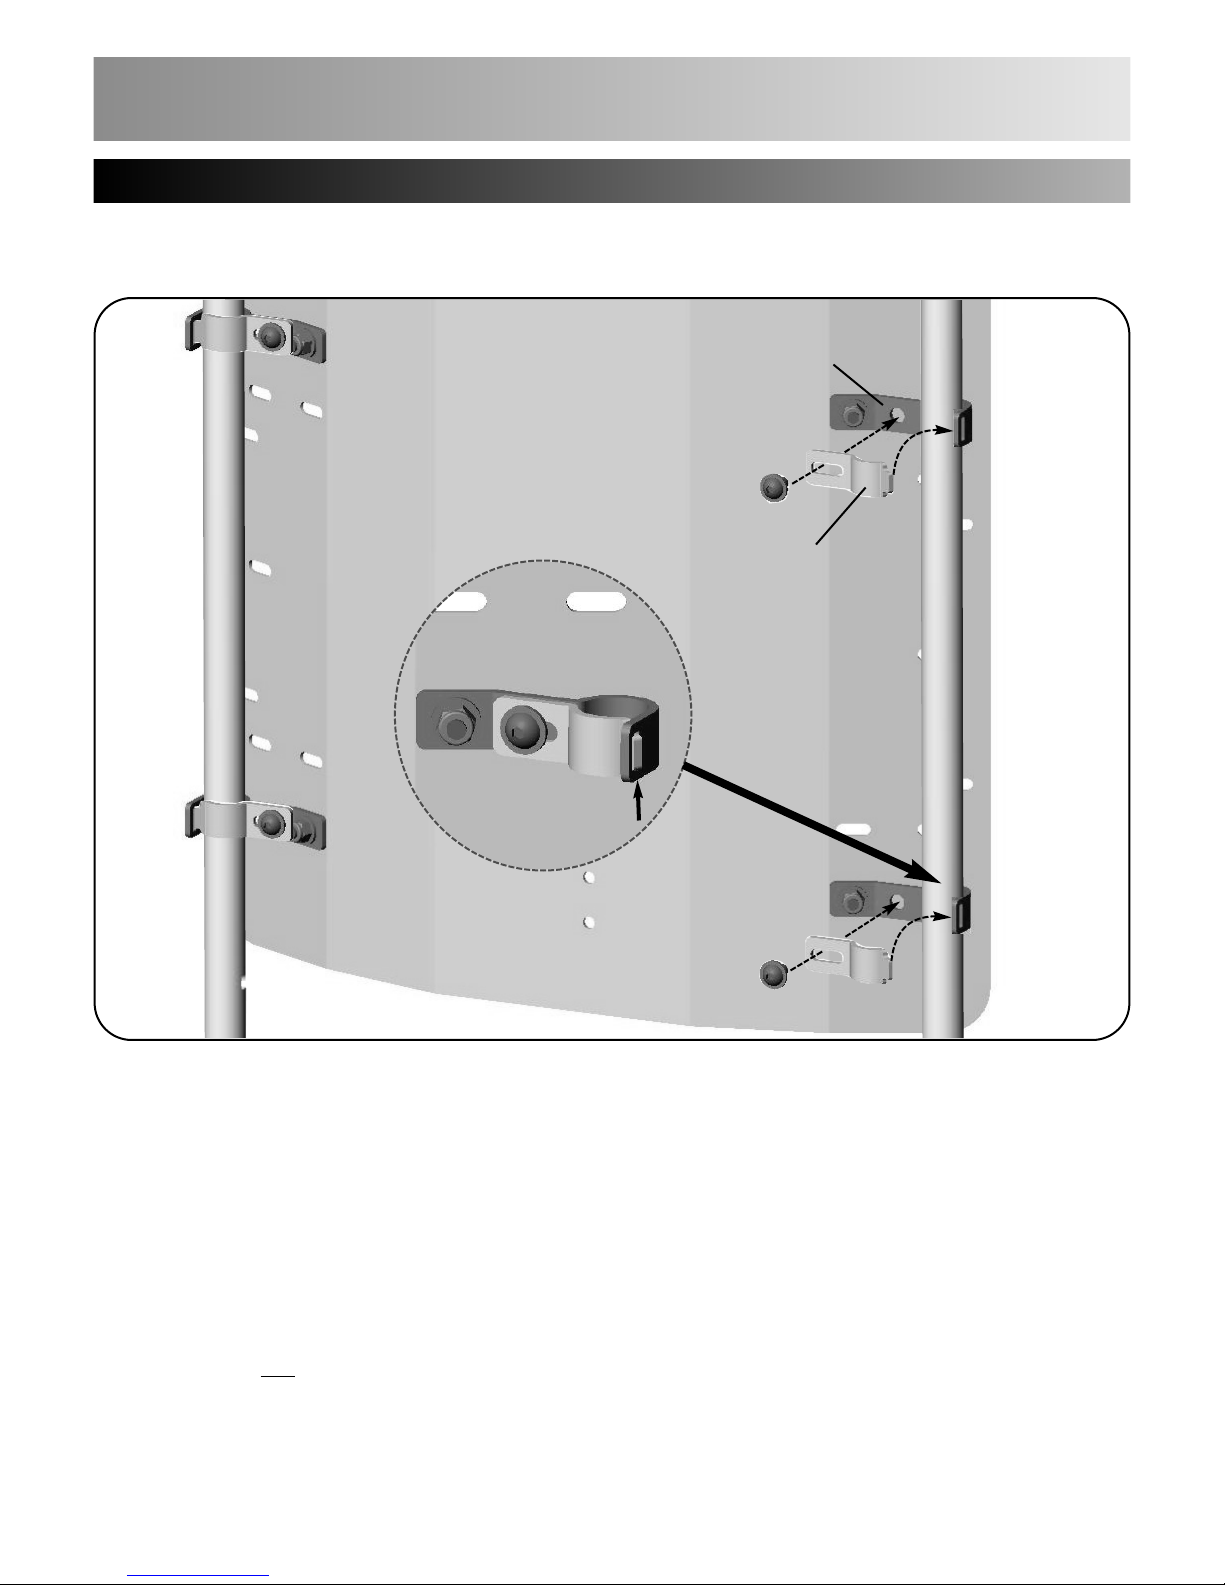
1. Begin by installing one clamping plate onto a mounting bracket on either side of the MaTRx High Back.
(note: the second clamping plate should be installed directly opposite the first)
2. Insert the metal tab from the clamping plate into the notch/slot at the end of the mounting bracket (as
illustrated in Figure 3. above).
3. Squeeze* the clamping plate around the back cane and secure it in place using the hardware provided.
*
Note
: the clamping plates are designed to form a very tight fit around the backcanes; a handclamp or vice-grips may be required to pinch the plate around the backcane and hold it in position
while the hardware is being installed.
4. After the first two
clamping plates are installed, verify the back height/ position along the back canes
and make adjustments (as needed) by loosening and re-tightening the clamping plates.
5. With the back position confirmed, install the two remaining clamping plates per steps 2-3 above.
6. Verify that all hardware is fully tightened (including hanger brackets), and ensure the MaTRx High
Back is safely secured onto the wheelchair.
Figure 3.
BACKPAN
(rear view)
Mounting
Bracket
Clamping
Plate
Backcane
4.0 Clamping Plate/ High Back Installation
With the MaTRx High Back clamped and/or ‘blocked’ at the desired height on the backcanes, the clamping plates
can be installed to secure the back in place (refer to Figure 3. and instructions below).
Note:
the clamping plate “clips”
into the slot on the mounting
bracket and tightens up against
the backcane (not shown) using
the hardware provided
Note: crossbrace/ support between
the backcanes is not shown
MM
MMaaaaTTTTRRRRxxxx HHHHiiiigggghhhh BBBBaaaacccckkkk
Page 8

UUSSAA
700 Ensminger Rd. Suite 112
Tonawanda, NY, USA 14150
716-447-0050
888-433-6818
CCaannaaddaa
84 Citation Dr. Units 1-3
Concord, Ontario,
Canada L4K 1C9
905-695-0134
866-748-7943
www.motionconcepts.com
WWARRANTY
ARRANTY
Every MaTRx High Back is carefully inspected and tested to provide
optimum performance. Each back is guaranteed to be free from defects
for a period of 24 months from the date purchase provided normal use.
Should a defect in materials or workmanship occur within 24 months of
the original date of purchase, Motion Concepts will, at its option, repair
or replace it free of charge. This warranty does not apply to punctures,
tears or burns, nor to the removable cushion cover.
The original back must be returned to the dealer and will become the
property of Motion Concepts as a condition of processing the warranty
claim. All warranty claims must be made through the dealer where the
cushion was purchased. Except for express warranties made herein, all
other warranties of fitness or use for a particular purpose are excluded.
There are no warranties that extend beyond the warranties provided
above. Remedies for breach of this warranty are limited to repair or
replacement of goods. In no event shall damages for breach of any
warranty include any consequential damages or exceed the original
cost of the back.
 Loading...