

Page 1

CFT-Series
Docking Station
User’s Guide
CFT-001/CFT-002/CFT-003
Station d’accueil
Guide de l’utilisateur
Docking-Station
Benutzerhandbuch
Estación base
Guía del usuario
Base de encaixe
Guia do Usuário
Page 2

© 2011 Motion Computing, Inc. All rights reserved.
This document contains information protected by
copyright. No part of this document may be
reproduced in any form without written consent
from Motion. The information in this document is
provided “as is” and is subject to change without
notice. Motion is not liable for errors or omissions in
this document. Motion, Motion Computing, Speak
Anywhere, and View Anywhere are trademarks or
registered trademarks of Motion Computing, Inc. in
the U.S.A. and other countries.
Microsoft Windows is a registered trademark of
Microsoft Corporation in the United States and/or
other countries.
Motion Computing, Inc. has made every effort to
identify trademarked properties and owners on this
page. All brands and product names used in this
document are for identification purposes only and
may be trademarks or registered trademarks of their
respective companies.
The warranties for Motion products are set forth in
the express limited warranty statements
accompanying such products. Nothing in this
document constitutes an additional warranty.
The Motion Computing products and services may
be covered by one or more patent-protected
inventions. Additional patents may also be pending.
For more information, see
www.motioncomputing.com/info/patents.asp.
© 2011 Motion Computing, Inc. Tous droits réservés.
Les informations du présent document sont
protégées par des droits d’auteur. Aucun élément du
présent document ne peut être copié ou reproduit
sous quelque forme que ce soit sans l’accord écrit de
Motion. Les informations du présent document sont
fournies « en l’état » et peuvent faire l’objet de
modific ations sans préavis. Motion n e peut être tenu
responsable des erreurs ou omissions dans ce
document. Motion, Motion Computing, Speak
Anywhere et View Anywhere sont des marques
commerciales ou des marques déposées de la
société Motion Computing, Inc. aux Etats-Unis et
dans d’autres pays.
Microsoft Windows est une marque déposée de la
société Microsoft Corporation aux Etats-Unis et/ou
dans d’autres pays.
Motion Computing, Inc. a fait en sorte d’identifier les
appartenances et les propriétaires des marques
déposées et commerciales. Les marques et les noms
de produits mentionnés dans le présent document
sont désignés exclusivement à des fins
d’identification et peuvent être des marques
commerciales ou déposées appartenant à leurs
propriétaires respectifs.
Les garanties relatives aux produits, consenties par
Motion, sont spécifiées dans les clauses de garantie
limitée accompagnant les produits concernés.
Aucun élément du présent document ne constitue
une garantie complémentaire.
Les produits et services de Motion Computing
peuvent être protégés par une ou plusieurs
inventions brevetées. D’autres brevets peuvent être
en cours de certification. Pour plus d’informations,
consultez le site
www.motioncomputing.com/info/patents.asp.
© 2011 Motion Computing, Inc. Alle Rechte
vorbehalten.
Dieses Dokument enthält urheberrechtlich
geschützte Informationen. Kein Teil dieses
Dokuments darf ohne schriftliche Genehm-igung
von Motion reproduziert werden. Die Informationen
in diesem Dokument werden in ihrem derzeitigen
Zustand zur Verfügung gestellt und unterliegen
unangekündigten Änderungen. Motion haftet nicht
für Fehler oder Auslassungen in diesem Dokument.
Motion, Motion Computing, Speak Anywhere und
View Anywhere sind Marken oder eingetragene
Marken von Motion Computing, Inc. in den USA und
anderen Ländern.
Microsoft Windows est ein eingetragene Marke von
Microsoft Corporation in den Vereinigten Staaten
und/oder anderen Ländern.
Motion Computing, Inc. war bestrebt, sämtliches
Markeneigentum und deren Inhaber auf dieser
Seite zu erwähnen. Alle Marken und Produktnamen
in diesem Dokument dienen ausschließlich
Identifizierungszwecken und können Marken
oder eingetragene Marken ihrer jeweiligen
Unternehmen sein.
Die Garantien für Motion-Produkte sind in den
Erklärungen zur eingeschränkten Garantie
ausgeführt, die den Produkten beiliegen. Die
Informationen in diesem Dokument stellen keine
zusätzliche Garantie dar.
Die Motion Computing-Produkte und
-Dienstleistungen können einer oder mehreren der
folgenden durch Patente geschützten Erfindungen
unterliegen. Weitere Patente sind angemeldet.
Weitere Informationen erhalten Sie unter
www.motioncomputing.com/info/patents.asp.
PN 024-02-0231-A01
Page 3

© 2011 Motion Computing, Inc. Todos los derechos
reservados.
Este documento contiene información protegida por
copyright. No se permite la reproducción de parte de
este documento en ningún medio sin el
consentimiento escrito de Motion. La información de
este documento se proporciona “tal cual” y queda
sujeta a modificaciones sin previo aviso. Motion no
es responsable de los errores u omisiones de este
documento. Motion, Motion Computing, Speak
Anywhere y View Anywhere son marcas comerciales
o marcas comerciales registradas de Motion
Computing, Inc. en EE.UU. y otros países.
Microsoft Windows es una marca registrada de
Microsoft Corporation en Estados Unidos y/o otros
países.
Motion Computing, Inc. ha realizado todos los
esfuerzos razonables para identificar las propiedades
de marcas comerciales y sus propietarios en esta
página. Todas las marcas y nombres de productos
utilizados en este documento se utilizan únicamente
con fines de identificación y pueden ser marcas
comerciales o marcas comerciales registradas de sus
respectivas empresas.
Las garantías de los productos de Motion se
establecen en las declaraciones de garantía limitada
expresas que acompañan a estos productos.
Ninguna de las partes de este documento constituye
una garantía adicional.
Los productos y servicios de Motion Computing
pueden estar cubiertos por uno o más inventos
protegidos por patentes. Es posible que también
haya patentes adicionales pendientes de
tramitación.
Si desea más información, consulte
www.motioncomputing.com/info/patents.asp.
© 2011 Motion Computing, Inc. Todos os direitos
reservados.
Este documento contém informações protegidas por
direitos autorais. Nenhuma parte deste documento
pode ser reproduzida de forma alguma sem o
consentimento por escrito da Motion. As
informações neste documento são fornecidas “como
estão” e estão sujeitas a alteração sem aviso prévio. A
Motion não se responsabiliza por erros ou omissões
neste documento. Motion, Motion Computing,
Speak Anywhere e View Anywhere são marcas
comerciais ou re gistradas da Motion Computi ng, Inc.
nos EUA e em outros países.
Microsoft Windows é uma marca comercial
registrada da Microsoft Corporation nos Estados
Unidos e/ou outros países.
A Motion Computing, Inc. fez todo o esforço possível
para identificar as propriedades e proprietários de
marcas registradas nesta página. Todas as marcas e
nomes de produtos usados neste documento têm
objetivo de identificação somente e podem ser
marcas comerc iais ou registradas de sua s respectivas
empresas.
As garantias para os produtos da Motion são
estabelecidas nas declarações de garantia limitada
expressa que acompanham tais produtos. Nada
neste documento constitui uma garantia adicional.
Os produtos e serviços da Motion Computing
podem estar cobertos por uma ou mais invenções
protegidas por patentes. Pode haver patentes
adicionais pendentes.
Para obter mais informações, consulte
www.motioncomputing.com/info/patents.asp.
Page 4

Page 5

Contents
Docking Station . . . . . . . . . . . . . . . . . . . . . . . . . . . . 1
Placing and mounting the Docking Station . . . . . . . . . . . . . . . . . .2
Placing on a desk or table. . . . . . . . . . . . . . . . . . . . . . . . . . . . . . . . .2
Mounting to a wall . . . . . . . . . . . . . . . . . . . . . . . . . . . . . . . . . . . . . . . 2
Mounting to a cart or mounting arm . . . . . . . . . . . . . . . . . . . . . . 3
Connecting the Docking Station. . . . . . . . . . . . . . . . . . . . . . . . . . . . .4
Using the Docking Station . . . . . . . . . . . . . . . . . . . . . . . . . . . . . . . . . . 6
Reading the status lights . . . . . . . . . . . . . . . . . . . . . . . . . . . . . . . . .6
Docking and removing the tablet . . . . . . . . . . . . . . . . . . . . . . . . .7
Setting the viewing angle . . . . . . . . . . . . . . . . . . . . . . . . . . . . . . . . 8
Locking the Docking Station . . . . . . . . . . . . . . . . . . . . . . . . . . . . . .9
Using an external monitor and projector . . . . . . . . . . . . . . . . .10
Using the battery charging bay . . . . . . . . . . . . . . . . . . . . . . . . . .11
Changing the tablet battery while the tablet is docked . . .12
Warranty . . . . . . . . . . . . . . . . . . . . . . . . . . . . . . . . . . . . . . . . . . . . . . . . . .13
Safety and regulatory. . . . . . . . . . . . . . . . . . . . . . . . . . . . . . . . . . . .13
Service and support . . . . . . . . . . . . . . . . . . . . . . . . . . . . . . . . . . . . .14
Patents . . . . . . . . . . . . . . . . . . . . . . . . . . . . . . . . . . . . . . . . . . . . . . . . .14
Station d’accueil. . . . . . . . . . . . . . . . . . . . . . . . . . . 15
Positionnement et montage de la station d’accueil. . . . . . . . . .16
Installation sur une table ou un bureau . . . . . . . . . . . . . . . . . .16
Montage mural. . . . . . . . . . . . . . . . . . . . . . . . . . . . . . . . . . . . . . . . . .16
Montage sur un chariot ou un accoudoir . . . . . . . . . . . . . . . . .17
Connexion de la station d’accueil . . . . . . . . . . . . . . . . . . . . . . . . . . .18
Utilisation de la station d’accueil . . . . . . . . . . . . . . . . . . . . . . . . . . .20
Description des voyants d’état . . . . . . . . . . . . . . . . . . . . . . . . . . .20
Placement et retrait de la tablette. . . . . . . . . . . . . . . . . . . . . . . .21
Définition de l’angle de vision . . . . . . . . . . . . . . . . . . . . . . . . . . .22
Verrouillage de la station d’accueil . . . . . . . . . . . . . . . . . . . . . . .23
iii
Page 6

Utilisation d’un moniteur externe et d’un projecteur. . . . . .24
Utilisation de la baie de chargement de la batterie . . . . . . .25
Changement de batterie lorsque la tablette est
sur la station d’accueil . . . . . . . . . . . . . . . . . . . . . . . . . . . . . . . . . . .26
Garantie . . . . . . . . . . . . . . . . . . . . . . . . . . . . . . . . . . . . . . . . . . . . . . . . . . .27
Sécurité et réglementation . . . . . . . . . . . . . . . . . . . . . . . . . . . . . .27
Entretien et assistance technique . . . . . . . . . . . . . . . . . . . . . . . .28
Brevets. . . . . . . . . . . . . . . . . . . . . . . . . . . . . . . . . . . . . . . . . . . . . . . . . .28
Dockingstation . . . . . . . . . . . . . . . . . . . . . . . . . . . . 29
Positionieren und Montieren der Dockingstation . . . . . . . . . . .30
Aufstellen auf einem Schreibtisch oder Tisch . . . . . . . . . . . . .30
Befestigen an der Wand . . . . . . . . . . . . . . . . . . . . . . . . . . . . . . . . .30
Befestigen an einem Wagen oder Befestigungsarm. . . . . . .31
Anschließen der Dockingstation. . . . . . . . . . . . . . . . . . . . . . . . . . . .32
Verwenden der Dockingstation . . . . . . . . . . . . . . . . . . . . . . . . . . . .34
Interpretieren der Statuslämpchen. . . . . . . . . . . . . . . . . . . . . . .34
Einsetzen und Entnehmen des Tablet PCs. . . . . . . . . . . . . . . .35
Einstellen des Sichtwinkels . . . . . . . . . . . . . . . . . . . . . . . . . . . . . .36
Sichern der Dockingstation . . . . . . . . . . . . . . . . . . . . . . . . . . . . . .37
Verwendung eines externen Monitors und Projektors . . . .38
Verwendung des Akkuladeschachts. . . . . . . . . . . . . . . . . . . . . .39
Austauschen des Akkus während sich der Tablet
PC in der Dockingstation befindet . . . . . . . . . . . . . . . . . . . . . . .40
Garantie . . . . . . . . . . . . . . . . . . . . . . . . . . . . . . . . . . . . . . . . . . . . . . . . . . .41
Sicherheit und Vorschriften . . . . . . . . . . . . . . . . . . . . . . . . . . . . . .41
Service und Support. . . . . . . . . . . . . . . . . . . . . . . . . . . . . . . . . . . . .42
Patente . . . . . . . . . . . . . . . . . . . . . . . . . . . . . . . . . . . . . . . . . . . . . . . . .42
Estación base. . . . . . . . . . . . . . . . . . . . . . . . . . . . . . 43
Colocación y montaje de la estación base. . . . . . . . . . . . . . . . . . .44
Colocación en una mesa o escritorio . . . . . . . . . . . . . . . . . . . . .44
Montaje en una pared . . . . . . . . . . . . . . . . . . . . . . . . . . . . . . . . . . .44
Montaje en un carro o brazo de montaje . . . . . . . . . . . . . . . . .45
Conexión de la estación base. . . . . . . . . . . . . . . . . . . . . . . . . . . . . . .46
Uso de la estación base . . . . . . . . . . . . . . . . . . . . . . . . . . . . . . . . . . . .48
iv Contents
Page 7

Lectura de las luces de estado . . . . . . . . . . . . . . . . . . . . . . . . . . .48
Acoplamiento y retirada del tablet . . . . . . . . . . . . . . . . . . . . . . .49
Configuración del ángulo de visión . . . . . . . . . . . . . . . . . . . . . .50
Bloqueo de la estación base . . . . . . . . . . . . . . . . . . . . . . . . . . . . .51
Uso de un monitor y proyector externos . . . . . . . . . . . . . . . . .52
Uso de la bahía de carga de la batería . . . . . . . . . . . . . . . . . . . .53
Cambio de la batería del tablet mientras está
acoplado en la estación base . . . . . . . . . . . . . . . . . . . . . . . . . . . .54
Garantía . . . . . . . . . . . . . . . . . . . . . . . . . . . . . . . . . . . . . . . . . . . . . . . . . . .55
Seguridad y normativa . . . . . . . . . . . . . . . . . . . . . . . . . . . . . . . . . .55
Servicio y asistencia . . . . . . . . . . . . . . . . . . . . . . . . . . . . . . . . . . . . .56
Patentes . . . . . . . . . . . . . . . . . . . . . . . . . . . . . . . . . . . . . . . . . . . . . . . .56
Base de encaixe . . . . . . . . . . . . . . . . . . . . . . . . . . . 57
Posicionando e montando a base de encaixe . . . . . . . . . . . . . . .58
Posicionamento em uma mesa ou escrivaninha . . . . . . . . . .58
Montagem na parede . . . . . . . . . . . . . . . . . . . . . . . . . . . . . . . . . . .58
Montagem em um carrinho ou braço de montagem. . . . . .59
Conectando a base de encaixe . . . . . . . . . . . . . . . . . . . . . . . . . . . . .60
Usando a base de encaixe . . . . . . . . . . . . . . . . . . . . . . . . . . . . . . . . . .62
Leitura das luzes de status . . . . . . . . . . . . . . . . . . . . . . . . . . . . . . .62
Colocando e removendo o tablet da base de encaixe. . . . .63
Ajustando o ângulo de visualização. . . . . . . . . . . . . . . . . . . . . .64
Travando a base de encaixe . . . . . . . . . . . . . . . . . . . . . . . . . . . . .65
Usando um monitor ou projetor externo . . . . . . . . . . . . . . . . .66
Usando a base de carregamento da bateria . . . . . . . . . . . . . .67
Trocando a bateria do tablet enquanto ele estiver
na base de encaixe . . . . . . . . . . . . . . . . . . . . . . . . . . . . . . . . . . . . . .68
Garantia . . . . . . . . . . . . . . . . . . . . . . . . . . . . . . . . . . . . . . . . . . . . . . . . . . .69
Segurança e normas. . . . . . . . . . . . . . . . . . . . . . . . . . . . . . . . . . . . .69
Serviço e suporte. . . . . . . . . . . . . . . . . . . . . . . . . . . . . . . . . . . . . . . .70
Patentes . . . . . . . . . . . . . . . . . . . . . . . . . . . . . . . . . . . . . . . . . . . . . . . .70
Contents v
Page 8

vi Contents
Page 9

Docking Station
This document applies to the docking station for the Tablet PC
models CFT-001, CFT-002, and CFT-003. To determine which
tablet model you have, refer to the label on the back of the unit.
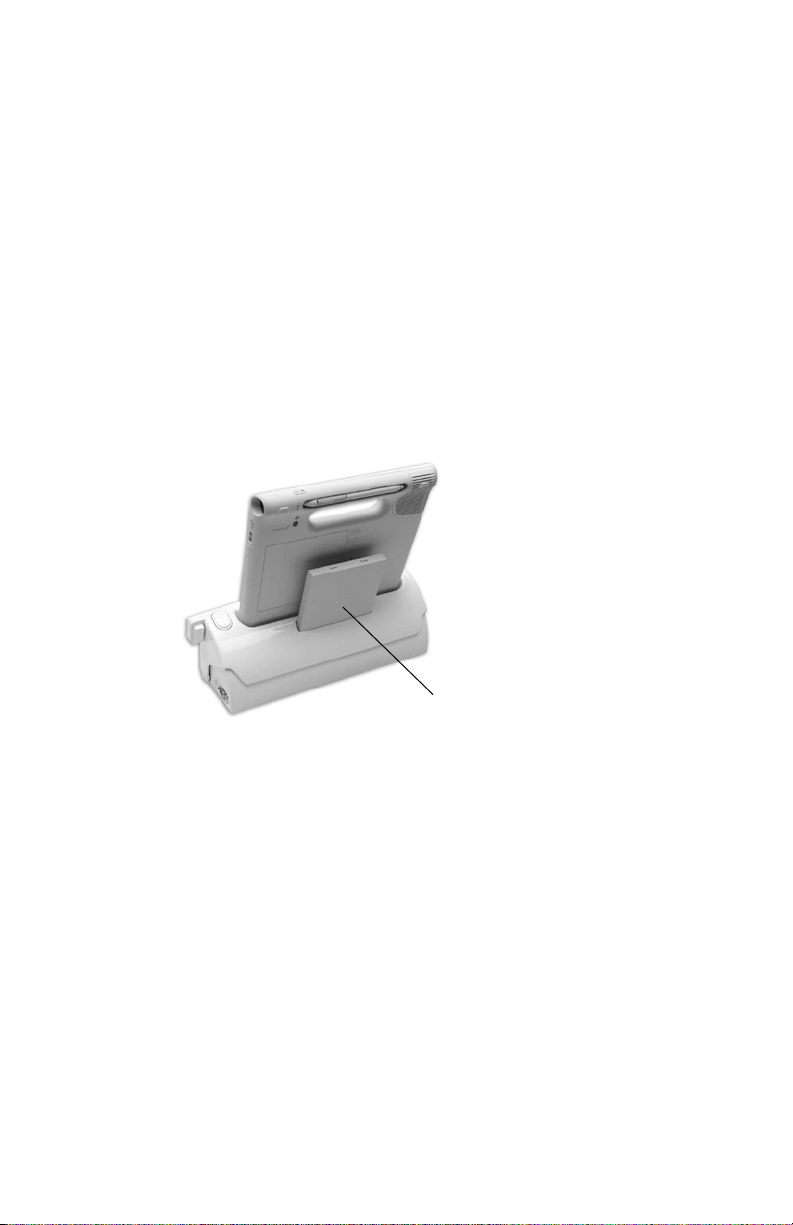
The Docking Station adds functionality to your tablet, including
port expansion for Ethernet, VGA monitors, and USB devices such
as printers, keyboards, and mice.
The Docking Station also charges the tablet and includes a
charging bay for an extra battery.
For more information about other peripherals and optional
hardware, go to www.motioncomputing.com.
A tablet in the Docking Station
Docking Station 1
Page 10

Placing and mounting the Docking Station
You can place the Docking Station on a desk or table, or mount it
to a wall, cart, arm mount, or other equipment.
The bottom of the Docking Station has a standard VESA
mounting pattern that can be used with other VESA-compatible
equipment.
The Docking Station also includes a security slot for locking the
Docking Station to a table, desk, or other fixture.
Note: Certain mounting configurations may require other
components such as a wall bracket.
Placing on a desk or table
When using the Docking Station on a desk or table, place the
Docking Station approximately 4 inches from a wall to allow you
to reach the spare battery.
Depending on your intended use, you can adjust the viewing
angle of the Docking Station to three different positions: 15°, 25°,
or 38°. For more information about viewing angles, see “Setting
the viewing angle” on page 8.
Mounting to a wall
Mounting the Docking Station to a wall requires a separate wall
bracket that is compatible with a 75 mm VESA-pattern mount.
To minimize the distance the Docking Station projects from the
wall, we recommend that you adjust the viewing angle to 38°.
The wall bracket must facilitate this angle to keep the tablet in a
vertical orientation.
2Docking Station
Page 11
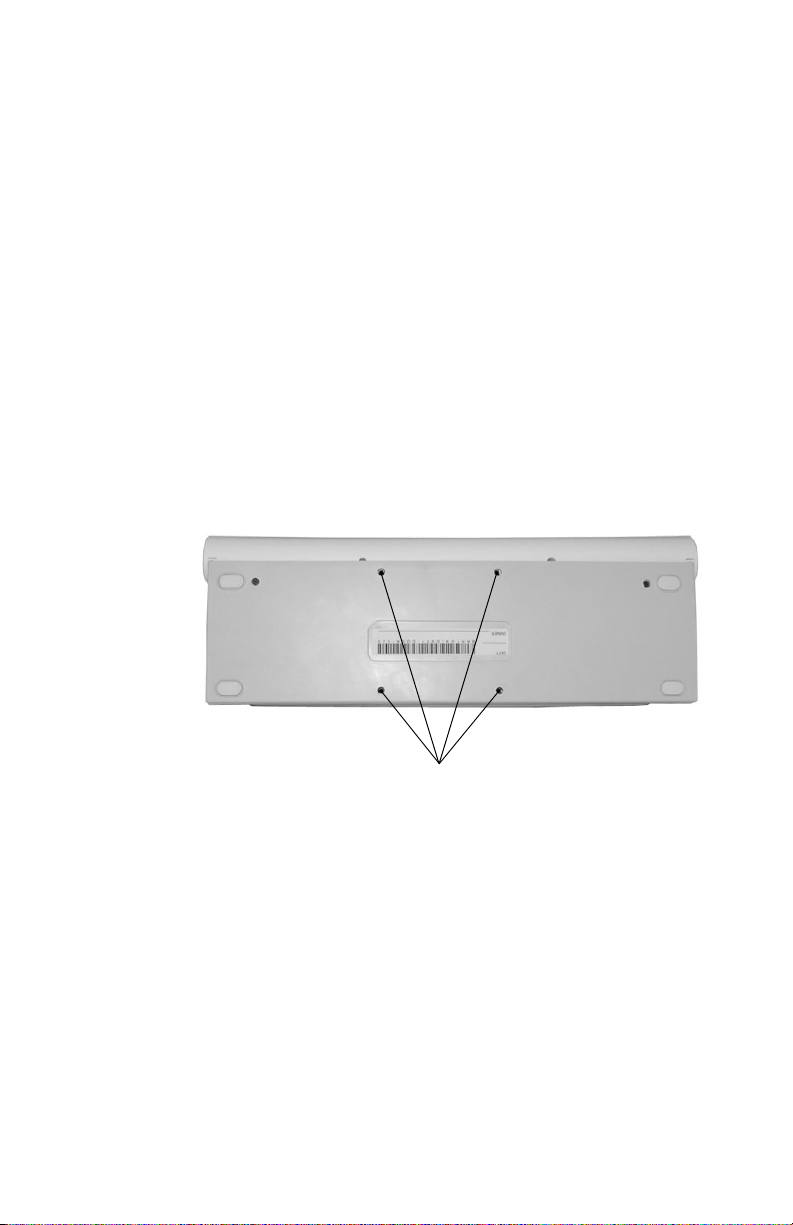
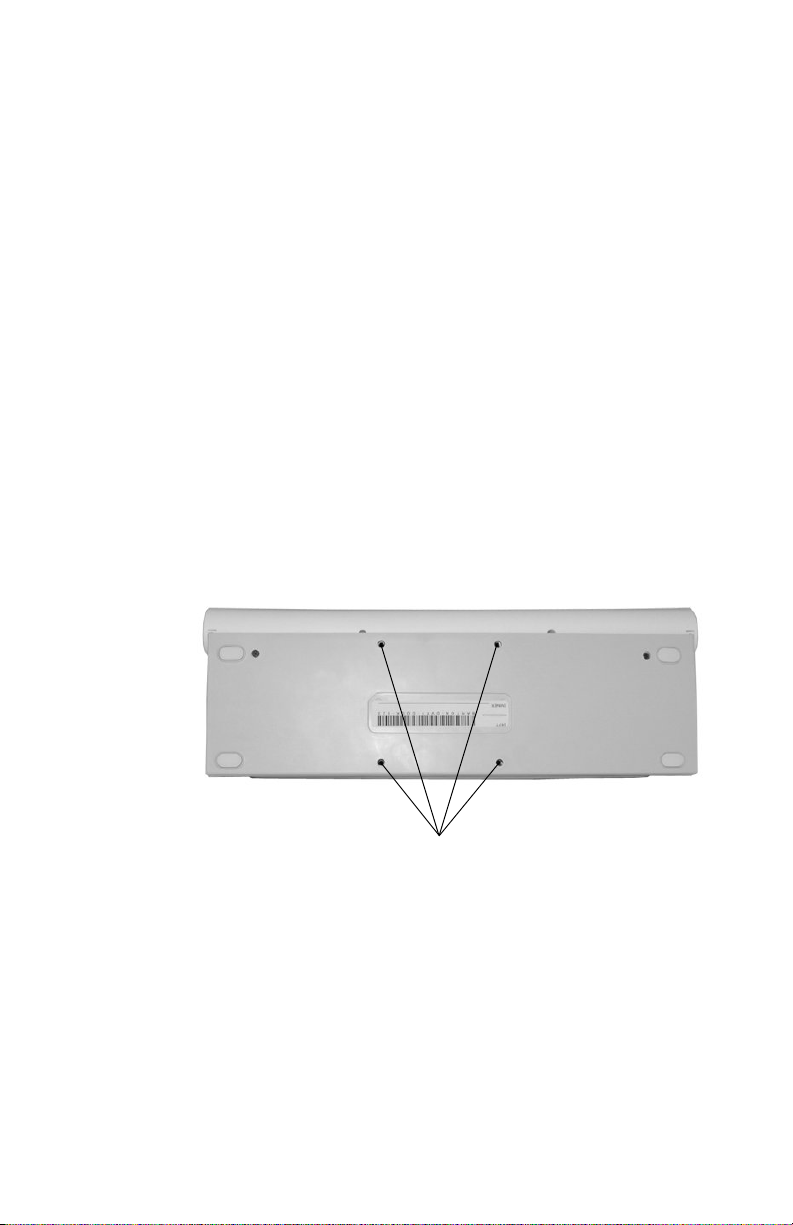
Mounting to a cart or mounting arm
VESA mounting holes on the bottom of the Docking Station
Mounting the Docking Station to a cart or mounting arm requires
a VESA-compatible mount to interface with the 75 mm VESA hole
pattern on the bottom of the Docking Station.
For information about viewing angles of the Docking Station, see
“Setting the viewing angle” on page 8.
To mount the Docking Station
1. The Docking Station has four 75 mm VESA-compatible
mounting holes. For specific mounting requirements for your
wall mount, mounting arm, or cart, refer to your mounting
equipment instructions.
2. If using a VESA mount, fasten the Docking Station to the VESAcompatible equipment with four M4 screws, 12 mm maximum
length.
Docking Station 3
Page 12
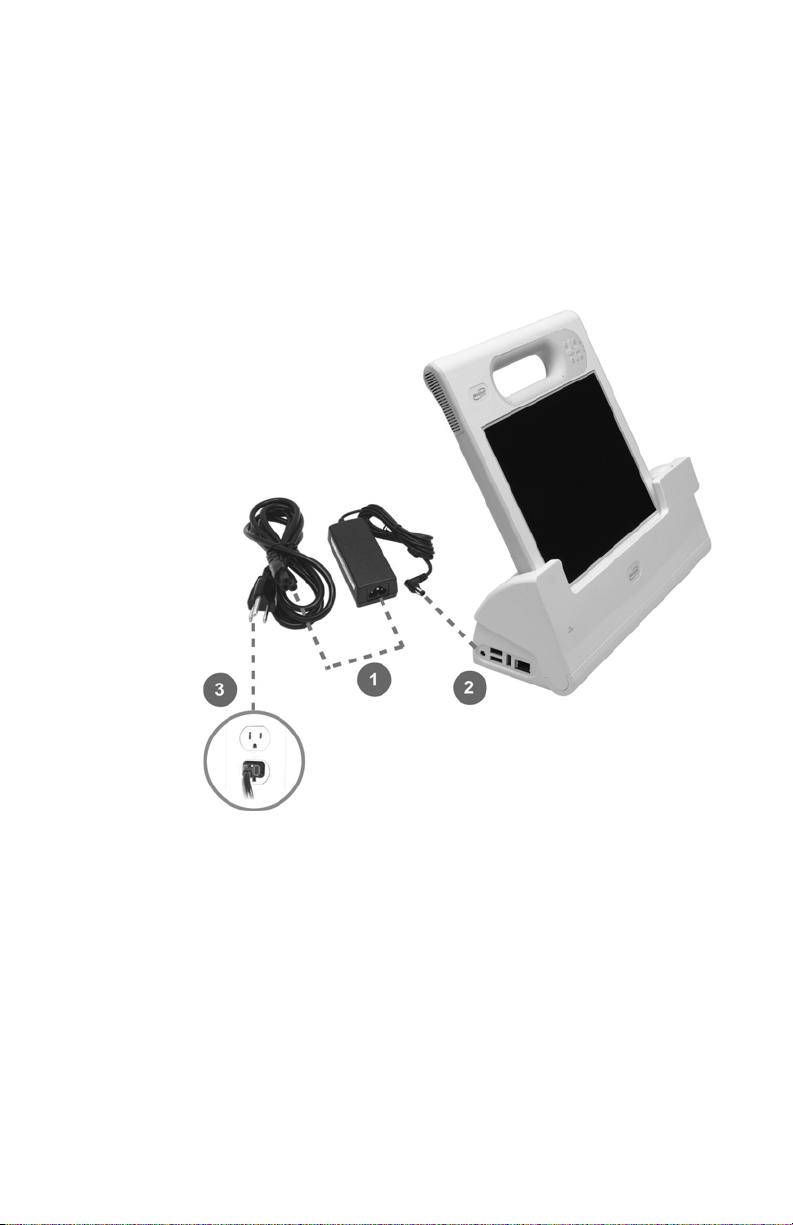
Connecting the Docking Station
The Docking Station includes ports for extending the capabilities
of your tablet and charging the battery.
To connect to the Docking Station ports
1. Connect the power adapter as shown in the following
illustration.
4Docking Station
Page 13
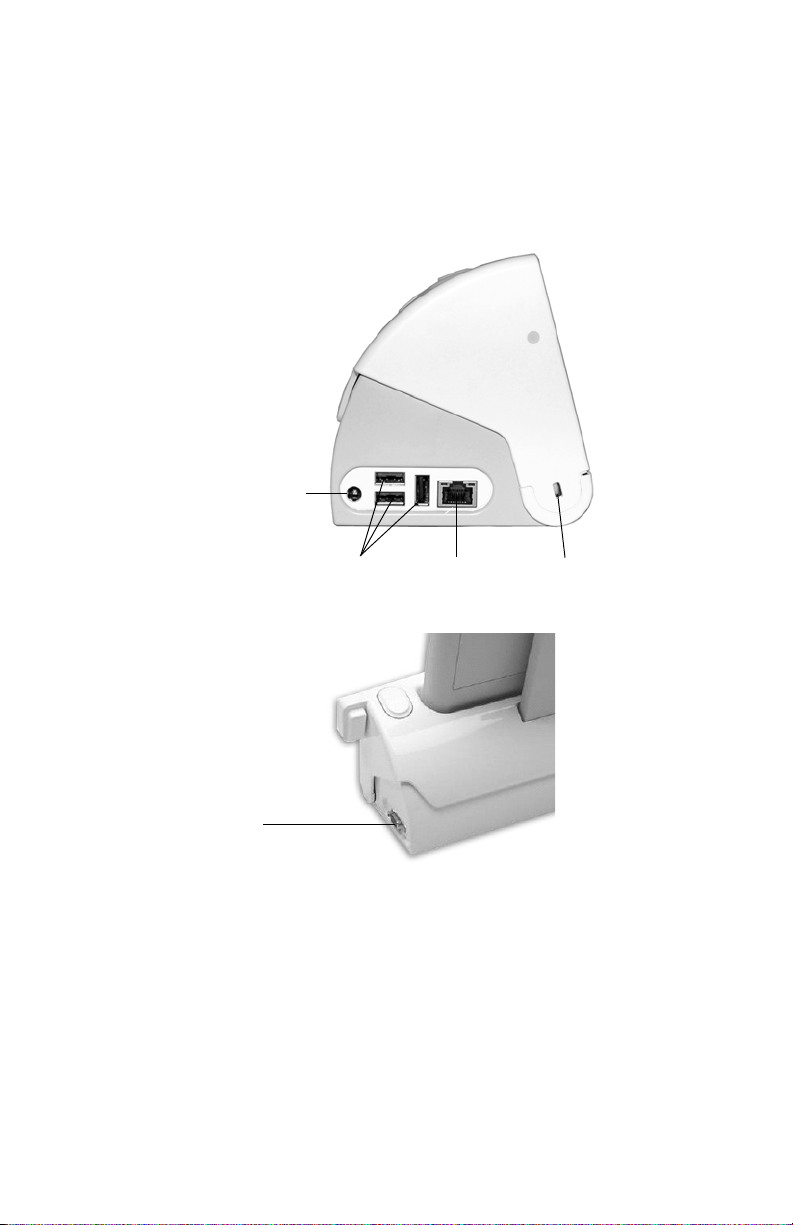
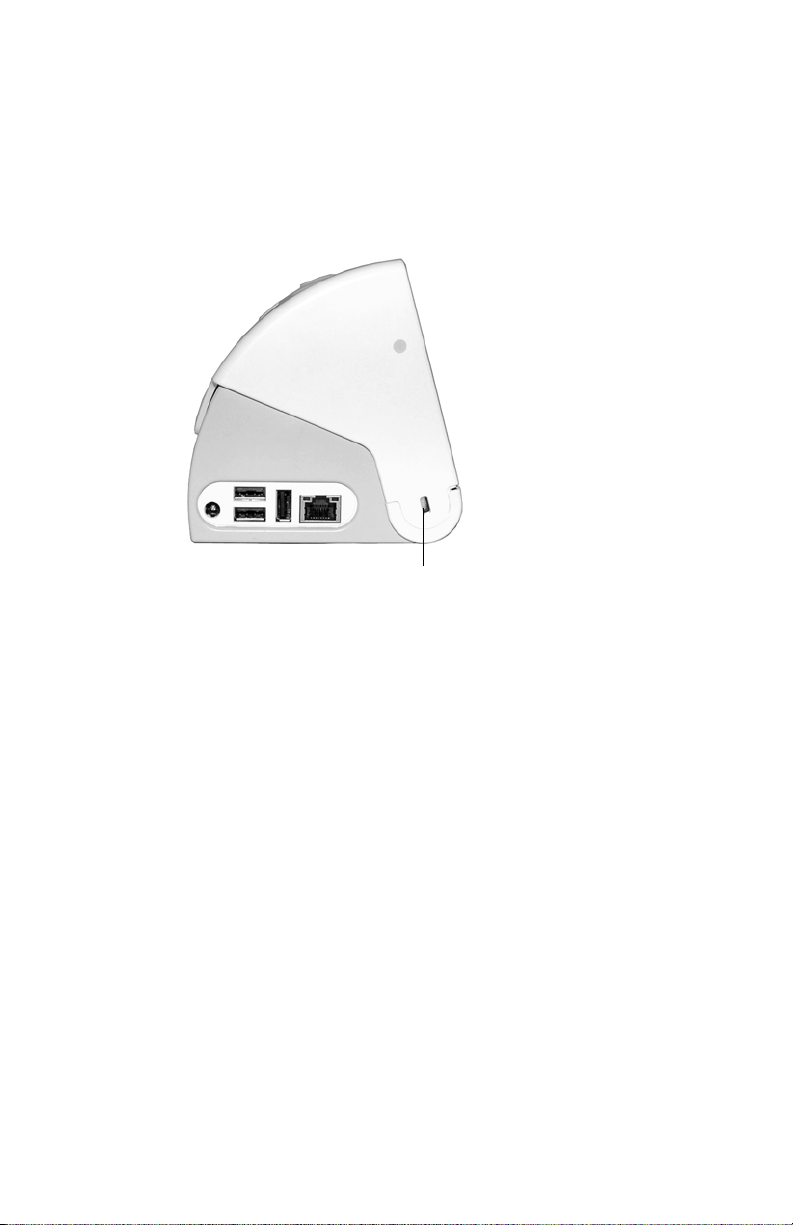
2. Connect peripherals such as a keyboard or mouse to the USB
USB ports
Ethernet port
AC power port
Security slot
VGA port
ports.
Note: The ports on the Docking Station can be powered by the
tablet’s battery or by AC power.
Docking Station 5
3. If desired, secure the Docking Station using a Kensington-style
lock in the security slot. For more information, see “Locking
the Docking Station” on page 9.
Page 14
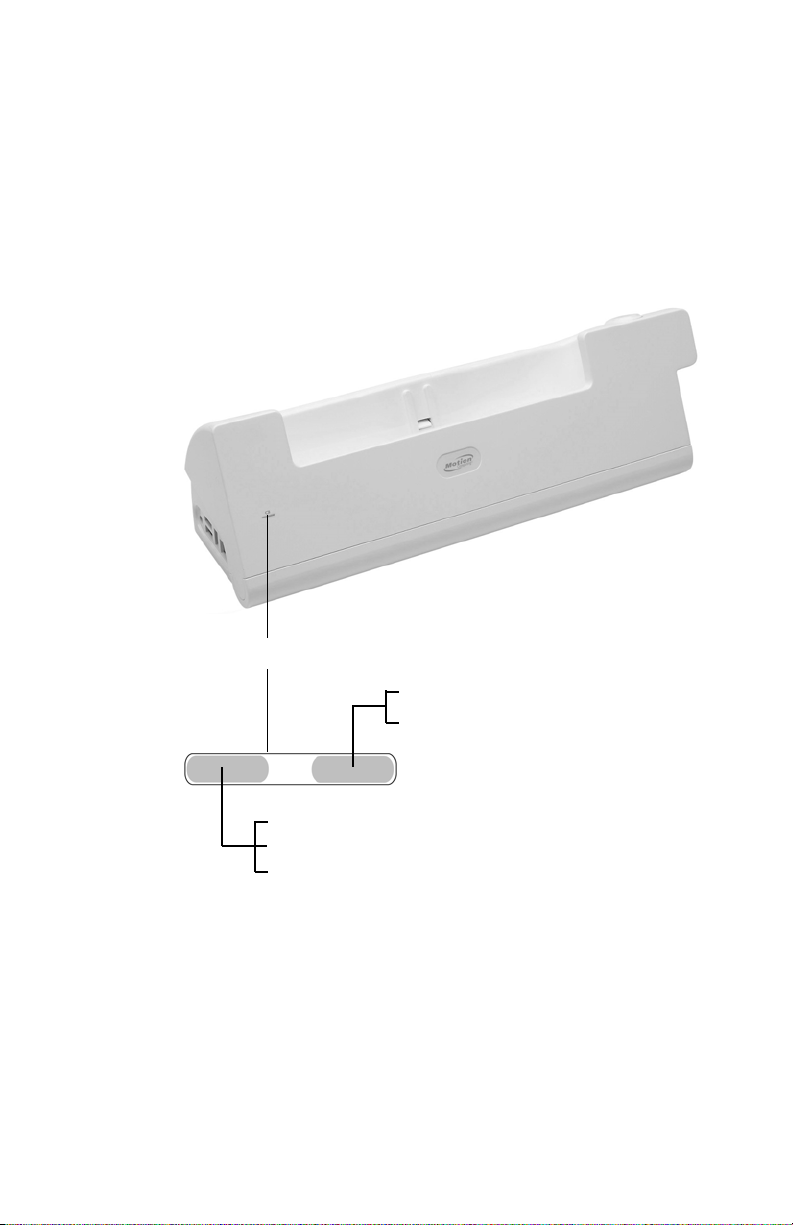
Using the Docking Station
Green: Tablet is docked
Off: Tablet is not docked
Amber: Spare battery in battery bay is charging
Green: Spare battery is charged
Off: Spare battery is not docked
Status lights
After you have mounted the Docking Station and attached
peripherals, you can use the Docking Station to enhance the
performance of your tablet.
Reading the status lights
The lights on the front of the Docking Station indicate its status.
6Docking Station
Page 15
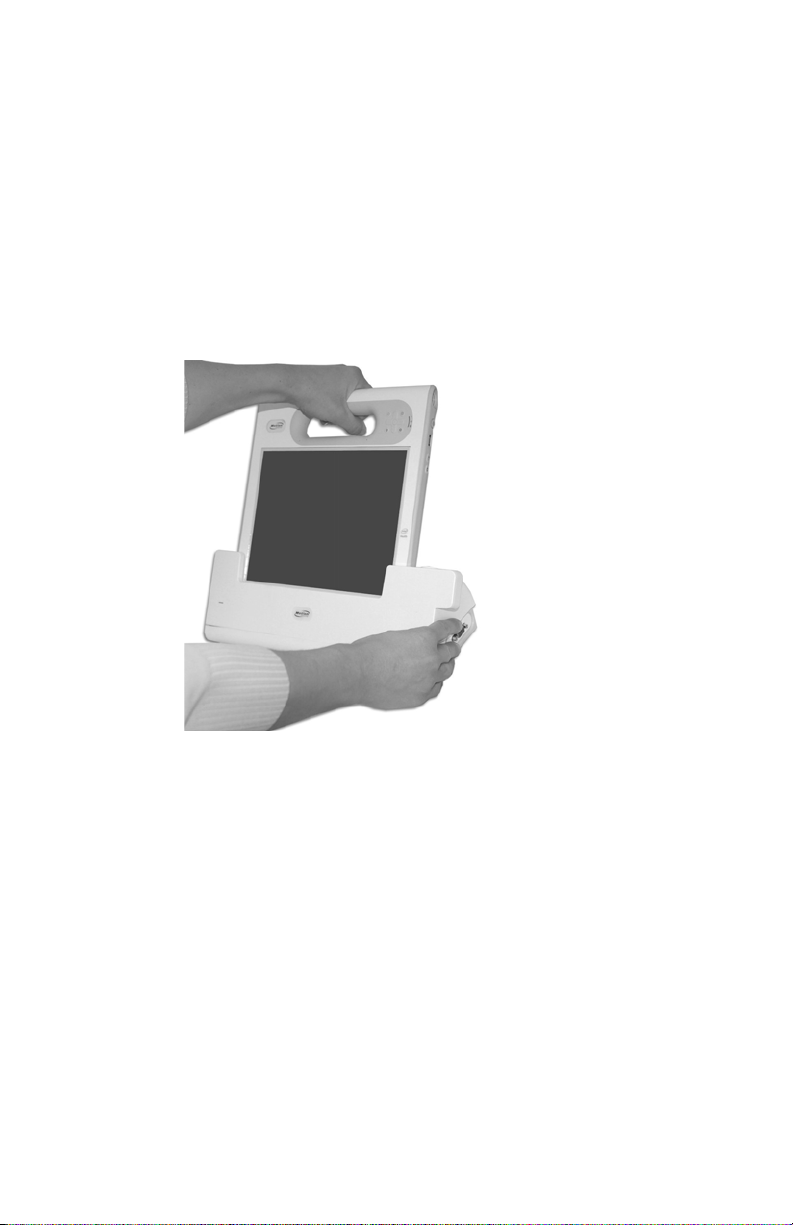
Docking and removing the tablet
You can easily insert and remove the tablet from the Docking
Station.
To dock the tablet
• Gently slide the tablet into the Docking Station. The tablet
locks into place when cradled securely.
The green docking light indicates a successful dock.
Docking Station 7
Page 16
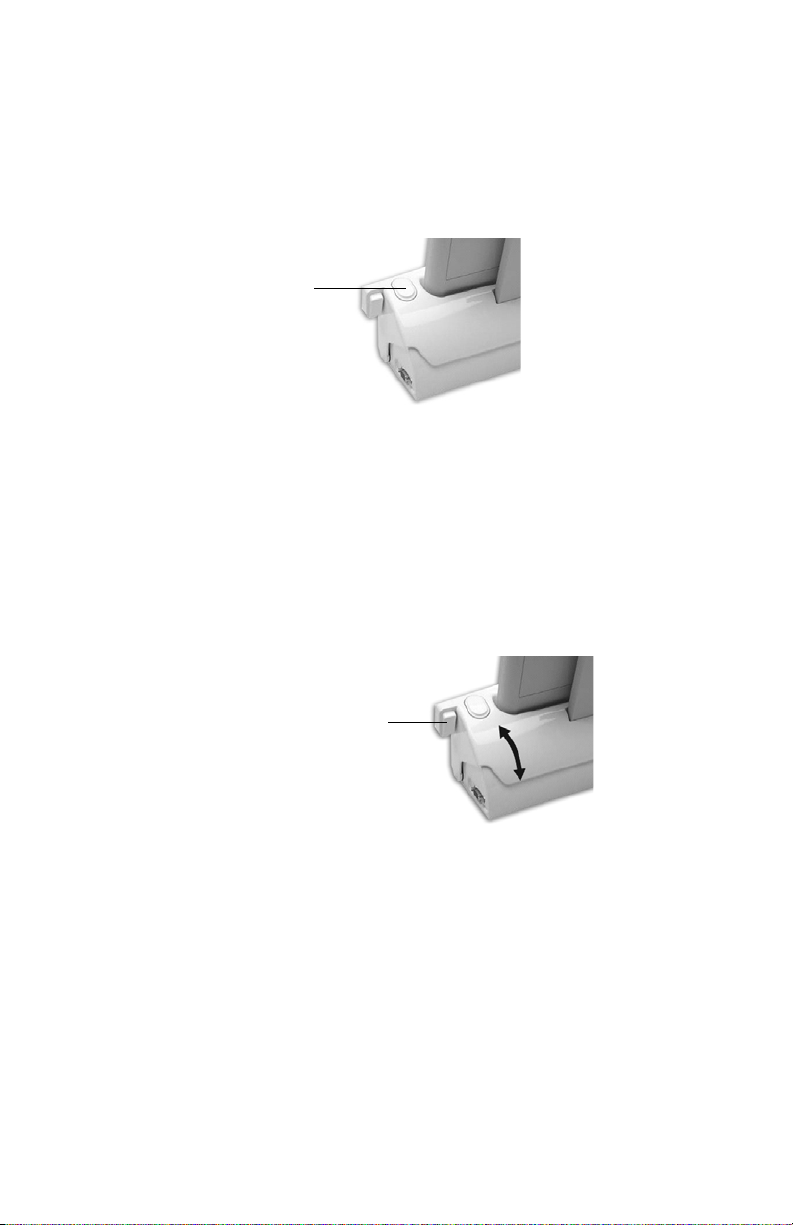
To remove the tablet
Eject button
Viewing angle button
The tablet can be removed from the Docking Station in two ways:
• Press the eject button, and then pull the tablet out of the
Docking Station.
• Hold the Docking Station with one hand and pull the tablet
out of the Docking Station. When removing the tablet, you
will feel some resistance; this is normal.
Setting the viewing angle
You can adjust the viewing angle to 15°, 25°, or 38°.
To set the viewing angle
1. Press the viewing angle button.
8Docking Station
2. Rotate the front of the Docking Station forward or backward
to the desired viewing angle and release the viewing angle
button. When the unit reaches a supported viewing angle, it
locks into place.
When the Docking Station is used only for charging the tablet
battery or the spare battery, set the viewing angle to 15° to save
space and improve stability.
For keyboard use with a tablet docked in the Docking Station, set
the viewing angle to 25° or 38°.
Page 17
Locking the Docking Station
Security slot
The security slot locks the Docking Station only, not the tablet.
To lock the Docking Station
1. Locate the security slot on the Docking Station.
2. Open and place your lock in the security slot.
3. Attach the lock cable to a desk, cart, or other fixture. Secure
the lock and lock cable according to the manufacturer
instructions. Depending on the type of lock, you may need to
loop, connect, or place a lock through the cabling.
Docking Station 9
Page 18
Using an external monitor and projector
VGA port
You can connect the Docking Station to a VGA monitor or
projector for presentations. The tablet supports various external
monitor configurations, including extended and mirrored
display.
To use a VGA monitor
1. Connect the monitor cable to the VGA port on the Docking
Station.
2. Plug the monitor or projector into a power outlet and turn it
on. The Microsoft Windows® operating system will recognize
the monitor and search for its hardware driver. You may need
to install the driver from the CD supplied by the monitor's
manufacturer.
3. By default, the content on the tablet will display to the
monitor or projector. You can use Motion Dashboard to
change the display settings. See the Motion Dashboard Help.
10 Docking Station
Page 19
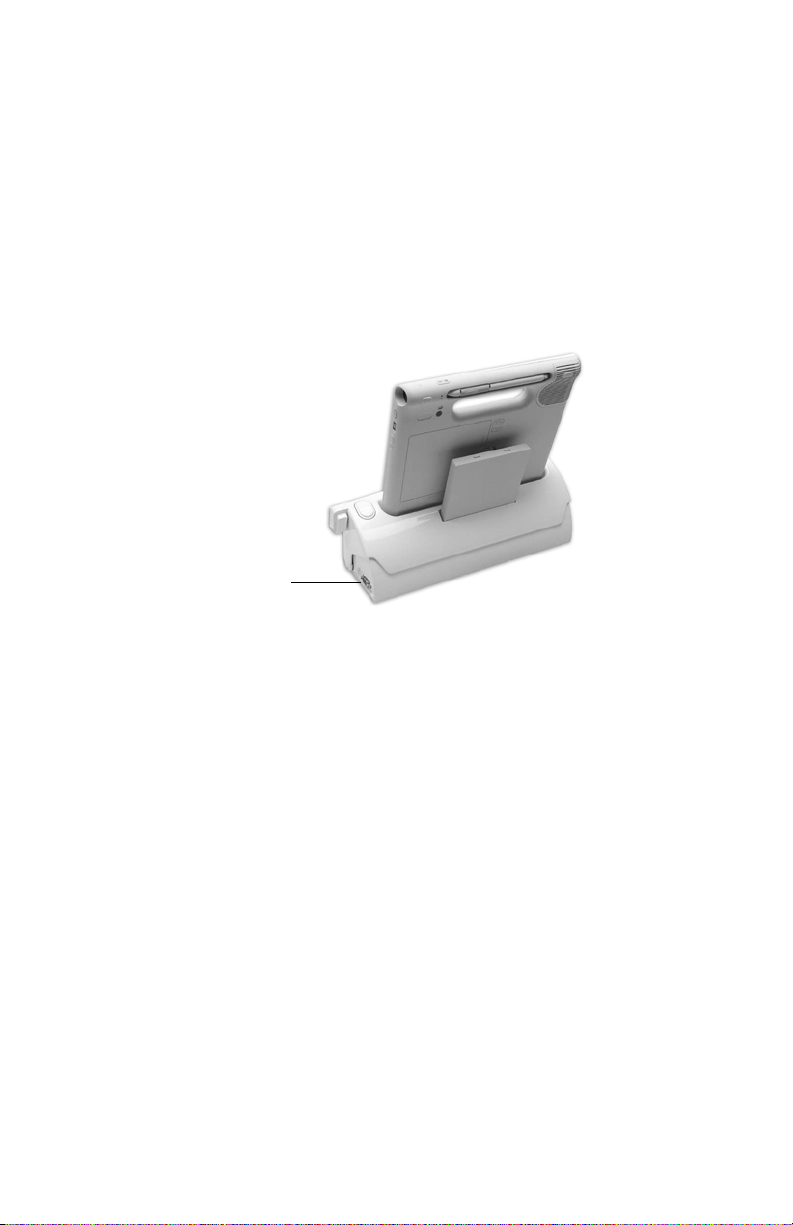
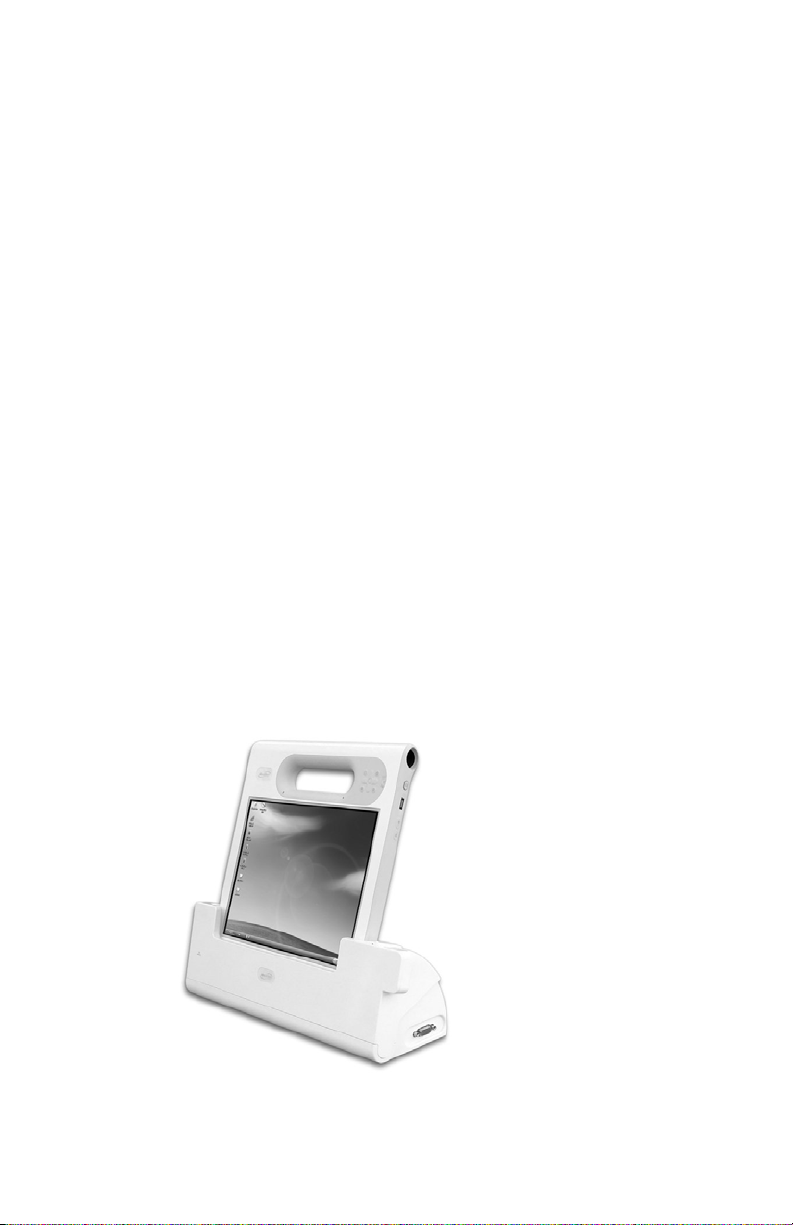
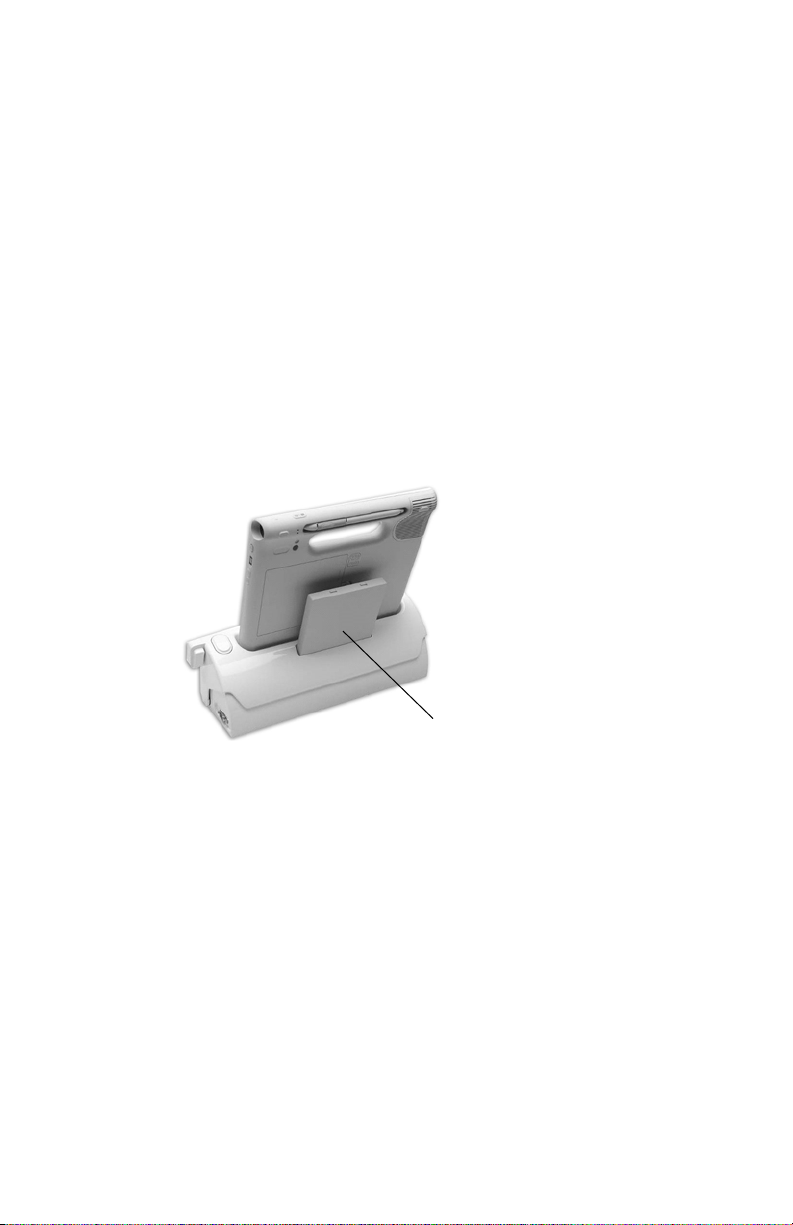
Using the battery charging bay
Battery in the charging bay
The battery charging bay at the rear of the Docking Station
enables you to charge the tablet and a spare battery at the same
time.
• To charge the tablet, place the tablet into the Docking Station.
• To charge an additional battery, insert a battery into the
battery charging bay.
The spare battery continues to charge when the tablet is not in
the Docking Station.
For information about the status lights and the battery charging
states, see “Reading the status lights” on page 6.
When the Docking Station is used only for charging the tablet
battery and spare battery, set the viewing angle to 15° to save
space and improve stability.
Docking Station 11
Page 20

Changing the tablet battery while the tablet is docked
You can change the battery in the tablet while the tablet is on
and docked.
WAR NI NG : (Models CFT-001 and CFT-002 only) Avoid lifting the
tablet and disconnecting the tablet from the docking connector
on the Docking Station, which will cause a power loss to the
tablet.
Note: On model CFT-003, you can change the battery while the
tablet is on and out of the dock.
To determine which tablet model you have, refer to the label on
the back of your tablet.
12 Docking Station
Page 21

Warranty
This product comes with a limited warranty. To see details about
this limited warranty, go to www.motioncomputing.com.
Safety and regulatory
For general safety information, see the Safety and Regulatory
Guide packaged with your tablet.
FCC Notice (United States): This equipment has been tested and
found to comply with the limits for a Class B digital device,
pursuant to part 15 of the FCC rules. These limits are designed to
provide reasonable protection against harmful interference in a
residential installation. This equipment generates, uses and can
radiate radio frequency energy and, if not installed and used in
accordance with the instructions, may cause harmful interference
to radio communications. However, there is no guarantee that
interference will not occur in a particular installation. If this
equipment does cause harmful interference to radio or television
reception, which can be determined by turning the equipment
off and on, the user is encouraged to try to correct the
interference by one or more of the following measures:
• Reorient or relocate the receiving antenna.
• Increase the separation between the equipment and the
receiver.
• Connect the equipment into an outlet on a circuit different
from that to which the receiver is connected.
• Consult the dealer or an experienced radio/TV technician for
help.
IC Notice (Canada): The Docking Station is classified by the
Industry Canada (IC) Interference-Causing Equipment Standard
#3 (ICES-003) as Class B digital devices. This classification is
located on the label on the bottom of the Docking Station. Look
for a statement on the label similar to the following: Canada ICES003, Class/Classe B. This Class B (or Class A, if so indicated on the
registration label) digital apparatus meets the requirements of
the Canadian Interference-Causing Equipment Regulations.
Docking Station 13
Page 22

CE Notice (European Notice): The Conformité Européne symbol
found on the Docking Station indicates compliance to the EMC
Directive and the Low Voltage Directive of the European Union.
This means that the tablet or Docking Station meets the
following technical standards: EN 55022 (CISPR22), EN 55024
(CISPR 24) (IEC 61000 4-2, 4-3, 4-3, 4-5, 4-6, 4-8, 4-11), EN 61000 32 (IEC 61000 3-2), EN 61000 3-3 (IEC 61000 3-3), EN60950 (IEC
60950 3rd Ed; 1999; 2000).
Service and support
For service and support, go to
www.motioncomputing.com/support.
Patents
The Motion Computing products and services may be covered by
one or more protected inventions. For more information, see
www.motioncomputing.com/info/patents.asp.
14 Docking Station
Page 23
Station d’accueil
Ce document s’applique à la station d’accueil des modèles de
tablette PC CFT-001, CFT-002 et CFT-003. Pour déterminer quel
est votre modèle, référez-vous à l’étiquette apposée à l’arrière de
la tablette.
La station d’accueil apporte d’autres fonctionnalités à votre
tablette, notamment une extension de port pour connectivité
Ethernet, écrans VGA et autres périphériques USB (imprimantes,
claviers, souris).
Elle permet en outre de charger la tablette et inclut une baie de
chargement pour une batterie supplémentaire.
Pour plus d’informations sur les autres périphériques et matériels
disponibles, rendez-vous sur le site www.motioncomputing.fr.
Une tablette dans la station d’accueil
Station d’accueil 15
Page 24

Positionnement et montage de la station d’accueil
La station d’accueil peut être placée sur un bureau ou une table,
ou être montée sur un mur ou tout autre équipement de type
accoudoir ou chariot.
La partie inférieure de la station contient un élément de montage
VESA standard, pouvant être fixé sur d’autres équipements
compatibles VESA.
En outre, la station d’accueil possède une fente de sécurité
permettant de l’attacher à un bureau, à une table ou à un autre
meuble.
Remarque : Des composants complémentaires peuvent être
requis sur certaines configurations de montage, par exemple un
crochet mural.
Installation sur une table ou un bureau
Lorsque vous utilisez la station d’accueil sur un bureau ou une
table, placez-la à 10 cm d’un éventuel mur, pour pouvoir accéder
facilement à la batterie de rechange.
Suivant l’utilisation voulue, vous avez le choix entre trois angles
de vision différents pour la station : 15°, 25° ou 38°. Pour plus
d’informations sur les angles de vision, consultez la section «
Définition de l’angle de vision », page 22.
Montage mural
Pour fixer la station d’accueil au mur, vous devez utiliser un
crochet mural (non fourni) compatible avec un support VESA 75
mm.
Pour réduire au maximum la distance de projection de la station
par rapport au mur, nous vous recommandons d’utiliser un angle
de vision de 38°. Le crochet mural choisi doit permettre un tel
angle pour que la tablette soit orientée verticalement.
16 Station d’accueil
Page 25

Montage sur un chariot ou un accoudoir
Trous de montage VESA situés en dessous de la station d’accueil
Pour monter la station d’accueil sur un chariot ou un accoudoir,
vous devez utiliser un support compatible VESA, qui servira
d’interface avec le support à trou VESA 75 mm de la station.
Pour plus d’informations sur les angles de vision de la station
d’accueil, consultez la section « Définition de l’angle de vision »,
page 22.
Pour monter la station d’accueil
1. La station d’accueil est dotée de plusieurs trous de montage
compatibles VESA de 75 mm. En cas de configuration de
montage spécifique, que ce soit pour un montage mural, sur
un accoudoir ou sur un chariot, reportez-vous aux instructions
de montage de l’équipement.
2. Si vous utilisez un support VESA, fixez la station d’accueil à
l’équipement compatible VESA à l’aide de quatre vis M4, d’une
longueur maximum de 12 mm.
Station d’accueil 17
Page 26

Connexion de la station d’accueil
La station possède des ports permettant d’étendre les capacités
de la tablette et de recharger la batterie.
Pour se brancher sur les ports de la station d’accueil
1. Branchez l’adaptateur secteur conformément à l’illustration cidessous.
18 Station d’accueil
Page 27

2. Branchez les périphériques souhaités (clavier ou souris) sur les
Ports USB
Port Ethernet
Port pour
Fente de sécurité
Port VGA
alimentation CA
ports USB.
Remarque : Les ports de la station d’accueil peuvent être
alimentés par batterie (tablette) ou sur secteur.
Station d’accueil 19
3. Vous pouvez sécuriser votre station d’accueil en insérant un
verrou de type Kensington dans la fente de sécurité. Pour plus
d’informations, consultez la section « Verrouillage de la station
d’accueil », page 23.
Page 28

Utilisation de la station d’accueil
Vert : la tablette est insérée dans
Eteint : la tablette n’est pas
Jaune : la batterie de rechange est en
Vert : la batterie de rechange est chargée.
Eteint : la batterie de rechange est absente
Voyants d’état
la station d’accueil.
insérée dans la station d’accueil.
cours de chargement dans la baie.
Une fois la station montée et les principaux périphériques
branchés, vous pouvez utiliser la station pour améliorer les
performances de votre tablette.
Description des voyants d’état
Les voyants situés à l’avant de la station d’accueil indiquent son
état.
20 Station d’accueil
Page 29

Placement et retrait de la tablette
Vous pouvez insérer la tablette dans la station d’accueil et l’en
retirer aisément.
Pour placer la tablette sur la station
• Faites glisser délicatement la tablette dans la station d’accueil.
La tablette doit se bloquer lorsqu’elle est correctement mise
en place.
Le voyant de verrouillage vert doit également s’allumer dans ce
cas.
Station d’accueil 21
Page 30

Pour retirer la tablette de la station
Bouton d’éjection
Bouton Angle de vision
Il existe deux méthodes pour sortir la tablette de la station
d’accueil :
• Appuyez sur le bouton d’éjection, puis tirez la tablette hors de
la station.
• Tout en maintenant la station d’une main, tirez sur la tablette
pour la sortir. Lors du retrait de la tablette, il est normal de
sentir une résistance.
Définition de l’angle de vision
Vous pouvez adopter l’angle de vision voulu : 15°, 25° ou 38°.
Pour définir l’angle de vision
1. Appuyez sur le bouton Angle de vision.
22 Station d’accueil
2. Faites pivoter la partie avant de la station vers l’avant ou vers
l’arrière, jusqu’à obtenir l’angle approprié, puis relachez le
bouton Angle de vision. Lorsque la station atteint un angle
prédéfini, elle se bloque.
Si vous utilisez la station uniquement pour recharger votre
tablette ou la batterie, choisissez un angle de 15° pour gagner de
l’espace et optimiser la stabilité.
Page 31

Si vous utilisez un clavier avec votre station, lorsque la tablette est
Fente de sécurité
insérée, choisissez un angle de 25° ou 38°.
Verrouillage de la station d’accueil
La fente de sécurité protège uniquement la station et non la
tablette.
Pour verrouiller la station d’accueil
1. Localisez la fente de sécurité de la station.
2. Ouvrez votre cadenas et insérez-le dans la fente.
3. Fixez le câble du cadenas à un bureau, un chariot ou à tout
autre meuble. Fixez le cadenas et son câble conformément
aux instructions du fabricant. Suivant le type de cadenas, il
peut être nécessaire d’utiliser une boucle, un raccord ou de
passer le cadenas dans le câblage.
Station d’accueil 23
Page 32

Utilisation d’un moniteur externe et d’un projecteur
Port VGA
Vous pouvez brancher la station d’accueil à un moniteur VGA ou
à un projecteur, afin de réaliser des présentations. Votre tablette
prend en charge plusieurs configurations de moniteur externe,
notamment en affichage étendu et en miroir.
Pour utiliser un moniteur VGA
1. Branchez le câble du moniteur sur le port VGA de la station
d’accueil.
2. Branchez le moniteur sur une prise secteur et mettez-le en
marche. Le système d’exploitation Microsoft Windows®
reconnaît le moniteur et recherche son pilote matériel. Il se
peut que vous deviez installer le pilote à partir du CD fourni
par le fabricant du moniteur.
3. Par défaut, le contenu de la tablette s’affiche sur le moniteur
ou le projecteur. Utilisez Motion Dashboard pour modifier les
paramètres d’affichage. Reportez-vous à l’aide de Motion
Dashboard.
24 Station d’accueil
Page 33

Utilisation de la baie de chargement de la batterie
Batterie dans la baie de chargement
La baie de chargement située à l’arrière de la station d’accueil
vous permet de charger simultanément la batterie de votre
tablette et une batterie supplémentaire.
• Pour recharger la tablette, placez-la sur la station d’accueil.
• Pour recharger une batterie supplémentaire, insérez-la dans la
baie de chargement.
Elle charge également lorsque la tablette n’est pas insérée dans la
station.
Pour plus d’informations sur les voyants d’état et les niveaux de
charge de batterie, consultez la section « Description des voyants
d’état », page 20.
Si vous utilisez la station uniquement pour recharger et
économiser la batterie de votre tablette, choisissez un angle de
15° pour gagner de l’espace et optimiser la stabilité.
Station d’accueil 25
Page 34

Changement de batterie lorsque la tablette est sur la station d’accueil
Vous pouvez changer la batterie de la tablette alors que celle-ci
est en marche et placée sur la station d’accueil.
AVERTISSEMENT : (Modèles CFT-001 et CFT-002 uniquement)
Evitez de retirer la tablette et de la déconnecter du connecteur
d’ancrage de la station, car ceci entraînerait une perte
d’alimentation pour la tablette.
Remarque : Sur le modèle CFT-003, vous pouvez changer la
batterie, que la tablette soit ou non placée sur la station d’accueil.
Pour déterminer quel est votre modèle, référez-vous à l’étiquette
apposée à l’arrière de votre tablette.
26 Station d’accueil
Page 35

Garantie
Ce produit est fourni avec une garantie limitée. Pour obtenir plus
de détails sur cette garantie limitée, rendez-vous sur le site
www.motioncomputing.com.
Sécurité et réglementation
Pour obtenir des informations générales en matière de sécurité,
reportez-vous au Guide des conseils de sécurité et
réglementations fourni avec la tablette.
Avis FCC (Etats-Unis) : Cet équipement a été testé et déclaré
conforme aux limites imposées aux appareils numériques de
classe B en vertu du chapitre 15 des règles FCC. Ces limites ont
été calculées de manière à fournir une protection raisonnable
contre les interférences nuisibles dans une installation
résidentielle. Cet équipement génère, utilise et irradie de
l’énergie en fréquence radio et, s’il n’est pas installé et utilisé
conformément aux instructions, il peut provoquer des
interférences radio nuisibles aux communications radio.
Cependant, il n’existe aucune garantie qu’il n’y aura pas
d’interférence dans une installation spécifique. Si l’équipement
engendre des interférences nuisibles à la réception radio ou
télévisuelle, ce qui peut être déterminé en mettant l’équipement
successivement hors et sous tension, l’utilisateur est encouragé à
tenter d’y remédier en ayant recours à l’une des mesures
suivantes :
• Réorienter ou déplacer l’antenne de réception.
• Augmenter l’espace entre l’équipement et le récepteur.
• Connecter l’équipement à une prise placée sur un circuit autre
de celui du récepteur.
• Consulter le revendeur ou un technicien radio/TV
expérimenté pour obtenir de l’aide.
Avis IC (Canada) : La station d’accueil est classifiée comme
appareil numérique de classe B, en vertu de la norme ICES-003
(Interference-Causing Equipment Standard #3) d’IC (Industry
Canada). Cette classification figure sur l’étiquette apposée sous la
station d’accueil. Vérifiez que l’étiquette comporte une mention
semblable à celle-ci : Canada ICES-003, Class/Classe B. This Class B
Station d’accueil 27
Page 36

(or Class A, if so indicated on the registration label) digital
apparatus meets the requirements of the Canadian InterferenceCausing Equipment Regulations.
Avis CE (Union européenne) : Le symbole Conformité
Européenne présent sur la station d’accueil indique que celle-ci
est conforme aux directives européennes relatives à la
compatibilité électromagnétique et aux basses tensions. En
d’autres termes, la tablette ou la station d’accueil répond aux
normes techniques suivantes : EN 55022 (CISPR22), EN 55024
(CISPR 24) (CEI 61000 4-2, 4-3, 4-3, 4-5, 4-6, 4-8, 4-11), EN 61000 32 (CEI 61000 3-2), EN 61000 3-3 (CEI 61000 3-3), EN60950 (CEI
60950 3ème Ed ; 1999 ; 2000).
Entretien et assistance technique
Pour obtenir une assistance technique ou des informations sur
nos services, rendez-vous sur le site
www.motioncomputing.fr/support.
Brevets
Les produits et services de Motion Computing peuvent être
protégés par une ou plusieurs inventions brevetées. Pour plus
d’informations, consultez le site www.motioncomputing.com/
info/patents.asp.
28 Station d’accueil
Page 37

Dockingstation
Dieses Dokument bezieht sich auf die Dockingstation für die
Tablet PC-Modelle CFT-001, CFT-002 und CFT-003. Wenn Sie
wissen möchten, wie Ihr Tablet-Modell lautet, lesen Sie das
Etikett auf der Rückseite Ihres Tablet PCs.
Die Dockingstation erweitert die Funktionalität Ihres Tablets PCs.
Sie verfügt über Anschlussmöglichkeiten für Ethernet, VGAMonitore und USB-Geräte wie Drucker, Tastaturen und Mäuse.
Zudem dient die Dockingstation zum Laden des Tablets PCs und
verfügt über einen Akkuladeschacht für einen zusätzlichen Akku.
Weitere Informationen zu verfügbaren Peripheriegeräten und
optionaler Hardware finden Sie unter
www.motioncomputing.de.
Ein Tablet PC in der Dockingstation
Dockingstation 29
Page 38

Positionieren und Montieren der Dockingstation
Die Dockingstation kann auf einem Schreibtisch oder einem
anderen Tisch aufgestellt bzw. an der Wand oder anderen
Vorrichtungen befestigt werden.
Auf der Unterseite der Dockingstation befinden sich
Montagevorrichtungen gemäß VESA-(Video Electronics
Standards Association-)Standard, die mit anderen diesem
Standard entsprechenden Vorrichtungen verwendet werden
können.
Die Dockingstation ist zudem mit einem Sicherheitsschlitz zum
Sichern der Dockingstation an einen Tisch, Schreibtisch oder
einem anderen Fixpunkt ausgestattet.
Hinweis: Für bestimmte Montagearten sind u. U. weitere
Komponenten erforderlich, beispielsweise ein Mauerbügel.
Aufstellen auf einem Schreibtisch oder Tisch
Wenn Sie die Dockingstation auf einem Schreibtisch oder einem
anderen Tisch verwenden möchten, positionieren Sie die
Dockingstation so, dass der Abstand zur Wand etwa 10 cm
beträgt. Auf diese Weise ist der Ersatzakku für Sie problemlos
zugänglich.
Abhängig von dem beabsichtigten Einsatz gibt es für den
Sichtwinkel der Dockingstation drei Einstellmöglichkeiten: 15°,
25° oder 38°. Weitere Informationen zu Sichtwinkeln finden Sie
unter “Einstellen des Sichtwinkels“ auf Seite 36.
Befestigen an der Wand
Zur Befestigung der Dockingstation an der Wand ist ein separater
Mauerbügel erforderlich, passend zur 75-mm-VESAMontagevorrichtung.
Damit die Dockingstation so wenig wie möglich vorsteht,
empfehlen wir die Einstellung des Sichtwinkels von 38°. Der
Mauerbügel muss diesen Winkel ermöglichen, um zu
gewährleisten, dass der Tablet PC vertikal ausgerichtet bleibt.
30 Dockingstation
Page 39

Befestigen an einem Wagen oder Befestigungsarm
VESA-Montagebohrungen an der Unterseite der Dockingstation
Für das Befestigen der Dockingstation an einem Wagen oder
Befestigungsarm ist eine Vorrichtung gemäß VESA-Standard
erforderlich, die der 75-mm-VESA-Lochung an der Unterseite der
Dockingstation entspricht.
Informationen zu den Sichtwinkeln der Dockingstation finden Sie
unter “Einstellen des Sichtwinkels“ auf Seite 36.
So montieren Sie die Dockingstation
1. Die Dockingstation weist vier 75-mm-Montagebohrungen
auf, die dem VESA-Standard entsprechen. Ziehen Sie
hinsichtlich der spezifischen Anforderungen für die
Wandhalterung, den Befestigungsarm bzw. den Wagen die
Anweisungen zurate, die der jeweiligen Vorrichtung beiliegen.
2. Wenn Sie eine VESA-Vorrichtung verwenden, befestigen Sie
die Dockingstation mit vier M4-Schrauben mit einer
Maximallänge von 12 mm an der Vorrichtung gemäß VESAStandard.
Dockingstation 31
Page 40

Anschließen der Dockingstation
Die Dockingstation verfügt über Anschlüsse, die den
Funktionsumfang Ihres Tablet PCs erweitern und zudem das
Laden des Akkus ermöglichen.
So nehmen Sie den Anschluss an den Anschlüssen der
Dockingstation vor
1. Verbinden Sie den Netzadapter wie in folgender Abbildung
dargestellt.
32 Dockingstation
Page 41

2. Verbinden Sie Peripheriegeräte, beispielsweise eine Tastatur
USB-Anschlüsse
Ethernet-Anschluss
Netzanschluss
Sicherheitsschlitz
VGA-Anschluss
oder Maus, mit den USB-Anschlüssen.
Hinweis: Die Anschlüsse an der Dockingstation können vom
Akku des Tablet PCs oder mit Netzstrom betrieben werden.
Dockingstation 33
3. Falls gewünscht, können Sie zum Sichern der Dockingstation
ein für den Sicherheitsschlitz passendes Schloss im
Kensington-Stil verwenden. Weitere Informationen erhalten
Sie unter “Sichern der Dockingstation“ auf Seite 37.
Page 42

Verwenden der Dockingstation
Grün: Der Tablet PC ist angedockt.
Aus: Der Tablet PC ist nicht angedockt.
Gelb: Ersatzakku im Akkuschacht wird geladen
Grün: Ersatzakku ist geladen
Aus: Ersatzakku ist nicht in Dockingstation eingesetzt
Statuslämpchen
Nach erfolgter Montage der Dockingstation und Anschluss der
Peripheriegeräte können Sie die Dockingstation verwenden, um
den Leistungsumfang Ihres Tablet PCs zu erweitern.
Interpretieren der Statuslämpchen
Die Lämpchen an der Vorderseite der Dockingstation zeigen den
Status an.
34 Dockingstation
Page 43

Einsetzen und Entnehmen des Tablet PCs
Sie können den Tablet PC ganz einfach in die Dockingstation
einsetzen und ihn wieder entnehmen.
So setzen Sie den Tablet PC ein
• Setzen Sie den Tablet PC vorsichtig in die Dockingstation ein.
Der Tablet PC rastet ein, wenn er richtig eingesetzt ist.
Das grüne Docking-Lämpchen zeigt eine erfolgreiche
Verbindungsherstellung an.
Dockingstation 35
Page 44

So entnehmen Sie den Tablet PC
Auswurfknopf
Knopf für Sichtwinkel
Es gibt zwei Möglichkeiten, den Tablet PC aus der Dockingstation
zu entnehmen:
• Drücken Sie den Auswurfknopf und ziehen Sie den Tablet PC
dann aus der Dockingstation.
• Halten Sie die Dockingstation mit einer Hand fest und ziehen
Sie den Tablet PC aus der Dockingstation. Beim Entnehmen
aus der Dockingstation ist ein gewisser Widerstand zu spüren.
Das ist normal.
Einstellen des Sichtwinkels
Sie können den Sichtwinkel auf 15°, 25° oder 38° einstellen.
So stellen Sie den Sichtwinkel ein
1. Drücken Sie den Knopf für den Sichtwinkel.
36 Dockingstation
2. Drehen Sie die Vorderseite der Dockingstation, bis der
gewünschte Sichtwinkel erreicht ist und lassen Sie den Knopf
für den Sichtwinkel wieder los. Wenn das Gerät einen
unterstützten Sichtwinkel erreicht hat, rastet es in die Station
ein.
Page 45

Wenn die Dockingstation lediglich zum Laden des Akkus des
Sicherheitsschlitz
Tablet PCs oder des Ersatzakkus verwendet wird, stellen Sie den
Sichtwinkel auf 15° ein. Auf diese Weise sparen Sie Platz und
erhöhen die Stabilität.
Wenn der Tablet PC in die Dockingstation eingesetzt ist und Sie
mit der Tastatur arbeiten möchten, stellen Sie den Sichtwinkel
auf 25° oder 38° ein.
Sichern der Dockingstation
Mit dem Sicherheitsschloss wird lediglich die Dockingstation,
nicht der Tablet PC gesichert.
So sichern Sie die Dockingstation
1. Machen Sie den Sicherungsschlitz der Dockingstation
ausfindig.
2. Öffnen Sie das Schloss und hängen Sie es in den
Sicherheitsschlitz ein.
3. Befestigen Sie das Stahlkabel an einem Schreibtisch, Wagen
oder einem anderen Fixpunkt. Befolgen Sie hinsichtlich der
Sicherung von Schloss und Stahlkabel die Anweisungen des
Herstellers. Je nach Art des Schlosses müssen Sie das Kabel
möglicherweise verknoten, befestigen oder mit einem
weiteren Schloss versehen.
Dockingstation 37
Page 46

Verwendung eines externen Monitors und Projektors
VGA-Anschluss
Sie können die Dockingstation für Präsentationen mit einem
VGA-(Video Graphics Array-)Monitor oder einem Projektor
verbinden. Ihr Tablet PC unterstützt unterschiedliche
Konfigurationen externer Monitore, beispielsweise die erweiterte
und gespiegelte Anzeige.
So verwenden Sie einen VGA-Monitor
1. Schließen Sie das Monitorkabel am VGA-Anschluss der
Dockingstation an.
2. Schließen Sie den Monitor oder Projektor an eine Steckdose
an und schalten Sie ihn ein. Das Microsoft Windows®Betriebssystem erkennt den Monitor und sucht nach einem
Hardwaretreiber. Möglicherweise müssen Sie den Treiber von
der CD installieren, die vom Hersteller des Monitors beigelegt
wurde.
38 Dockingstation
3. Standardmäßig wird der Inhalt des Tablet PCs auf dem
Monitor bzw. Projektor angezeigt. Der Adapter kann mithilfe
von Motion Dashboard geändert werden. Siehe bitte die
Motion Dashboard-Hilfe.
Page 47

Verwendung des Akkuladeschachts
Akku im Ladeschacht
Im Akkuladeschacht an der Rückseite der Dockingstation können
der Tablet PC und ein Ersatzakku gleichzeitig geladen werden.
• Wenn Sie den Tablet PC laden möchten, setzen Sie ihn in die
Dockingstation ein.
• Wenn Sie einen Zusatzakku laden möchten, setzen Sie einen
Akku in den Akkuladeschacht ein.
Der Ersatzakku wird weiter geladen, wenn der Tablet PC nicht in
die Dockingstation eingesetzt ist.
Informationen zu den Statuslämpchen und den
Akkuladestandsanzeigen finden Sie unter “Interpretieren der
Statuslämpchen“ auf Seite 34.
Wenn die Dockingstation lediglich zum Laden des Akkus des
Tablet PCs und des Ersatzakkus verwendet wird, stellen Sie den
Sichtwinkel auf 15° ein. Auf diese Weise sparen Sie Platz und
erhöhen die Stabilität.
Dockingstation 39
Page 48

Austauschen des Akkus während sich der Tablet PC in der Dockingstation befindet
Sie können den Akku im Tablet PC austauschen, während der
Tablet PC eingeschaltet ist und sich in der Dockingstation
befindet.
ACHTUNG: (Nur die Modelle CFT-001 und CFT-002) Sie dürfen
den Tablet PC keinesfalls herausnehmen und die Verbindung des
Tablet PCs mit dem Docking-A nschluss der Dockingstation
trennen, da hierdurch die Stromversorgung des Tablet PCs
unterbrochen wird.
Hinweis: Beim Modell CFT-003 können Sie den Akku
austauschen, während der Tablet PC eingeschaltet ist und sich
außerhalb der Dockingstation befindet.
Wenn Sie wissen möchten, wie Ihr Tablet-Modell lautet, lesen Sie
das Etikett auf der Rückseite Ihres Tablet PCs.
40 Dockingstation
Page 49

Garantie
Dieses Produkt unterliegt einer eingeschränkten Gewährleistung.
Weitere Einzelheiten zu dieser eingeschränkten Gewährleistung
finden Sie unter www.motioncomputing.com.
Sicherheit und Vorschriften
Allgemeine Sicherheitsinformationen finden Sie im Sicherheitsund Vorschriftshandbuch zu Ihrem Tablet PC.
FCC-Erklärung (USA): Die Prüfung dieses Geräts hat ergeben,
dass die Grenzwerte für ein digitales Gerät der Klasse B, gemäß
Teil 15 der FCC-Bestimmungen, eingehalten werden. Diese
Grenzwerte wurden festgelegt, um einen angemessenen Schutz
gegen Störungen bei der Installation in Wohnbereichen zu
bieten. Das Gerät nutzt Hochfrequenzenergie und kann diese
erzeugen und abstrahlen. Dies kann zu Störungen im
Funkwellenempfang führen, wenn das Gerät nicht entsprechend
den Anleitungen installiert und betrieben wird. Es gibt jedoch
keine Garantie dafür, dass bei einer bestimmten Installation keine
Störungen auftreten. Kommt es durch das Gerät zu Störungen im
Radio- oder Fernsehempfang, was sich durch Ein- oder
Ausschalten des Geräts feststellen lässt, sollte der Benutzer
versuchen, die Störung durch eine oder mehrere der folgenden
Maßnahmen zu beheben:
• Empfangsantenne neu ausrichten oder versetzen.
• Abstand zwischen Gerät und Empfänger erhöhen.
• Gerät an einen Ausgang eines anderen Stromkreises
anschließen, an dem der Empfänger nicht angeschlossen ist.
• Einen Händler oder einen erfahrenen Rundfunk- und
Fernsehtechniker zurate ziehen.
IC-Erklärung (Kanada): Die Dockingstation wird entsprechend
der kanadischen IC-Norm Nr. 3 für störungsverursachende Geräte
(Industry Canada (IC) Interference-Causing Equipment Standard
#3, ICES-003) als digitales Gerät der Klasse B klassifiziert. Diese
Klassifizierung befindet sich auf dem Etikett an der Unterseite der
Dockingstation. Lesen Sie die Erklärung Canada ICES-003, Class/
Classe B. Dieses digitale Gerät der Klasse B (oder Klasse A, falls so
Dockingstation 41
Page 50

auf dem Registrierungsetikett vermerkt) entspricht den
kanadischen Bestimmungen für störungsverursachende Geräte
(Canadian Interference-Causing Equipment Regulations).
CE-Kennzeichnung (Europa): Die Kennzeichnung mit dem
Conformité Européne-Symbol auf der Dockingstation gibt an,
dass dieses Gerät den Bestimmungen der EMV-Richtlinie sowie
der Richtlinie für Niederspannungsgeräte der Europäischen
Union entspricht. Dies bedeutet, dass der Tablet PC und die
Dockingstation den folgenden technischen Normen entspricht:
EN 55022 (CISPR22), EN 55024 (CISPR 24) (IEC 61000 4-2, 4-3, 4-3,
4-5, 4-6, 4-8, 4-11), EN 61000 3-2 (IEC 61000 3-2), EN 61000 3-3
(IEC 61000 3-3), EN60950 (IEC 60950 3. Ausgabe; 1999; 2000).
Service und Support
Für Service und Support besuchen Sie:
www.motioncomputing.de/support.
Patente
Die Motion Computing-Produkte und -Dienstleistungen können
einem oder mehreren geschützten Erfindungen unterliegen.
Weitere Informationen finden Sie unter
www.motioncomputing.com/info/patents.asp.
42 Dockingstation
Page 51

Estación base
Este documento se aplica a la estación base de los modelos de
Tablet PC CFT-001, CFT-002 y CFT-003. Para determinar de qué
modelo de tablet dispone, consulte la etiqueta que se encuentra
en la parte trasera de la unidad.
La estación base añade funciones a su tablet, incluyendo
ampliación de puerto Ethernet, monitores VGA y dispositivos USB
como impresoras, teclados y ratones.
La estación base también carga el tablet e incluye una bahía de
carga para una batería adicional.
Para obtener información acerca de otros periféricos y hardware
opcional, visite www.motioncomputing.es.
Un tablet en la estación base
Estación base 43
Page 52

Colocación y montaje de la estación base
Puede colocar la estación base sobre una mesa o escritorio, o
montarla en una pared, un carro, un brazo de montaje u otro
equipo.
La parte inferior de la estación base dispone de un patrón de
montaje VESA estándar que puede utilizar con otros equipos
VESA compatibles.
La estación base incluye también una ranura de seguridad para
fijar la estación base a una mesa, escritorio u otro objeto.
Nota: Algunas configuraciones de montaje requieren otros
componentes como un soporte de pared.
Colocación en una mesa o escritorio
Al utilizar la estación base en una mesa o escritorio, coloque la
estación base a 10 cm de una pared para poder acceder a la
batería de repuesto.
Según el uso que vaya a darle, puede ajustar el ángulo de visión
de la estación base para tres posiciones diferentes. 15°, 25° ó 38°.
Si desea obtener más información acerca de los ángulos de
visión, consulte “Configuración del ángulo de visión” en la
página 50.
Montaje en una pared
El montaje de la estación base en una pared requiere un soporte
de pared por separado, compatible con un patrón de montaje
VESA de 75 mm.
Para reducir la distancia entre la estación base y la pared, le
recomendamos que ajuste el ángulo de visión a 38º. El soporte
de pared debe facilitar la obtención de este ángulo para
mantener el tablet en una orientación vertical.
44 Estación base
Page 53

Montaje en un carro o brazo de montaje
Orificios de montaje VESA en la parte inferior de la estación base
El montaje de la estación base en un carro o brazo de montaje
requiere un montaje compatible con VESA para que se ajuste al
patrón de orificio VESA de 75 mm de la parte inferior de la
estación base.
Para obtener más información acerca de los ángulos de visión de
la estación base, consulte “Configuración del ángulo de visión” en
la página 50.
Para montar la estación base
1. La estación base cuenta con cuatro orificios de montaje
compatibles con VESA de 75 mm. Para obtener los requisitos
de montaje específicos para su montaje en la pared, brazo de
montaje o carro, consulte sus instrucciones del equipo de
montaje.
2. Si está utilizando un montaje VESA, fije la estación base al
equipo compatible con VESA con cuatro tornillos M4 con
longitud máxima de 12 mm.
Estación base 45
Page 54

Conexión de la estación base
La estación base incluye puertos para ampliar las funciones de su
tablet así como para cargar la batería.
Para conectarse a los puertos de la estación base
1. Conecte el adaptador de alimentación como se muestra en la
siguiente ilustración.
46 Estación base
Page 55

2. Conecte los periféricos como un teclado o ratón a los puertos
Puertos USB
Puerto Ethernet
Puerto de
Ranura de seguridad
Puerto
alimentación
de CA
VGA
USB.
Nota: Los puertos de la estación base pueden recibir
alimentación a través de la batería del tablet o por alimentación
de CA.
Estación base 47
3. Si lo desea, proteja la estación base utilizando un cierre de
tipo Kensington en la ranura de seguridad. Para obtener más
información, consulte “Bloqueo de la estación base” en la
página 51.
Page 56

Uso de la estación base
Verde: Tablet acoplado
Apagado: Tablet no acoplado
Ámbar: Batería de repuesto en carga en bahía de batería
Verde: Batería de repuesto cargada
Apagado: Batería de repuesto no acoplada
Luces de estado
Una vez que haya montado la estación base y conectado los
periféricos, puede utilizar la estación base para mejorar el
rendimiento de su tablet.
Lectura de las luces de estado
La luces ubicadas en la parte delantera de la estación base
indican su estado.
48 Estación base
Page 57

Acoplamiento y retirada del tablet
Puede insertar y retirar el tablet fácilmente de la estación base.
Para acoplar el tablet
• Deslice suavemente el tablet sobre la estación base. El tablet
queda bloqueado en su sitio cuando está acoplado de forma
correcta.
La luz verde de la base indica que se ha acoplado correctamente.
Estación base 49
Page 58

Para retirar el tablet
Botón de
expulsión
Botón de ángulo
de visión
Puede retirar el tablet de la estación base de dos formas:
• Pulse el botón de expulsión y luego retire el tablet de la
estación base.
• Sujete la estación base con una mano y retire el tablet de la
estación base. Al retirar el tablet, le costará un poco, es normal.
Configuración del ángulo de visión
Puede ajustar el ángulo de visión en 15°, 25° ó 38°.
Para establecer el ángulo de visión
1. Pulse el botón de ángulo de visión.
50 Estación base
2. Gire la parte delantera de la estación base hacia adelante y
hacia atrás hasta obtener el ángulo de visión deseado y suelte
el botón de ángulo de visión. Cuando la unidad alcanza un
ángulo de visión compatible, queda bloqueada en su sitio.
Cuando se utiliza la estación base únicamente para recargar la
batería del tablet o la batería de repuesto, establezca el ángulo de
visión en 15º para ahorrar espacio y mejorar la estabilidad.
Para utilizar un teclado con un tablet colocado en una estación
base, establezca el ángulo de visión en 25º ó 38º.
Page 59

Bloqueo de la estación base
Ranura de seguridad
La ranura de seguridad sólo bloquea la estación base, no el
tablet.
Para bloquear la estación base
1. Localice la ranura de seguridad en la estación base.
2. Abra y coloque su cierre en la ranura de seguridad.
3. Una el cable del cierre a un escritorio, carro u otro objeto. Fije
el cierre y el cable del cierre siguiendo las instrucciones del
fabricante. Según el tipo de cierre, es posible que tenga que
amarrar, conectar o colocar un cierre a lo largo del cable.
Estación base 51
Page 60

Uso de un monitor y proyector externos
Puerto
VGA
Para las presentaciones, puede conectar la estación base a un
proyector o monitor VGA. El tablet admite varias configuraciones
del monitor externo, incluyendo pantallas duplicadas y
ampliadas.
Para utilizar un monitor VGA
1. Conecte el cable del monitor al puerto VGA de la estación
base.
2. Conecte el monitor o proyector a una toma de corriente
y enciéndalo. El sistema operativo Microsoft Windows®
detectará el monitor y buscará su controlador de hardware.
Es posible que necesite instalar el controlador desde el disco
proporcionado por el fabricante del monitor.
3. El contenido del tablet aparecerá en el monitor o proyector de
forma predeterminada. Puede utilizar Motion Dashboard para
cambiar la configuración de la pantalla. Consulte la ayuda de
Motion Dashboard.
52 Estación base
Page 61
Uso de la bahía de carga de la batería
Batería en la bahía de carga
La bahía de carga de la batería de la parte trasera de la estación
base le permite cargar el tablet así como una batería de repuesto
al mismo tiempo.
• Para cargar el tablet, colóquelo en la estación base.
• Para cargar una batería adicional, inserte una batería en la
bahía de carga de la batería.
La batería de repuesto sigue en carga cuando el tablet ya no está
en la estación base.
Para obtener más información acerca de las luces de estado,
estados de carga de la batería, consulte “Lectura de las luces de
estado” en la página 48.
Cuando se utiliza la estación base únicamente para recargar la
batería del tablet y la batería de repuesto, establezca el ángulo de
visión en 15º para ahorrar espacio y mejorar la estabilidad.
Estación base 53
Page 62

Cambio de la batería del tablet mientras está acoplado en la estación base
Puede cambiar la batería en el tablet mientras está encendido y
acoplado.
ADVERTENCIA: (Modelos CFT-001 y CFT-002 únicamente) Evite
levantar y desconectar el tablet del conector de base que hay en
la estación base, ya que causará una pérdida de alimentación del
tablet.
Nota: En el modelo CFT-003, puede cambiar la batería mientras el
tablet está encendido y fuera de la base.
Para determinar el modelo de tablet de que dispone, consulte la
etiqueta que se encuentra en la parte trasera del tablet.
54 Estación base
Page 63

Garantía
Este producto cuenta con una garantía limitada. Para ver los
detalles de esta garantía limitada, visite
www.motioncomputing.com.
Seguridad y normativa
Para obtener información general de seguridad, consulte la guía
de seguridad y normativa incluida con su tablet.
Aviso de la comisión federal de comunicaciones (FCC)
(Estados Unidos): Este equipo ha sido probado y cumple con los
límites establecidos para dispositivos digitales de Clase B, de
conformidad con el Apartado 15 de la Normativa de la FCC. Estas
limitaciones están diseñadas para proporcionar una protección
razonable frente a interferencias en una instalación residencial.
Este equipo genera, utiliza y puede emitir energía de
radiofrecuencia y, si no se instala y utiliza de acuerdo con las
instrucciones, puede ocasionar interferencias perjudiciales en las
comunicaciones por radio. No obstante, no hay garantía alguna
de que no vaya a causar interferencias en una instalación
específica. En caso de que este equipo cause interferencias
perjudiciales para la recepción de emisiones de radio o televisión,
que pueden comprobarse apagando y encendiendo el equipo,
invitamos a los usuarios a intentar corregirlas probando uno o
más de los siguientes métodos:
• Cambie la orientación o ubicación de la antena receptora.
• Aleje el equipo del receptor.
• Conecte el equipo a una toma de corriente de un circuito
diferente al del receptor.
• Consulte al distribuidor o a un técnico experto en radio o
televisión para obtener ayuda.
Aviso del Ministerio de industria de Canadá (Canadá): De
acuerdo con su estándar de equipos causantes de interferencias
nº 3 (ICES-003), el Ministerio de Industria de Canadá (IC) clasifica
las estaciones base como dispositivos digitales de Clase B. Esta
clasificación se indica en la etiqueta situada en la parte inferior de
su estación base. Busque una declaración en la etiqueta que
presente el siguiente aspecto: This Class B (or Class A, if so
Estación base 55
Page 64

indicated on the registration label) digital apparatus meets the
requirements of the Canadian Interference-Causing Equipment
Regulations.
Aviso de la UE (Aviso de la Unión Europea): El símbolo
(Conformidad Europea) que se encuentra en la estación base
indica la conformidad con la Directiva CEM y la Directiva de baja
tensión de la Unión Europea. Esto significa que la estación base o
tablet cumplen los siguientes estándares técnicos: EN 55022
(CISPR22), EN 55024 (CISPR 24) (IEC 61000 4-2, 4-3, 4-3, 4-5, 4-6, 48, 4-11), EN 61000 3-2 (IEC 61000 3-2), EN 61000 3-3 (IEC 61000 3-
3), EN60950 (IEC 60950 3rd Ed; 1999; 2000).
Servicio y asistencia
Para obtener servicio y asistencia, visite
www.motioncomputing.es/support.
Patentes
Los productos y servicios de Motion Computing pueden estar
cubiertos por uno o más inventos protegidos. Para obtener más
información, visite www.motioncomputing.com/info/
patents.asp.
56 Estación base
Page 65

Base de encaixe
Este documento aplica-se às bases de encaixe para modelos de
Tablet PC CFT-001, CFT-002 e CFT-003. Para determinar qual
modelo de tablet você tem, consulte a etiqueta na parte de trás
do aparelho.
A base de encaixe adiciona funcionalidades ao seu tablet,
incluindo expansão de portas para Ethernet, monitores VGA
e dispositivos USB, como impressoras, teclados e mouse.
A base de encaixe também carrega o tablet e inclui uma base de
carregamento para uma bateria extra.
Para obter mais informações sobre outros periféricos e hardware
opcional, visite o site www.motioncomputing.pt.
Um tablet na base de encaixe
Base de encaixe 57
Page 66

Posicionando e montando a base de encaixe
É possível posicionar a base de encaixe em uma mesa ou
escrivaninha, ou montá-la em uma parede, carrinho, braço de
montagem ou outro equipamento.
A parte de baixo da base de encaixe possui uma montagem do
padrão VESA, que pode ser usada com outros equipamentos
compatíveis com esse padrão.
A base de montagem também inclui um encaixe de segurança,
que permite travá-la em uma mesa, escrivaninha ou outra
fixação.
Nota: Determinados tipos de montagem podem exigir outros
componentes, como um suporte de parede.
Posicionamento em uma mesa ou escrivaninha
Ao usar a base de encaixe em uma mesa ou escrivaninha,
posicione-a a aproximadamente 4 polegadas (cerca de 10
centímetros) de uma parede para permitir que você alcance a
bateria extra.
Dependendo do uso pretendido, é possível ajustar o ângulo de
visualização da base de encaixe em três posições diferentes: 15º,
25º ou 38º. Para obter mais informações sobre os ângulos de
visualização, consulte “Ajustando o ângulo de visualização” na
página 64.
Montagem na parede
A montagem da base de encaixe em uma parede requer um
suporte de parede adicional que seja compatível com a
montagem do padrão VESA de 75 mm.
Para minimizar a distância da projeção da base de encaixe da
parede, recomendamos que você ajuste o ângulo de visualização
para 38º. O suporte de parede precisa facilitar esse ângulo para
manter o tablet em orientação vertical.
58 Base de encaixe
Page 67
Montagem em um carrinho ou braço de montagem
Orifícios de montagem VESA na parte de baixo da base de encaixe
A montagem da base de encaixe em um carrinho ou braço de
montagem requer uma montagem compatível com VESA para
que seja possível fazer a conexão com o orifício VESA de 75 mm
na parte de baixo da base de encaixe.
Para obter mais informações sobre os ângulos de visualização da
base de encaixe, consulte “Ajustando o ângulo de visualização”
na página 64.
Para montar a base de encaixe
1. A base de encaixe tem quatro orifícios de montagem de
75 mm compatíveis com o padrão VESA. Consulte as
instruções do seu equipamento de montagem para conhecer
os requerimentos específicos de montagem para sua
montagem na parede, braço de montagem ou carrinho.
2. No caso de uma montagem VESA, fixe a base de encaixe no
equipamento compatível com VESA usando quatro parafusos
M4 com no máximo 12 mm de comprimento.
Base de encaixe 59
Page 68

Conectando a base de encaixe
A base de encaixe inclui portas para estender os recursos do seu
tablet e recarregar a bateria.
Para conectar-se às portas da base de encaixe
1. Conecte o adaptador de corrente conforme exibido na
ilustração a seguir.
60 Base de encaixe
Page 69

2. Conecte os periféricos, como o teclado ou o mouse, nas portas
Portas USB
Porta Ethernet
Portas da fonte
Encaixe de segurança
Porta VGA
de alimentação CA
USB.
Nota: As portas da base de encaixe podem ser alimentadas pela
bateria do tablet ou pela fonte de alimentação CA.
Base de encaixe 61
3. Se desejar, fixe a base de encaixe usando uma trava do estilo
Kensington no encaixe de segurança. Para obter mais
informações, consulte “Travando a base de encaixe” na
página 65.
Page 70

Usando a base de encaixe
Verde: tablet na base.
Desligada: tablet fora da base.
Âmbar: bateria extra sendo recarregada na base da bateria.
Verde: bateria extra carregada.
Desligada: bateria extra não posicionada na base.
Luzes de status
Após montar a base de encaixe e conectar os periféricos, é
possível usá-la para melhorar o desempenho do seu tablet.
Leitura das luzes de status
As luzes na parte da frente da base de encaixe indicam seu status.
62 Base de encaixe
Page 71

Colocando e removendo o tablet da base de encaixe
É possível colocar e remover facilmente o tablet da base de
encaixe.
Para colocar o tablet na base
• Com cuidado, deslize o tablet na base de encaixe. Quando
posicionado corretamente, o tablet encaixa e prende na base
com segurança.
A luz verde de encaixe indica que o tablet foi posicionado
corretamente.
Base de encaixe 63
Page 72

Para remover o tablet da base
Botão de
ejetar
Botão do ângulo
de visualização
É possível remover o tablet da base de encaixe de duas maneiras
diferentes:
• Pressione o botão de ejetar e retire o tablet da base de
encaixe.
• Segure a base de encaixe com uma mão e retire o tablet com a
outra. Ao remover o tablet, você perceberá que há uma certa
resistência, o que é normal.
Ajustando o ângulo de visualização
É possível ajustar o ângulo de visualização para 15º, 25º ou 38º.
Para ajustar o ângulo de visualização
1. Pressione e segure o botão do ângulo de visualização.
64 Base de encaixe
2. Gire a parte da frente da base de encaixe para frente e para
trás até atingir o ângulo de visualização desejado e, então,
solte o botão do ângulo de visualização. Quando o aparelho
atinge um ângulo de visualização suportado, ele trava na
posição.
Quando a base de encaixe for usada somente para recarregar a
bateria do tablet ou a bateria extra, ajuste o ângulo de
visualização para 15º para economizar espaço e melhorar a
estabilidade.
Page 73

Para usar o teclado com um tablet posicionado na base de
Encaixe de segurança
encaixe, ajuste o ângulo de visualização para 25º ou 38º.
Travando a base de encaixe
O encaixe de segurança trava somente a base de encaixe, e não o
tablet.
Para travar a base de encaixe
1. Localize o encaixe de segurança na base de encaixe.
2. Abra e coloque sua trava no encaixe de segurança.
3. Coloque um cabo de trava em uma mesa, carrinho ou outro
local de fixação. Proteja a trava e o cabo da trava de acordo
com as instruções do fabricante. Dependendo do tipo de
trava, talvez seja necessário amarrar, conectar ou colocar uma
trava no cabeamento.
Base de encaixe 65
Page 74

Usando um monitor ou projetor externo
Porta VGA
É possível conectar a base de encaixe a um monitor VGA ou a um
projetor para realizar apresentações. O tablet suporta diversas
configurações de monitores externos, incluindo monitores
espelhados e estendidos.
Para usar um monitor VGA
1. Conecte o cabo do monitor à porta VGA na base de encaixe.
2. Conecte o monitor ou o projetor a uma tomada elétrica e
ligue-o. O sistema operacional Microsoft Windows®
reconhecerá o monitor e procurará pelo seu driver de
hardware. Talvez seja necessário instalar o driver usando o CD
fornecido pelo fabricante do monitor.
3. Por padrão, o conteúdo do tablet será exibido no monitor ou
projetor. É possível usar o Motion Dashboard para alterar as
configurações de exibição. Consulte a ajuda do Motion
Dashboard.
66 Base de encaixe
Page 75

Usando a base de carregamento da bateria
Bateria na base de carregamento
A base de carregamento da bateria na parte de trás da base de
encaixe permite que você recarregue o tablet e uma bateria extra
ao mesmo tempo.
• Para recarregar o tablet, posicione-o na base de encaixe.
• Para recarregar uma bateria adicional, insira a bateria na base
de carregamento.
A bateria extra continuará sendo recarregada, mesmo quando o
tablet não estiver mais na base de encaixe.
Para obter informações sobre as luzes de status e os estados de
carregamento da bateria, consulte “Leitura das luzes de status”
na página 62.
Quando a base de encaixe for usada somente para recarregar a
bateria do tablet e a bateria extra, ajuste o ângulo de visualização
para 15º para economizar espaço e melhorar a estabilidade.
Base de encaixe 67
Page 76

Trocando a bateria do tablet enquanto ele estiver na base de encaixe
É possível trocar a bateria do tablet enquanto ele estiver na base
de encaixe.
AVI SO: (Somente modelos CFT-001 e CFT-002) Evite erguer o
tablet e desconectá-lo do conector da base de encaixe, pois isso
causará perda de energia no tablet.
Nota: No modelo CFT-003, é possível trocar a bateria
independentemente de o tablet estar posicionado na base.
Para determinar qual modelo de tablet você tem, consulte a
etiqueta na parte de trás do aparelho.
68 Base de encaixe
Page 77

Garantia
Este produto é fornecido com um garantia limitada. Para obter
mais detalhes sobre a garantia limitada, visite o site
www.motioncomputing.com.
Segurança e normas
Para obter informações gerais de segurança, consulte o Guia de
Normas e Segurança que foi enviado junto com o seu tablet.
Notificação FCC (Estados Unidos): Este equipamento foi
testado e está em conformidade com os limites de dispositivo
digital de classe B, de acordo com a seção 15 das regras da FCC.
Esses limites são projetados para fornecer proteção razoável
contra a interferência prejudicial em uma instalação residencial.
Este equipamento gera, usa e pode irradiar energia de
radiofrequência e, se não for instalado e usado de acordo com as
instruções, poderá causar interferência prejudicial às
comunicações de rádio. Contudo, não há garantia que não
haverá interferência em uma instalação em particular. Se este
equipamento causar interferência prejudicial na recepção de
rádio ou televisão, o que pode ser determinado ligando e
desligando o equipamento, recomenda-se que o usuário tente
corrigir a interferência por meio de uma ou mais das medidas a
seguir:
• Redirecione ou reposicione a antena receptora.
• Aumente a distância entre o equipamento e o receptor.
• Conecte o equipamento em uma tomada em um circuito
diferente do que o receptor está conectado.
• Consulte o vendedor ou um técnico experiente de rádio/
televisão para obter ajuda.
Notificação IC (Canadá): A base de encaixe é classificada pelo
padrão nº 3 de equipamento que causa interferência (ICES-003)
da Industry Canada (IC) como dispositivo digital de classe B. Essa
classificação está localizada no rótulo na parte de baixo da base
de encaixe. Procure por uma declaração no rótulo que se pareça
com o seguinte: Canadá ICES-003, Classe B. Este aparelho digital
de Classe B (ou Classe A, se for indicado no rótulo de registro)
atende aos requisitos estabelecidos pelos Regulamentos para
equipamentos que causam interferência do Canadá.
Base de encaixe 69
Page 78

Notificação CE (Europeia): O símbolo do Conformité Européne
encontrado na base de encaixe indica a conformidade com a
diretiva de EMC e a diretiva de baixa tensão da União Europeia.
Isso significa que o tablet ou a base de encaixe está de acordo
com os seguintes parâmetros técnicos: EN 55022 (CISPR22), EN
55024 (CISPR 24) (IEC 61000 4-2, 4-3, 4-3, 4-5, 4-6, 4-8, 4-11), EN
61000 3-2 (IEC 61000 3-2), EN 61000 3-3 (IEC 61000 3-3), EN60950
(IEC 60950 3rd Ed; 1999; 2000).
Serviço e suporte
Para serviço e suporte, visite o site
www.motioncomputing.pt/support.
Patentes
Os produtos e serviços da Motion Computing podem estar
cobertos por uma ou mais invenções protegidas por patentes.
Para obter mais informações, consulte o site
www.motioncomputing.com/info/patents.asp.
70 Base de encaixe
 Loading...