

Page 1

M
OTION
C
OMPUTING
T
ABLET
USER GUIDE
PC
Page 2

Copyright Information
Acrobat is a registered trademark of Adobe Systems Incorporated.
Microsoft Windows, Windows XP, Windows XP Tablet PC Edition, and Windows Journal are
either registered trademarks or trademarks of Microsoft Corporation in the United States and/
or other countries.
Realtek is a trademark of Realtek Semiconductor Corporation.
Intel, Intel Centrino, Intel Inside, the Intel Centrino logo, the Intel Inside logo, and Pentium are
trademarks or registered trademarks of Intel Corporation or its subsidiaries in the United
States and other countries.
PCTEL is a registered trademark of PCTEL, Inc.
Sigmatel is a registered trademark of Sigmatel Corporation.
VirtualDrive is a trademark of FarStone Technologies, Inc.
Wi-Fi is a registered trademark of the Wi-Fi Alliance.
Motion Computing, Inc. has made every effort to identify trademarked properties and owners
on this page. All brands and product names used in this document are for identification
purposes only and may be trademarks or registered trademarks of their respective
companies.
NOTICE: The information in this publication is subject to change without notice. MOTION
COMPUTING, INC. SHALL NOT BE HELD LIABLE FOR TECHNICAL OR EDITORIAL
ERRORS OR OMISSIONS CONTAINED HEREIN NOR FOR ACCIDENTAL OR
CONSEQUENTIAL DAMAGES RESULTING FROM THE FURNISHING, PERFORMANCE,
OR USE OF THIS MATERIAL. The information contained in this document is provided “as is”
without warranty of any kind and is subject to change without notice. The warranties for
Motion Products are set forth in the express limited warranty statements accompanying such
products. Nothing herein should be construed as constituting an additional warranty. This
publication contains information protected by copyright. No part of this publication may be
photocopied or reproduced in any form without prior written consent from Motion Computing,
Inc.
© 2003 Motion Computing, Inc.
Motion Computing and the Motion logo are trademarks of Motion Computing, Inc.
(October 2003)
P/N 024-02-0016 Rev.A09
Motion Computing Tablet PC User Guide
Page 3

About This User Guide
CAUTIONS, WARNINGS AND NOTICES
MENU ITEMS, BUTTONS, ICONS
WRITING ON
THE DISPLAY
The following notices are found in this User Guide:
WARNING: Text set off in this way indicates that failure to follow
directions in the warning could result in bodily harm or loss of life.
CAUTION: Text set off in this way indicates that failure to follow
directions in the Caution could result in damage to the equipment or
loss of information.
IMPORTANT: Text set off in this way presents information or instructions that
should be followed or information of particular interest.
NOTE: Text set off in this way presents information or instructions.
Menu items, icons, and instructions found in the procedures in this User
Guide are set apart by capitalizing them exactly as shown on screen. For
example, the Start menu, Dashboard, Tablet and Pen Settings icon,
Apply , Reset, etc. Buttons on the chassis are identified through diagrams.
Writing on the Motion Tablet PC digitizer display in this User Guide
refers to any hand-written input using the specially-designed Motion
digitizer Pen, provided. The display responds only to this Motion Pen
and not to any other type of pen or to a stylus or other device such as
those used with personal digital assistants (PDAs). The display surface
may be damaged by ink pens or other pointed objects.
INK Reference to ink in the documentation means text entered in handwritten
format and converted to an object that can be displayed exactly as you
write it.
REFERENCES
TO USING THE
P
EN AND
EN FUNCTION
P
BUTTON
Notations for using the Motion Digitizer Pen, which are found
throughout this User Guide, are described below:
• Tap — Tap the Pen on the Tablet PC display, without pressing the
function button on the Pen
• Double-tap — Double-tap the Pen on the display , without pressing the
function button on the Pen
• Right-click — Press the function button on the Pen and tap the Pen on
the display (equivalent to a mouse right-click)
• Press and hold — Press and hold the tip of the Pen to the display,
without pressing the function button on the Pen (equivalent to a mouse
right-click)
• Tap and drag — Tap and drag the Pen on the display
• Select/Highlight — Tap on the item on the Tablet PC display with the
Pen to activate the function
Motion Computing Tablet PC User Guide
Page 4

Table of Contents
About This User Guide
Cautions, Warnings and Notices
Menu Items, Buttons, Icons
Writing on the Display
Ink
References to Using the Pen and Pen Function Button
Table of Contents
Chapter 1 Getting Started with the Motion Tablet PCs
Motion Tablet PC Features . . . . . . . . . . . . . . . . . . . . . . . . .5
What’s New with the Motion M1300 . . . . . . . . . . . . . . . . . . . 6
Package Contents . . . . . . . . . . . . . . . . . . . . . . . . . . . . . . . . 7
Motion Accessories . . . . . . . . . . . . . . . . . . . . . . . . . . . . . 7
Some Hints About What To Do First . . . . . . . . . . . . . . . . . . .8
Calibrate the Pen . . . . . . . . . . . . . . . . . . . . . . . . . . . . . . 8
Practice Using the Pen . . . . . . . . . . . . . . . . . . . . . . . . . . 8
Take the Tutorials . . . . . . . . . . . . . . . . . . . . . . . . . . . . . . 9
Motion Resources Page and Online User Guide . . . . . . 9
Microsoft Help and Resources Center Page . . . . . . . .10
Did You Know Section . . . . . . . . . . . . . . . . . . . . . . . . . 10
Take a Tour of Windows XP . . . . . . . . . . . . . . . . . . . . . 10
Chapter 2 Motion Tablet PC Hardware
Tablet PC Display and Writing Surfaces . . . . . . . . . . . . . . 11
Overview of the Display . . . . . . . . . . . . . . . . . . . . . . . . . . .12
Chassis and Hard Top . . . . . . . . . . . . . . . . . . . . . . . . . . . .14
Pen . . . . . . . . . . . . . . . . . . . . . . . . . . . . . . . . . . . . . . . . . . . 14
Motion AC Adapter . . . . . . . . . . . . . . . . . . . . . . . . . . . . . . 14
Motion Batteries . . . . . . . . . . . . . . . . . . . . . . . . . . . . . . . . . 14
Front Panel Buttons . . . . . . . . . . . . . . . . . . . . . . . . . . . . . .15
Modem and LAN Ports . . . . . . . . . . . . . . . . . . . . . . . . . . . . 15
Tablet PC LEDs . . . . . . . . . . . . . . . . . . . . . . . . . . . . . . . . . 16
Front Panel LEDs . . . . . . . . . . . . . . . . . . . . . . . . . . . . . 16
Battery Status LEDs . . . . . . . . . . . . . . . . . . . . . . . . . . . 17
Battery Status Gauge . . . . . . . . . . . . . . . . . . . . . . . . . . 17
Labels . . . . . . . . . . . . . . . . . . . . . . . . . . . . . . . . . . . . . . . . . 18
Accessories . . . . . . . . . . . . . . . . . . . . . . . . . . . . . . . . . . . . 19
Motion Computing Tablet PC User Guide
Page 5

Motion Desktop Stand . . . . . . . . . . . . . . . . . . . . . . . . .19
Motion FlexDock . . . . . . . . . . . . . . . . . . . . . . . . . . . . . . 19
Motion Multi-Unit Battery Charger . . . . . . . . . . . . . . . . .20
Motion Mobile Keyboard with Touch Pad . . . . . . . . . . . 20
Motion Hard Top Cover and Portfolios . . . . . . . . . . . . . 21
Motion Optical Disc Drives . . . . . . . . . . . . . . . . . . . . . . 21
256MB and 512MB Memory Upgrade Modules . . . . . . 22
PC Card Slot . . . . . . . . . . . . . . . . . . . . . . . . . . . . . . . . . 22
Mini PCI Card (Wireless) . . . . . . . . . . . . . . . . . . . . . . . 22
Chapter 3 Motion Tablet PC Software
Software CDs . . . . . . . . . . . . . . . . . . . . . . . . . . . . . . . . . . . 23
Motion System Recovery CDs . . . . . . . . . . . . . . . . . . . 23
Motion Utilities and Drivers CD . . . . . . . . . . . . . . . . . . . 24
Motion Application CD . . . . . . . . . . . . . . . . . . . . . . . . . 24
Motion Application Software . . . . . . . . . . . . . . . . . . . . . . . . 25
Motion Dashboard . . . . . . . . . . . . . . . . . . . . . . . . . . . . 25
Tablet PC Input Panel . . . . . . . . . . . . . . . . . . . . . . . . . . 26
Speech and Voice Recognition . . . . . . . . . . . . . . . . . . . 26
Chapter 4 Using Your Motion Tablet PC
Initializing Microsoft Windows XP . . . . . . . . . . . . . . . . . . . .28
Required Equipment and Information . . . . . . . . . . . . . . 28
Optional Connections, Equipment, and Information . . . 28
Windows Initialization Procedure . . . . . . . . . . . . . . . . . 29
Microsoft Office Registration . . . . . . . . . . . . . . . . . . . . . 30
Starting and Stopping the Motion M1200 Tablet PC . . . . . 30
Starting . . . . . . . . . . . . . . . . . . . . . . . . . . . . . . . . . . . . . 30
Stopping . . . . . . . . . . . . . . . . . . . . . . . . . . . . . . . . . . . . 30
Opening the Motion Dashboard . . . . . . . . . . . . . . . . . . . . . 31
Conserving Power Using Stand By or Hibernate . . . . . . . . 31
Launching Stand By or Hibernate from the Start Button 32
Setting Up Stand By or Hibernate from the Power Button32
Resuming Work from Stand By or Hibernate. . . . . . . . . 32
Operating the Motion Digitizer Pen . . . . . . . . . . . . . . . . . . 32
Calibrating the Pen to Increase Its Accuracy. . . . . . . . . 33
Hints for Writing with the Pen . . . . . . . . . . . . . . . . . . . .33
Adjusting Pen Properties for Ease of Use . . . . . . . . . . .35
Hints for Optimizing Your Display Window . . . . . . . . . . . . . 36
Making Best Use of the Tablet PC Input Panel . . . . . . . . . 36
Hints for Working with the Tablet PC Input Panel . . . . . . . 36
Motion Computing Tablet PC User Guide
Page 6

Input Panel Text Preview Window . . . . . . . . . . . . . . . . . 38
“Sending as Ink” (Handwriting/Drawings) from the
Input Panel . . . . . . . . . . . . . . . . . . . . . . . . . . . . . . . . . . 38
Eliminating Paper with Windows Journal . . . . . . . . . . . . . . 39
Creating Forms and Editing Them in the Windows Journal 39
Have Sticky Notes Handy for Jotting Down Information . . .40
Changing Screen Orientation . . . . . . . . . . . . . . . . . . . . . . 40
Customizing Buttons . . . . . . . . . . . . . . . . . . . . . . . . . . . . . . 41
Adjusting Brightness for Different Lighting Scenarios . . . . . 42
Identifying the Right AC Power Adapter . . . . . . . . . . . . . . . 42
Keeping Tabs on Your Battery Power . . . . . . . . . . . . . . . . 42
Reading Battery Power from the Tablet PC Display . . . 42
Reading Battery Power from the Battery Gauge . . . . .43
Reading Battery Power from the Power Meter . . . . . . . 43
Creating a New Power Scheme . . . . . . . . . . . . . . . . . . . . . 43
Setting Up Max Battery Mode . . . . . . . . . . . . . . . . . . . . . . . 43
Charging the Battery . . . . . . . . . . . . . . . . . . . . . . . . . . . . . 44
Swapping the Battery . . . . . . . . . . . . . . . . . . . . . . . . . . . . . 44
Disposing of Used Batteries . . . . . . . . . . . . . . . . . . . . .45
Battery and Power Management Hints . . . . . . . . . . . . . 45
Adding Memory to Improve System Performance . . . . . . .45
Installing Optical Disc Drives . . . . . . . . . . . . . . . . . . . . . . . 46
Mirroring or Extending Your Display . . . . . . . . . . . . . . . . . . 48
Connect the VGA Monitor and Tablet PC . . . . . . . . . . . 48
Setting Up a Mirrored Display . . . . . . . . . . . . . . . . . . . . 48
Setting Up an Extended Desktop. . . . . . . . . . . . . . . . . . 48
Setting Up a Wireless Connection . . . . . . . . . . . . . . . . . . .50
Setting Up Speech Recognition for Dictation . . . . . . . . . . . 50
Using Speech Recognition Commands . . . . . . . . . . . . . . .51
Changing Screen Resolution . . . . . . . . . . . . . . . . . . . . . . .51
Creating a Screen-Resolution Scheme for an External
Monitor or Similar Device . . . . . . . . . . . . . . . . . . . . . . . . . . 52
Multimedia Applications . . . . . . . . . . . . . . . . . . . . . . . . . . .52
Setting Up Tablet PC Security . . . . . . . . . . . . . . . . . . . . . .52
Setting the Windows Operating System Password . . .53
Setting the BIOS Passwords . . . . . . . . . . . . . . . . . . . . 53
Clearing Tablet PC Security . . . . . . . . . . . . . . . . . . . . . . . . 54
Caring for the and Its Accessories . . . . . . . . . . . . . . . . . . . 55
General Care . . . . . . . . . . . . . . . . . . . . . . . . . . . . . . . . 55
Caring for the Display Screen . . . . . . . . . . . . . . . . . . . . 55
Caring for the Motion Digitizer Pen . . . . . . . . . . . . . . . . 56
Ordering New Pens . . . . . . . . . . . . . . . . . . . . . . . . . . . 56
Traveling With the Tablet PC . . . . . . . . . . . . . . . . . . . .56
Packing the Tablet PC . . . . . . . . . . . . . . . . . . . . . . . . . 56
Traveling by Air . . . . . . . . . . . . . . . . . . . . . . . . . . . . . . . 57
Other Travel Hints . . . . . . . . . . . . . . . . . . . . . . . . . . . . . 57
Motion Computing Tablet PC User Guide
Page 7

Appendix A Troubleshooting and Support
Appendix B Specifications
Appendix C Wireless Mini-PCI Installation
Index
Motion Computing Tablet PC User Guide
Page 8

Chapter 1 Getting Started with Your Motion Tablet PC
MOTION
ABLET PC
T
EATURES
F
Chapter
1
Getting Started with
Your Motion Tablet PC
Thank you for deciding to purchase a T a blet PC from Motion Computing TM!
Motion Tablet PCs combine the best features of desktop computing and
notebooks with more power than any touchscreen PC or personal digital
assistant (PDA) can provide.
The Motion M1200 Tablet PC offers these unique features:
•Intel® Pentium® III M processor (ULV)
• Intel 830GM chipset family
• IEEE 802.11b wireless LAN mini-PCI card capability
• USB 1.1
• PC133 SDRAM memory slot
• Graphics resolution 1800 x 1440 (maximum)
The Motion M1300 Tablet PC offers these unique features:
TM
•Intel® Centrino
• Intel Pentium M processor (ULV)
• Intel 855 chipset family
• Intel PRO/Wireless 2100 Network Connection that supports IEEE
802.11b or WMIB-100 GS that supports IEEE 802.11g; Wi-Fi
compliant
• USB 2.0
• PC266 DDR memory slot
• Graphics resolution 2048 x 1536 (maximum)
Motion Tablet PCs offer these standard features:
mobile technology, which includes:
Motion Computing Tablet PC User Guide 5
TM
Page 9

Chapter 1 Getting Started with Your Motion Tablet PC
•Microsoft® Windows® XP Tablet PC Edition operating system
• 12.1-inch XGA TFT LCD display
• Motion Digitizer Pen
• 256MB base RAM, upgradeable to 1GB; minimum 20GB hard drive
• Front panel status LEDs
• Front panel function Buttons
• Motion Dashboard for easy access to Tablet PC functions
• Screen rotation; handwriting and drawing recognition; voice recognition
software; dual-head video controller
• Power switch On/Off; with Stand By and Hibernate modes
• AC Power Adapter and power cord
• I/O: Microphone in; Headphone out; DC power in; two USB ports; IEEE
1394 port; external VGA monitor port; RJ-11 (modem); RJ-45 (Ethernet
network)
• Pen storage slot and Pen tether anchor on the Tablet PC chassis
• PC card slot, for networking, memory expansion or accessory connections
• USB keyboard and mouse support
• 3- and 6-cell, prismatic Lithium-ion battery
WHAT’S NEW
WITH THE
OTION
M
M1300
• Programmable power-saving schemes
• Lightweight Magnesium alloy chassis
• Kensington lock slot
Intel Centrino mobile technology
• Higher CPU performance
• Improved graphics performance
• Integrated 802.11b wireless LAN capability
USB 2.0 interface
• Peripheral-to-PC connection speed: 480 Mbps; 40 times faster
than USB 1.1
• Fully backward compatible to USB 1.1
Motion Computing Tablet PC User Guide 6
Page 10

Chapter 1 Getting Started with Your Motion Tablet PC
PACKAGE
ONTENTS
C
Motion Tablet PC packages may contain the following Motion equipment:
• Motion M1200 or M1300 Tablet PC
• Digitizer Pen, extra Pen tips, and Pen tip replacement tool
• AC Adapter, Power Cord, and AC Mini Plug
• Hardtop Cover
• Adjustable desktop stand
• Cloth for cleaning the display
• System software CDs (for a list of CDs, see Chapter 3 of this
User Guide)
• Product documentation
NOTE: Before discarding any shipping containers, check that you’ve unpacked
all the items. If anything appears to be missing from your order, read the invoice
to see if the part was back ordered. To check your order, contact your Motion
Computing, if you bought the Tablet PC directly from us, or your Motion reseller.
Motion Accessories
You can purchase any of the following Motion accessories:
NOTE: New accessories may be added from time to time. Visit the Motion
Computing website at www.motioncomputing.com/accessories for the most
current list of options.
• Motion FlexDock docking station with Microphone in; Headphone out;
DC power in; three USB ports, one IEEE 1394 port; VGA monitor port;
pass-through to an RJ-11 (modem) port on the Tablet PC; RJ-45 (Ethernet LAN/network) port; docking connector for the Tablet PC
• Mobile Keyboard with Touch Pad
• Motion Hardtop Keyboard
• Replacement Hardtop cover
• Executive Portfolio or Clamshell Portfolios
• Rubber Edge Protector
• Battery charger
• Extra batteries
• Extra pens
• Optical Disc Drives
• 256MB or 512MB Memory Upgrade Modules
• 40GB or 60GB Hard Drives
• PC card options
• Additional software (For a list of software, see Chapter 3.)
Motion Computing Tablet PC User Guide 7
Page 11

Chapter 1 Getting Started with Your Motion Tablet PC
SOME HINTS
BOUT WHAT
A
O DO FIRST
T
Congratulations on selecting a Motion T ablet PC! By now you have read the
Installation Poster, probably started your Tablet PC, and started Windows
XP. We recommend that you now take the following steps:
NOTE: If you are reading this User Guide from our website, you may not have
set up nor used a Tablet PC before. When you begin using your unit, you may be
required to attach a standard USB keyboard to initialize Windows XP operating
system software. This procedure is described in Chapter 4 of this User Guide.
• Calibrate the Pen.
• Practice using the Pen.
• Play Inkball.
• Go through the tutorials.
• Check out the Using Your Motion Tablet PC page.
• See what’s on the Windows Help and Support Center page.
• Take the Microsoft Windows XP tour.
Each of these is briefly described in the following sections.
Calibrate the Pen
Your Digitizer Pen will function better and you’ll be more successful using
it if you calibrate it immediately and recalibrate it occasionally. For
information about calibrating the Pen, see the section “Calibrating the Pen”
in Chapter 4 of this User Guide.
Practice Using the Pen
The Motion Digitizer Pen is one of the unique components of the Tablet PC,
but it may take a little practice to use. Here are some hints:
• When you write with the Pen, you can rest your hand or arm anywhere
on the Tablet PC display without disturbing any open programs or damaging the display surface.
• Watch the Pen cursor instead of the Pen tip when you write. The cursor
is a guide for your Pen movements.
• Practice writing and learn how hard and where to tap on the Tablet PC
display. You need these skills for writing recognition and for activating
programs, menus, or other Tablet PC functions.
• The Pen can be held like any other writing tool. Learn how to hold it and
when and how to press the Pen function button, which activates rightclick functions.
For other hints about using the Pen, see the section “Using the Pen” in
Chapter 4 of this User Guide.
Motion Computing Tablet PC User Guide 8
Page 12
Chapter 1 Getting Started with Your Motion Tablet PC
Play Inkball
Practice your Digitizer Pen skills on this game, which is
activated from Start, All Programs, Games, Inkball.
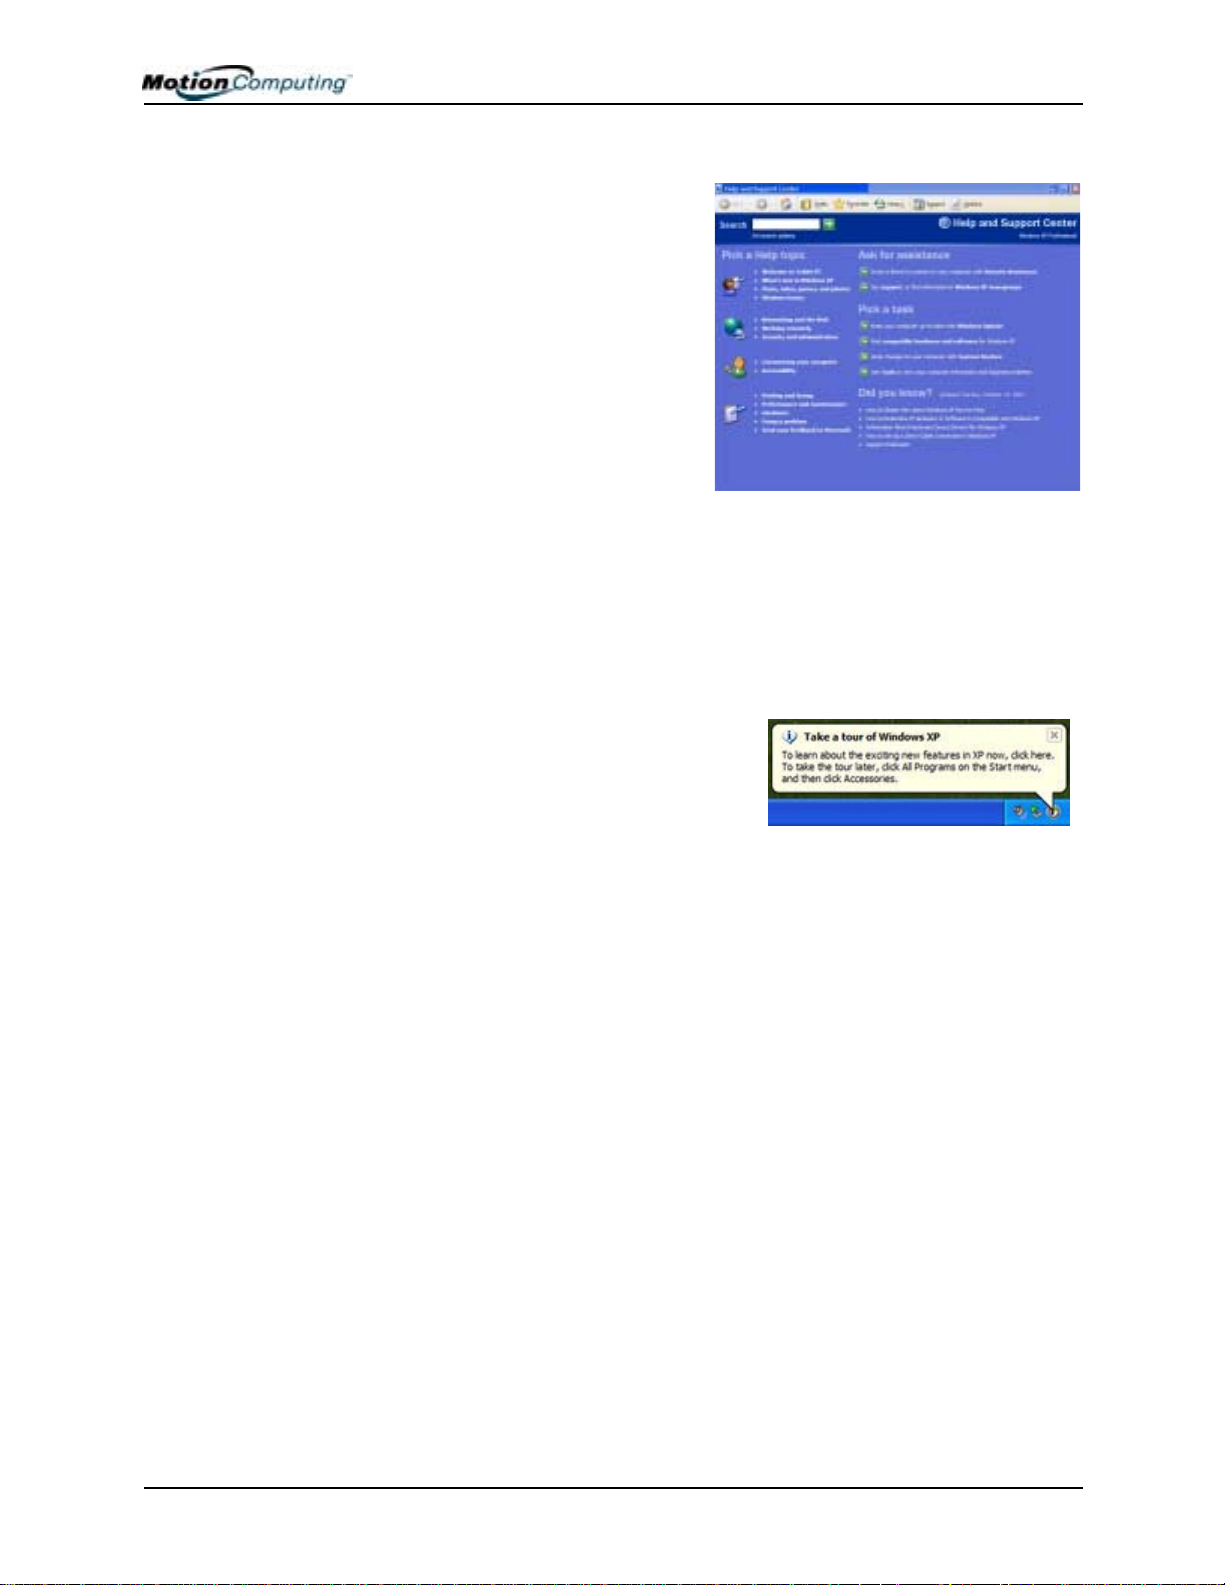
Take the Tutorials
When you start your Tablet PC,
several Tutorials are offered to help
you learn about its various functions,
such as the Windows Journal, Tablet
PC Input Panel, and Speech
recognition.
The Tutorials are short, quick, and
informative and we highly
recommend them as a starting place
to begin a successful Tablet PC
experience.
NOTE: Microsoft Windows XP for Tablet PC offers several tutorials. One set appears
each time you start the Tablet PC (unless you deactivate this option). Others can be
found by selecting Start, Using Your Motion Tablet PC, or from Start, Get Going with
Tablet PC.
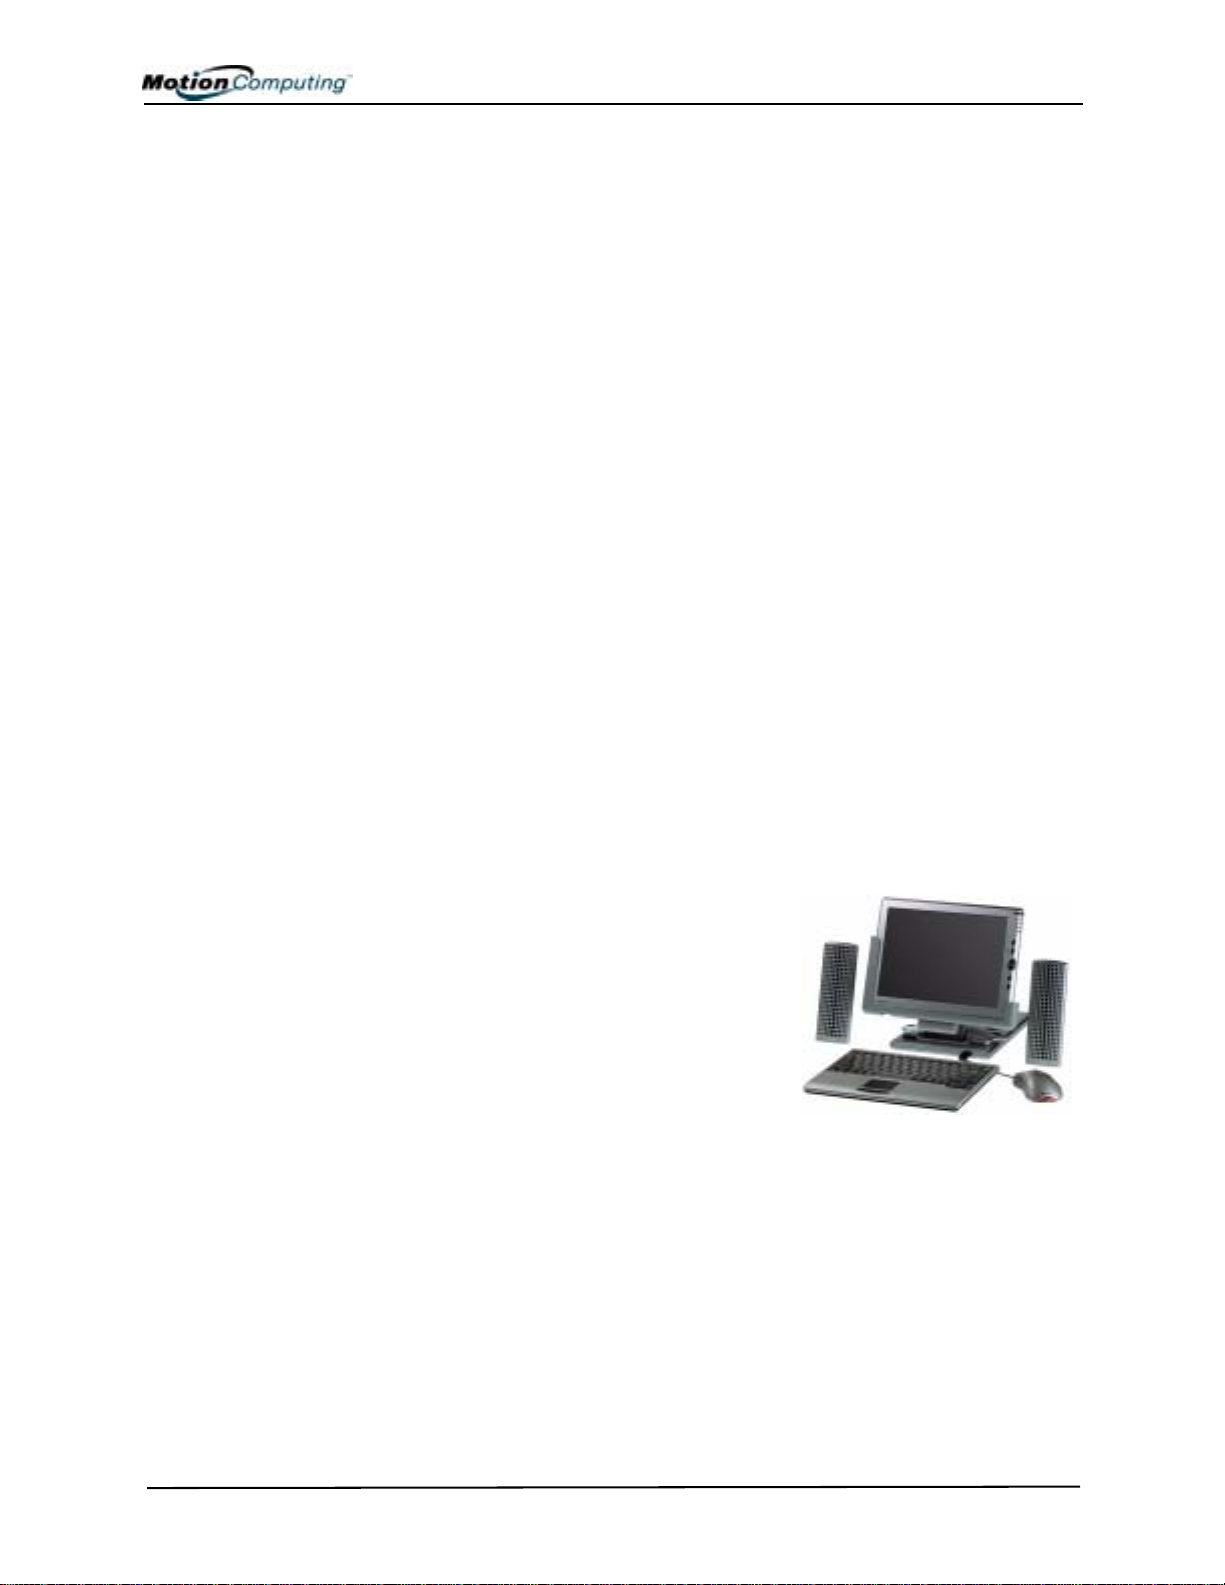
Motion Resources Page and Online User Guide
The link to the Motion Tablet PC
User Guide is provided on the
Using Your Motion Tablet PC
page, shown here. In addition to
this link, other instructions for
using the Pen, Dashboard, and
other applications are included
there.
Motion Computing Tablet PC User Guide 9
Page 13
Chapter 1 Getting Started with Your Motion Tablet PC
Microsoft Help and Resources Center Page
You can find additional information
about your Tablet PC and the
Microsoft Windows XP operating
system in the Microsoft Help and
Support Center. The Help and
Support Center is installed on your
Tablet PC. To access Help, select
Start, then Help and Support.
Did You Know Section
Whenever you open the Help and
Support Center while your Tablet PC is connected to the Internet, the “Did
You Know” section checks for updates from Microsoft and Motion
Computing, such as system-use hints, or notices from Motion Computing
about your Tablet PC.
Take a Tour of Windows XP
If this is your first experience with the
Windows XP operating system, this tour
is a good introduction. You can find this
by selecting Start, then Windows Help
and Support Center, and finally What’s
New in Windows XP.
Motion Computing Tablet PC User Guide 10
Page 14
Chapter 2 Motion Tablet PC Hardware
TABLET PC DISPLAY AND WRITING SURFACES
Chapter
2
Motion Tablet PC Hardware
This chapter describes the Motion Tablet PC, including components, LEDs,
hardware, and accessories.
All Motion Computing Tablet PC displays and writing surfaces combine
three key components:
• A highly-readable, liquidcrystal display
• An acrylic protective layer that provides
a hard writing surface, minimizes glare,
and improves viewability
• Under the display, a digitizer panel that
allows on-screen keyboard data entry,
plus hand-written entry with a speciallydesigned Digitizer Pen
The Motion Tablet PC display, unlike touchscreens and personal digital
assistants (PDAs), responds to the Motion Digitizer Pen, but not to a PDA
stylus or to finger taps.
You can steady your hand on the display surface when you write. The
pressure of your hand won’t affect any open programs or data input.
NOTE: For more information about the care and maintenance of the Tablet PC
display and writing surface, see Chapter 4 of this User Guide.
Motion Computing Tablet PC User Guide 11
Page 15
Chapter 2 Motion Tablet PC Hardware
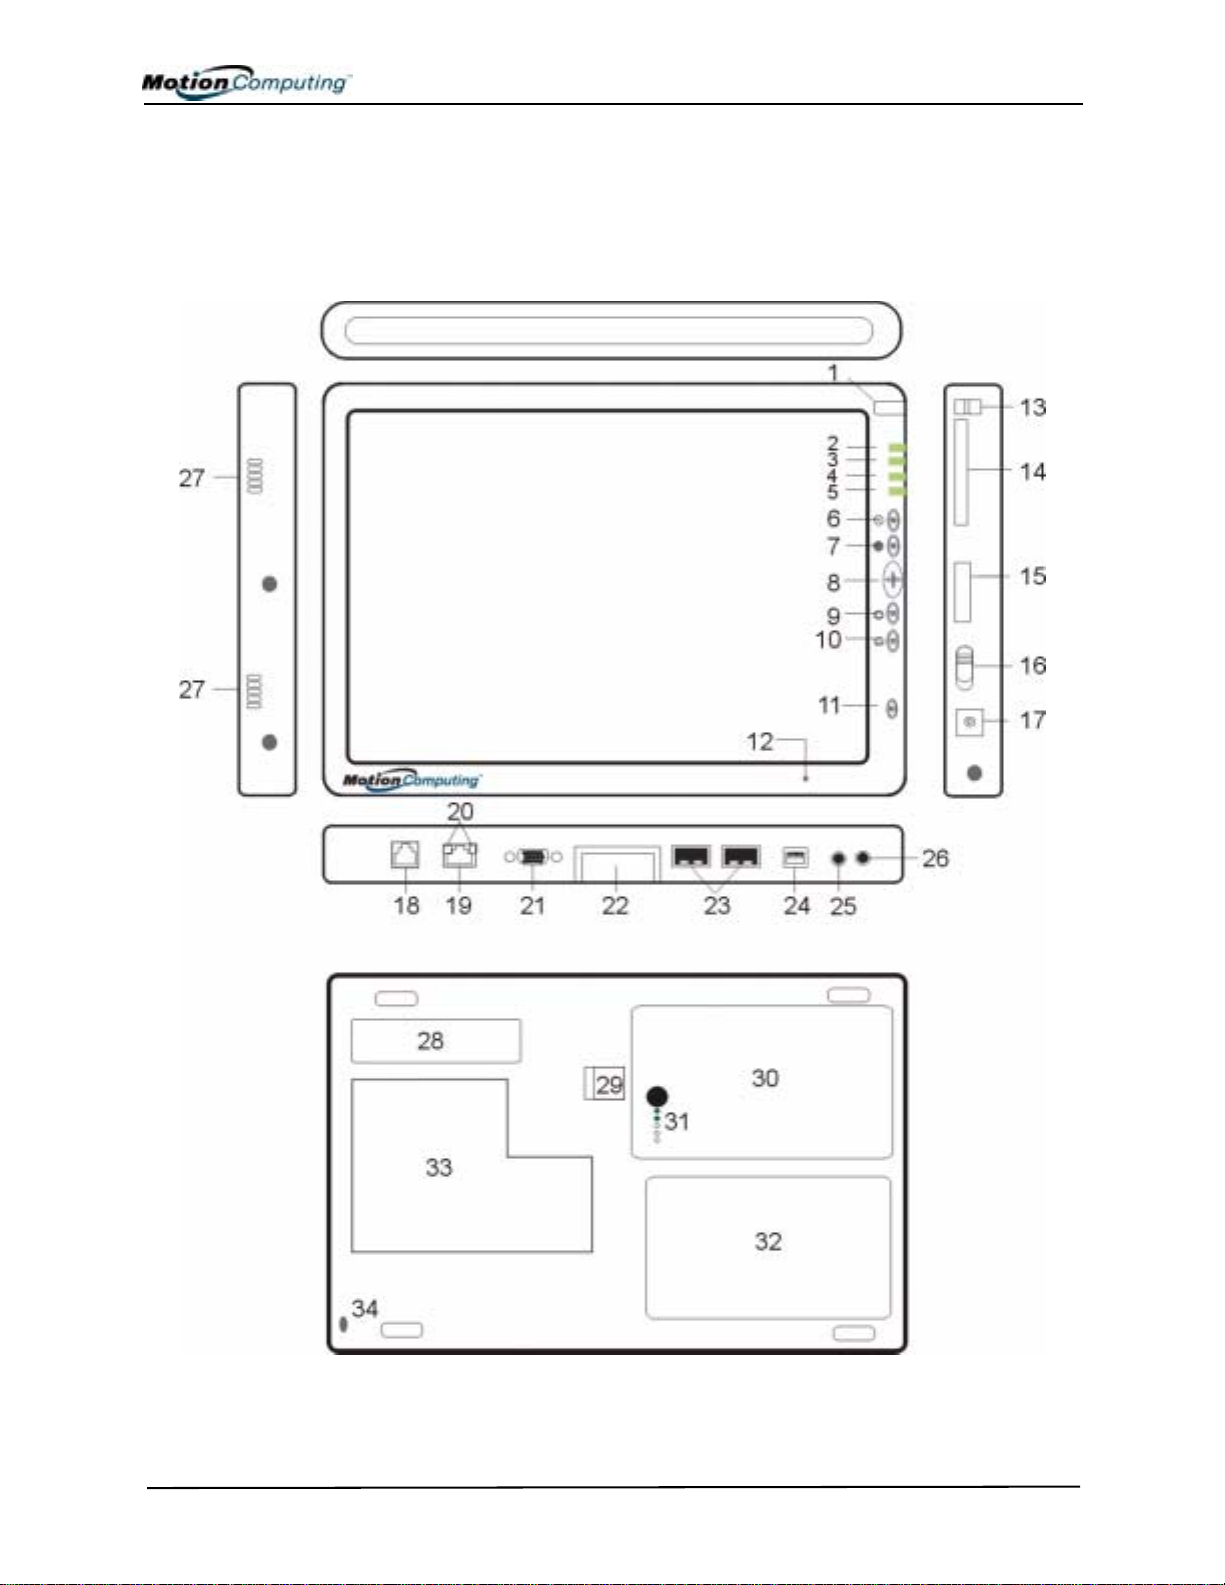
OVERVIEW OF
THE DISPLAY
The following diagram shows the LEDs, buttons, connectors, and other
components on the Tablet PC.
Motion Computing Tablet PC User Guide 12
Page 16

Chapter 2 Motion Tablet PC Hardware
Table 2-1 Tablet PC LEDs, Buttons, Connectors, and Other Components
1 Pen holder Storage bay for the Motion Digitizer Pen
2 Power LED Displays power status
3 Battery LED Displays battery status
4 Hard Disk Drive LED Displays Hard Disk Drive (HDD) activity
5 Wireless LED Displays wireless activity and on/off status
6 Escape button Primary function (not programmable): Esc. Secondary function (programmable): Alt+Tab
7 Function button Press this Function button + another button to activate Secondary functions
8 Five-way directional
control button
9 Hot Key #1 Primary function (programmable): Displays the Motion Dashboard
10 Hot Key #2 Primary function (programmable): Changes the Tablet PC display orientation
11 Security button Primary function: Ctrl-Alt-Del; Secondary function: None
12 Microphone Works at a natural distance; disabled when an external microphone is plugged in
13 Pen tether post Post to which you can secure th e Pen by means of a plastic loop
14 PC card slot Holds one Type-II PC card for networking, memory expansion or accessory connections.
15 Antenna cover 802.11 wireless networking antenna cover; this area does not open
16 Power switch Turns the Tablet PC on and off; can configure to activate Hibernate or Stand By modes
17 AC power jack Connects to the Motion AC Adapter through a right-angled connector on the Adapter. Use
18 RJ-11 modem port Connector for a 56.6K V.90 modem
19 RJ-45/LAN Standard RJ-45 connector for a 10/100 Mbps network
20 RJ-45 LEDs (2) Display LAN connection status; blink green/amber for a connection
21 VGA connector A standard DB-15 monitor connector for an external monitor
22 Docking connector Docks with the Motion FlexDock
23 USB ports (2) Stands for Universal Serial Bus; a port connect for connecting USB devices, such as a
24 IEEE 1394 port Connects 4-pin accessories, such as DVD players, optical disc drives, video cameras and
25 Audio-in/Microphone Input jack for 3.5mm plug for a microphone
26 Audio-out/Headphone Input jack for a 3.5mm plug for a headset; mutes the built-in speakers
27 Speakers (2) Integrated speakers that mute when you connect a headset or external speakers
28 Product identification Serial numbers and system certifications marks and labels
29 Battery release latch Latch that releases the battery from the battery bay
30 Battery Self-monitoring battery tracks the amount of charge
31 Battery gauge Displays the battery’s charge
32 Hard drive bay Bay that houses the HDD; 20GB HDD memory (standard); optional 40GB and 60GB
33 Memory/mini-PCI
access
34 Security lock slot Fits a cable lock for securing the unit to a desk, etc.
Primary functions (not programmable): Scrol ls Up/D ow n /R i g ht/Left + Enter
Secondary functions (programmable): Left arrow—Shift+Tab; Right arrow—Tab; Up
arrow—Page Up; Down arrow—Page Down
Secondary function (programmable): Opens the Microsoft Windows Journal
Secondary function (programmable): Opens the Tablet PC Input Panel.
A plastic blank ships in this slot in the Tablet PC; leave this installed when not in use.
only a Motion AC Adapter with the Tablet PC.
mouse, printer, or digital camera
other electronics
capacity
Bay that houses the memory modules and mini-PCI card; 256MB memory (standard),
upgradeable to 1GB
Motion Computing Tablet PC User Guide 13
Page 17
Chapter 2 Motion Tablet PC Hardware
CHASSIS AND HARDTOP COVER
The Motion Tablet PC chassis are constructed of magnesium alloy, which is
lightweight, durable, and easy to maintain. The Motion Hardtop Cover is
molded of a tough plastic. It snaps over the display, to protect it when the
Tablet PC is not in use or snaps onto the bottom of the Tablet PC for
convenient storage.
PEN The Motion Digitizer Pen is a sensitive, electronic data-entry device
designed in conjunction with the Tablet PC display. It contains no batteries
and requires no external power. To help prevent Pen loss attach it to the
built-in pen tether post on the chassis.
NOTE: For best results, we recommend that you calibrate your Pen before using
it for the first time. For information about this and other Pen procedures, see
Chapter 4 of this User Guide.
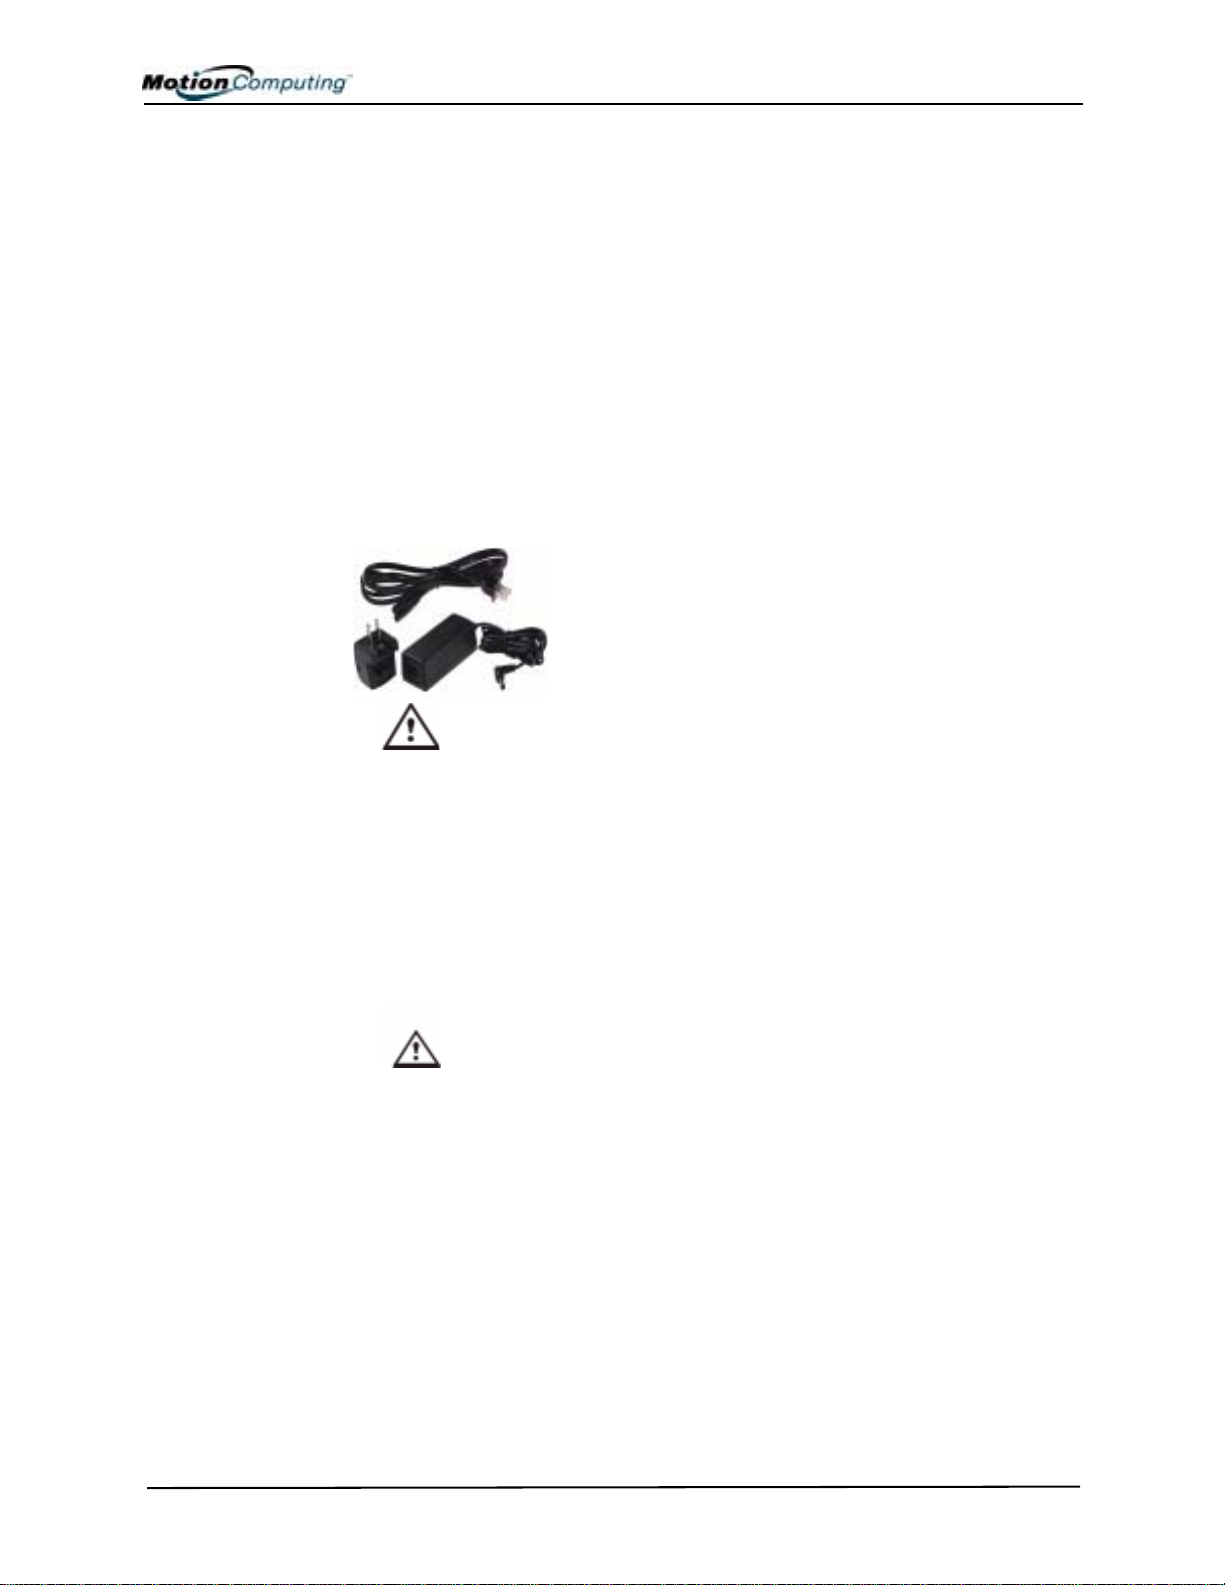
MOTION AC ADAPTER
The Motion AC Adapter has three components:
•AC power adapter (with a right-angled connector)
•Power cord
•AC mini-plug with folding prongs for travel
CAUTION: Use the appropriate AC Adapter with your
Motion Tablet PC. This adapter should not be used to power any other
electronic devices. If you do so, you may damage the accessory or
other device.
MOTION BATTERIES
A standard configuration Motion Tablet PC ships with a 6-cell Lithium-ion
battery in the battery bay. Fully charged, a new 6-cell battery can power the
Tablet PC for 3-4 hours, depending on operating conditions.
Extra batteries are available from Motion Computing. Use only Motion
Lithium-ion batteries in your Motion Tablet PC.
WARNING: To avoid personal injury, handle the battery with care. Do
not open, puncture, short, or expose it to fire or water. Keep the battery
in an ambient temperature of less than 140° F (60° C); for example,
don’t leave it in a closed car in hot weather for extended periods of time.
NOTE: For more information about the battery LEDs, see the section “Battery
Status LEDs” in this chapter; and for more information about battery care, see
Chapter 4 of this User Guide.
Motion Computing Tablet PC User Guide 14
Page 18

Chapter 2 Motion Tablet PC Hardware
FRONT PANEL BUTTONS
The front panel of the Motion Tablet PC contains six buttons, shown in
T able 2-2. Most of these buttons have both primary and secondary functions.
In addition, some may be re-programmed for other functions.
Table 2-2
Default Button Functions
Button Primary Function
Escape
Function
Five-way
Directional Control
Button
Hot Key #1
Hot Key #2
Security
2
3
2
1 & 2
1 & 2
3
Same as keyboard Esc key Equivalent to Alt + Tab
Function + other button
activates secondary function
Works like the arrow keys
on a keyboard. The center
of the button works like the
Enter key.
Opens the Motion Dashboard. Opens the Windows Journal.
Rotates the display. Opens the Tablet PC Input Panel.
Opens the Windows Task
Manager (Ctrl + Alt + Del). Also
used for domain authentication
or logon screen.
Secondary Function
(Press Function + this button)
None
Left arrow = Shift+Tab
Right arrow = Tab
Up arrow = Page Up
Down arrow = Page Down
None
MODEM
AND LAN
CONNECTORS
NOTE: 1Primary function programmable. 2Secondary function programmable.
3
Not programmable. For information about programming buttons, see Chapter 4.
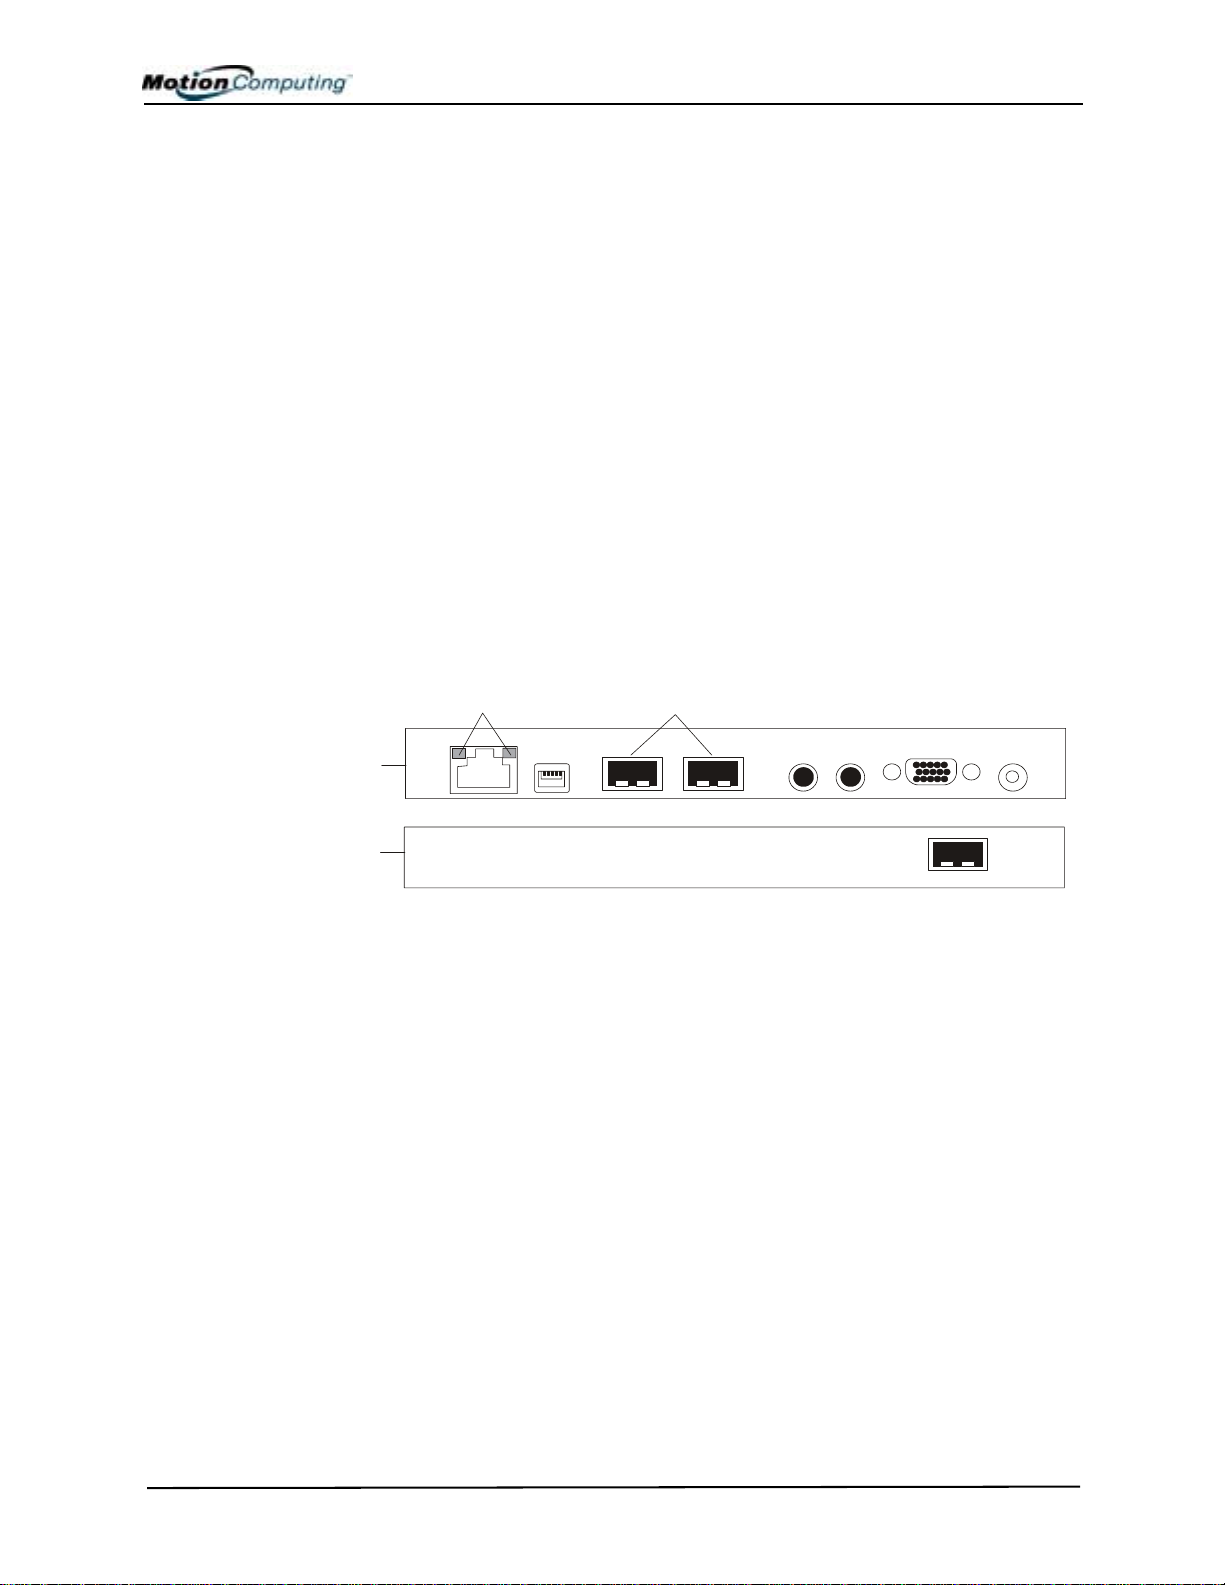
The Motion Tablet PC modem and LAN (network connection)
communication ports are found on the connector edge, as shown below.
1
2
3
Modem and LAN Connectors: (1) RJ-45 LEDs; (2) RJ-11
Modem; (3) RJ-45 LAN
NOTE: The Motion FlexDock has no built-in modem port. When using a
FlexDock, you must connect to the modem port on the Tablet PCs through the
FlexDock opening designed for this purpose.
• Modem (RJ-11 port) — Built-in, V.90 modem that operates at a
maximum of 56.6K throughput and has fax capabilities; port supports
a standard phone cord connector; connect the modem only to an
analog telephone jack, not to a digital telephone (PBX) network jack
• Ethernet LAN (RJ-45) — Connects a network, cable modem, or
xDSL; contains two status LEDs
CAUTION: Do not plug a standard RJ-11 phone cord into the RJ-45
port or you may damage the RJ-45 LAN port.
Motion Computing Tablet PC User Guide 15
Page 19
Chapter 2 Motion Tablet PC Hardware
TABLET PC CHASSIS LEDS
The T ablet PC front panel (shown in the diagram) and the battery case on the
bottom of the unit contain status LEDs, described here.
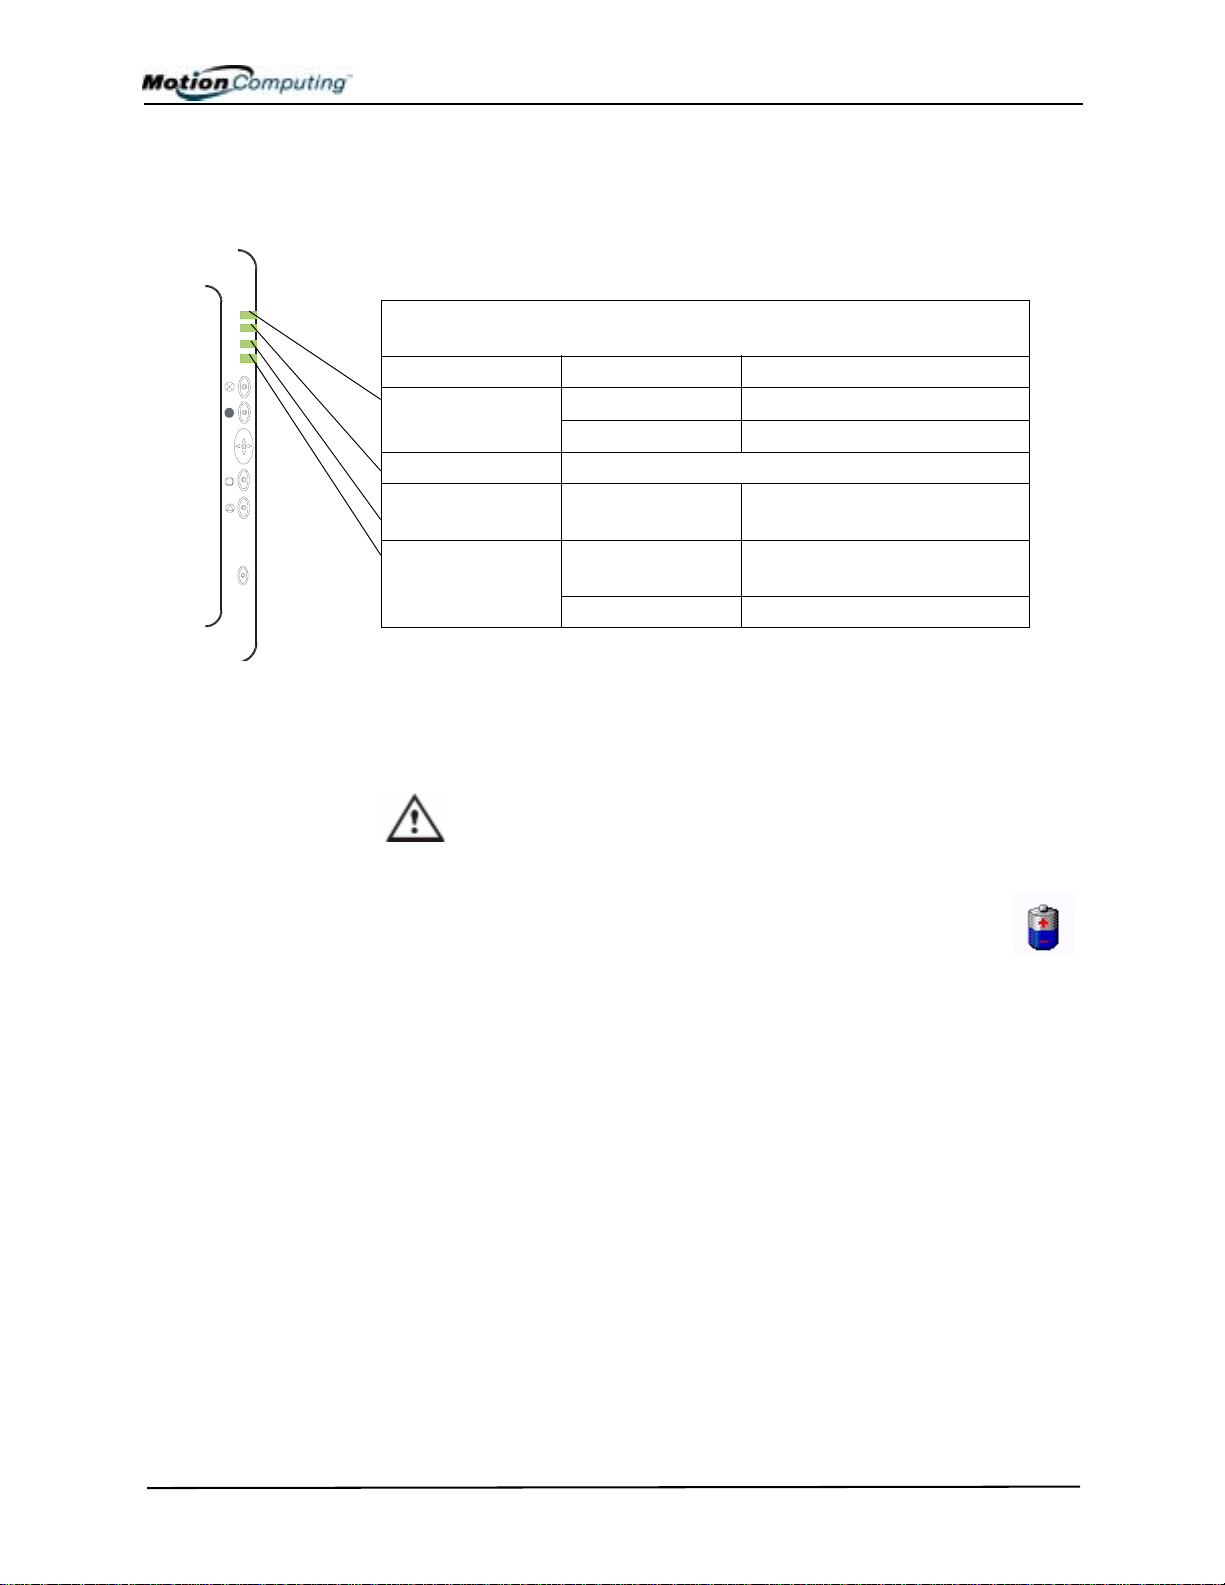
Tablet PC Front Panel LEDs
The Motion Tablet PC has four front-panel status LEDs:
Table 2-3
Front Panel Status LEDs
LED Description Status
Power/Stand By Steady green Tablet PC is on.
Flashing green Tablet PC is in Stand By.
Battery Status See Table 2-4.
Hard Disk Drive
(HDD)
Wireless Activity Steady or flash-
Flashing/On The Tablet PC HDD is being
read or written to.
Wireless is on.
ing green
Off Wireless is off.
Battery Status LEDs
The Motion Tablet PCs are equipped with a “smart” battery that can
communicate messages about power status. Some messages are
informational only, while others require attention, as described in Table 2-4.
CAUTION: To avoid personal injury, if the battery is overheated, wait
until the battery cools to room temperature before recharging or
replacing it.
NOTE: If the unit operatingis on battery power, you can move the Pen
over the Power/Battery icon, shown here, (in the System Tray at the
lower-right corner of the Tablet PC display) to see the number of hours
of charge and the percentage of battery charge remaining.
Motion Computing Tablet PC User Guide 16
Page 20
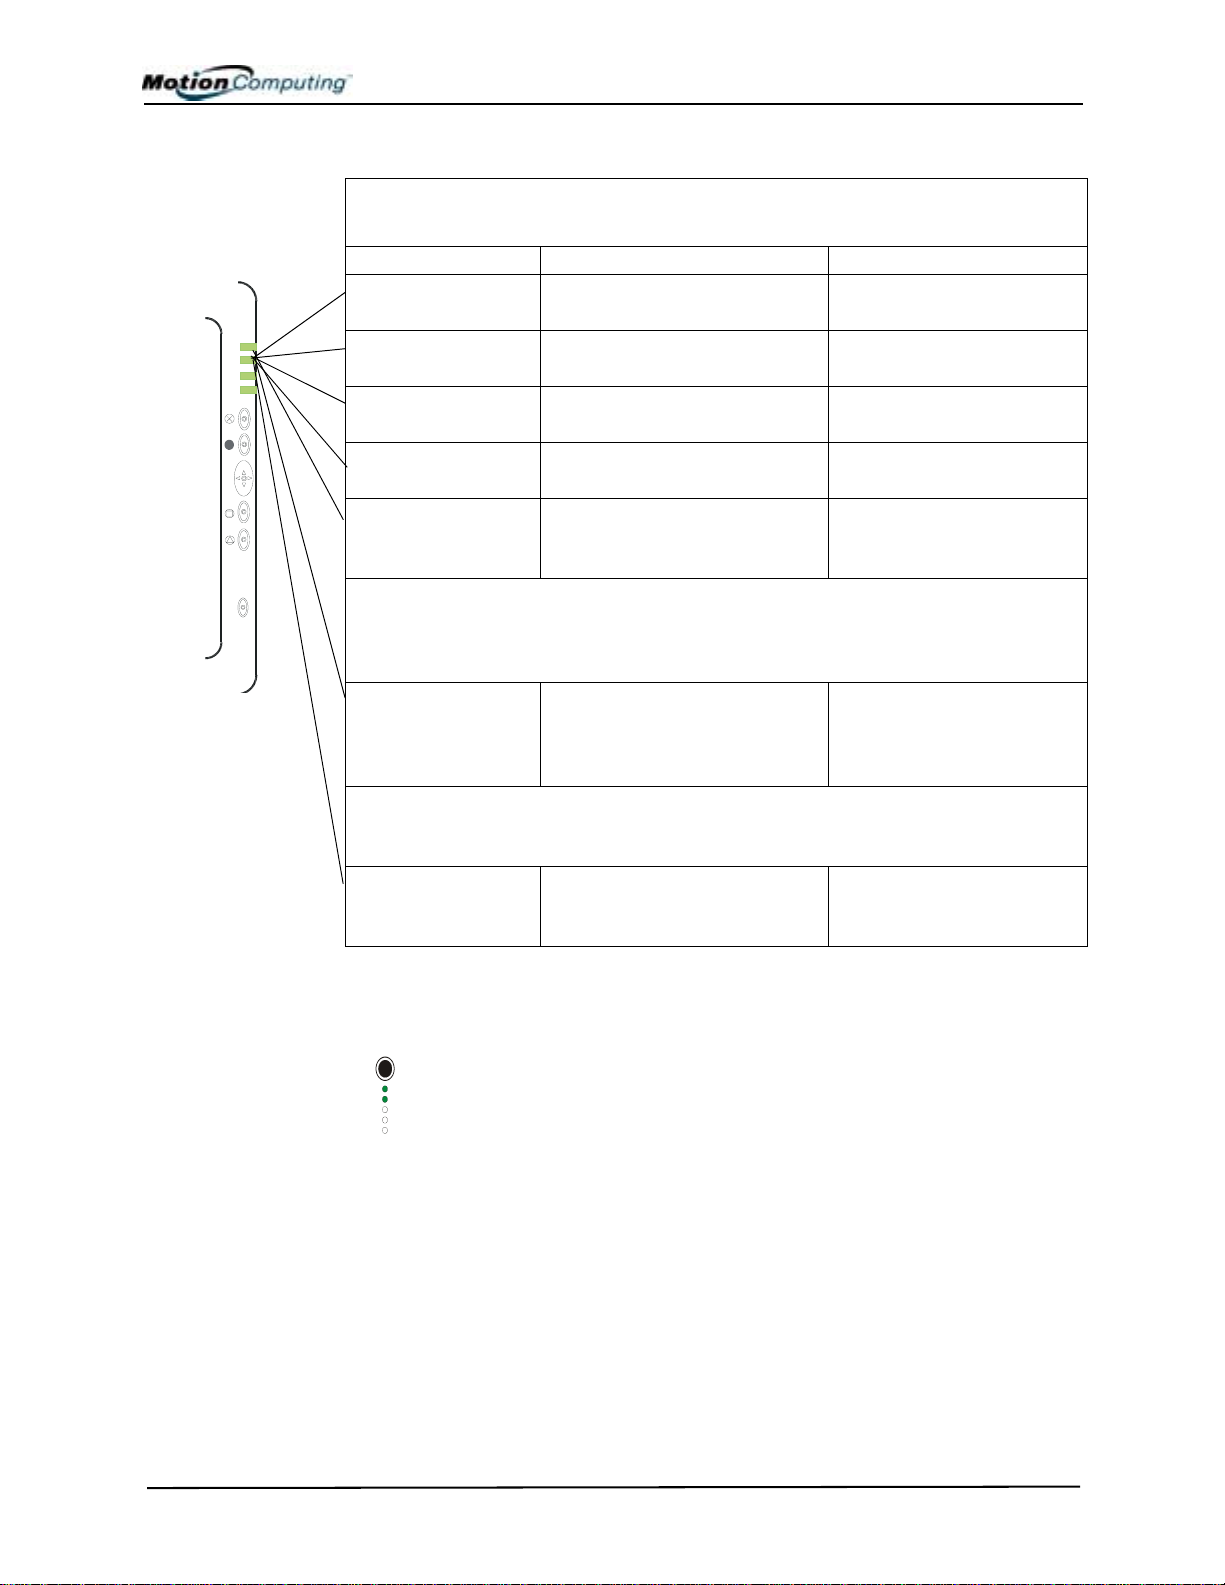
Chapter 2 Motion Tablet PC Hardware
Table 2-4
Front Panel Battery Status LED
LED Battery Status Action
Steady green Battery 100% charged
(AC plugged in)
Steady amber Battery charging
(AC plugged in)
Steady red Battery overheated or defective Wait for the battery to cool.
Flashing green and
amber
Slow-flashing amber 10% battery charge remaining
NOTE: When the remaining battery charge is 10%, the Tablet PCs issue a Low
Battery alarm message in addition to the LED warning. For information about
modifying this alarm (you can set it to display a message or to produce an audible
warning), see Chapter 4 of this User Guide.
Fast-flashing amber
(for only a few
seconds)
NOTE: Hibernate mode attempts to save data in any open programs to your Hard
Disk Drive. When you restart the Tablet PC, it returns to the same system status as
before hibernation.
Off Tablet PC is unplugged from
Battery discharging abnormally Replace the battery.
(AC unplugged).
3% battery charge remaining
(AC unplugged)
AC power and the system is
running on battery power.
None
None
Replace the battery.
Immediately charge the
battery to avoid loss of data.
The Tablet PCs issue a
Critical Battery alarm and
automatically goes into
Hibernate mode.
Plug the Tablet PC into AC
power if you want to
preserve battery power.
Battery Status Gauge
A five-LED battery gauge is located on the battery on the bottom of
the Tablet PCs. Each LED represents about 20% of available power.
You can activate the gauge by pushing the black button next to the
LEDs.
In the example shown here, two LEDs are lit, which means the
battery has about 40% of its power remaining.
Motion Computing Tablet PC User Guide 17
Page 21
Chapter 2 Motion Tablet PC Hardware
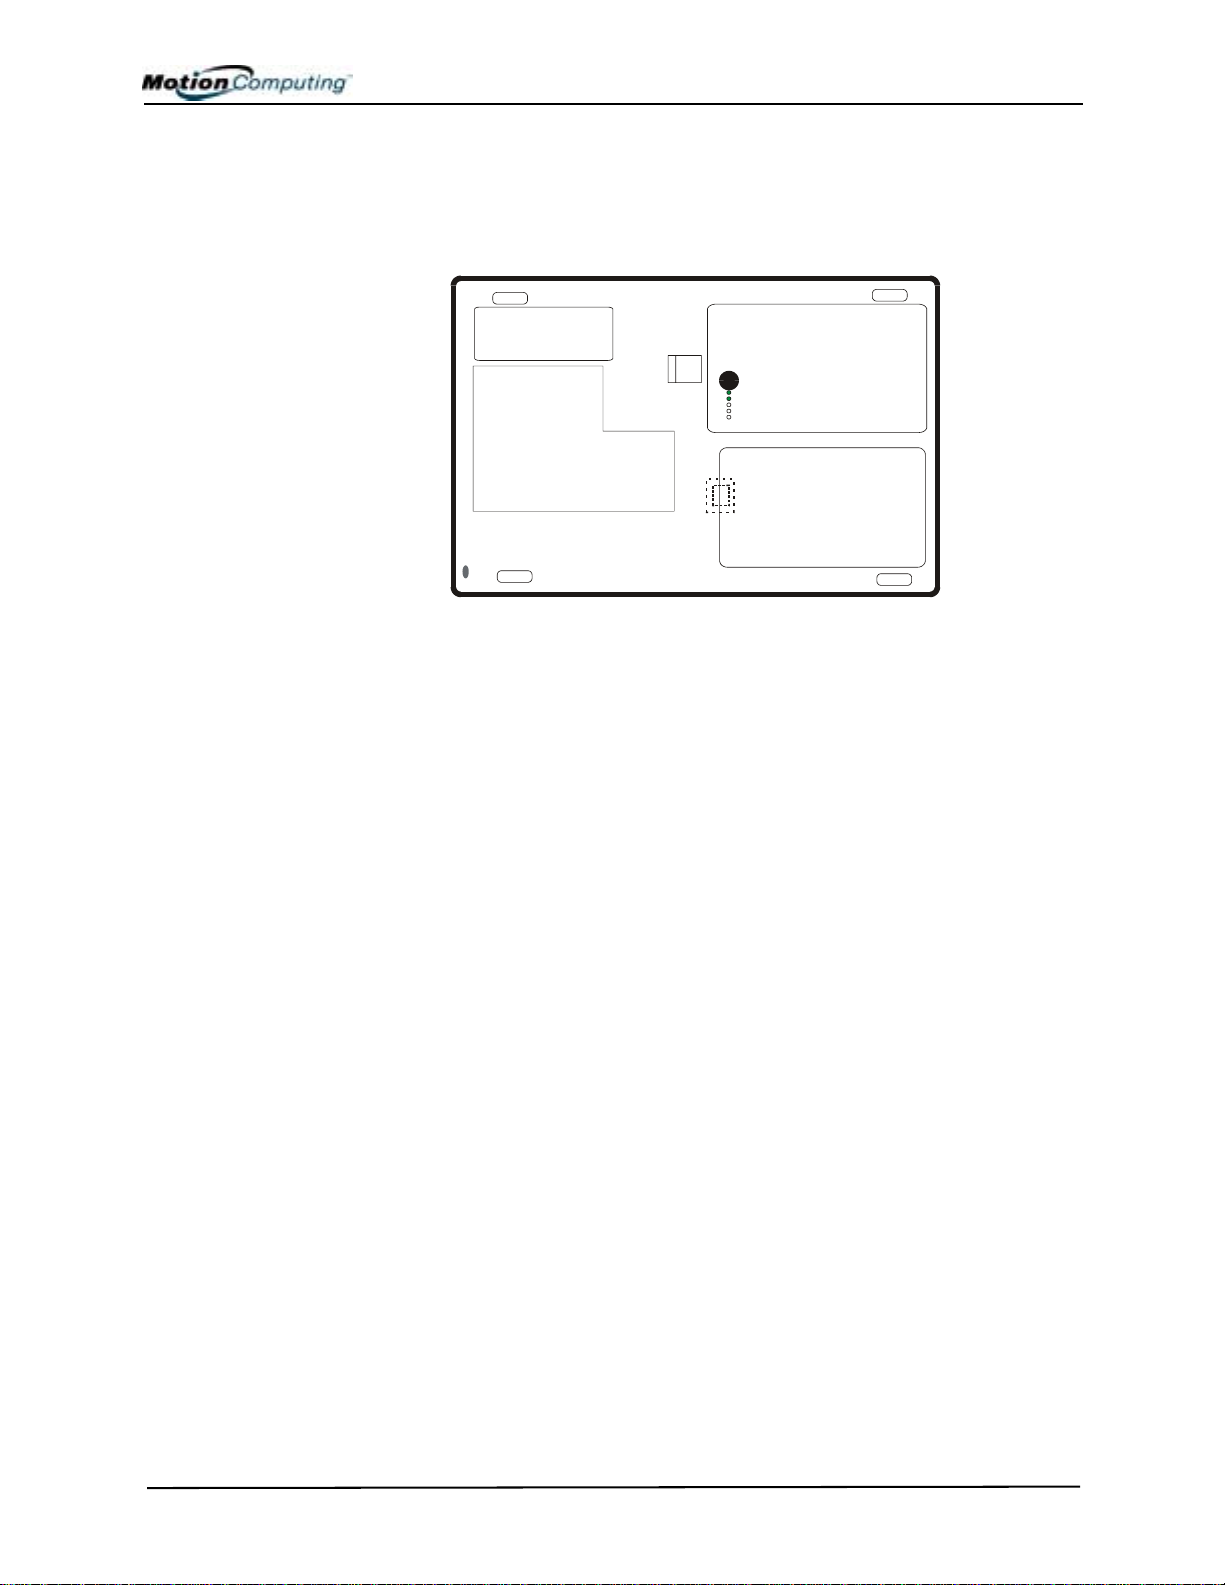
LABELS Most Tablet PC identification and system labels are on the bottom of the
unit. These include serial and model numbers as well as regulatory and
approval labels. Some internal components, such as the modem, also contain
their own approval labels.
1
2
Motion T able t PC Label Locations: ( 1) Produ ct Identificat ion, System Labels;
(2) Internal Modem with Label; (3) Hard Disk Drive Cover
3
Motion Computing Tablet PC User Guide 18
Page 22
Chapter 2 Motion Tablet PC Hardware
ACCESSORIES You can order the following accessories from the Motion Computing
website at www.motioncomputing.com/accessories.
NOTE: You can order the Motion FlexDock, batteries, and Digitizer Pens from
Motion Computing.
Motion Desktop Stand
The Motion Desktop Stand is an easel-like device that holds the Tablet PC in
portrait or landscape modes. You can open the Desktop Stand to different
widths to change the display angle: the wider you open the stand, the less the
Tablet PCs will tilt back.
Some connectors may be inconveniently located when the Tablet PC is in
the Desktop Stand. If you regularly connect several accessories to your
Tablet PC, consider buying a Motion FlexDock.
Motion FlexDock
The Motion FlexDock is a desktop docking station that provides a
convenient interface for the Tablet PC. Its components are shown below:
3
4
5
6
78
109
1
2
Motion FlexDock: (1) Back of FlexDock; (2) Front of FlexDock; (3) RJ-45/Ethernet;
(4) RJ-45 LEDs; (5) IEEE 1394; (6) USB; (7) Audio-in/Microphone Jack; (8) Audioout/Headphone Jack; (9) External Monitor; (10) Power Jack; (11) USB
• Easily docks and undocks with the Tablet PC
• Adjusts to support the display from 0o- 90o for viewing and writing
• Automatically adjusts the display when you rotate the Tablet PC 90o
between Primary Landscape and Primary Portrait
• “Grab-and-Go” capability lets you safely remove the Tablet PC from
the FlexDock without turning the system off or putting it in
Stand By mode
NOTE: For more information about installing the FlexDock, see Chapter 4 of this
User Guide or the Installation Guide packaged with the FlexDock.
11
Motion Computing Tablet PC User Guide 19
Page 23
Chapter 2 Motion Tablet PC Hardware
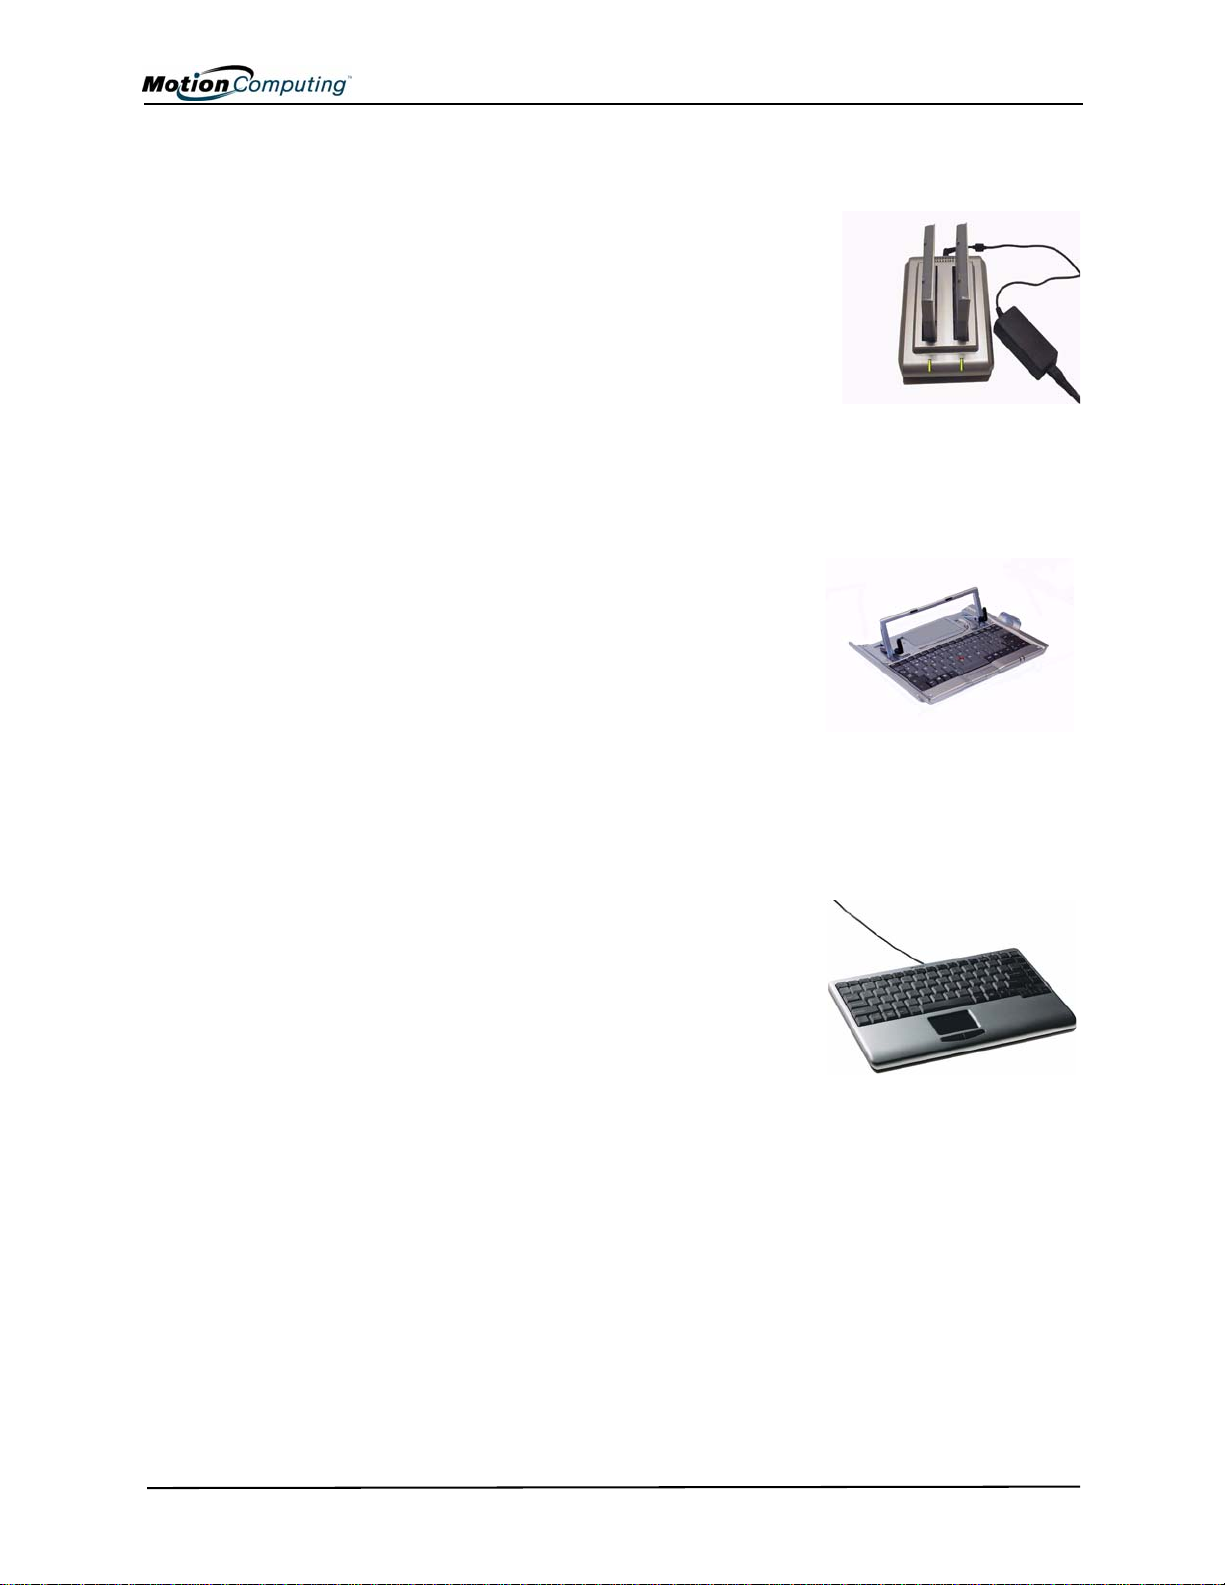
Motion Multi-Unit Battery Charger
The Multi-Unit Battery Charger provides a quick
and convenient way to recharge a 3- or 6-cell
battery independent of your Tablet PC. It contains
two charge bays with status LEDs on each bay
and can simultaneously charge two batteries. It
can recharge the 3-cell battery to 95% capacity in
1-3/4 hours and the 6-cell battery in 2-1/2 hours; it
resumes charging automatically if power is
interrupted. For further information about operation of the Battery Charger,
see the documentation packaged with the unit. For Battery Charger
specifications, see Appendix D of this User Guide.
Motion Hardtop Keyboard
The Motion Hardtop Keyboard combines the
functions of a keyboard, stand, and display
cover into a single product. It features an
integrated USB cable that plugs into the Tablet
PC, an integrated pointing device, mouse
buttons, and a display angle adjuster. The
Hardtop Keyboard is powered directly through
the USB cable. The Hardtop Keyboard also snaps onto the bottom of the
Tablet PC for convenient storage or onto the top to protect the display.
Motion Mobile Keyboard with Touch Pad
The Motion Mobile Keyboard with Touch Pad
plugs into any USB port on the Tablet PC or
into the Motion FlexDock. The Keyboard
features an integrated touch pad and compact
size, making it perfect for tight work spaces or
travel.
IMPORTANT: The first time you start your Tablet
PC, you may be required to connect a standard
USB keyboard to complete the initialization of the Windows XP operating
system. For the steps in this procedure, see Chapter 4 of this User Guide.
Motion Computing Tablet PC User Guide 20
Page 24

Chapter 2 Motion Tablet PC Hardware
The Touch Pad on the keyboard has a
scroll zone (1) similar to the scroll bar
along the side of a window.
• Scrolling — Drag your finger
up, to scroll up; or down, to
scroll down through a document
• Deleting text — Align the cursor
over the text you want to select,
tap the Entry bar (2) with your finger to place the cursor in the text (the
cursor will begin to blink). Tap again to select a single word; doubletap to select a whole line. Select Delete from the keyboard. (Or, tap the
right entry bar, which opens a drop down menu. Select Cut.)
Motion Hardtop Cover, Portfolios, and Cases
• The Motion Hardtop Cover is molded of a tough plastic. When snapped
over the display, it protects the display when it is not in use. It can also
be snapped onto the bottom of the Tablet PC for convenient storage.
• The Motion Portfolio is a lightweight cover with a hand strap for a
secure hold, plus a shoulder strap and two pen holders.
• The Motion Executive Portfolio is made of high-quality materials with a
shoulder strap and foldover cover. It features a sleeve for papers, a business card holder, and pen holder. Snap-in retention clips make it easy to
insert and remove the Tablet PC.
• The Motion Slip Case has a clear cover to protect the display, zippered
access to side ports, and a hand strap on the back.
• The Clamshell Portfolio has a flip-out stand, pockets, carrying handles,
and a shoulder strap and was designed for use with a mobile keyboard.
• The Rubber Edge Protector fits around the edge of the Tablet PC to provide extra edge cushioning and to protect the port connections.
1
2
For information about the latest portfolios and cases, visit the Motion
Computing website at www.motioncomputing.com.
Motion Optical Disc Drives
Motion offers CDROM and DVD/CDRW combo drives. Depending on
which you purchase, these drives offer CDROM, CDRW, or DVD
capabilities.
For information about installing these Drives, see the documentation
packaged with each Drive. For general information about Optical Disc Drive
software, see Chapter 4 of this User Guide.
256MB and 512MB Memory Upgrade Modules
Additional memory modules improve the performance of your Tablet PC.
You can add up to 1GB of memory in your Tablet PC.
Motion Computing Tablet PC User Guide 21
Page 25

Chapter 2 Motion Tablet PC Hardware
NOTE: For information about installing additional
memory upgrade modules, see Chapter 4 of this User
Guide or the Installation Guide packaged with
the memory module.
PC Card Slot
The PC card slot, located on the Power Switch edge of the Tablet PC, holds
one Type-II PC Card for networking, memory expansion, or accessory
connection.
1. To install the PC card, insert it label-side up.
2. To remove the PC card, push the button next to the slot until it
pops out
3. Push it again to eject the card.
NOTE: Both Tablet PC models ship with a plastic blank in the PC Card slot.
When the slot isn’t in use, we recommend that you leave the plastic blank
in place.
Mini PCI Card (Wireless)
Both T ablet PC models accept a mini-PCI card for wireless communications.
Motion Computing Tablet PC User Guide 22
Page 26

Chapter 3 Motion Tablet PC Software
Chapter
3
Motion Tablet PC Software
Pre-loaded on Motion Computing Tablet PCs is the Windows XP Tablet PC
Edition operating system plus additional software applications, drivers, and
utilities. These help you personalize and make the most of your Tablet PC
and its features. This chapter describes some of the CDs, software,
applications, and software features available for your Tablet PC.
NOTE: For additional information about Tablet PC software applications, from
Start, tap Using Your Motion Tablet PC, Explore the Tablet PC applications.
SOFTWARE CDS
Depending on which Motion Tablet PC and software configuration you
order, you may receive the following CDs:
• Motion M1200: Two Motion System Recovery CDs; Motion Utilities
and Drivers CD; Motion Application CD (Optional)
• Motion M1300: Motion Operating System Recovery CD; Motion
Utilities and Drivers Recovery CD; Motion Application CD (Optional)
IMPORTANT: For additional information about initial installation of software on
your Tablet PC, see the section “Installing Initialization Software” in Chapter 4 of
this User Guide.
Motion System Recovery CD(s): Description and Use
These CDs contain a complete re-install of the Windows XP Tablet PC
Edition operating system, all drivers, utilities, and applications.
They include Utilities and Drivers Readme.txt and System Recovery .txt files
with installation instructions. Use the System Recovery CDs when your
system is completely down and you must completely re-install. If possible,
back up your data files before running this procedure.
Motion Computing Tablet PC User Guide 23
Page 27

Chapter 3 Motion Tablet PC Software
Motion M1200 System Recovery Procedure -- Once initiated, this
procedure overwrites everything on your system with complete data loss.
1. If possible, back up your data files.
2. Turn off your Tablet PC.
3. Attach a USB keyboard.
4. Insert the Recovery CD-1 of 2 (Windows XP Professional Service
Pack 1 CD) into your CDROM drive.
5. Turn on the Tablet PC. The system should automatically begin
installing the operating system.
6. Follow the onscreen instructions for entering any information.
For the Motion M1300System Recovery Procedure -- In most cases, once
initiated, this procedure lets you repair the Tablet PC hard disk drive and
retain the original system data, applications, passwords, and settings with no
data loss. When no repair is possible, it overwrites your system data.
However, you can cancel before beginning the procedure.
1. If possible, back up your data files.
2. Turn off your Tablet PC.
3. Attach a USB keyboard.
4. Insert the Motion M1300 Operating System Recovery (Windows XP
Professional Service Pack 1) CD into the CD-ROM drive and start
the Tablet PC.
5. When prompted, quickly press any key to boot from the CD.
6. On the Setup screen, select ENTER to set up Windows XP.
NOTE: Do not select R=Repair before you execute the End User License
Agreement (EULA). If you do, you need to exit this procedure, shut down and
restart your Tablet PC, and read/accept the EULA before proceeding.
7. Press F8 to accept the terms of the End User License Agreement.
8. When the next options appear, select from the following:
IMPORTANT: In those cases where Windows XP cannot repair your installation,
the procedure automatically skips to the reformatting option.
• R=Repair option -- Installs Windows XP Tablet PC Edition on your
system, preserving your system data, applications, passwords,
and settings
• ESC=Don't Repair (reformatting) option -- Reformats your hard
disk drive. If Windows XP automatically skips to this option (that is,
no repair is possible), you either reformat now or cancel the procedure. If you choose to reformat, select either Format the partition
using the NTFS File System or the NTFS File System (Quick). If
you choose not to reformat, select ESC to cancel the procedure.
9. Continue following the onscreen instructions.
10.After your operating system has been reinstalled, you will be
prompted to insert the Motion Utilities and Drivers Recovery CD.
Motion Computing Tablet PC User Guide 24
Page 28

Chapter 3 Motion Tablet PC Software
a. For a repaired system, this process is quick and your system will
automatically reboot. If you receive a VirtualDrive error message,
you may need to re-install the FarStone’s VirtualDrive application
(described below).
b. For a reformatted system, this process takes some time as the
drivers and utilities are reinstalled. Don’t interrupt this process.
When the reformatting is complete, your system will automatically
reboot. At that point, you need to install any additional software
(such as Microsoft Office), as appropriate. You may also want to
restore your personal preferences and settings.
Reinstalling the VirtualDrive Application (Optional)
If you previously had the VirtualDrive application installed on
your Tablet PC and you get VirtualDrive error messages, perform
these steps to reinstall the application.
1.Go to Control Panel, Add/Remove Programs, and uninstall the
VirtualDrive application. You will be prompted to reboot your
system.
2.Insert the Motion Utilities and Drivers Recovery CD.
3.Go to Start, Run and type in "d:/vdrive/vdrive.bat" and press
enter.
4.Reinstall the Virtual Drive application from c:\windows\motion\virtualdrive\setup.exe or from the Motion Application CD.
Motion Utilities and Drivers CD
The Motion Utilities and Drivers CD contains installable drivers and
utilities. To install a specific driver or utility, open the Utilities and Drivers
Readme.txt file on the Motion CD and follow the instructions.
Motion Application CD
The Motion Application CD contains additional applications for the Motion
M1200 and M1300. Go to the Motion Computing website at
www.motioncomputing.com to see a list of Motion Computing software,
third-party applications to purchase, as well as free applications.
Motion Computing Tablet PC User Guide 25
Page 29

Chapter 3 Motion Tablet PC Software
MOTION APPLICATION SOFTWARE
Both T ablet PC models contain software applications to enhance your Tablet
PC, some available exclusively from Motion Computing.
Motion Dashboard
An exclusive Motion Computing
design for Motion Tablet PCs, the
Motion Dashboard makes many
operations easy to identify and puts
them in a single location for
convenient access.
To display the Motion Dashboard,
press Hot Key #1.
Motion Dashboard features:
Table 3-1
Motion Dashboard Features
Feature Description
Speaker
Volume
Display
Brightness
Display
Rotation
Calibrate Opens the interface to calibrate the Pen to the display
Properties Displays the Intel(R) Graphics Controller properties
External
Display
Power
Management
Wireless
Operation
Battery Displays the battery status.
Quick Keys Performs the keyboard equivalent of various keystrokes. The slide bar
Shortcuts Provides access to software programs, e.g. Windows Journal, Sticky
Input Panel Opens the onscreen Tablet PC Input Panel for typing and writing.
Stand By Puts the Tablet PC in low-power Stand By for temporary suspension
Help Motion Dashboard Help.
Adjusts the speaker volume. The Advanced option adjusts or mutes the
volume of the Tablet PC Wave, SW Synth, and PC Speaker.
Adjusts the display’s brightness level.
o
Lets you directly change the Tablet PC display orientation to 0
o
, or 270o.
180
Lets you Mirror (clone) the Tablet PC display or Extend it to an external
monitor or projector.
Lets you view and select Power Schemes and Power Button options.
Power Option Properties lets you set Power Schemes and Alarms,
check the Power Meter, and enable/disable Hibernate.
Enables/Disables the optional mini-PCI wireless LAN.
Properties include General (a description of the connection),
Wireless Network and Internet connection options
lets you view additional Quick Keys.
Notes, MSN Messenger, Calculator , Tablet and Pen Settings, Windows
Control Panel.
from which you can quickly resume your Windows session.
, 90o,
Motion Computing Tablet PC User Guide 26
Page 30

Chapter 3 Motion Tablet PC Software
Tablet PC Input Panel (TIP)
To open the Tablet PC Input Panel, tap the TIP icon located next to the Start
button. From this window, you can enter hand-written data or input data by
soft keyboard or by voice.
The illustration below shows the Tablet PC Input Panel with the Text
Preview window open. You can select this option from the Tools
drop-down menu.
NOTE: For more information about the Tablet PC Input Panel, see Chapter 4 of
this User Guide.
IMPORTANT: To view the text you write or type in the Tablet PC Input Panel,
you must open another application, such as Windows Journal, Notepad,
Wordpad, or install Microsoft Office (ordered separately; this works with XP Pack
for Tablet PC-- called Pen Extensions). Otherwise, your text will be transferred to
the Text Preview area (if it is open), but not to another application since none is
available to accept the input. If the text preview window isn’t open, your text will
disappear from the display after a few seconds.
NOTE: For security and accuracy when entering passwords or other confidential
text, we recommend that you use the soft keyboard on the Tablet PC Input Panel
instead of the writing pad.
Speech and Voice Recognition
Both Tablet PC models are
designed to accept and interpret the
human voice for dictation as well
as for keyboard-equivalent voice
commands.
NOTE: For information about
setting up speech recognition
through the Tablet PC Input Panel,
see Chapter 4 of this User Guide.
Motion Computing Tablet PC User Guide 27
Page 31

Chapter 4
Using Your Motion Tablet PC
INITIALIZING MICROSOFT WINDOWS XP
Chapter
4
Using Your
Motion Tablet PC
This chapter describes various procedures and functions you for your
Motion Tablet PC.
Motion Tablet PCs come with pre-installed software applications and
drivers, including those for the Windows XP Tablet PC Edition operating
system. The first time you start your Tablet PC, you must initialize
Windows XP.
Required Equipment and Information
• Computer name (you can create this yourself or obtain one from your
system administrator); this should be a unique name
• A USB keyboard (for inputting information to initialize the Microsoft
Windows XP for Tablet PC operating system) may be needed
Optional Connections, Equipment, and Information
• Internet access
• Motion AC Power Adapter
• Administrative password
• Description of your computer
• Company name
• Network settings
• Domain name
• Names of the people who will be using this Tablet PC
• Microsoft Office Product Keys (if you are going to install any Microsoft
Office products, such as Word, Excel, PowerPoint)
Motion Computing Tablet PC User Guide 28
Page 32

Chapter 4
Using Your Motion Tablet PC
Windows Initialization Procedure
IMPORTANT: Y ou do NOT need Internet access to initialize Windows. When the
Windows initialization procedure prompts you for this information, you can either
select “Skip” or select the option that lets you set up Internet access later.
1. (Optional) Before you start your T ablet PC, you may need to connect
any USB keyboard to a USB port on the Tablet PC so that you can
enter information through the keyboard or keyboard touch pad. (The
Pen does not function until later in the Windows initialization process.)
2. (Optional) Connect your Tablet PC to AC power. (This ensures continuous power during this initialization procedure and in case the battery is low.)
3. Slide the Power switch to start the Tablet PC. After a short time, the
“Welcome to Microsoft Windows” screen appears.
4. Move the cursor with the keyboard touch pad and select Next. The
End User License Agreement for Microsoft Windows XP appears.
NOTE: You can also use the Tab key, arrow keys, Enter keys, space bar, and
other keys on the keyboard to select and enter data. This installation only
describes using the keyboard touch pad.
5. To accept the End User License Agreement and continue the installation, select “Yes, I Accept.” Then select Next.
6. Type in the name of your computer (Tablet PC name). Choose the
name provided by your network administrator or, if one isn’t available, a unique network name.
7. (Optional) Type in a description of your computer. Select Next.
8. (Optional) Enter the Administrator password (from your network
administrator) or specify a password for yourself as Administrator . If
you don’t have an Administrator password, just select Next.
9. (Optional) Type in the domain name (from your network Administrator). If you don’t have a domain name, select “No,” then Next.
10.(Optional; you do not need Internet access to initialize Windows)
Check the option for how this computer will connect to the Internet.
Select Skip to set up Internet access later.
11.Select “Yes, Ready to activate Microsoft Windows XP.”
12.(Optional) Ready to register with Microsoft. Skip this screen if you
don’t want to register now. Select “No, not at this time.” If you
choose to register, you will need Internet access.
13.You may get a message either that your computer is not connected to
the Internet or asking if you want to set up Internet access. You do
not have to set up Internet access to initialize Windows. Select Skip.
14.Type in your name in the “Your name” field. If others will be using
the Tablet PC, type in their names also (up to five total). These messages appear:
Thank you! Congratulations, you’re ready to go!
Motion Computing Tablet PC User Guide 29
Page 33

Chapter 4
Using Your Motion Tablet PC
15.Select Finish. These messages appear:
Windows XP
Please wait.
Windows is starting up....
Loading your personal settings
Applying your personal settings
IMPORTANT: It is not necessary to connect to the Internet to activate
your system.
16.Windows will load and may discover and install new hardware.
When prompted, answer Yes or OK to install all hardware.
17.When the Tablet PC Tutorials appear, we recommend that you run
them. However, you can access them later if you wish.
This completes the Windows XP initialization process. The Tablet PC is
ready to use and your Pen is operational.
Microsoft Office Registration (Optional)
If you ordered the Microsoft Office XP Professional software with your
Tablet PC system, all the necessary software it is already installed. To
register Microsoft Office, follow these steps:
STARTING AND
TOPPING
S
Y
OUR
ABLET PC
T
1. Open a Microsoft Office application, such as Microsoft Word.
2. A screen appears, prompting you to enter your User name, Initials,
Organization, and the 25-character Product Key. The Product Key is
printed on the Microsoft Office CD packaged with your Tablet PC.
3. Follow the onscreen messages to complete the Microsoft
Office installation.
Starting
Start the Tablet PC by sliding the Power switch (the ridged button beside the
Tablet PC). If you have connected the Tablet PC to AC power, the Power
LED briefly turns amber and then solid green and the Hard Disk Drive
(HDD) LED flashes green. Then Windows XP launches.
When you start the Tablet PC, the Windows XP Tablet PC Tutorials screen
appears. If you don’t want this to continue to appear, check “Do not show
me this again.” We recommend that you look at the tutorials, which take just
a few minutes. You can return to the Microsoft Tutorials from Start, Using
Your Motion Tablet PC.
Stopping
The recommended way to shut down your Tablet PC is by selecting Start
and then Turn Off Computer.
IMPORTANT: You can force a shutdown by pressing and holding the Power
switch for about 5 seconds. A forced shutdown should only be used when the
Motion Computing Tablet PC User Guide 30
Page 34

Chapter 4
Using Your Motion Tablet PC
system is completely unresponsive to software commands. If you have any
applications open or any unsaved work, you will lose it. Windows will not prompt
you to save your work if you force a shutdown.
OPENING THE MOTION DASHBOARD
CONSERVING
POWER WITH
STAND BY
OR HIBERNATE
In the following sections, you will be instructed to open the
Motion Dashboard. To do this, press Hot Key #1 (see Table 2-2)
on the Tablet PC front panel.
You can also access
Dashboard by first
selecting Start, All
Programs, and then
Motion Resources.
The Motion Dashboard
offers many Tablet PC
functions in a
convenient location.
Low-power Stand By or Hibernation modes can conserve Tablet PC power.
Each preserves your Tablet PC settings so you can resume work where you
left off.
• Stand By — Greatly reduces Tablet PC power consumption and restarts
from within a few seconds; the T ablet runs on battery if not connected to
AC power. The Tablet PC r. Choose Stand By when you plan to return to
work within a short time (a few minutes to a few hours) and want to conserve power.
• Hibernate — Completely shuts down the Tablet PC to conserve power.
It takes slightly longer to restart from Hibernate than from Stand By.
Choose Hibernate when you plan to stop work for longer periods of time,
such as overnight. Saves the system status of the
Tablet PC to the hard disk drive.
Launching Stand By or Hibernate from the Start Button
To quickly place your system in Stand By or Hibernate:
1. Select Start/Turn Off Computer.
2. From the pop-up window, tap Stand By or press the Shift key on the
keyboard to toggle to Hibernate, and then tap that option.
3. The Tablet PC will then enter Stand By or Hibernate. In Stand By,
the power LED will flash green. In Hibernate, all LEDs are off.
Motion Computing Tablet PC User Guide 31
Page 35

Chapter 4
Using Your Motion Tablet PC
IMPORTANT: You can put the Tablet PC in either Stand By or Hibernate to swap the
battery. See the section “Swapping the Battery” in this chapter.
Launching Stand By from the Motion Dashboard
Open the Motion Dashboard and then tap the Stand By button.
Setting Up Stand By or Hibernate from the Power Switch
When you slide the power switch, by default it shuts down your Tablet PC.
You can change this so you start Stand By or Hibernate from the power
switch. To do this:
1. Open the Motion Dashboard.
2. On the Dashboard, under Power Management, tap the down arrow by
the Pwr Button.
3. From the drop-down menu, select Stand By or Hibernate, as desired.
4. Select OK.
Restarting from Stand By or Hibernate
OPERATING THE MOTION DIGITIZER PEN
To restart from Stand By or Hibernate, briefly slide the Power switch until
the display Tablet PC starts up. Tap your user name to resume work.
The Motion Digitizer Pen contains internal
electronics that make the Pen the only way you
input information on the Tablet PC display.
Finger-tapping or writing with a PDA stylus has
no effect. The Pen contains a Pen function button,
used for right-clicking (like a mouse) and a small opening near the end for
attaching it to the Pen tether. The Pen also comes with replacement Pen tips
and a replacement tool, shown here. For information about replacing the Pen
tips, see “Replacing the Pen Tips” in this chapter.
Notations for using Motion Pen are described below:
• Tap — Tap the Pen on the Tablet PC display, without pressing the function button on the Pen
• Double-tap — Double-tap the Pen on the display, without pressing the
function button on the Pen
• Right-click — Press the function button on the Pen and tap the Pen on
the display (equals a mouse right-click). For more information about
using the Pen function button, see the section “Writing with the Pen” in
this chapter.
• Press and hold — Press and hold the tip of the Pen to the display without
pressing the Pen function button (equivalent to a mouse right-click)
• Tap and drag — Tap and drag the Pen on the display
• Select/Highlight — Tap on the item on the Tablet PC display with the
Pen to activate the function
Motion Computing Tablet PC User Guide 32
Page 36

Chapter 4
Using Your Motion Tablet PC
Calibrating the Pen to Increase Its Accuracy
Be sure to calibrate your Pen the first time you start your Tablet PC, then at
other times if the cursor doesn’t seem to line up with the Pen tip. Calibration
ensures the accuracy of the Pen and adjusts the Tablet PC display for each
person who uses it. The Tablet PC stores Pen settings on a per-user basis.
To open the calibration program:
1. Open the Motion Dashboard and tap the Calibrate button. Or double-tap the Tablet and Pen Settings icon in
the System Tray, located in the lower right-hand corner
of the display window. This opens the Tablet and Pen Settings window.
NOTE: This icon may be hidden in the System Tray. Tap the System Tray
left-arrow to open all hidden icons.
2. Choose the Settings tab.
3. Tap Calibrate while holding the Pen in
a normal writing manner.
4. Carefully align the Pen point precisely
in the crosshairs of the calibration display.
5. Rotate the Tablet PC display and
repeat this for each orientation
(0o, 90o, 180o, or 270o).
Hints for Writing with the Pen
The first time you pick up the Pen, you’ll notice it is lightweight (it has no
internal battery), has a plastic tip, and contains an elongated button that
called the “function button.”
• You can hold the Pen like any other writing tool, except you may want to
place your fingers on either side of the Pen function button so that you
don’t inadvertently press it as you write. Pressing the function button
while tapping the Pen on the display is like right-clicking with a mouse
and will launch pop-up menus.
• Practice pressing the Pen function button with both your index finger and
thumb to see which you prefer.
• Relax your grip. Only a light touch is needed to write with the Pen.
• With a little practice, you will learn how to tap on the Tablet PC display
to activate buttons and menus.
• The more precise your handwritten input, the more accurate the Tablet
PC will be in converting it to text. You can use printed or cursive handwriting, but a mixture of upper and lowercase letters works best.
• When you hold the Pen over the Tablet PC display, a pointer (small dot)
appears under the Pen tip on the display and moves with the Pen on the
Motion Computing Tablet PC User Guide 33
Page 37

Chapter 4
Using Your Motion Tablet PC
display.
• To select something on the display, line up this pointer before you touch
(tap) the Pen to the display surface. The digitizer under the Tablet PC
display reads the position of the pointer, not where you touch the Pen to
the display.
CAUTION: Do not write on the Tablet PC display with ink pens or other
pointed objects that could damage it.
A comparison of the Pen and mouse operations is made below:
Table 4-1 Mouse versus Pen Actions
With a Mouse
Point and click Point and tap the Pen on the display.
Double-click Double-tap the Pen on the display.
Click-and-drag Tap-and-drag the Pen on the display.
Right-click Press the Pen button while tapping, or press
and hold the Pen on the display.
With the Digitizer
Pen
Ending Accidental Right-Clicks
If your writing is frequently interrupted with right-clicks of the
Pen when you accidentally press the Pen button, you may want to
deactivate this function altogether. (You will still be able to
activate right-click menus by pressing and holding the Pen
against the display surface.
1. Double-tap the Tablet and Pen Settings icon in the System Tray,
located in the lower right-hand corner of the display window. This
opens Tablet and Pen Settings. (You can also access this through the
Windows Control panel.)
2. Select the Pen Options tab.
3. Uncheck the option Use pen
button to right-click.
4. Tap Apply.
Adjusting Pen Properties for Ease of Use
For convenience and ease of use, you
may want to adjust the settings on the
Pen, such as which hand you write with
or the menu location.
To access Pen properties:
1. Repeat Steps 1 and 2 above.
2. Select the Settings tab.
3. Change the Handedness or Menu location, as desired.
4. Tap Apply.
Motion Computing Tablet PC User Guide 34
Page 38

Chapter 4
Using Your Motion Tablet PC
You can use Pen gestures to quickly perform the following actions:
NOTE: Gestures work primarily in the Tablet PC Input Panel and the Write Anywhere
feature. For more information about gestures, gesture symbols, and for handwriting
tips, open the Tablet PC Input Panel, Tools menu, then select Help, Help Topics.
Under Tips and Tricks, select T ips for entering text. You will find a Gesture reference.
• Open the Tablet PC Input Panel — Holding the tip of the Pen above
the screen, quickly move the pointer back and forth several times.
• Backspace (erase the previous
character) — Quickly draw a
right-to-left line on the display
surface
• Erase — Draw a short, wide
“Z” from left to right across
what you want to erase. (It may
take some practice to master
this gesture. ) The erase gesture
works in the Windows Journal,
Tablet PC Input Panel, and the
Write Anywhere (an option of
the Windows Journal).
HINTS FOR OPTIMIZING YOUR DISPLAY WINDOW
To free work space and enlarge your writing area, you can optimize your
Tablet PC display window in these ways:
• Move the Tablet PC Input Panel
anywhere — From T ools, uncheck Dock.
This lets you drag the input panel
anywhere on the display.
• Hide the Input Panel — Select the (up
arrow) on the Input Panel
• Enlarge the Preview window — From
Tools, tap Options, and then tap Two lines.
• Relocate the taskbar anywhere on the display — From Windows
Control Panel, tap Taskbar and Start Menu (Classic View) or doubleclick Appearance and themes (Category View) and then tap Taskbar
and Start Menu. Uncheck the box beside Lock the taskbar. Tap OK
and close Control Panel. Now place your Pen inside the Taskbar and
drag it to the sides or top of the display.
• Change the amount of delay to transfer writing, or the thickness of the
ink — From Tools, select Options.
NOTE: For more information about Tablet PC Input Panel functions, see the Help
menu under Tools on the Tablet PC Input Panel window.
Motion Computing Tablet PC User Guide 35
Page 39

Chapter 4
Using Your Motion Tablet PC
MAKING BEST USE OF THE TABLET PC INPUT PANEL
HINTS FOR
WORKING WITH
THE INPUT
PANEL
The Tablet PC Input Panel keyboard and writing pad let you:
• Enter information in other input fields, such as passwords
• Hand write or type entries in Journal documents
• Write or type E-mail messages
1. Open the Tablet PC Input Panel by tapping the icon,
shown here.
2. With another application active, such as a password entry field, a
Journal document, or Outlook, write or type on the Input Panel window.
3. By default, after a short delay, your handwriting will be automatically sent to the active program.
Here are some hints about the Tablet PC Input Panel:
• Disappearing text — If you don’t have an active application or the
Input Panel Preview window open, your writing or typing will
disappear from the display in a few seconds. Open an application
(such as Microsoft Word) or the Preview window to accept your text.
• Tablet PCs without Microsoft Office Pen Extensions installed — If
you have Microsoft Office installed but not Pen Extensions, these
programs (Microsoft Word, Outlook, and Excel) will not accept ink.
Pen Extensions are included with associated Motion software orders or
are available free on the Microsoft website.
• However, other programs will accept text, including Journal,
Wordpad, and Notepad.
• Sending drawings — While probably not the best application for
drawings, you can send them from the Input Panel to some
applications (such as Wordpad or Microsoft Word). However, they
don’t transfer to the Text Preview window. If you draw from the Input
Panel with the Text Preview window open, Windows XP tries to
interpret the drawing as text, with unpredictable results.
• Entering passwords — For security and accuracy, we recommend you
use the keyboard on the Input Panel instead of writing this confidential
information where it is clearly visible and where handwriting
recognition will try to make it into words.
Input Panel Text Preview Window
The Tablet PC Input Panel has a Text Preview window that lets you see a
text transcription of what you have written before you send it to an active
application:
Motion Computing Tablet PC User Guide 36
Page 40

Chapter 4
Using Your Motion Tablet PC
“Sending as Ink” (Handwriting and Drawings) from the Input Panel
To transfer ink input to another application:
1. Open the Tablet PC Input Panel.
2. Close the Text Preview window by deselecting it in Tools.
3. Open another application, such as Notepad, Wordpad, or Microsoft
Word to write your input to. If you don’t open this second application, your input will disappear from the Tablet PC Input Panel display in a few seconds.
4. Tap the down arrow beside Send.
5. Enable Send as Ink. (If the application you have open doesn’t accept
ink input, this option will be grayed out.)
6. Create the text or simple drawing you want to send as ink.
NOTE: To increase the size of the text and drawings, highlight these on screen, then
change the font size. Wordpad and Notepad don’t allow you to reset the default font
size, but once you can increase the font size.
Motion Computing Tablet PC User Guide 37
Page 41

Chapter 4
Using Your Motion Tablet PC
ELIMINATING PAPER WITH WINDOWS JOURNAL
Windows Journal of fers these note-taking
capabilities:
• Search — Look for a handwritten
or typewritten word in all your
Journal Notes
• Organization — Use color, and/or
titles to arrange information
• Versatility — Draw diagrams and
charts, copy and paste information
between documents, convert
handwriting to text
CREATING
FORMS AND
EDITING THEM
IN WINDOWS
JOURNAL
You can create forms or edit documents from many formats (such as Word,
Excel, Adobe® Acrobat) by creating a Journal T emplate. You can then write
on your new “form,” exchange edits with others, or write on them during a
presentation.
1. Create or open the desired document on your Tablet PC.
2. Tap Print.
3. Select the Journal Note Writer as the printer.
4. Tap Print.
5. On the Save As screen, type in a name for the document.
6. Tap Save. By default, this saves your document as a Windows Journal template (.JNT file) to My Documents/My Notes.
7. Tap Save. By default, this saves your document as a Windows Journal template (.JNT file) to My Documents/My Notes.
NOTE: Windows Journal may take a few minutes to save, but even multi-page
files will convert to a Journal Note Writer file.
8. Open the Windows Journal, then open your document.
9. Write with your Pen on this document as you would any other Journal document (fill in your “form” or make your annotations).
10.Save your document with a new file name to preserve your edits.
You can reuse and save this document as many times as you want.
Motion Computing Tablet PC User Guide 38
Page 42

Chapter 4
Using Your Motion Tablet PC
HAVE STICKY
NOTES HANDY
FOR JOTTING
DOWN
INFORMATION
CHANGING
CREEN
S
O
RIENTATION
Sticky Notes are a convenient place to store things like names, phone
numbers, simple maps, or other information that you would normally put on
a paper note. And since they’re electronic, you can export them to other
programs. Sticky Notes are kept in a numbered stack that you can browse
through and discard when you’re through with them.
They can also be used to record voice notes
(although you can’t drag the voice notes to
another program or the desktop).
To change the display orientation:
• From the Motion Dashboard
1. Press Hot Key #1 on the Tablet PC chassis to open the Motion Dashboard.
2. Select from the rotation options: 0o, 90o, 180o, or 270o
• From the Tablet PC chassis
1. Press Hot Key #2 on the Tablet PC chassis. Each time you press the
key, the display rotates 90o.
2. Rotate the display to the desired orientation.
• From the Tablet and Pen Settings Screen
1. Tap the Tablet and Pen Settings icon on the System Tray, located at
the bottom right of the display window. Or, go to the Control Panel
and select the Tablet and Pen Settings icon.
2. From the Tablet and Pen Settings window, select the Display tab.
3. Tap the down-arrow next to Orientation.
4. Select the desired orientation: Primary landscape, Primary portrait,
Secondary Landscape, Secondary portrait.
Motion Computing Tablet PC User Guide 39
Page 43

Chapter 4
Using Your Motion Tablet PC
CUSTOMIZING BUTTONS
You can customize the Tablet PC buttons so they perform the functions
that you want. The default button settings of all the buttons are described
in Chapter 2 of this User Guide.
• Escape button (Secondary function is programmable)
• Function button (not programmable)
• Five-way directional control buttons (Secondary functions are
programmable)
• Hot Keys 1 & 2 (Primary and Secondary functions are programmable)
• Security (Ctrl+Alt+Del) not programmable)
To change the default button properties.
1. Double-tap the Tablet and Pen
Settings icon in the System
Tray, located in the lower righthand corner of the display window. Or, go to the Control
Panel and select the Tablet and
Pen Settings icon. This opens
the Tablet and Pen settings
window.
2. Choose the Tablet Buttons tab.
3. Highlight the button you want
to reprogram. The button being
programmed turns red.
4. Select Change.
5. On the Change Button Functions window, tap the down-arrow beside Action for a selection list.
6. Select a new action from the list.
DJUSTING
A
BRIGHTNESS
FOR DIFFERENT
IGHTING
L
S
ITUATIONS
NOTE: For some Actions, you only need to select the Action to change the
button property. For others, such as to launch a program, you must browse and
find the program; or, to set up a key combination, you must press a sequence of
keys. You can Reset the button defaults any time.
7. Select OK. The list of Actions should now display the new action for
the button you reprogrammed.
You may want to adjust the brightness level of the Tablet PC display for
different lighting situations and for improving battery life.
Motion Computing Tablet PC User Guide 40
Page 44

Chapter 4
Using Your Motion Tablet PC
•From the Motion Dashboard
1. Open the Motion Dashboard.
2. Adjust the desired brightness level on the Display
Brightness slider.
• From the Tablet and Pen Settings Window
1. Double-tap the Tablet and Pen Settings icon in the System Tray, located in the lower right-hand corner of the
display window. Or, go to the Control Panel and select
the Tablet and Pen Settings icon. This opens the Tablet
and Pen settings window.
2. Tap the Display tab.
3. Adjust the Brightness slider at the bottom of this window. You can
have a different setting when running on AC power versus battery.
RACKING
T
YOUR BATTERY
POWER
Reading Battery Power from the Tablet PC Display
To check the power while running on battery , move the Pen over
the Power/Battery icon, shown here, on the System Tray at the
bottom-right corner of the Tablet PC display. This displays the
number of hours of battery power and the percentage of battery
power left. (The blue area on the battery icon shrinks as the battery runs
down.)
Reading Battery Power from the Battery Gauge
Turn the Tablet PC over and press the battery gauge button. If all five LEDs
are green, the battery is fully charged. Each LED represents about 20%
battery capacity.
Reading Battery Power from the Power Meter
There are several other ways to determine the amount of battery power
remaining:
• Open the Power/Battery icon in the System Tray, located in the lower
right-hand corner of the display window; the Adjust Power Properties
and Open Power Meter is displayed.
• Open the Power/Battery window and tap to open the Power Options
Properties window. Select Power Meter.
Motion Computing Tablet PC User Guide 41
Page 45

Chapter 4
Using Your Motion Tablet PC
• From the Control Panel and select Power options.
CREATING NEW POWER SCHEMES FOR SPECIAL SITUATIONS
Creating a New Power Scheme
The Tablet PC is configured with the default power scheme “Motion
Computing Optimized” that helps performance and battery life. You may
want to create additional power schemes for other work scenarios or for
special situations.
1. Right-click the Power/Battery icon in the System Tray,
located at the bottom right of
the Tablet PC display window until Adjust Power
Properties or Open Power
Meter is displayed. Or, go to
the Control Panel and select
Power options.
2. Tap Adjust Power Properties
to open the Power Options
Properties.
3. The window opens to Power
Schemes.
4. Change the settings to the desired power configuration.
5. Tap Save As and enter a name for the new scheme.
6. Tap Apply.
HARGING THE
C
B
ATTERY
NOTE: We recommend that you create new power schemes instead of overwriting
the default (Motion Computing Optimized) so you can reactivate it later.
Setting Up Max Battery Mode for Additional Power Savings
Max Battery mode prolongs the battery’s charge.
1. Right-click on the Power/Battery icon in the System
Tray, located in the lower right-hand corner of the display window. Tap Adjust Power Properties in the menu.
This opens Power Options Properties. Or, go to the Control Panel and select Power options.
2. Under Power Schemes, tap the down arrow to display a list of
schemes.
3. Select Max Battery as your power scheme.
4. Tap apply.
When you connect the Tablet PC to AC power with the battery installed, the
system automatically charges the battery until it reaches full charge.
The Battery Status LED is amber while the battery is charging and changes
to green when fully charged.
Motion Computing Tablet PC User Guide 42
Page 46

Chapter 4
Using Your Motion Tablet PC
WARNING: To avoid personal injury, if the battery is overheated, wait
until it cools to room temperature before recharging or replacing it with
another battery.
To charge the battery:
1. Plug the AC power adapter into the Tablet PC, then into a wall outlet
or power strip. (Completely recharging the battery may take up to
two hours, although the battery reaches an 80% charge in much less
time.)
2. Turn the Tablet PC over to see the battery gauge on the
bottom of the Tablet PC and press the button next to the
battery gauge. If all five LEDs are green, the battery is
fully charged. Or, move the Pen over the Power/Battery
icon to display battery power resources. (The blue area on the battery
icon shrinks as the battery runs down.)
SWAPPING THE BATTERY
You can swap the battery while the system is powered on, with or without
having the Tablet PC plugged into an AC power outlet.
1. If the Tablet PC is running, save all active files.
2. Go to Start>Turn Off Computer.
3. When the Turn Off Computer wind ow appears, press the Shift key on
your external keyboard or tap Shift on the Tablet PC Input Panel keyboard to change the option from Stand By to Hibernate.
IMPORTANT: You can put the Tablet PC in either Stand By or Hibernate to swap
the battery:
• If you choose Stand By, the unit is designed to maintain your system for up to
30 seconds while the battery is swapped. However, you may have less than
30 seconds to swap the battery because of the settings and the programs that
you have running. You should save any data before putting the unit in Stand
By to swap the battery.
• If you choose Hibernate, you have unlimited time to swap the battery.
Hibernate saves the status of the Tablet PC to your Hard Disk Drive so that
you can resume operations later.
4. Tap Hibernate or Stand By. The Tablet PC displays that it is Standing By or Hibernating.
5. Wait until the system shuts down and all LEDs are off.
6. Push the battery release latch on the bottom of the Tablet PC to eject
the internal battery.
7. Insert the new battery until you hear the latch click, which ensures
the new battery is correctly seated.
CAUTION: To avoid damage to the Tablet PC, install only Motion
Computing batteries, which are specially designed for the Tablet PC.
Motion Computing Tablet PC User Guide 43
Page 47

Chapter 4
Using Your Motion Tablet PC
Disposing of Used Batteries
When a Tablet PC battery is no longer serviceable, dispose of it at a
hazardous materials recycling center. Do not toss it in the trash wher e it will
be sent to a landfill.
Battery and Power Management Hints
• Use AC power whenever available to lengthen the battery’s usable life.
Leave the battery in place when using AC power.
• Use AC power when installing software or writing to a CD and, for best
performance, when using a DVD player.
• When using battery power, if you leave the Tablet PC unattended, place
the system in Stand By or Hibernate.
• Keep in mind that the display, processor, PC cards, wireless cards, and
accessory drives all draw on the battery, so adjust properties and disable
unused accessories and PC cards when operating on battery power.
• When running on battery, adjust the power mode and display brightness
to lower settings to prolong the battery life.
ADDING MEMORY TO IMPROVE SYSTEM PERFORMANCE
Use only Motion Memory modules obtained from Motion Computing to
upgrade the factory-installed memory.
Supported Memory Configurations for Motion M1200
Base Memory-Slot A* Base Upgrade-Slot B* Total Memory
256MB 256MB 512MB
512MB 768MB
512MB 256MB 768MB
512MB 1GB
* PC133 SDRAM SODIMM
Note: The Motion M1200 has Base Memory factory-installed in Slot A. You can
install/reinstall memory modules in either Slot A or B for best performance.
Supported Memory Configurations for Motion M1300
Base Memory-Slot A** Base Upgrade-Slot B** Total Memory
256MB 256MB 512MB
512MB 768MB
256MB 512MB 768MB
512MB 1GB
** PC266 DDR SODIMM
Note: The Motion M1300 has Based Memory factory-installed in Slot B. If you
install/reinstall only a single memory module in the M1300, always install it in
Slot B for best performance.
Motion Computing Tablet PC User Guide 44
Page 48

Chapter 4
Using Your Motion Tablet PC
WARNING: To avoid the risk of personal injury or damage to the Tablet
PC, when performing the following tasks, turn off your Tablet PC, unplug
the AC power connection, and remove the battery. Ground yourself by
touching a grounded conductive surface, such as a device or appliance
with a grounded, three-pronged plug. Avoid touching the pins and leads
on the memory module and the internal circuitry of the Tablet PC.
1. After you disconnect power, unscrew the
L-shaped cover from the bottom of the
Tablet PC.
2. If you are replacing a module, release the clips
on each side of the module and lift to
remove it.
3. Align the pins on the Memory Upgrade
module with the receptors on the slot.
4. Gently push the new module into the slot at a
25-degree angle until it is firmly seated; then rotate it into place.
5. Replace the external cover and install the two screws.
INSTALLING OPTICAL DISK DRIVES
OPTICAL DISK DRIVE SOFTWARE
For information about installing your Optical Disk Drive, see the
documentation packaged with the Drive.
Software for the CDROM — The Optical Disk Drive you’ve purchased
does not require any special software drivers to operate as a standard
CDROM device.
Software for the DVD/CDRW Combo drive — Requires CD writing
software to write onto a CDR/RW disc for CD authoring. While Microsoft
Windows XP includes CD writing features and may be sufficient for your
needs, the additional CD writing software contains advanced features
beyond those offered by Windows XP. In addition, the DVD/MPEG
software is required to view video DVDs.
Motion Computing Tablet PC User Guide 45
Page 49

Chapter 4
3
Using Your Motion Tablet PC
MIRRORING OR EXTENDING YOUR DISPLAY
The Tablet PC has a Dual Head Video Controller that lets you mirror the
Tablet PC display or extend it to a second monitor or external device, such
as a projector.
Connecting the External Monitor/Data Projector and Tablet PC
1. Plug the VGA monitor cable into the VGA port on the Tablet PC or
Motion FlexDock.
2. Then, connect the external monitor or data projector to a power outlet
and turn it on. Windows XP will recognize the external monitor or data
projector and search for a driver.
3. If necessary, install the driver from the CD supplied by the monitor’s
manufacturer.
Setting Up a Mirrored Desktop
Use this feature to connect an external projector for presentations.
1
1
2
Mirrored Desktop Example: (1) Word Documents; (2) Tablet PC; (3) External
Monitor
NOTE: The resolution of the external monitor will be the same as the Tablet PC
display.
a. Open the Motion Dashboard.
b. Select the Mirror Desktop
radio button under External
Display. This setting
automatically creates an identical
display on the external monitor.
NOTE: You may also set up this
feature through the Intel(R) Extreme Graphics icon, shown here
(found in the Windows Control Panel or in the System Tray at the
bottom right of the Tablet PC display).
Motion Computing Tablet PC User Guide 46
Page 50

Chapter 4
Using Your Motion Tablet PC
Setting Up an Extended Desktop
Use this feature to when you want multiple applications open on separate
monitors, for example, your email and Microsoft Word.
Extended Desktop Example: (1) Word Document; (2) Tablet PC; (3) External
Monitor; (4) Spreadsheet; (5) E-mail
a. Open the Motion Dashboard.
b. Select the Extend Desktop
radio button under External
Display. This setting
automatically extends the Tablet
PC display to the external
monitor.
NOTE: You may also set up this
feature through the Intel(R) Extreme Graphics icon found in the
Windows Control Panel or through this same icon, which is located
in the System Tray at the bottom right of the Tablet PC display.
Motion Computing Tablet PC User Guide 47
Page 51

Chapter 4
Using Your Motion Tablet PC
SETTING UP A WIRELESS CONNECTION
Wireless network access points are available in airports, public businesses,
such as coffee shops, as well as in private companies. With the proper
hardware, you can even have a wireless access point at home. Each access
point may provide various levels of security and may require passwords and/
or fees for connection.
Although wireless access is available in public areas, your ability to use the
wireless access point depends on the following conditions:
NOTE: The Tablet PC antenna should not be covered by your hand when
making a wireless connection.
• Distance from the access point
• Ability to connect to the access point
• Service rights to it (which may require an account fee, user name,
password, an/or network setup through an administrator)
WARNING: FAA regulations require that you disable any wireless
connection when traveling by air. If the Wireless LED on the front of the
Tablet PC is off, wireless communications are disabled.
T o set up a wireless connection through
the Motion Dashboard:
1. Open the Motion Dashboard
and make sure that Enable
WMIB-100 GS Radio is
checked.
2. Under Wireless Operation, tap
Properties.
3. On the Wireless Network Connection Properties screen, tap
the Wireless Networks tab.
4. From Available Networks, choose a network (an access point).
5. Tap Configure. The access point you selected should appear in the
Network name (SSID) description.
6. Tap OK.
7. Tap OK again to complete the setup of the wireless connection.
NOTE: To complete the wireless connection, you may need to enable Wired
Equivalent Privacy (WEP), Extensible Authentication Protocol (EAP), or other
settings before the wireless network will connect. This may require you to add a
network name (SSID) and Network key and/or to authenticate access (by
password or other means). In a corporate wireless network, contact your System
Administrator for these settings. For a home network, follow the instructions that
come with your wireless access point. For other wireless access points that are
available through third-party service providers (such as a wireless telephone
service), contact the appropriate service provider.
To set up a wireless connection through the Control Panel:
Motion Computing Tablet PC User Guide 48
Page 52

Chapter 4
Using Your Motion Tablet PC
1. Open the Control Panel and tap Network Connections.
2. Make sure the Wireless Network Connection is enabled. (If it’s not,
right-click on the connection and tap Enable.)
3. Right-click Wireless Network Connection.
4. Tap View Available Wireless Networks.
5. Tap Advanced.
6. Repeat Steps 3-7 in the previous procedure.
SETTING UP
SPEECH
RECOGNITION
FOR DICTATION
To set up speech recognition for dictation:
NOTE: The Tablet PC works best for dictation if you use a high-quality headset
microphone.
1. Plug a microphone into your Tablet PC.
2. Tap the Tablet PC Input Panel icon on the menu bar at
the bottom of the Tablet PC display. The Tablet PC
Input Panel appears.
3. T ap the down-arrow beside Tools to open
the selection box.
4. Tap Speech. The first time you access
this function, a Speech Recognition
Enrollment message appears suggesting
that you take 10 minutes to adjust the
microphone and train speech recognition
before continuing. If you have not completed speech training, the speech buttons are inactive.
5. Tap Next and follow the Microphone Wizard.
NOTE: Speech recognition will only correctly recognize 85%-90% of your words
as you dictate. As you use this tool, accuracy gradually improves. You can
improve this performance by running further speech training sessions. Open the
Windows Control Panel and select Speech to access speech training.
USING SPEECH
ECOGNITION
R
FOR COMMANDS
CREATING A
CREEN-
S
R
ESOLUTION
CHEME FOR AN
S
EXTERNAL
M
ONITOR OR
IMILAR DEVICE
S
After you complete Speech Recognition training, when you select Speech,
the Tablet PC Input Panel displays options for Dictation or Commands. The
display also indicates if it is Not Listening or Listening.
NOTE: For more information about using this feature, see the Windows Help and
Support Center where you can search for topics about speech recognition and
training. Also available are the speech tutorials. To find the speech tutorial,
select Start, Help and Support, Welcome to Tablet PC, Tablet PC Tutorials.
To create a special screen resolution scheme:
1. Tap the Properties button on the Motion Dashboard. Or, the Intel(R)
Extreme Graphics icon in the System Tray, located at the bottomright corner of the display. Then select Graphics Options, Graphics
Properties...
Motion Computing Tablet PC User Guide 49
Page 53

Chapter 4
Using Your Motion Tablet PC
2. From the Intel(R) 82830M Graphics Controller Properties window,
select the Schemes tab. The current Video Mode is displayed.
3. Tap the New button on this window.
4. Type in a name for the new scheme.
5. Highlight this new scheme in the Schemes window.
6. Add or change the parameters for this scheme.
7. Tap Save.
8. To test or launch a scheme, select it from the list and tap the
Invoke button.
9. Tap OK.
MULTIMEDIA APPLICATIONS
SETTING UP TABLET PC SECURITY
M1200 and the M1300 Tablet PCs support most multimedia applications.
Passwords protect your Tablet PC from unauthorized access. Passwords can
create different levels of protection for your Tablet PC and its data:
• Operating system password — Secures the files on your Tablet PC
from other users
• BIOS passwords — Secures the software routines that test hardware at
startup, start the operating system, and support the transfer of data
among hardware devices; BIOS is the Basic Input/Output System
• System password — Locks access to the BIOS setup
• Boot password — Locks access to the system
• HDD (Hard Disk Drive) password — Secures your data so the Hard
Disk Drive cannot be accessed by removing it and connecting it to
another Tablet PC
Setting the Windows Operating System Password
You can set up a Windows operating system password through the Control
Panel, User Accounts.
Setting the BIOS Passwords
CAUTION: We strongly recommend that you write down your password(s)
and keep it in a location that is appropriate to your work environment. If you
enter a wrong BIOS System password several times, you will be locked out
of the system. If you become locked out, you can restart the Tablet PC and retry the
password again. You can repeat restarting and retrying the password as many times
as you want. However, if you are unable to remember your password, you will not be
able to access your Tablet PC. If this happens, you call Motion Computing Technical
Support or your Motion reseller for assistance. Have your Tablet PC Serial number
available (located on the label on the back of the unit) for them to assist you.
The level of security you want on your Tablet PC helps determine what
BIOS password(s) you set. These are described in the following sections.
BIOS System Passwords
Motion Computing Tablet PC User Guide 50
Page 54

Chapter 4
Using Your Motion Tablet PC
To set up a password to access the PhoenixBIOSTM Setup Utility
on the Tablet PC:
NOTE: These procedures describe using the Pen to enter information; you can
also attach an external keyboard if you prefer.
1. Start the Tablet PC.
2. When the Motion Computing Splash Screen appears,
quickly press Hot Key #2 (icon shown here). If you
miss the Splash screen, turn the Tablet PC off then back
on and try this step again.
3. From the PhoenixBIOS Setup Utility, tap Security on the menu bar.
4. To set up a System password, double-tap Enter next to Set
System Password.
5. Type in a System Password using the onscreen keyboard.
6. Tap Enter.
7. Type in the password again to confirm it.
8. Tap Enter. The system returns to the Security screen and the System
Password reads Set. A password is now required to enter the
PhoenixBIOS Setup Utility.
9. To set up a Password on boot, tap Disabled next to Password on
boot until Enabled is highlighted. You will not be prompted to type
in another password because Password on boot uses the System
password.
NOTE: You cannot set up Password on boot until you set up a
System password.
10.If you have finished setting up a password, tap Exit or press the Esc
key on the Tablet PC to exit the PhoenixBIOS Setup Utility.
11.When you exit, you’re prompted to select from the
following options:
• Exit Saving Changes
• Exit Discarding Changes
• Load Setup Defaults
•Discard Changes
• Save Changes
12.Select the desired action.
13.Confirm the selection by tapping Yes.
Hard Disk Drive (HDD) Password
To set up a password to start the Tablet PC (so no one can access the
information on the Hard Disk Drive of your Tablet PC even if it’s
removed and installed in another Tablet PC without the proxy
password):
1. Start the Tablet PC.
Motion Computing Tablet PC User Guide 51
Page 55

Chapter 4
Using Your Motion Tablet PC
2. When the Motion Computing Splash Screen appears,
quickly press Hot Key #2. If you miss the Splash
screen, turn the Tablet PC off then back on and try this
step again.
3. From the PhoenixBIOS Setup Utility, tap Security on the menu bar.
4. To set the hard disk password, double-tap Enter next to Set Hard
Disk Password.
5. Type in a New Password.
6. Tap Enter.
7. Type in the password to confirm it.
8. Tap Enter. The system returns to the Security screen and the HDD
Password is Set. (When you exit then re-enter the PhoenixBIOS
setup, the HDD Password is Locked.)
9. Repeat Steps 10-13 in the section “Bios System Passwords.”
CLEARING TABLET PC SECURITY
To clear the Tablet PC PhoenixBIOS security:
1. Start the Tablet PC.
2. When the Motion Computing Splash Screen appears,
quickly press Hot Key #2. If you miss the Splash
screen, turn the Tablet PC off then back on and try this
step again.
3. From the PhoenixBIOS Setup Utility, tap Security on the menu bar.
If you have rebooted, you will be prompted to enter the password(s)
you’ve set up.
4. To clear the System and Password on boot passwords, double-tap
Enter next to Set System Password.
5. Type in the Current Password.
6. Leave the space blank next to Enter New Password.
7. Tap Enter.
8. Leave the space blank to Confirm New Password.
9. Tap Enter.
10.When the Security screen appears, the System Password should be
Clear and the Password on boot Disabled.
11.To clear the Hard Disk Drive password, double-tap Enter next to Set
Hard Disk Password.
12.Type in the Current Password.
13.Leave the space blank next to Enter New Password.
14.Tap Enter.
15.Leave the space blank to Confirm New Password.
16.Tap Enter.
17.When the Security screen appears, the HDD Password should be
Clear.
Motion Computing Tablet PC User Guide 52
Page 56

Chapter 4
Using Your Motion Tablet PC
CARING FOR YOUR TABLET PC AND ITS ACCESSORIES
The Tablet PC display and chassis are designed to be very durable. This
section describes the proper care and maintenance that will keep them
working and in good condition for a long time.
CAUTION: Be sure to follow the guidelines listed below when caring for
your Tablet PC and its components. Improper use may damage the
Tablet PC and/or its components.
General Care
• Protect the Tablet PC from exposure to extreme temperatures, shock,
liquids, strong magnetic fields, and turbulent conditions.
• Do not open or disassemble the Tablet PC other than to replace
memory modules or to replace the battery. Always follow the
instructions included with these accessories when performing these
procedures.
WARNING: To avoid the risk of personal injury or damage to the Tablet
PC, when replacing memory modules, turn off your Tablet PC, unplug
the AC power connection, and remove the battery. Ground yourself by
touching a grounded conductive surface, such as a device or appliance
with a grounded, three-pronged plug. Avoid touching the pins and leads
on the memory and the internal circuitry of the Tablet PC. See the
section “Adding Memory” in this chapter for more information about
replacing or adding memory modules.
• When storing the T ablet PC for an extended period of time, unplug AC
power and remove the battery after discharging it partway.
• Do not place heavy objects on top of the Tablet PC.
Caring for the Display Screen
• You can clean fingerprints and most marks from the display surface by
wiping it with the soft cloth (provided). If needed, you can spray this
cloth with a window-type cleaner . Never spray or pour liquids directly
onto the display surface itself. Never use an abrasive cleaner on the
display. If liquid is spilled on the display, wipe it up immediately.
• Avoid using tissues or paper towels to clean the display surface. These
contain wood fibers that can scratch the display.
• Use only the Motion Digitizer Pen on the display. Do not write on the
surface with an ink pen or pencil, any pointed or other object that
could damage the display surface.
• Do not place heavy objects on the display surface.
• Protect the display surface from unnecessary contact by using the
Hardtop Cover or a portfolio when transporting the Tablet PC.
• Avoid exposing the display to direct sunlight for long periods of time.
Motion Computing Tablet PC User Guide 53
Page 57

Chapter 4
Using Your Motion Tablet PC
Caring for the Motion Digitizer Pen
• Always store the Motion Digitizer Pen in the Tablet PC Pen holder or
in the portfolio when not in use.
• Store extra Pens in your portfolio. The Pen should not be stored
vertically on the tip as constant tip pressure can affect the Pen-todigitizer interaction.
• The Pen contains sensitive electronics. Do not immerse it in liquids.
Replacing the Pen Tips
Normal use eventually wears down the Pen tip, so the Pen ships with extra
tips and a tool for replacing them.
1. Grasp the old tip with the silver ring of the replacement tool.
2. Pull the old tip out of the Pen.
3. Insert a new tip.
4. Apply slight pressure to set it in place.
Ordering New Pens
TRAVELING WITH YOUR TABLET PC
To order additional Pens, visit the Motion Computing website at
www.motioncomputing.com/accessories.
WARNING: FAA regulations require that you disable any wireless
connection when traveling by air. The LED on the front of the Tablet PC
provides a convenient way to check the status of your wireless
connection. If the LED is off, wireless communications are disabled.
Packing Your Tablet PC for Travel
• Remove all accessories and cables. Remember to pack those you’ll
need while traveling and don’t forget to pack at least one Motion
Digitizer Pen.
• Attach the Hardtop Cover or slip the Tablet PC into its portfolio to
protect the display.
• Protect the Pen by keeping it in the Tablet PC Pen holder or portfolio
case during travel.
• Pack the Tablet PC securely in a briefcase or hand-carried luggage,
and keep it separate from toiletries, liquids, and food. Do not pack it in
checked luggage when you travel.
• Keep the Tablet PC stable during travel; secure it to prevent it from
sliding around in overhead bins and car trunks.
Traveling by Air
• Prepare for airport security by charging the battery in the event
Security asks you to start the Tablet PC.
• Have it hand-inspected or sent through the X-ray scanner, but never
carry it through the metal detector.
Motion Computing Tablet PC User Guide 54
Page 58

Chapter 4
Using Your Motion Tablet PC
• Either turn off or place the Tablet PC in hibernation for takeoff
and landing.
F A A Wireless Air Travel Requirement
WARNING: The FAA requires that wireless operations be suspended
before boarding the plane. The easiest way to disable wireless
operations is by unchecking the Enable 802.11 Wireless Radio box in
the Motion Dashboard. The wireless LED on the Tablet PC front panel,
marked as shown here, is off when wireless communications
are disabled.
WARNING: Do not transport the Lithium ion batteries used in your
Tablet PC in checked baggage. You may take up to two spare batteries
in carry-on luggage in addition to the one in your Tablet PC.
Transporting batteries in check baggage or transporting more than two
spare batteries is a violation of transportation regulations.
Other Travel Hints
• Before extended use in the field or long trips away from AC power,
adjust the Power properties to maximize battery conservation. Rightclick the Power/Battery icon in the System Tray, located in the lower
right-hand corner of the display window, to open the Power Options
Properties dialog box. Then adjust the options. For more information,
see the section “Changing the Default Power Scheme” in this chapter.
Or see the Performance and Maintenance section of the Help and
Support Center for details about power settings.
• For international travel, obtain and use the appropriate adapters for
your destination’s electrical outlets. A current converter is not
necessary.
• You may want to carry proof of ownership or a merchandise passport
when traveling internationally.
• Consult your insurance company and credit card company to learn
about emergency travel assistance if your Tablet PC is lost or disabled.
Motion Computing Tablet PC User Guide 55
Page 59

Appendix A Troubleshooting and Support
Troubleshooting and Support
All Motion Computing Tablet PCs have passed a rigorous series of
performance and quality-control tests, but now and then a problem may
occur. If you don’t see a solution among the following system and software
issues, check the Support Options listed at the end of this chapter or go to
our website at www.motioncomputing.com/support.
SOLUTIONS
PROBLEM
POWER
The Tablet PC won’t start when I
slide the Power switch.
The Tablet PC won’t shut down. An application has locked up the
The Tablet PC won’t enter
Hibernation mode.
The Tablet PC won’t come out of
Hibernation mode when running
on battery power.
The Power switch hasn’t been
fully engaged.
Fully discharged battery or no
battery and no AC power.
Tablet PC.
Hibernation isn’t enabled. Enable Hibernation through Power
Fully discharged battery and no
AC power.
CAUSE SOLUTION
Appendix
Slide and hold the Power switch
for at least a half-second, but no
more than three seconds.
Connect the AC adapter to
operate the Tablet PC and charge
the battery.
Slide and hold the Power switch
for at least 5 seconds to force a
shutdown of the Tablet PC.
Option Properties.
Connect the AC adapter to
provide power to the Tablet PC
and charge the battery.
A
Motion Computing Tablet PC User Guide i
Page 60

Appendix A Troubleshooting and Support
PROBLEM
POWER (CONTINUED)
The display goes black while the
Tablet PC is still turned on.
BATTERY
Data loss during battery swap. The unit is designed to maintain
The battery seems to run down
very quickly (lasting less than
three hours after a full charge).
The Tablet PC system has gone
into St and By after sitting idle for a
period of time. (In this state, the
power LED flashes green.)
System has gone into low-battery
Hibernation. (In this state, the
power LED is off.)
the data and settings for up to 30
seconds in Stand By while you
swap the battery. This time may
vary due to your system and the
programs you’re running.
Accessory devices such as a DVD
player and applications that make
heavy use of the hard drive drain
the battery more quickly.
The battery is weakening or
defective.
CAUSE SOLUTION
Slide the Power switch for about a
second to resume operations.
1, Slide the Power switch for
about a second to resume
operations. 2. Connect the AC
adapter to the Tablet PC to charge
the battery.
When you swap the battery with
the unit in Stand By, be sure to
save your data before removing
the battery to avoid data loss.
Use AC power when possible and/
or turn off the accessory devices.
All batteries weaken in time, but if
a new battery is needed, contact
your reseller or Motion Computing
Support about replacing it.
DISPLAY
The desktop is too big for the
display – I can’t see all of the
desktop icons.
When I disconnected a second
monitor from the Tablet PC, the
image became too big for the
Tablet PC display.
The display looks dim. Brightness is set too low. Adjust brightness from the Motion
Screen resolution is set higher
than the default 1024 x 768 with
32-bit resolution.
The Tablet PC has attempted to
spread the image of a window or
desktop beyond the screen area
of the active monitor.
Decrease the screen resolution by
opening the Motion Dashboard,
selecting Graphics Properties,
then the Schemes tab.
1. T ap the Pro perties button on the
Motion Dashboard.
2. Tap Graphics Options, then
Graphics Properties... to open the
Properties screen.
3. Select Notebook to make the
Tablet PC the primary display.
Dashboard.
Motion Computing Tablet PC User Guide ii
Page 61

Appendix A Troubleshooting and Support
The screen is unreadable or
distorted.
PEN
The Tablet PC digitizer screen
doesn’t respond to the plastic
stylus I use on my PDA.
I have the Tablet PC Input Panel
open, but a few seconds after I
write, my writing disappears.
The Motion Digitizer Pen tip
doesn’t line up with the arrowcursor when I tap on the screen.
I sometimes unintentionally click
the Pen function button while I’m
writing with the Pen.
Screen resolution and/or color
quality are set incorrectly.
Display driver has become
corrupted or uninstalled.
You’re using the wrong input
device.
You don’t have an application or
word processing program open to
which the Input Panel can send
the ink message.
The pen and display need
recalibrating.
You’re pressing the Pen button
with your thumb or finger when
you write or gripping the Pen too
tightly and accidentally pressing
the Pen button. This enables the
right-click function of the Pen.
Reset resolution to 1024 x 768
and color quality to 32-bit by
opening the Motion Dashboard,
Graphics Properties, then the
Schemes tab.
1. Open the Windows Control
Panel, select Performance and
Maintenance (Category View).
or System (Classic View).
2. Select the Hardware tab.
3. Select Device Manager.
4. Open Display adapters.
5. Double-tap on an adapter.
6. Select the Driver tab.
7. Choose Update Driver... and
follow the Installation Wizard.
Only the Motion Digitizer Pen lets
you write on the Tablet display.
The Tablet PC doesn’t respond to
other tablet pens or to a plastic
stylus.
Either open the Text Preview
window from the Tools menu on
the Input Panel, or open a word
processing program, such as
Microsoft Word, Notepad, or
Wordpad.
Double-tap the Tablet and Pen
Settings icon and select the Pen
Settings tab. Or select Calibrate
on the Motion Dashboard.
Try these hints:
• Readjust how you hold the Pen.
Place your fingers on either side
of the Pen function button when
you write.
• Practice using the Pen function
button with both your index finger and thumb to see which
you prefer.
• Relax your grip. Only a light
touch is needed to write with
the Pen.
• Deactivate the Pen right-click
function through Tablet and Pen
Settings. Instead, press and
hold the Pen to the display surface to right-click.
Motion Computing Tablet PC User Guide iii
Page 62

Appendix A Troubleshooting and Support
PROBLEM
PEN (CONTINUED)
The Pen button doesn’t work. I
can’t get it to right-click.
The buttons on the Tablet PC
don’t do what I expect them to do.
INTERFACE/PORTS
The system doesn’t recognize the
PC card I’ve inserted.
The system doesn’t recognize a
USB or IEEE 1394 device.
The Tablet PC is sitting in the
Motion FlexDock, but the system
doesn’t recognize any accessory
devices, such as the external
monitor or CDROM.
AUDIO
The built-in microphone doesn’t
seem to hear my voice correctly.
No sound is coming from the builtin speakers.
No sound is coming from any
speakers.
CAUSE SOLUTION
The right-click option for the Pen
button may be deactivated.
You may not be correctly timing
clicking the Pen button and
tapping the Pen on the display.
Button functions have been
changed.
The card is incorrectly inserted. Eject the card and re-insert it with
The device is not supported. Check Windows XP compatibility.
Windows XP may take a short
time to recognize the device.
The accessory isn’t connected to
the Tablet PC correctly.
The correct driver isn’t built into
Windows XP.
The Tablet PC isn’t fully seated in
the Motion FlexDock.
The built-in microphone is not
intended for dictation.
Connecting a headset or external
speakers mutes the built-in
speakers.
Audio volume is too low or has
been muted.
Re-activate the right-click option:
Double-click the Tablet and Pen
Settings icon, select Pen Options,
and reselect Use pen button to
right-click. Select Apply>OK.
To right-click, hold the Pen button
down and then tap on the display.
Double-tap the Tablet and Pen
Settings icon, then Tablet
Buttons. You can reset the
buttons to the defaults. Note:
Button functions are associated
with the orientation in which
they’re programmed.
the label side up.
Wait until Windows XP recognizes
the device.
Check the connection cable and
be sure it is inserted into the
correct port on the Tablet PC and
the accessory device.
Use the device’s installation CD or
check the manufacturer’s website
for the correct driver.
Reseat the Tablet PC in the
Motion FlexDock.
For speech recognition, attach a
headset microphone. A DSP
headset provides good results.
Disconnect the headset or
external speakers if not in use.
Open the Motion Dashboard and
adjust the speaker volume by
sliding the volume slider or
uncheck the Mute button.
Motion Computing Tablet PC User Guide iv
Page 63

Appendix A Troubleshooting and Support
PROBLEM
OPERATING SYSTEM
I’ve forgotten my BIOS password
and can’t access my system.
The program I’m working in has
stopped responding, but the
cursor moves and other programs
work.
The system keeps showing the
wrong date and time even after I
reset it.
The system seems to be operating
more slowly than usual.
COMMUNICATIONS
The wireless communication
keeps connecting even when I
don’t want it to.
Data doesn’t transfer through the
wired Ethernet cable.
CAUSE SOLUTION
The Tablet PC will let you enter a
certain number of incorrect
passwords (five) before it locks
the system.
The program has crashed. Press the Security button (small
Wrong time zone is selected. Check that the time zone is
The system memory battery on
the mainboard may need to be
replaced.
The hard disk drive is full or nearly
full.
The disk needs defragmenting. Run Disk Defragmenter to
The default setting is On. Uncheck the Wireless
The Ethernet cable is not
connected correctly.
Turn the Tablet PC off and back on
and try re-entering your password
(you can do this as many times as
needed). If you have forgotten
your password, contact your
Motion Computing reseller or
Motion Computing Technical
Support for information about
unlocking your system.
button with a key icon) on the
Tablet PC front panel to open the
Task Manager and end the nonresponsive program.
correct and reset it as needed.
Contact your Motion Computing
Reseller or Motion Computing
Support at
www.motioncomputing.com/
support
Run the Disk Cleanup utility to
clear out unnecessary and
temporary files. Remove
unneeded programs and files.
consolidate files and folders on
the hard drive. Consult the
“Performance and Maintenance”
section of the Help and Support
Center.
Communications checkbox in the
Motion Dashboard.
Reconnect and check the activity
LEDs next to the LAN (RJ-45)
port. They should flash green and
amber.
Motion Computing Tablet PC User Guide v
Page 64

Appendix A Troubleshooting and Support
FAQS How long will the battery stay charged?
This can vary according how you’re using the T ablet PC, but a new, fully
charged standard Motion 6-cell battery can last 3-4 hours.
Can I make the battery charge last longer?
• Change to the Max Battery power scheme (right-click on the Power/
Battery icon in the System Tray--located in the lower-right corner of
the display window--and tap Adjust Power Properties; under Power
schemes, tap Max Battery). The Tablet PC comes with Motion
Computing Optimized as the default power scheme.
• Dim the display brightness by opening the Motion Dashboard and
moving the Display Brightness slider. (You can also double-tap on the
Tablet and Pen Settings icon in the System Tray and choose the
Display tab to get this brightness slider.)
• Disconnect LAN/modem connections and disable wireless
communications when not in use (uncheck the Wireless
Communications checkbox in the Motion Dashboard).
• Turn off optional and unnecessary background programs and turn off
or unplug accessory equipment from the USB and IEEE 1394 ports.
What does the Tablet PC need for use in another country?
Just an outlet adapter, which you can find in airports and travel stores.
The AC adapter will adjust automatically to different voltage when
plugged into the correct location-appropriate power adapter.
What’s the best way to clean the display screen?
To clean the display screen, spray a window-type cleaner onto a soft
cloth, like the one supplied with your Tablet PC, then wipe the display.
Do not spray cleaners, spray/pour any liquid, nor wipe any abrasive
cleaner on the screen nor any surface of the T ablet PC. Do not use tissues
or paper towels to clean the screen. They contain wood fibers and may
scratch the surface.
Will scratches affect the display/digitizer’s performance?
Testing has not found appreciable loss of performance on a scratched
display.
How sensitive is the screen to sunlight and the elements?
As with any computer or electronic device, the Tablet PC should be
protected from liquids, dirt and sand, other contaminants, sunlight, and
extreme heat.
Will the Tablet PC work with any monitor or USB accessory keyboard, mouse,
disk drive, etc?
As long as the device’s driver is available either in the Windows XP
operating system or from the manufacturer and it carries the Windows
XP logo or certification, it should work with your Tablet PC. For more
information, see www.microsoft.com/help.
Motion Computing Tablet PC User Guide vi
Page 65

Appendix A Troubleshooting and Support
Why doesn’t the Tablet PC or FlexDock have parallel, serial, or
PS2 (mouse) ports?
Microsoft Tablet PC certification requires the system to be completely
Grab-and-Go—that is, to be able to dock with and undock from all
accessories without putting the system into suspend or shutting it down.
Connection through legacy ports (serial, parallel, PS2) often requires
suspending or restarting the system, which prevents you from moving
between desktop mode and mobile mode seamlessly in one docking/
undocking step. You can purchase a USB-to-serial or USB-to-parallel
adapter from Motion Computing or a Motion Computing reseller.
How do I adjust the Tablet for left-handed use?
Double-tap on the Tablet and Pen Settings icon in the System Tray,
located in the lower-right corner of the display window, which opens the
Settings window. You can change handedness as well as the location of
the menus. Then, recalibrate the Pen.
MOTION WARRANTIES
MOTION
COMPUTING
UPPORT
S
O
PTIONS
Standard, and Extended Warranty and Insurance Programs
Motion Computing offers a 1-year limited warranty on the Motion
Tablet PC, the Motion FlexDock, and Memory Upgrade Modules. For a
copy of this Warranty, see the Warranty packaged with your Tablet PC.
Motion Computing offers a 90-day warranty on other accessories. For a
copy of this Warranty, see the Warranty packaged with your Tablet PC.
In addition, Motion Computing offers 1-year and 2-year extended
warranties along with various screen and configuration insurance
programs. For information, contact Motion Computing at
www.motioncomputing.com/support.
Motion Computing Support
If you need assistance or answers to frequently asked questions about
your Motion Tablet PC, visit www.motioncomputing.com/support. We
also offer a Knowledge Base of additional information that may help
with your problem.
Returning the Motion Tablet PC for Repairs
To request service for your Motion Computing Tablet PC, contact
Motion Computing Technical Support at www.motioncomputing.com/
support.
Motion Computing Tablet PC User Guide vii
Page 66

Appendix A Troubleshooting and Support
RMA Process (Warranty Service)
To request warranty service, contact Motion Technical Support. If
Motion determines a return is necessary, you will be given an RMA
(Return Material Authorization) number, as well as packing and shipping
instructions. Motion Computing will complete the repair within 48
business hours and return it by two-day air shipment.
Motion Computing Tablet PC User Guide viii
Page 67

Appendix B Motion Tablet PC Specifications
Appendix
Motion Tablet PC Specifications
Motion M1200 and M1300 Tablet PCs
CPU Motion M1200: Intel Pentium III Processor-M, ULV*
Motion M1300: Intel Pentium M Processor, ULV*
*ULV=Ultra Low Voltage
Chipset Motion M1200: Intel 830GM
Motion M1300: Intel 855GM with 64MB video RAM
System Memory Motion M1200: 256MB base RAM (maximum 1GB); two PC133 SDRAM SODIMM slots
Motion M1300: 256MB base RAM (maximum 1GB); two PC2100 DDR SODIMM slots
System Storage (Hard Disk Drive) Available configurations: minimum 20GB, upgradeable
I/O Microphone-in; Headphone out; DC power in
Front Panel Buttons (in Primary
landscape mode; top to bottom)
PC Card Controller O2 Micro OZ6912T PCI Cardbus
PCMCIA Single Type-II PCMCIA cardbus slot
Audio Motion M1200: Sigmatel AC9750
Display 12.1” XGA TFT LCD (1024 x 768)
Graphics Motion M1200: Intel 830GM integrated graphics with UMA rotational support.
Communications
Ports: two USB ports (M1200=USB 1.1; M1300=USB 2.0); one IEEE 1394; one RJ-11;
one RJ-45; one VGA monitor; one docking connector
One Alt+Tab key with secondary function
One Function key
Five-way directional control button with secondary functions
Programmable Hot Key: One Dashboard display button with secondary function
Programmable Hot Key: One Portrait/Landscape rotation key with secondary function
One Security button (Ctrl+Alt+Del)
Motion M1300: RealTek ALC203
Motion M1300: Intel 855GM integrated graphics with UMA rotational support.
Rotation: 0
External Monitor Resolution Support: Motion M1200 -- 1800 x 1440 (maximum);
Motion M1300 -- 2048 x 1536 (maximum)
o
, 90o, 180o, 270
o
B
Ethernet LAN 10/100: Realtek RTL8100BL LAN on motherboard
Modem PCTEL MDC V.92 56.6Kbps/14.4Kbps transceiver fax
Wireless Motion M1200: 802.11b via Type-IIIA mini-PCI interface
Motion M1300: 802.11b dual band
Motion Computing Tablet PC User Guide ix
Page 68

Appendix B Motion Tablet PC Specifications
Input Device Active digitizer pen (no battery required) with single function button
Docking Motion FlexDock docking station. Features include: microphone-in; headphone out; DC
Battery/Power Management
power in; three USB ports (M1200=USB 1.1; M1300=USB 2.0); IEEE1394 connector;
RJ-45 connector; VGA connector (for external monitor); docking connector to the Tablet
PC; cut-out that allows access to the RJ-11 (modem) connector on either MotionTablet
PC model
Battery Type Six prismatic Lithium-ion cells; Smbus control; 40Whr capacity (optional lightweight 3-cell
Lithium-ion battery, purchased separately)
Battery Life Six-cell battery: Maximum 3-4 hours
Battery Charging Time Approximate charging time of 2 hours (Tablet PC on); 1.2 hours (Tablet PC off)
Battery Charger Motion Multi-Unit Battery Charger: Nominal Input Voltage=19VDC; nominal output
voltage=12.5V; operating ambient temperature: 0
o
storage temperature: -2
C to +70o C (-4oF to +158oF)
o
C to + 50oC (+32 F to +122oF);
AC Power Adapter 50W universal, 2-pin jack, 90~264V AC, 47-63Hz
LED System Status Indicators Power/Stand By; Battery Status; Hard Drive Access; Wireless Activity
Software (standard) Microsoft Windows XP T ablet PC Edition; Adobe Acrobat; Motion Computing Dashboard;
customer support tools; online documentation; drivers
BIOS 512 KB (Motion M1200) or 1024KB (Motion M1300) Flash BIOS ROM; password
protection for the system and Hard Disk Drive; ACPI 1.1 compliant; Pen/Button based
setup utility
Environment
Operating Temperature: +5
Storage Temperature: -20
o
C to +35oC (+41F to +95oF)
o
C to +60oC (+4F to +140oF)
Humidity: 10% to 90% without condensation
Operating Altitude: 0 to 10,000 feet
Storage Altitude: 0 to 40,000 feet
Physical Characteristics
Size 296.0mm x 240.0mm x 22.0mm (11.7” x 9.4” x 0.90”)
Carrying Weight <3.0 lb (1.36KG) (in selected configurations)
Optional Accessories*
Motion FlexDock; Motion Desktop Stand; Motion Slip Case; Motion Hardtop Cover;
Motion Portfolio; Motion Executive Portfolio; Clamshell Portfolio; Motion Mobile Keyboard
*New accessories may be added from
time to time. For a list of the currently
available accessories, see the Motion
website at
with Touch Pad; Motion Hardtop Keyboard; Motion Rubber Edge Protector; Motion
Optical Disk Drive; Motion 3-cell Battery; Motion 6-cell Battery; 256MB Memory Upgrade
for Motion Tablet PCs; 512MB Memory Upgrade for Motion Tablet PCs; Motion 40GB and
60GB hard drive upgrades.
www.motioncomputing.com/
accessories.
Service/Support
Motion Computing Support Contact your Motion Computing reseller or go to the Motion Computing support website
at www.motioncomputing.com/support.
Agency Certifications
Motion Computing Tablet PC User Guide x
Page 69

Emissions FCC 15, Class B
EN55022 (CISPR22) Class B
ICES-003 Class B
ETS 300 328
ETS 300 826
IC RSS 210
Immunity EN55024
Safety UL and CUL, UL1950
CSA C22.2
EN60950
TUV/GS
Telecom FCC Part 68
IC CS03
Appendix B Motion Tablet PC Specifications
Motion Computing Tablet PC User Guide xi
Page 70

Appendix C Wireless Mini-PCI Installation
WIRELESS
MINI-PCI
INSTALLATION
Appendix
C
Wireless Mini-PCI Installation
To install the wireless mini-PCI card (WMIB 100GS) in your Tablet PC,
follow these steps:
WARNING: To avoid the risk of personal injury or damage to the Tablet PC,
when performing the following tasks, turn off your Tablet PC, unplug the AC
power connection, and remove the battery. Ground yourself by touching a
grounded conductive surface, such as a device or appliance with a grounded,
three-pronged plug. Avoid touching the pins and leads on the memory module
and the internal circuitry of the Tablet PC.
1. After you disconnect power, unscrew the
L-shaped cover from the bottom of the
Tablet PC.
2. If you are replacing a wireless card, release the
clips on each side of the card then lift to
remove it from the slot.
3. Align the pins on the wireless card with the
receptors on the slot.
4. Gently push the new wireless
mini-PCI card into the mini-PCI
socket of the Tablet PC motherboard at a 25-degree angle until it
is firmly seated, then snap it into
place.
Motion Computing Tablet PC User Guide xii
Page 71

Appendix C Wireless Mini-PCI Installation
X
5. Connect the gray antenna from the
T ablet PC to the RF MAIN terminal
of the mini-PCI card.
6. Connect the black antenna on the
Tablet PC to the RF AUX auxiliary
terminal of the mini-PCI card.
7. Replace the cover on the bottom of
the Tablet PC, reinsert the screws,
and tighten them.
8. Reinsert the battery and connect to
AC power; then power up the
Tablet PC.
RF MAIN.....RF AU
Motion Computing Tablet PC User Guide xiii
Page 72

A
AC mini-plug 14
AC power adapter 14
wrong 47
Accessories 7, 19
FlexDock 19
Hard Top Cover 21
Keyboard 20
Memory Upgrade Modules 22
Optical Disk Drives 21
Portfolio 21
Adding memory 45
Adjusting brightness 42
Administrator password 29
Analog telephone jack 15
Application CD 23
Arrow keys 15, 41
B
Battery 13
and storing the Tablet 55
Battery Status Gauge 17
Battery Status LED 44
charging 44
Dashboard 25
disposing of 45
functions 14
gauge 44
hints 45
overheated 44
reading the Power Meter 42, 44
recharging 44
recharging time 44
Status 16
temperature 14
testing the charge 44
Battery Status 16
Battery status gauge 13, 17
BIOS
accessing 53, 54
exiting 54
Brightness 25
Button functions
Alt + Tab 15
Tablet PC Input Panel 15
Buttons
changing defaults 41
Escape button 15
Function button 15
Hot Key #1 (Dashboard) 15
primary functions 15
Resetting button functions 41
secondary functions 15
setting functions x
C
Cable connections
DVD, CDRW 46
Calibrating 25
CDROM 46
CDRW 46
Cleaning recommendations 56
Cloning 48
Commands
voice 51
Computer name 29
D
Dashboard 25
Calibrate Pen button 33
Quick Keys 25
Default power scheme 43
Desktop Stand 19
Dictation 51
Did You Know updates 10
Disappearing 36
Display
brightness 42
cleaning 55
orientation 40
Display Brightness 25
Display Rotation 25
Display screen 55
Domain name 29
Drawings 37
Dual Head Video Controller 48
DVD/CDRW 46
E
Enable 802.11 Wireless Radio 50
End User License Agreement 29
Motion Computing Tablet PC User Guide xiv
Page 73

F
Faxing 15
FCC i
Features 5, 6
FlexDock 19, 48, x
Function button. See Pen, function button 34
G
Gauge 17
Gestures, Pen 35
Graphics 48, 49
Grounding 45
H
Hard drive 13
Hard Drive LED 16
Hard Top 56
Hard Top Cover 21, 56
HDD password 52
Headphone 13
Hibernate
Power Management 45
Hibernation
definition of 31
exiting 32
when to use 31
Hints
battery 45
Power Management 45
Wireless 22
Hot Key #2 (Orientation) 15, 40
Hot Keys 41
I
I/O 6
IEEE 1394 46
Inkball 9
Intel Extreme Graphics 48, 49
Internet
initializing in Windows XP 28
K
Keyboard 20
Keyboard, USB 29
L
LEDs
Battery Status 16
front panel 16
Hard Drive 16
Power/Standby 16
status 16
Wireless 16
Lithium-ion battery 6
Lock slot 13
Locked, HDD Password 54
M
Memory 13, 45
amount of 46
Memory configurations 22
Memory upgrade modules 22
Microphone
built-in 13
jack 13
Microphone Wizard 51
Mini-PCI card 5, 13, 22
Modem 15
Motion M1200 Tablet PC
care 55
chassis 14
features 5, 6
software 28
starting and stopping 30
storing 55
Motion Digitizer Pen 14
Multimedia 52
i
O
Optical Disk Drive
AC power adapter 47
cables 46
diagram 46
installation 46
Optical Disk Drives 21
Orientation
changing 40
P
Password
Motion Computing Tablet PC User Guide xv
Page 74

forgotten 53
HDD 52
operating system 52
Password on boot 53
removing 54
PBX 15
PC card
PC card slot 13, 22
Pen
adjusting properties 35
and mouse 34
backspace gesture 35
button 32
calibrating 14, 33
care 34, 56
description 11
double-tap 33
electronics 56
function button 33
gestures 35
hints for using 33
ordering 56
overview 32
pen tether anchor 13
pointer 34
practice 8
press and hold 33
replacing pin tips 56
right-click 33
select/highlight 33
tap and drag 33
using on the display 56
Windows XP pen functions 27
writing with 33
Pen Calibration 25
Peripheral devices 19
PhoenixBIOS Setup Utility 53
Plugging in wrong AC power adapter 47
Portfolio 21, 56
Ports
IEEE 1394 13
LAN (RJ-45) 15
modem (RJ-11) 13, 15
tUSB 13
VGA monitor 13, 48
Power Management 25
hints 45
Power Meter 43
Power switch 13, 30
Power/Standby LED 16
Preview window 36
Product Key 28
Q
Quick Keys
Dashboard 25
R
RJ-11 15
S
Scheme
screen resolution 52
Screen resolution
setting up a new scheme 52
Security 52
disabling passwords 54
Security button 15
Set System Password 53
Shortcuts
Dashboard 25
Slot A 22
Slot B 22
Smart battery 16
Software 23
Dashboard 25
Microsoft activation 28
Speaker Volume 25
Speakers 13
Speech
headset microphone 51
Listening... 51
Not Listening 51
Speech recognition 26
setting up 51
Standby 25
definition of 31
exiting 32
Power Management 45
when to use 31
Standby mode 19
Starting and stopping 30
Motion Computing Tablet PC User Guide xvi
Page 75

Sticky Notes 27, 39, 40
System Restore and Recovery CDs 23
T
Tablet and Pen Settings 27
Tablet PC Input Panel
icon 36
ink 36
send as Ink 36
writing 26
Tablet PC Tutorials 9
Take a Tour of Windows XP 10
Task Manager 15
Temperature 55
Throughput 15
Touchpad 20
scroll zone 20
Travel
adjusting power settings 57
international 57
wireless on airplanes 57
Tutorials, Tablet PC 9
setting up
Wireless
non-secure 50
Wireless access point
connecting to 50
Writing 11
Writing with the Pen 33
X
xDSL 15
U
USB 46
keyboard requirement 28
USB Keyboard 20
Utilities and Drivers CD 23
V
VGA 48
Video Mode 52
Voice commands 26
Voice notes 40
W
Windows Journal 13, 27
Windows XP Pen Functions 27
Windows XP Tablet PC Edition
initilizing 28
Wireless 5, 22
Control Panel 50
Dashboard 25, 50
disabling for air travel 50, 56
Enable 802.11 Wireless Radio 50
FAA regulations 50, 56
Motion Computing Tablet PC User Guide xvii
 Loading...