

Page 1

M
OTION
C
OMPUTING
LE1600
MICROSOFT WINDOWS XP EMBEDDED TABLET CLIENT
USER GUIDE
TC
Page 2

Copyright Information
Acrobat is a registered trademark of Adobe Systems Incorporated.
Atheros. the Atheros logo, Super G, Super A/G, Wake-on-Wireless, and Wake-on-Theft are
registered trademarks of Atheros Communications, Inc.
AuthenTec is a registered trademark of AuthenTec, Inc.
BLUETOOTH is a registered trademark owned by the Bluetooth SIG, Inc., U.S.A. and
licensed to Motion Computing, Inc.
Broadcom is a registered trademark of the Broadcom Corporation.
Citrix Metaframe Access is a registered trademark of CITRIX Systems, Inc.
Intel, Intel Inside, the Intel Inside logo, Pentium, and PROSet are trademarks or registered
trademarks of Intel Corporation or its subsidiaries in the United States and other countries.
Knowles and IntelliSonic are trademarks or registered trademarks of Knowles Acoustics, Inc.
Microsoft Windows, Windows XP, Windows XP Tablet PC Edition, and Windows Journal are
either registered trademarks or trademarks of Microsoft Corporation in the United States and/
or other countries.
Motion Computing, Speak Anywhere, and View Anywhere are trademarks or registered
trademarks of Motion Computing, Inc. in the U.S. and other countries.
OmniPass is a trademark of Softex, Inc.
Realtek is a trademark of Realtek Semiconductor Corporation.
ritePen is a registered trademark of Evernote Corporation.
SigmaTel is a registered trademark and Universal Jacks is a trademark of SigmaTel
Corporation.
Wi-Fi is a registered trademark of the Wi-Fi Alliance.
Motion Computing, Inc. has made every effort to identify trademarked properties and owners
on this page. All brands and product names used in this document are for identification
purposes only and may be trademarks or registered trademarks of their respective
companies.
PATENTS: The Motion Computing products and services may be covered by one or more of
the following protected inventions. Additional patents may also be pending.
US PATENTS: D480,730. OTHER PATENTS: GB3009545, BG3009546, AUS154529,
CAN101617, J1188539. For more information, see www.motioncomputing.com/info/patents.
NOTICE: The information in this publication is subject to change without notice. MOTION
COMPUTING, INC. SHALL NOT BE HELD LIABLE FOR TECHNICAL OR EDITORIAL
ERRORS OR OMISSIONS CONTAINED HEREIN NOR FOR ACCIDENTAL OR
CONSEQUENTIAL DAMAGES RESULTING FROM THE FURNISHING, PERFORMANCE,
OR USE OF THIS MATERIAL. The information contained in this document is provided “as is”
without warranty of any kind and is subject to change without notice. The warranties for
Motion Products are set forth in the express limited warranty statements accompanying such
products. Nothing herein should be construed as constituting an additional warranty. This
publication contains information protected by copyright. No part of this publication may be
photocopied or reproduced in any form without prior written consent from Motion
Computing, Inc.
© 2005 Motion Computing, Inc. (April 2005)
P/N 024-02-0080 Rev. A00
Page 3

Table of Contents
About This User Guide
How To Search The PDF Documentation . . . . . . . . . . . . . . . . . . . . . . . . . . . . . .vii
Cautions, Warnings and Notices . . . . . . . . . . . . . . . . . . . . . . . . . . . . . . . . . . . . .vii
Menu Items, Buttons, Icons . . . . . . . . . . . . . . . . . . . . . . . . . . . . . . . . . . . . . . . . .vii
Writing on the Display . . . . . . . . . . . . . . . . . . . . . . . . . . . . . . . . . . . . . . . . . . . . .vii
Ink . . . . . . . . . . . . . . . . . . . . . . . . . . . . . . . . . . . . . . . . . . . . . . . . . . . . . . . . . . . .vii
References to Using the Pen and Pen Function Button . . . . . . . . . . . . . . . . . . .viii
Task Bar/System Tray . . . . . . . . . . . . . . . . . . . . . . . . . . . . . . . . . . . . . . . . . . . . .viii
Chapter 1 Getting Started with Your Tablet Client
Features Overview . . . . . . . . . . . . . . . . . . . . . . . . . . . . . . . . . . . . . . . . . . . . . . .1
Quick Start Instructions . . . . . . . . . . . . . . . . . . . . . . . . . . . . . . . . . . . . . . . . . . . .2
Using the Motion Digital Pen . . . . . . . . . . . . . . . . . . . . . . . . . . . . . . . . . . .2
Pen Usage . . . . . . . . . . . . . . . . . . . . . . . . . . . . . . . . . . . . . . . . . . . . . . . . .3
Helpful Hints for Using Pen and Ink . . . . . . . . . . . . . . . . . . . . . . . . . . . . . .3
Using Your Motion Tablet and User Guide . . . . . . . . . . . . . . . . . . . . . . . .4
Open the Motion Dashboard . . . . . . . . . . . . . . . . . . . . . . . . . . . . . . . . . . .4
Hardware Overview . . . . . . . . . . . . . . . . . . . . . . . . . . . . . . . . . . . . . . . . . . . . . . .5
Tablet Client Display . . . . . . . . . . . . . . . . . . . . . . . . . . . . . . . . . . . . . . . . .5
Tablet Client View AnywhereTM Display Option . . . . . . . . . . . . . . . . . . . .5
Fingerprint Reader . . . . . . . . . . . . . . . . . . . . . . . . . . . . . . . . . . . . . . . . . . .5
Motion AC Adapter . . . . . . . . . . . . . . . . . . . . . . . . . . . . . . . . . . . . . . . . . .6
Motion Battery Pack . . . . . . . . . . . . . . . . . . . . . . . . . . . . . . . . . . . . . . . . . .6
Tablet Client Buttons, Connectors, and Indicators . . . . . . . . . . . . . . . . . . . . . . .6
Front Panel Buttons . . . . . . . . . . . . . . . . . . . . . . . . . . . . . . . . . . . . . . . . . .9
Front Panel LEDs . . . . . . . . . . . . . . . . . . . . . . . . . . . . . . . . . . . . . . . . . . . .9
Battery Status LEDs . . . . . . . . . . . . . . . . . . . . . . . . . . . . . . . . . . . . . . . . . .10
Ports, Slots and Connectors . . . . . . . . . . . . . . . . . . . . . . . . . . . . . . . . . . . . . . . .11
Description of Left-Side of Tablet Client . . . . . . . . . . . . . . . . . . . . . . . . . . .11
Description of Right-Side of Tablet Client . . . . . . . . . . . . . . . . . . . . . . . . .12
Description of Docking Side of Tablet Client . . . . . . . . . . . . . . . . . . . . . . .12
Software Overview . . . . . . . . . . . . . . . . . . . . . . . . . . . . . . . . . . . . . . . . . . . . . . .13
Motion Dashboard . . . . . . . . . . . . . . . . . . . . . . . . . . . . . . . . . . . . . . . . . . .13
Motion Security Center . . . . . . . . . . . . . . . . . . . . . . . . . . . . . . . . . . . . . . . .16
Client Applications . . . . . . . . . . . . . . . . . . . . . . . . . . . . . . . . . . . . . . . . . . .16
Browser - Microsoft Internet Explorer . . . . . . . . . . . . . . . . . . . . . . . . . . . . .16
Thin Client Environment . . . . . . . . . . . . . . . . . . . . . . . . . . . . . . . . . . . . . . . . . . .16
Chapter
2 Using Your Motion Tablet Client
Pen and Ink . . . . . . . . . . . . . . . . . . . . . . . . . . . . . . . . . . . . . . . . . . . . . . . . . . . . .19
Configuring Tablet and Pen Settings . . . . . . . . . . . . . . . . . . . . . . . . . . . . .19
Calibrating Your Digitizer Pen . . . . . . . . . . . . . . . . . . . . . . . . . . . . . . . . . .20
ritePen Software Application . . . . . . . . . . . . . . . . . . . . . . . . . . . . . . . . . . .20
Using the On Screen Keyboard . . . . . . . . . . . . . . . . . . . . . . . . . . . . . . . . .22
Motion Dashboard Audio System Controls . . . . . . . . . . . . . . . . . . . . . . . .22
Adjusting Display Settings and Screen Brightness . . . . . . . . . . . . . . . . . .23
Motion Computing LE1600TC Tablet Client User Guide iii
Page 4

Power Management . . . . . . . . . . . . . . . . . . . . . . . . . . . . . . . . . . . . . . . . . . . . . .27
Configuring Your Power Management Settings . . . . . . . . . . . . . . . . . . . . .27
Using Your Batteries . . . . . . . . . . . . . . . . . . . . . . . . . . . . . . . . . . . . . . . . .29
Helpful Hints: Battery and Power Management . . . . . . . . . . . . . . . . . . . .31
Security Features and Settings . . . . . . . . . . . . . . . . . . . . . . . . . . . . . . . . . . . . . .32
Motion Security Center . . . . . . . . . . . . . . . . . . . . . . . . . . . . . . . . . . . . . . .32
Fingerprint Reader and Motion OmniPass . . . . . . . . . . . . . . . . . . . . . . . . .33
Helpful Hints for Successful Fingerprint Captures . . . . . . . . . . . . . . . . . . .36
Capturing a Fingerprint . . . . . . . . . . . . . . . . . . . . . . . . . . . . . . . . . . . . . . .37
Capturing a Second Fingerprint Later . . . . . . . . . . . . . . . . . . . . . . . . . . . .40
Configuring Advanced OmniPass Features . . . . . . . . . . . . . . . . . . . . . . . .40
Logging Onto a Remembered Site . . . . . . . . . . . . . . . . . . . . . . . . . . . . . .42
Configuring Strong Logon Security . . . . . . . . . . . . . . . . . . . . . . . . . . . . . .42
Infineon Trusted Platform Module . . . . . . . . . . . . . . . . . . . . . . . . . . . . . . .43
Windows Security System Components Overview . . . . . . . . . . . . . . . . . .44
Speech . . . . . . . . . . . . . . . . . . . . . . . . . . . . . . . . . . . . . . . . . . . . . . . . . . . . . . . .48
Motion Speak Anywhere Technology . . . . . . . . . . . . . . . . . . . . . . . . . . . .48
Helpful Hint for Dictating and Recording . . . . . . . . . . . . . . . . . . . . . . . . . .50
Ports, Slots and Connectors . . . . . . . . . . . . . . . . . . . . . . . . . . . . . . . . . . . . . . . .50
PC Cards . . . . . . . . . . . . . . . . . . . . . . . . . . . . . . . . . . . . . . . . . . . . . . . . . .50
SD Cards . . . . . . . . . . . . . . . . . . . . . . . . . . . . . . . . . . . . . . . . . . . . . . . . . .50
USB Ports . . . . . . . . . . . . . . . . . . . . . . . . . . . . . . . . . . . . . . . . . . . . . . . . .51
Speaker Port . . . . . . . . . . . . . . . . . . . . . . . . . . . . . . . . . . . . . . . . . . . . . . .51
Microphone Port . . . . . . . . . . . . . . . . . . . . . . . . . . . . . . . . . . . . . . . . . . . . .51
VGA Connector . . . . . . . . . . . . . . . . . . . . . . . . . . . . . . . . . . . . . . . . . . . . .51
Docking Connector . . . . . . . . . . . . . . . . . . . . . . . . . . . . . . . . . . . . . . . . . .51
Wi-Fi (802.11) Wireless Connections . . . . . . . . . . . . . . . . . . . . . . . . . . . . .52
Bluetooth Wireless Connections . . . . . . . . . . . . . . . . . . . . . . . . . . . . . . . .53
Using the Bluetooth Application . . . . . . . . . . . . . . . . . . . . . . . . . . . . . . . . .55
Helpful Hints for Using Bluetooth Wireless . . . . . . . . . . . . . . . . . . . . . . . .59
Using Infrared Wireless Connections . . . . . . . . . . . . . . . . . . . . . . . . . . . . .60
Tablet Client Buttons . . . . . . . . . . . . . . . . . . . . . . . . . . . . . . . . . . . . . . . . . . . . . .62
Chapter
iv Motion Computing LE1600TC Tablet Client User Guide
3 Care and Maintenance
Caring for Your Tablet Client and Its Accessories . . . . . . . . . . . . . . . . . . . . . . . .63
General Care . . . . . . . . . . . . . . . . . . . . . . . . . . . . . . . . . . . . . . . . . . . . . . .63
Caring for the Standard and View Anywhere Displays . . . . . . . . . . . . . . .64
Caring for the Motion Digitizer Pen . . . . . . . . . . . . . . . . . . . . . . . . . . . . . .64
Ordering New Pens . . . . . . . . . . . . . . . . . . . . . . . . . . . . . . . . . . . . . . . . . .65
Traveling With Your Tablet Client . . . . . . . . . . . . . . . . . . . . . . . . . . . . . . . . . . . .65
Traveling by Air . . . . . . . . . . . . . . . . . . . . . . . . . . . . . . . . . . . . . . . . . . . . .65
FAA Wireless Air Travel Requirement . . . . . . . . . . . . . . . . . . . . . . . . . . . .65
Other Travel Hints . . . . . . . . . . . . . . . . . . . . . . . . . . . . . . . . . . . . . . . . . . .66
Page 5

Appendix
A Troubleshooting and Support
Solutions To Common Problems . . . . . . . . . . . . . . . . . . . . . . . . . . . . . . . . . . . . .67
Frequently Asked Questions . . . . . . . . . . . . . . . . . . . . . . . . . . . . . . . . . . . . . . . .71
Motion Warranties . . . . . . . . . . . . . . . . . . . . . . . . . . . . . . . . . . . . . . . . . . . . . . . .72
Standard and Extended Warranty and Insurance Programs . . . . . . . . . . .72
Motion Computing Support . . . . . . . . . . . . . . . . . . . . . . . . . . . . . . . . . . . . . . . . .72
Motion Computing LE1600TC Tablet Client User Guide v
Page 6

vi Motion Computing LE1600TC Tablet Client User Guide
Page 7
About This User Guide
HOW TO SEARCH THE PDF DOCUMENTATION
CAUTIONS, WARNINGS AND NOTICES
You can search for and locate information in this PDF using the following
methods:
• In the Bookmark navigation tab (left frame of PDF), select the section
of the user guide you want to view. The section opens in the right
frame of the PDF.
• In the Table of Contents of the PDF, click on the section of the user
guide you want to open. The section opens in the right frame of the
PDF.
• In the tool bar at the top of the PDF, click the binoculars icon or select
the menu Edit > Search, and enter the text describing the topic you
want to view, and then tap (click) Search. Narrow your search by
selecting the search settings options.
• From the menu, select Edit > Find or press Ctrl+F, and type the text
describing the topic you want to view, and then tap (click) Next.
The following notices are found in this User Guide:
WARNING: Text set off in this way indicates that failure to
follow directions in the warning could result in bodily harm or
loss of life.
CAUTION: Text set off in this way indicates that failure to
follow directions in the CAUTION could result in damage to
the equipment or loss of information.
IMPORTANT: Text set off in this way presents information or
instructions that should be followed or information of particular
interest.
NOTE: Text set off in this way presents information or instructions.
MENU ITEMS,
B
UTTONS, ICONS
WRITING ON THE
ISPLAY
D
Menu items, icons, and instructions found in the procedures in this User
Guide are set apart by capitalizing them exactly as shown on screen.
Examples are the Start menu, Dashboard, WACOM Pen Settings icon,
and Apply buttons.
Writing on the Motion Tablet Client digitizer display in this User Guide
refers to any handwritten input using the specially-designed Motion
digitizer pen, that is provided. The display responds only to this pen and
not to any other type of pen or to a stylus or other device such as those
used with personal digital assistants (PDAs). The display surface may be
damaged by ink pens or other pointed objects.
INK The term ink refers to digital ink, i.e., hand-drawn or handwritten input
and that can be displayed or converted into text.
Motion Computing LE1600TC Tablet Client User Guide vii
Page 8

REFERENCES
TO USING THE
PEN AND
PEN
FUNCTION
UTTON
B
Notations for using the Motion Digitizer Pen, which are found throughout this
User Guide, are described below:
• Tap — Firmly tap the pen on the Tablet Client display, without pressing
the function button on the pen; a tap equals a mouse left-click
• Double-tap — Tap the pen twice on the display, without pressing the
function button on the pen
• Right-click — Press the function button on the pen and tap the pen on
the display (equals a mouse right-click)
• Tap and drag — Tap and drag the pen on the display
• Select/Highlight — Tap on the item on the display to activate the function: to select a line of text, tap, hold down the button, and drag the pen
across the text to highlight it
TASK BAR/ SYSTEM TRAY
The Microsoft Windows task bar is on the lower-left of the display; the
system tray (or notification area) is on the lower right, near the clock.
viii Motion Computing LE1600TC Tablet Client User Guide
Page 9

Chapter
1
Getting Started with Your Tablet Client
Chapter
Getting Started with Your Tablet Client
The Motion LE1600TC Tablet Client combines the best features of thin client
computing with the unique mobility and versatility found only in a Tablet
Client. For more information about the thin client environment, see “Thin
Client Environment” on page 16.
• This chapter provides a quick start overview of the hardware and software features of the LE1600
• Chapter 2 provides specific details on how to set up and use the Tablet
Client.
• Chapter 3 provides information about the Care and Maintenance of your
new Tablet Client.
• Appendix A is a summary of common problems and the steps to take if
those problems occur.
• Appendix B is a reference for the Tablet Client Specifications.
It is not necessary to read this document from cover to cover. If you are
familiar with thin client computers, you may feel comfortable proceeding to
the instructions in the next chapter. If there are certain things you want to
learn about your new Tablet Client, look in the Table of Contents or search
for that topic.
TC.
1
FEATURES OVERVIEW
The Motion LE1600TC Tablet Client includes these key features:
•Microsoft
• Optional View Anywhere
outdoor and indoor viewing, providing the same wide viewing angles as
the standard display while significantly improving the sunlight contrast
ratio and significantly reducing unwanted reflection and glare
• Ambient Light Sensor (ALS) to automatically optimize display performance and battery life
• Integrated 802.11 Wi-Fi wireless technology
• Integrated Bluetooth
devices
• Fingerprint reader for convenient, secure biometric password management; combined with Motion OmniPass software to manage settings
• Speak Anywhere
tics software with integrated array microphones to optimize the audio
capabilities of your LE1600
®
Windows® XP Embedded Operating System
TM
display which optimizes the display for both
®
wireless technology for pairing with Bluetooth
TM
technology that combines user-configurable acous-
TC
Motion Computing LE1600TC Tablet Client User Guide 1
Page 10

Chapter
1
Getting Started with Your Tablet Client
• Motion Dashboard for convenient access to Tablet Client controls
• Three clients: Remote Desktop, CITRIX MetaFrame Access® Program
Neighborhood, and Microsoft Internet Explorer for application support
• High speed USB ports
• Front panel status LEDs and function buttons
• Screen rotation
• Handwriting and voice recognition
• PC Card slot for memory expansion, or accessory
connections
• Secure Digital (SD) Card slot to support SD storage devices
• User-configurable power-saving schemes
• Additional I/O ports
• Two audio jacks (designated as microphone/audio in and
headphone/audio out)
• Two USB 2.0 ports
• External VGA monitor port
• RJ-45 (Gigabit Ethernet network)
• DVI-D (Digital Video Interface) port
• Infrared (IrDA) transceiver
• DC power-in port
• Motion Digitizer Pen for ink input, with a pen storage bay and a pen
tether anchor built into the Tablet Client
• Universal security lock slot
QUICK START INSTRUCTIONS
Start the LE1600TC by sliding the power switch. The power LED turns blue
and the Disk Drive (DD) LED intermittently flashes blue (these are the first
and third LEDs on the upper right corner). Then, Windows XP Embedded
launches.
Using the Motion Digital Pen
Function Button
Tip
contains no batteries and requires no external power. The pen contains a
pen function button, used for right-clicking (like a mouse) and a small
opening at one end for attaching a pen tether cord. Using the pen tether
(provided) helps prevent pen loss. Attach the tether to the built-in pen
tether post on the upper right edge of the Tablet Client. The pen also
comes with replacement pen tips and a replacement tool. For information
about replacing the pen tips, refer to the Care and Maintenance
information in Chapter 3.
The Motion Digital Pen contains
internal electronics that enable
you to enter digital ink on the
Tablet Client display. The pen is a
sensitive, electronic, data-entry
device designed in conjunction
with the display. The pen includes
a user-replaceable tip. The pen
2 Motion Computing LE1600TC Tablet Client User Guide
Page 11

Chapter
1
Getting Started with Your Tablet Client
Pen Usage
Think of the pen as your mouse; review the following pen information about
tapping the pen and the using the function button.
• Tap — Firmly tap the pen on the Tablet Client display, without pressing
the function button on the pen; a tap equals a mouse left-click
• Double-tap — Tap the pen twice on the display, without pressing the
function button on the pen
• Right-click — Press the function button on the pen and tap the pen on
the display (equals a mouse right-click)
• Tap and drag — Tap and drag the pen on the display
• Select/Highlight — Tap on the item on the display to activate the function: to select a line of text, tap, hold down the button, and drag the pen
across the text to highlight it
NOTE: For best results, we recommend that you calibrate
your pen before using it for the first time. For information
about this and other pen procedures, refer to “Calibrating Your
Digitizer Pen” on page 20.
For information about the ritePen software application, refer to “ritePen
Software Application” on page 20. The ritePen feature is a handwriting
recognition application that is included with the Tablet Client.
Helpful Hints for Using Pen and Ink
Here are some additional hints about working with the digital pen. For more
information about the pen and Tablet Client settings refer to “Configuring
Tablet and Pen Settings” on page 19.
• When you write with the pen, you can rest your hand or arm anywhere
without disturbing any open programs or damaging the display.
• Watch the cursor instead of the pen tip when you write. The cursor is a
guide for your pen movements. If it does not align with the pen tip, you
should recalibrate the pen.
• Practice writing and learn how firmly and where to tap on the Tablet Client display. You need these skills for activating programs, menus, or
other Tablet Client functions.
• The pen can be held like any other writing tool. Learn how to hold it and
when and how to press the function button on the pen, which activates
right-click options (such as pop-up menus). You can also activate the
right-click options by pressing and holding the pen tip on the surface of
the display.
• Change pen tips every 90 days in a clean environment. Change pen tips
every 30 days if you use the pen in an environment with airborne or surface debris (sand, dust, etc.) or if you drop it on a rough surface. Any of
these or similar situations could damage the pen tip or embed debris in
it. You may not notice the damage or debris until it is too late. Damaged
pen tips could scratch the display.
Motion Computing LE1600TC Tablet Client User Guide 3
Page 12

Chapter
1
Getting Started with Your Tablet Client
To familiarize yourself with the Tablet Client, perform the following:
• Review the User Guide
• Open the Motion Dashboard
Using Your Motion Tablet and User Guide
Double-tap the shortcut User Guide icon on your desktop to open the
Motion Computing LE1600
using the pen, the Motion Dashboard, and other features are provided in
the user guide.
TC Tablet Client User Guide. Instructions for
Open the Motion Dashboard
The Motion Dashboard is an exclusive Motion Computing application that
you can use to access programs and functions as well as configure your
Tablet Client.
To open the Motion Dashboard, press the Dashboard button on the Tablet
Client front panel or select Start > All Programs > Motion Resources >
Motion Dashboard. (Refer to “Tablet Client Buttons, Connectors, and
Indicators” on page 6 for a description of the Tablet Client buttons and
indicators).
The Motion Dashboard can be used to monitor and set some of the most
commonly used control panel items for the Tablet Client. For more
information, refer to “Motion Dashboard” on page 13.
4 Motion Computing LE1600TC Tablet Client User Guide
Page 13

Chapter
1
Getting Started with Your Tablet Client
HARDWARE OVERVIEW
Tablet Client Display
The Motion Tablet Client includes a 12.1-inch display with wide viewing
angles. The Tablet Client standard display incorporates the following
features:
• A highly-readable, liquid-crystal display (LCD)
• A protective layer that offers a firm writing surface and minimizes glare
• A digitizer panel underlying the display that enables handwritten entry
with a specially-designed Motion Digitizer Pen
• A wide viewing angle display that provides bright, clear viewing at up to
180 degrees, plus a high contrast ratio, fast response time, and authentic color at any angle
• A digitizer that responds to the Motion Digitizer Pen, but not to a plastic
stylus or to finger touches
• A display surface that lets you touch or rest your hand on it without
affecting open programs or data input
NOTE: For information about display care, see Chapter 3 of
this User Guide.
Tablet Client View AnywhereTM Display Option
The View Anywhere display option was designed to enhance indoor viewing
and to improve outdoor viewing while retaining all the standard display
features. The bright 12.1-inch XGA TFT display was developed from a
proprietary optical enhancement process based on technology initially
developed for high-end military aviation and marine applications. The View
Anywhere display includes all the features of the standard display plus the
following components:
• A protective layer that improves the sunlight contrast ratio and significantly reduces reflection and glare
• Improved sunlight contrast ratio, which enhances viewability at wide
viewing angles even further than the standard display
• Enhanced optical display technology with a significant reduction in
unwanted reflection and glare and improved light pass-through efficiency
Fingerprint Reader
The fingerprint reader enables you to scan your
fingerprint and associate it with passwords. This feature
offers a quick and convenient way to log on to your Tablet
Client, provides global password management, and
protects your Tablet Client data from unauthorized
access. The OmniPass Control Center software enables
configuration of the fingerprint reader. For more
information about setting up the fingerprint reader and
OmniPass settings, see “Fingerprint Reader and Motion
OmniPass” on page 33.
Motion Computing LE1600TC Tablet Client User Guide 5
Page 14
Chapter
1
Getting Started with Your Tablet Client
The fingerprint reader also serves as a scrolling device; you can move
your finger vertically (from top to bottom) to scroll the cursor within the
active application window.
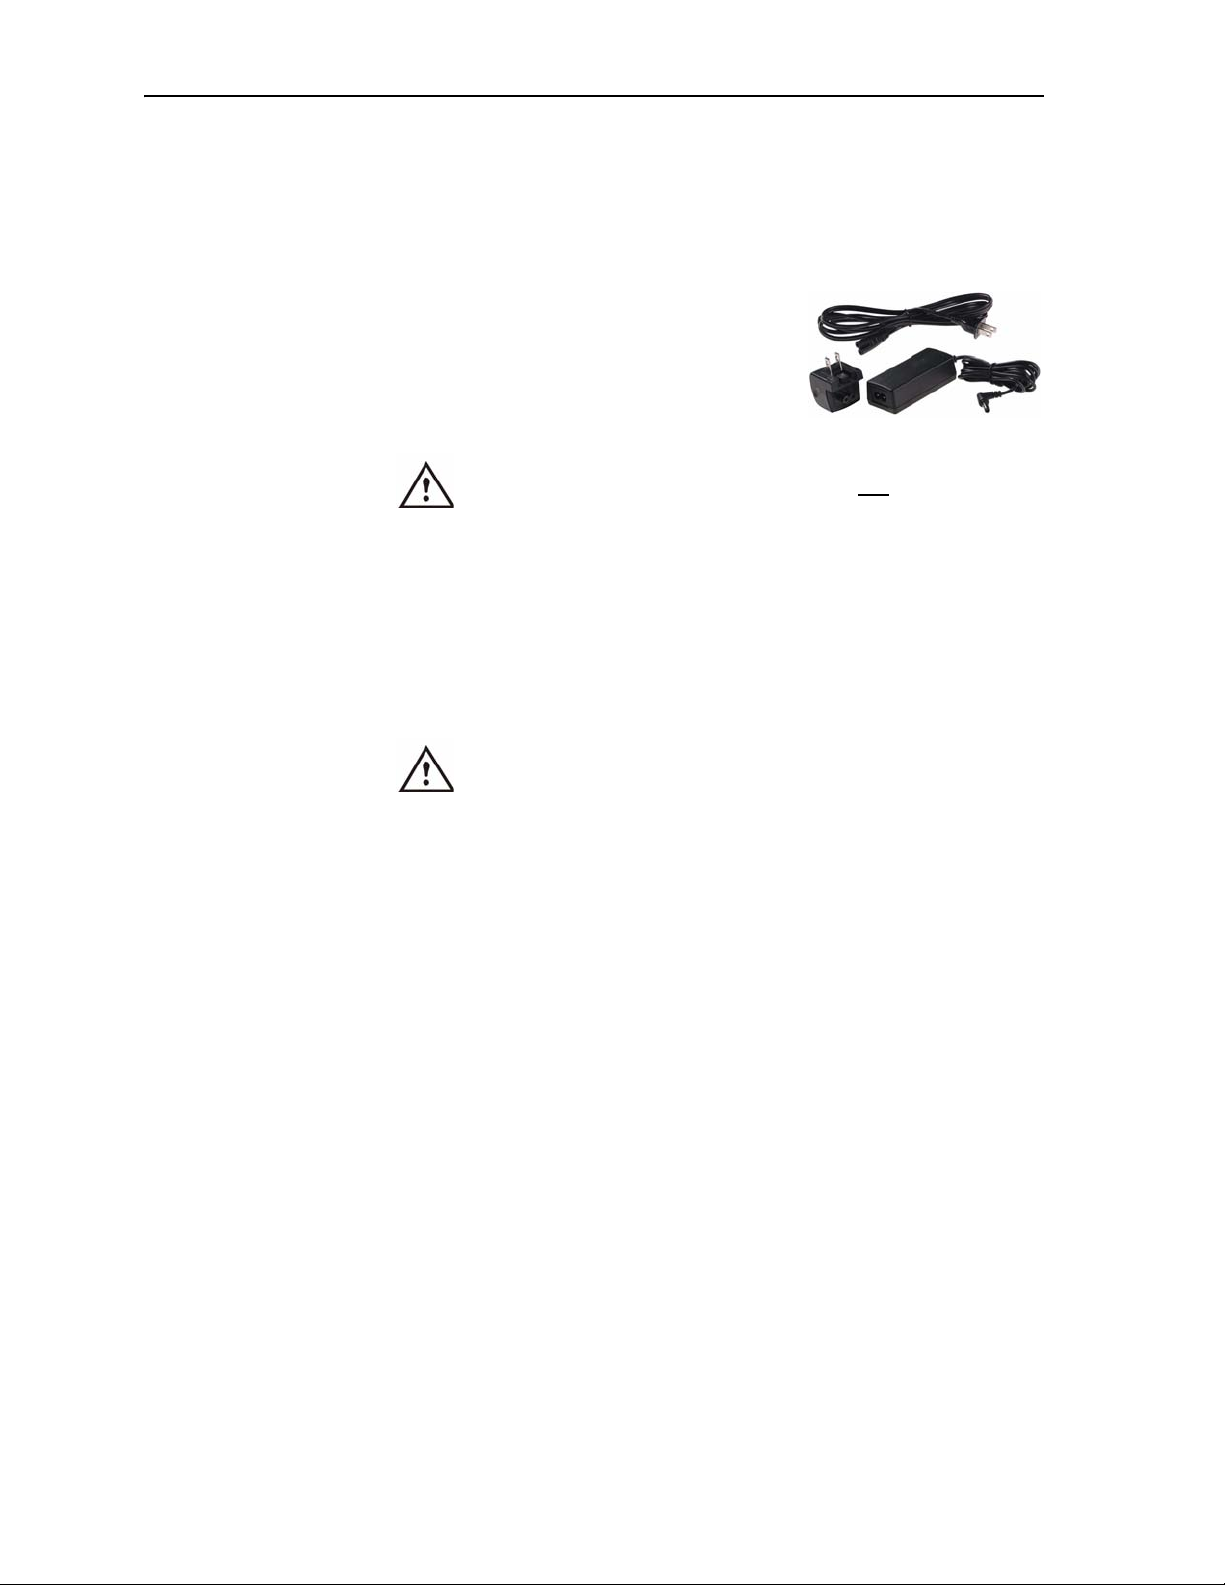
Motion AC Adapter
The Motion AC Adapter has three components:
• AC power adapter
• Power cord
• AC mini-plug with folding prongs that can be
used instead of the long cord when traveling
CAUTION: Use the Motion AC Adapter with your
Motion Tablet Client. This adapter should not
to power any other electronic devices. If you do so,
you may damage the accessory or the other device.
Motion Battery Pack
Each Motion Tablet Client ships with a Lithium-ion (Li-ion) battery mounted
and latched at the top edge of the Tablet Client. Extra batteries are
available from Motion Computing. An optional Extended Battery is
available that provides additional hours of continuous operation.
be used
TABLET C LIENT
B
UTTONS,
ONNECTORS,
C
AND
INDICATORS
WARNING: To avoid personal injury, handle the
battery with care. Do not open, puncture, short, or
expose it to fire or water. Keep the battery in an
ambient temperature of less than +104°F (+40°C);
for example, do not leave it in a closed car in hot
weather for an extended time.
For additional safety information, see the Safety and
Regulatory Guide packaged with your Tablet Client.
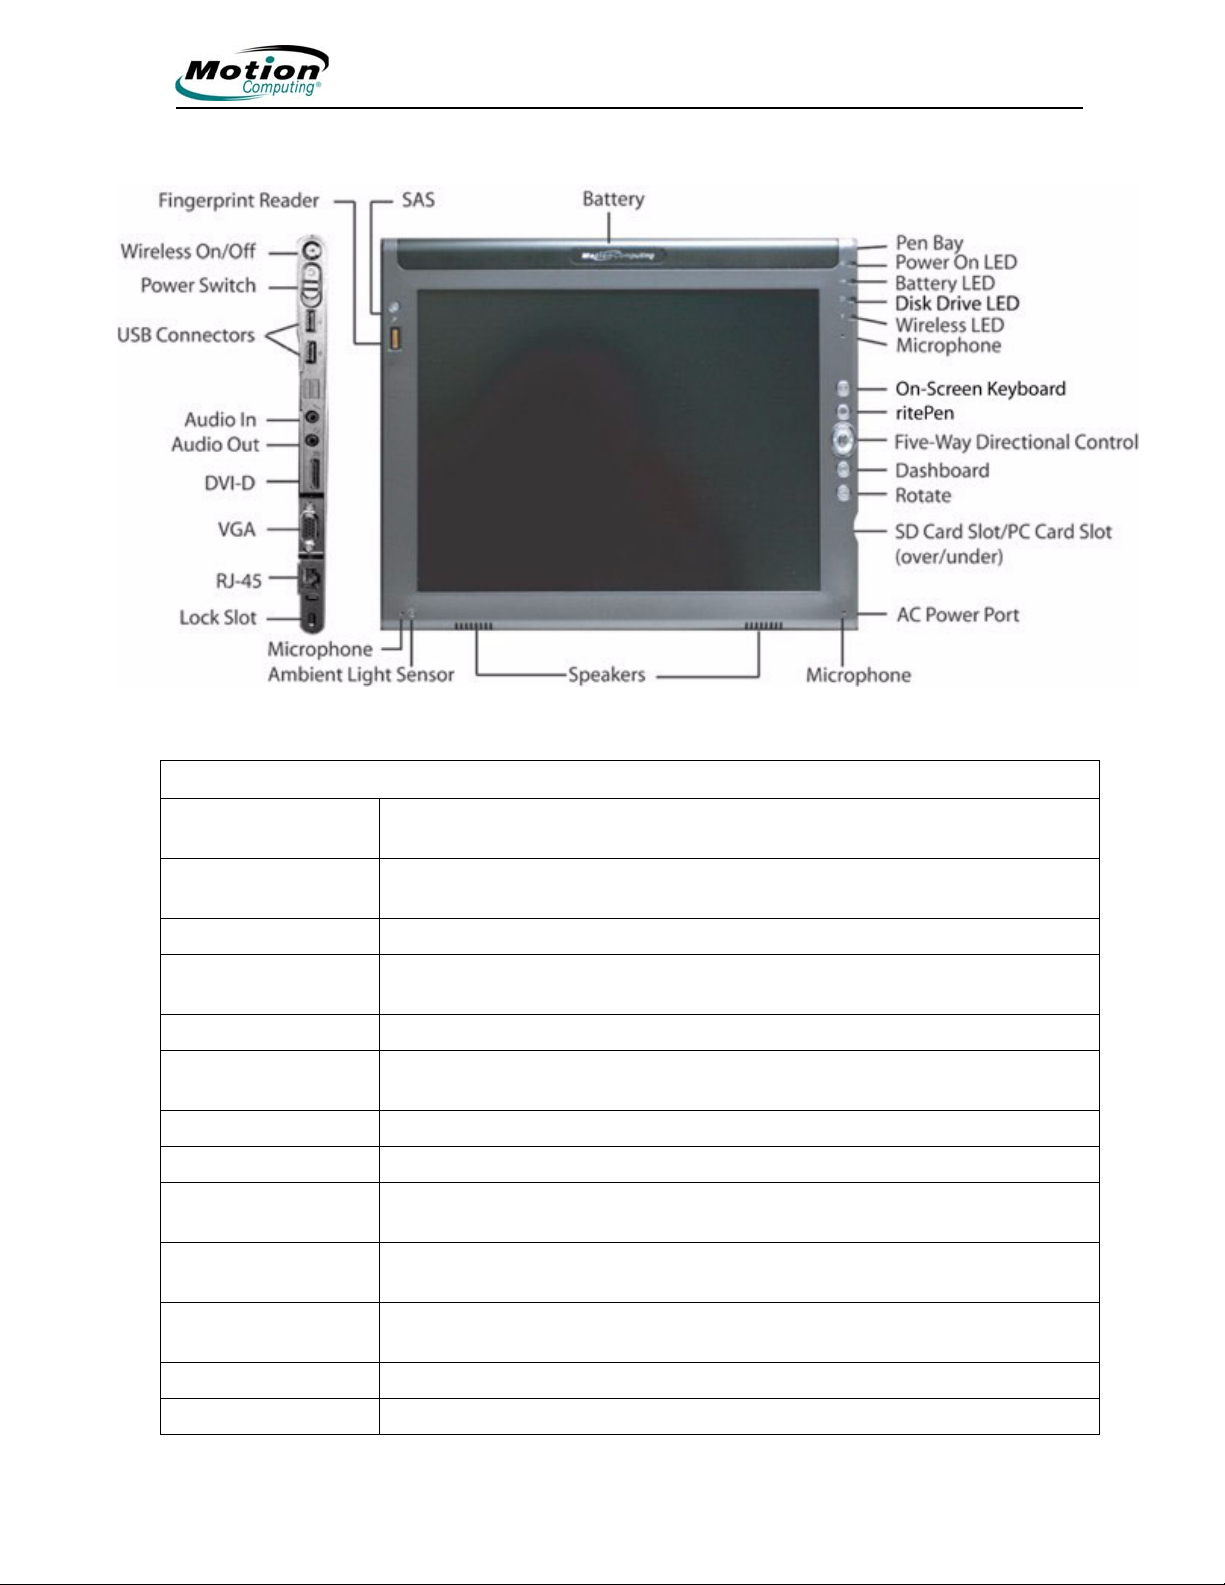
The following illustration shows the buttons, connectors, and other
components on the Tablet Client. While there are no controls on the back
side of the Tablet Client, there is a sliding panel that covers the Extended
Battery connector. This panel must be open before connecting the optional
Extended Battery. The connector panel should be closed when not being
used.
6 Motion Computing LE1600TC Tablet Client User Guide
Page 15
Chapter
1
Getting Started with Your Tablet Client
Tablet Client LEDs, Buttons, Connectors, and Other Components
Wireless On/Off Alternately turns wireless on and off; makes it easy to disable wireless on
airplanes (button must be pressed and held for 1/2 second to take effect)
Pen bay Storage area for the Motion digitizer pen; located at upper right edge. A pen
tether attachment point is located directly above the pen bay.
Power LED Displays power status; lights blue when power is on, blinks blue on low battery
Battery LED Displays battery status; lights amber when battery is charging; blinks blue when
in stand by state
Disk drive LED Displays disk drive (DD) activity - blinks blue
Wireless LED Displays wireless 802.11 and Bluetooth activity; white for 802.11, blue for
Bluetooth
On-Screen Keyboard Starts the On-Screen Keyboard
ritePen Starts the ritePen application
Five-way directional
control button
Dashboard Opens the Motion Dashboard
Rotate Display Changes the Tablet Client display orientation
Scrolls Up/Down/Right/Left + Enter
SAS button Ctrl-Alt-Del
Microphones Work at a natural distance; disabled when an external microphone is plugged in
Motion Computing LE1600TC Tablet Client User Guide 7
Page 16

Chapter
PC card slot Holds one Type-II PC Card for memory expansion, Smart Card
SD card Slot Holds one SD-type card, for memory expansion (SDIO compatible)
1
Getting Started with Your Tablet Client
Tablet Client LEDs, Buttons, Connectors, and Other Components
Infrared (IrDA)
transceiver
Power switch Turns the Tablet Client on and off; can be configured to activate Stand By mode
DVI-D connector A digital video interface digital connector for attachment to a digital video
AC power port AC point of connection for the AC adapter
RJ-45/LAN Standard RJ-45 connector for a 10/100/1000 Mbps network
VGA connector A standard DB-15 monitor connector for an external monitor, projector, or other
Docking connector Connects the Tablet Client with the Motion FlexDock for the LE series (not
USB ports (2) Universal Serial Bus; a port for connecting USB 2.0 devices, such as a storage
Audio input/output (2) Microphone and headset plug; 3.5 mm plug
Speakers (2) Integrated speakers that are muted when you connect a headset or external
An infrared transceiver built into the Tablet Client. Allows communication with
other devices compliant with the IrDA standard. Effective range is approximately
3 feet
interface monitor. An optional DVI-D cable is available from Motion Computing.
To use a digital video interface monitor you must use this cable with your Tablet
Client.
VGA device
pictured in the illustration)
device, mouse, printer, digital camera, or optical disk drives. You may need to
install drivers for these devices; consider your available system space when
installing drivers.
speakers
Fingerprint reader Swipe-type sensor for scanning fingerprints; used for password management
and security; also serves as a scroll device in active application window
Ambient Light Sensor Measures the background light and automatically balances display brightness
Air vent Active cooling system vent, dissipates heat from the Tablet Client (side and
back) (not pictured in the illustration)
External battery
connector
An external battery connector is included on the backside of the Tablet Client. It
is located under a sliding panel in the upper center of the chassis. The sliding
panel must be opened before attempting to attach the Extended Battery.
8 Motion Computing LE1600TC Tablet Client User Guide
Page 17
Chapter
1
Getting Started with Your Tablet Client
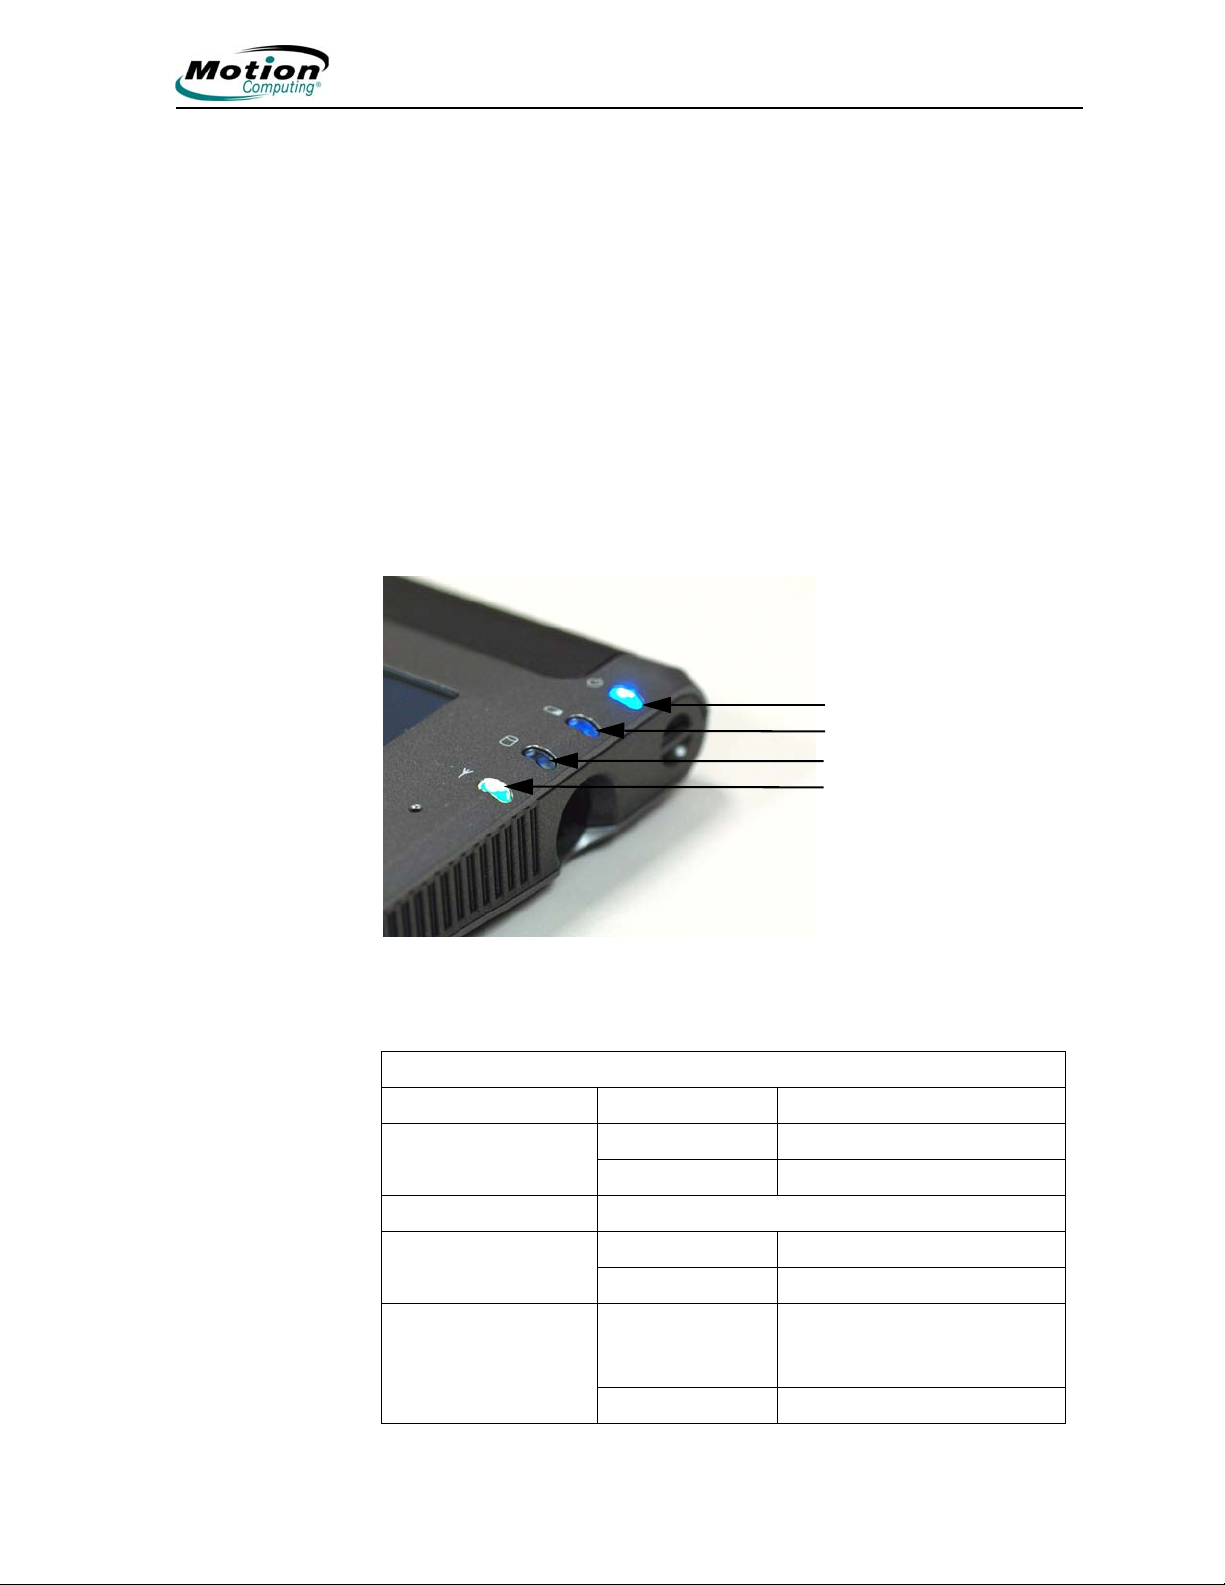
Front Panel Buttons
The front panel of the Motion Tablet Client contains six buttons. The SAS
(secure attention sequence) button is located at the top left corner of the
Tablet Client and activates the Ctrl-Alt-Del function when it is pressed.
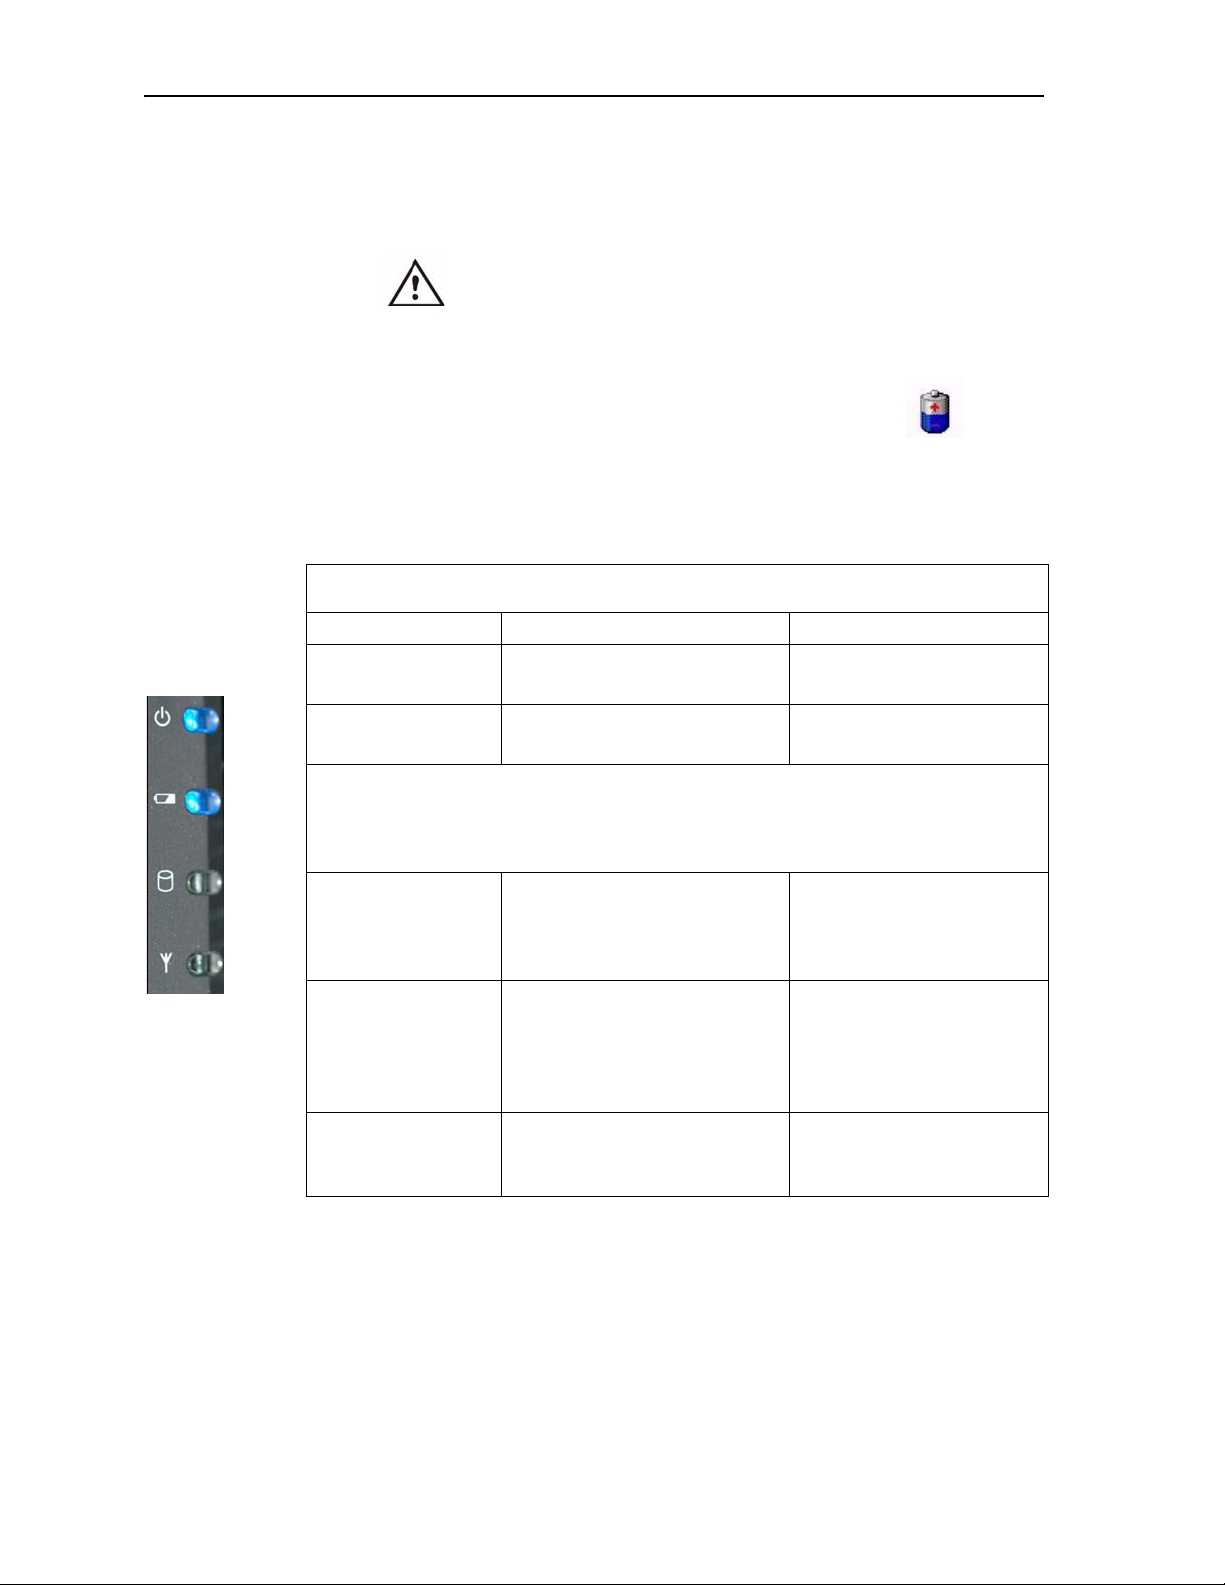
Front Panel LEDs
The Tablet Client front panel (shown in the illustration) contains status LEDs
for the following:
• Power On and Off
• Battery
• Disk Drive
• Wireless
Power
Battery
Disk Drive
Wireless (white is
802.11, blue is
Bluetooth)
The front panel LEDs are described in the following table.
Front Panel Status LEDs
LED Description Status
Power/Stand By Steady blue Tablet Client is on
Flashing blue Tablet Client is in Stand By
Battery Status See Front Panel Battery Status LED below
Disk Drive Flashing/On Some DD activity
Off No DD activity
Wireless Activity Independently
flashing white and
blue
Off Wireless is off
Motion Computing LE1600TC Tablet Client User Guide 9
Wireless is on:
White=802.11
Blue=Bluetooth
Page 18
Chapter
1
Getting Started with Your Tablet Client
Battery Status LEDs
Your Motion Tablet Client is equipped with a smart battery that provides
information about its power status.
CAUTION: To avoid personal injury, or the risk of fire
or explosion if the battery is overheated, wait until the
battery cools to room temperature before recharging
or replacing it.
NOTE: If the unit is operating on battery power, you
can move the pen over the Power/Battery icon
(shown here and found in the system tray at the
lower-right corner of the Tablet Client display) to see
the number of hours of battery life and the percentage of
battery charge remaining.
Front Panel Battery Status LED
Battery LED Battery Status Action
Power
Battery
Hard
Disk
Drive
Wireless
Steady blue Battery charged
(AC plugged in)
Amber Battery charging (AC plugged
in)
NOTE: When the remaining battery charge is 10%, your Tablet Client issues a Low
Battery alarm message in addition to the LED warning. For information about
modifying this alarm (you can set it to display a message or to produce an audible
warning), refer to “Configuring Your Power Management Settings” on page 27.
Fast-flashing amber
(lasts only a few
seconds)
Slow-flashing amber The battery is too hot to charge Move the Tablet Client/
Off Tablet Client is unplugged from
3% battery charge remaining
(AC unplugged)
AC power and the system is
running on battery power.
None
None
The Tablet Client issues a
Critical Battery alarm and
automatically goes into
Stand By mode.
battery to a cooler
environment until the
temperature is closer to
normal.
Plug the Tablet Client into
AC power if you want to
preserve battery power.
Refer to “Power Management” on page 27 for more information about your
battery and power settings.
10 Motion Computing LE1600TC Tablet Client User Guide
Page 19
Chapter
1
Getting Started with Your Tablet Client
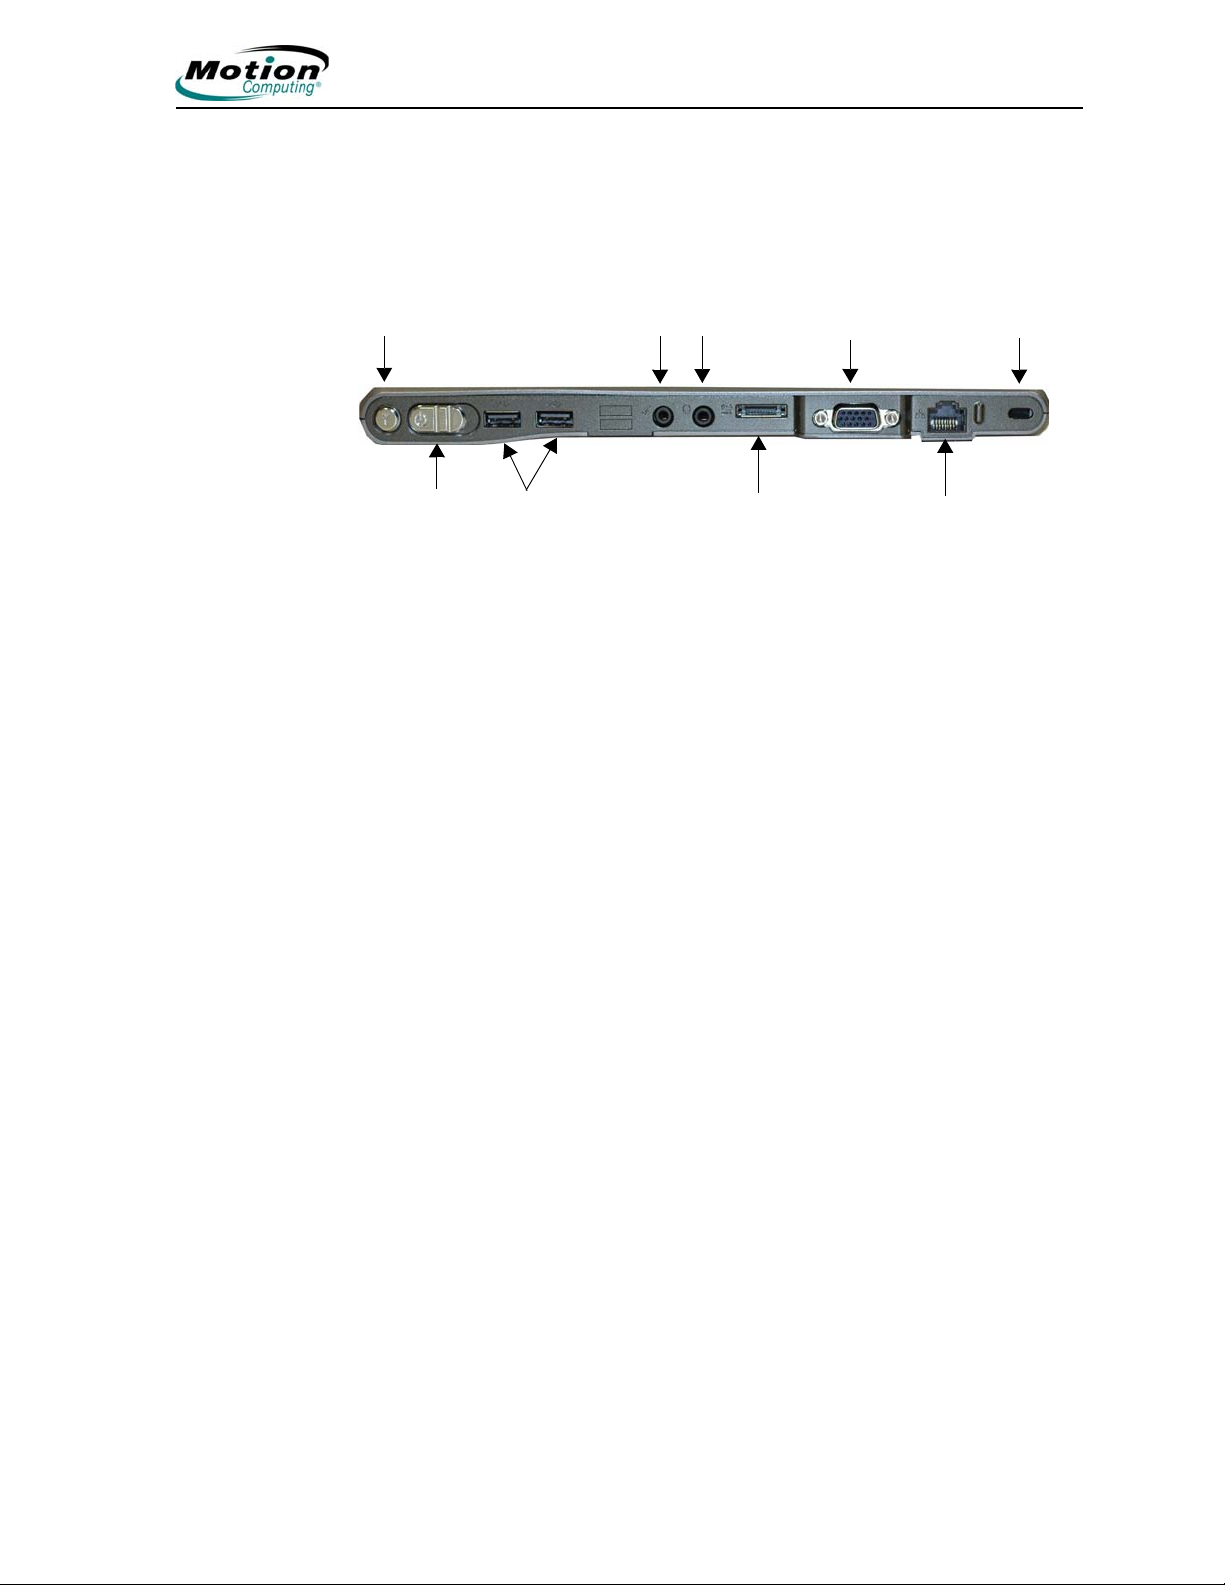
PORTS, SLOTS AND CONNECTORS
Description of Left-Side of Tablet Client
The Motion Tablet Client contains a number of ports and connectors that
you can use to attach to input/output and networking devices. The following
illustration shows the ports, slots, and connectors that are located on the left
side of the LE1600
Wireless On/Off
Power
USB Connectors. Two USB connectors are included. These can be used
to connect any USB device to the Tablet Client.
Audio In/Out Connectors. The connectors are marked for microphone
input and speaker output connections.
DVI-D Connector. The Digital Video Interface (DVI-D) connector can be
used to attach a third-party Digital Video Interface enabled monitor to the
Tablet Client. An optional DVI-D cable is offered by Motion Computing for
this purpose. Refer to “Mirroring or Extending Your Display” on page 25
about how to set up video that is displayed on an attached external display/
monitor.
TC Tablet Client.
USB Connectors
Audio In/Out
DVI-D
VGA
LAN Connector
Lock
Slot
VGA Connector. The VGA connector can be used to attach a third-party
VGA capable display/monitor to the Tablet Client. Motion Computing does
not provide a VGA cable; refer to the information that came with your
display for the type of cable to use.
LAN Connector. This is a Gigabit Ethernet LAN (RJ-45) connector that
can be used to connect to a network, cable modem, or DSL; it contains two
status LEDs.
Motion Computing LE1600TC Tablet Client User Guide 11
Page 20
Chapter
1
Getting Started with Your Tablet Client
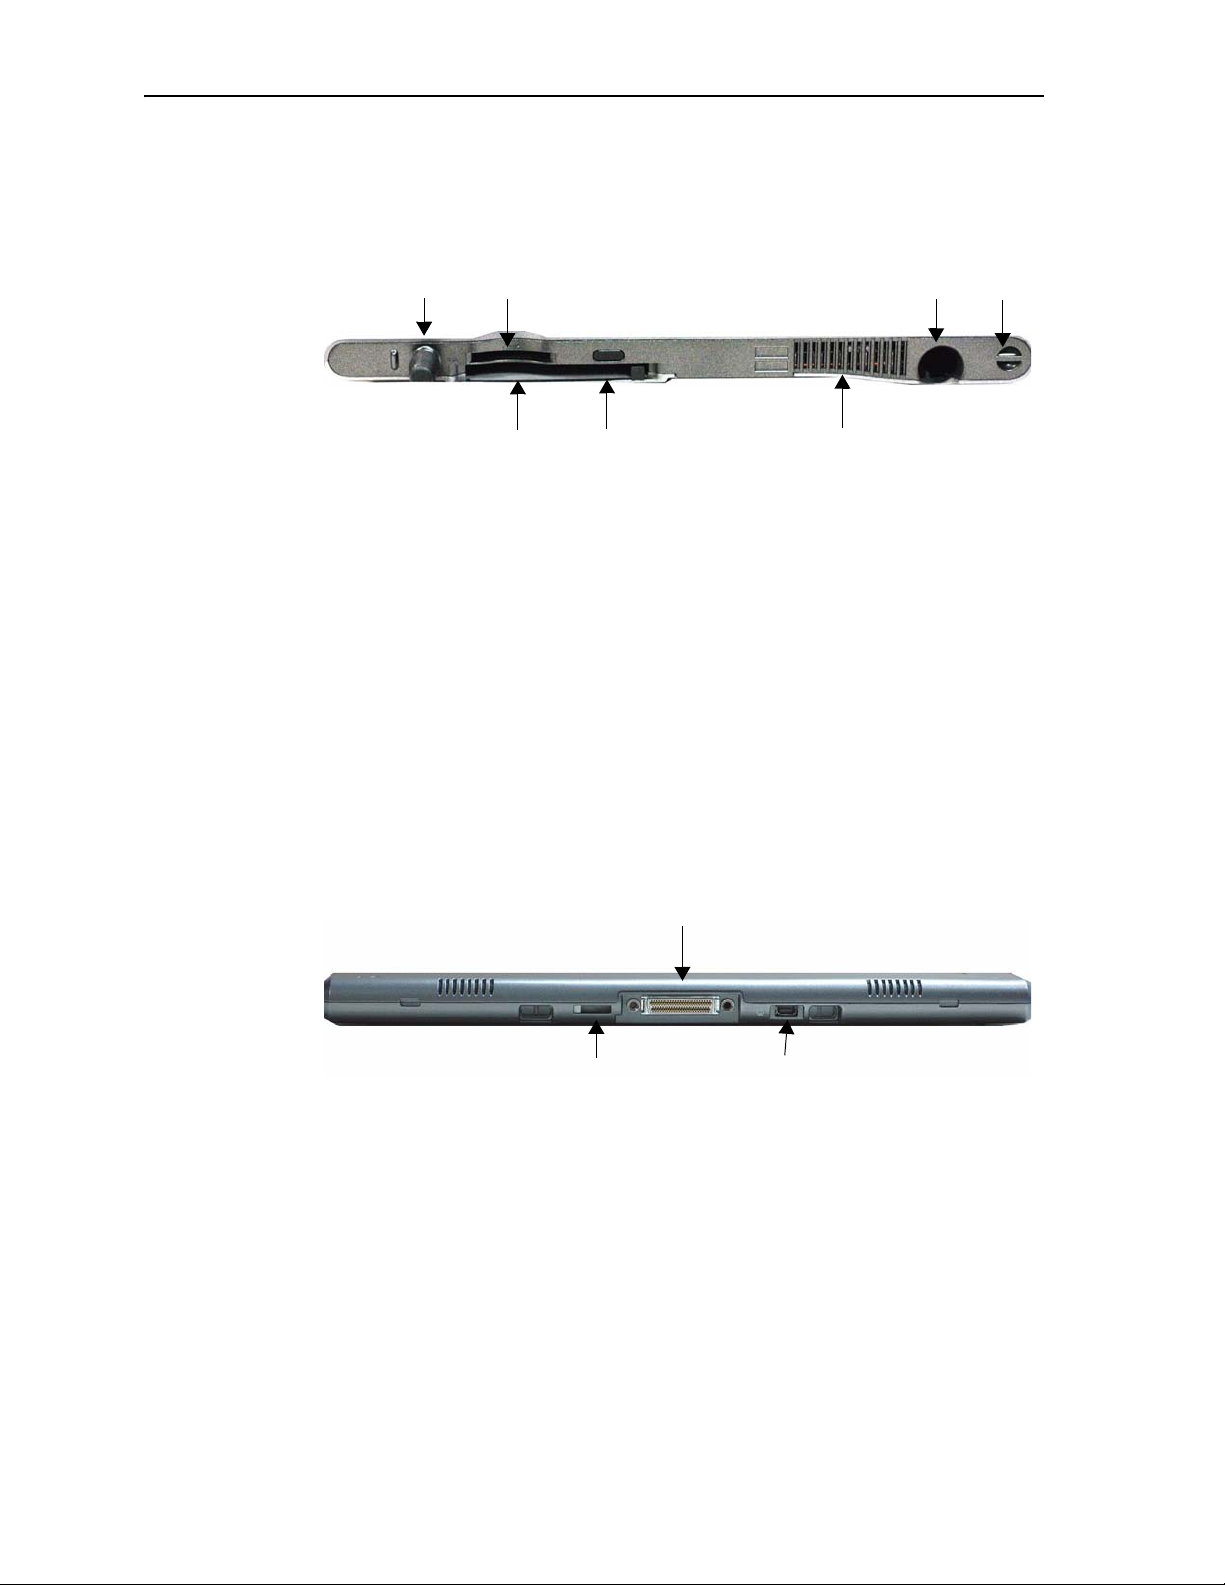
Description of Right-Side of Tablet Client
The following illustration shows the ports, slots, and connectors that are
located on the right side of the LE1600
TC Tablet Client.
AC
Power
SD Card Slot
PC Card Slot Air Vent
IrDA Transceiver
Pen
Bay
Pen
Te th e r
The right side of the Tablet Client contains the following connectors and
slots:
• AC Power port
• SD Card slot for expanded accessory options (SDIO compatible)
• PCMCIA card slot for third-party type-II PC cards
• Infrared (IrDA) transceiver for short distance network connections with
another IrDA compliant device
• Pen Bay for the Motion Digitizer Pen
• Pen Tether post for attaching the Motion Digitizer Pen
Description of Docking Side of Tablet Client
The following illustration shows the connectors and attachment points on the
docking side of the Tablet Client.
FlexDock Connector
Convertible
Keyboard/FlexDock
Attachment
FlexDock Connector. There is a FlexDock connector at the bottom edge of
the Tablet Client. This connector mates with the corresponding connector on
the FlexDock for the LE Series to provide the required signal connections
when the Tablet Client is “docked.” Refer to the Installation Guide provided
with the FlexDock for the LE series unit for more information.
Motion Accessory Port. The Motion Accessory port is for connecting
input/output devices directly to the Motion Tablet Client, or to the FlexDock
for the LE Series when the Tablet Client is mated to the FlexDock. For
example, this is the port for attaching the optional external DVD/CD-RW
Drive to the Tablet Client - all power to the drive is provided through this port.
12 Motion Computing LE1600TC Tablet Client User Guide
Motion
Accessory
Port
Page 21

Chapter
1
Getting Started with Your Tablet Client
Attachment Points for Convertible Keyboard. There are two attachment
points for mating the Tablet Client to the Motion Convertible Keyboard.
When the Tablet Client is attached to the keyboard, the Tablet Client can be
angled to provide a comfortable viewing angle.
SOFTWARE
O
VERVIEW
Your new Motion Tablet Client ships with the Motion Security Center and
Motion Dashboard.
Motion Dashboard
The Motion Dashboard puts many operations at your fingertips for
convenient access and control. In addition, the Tablet Client contains the
Microsoft Windows XP Embedded operating system that includes an
improved security infrastructure that helps defend against viruses, worms,
and hackers.
To open the Motion Dashboard, perform one of the following steps:
• Press the Dashboard button on the Motion LE1600
• Tap Start, and then select All Programs > Motion Resources >
Motion Dashboard.
NOTE: The Motion Dashboard does not include an “Apply”
button. When you change a setting, the change occurs
immediately. Tapping “OK” on the Motion Dashboard closes
the window.
TC Tablet Client.
Motion Computing LE1600TC Tablet Client User Guide 13
Page 22

Chapter
1
Getting Started with Your Tablet Client
Also, if you disable your wireless connection from the Motion
Dashboard, it may still appear to be working for a short time.
The wireless/Bluetooth LED may continue to blink for a few
seconds. This is a timing delay; the connection will end
shortly.
Motion Dashboard Features
Feature Description
Display
Brightness
External
Monitor
The built-in Ambient Light Sensor (ALS) detects light in the
environment and automatically adjusts the display brightness.
Available settings:
•Off
— Blanks the display to save power
•Fixed
•Dynamic
The Tablet Client has a dual-head video controller that can
“mirror” the Tablet Client display or extend it to a second
monitor or external device, such as a data projector. This
feature is disabled by default.
Available settings:
• Mirror Display
• Extend Display
• Disable
— Maintains a fixed brightness level on the display
that remains constant under varying light conditions
— Uses ALS to maintain a relative brightness level
on the display in varying light conditions
NOTE: For optimal battery life benefits and
viewability from ALS, set the brightness scale to
the mid-point or slightly above. If the setting is
higher than this, you lose some of the batterysaving benefits while gaining minimal improvement in viewability.
— Clones or duplicates the Tablet Client dis-
play on another monitor or projector
— Enlarges the overall desktop work space
to include both the external monitor and the Tablet Client display
— Disables the External Monitor feature
Audio Speaker
Volume
Available settings:
• Mute the speaker sound; sliding the scale changes the
speaker volume
• Multimedia Optimized — Best equalization setting for sound
reproduction from the Tablet Client for a CD player, DVD, or
sound recorder
• Voice Optimized — Best setting for voice reproduction from
the Tablet Client speakers
• External Speakers— Best setting for external speakers or
headphones
• Properties — Access advanced operating system controls to
configure your audio experience. Tap Volume Control >
Options > Properties to set Playback and Recording for a
selected device.
14 Motion Computing LE1600TC Tablet Client User Guide
Page 23

Chapter
Motion Dashboard Features
Feature Description
1
Getting Started with Your Tablet Client
Audio Microphones
Pen and
Digitizer
Wireless Available Settings:
Available settings:
• Mute — Sliding scale changes microphone volume
• Narrow Angle — Best setting for dictation, Voice over IP
(VoIP), or “voice noisy” environments
• Medium Angle — Best setting for small group, conference
table, or “voice quiet” environments; the microphone detects
sounds from a larger area
• Wide Angle — Best setting for an open meeting room
• Calibrate — Trains the microphones to focus on sounds from
a particular location or angle
Available Options:
• Calibrates the pen to the display
• Pen and Button Options — Changes Tablet Client, pen, and
button properties. Use the Control Panel to change the
properties.
• Enables/disables the 802.11 (Wi-Fi) and/or Bluetooth wireless radio
• Disables either or both wireless devices at Tablet Client start
up (useful in environments where policy prohibits wireless
operations)
• The physical wireless button (not on the Motion Dashboard)
is intended for situations where you want to shut wireless
down quickly and reliably.
Power
Management
Motion
Security
Center
Stand By Puts the Tablet Client in a low-power Stand By state for a
Help Displays Motion Dashboard Help application
Lets you set power schemes and power button options; also
displays remaining battery power. You can select from an
extensive list of power schemes or you can create custom
power schemes to fit your environment.
Opens the Motion Security Center where you can do the
following:
• Access Motion OmniPass; refer to “Fingerprint Reader and
Motion OmniPass” on page 33
• Review or modify Trusted Platform Module settings; refer
to“Infineon Trusted Platform Module” on page 43
• Open the Microsoft Security Center to review or modify Windows security settings; refer to“Using Windows Security” on
page 45
temporary suspension from which you can quickly resume a
Windows session.
Motion Computing LE1600TC Tablet Client User Guide 15
Page 24

Chapter
1
Getting Started with Your Tablet Client
Motion Security Center
The Motion Security Center consolidates the tablet security applications
into one single security management dashboard. It provides the ability to
manage the security applications and settings from a single point. You can
also find quick links for help with various security-related tasks. Motion
Security Center provides access to the Motion OmniPass, Infineon TPM,
and Microsoft Security Center applications.
Client Applications
The Motion LE1600TC Tablet Client includes the following client options.
Citrix MetaFrame Access Program Neighborhood
Citrix is a server based function that is very similar to the Remote Desktop
Protocol. You cannot add application software to the Tablet Client. All
software applications are accessed through the Citrix MetaFrame Access
Program Neighborhood or the Remote Desktop Protocol. Your IT
department can tell you if there are applications that you can use with the
Citrix environment.
• To open the application, double-tap the Citrix ICA icon or select the
application from the Start > All Programs menu.
THIN CLIENT
E
NVIRONMENT
Remote Desktop
Remote Desktop is a server based desktop where you will find the
applications to run on your Tablet Client. Remote Desktop is also where
you can save the document and reports that you create and modify as part
of your job. You cannot add applications to your Tablet Client because you
do not have a hard drive. You can save some number of documents to the
Flash Drive but you are limited by the available space. Saving documents in
your defined location on the remote server is more secure.
• Microsoft Remote Desktop connection — To open the application, tap
Start, select Start > All Programs > Accessories > Communications
> Remote Desktop Connection, and then follow the window prompts.
Browser - Microsoft Internet Explorer
Internet Explorer is a server based application that enables you to connect
to the Internet.
• To open the application, double-tap the Internet Explorer icon or
select the application from the Start > All Programs menu.
The Motion LE1600TC Tablet Client is designed for optimum use in a thin
client environment. The Tablet Client runs in a server-based computing
environment, in which the server runs applications that are used by the
Tablet Client. Data displayed by the Tablet Client is stored on the server
network, providing secure backup of the data.
The thin client environment provides better security than typical desktop
PCs because the thin clients are closed systems that do not allow software
and hardware installations without authorized system administrator
16 Motion Computing LE1600TC Tablet Client User Guide
Page 25

Chapter
1
Getting Started with Your Tablet Client
assistance. This environment enables efficient management of software
applications and hardware peripherals. Software updates are performed at
the server level, thereby ensuring that all Tablet Clients connected to a
server are running the same level of applications and operating system
versions.
To enable accessing and using software applications stored on the server,
thin client remote access protocols such as Microsoft Remote Desktop
Protocol (RDP), Citrix ICA Client, and Citrix MetaFrame Access Program
Neighborhood are provided on the Tablet Client. Each Tablet Client can run
applications on the server; access data, files, and databases; and access
network resources. Each user session runs independently, and all resource
conflicts are resolved at the server.
The thin client environment enables running multiple thin clients on a
server, with each thin client having a separate user account. When a user
logs on to the server, a user session is created. Each user session is
unique, similar to a typical desktop PC. The server runs the application,
and the client displays the user interface and sends user input back to the
server.
Motion Computing LE1600TC Tablet Client User Guide 17
Page 26

Chapter
1
Getting Started with Your Tablet Client
18 Motion Computing LE1600TC Tablet Client User Guide
Page 27

Chapter 2 Using Your Motion Tablet Client
Chapter
2
Using Your Motion Tablet Client
This chapter contains the following sections:
• “Pen and Ink” on page 19
• “Audio and Video” on page 22
• “Power Management” on page 27
• “Security Features and Settings” on page 32
• “Speech” on page 48
• “Ports, Slots and Connectors” on page 50
• “Wireless Networking” on page 52
• “Tablet Client Buttons” on page 62
Each of these sections includes a brief introduction to the topic, and
information on how to access and use the feature or function. Other than a
brief introduction to these topics in Chapter 1, all other information regarding
the topic, including set-up, operating procedures, and helpful hints, is
included in this chapter.
PEN AND INK A significant difference between using a standard personal computer or a
laptop and your Tablet Client is the use of pen and ink in software
applications. Some software applications are designed specifically for pen
and ink while others may be “ink enabled” to improve their suitability with ink
input.
Configuring Tablet and Pen Settings
CAUTION: Do not write on the Tablet Client display
with ink pens or other sharp objects that could
damage it. Do not use markers that could also
damage the display.
To configure the tablet and pen settings:
1. Open the Control Panel.
2. Select Printers and Other Hardware.
3. Select WACOM Pen Settings.
4. Select the tab for the settings you want to review or change.
Motion Computing LE1600TC Tablet Client User Guide 19
Page 28

Chapter 2 Using Your Motion Tablet Client
Calibrating Your Digitizer Pen
To calibrate your digitizer pen:
1. Select Start > Control Panel.
2. In the navigation pane of the Control Panel, tap Switch to Classic
View.
3. Double-tap the Wacom Pen Settings icon.
4. Tap the Calibrate tab.
5. Tap the Calibrate button, and then follow the instructions in the
Calibration window.
Refer to the following to compare mouse and pen actions:
Mouse versus Pen Actions
Action With a Mouse
Point and click Point and tap the pen on the display.
Double-click Double-tap the pen on the display.
Click-and-drag Tap-and-drag the pen on the display.
Right-click Press the pen button while tapping.
Action With the Digitizer
Pen
ritePen Software Application
The ritePen software application is a handwriting recognition application that
is included with the LE1600
Start > All Programs > Evernote > ritePen > ritePen menu selection.
If the application was previously started, a ritePen icon is displayed in the
system tray.
When ritePen is not enabled or active, the pen icon in the system tray is
covered with a red circle and slash. Tapping the icon alternately enables and
disables the application.
TC Tablet Client and is accessed through the
When using ritePen for handwriting recognition, you can write anywhere on
the screen. The handwriting is transformed into typed text in the active
application window. For example, if you are using Microsoft Word (via the
Remote Desktop Protocol) and you are writing with the digital pen, the
words you write are entered as text in Microsoft Word. There is a slight delay
between the time you write text and the word or words appear in the active
application window. The following is an example of ritePen being used to
enter text into Notepad.
20 Motion Computing LE1600TC Tablet Client User Guide
Page 29

Chapter 2 Using Your Motion Tablet Client
The word “writing” disappears from the screen and is replaced by the typed
word “writing” at the cursor location in the Notepad application. Depending
on how quickly you write and the settings for ritePen, you may be able to
write several words before they are transformed into text in the application.
For more information on the ritePen application and using ritePen gestures,
refer to the Help file that is provided with the ritePen application. Access the
Help through the Start > All Programs > Parascript > ritePen > ritePen
Help menu selection
Motion Computing LE1600TC Tablet Client User Guide 21
Page 30

Chapter 2 Using Your Motion Tablet Client
Using the On Screen Keyboard
You can use the On Screen Keyboard to type words, letters, numbers, and
characters from keyboard using your pen. For improved security and
accuracy, you may want to enter passwords with the On Screen Keyboard
instead of handwritten text.
NOTE: When using the On Screen Keyboard, be sure to place
your cursor where you want to enter text in the text entry box
before you tap.
AUDIO AND
VIDEO
The Audio and Video controls are in the Motion Dashboard in the Audio
and Display sections. You will find additional information regarding audio
settings and acceptance angles in the Speech section of this chapter, refer
to “Speech” on page 48.
Motion Dashboard Audio System Controls
The Motion Dashboard contains volume and directional controls for both
speech recognition and recording functions.
Speaker Volume. While the noise suppression software removes most
background noise, in some cases speaker playback (such as background
music or intermittent audio messages) can affect recording. In general,
reducing speaker volume will eliminate these extraneous noises.
Microphone Volume. The default volume setting for the microphones is at
roughly two-thirds of the sliding scale. When recording, dictating, or using
voice commands, you may need to adjust this setting until you achieve the
desired results.
22 Motion Computing LE1600TC Tablet Client User Guide
Page 31

Chapter 2 Using Your Motion Tablet Client
Adjusting Display Settings and Screen Brightness
The Display settings on the Motion Dashboard are used to set the
brightness level of the LCD display. These settings are used in conjunction
with the Ambient Light Sensor (ALS) to maintain a level of brightness and
contrast in all lighting conditions.
The built-in light sensor located on the Tablet Client front panel measures
the ambient light in the environment. The system then automatically
balances the brightness of the Tablet Client display in relation to the
surroundings. You can set brightness modes from the Motion Dashboard
(note: you can also turn the display off).
• Fixed — Sets the display brightness to a fixed level (ALS is off); use the
slider to adjust the display to the desired brightness level
• Dynamic — Sets the display so that the system adjusts the brightness to
the preferred level under changing lighting conditions while maintaining
viewability (ALS is on)
Setting “Dynamic” Display Brightness: ALS On
When you turn on the ALS, the display will automatically brighten if you
move from dim to bright light (within the range supported by the hardware),
or automatically dim if you move to an environment with a lower level of
lighting. You may not be able to visibly detect the adjustment. Using ALS
also helps to reduce power consumption when possible.
To set the “Dynamic” display brightness to ALS On
1. Open the Motion
Dashboard.
2. Under Display, tap the radio
button beside Dynamic.
3. Move the slider until the
Tablet Client display is at the
preferred brightness level.
The system will then automatically adjust the display
brightness to changes in lighting.
Setting “Fixed” Display Brightness: ALS Off
To set the “Fixed” display brightness to Off:
1. Open the Motion Dashboard.
2. Under Display, tap the radio button beside Fixed.
3. Move the slider until the brightness is at the desired level. The
system will keep the same brightness level at all times; that is, it will
not adjust the display brightness to changes in lighting.
NOTE: In low-light settings, the “Fixed” brightness setting
may keep the display brighter than is needed for good
viewability. Keeping the brightness always at the same level
may also use more battery power than necessary.
Move slider to preferred
brightness level.
Motion Computing LE1600TC Tablet Client User Guide 23
Page 32

Chapter 2 Using Your Motion Tablet Client
Turning the Display On and Off
To turn the display on and off:
1. Open the Motion Dashboard by pressing the button on the Tablet Client, or by selecting the menu Start > All Programs > Motion
Resources > Motion Dashboard.
2. Tap Off in the Brightness area of the Display settings.
NOTE: To turn the display back on, wave your pen over the
display or press any key on the keyboard. When the display
comes on, the Fixed/Dynamic setting remains selected as it
was.
Changing Display Orientation
An interesting and useful feature of the Tablet Client is the ability to change
the screen orientation from landscape to portrait by pressing the Rotate
button. Also, you can rotate the screen in 90-degree increments.
The Tablet Client flexibility in changing the screen orientation allows you to
set the view to suit your purpose. You may be using an application where it
is more advantageous to have a portrait (vertical) view of the screen. You
may be filling out a form that is longer than the standard screen view. At
other times you may want to view a wider than normal page; in this instance
you would use landscape view.
Be aware that changing the screen orientation may require you to
recalibrate the pen; refer to “Calibrating Your Digitizer Pen” on page 20.
To change the display orientation, perform one of the following procedures.
To change the display orientation using the Rotation button:
1. On the Tablet Client, press the Rotation button repeatedly until the
display orientation that you want appears.
To change the display orientation through the Motion Dashboard:
1. Open the Motion Dashboard by pressing the button on the Tablet
Client, or by selecting the menu Start > All Programs > Motion
Resources > Motion Dashboard.
2. In the Display panel, tap or click Properties.
3. Select the Rotation tab.
4. Select the orientation, and then tap or click OK.
Motion Dashboard Button
Rotation Button
24 Motion Computing LE1600TC Tablet Client User Guide
Page 33

Chapter 2 Using Your Motion Tablet Client
Mirroring or Extending Your Display
The Tablet Client has a Dual Head Video Controller that lets you run a
presentation from your Tablet Client on an external monitor or data projector
while taking notes in ink. You can also move applications onto a second
monitor to create additional work space.
To connect the Tablet Client and a monitor or projector:
1. Plug the VGA monitor cable into the VGA port on the Tablet Client or
Motion FlexDock for the LE Series.
2. Connect the external monitor or data projector to a power outlet and
turn it on. The software recognizes the external monitor or data projector and searches for a driver.
3. Set up the mirrored desktop or extended display.
To set up a mirrored display, see “Setting Up a Mirrored
Display” on page 25.
To set up an extended display, see “Setting Up an Extended
Display” on page 26.
IMPORTANT: Be sure to drag any application window back to
the Tablet Client display before shutting down the external
data projector or monitor. Otherwise, you cannot access the
application(s) to shut it down. If you do leave an application
open on the extended display, you can disable it from the
Windows Control Panel Display Properties or from the
Motion Dashboard.
Setting Up a Mirrored Display
Use this feature to connect an external projector for presentations or an
extra display on your desk. This example shows a Word document (1),
displayed (“mirrored”) on both the Tablet Client (2), and an external monitor
(3).
Mirrored Display Example: (1) Word document; (2) Tablet
Client display; (3) external monitor
NOTE: The resolution and orientation of the external monitor
will be the same as the Tablet Client display.
Motion Computing LE1600TC Tablet Client User Guide 25
Page 34

Chapter 2 Using Your Motion Tablet Client
To Mirror the Tablet Client Display:
1. Open the Motion Dashboard.
2. Select the Mirror Display radio button under External Monitor. This
setting automatically creates an identical display on the external
monitor.
NOTE: You can also tap the icon for the Intel Graphics Media
Accelerator Driver for Mobile, in the system tray at the bottom
right of the Tablet Client display (or found in the Windows
Control Panel) to set up this feature from the Graphics Media
pop-up menu.
Setting Up an Extended Display
Use this feature when you want to simultaneously open applications on two
monitors and significantly expand your workspace without hiding open
documents under layers of other work. This example shows the Tablet Client
(1) and an external monitor (2) with an Excel spreadsheet extended across
both. It also shows a Word document (4) on the Tablet Client and e-mail (5)
on the extended desktop.
Extended Desktop Example: (1) Tablet Client display; (2) external monitor; (3)
spreadsheet; (4) Word document; (5) email message
To Extend the Tablet Client Display:
1. Open the Motion Dashboard.
2. Tap the Extend Display radio button under External Monitor. This
setting automatically extends the Tablet Client display to the external
monitor.
NOTE: You can also tap the icon for the Intel Graphics Media
Accelerator Driver for Mobile in the system tray at the bottom
right of the Tablet Client display (or found in the Windows
Control Panel as Intel GMA Driver for Mobile) to set up this
feature Helpful Hints: Mirrored and Extended Modes
26 Motion Computing LE1600TC Tablet Client User Guide
Page 35

Chapter 2 Using Your Motion Tablet Client
POWER MANAGEMENT
The Tablet Client provides access to a comprehensive suite of power
management functions by using the buttons and controls on the Motion
Dashboard.
Configuring Your Power Management Settings
The following power-related settings can be accessed, monitored or
controlled from the Motion Dashboard.
• Power schemes
• Alarms for low and critical battery
• Power meter readings for up to two batteries
• Advanced power settings
Tapping the Properties button in the Power area of the Motion Dashboard
opens the Power Options Properties window. Each of the power options is
represented by a tab in this window. Tapping one of the tabs shows the
various properties for that aspect of the Tablet Client power management
feature. The following example shows the window open at the Power
Schemes tab; it illustrates the various power schemes properties that can
be set for the Tablet Client. The remaining option properties windows are
described, but illustrations to show the various options are not included in
this User Guide.
The Power Options Properties window contains the following tabs for
configuring your power settings:
Power Schemes. Tap the Power Schemes tab to show the Power
Schemes window. You can select from a set of pre-defined power schemes
that apply to a wide variety of home and work environments. Try it yourself
by selecting one of the options from the pull-down menu and seeing how
your choice affects the power settings. This operation also gives you the
flexibility to define your own scheme and keep the same name or rename it
to something that makes more sense to you.
Motion Computing LE1600TC Tablet Client User Guide 27
Page 36

Chapter 2 Using Your Motion Tablet Client
Alarms. The Alarms tab shows the Alarms window. This option lets you
specify the point at which battery alarms are activated for both the low and
critically low battery level states. You also define the action that the Tablet
Client should take when that battery level is reached. For example, you may
choose to have the Tablet Client sound an alarm, or you may prefer to
receive a text message.
Power Meter. The Power Meter tab shows the Power Meter window and
shows a visual indication of the Battery Status for battery #1 and #2 (if
present and attached to the Tablet Client). The icon shows the remaining
battery level and the text shows the percentage remaining. You can click on
a battery icon to open a detailed information window for that battery.
Advanced. The Advanced tab shows the Advanced window where you
specify the power settings options that you want to use. You can also
specify what you want the Tablet Client to do when you press the Power
switch. Your choices include everything from doing nothing, going into
standby mode, or performing a shut down of your computer.
Checking Your Battery Power Level. There are several ways to see how
much battery power is left on your Tablet Client. You can determine the
remaining battery power by doing any of the following:
• Reading Battery Power from the Tablet Client Display
To check the power level while you are on battery power,
move the pen over the Power Meter icon, shown here, in
the system tray at the bottom-right corner of the Tablet
Client display. This displays the number of hours of battery
power and the percentage of battery power left. (Also, the
blue area on the battery icon gets smaller as the battery discharges.)
• Reading Battery Power from the Battery Gauge (requires battery
removal)
Ensure that AC power is plugged into the Tablet Client, or that the Tablet
Client is turned off. Turn the system over so that you are looking at the
back and remove the battery from the top of the tablet. The gauge is
mounted on the backside of the standard battery. Press the button and
look at the LEDs. Each LED represents approximately 20% of the total
available charge. (If the optional Extended Battery is attached, the
battery gauge is located on the backside of the Extended Battery and
can be checked without removal.).
Caution: When you replace the standard battery, make sure
that the locking latch is in the correct position, moved fully to
the right to lock the battery in place, and that the battery is
firmly installed.
28 Motion Computing LE1600TC Tablet Client User Guide
Page 37

Chapter 2 Using Your Motion Tablet Client
Spring-Loaded Latch Locking Latch
Slide latches toward center to open
Extended Battery Connector Under Sliding Panel
(must be open to install Extended Battery)
• Reading Battery Power from Motion Dashboard
The Motion Dashboard also has a battery power gauge that displays
the percent of remaining battery charge. If a Standard Battery and a
Extended Battery are both attached, the power reading is the cumulative
amount of both batteries.
• Reading Battery Power from the Power Meter
Right-click on the Power Meter icon in the system tray, located in the
lower right-hand corner of the display window (only visible if you are
running on the battery). To see remaining power, tap Power Meter; or
tap Adjust Power Properties > Power Meter tab.
From the Windows Control Panel (in Classic view), double-click Power
Options. Or (in Category View), tap Performance and Maintenance,
then tap Power Options.
Using Your Batteries
This section describes how to use your Tablet Client battery. The Standard
Battery is located at the top of the Tablet Client. There is an optional
Extended Battery that can be attached to the back of the Tablet Client. The
upper center area of the back of the system includes a small sliding panel
that covers the terminal connections for the Extended Battery.
Caution: Ensure that the sliding panel is open before attempting to
attach the Extended Battery. Otherwise, there may be damage to the
Extended Battery connector.
Both batteries are designed to be re-charged by using the AC adapter when
attached to the Tablet Client.
Motion Computing LE1600TC Tablet Client User Guide 29
Page 38

Chapter 2 Using Your Motion Tablet Client
Charging the Battery
When you connect the Tablet Client to AC power with a battery attached, the
system automatically charges the battery until it reaches full charge. If two
batteries are attached, the primary battery charges first, followed by the
secondary battery. The charging sequence is staggered to ensure that both
batteries become fully charged at nearly the same time. The standard
battery charges to the 80% level, followed by the Extended Battery charging
to the 80% level. Then each battery charges for a short interval until both
reach 100%.
The Battery Status LED is on the Tablet Client flashes amber when the
battery is at a critically low level and changes to solid amber while charging.
When the battery is fully charged, the Battery Status LED is solid blue.
WARNING: To avoid injury, keep the battery within
the recommended temperature range when
charging it. Wait until it cools to room temperature
before recharging it in the Tablet Client or the battery
charger. For more information, see the Safety and
Regulatory Guide shipped with your Tablet Client or
the documentation that came with the battery
charger. Or go to www.motioncomputing.com/
support to view these documents.
To charge the battery:
1. Plug the AC adapter into the Tablet Client.
2. Then plug the AC adapter cable into a wall outlet or power strip.
(Completely recharging the battery may take up to two hours,
although the battery reaches an 80% charge in much
less time.)
Swapping the Battery
You can swap the Standard Battery while the system is powered on, with or
without having the Tablet Client plugged into an AC power outlet.
CAUTION: To avoid damage to the Tablet Client, install only Motion
Computing batteries, which are specially designed for the Tablet
Client.
To swap the battery:
1. If the Tablet Client is running, open the Motion Dashboard and tap
Stand By. The Tablet Client immediately goes into the Stand By
state.
2. Alternatively, go to Start > Turn Off Computer.
3. Do one of the following:
• If you are logged on to a domain: When the Turn Off
Computer window appears, tap Stand By from the
drop-down list.
NOTE: Here is information about putting the Tablet Client in
Stand By mode to swap the battery:
30 Motion Computing LE1600TC Tablet Client User Guide
Page 39

Chapter 2 Using Your Motion Tablet Client
• When choosing Stand By, the Tablet Client is designed
to maintain your system for up to 30 seconds while you
swap the battery.
• However, you may have less than 30 seconds if you are
running a number of programs that drain power faster.
• You should save any data before putting the system in
Stand By to swap the battery.
4. Tap Stand By. The Tablet Client opens a dialog box
stating that it is “preparing to standby.”
5. Wait until the system shuts down. In Stand By, the Power LED
flashes.
6. Slide the battery release latches on the back of the Tablet Client
toward the center and lift the battery upward to remove it.
7. Insert the new battery until you hear the left latch click, which
ensures the new battery is correctly seated. Slide the right latch further to the right to lock it in place. Check to make sure the latches
are fully seated.
Disposing of Used Batteries
The Tablet Client contains a Lithium-ion (Li-ion) battery that should be
disposed of at a hazardous materials recycling center when it is no longer
serviceable. Do not throw it in a waste receptacle where it will be sent to a
landfill.
Helpful Hints: Battery and Power Management
• Use AC power when available to lengthen the battery’s usable life. The
battery will charge automatically as you run on AC power, so leave the
battery in the Tablet Client while you are working.
• Use AC power when installing software or writing to a CD, and for optimal battery life, when using a CD or DVD player.
• When using battery power, if you leave the Tablet Client unattended,
place the system in Stand By mode.
• Keep in mind that the display, processor, PC Cards, SD cards, wireless
cards, and accessory drives all draw on the battery, so adjust properties
and disable unused accessories and PC Cards when operating on battery power.
• When using battery power, adjust the power mode and display brightness to lower settings to prolong the battery life.
• Turn off all wireless devices through the Motion Dashboard when not
being used.
• Enable the Ambient Light Sensor (ALS) through Motion Dashboard.
See the section “Adjusting Display Settings and Screen Brightness” on
page 23.
Motion Computing LE1600TC Tablet Client User Guide 31
Page 40

Chapter 2 Using Your Motion Tablet Client
SECURITY
FEATURES
AND
SETTINGS
Motion Computing has strongly embraced the need for enhanced platformbased security for the Tablet Client. The result of that commitment has been
to provide an out-of-box, safe computing environment that enables strong
security protection and that will serve as the foundation for complementary
add-on security technologies. These core security features include
password-protected Phoenix TrustedCore BIOS with HDD locking and
networking control, a universal security lock slot, the Motion Security Center,
a built-in fingerprint reader, a Trusted Computing Group Trusted Platform
Module (TPM), and a Smart Card-ready platform.
The Motion Computing Tablet Client includes a comprehensive security
solution that is designed to protect the hardware platform, the operating
system, and any information stored on the Tablet Client from most potential
outside threats. The Motion Security Center includes the following:
• Motion OmniPass
• Infineon TPM
• Microsoft Security Center
Motion Security Center
The Motion Security Center consolidates the tablet security applications into
one single security management dashboard. It provides the ability to
comprehensively manage the security applications and settings from a
single point. You can also find quick links for help with various securityrelated tasks. Motion Security Center provides access to Motion
OmniPass, Infineon TPM, and Microsoft Security Center. Click on those
headings to launch the respective application.
32 Motion Computing LE1600TC Tablet Client User Guide
Page 41

Chapter 2 Using Your Motion Tablet Client
Fingerprint Reader and Motion OmniPass
The Tablet Client Fingerprint Reader (built-in hardware) and the Motion
OmniPass Control Center (software application) are vital elements of the
Motion Security Center. Using the Fingerprint Reader and this application,
you can define the security and convenience features of your Tablet Client.
When implemented within the security policies of your work environment,
the OmniPass authentication tools add another layer of security for your
passwords, files, and other logons.
The OmniPass application can be opened by tapping the
OmniPass icon (shown at right) in the System tray. Or, you can
open the application by opening the Motion Dashboard then
Motion Security Center > Motion OmniPass. The
OmniPass Control Center window is shown below.
There is extensive help supporting the Motion OmniPass Control Center.
To get help on a specific topic, tap the Help button in the Motion OmniPass
Actions panel, and use the Search or Index function.
At this point you can choose from the following options:
• Manage OmniPass Users and Settings to add users
• Change OmniPass System Settings
• Manage Your Passwords
• Protect Your Files
Motion Computing LE1600TC Tablet Client User Guide 33
Page 42

Chapter 2 Using Your Motion Tablet Client
Also, notice that there are three selection areas, an action panel and two
information panels, at the left side of the window. These areas allow actions
or show specific information.
• Action panel
• Log Off Current User
• Switch User Identity
• Password
• Information
• Help
• User Information panel
• Shows current user information
• Version Detail panel
• Shows version and build Information
Manage OmniPass Users and Settings
When you select this action you are presented with the following options:
• Add a new user to OmniPass
• Remove a user from OmniPass
• Import a new user into OmniPass
• Export an OmniPass profile
These are advanced operations and may not be part of your typical work
flow. If you need more information about this aspect of the Motion OmniPass
application, refer to the OmniPass Help by tapping Help in the Action panel.
34 Motion Computing LE1600TC Tablet Client User Guide
Page 43

Chapter 2 Using Your Motion Tablet Client
Other OmniPass Set Up Functions
You can also tap the Change User Settings icon; the Change User
Settings window is opened where you can select from the following
operations:
• Audio Settings
• Use radio buttons to set the desired audio setting
• Taskbar Tips
• Use radio buttons to set the desired taskbar tip level
• Encrypt/Decrypt
• Select digital certificate or select an algorithm for encryption
• Enrollment
• Use the enrollment wizard to create a user account or to enroll new
authentication devices (e.g., fingerprint reader, digital certificates)
• Manage Your Passwords
• Opens the User Name/Domain dialog where you enter the password
and domain information to authenticate the user for access to the
password vault. There you can change your password.
• Protect Your Files
• Browse to select files to be encrypted
• Browse to select encrypted files to decrypt
Fingerprint Reader
The built-in fingerprint reader enables you to scan
your fingerprint and associate it with a password.
This offers a quick and convenient way to log on
to your Tablet Client, provides global password
management, and helps protect your Tablet Client
data from unauthorized access. The illustration at
the right shows the bi-directional scan of a
fingerprint. You can move your selected finger
from left-to-right (one direction only, not back and
forth) or right-to-left (one direction only, not back
and forth). Refer to “Helpful Hints for Successful Fingerprint Captures” on
page 36 for more information about obtaining a successful fingerprint
capture.
The fingerprint reader also functions as a scrolling device; you can move
your finger vertically (vertical in relation to the orientation of the Tablet
Client) across the scanner to scroll the Tablet Client application within the
window.
NOTE: The scroll function is disabled while scanning a
fingerprint.
Motion Computing LE1600TC Tablet Client User Guide 35
Page 44

Chapter 2 Using Your Motion Tablet Client
Using Motion OmniPass Security and the Fingerprint Reader
The fingerprint reader built into your Motion Tablet Client enables you to
scan your fingerprint to log onto your Tablet Client and perform other
functions such as accessing email, e-banking, paying bills online, or
accessing network resources.
The OmniPass software offers a secure and convenient system for
managing your passwords and providing confidentiality for your sensitive
data through file encryption.
The procedures for setting up the fingerprint reader are divided into basic
and advanced options. For a more successful experience, start with the
basic set-up before setting the more advanced features.
Basic setup includes:
• Enrolling (your username and password)
• Selecting a finger
• Capturing a fingerprint
• Capturing a second fingerprint
Advanced OmniPass setup features include:
• User management
• User settings
• System settings
• You can modify the OmniPass startup options
• You can enable Strong Logon Security to authenticate with a specific
security device before showing the windows desktop
• Vault management
• The vault is a storage area for passwords and dialogs that you have
associated with web sites and applications.
• Encrypting and decrypting files
• You can encrypt any file on your Tablet Client except for system files.
• Only an authenticated user can decrypt files that have been
encrypted.
Descriptions of these features may be found in the OmniPass Help section
(open Motion Dashboard then Motion Security Center > Motion
OmniPass and tap the Help icon in that window).
Helpful Hints for Successful Fingerprint Captures
The following helpful hints can help you when using the fingerprint capture
feature.
• Be consistent. Hold your finger and scan at the same angle each time.
For example, if you enroll your finger with your hand open (or closed),
hold your hand this way each time you scan. If you enroll your thumb
while holding the edge of the Tablet Client while scanning, you need to
scan like this each time.
• The scanner is bi-directional; you can move your finger from right-to-left
or left-to-right.
36 Motion Computing LE1600TC Tablet Client User Guide
Page 45

Chapter 2 Using Your Motion Tablet Client
• Read the prompts carefully and make sure you are waiting to be
prompted before each swipe.
• Swiping too fast or too slow can make a capture unsuccessful. Change
the swipe speed until you learn what speed works best.
• When scanning, press hard enough to fully contact both the nickel-colored ring and the sensor; you do not have to press hard.
• Rub your fingers together to stimulate the natural skin oils so your fingerprint is easier for the sensor to detect. Conversely, wipe your finger
off so nothing interferes with the scan.
• If you are repeatedly having trouble getting a good scan, you may need
to clean the sensor. First, power down the Tablet Client and remove the
battery. Then, clean the sensor using a cotton swab sprayed with a window-type cleaner (no bleach, solvents, or abrasives); then dry the sensor. Do not spray, pour, or otherwise dispense any liquid directly on the
sensor.
• If you are having trouble enrolling a specific finger, enroll a different finger. Typically, you will get the best results by scanning an index finger,
thumb, middle finger, ring finger, and little finger in that order.
Capturing a Fingerprint
To capture a fingerprint:
1. Tap Motion Dashboard then Motion Security Center > Motion
OmniPass > Manage OmniPass Users and Settings > Add a new
user to OmniPass. This step enrolls a new user; you decide on the
authentication method (e.g., fingerprint, digital certificate, TPM, etc.).
2. Type in the User Name, Domain, and the Password (if you have one
set up) for this OmniPass account. (This may default to the user
name you logged on with and the password associated with it.)
3. Tap Next to take you to Selecting a Finger and Practicing Finger-
print Capture.
4. When the Choose Finger window appears, tap the dotted area
above the finger you want to enroll. A red arrow appears above the
selected finger.
IMPORTANT: To get a feel for finger position and swipe
speed, tap Practice. “Practice” takes you through all the
enrollment steps and helps you get a successful fingerprint
scan. You are asked to scan the same finger three times.
Motion Computing LE1600TC Tablet Client User Guide 37
Page 46
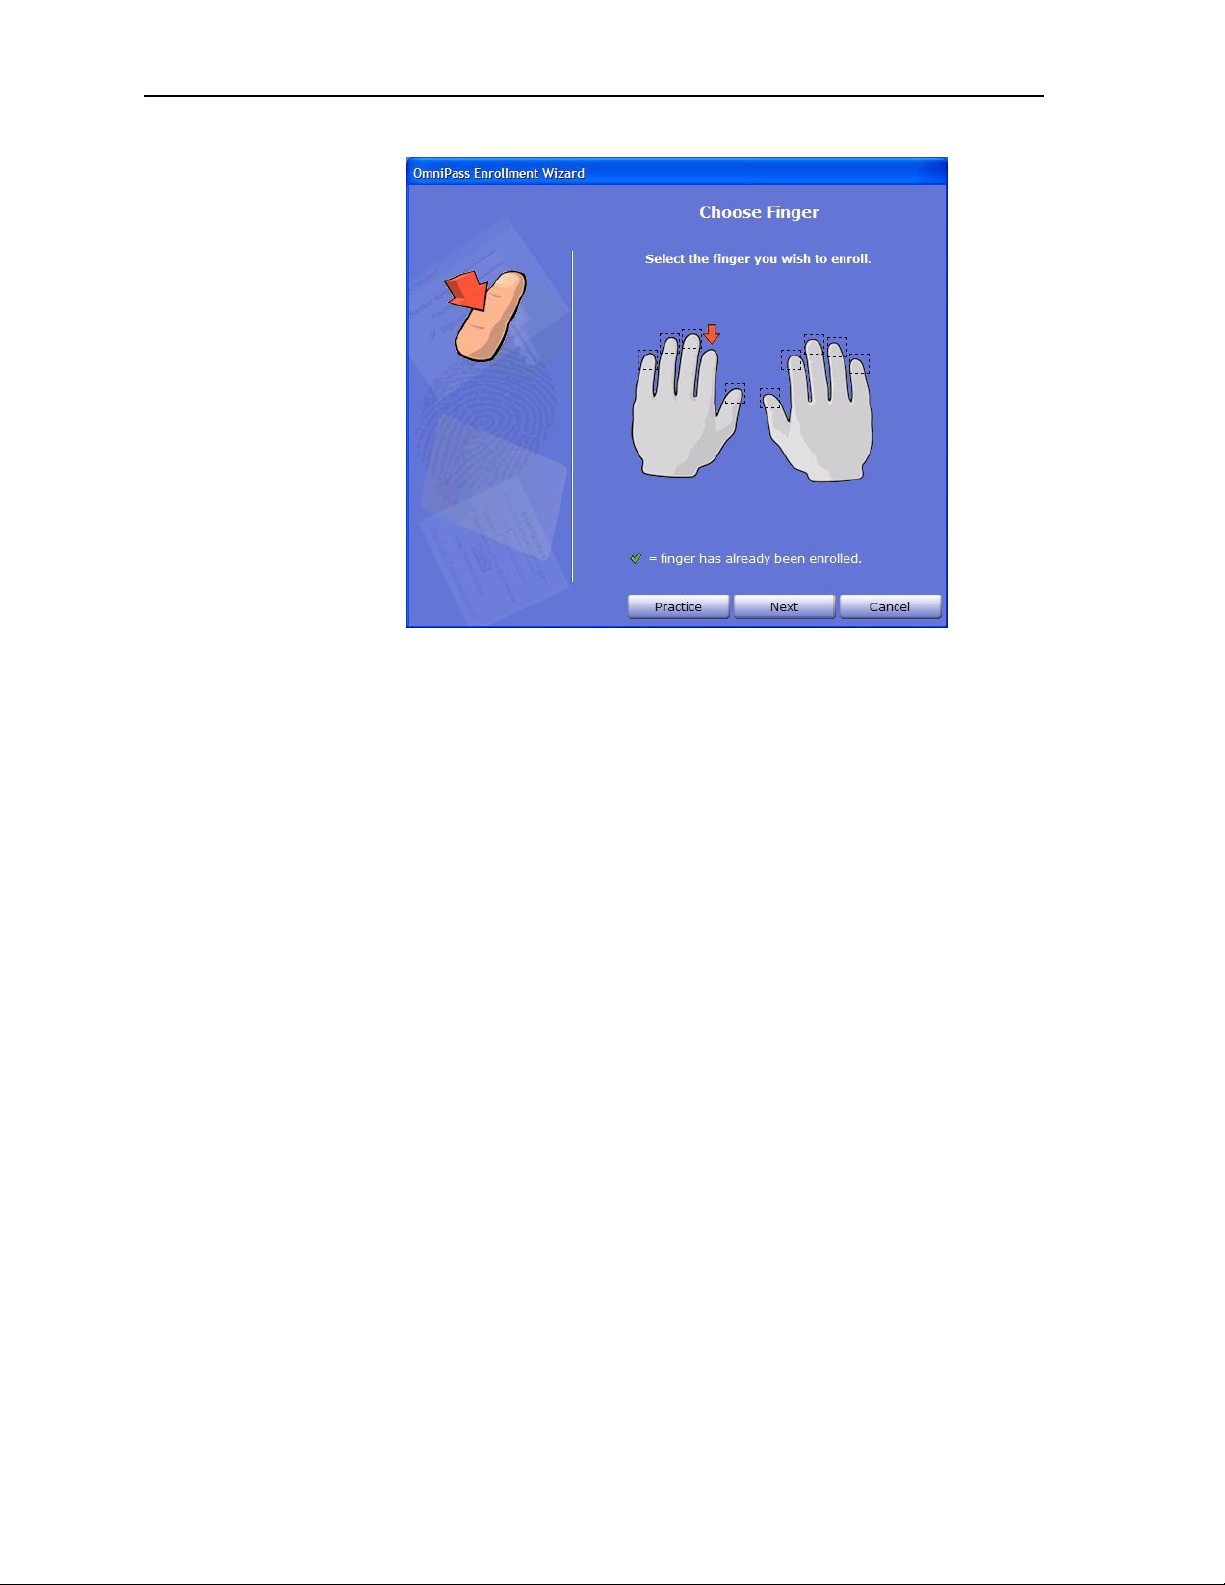
Chapter 2 Using Your Motion Tablet Client
5. After you have practiced, you will be asked to scan one more time for
verification. After the verification is successful, tap Next to scan your
finger again, this time for real (not practice).
6. Place the selected finger over the nickel-colored ring and slowly, with
moderate pressure, drag your finger across the sensor from right-to-
left (one direction only, not back and forth) or left-to-right (one direc-
tion only, not back and forth). Make sure your entire fingerprint (i.e.,
your fingertip, not your whole finger) touches both the nickel-colored
ring and the sensor surface.
Successful fingerprint capture: If the capture is successful,
you will see a green fingerprint image in the capture area. If
the capture is unsuccessful, an information message
appears, such as “Scan too slow/too fast...” and the green
fingerprint will not appear. Swipe your finger across the
sensor again as many times as required for a successful
scan.
38 Motion Computing LE1600TC Tablet Client User Guide
Page 47

Chapter 2 Using Your Motion Tablet Client
7. After the first scan is successful (and a green fingerprint image
appears), OmniPass prompts you to scan your fingerprint additional
times. Wait until the green fingerprint disappears from the display
and the fingerprint image area is blank before swiping your finger
again. After OmniPass successfully captures three fingerprints, the
Verify Fingerprint window appears. Swipe your finger one more
time to complete the enrollment.
When the messages “The selected finger has been enrolled in
OmniPass” and “Verification Successful!” and a green fingerprint
image appear, enrollment is successful and complete.
IMPORTANT: During the verification process, you may get
red fingerprint images or the message “Verification Failed.” If
this happens, tap the Back button and try again. You can have
as many tries as you need for enrollment and verification.
8. Tap Next. When you are asked if you would like to enroll a second
fingerprint, tap Yes.
IMPORTANT: We recommend that you enroll a second
fingerprint. A finger injury could prevent authentication and
block access to your accounts.
9. Repeat Steps 6-8 to enroll a second fingerprint.
10. Tap Next. The Audio and Taskbar Settings window appears. You can
leave the defaults or change the settings, as desired.
11. Tap Next. The Congratulations window appears. OmniPass recom-
mends that you “Export” (backup or make a copy of) your user profile so you can restore a lost or corrupted OmniPass configuration or
encryption keys. See the section “Exporting Your User Profile” on
page 42 for more information.
Motion Computing LE1600TC Tablet Client User Guide 39
Page 48

Chapter 2 Using Your Motion Tablet Client
NOTE: You can export your profile at any time, but this may
not be the best time since you are a new user and your profile
has little information associated with it. You should backup
your profile later and on a routine basis to protect your
configuration and any stored passwords and encryption keys.
12. Tap Done.
13. Tap Yes to log yourself on as a new user.
Capturing a Second Fingerprint Later
Capturing a second fingerprint is a good practice to follow. While it is easier
to do this at the time of the initial enrollment, it is possible to capture a second fingerprint later. To do so, open the Motion Dashboard, then tap the
following: Motion Security Center > Motion OmniPass > Manage
OmniPass Users and Settings > Change User Settings > Enroll
Authentication Devices (e.g. enroll a new finger). Then follow the
procedure to enroll.
Configuring Advanced OmniPass Features
OmniPass offers a number of advanced features that provide additional
password management for your Tablet Client beyond the basic convenience
of logging on.
CAUTION: Before configuring advanced features, please
read the Motion OmniPass Help, including any cautions or
warnings about features. Activating some features
(specifically Strong Logon Security) may, as a normal part of
the OmniPass operation, change the way your Tablet Client
starts up and/or the start-up options that are available. Before
using advanced features, back up your user profile using the
feature provided.
To access these advanced features, tap the OmniPass icon in the system
tray and open the OmniPass Control Center, or open the Motion
Dashboard then Motion Security Center > Motion OmniPass. The
following is an overview of these features. For further information, refer to
the OmniPass Help.
• Motion OmniPass > Manage OmniPass Users and Settings
• Add/remove users
• Import a new user
• Export OmniPass user profiles; user profiles are stored as .opi
(OmniPass Import/Export) files
IMPORTANT: To restore a lost or corrupted OmniPass
configuration and encryption keys, back up and store a copy
of your user profile(s) in a safe place.
40 Motion Computing LE1600TC Tablet Client User Guide
Page 49

Chapter 2 Using Your Motion Tablet Client
• Motion OmniPass > Change User Settings
• Change user audio settings
• Change taskbar tips
• Modify file encryption settings
• Enroll authentication devices
• Set authentication rules and policies
NOTE: For instructions for setting up passwords, refer to
“Replacing Password Logons” on page 41.
• Change System Settings
• Startup options for Windows
• Strong Logon Security
• Vault Management — Password management for websites,
applications, or any password-protected resource
• Encrypt/Decrypt — Settings for authenticating encrypted/decrypted
files
Checking Logon Status
Move your pen over the OmniPass key icon in the system tray to check. A
pop-up window shows who is logged on.
Open the Motion Dashboard, tap Motion Security Center > Motion
OmniPass or tap the OmniPass key icon and open the OmniPass Control
Center and look at the Current User/Domain information in the second
panel on the left. See the OmniPass Control Center illustration for an
example of this window.
Replacing Password Logons
OmniPass lets you replace the password logons at web sites or anywhere
you are prompted to provide your credentials, such as Internet email, ftp
logons, client logons, or any restricted-access network resource. Once
OmniPass registers your logon credentials, you can conveniently access
any of these restricted areas with your fingerprint. You can also access
these sites with your password.
To replace password logons:
1. Go to a site that requires a log on (username and password), but do
not log on yet.
2. At the site logon prompt, enter your username and password in the
fields provided, but do not
tap Enter, Submit, OK, or Logon or any
other method that accesses the site.
3. Right-click the yellow OmniPass key icon that appears in the system
tray at the bottom of the screen.
4. Tap Remember Password. The Windows arrow cursor will change
to the OmniPass “golden key” cursor.
5. Drag this OmniPass cursor to the area on the site where you would
normally enter your username and password to log on, but do not
tap “Logon” or “Submit” yet. (You will complete the logon in Step 9.)
Motion Computing LE1600TC Tablet Client User Guide 41
Page 50

Chapter 2 Using Your Motion Tablet Client
6. If a “Friendly Name” window appears, enter a name that reminds you
of the website. OmniPass associates this name with this website.
NOTE: Verify that the Settings for this Password Site are set
the way you want the site authenticated:
• Automatically enter— Instantly accesses the site without requiring a password or fingerprint scan. If you are
logged in to OmniPass and you access a secure website, OmniPass will automatically submit your user
name and password without prompting for verification.
If you leave your system unattended and unlocked, this
website can be viewed by anyone who has access to
your Tablet Client.
• (Default) Automatically click— Prompts you for your
OmniPass/Windows password or fingerprint scan when
you access the site.
7. If needed, swipe your fingerprint or enter your master password to
authenticate these settings.
8. Tap OK, Submit, Sign In, or Logon to access the site.
9. Tap Finish to complete the “Remember Password” procedure. The
site location, the credentials to access the site, and the OmniPass
authentication settings for the site are now stored in the OmniPass
secure database.
Logging Onto a Remembered Site
To log on to a remembered site:
1. Open a website where you have set up the OmniPass logon (that is,
a “Remembered Site”).
2. Swipe your finger when you are prompted for a fingerprint/master
password authentication.
NOTE: You can remove a remembered site through the
OmniPass Control Center > Vault Management >
Manage Passwords option.
Exporting Your User Profile
The OmniPass Help application contains information about exporting your
user profile. Go to Motion Dashboard then Motion Security Center >
Motion OmniPass, and tap Help in the Action panel.
Configuring Strong Logon Security
Strong logon security can be configured to require authentication before
showing the Windows desktop. Be aware that enabling strong logon security
will force you to authenticate with a specific security device (e.g., the
fingerprint reader, a Smart Card) before allowing access to the Windows
desktop. Once enabled, the Windows XP Embedded Welcome screen and
Windows fast switching will not be available on this Tablet Client.
42 Motion Computing LE1600TC Tablet Client User Guide
Page 51

Chapter 2 Using Your Motion Tablet Client
To configure Strong Logon Security:
1. To enable Strong Logon Security, open the Motion Dashboard, tap
Motion Security Center then Motion OmniPass to open the
OmniPass Control Center.
2. Tap Change OmniPass System Settings
3. Tap Enable strong logon security. The Enable strong logon
security window is shown.
4. Tap the checkbox: Enable strong logon security.
5. Tap the checkbox: Save all changes. A dialog box tells you that you
have made changes that require you to restart your computer.
6. Tap OK and restart your computer. During logon you will be required
to use the specified authentication device.
Infineon Trusted Platform Module
The Infineon Trusted Security Platform Solution is a comprehensive set of
tools provided with your Tablet Client. Together, these tools and the Trusted
Platform Module (TPM) result in the one of the most secure computing
environments now available on a Tablet Client. With this application it is now
possible to create and manage digital certificates for user and platform
authentication. The Infineon TPM is not automatically enabled at startup
and requires system administrator action to enable the feature.
More Information About the Infineon Security Solution
Ask your system administrator for more information or learn more about the
Infineon Security Solution by opening the Motion Dashboard then Motion
Security Center > Infineon TPM > Getting Started Guide.
Motion Computing LE1600TC Tablet Client User Guide 43
Page 52

Chapter 2 Using Your Motion Tablet Client
Windows Security System Components Overview
Among the new security features, the Microsoft Windows Security Center
automatically sets up a Windows Firewall on your Tablet Client to block
unwanted access to your system over the internet and from other networks.
The Security Center system provides security alerts during startup and
messages while running Internet Explorer. These messages are a normal
part of the operating system. Microsoft provides information with these alerts
to help you decide what action to take.
In addition, you can set up the firewall to block all outside sources from
connecting to your system (recommended) or can make exceptions to allow
communications with a certain program. Within these settings, you can
change the scope to specify a set of computers for which this port or
program is unblocked.
• Microsoft Security Center — Lets you check security
settings and learn more about improving security. Access
is via open Motion Dashboard > Motion Security
Center.
• Windows Firewall — On by default; helps protect your
Tablet Client against viruses and other security threats,
such as intruders who might try access over the Internet
or a network. Tap the Windows Firewall icon on the
Control Panel (Classic view) or the Security Center >
Windows Firewall icon (Category view). From here, you can add
exceptions to bypass selected programs and services. If a program
or service needs to open the firewall to perform, it notifies you and
lets you decide whether to open the firewall and allow access.
• Internet Explorer — Provides security settings to warn you about
viruses and other security threats that can spread over the Internet
or other types of networks; blocks certain website features and gives
you a warning, so you can decide whether it is safe to proceed.
Access from Internet Explorer Tools > Internet Options > Security.
You can always bypass the settings for sites of your choice by
changing the options for that site.
Pop-up blocker in Internet Explorer
Stops most browser windows from popping up without your permission,
giving you more control over your Web browsing experience. Access from
Internet Explorer Tools > Internet Options > Security. You can always
bypass the settings for sites of your choice by changing the options for that
site.
Microsoft Security Center
The Windows XP Embedded SP2 operating system provides new security
features that help defend against viruses, worms, and hackers. To learn
more about these features, go to Motion Dashboard then Motion Security
Center > Microsoft Security Center or tap the Windows Security Alerts
icon in the system tray (this icon only remains active for a short time on your
desktop).
44 Motion Computing LE1600TC Tablet Client User Guide
Page 53

Chapter 2 Using Your Motion Tablet Client
Using Windows Security
Passwords protect your Tablet Client from unauthorized access. Passwords
can create different levels of protection for your Tablet Client and its data.
• Operating system passwords — Secure the files on your Tablet Client
from other users
• BIOS (Basic Input/Output System) passwords — Secure the software
routines that test hardware at startup, start the operating system, and
support the transfer of data among hardware devices
• System password — Locks access to the BIOS set up
• Boot password — Locks access to the system
• Disk Drive (DD) password — Secures your data so the DD cannot
be accessed by removing it and connecting it to another Tablet
Client
Setting the Windows Operating System Password
Be aware that the following advanced procedures require you to make
changes in Windows BIOS. You should not perform this procedure unless
you are comfortable with the following cautionary information. You can set
up a Windows operating system password going to Start > Control Panel >
User Accounts > Create a new account... (Classic View)
Setting BIOS Passwords
CAUTION: We strongly recommend that you read
the information in this section carefully to understand
the implications of setting up a BIOS system
password. If you set up a BIOS System password
and enter it incorrectly several times, you will be locked out of
the system. If you become locked out, you can restart the
Tablet Client and retry the password again. You can restart the
Tablet Client and re-enter the password as many times as you
need to. However, if you are unsuccessful in entering the
password, you will not be able to access your Tablet Client.
If this happens, contact Motion Computing Technical Support
at www.motioncomputing.com/support for assistance. Have
your Tablet Client serial number available (on the label on the
back of the system).
The level of security you want on your Tablet Client helps determine what
BIOS password(s) you set.
Setting a BIOS System Password
Perform these steps to set up a password to access the PhoenixBIOS
TM
Set
Up Utility on the Tablet Client:
NOTE: These procedures describe using the pen to enter
information; you can also attach an external keyboard if you
prefer.
Motion Computing LE1600TC Tablet Client User Guide 45
Page 54

Chapter 2 Using Your Motion Tablet Client
To set a BIOS system password:
1. Start the Tablet Client.
2. When the Motion Computing splash screen appears, quickly press
the Rotate Display button. If you miss the splash screen, turn the
Tablet Client off then back on and try this step again.
3. From the PhoenixBIOS Set Up Utility, tap Security on the menu bar.
4. To set up a System password, double-tap Enter next to Set
System Password.
5. Type in a System Password using the On Screen Keyboard.
6. Tap Enter.
7. Type in the password again to confirm it.
8. Tap Enter. The system returns to the Security screen and the Sys-
tem Password reads Set. A password is now required to enter the
PhoenixBIOS Set Up Utility.
9. To set up a Password on boot, tap Disabled next to
Password on boot until Enabled is highlighted. You will not be
prompted to type in another password because Password on boot
uses the System password.
NOTE: You cannot set up Password on boot until you set up
a System password.
10. If you have finished setting up a password, tap Exit or press the Esc
key on the Tablet Client to exit the PhoenixBIOS Set Up Utility.
11. When you exit, you are asked to select from the following options:
• Exit Saving Changes
• Exit Discarding Changes
• Load Set Up Defaults
• Discard Changes
• Save Changes
12. Select the desired action.
13. Confirm the selection by tapping Yes.
Disk Drive (DD) Password
To set up a password to start the Tablet Client (so no one can access the
information on the HDD of your Tablet Client even if it is removed and
installed in another Tablet Client without the proxy password):
To create a disk drive password:
1. Start the Tablet Client.
2. When the Motion Computing splash screen appears, quickly press
Rotate Display button. If you miss the splash screen, turn the Tablet
Client off then back on and try this step again.
3. From the PhoenixBIOS Set Up Utility, tap Security on the menu bar.
4. To set the HDD password, double-tap Enter next to Set Hard Disk
Password.
46 Motion Computing LE1600TC Tablet Client User Guide
Page 55

Chapter 2 Using Your Motion Tablet Client
5. Type in a New Password.
6. Tap Enter.
7. Type in the password to confirm it.
8. Tap Enter. The system returns to the Security screen and the HDD
Password is Set. (When you exit then re-enter the PhoenixBIOS
setup, the HDD Password is Locked.)
9. If you have finished setting up a password, tap Exit or press the Esc
key on the Tablet Client to exit the PhoenixBIOS Set Up Utility.
10. When you exit, you are prompted to select from the
following options:
• Exit Saving Changes
• Exit Discarding Changes
• Load Set Up Defaults
• Discard Changes
• Save Changes
11. Select the desired action.
12. Confirm the selection by tapping Yes.
Clearing Tablet Client Security
To clear the Tablet Client PhoenixBIOS security:
1. Start the Tablet Client.
2. When the Motion Computing splash screen appears, quickly press
Rotate Display button. If you miss the splash screen, turn the Tablet
Client off then back on and try this step again.
3. From the PhoenixBIOS Set Up Utility, tap Security on the menu bar.
If you have rebooted, you will be prompted to enter the password(s)
you have set up.
4. To clear the System and Password on boot passwords, double-tap
Enter next to Set System Password.
5. Type in the Current Password.
6. Leave the space blank next to Enter New Password.
7. Tap Enter.
8. Leave the space blank to Confirm New Password.
9. Tap Enter.
10. When the Security screen appears, the System Password should be
Clear and the Password on boot Disabled.
11. To clear the HDD password, double-tap Enter next to Set Hard Disk
Password.
12. Type in the Current Password.
13. Leave the space blank next to Enter New Password.
14. Tap Enter.
15. Leave the space blank to Confirm New Password.
16. Tap Enter.
Motion Computing LE1600TC Tablet Client User Guide 47
Page 56

Chapter 2 Using Your Motion Tablet Client
17. When the Security screen appears, the HDD Password should
now display Clear.
SPEECH Motion Speak Anywhere Technology
The Motion Speak AnywhereTM audio system combines the Knowles®
Acoustics IntelliSonic
let you record audio, dictate notes, and use voice commands without the
need for a microphone headset. These capabilities make the Motion Tablet
Client with Speak Anywhere technology a valuable tool for mobile users in a
variety of work settings, including small or large groups, or for individual
dictation or voice commands.
• Integrated microphones, two of the three are used at one time — The
integrated microphones help optimize the sound capturing capabilities of
the Tablet Client for speech recognition and voice recording. The locations of the microphones have been carefully designed to let the system
detect sound input from a specific angle, rejecting sounds from outside
that angle. There are three microphones; the software determines which
two of the three provide the best results.
• Knowles Acoustics IntelliSonic software — This software lets you direct
sounds coming from a specific direction to the microphones, while canceling interfering noise from other directions, thus minimizing the effects
of environmental noise and eliminating acoustic echo feedback. It is
based on the following audio technologies:
• Array Processing or “beam forming” software — Removes all sound
outside a software-defined “angle of acceptance”
• Noise Suppression — Removes background and ambient noise
• Acoustic Echo Cancellation (AEC) — Removes echo caused by the
microphone picking up the system’s speaker output, thus preventing
feedback
TM
software application with integrated microphones to
Using Motion Dashboard Directional Controls
The Microphone settings in the Motion Dashboard include three radio
buttons that define the directional angle that is to be used for speech
recording. The selected setting determines the angle of acceptance. The
following information is intended to help you understand the differences
between the narrow, medium, and wide angles. However, the best reference
will be your actual experience in using the technology. There are three
microphones, but only two are used at one time. If you are in landscape
mode, the microphones along the bottom edge (as viewed in primary
landscape mode) of the Tablet Client are used. If you are in portrait mode,
the two microphones along the right side are used.
• Angle of acceptance. Three pre-defined “angles of acceptance” are
part of the Motion Speak Anywhere audio technology:
• Narrow Angle (1) — Best setting for dictation, Voice over IP, “voice
noisy” environments; the microphones detect sound on a narrow
angle near the bottom center (landscape orientation) or top center
(portrait orientation) of the display. If you do not speak within the
angle of acceptance, e.g., if you turn your head while dictating or
change the angle of the Tablet Client, the sound will not be recorded.
48 Motion Computing LE1600TC Tablet Client User Guide
Page 57

Chapter 2 Using Your Motion Tablet Client
• Medium Angle (2) (default) — Best setting for a small group,
conference table, “voice quiet” environment; microphones detect at
a wider angle
• Wide Angle (3) — Widest angle of acceptance. Try starting with this
setting (even for dictation) before using a more restricted angle.
Change to the Narrow or Medium Angle to eliminate more
background noise.
1 Narrow Angle; 2 Medium Angle; 3 Wide Angle; 4 Microphones (only two of
the three are shown in the illustration).
• Skew angle. The pre-set sound detection area is straight in front of
the system display. If you want the system to receive sound from
elsewhere, you can skew the receiving direction towards one or the
other microphone (keeping the same relative angle of acceptance.
To set up the skew angle:
1. Open the Motion Dashboard.
2. Under Microphone, tap Narrow Angle or Medium Angle. (You cannot calibrate wide angle.)
3. Move to where you want the microphone to detect your voice.
4. Tap Calibrate. A block of text appears.
5. Read the text aloud, speaking normally towards the Tablet Client
microphones. This should take 20-40 seconds.
NOTE: In many cases, you will not need to calibrate the
microphone because the audio system filters out many
unwanted sounds. If you are dictating in an office or recording
during a meeting, the audio system may work well with no
additional calibration.
IMPORTANT: The audio system does not store calibrations.
If you change to another angle/position and then return to the
previous one, you must re-calibrate the audio system.
Motion Computing LE1600TC Tablet Client User Guide 49
Page 58

Chapter 2 Using Your Motion Tablet Client
Helpful Hint for Dictating and Recording
Use the following helpful hints when working with dictating and recording.
• You may want to start recording or dictating from the Wide Angle
(Motion Dashboard setting) and change to a more-restricted angle
(Narrow or Medium) if too many outside sounds are recorded. The
advantage to the Wide Angle is that no sounds will be lost if you change
your location. The disadvantage is that outside sounds may be picked
up that interfere with the recording.
• You MUST recalibrate the microphones if you change from one orientation (landscape) to another (portrait). This is because the skew angle
changes and the sound will no longer be in the angle of acceptance. If
necessary, refer to the earlier information on skew angle.
• Even with the Narrow Angle setting, if a sound is loud enough and within
the angle of acceptance (no matter how distant), the sound will be
picked up by the microphones. The advantage of the Tablet Client is that
it detects fewer extraneous sounds than other audio systems. You can
further limit the detection of these outside sounds by turning down the
microphone volume and speaking louder; this reduces the microphones’
range and restricts their ability to detect extraneous sounds.
• The Tablet Client contains pre-installed audio components. If you install
a third-party audio device (such as USB or Bluetooth devices), the
Motion-installed audio may not work. If this happens, you must reinstall
the Motion-audio components. (The Motion audio components are the
SigmaTel and Knowles Acoustics audio drivers.) After you install these,
if you still have problems recording, contact Motion Technical Support or
the Bluetooth or USB manufacturer’s technical support.
PORTS, SLOTS AND CONNECTORS
PC Cards
The PC Card slot (also referred to as a PCMCIA card slot), located on the
right edge of the Tablet Client, holds one Type-II PC Card for networking,
memory expansion, or accessory connection.
To install and remove a PC Card:
1. To install a PC Card, insert it label side up.
2. To remove a PC Card, push the button next to the slot until it
pops out.
3. Push it again to eject the PC Card.
NOTE: Your Tablet Client ships with a plastic blank card in the
PC Card slot. When the slot is not in use, we recommend that
you leave the plastic blank in place.
SD Cards
The SD Card slot, located just above the PC card slot on the right edge of
the Tablet Client, holds one SD Card for networking, memory expansion, or
accessory connection.
50 Motion Computing LE1600TC Tablet Client User Guide
Page 59

Chapter 2 Using Your Motion Tablet Client
To install and remove an SD card:
1. To install an SD Card, insert it in the slot, label side up.
2. To remove the SD Card, grip the edge of the card and carefully pull it
from the slot. Notice that the edge of the Tablet Client is curved
slightly in the area of the SD Card. This makes it easier to grip the
edge of the card for insertion and removal.
USB Ports
There are two high speed USB ports on the left edge of the Tablet Client.
These can be used to attach any USB device to the Tablet Client. Typically a
USB device draws power from the Tablet Client and it is advisable to use AC
power when one or more USB devices are attached. Running USB devices
while on the battery power will affect your power consumption.
Speaker Port
The speaker port is on the left edge of the Tablet Client. It is marked with a
small headphones symbol and is designed as an audio output channel only.
You can attach external speakers or headphones to this port. When
headphones or external speakers are attached, the internal speakers are
disabled.
Microphone Port
The microphone port is on the left edge of the Tablet Client. It is marked with
a small microphone symbol and is designed as an audio input/line in
channel only. You can attach an external microphone directly to this port to
enhance your audio recording capabilities. When an external microphone is
attached, the built-in microphones are disabled.
VGA Connector
The VGA Connector is on the left edge of the Tablet Client. It is intended for
use with standard analog video displays. An attachment cable is not
provided for this purpose; if you use the Tablet Client with a standard VGAtype display, you will need to purchase a corresponding cable. When an
external monitor is attached, the Motion Dashboard display settings can be
used to set the external display as a mirrored or extended display.
Docking Connector
The Docking Connector is at the bottom edge of the Tablet Client. It is
designed to integrate the Tablet Client with the new Motion FlexDock for the
LE Series. When the Tablet Client is used with the new FlexDock, the port
connections on the Tablet Client are replicated on the FlexDock. For more
information about the new FlexDock for the LE Series, contact your Motion
sales representative or visit the Motion Computing website at
www.motioncomputing.com/accessories.
Motion Computing LE1600TC Tablet Client User Guide 51
Page 60

Chapter 2 Using Your Motion Tablet Client
WIRELESS
NETWORKING
There are three technologies available in the Tablet Client for wireless
networking connections.
• Wi-Fi (802.11)
• Bluetooth
• Infrared
Wi-Fi (802.11) Wireless Connections
IMPORTANT: Since wireless set ups differ widely, the
information presented here is general and may not cover all
the steps required for your wireless configuration. For more
information about wireless networks, you may need to contact
your System Administrator. Or, go to Start > Help and
Support and search for wireless help from Microsoft.
Although wireless access is available in public areas, your ability to use the
wireless access point depends on the following conditions:
• Distance from the access point
• Ability to connect to the access point
• Service rights to it (which may require an account fee, user name, password, an/or network set up through an administrator)
• The access point is not broadcasting a network name (Check your security settings, the SSID may not be broadcasting)
• The security settings may not be configured properly for wireless networking.
WARNING: FAA regulations require that you disable
any wireless connection when traveling by air. If the
Wireless LED on the front of the Tablet Client is off,
internal wireless communications are disabled.
Enabling/Setting Up a Wireless Connection Through Dashboard
To enable and set up a wireless connection through the Motion
Dashboard:
1. Open the Motion Dashboard by pressing the Dashboard button on
the Tablet Client or by selecting Start > All Programs > Motion
Resources > Motion Dashboard.
2. Make sure that Enable Internal 802.11 Wireless Radio is checked.
3. Under Wireless on the Motion Dashboard, tap Properties.
4. In the Wireless Network Connection Properties window, tap the
Wireless Networks tab.
5. In the Wireless Networks window, tap View Wireless Networks to
see a list of available networks.
52 Motion Computing LE1600TC Tablet Client User Guide
Page 61

Chapter 2 Using Your Motion Tablet Client
6. Highlight the network you want to connect to and tap Connect.
7. Tap OK.
NOTE: If you are on a secure network, you may also need to
enter a network key.
Bluetooth Wireless Connections
The internal Bluetooth wireless radio in the Tablet Client is disabled by
default. Bluetooth software comes pre-installed on your Tablet Client and
can be activated through the Motion Dashboard.
To begin using Bluetooth:
1. Open the Motion Dashboard by pressing the Dashboard button on
the Tablet Client, or select Start > All Programs > Motion
Resources > Motion Dashboard.
For the location of the Dashboard button, see “Tablet Client
Buttons” on page 62.
Motion Computing LE1600TC Tablet Client User Guide 53
Page 62

Chapter 2 Using Your Motion Tablet Client
2. Check the box that enables your internal wireless Bluetooth radio.
The Bluetooth software completes its installation.
Accessing Bluetooth
When you first enable Bluetooth on your Tablet Client, you will see a
Bluetooth icon in the system tray. This icon offers shortcuts to the Bluetooth
Settings window, the Bluetooth File Transfer Wizard, and the Add New
Connection Wizard.
To open the Bluetooth Settings menu:
• Press and hold the pen tip on the Bluetooth icon.
The Bluetooth menu opens.
Bluetooth Device Connection Process
The following process is generally common for connecting most Bluetooth
devices (keyboard, mouse, printer, cellular phone, PDA, Tablet Client,
notebook PC, etc.). The actual steps may be slightly different for every type
and brand of Bluetooth device. Read and follow the installation instructions
included with your specific device. These are the four generic steps for
connecting to a Bluetooth device.
1. Make the device discoverable. Making a Bluetooth device discoverable
makes it visible to other Bluetooth devices. Each Bluetooth device uses a
different method (pressing a button or key combination) to make it
discoverable; this is generally described in the device’s documentation.
2. Search for Bluetooth devices in range. This process will find every
Bluetooth device that is discoverable and available for connection within 33
feet (10 meters).
54 Motion Computing LE1600TC Tablet Client User Guide
Page 63

Chapter 2 Using Your Motion Tablet Client
3. Pairing. Using a passkey creates a secure connection (pairing) between
the Tablet Client and Bluetooth device. This passkey helps prevent data
from being intercepted and interpreted by another device.
IMPORTANT: Though the passkey exchange helps to secure
your data, Bluetooth wireless technology should not be
considered completely secure.
4. Connect the devices. The first time a Bluetooth device is connected to
the Tablet Client the drivers are loaded for that device. After this initial
connection, some Bluetooth devices may disconnect when they go into
power-saving mode. Most will automatically reconnect when they become
active again.
Using the Bluetooth Application
1. Make sure that either the Bluetooth LED is flashing or that there is a
checkmark beside Enable Internal Bluetooth Wireless Radio
(both indicate that Bluetooth is running) in the Motion Dashboard
2. Using your pen, single tap the Bluetooth Devices icon in the
system tray.
3. Tap Add New Connection to launch the Bluetooth Add New Con-
nection Wizard.
The Bluetooth Settings window is shown and is quickly followed by the
Add New Connection Wizard.
4. Place the Bluetooth device (mouse, keyboard, printer, etc.) in discoverable mode (to enable making it recognizable to other Bluetooth
devices).
NOTE: Each Bluetooth device may have a different way to
make it discoverable. Some have a small button on the back
of the mouse or keyboard; others may require that you press
a key sequence on the keyboard. Look at the documentation
that came with the Bluetooth device or visit the
manufacturer’s website for information.
Motion Computing LE1600TC Tablet Client User Guide 55
Page 64

Chapter 2 Using Your Motion Tablet Client
5. After you make the Bluetooth device discoverable, tap Next. The
“Searching for Bluetooth devices” window is shown.
When the Bluetooth device is detected, it is shown in the Add New
Connection Wizard Select a device window. If multiple devices are
detected, each is shown in the window. Select the device to be
connected.
6. Tap Next to add the Bluetooth device.The wizard searches for
remote device services. The Wizard will display a message that it is
connecting and then the passkey number if authentication is
required.
NOTE: If required, immediately enter the number shown in
the Passkey field and press Enter. Consult your device
documentation for more information.
56 Motion Computing LE1600TC Tablet Client User Guide
Page 65
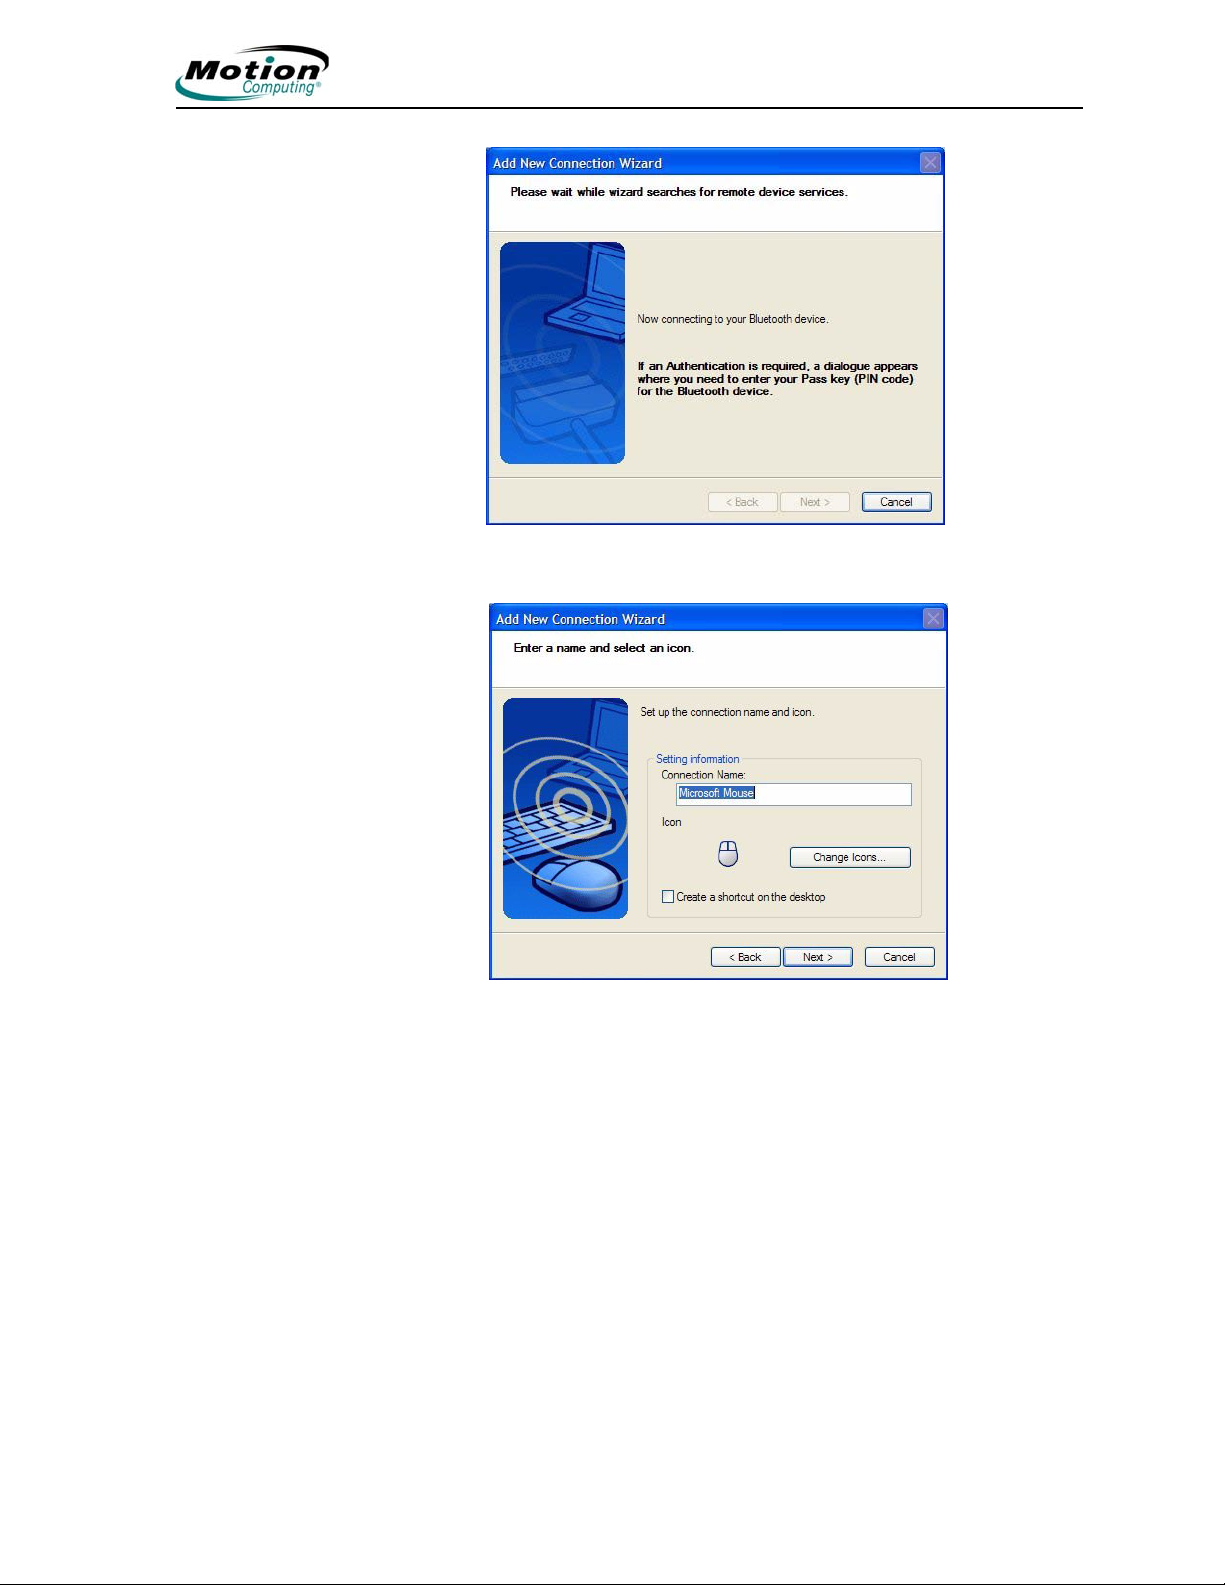
Chapter 2 Using Your Motion Tablet Client
It may take a short time to complete the connection. Please
wait.
7. When the Completing the Add Bluetooth Device Wizard window
appears, the Bluetooth installation is nearly complete. Tap Finish to
complete the installation
Motion Computing LE1600TC Tablet Client User Guide 57
Page 66

Chapter 2 Using Your Motion Tablet Client
8. Take your device for a spin. You can now begin using your Bluetooth
device.
Important Actions To Perform If the Device Is Not Discovered
If the Tablet Client fails to detect the Bluetooth device after what you
consider a reasonable number of attempts, try the following:
• Make sure the Bluetooth LED is flashing. If not, open the Motion
Dashboard and enable the Bluetooth Wireless radio button.
To open the Motion Dashboard:
• Press the Dashboard button on the Tablet Client, or select Start
> All Programs > Motion Resources > Motion Dashboard.
• Make sure the device you are adding is discoverable. There are
several things you need to check:
• Install new or fully charged batteries in the Bluetooth device; make
sure these are installed correctly
• For keyboards, mice, printers, etc., read the instructions that came
with the device or visit the device manufacturer’s website for
information and other troubleshooting tips. Some devices have a
button to press or a series of keys to press to make it discoverable.
• For Tablet Clients transferring files, both Tablet Clients must turn on
the device transfer wizard, although only the receiving Tablet Client
needs to be discoverable. Tap the Bluetooth icon and then either
“Send a file” or “Receive a file.” When you do this, discovery is
automatically turned on for the receiving device.
• Also for Tablet Clients, you need to enable “Allow Bluetooth devices
to connect to this computer” to connect to keyboards, mice, printers,
etc. While this is the default, make sure that this setting has not been
changed. You find this by right-clicking the Bluetooth icon > Show
Bluetooth Devices > Options.
• When you open the Bluetooth Devices tab, only the connected
devices will be displayed. Other devices are only displayed when
you add a device using the Bluetooth Device Wizard.
58 Motion Computing LE1600TC Tablet Client User Guide
Page 67

Chapter 2 Using Your Motion Tablet Client
• Check to see what Bluetooth devices are connected. Tap the
Bluetooth Devices icon > Open Bluetooth Settings. On the
Devices window, you should be able to see Bluetooth devices that
are currently connected.
If the Bluetooth card in the Tablet Client still fails to detect the Bluetooth
device, contact the device manufacturer or visit their website for assistance.
NOTE: A system reboot is not required.
The Bluetooth device is ready to use. If you look at the
Bluetooth Settings window, the connected device or devices
are shown. An example of a Bluetooth Settings window with
both a Bluetooth keyboard and a Bluetooth mouse is shown
below.
Helpful Hints for Using Bluetooth Wireless
Motion Computing and its Bluetooth partners have worked to ensure a
positive experience with this technology, as well as to ensure Bluetooth
inter-operability. In doing so, the following operating issues have been
found:
• When simultaneously operating Bluetooth wireless and 802.11 wireless,
interference between these wireless technologies impacts Bluetooth
performance. This is most noticeable when you try to transfer large
amounts of data, such as file transfers or printing large documents. This
may also be noticeable when you try to transfer large or small amounts
of data may if several Bluetooth devices are operating simultaneously in
an office.
• Bluetooth audio support is currently based on technology that has not
been fully developed for speech recognition. In addition, the Bluetooth
software in the Tablet Client does not have a pre-installed Bluetooth
headset profile. Therefore, for speech recognition, we recommend that
you not use a Bluetooth wireless headset. Moreover, the Motion Speak
Anywhere technology is designed to record clear audio, dictate notes,
and use voice commands without the need for any type of microphone
headset.
Motion Computing LE1600TC Tablet Client User Guide 59
Page 68

Chapter 2 Using Your Motion Tablet Client
• Should you attempt to install other wireless headset or other audio drivers (such as Bluetooth or USB) over the Tablet Client audio drivers, a
malfunction of the Tablet Client audio system may occur because the
drivers may not be compatible.
• Because Bluetooth is a relatively new technology, some cross-device
compatibility issues may occur. If you are having problems with interpretability of Bluetooth devices, contact the manufacturer of your Bluetooth
device and check its compatibility with the Bluetooth software installed
on your Tablet Client.
• Do not install Bluetooth software from another manufacturer over the
Microsoft Bluetooth software installed on the Tablet Client. This will
cause the Tablet Client Bluetooth system to malfunction.
Using Infrared Wireless Connections
The infrared software is installed by default. You can access the Infrared
software by going to the Control Panel and tapping the Wireless Link icon.
Double-tap the Wireless Link icon to open the Wireless Link window. The
following shows the Wireless Link window at the Infrared tab. Tap the
desired check boxes.
60 Motion Computing LE1600TC Tablet Client User Guide
Page 69

Chapter 2 Using Your Motion Tablet Client
Accessing Image Transfer
To transfer an image from your camera to your Tablet Client, tap the Image
Transfer tab in the Wireless Link window. The Image Transfer window is
shown. Specify the destination of the received image(s) and tap OK to
begin.
For information about the Infrared Port, tap the Hardware tab to open that
window.
Motion Computing LE1600TC Tablet Client User Guide 61
Page 70

Chapter 2 Using Your Motion Tablet Client
TABLET
CLIENT
BUTTONS
This section describes the buttons located on top of the Tablet Client.
• On-screen keyboard button
• ritePen button
• Five-way directional control buttons
• Dashboard button
• Rotate button
• SAS (Ctrl+Alt+Del) - this button is located on the front panel in the upper
left corner (when in primary landscape orientation) above the key icon
and the fingerprint reader.
Tablet Client Buttons
On screen
keyboard
button
SAS button
ritePen button
Five-way
directional
control
Dashboard button
Button Default Functions
Button Function
On screen keyboard
ritePen
Five-way Directional
Control Button
Dashboard
Rotate
SAS
(This button is located at the
top left corner with a key
icon)
Activates the on screen keyboard
Activates the ritePen function on the desktop
Works like the arrow keys on a keyboard. The center of
the button works like the Enter key.
Opens Motion Dashboard
Rotates the display
Ctrl + Alt + Del (Windows Task Manager). Also used for
domain authentication or logon screen.
Rotate button
62 Motion Computing LE1600TC Tablet Client User Guide
Page 71

Chapter 3 Care and Maintenance
CARING FOR YOUR TABLET CLIENT AND ITS ACCESSORIES
Chapter
3
Care and Maintenance
This chapter describes various care and maintenance procedures that you
should do on a routine basis with your Motion Tablet Client.
The Tablet Client display and chassis are designed to be very durable. This
section describes the proper care and maintenance that will keep them
working and in good condition for a long time. For general information about
care of the Tablet Client and its components and accessories, see the
Regulatory and Safety Guide packaged with your Tablet Client.
CAUTION: Be sure to follow the guidelines listed
below when caring for your Tablet Client and its
components. Improper use may damage the Tablet
Client and/or its components and void the warranty.
General Care
• Protect the Tablet Client from exposure to extreme temperatures, shock,
liquids, and strong magnetic fields.
• Do not open or disassemble the Tablet Client other than to replace
memory modules or to replace the battery. Always follow the instructions
included with these accessories when performing these procedures.
WARNING: To avoid the risk of personal injury or
damage to the Tablet Client, when replacing memory
modules, turn off your Tablet Client, unplug the AC
power connection, and remove the battery. Ground
yourself by touching a grounded conductive surface,
such as a device or appliance with a grounded,
three-pronged plug. Avoid touching the pins and
leads on the memory and the internal circuitry of the
Tablet Client.
• When storing the Tablet Client for an extended period of time, unplug
AC power and remove the battery after discharging it part way.
• Do not place heavy objects on top of the Tablet Client.
Motion Computing LE1600TC Tablet Client User Guide 63
Page 72

Chapter 3 Care and Maintenance
Caring for the Standard and View Anywhere Displays
• General cleaning of either display — Clean fingerprints and most marks
from the display surface by wiping it with the soft cloth (provided). Never
spray or pour liquids directly onto the display surface itself. Never use an
abrasive cleaner on the display. If liquid is spilled on the display, wipe it
up immediately.
• Cleaning the standard display — If needed, spray a soft cloth (not
directly on the display) with a window-type cleaner and wipe the
display.
• Cleaning the View Anywhere Display — If needed, clean with any
alcohol-based product recommended for use on anti-reflective glass.
Other cleaning products may leave a residue.
• Avoid using tissues or paper towels to clean the display surface. These
contain wood fibers that can scratch the display.
• Use only the Motion Digitizer Pen on the display. Do not write on the surface with an ink pen or pencil, any pointed or other object that could
damage the display surface.
• Do not place heavy objects on the display surface.
• Protect the display surface from unnecessary contact by using the Hardtop Cover or a portfolio when transporting the Tablet Client.
• Avoid exposing the display to direct sunlight for long periods of time.
Caring for the Motion Digitizer Pen
• Always store the Motion Digitizer Pen in the Tablet Client pen bay or in
the portfolio when not in use.
• Do not store the pen vertically on the tip. Constant tip pressure can
affect the pen-to-digitizer interaction.
• Change the pen tip regularly. See the CAUTION and refer to “Replacing
the Pen Tips” on page 64.
• The pen contains sensitive electronics. Do not immerse it in liquids.
CAUTION: Certain environments may contain
particles or debris that can adhere to the Tablet
Client display or to the pen tip. To avoid damaging
the display, clean it frequently with the cleaning cloth,
provided with your system. Also, change pen tips
regularly, especially if you drop the pen onto a rough
surface that could damage the tip or embed debris in
it. Damaged pen tips can scratch the display.
Consider using a Motion Slip Case to protect the
display and the pen.
Replacing the Pen Tips
Normal use eventually wears down the pen tip, so the pen ships with extra
tips and a small “tip tool” for replacing them.
To replace the pen tips:
1. Grasp the old tip with the silver ring of the tip replacement tool. Use
the notch on the ring to grab the tip.
64 Motion Computing LE1600TC Tablet Client User Guide
Page 73

Chapter 3 Care and Maintenance
2. Pull the old tip out of the pen.
3. Insert a new tip.
4. Apply slight pressure to push it into place.
Ordering New Pens
To order additional pens, visit the Motion Computing website at
www.motioncomputing.com/accessories.
TRAVELING WITH YOUR TABLET CLIENT
Here are some tips for traveling with your Tablet Client:
• Remove all accessories and cables. Remember to pack those you will
need while traveling and do not forget to pack at least one Motion
digitizer pen.
• Attach the Hardtop Cover or slip the Tablet Client into a portfolio to protect the display.
• Protect the pen by keeping it in the Tablet Client pen bay or portfolio
case during travel.
• Pack the Tablet Client securely in a briefcase or hand-carried luggage,
and keep it separate from toiletries, liquids, and food. Do not pack it in
checked luggage when you travel.
• Keep the Tablet Client stable during travel; secure it to prevent it from
sliding around in overhead bins and car trunks.
NOTE: For travel warnings, see the section “FAA Wireless Air
Travel Requirements” in this chapter.
Traveling by Air
• Prepare for airport security by charging the battery in the event Security
asks you to start the Tablet Client.
• Have it hand-inspected or sent through the X-ray scanner, but never
carry it through the metal detector.
• Turn off the Tablet Client for takeoff
and landing.
FAA Wireless Air Travel Requirement
WARNING: The FAA requires that you suspend
wireless operations, such as 802.11 and Bluetooth,
before boarding the plane. The easiest way to
disable internal wireless operations is by pressing
the Wireless on/off button for 1/2 second. You can
also uncheck (disable) all wireless devices in the
Motion Dashboard. The wireless LED on the Tablet
Client front panel, shown here, is off when wireless
communications are disabled. To disable external
wireless operations, remove any installed wireless
PC Cards.
Motion Computing LE1600TC Tablet Client User Guide 65
Page 74

Chapter 3 Care and Maintenance
WARNING: Do not transport the Lithium-ion
batteries used in your Tablet Client in checked
baggage. You may take up to two spare batteries in
carry-on luggage in addition to the one in your Tablet
Client.
Transporting batteries in checked baggage or
transporting more than two spare batteries is a
violation of transportation regulations.
Other Travel Hints
• Before extended use in the field or long trips away from AC power,
adjust the Power properties to maximize battery conservation. Rightclick the Power Meter icon in the system tray to open the Power
Options Properties dialog box. Then adjust the options. For more information, refer to“Helpful Hints: Battery and Power Management ” on
page 31.
• For international travel, obtain and use the appropriate adapters for your
destination’s electrical outlets. A current converter is not necessary.
• You may want to carry proof of ownership or a merchandise passport
when traveling internationally.
• Consult your insurance company and credit card company to learn
about emergency travel assistance in the event your Tablet Client
becomes lost or disabled.
66 Motion Computing LE1600TC Tablet Client User Guide
Page 75

SOLUTIONS TO COMMON PROBLEMS
Appendix
A
Troubleshooting and Support
All Motion Computing Tablet Clients have passed a rigorous series of
performance and quality-control tests, but now and then a problem may
occur. If you do not see a solution among the following system and software
issues, check the section “Support Options” in this chapter or go to our
website at www.motioncomputing.com/support.
PROBLEM
POWER
The Tablet Client won’t start when
I slide the Power switch.
The Tablet Client won’t shut down. An application has locked up the
The display goes black while the
Tablet Client is still turned on.
BATTERY
Data loss during battery swap. The unit is designed to maintain
The Power switch hasn’t been
fully engaged.
Fully discharged battery or no
battery and no AC power.
Tablet Client.
The Tablet Client system has gone
into stand by after sitting idle for a
period of time. (In this state, the
power LED flashes blue.)
the data and settings for up to 30
seconds in stand by while you
swap the battery. This time may
vary due to your system and the
programs you’re running.
CAUSE SOLUTION
Slide and hold the power switch
for at least a half-second, but no
more than three seconds.
Connect the AC adapter to
operate the Tablet Client and
charge the battery.
Press the SAS button (small
button with a key icon nearby) to
start Windows Task Manager and
close the application, or
Slide and hold the power switch
for at least 5 seconds to force a
shutdown of the Tablet Client.
Slide the power switch for about a
second to resume operations.
When you swap the battery with
the unit in stand by, be sure to
save your data before removing
the battery to avoid data loss.
Motion Computing LE1600TC Tablet Client User Guide 67
Page 76

PROBLEM
The battery seems to run down
very quickly (lasting less than
three hours after a full charge).
DISPLAY
The desktop is too big for the
display – I can’t see all of the
desktop icons.
CAUSE SOLUTION
Accessory devices such as a DVD
player and applications that make
heavy use of the hard drive drain
the battery more quickly.
The battery is weakening or
defective.
Screen resolution is set higher
than the default 1024 x 768 with
32-bit resolution.
Use AC power when possible and/
or turn off the accessory devices.
All batteries weaken over time, but
if a new battery is needed, visit the
Motion website to order a new
battery.
Decrease the screen resolution by
opening the Motion Dashboard,
selecting Graphics Properties,
then the Schemes tab.
When I disconnected a second
monitor from the Tablet Client, the
image became too big for the
Tablet Client display.
The display looks dim. Brightness is set too low. Adjust brightness from the Motion
The screen is unreadable or
distorted.
PEN
The Tablet Client digitizer screen
doesn’t respond to the plastic
stylus I use on my PDA.
The Tablet Client has attempted to
spread the image of a window or
desktop beyond the screen area
of the active monitor.
Screen resolution and/or color
quality are set incorrectly.
Display driver has become
corrupted or uninstalled.
You’re using the wrong input
device.
1. Tap the Properties button on the
Motion Dashboard.
2. Tap Graphics Options, then
Graphics Properties... to open the
Properties screen.
3. Select Notebook to make the
Tablet Client the primary display.
Dashboard.
Reset resolution to 1024 x 768
and color quality to 32-bit by
opening the Motion Dashboard,
Graphics Properties, then the
Schemes tab.
1. Open the Windows Control
Panel, select Performance
and Maintenance (Category
View). or System (Classic
View).
2. Select the Hardware tab.
3. Select Device Manager.
4. Open Display adapters.
5. Double-tap on an adapter.
6. Select the Driver tab.
7. Choose Update Driver... and
follow the Installation Wizard.
Only the Motion Digitizer Pen lets
you write on the Tablet Client
display. The Tablet Client doesn’t
respond to other tablet pens or to
a plastic stylus.
68 Motion Computing LE1600TC Tablet Client User Guide
Page 77

PROBLEM
The Motion Digitizer Pen tip
doesn’t line up with the arrowcursor when I tap on the screen.
When I write, I unintentionally click
the pen function button while I’m
writing with the pen.
The pen button doesn’t work. I
can’t get it to right-click.
CAUSE SOLUTION
The pen and display need
recalibrating.
You’re pressing the pen button
with your thumb or finger when
you write or gripping the pen too
tightly and accidentally pressing
the pen button. This enables the
right-click function of the pen.
The right-click option for the pen
button may be deactivated.
You may not be correctly timing
clicking the pen button and
tapping the pen on the display.
Refer to “Calibrating Your Digitizer
Pen” on page 20.
Try these hints:
• Readjust how you hold the pen.
Place your fingers on either side
of the pen function button when
you write.
• Practice using the pen function
button with both your index finger and thumb to see which
you prefer.
• Relax your grip. Only a light
touch is needed to write with
the pen.
• Deactivate the pen right-click
function through WACOM Pen
Settings. Instead, press and
hold the pen to the display surface to right-click.
Re-activate the right-click option:
Double-click the WACOM Pen
Settings icon, select Pen Options,
and reselect Use pen button to
right-click. Select Apply>OK.
To right-click, hold the pen button
down and then firmly tap on the
display.
The buttons on the Tablet Client
don’t do what I expect them to do.
INTERFACE/PORTS
The system doesn’t recognize the
PC card I’ve inserted.
The system doesn’t recognize a
USB device.
The button functions are preconfigured and cannot be
changed.
The card is incorrectly inserted. Eject the card and re-insert it with
The device is not supported. Check Windows XP compatibility.
Windows XP may take a short
time to recognize the device.
The accessory isn’t connected to
the Tablet Client correctly.
The correct driver isn’t built into
Windows XP.
The buttons are pre-configured.
the label side up.
Wait until Windows XP recognizes
the device.
Check the connection cable and
be sure it is inserted into the
correct port on the Tablet Client
and the accessory device.
Use the device’s installation CD or
check the manufacturer’s website
for the correct driver.
Motion Computing LE1600TC Tablet Client User Guide 69
Page 78

PROBLEM
The Tablet Client is sitting in the
Motion FlexDock for the LE
Series, but the system doesn’t
recognize any accessory devices,
such as the external monitor or
DVD/CD RW.
AUDIO
No sound is coming from the builtin speakers.
No sound is coming from any
speakers.
CAUSE SOLUTION
The Tablet Client isn’t fully seated
in the Motion FlexDock for the LE
Series.
Connecting a headset or external
speakers mutes the built-in
speakers.
Audio volume is too low or has
been muted.
Reseat the Tablet Client in the
Motion FlexDock for the LE
Series.
Disconnect the headset or
external speakers if not in use.
Open the Motion Dashboard and
adjust the speaker volume by
sliding the volume slider or
uncheck the Mute button.
I’ve forgotten my BIOS password
and can’t access my system.
The program I’m working in has
stopped responding, but the
cursor moves and other programs
work.
COMMUNICATIONS
The wireless communication
keeps connecting even when I
don’t want it to.
Data doesn’t transfer through the
wired Ethernet cable.
The Tablet Client will let you enter
several passwords incorrectly
before it temporarily locks the
system.
The program has crashed. Press the Security button (small
The default setting is On. Uncheck the wireless checkboxes
The Ethernet cable is not
connected correctly.
Turn the Tablet Client off and back
on and try re-entering your
password (you can do this as
many times as needed). If you
have forgotten your password,
contact Motion Computing
Technical Support for information
about unlocking your system at
www.motioncomputing.com/
support.
button with a key icon) on the
Tablet Client front panel to open
the Task Manager and end the
non-responsive program.
in the Motion Dashboard.
Reconnect and check the activity
LEDs next to the LAN (RJ-45)
port. They should flash green and
amber.
70 Motion Computing LE1600TC Tablet Client User Guide
Page 79

FREQUENTLY ASKED QUESTIONS
Can I make the battery charge last longer?
• Change to the Max Battery power scheme (right-click on the Power/Battery icon in the system tray—located in the lower-right corner of the display window—and tap Adjust Power Properties; under Power schemes,
tap Max Battery). The Tablet Client comes with Motion Computing Optimized as the default power scheme.
• Turn on the Ambient Light Sensor on the Motion Dashboard. This will
dim the display automatically (when possible) and save battery power.
• Dim the display brightness by opening the Motion Dashboard and moving the Display Brightness slider.
• Disconnect LAN/modem connections and disable wireless communications when not in use (uncheck the Wireless checkboxes in the Motion
Dashboard).
• Turn off optional and unnecessary background programs and turn off or
unplug accessory equipment from the USB ports.
What does the Tablet Client need for use in another country?
Just an outlet adapter, which you can find in airports and travel stores. The
AC adapter will adjust automatically to different voltages when plugged into
the correct location-appropriate power adapter.
What’s the best way to clean the standard display screen?
To clean the acrylic display screen, wipe it with a soft cloth (like the one
supplied) onto which you have sprayed a window-type cleaner. Do not spray
cleaners, spray/pour any liquid, nor wipe any abrasive cleaner on the
screen nor any surface of the Tablet Client. Do not use tissues or paper
towels to clean the screen. They contain wood fibers and may scratch
the surface.
How should I clean the View Anywhere display screen?
To clean the View Anywhere display screen, wipe it with a soft cloth (like the
one supplied). If needed, clean with any alcohol-based product
recommended for use on anti-reflective glass. Other cleaning products may
leave a residue. Do not spray cleaners, spray/pour any liquid, nor wipe any
abrasive cleaner on the screen nor any surface of the Tablet Client. Do not
use tissues or paper towels to clean the screen. They contain wood fibers
and may scratch the surface.
Will scratches affect the display/digitizer’s performance?
Testing has not found appreciable loss of performance on a scratched
display.
How sensitive is the screen to various elements?
As with any computer or electronic device, the Tablet Client should be
protected from liquids, dirt and sand, other contaminants, and
extreme heat.
Motion Computing LE1600TC Tablet Client User Guide 71
Page 80

Will the Tablet Client work with any monitor or USB accessory,
keyboard, mouse, disk drive, etc?
As long as the device’s driver is available either in the Windows XP
operating system or from the manufacturer and it carries the Windows XP
logo or certification, it should work with your Tablet Client. For more
information, see www.microsoft.com/help.
Why doesn’t the Tablet Client or FlexDock have parallel, serial, or
PS2 (mouse) ports?
The Tablet Client is configured to be completely Grab-and-Go—that is, to be
able to dock with and undock from all accessories without putting the
system into suspend or shutting it down. Connection through legacy ports
(serial, parallel, PS2) often requires suspending or restarting the system,
which prevents you from moving between desktop mode and mobile mode
seamlessly in one docking/undocking step.
How do I adjust the Tablet Client for left-handed use?
Double-tap on the WACOM Pen Settings icon in the system tray, located in
the lower-right corner of the display window, which opens the Settings
window. You can change it for left- or right-handed use as well as change
the location of the menus. Then, make sure you recalibrate the pen.
MOTION WARRANTIES
MOTION
COMPUTING
UPPORT
S
Standard and Extended Warranty and Insurance Programs
Motion Computing currently provides limited warranties on Motion products
and accessories. See the Warranty packaged with your Motion product or
accessory or visit our website at www.motioncomputing.com.
In addition, Motion Computing offers extended warranties along with various
screen and configuration insurance programs. Visit our website at
www.motioncomputing.com/support.
If you need assistance or answers to frequently asked questions about your
Motion Tablet Client, visit www.motioncomputing.com/support. We also offer
a Knowledge Base of additional information that may help with your
problem.
72 Motion Computing LE1600TC Tablet Client User Guide
 Loading...