

Page 1

Motion C5 Mobile Clinical Assistant
User Training Manual
Learning objectives: At the end of this course, the learner will
1. Demonstrate understanding of the functionality of the Motion C5 Mobile Clinical Assistant
2. Demonstrate understanding of the cleaning, charging and storage of the Motion C5 Mobile
Clinical Assistant.
3. Demonstrate the ability to use the Motion C5 Mobile Clinical Assistant in a full slate mode using
the Motion pen for data entry
4. Demonstrate the ability to use the Motion C5 Mobile Clinical Assistant’s barcode, camera, and
RFID functionality if applicable
Total course time:
2 hours for basic class
2.5 hours if adding barcode scanning or
3 hours if adding barcode scanning and
Audience:
Clinicians who will be using Motion C5 Mobile Clinical Assistant for entering clinical documentation
Preferred classroom setup:
• U-shaped setup preferred or classroom style with center and side aisles to allow for easy access
to learners
• Room should have wireless access and Motion C5 Mobile Clinical Assistant should be configured
to access facility clinical software either in training system or on training patients in live system to
allow for real-live practice
• One Motion C5 Mobile Clinical Assistant configured to facility system hooked to projector for
instructor to demo actions
• One Motion C5 Mobile Clinical Assistant with flex dock and keyboard (and mouse if keyboard
does not have touchpad or pointer) per learner
• If available, one super-user should be available to serve as second trainer to help individuals
Web Sites of Interest
• Motion Computing Support Website
• Motion C5 User Guides
our website
• Motion Tips & Tricks
• Free online video training tutorial for using the barcode scanner
are found in electronic version on each C5 and are downloadable from
biometric enrollment
biometric enrollment
© 2008 Motion Computing, Inc. All Rights Reserved Rev. 4
Page 1 of 29
Page 2

Motion C5 Mobile Clinical Assistant Overview
• Motion Company Intro
• Course Introduction
• Motion C5 Mobile Clinical Assistant
differences and similarities to a standard
PC
Motion C5 Mobile Clinical Assistant
Fundamentals
• Hardware tour of chassis and docking
station
• Logging on
Customizing Your Motion C5 Mobile Clinical
Assistant Environment
• Set handedness
• Calibrate pen to digitizer
• Hands on exercise
Pen and Ink Introduction
• Digital pen basics
• Using the pen as a mouse
• Hands on exercise
Using Handwriting Recognition to input text
• Accessing and using the Tablet Input
Panel (TIP) to insert text
• Changing the pen tip
• Hands on exercise
Power Management
• Checking your battery power level
• Charging the battery
• Changing the battery
• Hands on exercise
Caring for Your Motion C5 Mobile Clinical
Assistant
• User maintenance tips and tricks
• Replacing the pen tip
Agenda
Microsoft Journal Fundamentals
• Access and basic use (hands on
exercise)
• Converting ink to text
• Organizing your Journal notes
• Hands on exercise
Using Sticky Note
• How to use
• How to delete
• Hands on exercise
How to Obtaining Additional Support
• Accessing the on-board tutorials and
user guide
• Motion web site support resources
Optional based on facility need:
• Configuring and using the Motion
OmniPass fingerprint reader
• Using Voice Recognition
Practice using facilities’ software on Tablet
© 2008 Motion Computing, Inc. All Rights Reserved Rev. 4
Page 2 of 29
Page 3

Table of Contents
Benefits of the Motion C5..............................................................................................................4
Getting Started with the Motion C5...............................................................................................5
Hardware Fundamentals...........................................................................................................5
Logging on to C5.......................................................................................................................8
Holding the C5...........................................................................................................................9
Customizing Your Motion C5 Environment.................................................................................10
Motion Dashboard...................................................................................................................10
Pen and Ink Introduction .........................................................................................................11
Accessing and using the Tablet Input Panel (TIP) to insert text..............................................12
Using the Writing Pad..........................................................................................................14
Using the Character Pad .....................................................................................................15
Using the on-screen keyboard.............................................................................................16
Adding words to the TIP dictionary..........................................................................................17
To add a word to the handwriting dictionary........................................................................17
Additional Writing Tips.............................................................................................................17
Power Management................................................................................................................18
Checking your battery power level..........................................................................................18
Charging the battery............................................................................................................18
Best Practices: Extending Battery Life....................................................................................19
Using the Bar Code Reader........................................................................................................20
Holding the C5 for bar code scanning of medication...............................................................21
Holding the C5 for bar code scanning of patient wrist bands..................................................21
Using the Camera.......................................................................................................................22
Using the RFID Reader...............................................................................................................23
Caring for Your Motion C5 Mobile Clinical Assistant ..................................................................24
Disinfecting Procedures ..........................................................................................................24
Pen tip.....................................................................................................................................24
Additional Support...................................................................................................................25
Optional Topics...........................................................................................................................25
Microsoft Journal .................................................................................................................25
Microsoft Sticky Notes.........................................................................................................26
Motion OmniPass fingerprint reader........................................................................................26
Voice Recognition ...................................................................................................................26
Practice with facility’s software................................................................................................27
Competency Check-off Sheet.....................................................................................................28
Motion C5 Mobile Clinical Assistant Competency Test...............................................................29
© 2008 Motion Computing, Inc. All Rights Reserved Rev. 4
Page 3 of 29
Page 4

Benefits of the Motion C5
The Motion C5 saves time, reduces errors and ensures that the most up-to-date information
stays at your fingertips throughout all stages of the care delivery process. This can result in:
• Increased mobility and accessibility
• Automation of forms, processes and workflows
• Greater access to data at the point of care
• Elimination of duplicate efforts
• Facilitation of real-time communications
• Improvements in patient charge capture
• Increased patient safety
The Motion C5 has been designed with clinicians in mind. It’s weight is a bit over 3 lbs with a
10.4” display screen. It was built to withstand the rigors of the healthcare environment with a
magnesium-alloy internal frame, a disinfectant-resistant resin shell and a shock-mounted 1.8”
hard drive with DataGuard Accelerometer which “parks” the hard drive if it senses a dropping
motion.
It is highly sealed and easy to disinfect with a virtually “port-less” design, sealed display, sealed
speaker and buttons, liquid-resistant coating over microphones, and a sealed fan assembly
© 2008 Motion Computing, Inc. All Rights Reserved Rev. 4
Page 4 of 29
Page 5
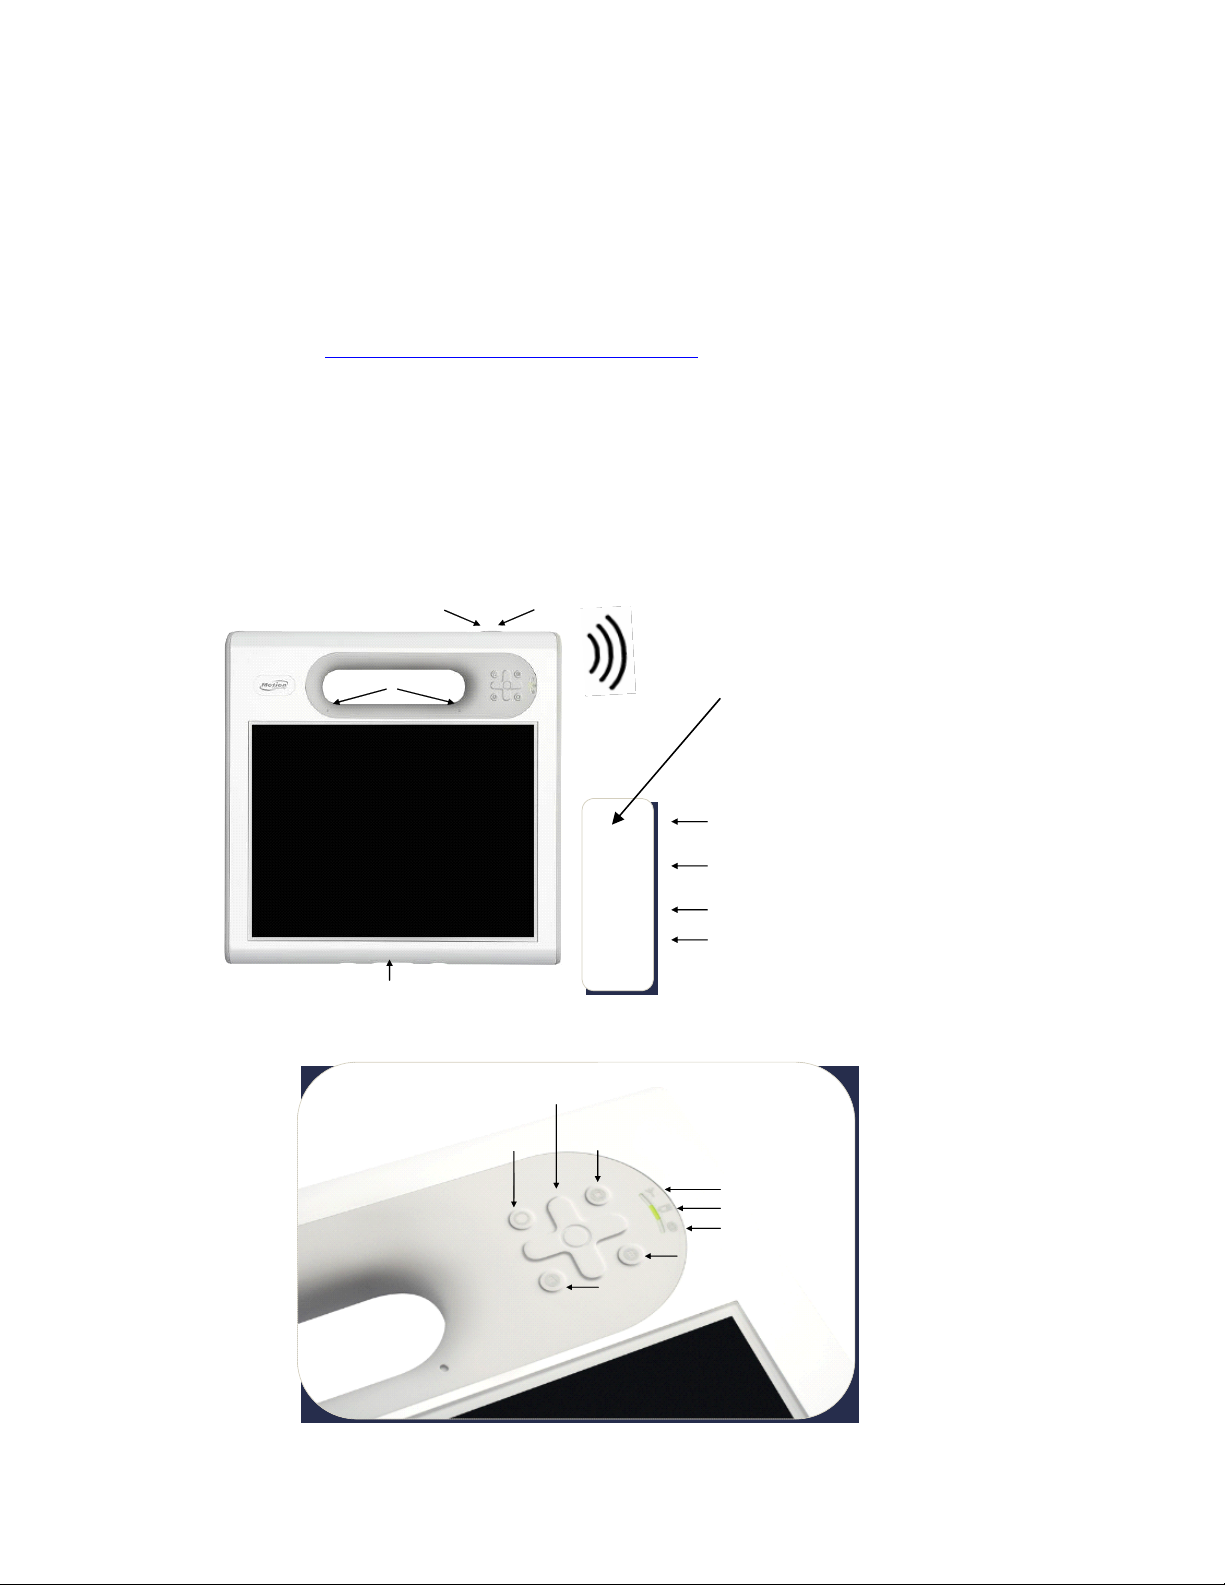
Getting Started with the Motion C5
Hardware Fundamentals
These illustrations show the basic features of the C5 and docking station required by the clinician. For
further information about the functionality, please see the C5 user’s guide found in .pdf format on each C5
or on our website at http://www.motioncomputing.com/support/
NOT contain any latex products.
There are two types of displays; the standard acrylic display and the View Anywhere Display (VAD). The
VAD screen is glass bonded to the standard acrylic digitizer display and is an optically enhanced display
that reduces glare in bright light environments. This solution was designed for mobile users that use tablet
PCs in bright light environments.
Mobile Clinical Assistant (MCA) – Front View
Barcode
Trigger
Handle
RFID
Trigger
Dual-Mic Array
10.4” XGA TFT LCD
Optional
View Anywhere
®
Display
Docking Connector
Top-Right Corner (Side View)
Mobile Clinical Assistant (MCA) – Top Right Corner
5-Way Navigation
Function
Button
Dashboard
Button
Programmable Button A
. Please note that the C5 product DOES
Barcode Scanning and
RFID Reading Directio
Power Button
Fingerprint
Reader
SAS Button
Camera Button
To rotate screen:
Press Function + Button A
802.11 LED
Battery status LED
Bluetooth LED
Programmable Button B
n
© 2008 Motion Computing, Inc. All Rights Reserved Rev. 4
Page 5 of 29
Page 6
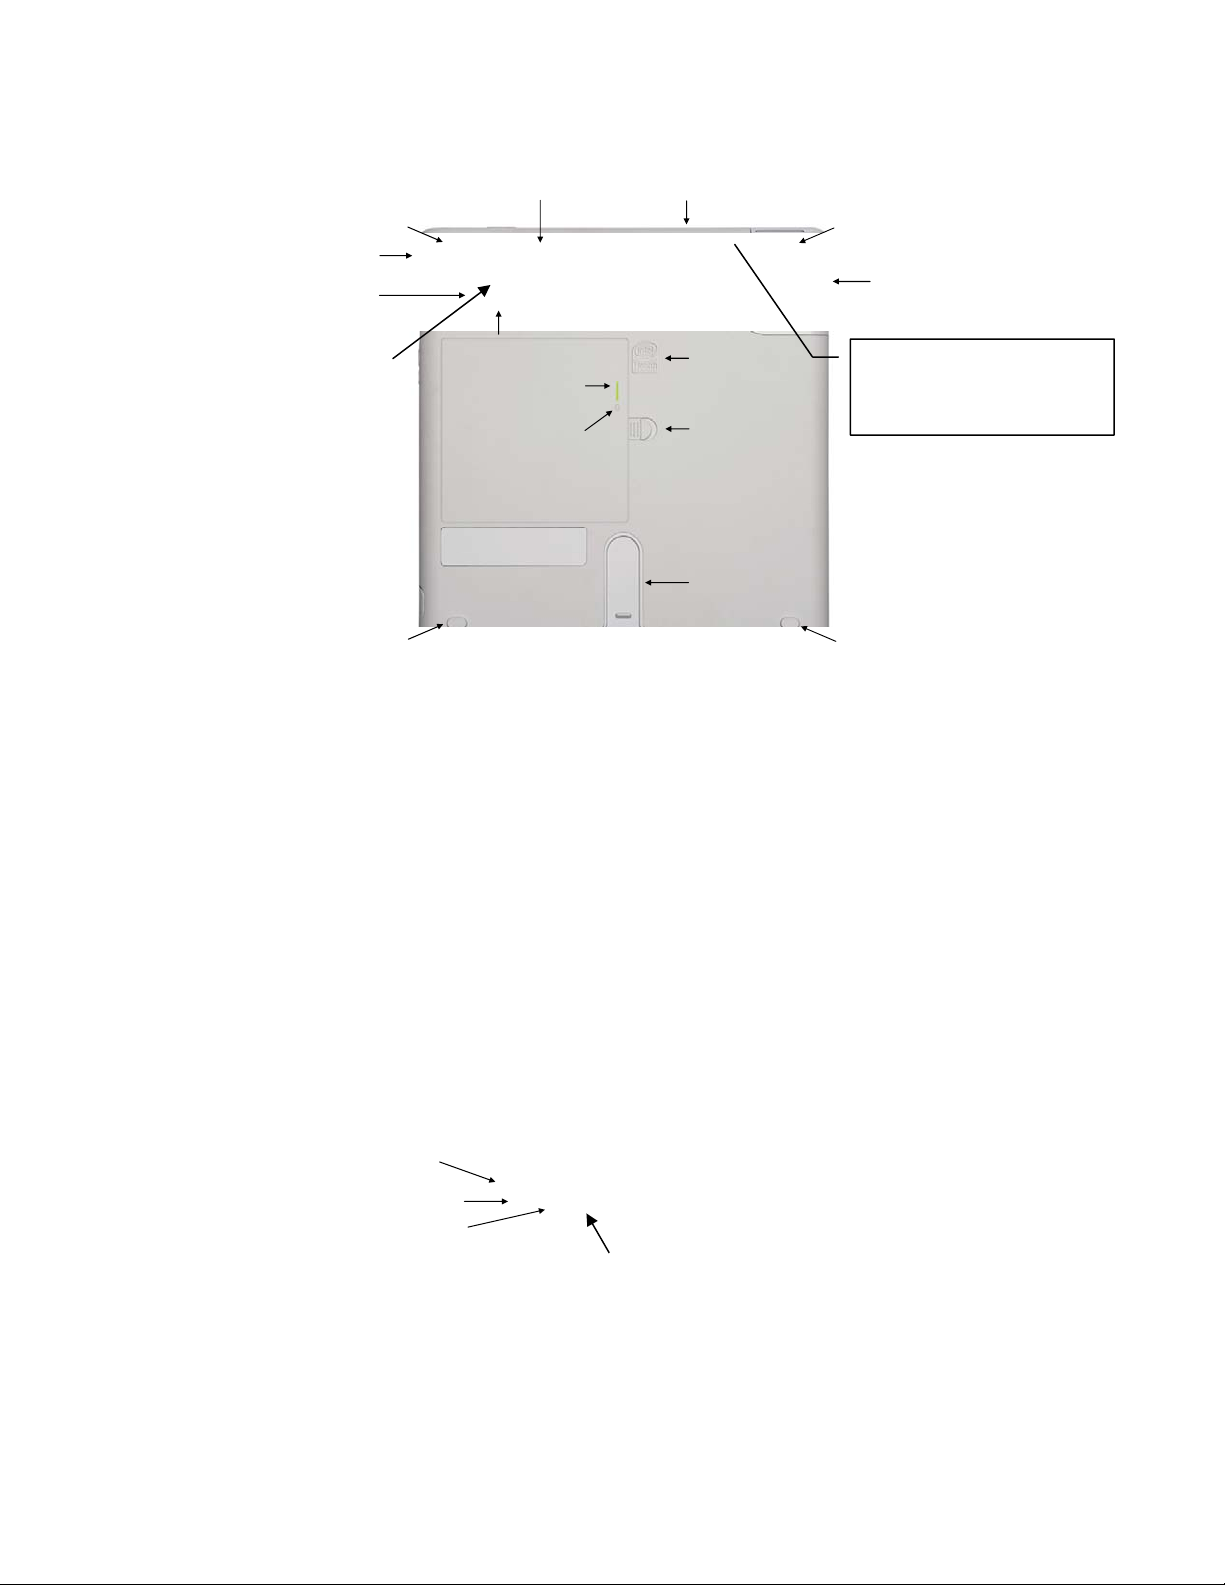
Barcode
Lens
Sealed
Speaker
Camera Light
Source
Foot
Mobile Clinical Assistant (MCA) - Rear View
Digitizer Pen
2MP
Camera
Lens
Button
to Activate
Battery LEDs
Label
Area
Battery
LEDs
Pen Storage Area
Intel
Digital Health
Logo
Battery
Eject
Mechanism
Docking
Alignment
System
Foot
VariableSpeed Fan
(removable
and cleanable)
TIP: Push in either end
of the pen to release
and withdraw the pen
Foot
AC Power
Port
3 USB Ports
Ethernet
connector
Foot
MCA Dock - Front View / Left Side
Security Slot
© 2008 Motion Computing, Inc. All Rights Reserved Rev. 4
Page 6 of 29
Page 7
Note: for more detailed
information on using the
C5 Docking Station,
please see the Docking
Station User’s Guide
found on the C5 or on our
website
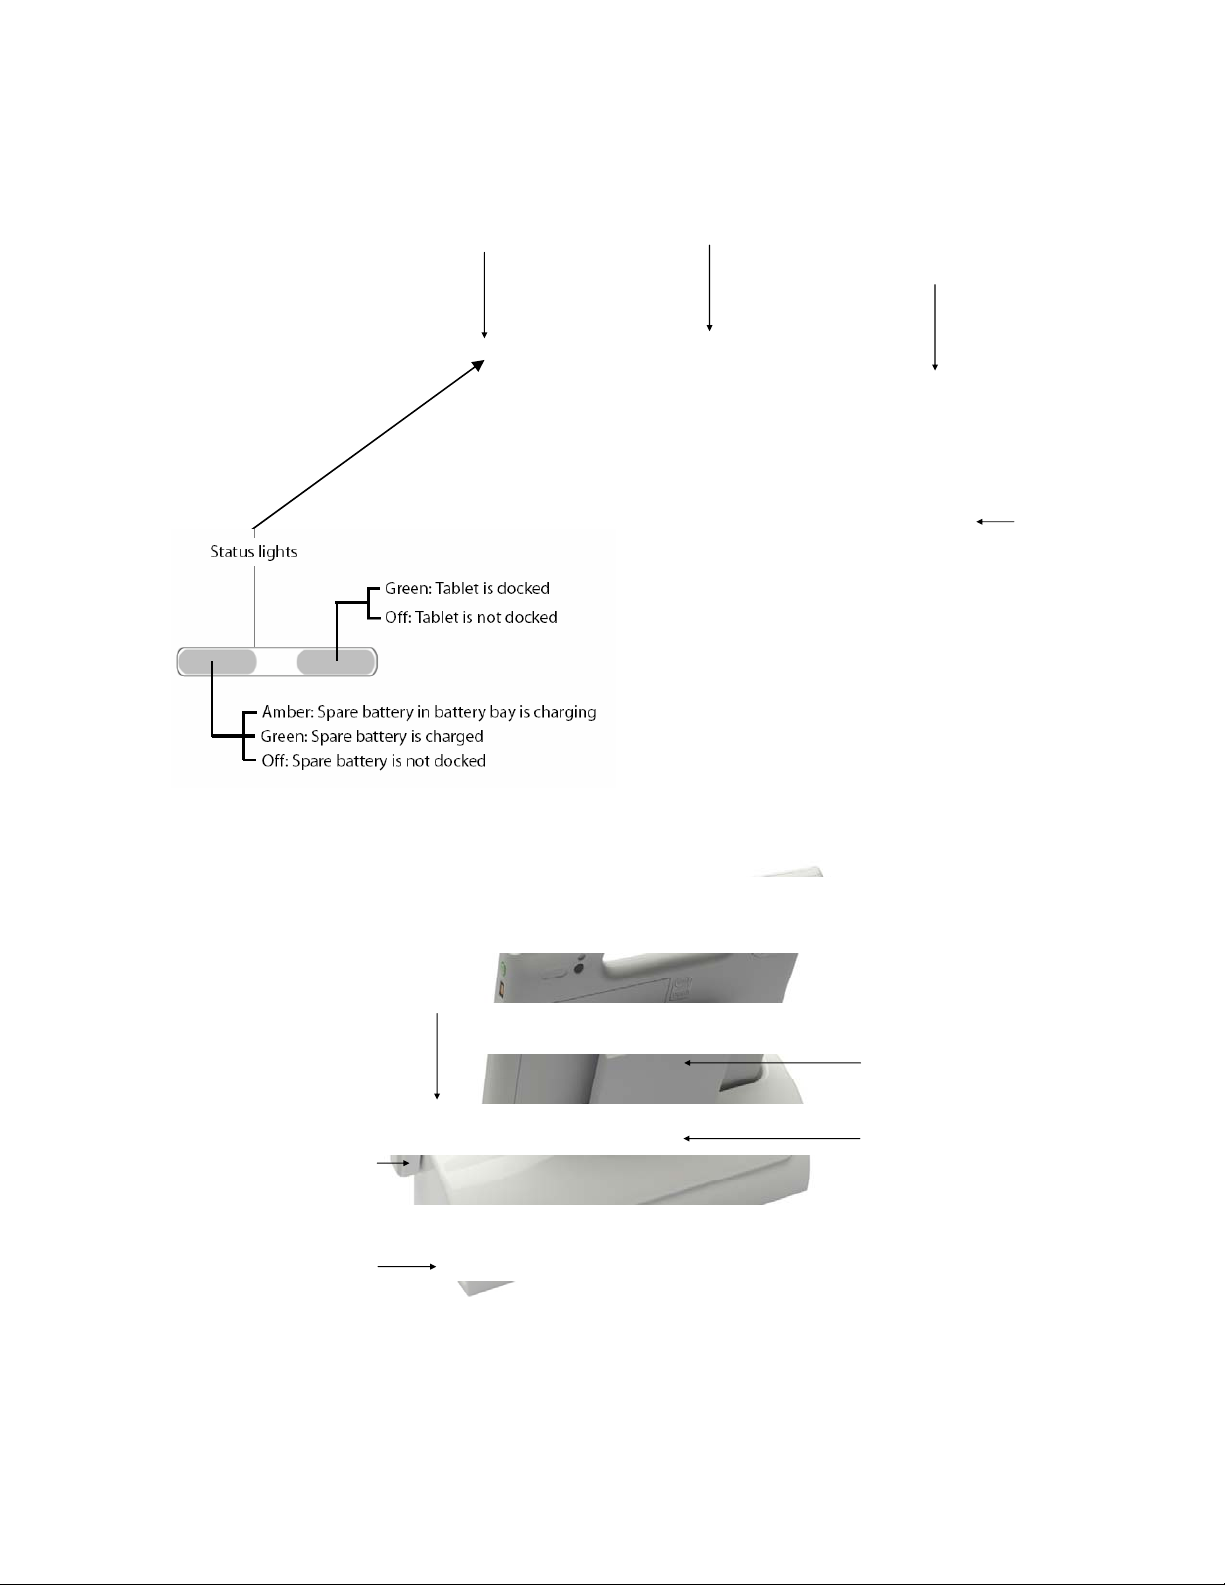
Charging
LED
MCA Dock - Front View / Right Side
Docking
Alignment
System
System
Ejection
Button
VGA
Port
Tilt
Adjustment
Button
VGA Port
MCA Dock - Rear View
System
Ejection
Button
Spare
Battery
Spare
Battery
Charging
Bay
© 2008 Motion Computing, Inc. All Rights Reserved Rev. 4
Page 7 of 29
Page 8
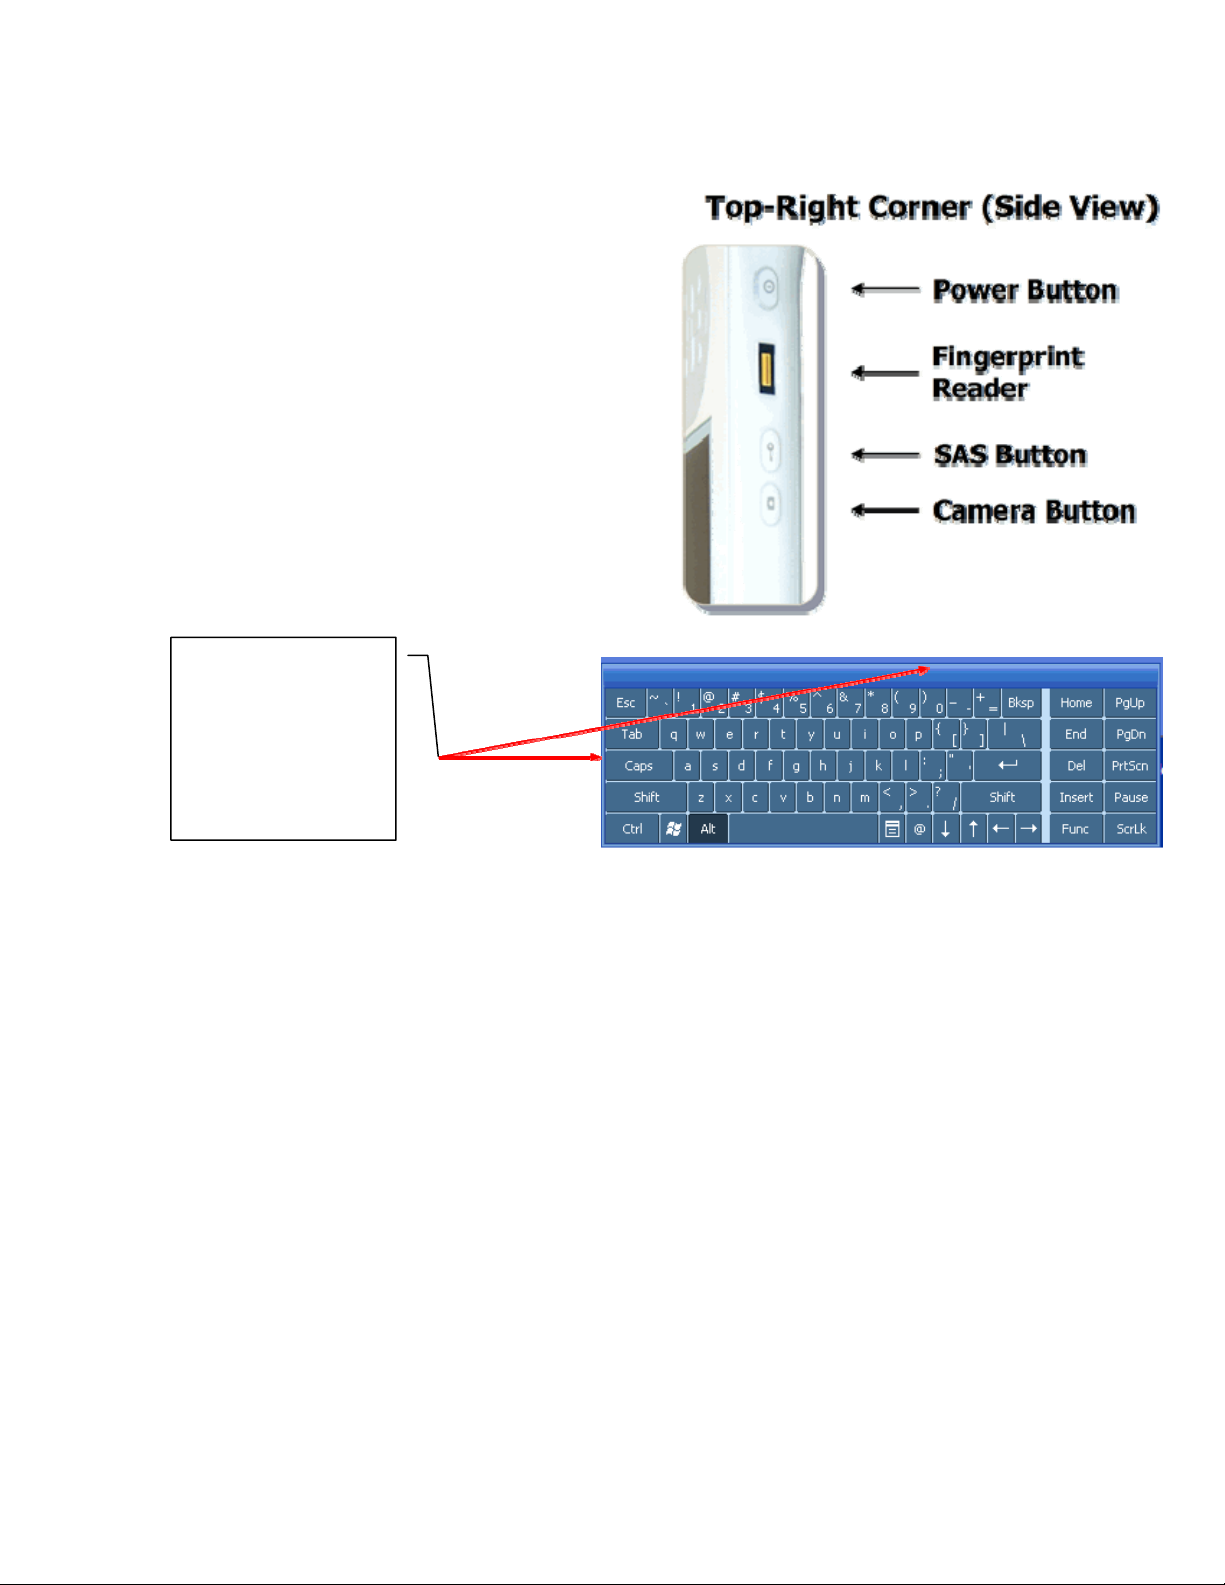
Logging on to C5
To power up the C5, use the following steps:
1. Press the Power Button for a second or two-note
the green light that surrounds the button will
come on
2. When the Windows login asks you to press
“CNTL-ALT-DEL” keys, you will press the SAS
button on the right side of the C5. This button
has the picture of the key.
3. Use the pen and on-screen keyboard and enter
your username
4. Either use the TAB button on the keyboard or
use the pen and tap in the password field
5. Use the pen and on-screen keyboard and enter
your password
6. Note: You may just have to enter your password
as the username field is already populated
Tip: You can
reposition by taping
and dragging the
Keyboard or
enlarge the KB size
by “pulling on the
top and sides
Depending on the complexity of your organization’s logon, the easiest way to
accomplish the logon process might be to place the C5 in a docking station and using
the keyboard
and mouse.
© 2008 Motion Computing, Inc. All Rights Reserved Rev. 4
Page 8 of 29
Page 9

Holding the C5
There are many ways to hold the C5 and you will need to find the ways that are most comfortable for you.
A common way to hold the C5 when you are standing is in the crook of your arm as shown in the pictures
below.
The screen can also be rotated to landscape mode and held as
demonstrated in the picture on the left. Please remember that not all
software applications are designed to be viewed in landscape mode and
may not work properly.
Rotate your screen for portrait mode viewing
• Press the function button then the A button for screen
rotation
• Each press rotates the display 90°
When you are sitting, hold the C5 comfortably similar to the way you would hold a clipboard.
© 2008 Motion Computing, Inc. All Rights Reserved Rev. 4
Page 9 of 29
Page 10

FAQ: My screen has gone black
Your C5 has either entered a power saving or standby mode.
1. Use your pen and tap the screen or….
2. Press a button
Is your display back?
1. Look at the power button light
2. Is it blinking or off?
• Blinking = Standby mode (very quick restart)
• Off = power off (either full reboot or resume from hibernate)
3. Press and release the power button to either reboot or bring the C5 out of standby mode
Customizing Your Motion C5 Environment
Motion Dashboard
The Motion Dashboard is a software application on the C5 tablet and is used to customize the computer
environment in two ways that are important to clinicians:
1. Changing the screen brightness – Caveat: the brighter the screen the most battery power is used
so it is recommended that the screen brightness be at the lowest brightness that is comfortable
for the user
2. Calibrating the pen tip -
To open the Dashboard click on the top right button on the C5
To calibrate the pen tap on Pen & Tablet menu on left side of
dialog box
Then tap on Calibrate Digitizer button and follow directions on
the screen
© 2008 Motion Computing, Inc. All Rights Reserved Rev. 4
Page 10 of 29
Page 11

To change the brightness of the screen tap on Display menu on left
side of dialog box
Use the slider bar to move between Dim and Bright as needed
Hands on exercise:
• Use the calibration feature
• Change the brightness of the screen manually
Pen and Ink Introduction
Digital pen basics
• When you write with the pen, you can rest your hand or arm anywhere without disturbing any
open programs or damaging the display.
• Watch the cursor instead of the pen tip when you write. The cursor is a guide for your pen
movements. If it does not align with the pen tip, you should recalibrate the pen – see instructions
above.
• Practice writing and learn how firmly and where to tap on the Motion C5 Mobile Clinical Assistant
screen.
• The pen can be held like any other writing tool. Learn how to hold it and when and how to press
the pen function button, which activates right-click options (such as pop-up menus). You can also
activate the right-click options by pressing and holding the pen tip on the surface of the display.
Using the pen as a mouse
• Tap — Firmly tap the pen on the Motion C5 Mobile Clinical Assistant display, without pressing the
function button on the pen; a tap equals a mouse left-click
• Double-tap — Tap the pen twice on the display, without pressing the function button on the pen
• Right-click — Press the function button on the pen and tap the pen on the display (equals a
mouse right-click)
• Press and hold — Press and hold the tip of the pen to the display without pressing the pen
function button (equals a mouse right-click)
• Select/Highlight — To select a letter, word, or line of text, drag the pen across the text to
highlight it.
Hands on exercise:
Practice above skills. Use Microsoft Notepad, WordPad or Word if needed.
If it feels like the pen tip is scratching the display surface then the pen tip needs changed. The pen tips
are softer than the display screen and will not scratch the screen however dirt/grit can become imbedded
in the pen tip and that will scratch the screen. Pen tips have a life expectancy of 6 months to 1 year
depending on use and environment.
© 2008 Motion Computing, Inc. All Rights Reserved Rev. 4
Page 11 of 29
Page 12

To change the pen tips: Take the little silver metal C-shaped device that came with the pens and
replacement tips. There is a notched area on one of the open end of the C. Use the C-shaped device like
a pair of tweezers and grasp the end of the pen tip. Pull out the old pen tip and replace with a new one.
NOTE: If your IT department did not provide you with replacement tips or the tip changing tool then
contact your IT support group and request a new pen tip.
Accessing and using the Tablet Input Panel (TIP) to insert text
The Motion C5 Mobile Clinical Assistant Input Panel (TIP) is the primary tool for entering text and
provides several text correction and control options. The TIP also includes buttons for activating speech
recognition and voice command capabilities. It is opened by tapping the TIP icon in the Windows task bar.
Tap the icon to open the Motion C5 Mobile Clinical Assistant Input panel (TIP). It is usually located at the
bottom left of the screen next to the start menu
The Tablet Input Panel has three input modes: Writing Pad, Character Pad, and On-Screen Keyboard
Writing Pad: With some practice, you can use handwriting recognition 80-95% of the time
Character Pad: note the vertical lines that make a space for each character – this is good for writing
complicated names or medications with letters and numbers such as D51/2NS
On-Screen Keyboard: best used for User Names and Password s
You can change from the writing pad to a
character pad or on-screen keyboard at
any time by tapping the appropriate icon on
the left side of the TIP panel.
On the right side of the TIP
panel there are icons for
Tools and Options and for
TIP Help.
Page 12 of 29
© 2008 Motion Computing, Inc. All Rights Reserved Rev. 4
Page 13

Click on the gray gear icon Tools and Options
This will bring up the menu that will allow you to put the TIP at the top
of the screen or the bottom by clicking on the “Dock at the Top of the
Screen” or “Dock at the Bottom of the Screen.”
If you dock the TIP at the top of the screen the TIP will automatically
expand as you had more lines. Below is an example of how the TIP
will expand when docked at top of screen. However, if the TIP is
docked at the bottom of the screen, it has no room to expand and you will need to tap on Insert at the end
of each line.
If you select “Undocked” the TIP tool will appear whenever you put the pen close to the screen and will
disappear when you take the pen away. This is called the “floating TIP.” It is important to remember that
this functionality may not work with certain applications or if you are using a Citrix environment. Your
Help Desk or IT department will be able to tell you if you are using Citrix.
© 2008 Motion Computing, Inc. All Rights Reserved Rev. 4
Page 13 of 29
Page 14

Using the Writing Pad
As you write, the software selects the best match for a word
from its dictionary of words and displays it on-screen. Word
recognition is based on shapes not actual words. You may
write in block text or cursive script but avoid using all caps. The writing pad is
the best mode for writing notes that are less than 2-3 sentences in length such
as those you write during a shift assessment. If you are doing a full admission
assessment, it may be easier to use a keyboard depending on the amount of
free text entry required. Like any psychomotor skills, it will take some practice
to learn to how the TIP recognizes your handwriting.
Correcting a Word in the Writing Pad
There are three ways to correct a word in the writing pad; correct by selection, correct by letter or erase
the entire word and rewrite it.
If the word shown is not the correct word, tap on the word to select it. This will bring up the character pad
and suggested words.
In the following example, either hand write directly over the incorrect character or tap the character to
open a list of alternatives (as shown here: O, 0, a, 6). You can erase a word you have just written, by
rapidly scratching back and forth over it. See instructions further on in this manual.
Handwriting
recognition can not be
“trained” to recognize
your specific
handwriting. It trains
you to write more
clearly ☺
© 2008 Motion Computing, Inc. All Rights Reserved Rev. 4
Page 14 of 29
Page 15

The writing and character pads expand to show Numbers (Num) or Symbols (Sym) toolbars, whose
symbols are inserted immediately in the text entry area as you select them. Then, when you begin to
hand write on the writing or character pad, the Num or Sym toolbar closes.
Number pad can be
useful for entering vital
signs and I&O
Erase by scratching through entire word: Must scratch back and forth in a straight line
two or three times; not in circles. Start your line before the word and end the line after
the word. You can also use a Z-shaped motion.
Hands on exercise:
Practice above skills. Use Microsoft Notepad, WordPad or Word if needed.
Using the Character Pad
Use the character pad for acronyms, equations, or other entries that require individual letters, numbers, or
symbols that the writing pad may interpret incorrectly. Some examples include the following: ~ ! @ # $ %
^ and*( ) _+ < >{ }[ ] \ /. Symbols/letters are displayed in a text equivalent that you can individually correct
by:
• Handwriting over the text equivalent in each character space
• Clicking on the arrow under the letter and selecting an alternative from the drop-down menu
The character pad expands vertically when you get near the end of the panel if you are docked at the top
of the screen.
Page 15 of 29
© 2008 Motion Computing, Inc. All Rights Reserved Rev. 4
Page 16

Using the on-screen keyboard. You can use the on-screen keyboard to type words, letters,
numbers, and characters from keyboard using your pen. For improved security and accuracy, you may
want to enter passwords with the onscreen keyboard instead of handwritten text.
NOTE: When using the on-screen keyboard, be sure to place your cursor where you want to enter text in
the text entry box before you begin. Whatever you tap will be immediately placed at the insertion point.
• Customizing — Select Tools and Options (the gear icon) then Options... from the TIP window
to open the Options window at the General tab. You can customize many features in the TIP.
Select one or more of the tabs and set the desired options.
• Refer to the Help and the Tutorials that are provided as part of the
Windows Operating System. Or refer to the Help information that is
provided in the Options window.
In some software applications you can insert handwriting by tapping in the field or next to
the blinking cursor in lieu of tapping the insert button on the TIP
Hands on exercise:
Practice with all three modes to determine your personal preference. Open Microsoft Word Pad
or Word and practice entering text using all three modes of the TIP.
Hello, my name is [insert your name]. I am
using the handwriting recognition feature of this
tablet computer. I have to remember to write
like I am back in school and write my letters
clearly.
© 2008 Motion Computing, Inc. All Rights Reserved Rev. 4
Page 16 of 29
Page 17

Adding words to the TIP dictionary
You can greatly improve handwriting recognition for words such as proper names, acronyms, technical
terms, and abbreviations by adding them to the handwriting dictionary.
To add a word to the handwriting dictionary
1. Open Tablet PC Input Panel.
2. To display the writing pad, tap the Writing Pad button.
3. In the writing area, write the word that you want to add to the handwriting dictionary.
4. If the word is not in the handwriting dictionary, it might be recognized incorrectly. Tap the
recognized text.
5. In the correction area, revise the text so that the word that you want to add to the dictionary
appears.
o Make sure that you spell the word correctly. If you add a misspelled word to the
handwriting dictionary, it could degrade the quality of your handwriting recognition.
6. Select Add to dictionary.
Additional Writing Tips
Please note that the following tips work in a Windows environment however, they may or may not work in
your clinical application.
If you want to select contiguous names or entries
• Tap/select the Shift Key
• Tap or select 1st entry to select
• Tap or select last entry to select
• Entries are now highlighted and ready to be copied via a drag and drop o r right mouse button
copy -> paste
Want to pick from a list of noncontiguous names or entries
• Tap Crtl key then tap on each entry to be selected
• You can now drag drop or right click to get the menu and cut & paste
© 2008 Motion Computing, Inc. All Rights Reserved Rev. 4
Page 17 of 29
Page 18

Power Management
It is best to place your tablet in a powered docking station when not in use. This will help keep the battery
at full power during your work so you may not need to change the battery during your shift. However, if
you power gets to 15-20% you should either change the battery or charge it.
Checking your battery power level
There are several ways to see how much battery power is left
on your Motion C5 Mobile Clinical Assistant. You can
determine the remaining battery power by doing any of the
following:
• Reading battery power from the Motion C5 Mobile
Clinical Assistant display
To check the power level while you are on battery power, move the pen over the Power
Meter icon, shown here, in the system tray at the bottom-right corner of the Motion C5 Mobile
Clinical Assistant display. Hovering over this icon shows the number of hours of battery
power and the percentage of battery power remaining. (Also, the blue area on the
battery icon, representing available power, changes to ½ blue and ½ silver then to
almost all silver as the battery discharges.)
• Reading battery power from the battery gauge (requires battery removal)
Ensure that AC power is plugged into the Motion C5 Mobile Clinical Assistant, or that the
Motion C5 Mobile Clinical Assistant is turned off. Turn the system over so that you are
looking at the back and remove the battery from the top of the tablet. The gauge is mounted
on the backside of the standard battery. If the light is not completely green, do not use this
battery but place back in the charging area to continue charging.
Charging the battery
When the Motion C5 Mobile Clinical Assistant (with a standard battery) is connected to AC power
(plugged in), the battery automatically charges until it reaches full charge, even while the Motion C5
Mobile Clinical Assistant is being used. The Battery LED is the one in the middle with the picture of the
battery to the right
Battery LED Status:
• Steady green 100% charged
• Amber charging
• Amber slow blink = 10% battery remaining
• Low power warning balloon displayed
• Amber fast blink = 3% battery remaining; goes to
hibernate saves data
Important Points:
• Battery life is approximately 3 and 1/2 hours dependent on use
• Charge Time approximately 2 hours to fully recharge
• Can I Hot Swap Batteries (i.e. change battery without logging off and logging back on)? Yes, as
long as power is being supplied to the tabled by either the docking station or with the power cord
plugged directly into the C5
© 2008 Motion Computing, Inc. All Rights Reserved Rev. 4
Page 18 of 29
Page 19

When the battery discharges to 10% a pop up balloon “low battery message” appears unless you are
running in a Citrix environment. Ask your IT department if you are not sure if your organization uses
Citrix. At 10% power, the battery LED slow blinks amber. If you ignore or do not see the warning, then
when the Standard Battery reaches 3%, battery LED fast blinks amber and the system enters Hibernation
mode
• When you try to reboot or power on the tablet the green power LED will flash momentarily but the
C5 will not reboot.
• Attach the tablet to AC and power on
• Tablet resumes from hibernate mode
• A low power message may still be present
• Tap on the x to close it
Best Practices: Extending Battery Life
• Place your tablet in standby or hibernate mode when not using it during your work day
• Charge your tablet using AC power cord or docking station
• Fully charge your battery overnight
• Reboot at least once a week
Removing and replacing the battery
Before you remove the battery, ensure that the C5 is
plugged in, turned off, or in Hibernate or Standby
mode.
To remove the battery
1. With the back of the unit facing you, slide and hold
the battery latch.
2. Insert your finger under the finger grip and remove
the battery from the battery compartment.
Hands on exercise:
Practice removing and inserting the battery
© 2008 Motion Computing, Inc. All Rights Reserved Rev. 4
Page 19 of 29
Page 20

Using the Bar Code Reader
There is a free online video training tutorial for using the barcode scanner found at:
http://www.motioncomputing.com/products/training_C5_barcode.asp
Although the bar code reader emits a red light, it is not a laser but an imager that takes a picture of the
bar code for the software to decode. Please note that the first time you use the bar code reader, it will
take about 2-5 seconds for the software to open and then the bar code reader will activate.
Best Practice Recommendation: the bar code scanner default timing be increased to 30
To use the bar code reader
seconds. This can be done by your IT department.
1. Open the application that you want to receive the bar code data and place the cursor in the
appropriate field. If the cursor is not in the correct field then the information will not be sca
the eMar even though you will get the “happy ta-ting” sou
2. Aim the reader window at the bar code.
nd indicating a successful scan.
nned in
3. When ready to scan, firmly press and release the barcode trigger button in one quick motion.
4. You will then hear a "
has been initialized.
5. When the reader is ready to receive input you will hear a high-pitched "ta-da".
6. After the "ta-da" you will have ~10 seconds to perform a successful scan. If the scan is success
you will hear an even higher pitched "ta-ting" sound. If a scan is not successful (e.g. unable
read barcode within 10 seconds) you will hear a harsh failure sound (low tone "da-dong").
7. Hold the barcode 4-5” away from the reader to start. The longe
needs to be so that the camera can see the entire bar codde.
8. If you do not get a successful scan after a couple of seconds, slowly move the barcode left and
right, then up and down, then back and possibly forward (SL
(e.g. back/forth, up/down and then tilt).
9. Look for t
reader.
he darker red center bar and align the barcode with it until you get used to using the
clunk" and a simultaneous flash of light. This means that the barcode reader
to
r the bar code the further away it
OWLY). Do this one axis at a time
ful
© 2008 Motion Computing, Inc. All Rights Reserved Rev. 4
Page 20 of 29
Page 21

Holding the C5 for bar code scanning of medication
There are several ways to hold the C5 when using the bar code reader. You should
experiment to determine the best way for you. You may use different holds depending
on the task you are performing. The following pictures show various ways to hold the C5.
Rest C5 on counter and pass
medication in front of
bar code reader
Rest the C5 on your forearm
and pass medication in front
of bar code reader
Holding the C5 for bar code scanning of patient wrist bands
When scanning the patient wrist band is best to hold the C5 by the side rather than the handle. You can
hold in either your left or right hand.
A recommended practice is to configure the “B” button on the front of the C5 to active the bar
code reader making it more flexible for individual user preferences. This can be done by your IT
department.
Using your left hand to scan patient wrist band
© 2008 Motion Computing, Inc. All Rights Reserved Rev. 4
Page 21 of 29
Using your right hand
to scan patient
wrist band
Page 22

Using the Camera
The camera lens light is on the back of the C5 and
there is a light source just above it.
Please note that the first time you use the bar camera, it will
take about 5-10 seconds for the software to open and then
the camera will activate. You will see the following dialog
box.
Subsequent scans will not have the delay for the
software to open unless the computer is restarted.
1. Press the Camera button to activate the camera and open the viewfinder.
2. Press the Camera button again to take a picture.
3. In the Pictures dialog box, do one of the following:
• To save the picture, tap Save. In the Save As dialog box,
specify a location in which to save the picture.
• To delete the picture, tap Delete. In the confirmation
dialog box, tap OK.
Tips
• If you are using a tethered pen make sure the tether is not in front of the lens
• Hold the camera steady and allow it to focus
• Make sure you have adequate lighting
© 2008 Motion Computing, Inc. All Rights Reserved Rev. 4
Page 22 of 29
Page 23
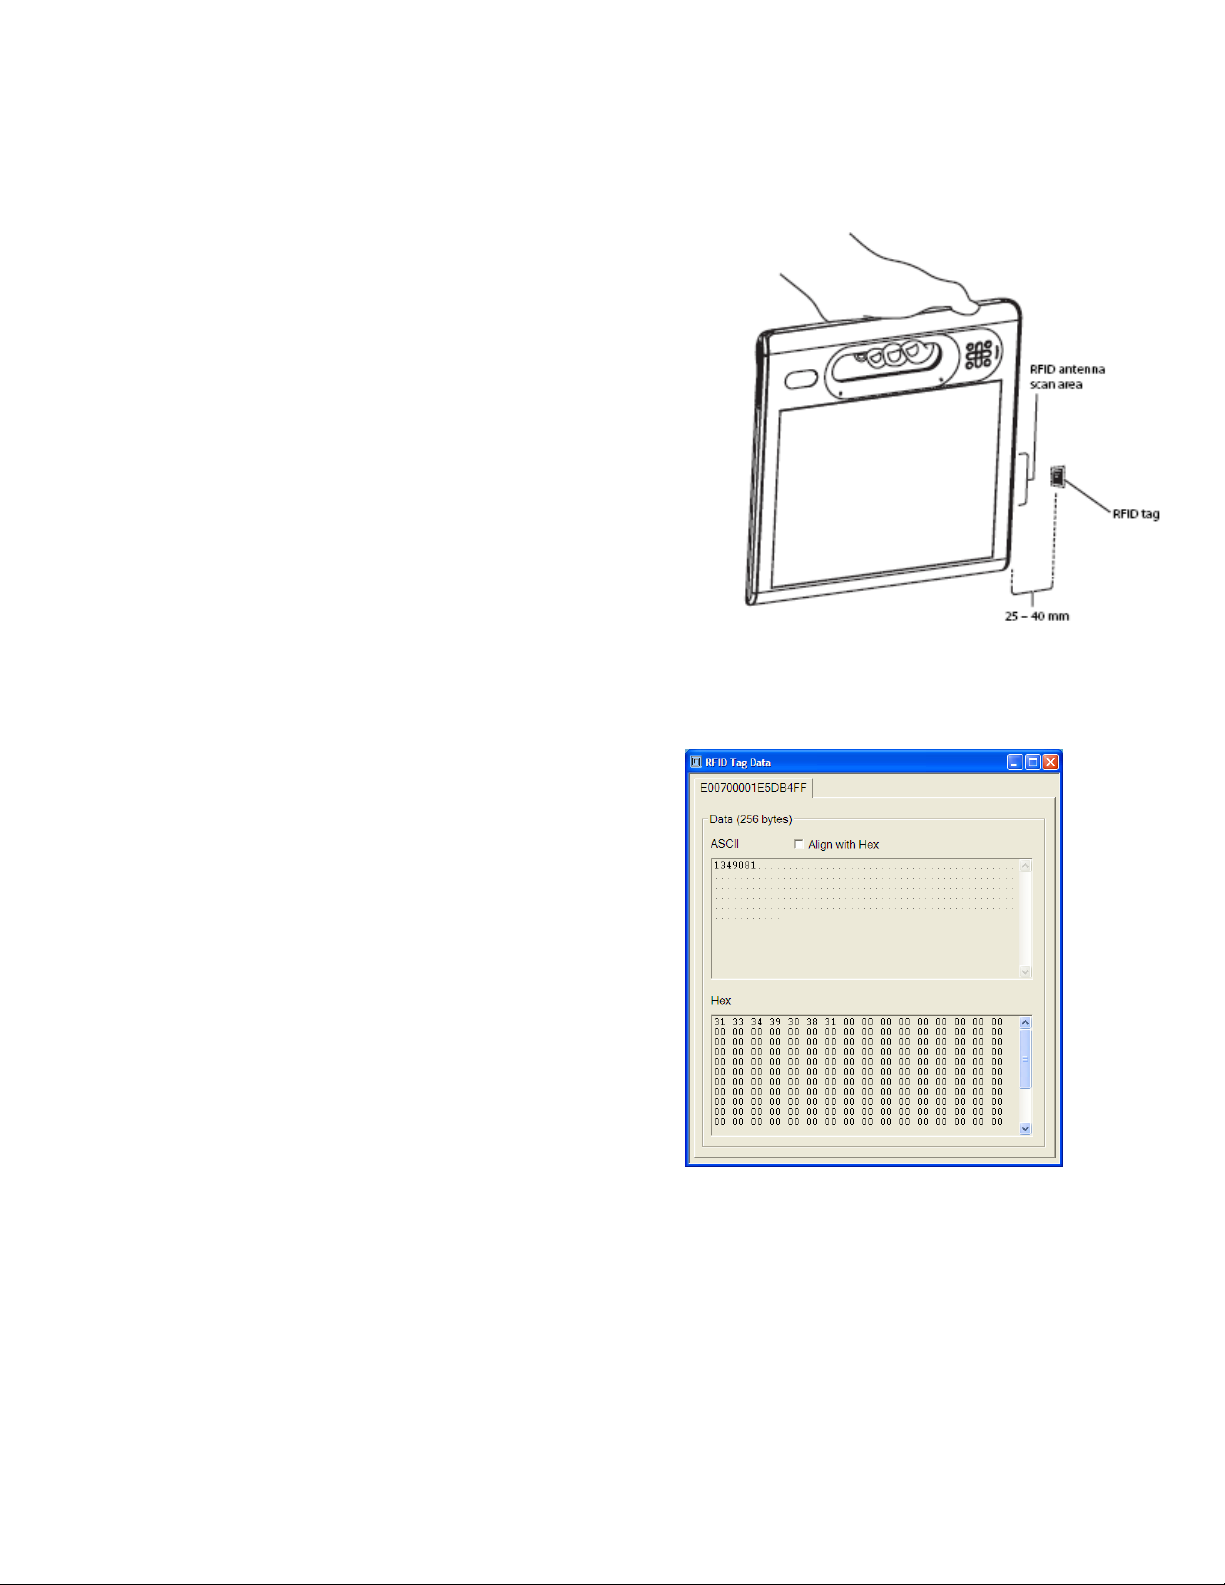
Using the RFID Reader
To use the RFID reader
1. Hold the C5 by the handle with the right edge in front of you.
2. Aim the right edge of the C5 at the RFID tag. Ensure that the tag
is less than 2 inches
3. Press and release the RFID button on the top of the C5. The RFID
light will come on to indicate that the unit is scanning.
from the RFID antenna scan area.
The RFID light goes off and the unit beeps to indicate a
successful scan. The ASCII and Hex data appears in the RFID
Tag Data window.
Note: RFID tags are typically used with specialized
applications.
© 2008 Motion Computing, Inc. All Rights Reserved Rev. 4
Page 23 of 29
Page 24

Caring for Your Motion C5 Mobile Clinical Assistant
Disinfecting Procedures
Disinfecting of the tablet is recommended periodically in accordance with the institutional polices of
surface and device safety and cleanliness. Motion has tested a variety of antimicrobial solvents and
information on specific products is available upon request.
Per the Center for Disease Control and Prevention, “items that do not ordinarily touch the patient or touch
only intact skin are not involved in disease transmission, and generally do not necessitate disinfection
between uses on different patients (CDC, 2002 para. 7).” Using an EPA-approved low-level disinfectant
when general cleaning is required is recommended.
If the tablet becomes soiled with blood or other body fluids, a hospital-approved low-level disinfectant
when used at recommended dilutions and contact times can be used to decontaminate spills of blood or
other body fluids. Visibly soiled areas should first be cleaned and then disinfected, or a detergent
disinfectant can be used. For disinfection, the pre-cleaned areas should be moistened with the
appropriate disinfectant and allowed to air dry (CDC, 2000 para. 7 and 8).
If a tablet is used with patients who are infected or colonized with microorganisms judged by the infectio n
prevention program to be of special or clinical or epidemiologic significance or with highly virulent
microorganisms based on current state, regional, or national recommendations (such as Ebola or Lassa),
then the tablet should be either dedicated to one patient or patient cohort or subjected to low-level
cleaning between patient uses (CDC, 2002 para 8-10).
Tips
• Clean the C5 with disinfecting cloths and wiping away any film they may leave – use a soft
cleaning cloth not paper as paper contains wood pulp and may over time scratch the screen.
• Use only the Motion pen on the display. Do not write on the surface with an ink pen or pencil, or
any pointed or other object that could damage the display surface.
• If you use alcohol prep pads or disinfecting products for cleaning the C5 surface and display
screen a white haze residue will remain on the screen and it cannot be removed using paper
based cloths. The blue Motion towel or any soft cloth will remove most of the residue. Your IT or
support staff should be able provide these cloths.
Pen tip
• Always store pen in the pen holder when not in use.
• Do not store the pen vertically on the tip. Constant tip pressure can affect the pen-to-digitizer
screen interaction.
• The pen contains sensitive electronics. Do not immerse it in liquids.
© 2008 Motion Computing, Inc. All Rights Reserved Rev. 4
Page 24 of 29
Page 25

Additional Support
• To access Motion C5 Users Guide and Quick Reference Guide go to
Start -> All Programs -> Motion Resources
• To access the onboard tutorial for using a tablet PC go to
Start -> All Programs -> Tablet PC -> Getting Going with Tablet PC
Optional Topics
Based on user preference, Microsoft Journal or Sticky Notes could be used to jot notes to yourself during
the workday. Illustrate the use of these two applications found under Start->AllPrograms -> Tablet PC
Illustrate use and discuss ways to integrate into your workflow.
IMPORTANT: Please be sure to follow your organization’s HIPAA guidelines when taking notes or
sending information.
Microsoft Journal
Journal is an “electronic notepad” that can
replace a paper notepad. It can be used to:
• Draw or illustrate pictures
• Record your shift notes and to-do’s
© 2008 Motion Computing, Inc. All Rights Reserved Rev. 4
Page 25 of 29
Page 26

Microsoft Sticky Notes
You can use Microsoft® Sticky Notes the same way
that you use a paper sticky note—to retain names,
phone numbers, simple maps with directions, and
other information that you need to write quickly and
keep easily available. You might want to use a
separate one for each patient in your care.
For convenience and quick access, sticky notes are
kept in a single stack that you can make "stick" to your
desktop, are always visible and available. In addition,
you can copy and paste sticky notes into other
programs and import and export your stack of sticky
notes.
Access via Start-> All Programs ->Tablet PC ->
Sticky Notes
Hands on exercise:
Practice with these two programs.
Motion OmniPass fingerprint reader
Consult the Motion C5 User’s Guide for instructions on setting up and using the fingerprint reader. The
Motion C5 User’s Guide can be found at http://www.motioncomputing.com/support/
Voice Recognition
Consult the Motion C5 User’s Guide for instructions on setting up and using the microphones and voice
recognition. The Motion C5 User’s Guide can be found at http://www.motioncomputing.com/support/
© 2008 Motion Computing, Inc. All Rights Reserved Rev. 4
Page 26 of 29
Page 27

Practice with facility’s software
Logging on to your facility test system or with practice patients, enter the following data using the pen as
your input device:
Shift Assessment:
• Blood pressure (BP) 164/80
• Pulse 92
• Respiratory rate 24
• Temp 38.2 C / 100.8 F
• Pulse saturation 89%
Respiratory
cough. Uses incentive spirometer every hour to 900ml. You place the patient on Oxygen 2L via nasal
cannula per order.
Cardiac
: Bowel sounds absent, states has not had a BM in 48 hrs, tender to palpation in LLQ
GI
: cool, dry, slightly pale, has a left flank incision with clean dry dressing in place, wound drain has
Skin
scant amount of bloody drainage in it
: 20 gauge in his right forearm D5 ½ NS at 125cc/hour, site is slightly red, puffy, and tender to
IV
palpation. You remove IV and restart with 20 gauge in left forearm
: rating pain at 7/10 – aching pain in left flank, increases with movement
Pain
Activity
– 300 cc cloudy yellow urine in urinal, slightly foul odor – sample sent for UA per protocol
GU
Teaching activity
repeating signs and symptoms and correctly identifying which are currently present
Psycho-social
: Crackles in LLQ posterior, decreased breath sounds in all fields. No pain on inspiration. Dry
: denies chest pain, normal sinus rhythm, radial pulses present and equal bilaterally
: up to bathroom without assistance. Walking slowly, stooped over and holding left flank
: signs and symptoms of potential urinary tract infection – demonstrated understand by
: Spouse and children at bedside, chaplain scheduled to visit today
© 2008 Motion Computing, Inc. All Rights Reserved Rev. 4
Page 27 of 29
Page 28

Competency Check-off Sheet
Learner: ______________________________________ Date: ____________________________
The following skills will demonstrate the learner’s basic competency using the Motion C5 Mobile Clinical
Assistant. The leader should complete the self assessment and see the instructor for additional practice
if unable to answer Yes. Select N/A if the skill was not covered in your training session.
Skill Validation:
I am able to competent to perform the following skills on the tablet:
Calibrate the Motion pen Yes No N/A
Change the brightness of the screen
Use the Motion pen to navigate via point/click Yes No N/A
Use the Motion pen to navigate via drop down menu Yes No N/A
Use the Motion pen to navigate via radio buttons
Enter free text using handwriting recognition in the writing pad Yes No N/A
Enter free text using handwriting recognition in the character pad Yes No N/A
Enter free text using the onscreen keyboard
Check the battery power levels on the Motion C5 Yes No N/A
Change the battery in the Motion C5
Dock and undock the Motion C5 Yes No N/A
Use the bar code reader on the Motion C5 Yes No N/A
Use the RFID reader on the Motion C5
Use the camera on the Motion C5 Yes No N/A
Clean the Motion C5 in a clinical environment Yes No N/A
My signature below indicates that I have practiced using the Motion C5 Mobile Clinical Assistant and am
competent in the basic skills needed to use it in a clinical environment.
_______________________________________________________________________
Learner’s signature
Circle appropriate
answer
Yes No N/A
Yes No N/A
Yes No N/A
Yes No N/A
Yes No N/A
© 2008 Motion Computing, Inc. All Rights Reserved Rev. 4
Page 28 of 29
Page 29

Motion C5 Mobile Clinical Assistant Competency Test
Learner: ______________________________________ Date: ____________________________
1) The Motion C5 Mobile Clinical Assistant should be cleaned:
A) Using soap and water once every 8 hours
B) Using disinfectant per facility protocol and procedures
C) Clean with plain water when needed
D) Soak in disinfecting solution when needed
2) To use the handwriting features of the C5, I must write with block letters only
A) True
B) False
3) To determine the amount of battery charge remaining on the C5, I would:
A) move the pen over the Power Meter icon in the system tray
B) press the camera button
C) Press the button shown in Picture A
4) To engage the barcode reader -- to identify a patient, medication or employee, I would:
A) Aim the reader to the label, press the barcode indicator on the top of the C5
B) Aim the camera lens to the label, press the camera button
C) The C5 does not have the ability to scan barcode labels
5) The purpose of the dock station is: (select all that apply)
A) Charge the battery
B) Storage of the device
C) Connect a keyboard to the C5
D) Charge an extra battery
6) There are 3 methods to input data using the C5 without a keyboard: (select all that apply)
A) Writing pad
B) Character pad
C) Onscreen keyboard
D) Use regular pen on screen
7) The C5 is my personal device, it is ok for me to take it home or give to a patient family member
A) True
B) False, it is hospital property and should be secured to protect the asset
8) I must use the Motion Computing pen to use the TIP (Tablet Input Panel)
A) True
B) False
9) To change the brightness on the screen, I would
A) Press the button shown in Picture A
B) Open the Motion Dashboard to access the slider bar
C) Put my finger on the fingerprint reader and slide down
10) To change the orientation of the screen, I would
A) Use the Tablet Input Panel
B) Press the two buttons shown in Picture B
C) Press the button shown in Picture C
© 2008 Motion Computing, Inc. All Rights Reserved Rev. 4
Page 29 of 29
 Loading...