

Page 1
WWW.MOTIC.COM
MOTIC HONG KONG LIMITED
Panthera Series
Scientific Instrument
Operation Manual
If the equipment is used in a manner
not specified by the manufacturer,
the protection provided by the
equipment may be impaired.
Note
If the equipment is used in a manner
not specified by the manufacturer,
the protection provided by the
equipment may be impaired.
Note
The clear knowledge of this Instruction Manual is needed to operate Motic Panthera Series
Microscopes at maximum performance and to ensure safety at all specified operations.
Please familiarize yourself with the use of this microscope and pay special attention to the
safety hints given in this manual. This Document is not subject of a update routine, please
download a newer version from the Motic website, if needed. Keep this instruction manual in
reach and easily accessible for future user reference. All Specifications, Illustrations and
items in this Manual are subject to changes. Forwarding, duplication or use in other
communication of this
E250223
Page 2

1
English:
Please familiarize yourselves with the Instruction Manual provided in English language. Other
Language versions are available as download on Motic web services under the Address:
http://www.motic.com/Panthera/Panthera_Eng_OP.zip
Page 3

2
TABLE OF CONTENTS
1. Genral notes on instrument safety 5
1.1 General safety notes and Instruction 5
1.2 Instrument safety, FCC and EMC conformity 6
1.3 Transporting, unpacking, storage of the Instrument 7
1.4 Instrument Disposal 7
1.5 Use of the Instrument 7
1.6 Intended use of the Microscope 9
1.7 Instrument warranty 9
2. Nomenclature 10
2.1 Panthera S 10
2.2 Panthera U / C / L / HD 11
3. Setting up the instrument 14
3.1 Operating environment 14
4. Assembling the microscope 17
4.1 Verifying input voltage 17
4.2 Illumination 17
4.2.1 Halogen bulb 17
4.2.2 LED 17
4.3 Stage 17
4.3.1 For Panthera S 17
4.3.2 For Panthera E / U / C / L / HD 18
4.4 Specimen holder 19
4.5 Objectives 19
4.6 Condenser (For Panthera L / HD) 19
4.7 Eyepiece tube 20
4.8 Eyepieces 20
4.9 Filters 20
4.10 Power cord 21
Page 4

3
5. Digital parts (setup and operation) 22
5.1 How to use QR-Link (For Panthera L / HD) 22
5.2 ImagingOnDevice 23
5.2.1 Panthera Series Backside Connection Panel 23
5.3 TeachingOnDevice (Panthera C / HD) 24
5.3.1 Panthera ImagingOnDevice realtime sharing ImagingOnDevice with QR-Link clients 25
5.3.2 ImageRecall 25
6. Usage of microscope components 26
6.1 Coarse and fine focusing 26
6.2 Coarse focus torque adjustment 26
6.3 Coarse focus quick stop 27
6.4 Stage upper limit stop adjustment 27
6.5 Interpupillary distance adjustment 28
6.6 Diopter adjustment 29
6.7 Adjustment of Brightfield (Panthera C / L) 30
6.7.1 Full Kohler Illumination 30
6.8 Use of aperture diaphragm 31
6.9 Use of field diaphragm (For Panthera C / L only) 31
6.10 Brightness and contrast adjustment 31
6.11 Illumination brightness adjustment 32
6.11.1 Panthera S / E / C 32
6.11.2 Panthera U / L / HD 32
6.12 Restore factory default for intensity (For Panthera U / L / HD only) 32
6.13 Standby mode (For Panthera U / L / HD only) 33
6.14 Adjust the Epi-illuminatioin intensity and transmitted illumination (Panthera U / L / HD only) 33
7. Photomicrographic procedure 34
8. Using oil immersion objectives 35
Page 5

4
9. Care and maintenance 36
9.1 Do not disassemble 36
9.2 Cleaning the microscope 36
9.2.1 Lenses and filters 36
9.2.2 Cleaning of painted or plastic components 36
9.3 Disinfecting the Microscope 36
9.4 When not in use 36
9.5 Bulb replacement 37
9.5.1 Replacing the 6V 30W halogen module or the two different LED module 37
(For Panthera C / L / HD)
9.5.2 Electrical Specifications 38
10. Troubleshooting table 39
10.1 Optical 39
10.2 Electrical 40
11. Selection Of The Power Supply Cord 41
Microscope terminology 43
Page 6
5
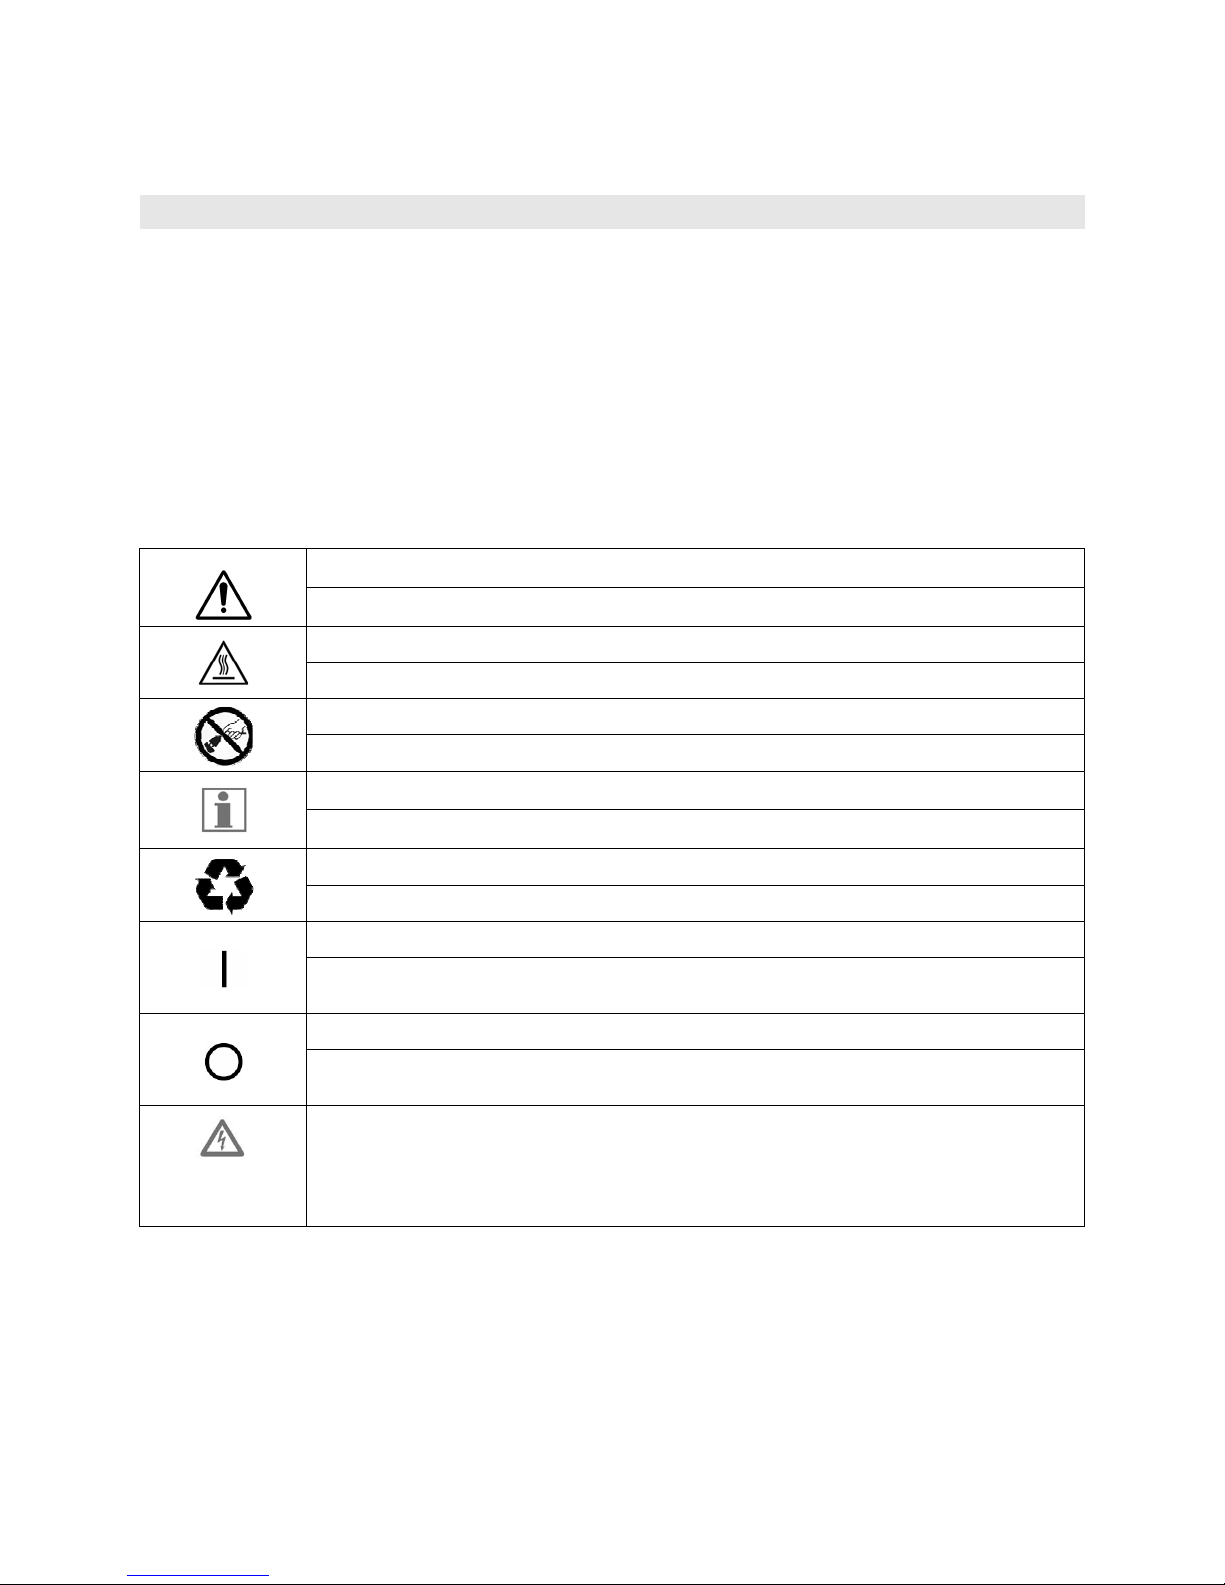
1.GENRAL NOTES ON INSTRUMENT SAFETY
1.1 General safety notes and Instruction
Please familiarize yourself with this Operation Manual before starting to use the Instrument.
In case additional information or support is needed, please contact Motic after sales Service.
To ensure safe operation and optimal function of the Instrument, strictly observe the precautions and
warnings given in this Operation manual.
Please observe the following indicators:
CAUTION, Risk of Danger
This symbol indicates a possible hazard to the user of the instrument.
CAUTION, Risk of Dangerous heat
This symbol indicates a possible hazard to the user of the instrument.
CAUTION, Risk of Electrical Danger
Disconnect the plug-in power unit from line power before opening the Instrument.
INFO
This symbol refers to a useful information or hint.
Disposal
This symbol refers you a advice that must be observed under all circumstances
Instrument ON
This symbol refers to the switched on (electrical system active) status of the
instrument
Instrument OFF
This symbol refers to the switched off (electrical system inactive) status of the
instrument
Risk of Dangerous Electrical Current
This symbol refers to potential hazardous electrical voltage/current and must be
observed at all circumstances!
Page 7

6
1.2 Instrument safety, FCC and EMC conformity
This Instrument has been designed, produced and tested in compliance with required safety standards
and regulations. UL, CE, FCC, EMC
“Safety of equipment used for measurement control and laboratory use”
Panthera Microscope Series Products are in conformity with the requirements of the CE
Directive 98/79/EC Annex 1 and carries the CE mark accordingly.
Conform to Class B Noise immunity is in compliance with EN 61326 and EMC and
Radio-noise suppression is in compliance with EN 5501 1
The instruments listed in this document are disposed of in compliance with WEEE Directive
2002/96/EC.
Lamp bulbs, LED Modules, lamphouses and Lampdrawers become very hot during and after a
period of operation. Risk of burn – Do not touch the lamp during or immediately after period of
operation.
Don’t pick the microscope up from the bottom during equipment operation.
Proper handling of the microscope will ensure years of trouble free service.
If repair become necessary, please contact your Motic agency or our Technical Service directly.
Page 8

7
1.3 Transporting, unpacking, storage of the Instrument
Please observe and follow the safety notes for transportation, unpacking and storage
given in this document:
● The microscope is delivered as set, packed into commercial standard plastic and
cardboard packaging; Please re-use the original packaging only for any transportation.
● It is advised to keep and use the original packaging for longer storage or return to the
manufacturer to avoid losing the warranty.
● At receiving and unpacking the equipment, please verify that all parts specified on the
delivery note are present.
● Keep Transport and storage temperatures as specified in this Manual.
● Set the microscope up on a stable worktable with solid and smooth top surface suitable for
Instrument use.
● Do not touch optical surfaces.
1.4 Instrument Disposal
Please observe the following safety notes for the disposal of the microscope:
Defective Instruments, accessories and consumables should be disposed in compliance with
the provisions of the local law.
1.5 Use of the Instrument
The microscope Instrument as well its accessories must not be used for microscopic techniques or
purposes other than those described in this Operating Manual.
Please always observe the following safety notes when using the microscope:
Motic cannot assume any liability for other applications then the intended use, including the
included modules and components. This includes to service or repair work that is not carried
out by authorized Motic service personnel. In case of non-compliance, all warranty claims and
liabilities shall be forfeited.
The microscope Instrument should only be operated by trained personnel who are familiar with
this Operation Manual and therefore aware of the possible dangers involved.
Page 9
8
This Microscope is a high-precision instrument that can be impaired in its performance or even
be destroyed when handled improperly.
This Instrument is equipped with a build in power supply allowing electric-net voltages to be
used in the range between 100 - 240 V ± 10%, 50/60 Hz. In case of any irregularity on the
electrical system observed, please switch of the Instrument, keep it safe guarded and consult
the Motic after sales service.
Please only use rated Power cords as described in the Appendix of this Document
Always disconnect the power cable, before opening the instrument and changing the lamp or
LED source.
Wait for the lamp to cool down before replacing it and do not touch the new bulb.
The instrument may only be opened by qualified Motic service staff.
The operation of the instrument in explosion-risk environments is not allowed.
Immersion Oil can be harmful. Please only use Motic immersion Oil and follow the safety
Instructions given. I
mmersion oil is to be used for Microscope application only! Please avoid skin
contact or swallow or any other use then the intended.
Page 10

9
1.6 Intended use of the Microscope
This Microscope is an optical instrument that has been designed to be used to observe and document
magnified images of specimens in teaching, routine and research applications.
Do not use this instrument for any other purpose than its intended use.
This Instrument complies with the requirements of directive 98/79/EG concerning in-vitro
diagnostic medical devices. CE marking shows the conformity to the directive.
NOTE: This Instrument has been tested and found to comply with the limits for a Class A
digital device, pursuant to Part 15 of the FCC Regulations. These limits are designed to
provide protection against harmful interference during operation in a commercial environment.
This equipment uses and generates frequencies and energy, if not properly installed in
accordance with the instruction manual, those may cause interference to radio
communications. Operation of this Instrument in a residential area is not permitted.
FCC WARNING: Changes or modifications would void the Instruments FCC compliance and is
therefore not permitted.
1.7 Instrument warranty
The Instrument should only be used for microcopy applications mentioned and instructed in this
operation manual. Please note the following information on the instruments warranty.
● If possible defects Motic must be notified immediately and steps be taken to minimize damage.
● If notified of such a defect Motic will evaluate the defect and if within warrant, rectify it at his
discretion, either by repairing the instrument or by delivering a replacement.
● Natural wear, or defects caused by improper use are not covered by the Instrument warranty.
● Motic shall not be liable for damage caused by faulty operation, negligence or tampering with the
Instrument.
● Altering or tampering of the instrument shall lead to a forfeit of all warranty claims
Page 11
10
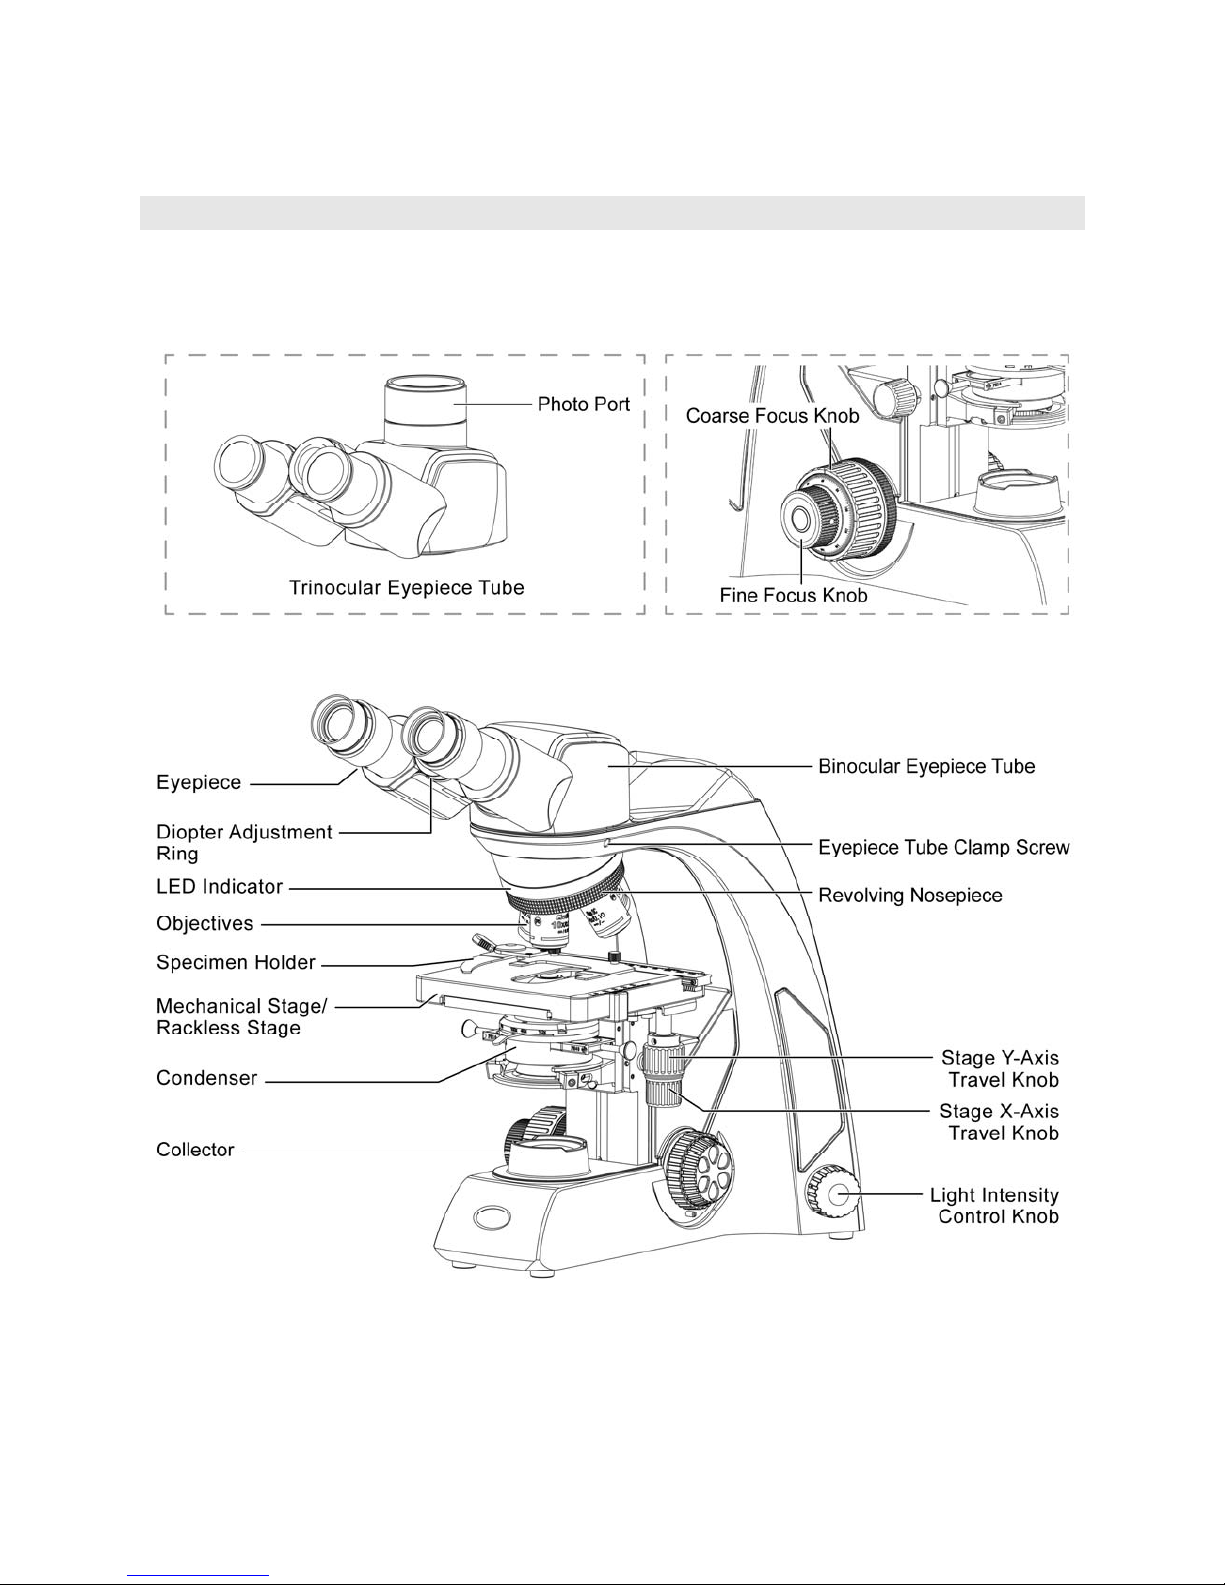
2.NOMENCLATURE
2.1 Panthera S (Binocular Version)
Page 12

11
2.2 Panthera U / C / L (Binocular Version) / HD
Page 13
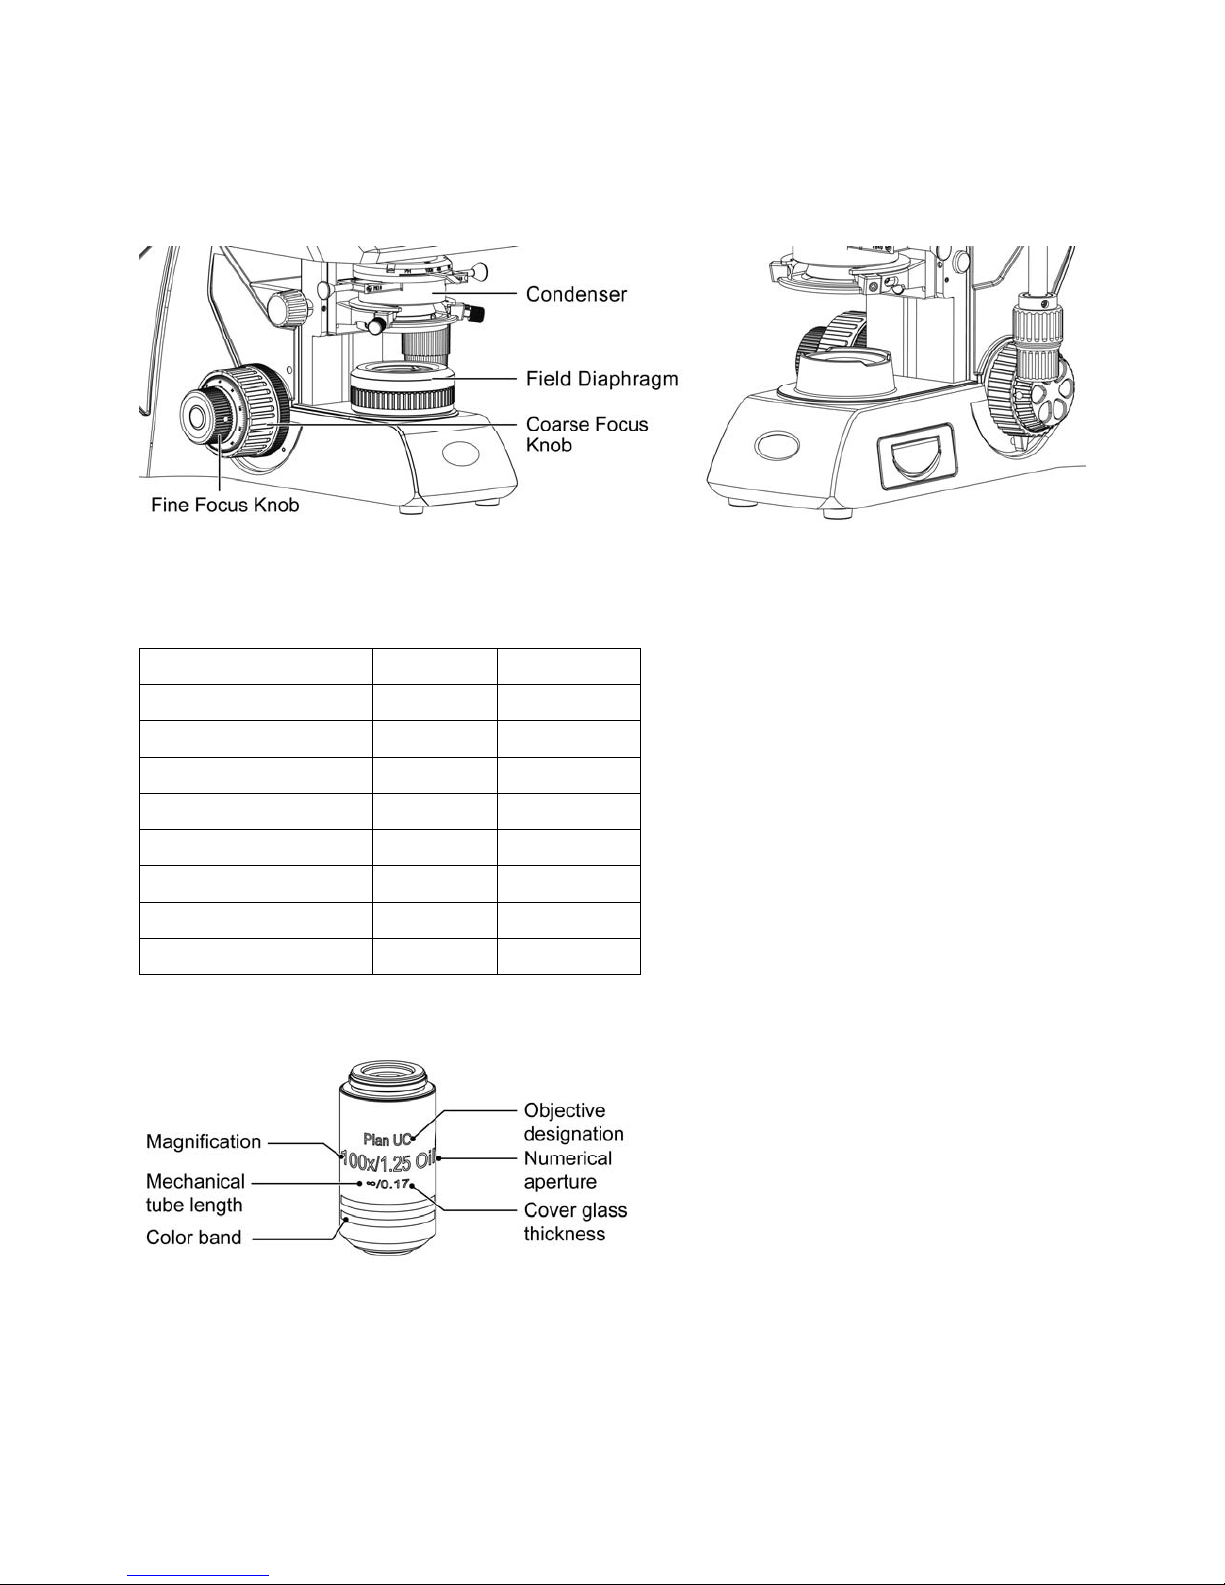
12
Full Kohler Illumination Fixed Kohler Illumination
Objective Lenses:
Magnification N.A. W.D (mm)
Plan UC 2X 0.05 7.2
Plan UC 4X 0.1 30.5
Plan UC 10X 0.25 17.4
Plan UC 20X 0.45 0.8
Plan UC 40X 0.65 0.6
Plan UC 60X 0.8 0.35
Plan UC 100X/1.25 Oil 1.25 0.16
Plan UC 100X/0.8 0.8 2
Page 14

13
Working distance WD: The distance from the cover glass top surface to the nearest point of the
objective.
Numerical aperture NA: The NA is a performance indicator. The higher NA, the higher the resolving
power.
It describes the ability of the lens to collect light under steep entry angles.
Resolution: The ability to differentiate two points, or minimum distance under which
two points can be differentiated.
Focal depth: The area along the optical axis where a focused image appears to be sharp.
If the aperture iris diaphragm is stopped down, the focal depth becomes
bigger. As greater the NA of an objective, as shorter the focal depth.
Field number: A value that indicates the diameter of the image of the field diaphragm that
is formed by the lens in front of it in mm.
Field of view: The actual size of the field of view in millimeters in the Eyepiece.
Total magnification: Objective magnification multiplied by the eyepiece magnification.
Page 15

14
3.SETTING UP THE INSTRUMENT
Avoid placing the instrument in locations exposed to direct sunlight, dust, vibration, high temperature,
high humidity and where it is difficult to unplug the power supply cord.
3.1 Operating environment
● Indoor use
● Altitude: Max 2000 meters
● Ambient temperature: 15°C to 35°C
● Maximum relative humidity: 75% for temperature up to 31°C decreasing linearly to 50% relative
humidity at 40°C
● Supply voltage fluctuations: Not to exceed ±10% of the normal voltage.
● Pollution degree: 2 (in according with IEC60664)
● Installation / Overvoltage category: 2 (in according with IEC60664)
● Air pressure of 75kPa to 106 kPa
● Avoid frost, dew, percolating water, and rain.
Panthera School
■ PowerOnDevice (USB Camera Power, USB Powerpack)
■ Cabinet size bino, trino head
■ Camera Power devise
Panthera E
■ PowerOnDevice (USB Camera Power, USB Powerpack)
■ Cabinet size bino, trino head
■ Camera Power devise
■ Rackless Stage
Page 16

15
Panthera University
■ Light Tracer, digital light control
■ Bino, trino, Plan UC optic
■ Rackless Stage
Panthera Classic
■ Bino, trino, Plan UC optic
■ Rackless Stage
Panthera LifeScience
■ Light Tracer, digital light control
■ ImagingOnDevice
■ QR-Link
■ ImageRecall
Page 17

16
Panthera HD
■ SmartLight brightness control
■ ImagingOnDevice
■ QR-Link
■ ImageRecall
■ Similar to Panthera L, without Eyepiece
Please familiarize yourself with the instructions given in this Operation Manual.
In case of unresolved questions, please contact Motic after sales Service or consult Motic
Webservices for further instructions.
Page 18

17
4.ASSEMBLING THE MICROSCOPE
4.1 Verifying input voltage
● The automatic voltage selection works with a broad range of settings, please check the power
rating of your country is admitted before the use of the Instrument under chapter specification.
However, always use a power cord that is rated for the voltage used in your area and that has
been approved to meet local safety standards. Using the wrong power cord could cause fire
or equipment damage.
● If using an extension cord, use only a power supply cord with a protective earth (PE) wire.
● In order to prevent electric shock, always turn the power switch on the power supply off before
connecting the power cord.
4.2 Illumination
4.2.1 Halogen bulb
● The quartz halogen bulb, provides a nearly complete vis light specimen with high luminance and
natural temperature.
● The halogen bulb maintains the same level of brightness and color temperature through its full
lifespan.
4.2.2 LED
● LED is more economical and environmental friendly and combines the advantages of low heat and
long life span. There are two different color temperature available. High contrast blue/warm color
temperature.
4.3 Stage
4.3.1 For Panthera S
● Remove specimen holder for fast hand scanning
of slides.
● Left-handed and right-handed operation stages are
available for option.
(Fig.1)
Page 19

18
4.3.2 For Panthera E / U / C / L / HD
Panthera E, U, C, L, HD Stage is fitted with a Rackless providing more clearance for the user and
avoid the possibility to scratch the users hand.
● Remove specimen holder for fast hand scanning of slides.
● Left-handed and right-handed operation stages are available for option.
Left hand operation stages is available for option. It should be used with the short stage knob for
avoiding to interfere the fine focus knob.
(Fig.2)
● Stage drive Torque adjustment (Optional feature)
The torque of the y-axis and x-axis travel knobs can be adjusted by torque adjusting knobs.
For y-axis to (+) increase or (-) decrease the torque,
turn Knob Y while holding A
For x-axis to (+) increase or (-) decrease the torque,
turn Knob X while holding B
Page 20

19
4.4 Specimen holder
● Attach the specimen holder, using the two mounting holes.
4.5 Objectives
● Lower the stage completely. Screw the objectives into the revolving nosepiece so that clockwise
rotation of the nosepiece brings the next higher magnification objective into position.
(Fig.3)
4.6 Condenser
● Raise the stage by turning the coarse focus knob.
● Completely lower the condenser carrier by turning the condenser focus knob. (Fig.4-1)
● Insert the condenser into the dovetail mount with aperture scale facing forward towards the user.
Secure it with the condenser clamp screw. (Fig.4-2)
● Turn the condenser focus knob to raise the condenser as far as it will go. (Fig.4-1)
(Fig.4-1) (Fig.4-2)
Page 21

20
4.7 Eyepiece tube
● Loosen the eyepiece clamp screw (Fig.5-2). Insert the round dovetail mount on the eyepiece tube
into the round dovetail mount on the microscope arm (Fig.5-1). Tighten the eyepiece tube clamp
screw to secure the eyepiece tube in place. (Fig.5-2)
(Fig.5-1) (Fig.5-2)
4.8 Eyepieces
● Use the same magnification eyepieces for both
the eyes.
● To secure the eyepiece in the eyepiece sleeve,
tighten the clamp screws.
● Twist the eyepiece (anti-clockwise or clockwise)
with 20~30 degree (Fig.6.1) and pull the
eyepieces gently out when removing the eyepiece.
(Fig.6.2)
(Fig.6)
4.9 Filters
For Panthera S / E / U:
● Place the filter in the filter holder located
around the field lens (Fig.7)
(Fig.7)
Page 22

21
For Panthera C / L / HD:
● Remove the collector cover (Fig.8-1) and place the filter in the filter holder located around the field
lens (Fig.8-2), screw back the collector cover (Fig.8-1), taking care that dust, dirt and fingerprints
do not get on the filter and the field lens.
(Fig.8-1) (Fig.8-2)
Filter selection:
Filter Function
ND2 (T=50%)
For brightness adjustment in photomicrography
ND4 (T=25%)
ND16 (T=6.25%)
Blue filter (colour balance filter) For routine microscopy and photomicrography
Green interference (546nm)
For phase contrast and contrast adjustment with black and
white film
HE (didymium filter)
For colour photomicrography of HE stained specimen with
tungsten type film
● A diffuser is built into the base of the microscope.
4.10 Power cord
● Connect the socket of the of the power cord to the AC inlet on the rear of the base of the
microscope. Plug in the other end of the cord to an AC outlet with ground conductor.
Page 23

22
5.DIGITAL PARTS (SETUP AND OPERATION)
5.1 How to use QR-Link (For Panthera L / HD)
In case you do not have the Panthera APP yet, please scan the QR-Code on the backside
Type Label to download Panthera APP in Android or IOS system, and get connected to the
correct APP store via Motic servicing Servers. In case of any issue, please visit the Website
http://www.motic.com/Panthera/app.html
Connect the same network with Panthera. If Panthera is hotspot, SSID format is like Motic ***.
No password required.
Use QR-Link to connect to ImagingOnDevice
To connect to Panthera L Digital Imaging system, open the Panthera APP and scan the QR code on the top of the Tube head cover. The connection should be activated almost immediately.
Page 24

23
5.2 ImagingOnDevice
5.2.1 Panthera Series Backside Connection Panel
Panthera Series is providing the user with a unseen combination of build in Digital Capabilities.
“Plug in your HDMI Screen, mouse and keyboard and start enjoy the simplicity of working with
Motic Panthera Series.”
● Direct Connect to Screen
● Projector
● Plug your Mouse or Keyboard
● Take care your data with a USB-Stick
● Connect to remote Location
● Online consultation and Discussion
● Digital Classroom
● Optional WIFI via USB Stick
Panthera L Backpanel Connections
1x HDMI Full HD 1080i
1x Ethernet LAN 1Gbit/s
2x USB 2.0 Plug and Play
1x USB 2.0 OTG (Wifi dongle support) Accessories port
To plug accessories like HDMI Screen, Mouse or Keyboard, turn off the Instrument plug in the
accessories and turn the Instrument on again.
Page 25

24
5.3 TeachingOnDevice (Panthera C / HD)
Panthera Microscope Series are providing direct HDMI, USB, LAN Network connectivity. Just
plug a HDMI capable Device, mouse and a Keyboard in the backside of the Instrument and
start to work.
Connect your Panthera Microscope to a touch enabled HDMI Screen and conveniently use a
keyboard to enter your reports.
Plug and Play Accessories:
● 3 Button Wheel mouse for ease of use and roll
to zoom
● USB Keyboard, simply connect the Keyboard
of your choice
● 1Gbit Lan connection port for high speed
remote consultaion on Motic DssStore or
simply network sharing
● Plug your personal USB stick to transport your
imagery
● Connect your Panthera to the local Wifi or
share your image via QR-Link.
Page 26

25
5.3.1 Panthera ImagingOnDevice realtime sharing ImagingOnDevice with QR-Link clients
Local: ImagingOnDeviceRemote: QR-Link Clients
Please refer to “5.1 How to use QR-Link”.
5.3.2 ImageRecall
Panthera ImagingOnDevice stores relevant Data into the EXIF-Header of each Image being
made. User can recall the same Illumination settings using the ImageRecall feature in order to
allow a easy reconstruction of the before Experiment.
Motic EXIF Header
■ Objective Lens Type with Specs
■ Brightness Settings
■ Camera settings
Page 27

26
6.USAGE OF MICROSCOPE COMPONENTS
6.1 Coarse and fine focusing (Fig.9-1)
● Focusing is carried out with the coarse and fine focus knobs at the left and right of the microscope
stand.
● The direction of vertical movement of the stage corresponds to the turning direction of the focus
knobs.
● One rotation of the fine focus knob moves the stage 0.2mm. The graduation on the fine focus knob
is 2 microns.
● Never attempt either of the following actions, since doing so will damage the
focusing mechanism:
● Rotate the left and right knob while holding the other.
● Turning the coarse and fine focus knobs further than their limit.
(Fig.9-1) (Fig.9-2)
6.2 Coarse focus torque adjustment (Fig.9-2)
● To increase the torque, turn the torque adjustment ring located behind the left-hand coarse focus
knob in the direction indicated by the arrow. To reduce the torque, turn the ring in the direction
opposite to that indicated by the arrow.
Page 28

27
6.3 Coarse focus quick stop (Fig.10)
● The coarse focus quick stop makes the stage can fixed at any position at which the specimen is in
focus i.e. by using the handle to lock the coarse focus knob.
● With the specimen in focus, turn the handle to fix the knob.
● When the coarse focus quick stop is in position, the stage cannot be raised from that position.
However, the fine focus knob can move the stage regardless of the limit but will only lower the
stage.
● Lower the stage by using the coarse focus knob.
(Fig.10)
6.4 Stage upper limit stop adjustment (Fig.11)
(Upper Stage Limit is preset at the factory; please only adjust if necessary)
● The Stage Upper Limit stop marks the stage position at which the specimen is in focus i.e. by
restricting the movement of the coarse focus knob.
● With the specimen in focus, turn the stage upper limit stop knurled ring clockwise until it reaches
the stop.
● When the stage upper limit stop is in position,
the stage cannot be raised from that position.
● Lower the stage by using the coarse focus knob
anticlockwise
(Fig.11)
Page 29

28
6.5 Interpupillary distance adjustment
Every human eye is different, to adjust the Instrument to best performance adjustment can be
necessary. Interpupillary distance adjustment enables the user to observe the specimen with
both eyes without fatigue
● Before adjusting the interpupillary distance, bring a specimen into focus using the 10x objective.
● Adjust the interpupillary distance so that both the right and left field of view become one.
● This adjustment will enable the user to observe the specimen with both eyes
Panthera Microscopes Series are equipped with a swivelling Binocular to provide the flexibility
to adjust the view height for individual viewers convenience (Fig.12).
360°swiveling movement, interpupillary distance 50 and 75mm
(Fig.12)
Page 30

29
6.6 Diopter adjustment
Every human eye is different, to adjust the Instrument to best performance adjustment can be
necessary.
● Set the diopter on both eyepieces to the “0” position.
● Change to 10x Magnification and the image of the specimen into focus using one eye only
.
● Change to the other eye and follow below steps.
- Correct the focus for the second eye by using only the diopter adjustment ring (Fig.13), do
not use the coarse / fine focusing knob!
- Change to a higher magnification to verify the result and if necessary repeat the procedure to
match the sharpness for higher magnification.
- Keep this final diopter position for all magnification / lenses. The diopter position for each user
can be recorded from the scale (Fig.13), so it can easily be reset.
(Fig.13)
Page 31

30
6.7 Adjustment of Brightfield (Panthera C / L)
6.7.1 Full Kohler Illumination
● Place as contrast rich specimen slide into the slide holder (1) and swing in a 10x Objective Lens.
● Move any darkfield or phase contrast slider (2) out of the beam path, If equipped with it.
● Adjust the illumination intensity to sufficient brightness (3).
● Turn the knurled condenser height adjustment knob (4) to bring the Abbe condenser up to its top
mechanical stop position.
● Look through one eyepiece (5) and turn the focusing drive (7) to focus the 10x lens on the
specimen.
● Look through the second eyepiece (6) and if necessary adjust the diopter until the second
eyepiece has sharp image.
● Fully open the Aperture diaphragm using the knurled ring Aperture ring the condenser (8). Then
close the field diaphragm until it becomes visible, it may appear not sharp by now.
● Adjust the condenser using the centring screws (9) by bringing the light pot of the field diaphragm
into the centre of the field of view.
● Open the field diaphragm iris diameter that it just disappears out of the field of view.
● Remove one of the eyepieces and set the aperture diaphragm (10) iris diameter to 2/3rd of it's the
field of view.
● Insert the eyepiece back in the tube.
Page 32

31
6.8 Use of aperture diaphragm
● The condenser aperture diaphragm is to adjust the numerical aperture (N.A.) of the illuminating
system, it serves the resolution of the image, contrast, depth of focus and brightness.
● Stopping it down will lower the resolution and brightness but increase the contrast and depth of
focus.
● An image with appropriate contrast can be obtained with an aperture setting that is 2/3 of the
objective N.A.
To check the adjustment of the aperture diaphragm:
● Check the condenser aperture scale
● Remove one eyepiece and check the image directly in the eyepiece tube
● Use a centring telescope after removing one of the eyepieces and focusing on the aperture
diaphragm.
6.9 Use of field diaphragm (For Panthera C / L only)
● The field diaphragm determines the illuminated area on the specimen. For normal observation, the
diaphragm is set slightly larger than the field of view. If the illuminated area is set much larger than
the field of view extraneous light will enter the field of view. This will create a flare in the image and
lower the contrast.
● The thickness spec of the glass slide must be 1.7mm or less, otherwise the field diaphragm may
not be focused on the specimen plane.
On Condensers with swing-in front lens, the diaphragm does not have any effect when the
condenser top lens is swung out of the optical path in the Swing-out type condenser.
Fully open the field diaphragm, as the N.A. of the illuminating system will be reduced if the
diaphragm is excessively stopped down.
6.10 Brightness and contrast adjustment
● Neutral density filters are used for brightness adjustment in routine microscopy and
photomicrography.
● For phase contrast and contrast adjustment with black and white film, a Green interference filter
(546nm) is recommended.
● An HE (didymium) filter for colour photomicrography, Haematoxylin, Eosin (HE) or Fuchsin stained
specimen with tungsten type film is available.
Page 33

32
6.11 Illumination brightness adjustment
6.11.1 Panthera S / E / C:
To adjust the Brightness turn the Light Intensity Control Knob and observe the brightness change until
the desired brightness has been reached.
There is no Standby or sleep mode available in this model
6.11.2 Panthera U / L / HD:
To adjust the Brightness, turn the Light Intensity Control Knob and observe the brightness change until
the desired brightness has been reached.
If the Illumination has not been changed for 3s the actual value will be stored for this Objective
magnification.
The light value stored is independently for each objective lens and will be automatically restored once
the user returns to the objective lens.
(Fig.14-1) (Fig.14-2)
6.12 Restore factory default for intensity (For Panthera U / L / HD only)
● Turn the Instrument off by switching the main switch on the backside of the Instrument.
Keep the intensity knob pressed and switch instrument on.
Keep holding the intensity control knob for 10s.
Now system is being reset to factory values.
Default intensity value for each objective is chosen to 10% of total brightness
Page 34

33
6.13 Standby mode (For Panthera U / L / HD only)
Standby mode self activates after 15 mins of idling time, in order to conserve energy, protect the
specimen from overexposure.
● To activate Standby just double click the intensity knob or leave the microscope for 15 minutes,
the standby mode turn on.
● Once touch the intensity knob or nosepiece, standby model turn off. Intensity will be adjusted to
the last memorized status.
LED Indicator shows breathing status, to indicate its in standby
6.14 Adjust the Epi-illuminatioin intensity and transmitted illumination (Panthera U / L / HD only)
Switch to the Epi-illumination intensity, push and turn up the intensity knob.
Push and turn down the intensity knob, then Epi-illumination is turned off. It switch to the transmitted
illumination.
Page 35

34
7.PHOTOMICROGRAPHIC PROCEDURE
● To ensure vibration free operation, set the microscope on a sturdy vibration free table or a bench
with a vibration proof device.
● Pull the optical path selection lever of the trinocular eyepiece tube all of the way out to the limit,
the ratio of light entering the observation tube and standard phototube will be 20:80.
● For the same total magnification, select a combination of the highest possible objective
magnification and lowest possible projection lens magnification to achieve the utmost
image definition and contrast.
● To ensure optimal illumination, check the position and centring of the lamp and position of the
condenser.
● Select a blue filter for routine application. An additional colour-compensating filter can also be
used depending on the colour rendition.
● Adjusting the field diaphragm is important for the purpose of limiting extraneous light that may
cause flare and lower the contrast. Stop down the diaphragm to achieve an illuminated area
slightly larger than that of the field of view.
● A change of depth of focus, contrast and resolution of image is attainable with an aperture setting
that is 2/3 of the objective N.A.
● For specific photomicrographic procedures, refer to the manual of the specific camera being used.
Page 36

35
8.USING OIL IMMERSION OBJECTIVES
● Oil immersion objectives are labelled with the additional engraving “Oil” and are to be immersed in
oil between the specimen and the front of the objective.
● The immersion oil supplied by Motic is synthetic, non-fluorescing and non-resining oil, with a
refractive index of 1.515.
● The small bottle of oil supplied with every immersion objective facilitates application of the oil to
the cover slip.
● Remove any air bubbles in the nozzle of the oil container before use.
● Immersion oil must be used sparingly. After the examination, the oil should be wiped off the
objective with a lens cleaning tissue and the residual film removed with soft cloth moistened with
petroleum benzene or absolute alcohol.
● Locate the field of interest with a lower magnification objective. Swing the objective out of the light
path, and add one drop of immersion oil over the site of the specimen.
Swing in the oil immersion objective. There should be a small column of oil from the cover slip to
the objective lens. Use the fine focus to make the image sharp.
● At operating with Immersion Oil, the space between Objective and Cover class must be free of
any Air bubbles
Page 37

36
9.CARE AND MAINTENANCE
9.1 Do not disassemble
● Disassembly may significantly effect the performance of the instrument, and may result in electric
shock or injury and will void the terms of the warranty.
● Never attempt to dismantle any parts other than described in this manual. If you notice any
malfunction, contact your nearest Motic representative.
9.2 Cleaning the microscope
9.2.1 Lenses and filters
● To clean lens surfaces or filters, first remove dust using an air blower. If dust still persists, use a
soft /clean brush or gauze.
● A soft gauze or lens tissue lightly moistened with Isopropyl alcohol should be used to remove
grease or fingerprints.
● Use isopropyl alcohol) to remove immersion oil from objective lenses.
Warning: alcohol is highly flammable liquid, be careful handling around open flame and always
observe the local security advise how to handle such substances
9.2.2 Cleaning of painted or plastic components
● Do not use organic solvents (thinners, alcohol, ether, etc.). Doing so could result in discolouration
or in the peeling of paint.
● For stubborn dirt, moisten a piece of gauze with diluted detergent and wipe clean.
● For plastic components, only moisten a piece of gauze with water and wipe clean.
9.3 Disinfecting the Microscope
● Follow the standard procedures for your laboratory.
9.4 When not in use
● When not in use, cover the instrument with vinyl dust cover and store in a place low in humidity
where mould is not likely to form.
● Store the objectives, eyepieces and filters in a container or desiccators with drying agent.
● Proper handling of the microscope will ensure years of trouble free service.
● If repair becomes necessary, please contact your Motic agency or our Technical Service direct.
Page 38

37
Note:
● If equipment is used in a manner not specified by the manufacturer, the warranty may be void.
● To avoid getting wet, do not use the microscope near water.
9.5 Bulb replacement
The lamp and the lamphouse become very hot during and after a period of operation.
Risk of burn – Do not touch the lamp during or immediately after period of operation.
Make sure the lamp has cooled sufficiently before attempting to replace the lamp.
● In order to prevent electric shock always turn the power switch off and unplug the power cord
before installing or replacing the bulb.
9.5.1 Replacing the 6V 30W halogen module or the two different LED module
(For Panthera C / L / HD)
● Left up the cover of illumination module. (Fig.15-1)
● Loosen the fastening screw of the illumination module. In doing so, slightly press the screw
against the spring and turn it by 90° (counter clockwise). (Fig.15-2)
● Pull the illumination module out of the stand. (Fig.15-3)
● If the stand is equipped with a 6V 30W halogen lamp, remove the halogen lamp from the lamp
carrier and insert the new halogen lamp. Do not touch the new lamp with naked fingers and this
will reduce lamp life.
● If the stand is equipped with an LED lamp replace the complete illumination module including the
LED.
● Push the illumination module back into the stand and lock it by means of the screw. In doing
so, slightly press the screw against the spring and turn it by 90° (clockwise). (Fig.15-4)
(Fig.15-1) (Fig.15-2)
Page 39

38
(Fig.15-3) (Fig.15-4)
9.5.2 Electrical Specifications:
A. Panthera S / E:
Camera USB Output: 5V / 0.5A
Input: AC100~240V, 50~60Hz 0.55A
Bulb: 0.5W LED, color temperature: 5700K
B. Panthera U:
Camera USB Output: 5V / 0.5A
Input: AC100~240V, 50~60Hz 0.55A
Output: DC12V 1A
Bulb: 3 W LED
LED module, high color temperature: 5500K ~ 6000K
LED module, low color temperature: 3000K ~ 3500K
C. Panthera C:
Camera USB Output: 5V / 0.5A
Input: AC100~240V, 50~60Hz 1.2A
Bulb: 3W LED or 6V 30W Halogen
LED module, high color temperature: 5500K~ 6000K
LED module, low color temperature: 3000K ~ 3500K
D. Panthera L / HD:
Input: AC100~240V, 50~60Hz 1.2A
Output: DC 12V 1A
Bulb: 3W LED or 6V 30W Halogen
LED module, high color temperature: 5500K~ 6000K
LED module, low color temperature: 3000K ~ 3500K
Page 40

39
10.TROUBLESHOOTING TABLE
As you use your microscope, you may occasionally experience a problem.
The troubleshooting table below contains the majority of frequently encountered problems and the
possible causes.
10.1 Optical
Problem Possible Cause
Vignetting or uneven brightness in the field
of view or field of view only partially visible
Lamp not installed properly
Lamp not centred
Diffuser is in intermediate position
Condenser not mounted correctly
Condenser is not centred
Condenser is set too low
Condenser top lens not fully swung in/out
Field diaphragm closed too far
Aperture diaphragm closed too far
Improper condenser objective combination
Revolving nosepiece not clicked into position
Trinocular eyepiece tube optical path selector lever in
intermediate position
Dust or dirt in the field of view
Aperture diaphragm closed too far
Condenser is set too low
Dust or dirt on specimen surface
Dust or dirt on field lens, filter,
condenser or eyepiece
Poor image
(low contrast or resolution)
Condenser is set too low
Aperture diaphragm closed too far
No cover glass
Too thick or thin cover glass
Immersion oil not used with oil immersion lens
Air bubbles in immersion oil
Specified immersion oil not used
Immersion oil on dry objective
Greasy residue on eyelens
Incorrect illumination
Page 41

40
Unequal focus
Stage installed on inclined plane
Specimen holder not fixed securely on stage
Specimen not secured in position
Image tinged yellow
Lamp voltage is set too low
Blue filter is not being us
Focusing is not possible with high
magnification objectives
Slide is upside down
Cover glass is too thick
High magnification objectives strike the
specimen when changing over from low to
high magnification
Slide is upside down
Cover glass is too thick
Eyepiece diopter not adjusted
Insufficient parfocality of objectives
Eyepiece diopter not adjusted
No cohesion of binocular image
Magnification or field of view of left and right eyepieces
differ
Interpupillary distance not adjusted
Eyepiece diopter not adjusted
Eye strain or fatigue
Interpupillary distance not adjusted
Diopter adjustment not made
Field of view of left and right eyepiece differ
Inadequate illumination
10.2 Electrical
Lamp does not light
Power supply not plugged in
Lamp not installed
Lamp burnt out
Inadequate brightness Specified lamp not being used
Lamp blows out immediately Specified lamp not being used
Lamp flickers
Connectors are not securely connected
Lamp near end of service life
Lamp not securely plugged into socket
Page 42

41
11.SELECTION OF THE POWER SUPPLY CORD
Motic Instruments are certified and tested for safety and environmental conformity. Only power supply
cords which are conform with below listed certification marks and countries are applicable.
CAUTION : Do not use non-approved power cord for Motic products, Motic can no longer
warrant the electrical safety of the equipment.
Table 1 Certified Cord
Specifications
Voltage Rating 125V AC (for 100-120V AC area) or, 250V AC (for 220-240V AC area)
Current Rating 6A minimum
Temperature Rating 60 C minimum
Length 3.05 m maximum
Fitting Configuration
Grounding type attachment pull cap Opposite terminates in molded-on
EC con-figuration appliance coupling.
The power supply cord should be certified by one of the agencies listed in Table 1, or comprised of
cordage marked with an agency marking per Table 1 or marked per Table 2. The fittings are to be
marked with at least one of agencies listed in Table 1..
Page 43

42
Table 2 HAR Flexible Cord
Approval Organizations And Cordage Harmonization Marking Methods
Approval Organization
Printed or Embossed
Harmonization Marking (May be
located on jacket or insulation of
internal wiring)
Alternative Marking Utilizing
Black-Red-Yellow Thred (Length
of color section in mm)
Black Red Yellow
Comite Electrotechnique Belge (CEBEC) CEBEC <HAR> 10 30 10
Verband Deutscher Elektrotechniker (VDE)
e.V.
<VDE> <HAR> 30 10 10
Union Technique de Electricity USE <HAR> 30 10 30
Instituto Italiano del Marchio di Qualita
(IMQ)
IEMMEQU <HAR> 10 30 50
British approvals Service for Electric Cables
(BASEC)
BASEC <HAR> 10 10 30
N.V. KEMA KEMA-KEUR <HAR> 10 30 30
SEMKO AB Svenska Elektriska
Matenelkontrollanstalter
SEMKO <HAR> 10 10 50
Österreichisher Verband fur Elektrotechnik
(ÖVE)
<ÖVE> <HAR> 30 10 50
Danmarks Elektriske Materialkontroll
(DEMKO)
<DEMKO> <HAR> 30 10 30
National Standards Authority of Ireland
(NSAI)
<NSAI> <HAR> 30 30 50
Norges Elektriske Materiellkontroll
(NEMKO)
NEMKO <HAR> 10 10 70
Asociacio Electroteca
Y Electronica Espanola EE)
<UNED> <HAR> 30 10 70
Hellenic Organization for Standardization ELOT <HAR> 30 30 70
Institute Portages da Qualidade (IPQ) np <HAR> 10 10 90
Schweizerischer Elektro TechnischerVerein
(SEV)
SEV <HAR> 10 30 90
Elektriska Inspektoratet SETI <HAR> 10 30 90
Page 44

43
MICROSCOPE TERMINOLOGY
Abbe Condenser
A two-lens sub-stage condenser located below
the stage of a microscope and functions to collect
light and direct it onto the object being examined.
Its high numerical aperture makes it particularly
suited for use with most medium- and highmagnification objectives.
Aperture, Numerical (N.A.)
The numerical aperture is an important factor
determining the efficiency of the condenser and
objective. It is represented by the formula: (N.A.
= ηsinα), where η is the refractive index of a
medium (air, water, immersion oil etc.) between
the objective and the specimen or condenser,
and α is half of the maximum angle at which light
enters or leaves the lens from or to a focused
object point on the optical axis.
Cover Glass Thickness
Transmitted light objectives are designed to
image specimens that are covered by a thin
cover glass (cover slip). The thickness of this
small glass piece is now standardized at 0.17
mm for most applications.
Diaphragm, Condenser
A diaphragm, which controls the effective size of
the condenser aperture. A synonym for the
condenser illuminating aperture diaphragm.
Magnification
The number of times by which the size of the
image exceeds the original object. Lateral
magnification is usually meant. It is the ratio of
the distance between two points in the image to
the distance between the two corresponding
points in the object.
Micrometer: um
A metric unit of length measurement
= 1x10
-6
meters or 0.000001 meters
Nanometer (nm)
A unit of length in the metric system equal to 10
-9
meters.
Phase–contrast (microscopy)
A form of microscopy, which converts differences
in object thickness and refractive index into
differences in image amplitude and intensity.
Real Viewfield
The diameter in millimetres of the object field.
Eyepiece Field of View
Real Viewfield =
Objective Magnification
Example:
Eyepiece field of view = 20mm
Objective magnification = 10X
Diameter of the object field = 20/10
= 2.0mm
Page 45

44
Diopter adjustment
The adjustment of the eyepiece of an instrument
to provide accommodation for the eyesight
differences of individual observers.
Depth of Focus
The axial depth of the space on both sides of the
image plane within which the image is sharp. The
larger the N.A. of objective, the shallower the
depth of focus.
Field of View (F.O.V.)
That part of the image field, which is imaged on
the observer’s retina, and hence can be viewed
at any one time. The field of view number is now
one of the standard markings of the eyepiece.
Filter
Filters are optical elements that selectively
transmit light. It may absorb part of the spectrum,
or reduce overhaul intensity or transmit only
specific wavelengths.
Immersion Oil
Any liquid occupying the space between the
object and microscope objective. Such a liquid is
usually required by objectives of 3-mm focal
length or less.
Resolving Power
A measure of an optical system's ability to
produce an image which separates two points or
parallel lines on the object.
Resolution
The result of displaying fine details in an image
Total Magnification
The total magnification of a microscope is the
individual magnifying power of the objective
multiplied by that of the eyepiece.
Working Distance
This is the distance between the objective front
lens and the top of the cover glass when the
specimen is in focus. In most instances, the
working distance of an objective decreases as
magnification increases.
X–axis
The axis that is usually horizontal in a twodimensional coordinate system. In microscopy Xaxis of the specimen stages is considered that
which runs left to right.
Y–axis
The axis that is usually vertical in a twodimensional coordinate system. In microscopy Yaxis of the specimen stages is considered that
which runs front to back.
Page 46

Updated: March, 2017, Ver.1.1
Panthera Series
Motic Hong Kong Limited (Hong Kong)
Unit 2002, L20, Tower Two, Enterprise Square Five, 38 Wang Chiu Road, Kowloon Bay, Kowloon, Hong Kong
Tel: 852-2837 0888 Fax: 852-2882 2792
Motic Instruments Inc. (Canada)
130-4611 Viking Way, Richmond, B.C., V6V 2K9 Canada Tel: 1-877-977 4717 Fax: 1-604-303 9043
Motic Deutschland GmbH (Germany)
Christian-Kremp-Strasse 11 D-35578 Wetzlar, Germany Tel: 49-6441-210 010 Fax: 49-6441-210 0122
Motic Europe (Spain)
C. Les Corts 12, Pol. Ind. Les Corts. 08349 Cabrera de Mar, Barcelona, Spain Tel: 34-93-756 6286 Fax: 34-93-756 6287
Website: http://www.motic.com
E-mail: info@motic.com.hk
Motic China Group., Ltd. (China)
Motic Building, Torch Hi-Tech Industrial, Development Zone, Xiamen P.R.C. Tel: 86-0592-562 7866 Fax: 86-0592-562 7855
© 2002-2017 Motic China Group Co., Ltd. All rights reserved. Motic is a registered trademark and service mark of Motic China Group Co., Ltd.
Microsoft Windows logo is a registered trademark of Microsoft Corporation. All other trademarks are the property of their respective owners.
Design Change: The manufacturer reserves the right to make changes in instrument design in accordance with scientific and mechanical
progress, without notice and without obligation.
NO.: 1300901110501
E250223
 Loading...