

Page 1
Page 2

1
We are constantly endeavouring to improve our instruments and to adapt them to the
requirements of modern research techniques and testing methods. This involves modification to
the mechanical structure and optical design of our instruments.
Therefore, all descriptions and illustrations in this instruction manual, including all
specifications are subject to change without notice.
Page 3

2
TABLE OF CONTENTS
Section Page
I. Nomenclature ………………………………………………………………………… 3
II. Setting-up the instrument …………………………………………………………… 5
III. Assembling the Microscope …………………………………………………………… 5
1. Installing the Lamp ………………………………………………………………… 5
2. Halogen Lamp ……………………………………………………………………… 6
3. Filter Holder ………………………………………………………………………… 6
4. Mounting the Condenser …………………………………………………………… 6
5. Installing the Objectives …………………………………………………………… 6
6. Mechanical Stage ………………………………………………………………… 6
7. Mounting the Eyepieces …………………………………………………………… 7
IV. Microscopic Procedure ……………………………………………………………… 7
1. Interpupillary Distance Adjustment ………………………………………………… 7
2. Diopter Adjustment ………………………………………………………………… 7
3. Brightfield Microscopy …………………………………………………………… 8
4. Phase-Contrast Microscopy ………………………………………………………… 8
V. Photomicrographic Procedure ……………………………………………………… 9
VI. Troubleshooting Table ………………………………………………………………… 10
VII. Care and Maintenance ………………………………………………………………… 12
1. Lenses and Filters …………………………………………………………………… 12
2. Cleaning of Painted or Plastic Components………………………………………… 12
3. When Not in Use …………………………………………………………………… 12
Page 4
3
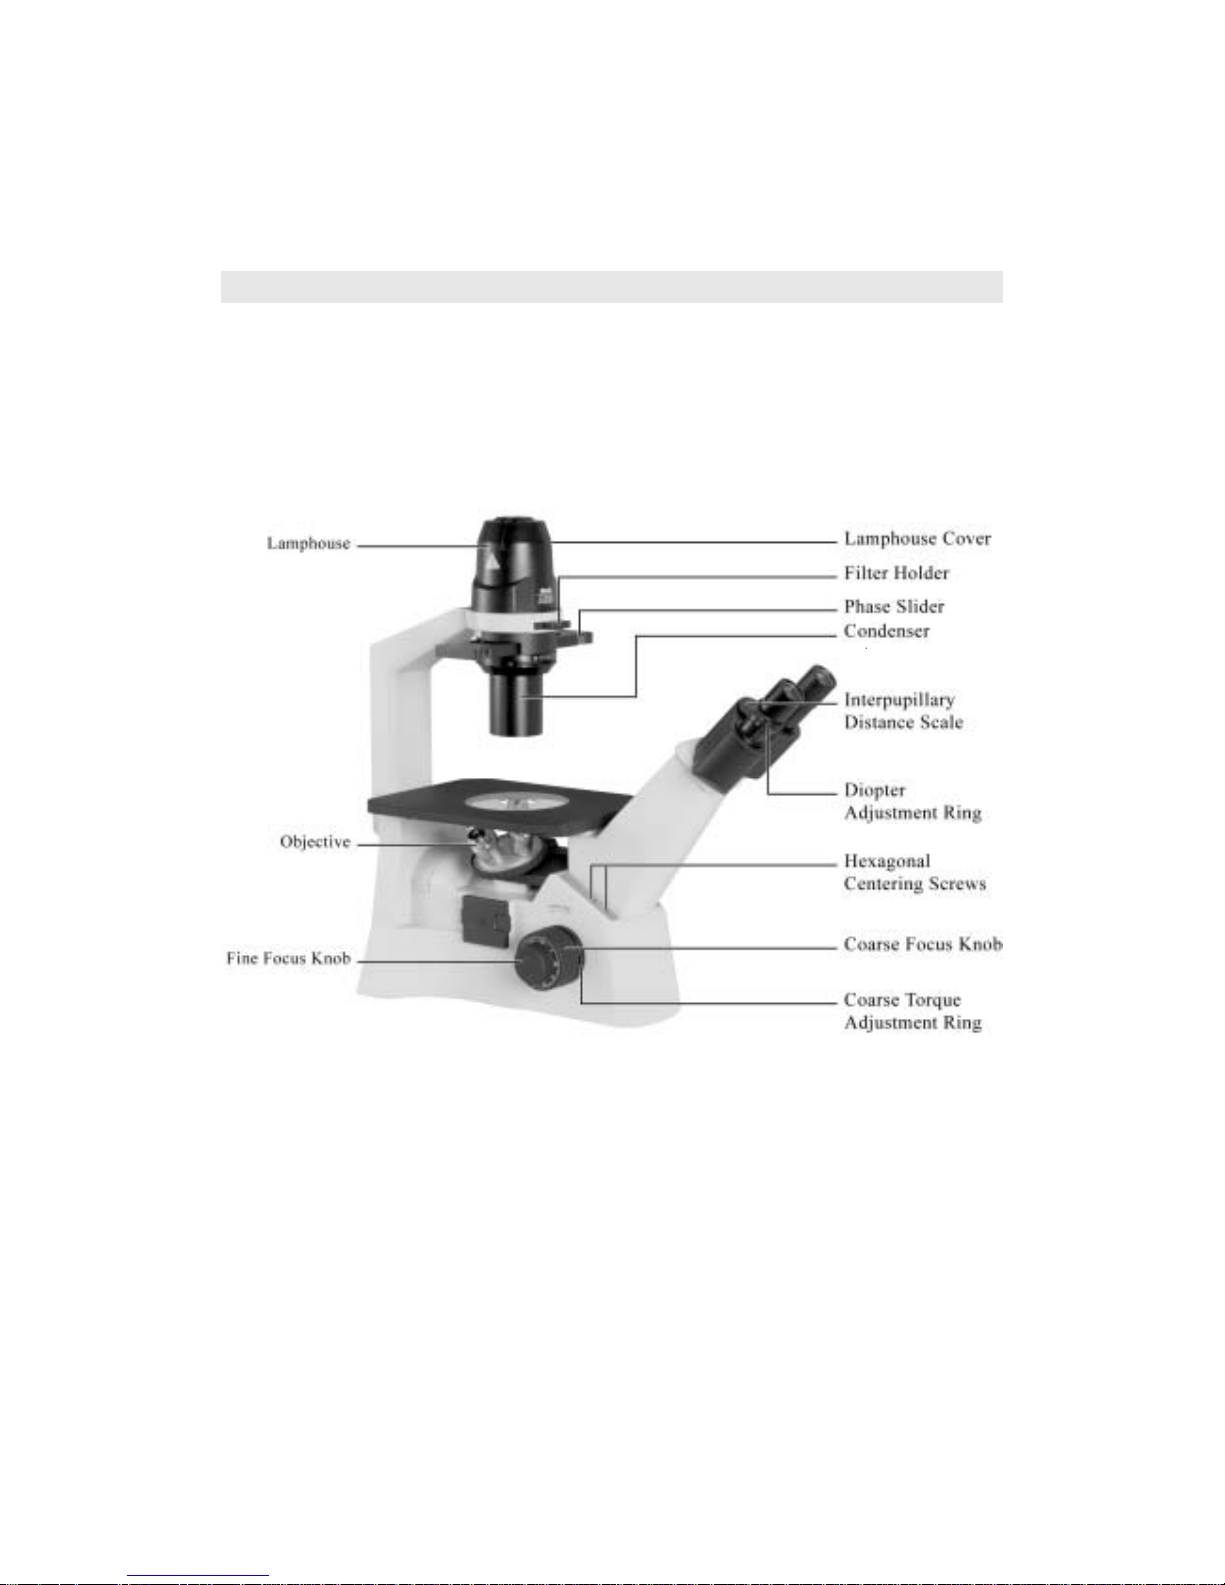
I. Nomenclature
Model AE20
Page 5

4
Model AE21
Page 6

5
II. Setting-up the Instrument
Working Environment
● The location should be free from dust, moisture, chemical vapours and from mechanical
vibrations.
● Do not situate the instrument in a warm and/or humid environment.
● Locate the instrument where the operator’s line of vision is not directed towards a window, a
lamp or a well-lit bright wall. The quality of the viewed image from the microscope will
deteriorate where there is significant ambient light.
III. Assembling the Microscope Input Voltage
● Automatic voltage selection works with electrical outlets worldwide. However, always use a
power cord that is rated for the voltage used in your area and that has been approved to meet
local safety standards. Using the wrong power cord could cause fire or equipment damage.
● In case of using the extension cord, use only the power supply cord with the PE
(protective earth) wire.
● In order to prevent electric shock, always turn the power switch on the power supply off before
connecting the power cord.
1. Installing the Lamp
● In order to prevent electric shock always turn the power switch off and unplug the power cord
before replacing the lamp.
● To remove lamphouse cover, press down lightly and rotate counter clockwise.
● Firmly insert the lamp into the socket pinholes until it reaches the limit, be careful not to tilt
the lamp when mounting.
Page 7

6
● When installing the lamp, do not touch the glass surface of the lamp with bare fingers. Doing
so will cause fingerprints, grease, etc., to burn onto the lamp surface, reducing the illumination
provided by the lamp. If surface is contaminated, wipe it clean using lens tissue.
● Return lamphouse cover to original position and rotate clockwise to lock into place. The
model name marked on the cover should face the user.
2. Halogen Lamp
● The quartz halogen lamp, used as a light source, has higher luminance and colour temperature
than conventional tungsten lamps. The luminance is approximately four times brighter.
● As long as the lamp voltage is kept constant, the halogen lamp maintains the same level of
brightness and colour temperature regardless of whether it is new or nearing the end of its life.
3. Filter Holder
● Insert filter holder in opening located under the lamphouse
4. Mounting the Condenser
● Mount the ELWD condenser on the circular dovetail mount of the condenser holder with the
aperture diaphragm lever and index marks facing the front and secure it with the clamp screw.
● Insert the Ph annular diaphragm slider with centering hexagonal socket head screws facing the
front.
5. Installing the Objectives
● Remove the metal stage insert from the stage.
● Install the objectives into the nosepiece so that the magnification increases with clockwise
rotation of the revolving nosepiece.
● Replace the metal stage insert.
6. Mechanical Stage
● Secure the mechanical stage to the AE20/21 plain stage using the two mounting screws located
beneath the stage on the right side (when facing the front of the instrument).
Page 8

7
7. Mounting the Eyepieces
● Remove the dust caps from the eyepiece tubes.
● Insert the eyepieces into the eyepiece tubes and tighten the eyepiece clamp screws.
● Be sure to use eyepieces with the same magnification.
● If the rubber eye guards are to be used, fit them in the groove around the eyepiece.
IV. Microscopic Procedure
1. Interpupillary Distance Adjustment
● Before adjusting the interpupillary distance, bring a specimen into focus using the 10x
objective.
● Adjust the interpupillary distance so that both the right and left field of view become one.
● This adjustment will enable the user to observe the specimen with both eyes.
2. Diopter Adjustment
● Diopter adjustment compensates for the differences in vision between the left and right eyes. In
addition to making observation through both eyes easier, this adjustment also reduces the
extent to which focusing is lost when the objective magnification is changed. In particular, this
occurs when a low magnification objective is used.
● The left eyepiece has a separate focusing provision to compensate for slight differences in the
focusing of each eye.
● Using the right eye only and viewing through the right-hand eyepiece, adjust the focus with the
microscope fine or coarse adjustment until the image of the specimen is at its sharpest.
● Using the left eye only and viewing through the left-hand eyepiece with its independent
diopter-focusing ring, focus until the specimen image is at its sharpest.
● The microscope should now be ready binocular viewing.
Page 9

8
3. Brightfield Microscopy
● Set the Phase annular diaphragm slider in centre position (O).
● Bring the specimen image into focus.
● Adjust the opening of the field of view diaphragm, for normal observation the size of the
diaphragm should be just outside the edge of the field of view.
● The condenser aperture diaphragm is provided for adjusting the numerical aperture (N.A.) of
the illuminating system of the microscope. It is important because it determines the resolution
of the image, contrast, depth of focus and brightness.
● Stopping down the aperture diaphragm will lower the resolution and brightness but increase
the contrast and depth of focus. By stopping down the N.A. of the condenser to 2/3 of the N.A.
of the objective, a good image of suitable contrast will be obtained.
4. Phase-Contrast Microscopy
Fully open the aperture diaphragm
Move the aperture diaphragm lever on the condenser to fully open position. Always fully open the
aperture diaphragm for phase contrast microscopy. If aperture diaphragm is closed, it will obstruct
the annular diaphragm and the phase contrast effect cannot be obtained.
● Phase contrast objectives are labelled “Ph”: Ph1; Ph2; Ph3.
● For phase contrast microscopy, be sure to use the annular diaphragm that has the same symbol
as the objective, despite of the magnification of the objective.
● Fully open the aperture diaphragm.
● Bring the 10x (Ph1) objective into optical path.
● Position the Phase annular diaphragm slider to 10 –20.
● Set slider to 40 when using 40x (Ph3) objective.
● Remove either eyepiece from the eyepiece tube and insert the phase centering telescope
instead. Rotate the eyepiece of the centering telescope to focus on both the phase plate image
of the objective and the annular diaphragm image of the phase slider.
● If the objective phase plate and the annular of the slider do not coincide, use the two hexagonal
screwdrivers supplied with the microscope to bring the slider annular ring to the centre of the
phase plate, so that the image of the annular diaphragm is concentric with the phase plate
image.
Page 10

9
● If the slider annular ring image is diverged from the phase plate image in the objective, a low
phase contrast image will result.
● For phase contrast microscopy at the maximum contrast, use GIF (Green interference filter) in
the optical path.
V. Photomicrographic Procedure (Model AE21 Only)
● The optical path selector lever can be used to set the optical path to either the Binocular tube
100:0 or Binocular tube / vertical tube 20:80 (observation: photo).
● Before starting photomicrography, check the following:
● The condenser is centered.
● The condenser annular diaphragm is centred.
● The field of view diaphragm is stopped down to slightly just outside the edge of the field of view.
● For photomicrographic procedures, refer to the manual of the specific camera being used.
Filter selection
Filter holder holds up to two filters
Filter type Procedure
Diffuser To be used in all cases
GIF (Green interference) 546nm
For phase contrast microscopy and for
improving the contrast in monochrome
photomicrography
NCB (Neutral Colour Balance) Blue
For routine microscopy and colour
photomicrography
Page 11

10
Never attempt either of the following actions, since doing so will damage the focusing
mechanism:
● Rotate the left and right knob while holding the other.
● Turning the coarse and fine focus knobs further than their limit.
VI. Troubleshooting Table
As you use your microscope, you may occasionally experience a problem. The troubleshooting
table below contains the most frequently encountered problems and their possible causes.
Optical and Operating Problems
Problem Possible Cause
Lamp not installed properly
Filter slider in intermediate position
Phase slider not in click-stop position
Incorrect condenser mounting
Aperture diaphragm closed too far
Revolving nosepiece not clicked into position
Vignetting or uneven brightness in the
field of view or field of view only
partially visible
Optical path selector lever in intermediate position
(Mod. AE21 only)
Aperture diaphragm closed too far
Dust or dirt in field of view
Dust or dirt on specimen’s surface
Page 12

11
Brightfield objective being used
Phase annular diaphragm not in optical path
Phase annular diaphragm and objective phase
symbol do not match
Slider annular ring image has moved away from the
objective phase plate image
Image quality:
No image under phase contrast or details
cannot be viewed
Thickness of specimen holder is outside the
compensating range of objective
Interpupillary distance not adjusted
Diopter adjustment not made
Inadequate illumination
Eye strain or fatigue
Field of view of left and right eyepiece differ
Electrical
Problem Possible Cause
Power supply not plugged in
Lamp not installed
Lamp does not light
Lamp burnt out
Inadequate brightness Specified lamp not being used
Page 13

12
Lamp blows out immediately Specified lamp not being used
Connectors are not securely connected
Lamp near end of service life
Lamp flickers
Lamp not securely plugged into socket
VII. Care and Maintenance
1. Lenses and Filters
● To clean lens surfaces or filters, first remove dust using an air blower. If dust still persists, use
a soft/clean brush or gauze.
● A soft gauze or lens tissue lightly moistened with pure alcohol should only be used to remove
grease or fingerprints.
● Use petroleum benzine to clean immersion oil.
● Use petroleum benzine only to remove immersion oil from objective lenses.
● Because petroleum benzine and absolute alcohol are both highly flammable, be careful
handling around open flame.
● Do not use same area of gauze or tissue, to wipe more than once.
2. Cleaning of Painted or Plastic Components
● Do not use organic solvents (thinners, alcohol, ether, etc.) doing so could result in
discolouration or in the peeling of paint.
● For stubborn dirt, moisten a piece of gauze with diluted detergent and wipe clean.
3. When Not in Use
● When not in use, cover the instrument with vinyl dust cover and store in a place low in
humidity where mould is not likely to form.
● Store the objectives, eyepieces and filters in a container or desiccator with drying agent.
Page 14

Page 15

 Loading...