

mothercare Xtreme User Manual
xtreme
user guide
IMPORTANT! KEEP FOR FUTURE REFERENCE,
IMPORTANT ! CONSERVER POUR RÉFÉRENCE ULTÉRIEURE, WICHTIG! ZUR
SPÄTEREN VERWENDUNG AUFBEWAHREN, ΝΑ ΦΥΛΑΣΣΕΤΑΙ ΓΙΑ ΜΕΛΛΟΝΤΙΚΗ
ΑΝΑΦΟΡΑ
ŹRÓDŁO INFORMACJI NA PRZYSZŁOŚĆ, ВАЖНО! СОХРАНЯЙТЕ ЭТИ ИНСТРУКЦИИ
ДЛЯ БУДУЩИХ СПРАВОК, ¡IMPORTANTE! GUARDAR PARA FUTURAS CONSULTAS,
ÖNEMLİ! GELECEKTE REFERANS OLMASI AMACIYLA SAKLAYINIZ.
,
,
WAŻNE! ZATRZYMAĆ JAKO PRZYDATNE
!.
1
Read these instructions carefully before use and keep them for future reference.
Your child's safety may be affected if you do not follow these instructions.
This vehicle is intended for one child from birth (0 months) and up to a maximum
weight of 15 kg. This vehicle is designed to carry one child only.
Safe travelling advice for you and your baby
Pushchairs are an ideal way of transporting your baby. It is important to
remember however, that during their first six months, babies should be spending
most of their day lying flat for comfort and development
important information, , informations importantes, Wichtige
Informationen, σηµαντικές πληροφορίες, , ważna Informacja, важная
информация, información importante, Önemli bilgi.
introduction
?
© Mothercare UK Ltd. 2010
2
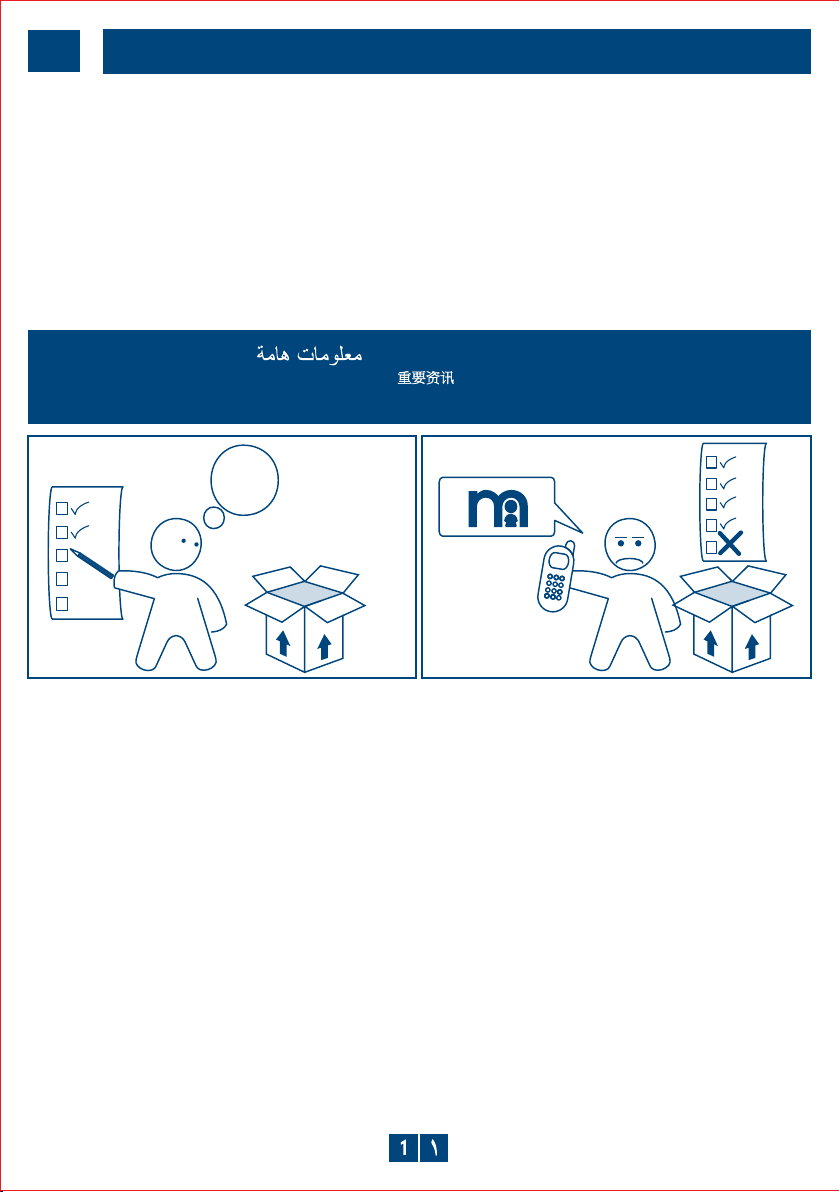
parts check list
fig 1a
Xtreme chassis with hood
and shopping basket
fig 1b
Clear plastic Weathershield™
fig 1c
Detachable bumper bar
fig 1d
2 rear wheels, 1 front wheel
fig 1e
Front footplate, 4 screws.
Fabric pack 3 screws with
sadle washers.
fig 1f
Cosy toes
fig 1g
Tyre Pump
3
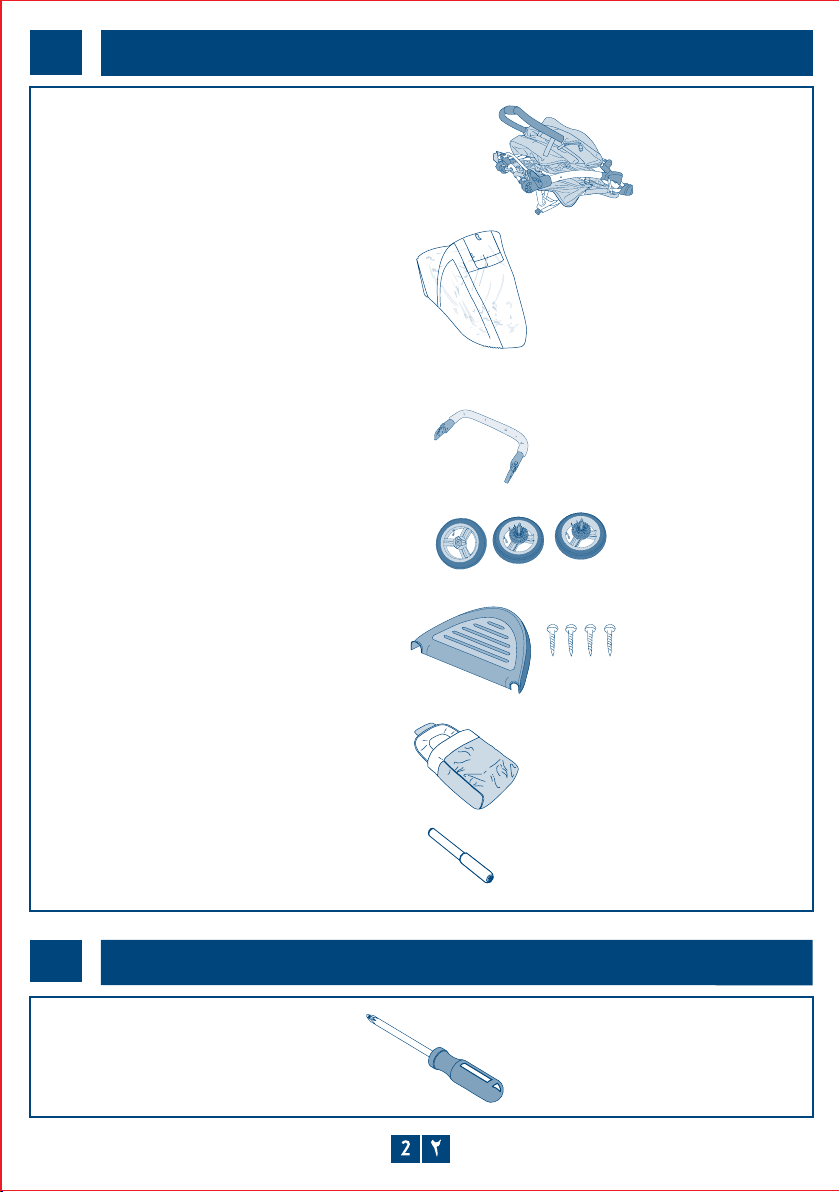
tools for assembly
Tools needed:
crosshead screwdriver
© Mothercare UK Ltd. 2010
4
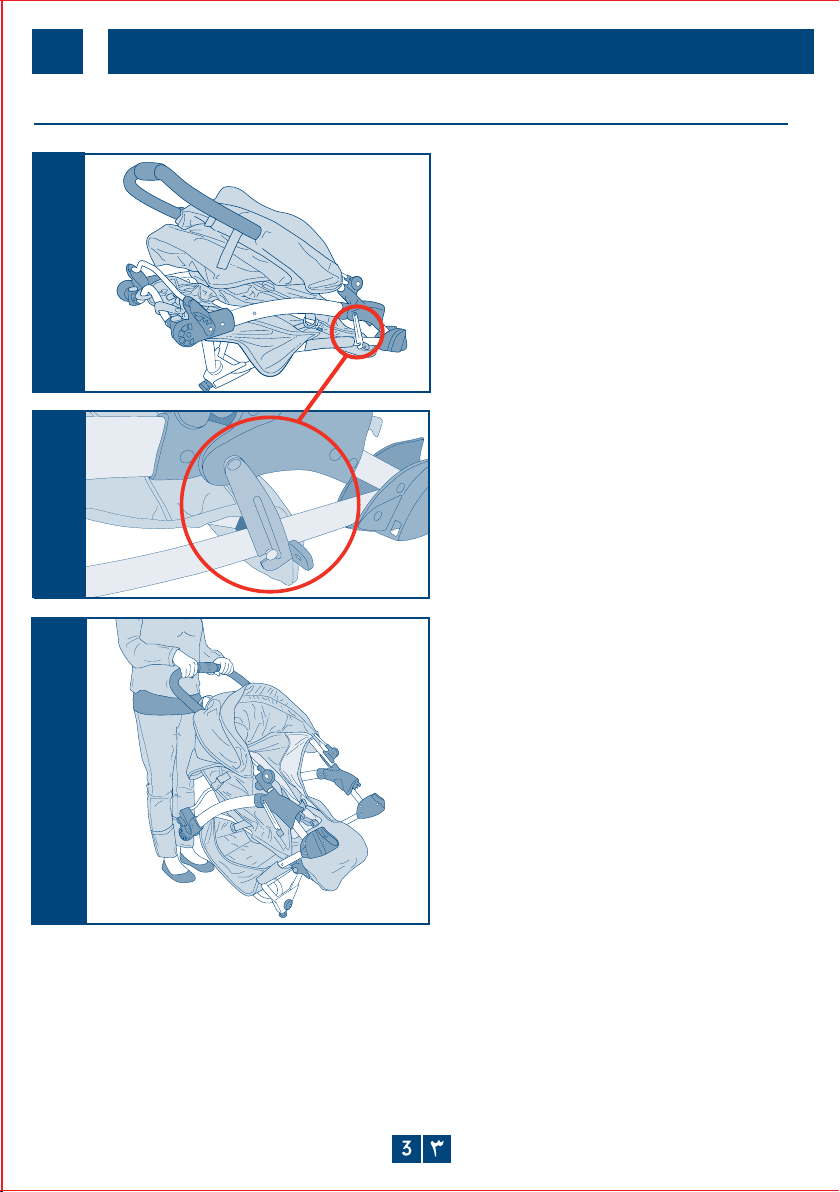
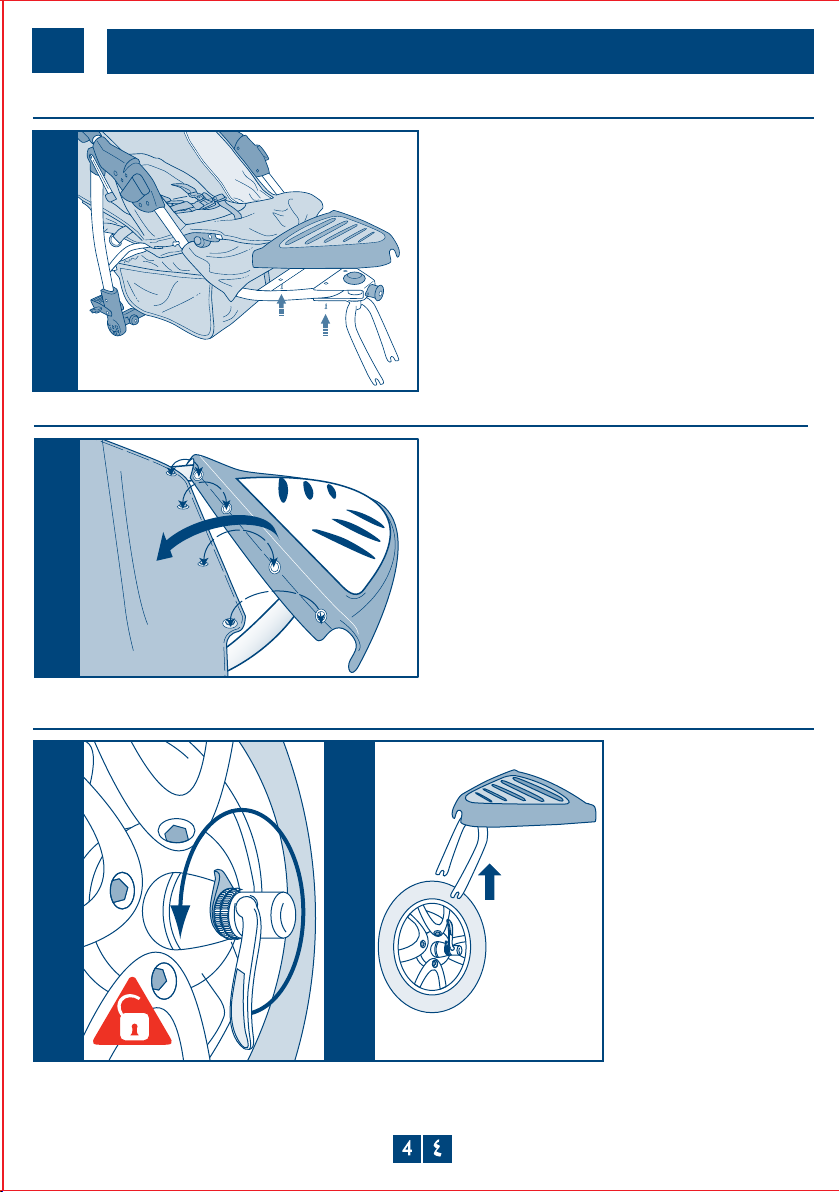
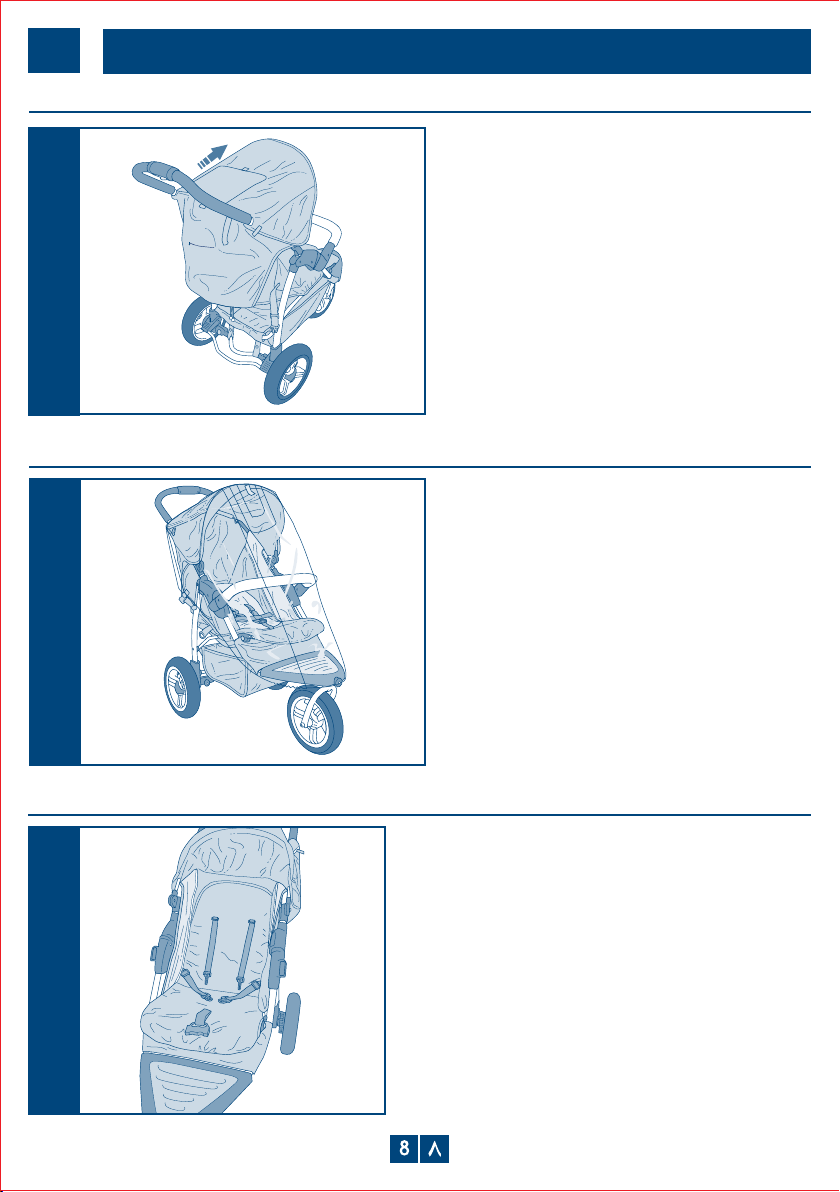
preparation for use
unfolding the chassis
fig 2
Remove all packaging materials from the
chassis. Lay the chassis on the floor with the
seat facing upwards and the handlebar
facing towards you.
fig 3
fig 4
Unfasten the folding latch on the side of the
chassis. There is only one.
Unfold the three wheeler by lifting the
handle upwards. As the three wheeler opens,
keep lifting the handlebar until you hear a
click and the locks on both sides are fully
engaged.
© Mothercare UK Ltd. 2010
4
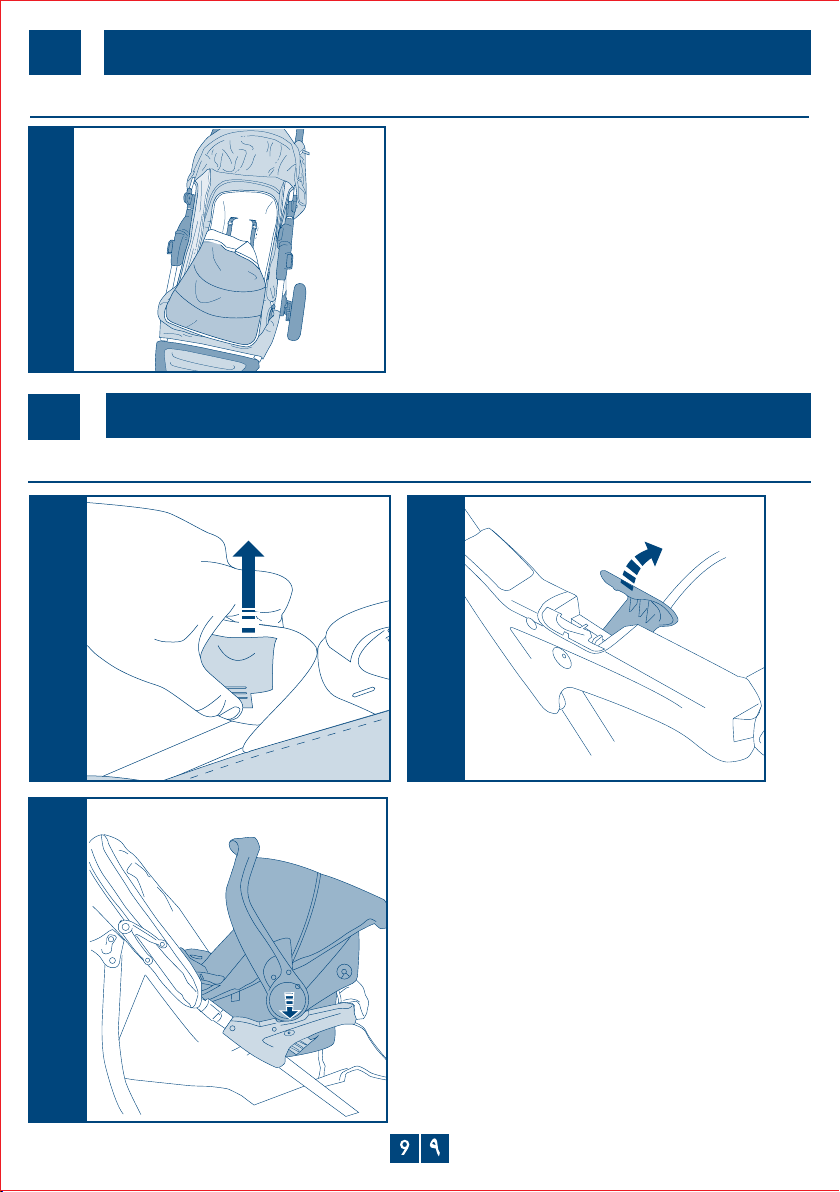
preparation for use
fitting the foot plate
fig 5
fitting the fabric to the foot plate
fig 6
fitting the front wheel
fig 7
fig 7a
Fit the footplate and secure using the
4 screws supplied.
Fit the fabric to the footplate and secure using
the 4 poppers.
Unscrew the quick release
lever enough so the wheel
can be fitted to the forks.
Ensure that the quick
release nut and lever are
past the out turn of the
fork, and that the plastic
cones are on the inside of
the fork.
© Mothercare UK Ltd. 2010
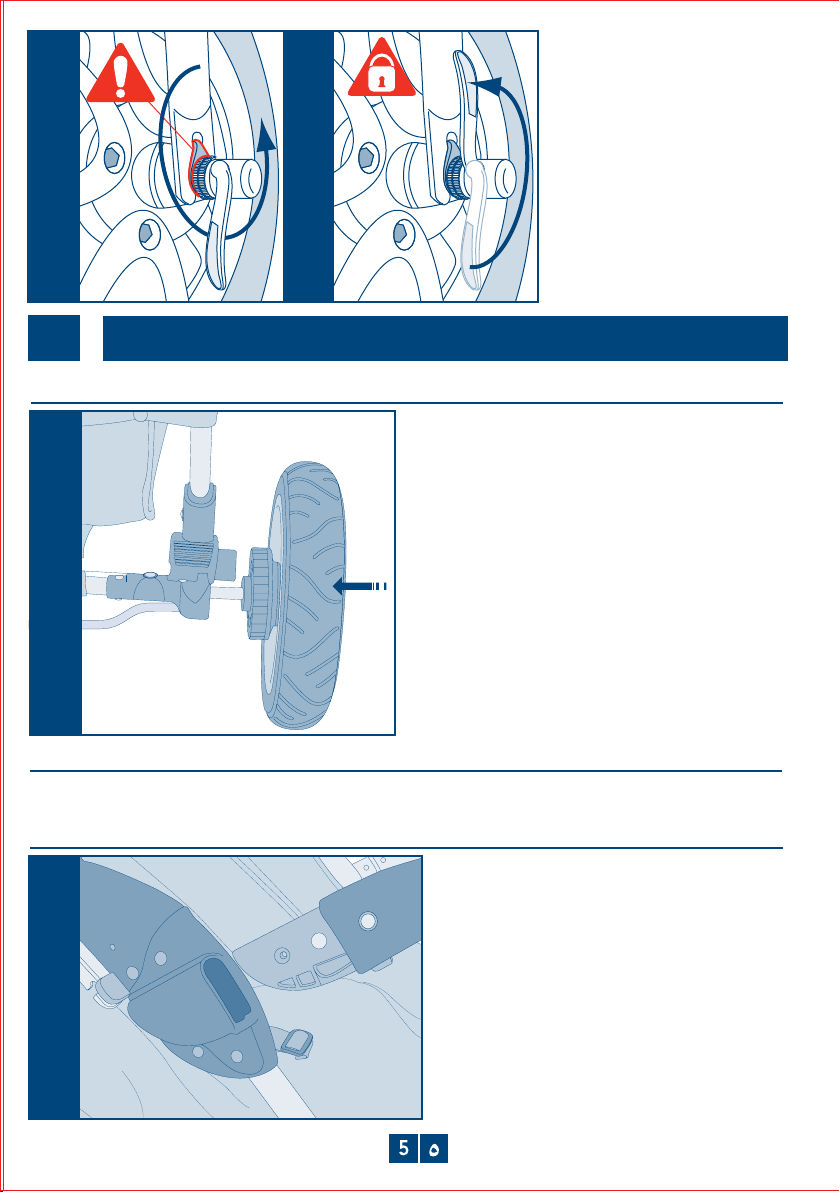
fig 7b
fig 7c
With the quick release lever open,
tighten in a clockwise direction
untill wheel is secure. Rotate the
lever from the open position to the
close firmly lock wheel in place.
4
preparation for use
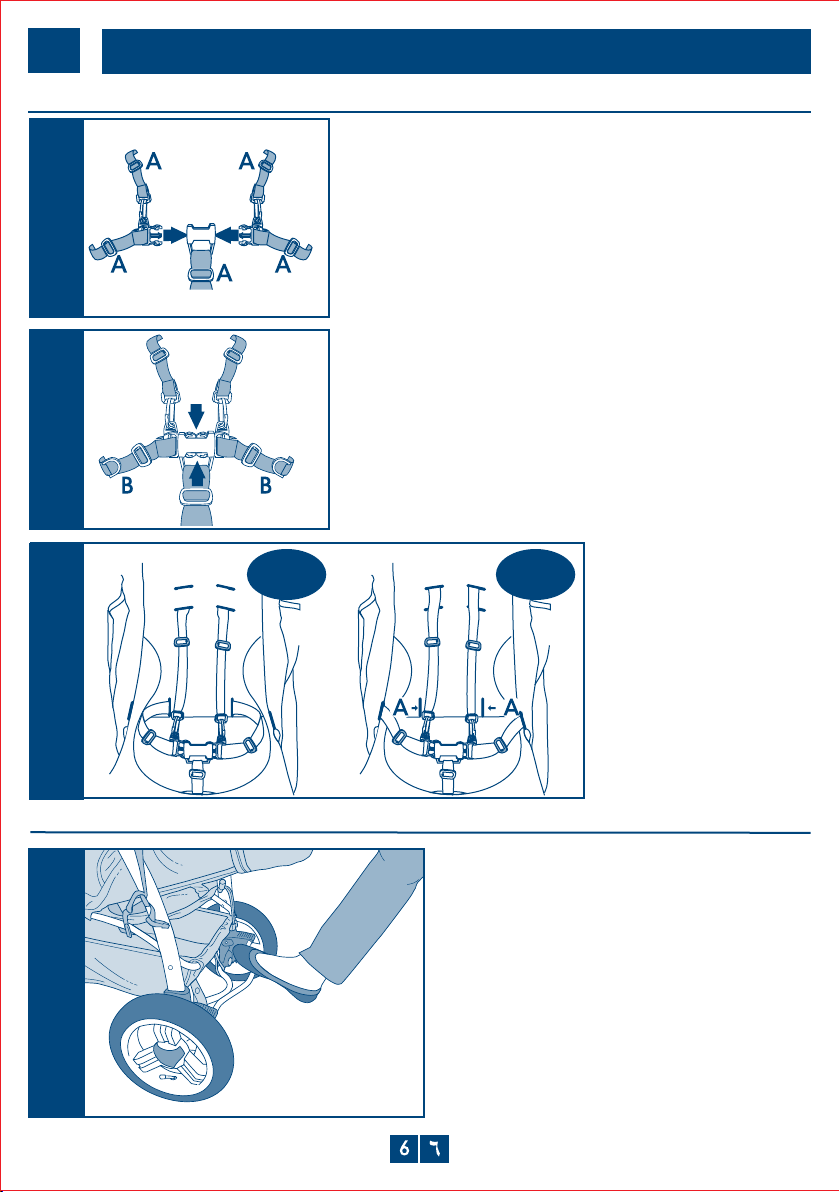
fitting the rear wheels
fig 8
Insert the spindle on each wheel into the
wheel joint. When fully in, pull gently on each
wheel to check that they are secure.
pumping up the tyres
The tyre pump is secured in the shopping basket. The three-wheeler’s tyres are supplied only partially
inflated. Inflate tyres until firm. Do not over inflate them.
attaching the bumper bar
fig 9
Insert the ends of the bumper bar into the
armrests. Check the bumper bar is securely
in place by pulling it.
To remove, press the release clips
(underneath the armrests) on both sides and
pull out.
© Mothercare UK Ltd. 2010
5
harness
fig 10
in use
To fasten, insert both fasteners securely into
clasp. Adjust each strap length with buckles A.
fig 10a
fig 10b
operating the brake
fig 11
0-6
months
To release, press the fastener prongs and
pull apart. ‘D’ rings (B) are provided for fitting
a separate harness complying with BS6684
or EN 13210.
Warning. Ensure your child wears a correctly
fitting harness at all times.
6+
months
Push down firmly on the brake bar between
the rear wheels to engage the brake. Check
the brake is on by trying to gently push
the three-wheeler. Lift the brake bar up to
release.
IMPORTANT:
From 6 months and
upwards the waist straps
need to be removed
from the inner loops (A).
© Mothercare UK Ltd. 2010
5
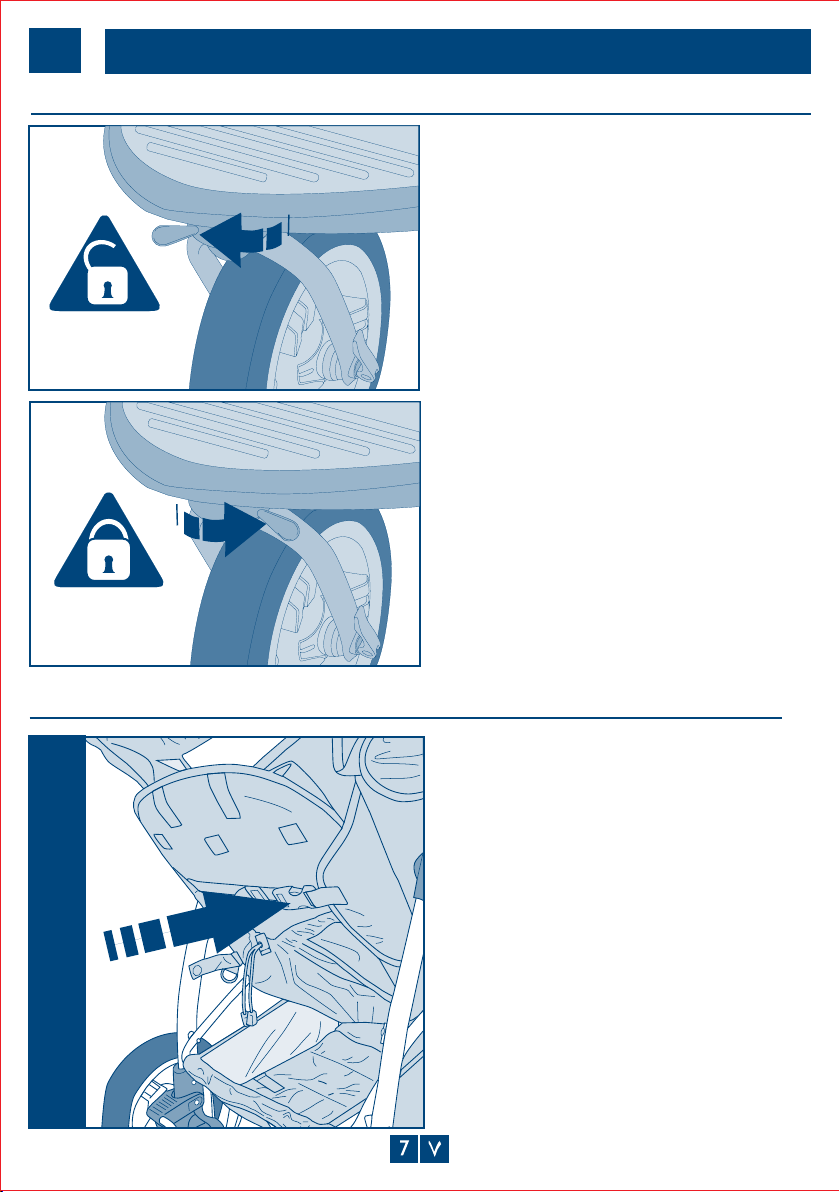
in use
adjusting the front wheel swivel
fig 12
fig 12b
reclining the seat
The front wheel can be locked to prevent
it from swivelling. It is recommended that
you do this when travelling across rough or
uneven ground.
To lock the front wheel, pull out the button
on the front of the footplate above the
front wheel. Twist the button until it clicks
and then push it back into place. The wheel
will no longer swivel. To unlock the wheel,
repeat these steps.
fig 13
The seat back can be lowered by pressing
the fastener prongs on the clasps and
releasing the straps. To raise the seat,
re-attach the clasp and pull the straps until
the desired seat height has been reached.
© Mothercare UK Ltd. 2010
5
hood
in use
fig 14
fitting the Weathershield™
fig 15
The hood can be pulled forward during use
to help protect your child from wind or bright
sunlight.
Fit the Weathershield™ on top of the hood.
The foot end of the Weathershield™ is
elasticated to fit around the footplate of the
three wheeler. There is an adjustable flap to
provide extra ventilation.
fitting the cosy toe
fig 16
Unclip the shoulder straps and undo the clasp,
so that the five harness straps are free. Unzip and
remove the front cover. Place the fleecy liner onto
the seat with the fastening flap at the top. Thread
the harness straps through the corresponding
holes in the liner. Fold the flap over the top of the
seat and press it down onto the velcro fastener.
Re-attach the harness straps to the clasp.
© Mothercare UK Ltd. 2010
5
in use
fitting the cosy toe
fig 17
6
for travel systems with an infant carrier
attaching the infant carrier
fig 18
The cosy toe cover can be zipped on when
required. The cover is optional and you should be
careful not use it indoors as this might lead to your
baby overheating.
fig 18a
fig 18b
open the covers on each armrest
Attach the infant carrier as shown,
ensure the infant carrier is correctly
located into the adaptors on the
armrests.
© Mothercare UK Ltd. 2010
6
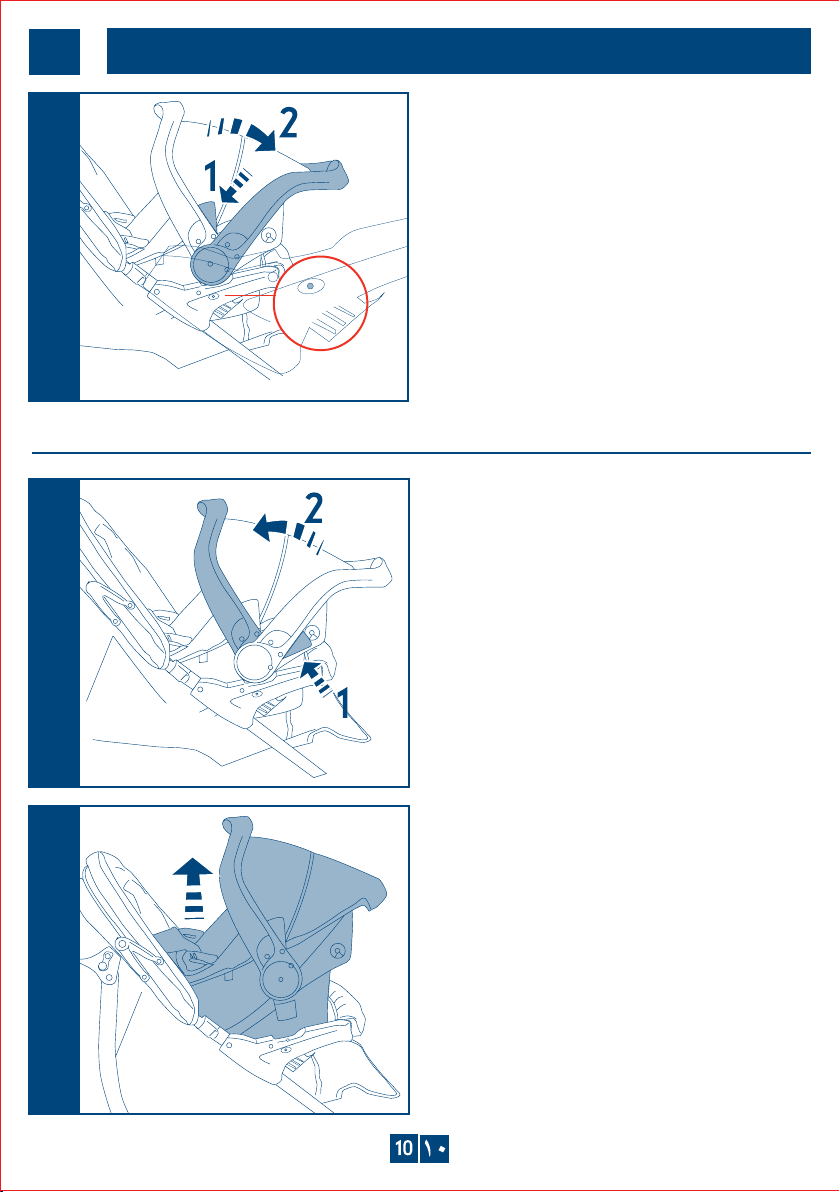
for travel systems with an infant carrier
fig 19
removing the infant carrier
fig 20
Lock the infant carrier to the pushchair
by depressing the handle release
buttons and rotating the handle to the
position shown.
Check the indicators on both sides of
the pushchair are green to confirm the
infant carrier is fitted correctly.
If any of the indicators on the pushchair
or the infant carrier are red then
remove the infant carrier and re-attach
Press the release buttons on either
side of the infant carrier and raise the
handle to the upper position.
Ensure the safety indicators on both
sides of the handle are green.
fig 21
Lift Infant carrier away from adaptors.
10
© Mothercare UK Ltd. 2010
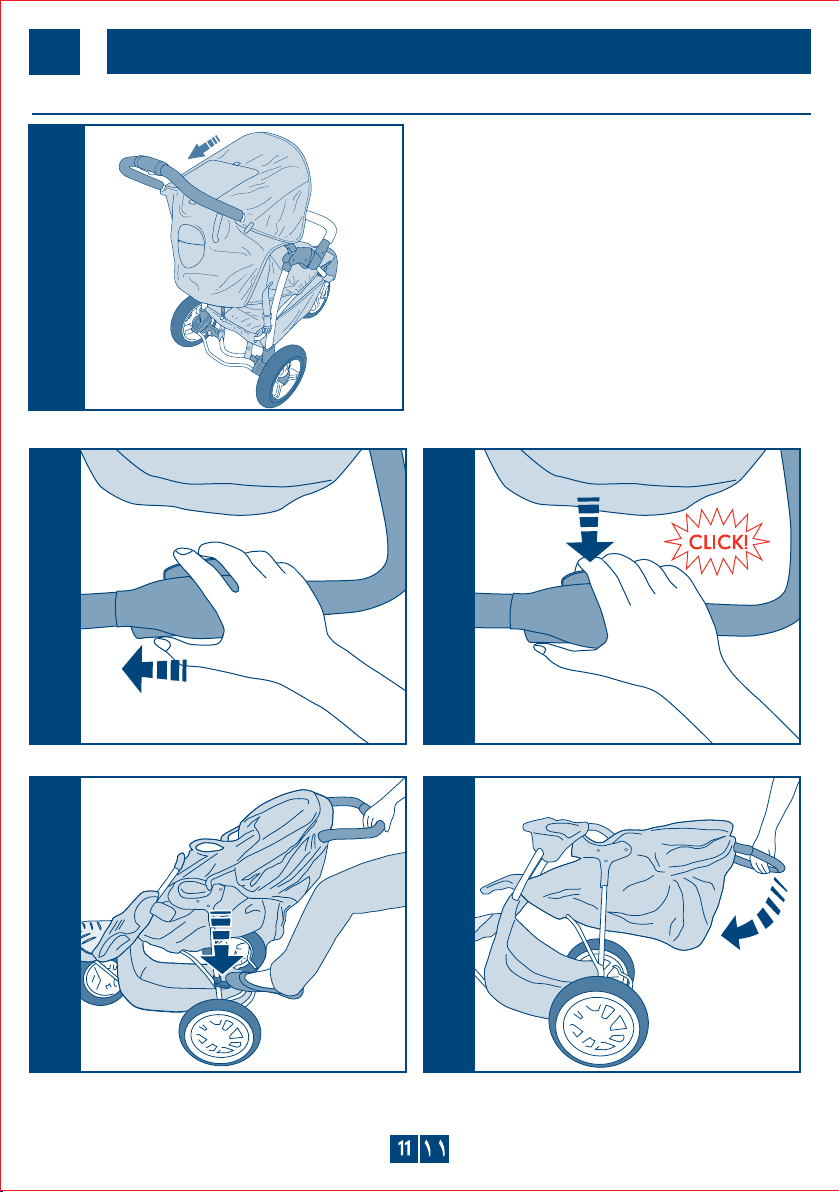
6
after use
folding the three-wheeler
fig 22
fig 23a
Engage the brake and remove the
Weathershield™ if fitted. Push the hood back.
Make sure that the seat backs are in the
reclined position and that the shopping
basket is empty. Place the front wheel on
swivel and lay it sideways.
fig 23b
fig 23c
fig 23d
© Mothercare UK Ltd. 2010

6
after use
folding the three-wheeler
fig 24
fig 25
Engage the folding latch before carrying the
three-wheeler.
The rear wheels of the axle have been
designed to be easily removable for more
compact storage. Pull the release button
next to each wheel joint and pull the wheel
away from the chassis.
7
BRAKE BAR:
Adjusting the tightness of the bolts securing the brake bar brackets will modify the ease of
movement of the brake bar. The bolts should be adjusted evenly on both brackets using a
cross-headed screwdriver and an 8mm open-ended spanner.
FOLDING MECHANISM:
The mechanism should be lubricated at intervals to
avoid stiffness in use. Water-dispersing type spray
lubricant is suitable. Apply the spray to the moving parts
inside the mechanism. Take care not to get any of the
spray on the fabric parts of the three-wheeler. Wipe off
any excess immediately to prevent staining.
handy hints
© Mothercare UK Ltd. 2010
8
looking after inflatable tyres
introduction
Inflatable tyres offer a level of comfort and smoothness that solid tyres cannot match, but as with
car and bicycle tyres, they are susceptible to occasional punctures.
There are obvious hazards to avoid when using your three wheeler e.g. thorns, nails, broken glass
etc, but punctures can also occur if the tyres are too soft and are pinched between the rim and a
hard object.
Like most bicycle tyres, three wheeler tyres are fitted with inner tubes. If these are punctured, they
tend to deflate quickly because of their small size – the smaller they are, the quicker they will go
down when punctured.
After-sales accessories are available from cycle shops to help reduce the
but it is advisable to carry a few basic tools to use in the event of a puncture. See the check list on
the following page.
likelihood of punctures,
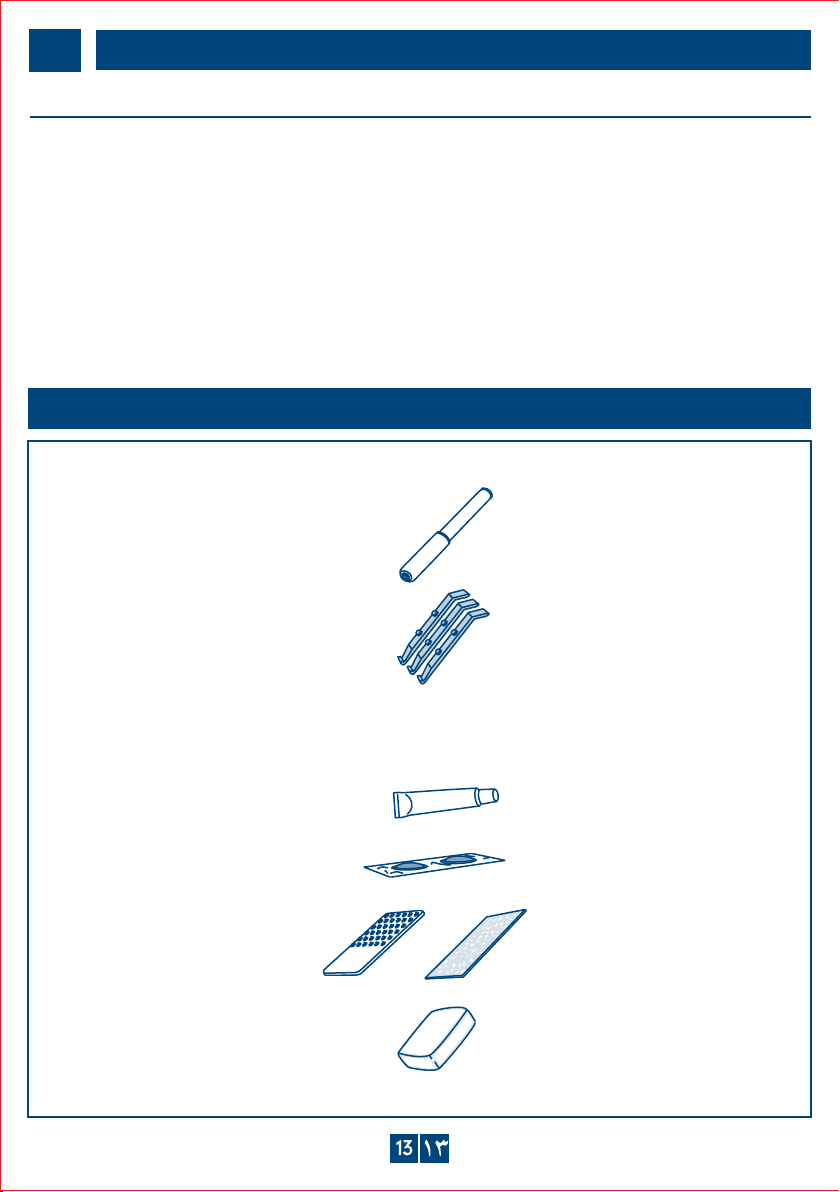
check list
fig 26
Tyre pump
Suitable for a Schrader valve
fig 27
Set of 2 or 3 tyre levers
Preferably plastic
Puncture repair kit including
fig 28
Tube of rubber solution
fig 29
Patches Preferably
‘feather or taper’ edged
fig 30
Grater or Sandpaper
fig 31
Chalk
© Mothercare UK Ltd. 2010
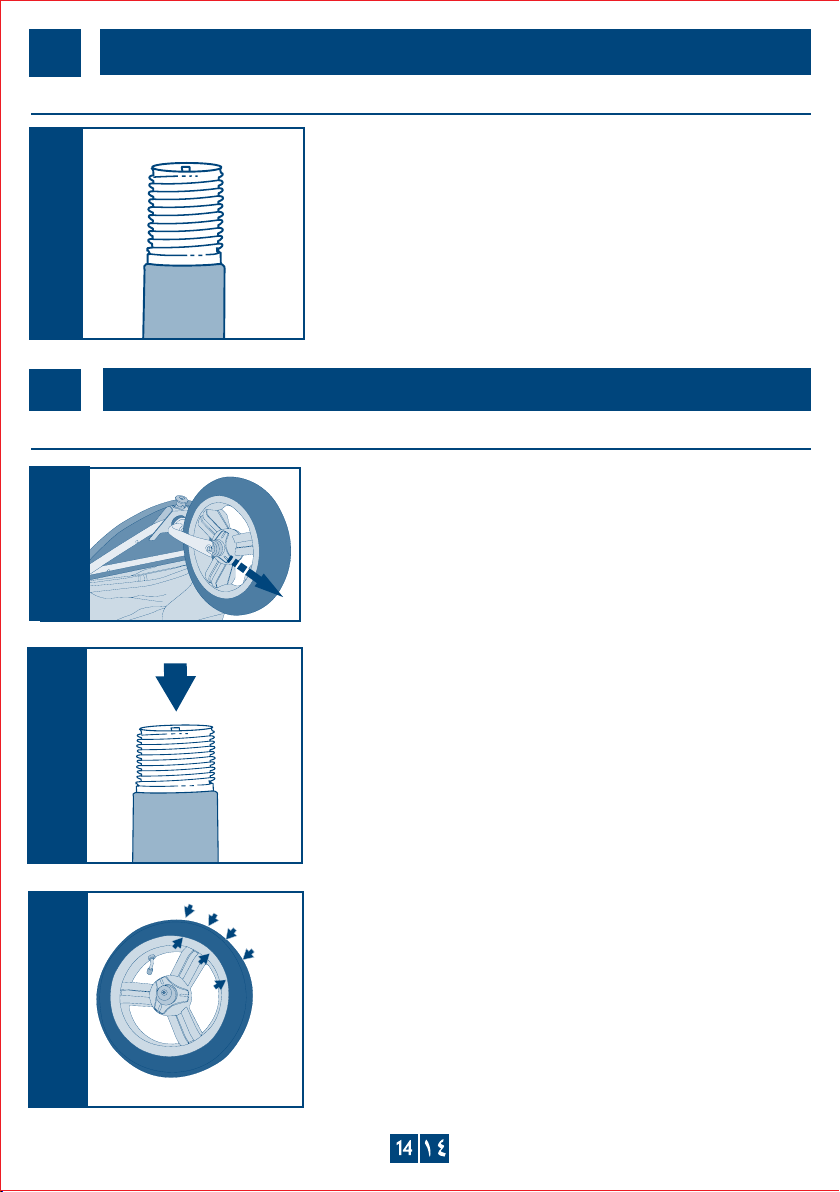
8
looking after inflatable tyres
valve type
fig 32
9
repairing a puncture
removing the tyre
fig 33
fig 34
This three wheeler uses a Schrader valve, this is the most
common type of tyre valve.
Remove the wheel with the punctured tyre using any
necessary tools.
To make the tyre easier to get off the wheel, ensure all the air
is out of the inner tube. Remove any valve caps, then press
on the pin in the centre of the valve.
fig 35
Squeeze the sides of the tyre together all the way around
the wheel to unseat the tyre sidewalls from the wheels rim.
© Mothercare UK Ltd. 2010
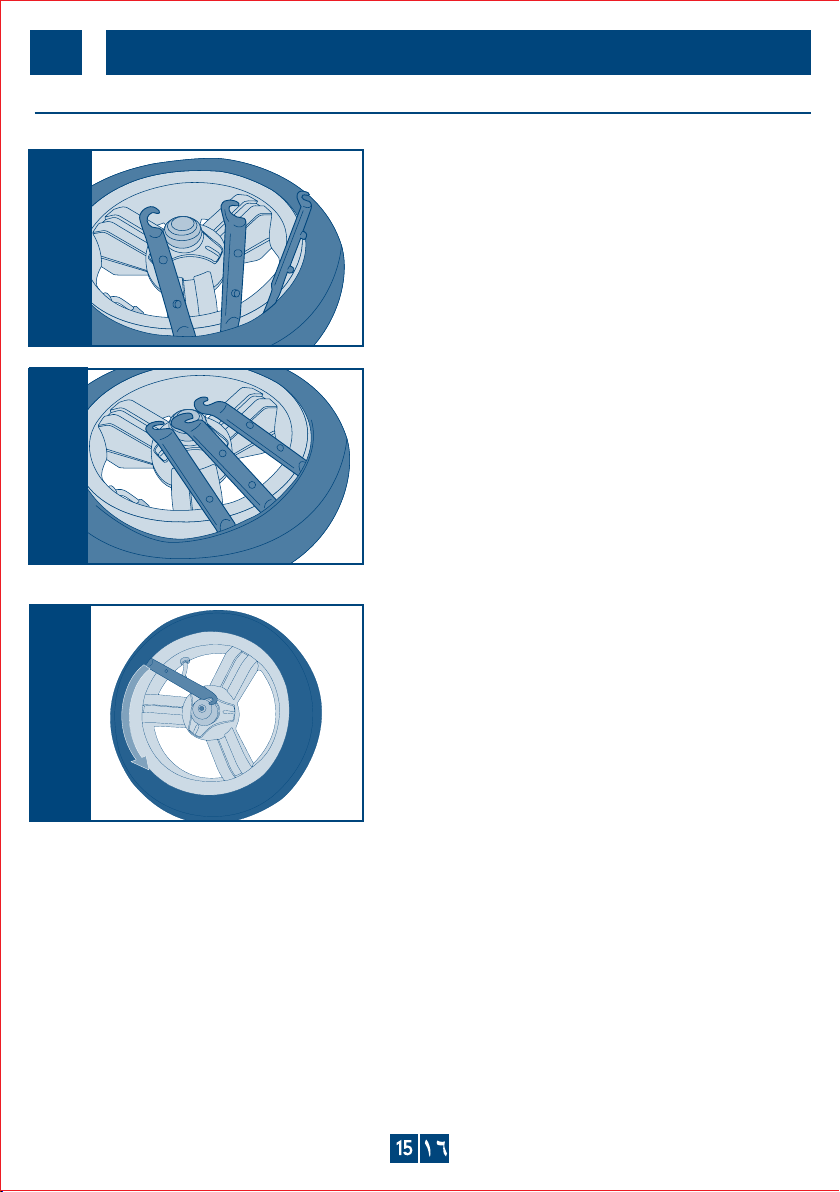
9
repairing a puncture
removing the tyre
fig 36
fig 37
fig 38
Insert the ends of the tyre levers under one side of the
tyre each a few centimetres apart.
One by one pull each lever down toward the spokes
of the wheels. The tyre will be pulled above the rim
of the wheel.
Slide one of the levers all the way around the
remainder of the wheel rim to pull out the rest of the
tyre. To remove the inner tube ensure that the valve
has been pushed through the wheel rim. Pull the
inner tube clear and put it safely to one side.
Completely remove the tyre from the wheel, using
the tyre levers if necessary.
© Mothercare UK Ltd. 2010
9
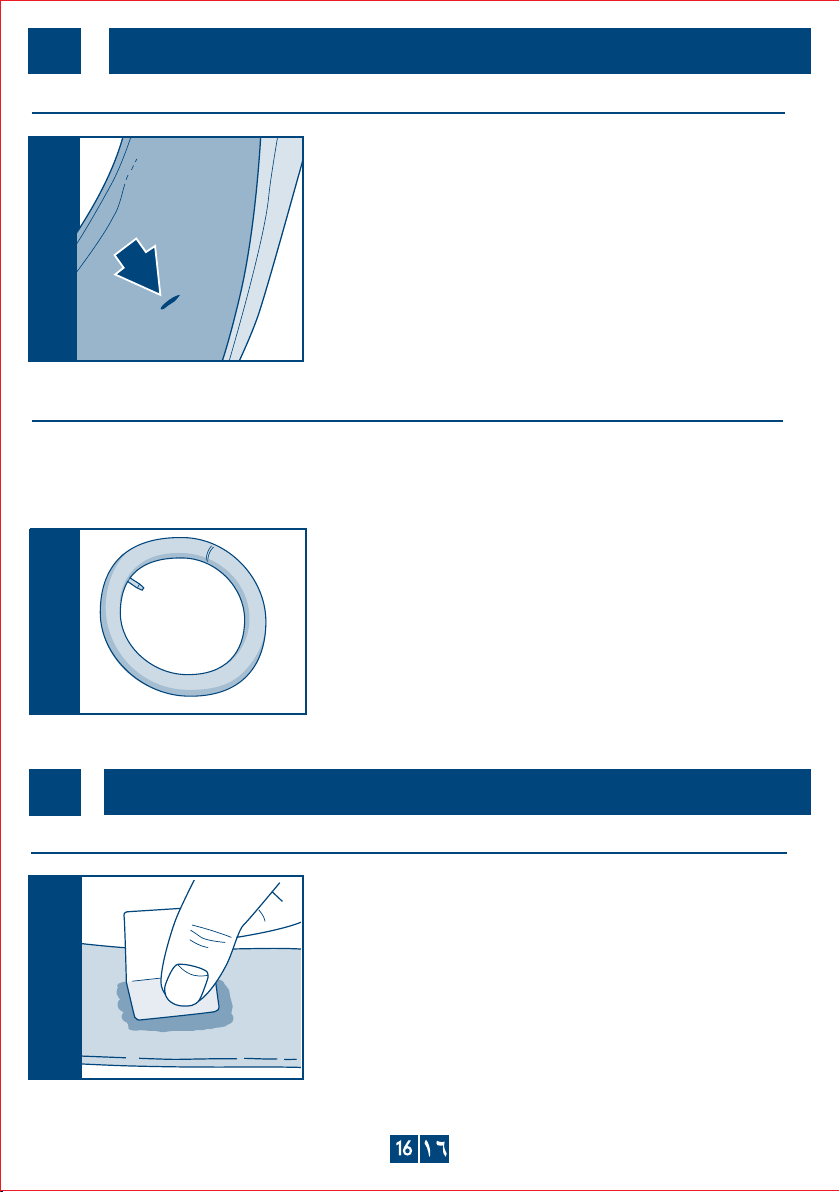
repairing a puncture
identify the cause
fig 39
Inspect the tyre, inside and out, for the cause of the puncture.
It may help to run your fingers around the inside of the tyre
but this should be done slowly and carefully as the object
that caused the puncture may still be sticking through the
tyre.
If there are any objects in the tyre remove them. If none are
found the puncture may have been caused by the tyre being
too soft and the inner tube becoming pinched between the
rim and a hard object.
repair the inner tube
WARNING: Rubber solution is flammable and gives off a strong vapour. It should only be used in
a well-ventilated area, away from heat sources. It may also cause skin irritation, so appropriate
protective clothing should be worn.
fig 40
Partly inflate the inner tube and listen carefully for airleaks.
Immersing the partly inflated tube in a bucket of water will
help locate small holes and valve leaks.
9
repairing a puncture
repair the inner tube
fig 41
Once the hole has been located roughen an area of
approximately 2cm all around the hole using the grater or
sandpaper from the puncture repair kit.
© Mothercare UK Ltd. 2010
9
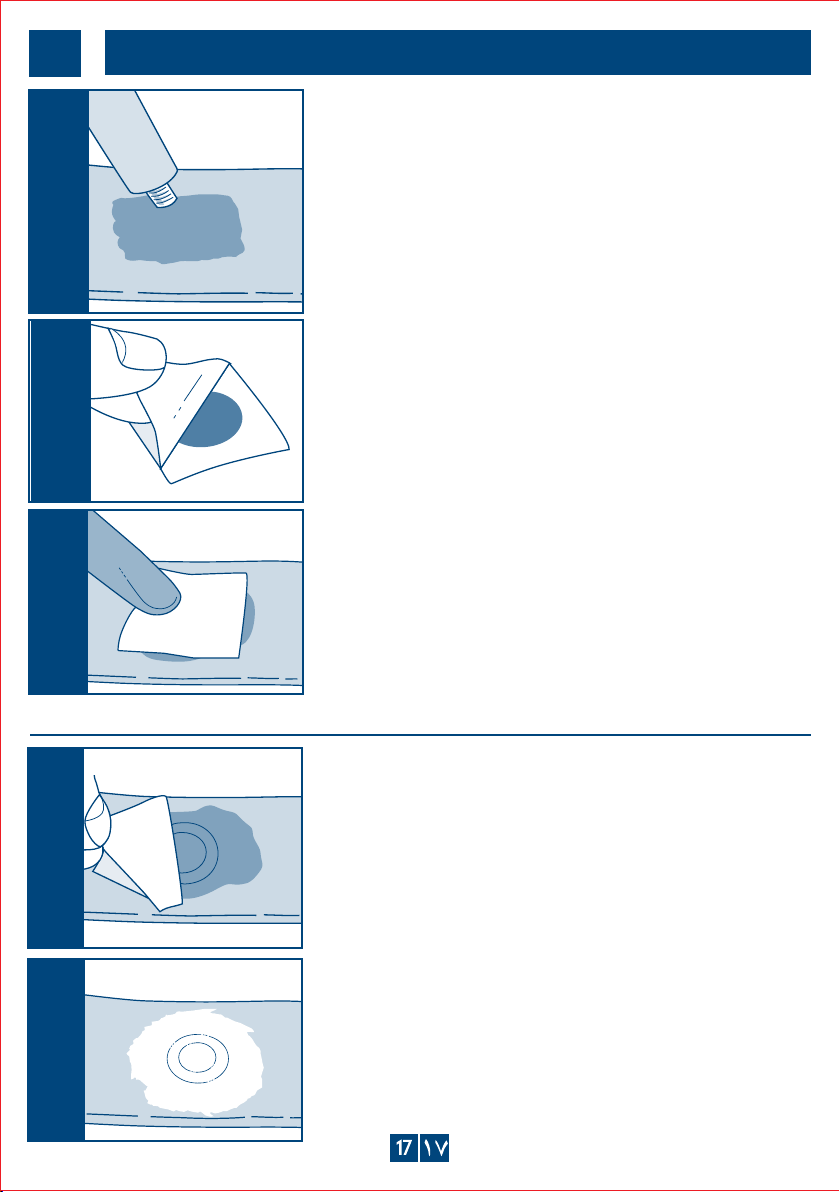
repairing a puncture
fig 42a
fig 42b
fig 42c
Smear a thin layer of rubber solution over the roughened
area. Less is better as it gives the best patch adhesion.
Wait around 5 minutes until the rubber solution is ‘touch dry’.
Cut one patch from the strip and remove the FOIL backing only.
Press the patch firmly over the hole and onto the ‘touch dry’
rubber solution. Then rub on the backing paper firmly until
the patch is securely attached.
repair the inner tube
fig 43a
fig 43b
Carefully peel the backing paper off the patch, without
lifting the rubber patch.
Grate some chalk over the patch area and rub the powder
around the patched area. This prevents the patch or rubber
solution sticking to the inside of the tyre when refitted.
© Mothercare UK Ltd. 2010

9
repairing a puncture
refitting the tyre
1. .yrassecenfisrevelerytehtgnisu,mirleehwehtrevokcaberytehtfoedisenotiF
2. hsupneht,elohehthguorhtevlavebutrenniehthsup,elohevlavehtmorfyawaerytehthsuP
the rest of the tube inside the tyre.
3. ehtgnisu,mirleehwehtotnokcaberytehtfoedisrehtoehttifdnaecalpnievlavehtdloH
tyre levers if necessary. Care must be taken not to pinch the tube under the end of the lever or
trap it under the tyre as this could cause further punctures.
4. leehwehtnoerytehtfosllawedisehttaesoterytehtetalfniYLTRAPdnapmupehttcennoC
rim. Check the valve is positioned correctly.
5. nidednemmocererusserpehtoterytehtetalfni,mirleehwehtnodetaesyllufsierytehtecnO
the user guide or on the sidewall of the tyre.
6. If valve caps are available, re-fit them to keep dirt out of the valve.
© Mothercare UK Ltd. 2010

safety & care notes
IMPORTANT! KEEP FOR FUTURE
REFERENCE: READ CAREFULLY
• WARNING It may be dangerous to leave your child unattended.
• WARNING Ensure that all the locking devices are engaged before use.
• WARNING Do not add an additional mattress to the pushchair.
• WARNING Ensure your child wears a correctly fitting harness at all times.
• WARNING Any load attached to the handle affects the stability of the pram/
pushchair.
• WARNING Always use the crotch strap in combination with the waist belt.
• WARNING Check that the pram body or seat unit attachment devices are
correctly engaged before use.
• WARNING This product is not suitable for running or skating.
• For extra safety, D-rings are provided for the attachment of a separate safety
harness approved to BS 6684 or BS EN 13210.
• Ensure children are clear of moving parts before making adjustments to the
pushchair.
• Overloading, incorrect folding and the use of non-approved accessories is
unsafe and may damage or break this pushchair.
• Do not allow your child to climb unassisted into the pushchair. Apply the
brake before putting your child into the pushchair.
• Never leave a rain cover hood or apron on indoors, in a hot atmosphere or
near a heat source as your child may overheat.
• Do not overload this pushchair with additional children, goods or accessories.
• Bags and other items should not be hung from the handles as this can affect
the stability of the pushchair.
• Always apply the parking brake when the pushchair is stationary.
• Ensure the parking brake is engaged during the loading and unloading of
children.
• Be careful when going up or down kerbs. Remove your child and fold the
pushchair when going up or down stairs or escalators.
• Don’t let children play with or hang on the pushchair.
• Do not use parts or accessories which are not approved by the manufacturer.
• If your pushchair is used by someone unfamiliar with it e.g. Grandparents,
always show them how it works.
• Do not use this pushchair near an open fire or exposed flame.
• Take extra care in windy conditions.
• This pushchair complies with BS EN 1888:2003
• To prevent damage, remove the weathershield before folding the pushchair.
• Do not place anything on top of the weathershield.
• To prevent your child overheating, always fold or remove the weathershield
when indoors or in warm environments.
• A basket is provided for the carriage of 2kg of items evenly distributed.
© Mothercare UK Ltd. 2010

Care of your product
• Your pushchair requires maintenance by you.
• Regularly inspect the locks, brakes, harness, catches, seat adjusters, joints
and fixings to ensure they are secure and in full working order.
• Brakes, wheels and tyres do wear and should be replaced if necessary.
This can be arranged through your local Mothercare store.
• If parts become stiff of difficult to operate, ensure dirt is not the cause, then
try a light application of a silicon lubricant, ensuring it penetrates between
the components. Regular lubrication of moving parts will extend the life of
your pushchair and make opening and folding easier.
• Plastic and metal parts may be sponged lightly using warm water and a
mild detergent. dry thoroughly before storing.
• Refer to sewn in labels for fabric care instructions.
• Never clean with abrasive, ammonia based, bleach based or spirit type
cleaners.
• After exposure to damp conditions, dry off with a soft cloth and leave fully
open in a warm environment. Storing damp will encourage mildew to form.
• Store in a dry place
• Do not leave in sunlight for prolonged periods - some fabrics may fade.
• Your pushchair should be serviced and reconditioned before using it for a
second baby, or within 18 months, whichever is the sooner. This can be
arranged by your local Mothercare store.
• The Weathershield™ can be cleaned by sponging with warm water and a
mild detergent.
• Never clean with abrasive, ammonia based, bleach based or spirit type
cleaners.
• Never store this cover where heat may distort the Weathershield™.
• Make sure that the pressure of all the tyres is correct. This means that the
pushchair will ride more easily and prevents damage to turning and hinged
parts.
• Inflate rear tyres to a maximum pressure of 26PSI (1.8Bar). The tyres are
equipped with a 'Car type valve' and can be inflated using the pump provided.
© Mothercare UK Ltd. 2010

replacement parts available
Your child’s safety is your responsibility
If you have a problem with this product or require replacement parts, please contact your
nearest Mothercare store or telephone the Mothercare Customer Care Line on
08453 30 40 30.
Alternatively write to:
Customer Care
Mothercare
Cherry tree road
Watford
Herts. WD24 6SH
www.mothercare.com
© Mothercare UK Ltd. 2010

© Mothercare UK Ltd. 2010

© Mothercare UK Ltd. 2010
 Loading...