

mothercare my4 User Manual
Importante. Retenga para
referencia futura
Important. Keep for
future reference
mothercare
user guide
guia para usuario

2
IMPORTANT: Read these instructions carefully before use and keep them for future
reference. Your child’s safety may be affected if you do not follow these instructions.
This vehicle is intended to carry a single child in an upright or reclined position from
birth and up to a maximum weight of 15kg. Use original accessories and manufacturer
approved parts only. A basket is supplied to carry a maximum of 4.5kg (9.9lbs) of
shopping and other baby items, evenly distributed. Built in adaptors enable Travel Tot
car seat to be fitted to the pushchair.
Warning! This product is not suitable for running or skating.
This product conforms to BS EN1888:2003
Safe travelling advice for you and your baby
Pushchairs are an ideal way of transporting your baby. It is important to remember
however, that during their first 3 months, babies should be spending most of their day
lying flat for comfort and development.
IMPORTANTE: Lea las instrucciones detenidamente antes de su uso y guárdelas para
una consulta futura. Si no sigue estas instrucciones, la seguridad de su hijo podrá
verse afectada.
Este vehículo ha sido creado para transportar a un solo niño en posición horizontal
o reclinada desde 0 años y con 15 kg de peso como máximo. Utilice exclusivamente
accesorios originales y piezas aprobadas por el fabricante. Además, el cochecito
incorpora una cesta que puede aguantar un máximo de 4,5 kg de artículos de
bebé o de la compra,distribuidos de manera uniforme. Gracias a los adaptadores
integrados, es posible acoplar al cochecito la silla de auto Travel Tot.
¡Advertencia! Este producto no es adecuado para realizar carreras ni para patinar.
Este producto ha sido fabricado de conformidad con EN1888.
Consejo sobre el transporte seguro de usted y de su bebé:
Los cochecitos para niños representan un transporte ideal para llevar a su bebé.
Sin embargo, no debe olvidar que durante los tres primeros meses, los bebés
deben pasar la mayor parte del día tumbados sobre una superficie plana para su
comodidad y desarrollo.
introduction • introducción
1
3
Cot liner
Funda para la
tapicería
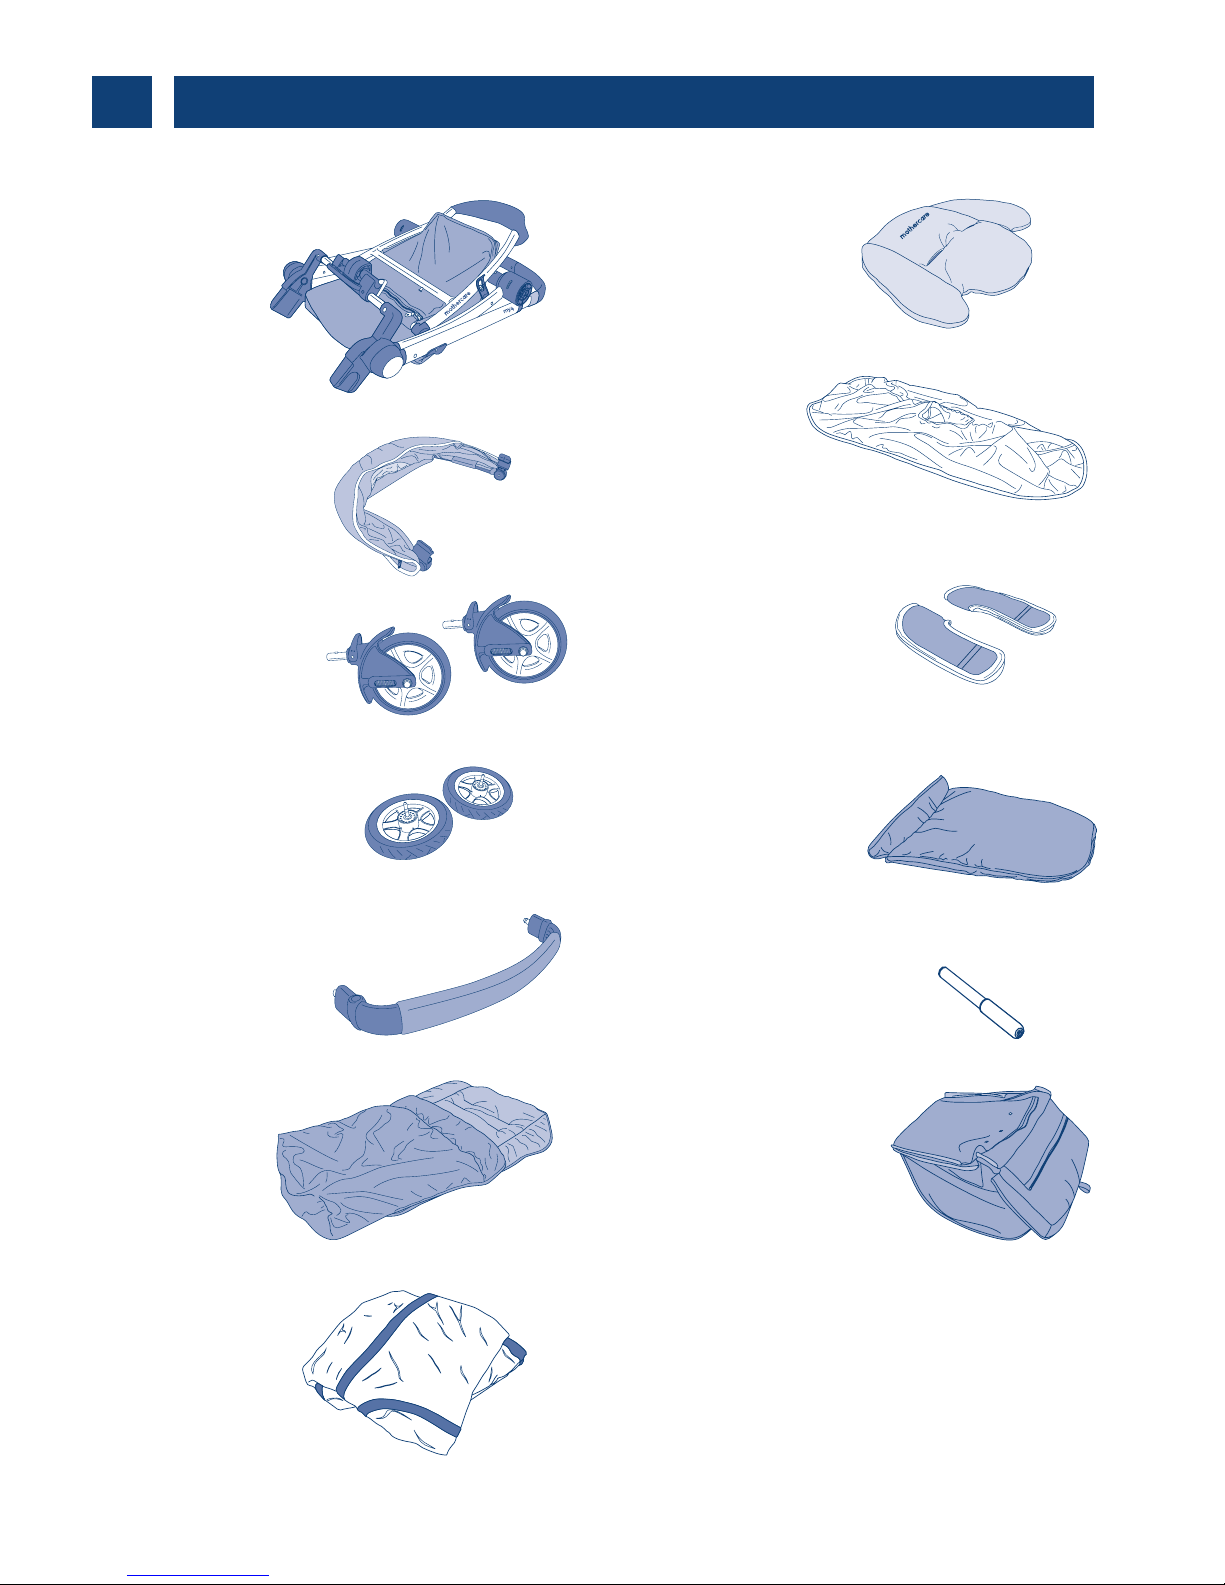
parts check list • cátalogo de piezas
2
Pram apron
Protector de cuco
Tyre pump
Bomba para inflar
Head hugger
Reposacabezas
Chassis
Chasis
Hood
Capota
2 Front wheels
2 Ruedas delanteras
Bumper bar
Barra de seguridad
Cosytoe
Saco
Harness pads
Fundas para arnés
Raincover
Impermeable
2 Rear wheels
2 Ruedas traseras
Shopping basket
Cesta de la compra
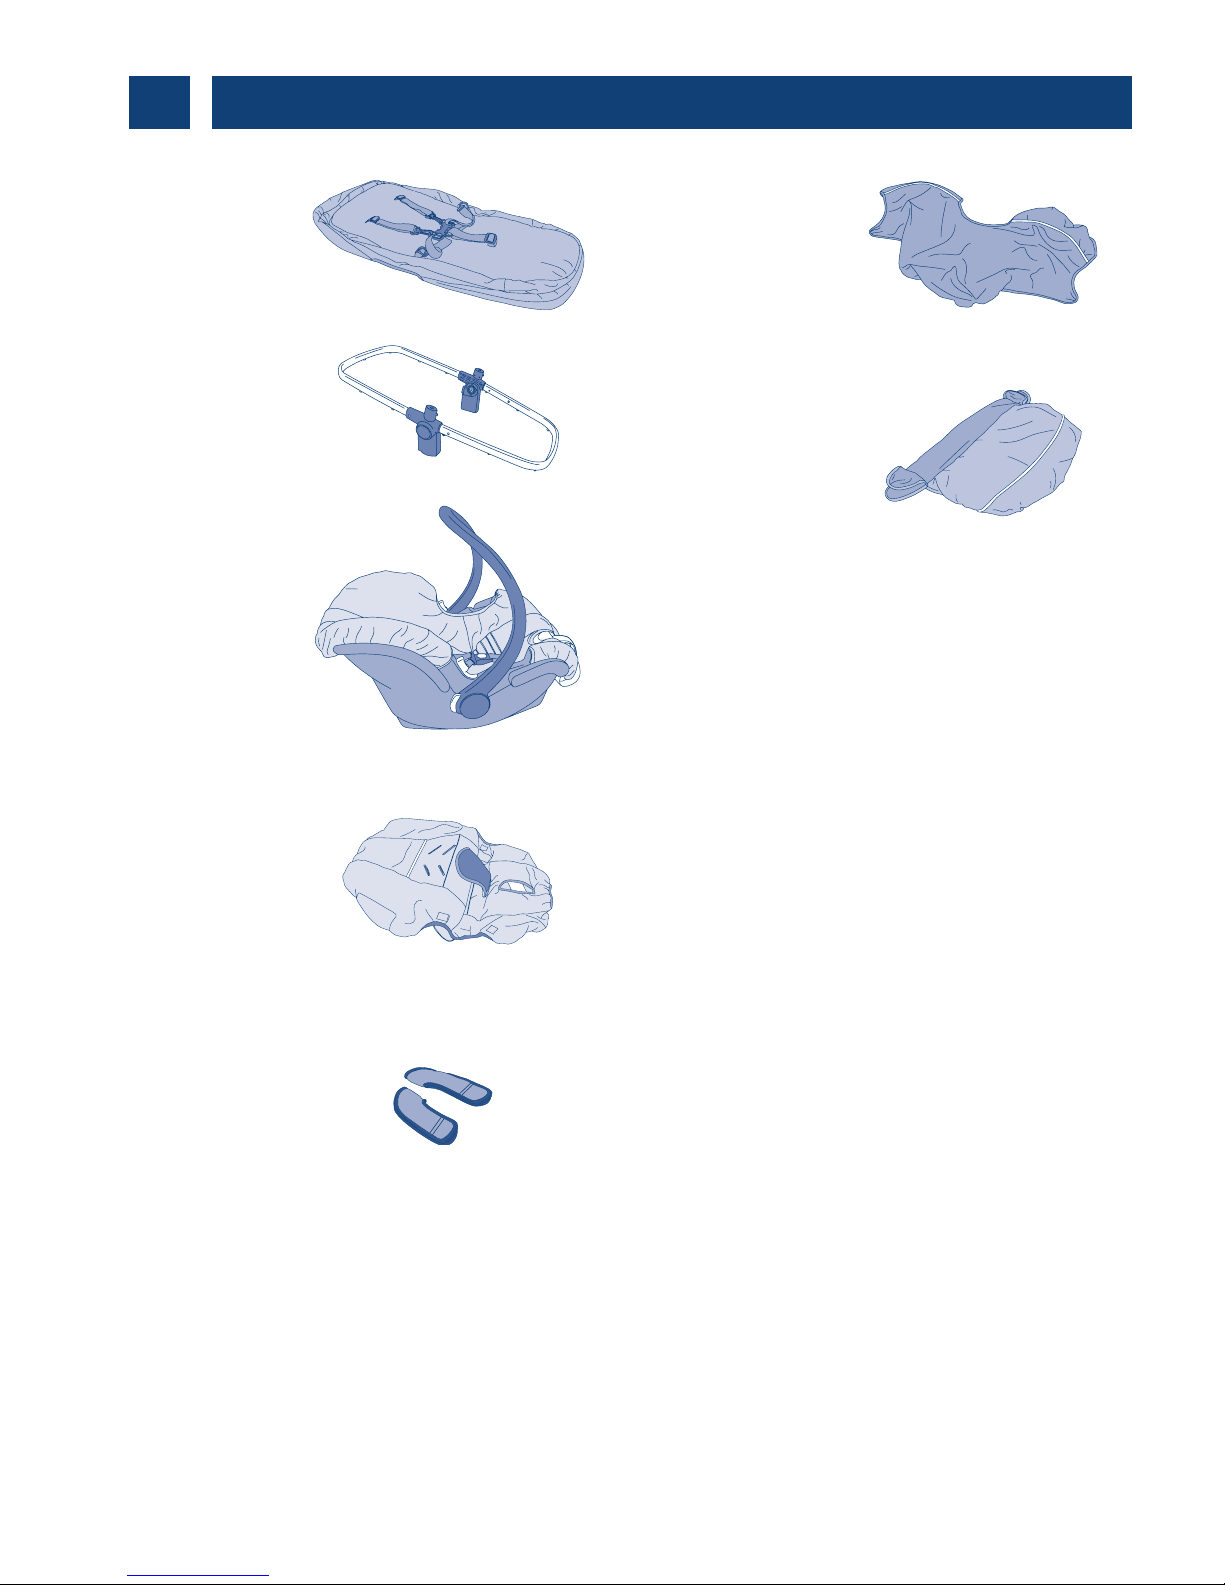
4
Fabric seat
Asiento de tela
Seat frame
Armazón del asiento
Infant carrier
Portabebé
Seat cover for
infant carrier
Tapizado para
portabebé
Harness pads for
infant carrier
Fundas de arnés
para portabebé
Infant carrier
canopy.
Cubierta para
portabebé
Infant carrier apron
Saco para
portabebé
parts check list • cátalogo de piezas
2
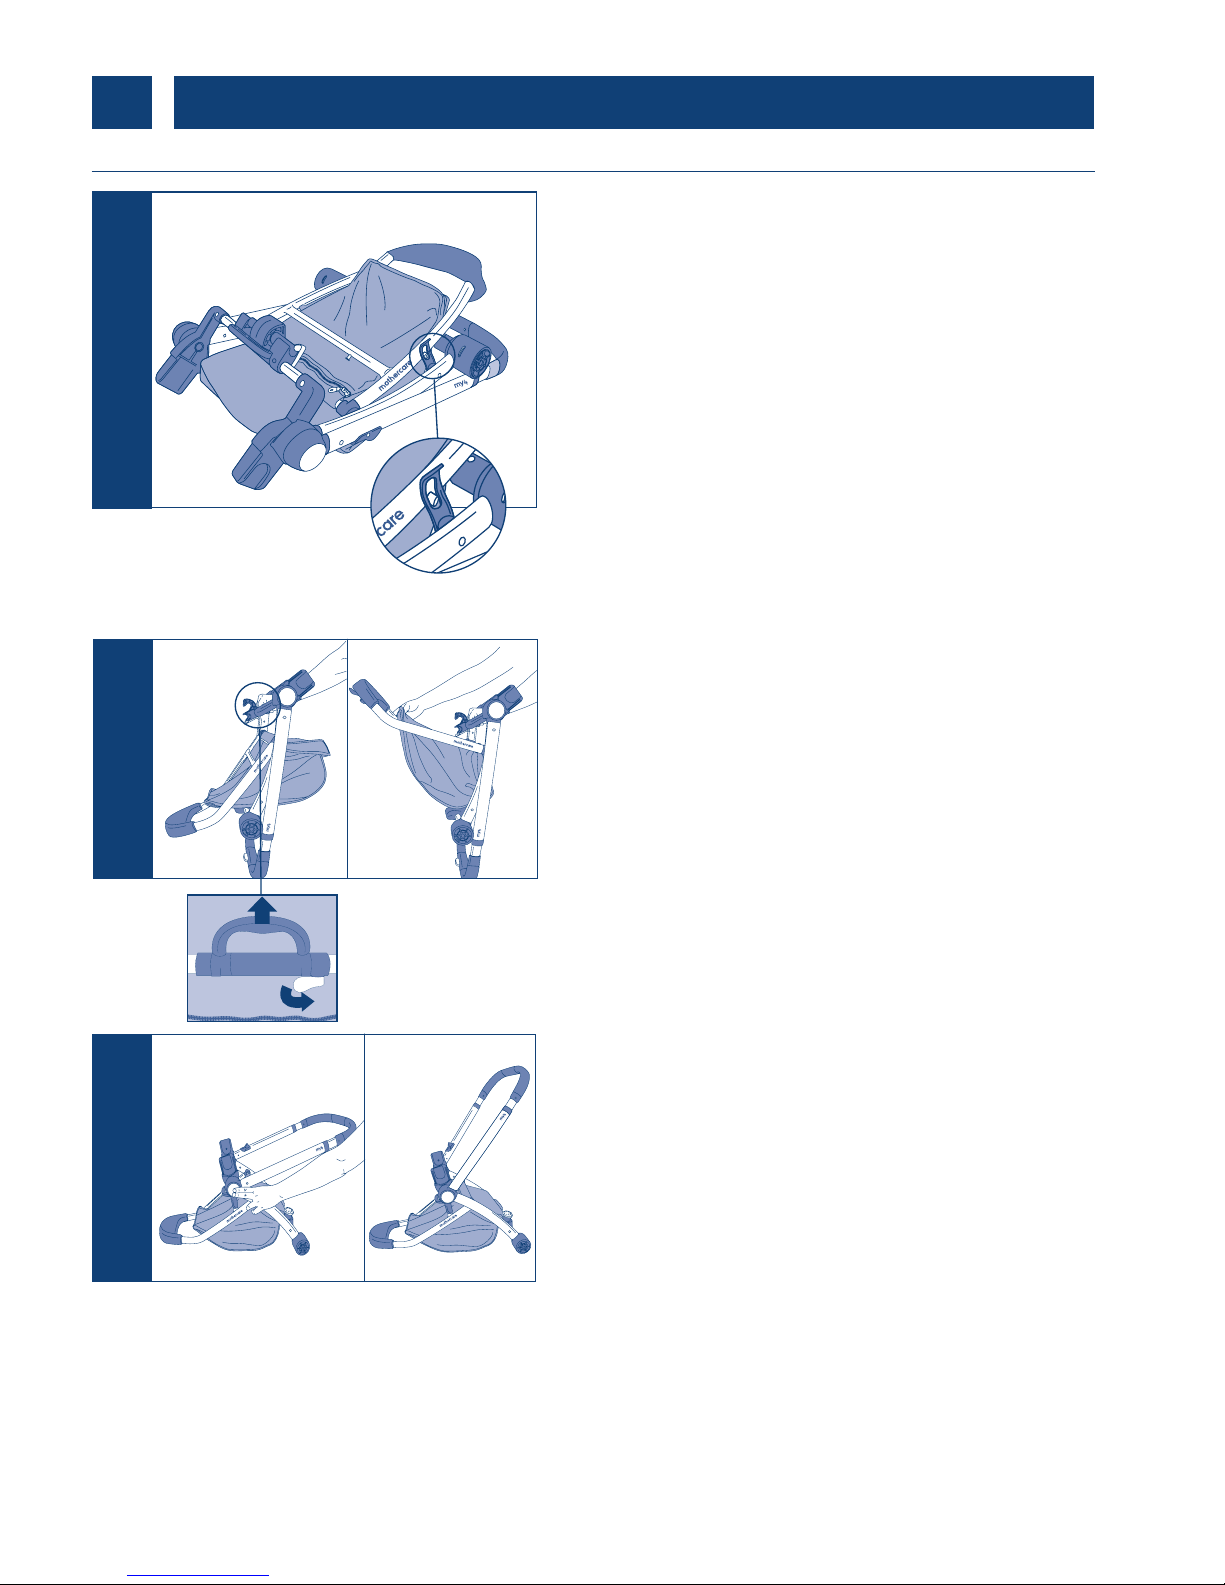
5
Flatten the pushchair carton to protect the
floor and place the chassis on the cardboard.
Release the folding catch by lifting the end of
the catch away from the retaining pin on the
front leg of the pushchair.
Coloque la caja del cochecito en el suelo
para no dañarlo y ponga el chasis sobre el
cartón. Libere el cierre de plegado retirando
el extremo del mismo del elemento de
sujección situado en la pata delantera
izquierda del carrito.
Lift the handle in the middle of the chassis
frame and lift the bottom of the frame until
the chassis is fully opened. There will be a
positive ‘click’ when the lock is engaged.
Sitúe la empuñadura en el centro de la
estructura del chasis y abra la parte inferior
de la estructura hasta que el chasis esté
completamente abierto. Oirá un "clic" cuando
el seguro se active.
Push the grey button on the left hand side of
the pushchair to release the handlebar and
lift this upwards. There will be a positive ‘click’
when it is engaged.
Presione el botón gris situado en la
parte izquierda del carrito para soltar la
empuñadura y tirar de ella hacia arriba.
Oirá un "clic" cuando el seguro se active.
1
opening the chassis cómo abrir el chasis
2
3
preparation for use • preparación para el uso
3
Warning! Ensure that all the locking devices are engaged before use.
¡Advertencia! Asegúrese de que todos los dispositivos de seguridad están activados
antes de la utilización del carrito.
2
1
6
fitting the front wheels cómo colocar las ruedas delanteras
Remove the packaging from the front area of
the pushchair. Slide the front wheel pins into
the housing on the pushchair. Each wheel will
‘click’ when installed correctly.
Note: Pull firmly on each wheel assembly to
ensure it is securely attached.
Retire el envoltorio de la parte frontal del
carrito. Coloque en el lugar correspondiente
cada rueda delantera con el enganche
mirando hacia el carrito. Si la rueda se ha
colocado correctamente, se oirá un "clic".
Nota: presione con firmeza sobre cada rueda
para asegurarse de que está insertada
correctamente.
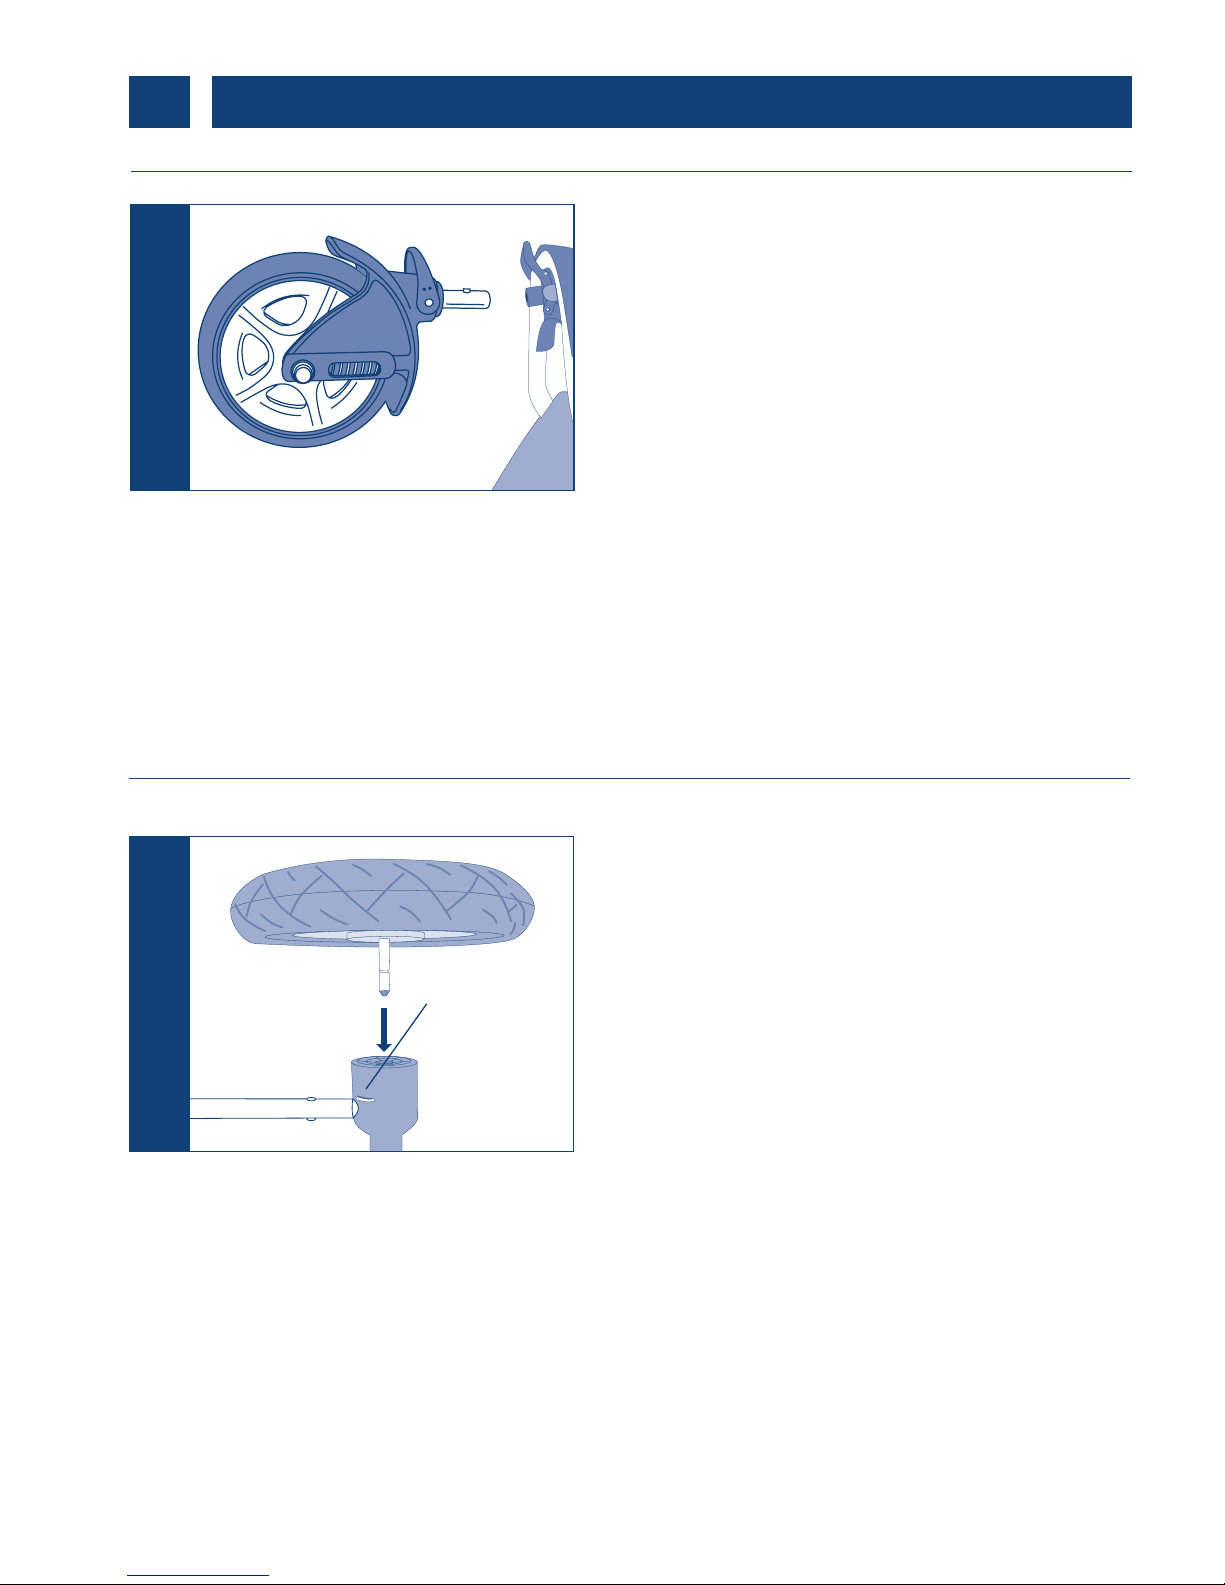
fitting the rear wheels cómo colocar las ruedas traseras
Slot the rear wheels into the housing on either
side of the chassis until you hear a ‘click’.
To remove the wheels press the release button
on the side of the wheel housing and pull the
wheel off.
Encaje las ruedas traseras en la estructura,
cada una en un lado del chasis y pare
cuando oiga un "clic".
Para retirar las ruedas, presione el botón de
desbloqueo situado en la parte inferior de la
estructura de la ruedas y retírelas
release
button/
preparation for use • preparación para el uso
3
botón de
desbloqueo

7
Place the seat unit onto the adaptors with
the seat facing forward until you hear a ‘click’.
Note: Pull gently on the seat unit to check that
it is attached securely.
Note: Ensure the fabric seat is attached to the
U bar by the poppers on the underside of the
seat before installing onto the chassis.
Coloque el conjunto del asiento sobre los
adaptadores con el asiento mirando hacia
delante hasta que oiga un "clic".
Nota: presione con firmeza sobre el conjunto
del asiento para asegurarse de que está
insertado correctamente.
Nota: asegúrese de que el asiento de tela
queda fijado a la barra en forma de U
mediante los corchetes situados en la parte
inferior del asiento antes de colocarlo en
el chasis.
2
attaching the seat unit in the
forward position
cómo fijar el conjunto del asiento
en posición hacia delante
1
Ensure the adaptors on the chassis frame
are in the upright position as shown in the
diagram and indicated as on the adaptors.
Note: Please ensure that both adaptors are
aligned before adding the seat unit.
Asegúrese de que los adaptadores de
la estructura del chasis están en posición
vertical como se muestra en el dibujo y se
indica en los adaptadores.
Nota: asegúrese de que los dos adaptadores
están alineados antes de colocar el asiento.
preparation for use • preparación para el uso
3

8
attaching the bumper bar cómo colocar la barra de seguridad
Guide the bumper bar pins into the holes on
the pushchair frame. Push the pins in until the
bumper bar ‘clicks’ into place.
Pull gently on the bumper bar to check that
it is securely in place on both sides.
Dirija los enganches de la barra de
seguridad hacia los orificios situados en la
estructura del carrito. Presione hasta que la
barra se haya encajado y oiga un "clic".
Apriete con firmeza la barra de seguridad
para asegurarse de que está colocada de
forma segura a ambos lados.
To remove the bumper bar press the black
release buttons on both sides and slide out.
Para retirar la barra de seguridad, presione
los botones negros de desbloqueo situados
a ambos lados y retírela.
1
2
preparation for use • preparación para el uso
3
Warning! Always secure your child with a harness. The bumper bar is not a restraint
device. DO NOT lift the pushchair by the bumper bar.
¡Advertencia! Asegure siempre a su hijo con un arnés. La barra de seguridad no es
un dispositivo de frenado. No levante el cochecito utilizando la barra de seguridad.
To remove the seat unit, press the two buttons
located behind the adjuster housing on either
side and lift the seat unit away from the frame.
Para retirar el conjunto del asiento, presione
los dos botones situados detrás y a ambos
lados de la estructura del medidor, y retire
el conjunto del asiento de la estructura.
3
9
attaching the hood cómo fijar la capota
Attach the hood to the seat unit frame using
the plastic clips on either side. Push the clips
firmly over the metal frame as shown in the
diagram. Pull the hood over the back of the
seat unit to ensure a better fit. To remove the
hood, gently lift the tab behind the clip and
remove, or pull the tab away from the frame.
Fije la capota a la estructura del asiento
mediante los clips que están situados a cada
lado del mismo. Presione firmemente los clips
contra la estructura de metal como se muestra
en el dibujo. Para retirar la capota, extraiga
con cuidado la lengüeta situada detrás del
clip o retire la lengüeta de la estructura.
adjusting the hood cómo ajustar la capota
The hood can be pulled forward during use
to help protect your child from wind or bright
sunlight. The hood has an optional window
panel on top, you can roll up the flap of
material and fasten it with the toggle to view
your child. There is also an optional mesh
section, simply undo the zip along the bottom
of the hood to increase the amount of air that
flows through the my4 keeping your child cool.
La capota puede echarse hacia adelante
para proteger a su hijo del viento o del sol.
La capota cuenta con un panel con una
ventana opcional en la parte superior, puede
enrollar el material protector y agarrarlo con
el elemento de sujección para ver a su hijo.
Además, hay una zona con malla opcional,
sólo tiene que tirar de la cremallera situada en
la parte inferior de la capota para aumentar
la cantidad de aire que corre a través de my4,
manteniendo así a su hijo aireado..
preparation for use • preparación para el uso
3

10
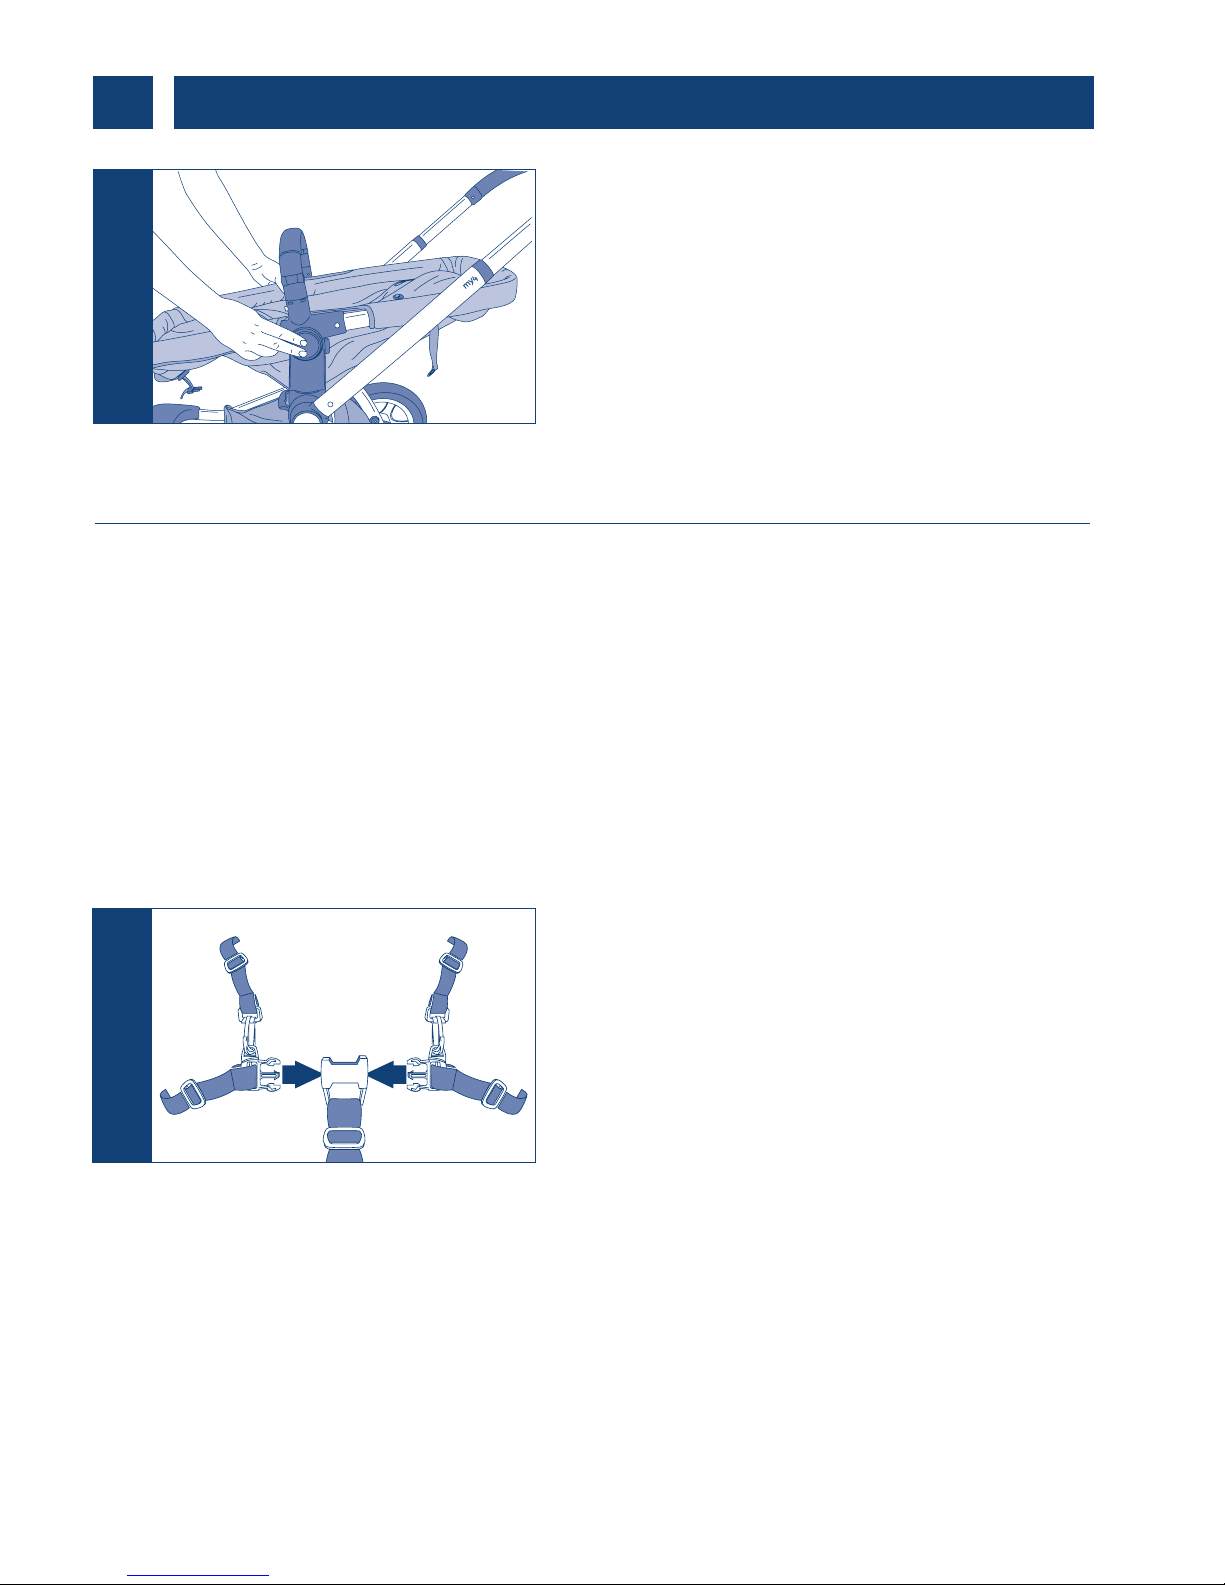
adjusting the handlebar height cómo ajustar la altura del manillar
To adjust the handlebar height push the
grey button situated on the underside of
the middle of the handle and pull the
handlebar towards you.
When the handlebar reaches the correct
height, release the grey button and the
handlebar will click into position.
Para ajustar la altura del manillar, presione
el botón gris situado en el centro de la parte
inferior del manillar y tire del manillar
hacia usted.
Cuando el manillar se encuentre a la altura
deseada, suelte el botón gris y el manillar
se fijará.
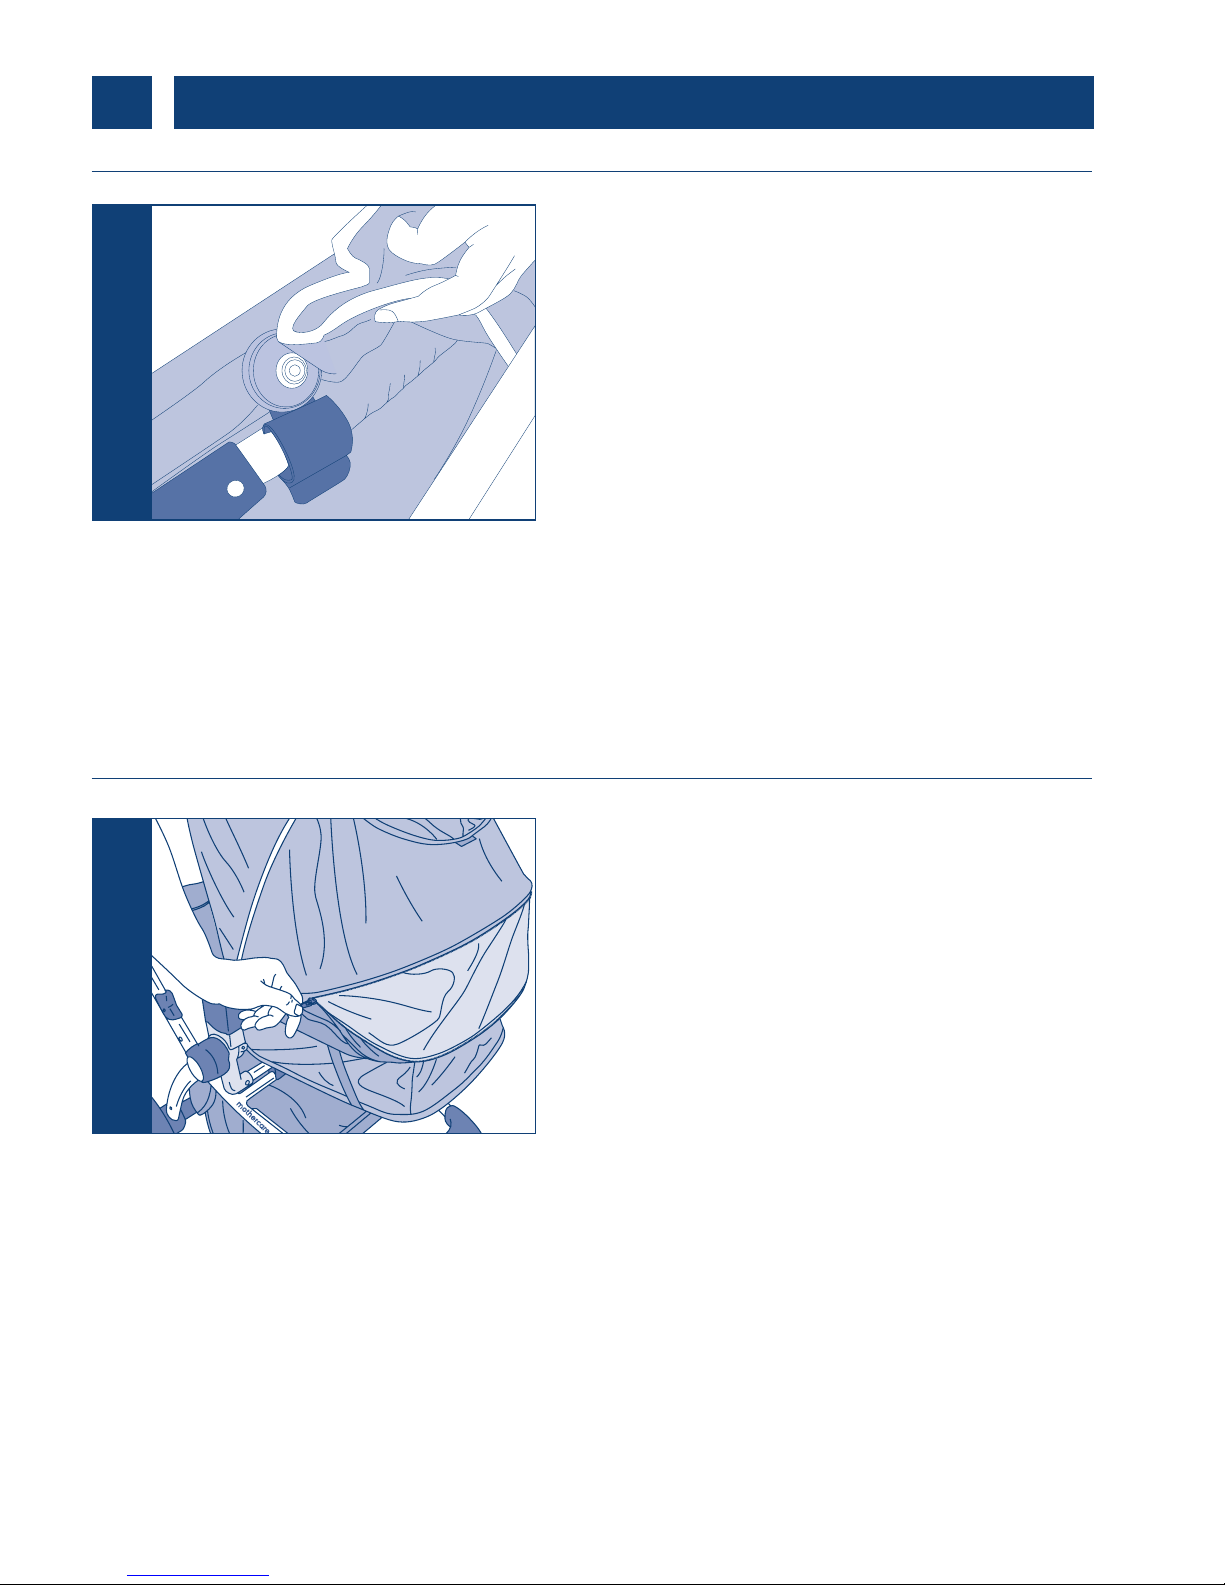
adjusting the backrest cómo ajustar el respaldo
To recline the backrest, squeeze the clasp
together and pull along the webbing. Lower
the seat back into the desired position and
release the clasp.
To raise the seat, squeeze the clasp together
and push along the webbing until the seat is
in the desired position then release the clasp.
Para reclinar el respaldo, ajuste el broche y
deslícelo por la cinta. Baje el respaldo del
asiento hasta encontrar la posición deseada
y suelte el broche.
Para elevar el asiento, deslice el broche y
apriete la correa hasta alcanzar la posición
deseada. Después, puede soltar el broche.
1
preparation for use • preparación para el uso
3
11
securing your child seguridad para su hijo
1
Warning! Avoid serious injury. Always use the harness.
Warning! Always use the crotch strap in combination with the waist belt.
Warning! It may be dangerous to leave your child unattended.
Warning! Use a harness as soon as your child can sit unaided.
¡Advertencia! Evite cualquier lesión grave. Use siempre el arnés.
¡Advertencia! Use siempre la correa de la entrepierna junto con la de la cintura.
¡Advertencia! No deje a su hijo desatendido.
¡Advertencia! El niño deberá usar un arnés desde el momento que pueda sentarse
sin ayuda.
The harness has been adjusted to be suitable
from birth, to lengthen the harness for older
children extend the straps.
To secure the harness, place the crotch strap
between the child’s legs and insert the harness
prongs into the centre clasp, making sure
your child’s fingers are clear. Adjust the strap
adjusters to get a snug fit around your child.
El arnés se ha diseñado para que se adapte
a los bebés desde su nacimiento; según
vayan creciendo podrá adaptarlo alargando
las correas. Para asegurar a su hijo con el
arnés, coloque la correa de la entrepierna
entre las piernas del niño e inserte los ajustes
del arnés en el anclaje central, teniendo
cuidado de no atrapar los dedos del bebé.
Regule los ajustadores de la correa para
conseguir el bienestar de su hijo
2
You can adjust the seat unit further by pushing
in the black buttons on either side of the seat
unit and reclining the seat backwards.
Puede seguir ajustando el conjunto del
asiento presionando los botones negros
situados a cada uno de los lados y
reclinando el asiento hacia atrás.
in use • durante su utilización
4
 Loading...