

OWNER’S
MANUAL
TM
MVP
CENTERFIRE RIFLE
WITH DETACHABLE
MAGAZINE
IMPORTANT “SAFETY WARNINGS” — NOTE THE SYMBOL
THESE SAFETY WARNINGS ARE FOR YOUR PROTECTION AS WELL AS
THE SAFETY OF OTHERS. DISREGARDING INFORMATION IN THIS
MANUAL MAY RESULT IN SERIOUS INJURY OR DEATH.
Be certain this owner’s manual is available for reference and is kept with
this firearm if transferred to another party. If the manual is lost or
misplaced, contact Mossberg for a free replacement copy.
After performing any work on your firearm such as cleaning, adjustments,
disassembly, or installation of any accessory, the firearm should be
re-checked for proper functioning before firing live ammunition.
Firearms are complicated mechanisms. Any modification, alteration, or
improper fitting of parts may result in a dangerous malfunction, damage
to the firearm and injury to the shooter and other persons. The firearm’s
owner must accept full responsibility for the correct reassembly and
functioning of the firearm after any disassembly or replacement of parts.
BOLT ACTION
If you do not understand any of the material in this manual or have any
questions, contact Mossberg or a qualified gunsmith directly.
Do not attempt to load or use any firearm until you have read and
understood the information contained in its owner’s manual. Before handling
your firearm, you should learn how it operates and how to maintain it.
This includes knowing its basic parts, how the manual safety and other
safety features operate, how to safely open and close the action, and
how to safely load and unload ammunition from the firearm. Improper
use and handling is dangerous and could cause serious injury or death
to you or those around you. All users of the firearm must become
thoroughly familiar with the instructions in this manual.
O.F. MOSSBERG & SONS, INC.
P.O. BOX 497 • 7 GRASSO AVENUE, NORTH HAVEN, CT 06473
Safety and safe firearms handling is everyone’s responsibility.
PHONE (800) 363-3555
www.mossberg.com

As the owner of a firearm, you must undertake the full-time responsibility of
safe firearms handling for your own safety and the safety of those around you:
• Keep all firearms and ammunition out of the reach of children.
• Store your firearms and ammunition separately.
• Never store a loaded firearm.
• Never leave a loaded firearm unattended.
• Never transport a loaded firearm in a vehicle.
• Unload your firearm when you have stopped shooting or when
you have to climb a tree or fence, cross a slippery surface or
have to transport it in a vehicle.
• Do not load your firearm before you are in a place where it is safe
to shoot, and keep your finger off the trigger until you are on target
and have decided to fire.
• Never shoot at water, rocks or any hard surfaces. Shots may
glance off such surfaces and cause injuries.
• Do not use alcohol or drugs before or while handling firearms.
• Do not touch the trigger while the safety button is being engaged
or disengaged.
Always point the muzzle of your firearm in a safe direction, regardless
of whether the firearm is loaded or unloaded.
Always treat every firearm as if it were loaded. Give your firearm to
someone with the action open (bolt fully rearward) and safety lever
pulled fully to the rear to the “ON” (SAFE) position, after you verify the
firearm is unloaded. Insist on the same procedure when receiving a
firearm from someone else. Learn the location of all the safety features
of your firearm and how they operate.
Wear eye and ear protection when shooting. Shooting without proper ear
protection can cause hearing damage. The use of eye protection during
any type of shooting is important to protect your vision.
Due to the heavy recoil of a firearm, maintain an adequate distance
between the rear of the scope (if equipped) and your face at all times.
Be certain the scope installation does not interfere with access to, or the
proper functioning of the safety lever.
WE SPECIFICALLY DISCLAIM ANY RESPONSIBILITY FOR DAMAGE
OR INJURY WHATSOEVER OCCURRING IN CONNECTION WITH, OR
AS A RESULT OF, THE USE OF FAULTY, OR NON-SAAMI STANDARD,
OR “REMANUFACTURED” OR HAND-LOADED (RELOADED) AMMUNITION. ADDITIONALLY, WE DISCLAIM ANY RESPONSIBILITY FOR
DAMAGE OR INJURY WHICH RESULTS FROM ANY MODIFICATIONS
OR CHANGES THAT ARE NOT A PART OF THE FIREARM AS DELIVERED FROM THE FACTORY.
Learn to clean your firearm thoroughly and make certain no oil, grease,
or other materials are blocking the barrel. Obstructions of any kind can
cause damage to the firearm, and may result in serious personal injury
to the shooter and/or others nearby.
Practice proper firearm maintenance and safety. Make sure all exposed
metal surfaces are coated with a thin film of oil, especially after being
exposed to damp weather. (See the proper section of this manual for
cleaning instructions). Do not plug the barrel or store in a fabric-lined
case which will absorb lubricants from the firearm. Before using after
storage, follow complete instructions stated in this manual for
refamiliarization with the firearm. A thorough inspection and function
test should be performed before going into the field. Have your firearm
periodically checked by a qualified gunsmith.
PART NO. 100136 REV. B

A note about the warnings and information contained in this Manual:
We strongly suggest that you check with your local licensed retailer or state
police for additional information concerning firearms ownership, or hunting or
target shooting rules that may be required by local law or regulation. Since such
rules and regulations are subject to change, local authorities are in the best
position to advise you on such matters.
TABLE OF CONTENTS
Page
Unpacking Your New Bolt Action Firearm .................................................... 2
The Mechanical Safety ................................................................................. 2
Lightning Bolt Action (LBA) Trigger System Adjustments ..............................3
Installing the Bolt in the Firearm ................................................................... 5
Loading the Firearm ..................................................................................... 6
Firing the Firearm .......................................................................................... 9
Unloading the Firearm ................................................................................ 10
Removing the Bolt from the Firearm .......................................................... 11
Cleaning and Lubrication ........................................................................... 12
Function Testing ..........................................................................................13
Service Instructions .................................................................................... 14
Warranty Information .................................................................................. 15
Parts List ............................................................................................... 16, 18
Exploded View ...................................................................................... 17, 19
The Basic Rules of Safe Firearms Handling ....................................... Back Cover
NOTE: ILLUSTRATIONS MAY VARY FROM ACTUAL PRODUCTS.
OPERATING INSTRUCTIONS
Read and understand this entire manual and its safety warnings before
handling this firearm.
UNPACKING YOUR NEW BOLT ACTION FIREARM
Visually and physically inspect the inside of the barrel and receiver to ensure they
are free of any excess oil, grease or any obstructions. Obstructions of any kind
can cause damage to the firearm and may result in serious personal injury to the
shooter and/or others nearby.
MECHANICAL SAFETY
The mechanical safety lever consists of a knurled lever on the right side of the
receiver immediately to the rear of the bolt handle. To put the safety in the “ON”
(SAFE) position, move the safety lever fully rearward. For safe firearm handling,
learn the feel of the positive “ON” and “OFF” positions of the safety lever. The
safety can be activated only when the rifle is cocked or the bolt is fully opened. DO
NOT check if the action is cocked by pulling the trigger, check first to insure the rifle
is unloaded.
Remember, a firearm’s manual safety is a mechanical device which can
never replace safe firearm handling practices.
Never rely on any mechanical mechanism or safety device to prevent the
dangers of careless handling or pointing a firearm in an unsafe direction.
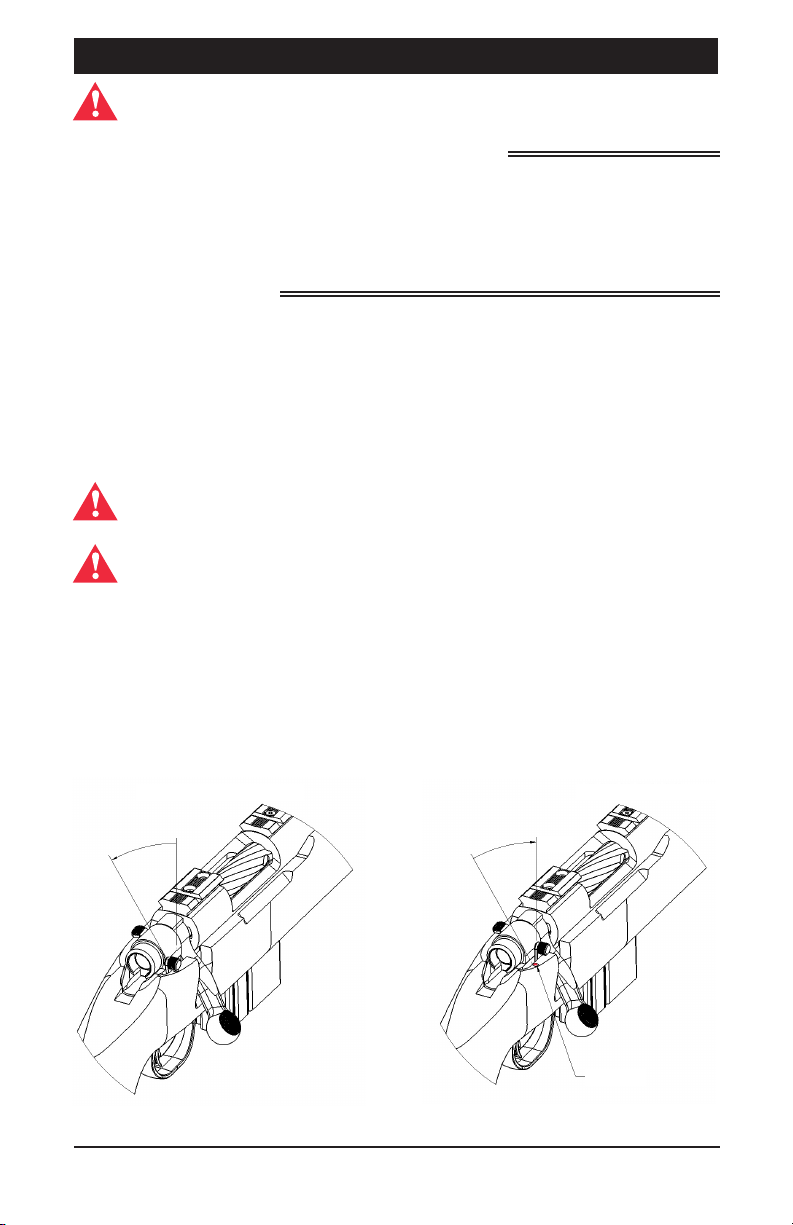
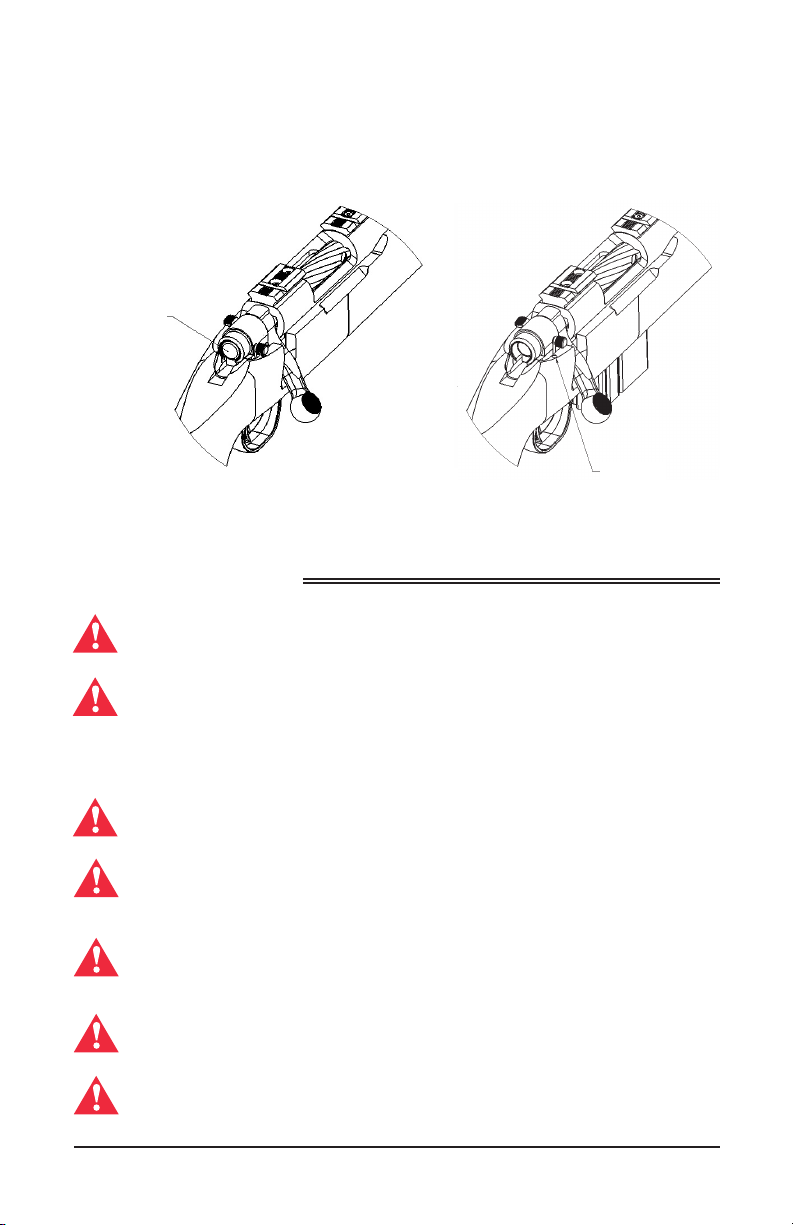
To put the safety in the “ON” (SAFE) position, move the safety lever fully rearward. The safety lever will now cover the red dot. The red dot is a training aid
used to show the direction of the “ON” (SAFE) position and should not be
used as an indicator that the safety is “ON” or “OFF” (Fig. 1 & 2).
To put the safety in the “OFF” or “FIRE” position, move the safety lever forward. (Fig. 2)
LEVER FULLY REARWARD
SAFE
Figure 1 Figure 2
2
LEVER FORWARD
FIRE
RED DOT

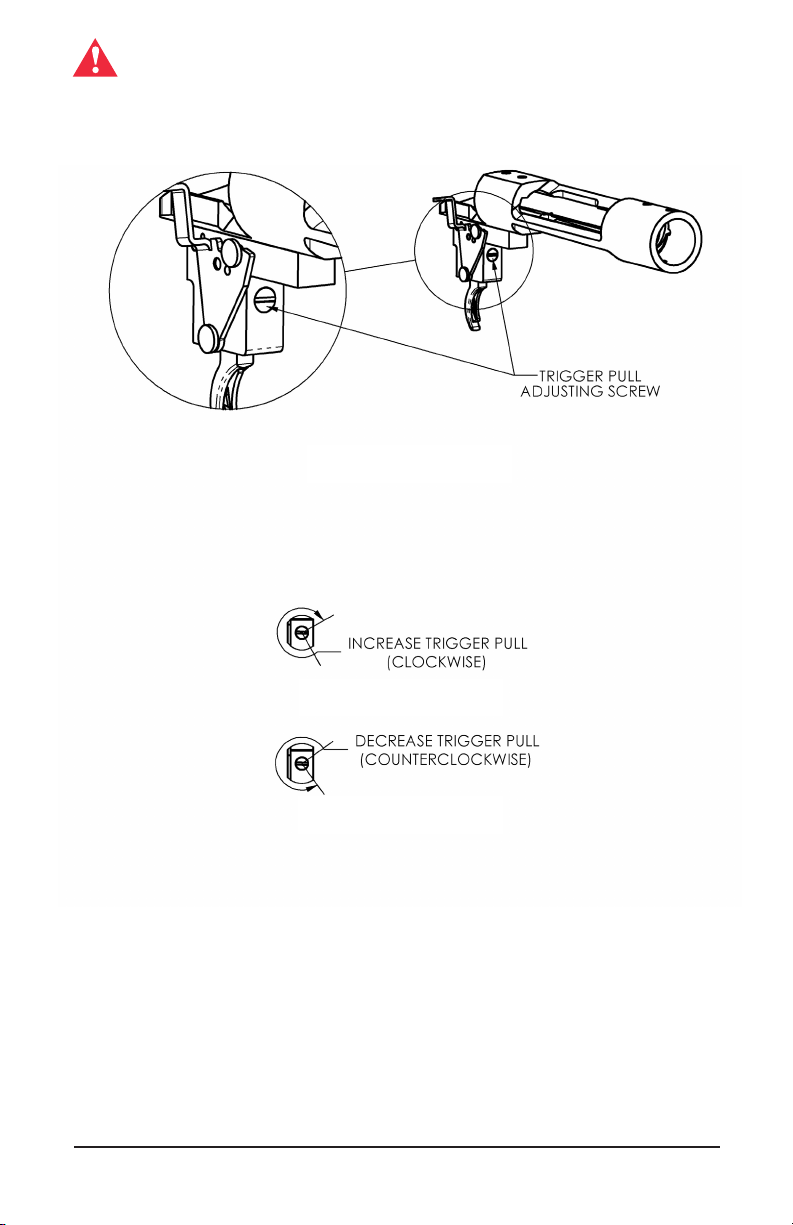
Lightning Bolt Action™ Trigger System Adjustments
Your firearm may be equipped with Mossberg’s revolutionary “Lightning Bolt
Action” Trigger System (Patent Pending), an adjustable trigger system that allows
you to safely adjust the trigger pull of your firearm from 2 to 7 pounds (approximately). Your firearm is shipped with the trigger pull set at the factory minimum. You
can adjust the trigger pull by turning the Trigger Pull Adjusting Screw (See Figures
2-1, 2-2, 2-3) clockwise (to increase trigger pull) or counterclockwise (to decrease
trigger pull).
BEFORE ANY ATTEMPT IS MADE TO ADJUST YOUR TRIGGER
PULL, VISUALLY AND PHYSICALLY INSPECT THE CHAMBER AND
MAGAZINE TO MAKE SURE THAT YOUR FIREARM IS UNLOADED.
KEEP THE MUZZLE POINTED IN A SAFE DIRECTION AT ALL
TIMES!!
To Adjust Your Trigger Pull
Remove the stock by removing the front and rear action screws. Lift the action out
of the stock. Adjust the trigger pull by turning the Trigger Pull Adjusting Screw clockwise (See Figure 2-2) to increase trigger pull, or counterclockwise (See Figure 2-3) to
decrease trigger pull. The Trigger Pull Adjusting Screw incorporates a nylon patch
that provides resistance while turning the screw for adjustment. This is normal and
to be expected. Do not remove the Trigger Pull Adjusting Screw or the Adjusting
Spring from the trigger housing. The components may get lost and trigger pull
adjustment will not be possible. Reinstall the action into the stock and tighten the
front first, and then the rear, action screws. With your firearm pointed in a safe direction, visually and physically inspect the chamber and magazine to make sure that
your firearm is unloaded. Then, using the instructions provided in this manual, perform a complete function test (see the “Function Testing” section of your owner’s
manual). If the trigger pull is not to your satisfaction, repeat the above procedure until
satisfactory results are obtained.
No other trigger adjustments are provided. In order to avoid serious
personal injury to you or those around you, no other changes, alterations, or adjustments should be made to the trigger system.
3
Firearms are complicated mechanisms. Any modification,
alteration, or improper fitting of parts may result in a dangerous
malfunction, damage to the firearm and injury to the shooter and
other persons. The firearm’s owner must accept full responsibility
for the correct reassembly and functioning of the firearm after any
disassembly or replacement of parts.
FIGURE 2-1
FIGURE 2-2
FIGURE 2-3
4
TO INSTALL THE BOLT IN THE FIREARM
Visually and physically check to make certain there is no ammunition in
the chamber or magazine. Keep the muzzle pointed in a safe direction at
all times.
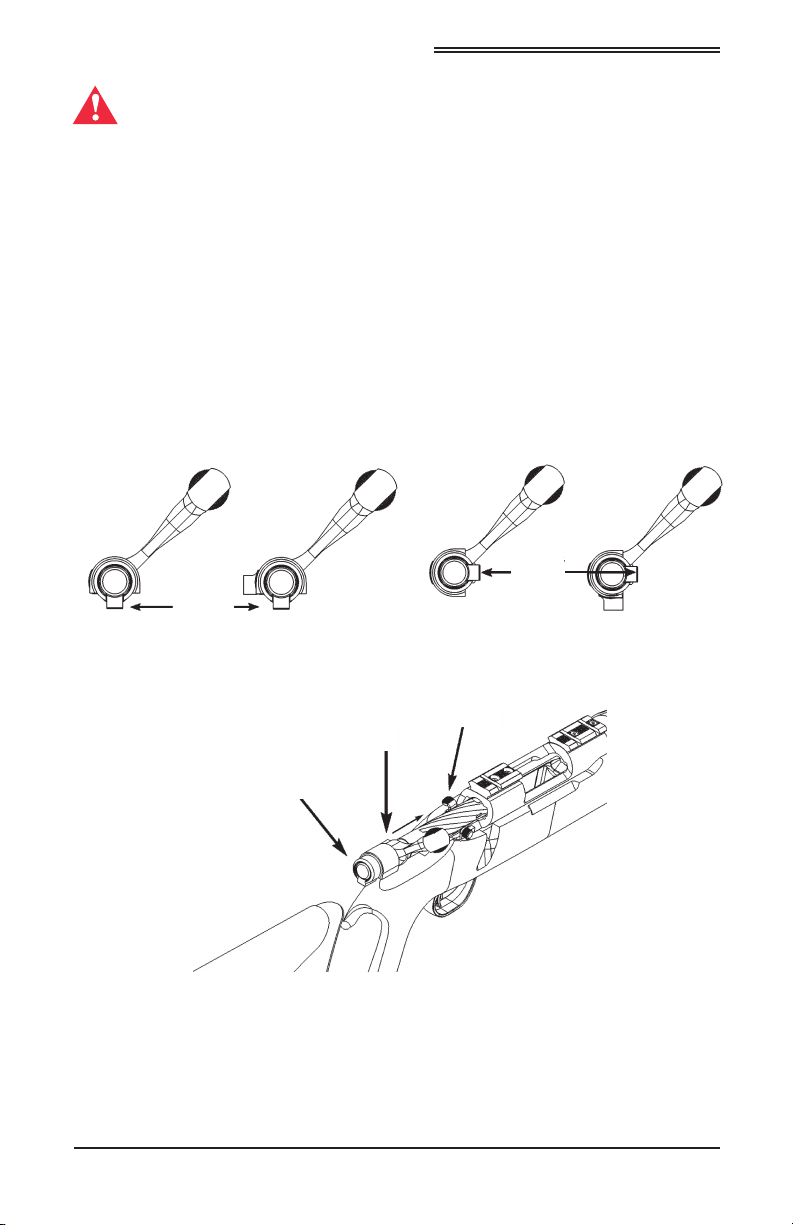
A. With the bolt handle pointing up and to the right, align the locking lugs on the
bolt with the matching machined cuts in the rear of the receiver.
When assembling the bolt into the firearm, make sure the position of the cocking piece
is as shown in Fig. 3A. If it is not, the bolt will not close fully. The bolt handle assembly
is designed so that it cannot be installed in the firearm unless it is in correct alignment.
The correct bolt assembly orientation is shown in figure 3A. With the bolt handle up
and to the right, the cocking piece is vertical and on the bottom.
The orientation shown in Fig. 3B requires resetting the bolt sleeve to the position
shown in Fig. 3A. This may be done by holding the bolt sleeve in a vise with padded
jaws (to prevent marring of the part) and rotating the bolt handle counter clockwise
until it is the same as Fig. 3A before assembling the bolt into the firearm.
CORRECT
ORIENTATION
SMALL ACTION
BOLT SHOWN
COCKING
PIECE
POINTS
DOWN
Fig. 3A
LARGE ACTION
BOLT SHOWN
COCKING PIECE
POINTS DOWN
BOLT SLEEVE
REQUIRES
RESETTING
SMALL ACTION
BOLT SHOWN
BOLT STOP
COCKING
PIECE
POINTS
RIGHT
Fig. 3B
LARGE ACTION
BOLT SHOWN
Figure 3C
B. Push the bolt forward gently into the receiver about one inch, until the bolt-stop
snaps into place behind the bolt lugs holding the bolt in place.
5
C. Push the bolt fully forward and rotate the bolt handle clockwise and down to
the “closed bolt” position. Observe the end of the bolt. The round flat end of the
striker is the cocking indicator. When it is flush with the outside ring of the bolt
sleeve, it indicates the firearm is cocked and will fire if the firearm is loaded (Fig.
4), the safety lever is moved to the “OFF” (FIRE) position, and the trigger is
pulled. When the firearm is fired, the cocking indicator will snap forward and be
recessed approximately 3/16" from the edge of the bolt sleeve (Fig. 5).
COCKING
INDICATOR
Figure 4
Figure 5
RED DOT
The bolt can be operated with the safety lever in either the “ON” (SAFE) or “OFF”
(FIRE) position.
LOADING YOUR FIREARM
Before loading, move the safety lever fully rearward to the “ON” (SAFE)
position.
Before loading, visually and physically inspect the chamber and bore of
the barrel for any obstruction, excessive oil or grease. (The chamber is
the rear portion of the barrel which contains the cartridge.) Obstructions
of any kind can cause damage to the firearm and may result in serious
personal injury to the shooter and/or others nearby.
During loading never allow fingers or any objects to contact the trigger.
Keep the muzzle pointed in a safe direction at all times.
Do not load firearm until ready for use! Unload firearm when shooting has
been completed! The safety lever should always be in the “ON” (SAFE)
position whether the firearm is loaded or not.
Check to be certain that the correct ammunition has been selected for use.
Ensure it is the same caliber and type of cartridge as designated on the left
side of the barrel.
This firearm is equipped with a removable magazine.
This firearm is capable of firing a chambered cartridge with the magazine
empty, without the magazine inserted, or if the magazine is dislodged from
its seat.
6

CAPACITY
The MVP™ Bolt Action Centerfire Rifle with detachable magazine has a capacity
dependant on the magazine used. The use of magazines with an anti-tilt follower is
recommended.
NOTE: Small Action firearms use AR-15 style magazines. Large Action firearms use
AR-10 and M14 / M1A style magazines interchangeably.
NOTE: Due to the design of the patent pending feeding systems used on these
firearms, the bolt may or may not close on empty magazine.
REMOVING THE MAGAZINE
WARNING
Because this firearm can be used as a single shot, it will fire whether or not a
magazine is in the firearm if a cartridge is chambered.
FIREARM WILL FIRE WITH MAGAZINE OUT.
WARNING
Removal of the magazine will not unload the firearm! Removing the
Removal of the magazine will not unload the firearm! After you remove the
magazine will not remove any cartridge which is in the firearm’s chamber!
magazine always
A cartridge in the firearm’s chamber can still be fired, even after the
to ensure the firearm is completely unloaded!
firearm’s magazine has been removed! After you remove the magazine
always
visually and physically inspect the chamber and receiver to ensure
visually and physically inspect the chamber and receiver
the firearm is completely unloaded!
FIREARM WILL FIRE WITH MAGAZINE OUT.
The magazine can be removed with the bolt in the open or closed position. Remove
the magazine by pulling the magazine latch rearward (Fig. 6). The magazine will fall
freely from its seat.
Familiarize yourself with the firearm by installing and removing an
unloaded magazine and by learning to keep the bolt in the open
position.
MAGAZINE LATCH
Figure 6
7

LOADING THE MAGAZINE
To load the magazine when it is out of the firearm, remove the magazine from the
firearm by pulling the magazine latch rearward (Fig. 6). The magazine will drop free
from its seat. Hold the magazine in one hand and insert one cartridge at a time,
pressing against the magazine follower and rearwards until the magazine is full, or
until the desired number of cartridges have been loaded (Fig. 7A and 7B).
PUSH CARTRIDGE DOWN
BELOW FEED LIPS
FEED LIPS
PUSH CARTRIDGE REARWARD
TO SEAT FULLY IN MAGAZINE
Figure 7A Figure 7B
LOADING THE SINGLE CARTRIDGES
Move the safety lever fully rearward to the “ON” (SAFE) position. POINT THE
MUZZLE IN A SAFE DIRECTION! Lift the bolt handle and pull the bolt to the rear
until it stops. Visually and physically check the chamber to make sure it is empty.
You may use your firearm as a single-shot by placing one cartridge at a time directly
into the chamber. Keeping the muzzle pointed in a safe direction, push the bolt
forward and rotate the bolt handle clockwise to its fully down position. The firearm is
ready for firing as soon as the safety lever is moved forward to the “OFF” (FIRE)
position.
8

LOADING WITHOUT CHAMBERING
If you wish to load the magazine but close the bolt on an empty chamber, keeping
the muzzle pointed in a safe direction, put the safety on, remove the magazine, visually and physically check to be certain there are no cartridges in the chamber or
receiver, and close the bolt, watching to make sure that no cartridge is pushed into
the chamber. Insert a loaded magazine into the firearm by sliding the magazine up
into the magazine opening until securely in place (Fig. 8).
Figure 8
LOADING THE CHAMBER AND MAGAZINE
If you wish to load the firearm up to its full shot capacity, put the safety on, then
remove and load the magazine. Keeping the muzzle pointed in a safe direction, place
(1) cartridge into the chamber of the barrel and close the bolt. Insert a loaded magazine into the firearm by sliding the magazine up into its seat until retained in place by
the magazine latch engagement. The firearm is ready for firing as soon as the safety
lever is moved forward to the “OFF” (FIRE) position.
To minimize the risk of unintended firing, leave the chamber empty and the
safety fully rearward in the “ON” (SAFE) position until you are actually
prepared to fire. Keep the muzzle pointed in a safe direction at all times and
your fingers and any other objects away from the trigger.
FIRING
Discharging firearms in poorly ventilated areas, cleaning firearms, or
handling ammunition may result in exposure to lead and/or other substances
known to cause birth defects, reproductive harm, and/or other serious
physical injury. Have adequate ventilation at all times. Wash hands thoroughly
after exposure.
With the firearm pointed in a safe direction and held in the proper firing position, push
the safety forward to its “OFF” (FIRE) position. Pulling trigger through its full travel to
the rear, will fire the firearm.
After the firearm is fired, raise the bolt handle and pull back as far as it will go. This
motion will eject the spent casing.
9

To feed the next cartridge, push the bolt handle fully forward, then down. The firearm
is again ready to fire.
Should the cartridge fail to fire, keep the firearm pointed in a safe direction.
Wait a few moments then lift the bolt handle and pull the bolt to the rear to
extract and eject the misfired cartridge and segregate from other ammunition. Do not attempt to refire a misfired cartridge.
If at any time during firing, the sound of any given cartridge is noticeably
louder or softer than previous cartridges fired, STOP! Do not load or fire
additional cartridges until you have safely unloaded your firearm and
inspected it for possible damage or obstruction in the chamber or bore. (The
bore is the inside surface of the barrel.) Firing the firearm with a bore
obstruction can cause damage to the firearm and may result in serious personal injury to the shooter and/or others nearby.
Each brand and type of ammunition can produce different accuracy results. It is best
to try as many types and brands of ammunition as possible to determine which
performs best in your firearm.
TO UNLOAD
Pull the safety lever fully rearward to the “ON” (SAFE) position (Fig. 1).
During unloading, never allow fingers or any other object to contact the
trigger. Keep the muzzle pointed in a safe direction at all times.
UNLOADING THE FIREARM
Lift the bolt handle and pull fully to the rear. This will extract a cartridge or empty shell
from the chamber. Remove the magazine by pulling the magazine latch.
UNLOADING THE MAGAZINE
Hold the magazine in one hand bottom down and front end forward (Fig. 8). Push
the cartridge forward and allow the nose of the cartridge to rise slightly upward until
is released from the magazine. Repeat until the magazine is unloaded.
After unloading always visually and physically inspect the chamber
and magazine to make sure that all of the cartridges have been
removed.
10

TO REMOVE THE BOLT FROM THE FIREARM
Figure 9
Pull the safety lever fully rearward to the “ON” (SAFE) position (Fig. 1);
keep the muzzle pointed in a safe direction at all times; visually and
physically inspect the chamber and magazine to make sure the firearm is
unloaded.
Raise the bolt handle and pull the bolt part way to the rear of the action. Depress the bolt
stop at the left rear of the receiver to withdraw the bolt rearward out of the receiver
(Fig. 9).
11

CLEANING AND LUBRICATION
With proper maintenance and care, your firearm will provide you with years of
dependable service. Your firearm should be inspected and cleaned
periodically to insure that it remains in good condition. Clean and lubricate your
firearm as soon as possible after use. This is especially important if your firearm has
been exposed to moisture. For maximum performance and continued satisfaction
with your firearm, periodic cleaning and lubrication are essential. Wear eye protection
during cleaning.
Use the instructions and equipment provided with a quality gun cleaning kit.
All metal parts should be cleaned with gun solvent and lightly lubricated with gun
oil. Over-lubrication should be avoided. Use only lubricants specifically designed for
firearms. Avoid the use of abrasives which may damage the metal finish.
If the firearm is to be stored for a long period of time it should be thoroughly
cleaned and oiled. Do not plug barrel or store in a fabric lined case that will absorb
lubricant from the firearm.
Scrub bore and chamber with solvent and follow with cleaning patches until barrel is
clean. A final pass with a lightly oiled patch will provide a protective coating.
The bolt can be removed from the barreled action, and the barreled action can be
removed from the stock, but further disassembly should be performed by a certified
gunsmith only.
Make sure the barrel and receiver are free of obstructions and excessive
lubricant after cleaning. Be sure not to leave cleaning patches or excessive
oil or grease in the bore as they can create dangerous obstructions.
Obstructions of any kind can cause damage to the firearm and may result in
serious personal injury to the shooter and/or others nearby.
Camouflage guns: Caution should be exercised to avoid exposure of camouflage patterns to solvents or insect repellants.
12

FUNCTION TESTING
Check your firearm for proper functioning before loading or firing live
ammunition.
Pull the safety lever fully rearward to the “ON” (SAFE) position (Fig. 1).
Be sure the firearm is completely unloaded by visually and physically
inspecting the chamber and magazine. Keep the firearm pointed in a
safe direction at all times.
Open and close the bolt several times to check for free movement of the action
assembly.
Close the bolt and leave the safety lever in the “ON” (SAFE) position. Pull the
trigger fully rearward. The firing pin should not release.
Remove your finger from the trigger. Move the safety lever fully forward to the
“OFF” (FIRE) position. The firing pin should not release.
Leave the safety lever in the “OFF” (FIRE) position. Make certain the firearm is
pointed in a safe direction. Pull the trigger rearward. The firing pin should
release.
When you have completed the function testing, open the action and move the
safety lever fully rearward to the “ON” (SAFE) position.
IF YOUR FIREARM DOES NOT PERFORM AS DESCRIBED IN ANY
OF THE PREVIOUS STEPS, CONTACT THE FACTORY AUTHORIZED
PRODUCT SERVICE CENTER IMMEDIATELY. DO NOT ATTEMPT TO
USE THE FIREARM.
Firearms are complicated mechanisms. Any modification, alterations, or
improper fitting of parts may result in a dangerous malfunction, damage
to the firearm and injury to the shooter and other persons. The firearm’s
owner must accept full responsibility for the correct reassembly and
functioning of the firearm after any disassembly or replacement of parts.
PERIODICALLY CHECK THAT THE MUZZLE BRAKE (IF SO EQUIPPED)
IS TIGHTENED FIRMLY ONTO THE BARREL.
13

SERVICE INSTRUCTIONS
Should your firearm, or any component of your firearm require service, ship your
entire firearm (please do not send components only), via your chosen
carrier, postage paid (we do not accept C.O.D. shipments), following these
instructions:
• Make absolutely certain your firearm is unloaded.
• Do not send ammunition with your firearm.
• Remove all accessories from your firearm such as scopes, slings,
mounts, etc.
• Ship your firearm in a suitable container, packaging it securely to
prevent parts from shifting and/or harm during shipping.
• Include a note with a clear description of the service you wish us to
perform, your complete return shipping address (no P.O. boxes please),
your daytime telephone number and your e-mail address (if available). It
is advisable to place your correspondence inside your shipping container
when shipping.
SHIPPING ADDRESS
Product Service Center
Maverick Arms, Inc.
1001 Industrial Blvd.
Eagle Pass, TX 78853
If you have any service related questions, please contact the Product
Service Center at (830) 773-9007 or service@mossberg.com
TO ORDER PARTS
To order parts from the Product Service Center, you can fax, phone,
mail, or e-mail your order to one of the below numbers/addresses.
Fax Number: (830) 773-5893
Phone Number: (830) 773-9007
E-mail Address: service@mossberg.com
Mailing Address: Product Service Center
Please provide your name, address, city, state, zip, your daytime phone number
and e-mail (if available). The Product Service Center will need the Model #, Serial
#, Gauge/Caliber, Finish, Item #, and Part Name. There is a $7.50 (U.S.) minimum
parts order charge. Most major credit cards, money orders, and bank drafts are
accepted.
Service outside of the U.S.A.
For Mossberg firearm parts and service requirements outside of the United
States, customers are requested to contact the closest Mossberg stocking
dealer/distributor.
Maverick Arms, Inc.
1001 Industrial Blvd.
Eagle Pass, TX 78853
Attn: Order Department
14

MOSSBERG WARRANTY
MVPTMBOLT ACTION RIFLE
ONE (1) YEAR LIMITED WARRANTY
Limited Warranty: O.F. Mossberg & Sons, Inc. (“Mossberg”) warrants to you, the original retail
purchaser of a new Mossberg
firearm will be free of defects in material or manufacture for a period of one (1) year from the date
of your purchase of the new Mossberg firearm (the “Warranty Period”) in the United States or
Canada. This is the only express warranty on the Mossberg firearm. MOSSBERG MAKES NO
OTHER WARRANTIES OF ANY KIND OR CONDITIONS, INCLUDING, BUT NOT LIMITED TO
ANY IMPLIED WARRANTY OF MERCHANTABILITY OR FITNESS FOR A PARTICULAR PURPOSE.
This Limited Warranty gives you specific legal rights, and you may have other rights that vary from State
to State.
Purchaser’s Remedy:
the Mossberg firearm or any part thereof that, upon examination and testing by Mossberg, does
not conform to the Limited Warranty without charge to you for parts or labor, or (2) replace the
Mossberg firearm with a new or similar model. THIS REMEDY SHALL BE YOUR EXCLUSIVE
AND SOLE REMEDY FOR ANY BREACH OF WARRANTY. MOSSBERG SHALL NOT BE
RESPONSIBLE FOR ANY OTHER EXPENSES, LOSSES OR INCONVENIENCE THAT YOU
MAY SUSTAIN AS A RESULT OF THE PURCHASE, USE, MALFUNCTION OR DEFECTIVE
CONDITION OF THE MOSSBERG FIREARM. Mossberg reserves the right to inspect, examine
and/or test the Mossberg firearm to assess any claim made under the Limited Warranty.
EXCLUSIONS:
THE MOSSBERG FIREARM OR ANY DAMAGE CAUSED BY:
(1) NORMAL WEAR AND TEAR;
(2) FAILURE TO PERFORM PROPER CARE AND MAINTENANCE;
(3) ACCIDENTS, ABUSE OR NEGLECT;
(4) BARREL OR BORE OBSTRUCTIONS;
(5) FAILURE TO FOLLOW THE INSTRUCTIONS AND WARNINGS THAT ACCOMPANY
THE MOSSBERG FIREARM; OR
(6) THE USE OF DEFECTIVE, NON-SAAMI STANDARD, REMANUFACTURED, HAND-
LOADED, AND/OR RELOADED AMMUNITION.
IN ADDITION, ANY UNAUTHORIZED REPAIRS, ALTERATIONS OR MODIFICATIONS TO THE
MOSSBERG FIREARM WILL AUTOMATICALLY VOID THE LIMITED WARRANTY.
THIS WARRANTY DOES NOT COVER THE COSMETIC APPEARANCE OF
®
MVPTMBolt Action Rifle (the “Mossberg firearm”), that the Mossberg
During the Warranty Period, Mossberg will, at its sole option, (1) repair
LIMITATION OF DAMAGES:
BE LIABLE FOR ANY LOSS OR DAMAGE WHATSOEVER ARISING FROM THE USE OF THIS
MOSSBERG FIREARM, WHETHER DIRECT, INDIRECT, SPECIAL, INCIDENTAL, CONSEQUENTIAL
OR PUNITIVE, REGARDLESS OF THE LEGAL THEORY ASSERTED, INCLUDING CONTRACT,
WARRANTY, NEGLIGENCE, OR STRICT LIABILITY. SOME JURISDICTIONS DO NOT ALLOW
LIMITATIONS ON HOW LONG AN IMPLIED WARRANTY LASTS, OR THE EXCLUSION OF
INCIDENTAL OR CONSEQUENTIAL DAMAGES, SO THE ABOVE LIMITATIONS MAY NOT APPLY TO
YOU.
Warranty Service:
found in the “Service Instructions” section of the Owner’s Manual and return the Mossberg firearm
to the authorized Product Service Center. You are responsible for all shipping costs to the Product
Service Center. Mossberg will not accept COD shipments of any Mossberg firearm for service.
After repair or replacement, the Mossberg firearm or a similar model will be returned to you, return
postage paid by Mossberg. If we replace the Mossberg firearm, we will keep the firearm that you
returned to Mossberg.
Modification of Warranty:
firearms has any authority to modify the terms or conditions of the Limited Warranty in any way.
The Limited Warranty may only be modified in writing by an authorized officer of Mossberg.
THIS LIMITED WARRANTY IS EFFECTIVE OCTOBER 1, 2011.
To obtain service under this Limited Warranty, you must follow the instructions
EXCEPT WHERE PROHIBITED BY LAW, MOSSBERG WILL NOT
No agent, representative, distributor, or authorized dealer of Mossberg
/N
15

2526272829303132333435363738394041
42
BOLT ACTION CENTERFIRE RIFLE PARTS LIST (SMALL ACTION, 5.56mm SIZE)
TM
MVP
1* RECEIVER 22* TRIGGER HOUSING ASSEMBLY
2* RECOIL LUG 23* TRIGGER HOUSING WASHER
ITEM DESCRIPTION ITEM DESCRIPTION
STRIKER ASSEMBLY SWIVEL STUD
BOLT BODY ASSEMBLY TRIGGER GUARD SCREW
O-RING TRIGGER GUARD
BOLT HEAD REAR ACTION SCREW
EJECTOR RETAINING PIN MAGAZINE ASSEMBLY
CARTRIDGE PUSHER SPRING FRONT ACTION SCREW
CARTRIDGE PUSHER PIN MAGAZINE GUIDE
3* BARREL LOCK NUT 24* TRIGGER HOUSING SCREW
4* BARREL STOCK
05
06*0708*
1011121314151617181920
09
16
CARTRIDGE PUSHER MAGAZINE LATCH PIN
EJECTOR SPRING ESCUTCHEON
EJECTOR MAGAZINE LATCH SPRING
BOLT HEAD ASSEMBLY PIN MAGAZINE LATCH
EXTRACTOR SPRING RECOIL PAD SCREW
DETENT BALL RECOIL PAD
EXTRACTOR FRONT SCOPE BASE
BOLT STOP SCREW FRONT SCOPE BASE SCREWS (1/4" LONG)
BOLT STOP SPRING REAR SCOPE BASE
BOLT STOP REAR SCOPE BASE SCREWS (5/16" LONG)
* Items on Parts List are reserved for qualified gunsmiths or the Authorized Product Center Only
21

17

24*25262728293031323334353637383940
BOLT ACTION CENTERFIRE RIFLE PARTS LIST (LARGE ACTION, 7.62mm SIZE)
TM
MVP
2* RECOIL LUG 22* TRIGGER HOUSING ASSEMBLY
1* RECEIVER 21* BOLT STOP
ITEM DESCRIPTION ITEM DESCRIPTION
STRIKER ASSEMBLY STOCK
BOLT BODY ASSEMBLY SWIVEL STUD
MAGAZINE RETAINER TRIGGER GUARD SCREW
BOLT HEAD TRIGGER GUARD
EJECTOR RETAINING PIN REAR ACTION SCREW
MAGAZINE RETAINER PIN MAGAZINE ASSEMBLY
3* BARREL LOCK NUT 23* TRIGGER HOUSING WASHER
4* BARREL TRIGGER HOUSING SCREW
05
06*0708*
09
1011121314151617181920
18
REAR SCOPE BASE SCREWS (5/16" LONG) FRONT ACTION SCREW
FRONT SCOPE BASE SCREWS (1/4" LONG) MAGAZINE GUIDE
EJECTOR SPRING MAGAZINE LATCH PIN
EJECTOR ESCUTCHEON
BOLT HEAD ASSEMBLY PIN MAGAZINE LATCH SPRING
EXTRACTOR SPRING MAGAZINE LATCH
DETENT BALL RECOIL PAD SCREW
EXTRACTOR RECOIL PAD
BOLT STOP SCREW REAR SCOPE BASE
BOLT STOP SPRING FRONT SCOPE BASE
* Items on Parts List are reserved for qualified gunsmiths or the Authorized Product Center Only

19

NOTES
20

NOTES
21

FIREARMS SAFETY DEPENDS ON YOU.
MAKE NO MISTAKE ABOUT IT!
From the time an individual picks up a firearm, that individual shooter becomes
a part of a system over which he has complete control. He is the only part of
the system that can make a gun safe – or unsafe. Hunting and target shooting
are among the safest of all sports. This booklet is intended to make them even
safer – by re-emphasizing and reaffirming the basics of safe gun handling and
storage and by reminding each individual shooter that he or she is the key to
firearms safety. You can help meet this responsibility by enrolling in hunter
safety or shooting safety courses. You must constantly stress safety when
handling firearms, especially to children and non-shooters. Newcomers in
particular must be closely supervised when handling firearms with which they
may not be acquainted. Don’t be timid when it comes to gun safety. If you
observe anyone violating any safety precautions, you have an obligation to
suggest safer handling practices, such as those in this booklet. Please read
these rules carefully and follow the safety procedures outlined. Firearms safety
is up to you. Make no mistake about it.
1. ALWAYS KEEP THE MUZZLE POINTED IN A SAFE DIRECTION
2. FIREARMS SHOULD BE UNLOADED WHEN NOT ACTUALLY
IN USE
3. DON’T RELY ON YOUR GUN’S “SAFETY”
4. BE SURE OF YOUR TARGET AND WHAT’S BEYOND IT
5. USE CORRECT AMMUNITION
6. IF YOUR GUN FAILS TO FIRE WHEN THE TRIGGER IS PULLED,
HANDLE WITH CARE
7. ALWAYS WEAR EYE AND EAR PROTECTION WHEN SHOOTING
8. BE SURE THE BARREL IS CLEAR OF OBSTRUCTIONS BEFORE
SHOOTING
9. DO NOT ALTER OR MODIFY YOUR GUN, AND HAVE GUNS
SERVICED REGULARLY
10. LEARN THE MECHANICAL AND HANDLING CHARACTERISTICS
OF THE FIREARM YOU ARE USING
Sporting Arms and Ammunition Manufacturers’ Institute, Inc.
Courtesy of
 Loading...