

Patent No. 7823315 B2 and Patents
Pending
Note: This manual is only a supplement to your firearm’s owner’s manual. It
only addresses the FLEX System and its accessories.
IMPORTANT “SAFETY WARNINGS” — NOTE THE SYMBOL
THESE SAFETY WARNINGS ARE FOR YOUR PROTECTION AS WELL AS THE
SAFETY OF OTHERS. DISREGARDING INFORMATION IN THIS MANUAL MAY
RESULT IN SERIOUS INJURY OR DEATH.
Be certain this owner’s manual is available for reference and is kept with
this firearm if transferred to another party. If this manual is lost or
misplaced, contact the Product Service Center for a free replacement
copy.
After performing any work on your firearm such as cleaning, adjustments,
disassembly or installation of any accessory, the firearm should be rechecked for proper functioning before firing live ammunition.
Firearms are complex mechanisms. Any modification, alteration, or
improper fitting of parts may result in a dangerous malfunction, damage to
the firearm and injury to the shooter and/or others nearby. The firearm’s
owner must accept full responsibility for the correct reassembly and
functioning of the firearm after any disassembly or replacement of parts.
If you do not understand any of the material in this manual or have any
questions, contact the Product Service Center or a qualified gunsmith.
Do not attempt to load, handle or use the firearm until you read and
understand the information contained in its owner’s manual. Before
handling your firearm, you should learn how it operates and how to
maintain it. This includes knowing its basic parts, how the manual safety
and other safety features operate, how to safely open and close the action
and how to safely load and unload ammunition from the firearm. Improper
use and handling is dangerous and could cause serious injury or death to
you or those around you. All users of the firearm must become thoroughly
familiar with the instructions in this manual.
O.F. MOSSBERG & SONS, INC.
P.O. BOX 497 • 7 GRASSO AVENUE, NORTH HAVEN, CT 06473
PHONE (800) 363-3555
www.mossberg.com
Safety and safe firearms handling is everyone’s responsibility.

As the owner of a firearm, you must undertake the full-time responsibility
of safe firearms handling for your own safety and the safety of those
around you:
Keep all firearms and ammunition out of the reach of children.
Store your firearms and ammunition separately.
Never store a loaded firearm.
Never leave a loaded firearm unattended.
Never transport a loaded firearm in a vehicle.
Unload your firearm when you have stopped shooting and when
you have to climb a tree, fence, cross a slippery surface or have
to transport it in a vehicle.
Do not load your firearm before you are in a place where it is safe
to shoot, and keep your finger off the trigger until you are on
target and have decided to fire.
Never shoot at water, rocks or any hard surfaces. Bullets may
glance off such surfaces and cause injuries.
Do not use alcohol or drugs before or while handling firearms.
Do not touch the trigger while the safety button is being engaged
or disengaged.
Always point the muzzle of your firearm in a safe direction, regardless of
whether the firearm is loaded or unloaded. You should become thoroughly
familiar with the function and operation of this firearm and the instructions
supplied with it.
Always treat every firearm as if it is loaded. Give your firearm to someone
with the action open (bolt fully rearward), and the safety button fully to the
“ON” (SAFE) position, after you verify the firearm is unloaded. Insist on the
same procedure when receiving a firearm from someone else. Learn the
location of all the safety features of your firearm and how they operate.
Wear eye and ear protection when shooting. Shooting without proper ear
protection can cause hearing damage. The use of eye protection during
any type of shooting is important to protect your vision.
When using a firearm with mounted optics, maintain an adequate distance
between the rear of the scope and your face at all times. Be certain the
scope installation does not interfere with access to, or the proper
functioning of the safety button.
We specifically disclaim any responsibility for damage or injury
whatsoever occurring in connection with, or as a result of, the use of
faulty, or non-commercially manufactured, or remanufactured or
hand-loaded (reloaded) ammunition. Additionally, we disclaim any
responsibility for damage or injury which results from any
modifications or changes that are not a part of the firearm as
delivered from the factory.
Learn to clean your firearm thoroughly and make certain no oil, grease or
other materials are blocking the barrel. Obstructions of any kind can cause
damage to the firearm resulting in personal injury.
Practice proper firearm maintenance and safety. Make sure all exposed metal
surfaces are coated with a thin film of oil, especially after being exposed to damp
weather. (See the proper section of this manual for cleaning instructions.) Do not
plug the barrel or store in a fabric-lined case, which will absorb lubricants from the
firearm. Before using after storage, follow complete instructions stated in this
manual for re-familiarization with the firearm. A thorough inspection and function
test should be performed before going into the field. Have your firearm periodically
checked by a qualified gunsmith.
PART N0. 100848 REV. A 2

A note about the warnings and information contained in this manual:
We strongly suggest that you check with your local licensed retailer or state
police for additional information concerning firearms ownership, or hunting
or target shooting rules that may be required by local law or regulation. Since
such rules and regulations are subject to change, local authorities are in the
best position to advise you on such matters.
TABLE OF CONTENTS
Page
To Attach Forearm . . . . . . . . . . . . . . . . . . . . . . . . . . . . . . . . . . . . . . . . . 4
To Remove Forearm . . . . . . . . . . . . . . . . . . . . . . . . . . . . . . . . . . . . . . . 5
To Remove/Attach Tactical Light Switch or Switch Blank . . . . . . . . . 6, 7
Using A Vertical Grip On The Tactical Forearm . . . . . . . . . . . . . . . . . . . 7
To Attach Buttstock / Pistol Grip . . . . . . . . . . . . . . . . . . . . . . . . . . . . . . 8
To Remove Buttstock / Pistol Grip . . . . . . . . . . . . . . . . . . . . . . . . . . 9, 10
To Attach Recoil Pad . . . . . . . . . . . . . . . . . . . . . . . . . . . . . . . . . . . . . . 11
To Remove Recoil Pad . . . . . . . . . . . . . . . . . . . . . . . . . . . . . . . . . . . . . 12
To Adjust 4 And 6 Position Buttstocks . . . . . . . . . . . . . . . . . . . . . . . . . 13
To Change Removable Combs . . . . . . . . . . . . . . . . . . . . . . . . . . . . . . 14
Service Instructions . . . . . . . . . . . . . . . . . . . . . . . . . . . . . . . . . . . . . . . 15
Basic Rules of Safe Firearms Handling . . . . . . . . . . . . . . . . Back Cover
PART N0. 100848 REV. A 3
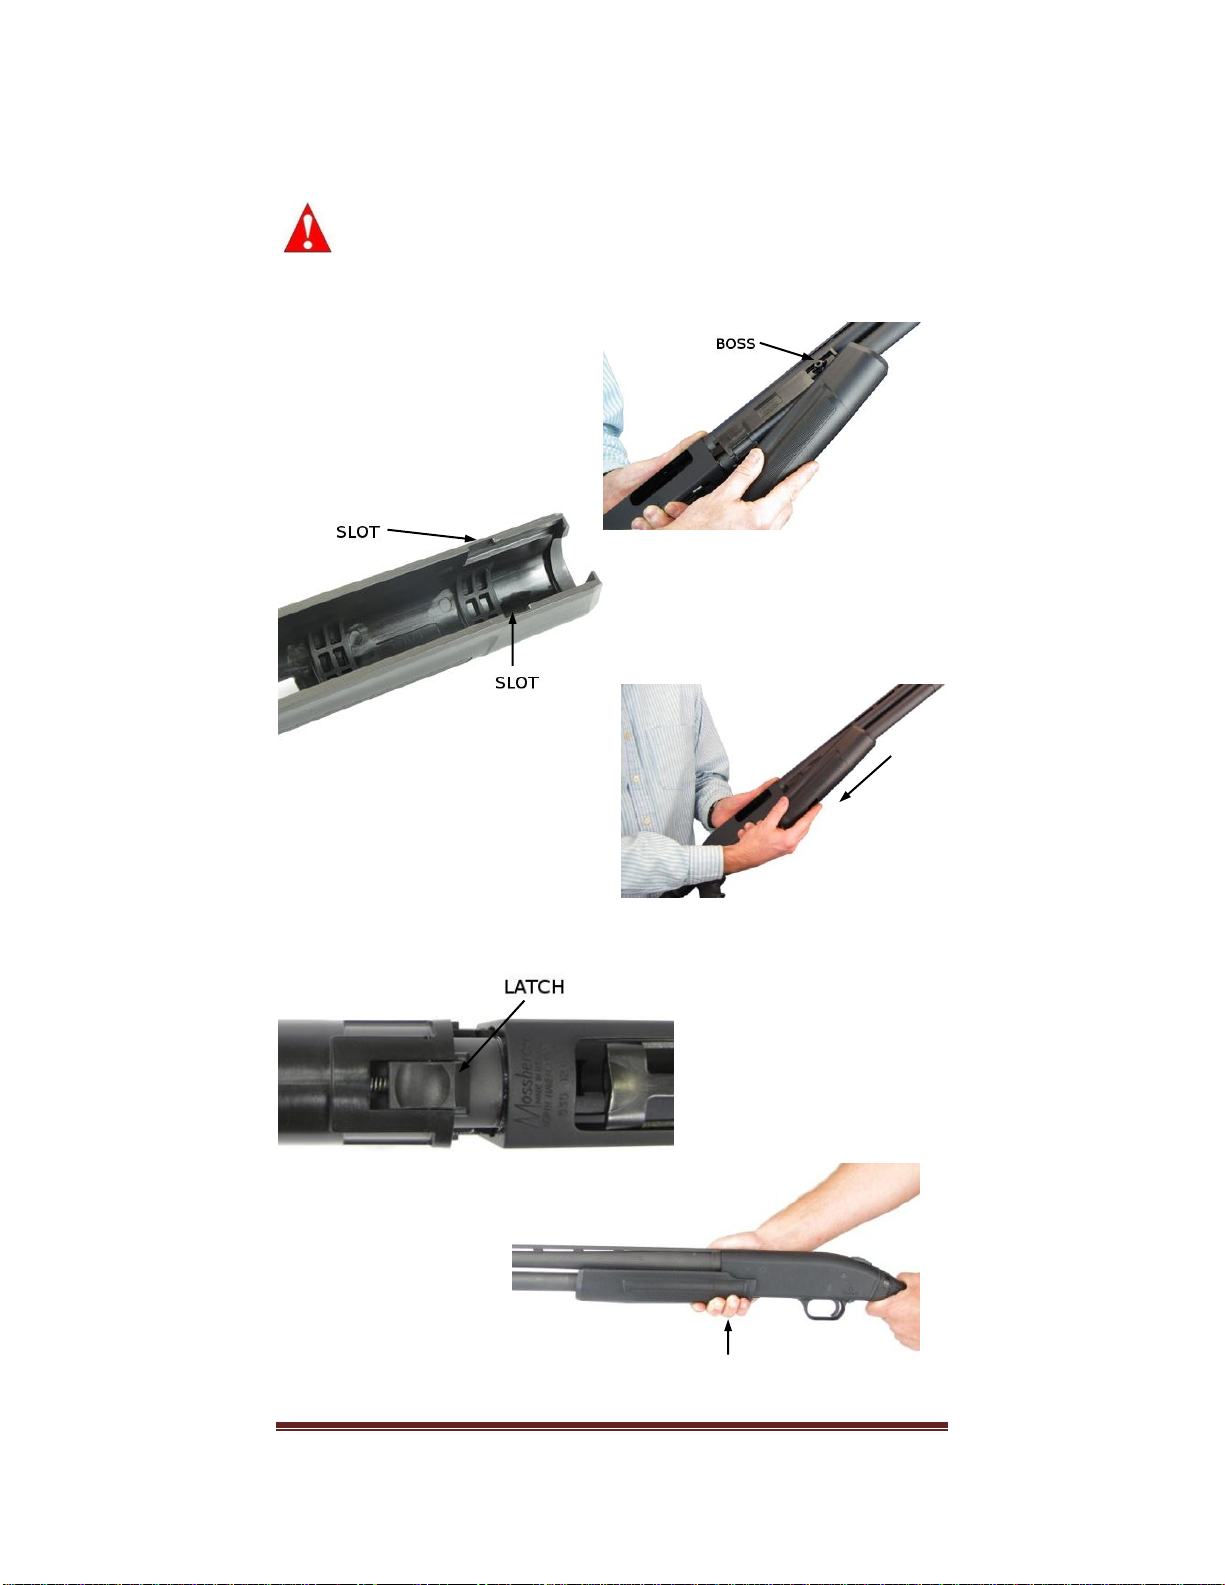
TO ATTACH FOREARM:
Before making any forearm changes, move the safety button fully
rearward to the “ON” (SAFE) position and visually and physically check
the chamber, elevator, and magazine tube to be certain the shotgun is
unloaded. Also, be sure to keep the action open and the muzzle pointed
in a safe direction. Refer to your firearm’s owner’s manual for additional
safety and functional information.
a) Tilt forearm (Fig. 1).
Fig. 1
b) Align slots in top of forearm with
bosses on carrier (Figs. 1 & 2).
Fig. 2
c) Push forearm over bosses and slide
fully rearward (Fig. 3).
Fig. 3
d.) Hinge forearm up until latch engages (Figs. 4 & 5). Pull down on the forearm to
ensure it is properly seated and perform a function test per instructions in your
firearm’s owner’s manual.
Fig. 4
Fig. 5
PART N0. 100848 REV. A 4
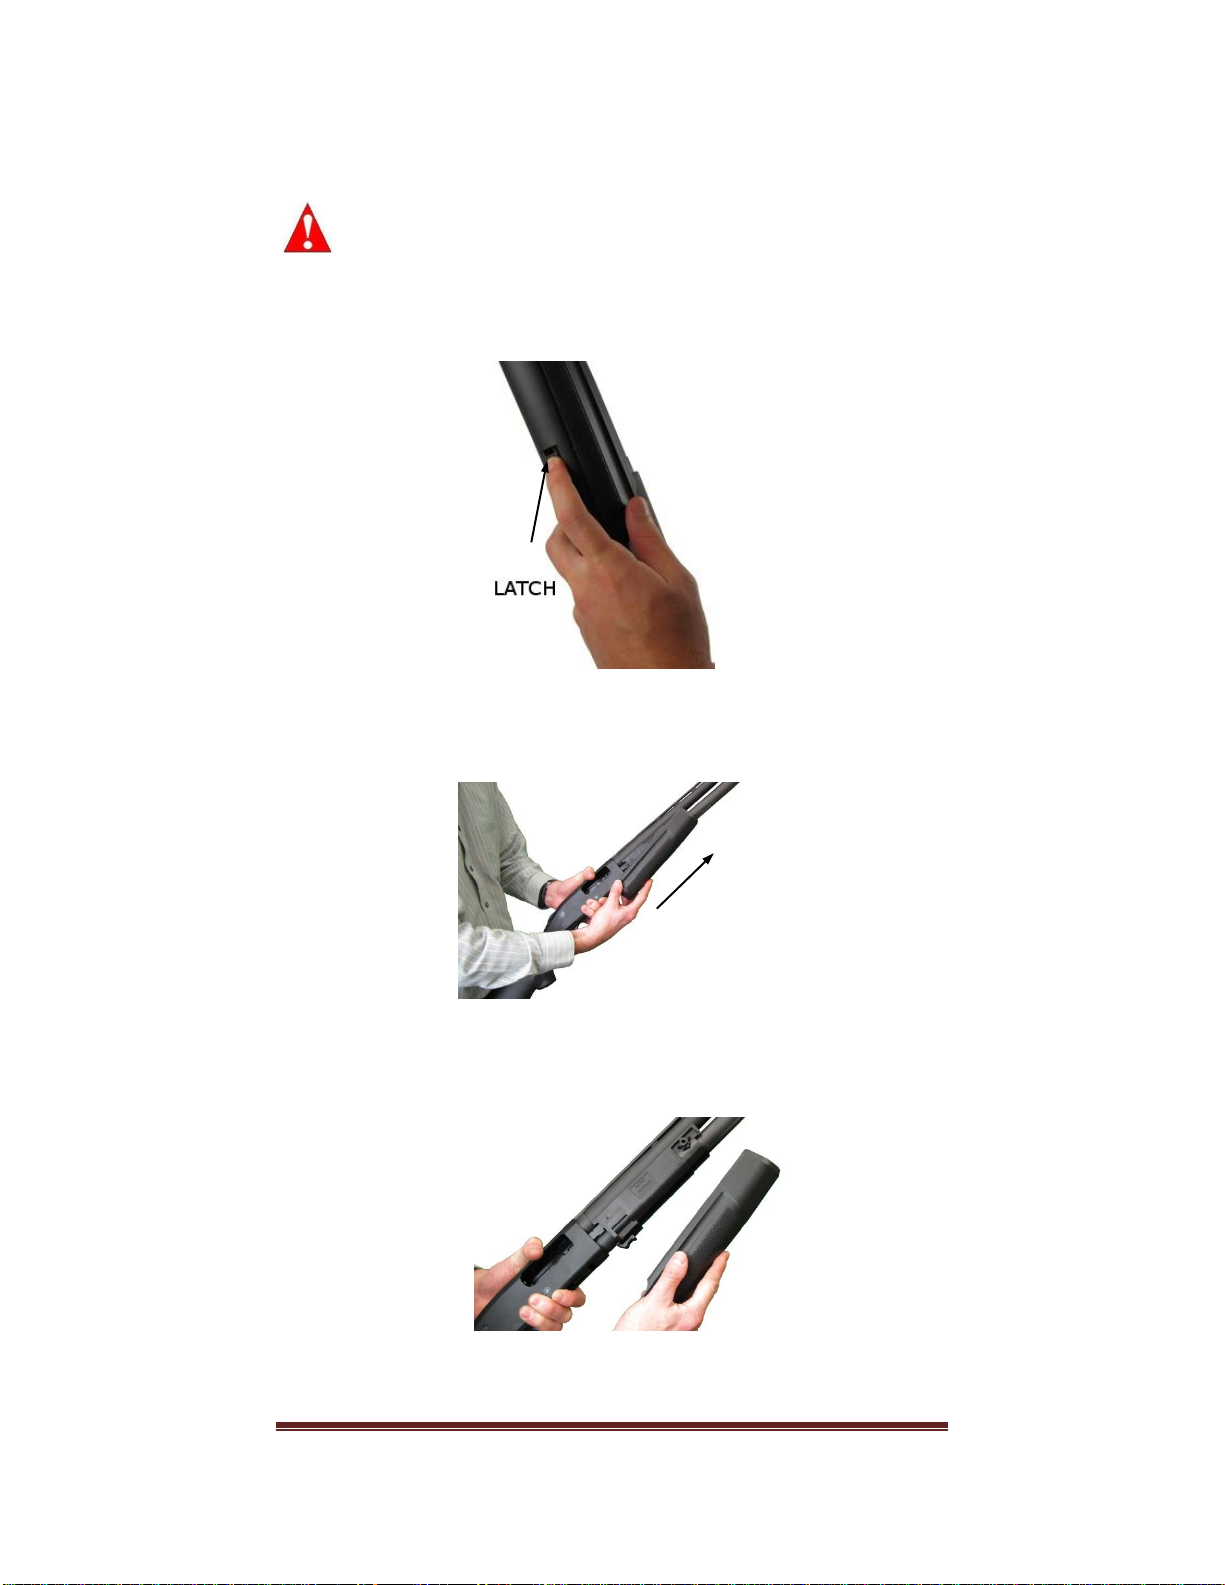
TO REMOVE FOREARM:
Before making any forearm changes, move the safety button fully
rearward to the “ON” (SAFE) position and visually and physically check
the chamber, elevator, and magazine tube to be certain the shotgun is
unloaded. Also, be sure to keep the action open and the muzzle pointed
in a safe direction. Refer to your firearm’s owner’s manual for additional
safety and functional information.
a) Push latch forward and rotate forearm down (Fig. 6).
Fig. 6
b) Push forearm forward until it stops (Fig. 7).
Fig. 7
c) Slide forearm off over the front bosses on forearm carrier (Fig 8.).
Fig. 8
PART N0. 100848 REV. A 5

TO REMOVE/ATTACH TACTICAL LIGHT SWITCH OR SWITCH BLANK
Before making any changes to forearm accessories, move the safety
button fully rearward to the “ON” (SAFE) position and visually and
physically check the chamber, elevator, and magazine tube to be certain
the shotgun is unloaded. Also, be sure to keep the action open and the
muzzle pointed in a safe direction. Refer to your firearm’s owner’s manual
for additional safety and functional information.
NOTE: A tactical light switch can be placed on either the right or
left side for the forearm.
a) Remove the tactical light switch blank by peeling it from the
forearm (Figs. 9 & 10).
LIGHT SWITCH POCKET
Fig. 9
Fig. 10
PART N0. 100848 REV. A 6

b) Locate tactical light switch in light switch pocket (Fig. 10) and
press down firmly (Fig. 11).
Fig. 11
Follow the same procedure to remove tactical light switch and
replace with tactical light switch blank.
To avoid damage to the accessory and to prevent possible personal injury,
before firing live ammunition verify by hand that the accessory is securely
locked into place and perform a function test per instructions in your
firearm’s owner’s manual.
USING A VERTICAL GRIP ON THE TACTICAL FOREARM
Attach vertical grips per the grip manufacturer’s instructions.
When using a vertical grip, DO NOT fire rounds heavier than 2-3/4” 00
buckshot. The high recoil of the heavier rounds may cause excessive
wear of the forearm latch, which may lead to damage or failure of the
latch.
When using a vertical grip, use only grips with a long base as shown in
Fig. 12a. Short-base grips as shown in Fig. 12b may cause damage to
the Picatinny rail.
Fig. 12a Fig. 12b
CORRECT GRIP INCORRECT GRIP
PART N0. 100848 REV. A 7

TO ATTACH BUTTSTOCK / PISTOL GRIP:
Before making any buttstock/pistol grip changes, move the safety button
fully rearward to the “ON” (SAFE) position and visually and physically
check the chamber, elevator, and magazine tube to be certain the shotgun
is unloaded. Also, be sure to keep the action open and the muzzle
pointed in a safe direction. Refer to your firearm’s owner’s manual for
additional safety and functional information.
a) Lift the latch and turn it 90 degrees clockwise as shown in Fig. 13a. Push the
buttstock/pistol grip forward on the adapter (Fig. 13b) and strike the rear of the
buttstock/pistol grip with an open palm to fully seat it on the adapter.
OPEN LATCH
Fig. 13a Fig. 13b
b) Turn latch 90 degrees clockwise so tab is facing forward and
will fit into slot on buttstock/pistol grip (Fig. 14).
TAB
Fig. 14
c) Close latch by pushing it fully downward until it is flush with the top
of the buttstock/pistol grip (Figs. 15 & 16). Tug buttstock/pistol grip to
make sure it is seated fully and perform a function test per
instructions in your firearm’s owner’s manual.
Fig. 15 Fig. 16
PART N0. 100848 REV. A 8

TO REMOVE BUTTSTOCK / PISTOL GRIP:
Before making any buttstock/pistol grip changes, move the safety button
fully rearward to the “ON” (SAFE) position and visually and physically
check the chamber, elevator, and magazine tube to be certain the shotgun
is unloaded. Also, be sure to keep the action open and the muzzle
pointed in a safe direction. Refer to your firearm’s owner’s manual for
additional safety and functional information.
a) Push the latch so it is fully extended as shown (Fig. 17).
Fig. 17
b) Turn latch 90 degrees counterclockwise (Fig. 18). The buttstock/pistol
grip will not come off if the latch is not turned in this direction.
Fig. 18
PART N0. 100848 REV. A 9

c) With an open palm strike the stock/pistol grip as shown to loosen it
from the adapter (Figs. 19a &19b).
Fig. 19a
Fig. 19b
d) Pull buttstock/pistol grip from the adapter (Fig. 20).
Fig. 20
PART N0. 100848 REV. A 10

TO ATTACH RECOIL PAD
Before making any recoil pad changes, move the safety button fully
rearward to the “ON” (SAFE) position and visually and physically check
the chamber, elevator, and magazine tube to be certain the shotgun is
unloaded. Also, be sure to keep the action open and the muzzle pointed
in a safe direction. Refer to your firearm’s owner’s manual for additional
safety and functional information.
Identify the bosses on the recoil pad (Fig. 21) and the pear-shaped holes in the
recoil pad release lever (Fig. 22).
RELEASE
BOSSES PEAR-SHAPED HOLES LEVER
Fig. 21 Fig. 22
Push bosses on recoil pad through the pear-shaped holes in recoil pad release
lever (Figs 23 & 24). Push the pad towards the top of the stock and in until the
release lever audibly clicks into place. Tug and twist the pad to ensure it is properly
seated and perform a function test per instructions in your firearm’s owner’s
manual.
Fig. 23
Fig. 24
PART N0. 100848 REV. A 11

TO REMOVE RECOIL PAD
Before making any recoil pad changes, move the safety button fully
rearward to the “ON” (SAFE) position and visually and physically check
the chamber, elevator, and magazine tube to be certain the shotgun is
unloaded. Also, be sure to keep the action open and the muzzle pointed
in a safe direction. Refer to your firearm’s owner’s manual for additional
safety and functional information.
To remove recoil pad, fully depress the recoil pad release button (Fig. 25)
while pulling the recoil pad away from the buttstock until it comes free (Fig. 26).
RECOIL PAD RELEASE
BUTTON
Fig. 25
Fig. 26
PART N0. 100848 REV. A 12

TO ADJUST 4 AND 6 POSITION BUTTSTOCKS
Before making any buttstock adjustments, move the safety button fully
rearward to the “ON” (SAFE) position and visually and physically check
the chamber, elevator, and magazine tube to be certain the shotgun is
unloaded. Also, be sure to keep the action open and the muzzle pointed
in a safe direction. Refer to your firearm’s owner’s manual for additional
safety and functional information.
The adjustable hunter buttstock (Fig. 27) has 4 positions for length of pull and
the adjustable tactical buttstock (Fig. 28) has 6 positions to adjust length of
pull. To adjust length of pull, squeeze latch and slide buttstock in or out to the
desired position. Release latch and push inward on rear of buttstock until the
buttstock locks into place. Tap or push on rear of buttstock to verify buttstock
is locked into place and perform a function test per instructions in your
firearm’s owner’s manual.
LATCH
LATCH
To avoid damage to the buttstock and to prevent possible personal injury,
before firing live ammunition verify the buttstock is locked into place by
tapping on rear of buttstock and performing a function test per instructions
in your firearm’s owner’s manual.
Fig. 27
Fig. 28
PART N0. 100848 REV. A 13

TO CHANGE REMOVABLE COMBS
Before making any comb changes, move the safety button fully rearward
to the “ON” (SAFE) position and visually and physically check the
chamber, elevator, and magazine tube to be certain the shotgun is
unloaded. Also, be sure to keep the action open and the muzzle pointed
in a safe direction. Refer to your firearm’s owner’s manual for additional
safety and functional information.
1) Using a 3/16 inch Allen head wrench (supplied) unscrew and remove the
comb retaining screw found at the top center of the removable comb.
2) Place the desired comb into position. Insert the comb retaining screw and
snug-tighten. Do not overtighten as this will damage the internal assembly
components.
Fig. 29 High Comb
Fig. 30 Low Comb
PART N0. 100848 REV. A 14

Should your firearm or any component of your firearm require service, ship your
entire firearm (please do not send components only), via your chosen carrier,
postage paid (we do not accept C.O.D. shipments), following these instructions:
● Make absolutely certain your firearm is unloaded.
● Do not send ammunition with your firearm.
● Remove all accessories from your firearm such as scopes, slings,
mounts, etc.
● Ship your firearm in a suitable container, packaging it securely to
prevent parts from shifting and/or harm during shipping.
● Include a note with a clear description of the service you wish us to
perform, your complete return shipping address (no P.O. boxes please),
your daytime telephone number and your e-mail address (if available).
It is advisable to place your correspondence inside your shipping
container when shipping.
SHIPPING ADDRESS
Product Service Center
Maverick Arms, Inc.
1001 Industrial Blvd.
Eagle Pass, TX 78853
If you have any service related questions, please contact the Product
Service Center at (830) 773-9007 or service@mossberg.com
TO ORDER PARTS
To order parts from the Product Service Center, you can fax, phone,
mail, or e-mail your order to one of the below numbers/addresses.
Fax Number: (830) 773-5893
Phone Number: (830) 773-9007
E-mail Address: service@mossberg.com
Mailing Address: Product Service Center
Maverick Arms, Inc.
1001 Industrial Blvd.
Eagle Pass, TX 78853
Attn: Order Department
Please provide your name, address, city, state, zip, your daytime phone number
and e-mail (if available). The Product Service Center will need the Model #, Serial
#, Gauge/Caliber, Finish, Item #, and Part Name. There is a $7.50 (U.S.) minimum
parts order charge. Most major credit cards, money orders, and bank drafts are
accepted.
Service outside of the U.S.A.
For Mossberg firearm parts and service requirements outside of the United States,
customers are requested to contact the closest Mossberg stocking
dealer/distributor.
PART N0. 100848 REV. A 15

PART N0. 100848 REV. A 16
 Loading...