

Mossberg 930 JM User Manual
MODEL 930™
PRO &
RHYTHM
SERIES™
MODEL SPECIFIC
INSTRUCTIONS
PLEASE REFER TO YOUR FIREARM’S OWNER’S MANUAL FOR
ADDITIONAL INFORMATION.
MAGAZINE CAPACITY
Your firearm is equipped with an extended magazine tube for increased
magazine capacity. Magazine capacity varies by model as follows;
JM Pro Series™ 9 Shot: Nine (9) 2 ¾” cartridges (eight (8) in the
JM Pro Series™ 10 Shot: Ten (10) 2 ¾” cartridges (nine (9) in the
Patrick Flanigan Rhythm Series™ 13 Shot: Thirteen (13) 2 ¾” cartridges
* Magazine capacity may be decreased when using 3” cartridges.
NOTE: You are responsible for complying with all local, state and federal laws
regarding magazine capacity.
magazine tube, plus one (1) in the chamber).*
magazine tube, plus one (1) in the chamber).*
(twelve (12) in the magazine tube, plus one (1)
in the chamber).*
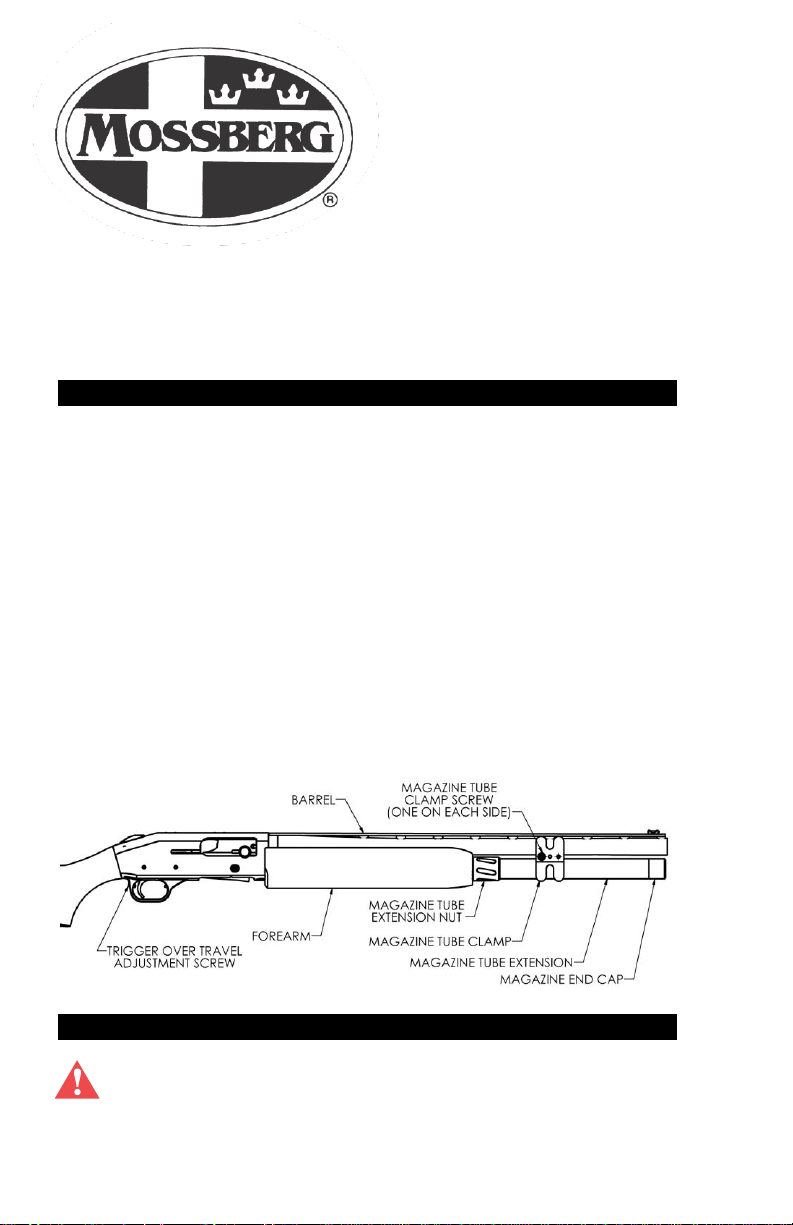
BARREL REMOVAL and INSTALLATION
Move the safety button fully rearward to the “ON” (SAFE) position
and visually and physically check the chamber, elevator, and
magazine tube to be certain the firearm is unloaded before
disassembling the firearm. Wear eye protection during disassembly
and cleaning to protect your eyes from oil spatter or spring loaded
components.

To Remove Your Barrel
The action must be in the open position (bolt locked fully rearward). (See “To
Lock Action Open” section of your firearm’s Owner’s Manual.)
1. Unscrew the magazine end cap. CAUTION: The magazine spring
is under considerable pressure and is retained by the
magazine end cap. The magazine spring will extend to its full
length when the magazine end cap is removed.
2. Remove the magazine spring.
3. Remove the two magazine tube clamp screws from the magazine
tube clamp.
4. Remove the magazine tube clamp.
5. Unscrew the magazine tube extension nut and magazine extension
from the magazine tube.
6. Slide the forearm forward.
7. Pull the barrel forward, free of the receiver and magazine tube.
8. Point the magazine tube downward and catch the magazine
follower as it comes out of the magazine tube. Note the proper
orientation of the magazine follower for reassembly.
To Install Your Barrel
The action must be in the open position (bolt locked fully rearward). (See “To
Lock Action Open” section of your firearm’s Owner’s Manual.)
1. Install the forearm retainer, gas system return spring, pusher
assembly, spacer tube, and gas piston onto the magazine tube.
When reinstalling the barrel onto the firearm, YOU MUST ensure
that the gas piston is present on the magazine tube prior to
installing the barrel. Failure to do so may result in a dangerous
malfunction, damage to the firearm and injury to the shooter and
other persons. The firearms owner must accept full responsibility
for the correct reassembly and functioning of the firearm after any
disassembly or replacement of parts.
2. Install the barrel into the receiver and over the magazine tube.
Continue to push the barrel into the receiver until fully seated. If the
barrel binds during assembly, slide the gas piston forward, toward
the gas cylinder. This should allow the barrel to seat.
3. Install the forearm.
4. Install the magazine tube extension nut and magazine extension
onto the magazine tube. Tighten hand tight only.
5. Install the magazine tube clamp and tighten the two magazine tube
clamp screws.
6. Install the magazine follower into the magazine tube extension.
Note the proper orientation of the magazine follower.
7. Install the magazine spring into the magazine extension.
8. CAREFULLY compress the magazine spring until the magazine end
cap can be threaded onto the magazine extension. Tighten the
magazine end cap hand tight only.
Be certain to check your firearm for proper functioning before
firing any live ammunition (refer to the Function Testing section of
your firearm’s owner’s manual).
 Loading...