

Page 1

MH-50B
Semi-Auto
Chemistry Analyzer
USER MANUAL
Add: No.5 Hepanxiang,Jinhua,Zhejiang, China 321001
Tel: 86-579- 82373070 Fax: 86-579-83533099
Website: www.mossinstruments.com
Page 2

MH-50B Chemistry Analyzer Operation Manual
1
CONTENT
Chapter 1 Introduction .............................................................................. 2
1.1 Test principle.......................................................................................................2
1.2 Technical Criterions.............................................................................................2
1.3 Structure Introduction ..........................................................................................2
Chapter 2 Installation................................................................................ 4
2.1 Work Environment...............................................................................................4
2.2 Instrument Installation: ........................................................................................4
Chapter 3 Operation ................................................................................. 6
3.1 Flow chart............................................................................................................6
3.2 Common operation..............................................................................................7
3.3 Test Sample ........................................................................................................7
3.4 Test Example ....................................................................................................10
3.5 RESULT REPORT.............................................................................................12
Chapter 4 Programme ............................................................................ 16
Chapter 5 Q. C and Reference Value ..................................................... 23
5.1 Preparation........................................................................................................23
5.2 Test Q.C. material .............................................................................................23
5.3 Print the curve and result of Q.C. ......................................................................23
Chapter 6 System Installation................................................................. 25
Chapter 7 Maintenance .......................................................................... 29
7.1 Maintenance......................................................................................................29
7.2 Trouble and Handle...........................................................................................30
Appendix 1: Input Method ......................................................................... 31
Appendix 2: Change the printer-paper ...................................................... 31
Appendix 3: Change Pump Pipe ............................................................... 32
Appendix 4: Clean the colorimetric cell ..................................................... 32
Appendix 5: Change Lamp........................................................................ 32
Appendix 6: Com. protocol ........................................................................ 33
Appendix 7: Items List: .............................................................................. 35
Page 3

MH-50B Chemistry Analyzer Operation Manual
2
Chapter 1 Introduction
1.1 Test principle
The Bio-chemical analyzer is mainly used for the quantitative analysis of the clinical bio-chemical
items, it applies to the Lamber- Beer law:
A=Kbc=lg(I0/I)
Among them:
A: Absorbance
K: Absorbent Index
B: Liquid layer’s Thickness
C: Solution’s Consistency
I
0
: Incident light’s Strength
I: Transmit light’s Strength
According to the above formulas, under the condition of the certain liquid layer’s thickness and
incident light’s strength, as long as test the strength of transmit light which goes through the liquid
layer , so we can calculate the consistency of the given solution.
1.2 Technical Criterions
Use Condition:
Temperature: 0 – 40
o
C;Relative humidity: 10 – 90 %;Applied elec. Power: Interflow 220V±10%;
Conserved Transportation Condition:
Temperature: 0 – 40
o
C; Relative humidity: 10 – 90 %; Amount of saved items’ parameters: ≤70
Solidify items’ parameters in out-firm : 50 units, described largely in “Chapter 4”
The result numbers instrument can save: 200 patients or quality control
The result numbers each patient can save: ≤30 units items
Absorbing samples volume:<600ul
Inner Printer: 36 bits thermal printer(wide:80mm)
(Printer paper: Thermic , 80mm
Screen: 240*128 dots graphic LCD
Communications connector: RS-232)
1.3 Structure Introduction
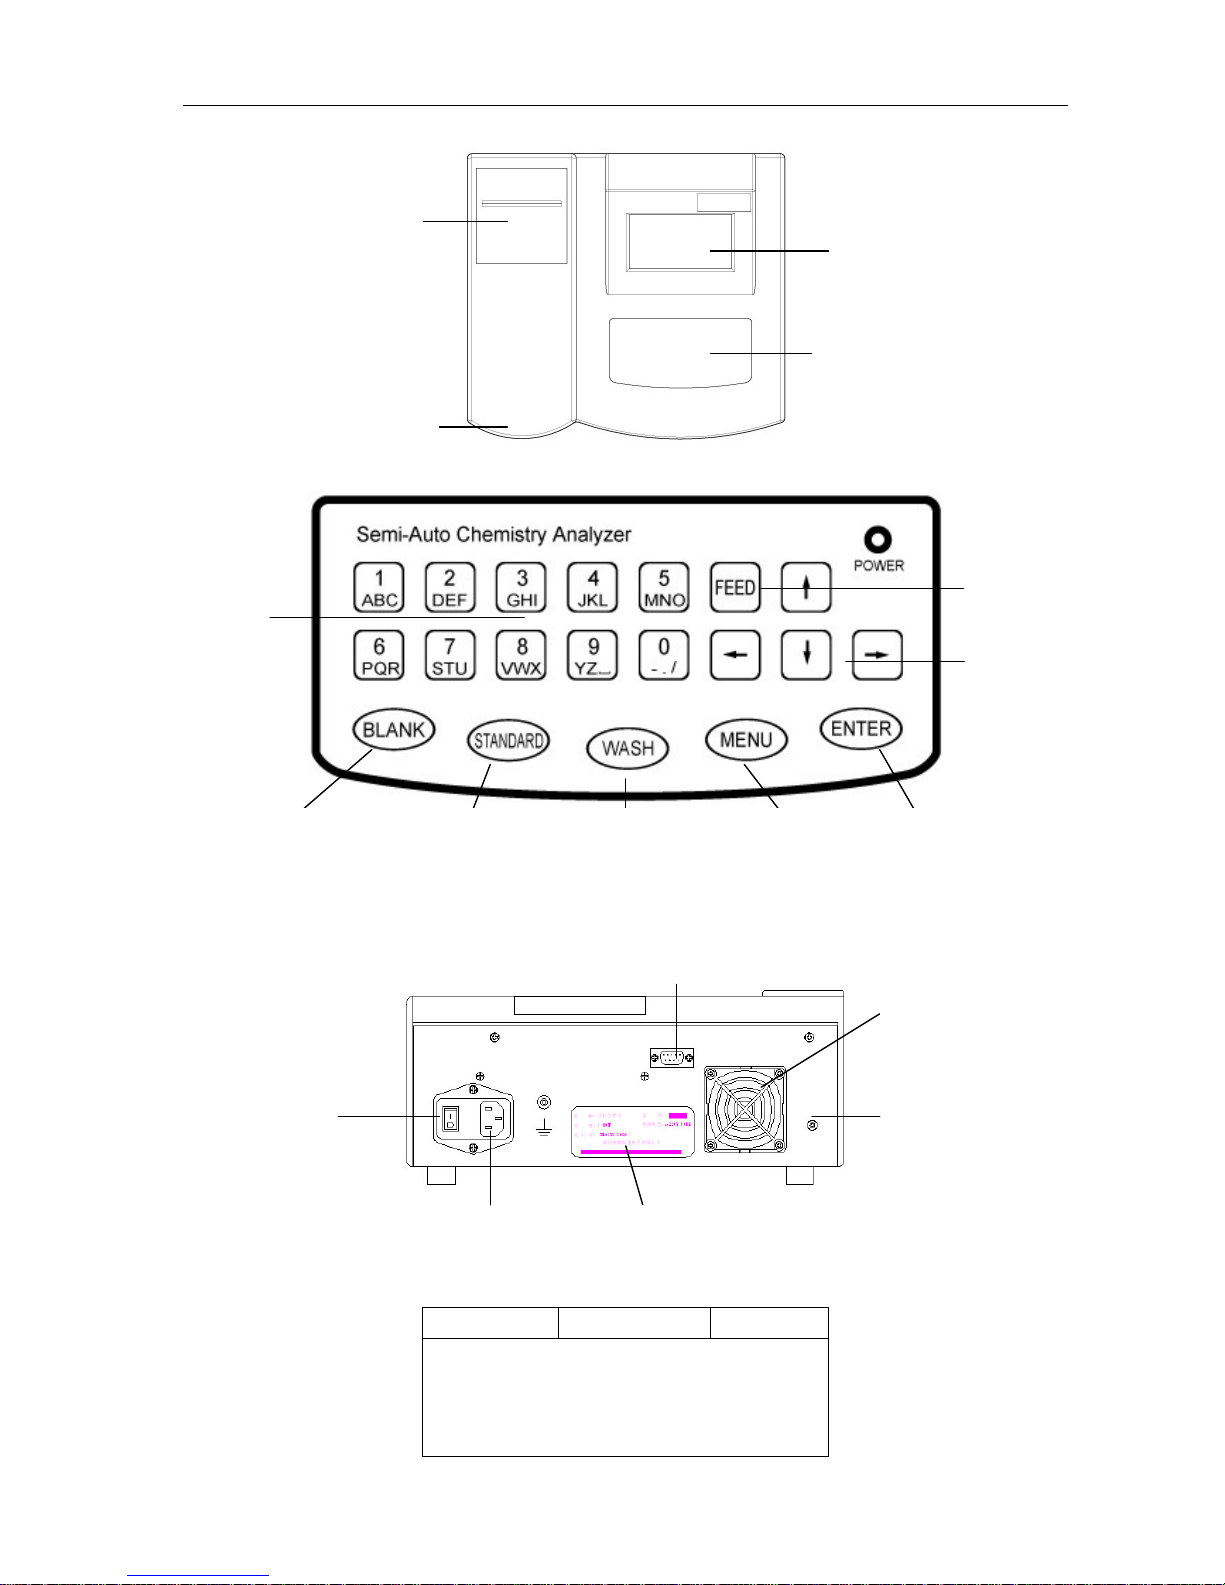
1.3.1 Main components view
Page 4
MH-50B Chemistry Analyzer Operation Manual
3
1.3.2 Scratch map of operation panel-board
1.3.3 Back Scratch Map
1.3.4 Menu Interface
MEASURE PRINT REPORT
MH-50B CHEMISTRY ANALYZER
Ver X.XX
Inner thermal printer
Display Screen
Operation panel-board
ASP Key
Digit Keys
Cursor Keys
FEED PAPER
Waste Outlet
Menu keyClean key Standard key Blank key
RS-232
Fan
3-core Elec.
Power socket
Switch
Enter key
Identification Label
Page 5

MH-50B Chemistry Analyzer Operation Manual
4
PROGRAME QC REPORT UTILITY
Turn on the instrument, it will show the main menu which is consists of 6 submenus, the
operator can select a menu by digit keys or by cursor keys (If you use the cursor keys,
the color of the menu frame will become dark while the color of the letters will become
light, then press the “ENTER” key to enter the menu); you can enter the corresponding
menu directly by pressing the digit keys as 1-6.
In daily work, the operator mainly operates the first, second and third items, you can do
sample test by operating the first item, and print result report by operating the second
item, and edit,examine,print the result report by operating the third item.
Chapter 2 Installation
2.1 Work Environment
This equipment is a precise instrument, so the environment must add to certain requirement in
order that the instrument can be used normally and get accurate results.
The concrete requirement such as follows:
Environment temperature:10°C~30°C Relative humidity: 20%~80%
Atmospheric pressure: 86KPa~106Kpa
Voltage: A.C.220V+
22V Frequency: 50Hz+3Hz
Floor-line: specially floor-line of medical instrument, the resistance of connecting the
earth must be less than 0.5Ω.
Additional requirements: the instrument must be put in a platform which has enough
room, stable level without any vibration; the situation should avoid the equipments such
as fans,air conditioners etc in order not to aeffect the accuracy of temperature control; it
is prohibited to be installed in the environment which is in high temperature,sunlight
shines directly or has much dust; also it can not be put with the equipments which have
big efficiency,heavy interference such as the centrifuges,refrigerators,thermostats etc
in the same room or use the same elec. Power socket.
2.2 Instrument Installation:
1)Open the instrument’s packing box. Check carefully whether the instrument,replacements in the
box match the packing list. If there is any shortage or damage, contact the suppliers quickly;
2)Get out the instrument cautiously after checking carefully, then put it on a stable,smooth work
platform;
3)Connect the earth-pole to the floor which is on the right side of the back of instrument by specially
medical earth-line;
4)Get the elec. Power line out, connect one line to the elec. Power socket which is in the middle of the
back panel, then connect the other line to the three-line plug which has installed earth-line;
5)Find a waste-liquor bottle, put the waste-liquor tube into the waste bottle;
6)Use a beaker or other container to get a cup of DI water;
7)Open the elec. Switch in the back panel;
8)Incubate at least 15 minutes after turning on the instrument’s elec. on;
Page 6

MH-50B Chemistry Analyzer Operation Manual
5
9)Follow the English introduction to operate
Page 7
MH-50B Chemistry Analyzer Operation Manual
6
Chapter 3 Operation
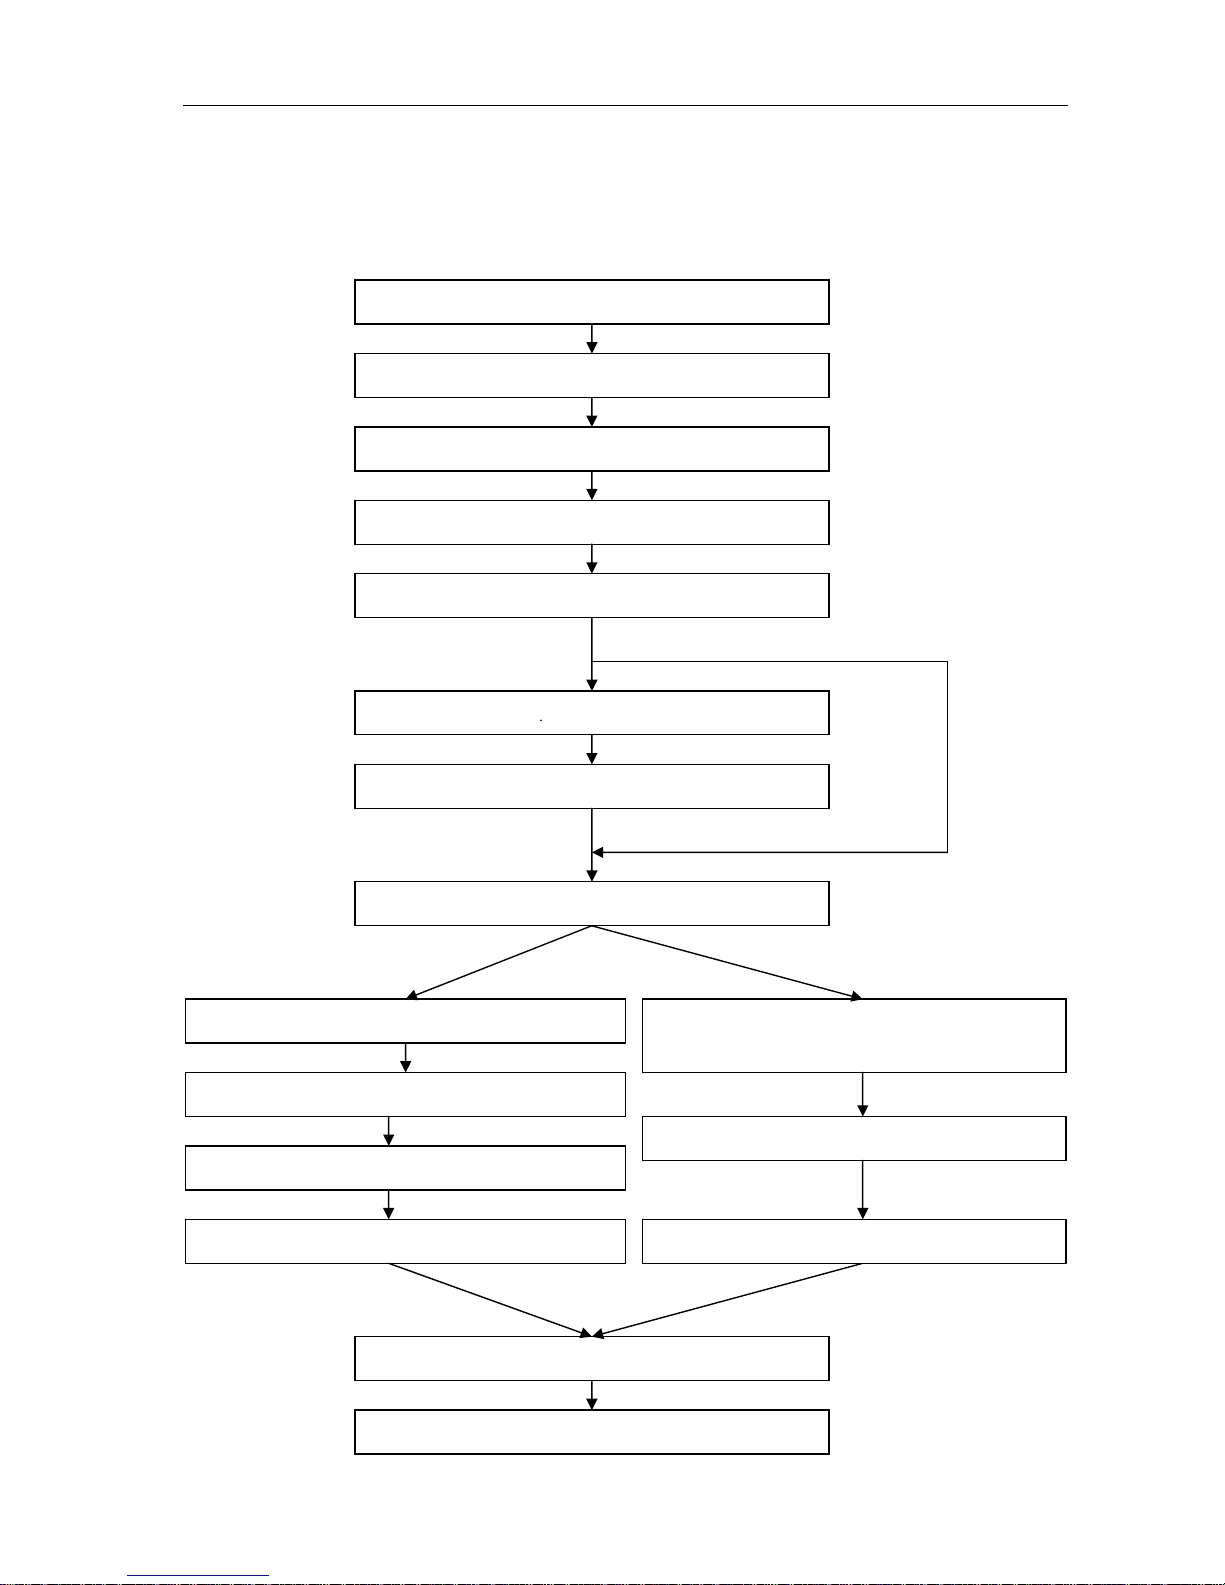
3.1 Flow chart
Switch on the elec. Power, incubate for 15 minutes
Press ‘1’ to enter the “MEASURE” interface
Select the item to be tested
Absorb CLEAN
Absorb BLANK (clean liquor)
Absorb STANDARD liquor
Absorb sample liquor and analyze it
Press 8 to select the patient’s No.
and print the result
Press MENU back to main menu
Press ‘3'enter the menu “RESULT REPORT”
Press 1 to edit patient’s information
Press 4 to print the patient’s result
Press ‘MENU’ back to main menu
Switch off the elec. power
Press ‘ENTER’ key to print the patient’s result
Not the first time
Press ‘MENU’ back to ‘TEST’ interface
Absorb the DI water and test the absorbance
Page 8

MH-50B Chemistry Analyzer Operation Manual
7
3.2 Common operation
3.2.1 Switch the elec. Power on,and incubate the instrument for 15minutes at least;
3.2.2 Test sample: Prepare the sample and reagent according to the reagent manual, enter the first
item in main menu after its reaction time add to the requirement minutes,:‘1-Test sample’ to test the
given sample;
3.2.3 Result report: after testing all items, press ‘menu’ key to enter the main menu, and press digit
key ‘3’ to enter the third item: “Result Report”, select “1-edit patient’s info”, input each patient’s info.
3.2.4 Print Report: After editing all patients’ info, press ‘MENU’ back to the “Result Report” board,
press digit key ‘4’ to print or delete patients’ results; If you only need to print one patient’s result, press
the digit key ‘2’ in the main interface, then input the given patient’s number to print; also you can press
the digit number ‘8’ in the Test items’ interface, then input the given patient’s number and print
directly;
3.2.5 Clean the pipe: clean the tube with CLEAN after you finish operation;
3.2.6 Power off the instrument: Finish all procedures, then cut off the elec. power.
3.3 Test Sample
Press 1 to enter into the menu “Test sample” interface, the system will show:
Press ‘↑’’↓’’←’’→’ to select test, there are more items can be selected:
Press ‘ENTER’ key to enter the interface of “absorb clean liquor”.
1. Absorb the clean liquor
Enter the interface of “Absorb clean liquor”, the screen will display as follows:
Zn P K Na CO2CP
Fe HGB RBC GRP A/G
UDBIL IGG IGM C3 CHE
CK BU U-PRO U-Hb U-GLU
U-URO U-BIL U-KET U-NIT U-PH
PRESS ARROW TO SELECT TEST
ALT ALP GOT r-GT TP
ALB Tbil DBIL TTT BUN
CRE UA CO2 NH3 GLU
TCHO HDLC LDLC TG LDH
AMS CL Ca Mg Cu
PRESS ARROW TO SELECT TEST
Page 9
MH-50B Chemistry Analyzer Operation Manual
8
Put the CLEAN (DI water or NaOH liquor), press ‘ENER’ key , the instrument starts to absorb the
CLEAN;
Press ‘CLEAN’ key to clean again if one time is not enough, it can clean for many times;
Press the ‘’↓’ to stepwise ‘Absorb clean liquor” to enter next step directly if it needn’t cleaning;
Press ‘MENU’ key back to the main menu.
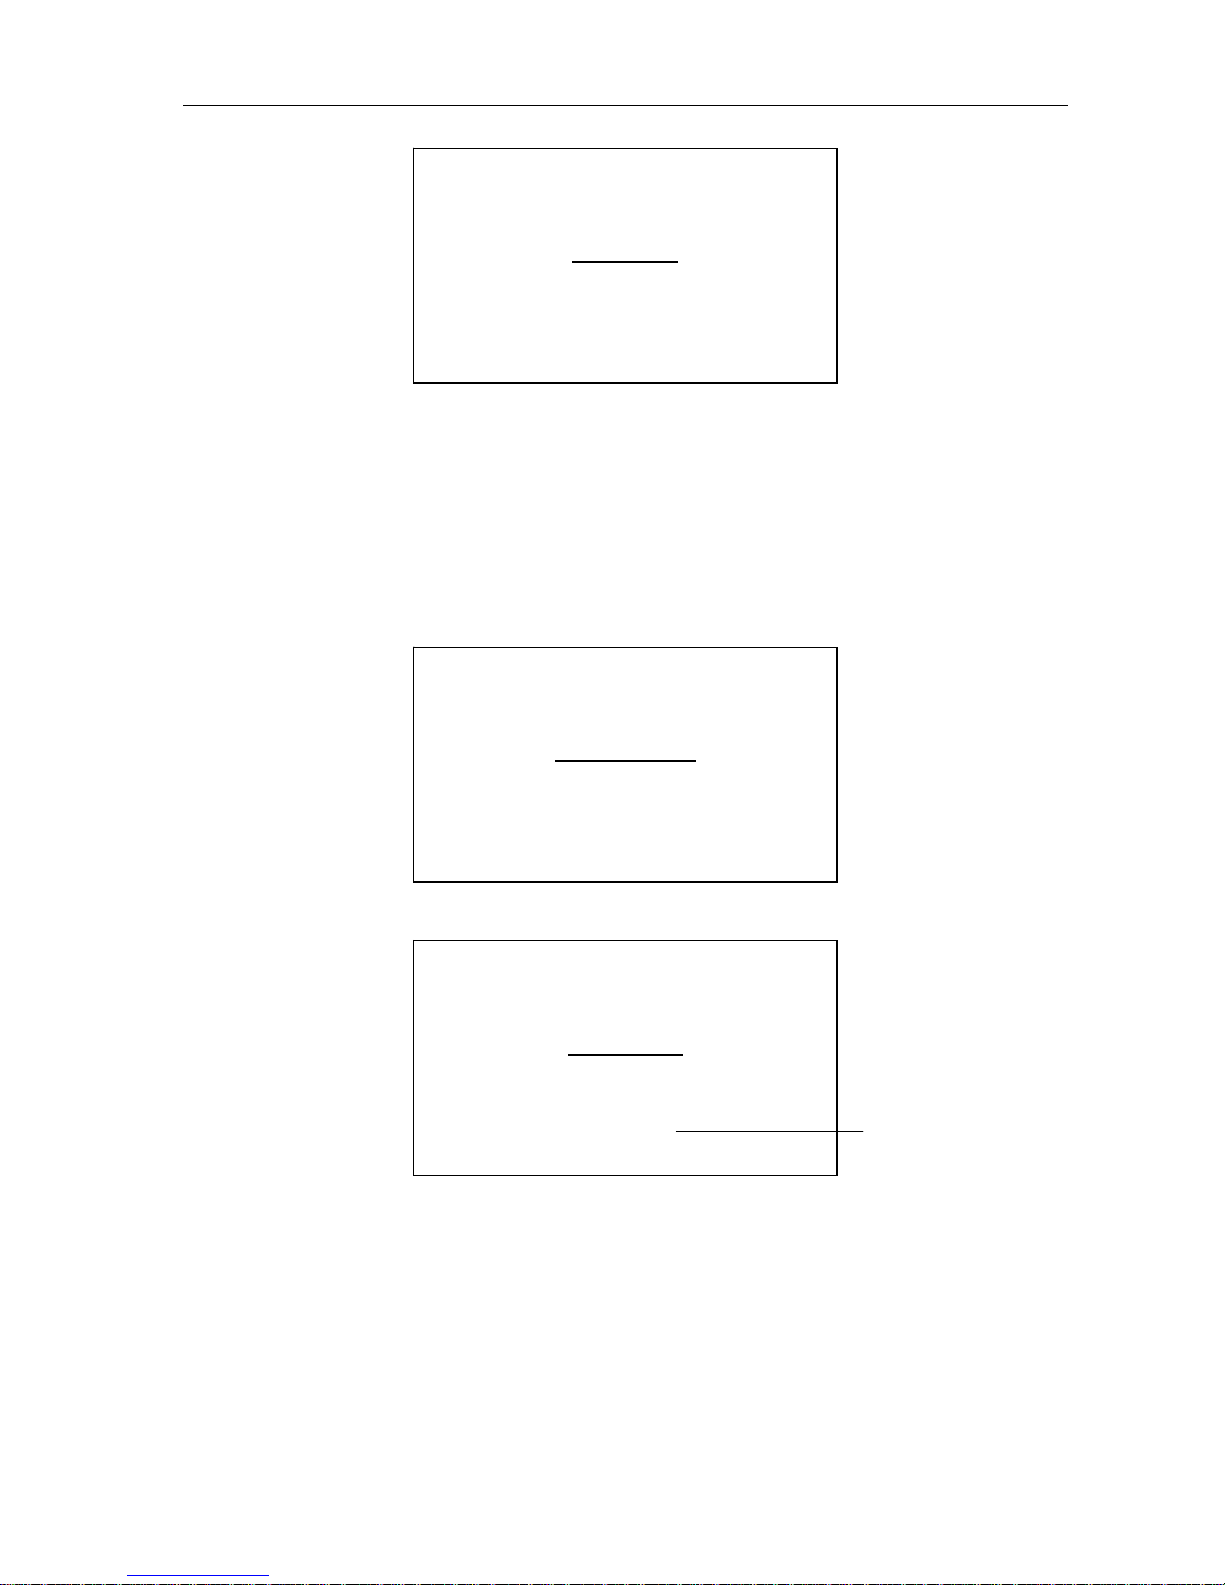
2. Absorb DI water
The system will automatically enter the “Absorb DI water” interface to test absorbance if test items
with END-point method, the screen will display:
Put DI water, and press ‘ENTER’ key, the instrument starts to absorb DI water and test absorbance.
It will prompt you to absorb DI water after filter-wheel rotated in order to adjust absorbance.
3. Absorb clean liquor
When you test the item for the first time, you need to do Blank Test and Standard Test, the system will
enter into “absorb clean liquor” interface automatically after finishing cleaning or finishing absorbance
test.
Put clean liquor, press “ENTER” key, the instrument starts to absorb clean liquor,it will test the
absorbance and original value of Blank liquor, the test result will be shown in the chart.
TEST CODE: 2 ALP
SAMPLE NO:
PRINT:OFF
ASP BLANK
WAVELENGTH: 340nm
ZERO: 4 1 STD: 100
ORIGINAL VALUE: 5440
TEST CODE: 2 ALP
SAMPLE NO:
PRINT:OFF
ASP DI WATER
WAVELENGTH: 340nm
ZERO: 4 1 STD: 100
TEST CODE: 2 ALP
SAMPLE NO:
PRINT:OFF
ASP RINSE
WAVELENGTH: 340nm
ZERO: 4 1 STD: 100
Shows after
finishing test
Page 10

MH-50B Chemistry Analyzer Operation Manual
9
4. Absorb standard liquor 1
Put standard liquor, press “ENTER” key, the instrument starts to absorb clean liquor,it will test the
absorbance and original value of Blank liquor, the test result will be shown in the chart.
Press “CLEAN” key to clean again.
Press “BLANK” key to test the blank liquor again.
Press “STANDARD” key to retest standard liquor again.
Press “MENU” key back to main menu.
5. Absorb sample liquor
If the instrument ever do the Blank Test and Standard Test for the item, it will enter into “Sample Test”
interface after cleaning and testing absorbance just as the above chart. If it is the first time to test the
item, you should do the Blank Test and Standard Test before testing the samples.
Press the “ENTER” key to absorb the sample to do the test when “Absorb standard liquor” twinkles
continually. The test result will be shown in the above chart, the system will change to the next patient
of the same item to test automatically;
You can do the follow operations in this interface (When “Absorb sample liquor” twinkles continually)
Press ‘Standard’,‘Blank’,‘Clean' keys to do the same operation
Press the digit key‘6’ to enter the item and select interface to test other items:
Press the digit key‘7’to alter the patient No., just show as follows:
TEST CODE: 2 ALP
SAMPLE NO: 6
PRINT:OFF
ASP SAMPLE
WAVELENGTH: 340nm
ZERO: 4 1 STD: 100
ABSORBANCE: 0.154
RESULT: 37 mmol/L
TEST CODE: 2 ALP
SAMPLE NO:
PRINT:OFF
ASP STANDARD
WAVELENGTH: 340nm
ZERO: 4 1 STD: 100
STANDARD ABS: 0.723
FACTOR: 138.2
TEST CODE: 2 ALP
SAMPLE NO:
PRINT:OFF
ASP STANDARD
WAVELENGTH: 340nm
ZERO: 4 1 STD: 100
BLANK ABS: 0.000
ORIGINAL VALUE: 5445
Shows after finishing
Blank Test
Shows the first
patient no
automatically
Shows after
finishing the
Sample Test
Shows after finishing
Standard Test
Page 11
MH-50B Chemistry Analyzer Operation Manual
10
Press the digit key ‘8’, the screen will show as follows:
Input “Patient No.” and press “ENTER” key, the system will print the patient’s result report instantly,
press “MENU” key back to “Test Sample” interface;
Press the digit key ‘9’ to setting the item’s coefficients;
Press the ‘MENU’ key back to main menu.
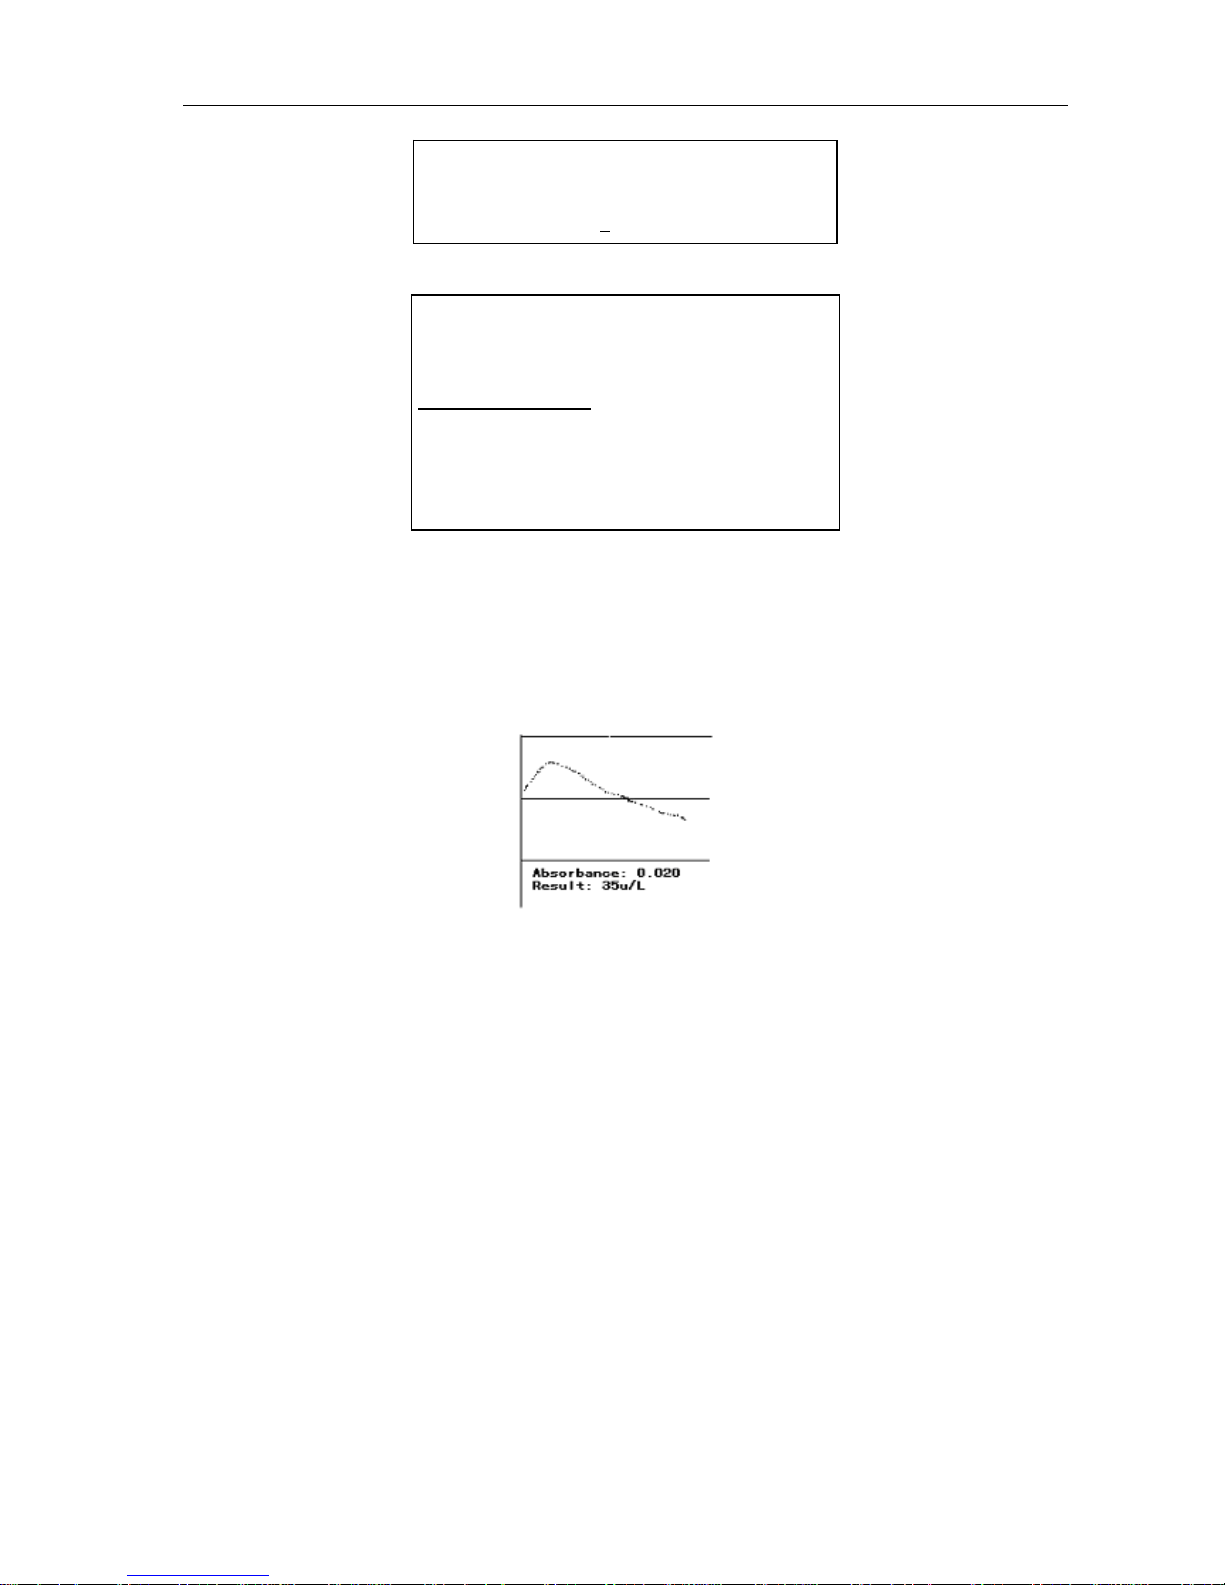
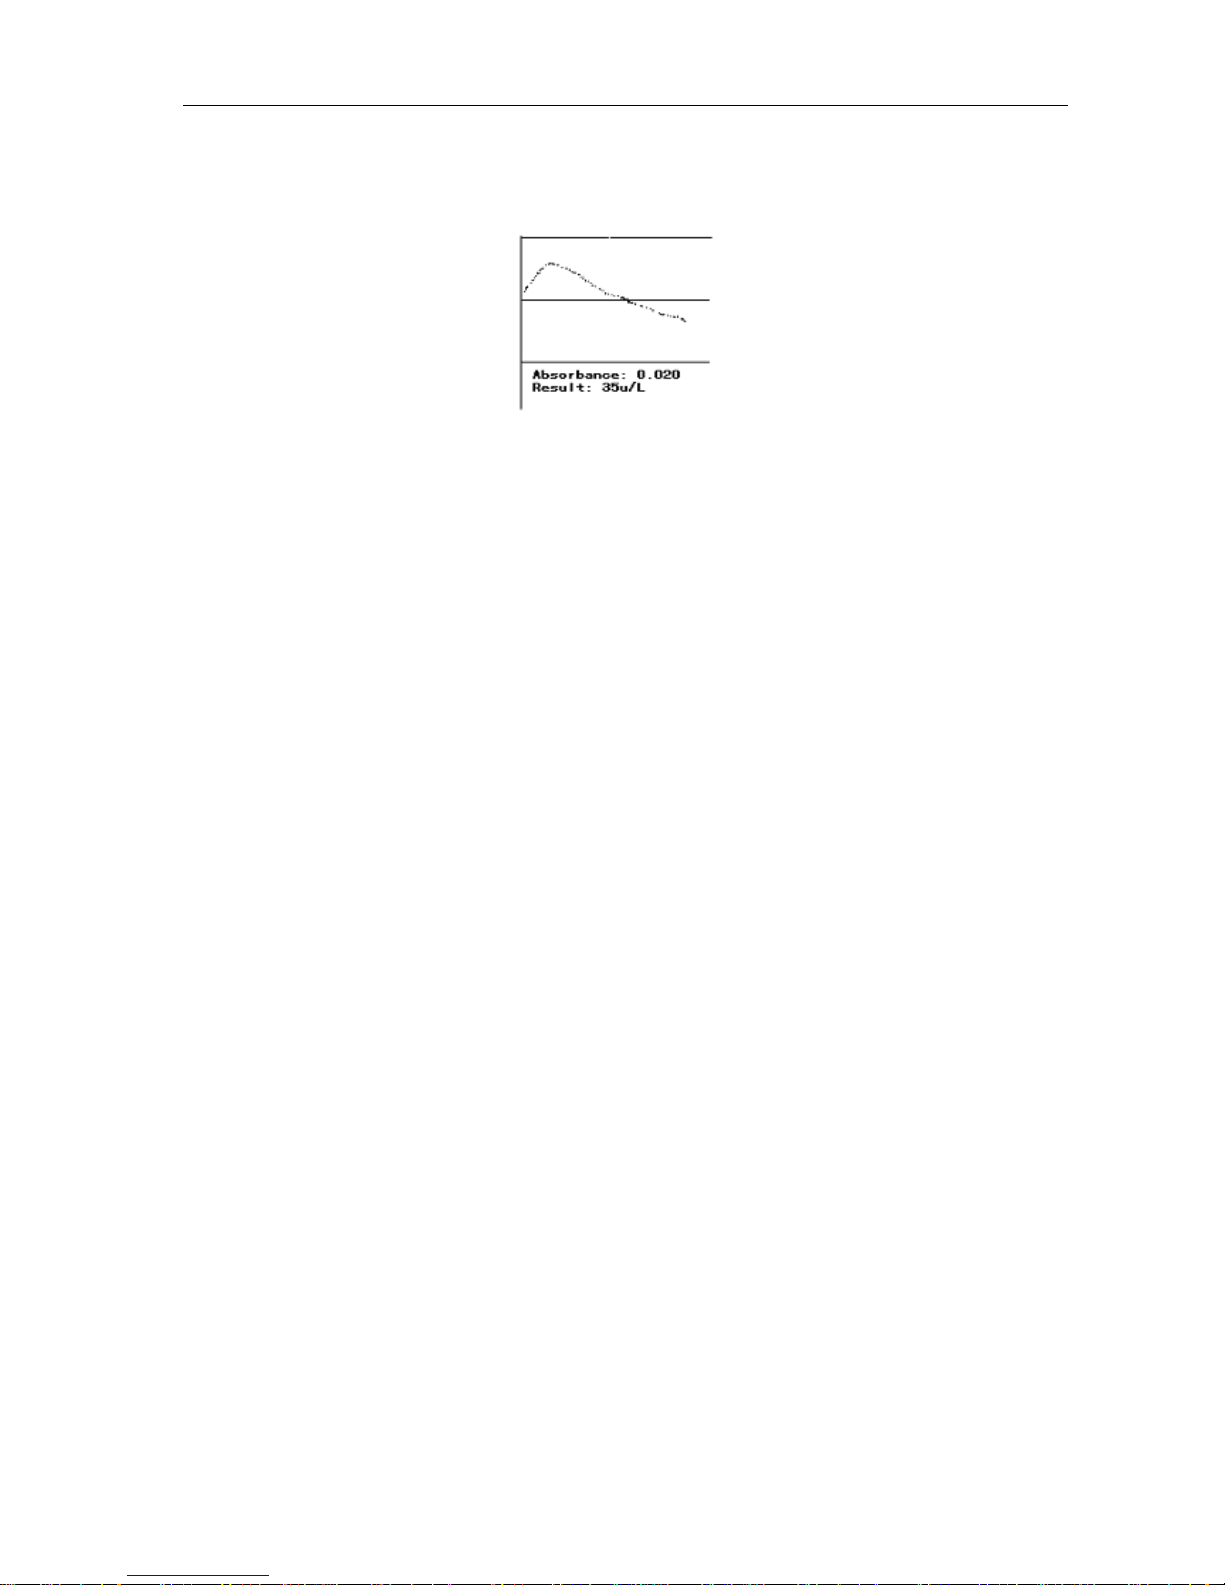
If the item applies Kinetics method, the screen will show the reaction curves when you test the
standard and samples, such as follows:
Press “ENTER” key, the screen will show the recent curve to observe it better, press “MENU” key to
return. Or the screen will be back to “Absorb sample liquor” interface to check the result and test next
time after finishing this step
3.4 Test Example
3.4.1 Test ALT/GPT with Kinetic method
1) Installing the parameters in the menu “EDIT TEST” according to the reagent manual as follows:
TEST CODE: 1 , TEST NAME: ALT/GPT , REAGENT SUPPLIER: HUILI
FACTOR: 1746, UNIT: u / L , METHOD:DYNAMIC
TEMP: 37
o
C , DECIMALS: 0, WAVELENGTH: 340nm ,
REAGENT BLANK: N, SAMPLE BLANK: N HIGHT: 36.0,
LOW: 8.0, LINEARITY RANGE: < 500, DELAY TIME: 30S,
INTERVAL TIME: 40S ASP TIME: 300, SAMPLE POINTS: 2,
STANDARD: 0,
2) Input the digit ‘1’ in “Test Sample” interface. select ‘1-LIVER TEST’ then select the ALT,
the screen will show “Absorb clean liquor”, put the CLEAN,then press “ENTER” key to start the clean
operation.
3) The screen will show “Absorb sample liquor”, please assure the patient No., press the digit ‘7’ to
TEST CODE: 2 ALP
SAMPLE NO: 6
PRINT:OFF
SAMPLE NO:
WAVELENGTH: 340nm
ZERO: 4 1 STD: 100
ABSORBANCE: 0.154
RESULT: 37 mmol/L
SAMPLE: 6
NEW SAMPLE NO:
Page 12
MH-50B Chemistry Analyzer Operation Manual
11
modify the patient No. and press “ENTER” key. Put the sample and press ‘ENTER’ key to test the
sample liquor.
4) The instrument will show the velocity curve in the reaction process after absorbing sample liquor:
If you want to check the curve carefully, press ‘ENTER’ key before the curve disappeared (before the
reaction is finished), the screen will show the reaction curve, press ‘MENU’ key to quit the curve. Or
the screen will stepwise to the next interface of “Absorb sample liquor” to do the next test after the
screen shows the curve.
5) If you want to test other items, press the digit ‘6’ key, then select the corresponding items, the
instrument will enter the item to test automatically.
3.4.2 Test total protein TP by one-standard end-point method
1. Setting the item’s parameters in the “EDIT TEST” menu according to the reagent manual as
follows:
TEST CODE: 5 , TEXT NAME: TP , REAGENT SUPPLIER: HUILI
FACTOR: 0 , UNIT: g / L , METHOD:E-END POINT
TEMP: 37
o
C ,DECIMALS: 0, WAVELENGTH: 546nm ,
REAGENT BLANK: Y, SAMPLE BLANK: N HIGHT: 82.0,
LOW: 62.0, LINEARITY RANGE: < 100, DELAY TIME: 4S,
INTERVAL TIME: 2S ASP TIME: 300, SAMPLE POINT:1
STANDARD: 1, STD 1: 70.0
2.Select the “LIVER ITEM” in “TEST SAMPLE” interface, press the ‘↓’ to page down, press digit key
‘1’to select the “TOTAL PROTEIN”. The screen will show “Absorb clean liquor”, then put the
CLEANand press the “ENTER” key to start the clean operation.
3.The screen will show “Absorb DI water” after finishing cleaning, put the DI water and press ‘ENTER’
key to do the absorbance, the screen will show “Absorb blank liquor” after finishing testing, put the
Blank liquor and press the “ENTER” key to assure the operation.
4.The screen will show “Absorb standard liquor”(Press the ”STANDARD” key to turn to the “Absorb
standard liquor” interface if the screen show “Absorb sample liquor”), put standard liquor and press
“ENTER” key to test it and calculate the parameters.
5.The screen will show “Absorb sample liquor” after finishing testing standard liquor, press the digit
key‘7’to modify the patient No, then put the corresponding patient’s sample and press ‘ENTER’ key
to test the sample liquor.
3.4.3 Test ALT/GPT by multi-standard end-point method
1) Setting the parameters in the menu “EDIT TEST” according to the reagent manual as follows:
TEST CODE: 1 , TEXT NAME: ALT/GPT , REAGENT SUPPLIER: MAIKE
FACTOR: 0 , UNIT: u / L , METHOD: END-POINT
TEMP: 37
o
C , DECIMALS: 0, WAVELENGTH: 505nm ,
REAGENT BLANK: Y, SAMPLE BLANK: N HIGHT: 40.0,
LOW: 5.0, LINEARITY RANGE: < 100, DELAY TIME: 5S,
Page 13

MH-50B Chemistry Analyzer Operation Manual
12
INTERVAL TIME: 10S ASP TIME: 300, SAMPLE POINT: 2,
STANDARD No.: 5, STD 1: 0.0 STD 2: 50.0
STD 3: 109 STD 4: 209, STD 5: 406.
2) Select the “LIVER TEST” in the “TEST SAMPLE” interface, press the digit key ‘1’ to select “GPT”.
The screen will show “Absorb clean liquor”, put the CLEAN and press ‘ENTER’ key to start the clean
operation. Put the DI water to test absorbance after finishing operation.
3)The screen will show “Absorb blank liquor” after testing, put the “Blank liquor” and press the
“ENTER” key to assure the operation.
4)Now the screen shows “Absorb standard liquor 1” (Press the ‘STANDARD’ key to turn to “Absorb
standard liquor 1” interface if it shows “Absorb sample liquor” ), put the standard liquors 1-5
successively, then press ‘ENTER’ key to test the standard liquor to calculate the parameters.
5) The screen shows “Absorb sample liquor” again after testing the standard liquor, press the digit key
‘7’ to modify the patient’s No, put the corresponding patient’s sample and press ‘ENTER’ key to test
the sample liquor.
Attention: The edit item(end-point) do not need to test the standard liquor after the first time, also you
can retest the standard liquor to assure the parameters. It is better to test the blank liquor before
testing the item everyday to get accurate results.
3.5 RESULT REPORT
Input the digit key ‘3’ in the main menu to enter the “RESULT REPORT” menu as follows; you can do
the EDIT.MODIFY.PRINT.DELETE etc. operations of the patient’s result in this menu.
3.5.1 Edit the patient’s information
You can input each patient’s name, gender, age and blood type according to this function.
First, the screen will display:
You can input the serial number directly or use the ‘↓’ key to search for the patient’s No , then press
“ENTER” key, the system will show as follows if the No. you input is not existed in the internal
memory:
SAMPLES SUM: 0
SAMPLE NO:
1-EDIT SAMPLE 4-PRINT/DELETE
2-DEL RESULT 5-TRANSMIT
3-ADD RESULT 6-RECEIVE
Page 14

MH-50B Chemistry Analyzer Operation Manual
13
The system will establish the patient’s record in the internal memory if the answer is ‘Y’ or press
‘ENTER’ key, then turn to next step, the system will be back to the Inputting Patient’s No. interface if
the answer is ‘N’.
The system will enter into next step after discovering patient in internal memory or creating new
patient,
The chart is as follows:
NAME: You can input 8 letters at most here. Press ‘ENTER’ key to confirm.
GENDER: Select correct option of MALE / FEMALE / INFANT/NONE by cursor key ‘←’ or ’→’.
AGE: Input number 0-199.
BLOOD GROUP: Select: A / B / AB / O by cursor key ‘←’ or ’→’.
If the No you input is existed in memory, the system will show the information which has been saved
in memory, you can modify at freedom and press ‘Menu’ to return, you can not input the patient’s
telephone No and address, But there is space in the RESULT REPORT for you to add.
3.5.2 Delete the results
You can delete the wrong result in TEST RESULT according to this function.
You can input the existed patient’s No, press ‘Enter’ key to enter the modify interface directly, or press
‘↓’ to enter search interface to find the patient.
The search interface is as below:
The first row shows the existed patients sum, the second row shows the searched patient’s No, the
third row shows the total results of the patient, press “ENTER” key to enter MODIFY interface:
SAMPLES SUM: 1
SAMPLE NO: 1234
2 RESULT EXISTED
SAMPLES SUM: 0
SAMPLE NO: 1234
NAME:CHARLES
GENDER:MALE
AGE: 24
BLOOD GROUP: B
PRESS ‘←’’→’ TO SELECT
SAMPLES SUM: 15
SAMPLE NO: 1234
THE SAMPLE DOESN’T EXIST!
‘MENU’ TO RETURN
‘ENTER’ TO CREATE NEW
Page 15
MH-50B Chemistry Analyzer Operation Manual
14
You can see the patient’s result with ‘↑’ ‘↓’ keys, see the last or the next patient’s result with ‘→’ ‘←’
keys, please press ‘ENTER’ key when the screen shows the given result if the result is not needed.
Whenever press ‘MENU’ key it can return to the last interface.
3.5.3 Add other results
Some tests can not be done in this analyzer but the results must be sent out concurrently, so you
must use other instruments to define the test according to the function.
In the ‘RESULT REPORT’ menu, press ‘3’ to select ‘Add other results’, input patient No. or press ‘↓’ to
search the patient No., then press ‘ENTER’ key.
It will suggest ‘CREAT NEW ITEM’ if you input an patient No. which is not existed, Press ‘Y’ or
‘ENTER’ to creat the patient No., press ‘N’ and ‘MENU’ to quit. Press ‘ENTER’ key to enter ‘ADD
OTHER RESULTS’ interface:
First, the cursor will stop at the back of the ‘ITEM CODE’ in the second row, input the item No. then
press ‘ENTER’ key it will show the item name in the third row and show the result in the fourth row,
the cursor will stop at the back of the result, it will show the radix point if there is decimal(the
definition of decimal is introduced in ‘EDIT TEST’->definition of test item).
Please input the results getting from other methods, if the selected item is yin and yang opposite
representation, you can select ‘+’. ‘-’. or ‘’ with ‘←’ ‘→’ cursor keys in the result, then input the
numbers of ‘+’or ‘-’ at the back of ‘AMOUNT’(4 numbers at most); if the selected item is
‘SUBTRACTION’ or ‘DIVISION’, you should not input the value there, the instrument will look up the
needed data in the patient’s results automatically and calculate the item’s result; press ‘MENU’ to
return to the last interface.
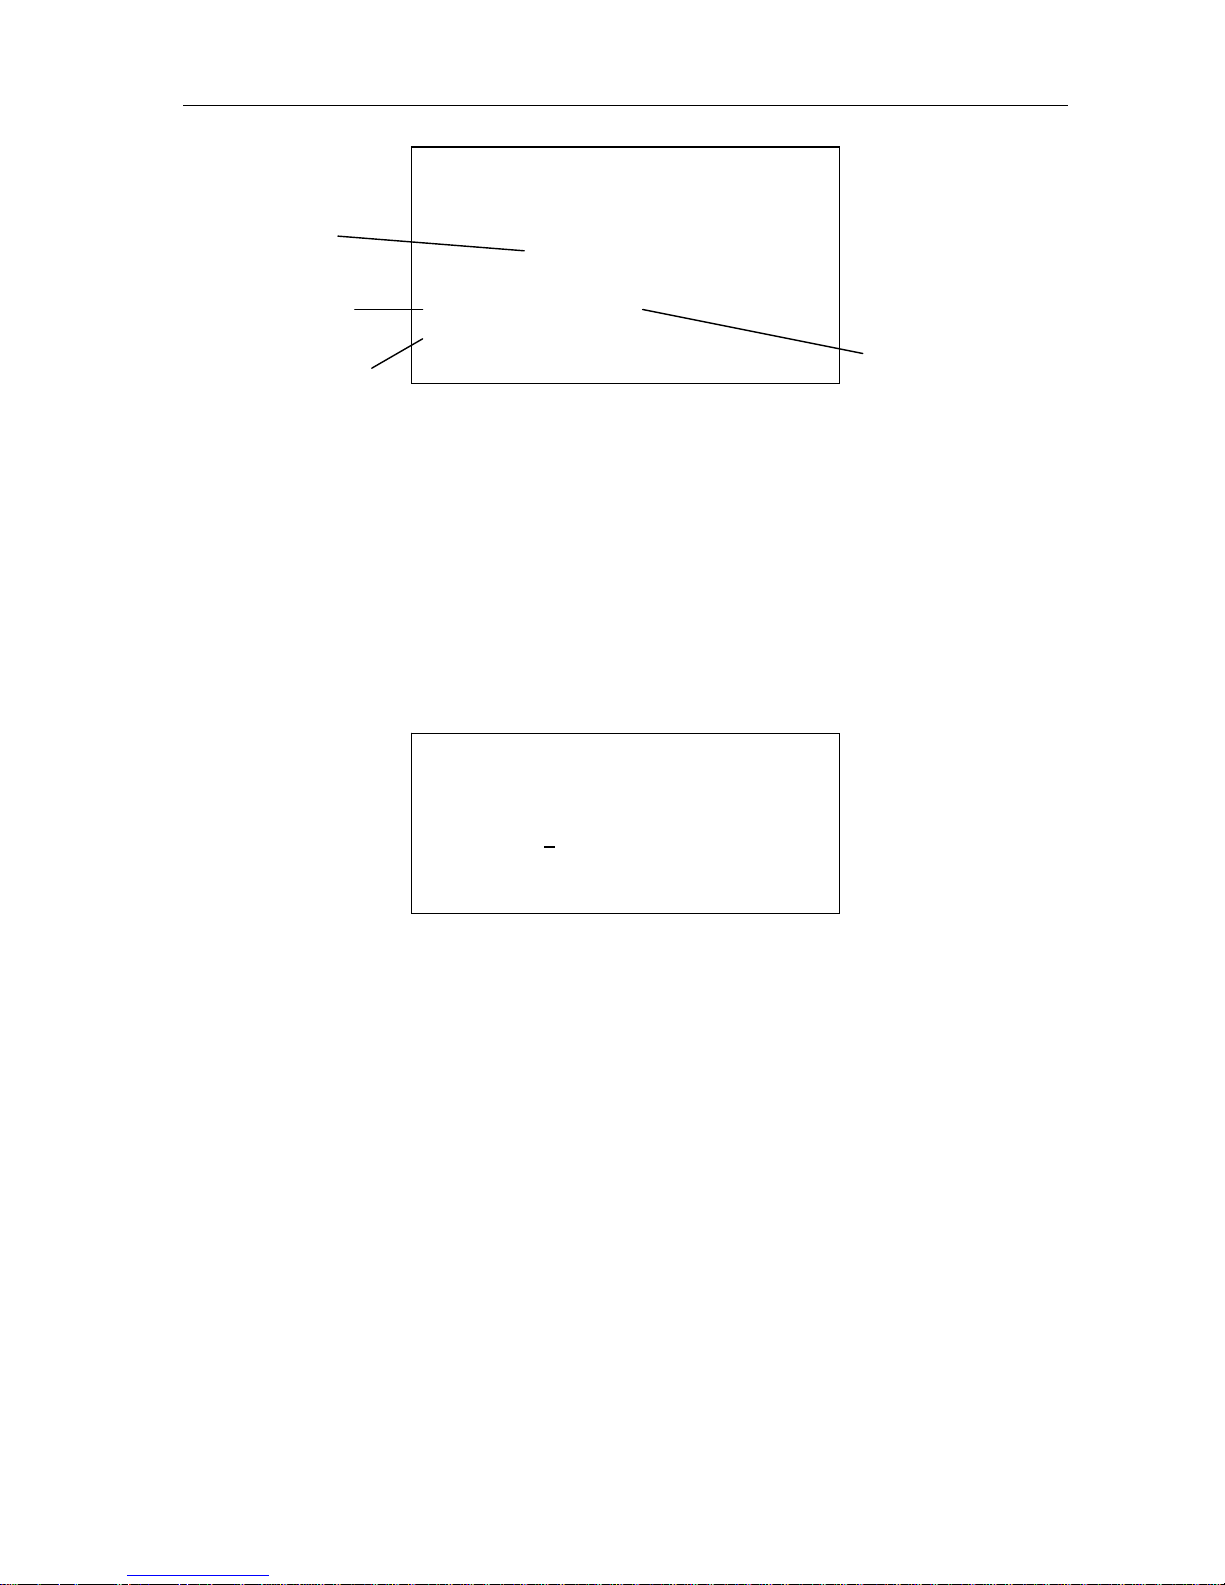
SAMPLE NO: 1234
TEST CODE:5 TP
RESULT: 4.5
SAMPLE NO: 1234 CHARLES
TESTS AMOUNT CURRENT FORMER
2 2 0
SEQ TEST RESULT UNIT
0 ALT 2345 u/L
REF RANGE( 0 - 40 )
PRESS ‘ENTER’ TO DELETE
Test results
Normal values range
The result No in
patient’s all results
The test amount
of the patient
Page 16

MH-50B Chemistry Analyzer Operation Manual
15
3.5.4 Print/Delete Report
Select ‘4-PRINT/DELETE’ in the ‘RESULT REPORT’ it will show the interface as below:
1.Print the appointed patient
You can select this function if you only want to print the certain patient, you can input the patient No.
to print directly; or press ‘↓’ key to startup the searching function either, then press ‘ENTER’ key to
print the patient’s report, press ‘MENU’ key to return.
2.Print all patients
a. The system offers the function of printing all patients’ reports to input the report easily.
When you input the end date, the system starts to look up all storage files in the internal memory, it
starts to print for each patient if it finds the result is fit for the condition until finishing printing; if you
want to stop printing in midway, you must close the system.
When the system suggests you input the start date, press ‘ENTER’ key directly to print all results in
internal memory, then it will show:
Print all results in internal memory instantly with pressing ‘Y’ or ‘ENTER’.
Return to ‘START DATE:’ state with pressing ‘N’ or ‘MENU’.
3.Delete the appointed patient report
You can delete the file and all storage result of the appointed patient in internal memory by selecting
this function. First the system suggests inputting the patient No.
You can input with cursor keys or use searching function, then press ‘ENTER’ key to delete. If the
system find the existed number in internal memory, press ‘ENTER’ key, it will delete the patient
directly without any hint, so be careful when you input the No. or use searching.
4.Delete all patients’ file
This part is the same as “Print all patients’ report”, the first one is to delete, the second one is to print,
it can not recover after deleting, so be careful.
PRINT ALL SAMPLES Y?
START DATE(MMDD):
--
END DATE(MMDD):
--
1-PRINT APPOINTED SAMPLE
2-PRINT ALL SAMPLES
3-DELETE APPOINTED SAMPLE
4-DELETE ALL SAMPLES
Page 17

MH-50B Chemistry Analyzer Operation Manual
16
Chapter 4 Programme
This chapter mainly introduces how to set the reagent’s test parameters when you use it for the first
time. It explains that setting the parameters again according to the reagent manual after replacing the
reagent every time to get the right result.
Select ‘EDIT TEST’ in main menu to enter this function interface which includes 4 functions:
1). Test item definition
Its main function consists in inputting the operation parameters of every test item into the instrument
in order it can carry out the test function according to the correct instruction.
Dependent item definition
Press key ‘1’ to enter ‘1-TEST SETUP’, select the item, the system shows:
(1). Input a code of 1—3 bits in the cursor, it can not be 0, press ‘ENTER’ key if it is 1 bit or 2 bits, it is
a dependent test item if the code is less than 200, it is a combination test if it is more than 200 or
equal to 200. Input the test code, press ‘ENTER’ key, the test item name will be shown at the back of
the name, you can use ‘→’ ‘←’ keys to change the tests name; use ‘→’ ‘←’ keys to select the reagent
supplier, there are 9 consent suppliers(Test name and suppliers name can be modified .added or
deleted in the menu of “ADD NAME” and “DELETE NAME” , they can not be modified here)
Select the supplier’s name, press ‘ENTER’ key to enter the next interface:
(2). Now the cursor is at the back of the ‘COEFFICIENT’, you can modify or input the test
coefficient(factors) from ‘0—59999’,if you input the number from 1bit to 5 bits, please press ‘ENTER’
key or press ‘↓’ key directly to turn to the next item.
(3). Select unit with ‘←’ ‘→’ keys, press ‘↓’ or ‘ENTER’ key to enter into next item, there are 11 units to
select: None.u/L.u/mL.umol/L.mmol/L.g/L.mg/L.mg/Dl.g/ml.g/Dl.X10(12)/L.
1 ALT
FACTOR: 0
UNIT: u/L
METHOD:K
INETICS
PRESS ‘←’ ‘→’ TO SELECT
TEST CODE: 1
TEST NAME:A
LT
PRESS ‘←’ ‘→’ TO SELECT
1-TEST SETUP
2-ADD TEST NAME
3-DELETE TEST NAME
4-DELETE TEST
Page 18

MH-50B Chemistry Analyzer Operation Manual
17
(4). Select analyze method with ‘→’ ‘←’ keys at the back of ‘METHOD’. There are 6 methods to select:
E-ENDPOINT.K-KINEMIC.B-DOUBLE-WAVELENGTH.C-SUBTRACTION.D-DIVISION.H-YIN and
YANG OPPOSITES.
This instrument can do all above tests, so please care that if the reagent is fit for the instrument when
you buy the reagent. Press ‘↓’ or ‘ENTER’ key to enter into the next screen:
(5). This instrument has Temperature Control system, you can select “37°C” or “30°C” or
“ROOM-TEMP” state with ‘←’ ‘→’;
(6). Input the needed decimals at the back of ‘DECIMAL’, input 2 digits at most, input 0 if there is
no decimal;
(7). Select the needed wavelength of the test item at the back of ‘WAVELENGTH 1’ by ‘→’
‘←’ ; When the ‘ANALYZE METHOD’ select ‘DOUBLE-WAVELENGTH’, it will show ‘WAVELENGTH
2:’, There are 8 wavelengths to select: 340nm.380nm.405nm.492nm.510nm.546nm.578nm.620nm ;
(8). Install ‘REAGENT BLANK’ and ‘SAMPLE BLANK’ according to the reagent manual; press
‘ENTER’ key or ‘↓’ key to enter into the next item:
(9).You can install the item’s reference value, this instrument allows to input 4 different reference
values according to the clinic application, if you have installed the patient gender, the system will
transfer the corresponding reference value, or it will transfer the common reference normal value.
Then press ‘ENTER’ or ‘↓’ key to enter into next item.
(10). Find the reagent’s linear time in the reagent manual, select “<” or “>” with cursor key ‘→’or ‘←’,
press ‘ENTER’ key to enter into the next item, input number “200”.
1 ALT
LINEAR RANGE:< 600
DELAY TIME: 60S
INTERVAL TIME: 60S
DATA NO: 2
ASP TIME: 250
PRESS ‘←’ ‘→’ TO SELECT
1 ALT REFERENCE RANGE
GENERAL MALE FEMALE INFANT
HIGH: 40 40 40 40
LOW: 0 0 0 0
1 ALT
TEMP:37 ℃ DECIMAL: 0
WAVELENGTH:340nm
REAGENT BLANK: Y SAMPLE BLANK: N
PRESS ‘←’ ‘→’ TO SELECT
Page 19

MH-50B Chemistry Analyzer Operation Manual
18
(11). Find the “DELAY TIME” and “TEST TIME” in reagent manual section of “TEST METHOD”, input
the times in the 2 positions. Do not modify the sampling time, it is only efficient for this test without any
influence for other tests. Standard is 0 for kinemics, standard is 1 for general reagent, you must install
the standard for multi-standard reagent; press ‘ENTER’ or ‘↓’ key to turn to next item after installing
the standard.
(12). You can install the item’s standard or standard curve in this interface.
Press ‘ENTER’ or ‘↓’ key to turn to next item after installing the standard. The system will suggest
‘Save modification?’ Press ‘Y’ or ‘ENTER’ key to save, or press ‘N’ key; The system will be back to
this section’s beginning state after input all needed condition, now you can input or modify the next
test item.
Attention: a. If the test method you selected is : SUBTRACTION, press ‘↓’ or ‘ENTER’ key, it will show:
Input all test codes under A.B.C.D.E.F, the corresponding codes for A.D must be existed, the decimal
of all tests must be equal, or it can not get correct result.
b. If the test method you selected is: DIVISION, press ‘ENTER’ or ‘↓’ it will show:
Input all test codes under A.B, the corresponding codes for A.B must be existed, the decimal of all
tests must be equal, or it can not get correct result.
2). Add new test name
You can add names of item combination or supplier for this operation, it will show:
ADD TEST NAME
ADDED NAME SUM: 0
PLEASE INPUT TEST NAME:
Y= A / B + C – D – E – F
Y=
2/ 46
Y= A + B + C – D – E – F
Y= 2 +
57 + 46 – 0 – 0 – 0
Page 20

MH-50B Chemistry Analyzer Operation Manual
19
Input item name directly and press ‘ENTER’ key to save. Press ‘MENU’ to exit.
Add names of combination and suppliers is close to add item name. You can select the added name
in the corresponding section of “TEST SETUP”.
3). Delete test name
You can delete the needless item name or item, If there is item in patient result, please delete it firstly,
or it will show wrong suggestion. It will show:
Press ‘ENTER’ to delete the current test name.
4). Delete test
You can delete the needless item, it will show as below after entering this interface:
Press cursor key to select the test, press “ENTER” to delete it.
5). Example of edit test
(1). Endpoint
For example: edit the test parameter of GPT according to GPT manual produced by
CHANGCHUN HUILI “GPT End Color Method Reagent Manual” (See in Appendix).
1. Enter into “EDIT TEST” interface in main menu.
2. Press ‘1’ to enter into “TEST ITEM DEFINITION” interface, input 1 in TEST CODE(You can look
up the solidified item amount and name of the instrument in item form , the item No. is 1).Press
‘ENTER’ key.
3. Select “GPT” with cursor keys ‘←’ ‘→’ in “NAME”, press ‘ENTER’ key to enter into next item.
4. Select “HUILI” WITH CURSOR KEYS ‘←’ ‘→’ IN “REAGENT SUPPLIERS”.
5. Input 0 in “COEFFICIENT”, do BLANK TEST and STANDARD TEST after editing, the system will
setting the value automatically.
6. Explain “NORMAL VALUE: 8—50u/L” in manual, you will know the reagent test unit is u/L. Search
the supplier with cursor keys ‘←’ ‘→’, press ‘ENTER’ key or ‘↓’ to turn to next item.
ALT ALP GOT r-GT TP
ALB Tbil DBIL TTT BUN
CRE UA CO2 NH3 GLU
TCHO HDLC LDLC TG LDH
AMS CL Ca Mg Cu
PRESS ARROW TO SELECT TEST
PRESS ‘ENTER’ TO DELETE
DELETE TEST NAME
ADDED NAME SUM: 2
THE NAME TO DELETE:EK
PRESS ‘←’ ‘→’ TO SELECT
Page 21

MH-50B Chemistry Analyzer Operation Manual
20
7. In the manual’s “TEST METHOD”, you will see “TEST BY ENDPOINT”, it shows the test method
of the reagent is “ENDPOINT”, select the method with ‘←’ ‘→’, then enter into next item.
8. Please setting the temperature to “37°C” in the position which doesn’t point out the temperature
range in “TEST METHOD”.
9. Setting the decimal according to the normal decimal value, for example: In the reagent “NORMAL
VALUE: 8—50u/L”, no decimal, you can setting the decimal to 0.
10. There is “WAVELENGTH: 510nm” in “TEST METHOD”, select 510nm with cursor keys ‘→’ ‘←’ in
“WACELENGTH”.
11. It requires “REAGENT BLANK IS 0” in manual, setting reagent blank to ‘Y’, setting sample blank
to ‘N’.
12. This manual requires “NORMAL VALUE: 8—50u/L”, there isn’t special requirement for people, so
you can setting “COMMON USE” “INFANT” “MALE” “FEMALE” to “HIGH RESTRICITION” to 50
and “LOW RESTRICITION” to 8.
13. There is “LINEARITY≤300u/L” in “TECHNICAL INDEX”, select “<” with cursor keys ‘←’ ‘→’ in
setting “LIEARITY RANGE”, press ‘ENTER’ then input “300”.
14. General, you can setting “DELAY TIME” to 5 in ENDPOINT method, “INTERVAL TIME ” is 10,
“SAMPL TIME” IS 300, “SAMPLPOINTS” IS “2”
15. General reagent is single-standard if there is no special explain, input “1” in “STANDARD”. If you
want to enter into next item, input “STANDARD 1:”, input 100 here.
16. Press ‘Y’ to assure the operation, the system will save the setting automatically.
17. Manual original script is as follows:
GPT ENDPOINT Colorimetric Manual
1.USE:
It belongs to the LIVER COMMON TEST ITEMS, all kinds virosis acute hepatitis raise remarkably,
chronic hepatitis active period raise slowly, other hepatitis raise with different degree.
2. PRINCIPLE:
GPT acts on ALALINE and a-KETOGLUTARIC ACID, it accelerates the reaction speed with
accelerant,
it produces PYRUVIC ACID, PYRUVIC ACID and 2,4 DPRN will be developed under ALKY, test
Absorbance with 510nm wavelength, calculate GPT’s activity with international unit.
3. REAGENT CONTENT AND STORAGE
GPT Base material powder (100ml); GPT Developer (100ml); 4N NaOH (100ml);
STANDARD LIQUOR (100u/L). The above reagents stable at 2—8°C for 1 year.
4.PRODUCE OF REAGENTS AND STABILITY
Dissolve the GPT Base material powder with DI water 100ml, stable for storing it at 2-8°C for 1
month, effective for freeze storing for 1 year. Add 900ml DI water to 4N NaOH(100ml), effective for
long-term. Other reagents can be used directly.
5.TESTING REQUIREMENT: fresh serum.
Page 22

MH-50B Chemistry Analyzer Operation Manual
21
6.TEST METHOD AND PROCEDURE:
6.1 HANDWORK:
SAMPLE TUBE STANDARD TUBE REAGENT BLANK TUBE
SERUM 50 - -
STANDARD
LIQUOR ul
- 50 -
GPT BASE
METERIAL
LIQUOR ul
250 250 250
Mixing, 37°C for 30 minutes or 50°C for 15 minutes, then add GPT developer 250ul into every tube,
37°C for 15 minutes or 50°C for 6 minutes, get all tubes , add diluted NaOH 2.5ml, lay them aside for
3 minutes, test wavelength 510nm. Adjust REAGENT BLANK to 0, test absorbance of sample tube
and standard tube.
SAMPLE TUBE GPT u/L =A sample/A standard X 100
6.2 SEMI-AUTO ANALYZER TEST BY ENDPOINT:
Operation procedure is the same to HANDWORK.
Adjust wavelength: 510nm, Adjust REAGENT BLANK to 0.
Input standard 100 , Absorb standard liquor(Attention: Electric knob instrument sample the
standard liquor then modify the standard to100). It will show the test result after absorbing the sample
liquor one-by-one.
7. NORMAL VALUE:8-50u/L
8. TECHNICAL INDEX AND NOTICE EVENTS:
BLANK ABSORBANCE A
510nm
<0.3, CV: 4.7%, LINEARITY≤300u
Attention: Keep the standard liquor airproof without pollution. Write down the factor value testing
for first
time for the instrument which has factor function, input factor, test sample tube’s consistency without
doing standard tube
(2). Kinetic
For example: GTP/ALT velocity reagent manual, input parameters in turn as follow:
TEST CODE: 1 NAME: GTP/ALT REAGENT SUPPLIER: HUILI
COEFFICIENT: 1746 UNIT: u/L METHOD: KINEMIC
TEMP CONTROL: 37°C DECIMAL: 0 WAVELENGTH: 340
REAGENT BLANK: N SAMPLE BLANK: N HIGH REF.: 36
LOW REF.: 8 LINEARITY RANGE: <500 DELAY TIME: 30S
INTERVAL TIME: 40S SAMPLE TIME: 300 SAMPLE POSITIONS: 2
STD.: 0
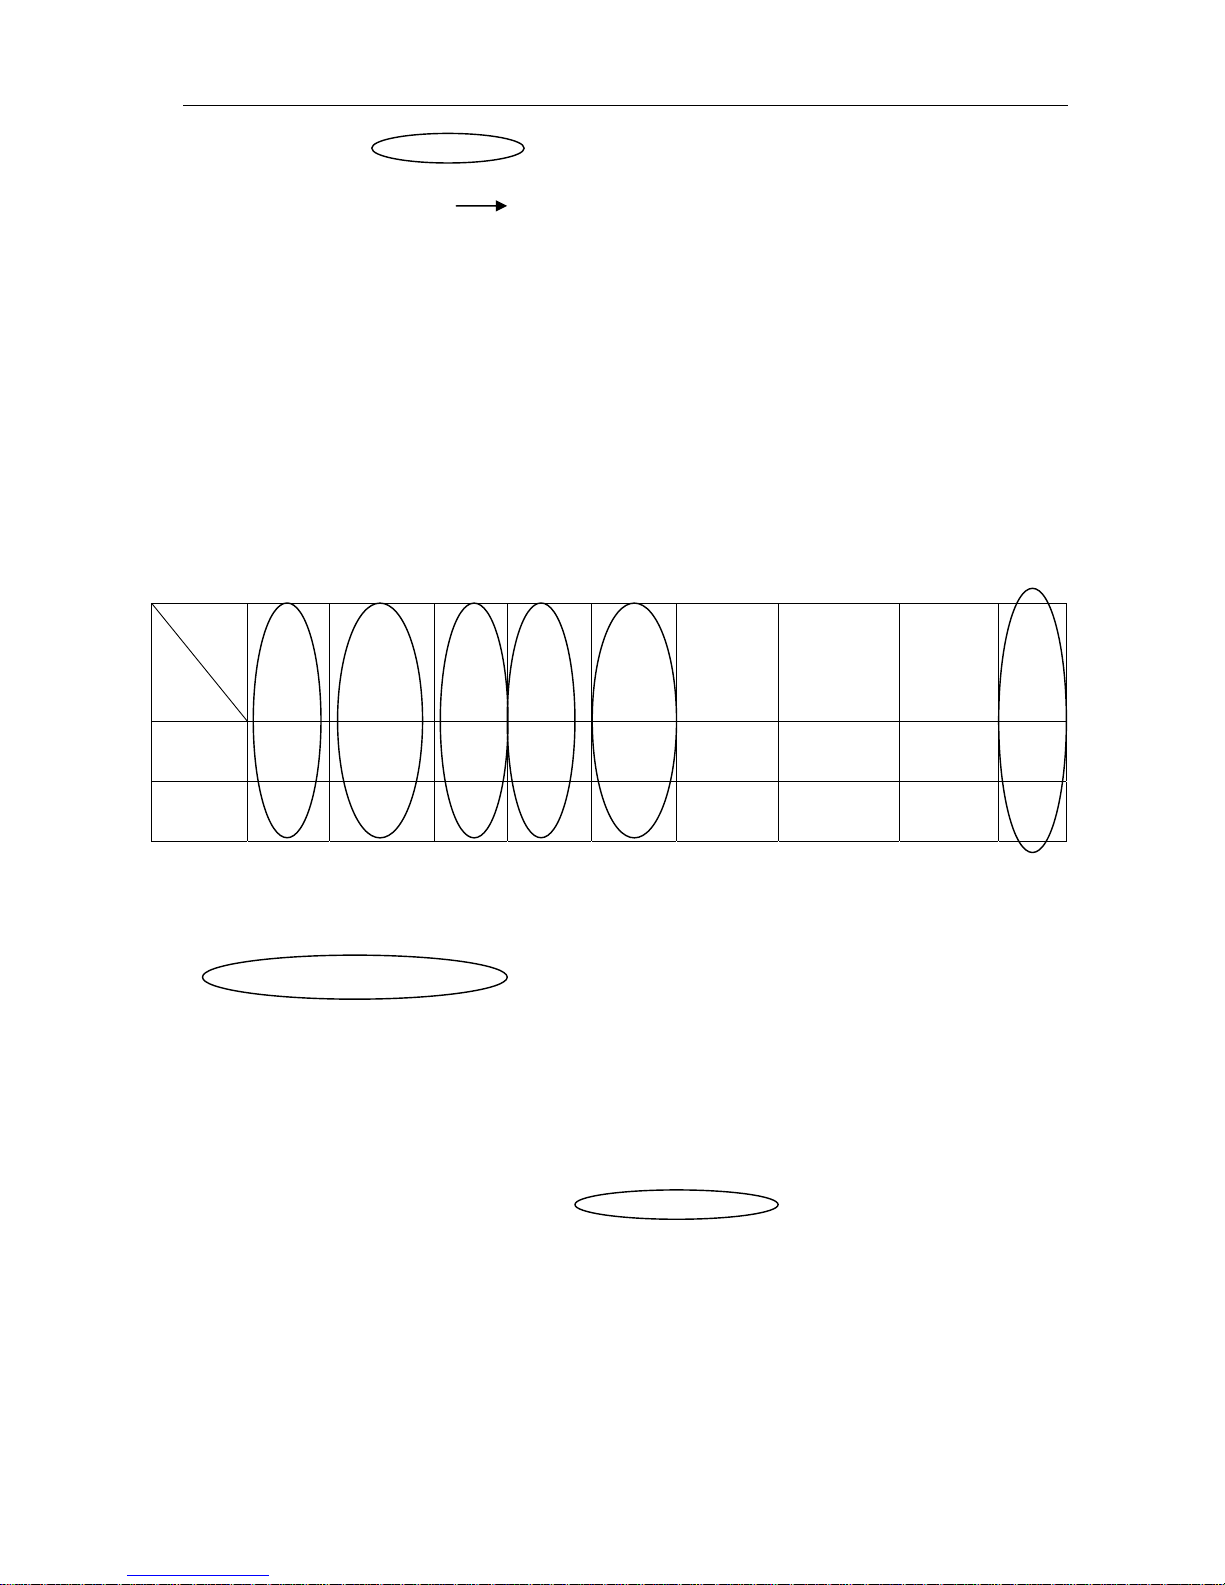
The circles in reagent manual shows how to confirm the parameters. REAGENT BLANK,SAMPLE
BLANK, SAMPLE TIME, SAMPLE POSITION, STD. have not explained in reagent manual, please
explain the setting according to the manual.
Page 23
MH-50B Chemistry Analyzer Operation Manual
22
GTP/ALT VELOCITY REAGENT MANUAL
1. PRINCIPLE: L-ALALINE +a-KETOGLUTARIC ACID ALT PYRUVIC ACID+ GLUTAMIC ACID,
PYRUVIC ACID + NADHLDH L- LACTIC ACID + NAD
+
When the wavelength is 340nm, test NADH absorbance decrease value every minute, calculate ALT
activity value.
2. REAGENT CONTENT, SIZE AND SPECIFICATION:
a) Single vial: 2 kit descriptions : 10ml X 10, 18ml X 10.
b) Two vials: It is consisted of RI and RIL with different kit descriptions, 10ml X 5, 18ml X 5.
3. Storage and Effective Date: 2-8°C, effective date is 12 months.
4. Reagent Mixing
Single vial: It can be used after dissolving with DI water according to the specification,
Reconstituted reagent is stable for 3 days at 2-8°C.
Two vials: Pour the RII and cushion to the RI bottle, dissolve them then use, effective date is 3
days.
5. TEST METHOD
FOR EXAMPLE:
PARA
MET
ER
SIZE
WAVE
LENG
TH
nm
METHOD TEM
P
°C
DELAY
TIME
TEST
TIME
REACTI
ON
DIRECTI
ON
REAGENT
VOL.
Ul.
SAMPL
E
VOL.
Ul.
FAC
TOR
ISP-I II 340 Kin 37/30 30 40 - 500 50 -176
8
Beckma
n700
340 Kin 37/30 30 40 - 500 50 -241
2
Attention: Icterus patient’s best ratio of serum to reagent is 1:20, factor is -3376.
Calculate Formula: u/l=△A/min X (10
3
X Vr) / (6.22 X Vs)
△A/min: Change value of absorbance every minute Vr: Total Vol. for reaction liquor
Vs: Sample Vol.
6. Normal value: 37°C: 8-36 u/L 30°C: 4-28 u/L
7. Reagent characters and technical specifications:
1) Characters: This reagent is packed with screw-mouth plastic bottle, it has long effective date. The
double-bottle reagent is made to cushion with high purified DI water, it solves the unpurified DI water
of user and pollution of microorganism. The cushion is installed in R II bottles with certain quantity
according to the specification.
2) Technical specifications:
3) The ratio of this reagent to Beckman reagent is γ: 0.994, in one group CV: 2.8%
Between two groups 3.9% Linearity ≤600u/L
Special note: Please write down and save the tested item parameters to avoid the system’s internal
memory to be disturbed by environment.
Page 24

MH-50B Chemistry Analyzer Operation Manual
23
Chapter 5 Q. C and Reference Value
The aim of Q.C. is to test,control the precision degree of the test; supervise the change of stability;
improve the conformity of sample test result about one group or between two groups in common test
work; it will assure the reliability of the test result for every patient sample.
You need to test Q.C. material in “TEST SAMPLE”, then print Q.C. curve and result in “Q.C.
REPORT”. “Q.C. REPORT” menu:
5.1 Preparation
1.1 Select Q.C. material:
The Q.C. material dry powder produced by professional supplier;
1.2 Prepare Q.C. material:
Dilute the Q.C. dry powder according to the manual, lay it aside for 20 minutes, use it after it
becomes stable.
5.2 Test Q.C. material
2.1 Press ‘2’ to enter “TEST SAMPLE” submenu in main menu, input the item No. of the Q.C.
item(For example: if the item is GPT, input ‘1’), press ‘ENTER’ to assure. It will suggest “ABSORB
SAMPLE LIQUOR” after absorbing the clean water, then press ‘7’ to setting the patient No., such as
59000(It’s better to setting it as 59XXX to avoid to confuse it with normal patients; please remember
the No. because it will be used in the follow procedures), then test the prepared Q.C. material
according to the method of testing sample.
2.2 Enter “RESULT REPORT” submenu after finishing testing, press ‘1’ to enter “EDIT PATIENT
INFORMATION”, select the Q.C. patient No., such as 59000, Input the item name (For example: GPT)
in “NAME” to check and print. Press ‘menu’ to quit, it is the whole test procedure of Q.C..
2.3 Later, you only need to operate the first step to test the item’s Q.C. result, Be care that the item
No. and patient No. should be the same to the setting of the first time test completely. Enter “Q.C.
REPORT” submenu to print the curve and result when there are more than 5 test results of the
patient.
5.3 Print the curve and result of Q.C.
3.1 Enter “Q.C. REPORT”, select the item No. of the Q.C. in the operation ‘1—SELECT Q.C. ITEM’
and setting the target value. You can evaluate or consult other materials.
3.2 Select the corresponding patient No. such as 59000 in the operation ‘2- SELECT Q.C. No.’
3.3 Carry out the Operation ‘3’.‘4’to print the Q.C. curve and result (Including MEAN and SD) after
carrying out operation ‘1’.‘2’.
3.4 When you test and print the Q.C. curve and result later, you should define the target value
1-SELECT Q.C. TEST
2-SELECT Q.C. No.
3-PRINT Q.C. CURVE
4-PRINT Q.C. RESULT
Page 25

MH-50B Chemistry Analyzer Operation Manual
24
according to the last Q.C. result.
Attention: 1.The operation for all patients in every test are the same except the test items. Select the
patient No. and the same test items for each test, you can not test other items for the appointed
patient No., or it will not print the correct Q.C. curve and result.
2. If there is not target value for the Q.C. material, you can test it for 10 times continually to assure all
items’ target values, then calculate the MEAN and SD as the target value and deviation. The target
value should be ascertained when you change new reagent.
3. Because the normal value range for different areas and different people are different, also the
instruments are different, other range only can be reference. Please creat the normal range fit to this
area’s people!
Page 26
MH-50B Chemistry Analyzer Operation Manual
25
Chapter 6 System Installation
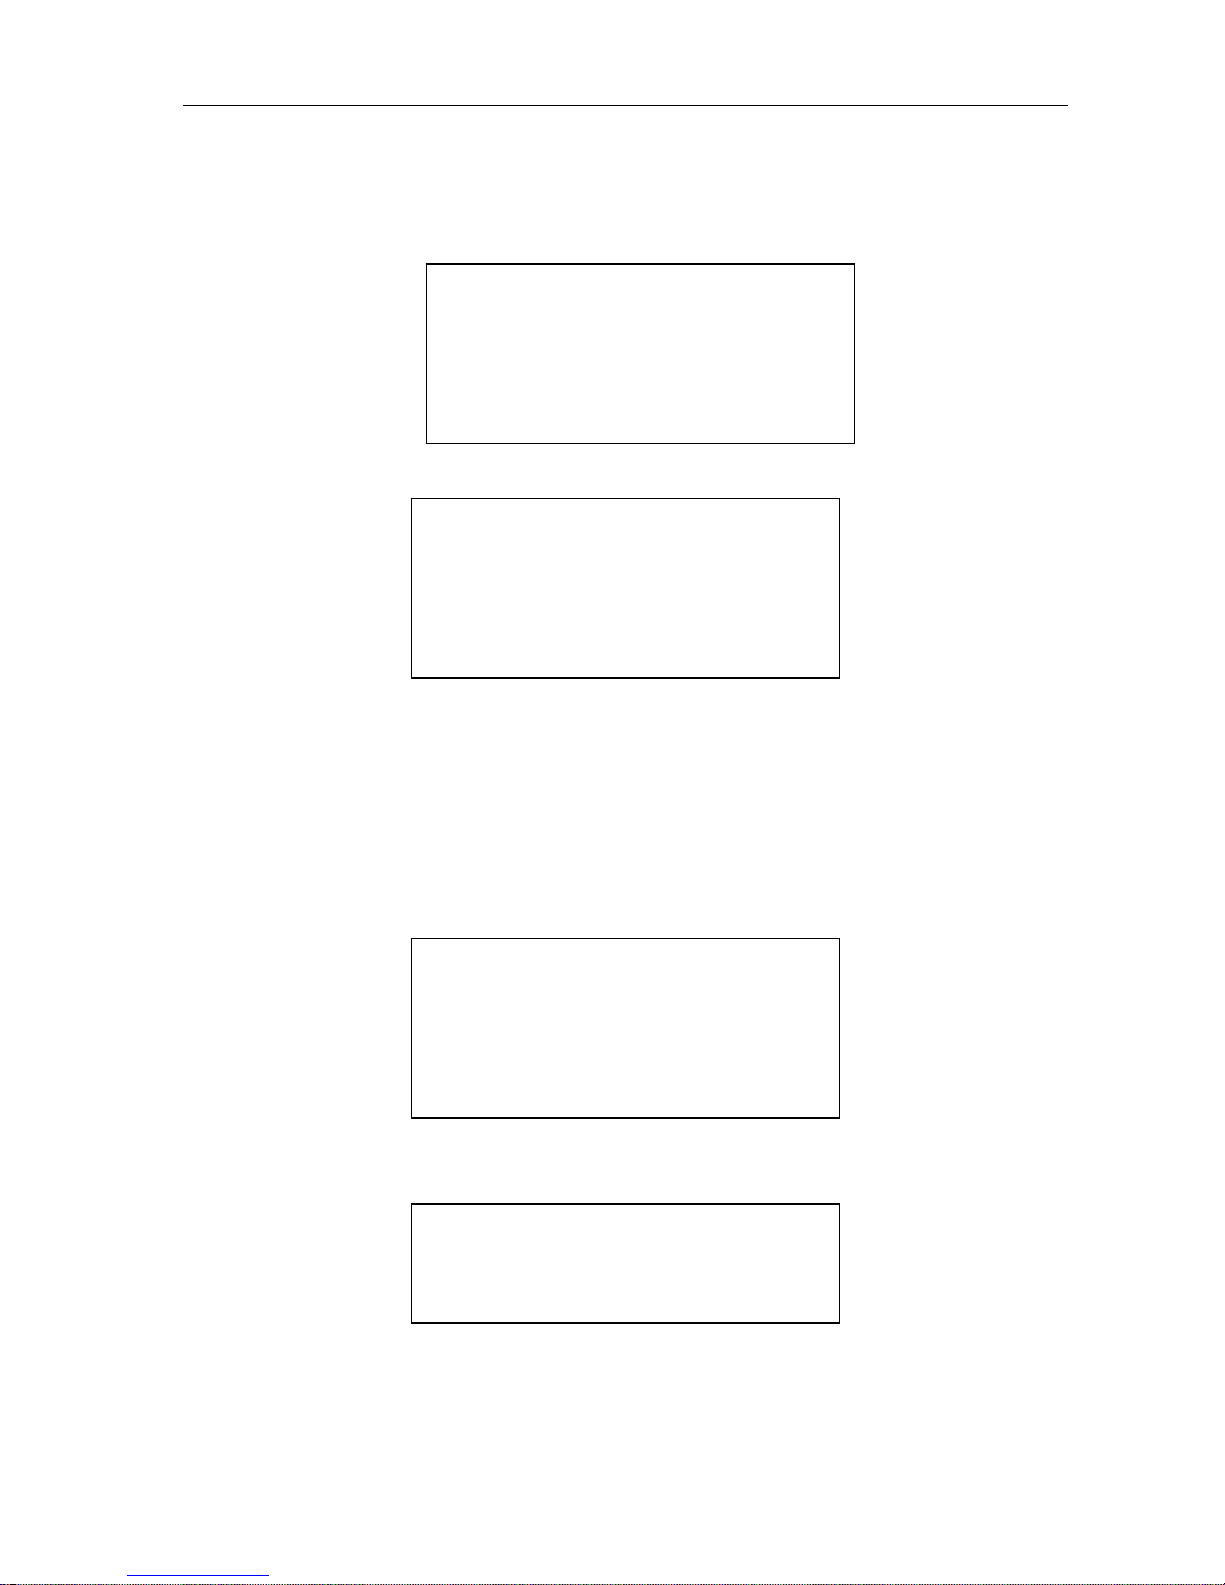
This menu mainly consists in “MAINTAIN” submenu. Press ‘6’ to enter it in main menu:
1. Temperature Rectify
You can change or install temperature with ‘→’ ‘←’keys with 1℃ unit, or ‘↓’ ‘↑’ keys with 0.1℃.
test temperature to observe the movement of the colorimetric cell.
2. Clean Time
You can set the clean time in ‘0—999’ at will according to this function, this installation must clean
the tube, the consent value is 700, it can be adjusted according to the actual event.
3. ADC
It shows the internal AD transfer parameter of the instrument, repairmen use it in repairing.
4. Printer and communication
4.1 Set Printer
a. Print Content:
Select ‘1—PRINT ALL RESULTS’, then to print report in ‘RESULT REPORT’, it will print all patients
and results in internal memory.
Select ‘2— PRINT THE RESULTS THAT DAY’, then to print report in ‘RESULT REPORT’, it will print
all patients and results in internal memory for that day. (General select mode 2)
√ 1-PRINT ALL RESULTS
2-PRINT CURRENT RESULTS
PRT AND COM
1-PRT SETUP
2-COM SETUP
SET TEMPERATURE: 37.00
CELL TEMPERATURE: 36.99
FAN STATE: OFF
0-CONTROL/UNCONTROL TEMP
1-TURN ON/OFF FAN
1-TEMP ADJ 5-ABSORBANCE
2-CLEAN TIME 6-DATABASE
3-ADC 7-UPDATE
4-PRT AND COM 8-CLOCK SETUP
Page 27
MH-50B Chemistry Analyzer Operation Manual
26
b. Print Format:
You can select the time to print the report.
①If you don’t print report during test, setting the print state to ‘1’;
②If you print a report for every sample, setting the print state to ‘2’ .
c. Modify report head, select ‘MODIFY REPORT HEAD’ interface as below:
The second row shows the modified report head the last time. If there is no modification, the consent
report head is “EK-50 REPORT”, it will recover to consent “EK-50 REPORT” when recovering the
system.
You can input 20 characters most for this.
d. Setting doctor’s autograph
Enter “SAVE DOCTOR’S NAME” to add a doctor’s autograph, select “SET DEFAULT DOCTOR’S
NAME” to install a consent doctor’s autograph and print it in report list, enter “DELETE DOCTOR’S
NAME” to delete a doctor’s autograph. The installation result will be shown at the last row of the
report list after installing the consent doctor’s autograph.
①SAVE DOCTOR’S NAME
Input the doctor’s autograph when it suggests “Please input doctor’s autograph”, it can’t be more than
8 characters, the input method state is shown in the right under side of screen(Consent: ENGLISH),
press “MENU” to enter “INPUT METHOD SELECTION” interface, or select other input methods.
It can save 10 doctors’ names at most, if it is more than 10, system will suggest “MEMORY IS FULL,
DELETE IT THEN SAVE”.
② SET DEFAULT DOCTOR’S NAME
The consent state is “NO INSTALLATION AUTOGRAPH”, if you print the doctor in report list, press
‘←’ ‘→’ to search the saved doctor’s name, press “ENTER” to install and press ‘MENU’ to quit.
③DELETE DOCTOR’S NAME
Press ‘←’ ‘→’ to search name after entering “DELETE DOCTOR’S AUTOGRAPH” interface, press
“ENTER” to delete and press “MENU” to quit.
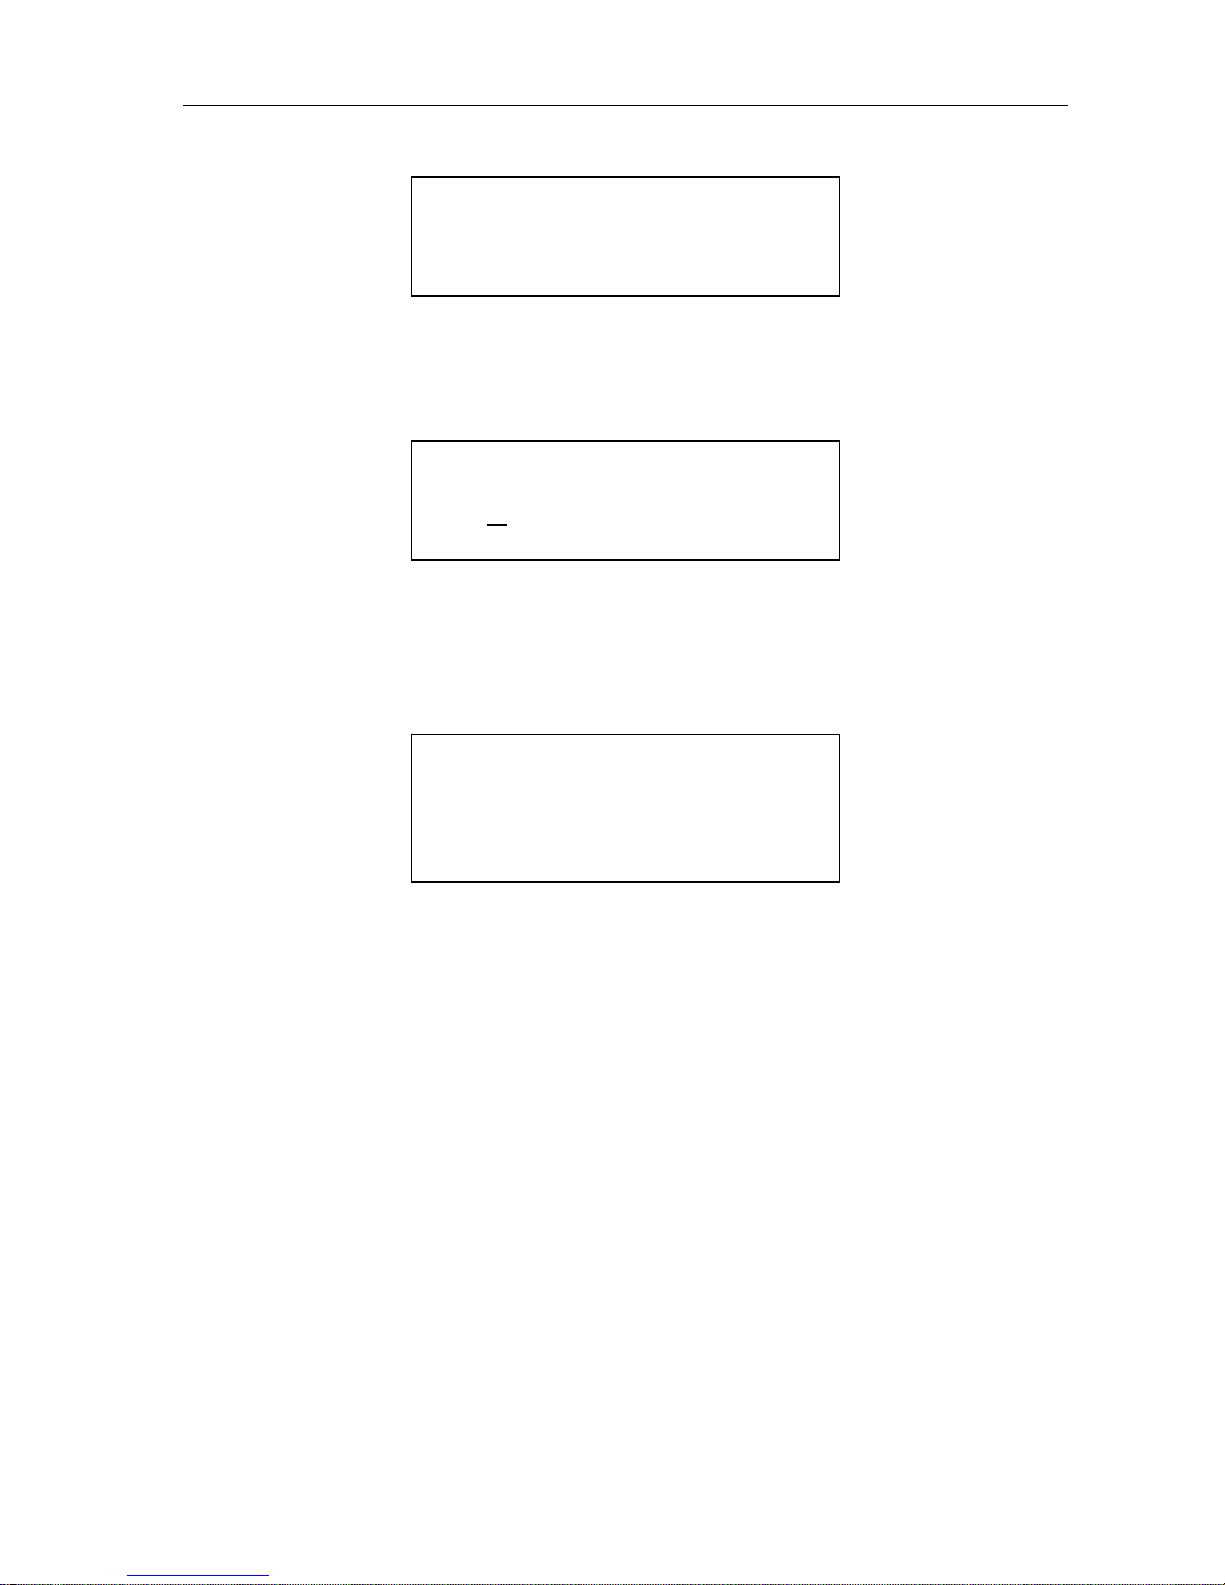
1-SAVE DOCTOR’S NAME
2-SET DEFAULT DOCTOR’S NAME
3-DELETE DOCTOR’S NAME
INPUT REPORT HEADER:
EK-50 REPORT
√ 1-AUTO PRINT ALL OFF
2-AUTO PRINT ON
Page 28
MH-50B Chemistry Analyzer Operation Manual
27
4.2 SET Serial com.
Setting the Serial com., select the parameters with ‘→’ ‘←’.
There are 5 BAUD RATIOS to select: 19200, 9600, 4800, 2400, 1200;
Input the BAUD RATIO, press ‘ENTER’ or ‘↓’ to select parameters of PARITY.
There are ODD, EVEN, NONE to select for PARITY.
Select “ON” or “OFF” for ‘Serial com.’, install the parameters of ‘Serial com.’ as the one in the
interface, install the ‘Serial com.’ with the same method for every time to power on, all ‘Serial com.’
state must be installed to asynchronous communication.
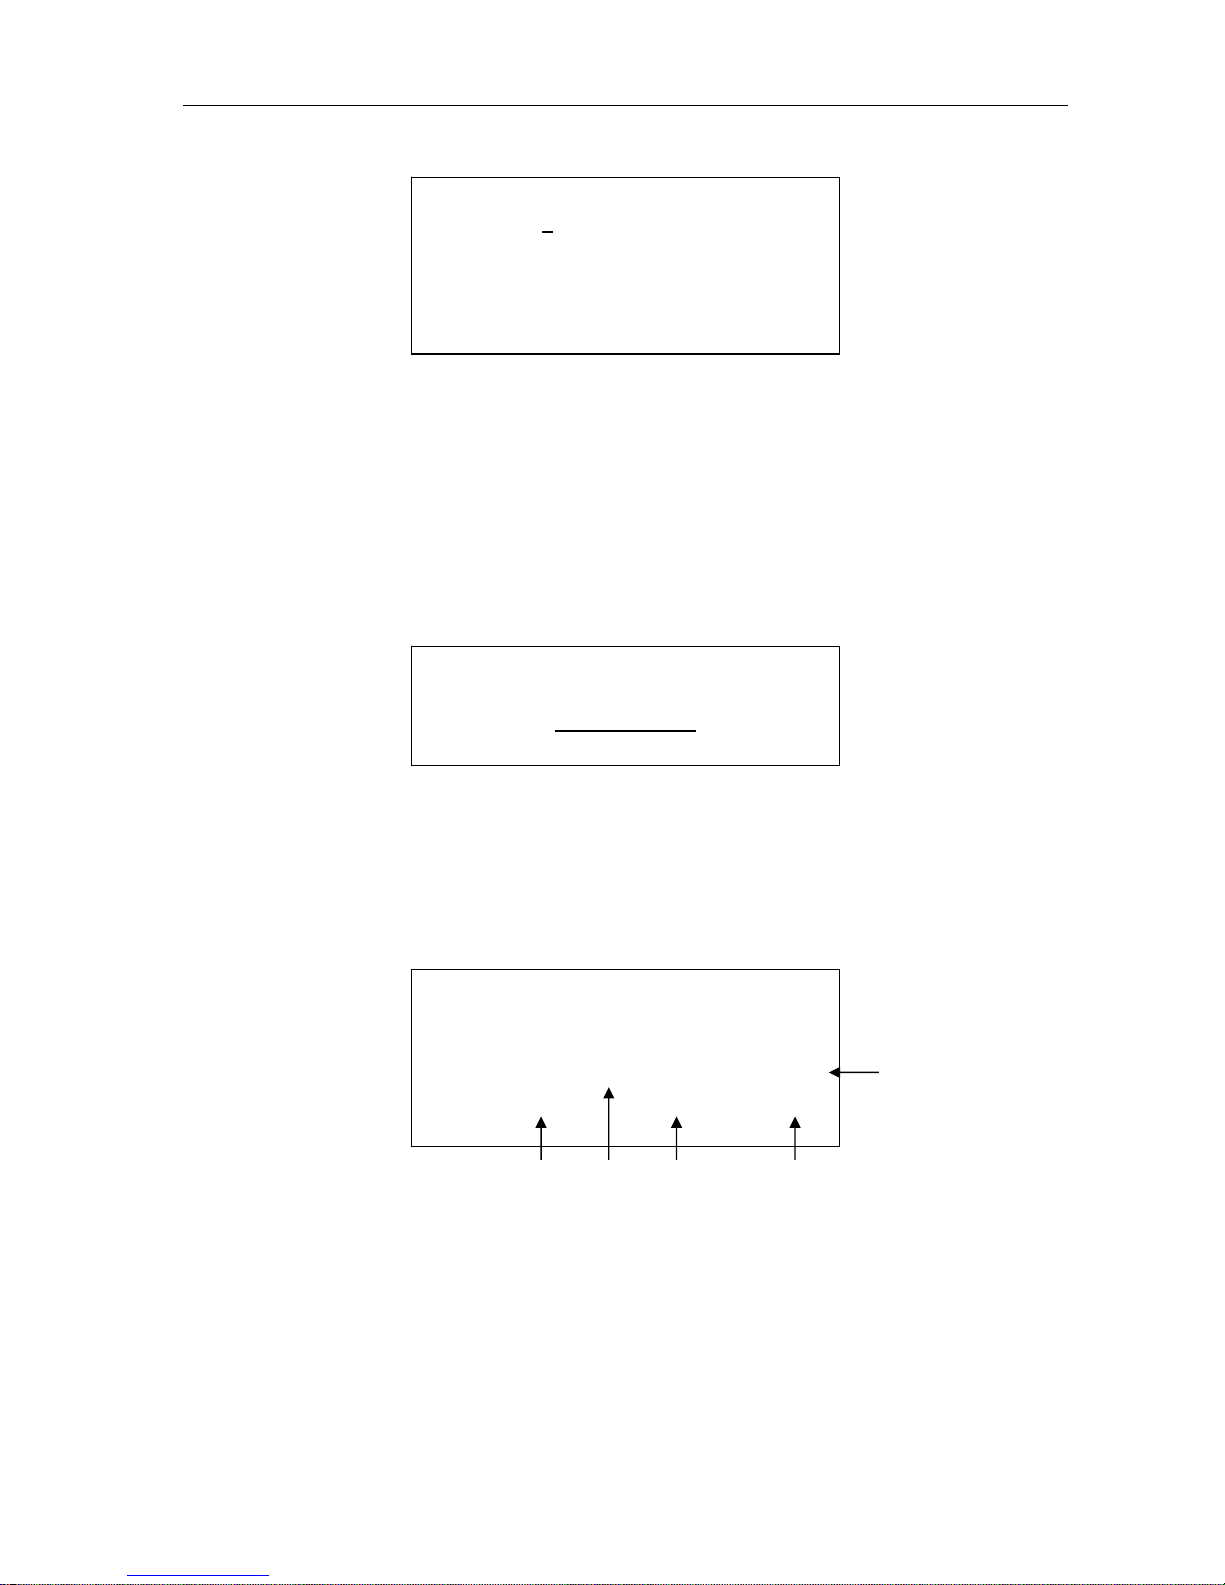
5. Absorbance Test
It will show:
Operate according to the screen’s suggestion, the aim is to assure the variety of absorbance between
different periods, then rectify. Each wavelength will show ‘OK!’ in ABSORBANCE test. Or it will
suggest ‘FAIL’ and need to be adjusted. Introduced largely in chapter 7 “MAINTENANCE”.
6. Edit patients’ file
The internal memory will be effected because of some reason, then it will save wrong data, it will
effect result report if without modification, this function is as follows:
A: The amount of patients saved in the system, range: 1—255;
B: The actual amount of patients detected by the instrument.;
C: Current position of patients’ file: range 0—249
D: Patient No., range:1—9999
E: Saved patient’s sample, range: 0—30
(1) In normal condition, A should be equal to B, now ‘1’ key is useless. In actual application, because
there are too many disturbance factors especially the moment of turning on and turning off, it is
instability in the twinkle of power on and power off, now it is very easy disturbed to make mistake. It
will suggest wrong information after detecting the mistake, now you need adjust the patients’ file with
BAUD RATIO:1
9200
PARITY:DISABLE
SERIAL:OFF
1-MODIFY RECORD No
2-DEL DISPLAYED SAMPLE
RECORD No:XXXXX SEARCH No:XXXXX
SAMPLE No:XXXXX XXX XXXX
MEASURE ABSORBANCE
ASP DI WATER
C DA E
B
Page 29

MH-50B Chemistry Analyzer Operation Manual
28
handwork modification, or it will show wrong result.
Method: Press ‘1’, the cursor will appear in A, modify the value in A equal to the one in B then press
‘ENTER’ key to correct the mistake.
(2) If you delete the patient’s information in patients’ file, search the patient with ‘↓’ ‘↑’, the patient No.
will be shown in D, press ‘2’ to delete the patient.
Attention: This operation can not be recovered, so be careful. If you delete the appointed result of
the patient, operate in “RESULT REPORT”.
(3) Press ‘MENU’ back to last menu.
7. Set the time
Enter “CLOCK SETUP” menu, it will show:
a>. Time Format: HOUR-MINUTE-SECOND XX: XX: AM: MORNING
PM: AFTERNOON
If it is 24 HOURS SYSTEM, XX is blank.
b>. Date Format: YEAR-MONTH-DATE
c>. Press ‘MENU’ if you don’t modify the time and date, don’t press ‘ENTER’, or it will effect the time’s
correctness.
8. System Reposition
When the system is disturbed by other reasons, this function can help you to reposit the system be
back to out-firm installation. Input ‘99999’ in ‘UTILITY’ to startup the function, it will ask you:
Press ‘1’ to reposit the system, then press ‘Y’ twice;
Press ‘2’ to clean the patients file, then press ‘Y’ twice;
Press ‘MENU’ to return.
All patients’ information and results will be lost after reposition in internal memory, so be careful.
PRESS ‘1’ TO RESET SYSTEM
PRESS ‘2’ TO RESET REPORTS
PRESS ‘MENU’ RETURN
HR FORMAT 1-12 Hr √
2-24 Hr
DATE: 2008-01-01
TIME: 12:01:10
‘←’’→’CHANGE HR FORMAT
NUM KEY CHANGE TIME
Page 30

MH-50B Chemistry Analyzer Operation Manual
29
Chapter 7 Maintenance
7.1 Maintenance
Maintenance and Utilities of EK-50 BIOCHEMISTRY ANALYZER is as follows:
1. Keyboard use
It requires ‘TOUCH’ keyboard, there is no sound when pressing each key, only sound for pressing
then loose it, so the operator shouldn’t press keys heavily.
2. Maintenance for every day
Clean the tube with DI water repeatedly after testing sample every day to get rid of residual reagent
and serum,protein especially remain thing in the cliff of colorimetric cell. The tube should be full of DI
water at last.
3. Maintenance for every week
Clean the tube with DI water after testing sample twice, then absorb the CLEAN once (Main
Component: NaClO, diluted it to 5%), let the CLEAN stay in the tube for 10 minutes, cleaning the tube
with DI water for 3 times. At last it should be full of DI water.
4. Cleaning instrument’s appearance
Wipe the instrument appearance with wet cloth (Turn the electricity power off).
Attention: Clean the instrument with clean water,neutral purge reagent or non-causticity scour, but it
can’t be cleaned with organic reagent or hot water, or it will be distorted or damaged.
Page 31
MH-50B Chemistry Analyzer Operation Manual
30
7.2 Trouble and Handle
phenomena cause Method
Fail absorbing
a) The pump doesn’t work
b) Loose pipe
c) Absorbing time is zero
d) The pipe is damaged
a) Tight the screw of the pump
b) Cut down a part of the pipe’s tie
c) Install the ASP TIME again
d) Change the pipe(Appendix)
No Display
a) The power doesn’t supply
b) The electricity doesn’t work
c) Signal display line is loose
a) Turn on the power
b) Check the power socket
c) Check the display cable
Dark Display
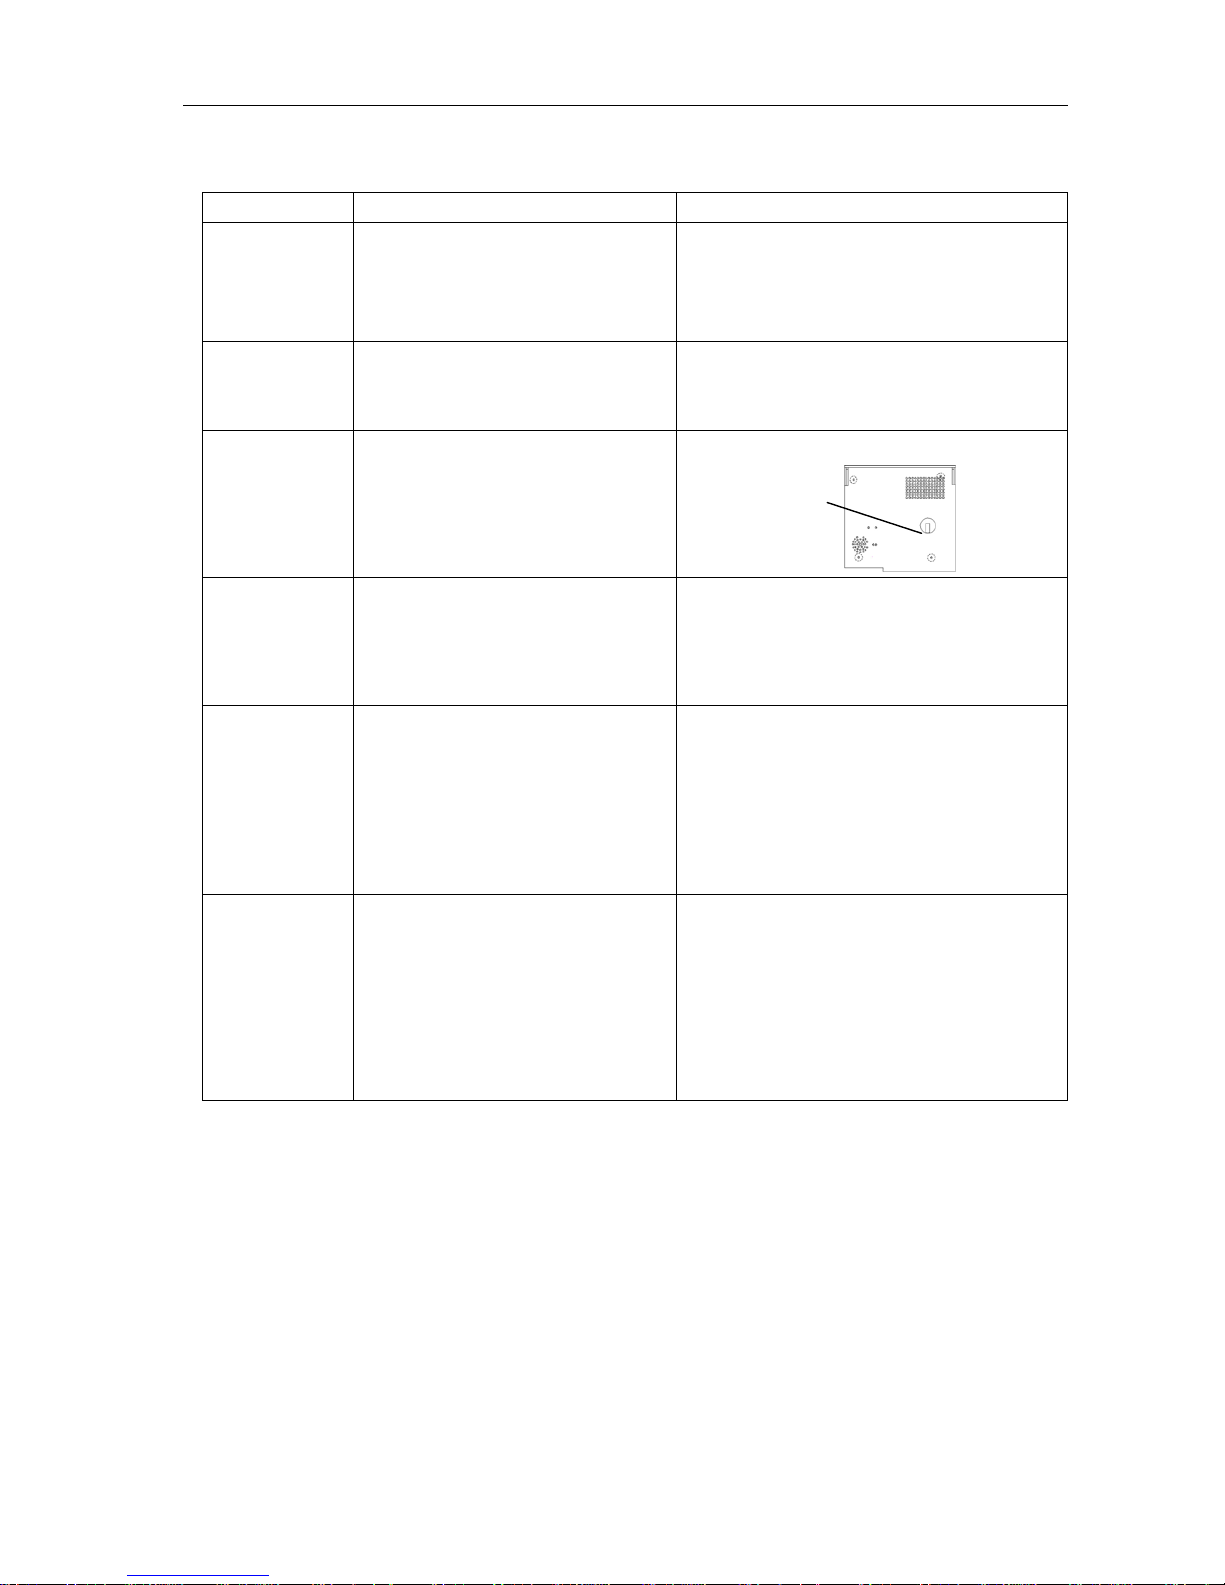
The contrast of the display is
changed with the environment.
Adjust the contrast adjustor
No Printing
a) No paper.
b) Print paper is blocked.
c) Thermal print paper is in reverse
a) change the new paper
b) install the paper again
c)install the paper again
Fail
Absorbance
a) Do not absorb DI water
b)There are bubble in the
colorimetric cell.
c) Dirty colorimetric cell
d) The lamp is aging
1. Test it with DI water
2. a): Clear the bubble in colorimetric cell
b): Clean the colorimetric cell with CLEAN
c): Change the lamp
Instable
results
a) No absorbance when power on
b) Invalidate reagent
c) Inadequate ASP quantity
d) No STD.
e)Improper wavelength
f) Absorb air into reagent to get high
result
a) Absorbance again
b) Change validity reagent
c) Adjust the ASP quantity≤600uL
d) Test the BLANK and STANDARD again
e) Test another wavelength
f) Operate carefully and standard
Contrast
adjustor
Page 32
MH-50B Chemistry Analyzer Operation Manual
31
Appendix 1: Input Method
The correspondent relation of cursor keys to ENGLISH characters are as follows:
1→ A,B,C
2→ D,E,F
3→ G,H,I
4→ J,K,L
5→ M,N,O
6→ P, Q , R
7→ S,T,U
8→ V,W,X
9→ Y,Z,(null)
0→ -,.,/,α,β,γ,δ,ε,ζ,η,θ,ι,κ,λ,μ,ν,ξ,ο,π,ρ,σ,τ,υ,φ,χ,ψ,ω.
Press ‘1’ key one time and you will get A. 1---------------- A
Press ‘1’ key twice quickly and you will get B. 1 & 1----------- B
Press ‘1’ key three times quickly and you will get C. 1 & 1 & 1----- C
You can get the others alphabet and mark with the analogy.……
Appendix 2: Change the printer-paper
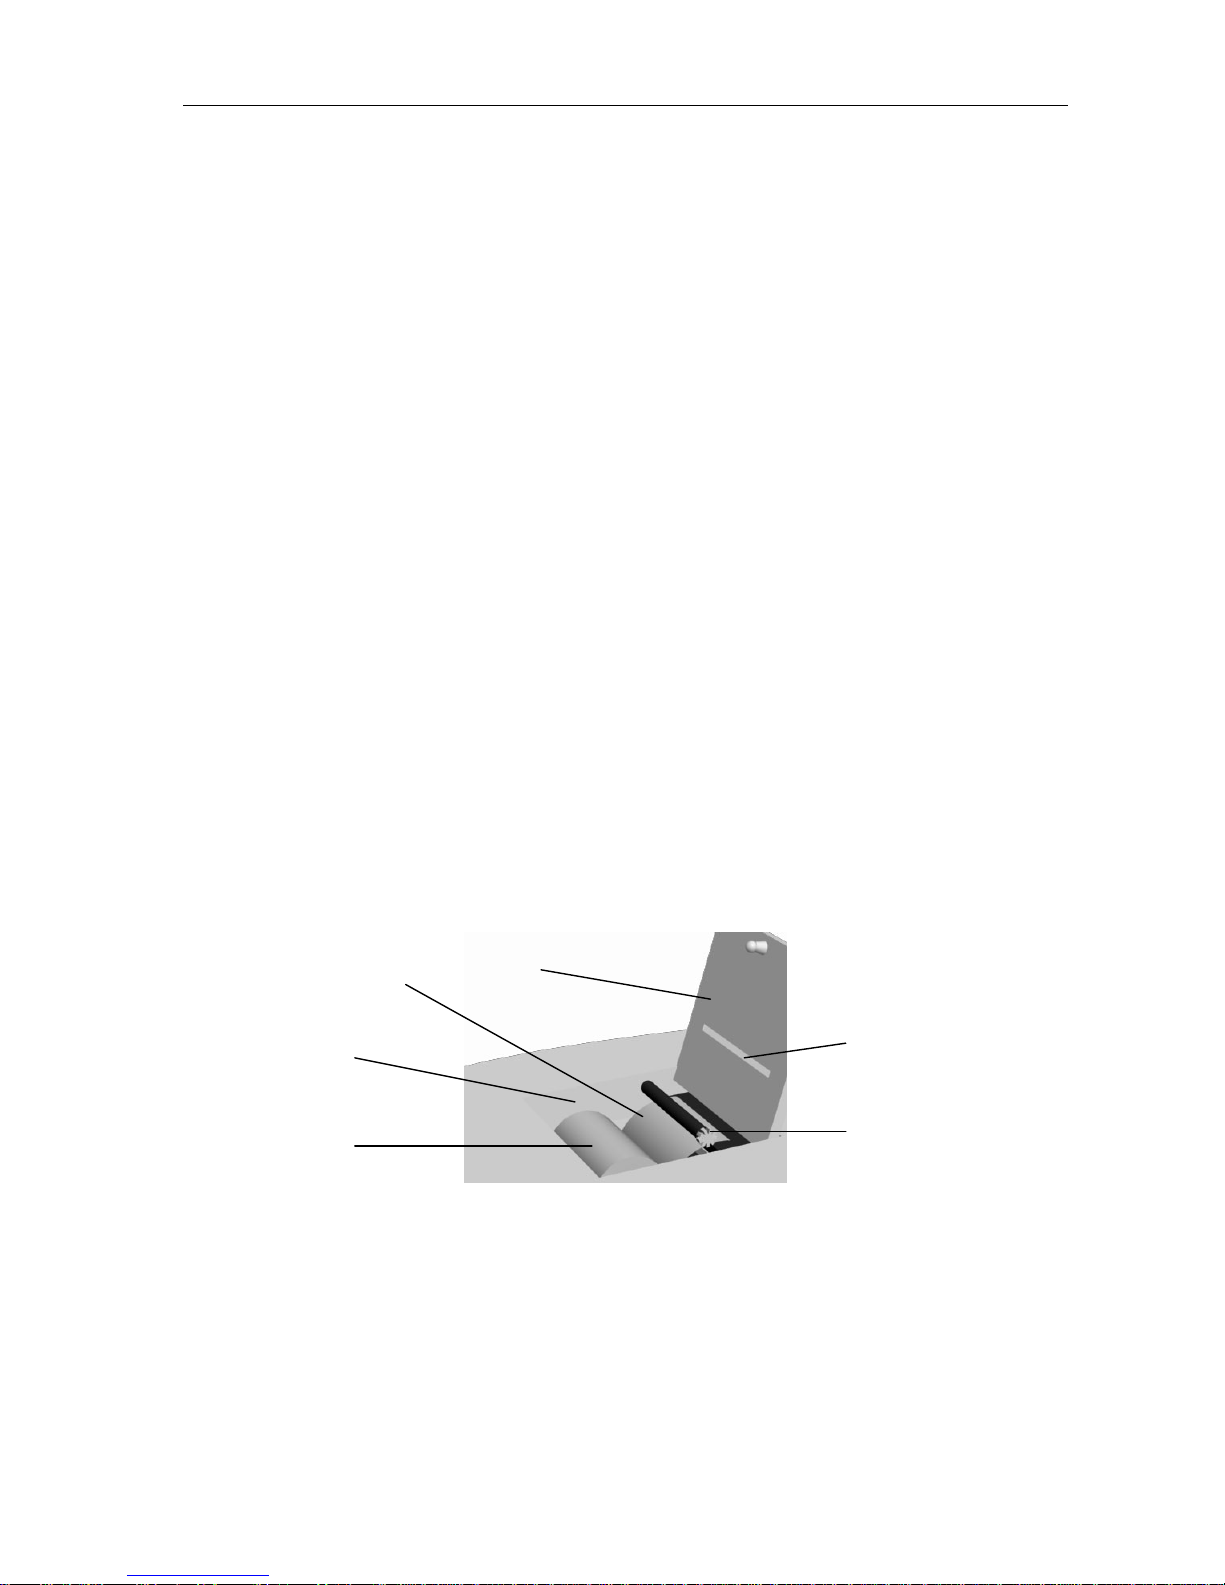
① Open the printer cover interface, press ‘FEED’, press it again to stop it after output the residual
paper, get the surplus paper out.
② Put the new Paper Scroll in Paper Groove, the thermal printer paper are different in two sides, so
pull the end of paper out when the thermal side downwards;
③ Take the roll axis out upwards, put the thermal side under the roll axis as the chart, the paper’ s
direction should be vertically with the one of the roll axis, it avoids the printer paper locked so that it
can’t print normally;
④ Install the print roll axis, put the gear in the right side of the printer, then put another side and press
it to lock it tight;
⑤ Press ‘FEED’, adjust it if the paper can’t get out or it’s direction is not vertically with the one of roll
axis, or it can’t work; press ‘FEED’ to stop it after print a segment(When paper get out of the cover
board)
⑥ Pull the paper out of the cover board, close it;
Attention: “FEED” function consists in Main menu, Test sample interface, Waiting keyboard input
interface, “PRINT/DELETE RESULT REPORT” interface and Q.C. report interface can be used in
“RESULT REPORT”, close “FEED” function in other interfaces.
Cover Board
Output paper
Roll-axis
The non-thermal face
Paper groove
Paper Scroll
Page 33
MH-50B Chemistry Analyzer Operation Manual
32
Appendix 3: Change Pump Pipe
1. Wring the 2 screws with screwdriver in the left side of the back, take the panel board out, there is
a black tube called Pump Pipe;
2. Slide the upper side of the Pump Pipe out of the gap;
3. Pull out the white ties connect with Pump Pipe’s two sides;
4. Get a new Pump Pipe, connect the 2 ties with the Pump Pipe correspondent;
5. Put one side of Pump Pipe in the flute, push another side from the upper flute according to the
middle part;
6. Close the upper board, tight the screws;
Appendix 4: Clean the colorimetric cell
1. Prepare a cup of DI water or alcohol, put the sample tube into the liquor;
2. Press ‘6’ to enter “Utilities” submenu in main menu, then press ‘3’ enter “ADC” interface;
3. Press ‘8’, clean;
4. If use alcohol, discharge the residual alcohol in tube with pressing ‘8’, change DI water twice;
5. Press ‘MENU’ to return to the main menu after cleaning;
Appendix 5: Change Lamp
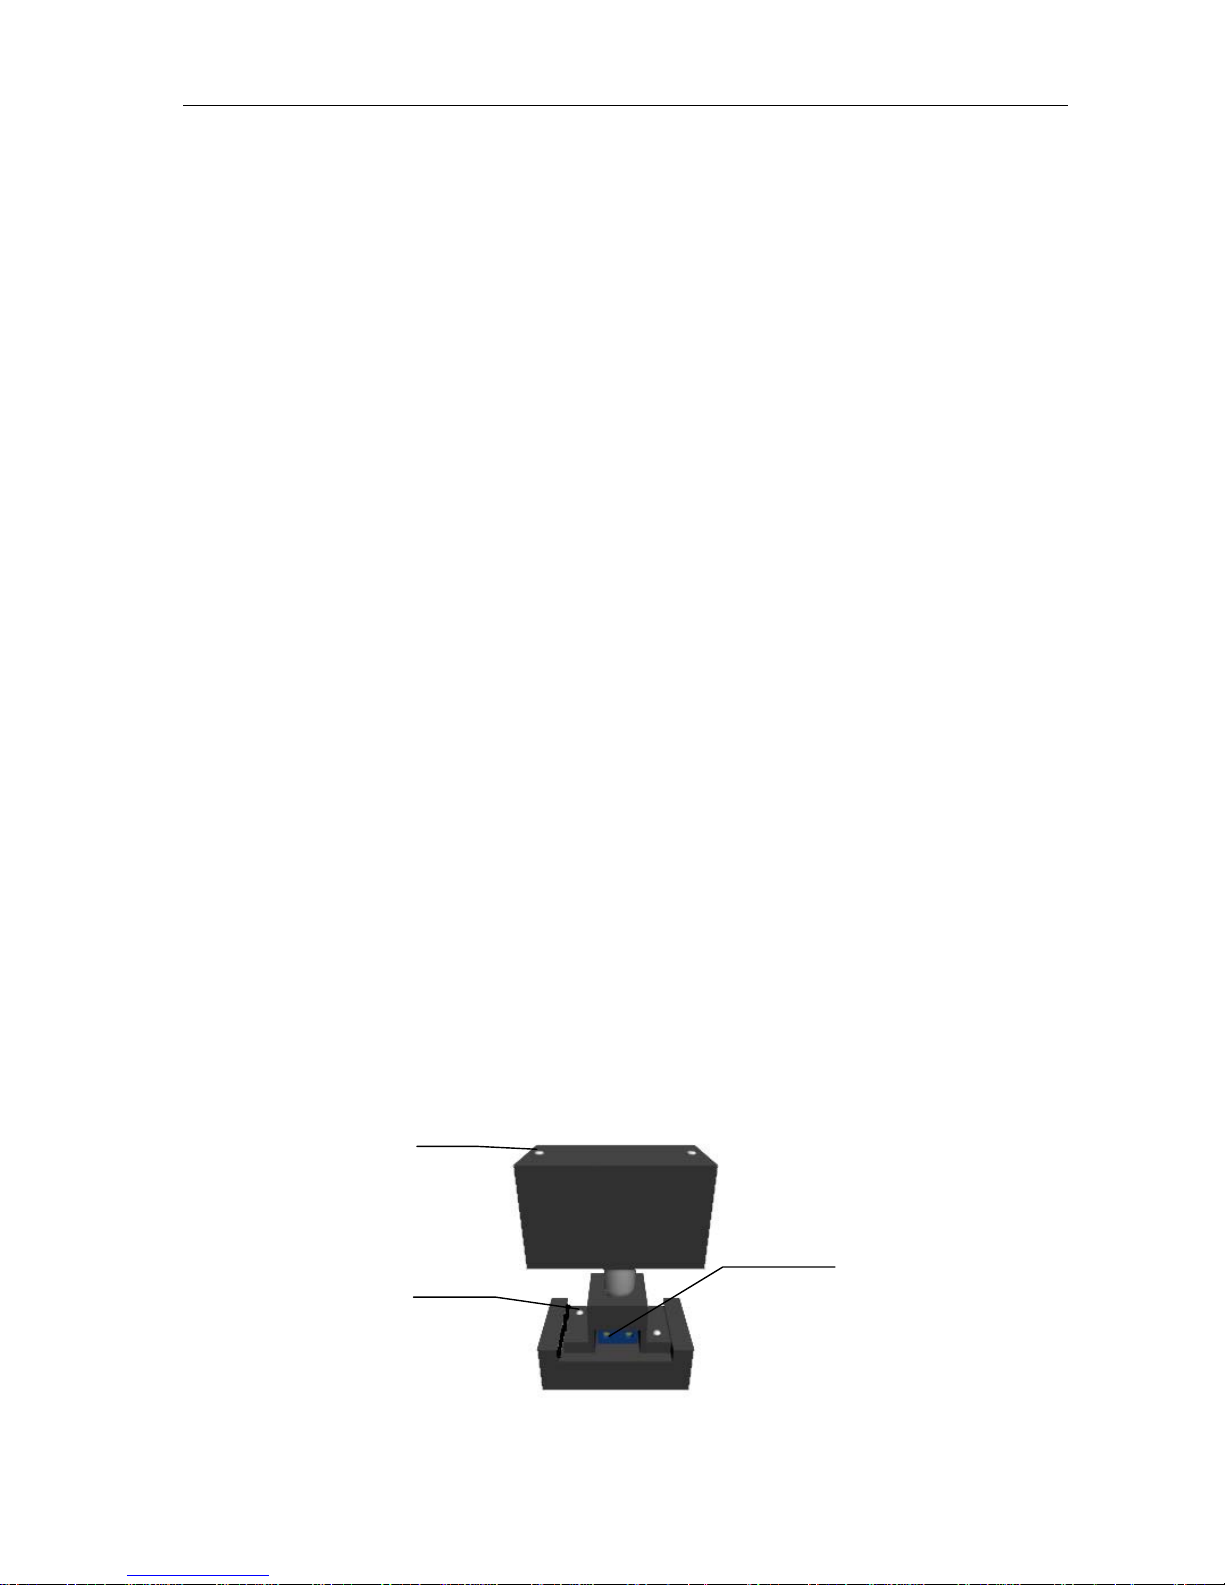
1. Open the upper board.
◆Wring the two screws on the front side in underneath board and back board;
◆Slide the upper board for a segment distance along the instrument (Don’t touch the sample
tube), get the upper board and put it on the right side.
2. Find a black box near the sample tube, it is Lamp box;
3. Wring the 2 screws(A.B)in the top of the Lamp box with screwdriver, get the Lamp box out;
4. Wring the 2 screws(C.D)in Lamp holder with screwdriver;
5. Wring the 2 screws(E.F),get the Lamp light out;
6. Replace the new lamp with old lamp, tight screws(E.F)
7. Tight 2 screws(C.D)
8. Put the Lamp box back to the place, tight the 2 screws;
9. Close the upper board, tight the screws.
Screw A, B
Screw C, D
Screw E, F
Page 34

MH-50B Chemistry Analyzer Operation Manual
33
Appendix 6: Com. protocol
Hardware condition: Connect 2 communication instruments’ RS-232C ties together with
RS-232C cable, or connect the instrument to PC instrument’s COM port.
Serial communication state:
BAUD ratio: 19200, 9600, 4800, 2400, 1200;
WORK MODE: 0(SYNCHRONISM), 1, 2, 3, 4(ASYNCHRONISM)
PARITY: ODD, EVEN, NONE;
WORK STATE: SEND, RECEIVE, DUPLEX OPERATION.
Concentration values are sent in packets with the following format:
Blank originality data:
BI
TE
1 1 1 2 1 1 3 1 1 1 3 1 1 1
TY
PE
Fra
me
he
ad
ver
sio
n
Instr
ume
nt
type
Instr
ume
nt
num
ber
Fra
me
len
gth
Fram
e
num
ber
Pat
ien
t ID
Item
num
ber
Mea
sure
state
Resu
lt
type
DATA decimal check
sum
Fram
e
end
CO
DE
FA 01 01 01 0-7F 0-7F 0-7F 80H-
8FH
D0 D3 0-7F
each
E0-E4 D7=0 FBH
Standard absorbance or result absorbance:
BI
TE
1 1 1 2 1 1 3 1 1 1 3 1 1 1 1
TY
PE
Fra
me
He
ad
ver
sio
n
Instr
ume
nt
Type
Ins
tru
me
nt
Nu
mb
er
Fram
e
Leng
th
Fram
e
Num
ber
Pat
ien
t ID
Te st
Num
ber
Me
as
ure
Sta
te
Re
sul
t
Ty
pe
DATA deci
mal
Unit ch
ec
k
Su
m
Fram
e
End
CO
DE
FA 01 01 01 0-7F 0-7F 0-7F 80H-
8FH
D1-
D2
D4 0-7F
each
E0-E4 C0H-C
FH
D7
=0
FBH
The result:
BI
TE
1 1 1 2 1 1 3 1 1 1 3 1 1 1 1
TY
PE
Fra
me
He
ad
ver
sio
n
Ins
tru
me
nt
Ty
pe
Instr
ume
nt
Num
ber
Fram
e
Leng
th
Fra
me
Nu
mb
er
Patie
nt ID
Te st
Num
ber
Me
as
ure
Sta
te
Re
sul
t
Ty
pe
DATA deci
mal
Unit ch
ec
k
Su
m
Fram
e
End
CO
DE
FA 01 01 01 0-7F 0-7F 0-7F 80H-
8FH
D2
D5 0-7F
each
E0-E4 C0H-C
FH
D7
=0
FBH
Page 35

MH-50B Chemistry Analyzer Operation Manual
34
Test code: (80-0xBF, 64 codes at most)
NUM TEST CODE CODE NUM TEST CODE CODE
1 1 81H 8 8 88H
2 2 82H 9 9 89H
3 3 83H 10 10 8AH
4 4 84H 11 11 8BH
5 5 85H …… …… ……
6 6 86H …… …… ……
7 7 87H …… …… ……
Unit code:
NUM NAME CODE NUM NAME CODE
0 C0H 8
g/dL
C8H
1
u/L
C1H 9
g/mL
C9H
2
u/mL
C2H 10
Leu/uL
CAH
3 u mol/L C3H 11
X1012/L
CBH
4 m mol/L C4H 12 CCH
5
g/L
C5H 13 CDH
6
mg/L
C6H 14
7
mg/dL
C7H 15
Measure State Result Type
NUM NAME CODE NUM NAME CODE
1 BLANK D0H 1 originality D3H
2 STANDARD D1H 2 Absorbance D4H
3 SAMPLE D2H 3 Consistence D5H
Attention:
a)Use originality to test BLANK, no unit;
b)Use absorbance to test, no unit, data is 3*N bites for N standards;
c) Use no unit absorbance and unit consistence to test;
d) Absorbance value: turn the decimal to left for 3 bites;
e) Consistence: turn the data to left for (D
decimal
—0xE0)bites;.
f) The CRC check begins with the start bite of FA and end with front one bite of the check sum;
g) Item’s result data bite and patient No. are ((D
o
&7F)<<14)+((D1&7F)<<7)+(D2&7F);
h) The frame length is which begins with the item type bit and end with the front one bit of the check
sum.
i) The first frame’s No. is 1, and it will add 1 when send one frame till 0x7f, then begins with 1 again.
j) The instrument sends data to the serial when the screen shows the result report. For example, it will
send data automatically when get the result in “TEST SAMPLE” and “RESULT REVIEW”.
Page 36

MH-50B Chemistry Analyzer Operation Manual
35
Appendix 7: Items List:
Code Abbreviation Code Abbreviation
1 ALT 26 Zn
2 ALP 27 P
3 GOT 28 K
4 γ-GT 29 Na
5 TP 30 CO2CP
6 ALB 31 Fe
7 TBIL 32 HGB
8 DBIL 33 RBC
9 TTT 34 GRP
10 BUN 35 A/G
11 CRE 36 UDBIL
12 UA 37 IGG
13 CO2 38 C3
14 NH3 39 IGM
15 GLU 40 CHE
16 TCHO 41 CK
17 HDLC 42 BU
18 LDLC 43 U-PRO
19 TG 44 U-Hb
20 LDH 45 U-GLU
21 AMS 46 U-URO
22 CL 47 U-BIL
23 Ca 48 U-KET
24 Mg 49 U-NIT
25 Cu 50 U-PH
 Loading...