

Page 1
Smart Share
USER MANUEL
Before operating the unit
Please read this manual thoroughly
Page 2
Contents
Android
Box.....................................................................................................................................1
SAFETY
WARNING .............................................................................................................................3
PREPARATION ........................................................................................................................
............4
Introduction ......................................................................................................................
........4
CONNECTION ........................................................................................................................
............6
HOW TO
CONNECT ....................................................................................................................6
TERMINAL
CONNECTION...........................................................................................................6
INSTALLING
WIZARD..........................................................................................................................7
WELCOME
PAGE ........................................................................................................................7
SETUP
PAGE ...............................................................................................................................
7
MAIN
LAUNCHER ............................................................................................................................
11
LAUNCHER
INTRODUCTION ....................................................................................................12
MEDIA
PLAYER.........................................................................................................................1
3
BROWSER .......................................................................................................................
.........15
APPLICATIONS ...............................................................................................................
..........16
z Install from U-disk/SD
card .................................................................................16
z Install from
Browser .............................................................................................16
ADVANCED
FEATURES .....................................................................................................................19
z Install from
ApkInstaller........................................................................................16
Remove
Applications ........................................................................................16
SETTINGS .......................................................................................................................
..........17
Tethering & portable hotspot(Optional
Only) .........................................................................19
General
Introduction ....................................................................................................19
Operating
Introductions ...............................................................................................19
DLNA (Digital Living Network
Alliance) ...................................................................................22
Page 3

General
Introduction ....................................................................................................22
Operating
Introductions ...............................................................................................22
Google TV Remote(For the U.S. region
only) ..........................................................................25
General
Introduction ....................................................................................................25
Operating
Introductions ...............................................................................................25
EXCEPTION
HANDLING ....................................................................................................................28
Systems
restore .......................................................................................................................28
General
Outline ...............................................................................................................................30
Page 4
SAFETY WARNING
Before operating the unit, please read this manual thoroughly.
Placement
z Do not place the unit on an unstable cart, stand, tripod, bracket, table, or shelf.
z Do not expose the unit to direct sunlight and other sources of heat.
z Do not handle liquids near or on the unit.
z Never spill liquid of any kind into the unit
z Do not put the unit near appliances that create magnetic fields.
z Do not put heavy objects on top of the unit.
Power Supply
z Check that the unit
z Please unplug power supply and aerial plug when the weather is thunder-storm or
lightning.
z Please unplug power supply, when there is nobody at home or didn't use over a long
period of time.
z Please keep power cord from physical or mechanical damage.
z Please use exclusive power cord, don't modify or lengthen it.
z Please check and ensure AC source is connected with the ground.
Temperature
z Do not place the unit near or over a radiator or a heater register.
z If your unit is suddenly moved from a cold to a warm place, unplug the power cord for
at least two hours so that moisture that may have formed inside the unit can dry
completely.
Humidity
z Do not expose machine in rain, damp or place near water.
z Ensure the indoor drying, cool.
Ventilation
z Keep the ventilation openings clear.
z Ensure that the unit has enough space for ventilation around: left, right and
back >10cm, top> 20cm.
Battery
z Accurate transaction and recall scrap battery after using.
z Please don't let kid touch battery, in case of dangerous don't throw battery into fire.
s operating voltage is identical with your local power supply.
Page 5
PREPARATION
Introduction
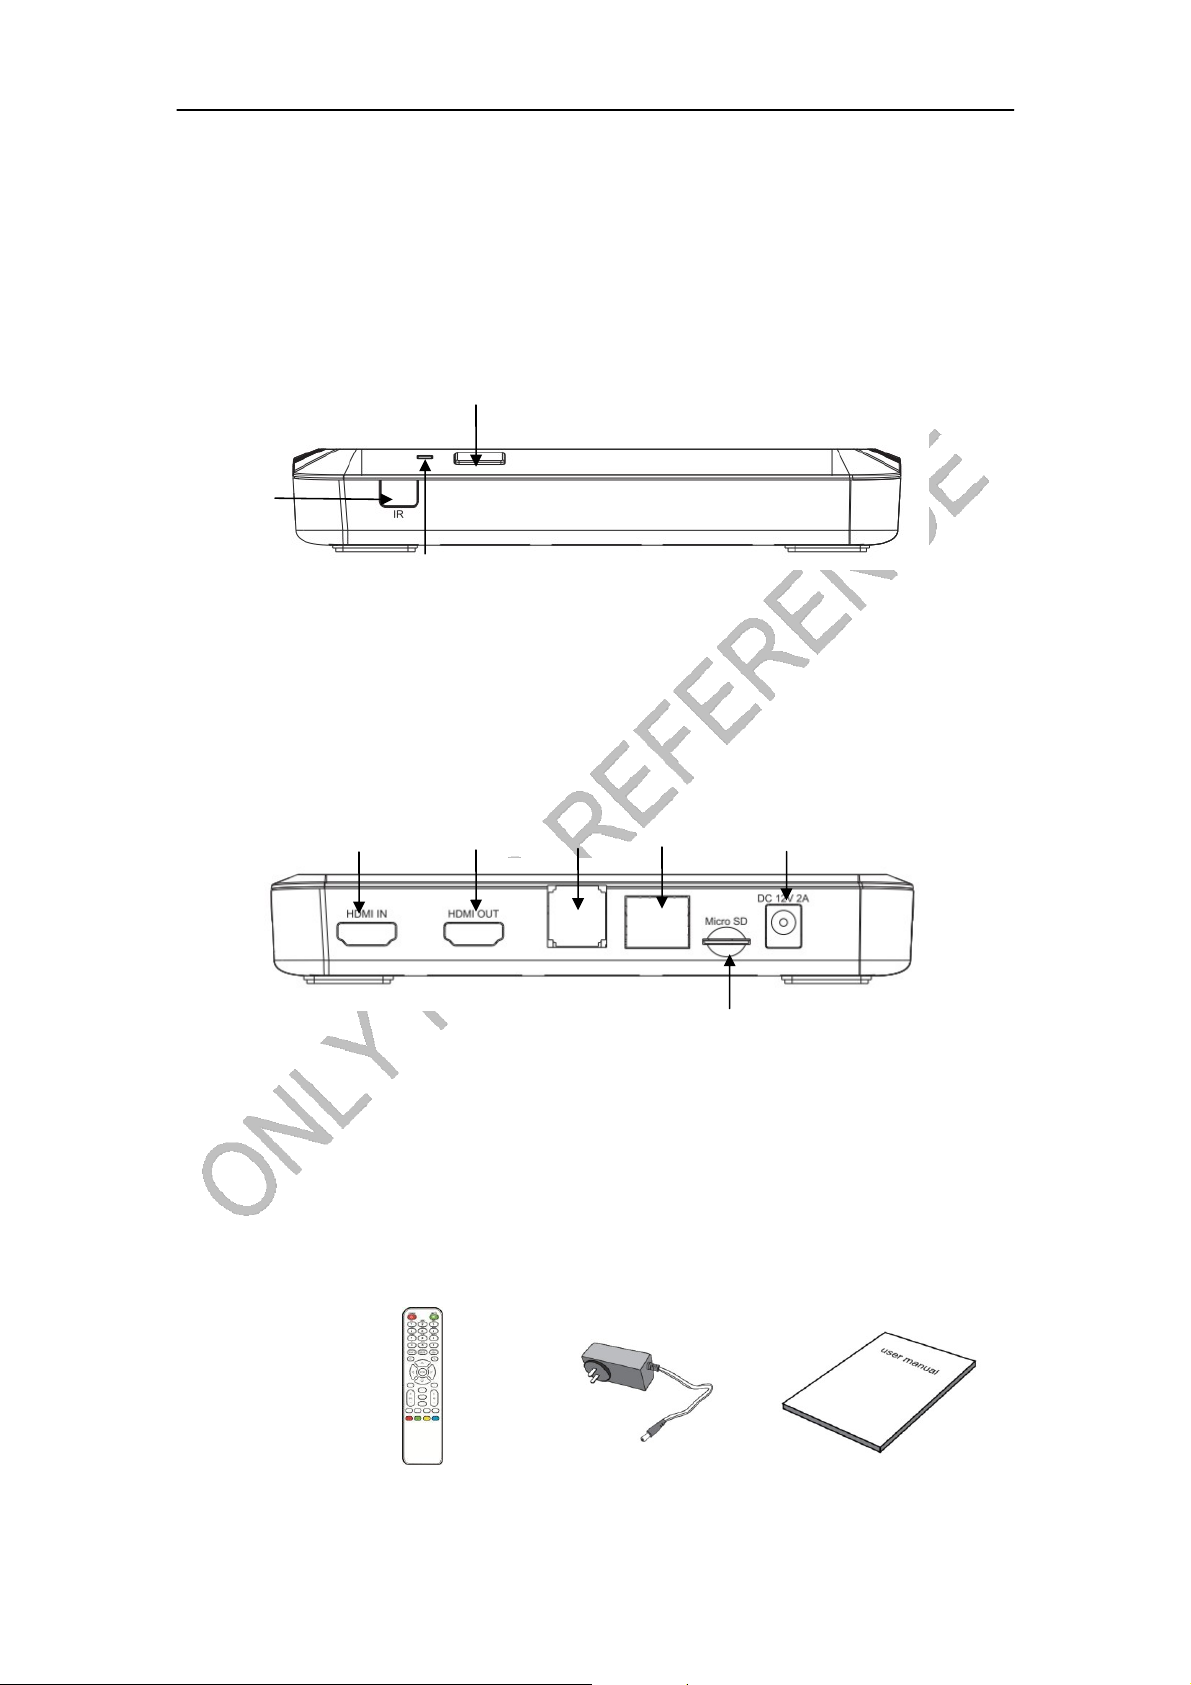
SKETCH
①
FRONT
① IR receiver
② Signal LED( green--power on)
③ Power button
BACK
①
HDMI input up to 1080P
② HDMI output up to 1080P
USB2.0 port x 2
③
④ Ethernet input
⑤ MircoSD slot(Up to 32GB)
⑥ DC in
PERIPHERAL Remote AC adapter User manual
②
①
②
③
③
④
⑥
⑤
Page 6
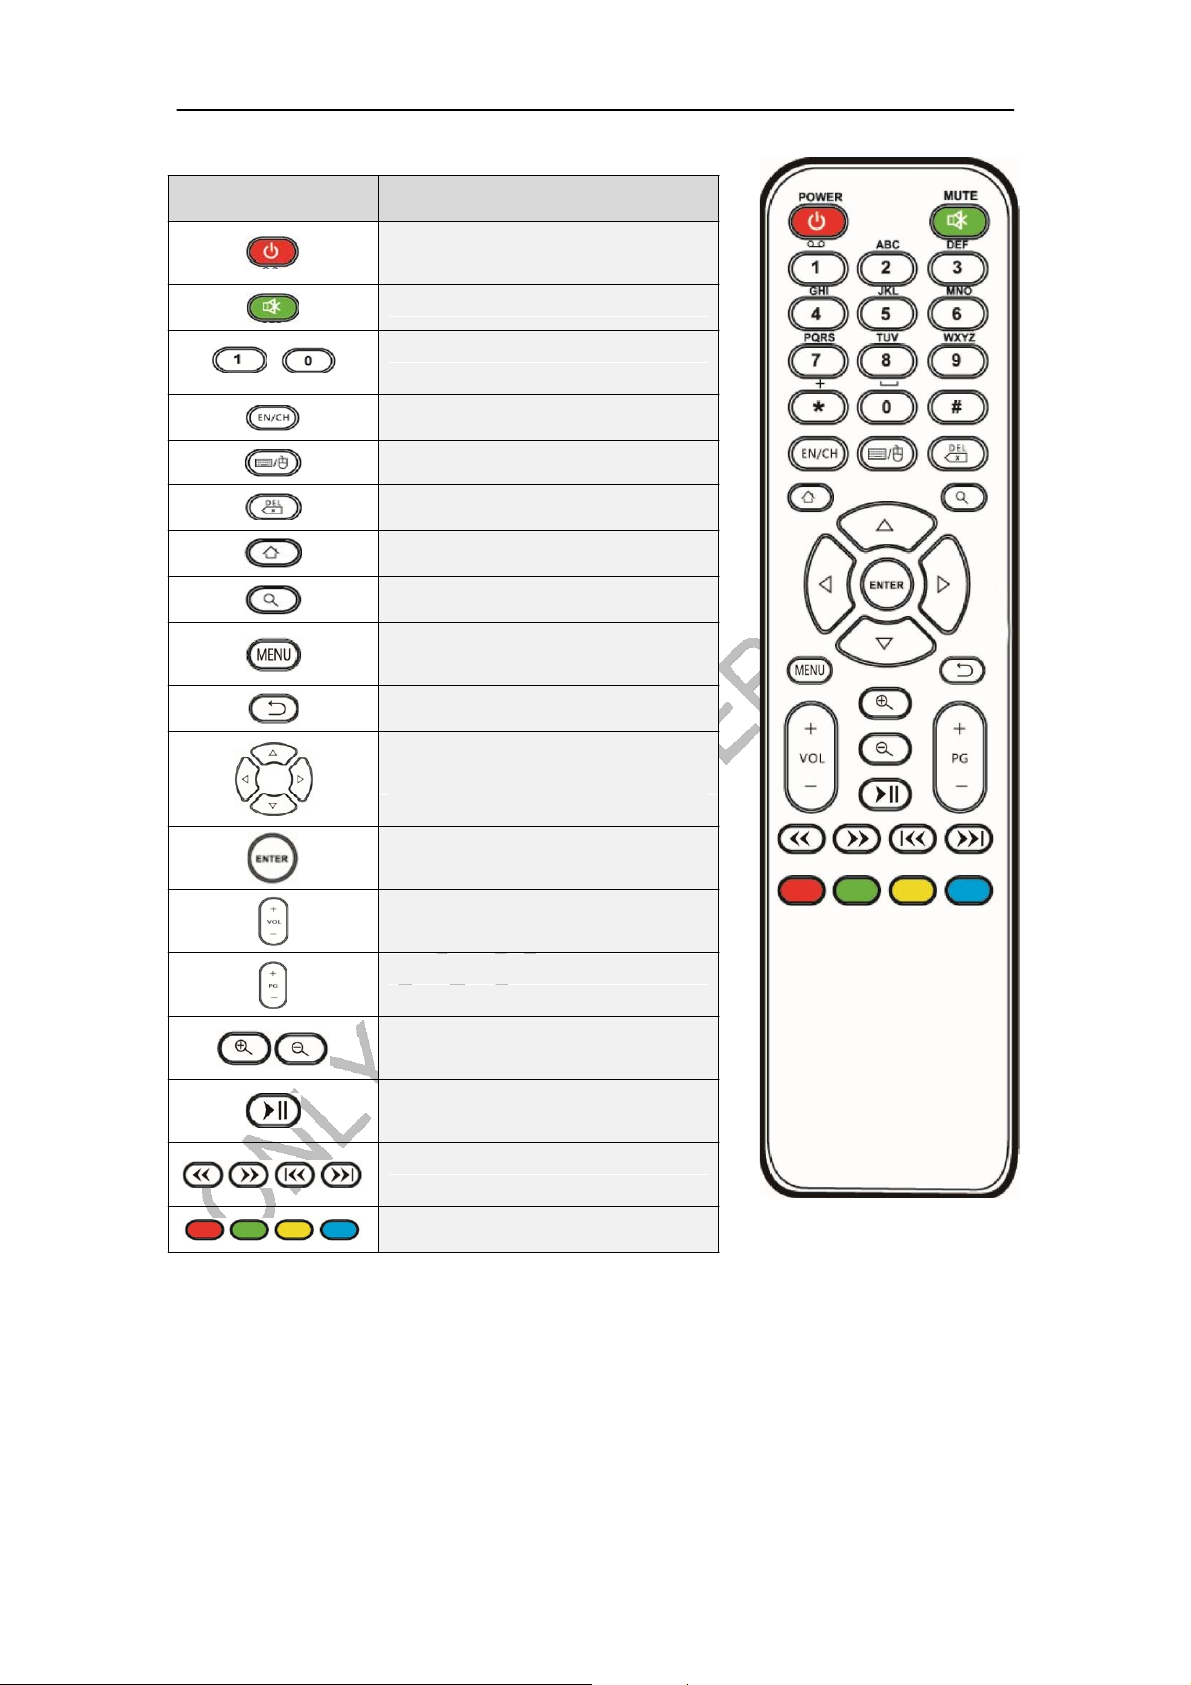
REMOTE CONTROL INTRODUCTION
Button Function
Turn on/off
Sound/Mute
Number 1~9 and “*”, “#”
~
Switch input language (EN/CH)
Turn on/off Mouse Mood
Delete
HOME button, back to main page
Call out search bar
Menu button
Back
Up, down, left and right direction
control
Confirm
Volume “+,-“(Turn up/down)
Page turning ”+,-“(Up/down)
Zoom in/out
Multimedia: Play/Pause
Multimedia: Forward/Backward/
Preview/Next
Defined function button
Page 7
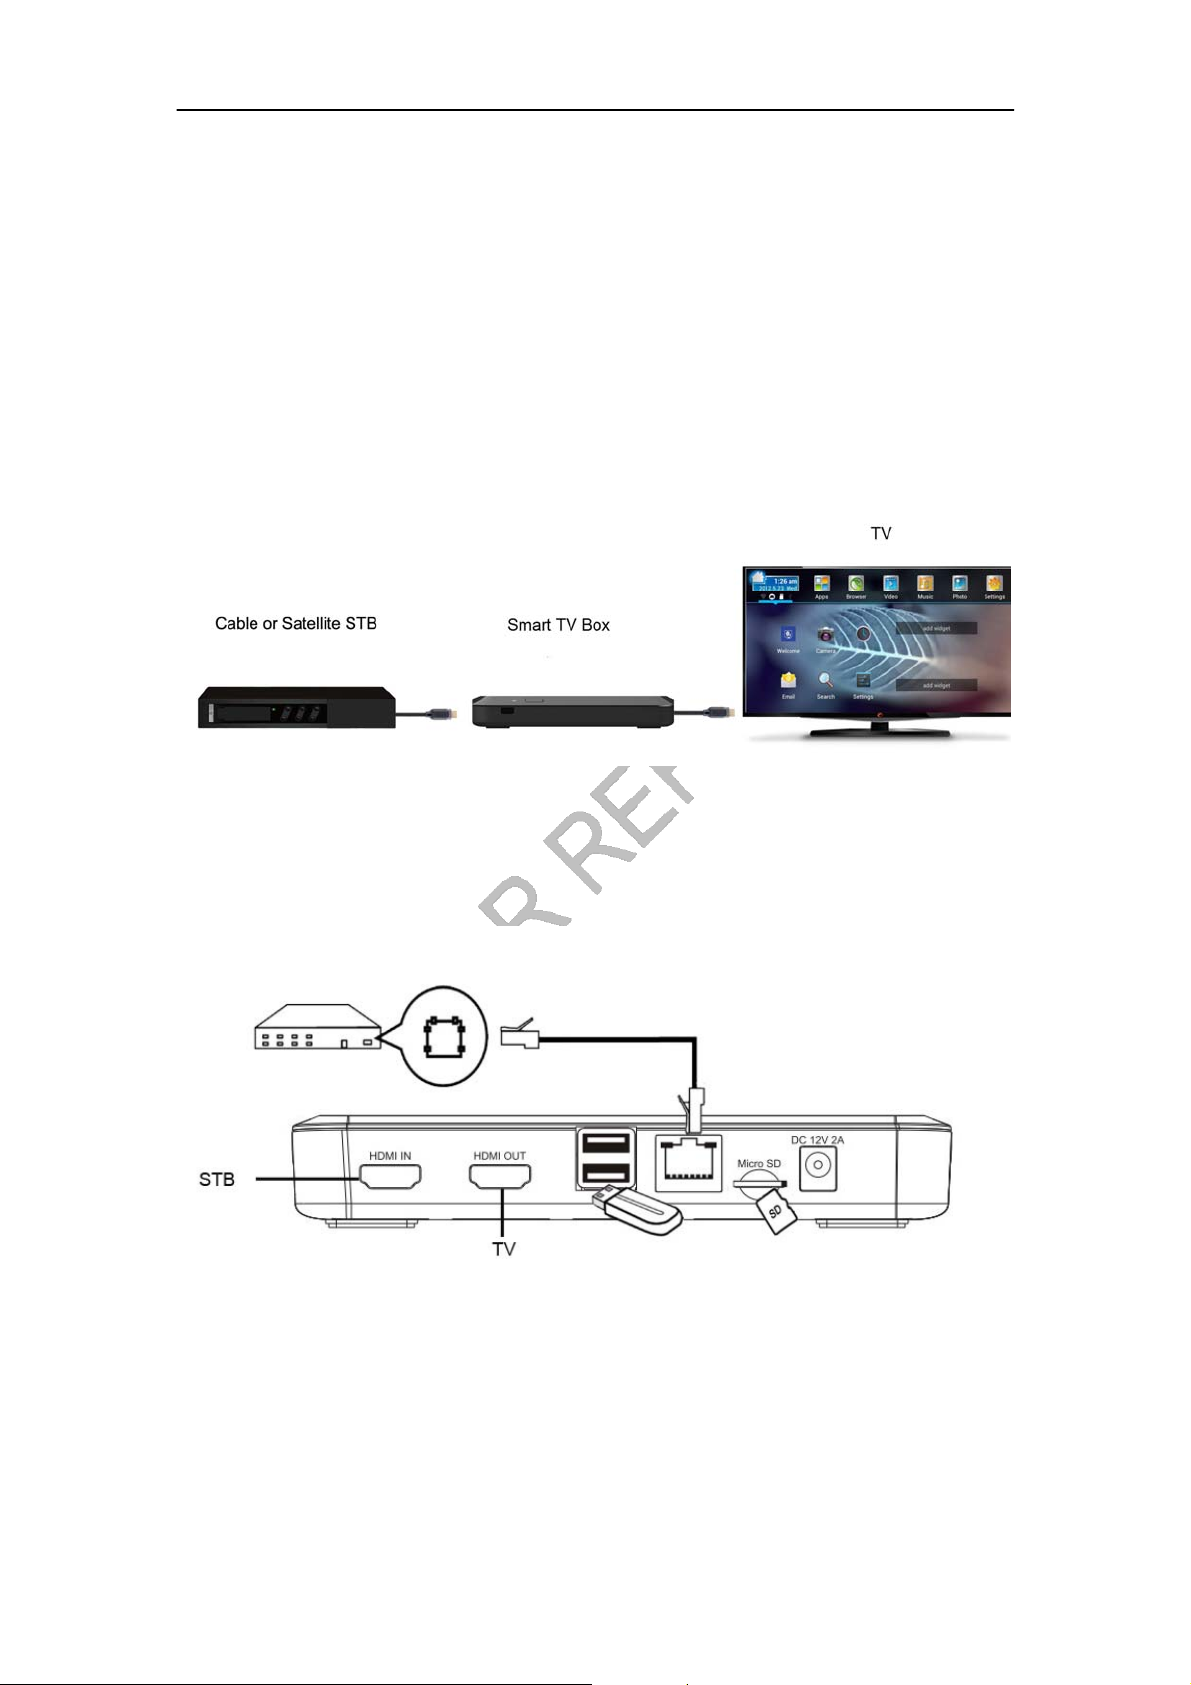
CONNECTION
HOW TO CONNECT
Connect the Smart TV box to a display and a STB with HDMI line.
Reminder: The display and STB must have a HDMI terminal
TERMINAL CONNECTION
z Micro SD slot (Support up to 32GB)
z USB 2.0 port support keyboard, mouse, U disk, mobile HDD and etc.
z LAN allows Ethernet
*Warning!: USB port allows only one mobile HDD at the same time!
Page 8
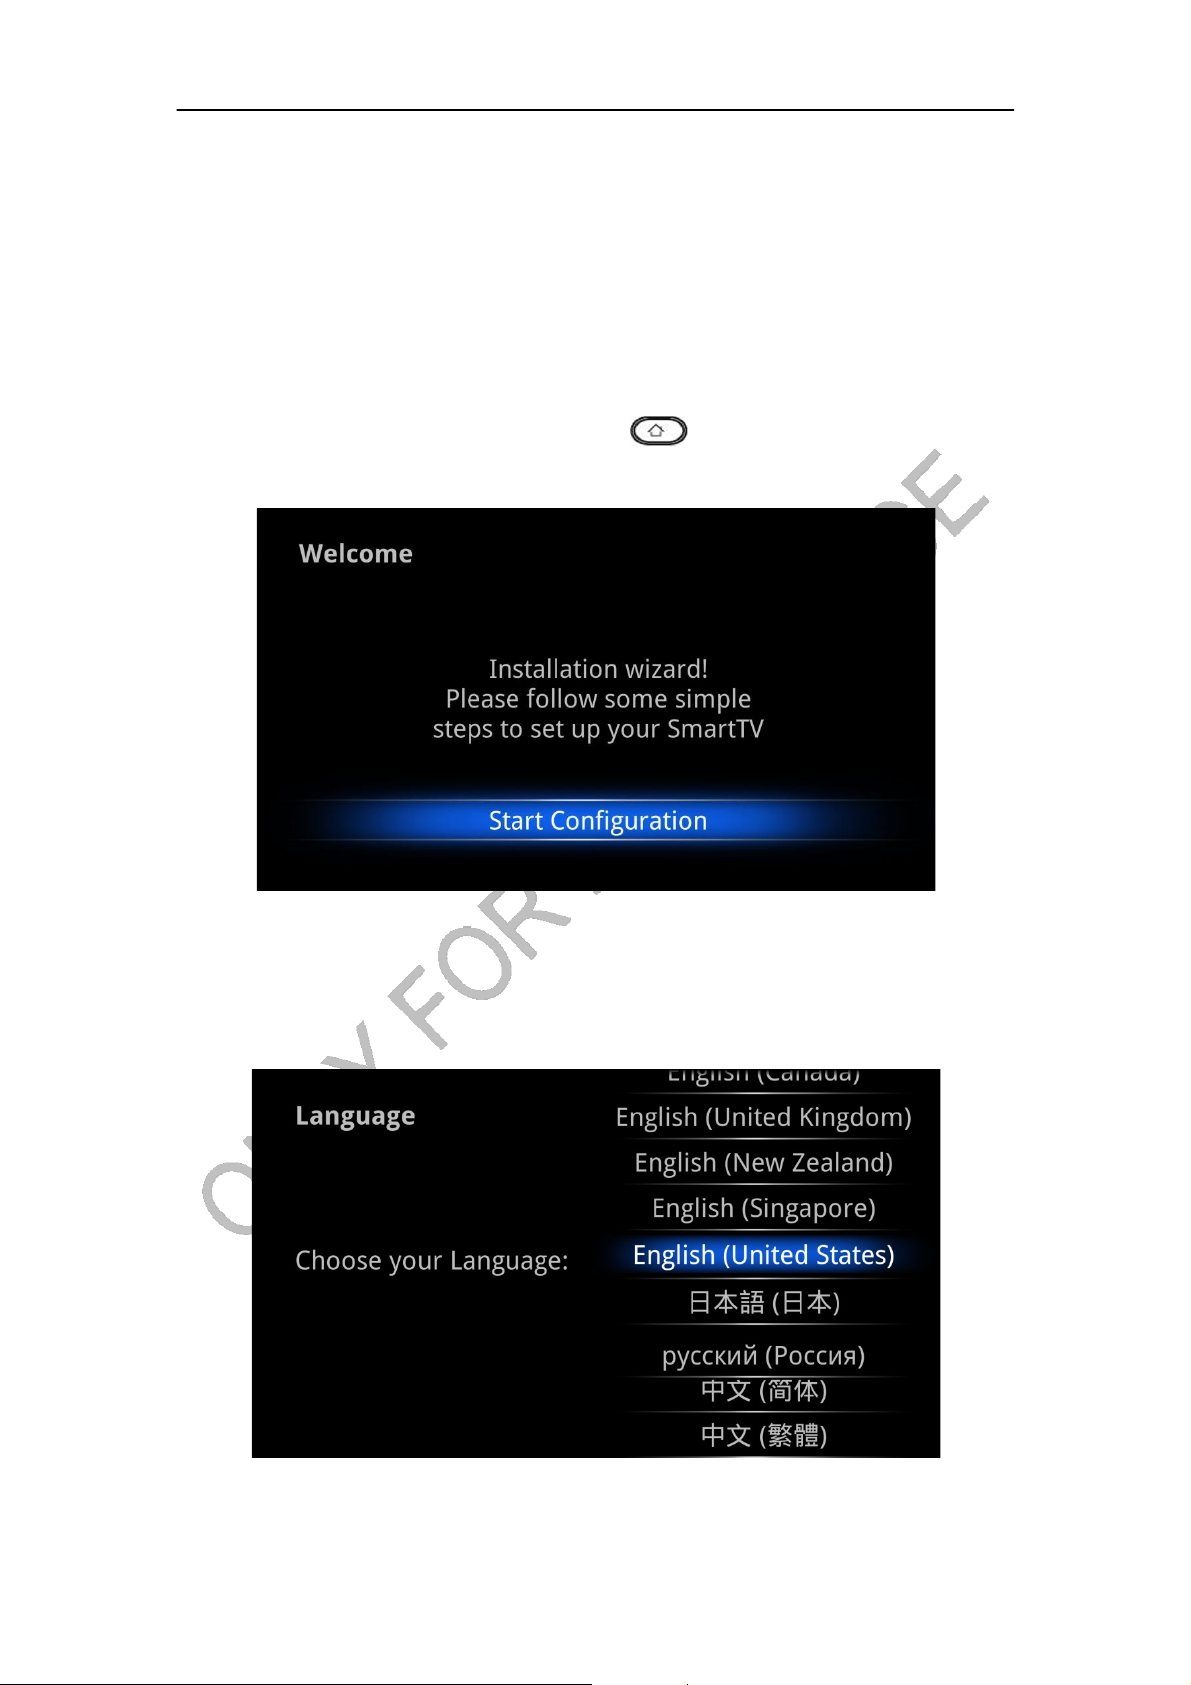
INSTALLING WIZARD
WELCOME PAGE
When the Android Box is first powered up, Welcome Page will be shown. It will help you to
configure the device.
Reminder: If you want to skip this wizard, press “ ” key. If you finish this wizard once,
it will not auto-open when system booted.
SETUP PAGE
Select Language:
Page 9
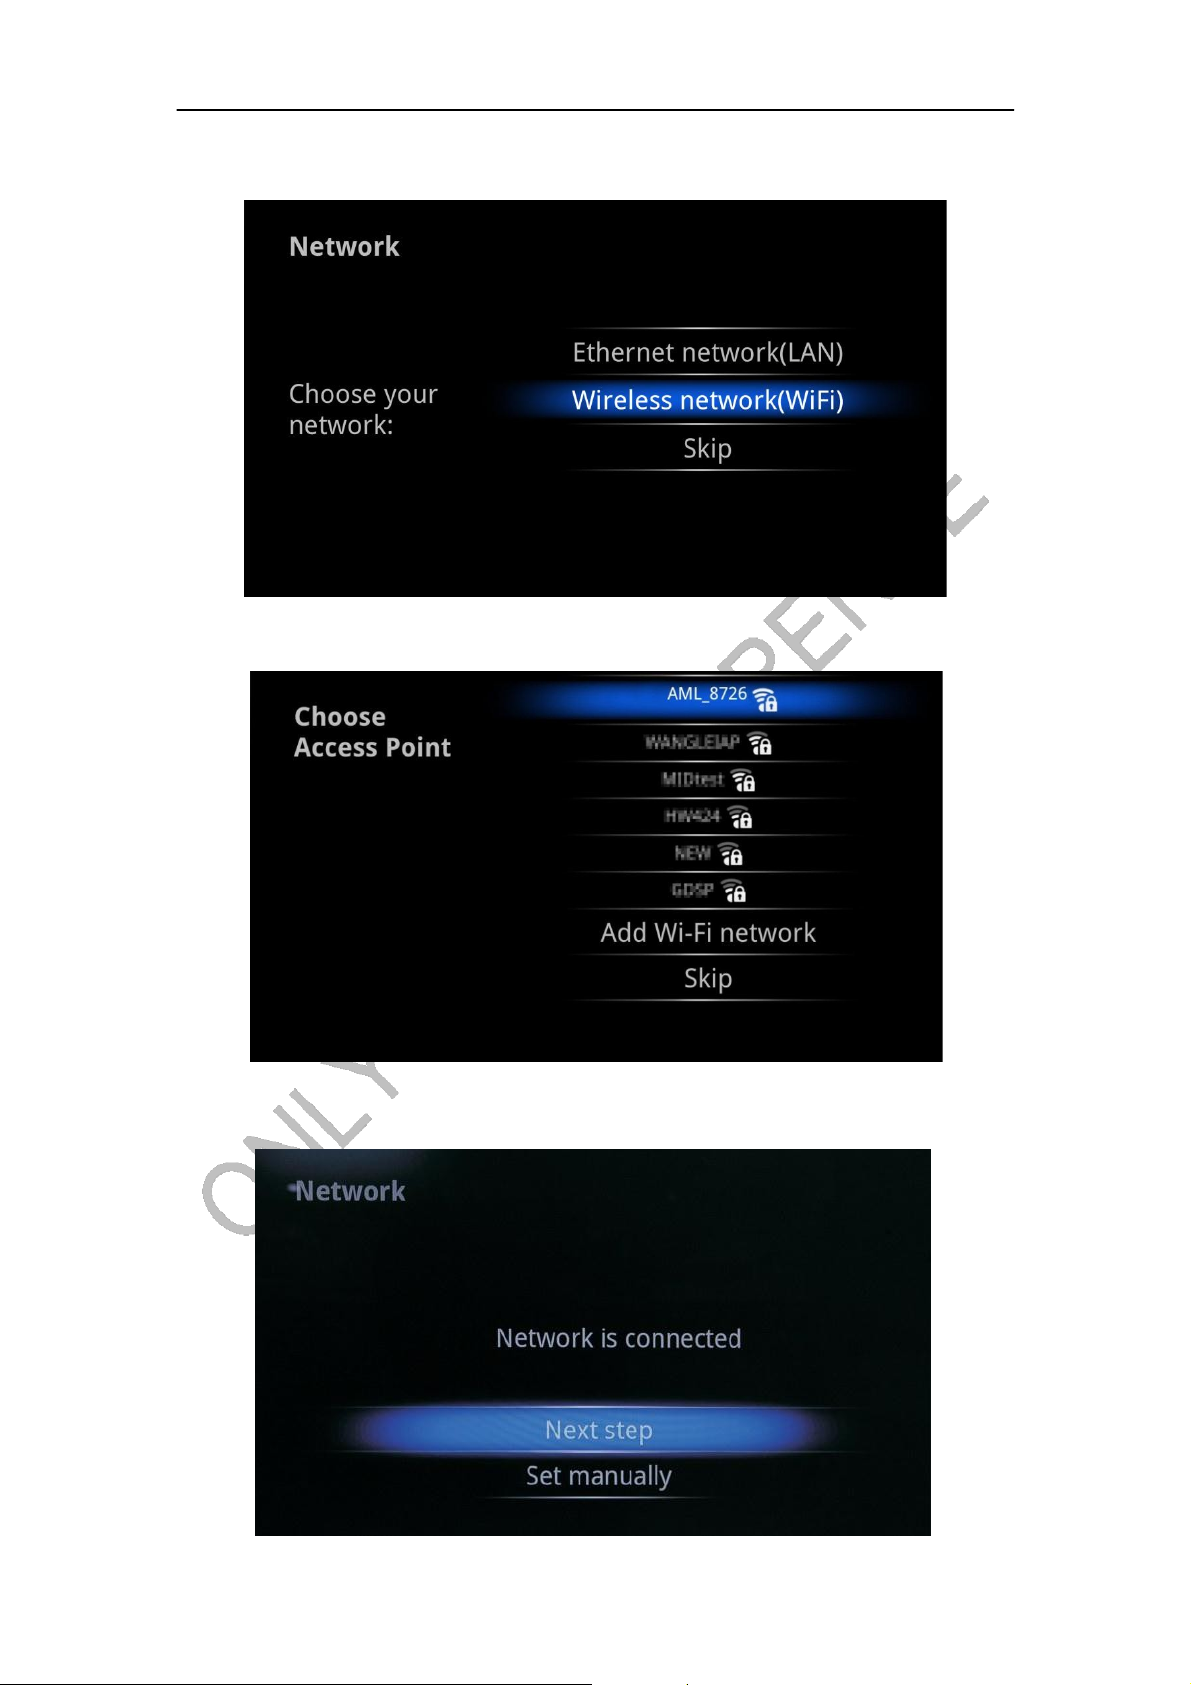
Select network type:
If „Wi-Fi, please select a Wi-Fi Access Point:
If „Ethernet, the screen will show Ethernet connection status:
Page 10
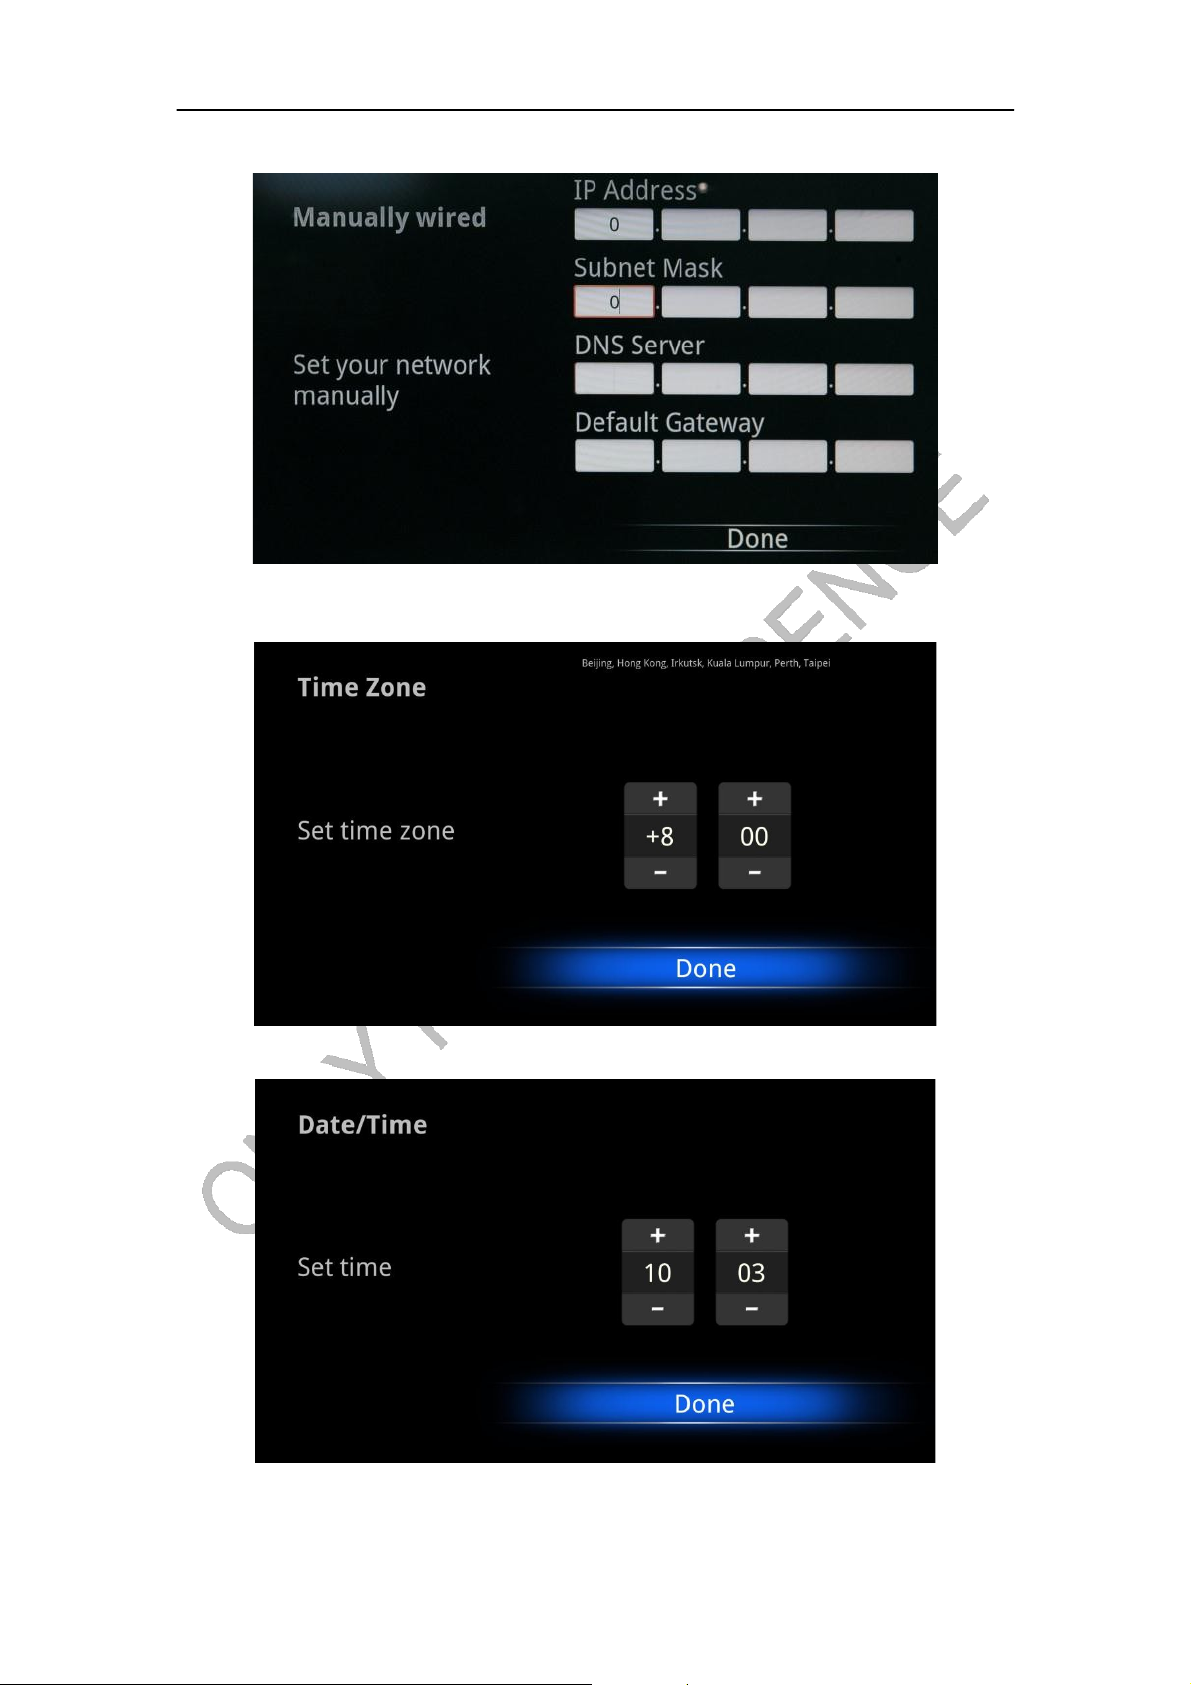
Configure Ethernet manually:
Set up the correct Time Zone:
If network is not connected, setup the date and time:
Page 11
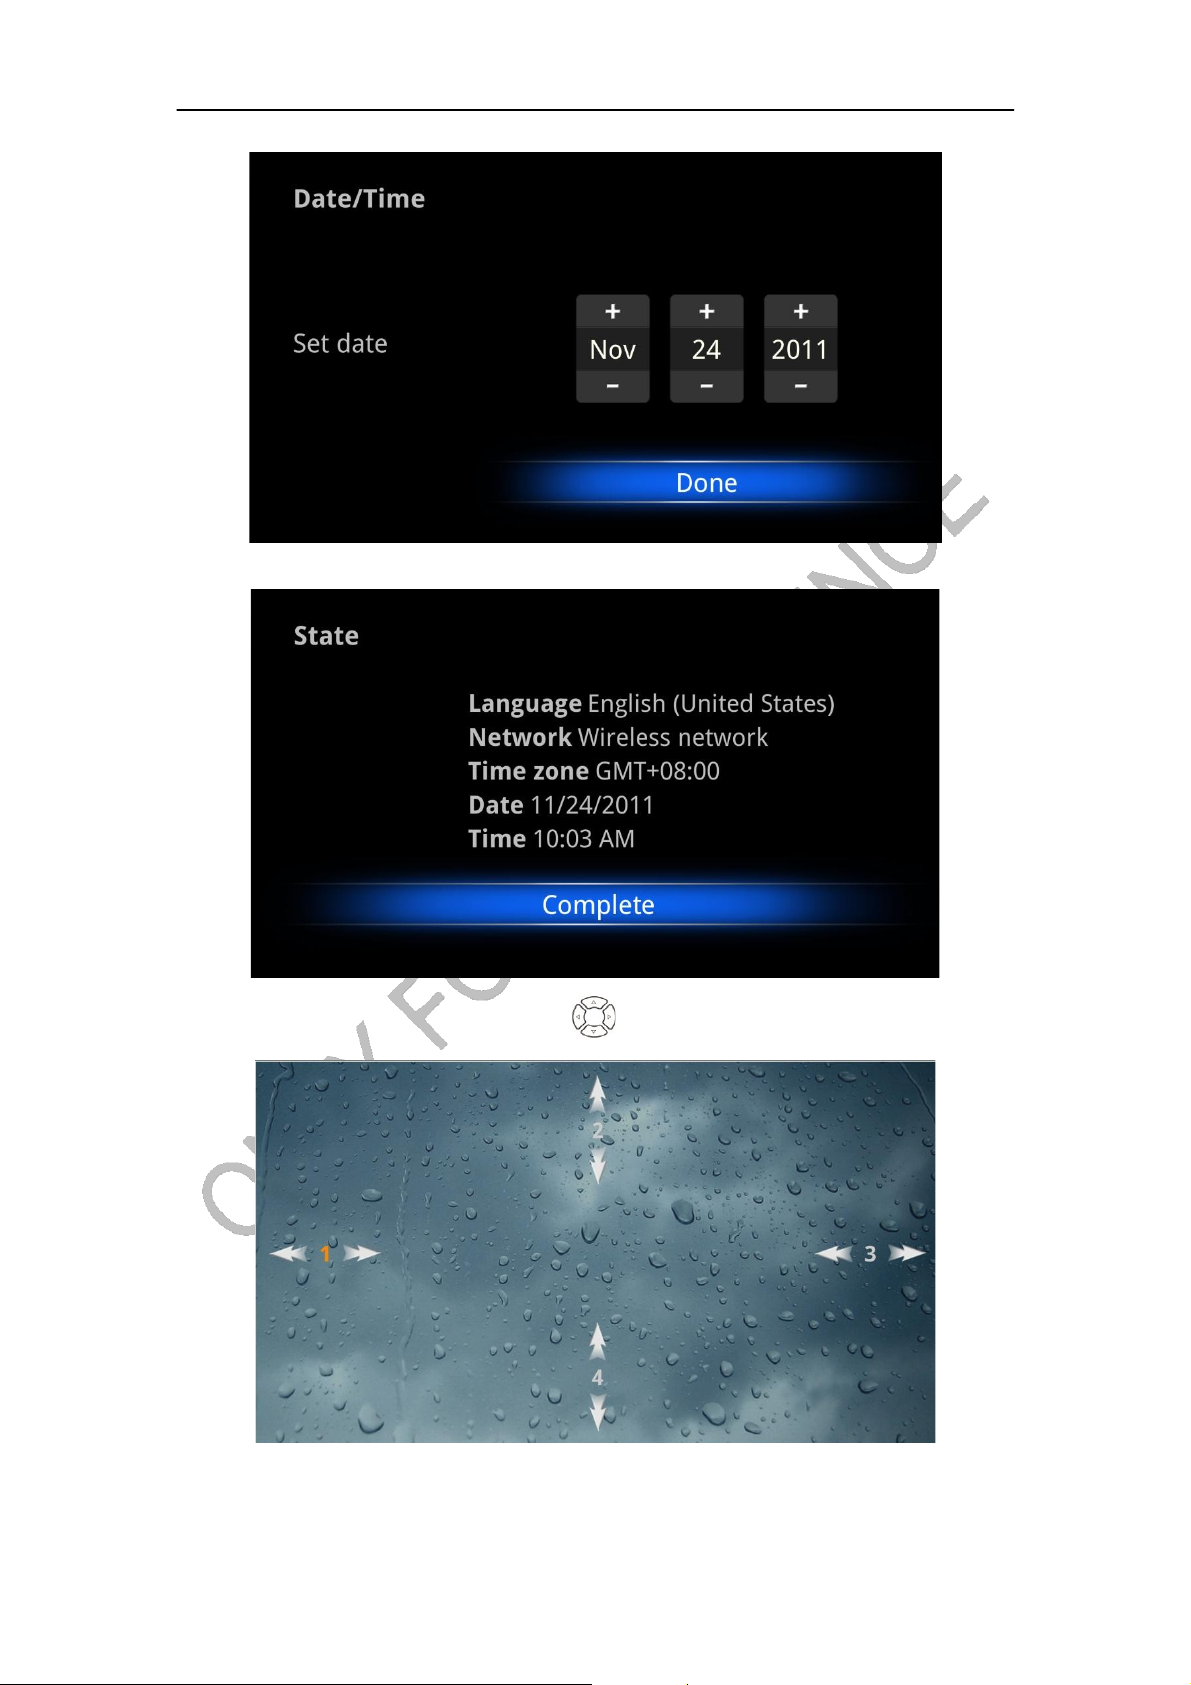
Configuration Result:
Adjust screen size, using the arrow buttons on remote control:
User can setup the Language, Network, Time Zone, Data/Time, and adjust screen size.
Page 12
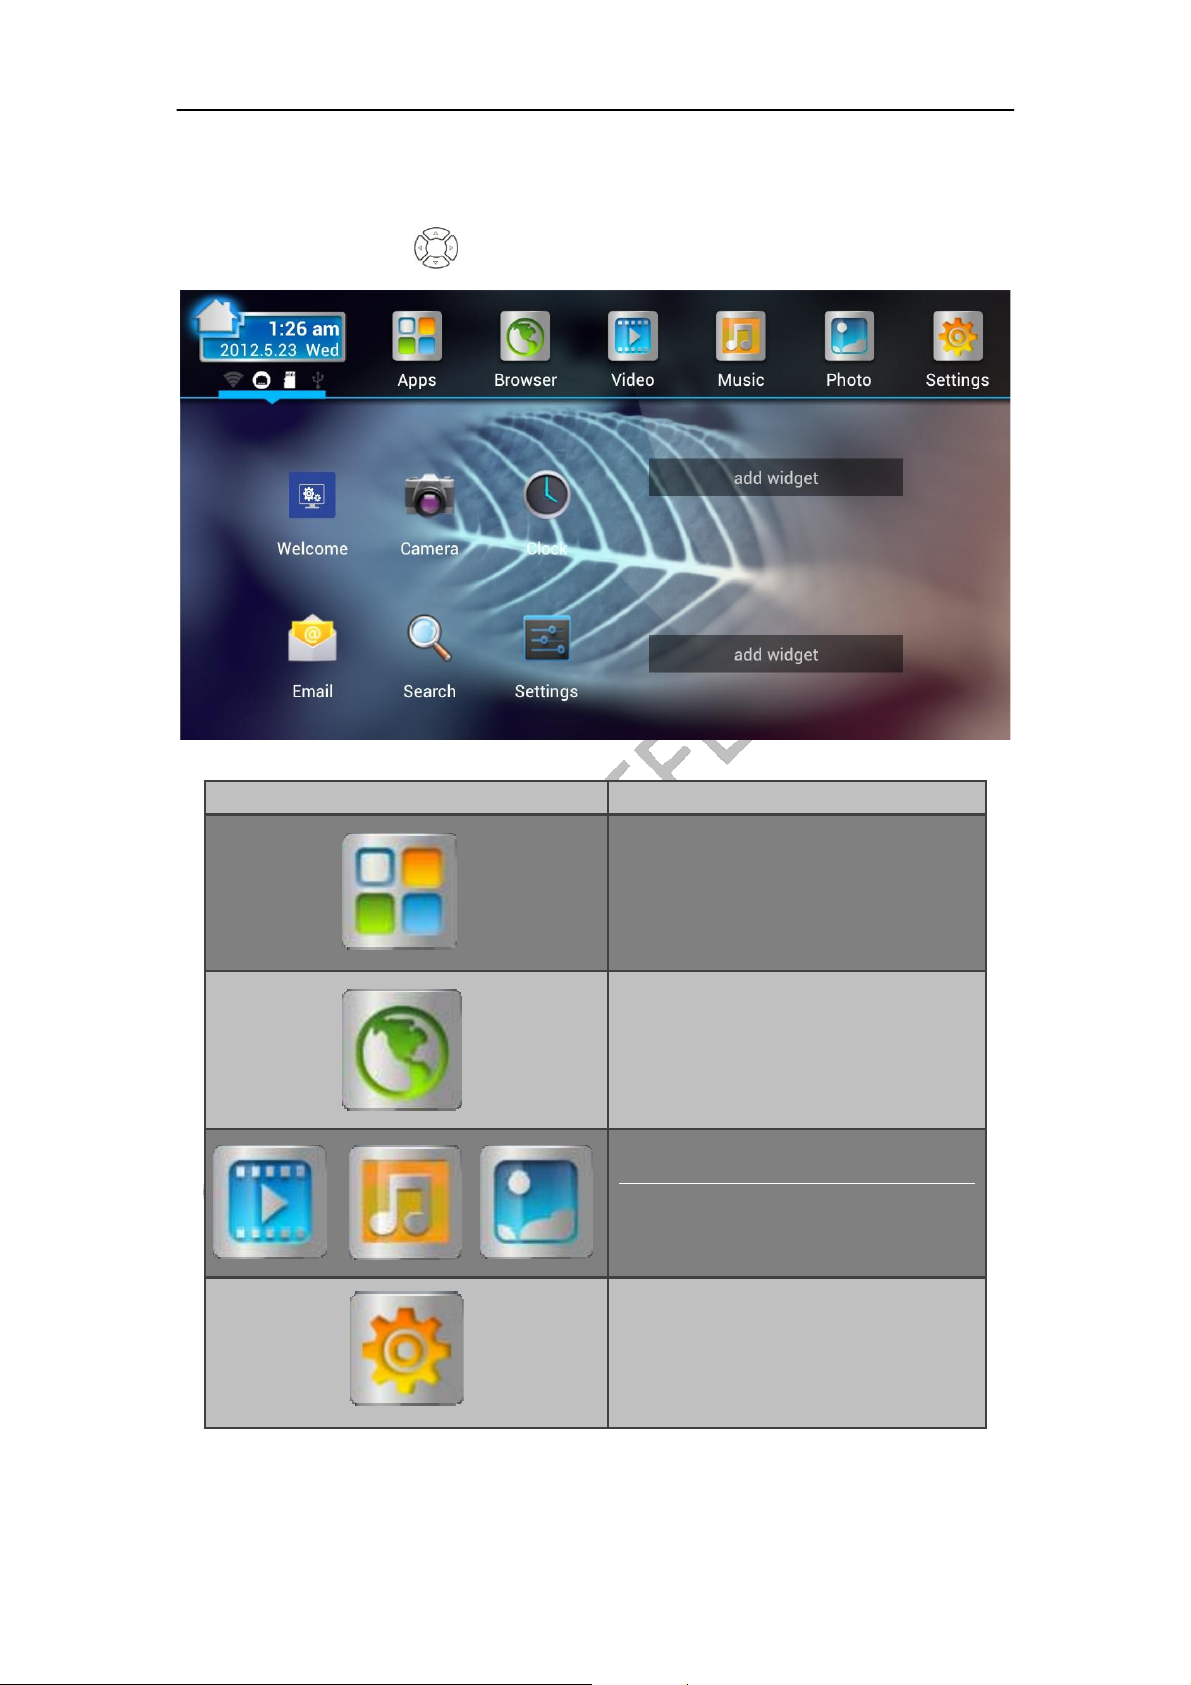
MAIN LAUNCHER
Press the arrow buttons to select the icon and
FUNCTION DESCRIPTION
The AppManager lets you launch
selected applications, such as Weather,
Calendar ,News
The Browser allows you enjoy your
time on surfing Internet and searching
for information
The Video/Audio/Picture Player lets
you enjoy all of your videos, music
and pictures from system memory or
storage devices.
The Video/Audio/Picture tab will show
a file browser to list your media files
The Settings screen contains most of
the customizing and configuration
options, such as language, aspect
ratio, date and time and network
„
ENTER the sub-screen:
Page 13
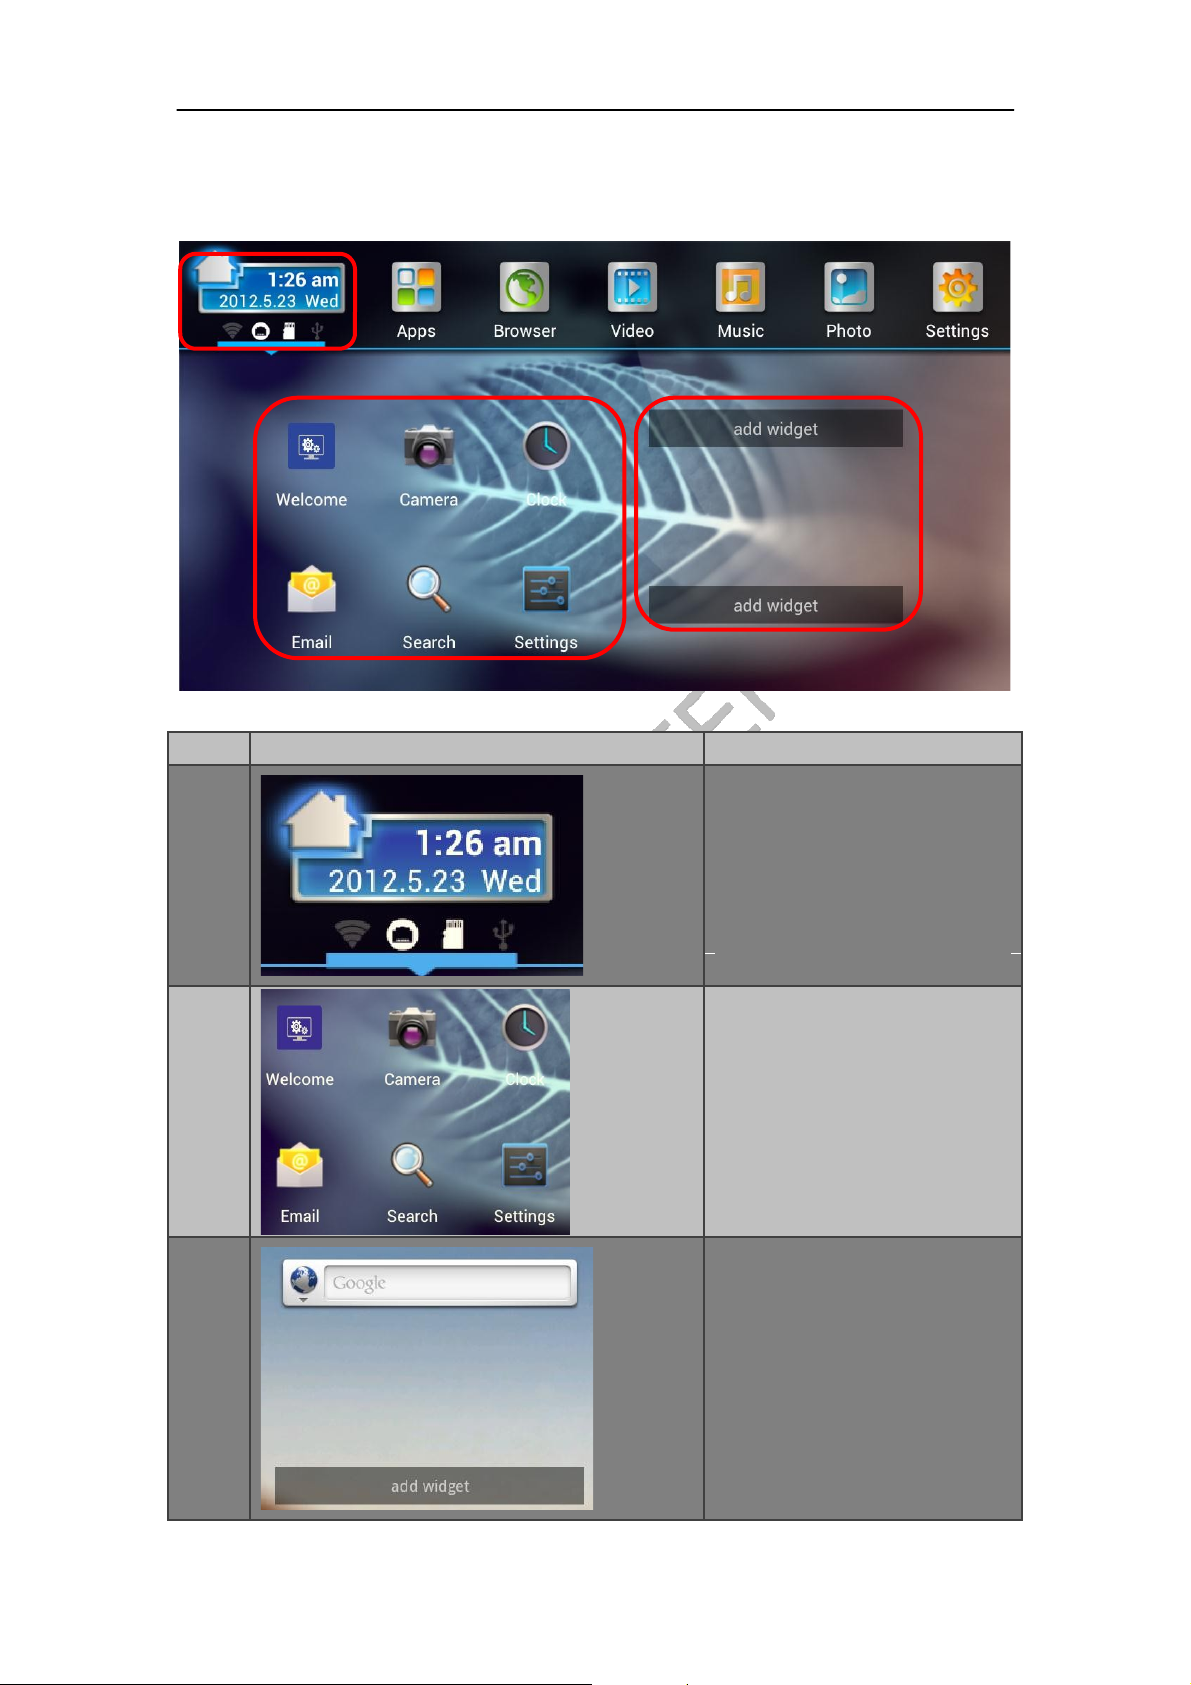
LAUNCHER INTRODUCTION
1
2 3
Area EXAMPLE DESCRIPTION
Show time, calendar and status
like: Wi-Fi, Ethernet, TF card
1
2
3
and USB storage.
You can set time/date/time
zone in settings
List the most often used 6 apps
You can set two widgets as:
News, Google search bar,
weather and etc.
Page 14
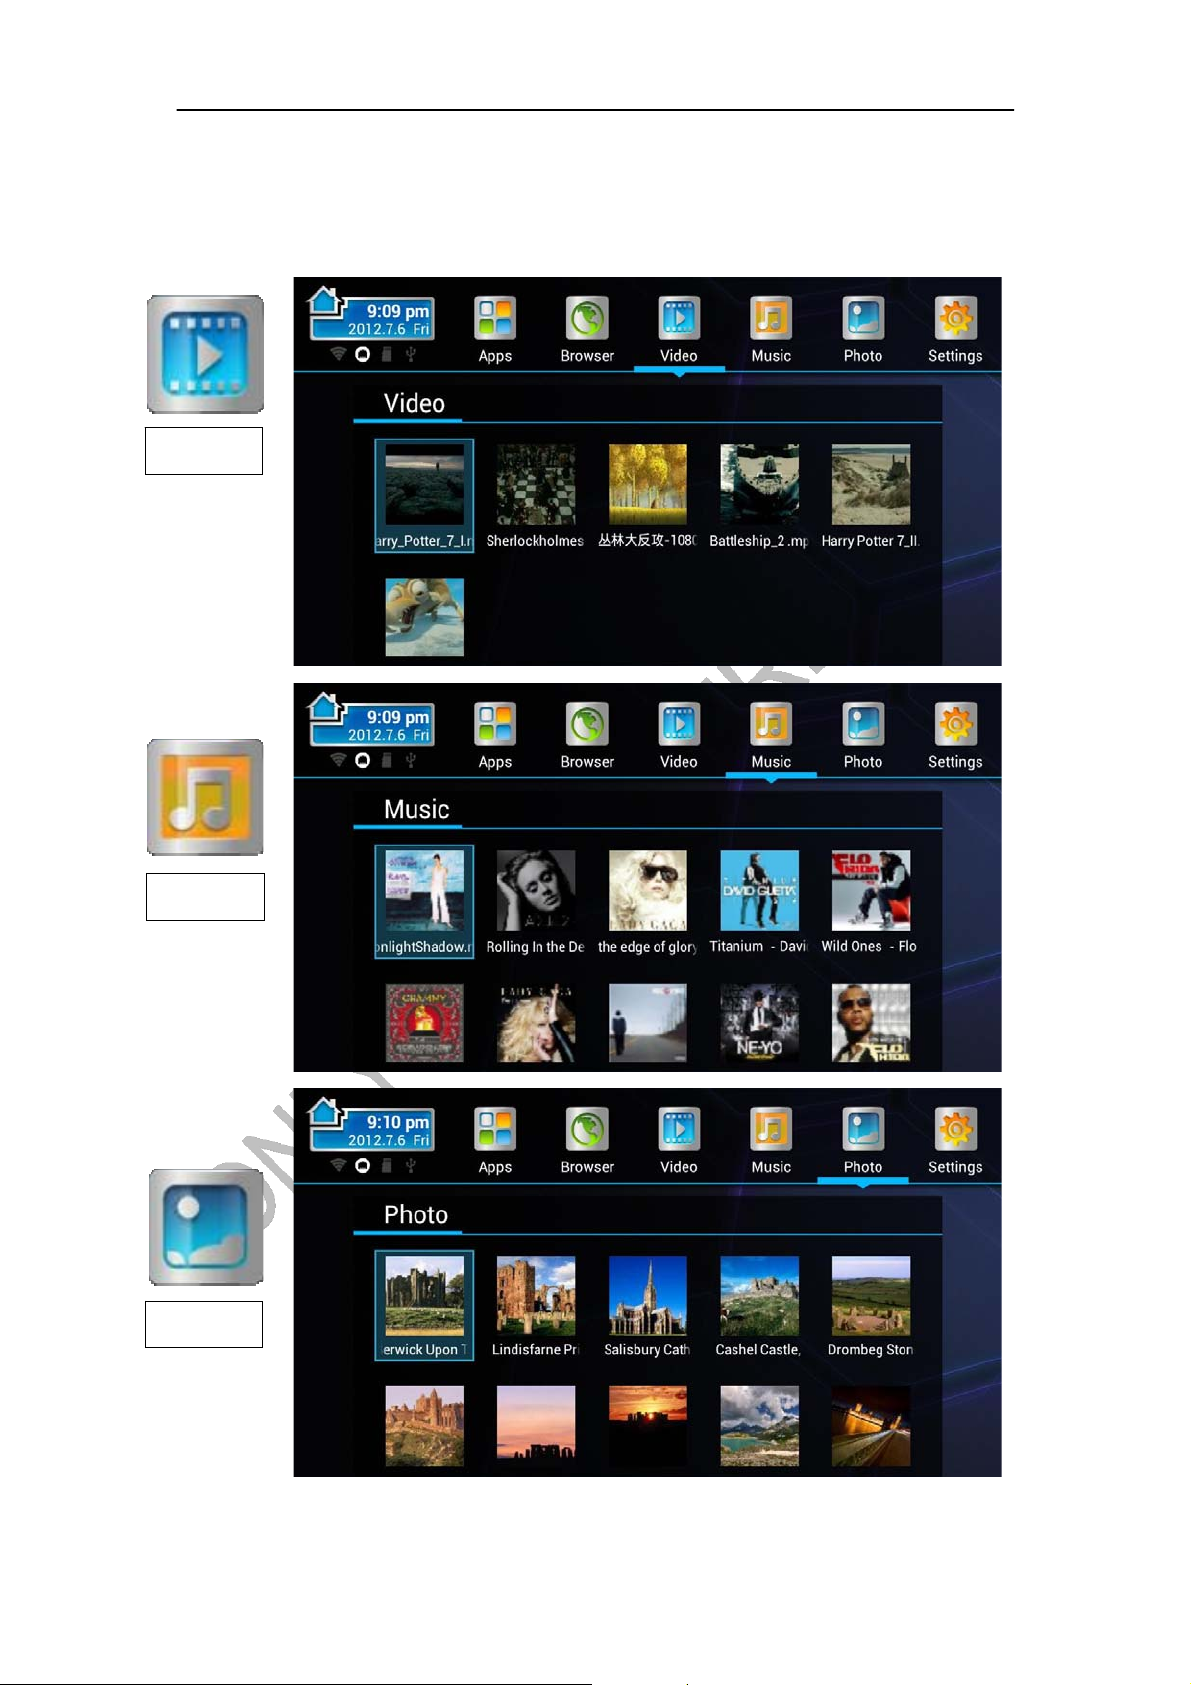
MEDIA PLAYER
The “Picture”, “Music” and “Video” are the media player for local storage. You can play the
media on the U-disk, SD-CARD etc.
V ideo
Music
Picture
Page 15
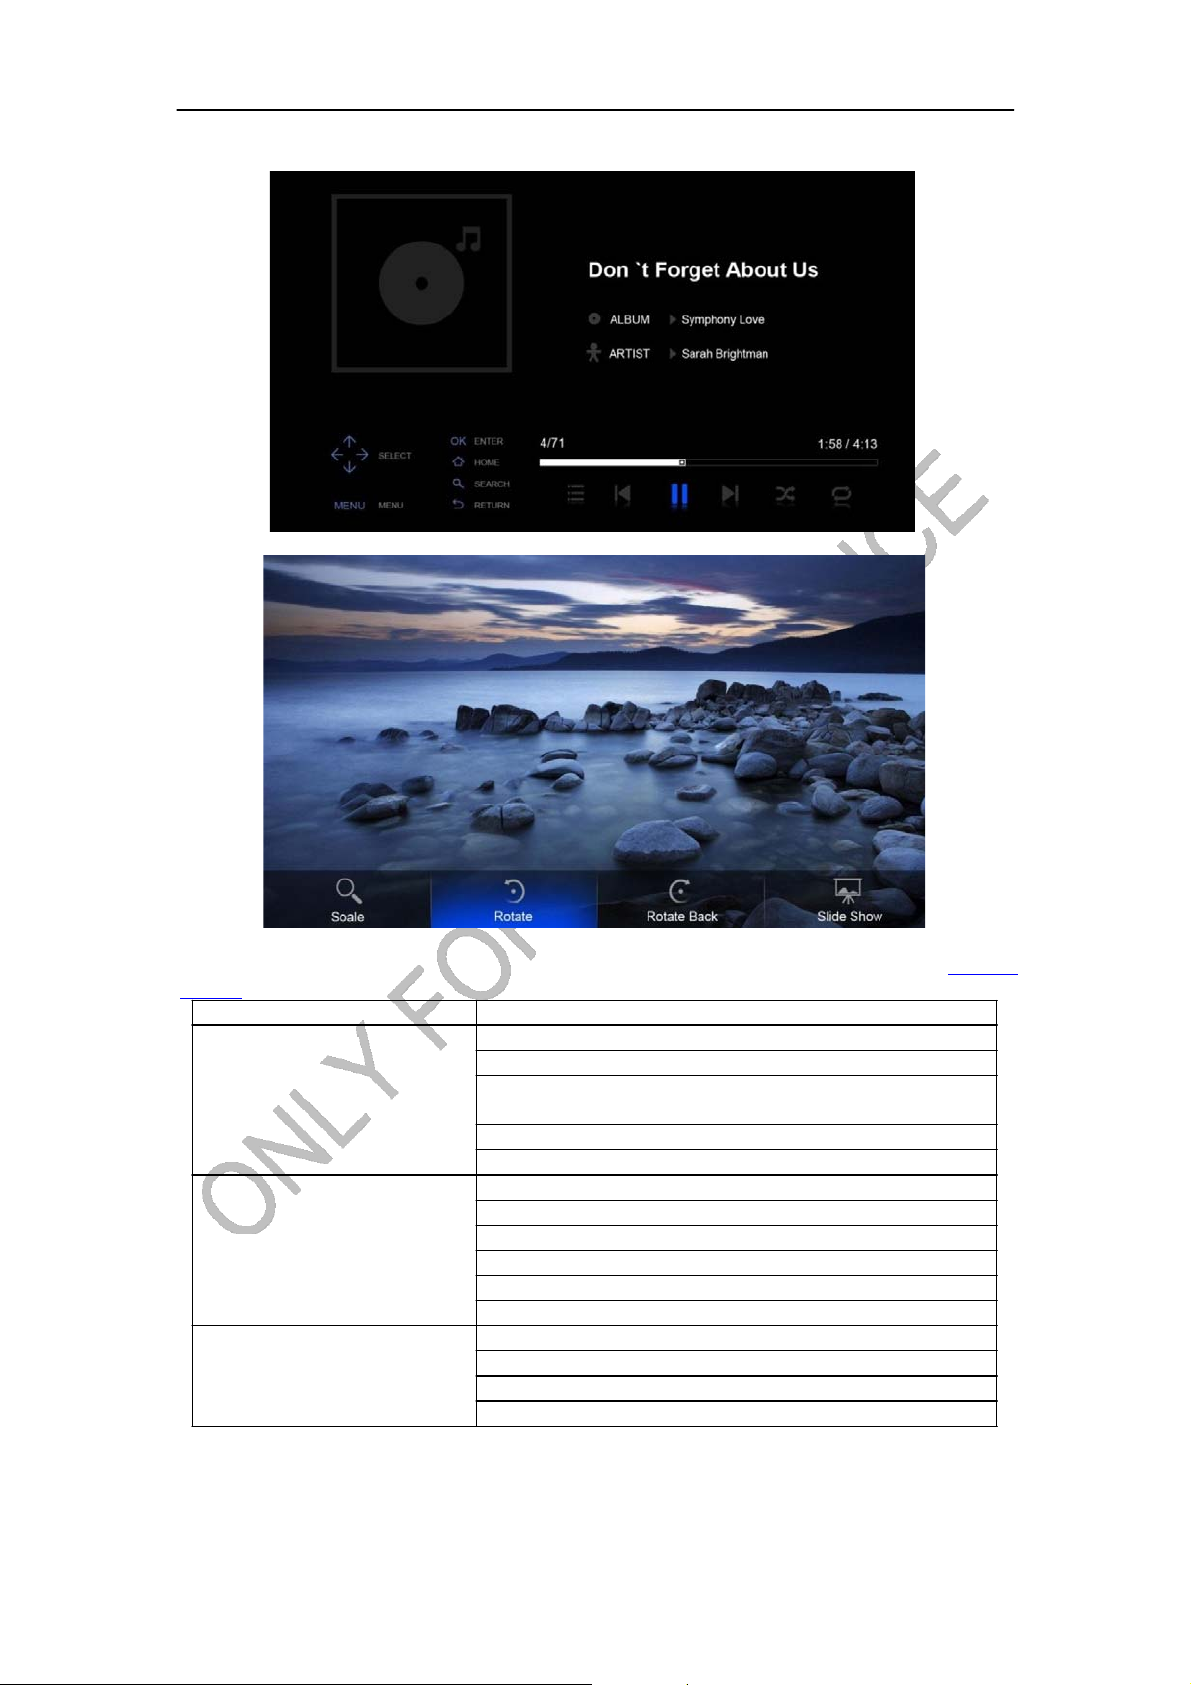
Music player
Picture player
Picture player
The following table shows the codec or format the product can play (more detail at general
outline
):
Type Format
Video (Upper to 1080P) H.264 (MKV, AVI, TS, M2TS, MOV, WMV, MP4, FLV)
DIVX (AVI)
MPEG1, MPEG2,MPEG4 (RM, VOB, MPG, MPEG,
TS, M2TS)
VC1
WMV
Audio MP3
WMA
AAC
OGG
WAV
M4A
Picture (Resolution < 20M) BMP
JPG/JPEG
GIF
PNG
Page 16
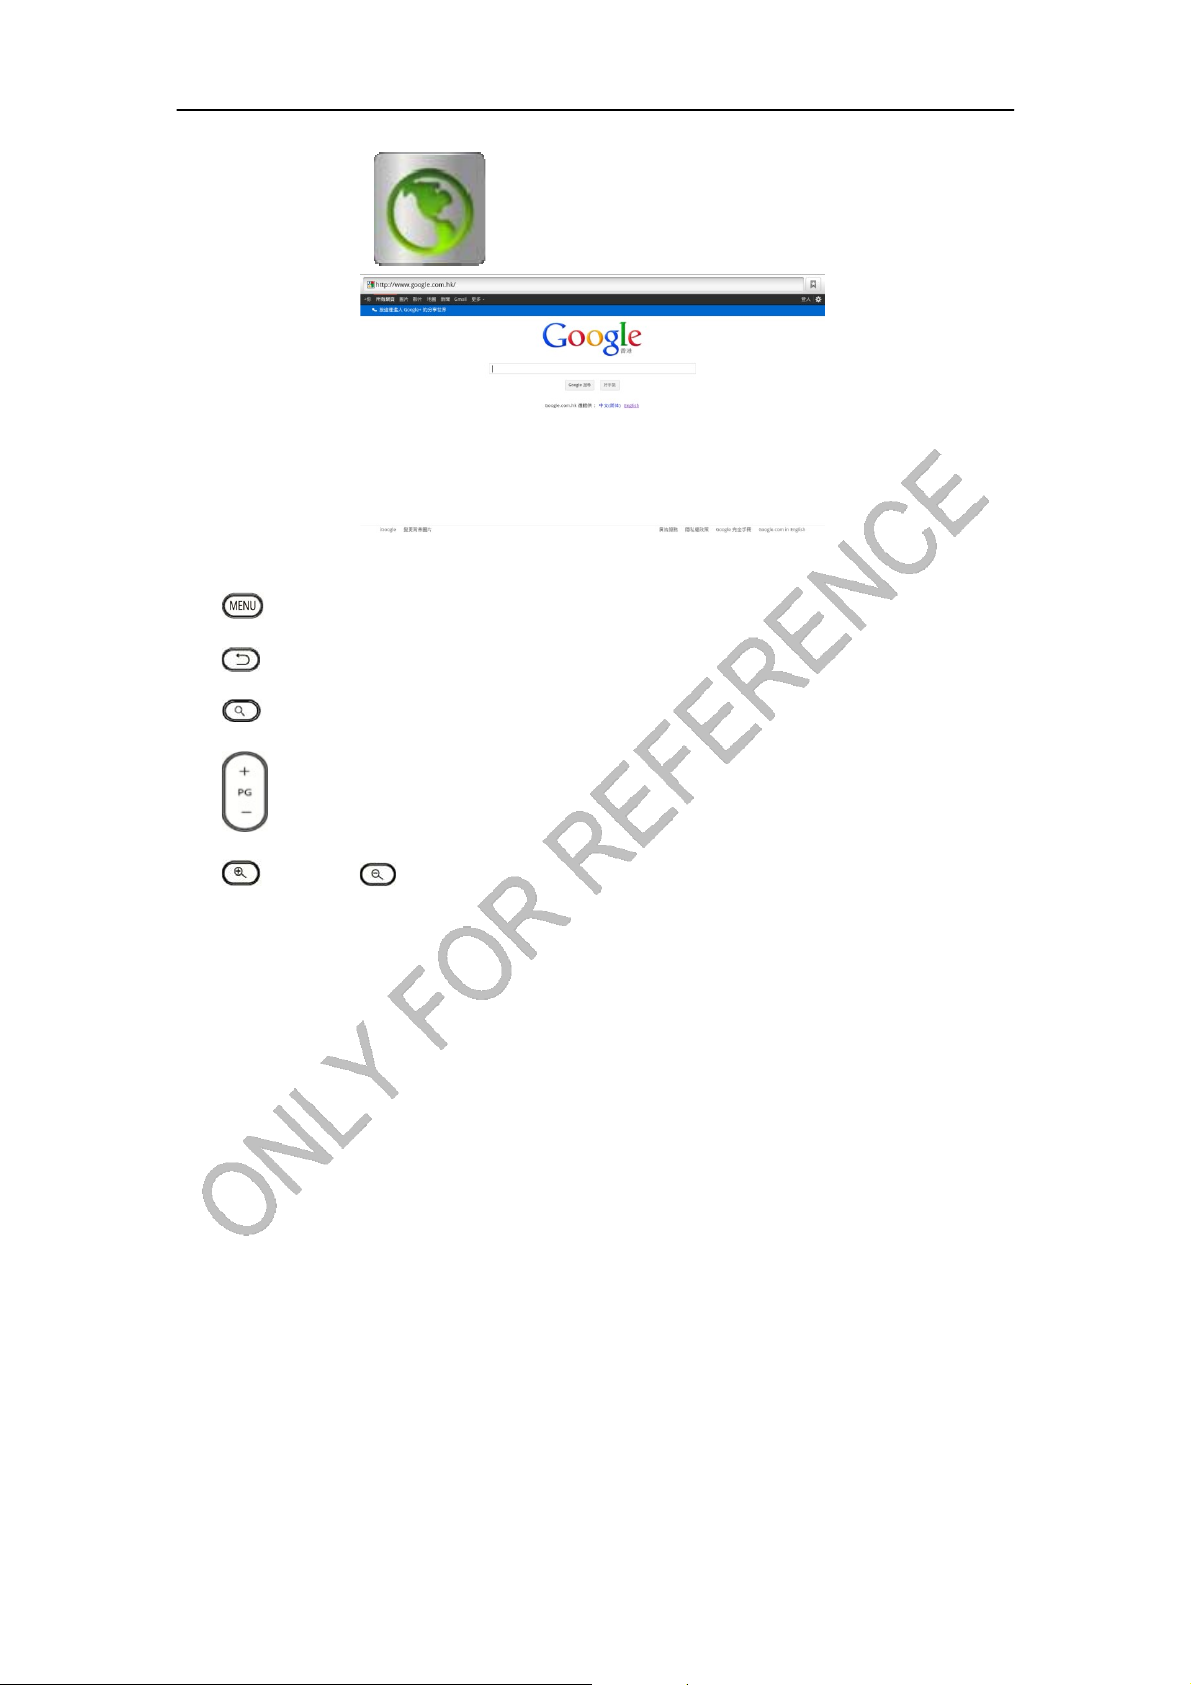
BROWSER
You will use the following key:
z Menu Key:
Call out the Browser
z Back key:
z Search key :
z PG +/ PG-:
z Zoom in/ Zoom out:
Back to the last page
Call out the search bar for searching or input new web address.
You can use the keys to browse up/ down the web page.
Zoom in/out the webpage comfortably.
s menu, include forward, edit bookmark, refresh etc.
Page 17
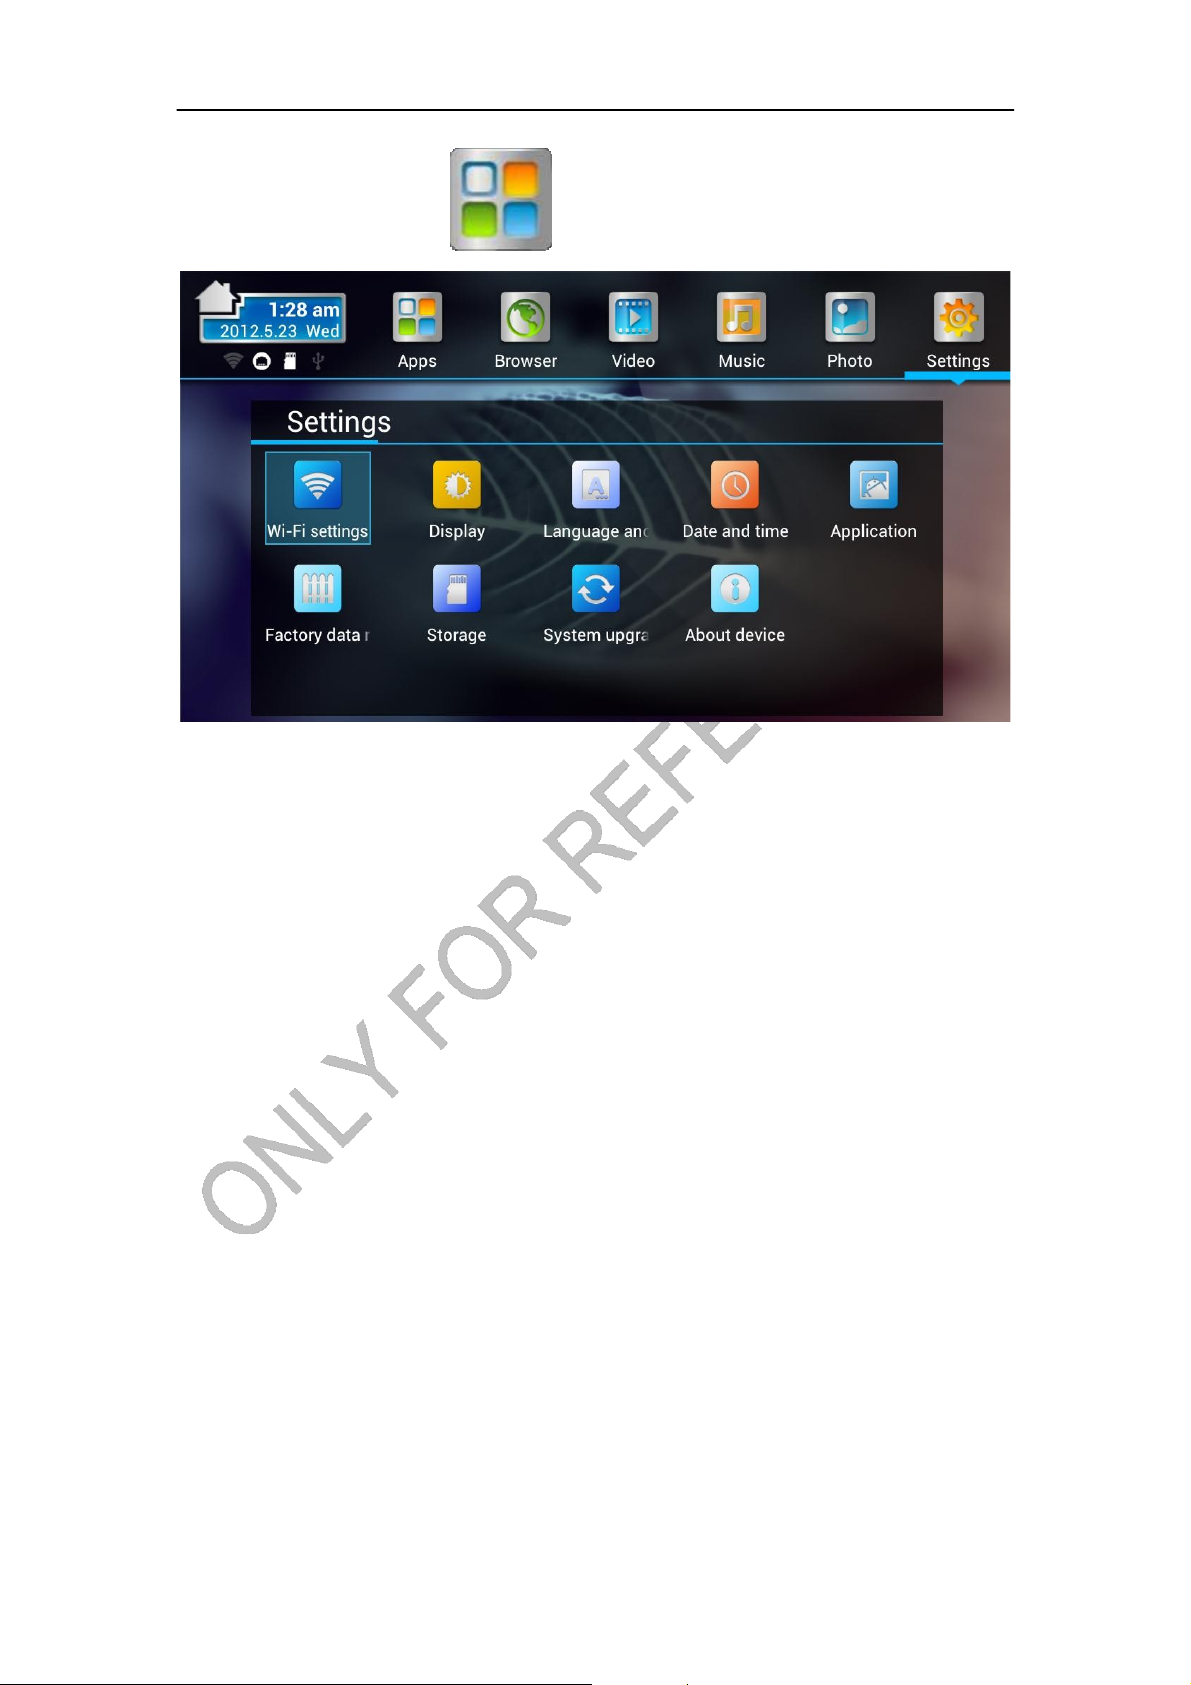
A
PPLICATIONS
z Install from U-disk/SD card
1. Open the “File Manager”.
2. Choose your U-disk or any other mass
3. Find you application, and press it.
4. Press the install button.
5. You can find the application in “App manager” after installation.
storages
folder.
z Install from Browser
1. Open the Browser.
2. Press search key and input your website address.
3. Download an APK file if there is a link for download this file (*Before download, you
must have your SD card in the card slot).
4. You can find the file in you SD card folder.
5. Install it use “File manager”.
z Install from ApkInstaller
1. Open the ApkInstaller.
2. Find the icon of the application, and enter it.
3. Press the install button.
4. You can find the application in “App manager” after installation.
Remove Applications
1. Enter SETTINGS
2. Enter "Applications--Manage applications"
3. Find the application you want to remove in tab "All"
4. Enter the icon and press "Uninstall"
5. Press "OK" to confirm uninstall
Page 18
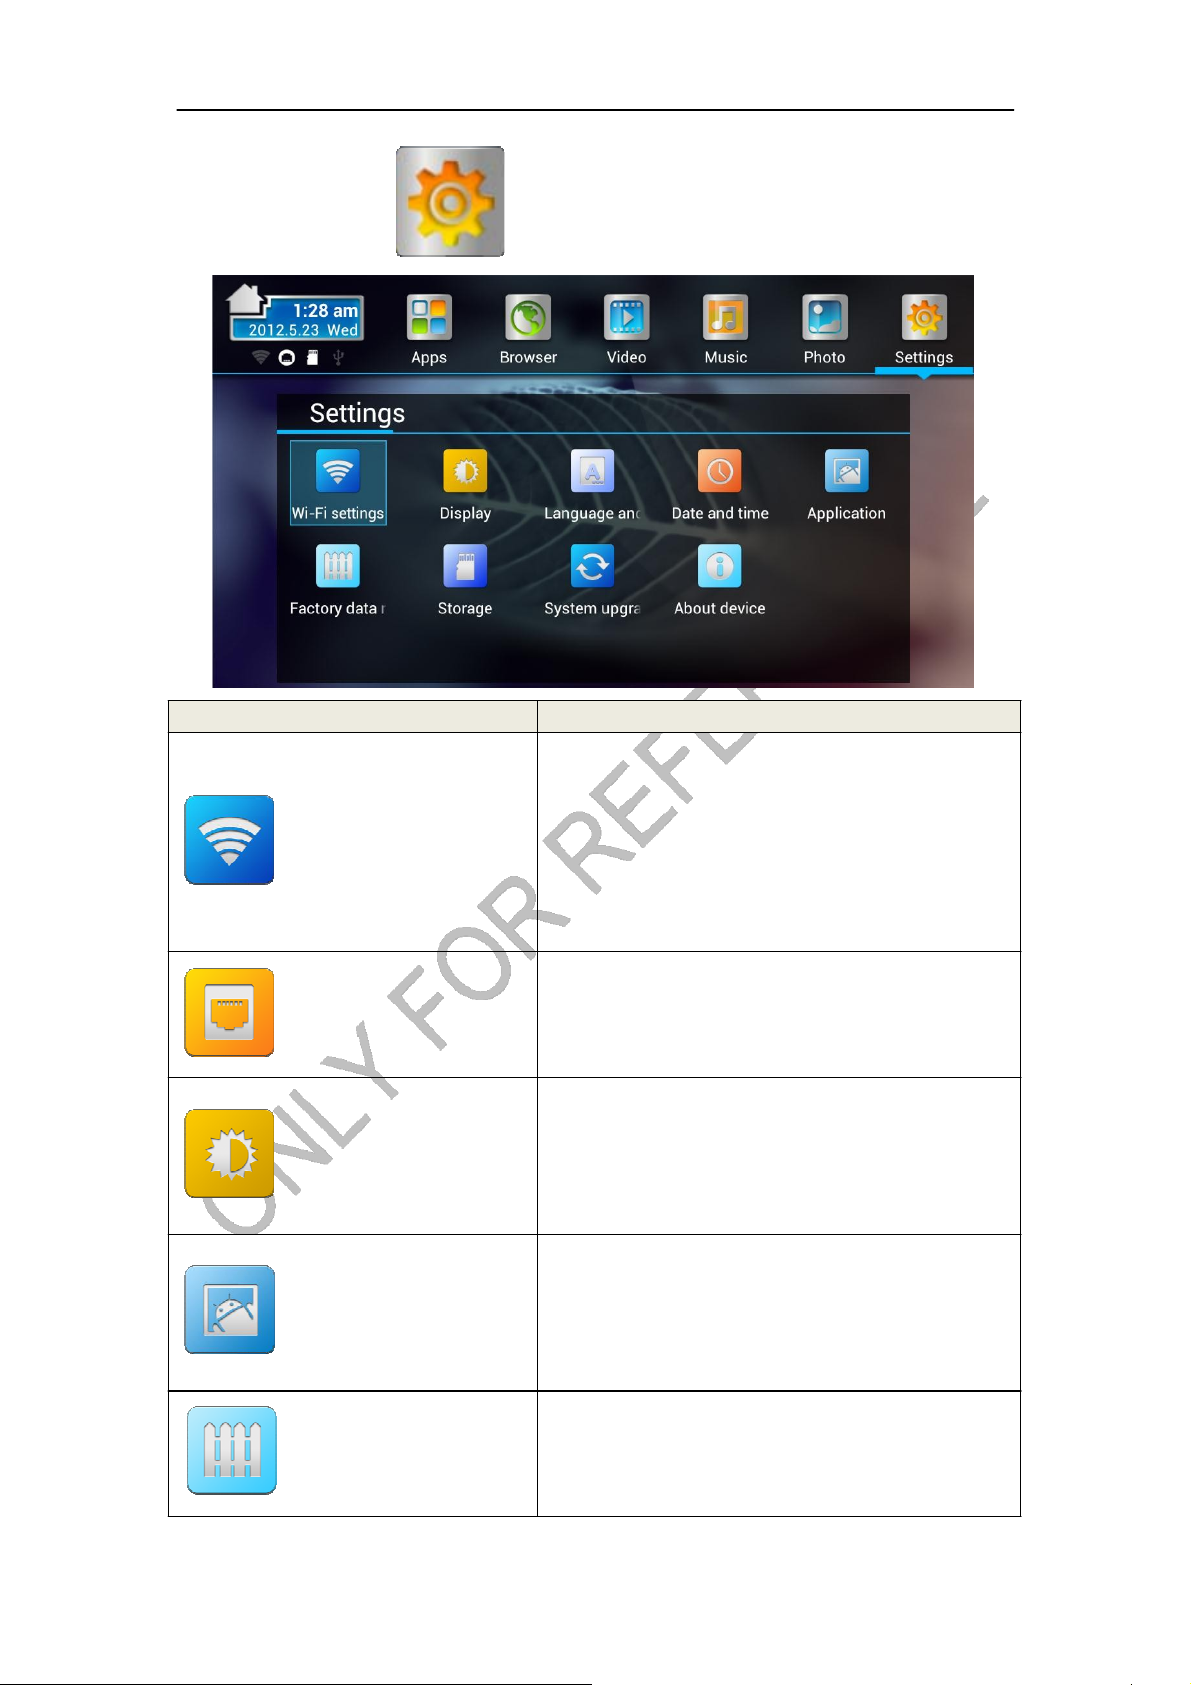
SETTINGS
Setup settings Brief description
Turn on/off Wi-Fi
Check to receive an notificaiton when an open
Wi-Fi network is available
Wi-Fi s ettings
Ethernet
Display
Application
Factory data reset
Set whether to keep Wi-Fi on during sleep
MAC/IP address
network by entering its SSID (the name it
broadcasts) and security type
Check to turn on Ethernet so you can connect to
Ethernet networks
Configure Ethernet devices
Output mode:
● 1080p
● 720p
Set your display overscan ratio
Set font size
Downloaded
On SD card
Running
All
Storage use
Back up my data
Back up account
Automatic restore
Factory data reset
Page 19
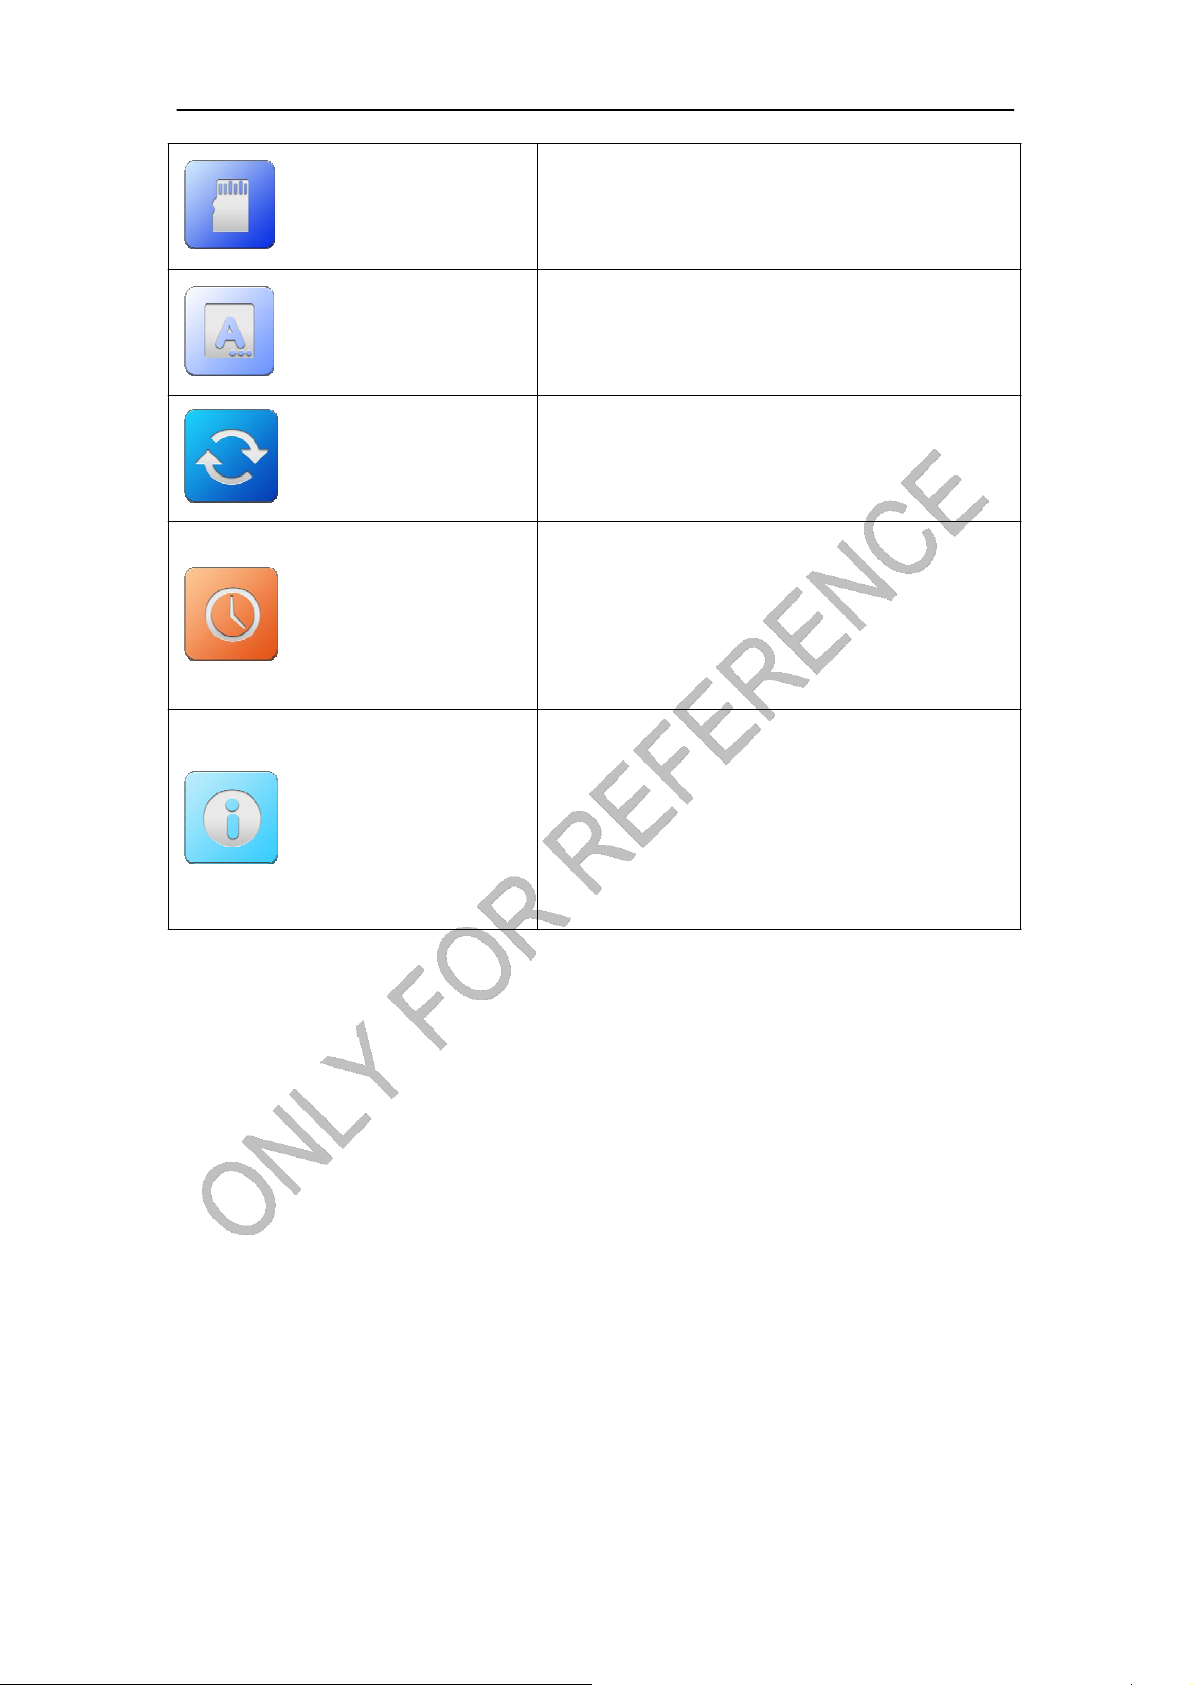
Total space
Available space
Unmount SD card
Storage settings
Language & Keyboard
Erase SD card
Select language
User dictionary
Android keyboard
Local device
Online Uprade
System up d ates
Date & time
About device
Automatic
Set date
Select time zone
Set time
Use 24-hour format
Select date format
System updates
Status
Model number
Android version
Kernel version
Build number
Page 20
ADVANCED FEATURES
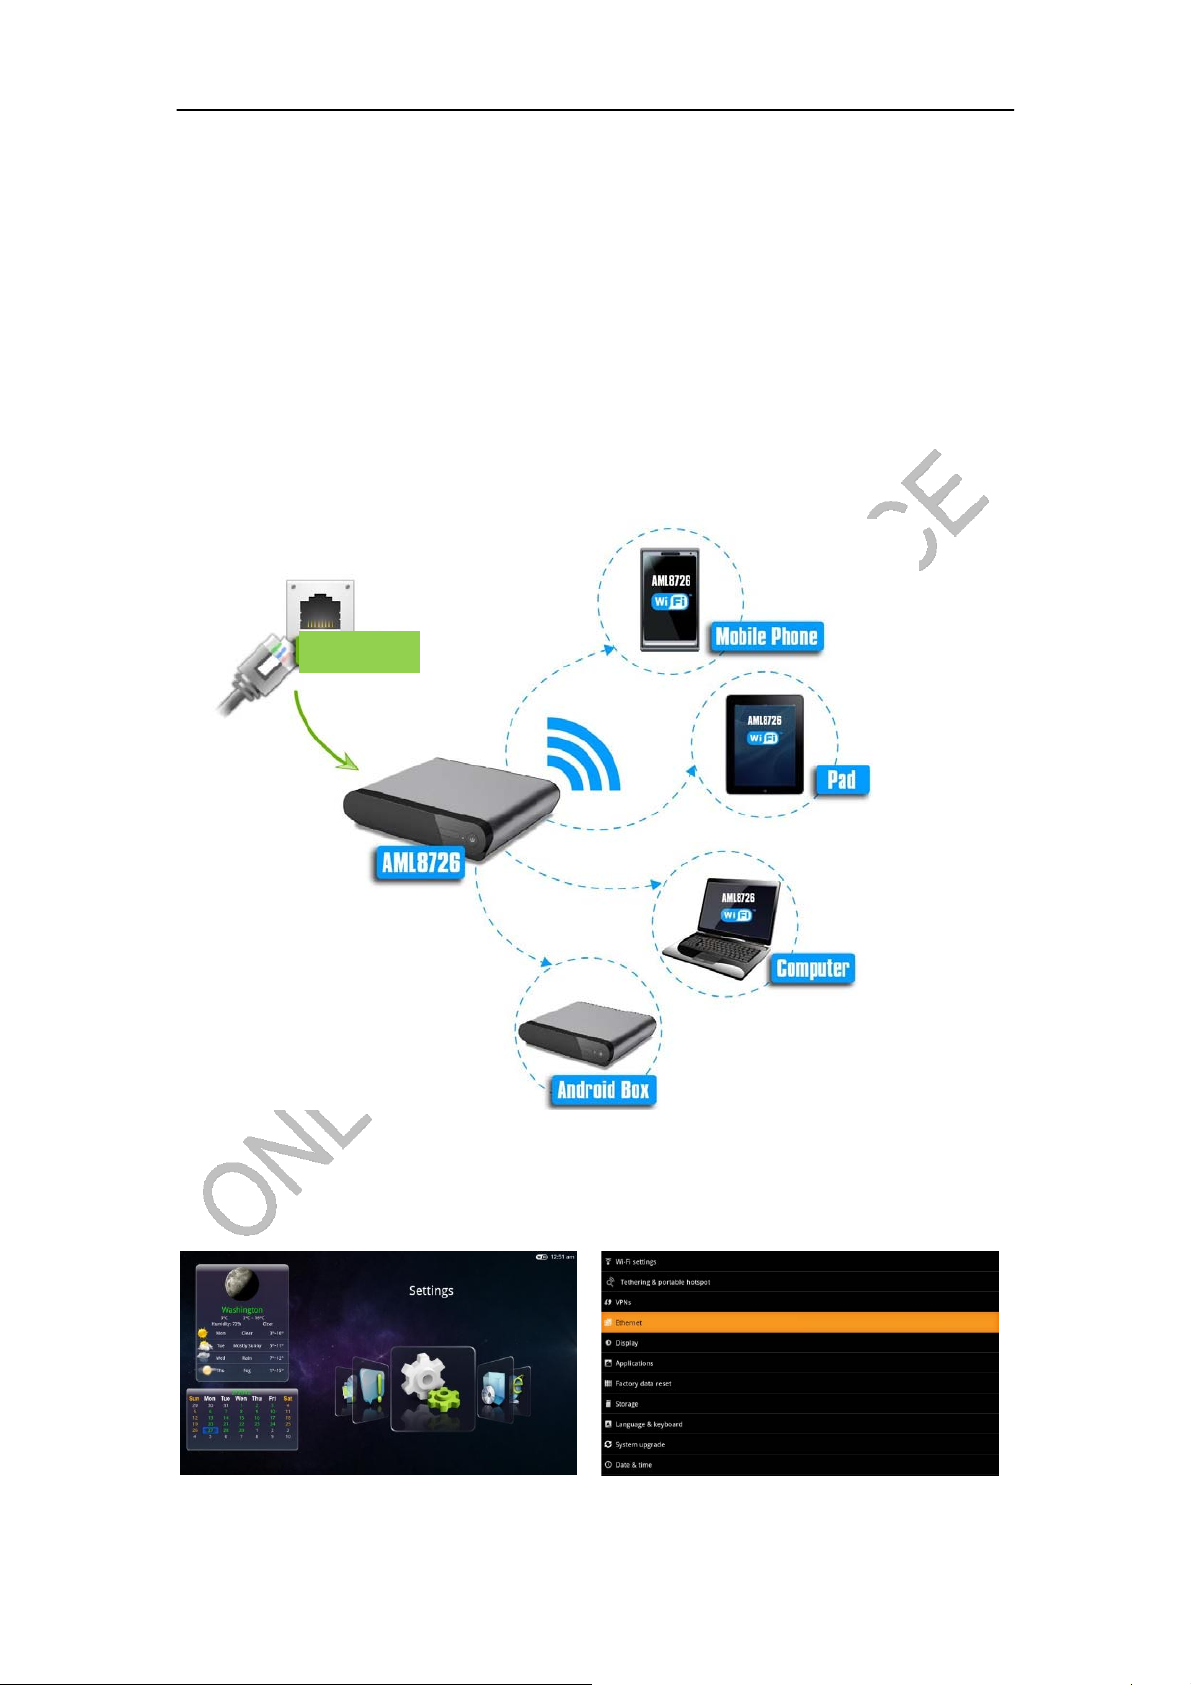
Tethering & portable hotspot(Optional Only)
General Introduction
Tethering & portable hotspot == A wireless router?Yes, we have made our
Smart TV box different devices connect to Internet through our product.
convenient if you have devices like notebook, mobile phone or tablet PC that
supports Wi-Fi connection.
Ethernet
Its
Operating Introductions
1) Enter Settings and choose Ethernet
Page 21
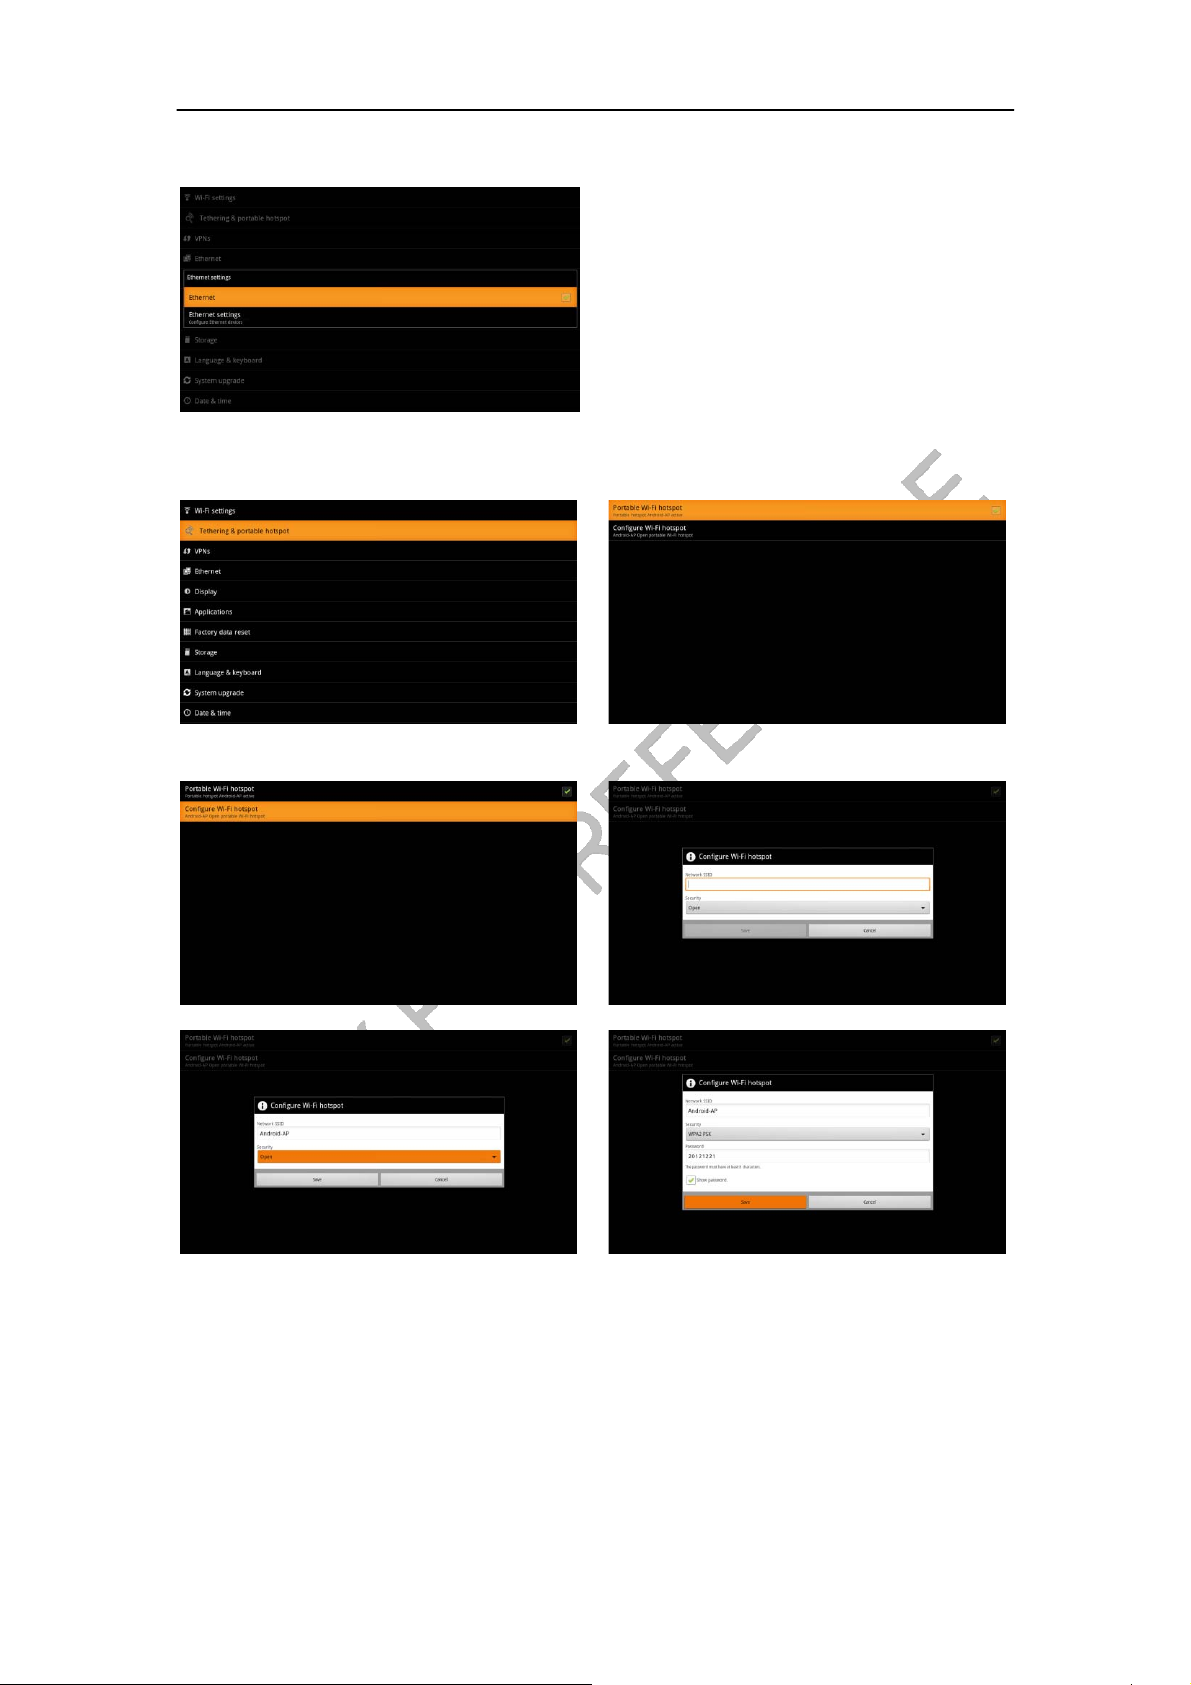
2) Connect to Internet via Ethernet
Tips:
Choose Ethernet
Use browser to surf Internet.
3) Choose Tethering & portable hotspot and turn on the Portable Wi-Fi
hotspot
4) Configure portable Wi-Fi hotspot, set network SSID, set security type
Operating introductions:
① Insert your SSID, such as “Android-AP”
② If chosen “Open” from security pull-down menu, your Wi-Fi connection will be
infinitized. If chosen “WPA2PSK” from security pull-down menu, you will need a security
code for your Wi-Fi connection.
③ After setting your portable Wi-Fi hotspot, you should save the operation.
5) How to connect your Android devices to your Wi-Fi hotspot
Page 22
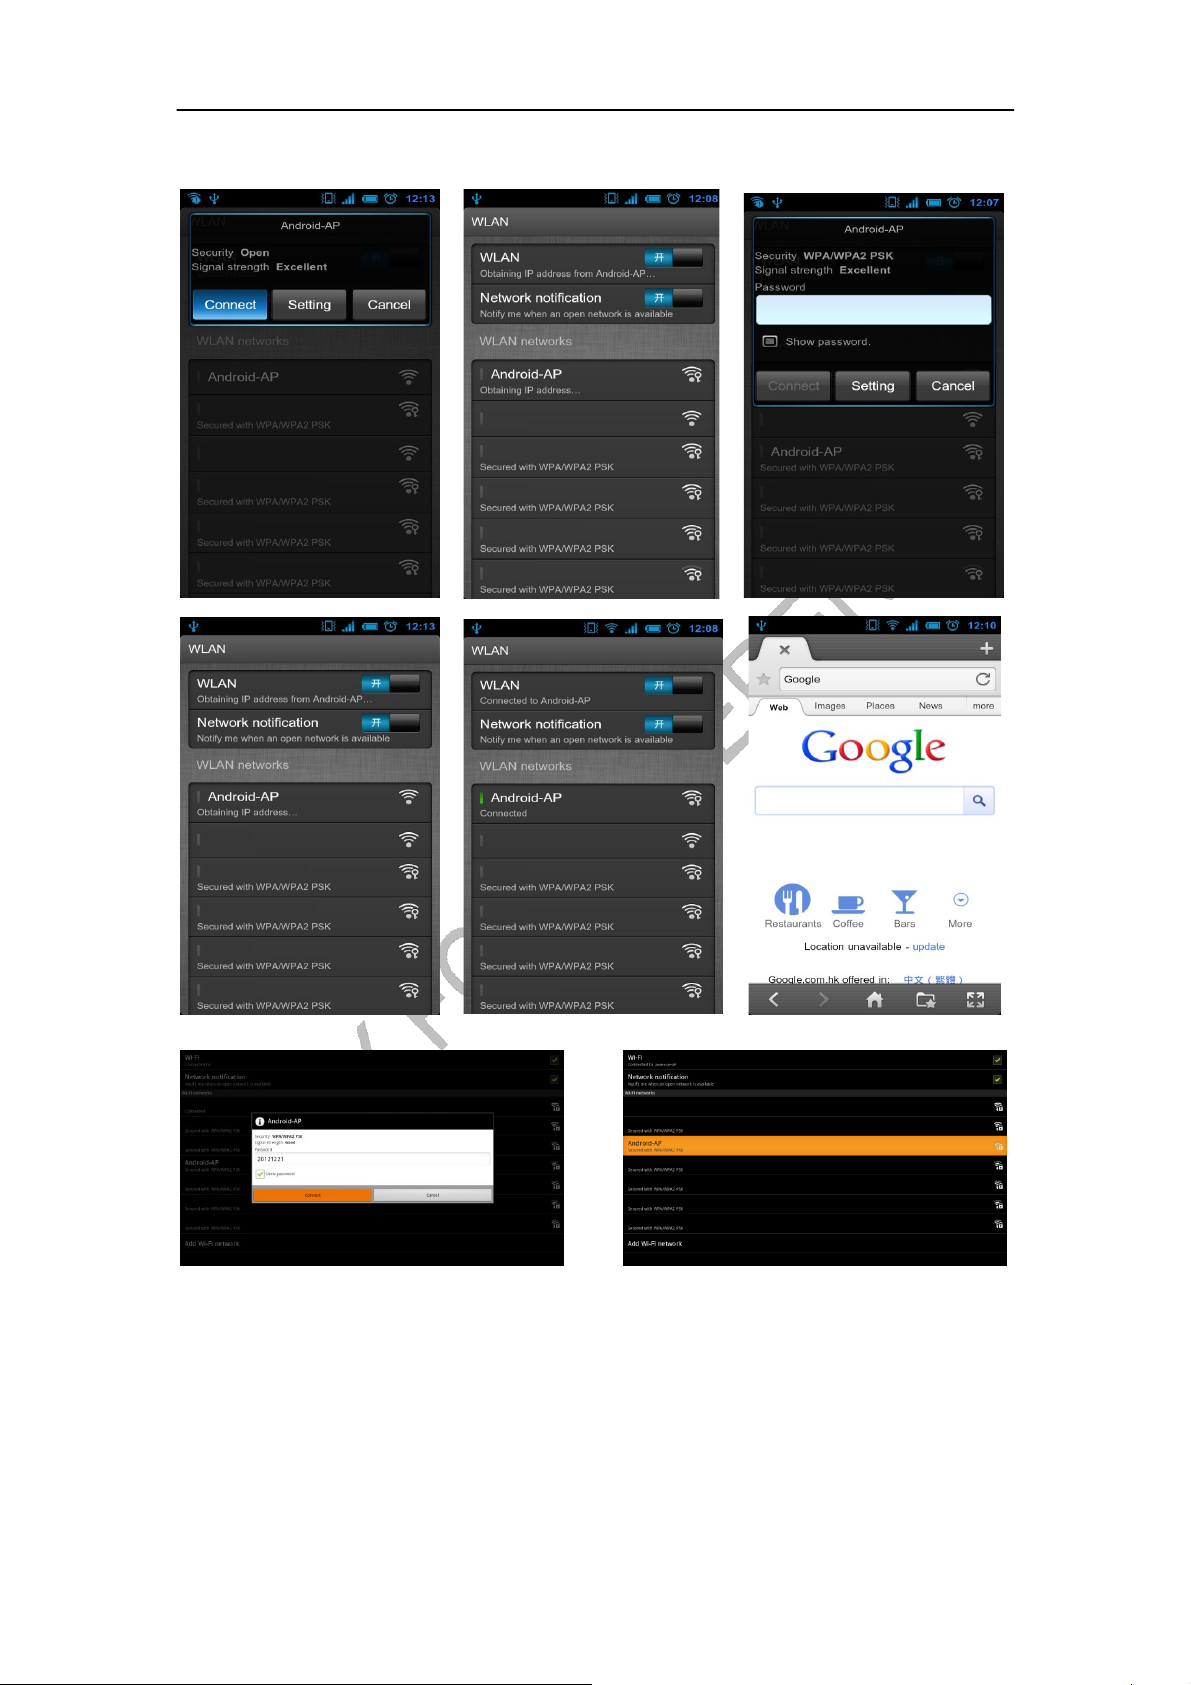
Mobile Devices (Smart phone):
Android BOX:
Page 23
DLNA (Digit al Living Network Alliance)
General Introduction
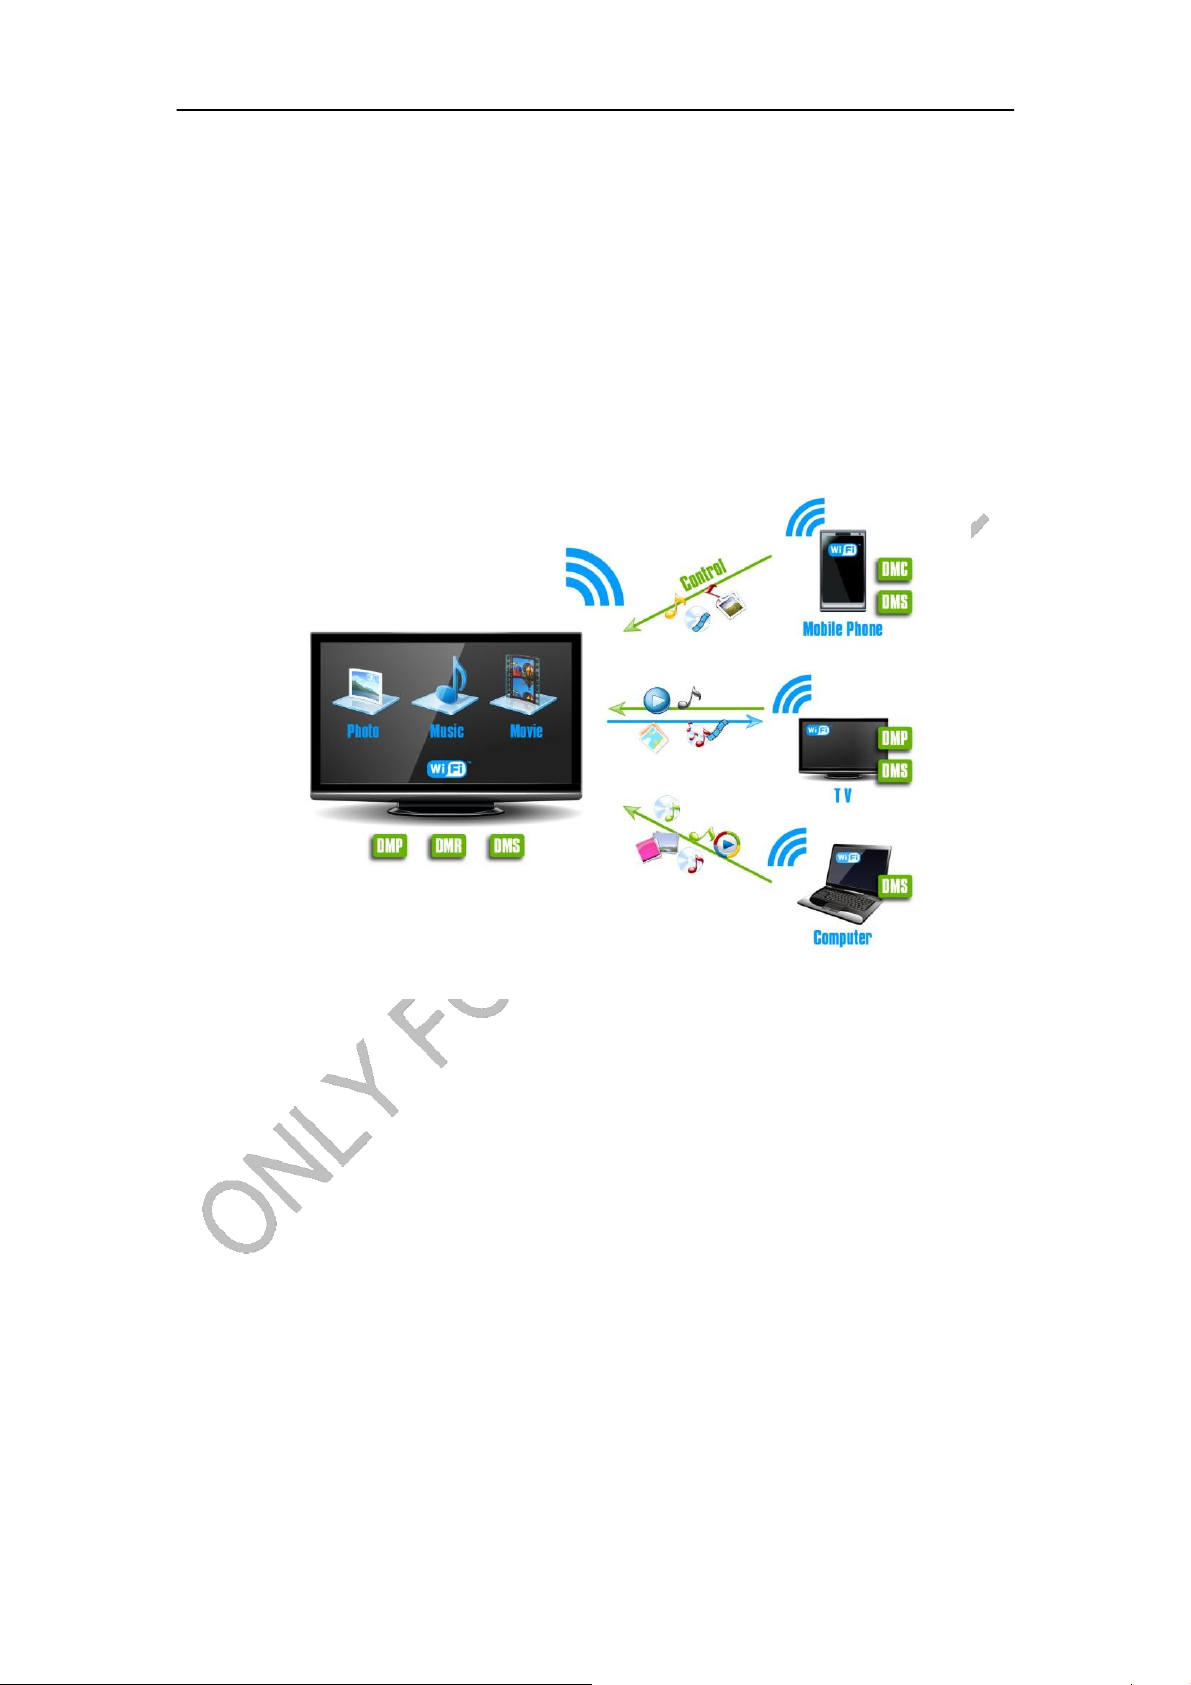
DLNA (Digital Living Network Alliance) seeks for more convenience,
choices and enjoyment of your digital content through DLNA Certified devices.
You can share/transfer/play/control media files from different devices through
Wi-Fi.
1) Android TV play the shared media files from notebook, phone or tablet
PCs. (DMP)
2) Android TV shares its media files, and other devices or itself can play the
shared files (DMS)
3) Android TV can be a display terminal of other devices(DMR)
4) Mobile phone can be the controller of the Android TV as well as push
media files into the TV(DMC)
Operating Introductions
1)Enter the APP MediaSharing. You will see a list of devices that support
DLNA on the left.
Page 24
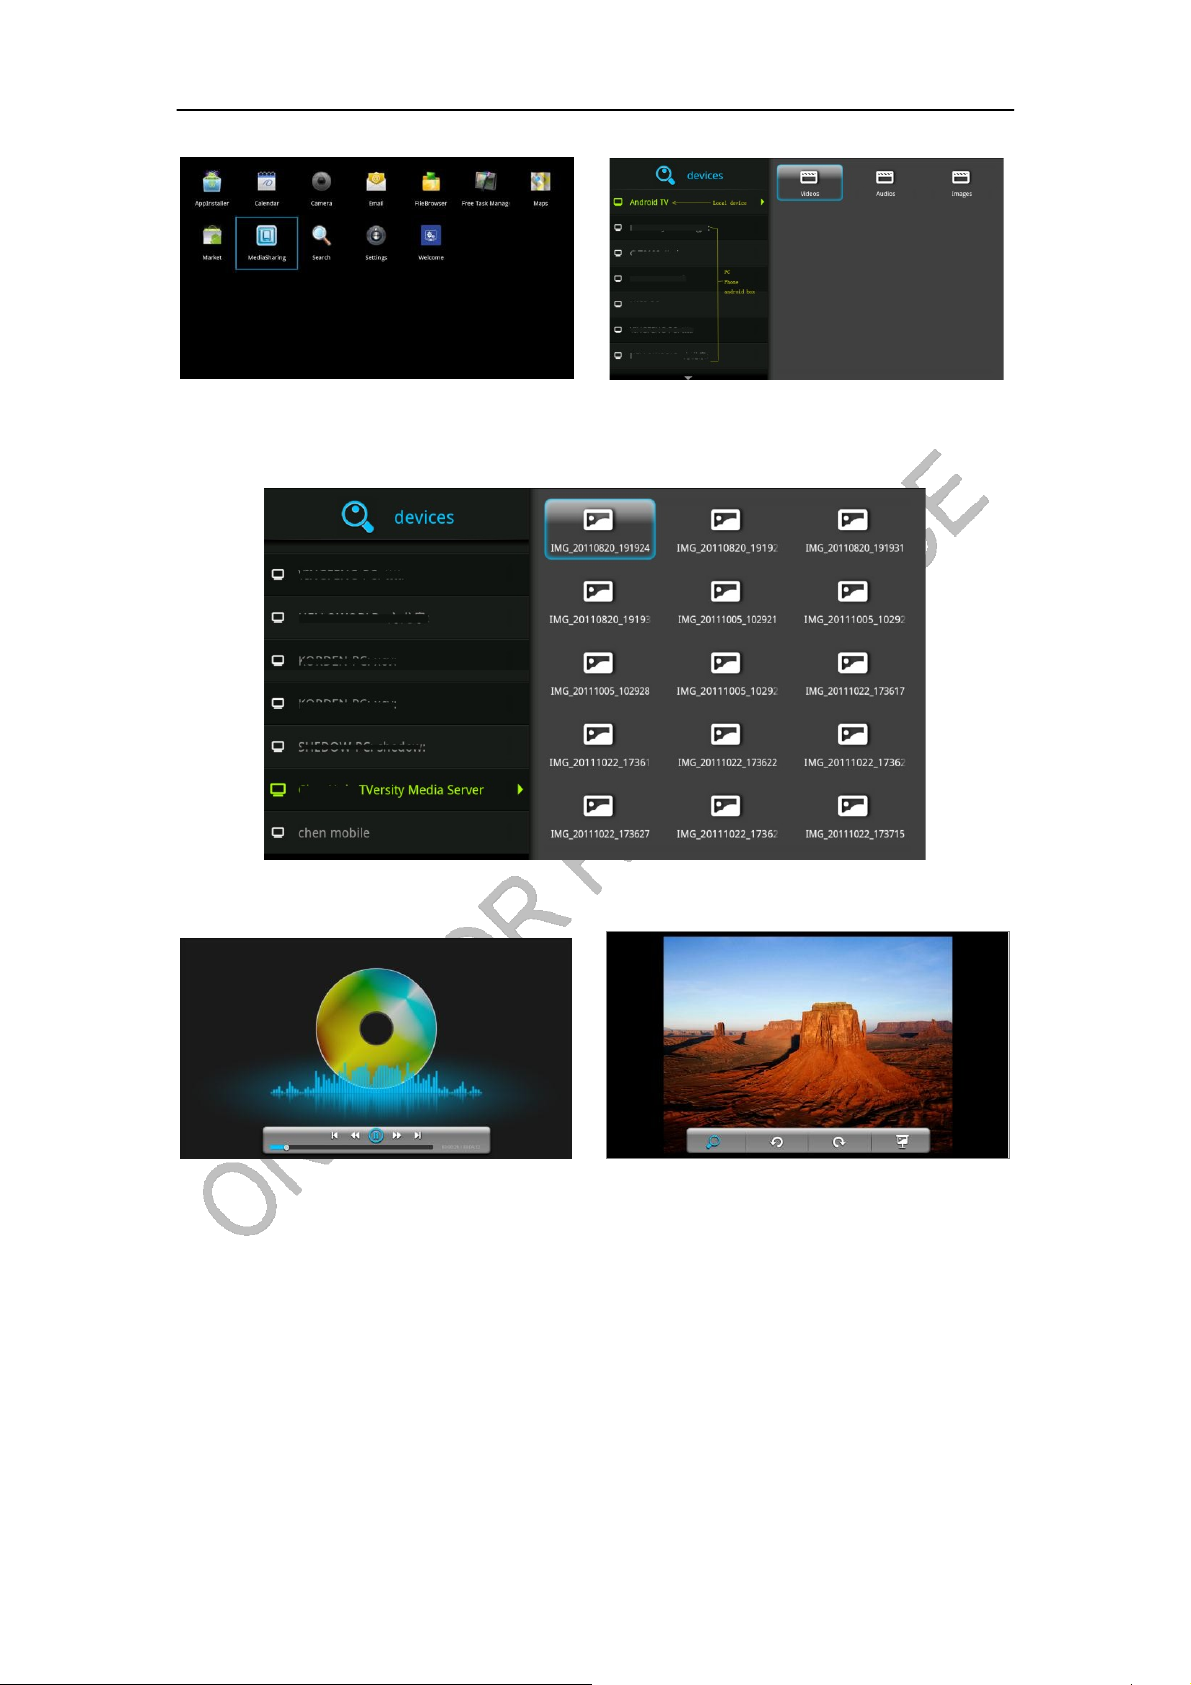
2) Choose the right device on the left, you will see a list of media files that
the device shared.
3) Choose and press the media file you want to play. It will take a little longer
for video files. Music and picture play screenshots are as followed:
Operating tips:
① You can drag the progress bar during playing music or video. You can
also have basic functions like forward/rewind and Prev/Next
② Picture player can zoom in/out and rotate the picture as you like, it
also provide filmslide function
4) Manu of MediaSharing
Page 25
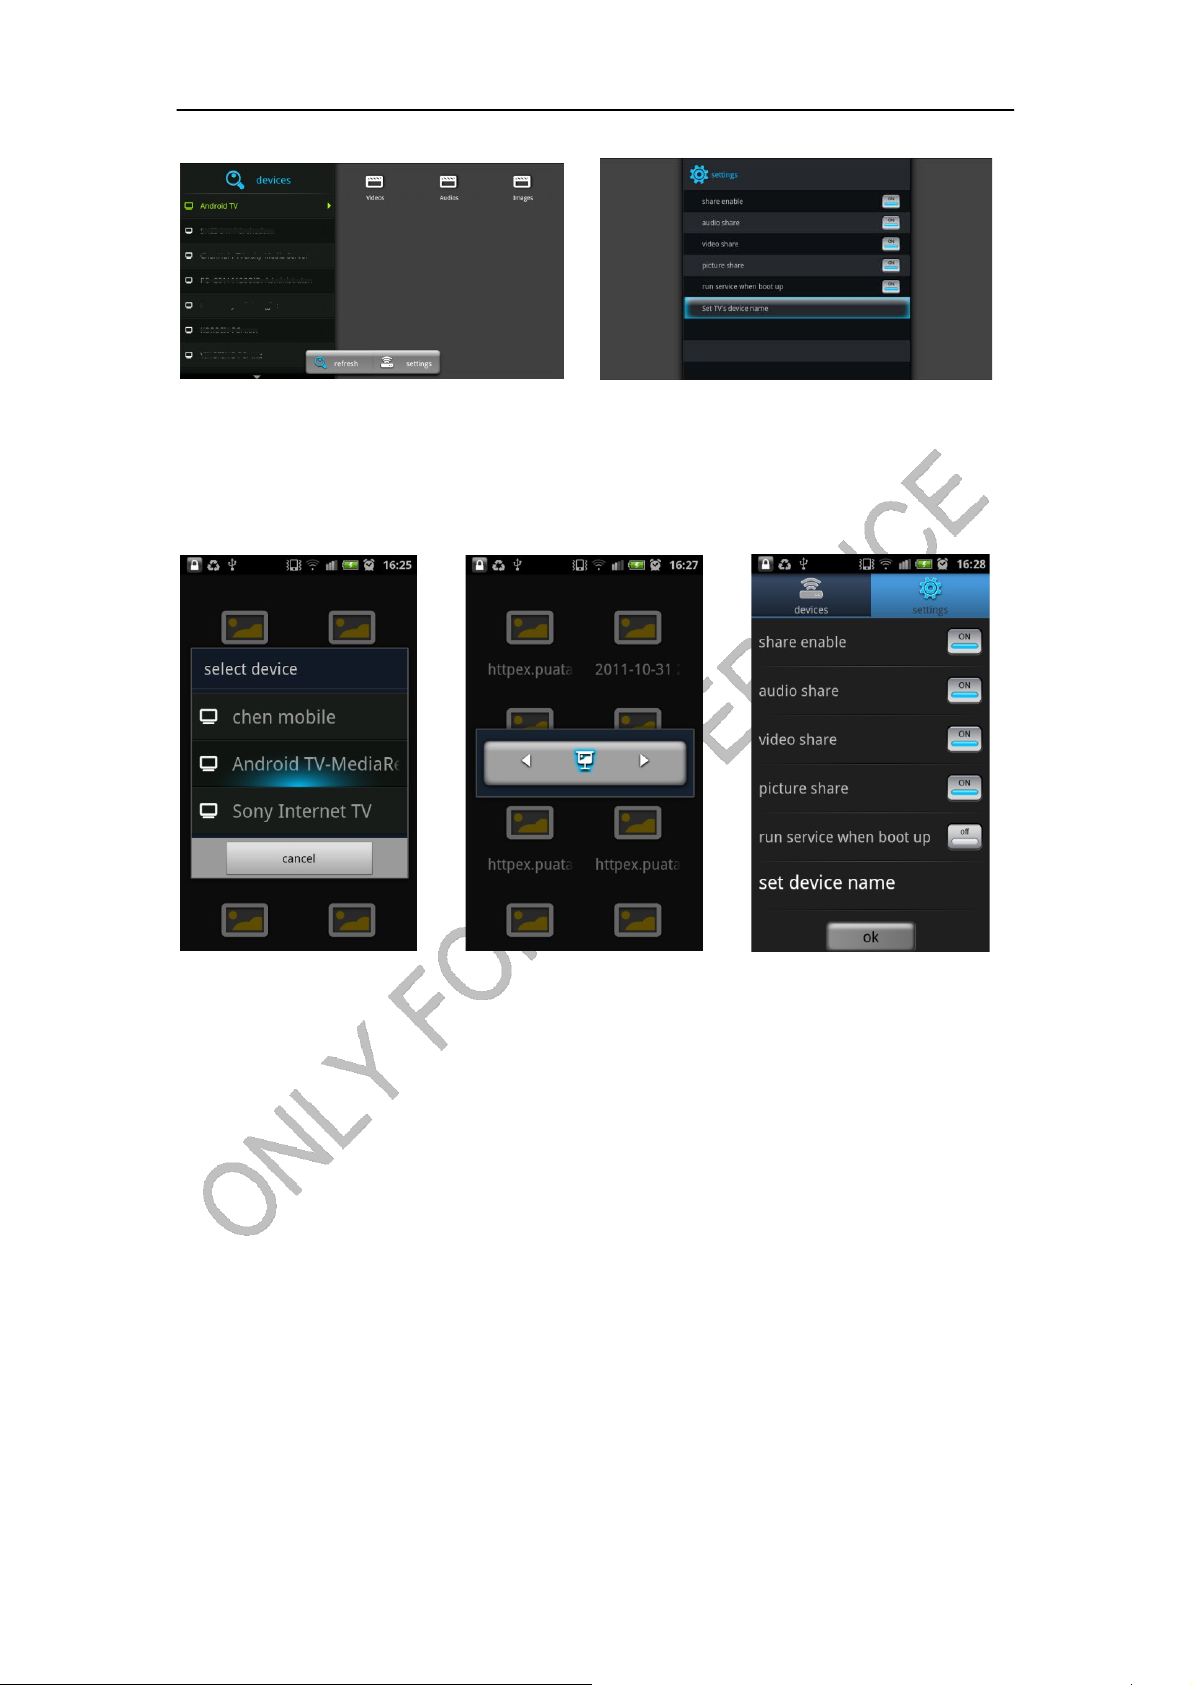
Operating tips:
① Refresh: Refresh the list of supported devices
② Settings: Turn on/off the function of sharing, turn on/off run service
when boot up and set TV
5) Set the APP for mobile phone
s device name
Operating tips:
① Install the APP for mobile phone. It will search for supported devices
automatically in the current Wi-Fi environment. You can use different devices
to play the media file you chose, such as Android TV .
② You can also have basic controller functions on your mobile phone. As
you can control forward/rewind, prev/next and filmslide and etc.
Page 26
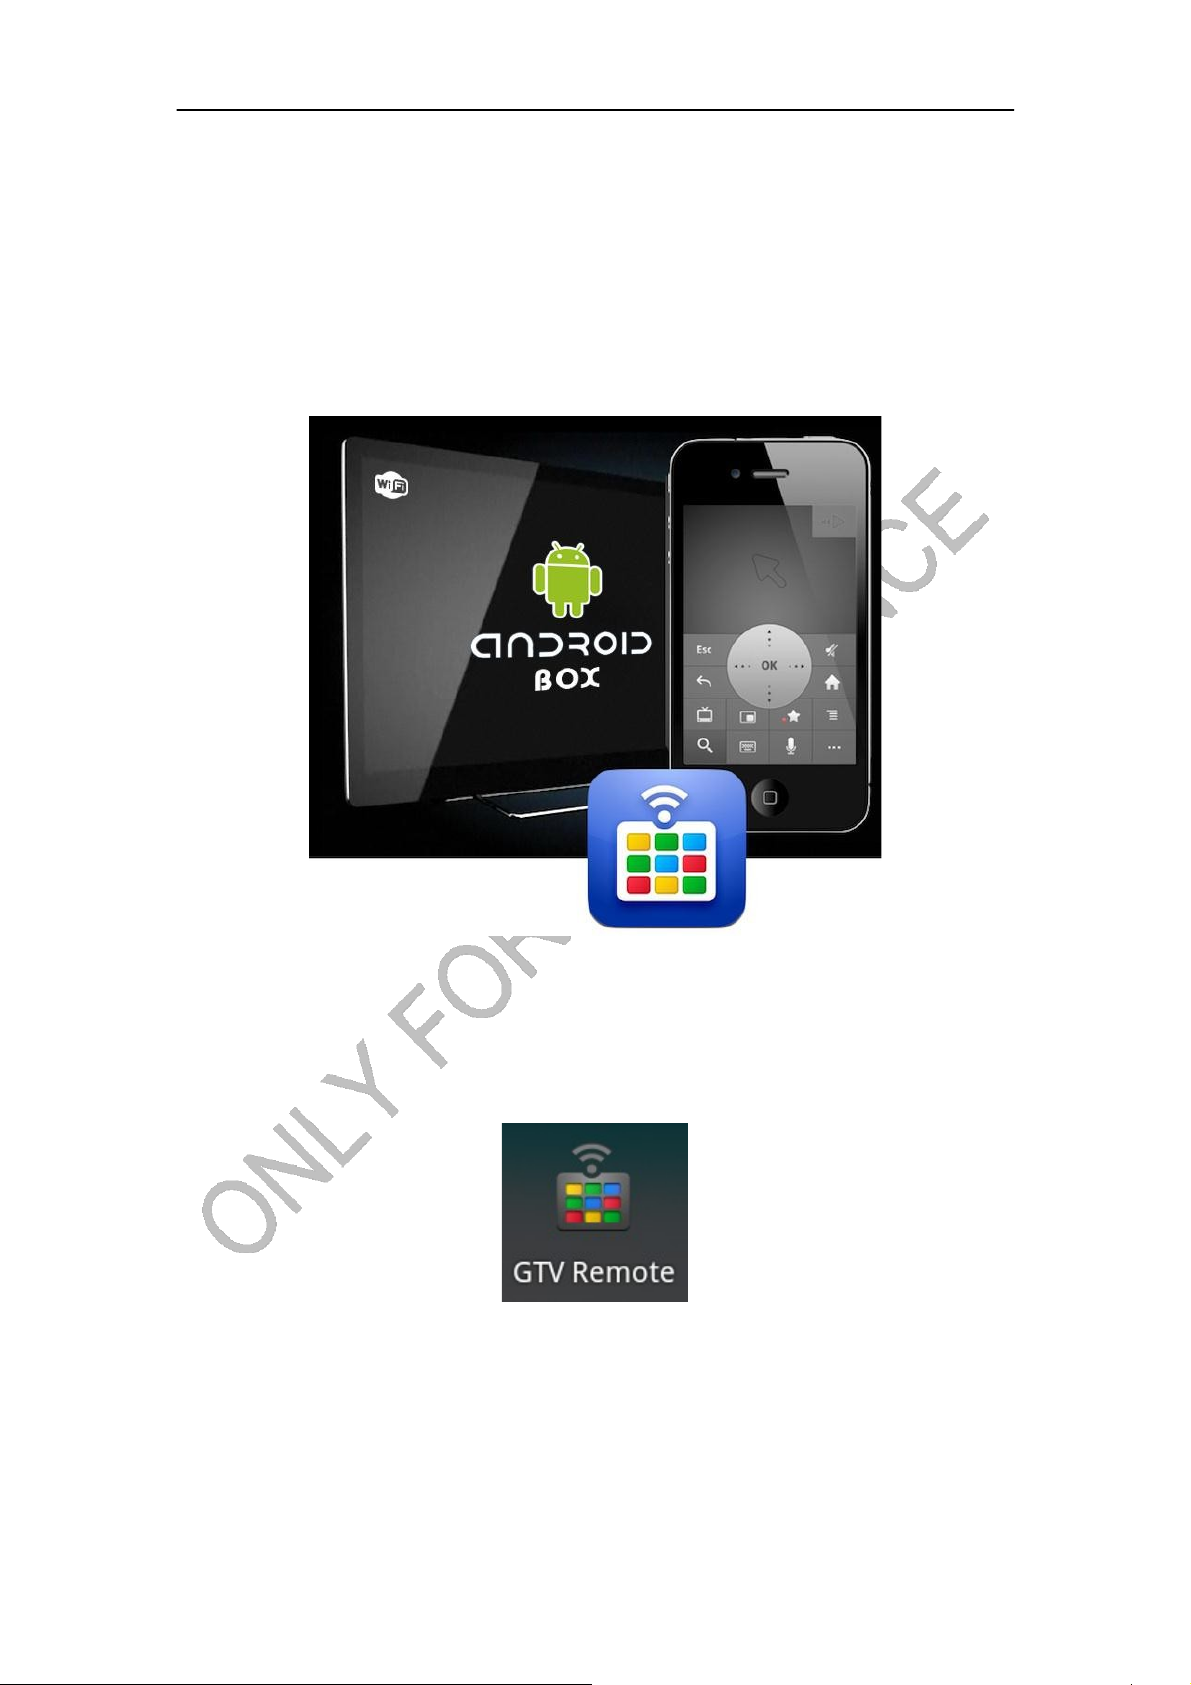
Google TV Remote(For the U.S. region only)
General Introduction
Google TV Remote is an app that makes your mobile phone into a fully
functional Google TV remote. Use the mouse pad, arrow keys, and the full
range of buttons. Allows you to turn the TV and AVR on/off so you can use this
as the primary remote. Even search using your voice!
Operating Introductions
1) Search and download the APP as below(Search only available in the U.S
region), install into your mobile phone:
2 ) Make our Smart TV Box and your mobile phone connected to the
same Wi-Fi connection. Open the GTV Remote, it will search for our product
automatically.
Page 27
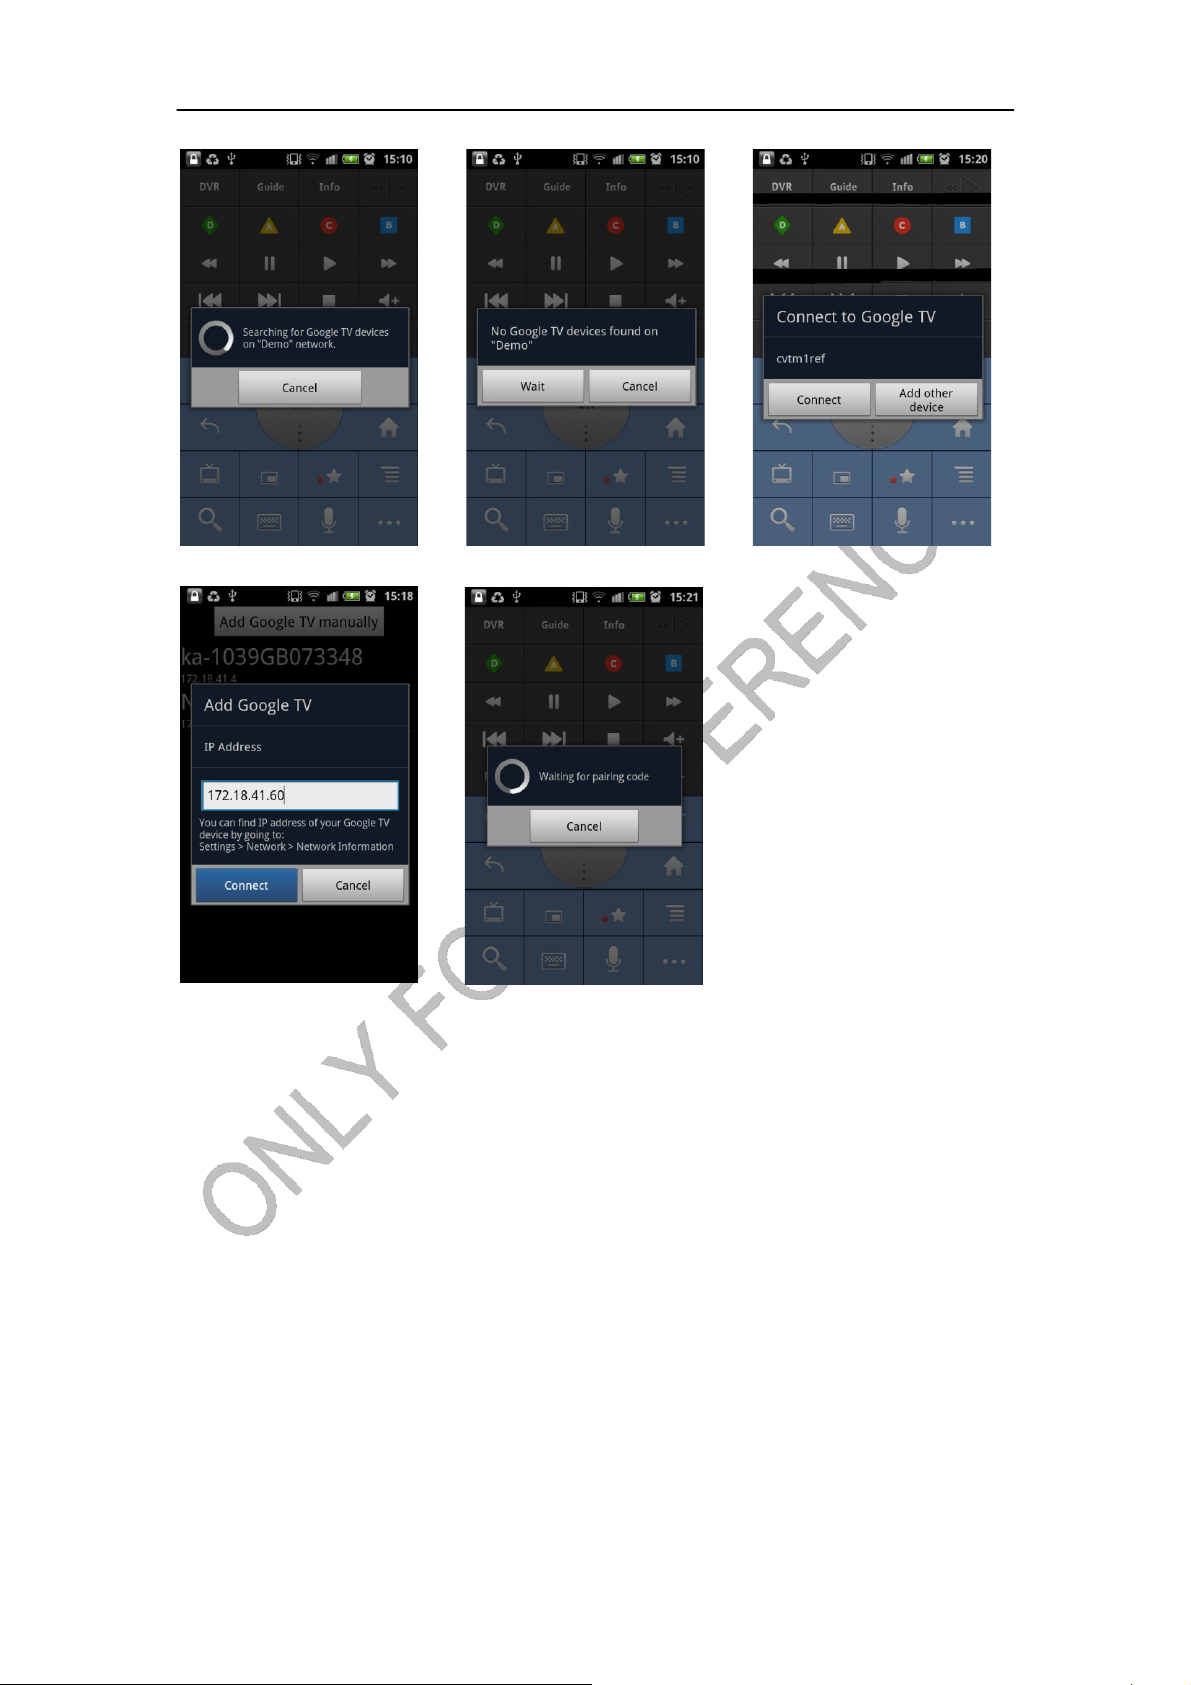
device
Waiting for pairing code after clicking “Connect”
Tips:
If you havent found
our product at first time,
press “Wait”
If you havent found
our product after several
times of trying, please
press “Cancel” and insert
IP of our product
manually
Choose “Connect” if ID of
the product is shown. Or
you may choose “Add
other device” to user other
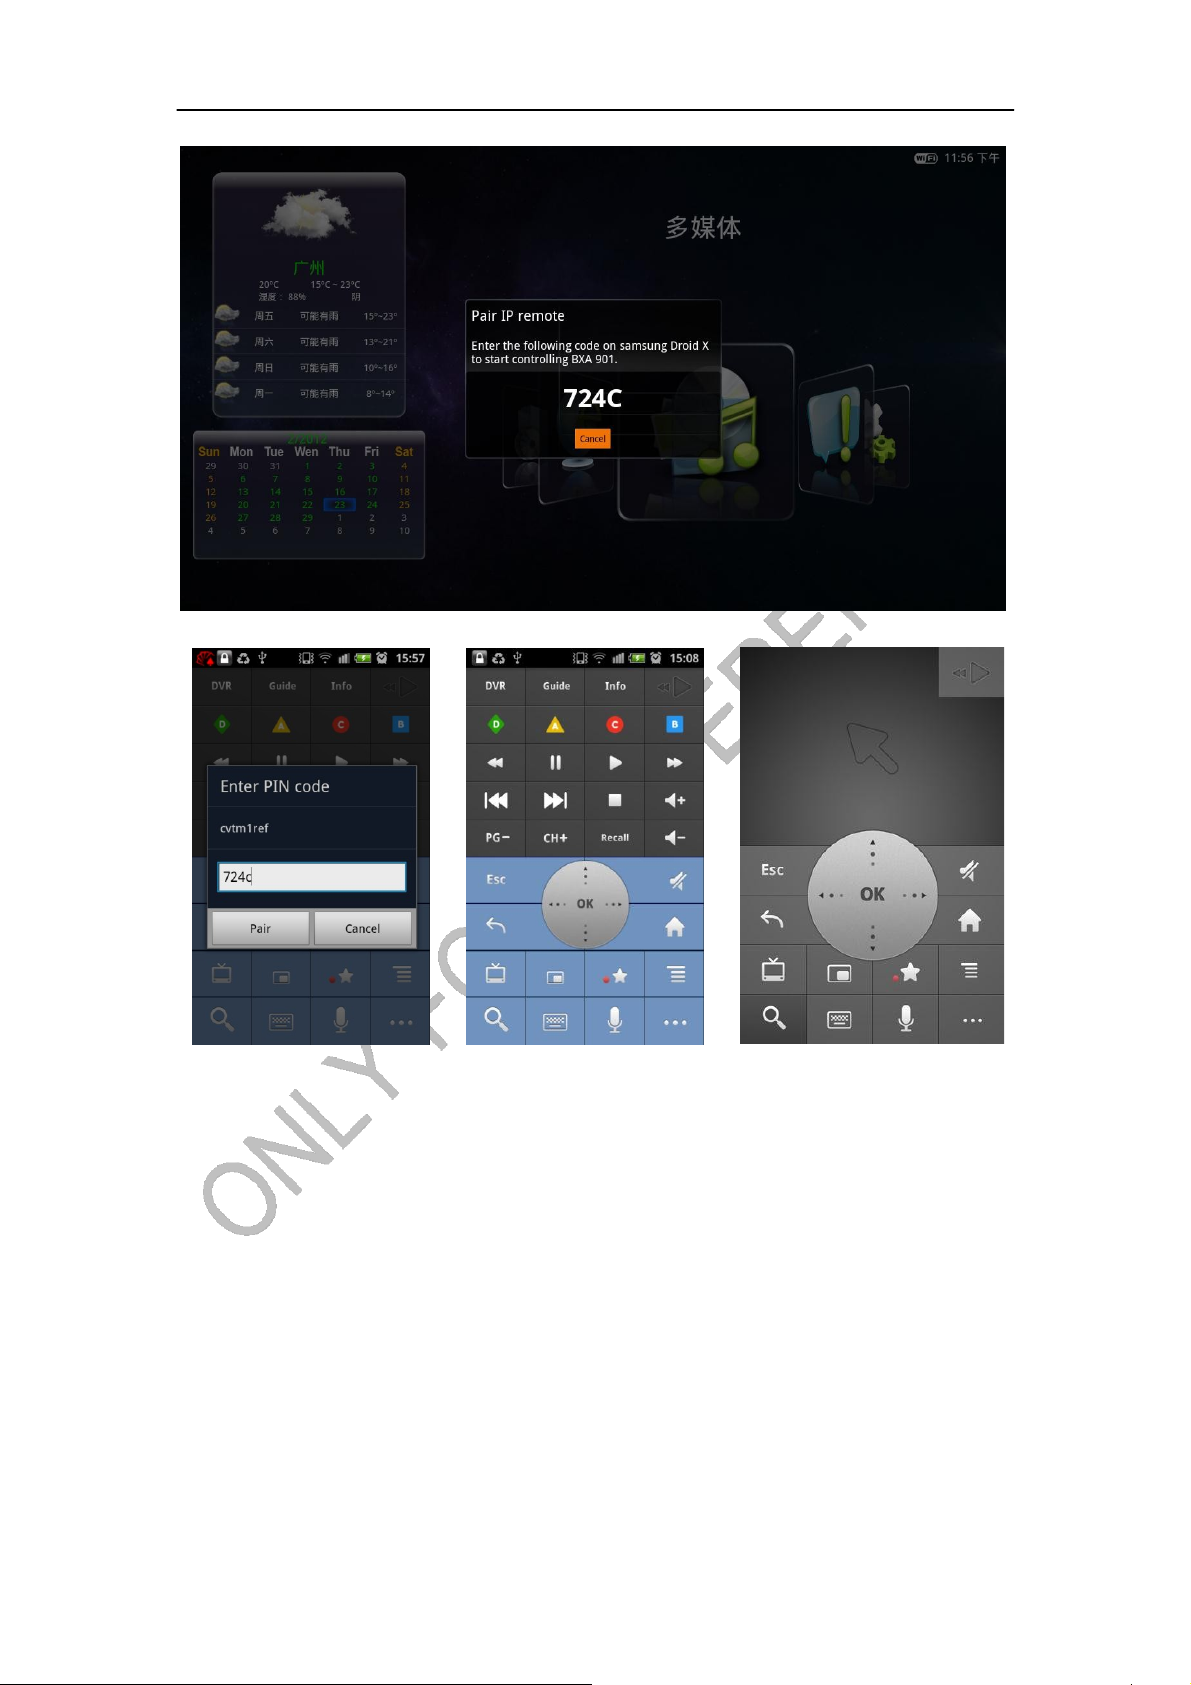
3) Insert the pairing code of our product on your mobile phone to connect.
Page 28
Page 29
EXCEPTION HANDLING
Systems restore
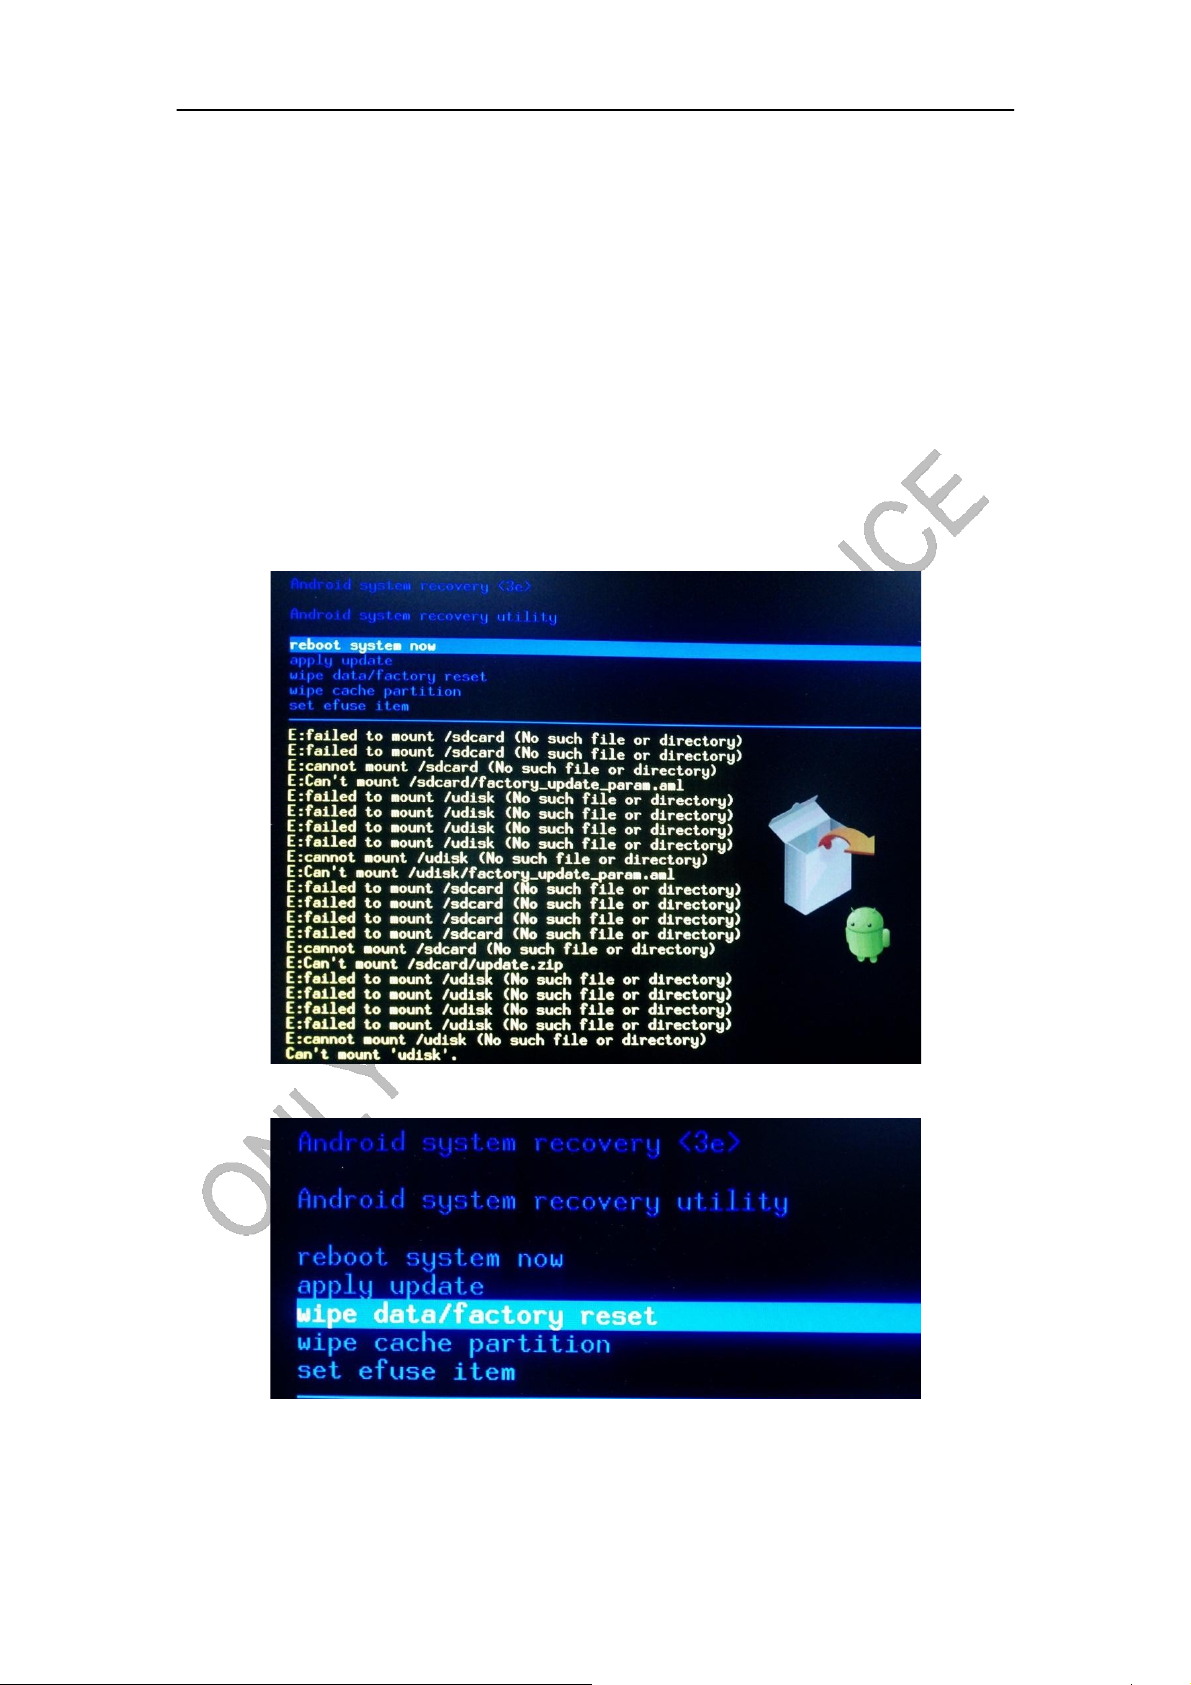
If the Android Device cannot start successfully, please proceed as follows:
*Please read carefully before operation!
1. Unplug your storage devices, such as: SD card, U-disk, mobile HDD and etc.
2. Unplug the power supply
3. Press the RECOVERY button, then plug in the power, release the RECOVERY
button until you see the screen as follow
4. Use Up/Down buttons to choose “wipe data/factory reset” and enter it
Page 30
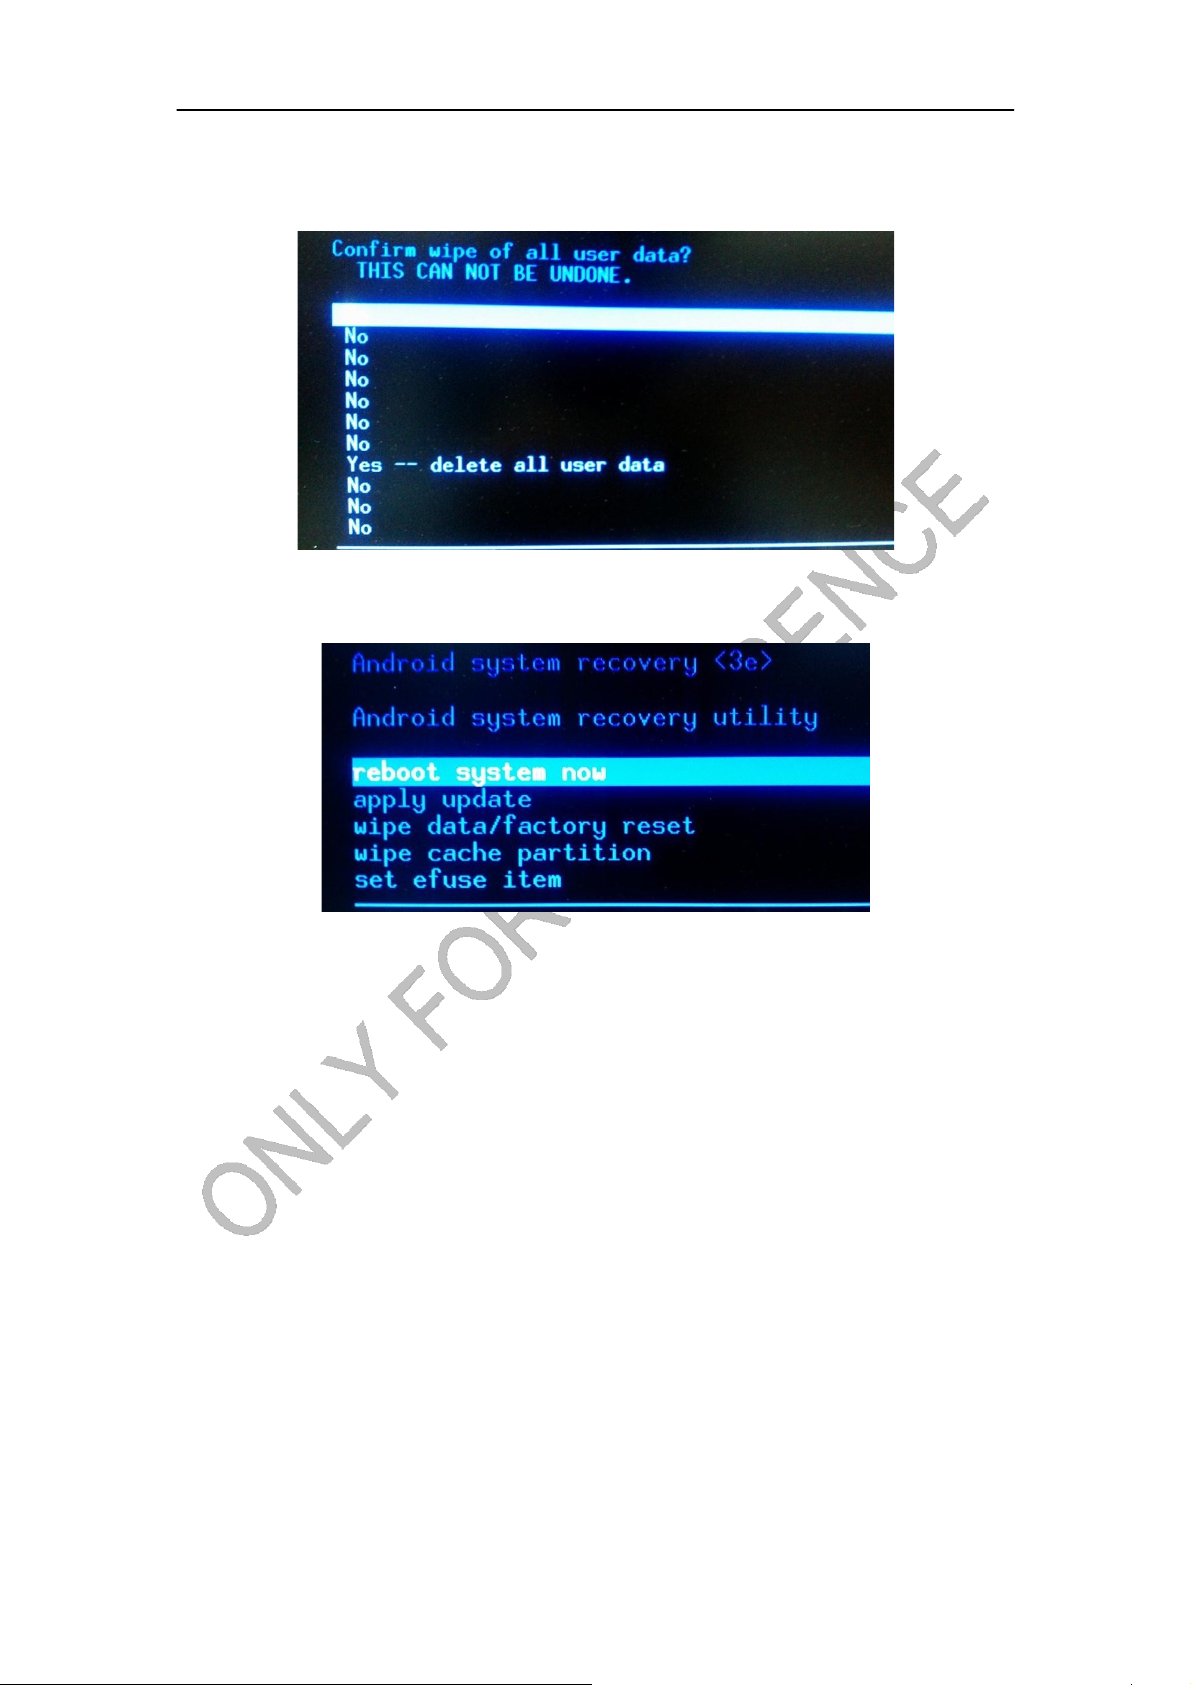
5. Use Up/Down buttons to choose “Yes -- delete all user data” and enter it
(
*Warning!: It will delete all of user’s information after confirmation
)
6. Use Up/Down buttons to choose “reboot system now” and enter it, the product will
reboot after confirmation
7. The product will enter the system successfully
Page 31

General
Outline
OS Android 4.0
ARM ARM Cortex A9
Frequency Up to 1.2GHz
RAM 1GB DDR3
ROM Built-in 4GB NAND Flash
2xUSB 2.0 port(support USB Hub)
Networking
Language
Display
Specs
Media
Format
Features
I/O
1xRJ45 port
Micro SD slot(support up to 32GB)
1x HDMI input
1x HDMI output
1x IR blaster extend jack
Built-in WIFI
Support Wireless: 802.11 b/g/n
Wired: Ethernet 10/100 Base-T
ENGLISH, CHINESE simplified, CHINESE traditional and JAPANESE
and etc.
Aspect Ratio : 16:9
Resolution: 1920 x 1080P (Full HD)
Video Formats: Full-format 1080P HD video decoding play
Supported Video decoding: MPEG 1, MPEG 2,MPEG4, H.264, H.263,
VC-1, RV30/40,
Supported Audio decoding: PCM, LPCM, MP3, AAC, MPEG Audio,
WM
Supported subtitle formats: SRT,SSA,ASS,SUB
Music format: WMA,MP3,WAV,OOG,AAC, M4A
Picture format: JPG,GIF,BMP,PNG
FTI(First Time Installation )
Screen keyboard or support USB keyboard, wireless keyboard and
mouse
Video, music, picture player
File manager
ApkInstaller
Email, Gmail and etc.(support POP, IMAP, Exchange)
Support kinds of third-party softwares
Support Adobe Flash
Page 32

FCC ID: 2ABQ7-PRN101
This device complies with Part 15 of the FCC Rules. Operation is subject to the following two
conditions: (1) this device may not cause harmful interference, and (2) this device must accept any
interference received, including interference that may cause undesired operation.
Changes or modifications not expressly approved by the party responsible for compliance could
void the user's authority to operate the equipment。
NOTE: This equipment has been tested and found to comply with the limits for a Class B digital
device, pursuant to Part 15 of the FCC Rules. These limits are designed to provide reasonable
protection against harmful interference in a residential installation. This equipment generates, uses
and can radiate radio frequency energy and, if not installed and used in accordance with the
instructions, may cause harmful interference to radio communications. However, there is no
guarantee that interference will not occur in a particular installation. If this equipment does cause
harmful interference to radio or television reception, which can be determined by turning the
equipment off and on, the user is encouraged to try to correct the interference by one or more of
the following measures:
-- Reorient or relocate the receiving antenna.
-- Increase the separation between the equipment and receiver.
-- Connect the equipment into an outlet on a circuit different from that to which the receiver is
connected.
-- Consult the dealer or an experienced radio/TV technician for help.
The antenna(s) used for this transmitter must be installed to provide a separation distance of at least 20cm from all
persons and must not be collocated or operating in conjunction with any other antenna or transmitter, except in
accordance with FCC multi-transmitter product procedures.
 Loading...