

Mosmatic TYR-f Service Manual
T
D
-
14
00
1
0
ub
j
ect to chan
g
e without notic
e
TYR-f
No. 81.400
A
ssembly and Service instruction
s
uct cleaner *fixed
*
Assembly instructions
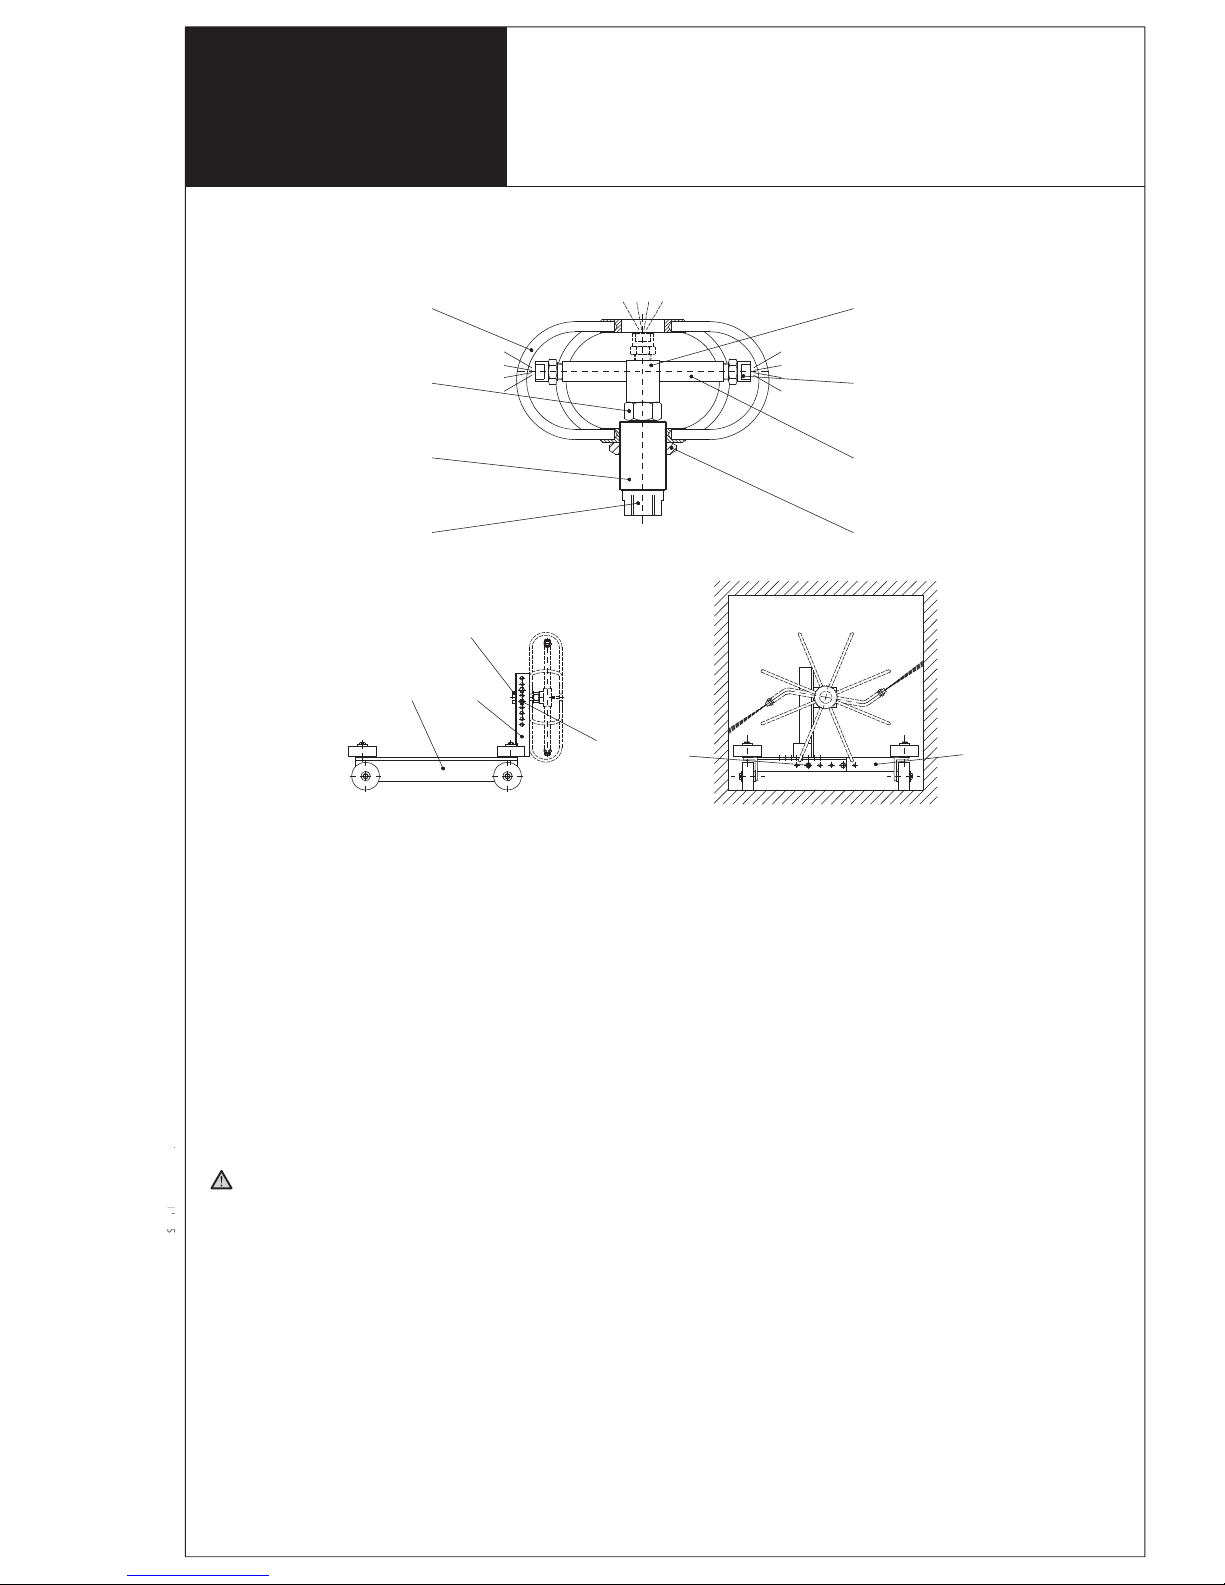
Assembly and connection
1. Screw the nozzles (a / accessory) into the pipes of the distributor-arm (b).
2. Turn the adjustable rotor guard (c) to the desired operating position and
secure with nut (h) tightly.
3. Fasten tightly the high pressure hose or the high pressure pipe
connection (d) of the swivel (e) coming from the high pressure pump.
Installation to t he TYR Mobile (accessory)
1. Install the duct cleaner with the swivel (e) to the support (f) of the
TYR mobile (g / accessory) and tighten it by hand.
Secure the rotor guard (c) with the nut (h) to the suppor t (f).
2. Adapt the TYR mobile (g / accessory) to the object to be cleaned, by
adjusting the frame (i) and the support (f) with the bolts (j).
3. Fasten tightly the high pressure hose or the high pressure pipe
connection (d) of the swivel (e) coming from the high pressure pump.
For your own safety
- Read all instructions before the initial operation. Check their proper
condition and that they operate safely.
- Always use protection gear when using products connected to high
pressure.
- Never direc t any high pressure water-jet at humans, animals or electric
installations.
- Before any maintenance or nozzle-change, turn off the high pressure
water supply, e.g.: turn off and secure the power switch.
- After turning off the system, allow all self propelled equipment to come
to a complete stop before handling.
- Safety regulations and guidelines (Accident Prevention Rules) from the
manufacturer of your high pressure cleaner are applicable.
- Nozzle installation according to Nozzle manufacturer.
- Do not run the unit if spray-arm is out of balance or bent, damage to the
swivel will result.
- No modifications to the unit are permitted.
- The equipment may be installed and used only by particularly trained
technical personnel.
Service instructions
Exchanging the swivel
1. Hold the coupling (k) on the swivel (e) with a spanner and remove
the distributor-arm (l) by hand.
2. Loosen the nut (h) with a spanner then turn out the swivel (e) from
the rotor guard (c).
3. Implement the procedure for the installation of the new swivel (e)
in reverse order.
Exchanging the distributor-arm
1. Hold the coupling (k) on the swivel (e) with a spanner and remove
the distributor-arm (l) by hand.
2. Implement the procedure for the installation of the new distributor-
arm (l) in reverse order.
Exchanging the rotor guard
1. Hold the coupling (k) on the swivel (e) with a spanner and remove
the distributor-arm (l) by hand.
2. Disconnect the nut (h) with a spanner then turn out the swivel (e)
from the rotor guard (c).
3. Implement the procedure for the installation of the new rotor
guard (c) in reverse order.
a
b
c
d
e
f
g
h
i
j
j
d
k
l
TD - 81400 E
© MOSMATIC AG 03.1 0.2011 Subject to change wi thout n otice
Spare parts list
Pos. Part No. Description
1a 57.003 Swivel (G1/4"F) - G3/8"M
1b 57.103 Swivel (G3/8"F) - G3/8"M
1c 57.203 Swivel (M21x1.5-M) - G3/8"F
1d 57.253 Swivel (M22x1.5-M) - G3/ 8"F
2a 900.859 Rotor guard ø75
2b 900.861 Rotor guard ø150
2c 900.864 Rotor guard ø300
2d 900.865 Rotor guard ø400
2e 900.866 Rotor guard ø500
2f 900.867 Rotor guard ø600
3a 900.150 Distributor arm for ø75 - 2f
3b 900.564 Distributor arm for ø75 - 3f
3c 903.488 Distributor arm for ø150 - 2f
3d 900.580 Distributor arm for ø150 - 3f
3e 900.572 Distributor arm for ø300 - 2f
3f 900.554 Distributor arm for ø300 - 3f
3g 900.868 Distributor arm for ø400 - 2f
3h 900.870 Distributor arm for ø400 - 3f
3i 900.589 Distributor arm for ø500 - 2f
3j 900.872 Distributor arm for ø500 - 3f
3k 900.874 Distributor arm for ø600 - 2f
3l 900.876 Distributor arm for ø600 - 3f
4 900.975 Nut M28x1.5
TYR-f
No. 81.400
Duct cleaner *fixed*
Accessories
(not included)
Pos. Part No. Description
5a 18.15030 Nozzle 1503, 1/8"
(pump capacity ~ 100 0 l/ h)
5b 18.15040 Nozzle 1504, 1/8"
(pump capacity ~ 1250 l /h)
5c 18.15045 Nozzle 15045, 1/8"
(pump capacity ~ 1500 l /h)
6a 81.902 TYR Mobile small
(see char t below)
6b 81.903 TYR Mobile large
(see char t below)
7 81.905 TYR Hook + Pin
TYR Mobile stainless
(adjust able)
Part No. TYR Mobile ø a(min.) a (max.) b(min.) b (max.) L
81.902 small 300 300 450 300 360 390
weight = 4164g 400 400 450 400 410 390
81.903 large 500 500 850 500 630 640
weight = 7088g 600 600 850 600 680 640
6a, b
L
b
a
3a, b
2a
2b
2c...f
1a...d
3c, d
3e...l
5a...c
4
ø
7
7
7
 Loading...