

Page 1
AVVERTENZA!
IL PRODOTTO È COSTRUITO
PER OPERARE
ESCLUSIVAMENTE
ALL’INTERNO DI
AUTOVEICOLI ALIMENTATI A
12 VOLT DC.
BETREIBEN SIE DIE ENDSTUFE NUR IN
FAHRZEUGEN MIT 12 VOLT.
WARNING!
USE ONLY IN VEHICLES WITH A 12 VOLT
NEGATIVE GROUND.
AVVERTENZE:
INTERROMPERE IMMEDIATAMENTE L’USO IN CASO
DI PROBLEMI. Diversamente si potrebbero causare danni
alla persona o al prodotto. Per riparazioni, rivolgersi ad un
rivenditore autorizzato MOSCONI.
NON SMONTARE O MODIFICARE. Tale azione potrebbe
causare incidenti, incendi o scosse elettriche. Ogni tipo di
manomissione comporta il decadimento immediato della
garanzia.
I COLLEGAMEN TI E L’INSTALLA ZIONE DEVON O
ESSERE EFFETTUATI DA PERSONALE QUALIFICATO. I
collegamenti e l’installazione dell’apparecchio richiedono
conoscenze tecniche ed esperienza particolari. Per ragioni
di sicurezza, contattare sempre un rivenditore autorizzato
per eseguire una corretta installazione del prodotto.
NON INSTALLARE IN LUOGHI ECCESSIVAMENTE
UMIDI O POLVEROSI. Evitare di installare l’apparecchio in
luoghi eccessivamente umidi o polverosi. La presenza di
umidità o polvere all’interno del prodotto potrebbe causare
problemi di funzionamento.
NON INSTALLAR E A CONTATTO D I SUPERF ICI
SENSIBILI AL CALORE. L’amplificatore può raggiungere
una temperatura superiore agli 80°, il contatto con superfici
e materiali sensibili al calore potrebbe causare incendi o
altri danni
NELL’EFFETTUARE I FORI, NON DANNEGGIARE I TUBI
O I CAVI. Nell’effettuare i fori nel telaio per l’installazione,
fare attenzione a non entrare in contatto, danneggiare o
ostruire i tubi, i condotti della benzina, i serbatoio i cavi
elettrici. La non osservanza di queste precauzioni potrebbe
causare incendi.
NON OSTR UIRE I C ANALI DI VEN TILAZION E.
Bloccandoli si potrebbe causare un surriscaldamento
interno dell’apparecchio che potrebbe dare luogo a incendi.
UTILIZZARE IL PRODOTTO IN VEICOLI CON BATTERIA
DA 12 V. Un utilizzo diverso da quello indicato potrebbe
causare incendi, scosse elettriche o altri incidenti.
PRIMA DI ESEGUIRE I COLLEGAMENTI, SCOLLEGARE
IL CAVO DEL TERMINALE NEGATIVO DELLA BATTERIA.
Altrimenti potrebbero derivare scosse elettriche o altre
lesioni dovute a cortocircuiti.
ESEGUIRE CORRETTAMENTE I COLLEGAMENTI.
Utilizzare cavi di dimensioni adeguate e rispettare tutte le
polarità, altrimenti potrebbero derivarne incendi o danni al
prodotto.
EVITARE CHE I CAVI SI IMPIGLINO AGLI OGGETTI
CIRCOSTANTI. Effettuare i collegamenti seguendo le
istruzioni in modo che i cavi non interferiscano con la guida.
I cavi o i fili che interferiscono o si impigliano in parti quali lo
sterzo, la leva del cambio, i pedali, ecc. potrebbero essere
pericolosi.
SISTEMARE I CAVI IN MODO CHE NON VENGANO
PIEGATI O COMPRESSI DA PARTI METALLICHE
TAGLIENTI. Per evitare che vengano danneggiati o piegati,
sistemare i cavi e i fili lontano da parti mobili (quali le guide
dei sedili) o da parti taglienti o aguzze. Se i cavi vengono
fatti passare attraverso un foro metallico, utilizzare un
anello di gomma per evitare che l’isolante dei cavi venga
tagliato dal bordo metallico del foro.
PER ESEGUIRE I COLLEGAMENTI DI TERRA, NON
UTILIZZARE BULLONI O DADI DEI SISTEMI DI FRENATA
O DI STERZO. Non utilizzare MAI bulloni o dadi dei sistemi
di frenata e di sterzo (o di qualsiasi altro sistema di
sicurezza), o dei serbatoi per eseguire l’installazione o per i
collegamenti di terra. L’utilizzo di queste parti potrebbe
inibire il controllo del veicolo e causare incendi o altro.
USARE FUSI BILI DI RICA MBIO DI AD EGUATO
AMPERAGGIO. Altrimenti potrebbero derivarne incendi o
scosse elettriche.
UTILIZZARE LE PARTI ACCESSORIE SPECIFICATE E
INSTALLARLE IN MODO CORRETTO. Assicurarsi di
utilizzare accessori specifici in dotazione.
NON EFFETTU ARE ALCUNA OPERAZI ONE CHE
POSSA DISTOGLIERE L’ATTENZIONE DALLA GUIDA
DEL VEICOLO. Qualsiasi operazione che necessita di
attenzione prolungata deve essere effettuata solo dopo il
completo arresto del veicolo. Arrestare sempre il veicolo in
un luogo sicuro prima di effettuare queste operazioni. In
caso contrario si potrebbero causare incidenti.
TENERE IL VOLUME AD UN LIVELLO CHE PERMETTA
DI UDIRE I RUMORI ESTERNI DURANTE LA GUIDA.
Livelli eccessivi di volume, in grado di coprire suoni quali le
sirene dei mezzi di soccorso o segnali stradali di attenzione
(ad esempio, passaggi a livello, ecc.) possono essere
pericolosi e provocare incidenti. Inoltre, l’ascolto di audio
ad alto volume in auto può provocare danni all’udito.
WARNUNG!
Power supply voltage
Analog DSP processed output
Low level + High level input sensitivity range
Low Level Ground Reference
Autosense power-on
Remote control (optional)
GENERAL PRECAUTIONS
AVVERTENZA!
PRIMA DI QUALSIASI INTERVENTO DI
INSTALLAZIONE, MANUTENZIONE E
RIMOZIONE, SCOLLEGARE I
MORSETTI DI ALIMENTAZIONE DALLA
BATTERIA.
WARNUNG!
KLEMMEN SIE DIE BATTERIE VOR DEM
EINBAU, DER WARTUNG ODER DEM
AUSBAU AB.
WARNING!
DISCONNECT THE BATTERY LEADS BEFORE INSTALLATION,
MAINTENANCE OR REMOVAL.
-20 ~ 70°C
10 ~ 90%
ACHTUNG! WARNHINWEISE:
STELLEN SIE DEN GEBRAUCH IM FALLE EINER
STÖRUNG EIN. Die Nichteinhaltung kann zu einem
Schaden an dem Produkt führen. Für eine Reparatur
wenden Sie sich bitte an einen autorisierten
MOSCONI Fachhändler.
ZERLEGEN ODER MODIFIZIEREN SIE DAS PRODUKT
NICHT: Dies könnte zu Unfällen, Feuer oder elektrischen
Schocks führen. Jeglicher Umbau oder Modifikation des
Produkts hebt sämtliche Garantieansprüche sofort auf.
DER EINBA U SOWIE DIE VERKAB ELUNG D ES
PR OD UKT S S OL LTE VO N Q UAL IF IZI ER TEM
PERSONA L A USGEFÜHRT WERDEN. Beson deres
technisches Wissen und Erfahrung ist für den Einbau und
die Verkabelung dieses Produkts von Nöten. Um die
Sicherheit zu wahren, kontaktieren Sie immer einen
autorisierten Händler, der dieses Produkt fachgerecht
einbaut.
NICHT AN FEUCHTEN ODER STAUBIGEN PLÄTZEN
EINBAUEN. Vermeiden Sie den Einbau des Produkts
innerhalb übermäßig feuchten oder staubigen Orten. Das
eindringen von Feuchtigkeit oder Staub kann zu einem
Ausfall führen.
NICHT IN DER NÄHE VON HITZEEMPFINDLICHEN
FLÄCHEN EINBAUEN. Die Endstufe kann Temperaturen
bis zu 80 ˆC e rrei chen u nd d er K onta kt m it
hitzeempfindlichen Bereichen birgt eine Brandgefahr und
kann zu Schäden führen.
KEINE LEITUNGEN UND KABEL WÄHREND DES
BOHRENS VON LÖCHERN BESCHÄDIGEN. Wenn Sie
Löc her bohr en, v erm eiden Sie Besc hädigu ngen.
Be sond ers de n Ko ntak t m it: L eitu nge n, der
Kraftstoffleitung, dem Tank und elektrischen Kabeln. Die
Unterlassung dieser Vorsichtsmaßnahmen führt zu einer
Feuergefahr.
BLOCKIEREN SIE KEINE ENTLÜFTUNGS ÖFFNUNGEN
ODER HITZESENKENDE ELEMENTE. Das Blockieren
von Öffnungen oder hitzesenkenden Elementen kann die
Temperaturen innerhalb des Verstärkers erhöhen. Dies
kann zu Feuer führen.
BENUTZEN SIE DIESES PRODUKT AUSSCHLIEßLICH
IN FAHRZEUGEN MIT 12V STROMVERSORGUNG. Die
Benutzung des Produkts bei anderer Stromstärke als 12V
kann zu Feuer, elektrischen Schocks oder Unfällen führen.
KLEMMEN SIE DIE NEGATIVE BATTERIELEITUNG VOR
DEM ANSCHLUSS DES GERÄTS AB. Die Nichterfüllung
kann elektrische Schocks oder andere Beschädigungen
aufgrund eines Kurzschlusses hervorrufen.
STELLEN SIE SACHGEMÄßE VERKABELUNG SICHER.
Um Feuer und Schaden am Produkt zu vermeiden,
verwenden Sie passend starke Kabel und achten Sie auf
Polarität der Anschlüsse.
VERMEIDEN SIE EIN DURCHEINANDER VON KABELN
MIT FAHRZEUGT EILEN. St ellen Si e sachgem äße
Verkabelung laut Bedienungsanleitung sicher, so dass die
Kabel den eigentlichen Betrieb eines Fahrzeugs nicht
behindern. Kabel, die sich mit Lenkelementen, dem
Schalthebel, Pedalen etc. verwickeln können gefährlich
sein.
LEGEN SIE DIE KABEL SO AUS, DASS SIE NICHT
GE KR ÜM MT SIN D O DER V ON SC HA RF EN
METALLISCHEN KANTEN EINGEDRÜCKT WERDEN.
Um eine Beschädigung und eine Krümmung der Kabel zu
vermeiden, verlegen Sie die Kabel weit entfernt von
beweglichen Teilen (wie Sitzschienen) und von scharfen
und spitzigen Fahrzeugteilen. Falls die Kabel durch ein
Loch des Metalls gelegt werden, benutzen Sie einen
Gummiring, um zu gewährleisten, dass die Kabelisolation
nicht von einer scharfen Kante aufgeschnitten wird.
F Ü R E IN EN M AS SE AN SC HL US S N IE MA LS
SCHRAUBEN VERWENDEN, DIE ZUM LENK- ODER
BREMSSYSTEM GEHÖREN. NIEMALS Schrauben des
L en k- o d e r Br e ms sy s te ms ( o de r a nd er e r
Sicherheitssysteme) oder des Tanks verwenden, um einen
Masseanschluss herzustellen. Der Gebrauch einer dieser
Teile kann die Fähi gkei t, das A uto zu steu ern,
beeinträchtigen und Unfälle, Feuer oder anderen Schaden
hervorrufen.
NUTZEN SIE GERÄTESCHUTZSICHERUNGEN MIT
HI NRE ICH END ER AM PER E B ELAS TBA RKE IT.
Andererseits können Feuer und elektrische Schocks
auftreten.
BENUTZEN SIE EINWANDFREIE ZUBEHÖRTEILE UND
BEFOLGEN SIE DIE INSTALLATIONSANLEITUNG.
Be nutz en Sie au ssch ließl ich vo rsch rif tsmä ßige
Zubehörteile. Der Gebrauch anderer Komponenten kann
das Produkt beschädigen oder zu einem unsachgemäßen
Einbau führen. Komponenten könnten nicht s icher
verkabelt sein und eine Fehlfunktion oder Gefahr
darstellen.
GEBRAUCHEN SIE DAS PRODUKT NICHT SO, DASS
IHRE AUFMERKSAMKEIT VOM FAHREN ABGELENKT
IST. Jede Handlung, die kontinuierliche Aufmerksamkeit
verlangt, muss im stehenden Zustand des Fahrzeugs
vollzogen werden. Beim Ausführen solcher Handlungen
stoppen sie das Fahrzeug immer in einer sicheren Zone.
Nichteinhaltung kann Unfälle verursachen.
HALTEN SIE DIE LAUTSTÄRKE AUF EINEM SOLCHEN
LEVEL, DER IHNEN ERLAUBT, EXTERNE GERÄUSCHE
WÄHREND DES FAHRENS ZU HÖREN. Überhöhte
Lautstärkepegel, welche die Sirene von Notfallfahrzeugen,
das Geräusch von Eisenbahnen etc. übertönen, können
gefährlich sein und Unfälle verursachen. Außerdem kann
das sehr laute Musikhören innerhalb eines Fahrzeugs das
Gehör schädigen.
TECHNICAL SPECIFICATIONS
10 - 16V
Onboard fuse
Overall efficiency
Power output
1 x 30A
>80%
90Wx4 (or 85x2 + 230Wx1 or 230Wx1 + 230Wx1) @ 14.4V
BTL connection allowed only on CH1-2 and CH5-6 outputs
Output CH3-4 is a pure hard bypass of input CH3-4
4 x 2Vrms
analog input 4 x high level + 2 x high/low level (EXT2RCA adapter available)
2Vrms (LL) - 15Vrms (HL) by default
Input impedance >15k Ohm (LL) - 600 Ohm / ~22 Ohm (HL)
Full Floating / ~22 Ohm
Available by High Level, BTL source only
Digial input
Optical (Toslink)
CARD (MOS standard modules and Extended cards)
Onboard DSP
Onboard DAC
Onboard ADC
Onboard DAC
294.912 MHz - 64 bit
96Khz Sample Rate - 106dB S/N ratio
96kHz/24bit Sample Rate - 107dB S/N ratio
96kHz/24bit Sample Rate - 106dB S/N ratio
RTC
Dimensions
Weight
150x156x46mm
1.1Kg
WARNING! CAUTION:
IN CASE OF TROUBLE IMMEDIATELY DISCONTINUE
USE. Failure to comply may cause injury or damage the
product . For r epair plea se contact an aut horized
MOSCONI dealer.
DO NOT DISASSEMBLE OR MODIFY THE PRODUCT:
This action may result in accidents, fire or electric shock.
Any alteration or modification to the product immediately
voids any expressed or implied warranty.
THE INSTALLATION AND CONNECTION OF THE
PRODUCT SHOULD BE PERFORMED BY QUALIFIED
PERSONNEL. The installation and connection of the
product require specific technical back ground and
experience. . For safety reasons, always contact an
authorized dealer to install the product in a correct way.
DO NOT INSTALL IN AREAS PARTICULARY HUMID OR
DUSTY. Avoid installing the product in areas excessively
humid or dusty. Presence of humidity or dust inside the
product can cause malfunction.
DO NOT INSTAL L NE XT TO HEAT S ENSITIV E
SURFACES. The amplifier may reach temperatures in
excess of 80°C (176°F) and contact with heat sensitive
surfaces may cause a fire hazard and damage to the
surface.
WHILE DRILLING HOLES, DO NOT DAMAGE TUBING
AND CABLES. While drilling holes in your vehicle during
installation, pay close attention to avoid damaging,
blocking or contact with: tubing, the fuel lines, the fuel tank
and electrical cables. Failure to follow these precautions
will pose a fire hazard and damages.
DO NOT OBSTRUCT VENTS OR HEAT SINKING
PANELS. Blocking vents or heat sinking panels may cause
increased temperatures inside the amplifier. This may
cause a fire hazard.
USE THIS PRODUCT EXCLUSIVELY IN VEHICLES WITH
12V POWER. Using the product with electrical power other
than 12V may cause fires, electric shock or other accidents.
DISCONNECT THE NEGATIVE (GROUND) BATTERY
LEAD BEFORE CONNECTING THE PRODUCT. Failure to
do so may cause electric shock or other damage and injury
due to short circuit.
ENSURE PROPER CONNECTIONS. To avoid fire hazard
and damage to the product, use cables of proper gauge and
pay close attention to the polarity of the connections.
AVOID TANGLING THE CABLES TO VEHICLE PARTS.
Make proper connections by following the instructions so
that the cables do not interfere with proper vehicle
operation. Cables that tangle with steering components,
gear lever, brake pedals, etc may be dangerous.
LAY OUT THE CABLES TO ENSURE THAT THEY ARE
NOT BENT OR COMPRESSED BY SHARP METAL
EDGES. To avoid damaging or bending the cables, lay out
the cables far from moving parts (such as the seat rails) and
from sharp or pointy vehicle parts. If the cables are to pass
through a hole in a metal sheet, use a rubber ring to ensure
that the cable insulation won't be cut by any sharp edge.
TO ESTABLISH A GROUND CONNECTION DO NOT USE
BOLTS THAT BELONG TO THE STEERING OR BRAKING
SYSTEM. NEVER use bolts from the steering or braking
system (or any other safety system) or the fuel tank to
establish a ground connection. Using any of these parts
may impair your ability to control the vehicle and cause
accidents, fire or other damage.
USE FUSES WITH ADEQUATE AMP RATING. Otherwise
there may be fires or electric shock.
USE THE CORREC T A CCESSORY PARTS AN D
FOLLOW THE INSTALLATION INSTRUCTIONS. Be sure
to use only specified accessory parts. Using other
components may damage the product or result in improper
installation. Components may not be connected securely
and cause malfunction or danger.
DO NOT OPERATE THE PRODUCT IN WAYS THAT MAY
DISTRACT YOUR ATTENTION FROM DRIVING. Any
operation that requires continued attention must be done
when the vehicle is at full stop. Always stop the vehicle in a
safe area when performing such operations. Failure to do
so may cause accidents.
MAINTAIN THE VOLUME AT LEVELS THAT ALLOW
EXTERNAL NOISES TO BE AUDIBLE WHILE DRIVING.
Excessive volume levels, capable of blocking the sound of
emergency vehicles, rail crossings, etc, may be dangerous
and cause accidents. Furthermore, listening to audio at
high volume inside a vehicle may cause damage to your
hearing.
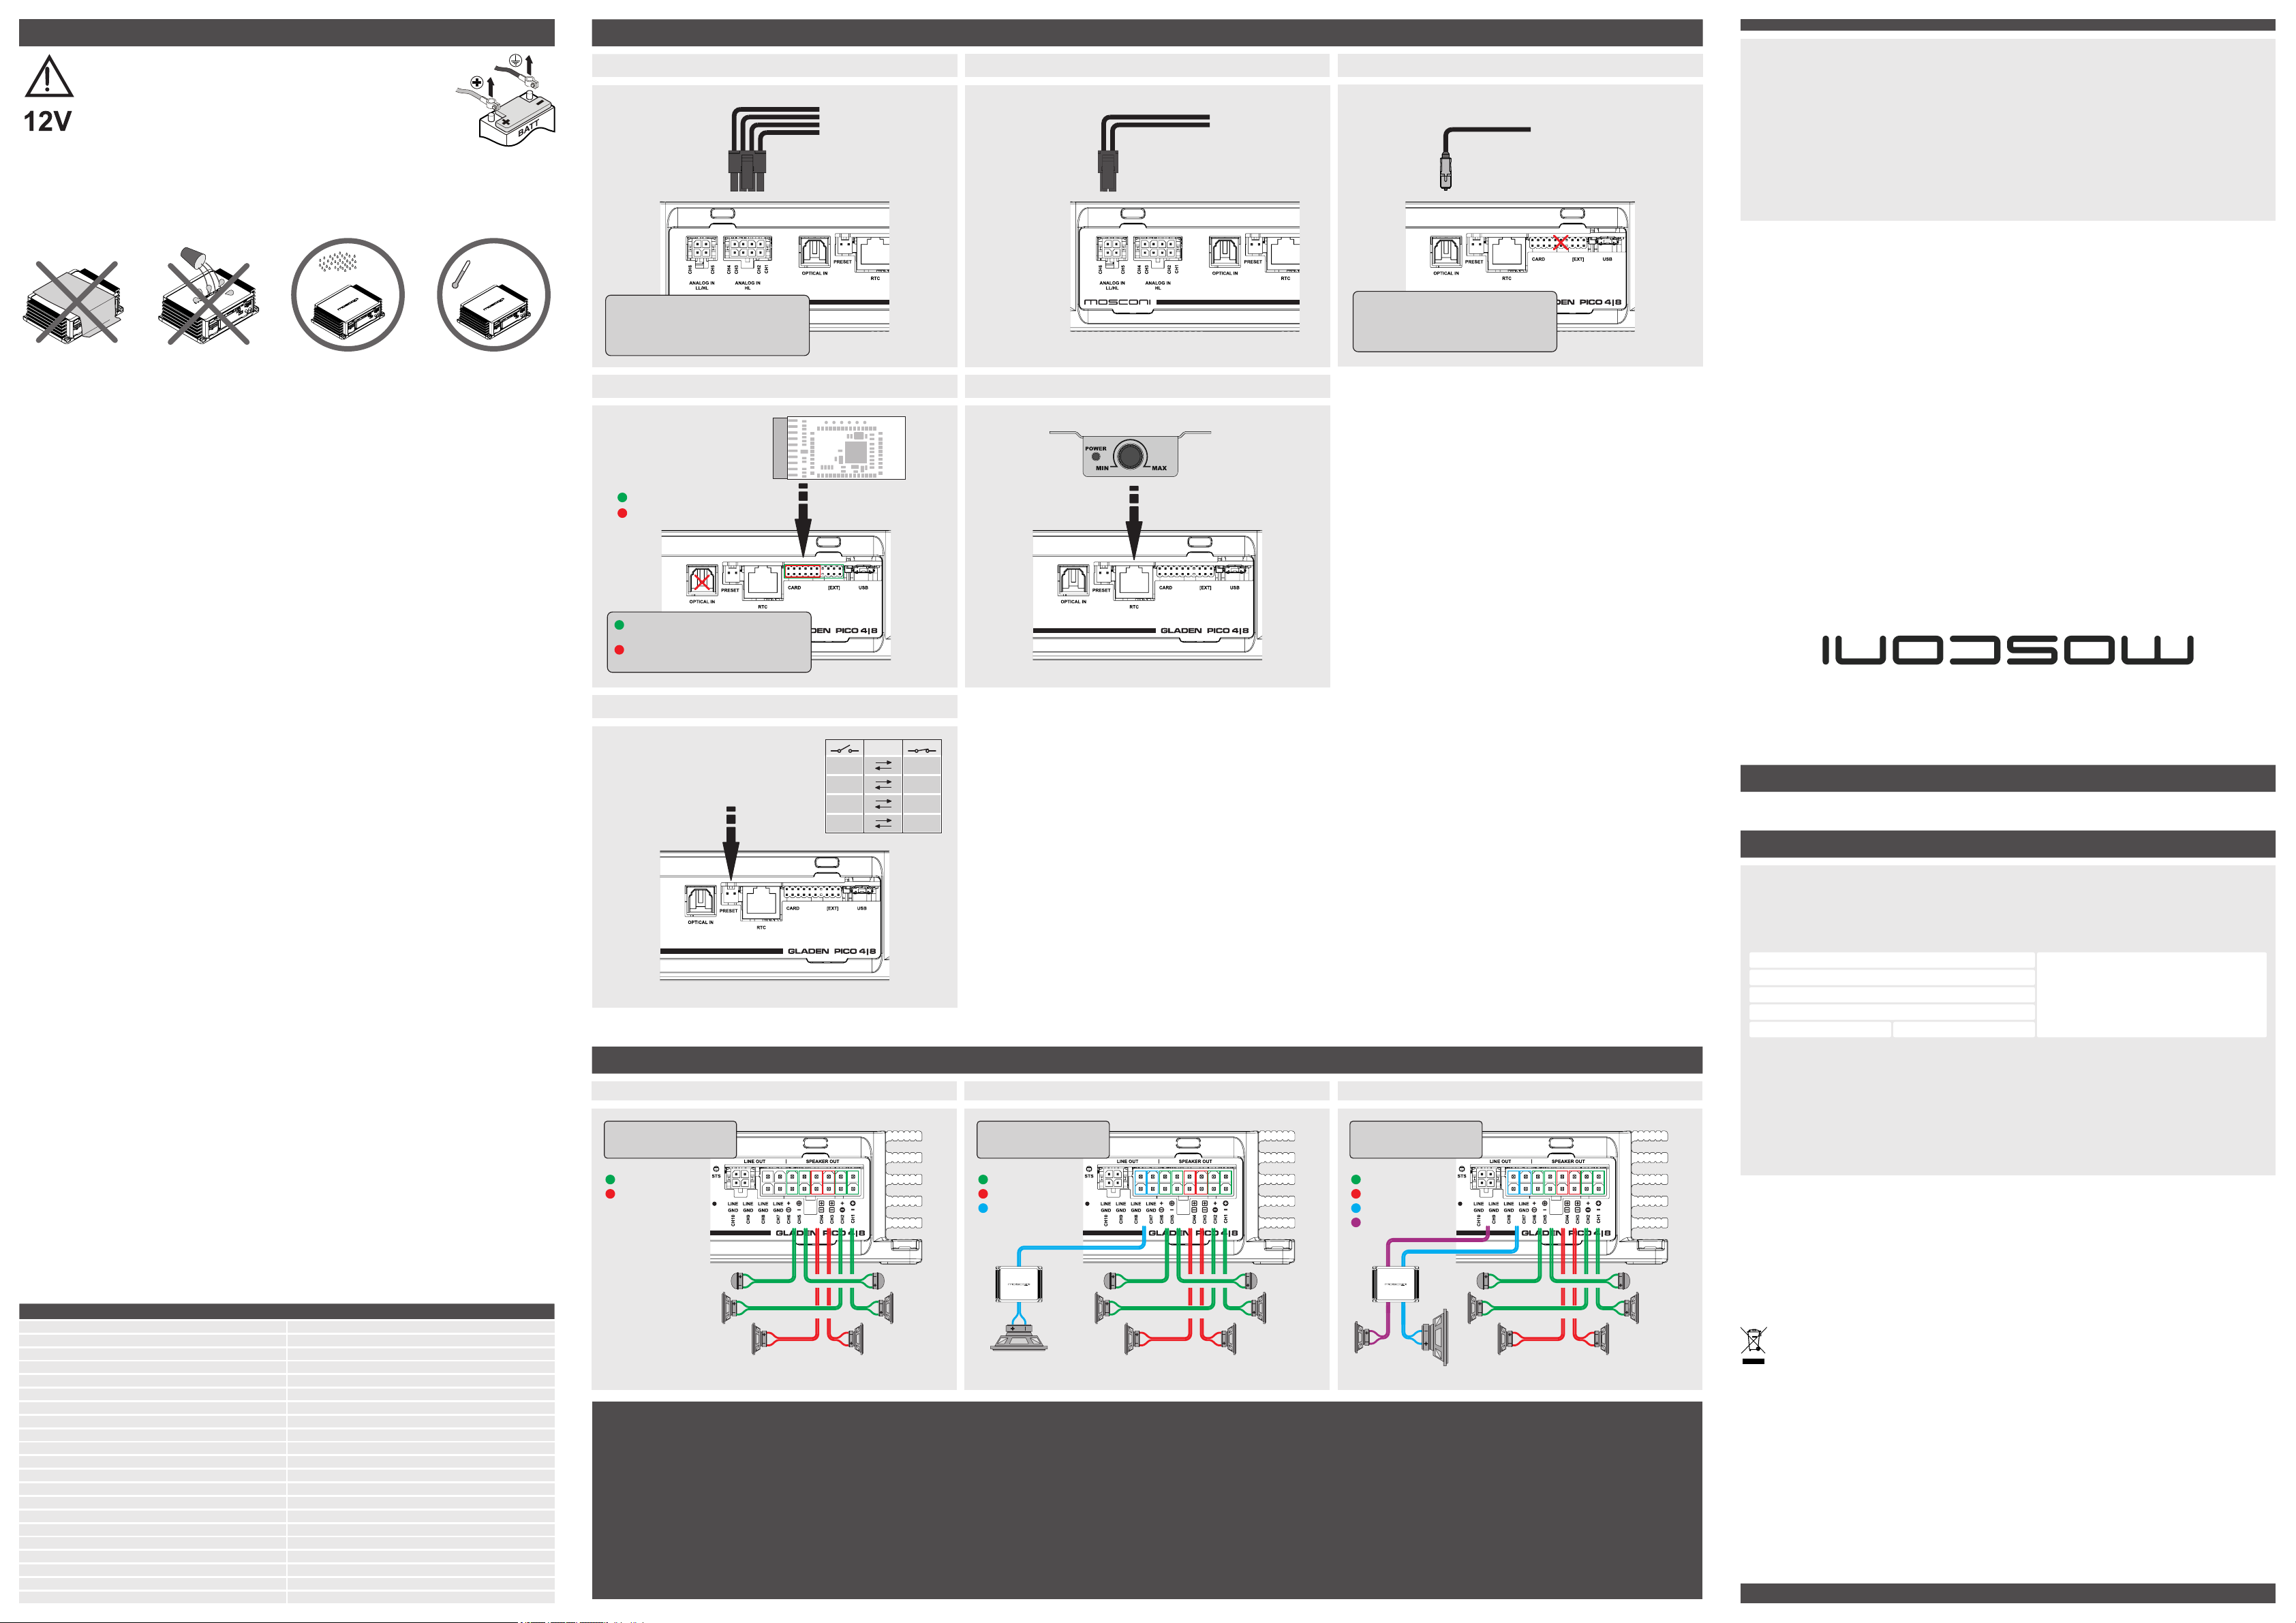
INPUT AND CONTROL CONNECTIONS
EXAMPLE: 2 STEREO HIGH LEVEL SIGNAL INPUT
CONNECTION
FROM SOURCE
SPEAKER OUTPUT
AUTOSENSE SETTING:
Enabled by default by internal jumper
REM connection NOT required
(available only on ANALOG IN CH1-4)
DIGITAL AUDIO STREAMING (e.g. BTS-LD4C)
LD4C
INSERT THE STREAMING
MODULE (optional)
IN YOUR AMPLIFIER
EXTENDED I2S MODULE (BTS-LD4C)
STANDARD SP-DIF MODULE (MOS-BTS)
EXTENDED modules must be enabled
by software (GUI)
STANDARD modules must be enabled
by internal jumper
201110
PRESET
Open pins on PRESET connector
Shorting pins by an external switch (or jumper),
don't sort any effect on preset setup.
will change PRESET accordingly to the
following diagram.
P1 P2
P2 P1
P3 P4
P4 P3
LINK
MODE
EXAMPLE: 1 STEREO LOW LEVEL SIGNAL INPUT
!! AUTOSENSE
DOESN'T WORK !!
it is only available with
high level signal input
on ANALOG IN CH1-4
Available the MOLEX-RCA
EXT2RCA adapter (optional)
REMOTE VOLUME CONTROL (RTC)
CONNECT THE
RTC (optional) TO THE
AMPLIFIER BY THE 5MT
INCLUDED CABLE
CONNECTION
FROM SOURCE
PRE-OUTPUT
OUTPUT CONNECTIONS
EXAMPLE 1 : 2 WAY FRONT + REAR
Output CH3-4 bypass
of high level input CH3-4
FRONT
REAR
MINIMUM ALLOWED IMPEDANCE: 3 OHM IN STEREO MODE
NOTA: il Mosconi GLADEN PICO 4|8 DSP è una amplificatore di potenza in Classe D ad alta efficienza.
Per loro natura intrinseca, gli amplificatori di Classe D sono inclini a produrre più inquinamento elettromagnetico rispetto ai tradizionali amplificatori analogici in
Classe AB. Per questo motivo, il processo di installazione deve essere curato esclusivamente da esperti.
Si raccomanda vivamente di contattare un tecnico professionista per installare questo dispositivo.
Impianti impropri o scarsa conoscenza delle buone norme di installazione, possono pregiudicare la qualità complessiva di tutto il sistema
HINWEIS: Mosconi GLADEN PICO 4|8 DSP ist ein Class D Hochleistungsvertärker.
Verglichen mit einem konventionellen analogen Class AB Verstärker, sind Class D Verstärker EMV konform zu installieren.
Aus diesem Grund muß die Installation von einem Experten durchgeführt werden.
Es wird dringend empfohlen, einen fachlich kompetenten Techniker mit der Installation dieses Gerätes zu beauftragen.
Unsachgemäße Installationen oder mangelnde Installationskenntnisse, können die Gesamtqualität des ganzen Systems beeinträchtigen.
NOTE: Mosconi GLADEN PICO 4|8 DSP is an high efficiency Class D power amplifier.
As per their intrinsic nature, Class D amplifiers are prone to produce more electromagnetic pollution when compared to conventional analog Class AB amplifiers.
For this reason, the installation process must be cared exclusively by experts.
It is strongly recommended to contact a professional technician to install this device.
Improper installations or poor knowledge of good installation rules, may prejudice the overall quality of the whole system.
Output CH3-4 bypass
of high level input CH3-4
FRONT
REAR
SUB
MINIMUM ALLOWED IMPEDANCE: 3 OHM IN STEREO MODE
EXAMPLE 2 : 2 WAY FRONT + REAR + SUB
EXAMPLE: OPTICAL INPUT
CONNECTION
FROM SOURCE
DIGITAL OUTPUT
OPTICAL IN:
Enabled by default by internal jumper
EXAMPLE 3 : 2 WAY FRONT + REAR + SUBWOOFER + CENTER
Output CH3-4 bypass
of high level input CH3-4
FRONT
REAR
SUB
CENTER
MINIMUM ALLOWED IMPEDANCE: 3 OHM IN STEREO MODE
Rev. 1.0 2021/06
OF THOSE INSTALLING AND USING THE PRODUCT.
CONTROLS AND FUNCTIONS OF THIS PRODUCT. FOLLOW ALL NOTICES TO ENSURE THE SAFETY
IMPORTANT: CAREFULLY READ THIS MANUAL TO FAMILIARIZE YOURSELF WITH ALL THE
PRODUKTS GEWÄHRLEISTET IST.
SIE ALLE HINWEISE, DAMIT DIE SICHERHEIT DER INSTALLATION UND DES GEBRAUCHS DES
DEN BEDIENTEILEN UND FUNKTIONEN DIESES PRODUKTS VERTRAUT ZU MACHEN. BEFOLGEN
WICHTIG: LESEN SIE DIESE GEBRAUCHSANLEITUNG GENAU DURCH, UM SICH SELBST MIT ALL
UTILIZZA IL PRODOTTO.
AFFINCHÉ POSSA ESSERE GARANTITA LA SICUREZZA DI CHI OPERA L’INSTALLAZIONE E DI CHI
CON TUTTI I CONTROLLI E LE FUNZIONI. E’ INDISPENSABILE OSSERVARNE TUTTE LE INDICAZIONI,
IMPORTANTE: LEGGETE ATTENTAMENTE QUESTO LIBRETTO D’USO AL FINE DI FAMILIARIZZARE
WARRANTY CARD
WARNINGS
OWNER’S MANUAL
GARANTIEKARTE
SICHERHEITSHINWEISSE
GEBRAUCHSANWEISUNG
GARANZIA
SICUREZZA
MANUALE D’USO
GLADEN AUDIO EUROPE
ITA - DEUT - ENG
GARANZIA - GARANTIEKARTE - WARRANTY
CONDIZIONI DI GARANZIA: RESTITUIRE, ASSIEME AL PRODOTTO DA RIPARARE, IL PRESENTE FOGLIO
COMPILATO IN TUTTE LE SUE PARTI CON ALLEGATO IL DOCUMENTO FISCALE D’ACQUISTO.
GARANTIEBEDINGUNGEN: DIE GARANTIEKARTE BITTE VOLLSTÄNDIG AUSGEFÜLLT ZUSAMMEN MIT EINER
FEHLERBESCHREIBUNG UND DER RECHNUNG EINSCHICKEN.
WARRANTY CONDITIONS: COMPLETE ALL SECTIONS AND RETURN THIS DOCUMENT ALONG WITH A) THE
PRODUCT TO REPAIR AND B) THE ORIGINAL DATED PURCHASE RECEIPT
Client
Address
e-mail & Phone
Model
MOSCONI s.r.l. garantisce i prodotti MOSCONI per 24 mesi dalla data di acquisto dichiarata nel presente riquadro e nel documento fiscale di acquisto (scontrino o fattura da allegare alla presente in caso di restituzione per riparazione al rivenditore). Il numero di matricola del presente certificato, deve corrispondere a quello stampigliato sull’apparecchio da riparare. MOSCONI s.r.l. non è responsabile di eventuali danni causati a persone che usano impropriamente i prodotti MOSCONl o a cose a questi collegate.
MOSCONI s.r.l. gewährt 24 Monate Garantie auf MOSCONI Produkte. Entscheident ist das Kaufdatum auf der Rechnung des autorisierten MOSCONI Fachhändlers. Die Seriennummer des Produkts muss mit der Seriennummer der abgestempelten Garantiekarte
übereinstimmen. MOSCONI s.r.l. übernimmt keinerlei Haftung bei unsachgemäßem Einbau und Gebrauch des Produkts.
MOSCONI s.r.l. extends a warranty to MOSCONI products for 24 months from the date of the original purchase as declared in the appropriate box and in the original purchase receipt. Enclose the dated purchase receipt when sending the product for return or repair
to the authorized dealer. The serial number of this certificate must correspond to the one stamped on the returned product.
MOSCONI s.r.l. is not responsible for damages or injury caused by improper installation or operation of the product.
MOSCONI s.r.l. si riserva il diritto di apportare modifiche o miglioramenti ai prodotti illustrati senza alcun preavviso. La disponibilità
dei prodotti illustrati può essere sottoposta a variazioni. I prodotti presenti su questo MANUALE D’USO rappresentano solo una
parte dei prodotti MOSCONI. Tutti i marchi eventualmente citati sono stati utilizzati esclusivamente a scopo descrittivo ed ogni
diritto appartiene ai relativi proprietari. La riproduzione totale o parziale di questo MANUALE D’USO è vietata.
MOSCONI s.r.l. hält sich jeder Art von Änderungen oder Verbesserung ohne Ankündigung vor. Die Verfügbarkeit der gezeigten
Produkte kann variieren. Alle Produkte, die in dieser Anleitung beschieben sind, sind ein Teil von MOSCONI. Alle Markenrechte
gehören dem Eigentümer MOSCONI. Ein total oder auch auszugsweiser Nachdruck ist nicht erlaubt.
MOSCONI s.r.l. reserves the right to modify or improve the products described here without notice. The availability of the displayed
products may vary. Products described in this MANUAL are a portion of all MOSCONI products. All trademarks mentioned are used
for descriptive purposes and all rights are reserved by their respective owners. The total or partial reproduction of this MANUAL is
prohibited.
Informazioni sullo smaltimento delle vecchie apparecchiature elettriche ed elettroniche
(valido per i paesi che hanno adottato sistemi di raccolta differenziata) Il simbolo (cassonetto su ruote barrato) riportato sul
prodotto o sulla confezione indica che il prodotto non può essere smaltito come normale rifiuto domestico. Vecchie
apparecchiature elettriche ed elettroniche devono essere riciclate presso strutture adeguate. Contattare le autorità locali
per i dettagli nel localizzare l’impianto di riciclo più vicino a voi. Il corretto riciclaggio e smaltimento dei rifiuti contribuirà a
conservare le risorse naturali e a prevenire effetti nocivi all’ambiente e alla nostra salute. Questo prodotto può essere
smaltito insieme alla vettura usata, in questo caso non rimuoverlo dall’automobile.
Entsorgung von gebrauchten elektrischen und elektronischen Geräten
(anzuwenden in Ländern mit einem separaten Sammelsystem für solche Geräte) Das Symbol (durchgestrichene
Mülltonne) auf dem Produkt oder seiner Verpackung weist darauf hin, dass dieses Produkt nicht als normaler
Haushaltsabfall behandelt werden darf, sondern an einer Annahmestelle für das Recycling von elektrischen und
elektronischen Geräten abgegeben werden muss. Durch Ihren Beitrag zur korrekten Entsorgung dieses Produktes
schützen Sie die Umwelt und die Gesundheit Ihrer Mitmenschen. Unsachgemässe oder falsche Entsorgung gefährden
Umwelt und Gesundheit. Weitere Informationen über das Recycling dieses Produktes erhalten Sie von Ihrer Gemeinde
oder den kommunalen Entsorgungsbetrieben. Dieses Produkt kann auch gemeinsam mit dem verwendeten Fahrzeug
entsorgt werden, eine Demontage ist in diesem Fall nicht notwendig.
Information on disposal of old electrical and electronic equipment
(applicable for countries that have adopted separate waste collection systems) The symbol (crossed-out wheeled bin)
shown on the product or on its packaging indicates that this product cannot be disposed of as household waste. Old
electrical and electronic equipment should be recycled at a special waste facility. Contact your local authority for details in
locating a recycle facility nearest to you. Proper recycling and waste disposal will help conserve resources whilst
preventing detrimental effects on our health and the environment. This product can be disposed of with the used car
together, in this case don't remove it from the car.
Designed and Manufactured in Italy by MOSCONI s.r.l. - via la Villa 28 zona artigianale Ghilardino 61034 Fossombrone, PU
S.N.
www.mosconi-system.it - www.mosconi.org
Autorized Dealer
GLADEN PICO 4|8 DSP
Page 2
AVVERTENZA!
IL PRODOTTO È COSTRUITO
PER OPERARE
ESCLUSIVAMENTE
ALL’INTERNO DI AUTOVEICOLI
ALIMENTATI A 12 VOLT DC.
WARNUNG!
ENDSTUFE NUR IN FAHRZEUGEN MIT 12
VOLT.
WARNING!
USE ONLY IN VEHICLES WITH A 12 VOLT
NEGATIVE GROUND.
ATTENZIONE!
Usare cavi di alimentazione di sezione
adeguata alla corrente che vi transita ed
alla lunghezza del collegamento. La
tabella qui riportata indica la sezione
minima da utilizzare per operare in
sicurezza.
E’ buona regola usare sempre cavi di
sezione più grande possibile.
ACHTUNG!
Benutzen Sie Stromkabel mit einer Dicke,
die der momentanen Beanspruchung und
der länge des Kabels entspricht. Die
Tabelle in dieser Anleitung geben die
minimale Dicke für einen sicheren Gebrauch an.
Sofern möglich, immer die größte vorhandene Dicke
verwenden.
ATTENTION!
Use power cables with a gauge that is appropriate to the current load and to the length of the cable. The table in this
manual indicates the minimum gauge for safe use. Whenever possible, use the largest gauge available.
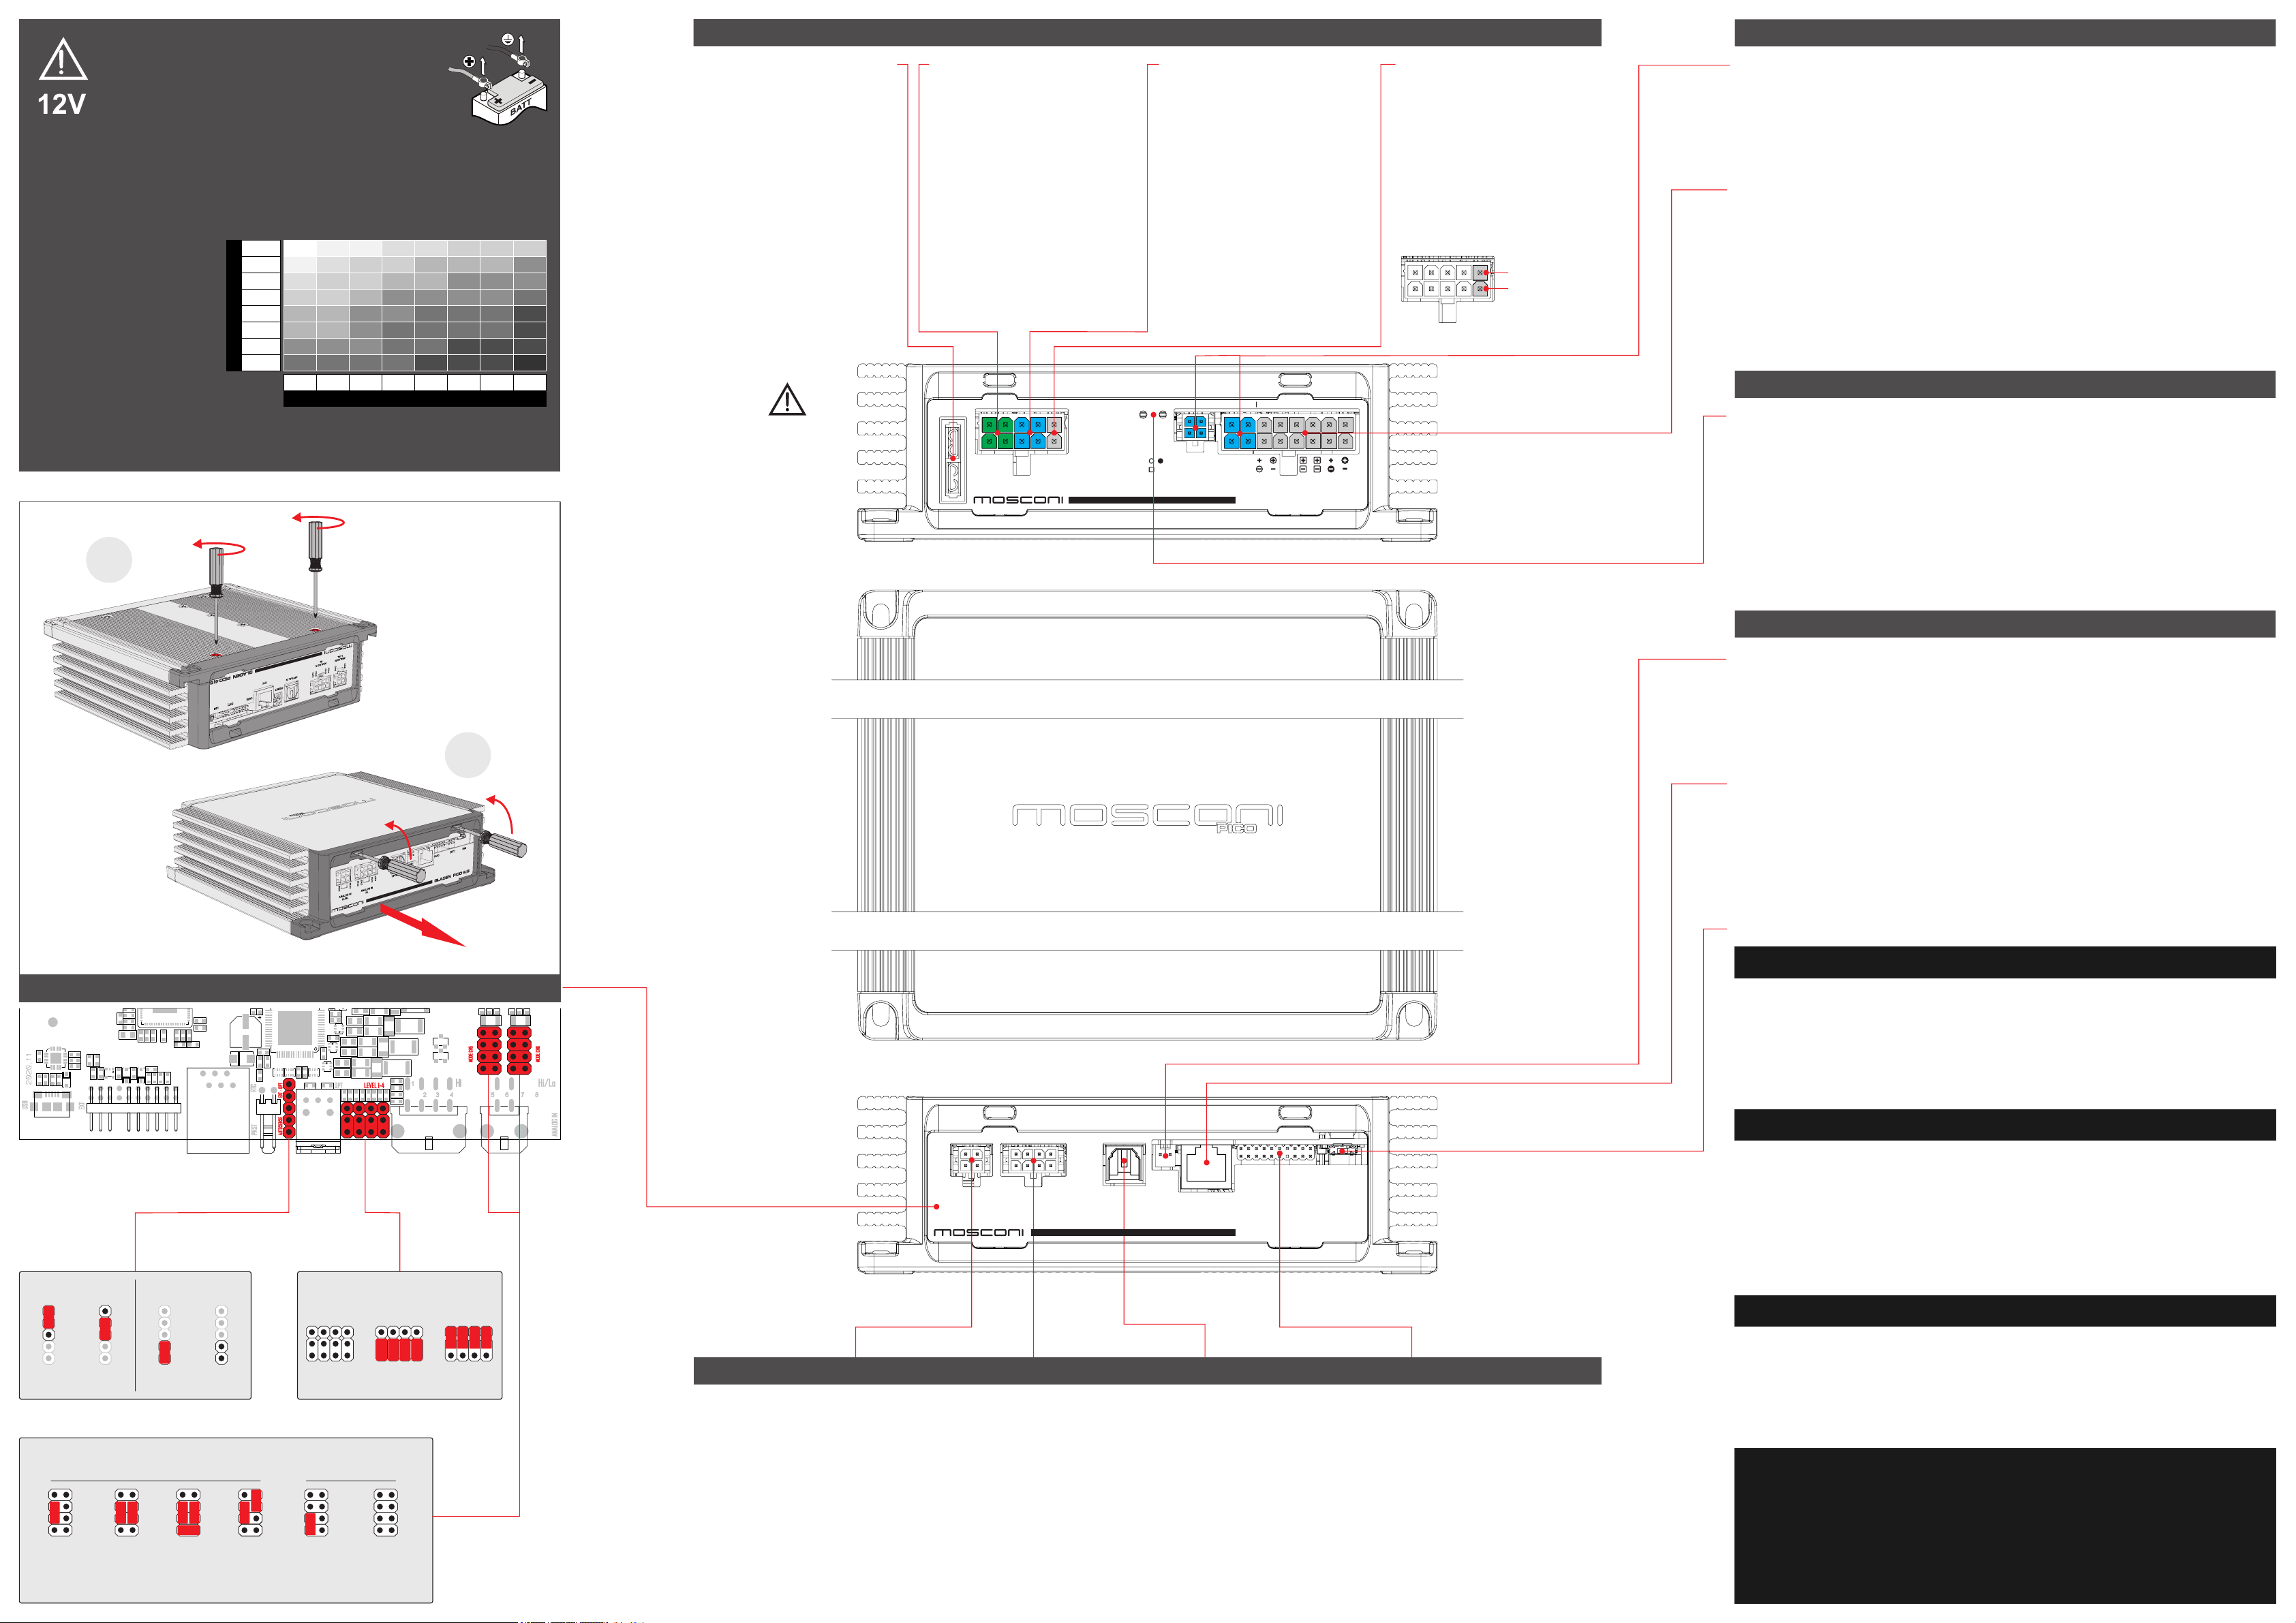
BETREIBEN SIE DIE
0-20
20-35
35-50
50-65
65-85
CURRENT (A)
85-105
105-125
125-150
AVVERTENZA!
PRIMA DI QUALSIASI INTERVENTO
DI MONTAGGIO,
MANUTENZIONE E
SMONTAGGIO, SCOLLEGARE I
MORSETTI DI ALIMENTAZIONE
DALLA BATTERIA.
WARNUNG!
KLEMMEN SIE DIE BATTERIE VOR
DEM EINBAU, DER WARTUNG ODER DEM AUSBAU AB.
WARNING!
DISCONNECT THE BATTERY LEADS BEFORE
INSTALLATION, MAINTENANCE OR REMOVAL.
MIN. SECTION (AWG/mm )
14/2 12/4
12/4 10/6
10/6
8/9 8/9
8/9 8/9
6/14
6/14
6/14
6/14
2/34 2/34 2/34
0-1.2 1.2-2.1 2.1-3.1 3.1-4.0 4.0-4.9 4.9-5.8 5.8-6.7
10/6 10/612/4 8/9 8/9 8/9
8/9 8/9
6/14
6/146/14
6/14
4/21
4/21 4/21 4/21
4/21
4/21
2/34 2/34 2/34
4/21
2/34 2/34
4/214/214/21
2/34 2/34
2/34
0/54 0/54
LENGTH (m.)
2
6/14 6/14
4/21 4/21
2/34 2/34
0/54
0/54 0/54
0/54
6.7-8.5
1
4/21
4/21
2/34
0/54
0/54
Procedere alla sostituzione del fusibile
assicurandosi che la sorgente sia spenta e
Togliere il fusibile bruciato e sostituirlo con uno
dello stesso tipo e di pari portata (stessa
Vor dem Austausch der Sicherung muss
das Radio abgeschaltet und die Batterie
Entfernen Sie die durchgebrannte Sicherung
und ersetzen Sie diese mit dem gleichen
Modell und der gleichen Belastbarkeit.
Before replacing the fuse, power off the
audio source and then disconnect the
Remove the blown fuse and replace it with the
same model and rating (same maximum amp)
la batteria scollegata.
abgeklemmt werden.
FUSIBILE
corrente massima).
SICHERUNG
FUSE
battery.
12V
POWER SUPPLY
POSITIVO DI ALIMENTAZIONE
Collegare saldamente il cavo al polo Positivo
della batteria utilizzando un cavo il più corto
possibile e opportunamente terminato.
Si consiglia l’utilizzo di un fusibile esterno il più
vicino possibile alla batteria
12V (PLUS) ANSCHLUSS
Verbinden Sie den Plusanschluss der Endstufe
mit dem Pluspol der Fahrzeugbatterie.
Verwenden Sie hierfür ein möglichst kurzes
Kabel mit ausreichendem Querschnitt.
Achtung! Benützen Sie unbedingt eine externe
Sicherung (optional) mit ausreichender
Kapazität (entsprechend dem
Kabelquerschnitt) und befestigen Sie diese so
nah wie möglich am Pluspol der
Fahrzeugbatterie.
POSITIVE POWER CONNECTION
Securely Connect the wire to the positive lead
of the battery. Use the shortest possible cable
with the proper terminal. We recommend using
an external fuse as close as possible to the
battery.
30A
FUSE
+BATT
POWER
SUPPLY
GND
REM IN
REM OUT
INPUT BYPASS
NEGATIVO DI ALIMENTAZIONE
Collegare saldamente il cavo ad un punto
metallico della vettura ripulito da residui,
utilizzando un cavo il più corto possibile e
opportunamente terminato.
MASSE (MINUS) ANSCHLUSS
Verbinden Sie den Minusanschluss der
Endstufe mit der Fahrzeugkarosserie. Darauf
achten dass die Kontaktfläche sauber, trocken
und unlackiert ist! Benützen Sie möglichst ein
kurzes Verbindungskabel
NEGATIVE POWER CONNETION
Securely connect the wire to a metallic part of
the frame or chassis of the vehicle. Strip the
paint and debris, and use the shortest possible
cable with the proper terminal.
LINE OUT
STS
FLT
LINELINE
LINE
LINEBTL
GND GND
CH10
CH9
GND
GND
CH8
CH7
CH6
SPEAKER OUT
CH5
GLADEN
CH1
CH2
CH3
CH4
PICO 4|8
ACCENSIONE REMOTA
Collegare il segnale di accensione remota al
cavo REM-IN
Prelevare dal cavo REM-OUT il segnale per
accendere altri dispositivi
VERSTÄRKER REMOTE
Verbinden Sie den Remote Ausgang Ihres
Autoradios mit der REM-IN Leitung.
Benutzen Sie die REM-OUT Leitung um
weitere Geräte einzuschalten.
REMOTE TURN-ON
Connect the remote power-on signal to the
REM-IN cable
Take the signal from the REM-OUT cable to
turn on other devices
IN (RED WIRE)
OUT (BLUE WIRE)
OUTPUT
USCITE PREAMPLIFICATE E PROCESSATE
Collegare i canali CH7-10 ad un amplificatore esterno
PROZESSIERTE AUSGÄNGE
Verbinden Sie Kanal 7-10 mit einem externen Verstärker.
PROCESSED PREOUTS
Connect the CH7-10 channels to an external amplifier
USCITE AGLI ALTOPARLANTI
Collegare i cavi delle uscite CH1-6 agli altoparlanti
Collegamento BTL consentito solo sulle uscite CH1-2 e CH5-6
Le uscite CH3-4 sono un bypass degli ingressi CH3-4
LAUTSPRECHERAUSGÄNGE
Verbinden Sie die CH1-6 Leitungen mit den Lautsprechern
Brückenbetrieb ist nur an Kanal 1-2 und 5-6 erlaubt.
Die Ausgänge CH3-4 sind ein Bypass der Eingänge CH3-4
SPEAKER CONNECTION
Connect the CH1-6 output cables to the speakers
BTL connection allowed only on CH1-2 and CH5-6 outputs
CH3-4 outputs are a bypass of CH3-4 inputs
SIGNAL LIGHTS
STATUS LED (STS)
Fast flashing 7x - Startup
Off - Normal operation
Slow flashing - Shutdown
On - Autofade Option locked
Short flashing - Receive from BT, USB or RCD
Very fast flashing + WARN LED on + FAULT LED on - Upload firmware or upload flow
FAULT LED (FLT)
Off - Normal operation
On - RTA measuring active
Slow flashing - Load <2 Ohm on any channel
Fast flashing - TAS fault trace active (Hardware fault, overtemp. shutdown, overcurrent shutdown, overvoltage shutdown,
____________undervoltage shutdown, DC fault on output 5/6)
JUMPER SETTINGS
2
CONTROLS
PRESET
Collegare uno switch o utilizzare un jumper per selezionare un preset diverso da quello impostato via software
PRESET
Verwenden Sie einen Schalter oder Jumper zum Umschalten des aktiven Presets
PRESET
Connect a switch or use a jumper to select a different preset than the one set by software
CONTROLLO REMOTO - RTC (opzionale)
Collegare il terminale del controllo remoto al connettore dell’amplificatore
PEGELFERNBEDIENUNG - RTC:
Verbinden Sie die Leitung der Pegelfernbedienung mit dieser Buchse
REMOTE CONTROL - RTC (optional)
Connect the remote control terminal to this connector
SOFTWARE DOWNLOAD
Potrai trovare la versione più recente del software direttamente su www.gladen-audio.com/DSP/download/ se non hai la
possibilità di fare il download, ti preghiamo di rivolgerti al rivenditore
Requisiti di sistema: Windows Vista,7,8 o 10 (32 e 64 bit).
Cliccare su “setup.exe” e installare il programma con relativa icona sul desktop (Mosconi DSP).
Per favore osservare l'ordine dei prossimi passi:
Avviare il programma con un doppio click sull'icona. Accendere il PICO 4|8 DSP e collegarlo al PC attraverso il cavo USB.
La connessione avverrà dopo circa 60 secondi. Ora decidere se trasferire i dati dal DSP al PC o viceversa.
il Menu contiene anche un filmato (formato Mp4, è presente anche Adobe Quicktime che potrebbe essere richiesto).
Per chiudere, terminare il programma e disconnettere il cavo USB dal DSP, quindi dal PC. Tutte le modifiche verranno salvate
automaticamente.
DIGITAL INPUT AUTOSENSE
OPTICAL
(Default)
CARD
ON
(Default)
INPUT 5-6 SENSITIVITY
HIGH LEVEL
BALLAST
1:1 6:1
BALLAST
(default)
6 : 1
class SB
class SB
headunit
WARNING: any other jumper configuration is NOT allowed
Bitte laden Sie sich die neueste Softwareversion von www.gladen-audio.com/DSP/download/
herunter. Sollten Sie keine Möglichkeit dazu haben, kontaktieren Sie bitte IhrenFachhändler.
Systemvoraussetzung: Windows Vista, 7, 8 oder 10 (32 und 64 bit).
INPUT 1-4 SENSITIVITY
(HIGH LEVEL INPUT ONLY)
CH6
ANALOG IN
LL/HL
CH5
CH3
CH4
ANALOG IN
PRESET
CH1
CH2
HL
OPTICAL IN
CARD [EXT]
RTC
GLADEN
USB
PICO 4|8
Nach dem Ausführen der "setup.exe" Datei wird das Programm automatisch installiert und ein Icon MOSCONI DSP auf dem
Desktop angezeigt.
Bitte die Reihenfolge der nächsten Schritte beachten!
Starten Sie das Programm durch einen Doppelklick auf das Icon. Schalten Sie den PICO 4|8 DSP und verbinden Sie es über
das USB-Kabel mit dem PC. Innerhalb 60 sec. wird automatisch eine Verbindung hergestellt. Entscheiden Sie nun, ob Sie die
Daten aus dem DSP zum PC oder vom PC zum DSP kopieren möchten. Innerhalb des Programms befindet sich eine
Videoanleitung (MP4 Format) die Sie durch das Programm führt (eventuell wird Adobe Quicktime benötigt). Zum Beenden
schließen Sie das Programm und trennen Sie die Verbindung zwischen DSP und PC. Die Einstellungen werden automatisch
gespeichert.
To get the latest software version please download on www.gladen-audio.com/DSP/download/
If you don't have the download possibility, please contact your dealer.
System requirements: Windows Vista, 7, 8 or 10 (32 and 64 bit).
After starting the "setup.exe",the program will install automatically and place an icon (MOSCONI DSP) on the desktop.
OFF
15Vrms
(Default)
30Vrms
LOW LEVEL
6 : 1
BALLAST
BALLAST
11:1
11 : 1
REF.
GND ref. floating6:1
class SB
headunit
INGRESSI ANALOGICI (alto/basso livello)
Collegare i cavi IN5 e IN6 ai segnali audio
In alternativa utilizzare l’adattatore MOLEX-
ANALOGE EINGÄNGE (high/low level)
Verbinden Sie IN5 und IN6 mit den analogen
Alternativ, benutzen Sie den MOLEX-RCA
ANALOG INPUTS (high/low level)
Connect the IN5 and IN6 cables to the analog
Alternatively, use the MOLEX-RCA EXT2RCA
analogici della sorgente
RCA EXT2RCA (optional)
Ausgängen Ihrer Quelle.
EXT2RCA Adapter (optional)
audio signals of the source
adapter (optional)
INGRESSI ANALOGICI (solo alto livello)
Collegare i cavi IN1, IN2, IN3 e IN4 ai segnali
audio analogici della sorgente
ANALOGE EINGÄNGE (Nur high Level)
Verbinden Sie IN1, IN2, IN3 und IN4 mit den
analogen Ausgängen Ihrer Quelle.
ANALOG INPUTS (high level only)
Connect the IN1, IN2, IN3 and IN4 cables to the
analog audio signals of the source
INPUT
INGRESSO OTTICO
Utilizzare un cavo audio digitale in fibra ottica
compatibile SPDIF con interfaccia Toslink
OPTISCHER EINGANG
Benutzen Sie ein SPDIF kompatibles
Glasfaserkabel mit Toslink-Stecker
OPTICAL INPUT
Use an SPDIF compatible optical fiber digital
audio cable with a Toslink interface
CARD
Compatibile con tutti i moduli standard
MOSCONI (MOS-BTM e MOS-BT S) e con
moduli estesi (EXT4HL, M OS-B TS+, ecc...)
CARD
Kompatibel mit allen MOSCONI
Standardmodulen (MOS-BTM und MOS-BTS)
und erweiterten Modulen (EX T4HL, MOS-
BTS+, usw...)
CARD
Compatible with all standard MOSCONI
modules (MOS-BTM and MOS-BTS) and with
extended modules (EXT4HL, M OS-B TS+,
etc...)
Please note the order of the next steps!
Start the program by double-clicking the icon.Turn on the PICO 4|8 DSP and connect it to the PC via the USB cable.
Within 60 seconds it will connect automatically. Now decide whether you want to copy the data from the DSP to the PC or PC to
the DSP. The menu contains a video tutorial (MP4 format) (Adobe may need QuickTime).
To exit, close the program and close the connection between the DSP and PC. The settings are saved automatically.
Importante: Sovrapponendo forti equalizzazioni in ingresso e/o uscita con valori molto alti di "Q" nel crossover è facile
portare in saturazione (clipping) il segnale e, conseguentemente, sovraccaricare gli altoparlanti. Si prega di controllare
sempre i LED rossi di clipping dopo ogni settaggio. Si raccomanda il massimo scrupolo e attenzione quando si impostano i
valori dei vari settaggi per evitare qualsiasi danneggiamento al prodotto e alla salute.
Wichtig: Durch das Überlagern von Equalizerbändern, sowie beim Einpegeln des Input- oder/und Output-Signals, sehr
hohen variablen Q- Faktoren bei den Frequenzweichenfiltern, kann die Gesamtverstärkung des DSP ein Clipping
verursachen, welches die Lautsprecher überlasten kann. Bitte beachten Sie immer die ST clipping LED und unterlassen Sie
es, solche nicht praxisgerechten Einstellungen unnötigerweise zu provozieren.
Important: By overlaying equalization in the input and/or output and very high variable Q-factors in the crossover filters it is
easy to cause very high clipping gains, which can overload a speaker. Please consider always the ST warning clipping LED
at the every stage. Practical attitudes are needed when setting up, otherwise damage will be caused.
 Loading...