

Page 1
GLADIATOR
Page 2

Sicherheitshinweise Safety instructions
Bitte lesen Sie alle Hinweise und Warnungen in dieser Anleitung.
Diese informieren Sie nicht nur über mögliche Schäden oder Beschädigungen, sondern auch über mögliche
Funktionen und Einstellungen.
Unsere Produkte sind nur für Anwender mit dem erforderlichen Fachwissen geeignet. Die einschlägigen
Sicherheitsbestimmungen über tragende Karosserieteile, Vorschriften über die innere Fahrzeugsicherheit
(StVZO/TÜV), sowie die Vorschriften der zuständigen Fahrzeughersteller (ABE) sind zwingend zu beachten.
Hörschäden: Anhaltende, übermäßige Lautstärken von über 85 dB können das Hörvermögen auf Dauer
beeinträchtigen. Audioanlagen sind in der Lage Lautstärken mit über 85 dB zu erzeugen.
Lautstärke und Wahrnehmung: Der Gebrauch von Audioanlagen kann das Hören von wichtigen
Geräuschen und Signalen im Verkehr behindern und dadurch während der Fahrt zu Gefahren führen.
GLADEN übernimmt keine Verantwortung für Gehörschäden, körperliche Schäden oder Sachschäden, die
aus dem Gebrauch oder Missbrauch seiner Produkte entstehen.
Arbeiten an Fahrzeugen: Nehmen Sie Fahrzeuge nicht in Betrieb, bevor alle nachgerüsteten Komponenten
(Gehäuse, Lautsprecher, Verstärker, DSP, …) fest und sicher verbaut sind. Lose Teile können im Falle eines
plötzlichen Fahrmanövers oder eines Unfalls zu gefährlichen (fliegenden) Geschossen werden. Bohren oder
schrauben Sie nicht in Fahrzeugverkleidungen oder Bleche, bevor Sie sich versichert haben, dass darunter
keine wichtigen Teile, Kabel oder Leitungen sind. Achten Sie schon bei der Anlagenplanung auf Dinge wie
Benzin-, Brems-, Ölleitungen und elektrische Kabel als Montagevorbereitung. Trennen Sie vor Beginn der
Montage den Massepol (-) von der Fahrzeugbatterie (Zusatzbatterien), um eventuelle Kurzschlüsse zu
vermeiden. Sollen zur Montage der Lautsprecher oder Verstärker Karosseriebleche bearbeitet oder
entfernt werden, nehmen Sie Kontakt mit einer entsprechenden Fachwerkstatt auf. Bei Beschädigungen
tragender Karosserieteile kann die Betriebserlaubnis erlöschen! Vorsicht beim Entfernen von
Innenverkleidungen. Die Fahrzeughersteller verwenden verschiedenste Befestigungselemente (Klipse,
Schraube, Nieten, …), welche bei der Demontage beschädigt werden können oder auch beschädigen
können (Dellen oder Kratzer auf Oberflächen (u.a. Bleche Rostgefahr)).
Strom Gefahr! Berühren Sie NICHT die Anschlüsse des Verstärkers oder der Lautsprecher während des
Betriebes!
Elektro und Hybrid Fahrzeuge! Hier besteht Lebensgefahr! Nehmen Sie selber keinerlei Arbeiten an der
Elektrik vor!
Entsorgung von gebrauchten elektrischen und elektronischen Geräten (anzuwenden in Ländern mit einem
separaten Sammelsystem für solche Geräte): Das Symbol (durchgestrichene Mülltonne) auf dem Produkt
oder seiner Verpackung weist darauf hin, dass dieses Produkt nicht als normaler Haushaltsabfall behandelt
werden darf, sondern an einer Annahmestelle für das Recycling von elektrischen und elektronischen
Geräten abgegeben werden muss. Durch Ihren Beitrag zur korrekten Entsorgung dieses Produktes
schützen Sie die Umwelt und die Gesundheit Ihrer Mitmenschen. Unsachgemäße oder falsche Entsorgung
gefährden Umwelt und Gesundheit. Weitere Informationen über das Recycling dieses Produktes erhalten
Sie von Ihrer Gemeinde oder den kommunalen Entsorgungsbetrieben. Dieses Produkt kann auch
gemeinsam mit dem verwendeten Fahrzeug entsorgt werden, eine Demontage ist in diesem Fall nicht
notwendig.
Please read all notes and warnings in this manual.
These will not only inform you about possible damage or injury, but also about possible functions and settings.
Our products are only suitable for users with the necessary specialist knowledge. The relevant safety regulations
for load-bearing body parts, regulations on internal vehicle safety, as well as the regulations of the responsible
vehicle manufacturers (general operating licence) must be observed.
Hearing damage: Sustained, excessive volume levels of over 85 dB can permanently impair hearing. Stereo
systems are capable of producing sound pressure level of over 85 dB.
Sound level and perception: The use of stereo systems can impede the hearing of important sounds and signals
in traffic and thus lead to hazards while driving. GLADEN assumes no responsibility for hearing damage, physical
injury or property damage resulting from the use or misuse of its products.
Working on vehicles: Do not operate vehicles until all retrofitted components (speaker boxes, speakers, amplifier,
DSP, ...) are securely installed. Loose parts can become dangerous (flying) projectiles in the event of a sudden
driving maneuver or an accident. Do not drill or screw into vehicle panels or sheet metal until you are sure that
there are no important parts, cables or lines underneath. Pay attention to things like fuel, brake, oil lines and
electrical cables as preparation for installation when planning the system. Disconnect the earth terminal (-) from
the vehicle battery (auxiliary batteries) before starting installation to avoid possible short circuits. If body panels
are to be machined or removed for mounting the speakers or amplifiers, contact an appropriate specialist
workshop. In the event of damage to load-bearing bodywork parts, the operating permit may be invalidated! Be
careful when removing interior panels. The vehicle manufacturers use a wide variety of fastening elements (clips,
screws, rivets, ...) which can be damaged or may be damaged during dismantling (dents or scratches on surfaces
(e.g. metal sheets may rust)).
Electricity danger! DO NOT touch the connections of the amplifier or the speakers during operation!
Electric and hybrid vehicles! There is danger to life! Do not any work on the electrical system by yourself!
Information on disposal of old electrical and electronic equipment (applicable for countries that have adopted
separate waste collection systems): Products with the symbol (crossed-out wheeled bin) cannot be disposed of
as household waste. Old electrical and electronic equipment should be recycled at a special waste facility.
Contact your local authority for details in locating a recycle facility nearest to you. Proper recycling and waste
disposal will help conserve resources whilst preventing detrimental effects on your health and the environment.
This product can be disposed of with the used car together. In this case don't remove it from the car.
Page 3
Sehr geehrte Kunde, wir danken Ihnen für den
Kauf des GLADEN GLADIATORs und gratulieren
Ihnen zu Ihrer Entscheidung.
Wir möchten, das s Sie l ange Freud e an
unserem Produkt haben und bitten Sie daher
die Sicherheits-Hinweise zu beachten.
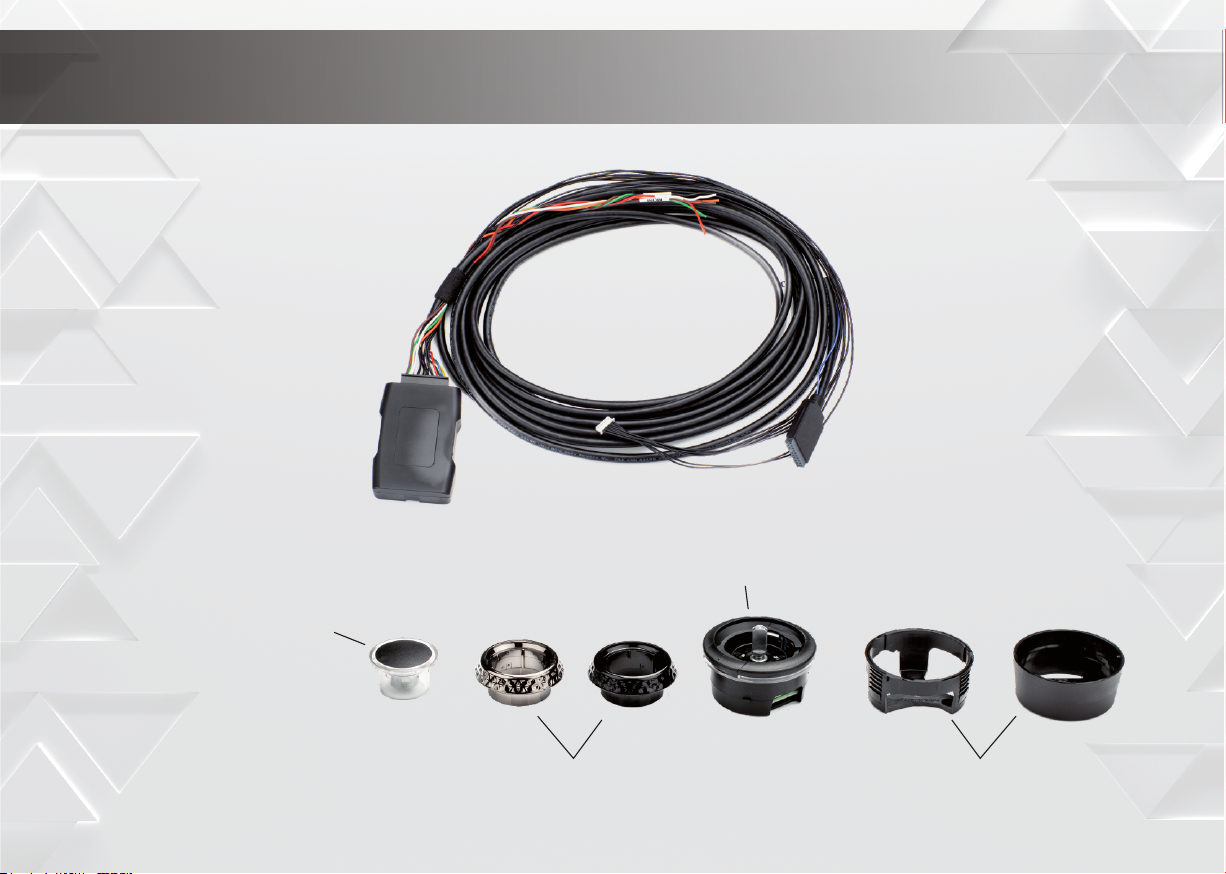
Lieferumfang: Package includes:
Dear customer, thank you for purchasing the
GLADEN GLADIATOR and congratulations on your
decision. We want you to enjoy our product for a
long time and therefore ask you to observe the
safety instructions.
Transparenter Deckel
Transparent lid
Hauptgehäuse inkl. Elektronik
Main housing incl. electronics
Drehregler (schwarz & chrom)
Rotary control (black & chrome)
Anschlusskabel inkl. Steuerinterface
Connection cable incl. control interface
Ein- und Aufbaugehäuse
Built-in and surface-mounted housing
Page 4
Einbau / Montage: Installation / assembly:
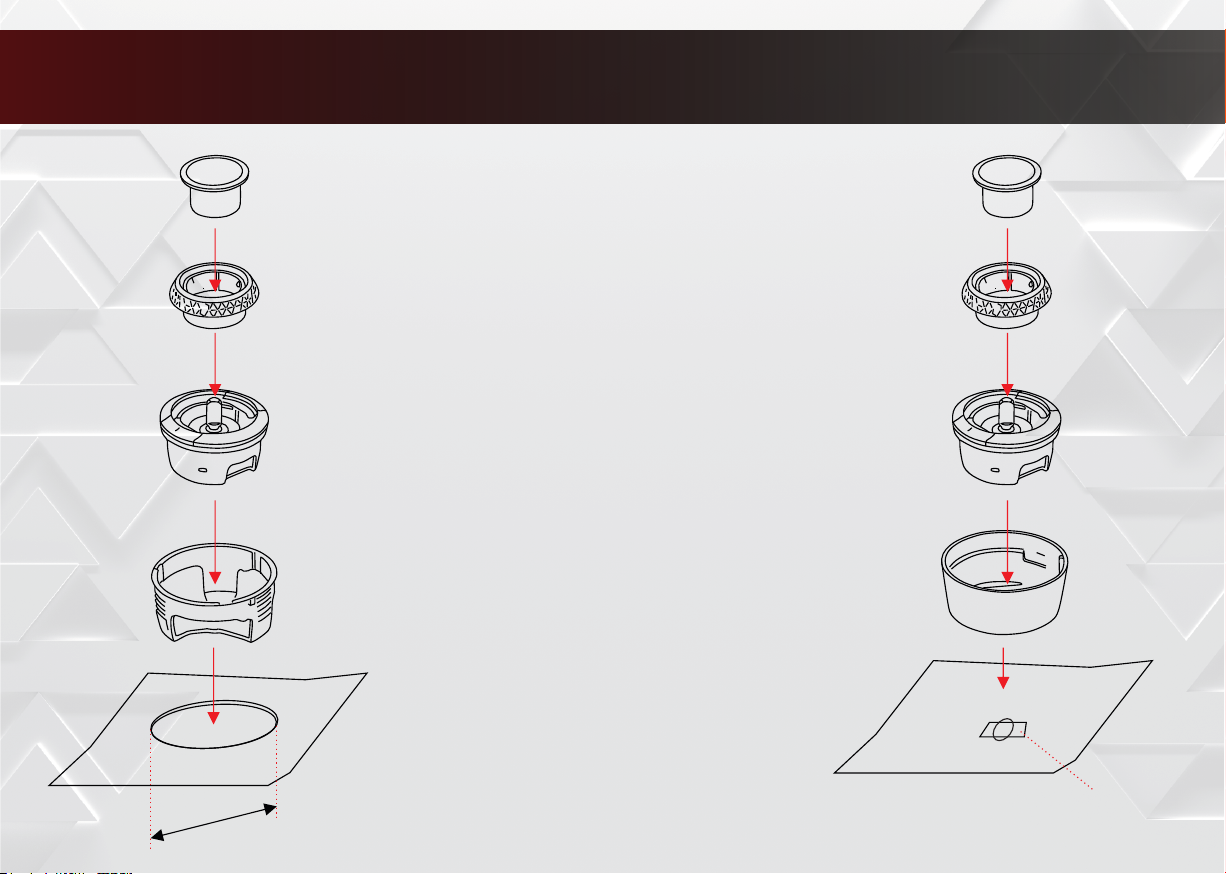
Für eine optisch perfekte Integration des GLADIATORS können Sie zwischen zwei
verschiedenfarbigen (schwarz/chrom) Drehreglern (B) wählen. Setzen Sie nun den
GLADIATOR wie folgt zusammen:
klick
click
leichter Druck
light pressure
Einsetzen und im
Uhrzeigersinn verriegeln
Insert and lock clockwise
1
2
4
3
41mm
1. Fügen Sie den transparenten Deckel in den von Ihnen gewählten schwarzen
oder verchromten Drehring ein bis es „klickt“.
2. Drücken Sie jetzt den fertigen Reglerknopf auf die Achse des Hauptgehäuses.
Beachten Sie hier die Aussparung der Achse. Nicht mit Gewalt zusammen
drücken.
3. Montieren Sie die Einbauhalterung, beziehungsweise das Aufbaugehäuse.
Für die Einbauhalterung wird eine Öffnung von 41mm benötigt. Das
Aufbaugehäuse kann verschraubt oder mit einem Klebestreifen befestigt
werden. Hier wird lediglich eine Öffnung für die Kabelverbindung (4 x 12 mm
oder 6mm Durchmesser) benötigt.
4. Stellen Sie die Kabelverbindung am GLADIATOR her. Setzen Sie die fertige
Regeleinheit in den Montagetopf ein und verriegeln sie diese mit einem
leichten Dreh im Uhrzeigersinn.
For a visually perfect integration of the GLADIATOR, you can choose
between two different colored (black/chrome) rotary controls (B). Now
assemble the GLADIATOR as follows:
1. Insert the transparent cover into the black and chrome knob
ring you have chosen until it "clicks".
2. Now press the finished control knob onto the axle of the main
housing. Note the recess in the axle. Do not force it together.
3. Fit the installation bracket or the surface-mounted housing. An
opening of 41 mm is required for the installation bracket. The
surface-mounted housing can be screwed on or attached with
an adhesive strip. Only an opening for the cable connection (4 x
12 mm or 6mm diameter) is required here.
4. Make the cable connection on the GLADIATOR. Insert the
finished control unit into the mounting pot and lock it in place
by turning it slightly clockwise.
1
2
4
3
klick
click
leichter Druck
light pressure
Einsetzen und im
Uhrzeigersinn verriegeln
Insert and lock clockwise
4 x 12 mm
or 6mm diameter
Page 5
Elektrische Verbindung: Electrical connection:
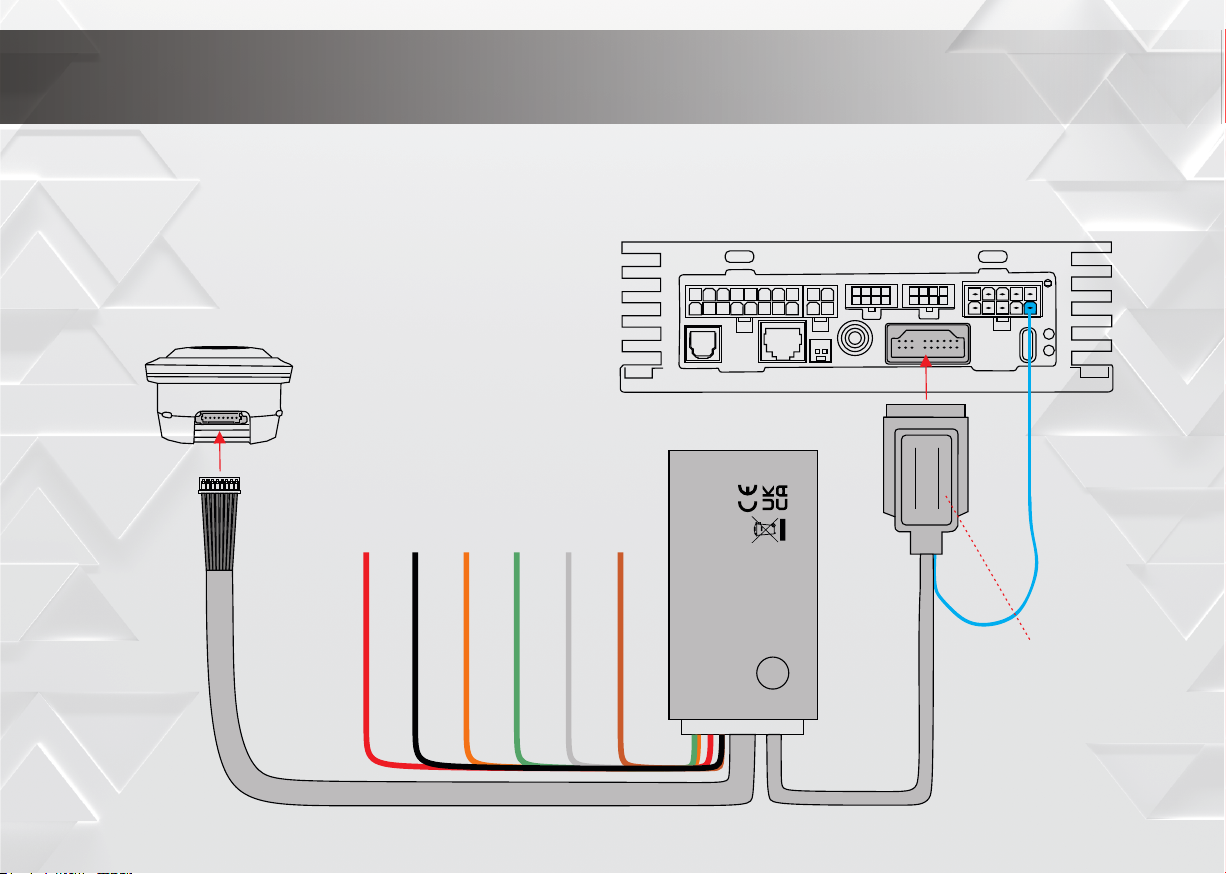
Schließen Sie alle nötigen Kabelverbindungen gemäß des Schaltplanes an.
Die blaue Leitung mit dem Remote - Ausgang des DSPs oder des Verstärkers
verbinden oder in den vorhandenen Stecker einpinnen.
Alle Stecker lassen sich leicht einstecken. Keine Gewalt anwenden.
Die losen Kabel sind für spätere Optionen (Bitte nicht anschließen)
Connect all necessary cable connections according to the wiring diagram.
8 poligen Mikrostecker in
die Regeleinheit einstecken.
Insert the 8-pin micro plug
into the control unit.
Connect the blue cable to the remote output of
the DSP or the amplifier, or pin it into the
existing connector.
All connectors can be plugged in easily. Do not
use force.
The loose cables are for later options (please
do not connect)
Kabel für spätere Optionen | Cable for later options
DSP oder DSP Verstärker | DSP or DSP amplifier
CARD 1EXT
CONTROLLER FOR GLADIATOR ROTARY
E24
POWER SUPPLY
Blaues Kabel an den
Remote - Ausgang
anschließen.
Connect the blue cable to
the Remote output.
20 poligen Stecker in die
EXT Buchse einstecken.
Insert the 20-pin plug into the EXT socket.
Page 6
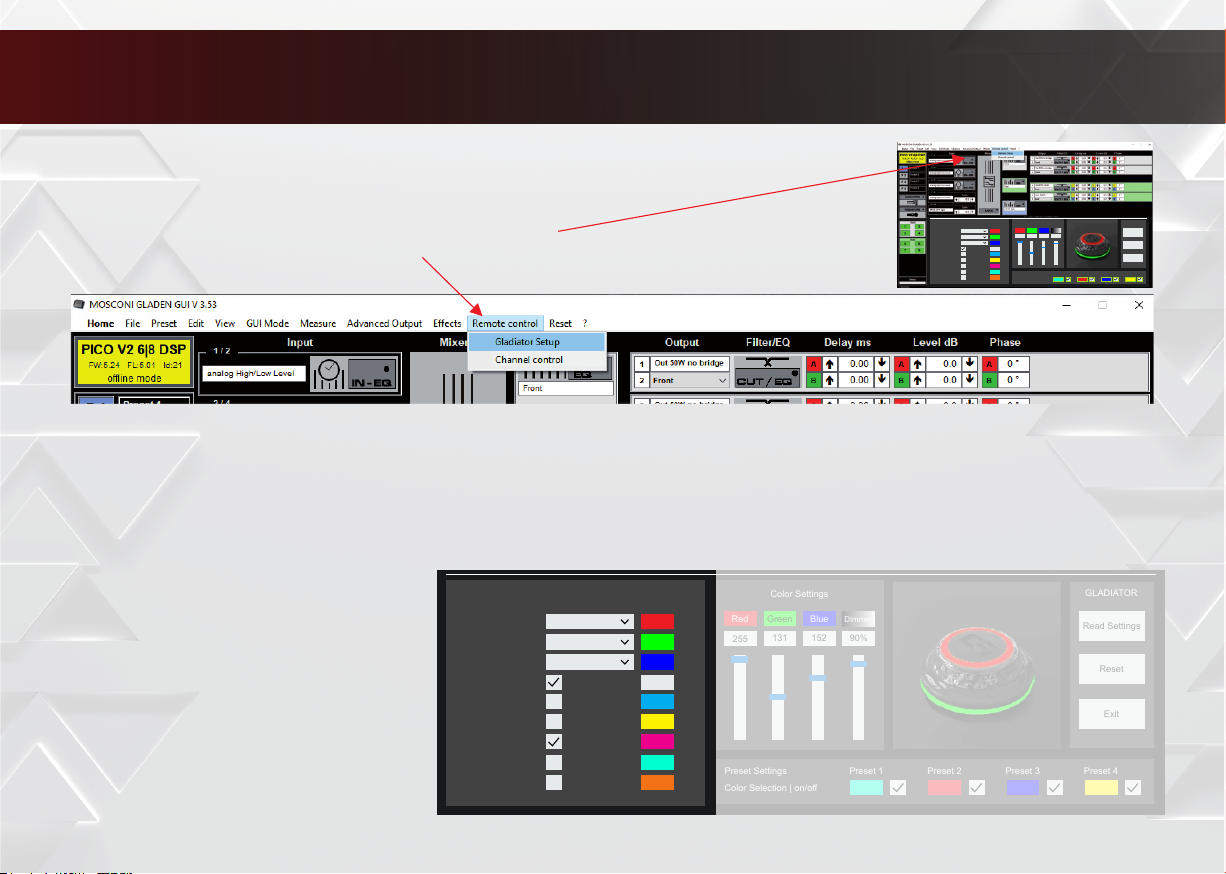
Programmierung: Programming:
Verbinden Sie das DSP Gerät per USB und starten Sie die MOSCONI GLADEN GUI (Version 3.53 oder höher).
Connect the DSP device via USB and start the MOSCONI GLADEN GUI (version 3.53 or higher).
Wählen Sie in der Menüleiste unter „Remote control das „Gladiator Setup“ aus.
Select the "Gladiator Setup" under "Remote control" in the menu bar.
Main Control Main Control
Second Function Sub-Level
Third Function
Preset Change
Balance
Fader
Bass
Mid
Treble
Color Settings
Color SelectionFunction Selection
Green
Dimmer
Blue
Red
Edit
131 90%152
256
Input Volume
on/off
on/off
on/off
on/off
on/off
on/off
Preset Settings
Color Selection | on/off
Preset 1 Preset 2 Preset 3
GLADIATOR
Read Settings
Preset 4
Reset
Exit
Der Einstellbereich für den GLADIATOR ist in mehrere Bereiche aufgeteilt. Im ersten Abschnitt, der „Function Selection“, lassen sich die Funktionen des Druck- beziehungsweise
Regelknopfes konfigurieren. Wird der Regler nicht vorab gedrückt, befindet sich der GLADIATOR in der „Main Control“ Ebene. Mit jedem kurzen Druck auf den GLADIATOR Drehknopf
wird in die nächste Ebene (sofern nicht deaktiviert) gewechselt. Eine Aktivierung oder Deaktivierung erfolgt bei der zweiten und dritten Funktion im Pull-down-Menü und bei den
restlichen Funktionen mit dem Setzen des Bestätigungshäkchens.
Unter „Color Selection“ können entsprechende RGB Farben eingestellt werden. Das Einstellen der Farben wird nachfolgend beschrieben.
The setting area for the GLADIATOR is divided into several
sections. In the first section, the "Function Selection", the
functions of the push or control knob can be configured. If the
knob is not pressed beforehand, the GLADIATOR is in the "Main
Control" level. Each short press on the GLADIATOR rotary knob
switches to the next level (if not deactivated). The second and
third functions are activated or deactivated in the pull-down
menu and the remaining functions are activated or deactivated
by ticking the confirmation box. The corresponding RGB colors
can be set under "Color Selection". The setting of the colors is
described below.
Main Control Main Volume
Second Function Sub-Level
Third Function
Preset Change
Balance
Fader
Bass
Mid
Treble
Input Volume
on/off
on/off
on/off
on/off
on/off
on/off
Color SelectionFunction Selection
Edit
Color Settings
Green
Red
255
Preset Settings
Blue
131 90%152
Dimmer
Preset 1 Preset 2 Preset 3
Color Selection | on/off
GLADIATOR
Read Settings
Reset
Exit
Preset 4
Page 7
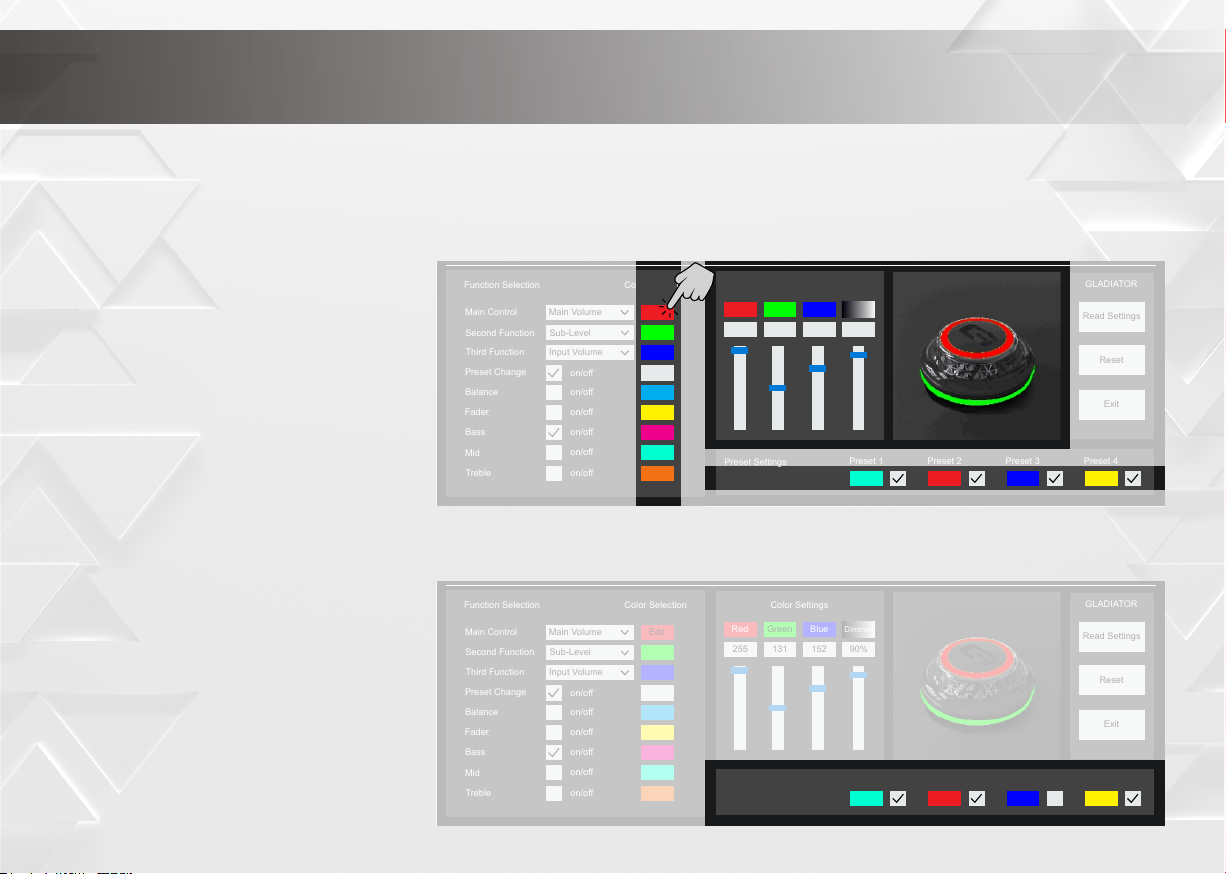
Unter „Color Settings“ können alle Farben der jeweiligen Funktionen oder Presets eingestellt werden. Wählen Sie hierzu die einzustellende Funktion oder Preset aus indem Sie mit dem
Mauspfeil auf das entsprechende Farbfeld klicken. Nach der Auswahl erscheint „Edit“ im Farbfeld. Nun können die Farben mit den Reglern „red, green und blue“ eingestellt werden. Zur
Kontrolle werden Ihnen die RGB Werte über den Schieberegeln angezeigt. Mit dem „Dimmer“ können Sie die Helligkeit Ihrer Einstellung verändern.
Die jeweiligen Farben der „Funktionen“ werden im GLADIATOR im oberen Leuchtband des Drehreglers angezeigt. Das aktive „Preset“ wird im unteren Leuchtkranz dargestellt.
Zur Kontrolle wird Ihnen eine Simulation mit dem GLADIATOR angezeigt. Anmerkung: Die Farben auf dem Bildschirm können zum GLADIATOR abweichen.
All colors of the respective functions or presets can be set under
"Color Settings". To do this, select the function or preset to be set
by clicking on the corresponding color field with the mouse
arrow. After the selection, "Edit" appears in the color field. The
colors can now be set using the "red, green and blue" sliders. The
RGB values are displayed above the sliders for you to check. You
can use the "Dimmer" to change the brightness of your setting.
The respective colors of the "Functions" are displayed in the
GLADIATOR in the upper light band of the rotary control. The
active "Preset" is displayed in the lower illuminated ring. A
simulation with the GLADIATOR is displayed for you to check.
Note: The colors on the screen may differ from the GLADIATOR.
Mit den „Preset Settings“ können Sie bestimmen welche
Settings über den GLADIATOR anwählbar sind. Bei allen
Presets die angewählt werden sollen muss ein Häkchen im
entsprechenden Feld gesetzt werden.
In dem gezeigten Beispiel wäre Preset 3 inaktiv.
With the "Preset Settings" you can determine which settings can
be selected via the GLADIATOR. A check mark must be placed in
the corresponding field for all presets that are to be selected.
In the example shown, preset 3 would be inactive.
Main Control Main Volume
Second Function Sub-Level
Third Function
Preset Change
Balance
Fader
Bass
Mid
Treble
Main Control Main Volume
Second Function Sub-Level
Third Function
Preset Change
Balance
Fader
Bass
Mid
Treble
Input Volume
on/off
on/off
on/off
on/off
on/off
on/off
Input Volume
on/off
on/off
on/off
on/off
on/off
on/off
Color SelectionFunction Selection
Edit
Color SelectionFunction Selection
Edit
Color Settings
Green
Red
131 90%152
255
Preset Settings
Color Selection | on/off
Color Settings
Green
Red
131 90%152
255
Preset Settings
Color Selection | on/off
Dimmer
Blue
Preset 1 Preset 2 Preset 3
Dimmer
Blue
Preset 1 Preset 2 Preset 3
GLADIATOR
Read Settings
Reset
Exit
Preset 4
GLADIATOR
Read Settings
Reset
Exit
Preset 4
Page 8
Main Control Main Volume
Second Function Sub-Level
Third Function
Preset Change
Balance
Fader
Bass
Mid
Treble
Input Volume
on/off
on/off
on/off
on/off
on/off
on/off
GLADIATOR
Read Settings
Reset
Red
256
Color Settings
Green
131 90%152
Blue
Dimmer
Color SelectionFunction Selection
Edit
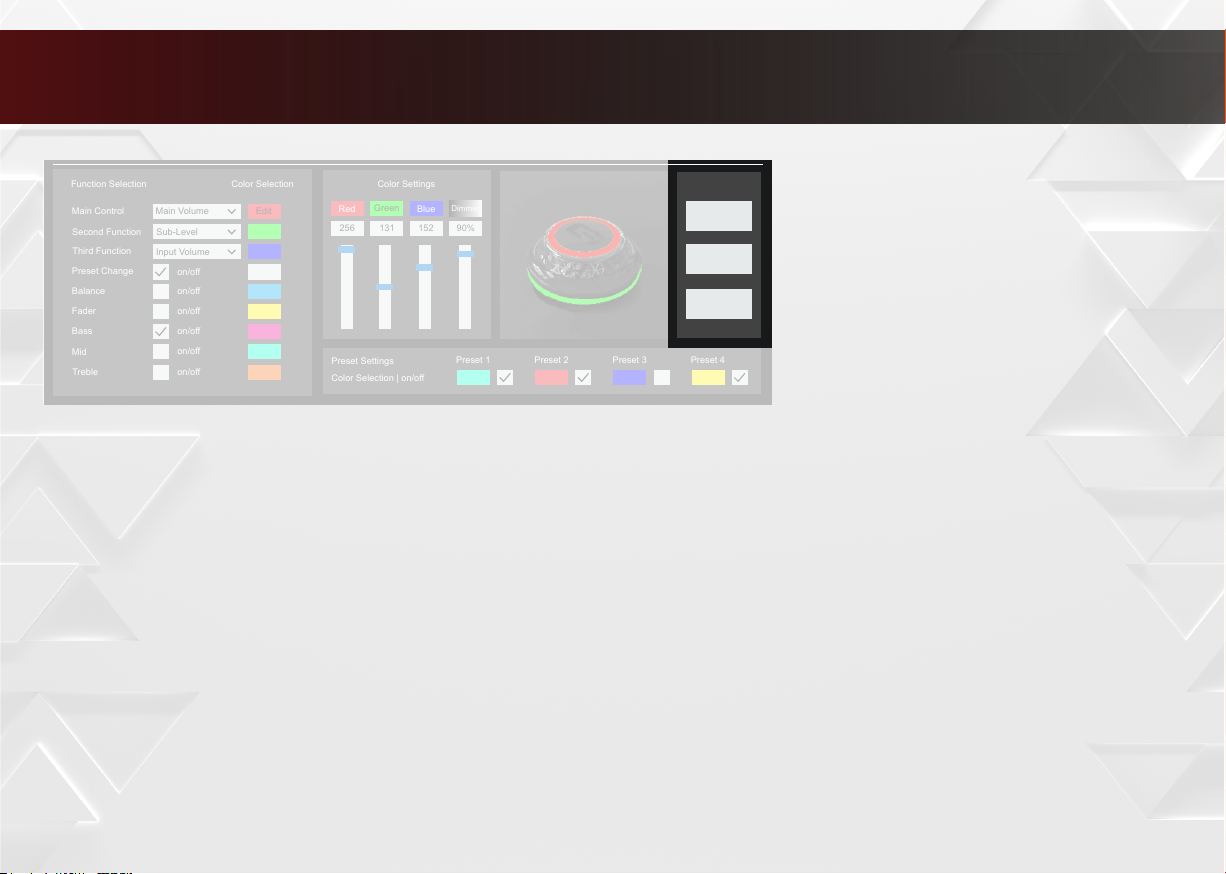
Sollten Sie den GLADIATOR erst nach dem Öffnen der GUI
verbunden haben, kann es nötig sein die Daten erneut
auszulesen. Dieses kann mit der „Read Settings“ Taste
durchgeführt werden.
„Reset“ stel lt alle GLADIATOR E instell ung a uf den
Werkszustand zurück.
Exit
Mit „Exit“ verlassen Sie die GLADIATOR Einstellungen.
Preset Settings
Color Selection | on/off
Preset 1 Preset 2 Preset 3
Preset 4
If you have only connected the GLADIATOR after opening the
GUI, it may be necessary to read out the data again. This can be
done with the "Read Settings" button.
"Reset" resets all GLADIATOR settings to the factory settings.
Exit" exits the GLADIATOR settings.
Page 9
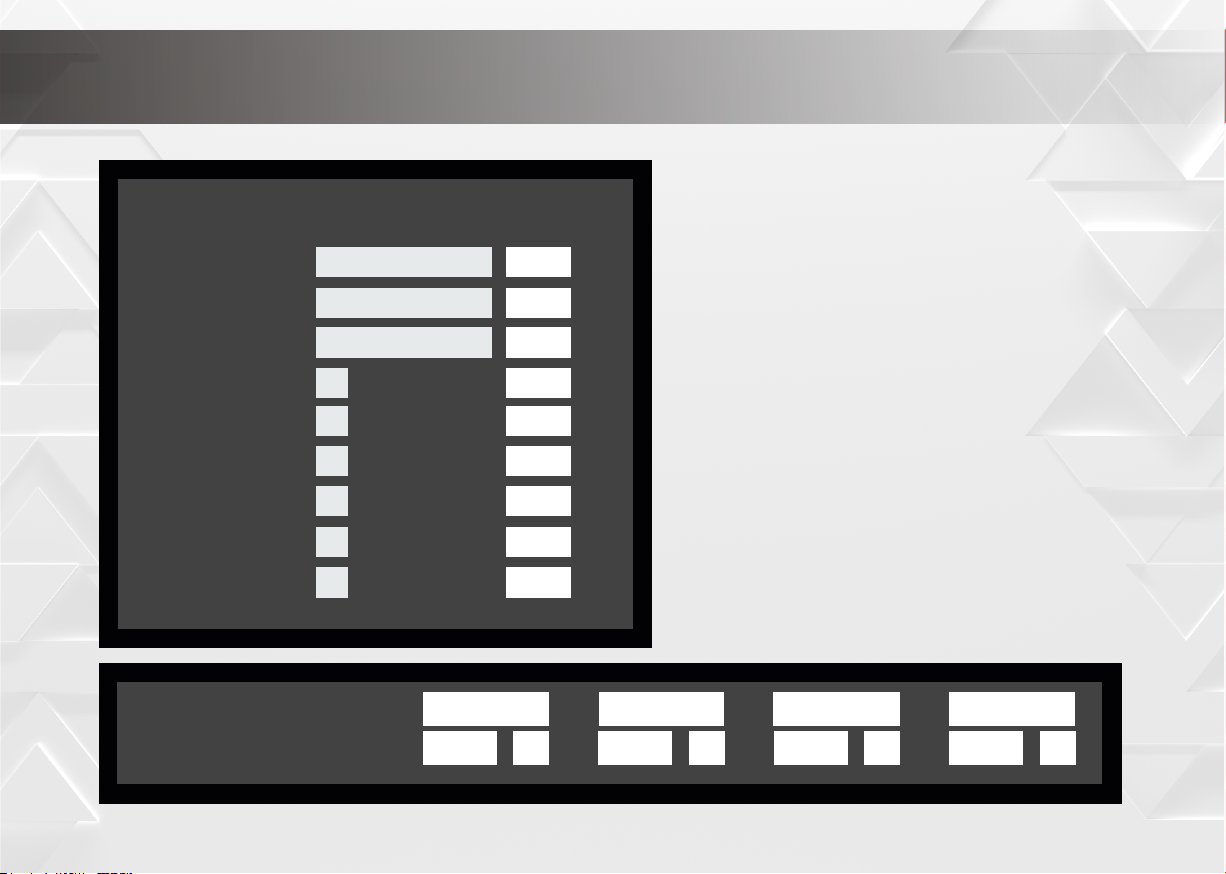
Notizen: Notes:
Um Ihnen den Einstieg in Ihren neuen GLADIATOR zu erleichtern können Sie
hier Notzien zu Ihren Programmierungen vornehmen.
Color SelectionFunction Selection
Bewahren Sie diese im Handschuhfach auf.
Main Control
Second Function
Third Function
Preset Change
Balance
Fader
Bass
Mid
Treble
Preset Settings
Color Selection | on/off
on/off
on/off
on/off
on/off
on/off
on/off
RGB
To make it easier for you to get started with your new GLADIATOR, you can make notes
RGB
RGB
on your programming here.
Keep these in the glove compartment.
RGB
RGB
RGB
RGB
RGB
RGB
Name Name Name Name
RGB RGB RGB RGB
Page 10
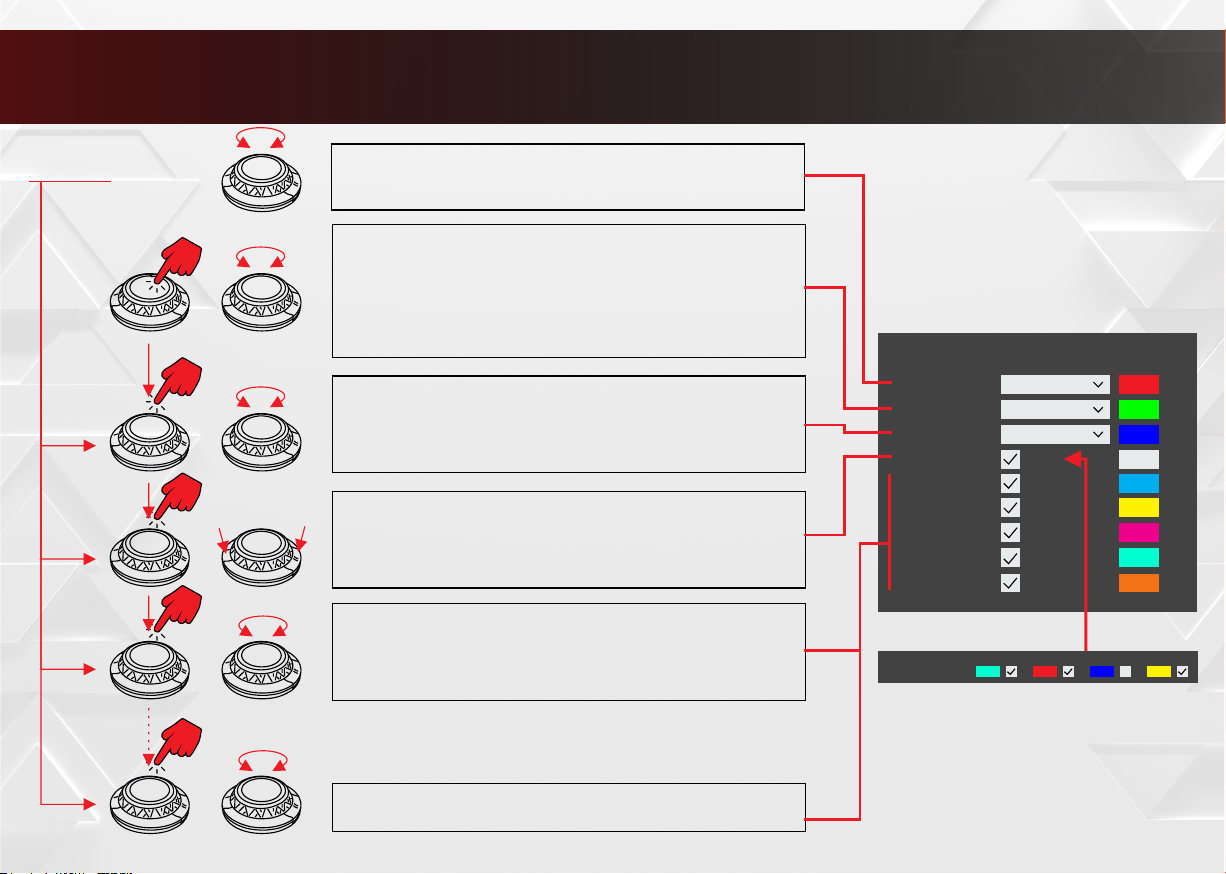
Bedienung: Handling:
Grundfunktion (ohne vorheriges Drücken des Reglers)
Basic function (without pressing the control beforehand)
2 x
drücken
push
3 x
drücken
push
4 x
drücken
push
usw.
and so on
1 x
1 x
1 x
1 x
back forward
Zweite Funktion (einmaliges Drücken des Reglers), danach kann die
eingestellte Funktion geregelt werden. Wenn innerhalb von 3 Sekunden
nichts eingestellt wird, wechselt der GLADIATOR wieder in die
Grundfunktion.
Second function (press the control once), then the set function can be
controlled. If nothing is set within 3 seconds, the GLADIATOR switches back to
the basic function.
Dritte Funktion (zweimaliges Drücken des Reglers), danach kann die
eingestellte Funktion geregelt werden.
Second function (press the control once), then the set function can be
controlled.
Preset-Auswahl (wenn aktiviert). Mit den Tasten I und II kann fortlaufend
zwischen den Preset** gewechselt werden. (**nur aktivierte Presets)
Preset selection (if activated). The I and II buttons can be used to switch
continuously between the presets**. (**only activated presets)
Sound Einstellungen (wenn aktiviert). Mit dem Drehregler kann hier die
jeweilige Einstellung vorgenommen werden.
Sound settings (if activated). The respective setting can be made here using the
rotary control.
und so weiter....
and so on....
Main Control Main Volume
Second Function Sub-Level
Third Function
Preset Change
Balance
Fader
Bass
Mid
Treble
Preset Settings
Color Selection | on/off
Input Volume
Preset 1 Preset 2 Preset 3
Beispiel | Example
Color Selection
Edit
on/off
on/off
on/off
on/off
on/off
on/off
Preset 4
Page 11
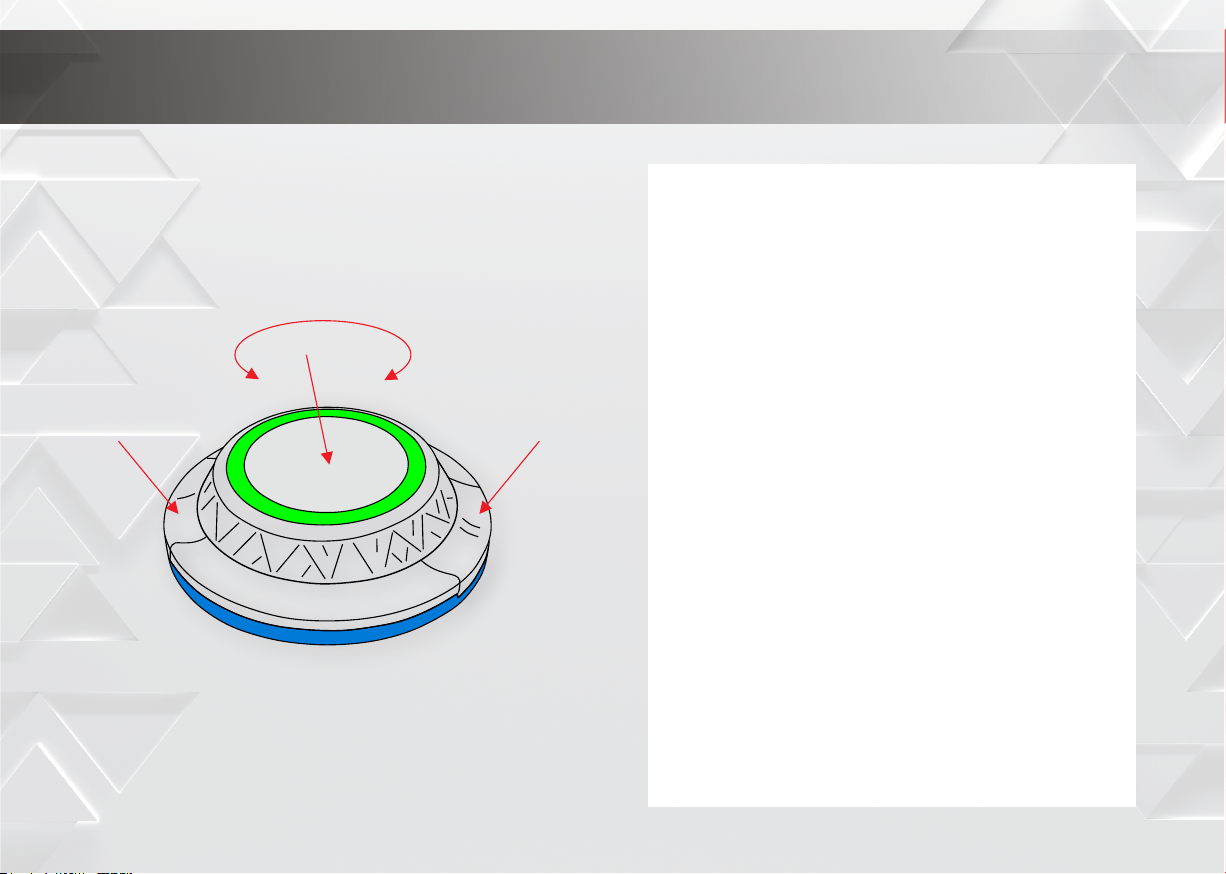
Regler | Controller
Dreh- und Drückfunktion | Turn and push function
Taste | button 1
Taste | button 2
Kompatibilität:
Der GLADEN GLADIATOR ist ausschließlich mit DSP und DSP Verstärker
der Marke MOSCONI kompatibel die einen EXT - CARD 1 Anschluss
besitzen.
Ei nste llung en un d Progr ammie rung en könn en n ur m it de r
GLADEN/MOSCONI GUI ab 3.53 oder höher vorgenommen werden.
Compatibility:
The GLADEN GLADIATOR is only compatible with DSP and DSP amplifiers of the
MOSCONI brand that have an EXT - CARD 1 connection.
Set ti ngs a nd pr ogramm ing c an on ly be ca rr ied o ut wi th th e
GLADEN/MOSCONI GUI from 3.53 or higher.
Maße | Dimensions:
Gesamtdurchmesser | Total diameter :
Höhe (ohne Einbauring) | Height (without mounting ring):
Einbautiefe | Installation depth:
Einbaudurchmesser | Installation diameter:
45 mm
32 mm
19 mm
41 mm
Page 12

Made in Ital
Obwohl wir sämtliche Angaben sorgfältig recherchiert und
mehrfach überprüft haben, können wir keine Haftung für
eventuelle Irrtümer übernehmen.
Although we have carefully researched and checked several times,
we cannot accept any liability for possible errors.
+
Bertha - Benz - Straße 9
72141 Walddorfhäslach
www.gladen.com
Stand 08/2024
 Loading...