

MOSCODE 401HR Instruction Manual
MOSCODE 401HR INSTRUCTION
MANUAL
© 2005 Moscode Corp, All Rights Reserved
MOSCODE 401HR INSTRUCTION MANUAL
Thank you for purchasing the Moscode 401HR stereo amplifier -- the embodiment of
more than 20 years of circuit design -- and dedicated to the late, great Harvey “Dr. Gizmo”
Rosenberg, a man of widely expanded horizons. (Thus, the HR!)* Since you are now part
of the Moscode family, I’ve included a reprint at the end of this manual of Harvey’s
introductory remarks in the original Moscode manual. Please be sure and follow all his
suggestions closely…
Back in 1984, while manufacturing the New York Audio Lab’s Futterman OTL amplifier, I
developed the first hybrid TUBE/MOSFET power amplifiers on the market using TUBE
driver stages and MOSFET power output devices. They were the Moscode 300 and 600,
which led to a series of memorable Moscode products made in conjunction with New York
Audio Lab’s Harvey Rosenberg.
The 401HR is a “true hybrid” amplifier. Some solid-state designs “feature” a single stage
of tube amplification tacked on before the power amp. That’s the same as running a tube
preamp with a solid-state power amp; you’re still listening to a solid-state power amp.
While it may warm the sound up, this approach doesn’t take full advantage of tubes’
strongest suit. We have optimized tube and solid-state circuitry for what each does best
and have combined them into a simple, elegant circuit utilizing a TUBE driver stage
mated to the reliable, powerful MOSFET’s.
*One other thing -- Some say the HR stands for “Harvey Resolution”. You be the judge.
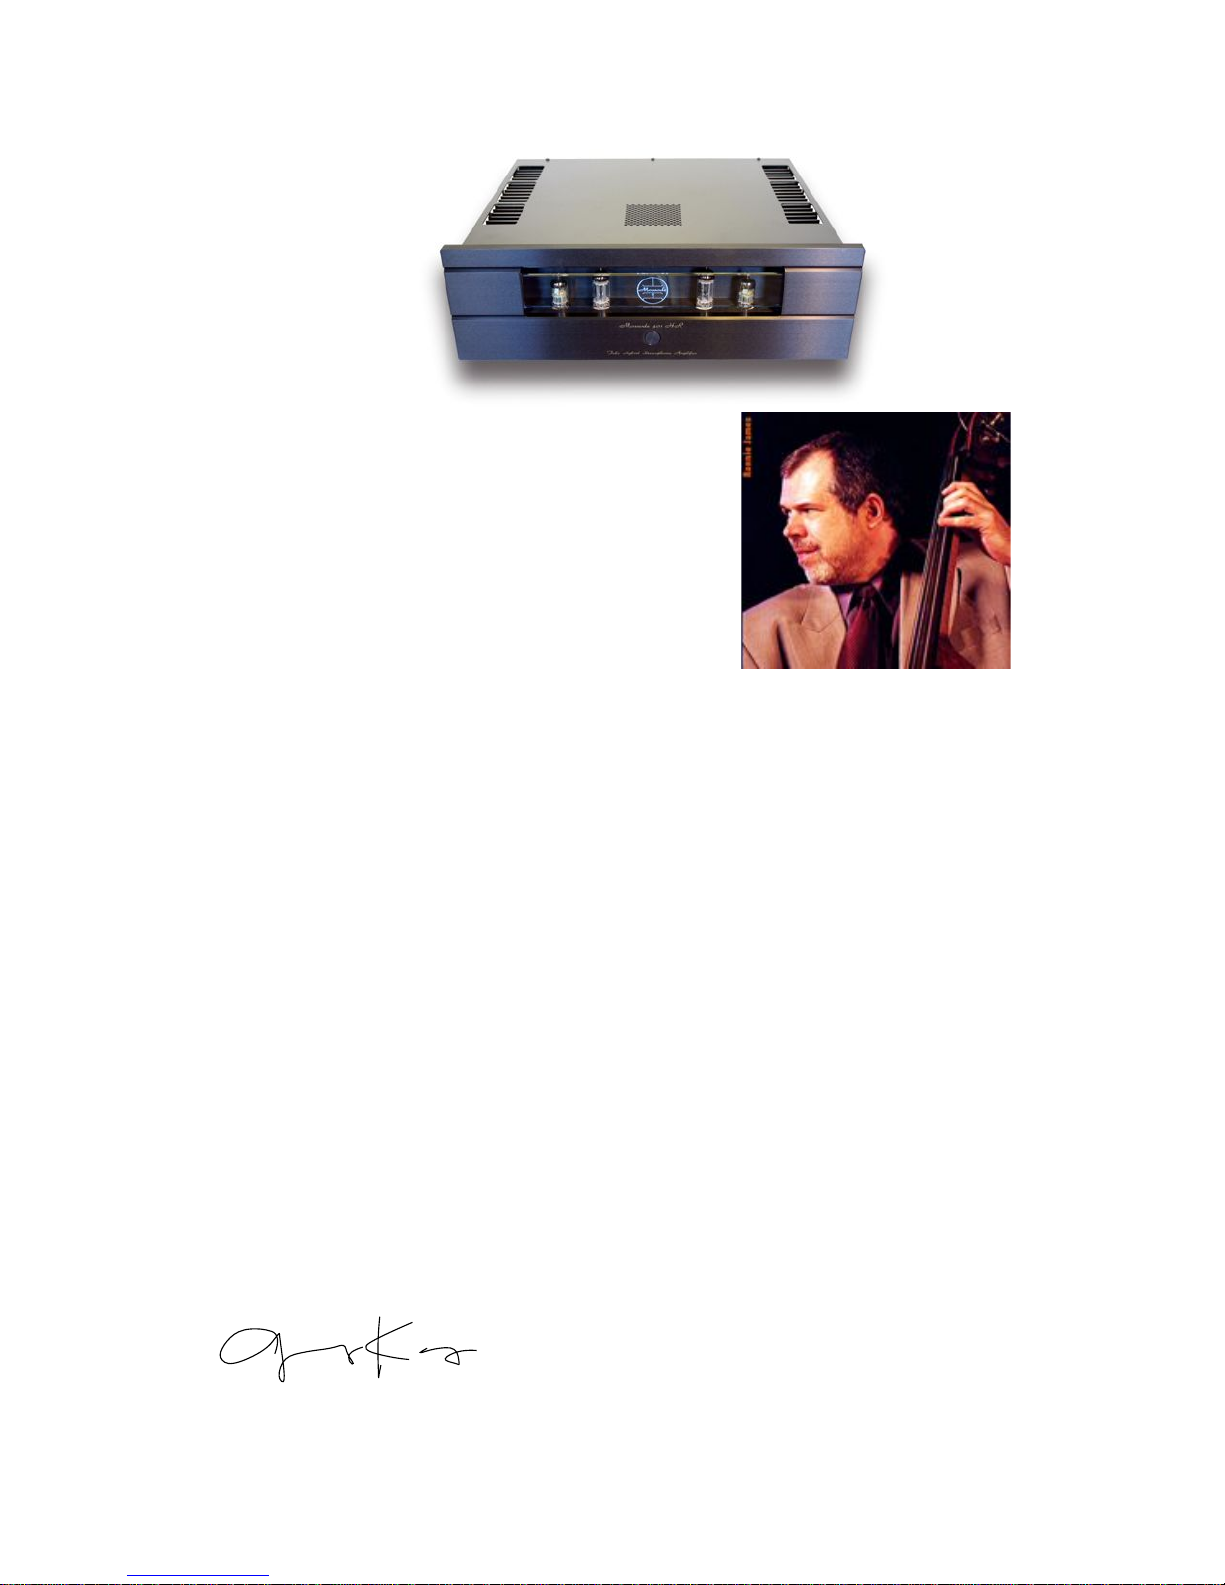
Welcome to the Moscode Family,
George Kaye
President
Moscode Corporation
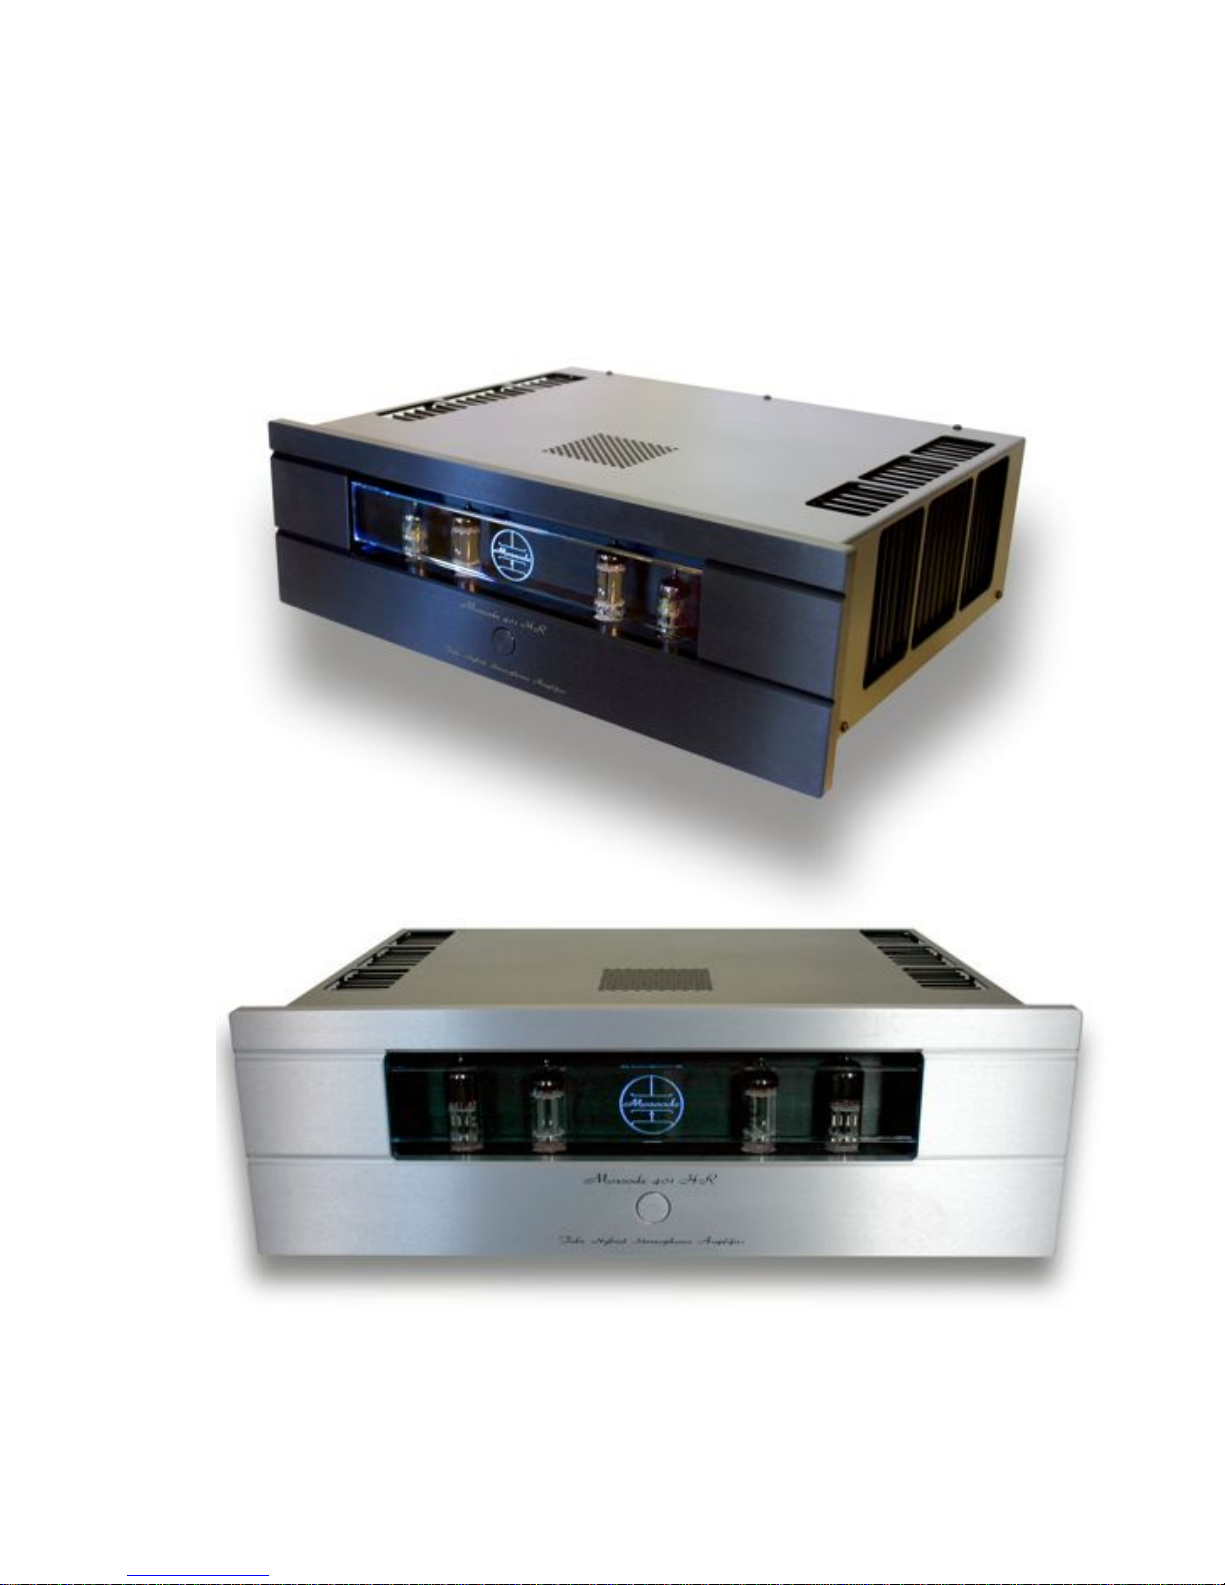
Moscode 401HR Tube
Hybrid Stereo Amplifier
Introduction
by George Kaye

MOSCODE 401HR INSTRUCTION MANUAL
Table of Contents
Safety ................................................................................................................. 1
Setup.................................................................................................................. 1
Tube Installation............................................................................................................................2
Operating Modes...........................................................................................................................2
The Importance of Speaker Phase.............................................................................................2
Stereo ..............................................................................................................................................3
Stereo Bi-wire ................................................................................................................................3
Vertical Stereo Biamp...................................................................................................................4
Connecting Vertical Stereo Biamp.............................................................................................5
Operation........................................................................................................... 6
Initial Power On .............................................................................................................................6
The Moscode Logo Status Indicator/ Hi-Temp ........................................................................6
Power On Sequence .....................................................................................................................6
More about your 401HR Stereo Amplifier .......................................................7
Edison Price 5-Way Music Binding Posts ................................................................................7
Cleaning Your Music Posts.........................................................................................................7
Other Ways of Connecting Speaker Cable ...............................................................................7
Power Matters................................................................................................................................8
Remote Control Power.................................................................................................................9
Output Servo..................................................................................................................................9
Maintenance ...................................................................................................................................9
Break-in & Tube Maintenance...................................................................................................10
Tubes and Tuning .......................................................................................................................10
Tubes and Gain ...........................................................................................................................10
Tubes and Sound ........................................................................................................................11
Tubes and Magic .........................................................................................................................11
The Circuit ....................................................................................................... 12
Tubes, Transistors and Getting Exactly What You Want from Both..................................12
Tube Driver Stage .......................................................................................................................12
MOSFET Output Stage ...............................................................................................................12
Output Transformers, MOSFETs, and the Rule of Ten.........................................................13
Power Supply...............................................................................................................................13
Troubleshooting Chart.................................................................................... 15
Fuse Replacement ......................................................................................................................17
Features/ Specifications................................................................................. 19
401HR Features ...........................................................................................................................19
Build Features..............................................................................................................................19
Specifications ..............................................................................................................................20
Notes/ Tube Records ..................................................................................................................21
Warranty .......................................................................................................................................22
Harvey’s Original Intro.................................................................................... 24

MOSCODE 401HR INSTRUCTION MANUAL
1
Safety
Important Safety Instructions
Please read this manual before setting up your 401HR
• Follow all warnings and cautions in this manual.
• Do not expose to moisture, rain or water.
• Do not “lift” ground and defeat the safety of a properly grounded circuit.
• Do not place power cord where it can be dislodged or damaged by footfalls.
• Best practice: turn amplifier off before making or breaking signal connections.
• While input connections can be made with the rear panel input switch set to mute
the safest method is to turn the amplifier off.
• Unplug during lightning storms or when not used for long periods of time.
• Service must be carried out by Moscode Corp. or an authorized agent.
• Clean with a soft, dry cloth.
CAUTION - HEAT WARNING: The Moscode 401HR will produce heat under normal
operating conditions. To maintain proper operation of your amplifier(s):
• If possible, do NOT install your amplifier(s) in an enclosed space.
o If there is no other choice, install a quiet fan to remove heat.
• It is best to allow 3” of clearance on the top and 2” of clearance on each side to
help disperse heat. Each amplifier should be placed on a separate shelf with
space above and to the sides. DO NOT STACK amplifiers.
• DO NOT place amplifier(s) directly on carpeting. Carpeting restricts the flow of air
from the bottom and causes the amplifier to heat up prematurely.
CAUTION: The power line should remain protected for no more than 20 amps, or the
maximum rating of the outlet.
WARNING! Lethal Voltages Are Present Inside Amplifier • Always
Disconnect From Power Source and Wait 10 Minutes to Allow Power
Supplies to Discharge Before Replacing Any Internal Fuses
Setup
(Now is a good time to read and follow Harvey’s original introduction on page 24.)
Carefully unpack your amplifier and position for use observing all safety precautions listed
above. Please save the box in case there’s a need to ship your 401HR for any reason.

MOSCODE 401HR INSTRUCTION MANUAL
2
Tube Installation
To install or change tubes, simply flip the faceplate down by pulling the top edge toward
you. The faceplate is hinged at the bottom. Grip each tube firmly and place over the
correct tube socket, being sure to line up the tube’s pins with the socket pins. Push the
pins into the socket and apply downward pressure while moving the tube in a gentle
circular motion to seat it in its socket. The circuit board will flex as you bear down; this is
normal as the boards are mounted with anti-resonance elastomer. Close the front panel
by pushing all the way up and in. It will click into place and activate the power interlock.
Tip: You’ll find the Tube Guide printed on the front panel of the amplifier chassis when
the faceplate is down.
If your 401HR came with a pair of 6H30Pi and a pair of 6FQ7, use the 6H30 for the
outside pair of sockets, V101 and V201. Insert the 6FQ7 into the inside pair, V102 and
V202.
Operating Modes
The Moscode 401HR features two modes of operation: Stereo and Vertical Biamp. In
stereo, the left channel carries the left signal, the right channel the right signal. (Page 5)
For the ultimate Moscode Music Experience, hook up two Moscode 401HRs and vertically
biamp them to your speakers, using one channel for low frequencies, the other for high
frequencies of the same amplifier. (Page 6)
The Importance of Speaker Phase
It’s important to maintain correct relative phase. That means hooking plus to plus (red-tored), negative to negative (black-to-black). When one speaker is out of phase (red-toblack), the sound becomes confused and diffuse, with significant loss of bass
frequencies. This happens because one driver moves in the opposite direction of the
others -- when the rest “push” it “pulls”.
In general, red (plus) binding posts on the speaker should be connected to the plus
connector of the amplifier. There is one exception to the Red-to-Red Rule. Some
preamps invert absolute phase. To compensate for this, just reverse the + and connections at either the amplifier or the speaker terminals, but not both.
NOTE: Arrange the power cords so they run separately from signal-carrying
interconnectIf you must cross them, do so at 90 degrees with at least an inch of space
between them.
MOSCODE 401HR INSTRUCTION MANUAL
3
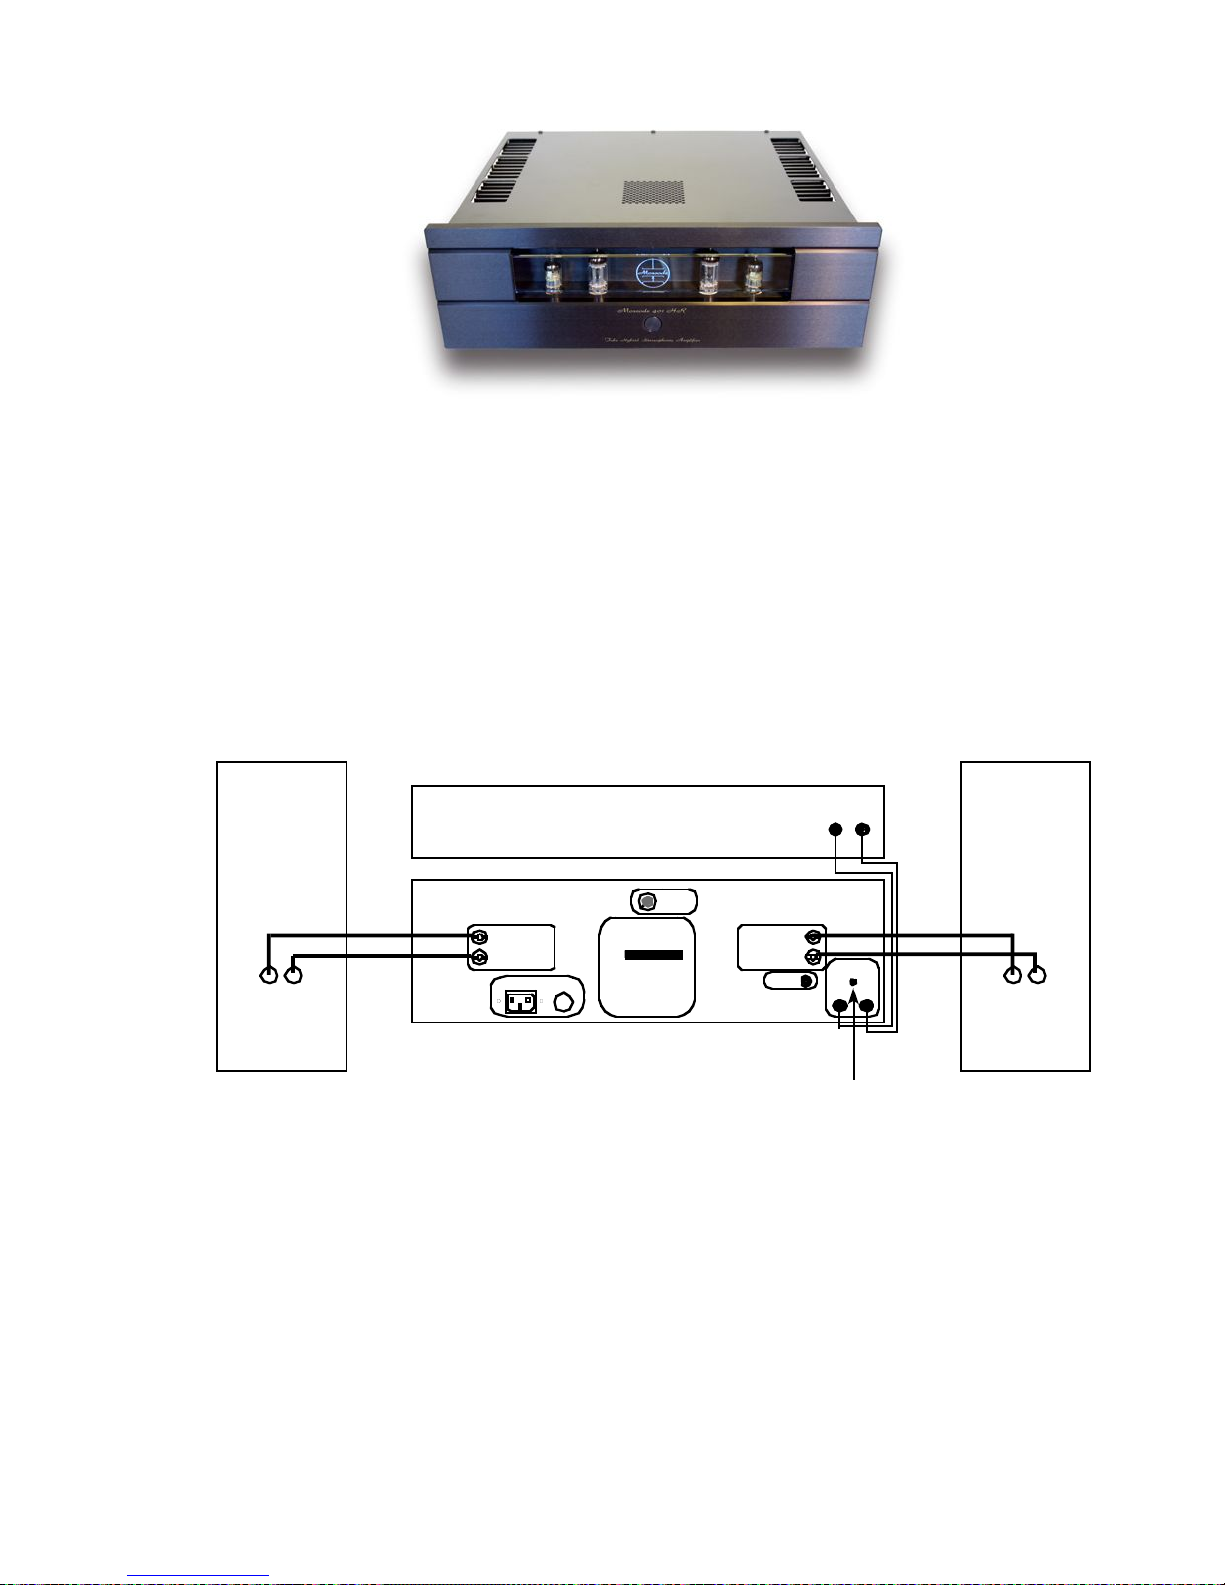
Stereo
• Set the input switch to STEREO.
• Connect the right channel interconnect from the right channel output of your
preamplifier or source to the right channel amplifier input.
• Connect the left channel interconnect from the left output of your source to the left
channel input.
• Connect the left speaker to the left output binding posts.
• Connect the right speaker to the right output binding posts.
POWER
FUSE
120V-8ASB
220V-4ASB
W ARNING!
LETHALVOLT AGESPRESENT INSIDE
.
ALWAYSdi sconnectfrom power sourceand wait10
minute stoal lowp owersuppliesto dischargebefore
replacing any internalfu ses.Forservi cecontact:
Moscode™,Inc. www.Moscode.com
REMOTE
P OWER O N/OFF
12VTIP +
ILL UMINATION
INTENSITY
R L
INPUT
R IGHT
SPEAKER
LE FT
SPEAKER
+
-
+
-
MOSCODE™, INC.
WWW.MOSCODE.COM
M oscode4 01 HR Amplifier
Dedicated to Harvey Rosenberg
S/N
Biamp
Mono
Mute
Stereo
Fuse
Preamp or Source R L
+ -
Right
Speaker
+ -
Left
Speaker
Stereo Hookup Illustration
Switch in Stereo
(Center) Position
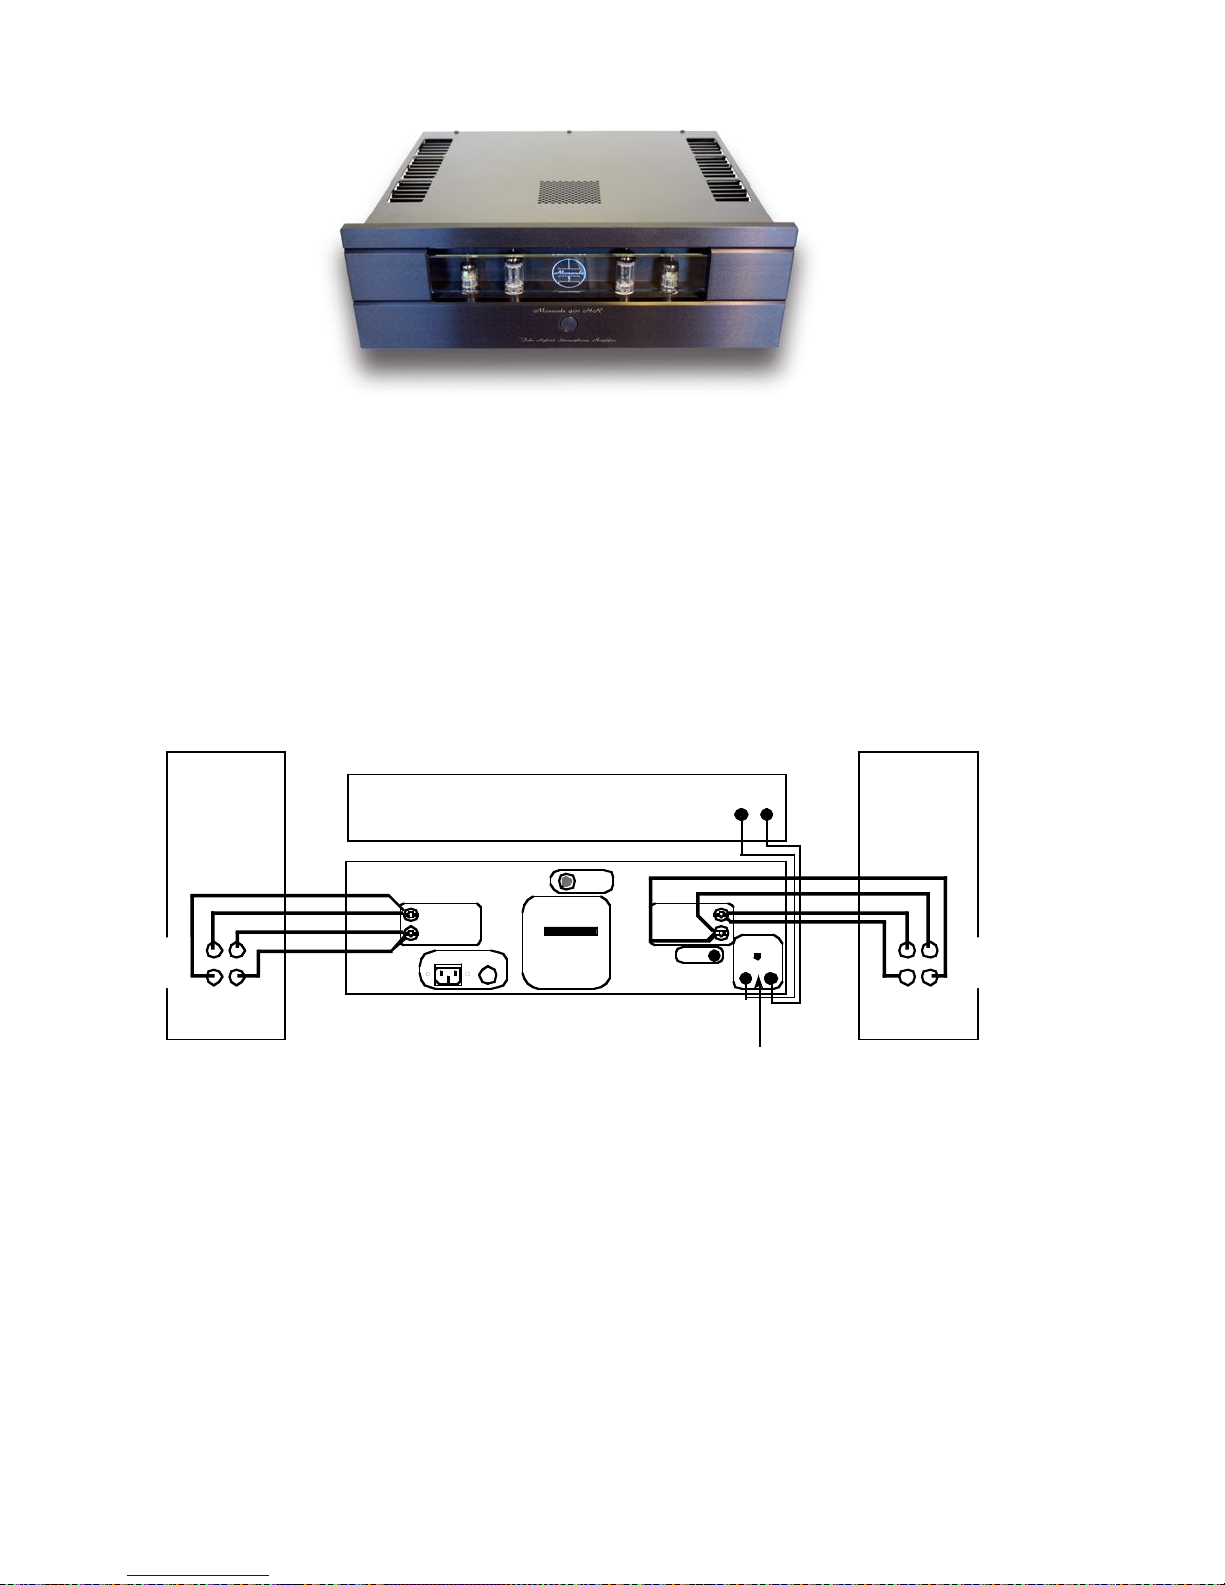
Stereo Biwire
Biwiring means running two separate speaker cable pairs per channel. You can further
refine the sound using the best cables for the frequency range the driver covers. In this
case, the crossover in the speaker routes the signal to the correct drivers. Additionally
biwiring relieves the signal to the upper frequencies from current-draining low frequency
demands.
To bi-wire, speakers must have biwiring connectors; at least two sets of binding posts per
speaker.
• Remove any links between bass and treble driver binding posts at the speaker.
• Connect the left channel of your preamp or source to left input of the amplifier.
• Connect the right channel to the right input.
MOSCODE 401HR INSTRUCTION MANUAL
4
• Connect the cable between the left amplifier binding posts and the speaker’s left
treble driver binding posts.
• Connect another speaker cable between the left output and the left low frequency
driver’s binding posts.
• Repeat for the right channel.
CAUTION! Remove all jumpers between the low and high frequency driver binding posts
on the speaker for biwiring. Improper hookup can result in a short to the amplifier.
Please observe all hookup instructions to the letter.
POWER
FUSE
120V-8 A SB
220V-4 ASB
WARNING!
LETHALVOLTAGESPR ESENT INSIDE
.
ALWAYSdisconn ectfrompo wersource andwait10
minutes toallow powersuppl iestodi schargebe fore
replacing anyinternal fuses.F orservice contact:
Moscode™,Inc. ww w.Moscode.com
REMOTE
POWER ON/OFF
12VTIP+
ILLUMINATION
INTENSITY
R L
INPUT
RIGHT
SP EAKER
LEFT
SPEAKER
+
-
+
-
MOSCODE™, INC.
WWW.MOSCODE.COM
Moscode 401 HR Amplifie r
Dedicatedt oHarveyR osenberg
S/N
Biamp
Mono
Mute
Stereo
Fuse
Preamp or Source R L
+ -
Right
Speaker
Left
Speaker
Stereo Bi-Wire Hookup Illustration
Switch in Stereo
(Center) Position
+ -
Tweeter
Woofer
Tweeter
Woofer
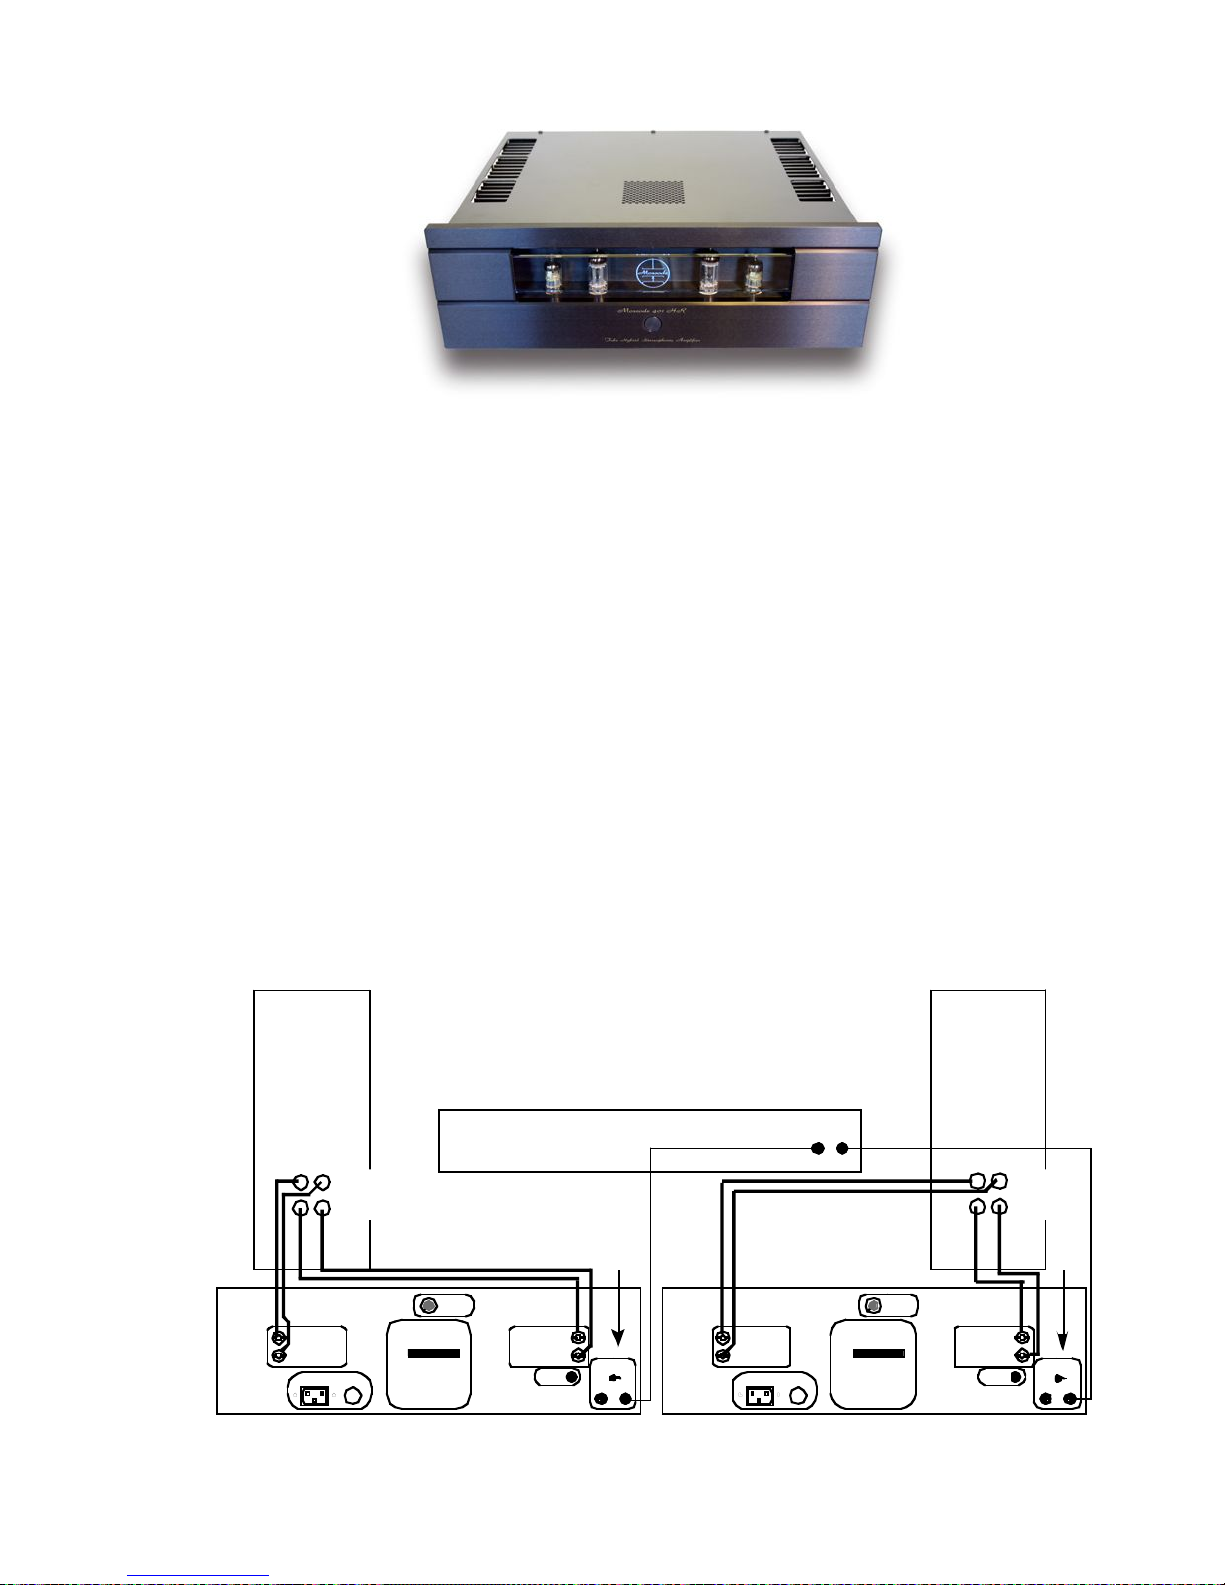
Vertical Stereo Biamp
Set the INPUT switch to BIAMP on the rear panel to optimize the 401HR for two
amplifiers, a stereo amp for the left channel, and a second stereo amp for right channel.
Vertical bi-amp mode feeds the same input to both channels, with one channel used for
low frequency drivers, the other for the high frequency drivers. The crossover within the
speaker routes the signal to the correct driver.
The advantages are many:
• Two channels of amplification means increased power for each speaker.
• Coherent/related signal information is grouped together in same chassis.
o Low and high frequencies more closely related in one mono channel than a
stereo pair.
o Independent power supplies for each channel.
MOSCODE 401HR INSTRUCTION MANUAL
5
o Any possible negative inter-channel reaction between two power amps in the
same box (stereo) sharing common parts is minimized.
• Separate amplifiers means greater stereo separation and imaging.
• Placing each amplifier near its speaker shortens cable length.
• Unused input functions as a pass-through circuit for powered subs or super tweeters.
• Drivers optimized for frequency range covered.
• Tune your system by using different tube types to optimize the sound. Install medium-
mu tubes in the bass channels, for example, to get a little more bass slam.
Connecting Vertical Stereo Biamp
You’ll need two Moscode 401HR amplifiers, and biwirable speakers.
• Remove any links between bass and treble driver binding posts at the speaker.
• Move the Input Switch above the inputs to BIAMP to tie both inputs together.
• Connect the left channel of your preamp or source to either of the two input jacks on
the left amplifier.
• Connect the right channel to either of the two inputs on the right amplifier.
• Connect one of the amplifier output binding posts to the treble driver binding posts of
the speaker.
• Connect the other channel to the bass or woofer drivers of your speaker.
POWER
FUSE
120V-8A SB
220V-4A SB
WARNING!
LETHALVOLTAGES PRESENT INSIDE
.
ALWAYSdi sconnectfrompow ersource andwait10
minutesto allow powersupplies todisch arge before
replacinganyi nternalfuses.For service contact:
Moscode™,Inc. www.Moscode.com
REMOT E
POWER ON/OF F
12VT IP+
ILLUMINATION
INTENSITY
R L
INPUT
RIGHT
SPE AKER
LEFT
SPEAKER
+
-
+
-
MOSCODE™, INC.
WWW.MOSCODE.COM
Mosc ode4 01 HR Amplifie r
Dedicated to HarveyRosenberg
S/N
Biamp
Mo no
Mu te
Stereo
Fuse
Preamp or Source
R L
+ -
Right
Speaker
Tweeter
Woofer
Left
Speaker
+ -
Tweeter
Woofer
Switch
in Biamp
(Right)
Position
POWER
FUSE
120V-8ASB
220V-4ASB
WARNING!
LETHALVOLT AGESPRESENT INSIDE
.
ALWAYSdi sconnectfrom power sourceandw ait10
minute stoallowp owersu ppliesto discharge before
replacing anyinternal fuses.Forservi cecontact:
Moscode™,Inc. www.Moscode.com
REMOTE
POWER ON/OFF
12VTIP +
ILL UMINATION
INTENSITY
R L
INPUT
RIGHT
SPEAKER
LE FT
SPEAKER
+
-
+
-
MOSCODE™,INC.
WWW.MOSCODE.COM
Moscode 4 01 HRAm plifier
Dedicated to HarveyRosenberg
S/N
Biamp
Mono
Mute
Stereo
Fuse
Switch in
Biamp
(Right)
Position
Bi-Amp Hookup Illustration

MOSCODE 401HR INSTRUCTION MANUAL
6
Operation
Initial Power On
After securing all connections to the signal source and speakers, connect the power cord
to the IEC power connector on the back panel next to the fuse. Plug the other end into the
AC wall outlet and you’re ready to enjoy your Moscode. Push in the round button on the
front panel to turn your Moscode 401HR on.
The Moscode Logo Status Indicator/ Hi-Temp
The Moscode 401HR features a cool edge-lit glass insert in the faceplate. When the
amplifier is powered, the logo is softly illuminated indicating power is present. During
warm-up, the logo’s illumination varies intensity during 3-second intervals while the
amplifier remains muted. Once stabilized for operation the muting circuit releases and the
Moscode logo stays on brightly. You may adjust the logo intensity with a control on the
back panel, top dead center.
If the amplifier overheats, the amplifier’s thermal sensors turn the amplifier off, and the
logo GLOWS BIGHT RED. Simply wait for the amplifier to cool off. It will restart when the
heat-sink temperature drops to a safe level. This may indicate that ventilation is
inadequate.
Power Up Sequence
Powering up your Moscode 401HR just requires a push on the large button on the front
panel. (Alternately the 12 volt remote trigger input may be used to turn you amp on.)
There will be an initial click of the amplifier’s Soft Start and Warm-Up Muting Delay
circuits. Soft Start limits the input current for the first few seconds to reduce stress on the
tubes and power supply. After about 5 seconds, you’ll hear another click and full power is
applied to the amplifier. You’ll notice the Moscode logo blinking, and when it stops, you’re
ready to go.
Note: If you are using the 12 volt Remote Power-On feature the front panel button should
be left in the off position (out). If left on the amplifier won’t respond to the remote power
off command.
 Loading...