


Fleur De Lis Swing
FSMVPT 2067
Customer Service: (888) 922-2336, 7:00am to 12:00am Everyday CST
Live Chat @ Academy.com: 24/7
Made in China
Please keep this instruction manual for future reference
Assembly Instructions
& User’s Manual
Brand Logo

Table of Contents
Page 1 of 7
Note: Before beginning assembly of product, make sure
all parts are present. Compare parts with package content
list and hardware contents above. If any part is missing or
damaged do not attempt to assemble the unit. Contact
customer service for replacement parts.
Warnings………………………………………………………………..…2
Tools and Parts…………………………………………………………...2
Assembly Instructions…………………………………………………....4
Care and Maintenance……………………………………………...……6
Warranty Information………………………………………....................7
Warnings
Page 2 of 7
This product requires adult assembly. Keep screws and parts away from children.
Please read this manual before assembly or use.
Do not tighten nuts or screws until assembly is complete.
Before assembly, check the package contents carefully to ensure that all part are included.
For missing or replacement parts, contact customer service at (888) 922-2336.
SKU#: 102634258 Style#: FSMVPT2067
NOTE: Mounting hardware not included
Hardware required to hang swing is not included and is the sole responsibility of the
purchaser, the manufacturer assumes no responsibility for improper mounting hardware
being used.
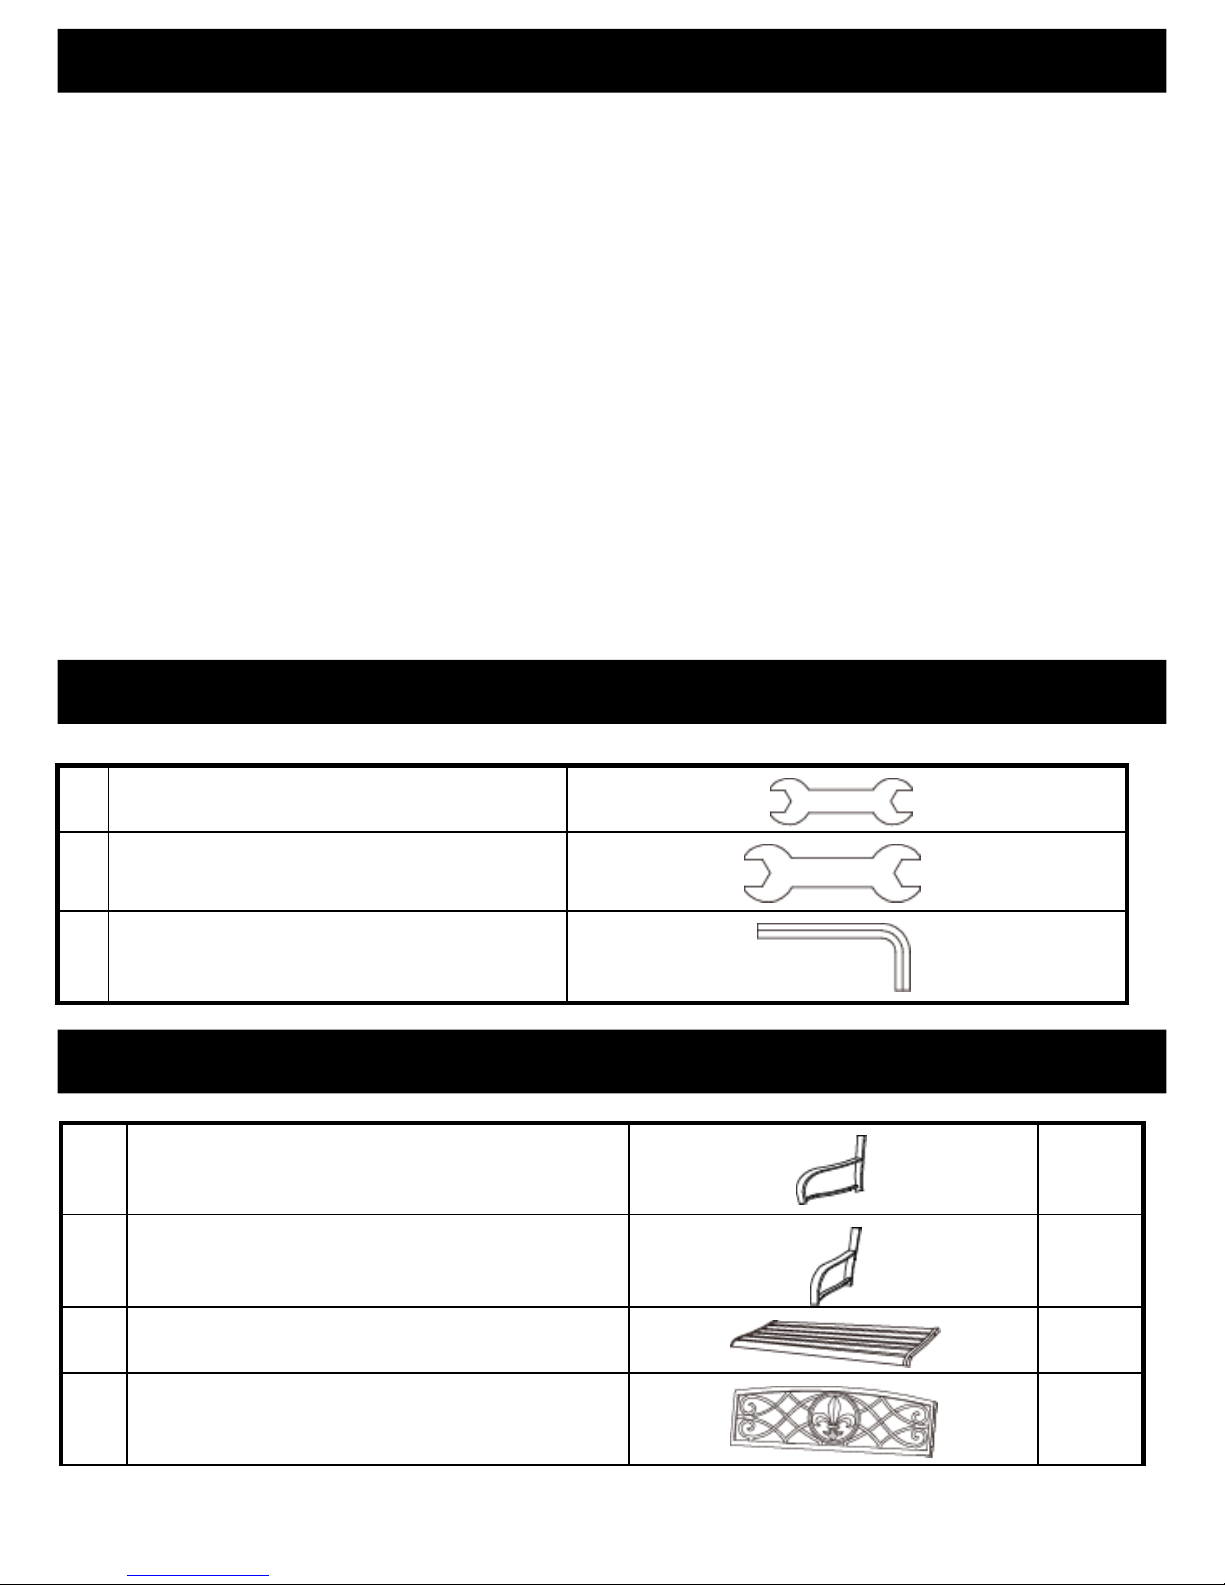
1 M6 Wrench
2 M10 Wrench
3 Allen Wrench
Tools Required (Included)
Parts List
A Left Arm 1
B Right Arm 1
C Seat 1
D Back 1

Hardware
E M6 x 70mm Bolt 2
F M6 x 50mm Bolt 4
G M10 x 53mm Bolt 2
H M10 x 73mm Bolt 2
I M6 Nut 6
J M10 Nut 4
K Nut Cap 6
L M6 Washer 6
M M10 Washer 4
Q Chain ( including clips) 2
Page 3 of 7

Assembly Instructions
Step 1:
Attach swing back (D) to left arm (A)
and right arm (B) at position 1 & 2,
using bolt 2X(H), M10 washer 2X(M)
and M10 nut 2X(J).
Attach the swing back (D) to left arm (A)
and right arm (B) at position 3 & 4,
using bolt (E), M6 washer (L) and M6
nut (I).
Hand tighten only.
Step 2:
Attach seat (C) to left arm (A) and right
arm (B) at position 1 & 2, using bolts
2X(F), M6 washers 4X(L), M6 nuts
4X(I).
Hand tighten only.
Page 4 of 7

Assembly Instructions
Step 3:
Attach bolts 2X(G), M10 washers
2X(M) and M10 Nuts 2X(J) to the left
arm (A) and right arm (B) as shown.
Hand tighten only.
Step 4:
Make sure the swing stands level and
straight (90) on the floor.
Tighten all nuts and bolts using
wrench(N & O) and Allen wrench (P).
Cover all M6 nuts by nut caps 6X(K).
Attach chain clip 4X(Q) to left arm (A)
and right arm (B) as shown.
The swing is now ready to be hung.
Consult your local hardware store for
proper hanging hardware.
Page 5 of 7

Care and Maintenance
Page 6 of 7
This swing should be cleaned on a regular basis to promote safe use and prolong product life.
To clean, wipe the frame with a smooth damp cloth and air dry.
Do not use abrasive cleaners as they may damage or scratch the surface paint.
Do not leave this product in harsh weather conditions for extended periods.
For extended product life, the swing should be stored indoors or covered during prolonged periods
of non-use.
Storing in a dry location will help prevent rust.

Warranty Information
Page 7 of 7
The appliance has been manufactured under the highest
standards of quality and workmanship. We warrant to the
original consumer purchaser that all aspects of this product will
be free of defects in material and workmanship for one year
from the date of purchase. A replacement for any defective
part will be supplied free of charge for installation by the
consumer. Defects or damage caused by the use of other then
genuine parts are not covered by this warranty. This warranty
shall be effective from the date of purchase as shown in the
purchaser receipt.
This warranty is valid for the original consumer purchaser only
and excludes industrial, commercial or business use of the
product, product damage due to shipment or failure which
results from alteration, product abuse, or product misuse,
whether performed by a contractor , service company , or
consumer. We will not be responsible for labor charges and/or
damage incurred in installation, repair or replacement nor for
incidental or consequential damage.
 Loading...