

BWL-0625 | Mosaic LED Light Bank 05/2012
www.limelite.uk.com
by
operating instructions
modular LED light-bank system
TM
/limelitevideo
contents
Information
Legal Notice 2
CE Mark 2
Safety Notes 3
Warranty 16
Operation
Controls 4
Start up 5
Mounting your Mosaic 5
User Mode 6
DMX Mode 7
F/Stop Mode 8
Joining Mosaic Panels 11
Attaching Barn-Doors 12
Accessories
Effects & Mounting Accessories 14
Mosaic Specifications 17
All Bowens products are certified by
the CE mark. The CE certified mark
is a declaration of conformity to the
required EEC directives 89/336/EEC
‘Electromagnetic Compatibility’ and
73/23/EEC ‘Low Voltage Directive’.
Legal Notice.
Limelite®, Bowens® and ‘the power behind the picture’®
are registered trademarks of Bowens International Ltd.
Due to our policy of continual product improve ment,
Bowens International Ltd reserves the right to change
equipment specifications at any time and without notice.
The information contained in this user guide should not be
relied on solely befo re making a purchase, seek further
information from your retailer.
© 2012 Bowens International Ltd.
modular LED light-bank system
TM
3 - Mosaic | Introduction & Safety Notes.
introduction
The MosaicTMLED light bank is a compact
continuous light source designed by working
closely with photography and video creatives to
develop a robust, reliable and versatile unit that
meets the exacting high standards demanded in
professional production today, at the same time
remaining simple and intuitive to use.
In order to obtain the full benefit from your
purchase, please take a few moments to
familiarise yourself with these operating
instructions.
For more information on our range of cross-media
lighting solutions, see our website at:
www.limelite.uk.com
safety notes
always... never...
• Avoid placing cables where they can be tripped over.
Protect from heavy, sharp or hot objects, which may
cause damage & replace damaged cables
immediately.
• All servicing must be carried out by a Bowens
authorised service centre.
• Always remove the power cord by gripping the plug.
NEVER pull the cord.
• Ensure that any extension cord used has a suitable
current rating to prevent overheating and never use
coiled extension cords.
• Use in an environment where moisture or flammable
vapour is likely to come in contact with the unit.
• Restrict air vents while in use.
• Use a unit with damaged housing, mouldings or
LEDs. If the unit is dropped or damaged in
any way, always have it checked before using.
• Operate the unit without a safe grounded AC supply.
DMX & Power Accessories 15
Remote Link 9
Power Sources 10
Diffusers & Filters 13

5 - Mosaic | Mounting.
4 - Mosaic | Controls.
controls
1. Ensure the mains power source is off.
2. Connect the Mosaic power supply unit to a
mains power socket and to the Mosaic DC in
socket.
3. Switch the mains power source on, then
switch on the Mosaic.
4. The unit will power up to the last saved level
and the display will indicate the power setting.
start up
mounting
USR
FST
END
DMX
DMX IN DMX OUT POWER ON/OFF 18V DC
1. Diffuser / Filter Slot
2. Tilt Bracket Lock
3. Mosaic Joining Plate
4. DMX / User Mode Select Button
5. Battery Mount
6. Power Level / DMX Channel Up/Down
7. 5/8” Female Mount
8. Swivel / Tilt Yoke & Mount (U Bracket)
9. DMX / Remote Link In
10. DMX / Remote Link Out
11. Save / End Select Button
12. Power Adaptor Mount
13. Power Switch
14. DC Power In Socket
1 2 3 4 65
1413121110987
A
B
Always mount your Mosaic on a dependable
stand or support system.
Standard Mounting.
The 5/8” female mount on the swivel/tilt yoke
allows two ways of mounting to the stand or
support.
Method A, is standard upright.
Method B, allows the light to be mounted at a 90º
angle to the stand so the light can point down
without obstruction.
2 and 4 Bank Cine Stand Mounting.
To mount onto a Cine Stand with a universal
28mm socket, first remove the locking knob from
the 5/8” bracket mount and slot the mount inside
the stand socket until the bracket rests on top of
the stand mount.
C

7 - Mosaic | DMX Mode.
6 - Mosaic | User Mode.
user mode dmx mode
Power up.
When the Mosaic unit is switched on it will step up in power from 000 to 255, or the last saved power
level, as indicated by the display screen.
The default mode is user mode. This is confirmed by the LED indicator and the
graphic on the display screen once the unit has reached the desired power level.
User Mode.
The - button will lower the Mosaic light output by one, if the button is pressed and held the
output will keep decreasing.
The + button will increase the Mosaic light output by one, if the button is pressed and held
the output will keep increasing.
To save the current light output level in user mode, press and hold the
save button until the display screen indicates that the value has been
saved.
When the unit is next powered up, the unit will light from 000 up to the saved light output level and will
remain in user mode.
Remote Link Mode (Page 9).
To control multiple Mosaic units from one unit, all units must be in ‘user mode’.
Change Mode.
To switch between User, DMX and FST mode, press the mode
button. The unit will switch between the three modes on each
button press as indicated by the LED indicators and the display.
DMX Mode.
The - button will lower the DMX address by one, if the button is pressed and held the
output will keep decreasing to the minimum address of 001.
The + button will increase the DMX address by one, if the button is pressed and held the
output will keep increasing to the maximum address of 256.
If the Mosaic unit is at the end of a DMX chain it must be set to
END. Press the End button once, END status will be confirmed by
the LED indicator and the graphic on the display screen.
To save the current DMX address, DMX mode and DMX END status, press and hold the
Save button. When the unit is next powered up, it will power up with the LEDs out and with
the DMX address and END status set. The unit will wait for a valid DMX value for this DMX
address, the LED output will then go to that value.
• Any changes to mode, address or END status should be saved to ensure the same settings are
used after the unit has been switched off.
• DMX cables should only be connected or disconnected while the Mosaic is switched off.
• Only use DMX cables to link a DMX controller with Mosaic units. Microphone cables or ethernet
cables should not be used.
• Spare lines in DMX cables should not be used to pass control voltages other than DMX/RDM
standard signals. i.e. mains power.
USR
USR
USR
FST
USR
FST
DMX
DMX
USR
FST
USR
FST
DMX
END
DMX
END
USR
FST
USR
FST
DMX
END
DMX
END
USR
FST
USR
FST
USR
FST
USR
FST
DMX
END
DMX
END
USR
FST
DMX
END

f/stop mode remote link mode
8 - Mosaic | F/Stop Mode.
In addition to DMX control, banked (2x1 or 2x2) Mosaic units can be linked together via a standard
ethernet cable, allowing all units to be controlled from one control panel. All units must be set to ‘user
mode’.
Creating a chain.
The first unit in the chain of units must be set to END. Press the End button once, END status will be
confirmed by the LED indicator and the graphic on the display screen. Plug one end of an ethernet
cable into the OUT socket and plug the other end into the IN socket of the next unit. Plug the OUT
socket of this unit into the IN socket of the next and so on until you reach the last unit in the chain.
The last unit in the chain must also be set to END by pressing the End button once.
Example:
Controlling the chain:
Once the chain has been set up, the light level on all units will be set to the same value. Changing the
value on any unit will change all other units in the chain.
DMX IN DMX OUT POWER ON/OFF 18V DC
DMX IN DMX OUT POWER ON/OFF 18V DC DMX IN DMX OUT POWER ON/OFF 18V DC DMX IN DMX OUT POWER ON/OFF 18V DC
USR
FST
END
DMX
USR
FST
END
DMX
USR
FST
END
DMX
USR
FST
END
DMX
9 - Mosaic | Remote Link Mode.
Change Mode.
To switch between User, DMX and FST mode, press the mode
button. The unit will switch between the three modes on each
button press as indicated by the LED indicators and the display.
FST Mode.
The - button will lower the f/stop value by 1/10th of a stop from 6.5 (max) to 1.5 (min).
If the button is pressed and held the output will keep decreasing.
The + button will increase the f/stop value by 1/10th of a stop from 1.5 (min) to 6.5 (max).
If the button is pressed and held the output will keep increasing.
To save the current f/stop value and mode, press and hold the Save button.
When the unit is next switched on, it will power up from 000 to the f/stop value previously
saved.
Any changes to mode, or f/stop value will need to be saved to be used after the unit has been
switched off.
USR
FST
USR
FST
DMX
END
DMX
END
USR
FST

power sources
10 - Mosaic | Using Batteries.
11 - Mosaic | Joining Mosaic Units.
joining mosaic units
The Mosaic LED Light Bank is designed to be
versatile and can be powered by either mains or
battery power.
The Mosaic can be powered using mains power
using the 100-240V AC power supply unit.
The unit can also be powered from an Anton
Bauer or V-mount battery with a 14.4V output (up
to a maximum weight of 1.5kg). The runtime of
the Mosaic will be dependant on rating of battery.
If using a battery you should ensure that the
Anton Bauer or V-mount battery plate is
connected to the DC input plug on the Mosaic
unit using the attached connecting cable.
Always ensure that the power switch on the unit
is in the ‘Off’ position before connecting the cable
or the batteries.
Only use a single Anton Bauer or V-mount battery
on the mounting plates.
DO NOT USE stackable batteries on the Mosaic
unit as this will put undue stress on the Mosaic,
and cause the unit to be unbalanced, this could
damage the Mosaic unit.
The maximum working voltage of the Mosaic
LED Light Bank is 18V DC. Exceeding this
operating voltage will cause damage to the
unit.
Mounting Batteries.
• Locate the
battery mount on
the rear of the
Mosiac unit.
• Slot the battery
into the mount
until it clicks into
place. Then plug
the connecting
cable into the DC
input socket.
• The battery is
now mounted
and the Mosaic
unit is ready to
be used.
• To remove the
battery, unplug
the power cord
then press the
battery release
button.
Joining kits are available to allow Mosaic units to
be banked together in 2x1 or 2x2 configurations.
Creating a 2x1 Bank.
First remove the ‘U’ Bracket and joining plates from
two Mosaic units. The 2x1 Joining Kit is supplied
complete with a 2x1 ‘U’ Bracket and a support
spine with left, right and central joining plates.
Simply attach each Mosaic unit to the joining kit as
shown in Figure 2 & 3 and secure the units with the
captive fasteners. You can now attach the mains
or battery supply toget her with DMX/E thernet
cables and the 2x1 bank is ready to use.
Creating a 2x2 Bank.
To create a 2x2 b ank, the process is simila r.
Remove the ‘U’ Brackets and Joining plates from
four Mosaic units then attach them one-by-one to
the pre-assembled 2x2 Joining Kit, fastening them
securely in place as you go with the captive
fasteners supplied. Finally add power and
DMX/ethernet cables as required.
SAFETY NOTE:
When mounting Mosaic units from a ceiling
track system or similar mount, always secure
the units to the mount using a safety cable.
Figure 1
Figure 2
Figure 3
Figure 4

attaching barn-doors
12 - Mosaic | Attaching Barn-Doors.
13 - Mosaic | Diffusers & Filters.
diffusers & filters
Colour LT Effect
Cosmetic Peach 57%
Adds subtle warm
highlights.
Moroccan Frost 57.2%
Smooths flood washes in
large areas.
Medium Amber 57.6%
Emulates afternoon
sunlight or candlelight.
Light Lavender 37.8%
Excellent for general area
washes.
Pale Blue 54.8%
Creates an overcast or cold
weather look.
Bright Pink 14%
Deep saturated pink. Great
for down/back lighting.
Light Red 11%
Good for TV and theatre as
well as cycloramas.
Bedford Blue 18%
Warm smokey blue, good
for skin tones.
Liberty Green 67%
Creates mystery and
suspense.
Sunlight Yellow 80%
Produces a strong sunlight
effect.
Colour LT Effect
Full CT Orange 55.4%
Converts 5600K daylight to
3200K tungsten.
1
⁄2 CT Orange 71%
Converts 5600K daylight to
3800K tungsten.
1
⁄4 CT Orange 79%
Converts 5600K daylight to
4600K tungsten.
White Diffusion 36%
Moderate diffuser that
creates a soft, even effect.
1
⁄2 Hanover Frost n/a
Light frost effect to soften
shadow & reduce hot spots.
White Frost 39%
Medium diffuser to soften
beam characteristics.
VB1506: Colour FX Filter Kit VB1505: Colour Control Filter Kit
LT = Light Transmission.
The percent of total visibl e light from the Mosaic
that is transmitted through the filter sheet.
The lower the nu mber, the less visible light
transmitted.
Filter Sets.
Two filter effects kits are available for the Mosaic.
These kits contain sets of gels or filters which simply slot into the front of the Mosaic panel to create
various colour or diffusion effects on the light output.
Each kit contains one each of the following colours or filters.
Light output from the Mosaic can be controlled
using one of the optional barn-door sets which are
available for individual units or banked units of two
or four.
Single Mosaic Unit.
The four-leaf barn-door set for the single Mosaic
unit is easily fitted by simply placing the barn-door
frame over the front of the unit and securing with
the thumbscrews at each corner.
Banked 2x1 Mosaic Units.
The two-leaf barn-door set for use with a 2x1
banked set of Mosaic units can be quickl y
assembled and fitted as follows.
First assemble the frame by slotting the sections
together. The frame can t hen be placed over the
front of the unit and, secured in place at each
corner. Finally, add the barn-doors to the frame.
Banked 2x2 Mosaic Units.
The two-leaf barn-door set for use with a 2x2
banked set of Mosaic units is fitted as above.
As the frame is sq uare, the barn-doors can b e
oriented to be top and bottom or side control.
Locking or loosening Barn-Doors.
The barn-door tension can altered by adjusting
the M3 self-locking nuts as required.

15 - Mosaic | Accessories.
accessories
3 pin XLR-RJ45 Adaptor
For Converting an older
DMX 3 pin Male or Female
XLR plug to an RJ45 male
plug.
VB1565 Male to male
VB1566 Female to male
DMX / Ethernet Cable
DMX / Ethernet cable for
linking mosaic units
together to form light
banks or chains.
VB1580 1m cable
AC/DC Power Adaptor
Spare or replacement 18V
AC Adaptor Power supply
unit. Power cord not
included.
VB1535
5 pin XLR-RJ45 Adaptor
For Converting an older
DMX 5 pin Male or Female
XLR plug to an RJ45 male
plug.
VB1570 Male to male
VB1571 Female to male
Anton/Bauer Battery Plate
For powering Mosaic units
from an Anton/Bauer
®
G-
mount, or similar, battery.
VB1555
V Mount Battery Plate
For powering Mosaic units
from a V-mount fitting
battery.
VB1556
AC Power Cord
6m power cord for use
with the AC/DC Adaptor
Power Supply Unit.
VB1541 UK
VB1540 Euro
VB1542 US
14 - Mosaic | Accessories.
accessories
Colour Control Set
A set of 6 filters for
adjusting the intensity or
colour temperature of the
light output.
VB1505 Colour Control
1x1 Barn-Door Set
A set of four-leaf (top,
bottom and sides) barndoors for use with a single
Mosaic unit.
VB1500
2x1 Barn-Door Set
A set of two-leaf (top,
bottom or sides) barndoors for use with two
joined Mosaic units.
VB1501
2x2 Barn-Door Set
A set of two-leaf (top,
bottom or sides) barndoors for use with four
joined Mosaic units.
VB1502
2x1 Joining Kit
For joining two Mosaic
units together. Includes
joining plate and an
extended swivel/tilt yoke.
VB1515
2x2 Joining Kit
For joining four Mosaic
units together. Includes
joining plates and a larger
swivel/tilt yoke.
VB1516
Safety Cable
Recommended for use
when suspending lights
from ceiling rail systems
and high stands.
BW2619
Colour FX Set
A set of 10 filters for
adding colour or cosmetic
effects to the light output.
VB1506 Colour FX

All Bowens products are covered by a two-year
warranty against any faulty design, materials and
workmanship.
If a product does not work on arrival, or up to a
maximum period of four weeks from the date of
dispatch of the product, it should be returned to
the dealer/retail outlet from where it was
purchased for exchange (subject to stock
availability). If the faulty unit was part of a kit, the
dealer/retailer may choose to only replace the
unit and not the entire kit.
Alternatively the dealer may offer to repair the unit
as soon as possible at no charge.
If neither an exchange nor repair is possible for
the faulty unit, then a full refund may be made.
If a warranty fault occurs after the initial fourweek period (and within the maximum two year
warranty period), then the unit should be returned
to the dealer, who will arrange to repair the unit as
soon as possible, at no charge.
This warranty does not apply to consumable
items such as flash tubes, modelling lamps, fuses
or consumable type batteries.
Should a unit be returned at any time within the
two year warranty period, and it is judged to have
experienced any of the following;
Failure to follow working instructions correctly,
accidental or willful damage, misuse, alteration or
repair by a non-authorised Bowens service/repair
centre, then the warranty will be deemed invalid
and any repairs required will be payable by the
owner.
The dealer, in advance of undertaking any work
that may be required, should notify the cost of
any repairs to the owner.
No warranty repairs can be undertaken to any
units without proof of purchase.
All warranty repairs or returns must be conducted
with the dealer from where the product was
purchased.
Other terms and conditions may be applicable in
specific countries, if stated at the time of
purchase.
warranty specifications
16 - Mosaic | Warranty.
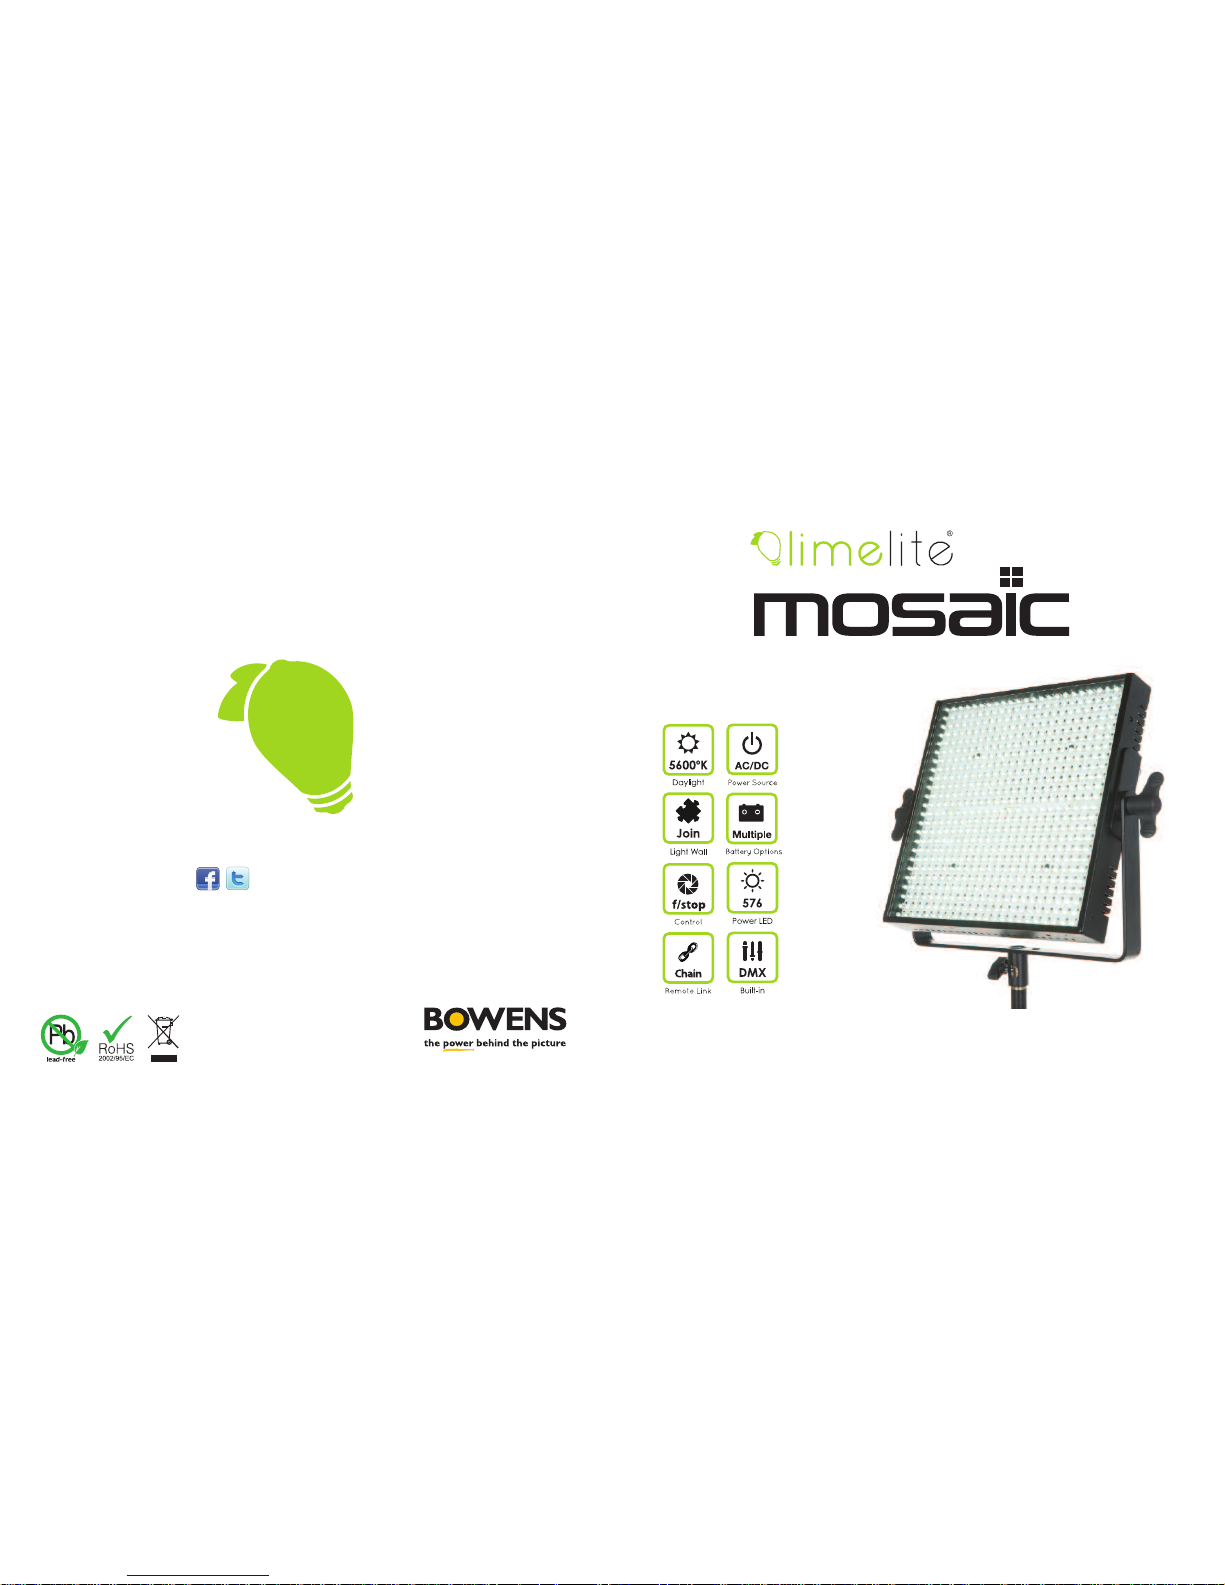
Mosaic LED daylight bank
576 x Power LED
40º
4200 Lux @1m
Stepless 0-100%
Digital control panel / DMX
Digital Display
>85
5600K ±300K
12-18V DC
45W at 18V
18V AC Adapter 100-240V
f/4.5 @ 1m
Built-in RJ45
350mm
85mm
375mm
1.4kg
VB1000
|NOTE: Add UK, EUR or US to code to ensure correct mains plug.
Model:
Bulb:
Light Angle:
Luminous Flux:
Power Variation:
Power Control:
Power Indication:
Colour Rendering Index:
Colour Temperature:
Operating Voltage:
Power Draw:
Power Supply:
Guide No. (m/100 ISO)
DMX I/O:
Width:
Depth:
Height:
Weight:
Part No.:
17 - Mosaic | Specifications.
Accessories:
Colour Control Filter Set VB1505
Colour Effects Filter Set VB1506
1x1 Barn-Door Set VB1500
2x1 Barn-Door Set VB1501
2x2 Barn-Door Set VB1502
2x1 Joining Kit VB1515
2x2 Joining Kit VB1516
Ceiling Mount Kit VB1517
1m DMX/Ethernet Cable VB1580
AC/DC Power Adaptor VB1535
Anton/Bauer Battery Mount VB1555
V-Mount Battery Adaptor VB1556
Safety Cable BW2619
 Loading...