

Page 1

MOSA 4491
User Manual
Edition 3.0
Update:2008/06/23
DCC NO. 9171004703
Page 2

User Manual
1 Safety Instruction
Warning
1. Do not attempt to service the product yourself. Any servicing of this product should be referred
to qualified service personal.
2. To avoid electric shock, do not put your finger, pin, wire, or any other metal objects into vents
and gaps.
3. To avoid accidental fire or electric shock, do not twist power cord or place it under heavy objects.
4. The product should be connected to a power supply of the type described in the operating
instructions or as marked on the product.
5. To avoid hazard to children, dispose of the product’s plastic packaging carefully.
6. Please read all the instructions before using this product.
2
Page 3

User Manual
Table of Contents
1 Safety Instruction...................................................................................................................2
2 Preface.....................................................................................................................................5
2.1 Features....................................................................................................................................5
3 Package Contents...................................................................................................................6
4 General Descriptions..............................................................................................................7
4.1 Panel.........................................................................................................................................7
4.1.1 Front Panel.....................................................................................................................7
4.1.2 Rear Panel.......................................................................................................................7
4.2 LED indicator...........................................................................................................................7
4.3 Connector.................................................................................................................................8
5 Application Structure ............................................................................................................9
6 Basic Configuration.............................................................................................................11
6.1 Connection of Network Cable................................................................................................11
6.2 Open Server Port to penetrate NAT .......................................................................................11
6.3 Connection of Console Cable ................................................................................................12
6.4 Configuration of My Phone Number.....................................................................................12
6.5 Verification and Check of Management Web........................................................................14
6.5.1 Basic Information..........................................................................................................14
6.5.2 IP Settings.....................................................................................................................15
6.5.3 Restart...........................................................................................................................16
7 Function Configuration.......................................................................................................17
7.1 Configure Authentication of Member....................................................................................17
7.2 Configure Forward Number...................................................................................................17
7.3 Make Call to Ext. of MOSA 4491 from MOSA IP-PBX.......................................................18
7.4 Make Call to MOSA 4491 then Offnet to PSTN or Mobile Phone .......................................19
7.4.1 Configure MOSA 4491..................................................................................................19
7.4.2 Configure Remote MOSA IP-PBX.................................................................................20
7.4.3 Dialing Example ...........................................................................................................21
7.5 Make call to MOSA 4491 then route to other MOSA IP-PBX..............................................21
7.5.1 Configuration of Extension Number.............................................................................21
7.5.2 Configuration of Phone Book .......................................................................................22
8
8.1 Configuration of Operator......................................................................................................23
Other Configuration............................................................................................................23
8.1.1 Built-in DISA.................................................................................................................23
8.1.2 Local Operator..............................................................................................................24
8.1.3 Network Operator.........................................................................................................25
8.2 Greeting of DISA...................................................................................................................25
8.2.1 Method to Record Greeting...........................................................................................26
8.2.2 Method to Listen Greeting ............................................................................................27
8.3 Instruction Greeting for User.................................................................................................28
8.3.1 Method to Record Instruction Greeting ........................................................................29
3
Page 4
User Manual
8.3.2 Method to Listen Instruction Greeting..........................................................................30
8.4 Application of Forward Map..................................................................................................30
8.5 Application of Offnet Map.....................................................................................................32
8.6 Application of Redirect Map..................................................................................................35
9 Management Web................................................................................................................37
9.1 Web Path: 1.System Config.\Basic Information....................................................................37
9.2 Web Path: 1.System Config.\1.2.Channel..............................................................................39
9.3 Web Path: 1.System Config.\1.3.Extension Number.............................................................40
9.4 Web Path: 1.System Config.\1.4.Broadcast Auth. .................................................................42
9.5 Web Path: 2.System Advanced\2.1.Member..........................................................................43
9.6 Web Path: 2.System Advanced\2.2.Offnet MAP...................................................................44
9.7 Web Path: 2.System Advanced\2.3.Forward MAP................................................................45
9.8 Web Path: 2.System Advanced\2.4.Behavior Setting............................................................46
9.9 Web Path: 3.IP Settings..........................................................................................................48
9.10 Web Path: 4.Phone Book .......................................................................................................50
9.11 Web Path: 5.File Transfer.......................................................................................................51
10 File Management..................................................................................................................53
10.1 File Type.................................................................................................................................53
10.2 Upgrade firmware by Management Web...............................................................................54
10.3 Upgrade firmware by FTP .....................................................................................................54
10.3.1 Software Update by FTP for File Type RUN and WEB................................................54
10.3.2 Update MEM file via FTP.............................................................................................57
11 Network Management.........................................................................................................59
11.1 Management by Console, and Telnet.....................................................................................59
11.1.1 List of all commands.....................................................................................................59
11.2 Management by Phone-set.....................................................................................................60
11.2.1 Command of phone set..................................................................................................60
12 Dialing Flow Chart...............................................................................................................61
13 Specification..........................................................................................................................62
Change History: Software Version 2.01 .0
We launch new
hardware and previous
hardware is phased out
New hardware has smaller dimension, more power-saving, more powerful and new
user-friendly management interface
Change History: Software Version from 1.00 to 1.05.0
Add new function and
bug fixed
Add new function and bug fixed
4
Page 5

User Manual
2 Preface
MOSA 4491 provides many Virtual Ports that can do Forward function for customer. This products
need to work with other MOSA IP-PBX/Gateway for Forward function.
2.1 Features
100 sets of Virtual Ports
Unlike other MOSA IP-PBX that has fixed ports (2、4、8、16 Ports), MOSA 4491 has 100 sets
of virtual ports
By using Redirect Map function and working with MOSA IP-PBX, system can expand
more extension ports and also penetrate traditional PBX
By using Redirect Map, extension Prefix can be assigned by this machine and extension suffix
is assigned by MOSA IP-PBX. It can expand more extension ports and also penetrate
traditional PBX
Call Forward Function
It has Call Forward function that redirect virtual port to other MOSA IP-PBX or to
PSTN/Mobile phone.
Built-in Auto Attendant
MOSA 4491 had built-in auto attendant. It provides auto attendant for each incoming call and
greeting can be recorded by extension phone set
Easy to Use and Configure
The same as other series of MOSA IP-PBX, it is easy to configure. Connect cable, input phone
number and IP address via system console, then it is able to communicate with other MOSA
IP-PBX around the world.
Allow to Use Private IP
MOSA 4600 can be connected to any MOSA products at any location around the world just
through the private IP address behind NAT.
Users Can Configure Call Forward Number by Themselves
Each user can dial IP call to this system and configure Call Forward destination (number) and
Offnet Forward destination (number)
Network Management
1. Complete Management Capabilities: Phone set, Console, Telnet and WEB
The machine provides the management tool via telephone set (by VODTEL's gateway),
system console, Telnet and Web Browser. Users can configure or modify the setting
through any telephone set, system console, or Telnet. System manager can browse
information through PC to manage the system no matter where he is.
2. Web and FTP Software Update
By Web browser and the FTP server that is embedded into this machine. The machine
provides file upload/download and firmware update.
5
Page 6

3 Package Contents
MOSA 4491 package Includes:
The MOSA 4491 Server
Power Core and adapter
RJ-45 network cable
Rubber foot
Console cable (optional)
User Manual
6
Page 7
4 General Descriptions
4.1 Panel
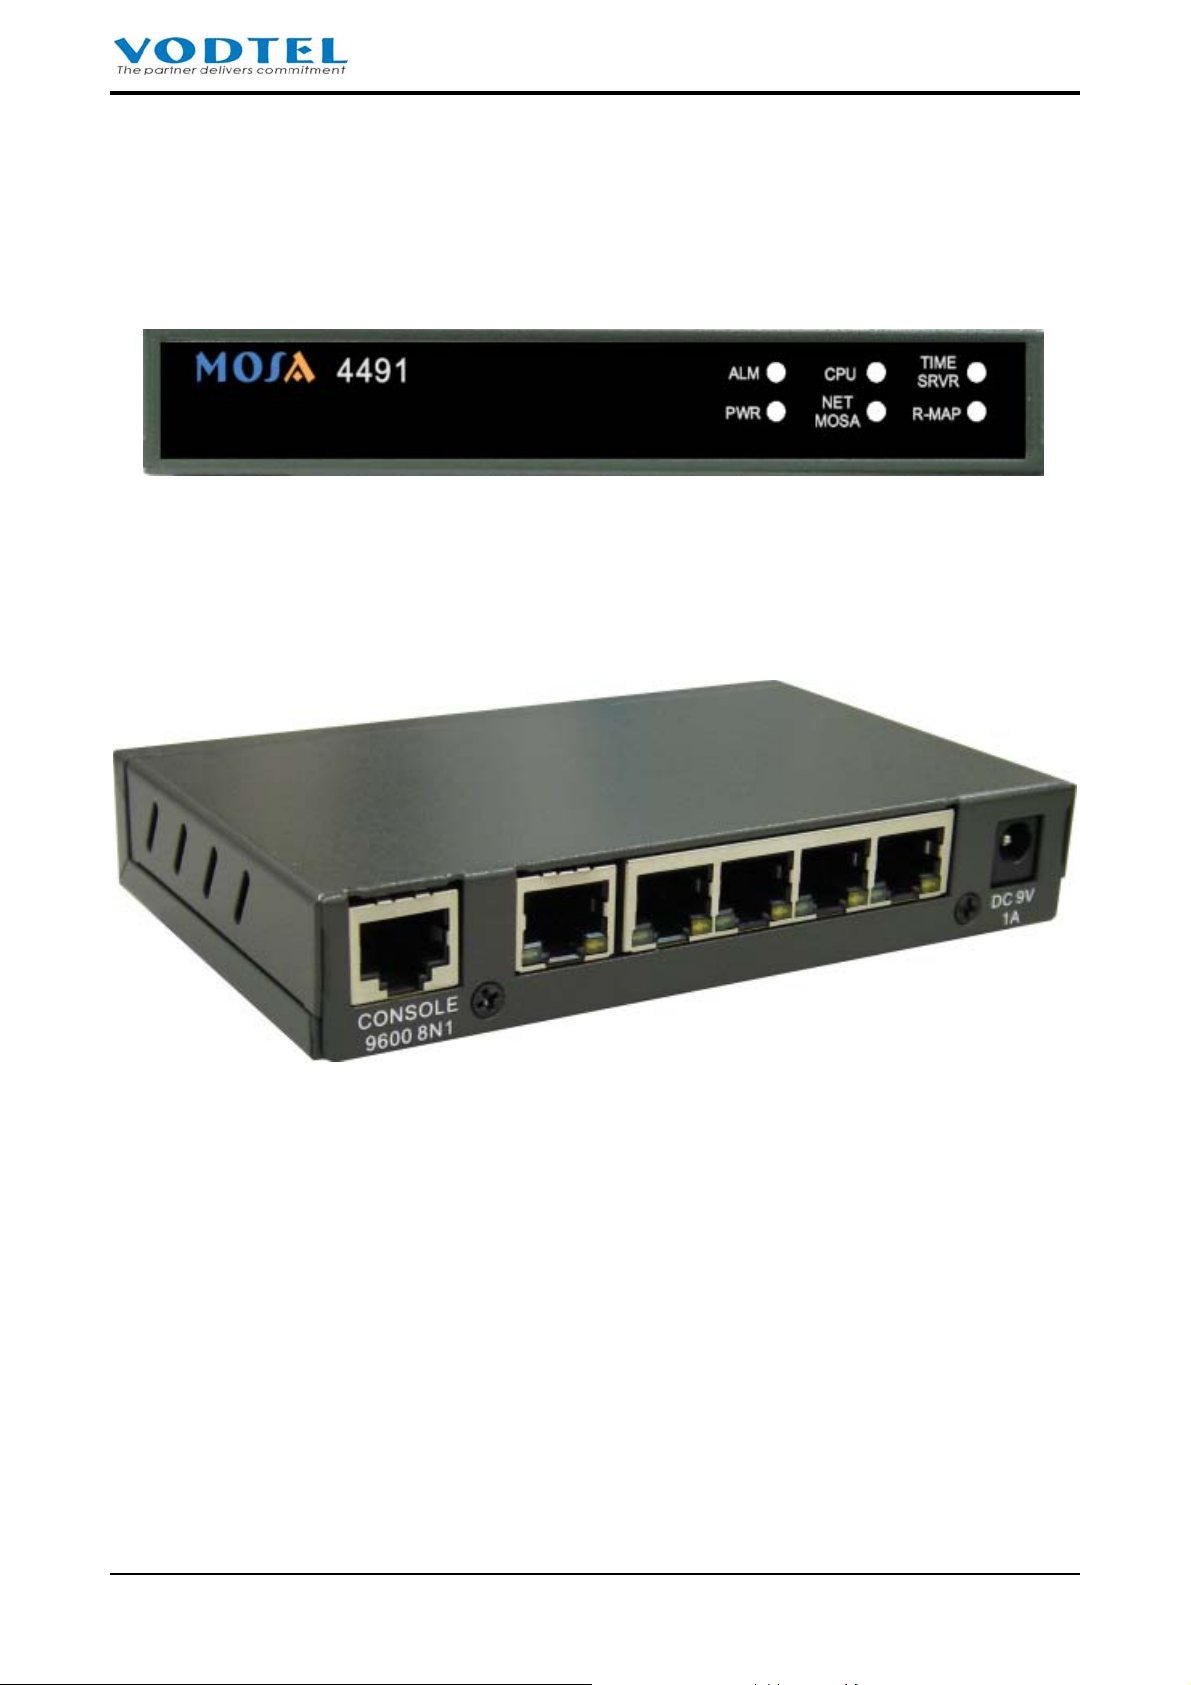
4.1.1 Front Panel
4.1.2 Rear Panel
User Manual
4.2 LED indicator
7
Page 8
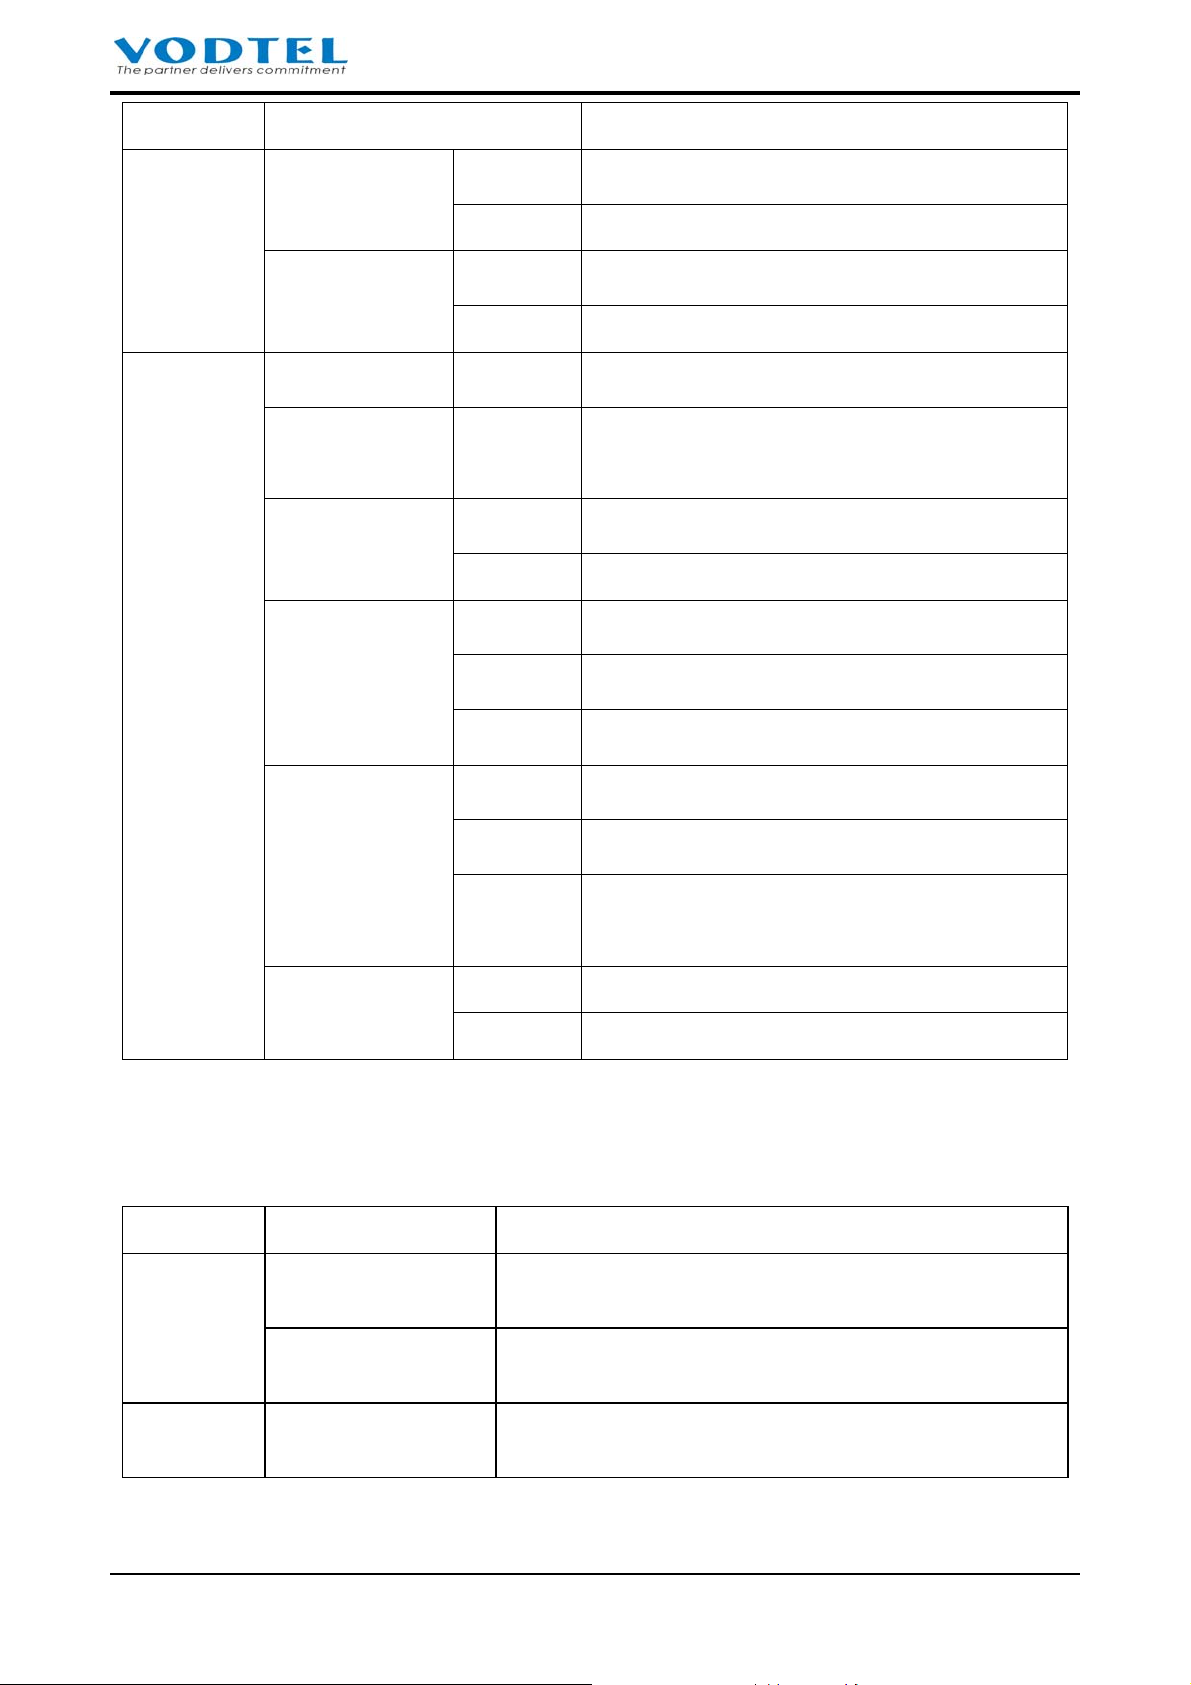
LED Label Description
User Manual
Front
Rear
Link/ACT (Green)
100Mbps (Yellow)
PWR
ALRAM
CPU/ACT
TIME SRVR
ON Network Linked Up
FLASH Sending/Receiving data packets
ON Transmission Rate is 100 Mbps
OFF Transmission Rate is 10 Mbps
ON Power supply normal
ON H/W error is detected when diagnostic test is
running.
ON CPU in normal operation
FLASH CPU is Running
ON Able to access to TIME SERVER
FLASH Trying to access to TIME SERVER
OFF NOT able to access to TIME SERVER
NETMOSA
R-MAP
ON Registered to NETMOSA
OFF Not registered to NETMOSA
FLASH Both NETMOSA and NETMOSA are configured,
but only one server is registered.
ON Redirect.map is uploaded
OFF No Redirect.map is uploaded
4.3 Connector
Connector Label Description
Network
1 RJ-45 connector, cascaded from other Switch/Hub is
suggested.
2, 3, 4, 5 RJ-45 connector, connect to LAN or cascaded to next
Switch/Hub is suggested.
RJ-45 CONSOLE Connect to system console. Connect to 9 pin serial port
(RS-232) of PC via Console cable.
8
Page 9
User Manual
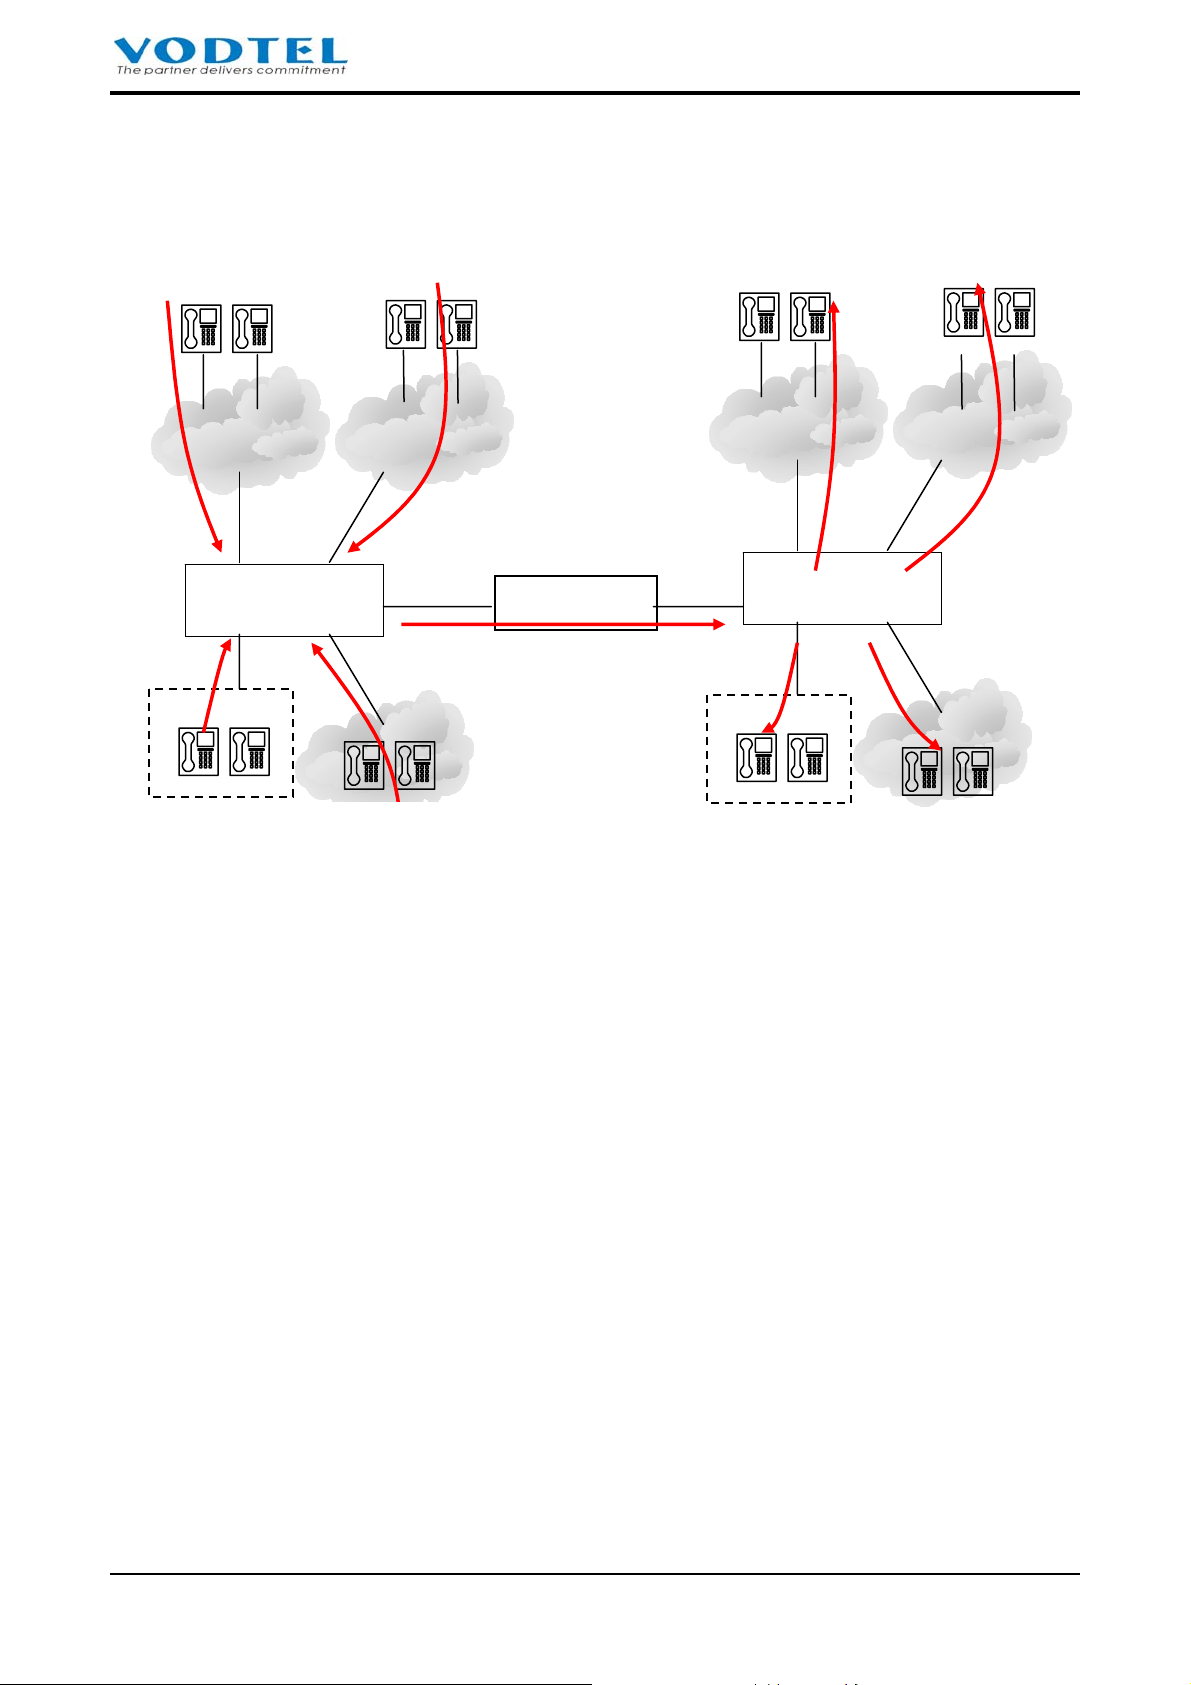
5 Application Structure
MOSA 4491 and MOSA IP-PBX work together can achieve many functions. Here is the
illustration.
One step or 2 steps dialing incoming call from trunk (PSTN, ITSP (Internet Telephony Service
Provider)) or line (Analog Ext., SIP Ext.) of MOSA IP-PBX to MOSA 4491 can be redirected to
line (Analog Ext., SIP Ext.) of remote MOSA IP-PBX directly or remote trunk (PSTN, ITSP
(Internet Telephony Service Provider)) of remote MOSA IP-PBX directly.
PSTN
MOSA IP-PBX
Series Products
Analog Ext.
ITSP
MOSA 4491
SIP Ext.
PSTN
MOSA IP-PBX
Series Products
Analog Ext.
ITSP
SIP Ext.
By using the Redirect map function of MOSA 4491, one-step dialing can penetrate traditional PBX
and it also expands usable extension number and no longer limited to the extension table of single
MOSA 4600 Plus
9
Page 10

User Manual
PSTN
MOSA IP-PBX
Series Products
Analog Ext.
ITSP
SIP Ext.
MOSA 4491
MOSA 4600 Plus
Traditional PBX
Analog Ext.
10
Page 11
User Manual
6 Basic Configuration
To configure the function of this machine, configure basic settings for PC to connect this machine
is required for configuration.
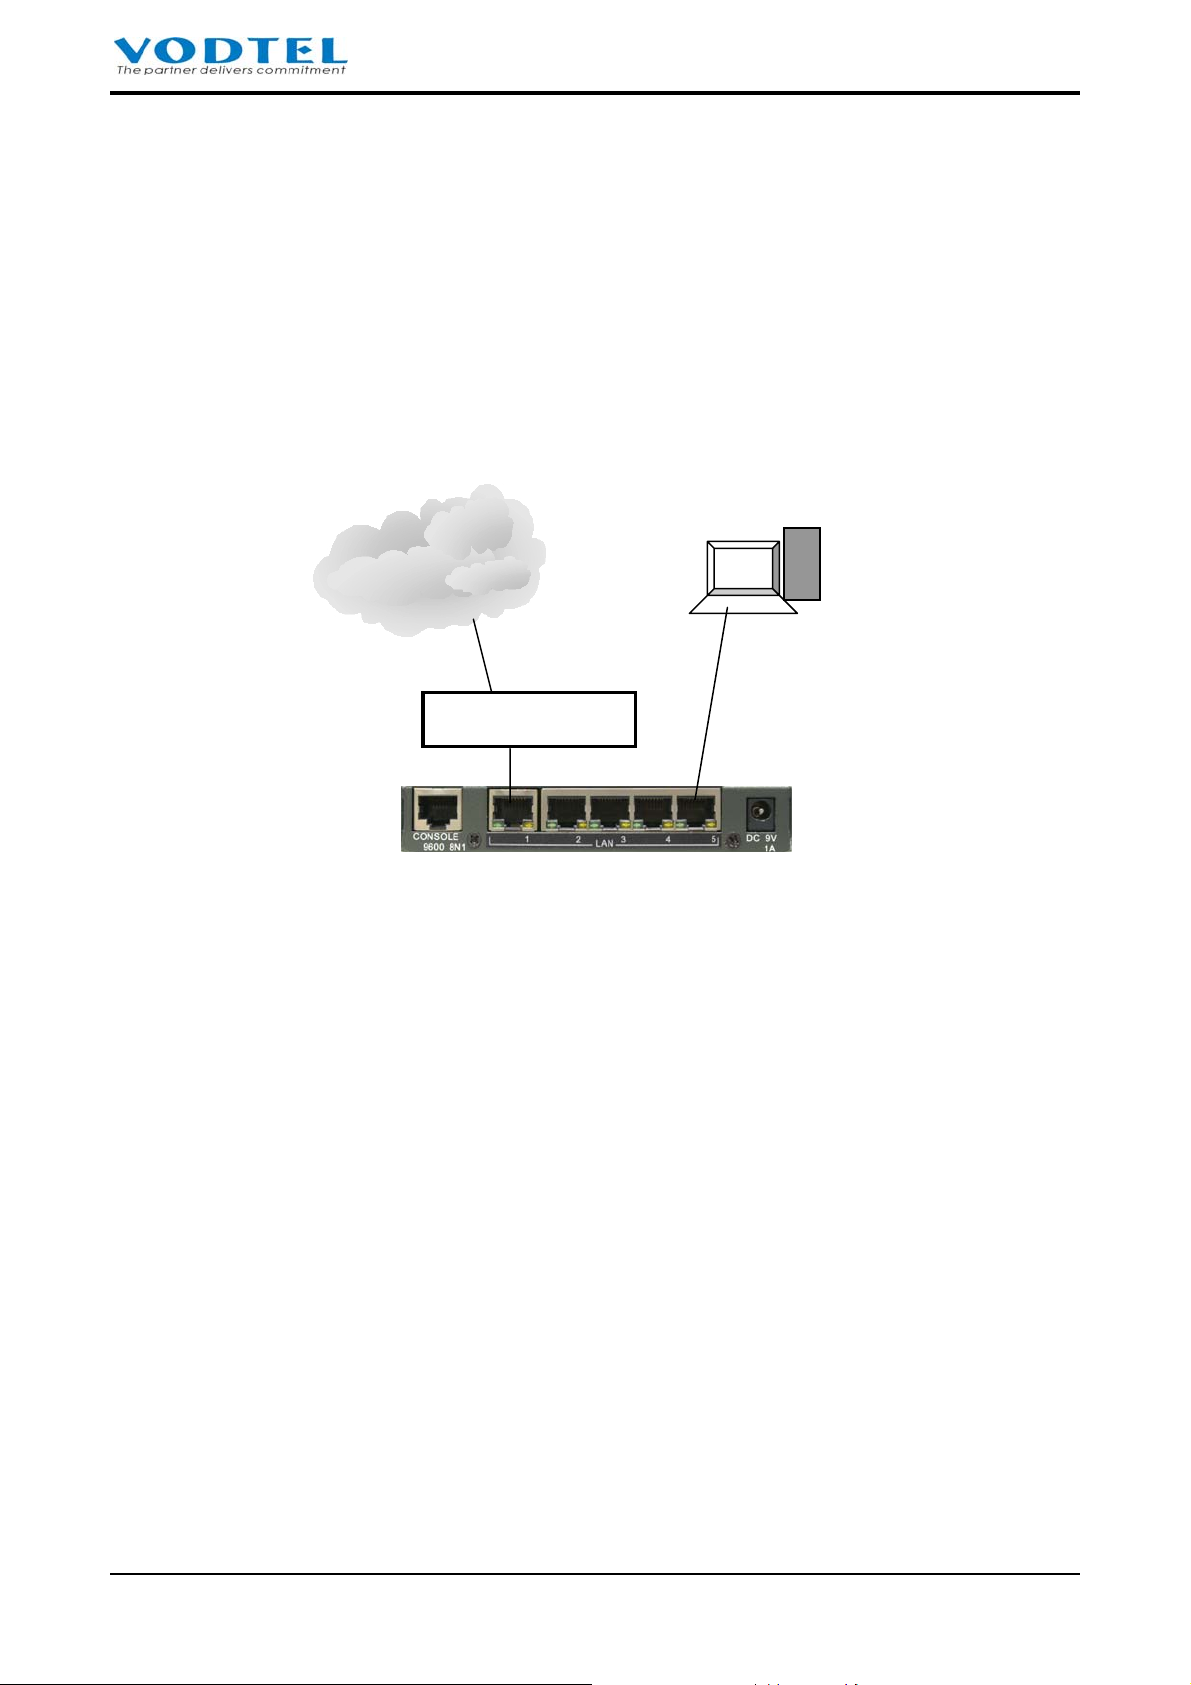
6.1 Connection of Network Cable
This machine provides 5 RJ-45 Ethernet switch port. It detects straight through and crossover
network cable automatically. Any ports can be connected to network. The connection figure below
is for your reference.
Please do confirm
z The Link/Act LED of PC network card is ON or blinking.
z 100Mbps (yellow) LED is ON and Link/ACT (green) LED is ON or blinking at network
port.
Otherwise, change port or LAN cable and retry it again
Note: To connect PC is for the configuration of this product. When configuration is done, no
PC is required to make or accept calls and all PCs can be shut down.
Internet/LAN
Optional
IP Sharing Device
PC
6.2 Open Server Port to penetrate NAT
In additional to connect this machine to Internet directly, MOSA 4491 may connect to IP Sharing
device and define the private IP Address to communicate with the other MOSA IP-PBX.
In the table followed, the port number used in MOSA 4491 is listed. Open the ports with port
number listed in the table to the firewall.
11
Page 12
User Manual
Packet type Signaling Port Number
Call Control UDP 2000
RTP Voice Packet UDP 4000 – 4199
FTP TCP 21
Web TCP 80
Telnet TCP 23
Description:
Normally every type of server uses the specific service port number, e.g. WEB server uses the port
of TCP 80, and FTP server uses the port of TCP 21. The configuration is to set mapping from the
specific port number to the internal private IP Address.
Therefore IP Sharing will transfer the packet, which is delivered to the specific port number, to the
corresponding private IP Address. For example, if the private IP Address 192.168.0.2 is used in the
LAN network, it should be mapping to a corresponding port number (TCP port 80 of IP Sharing
deviceÅÆ, 192.168.0.2 mapping port 80). Hence, any packets to TCP port 80 will be transferred
to TCP port 80 of IP Address "192.168.0.2". In this machine, UDP port 2000 is used for Packet of
Control, there should be a mapping port on the IP Sharing. (UDP port 2000 of IP sharing device
ÅÆIP of this machine, UDP port 2000).
Therefore, open Server Port at IP sharing device can let devices inside and outside of firewall can
communicate.
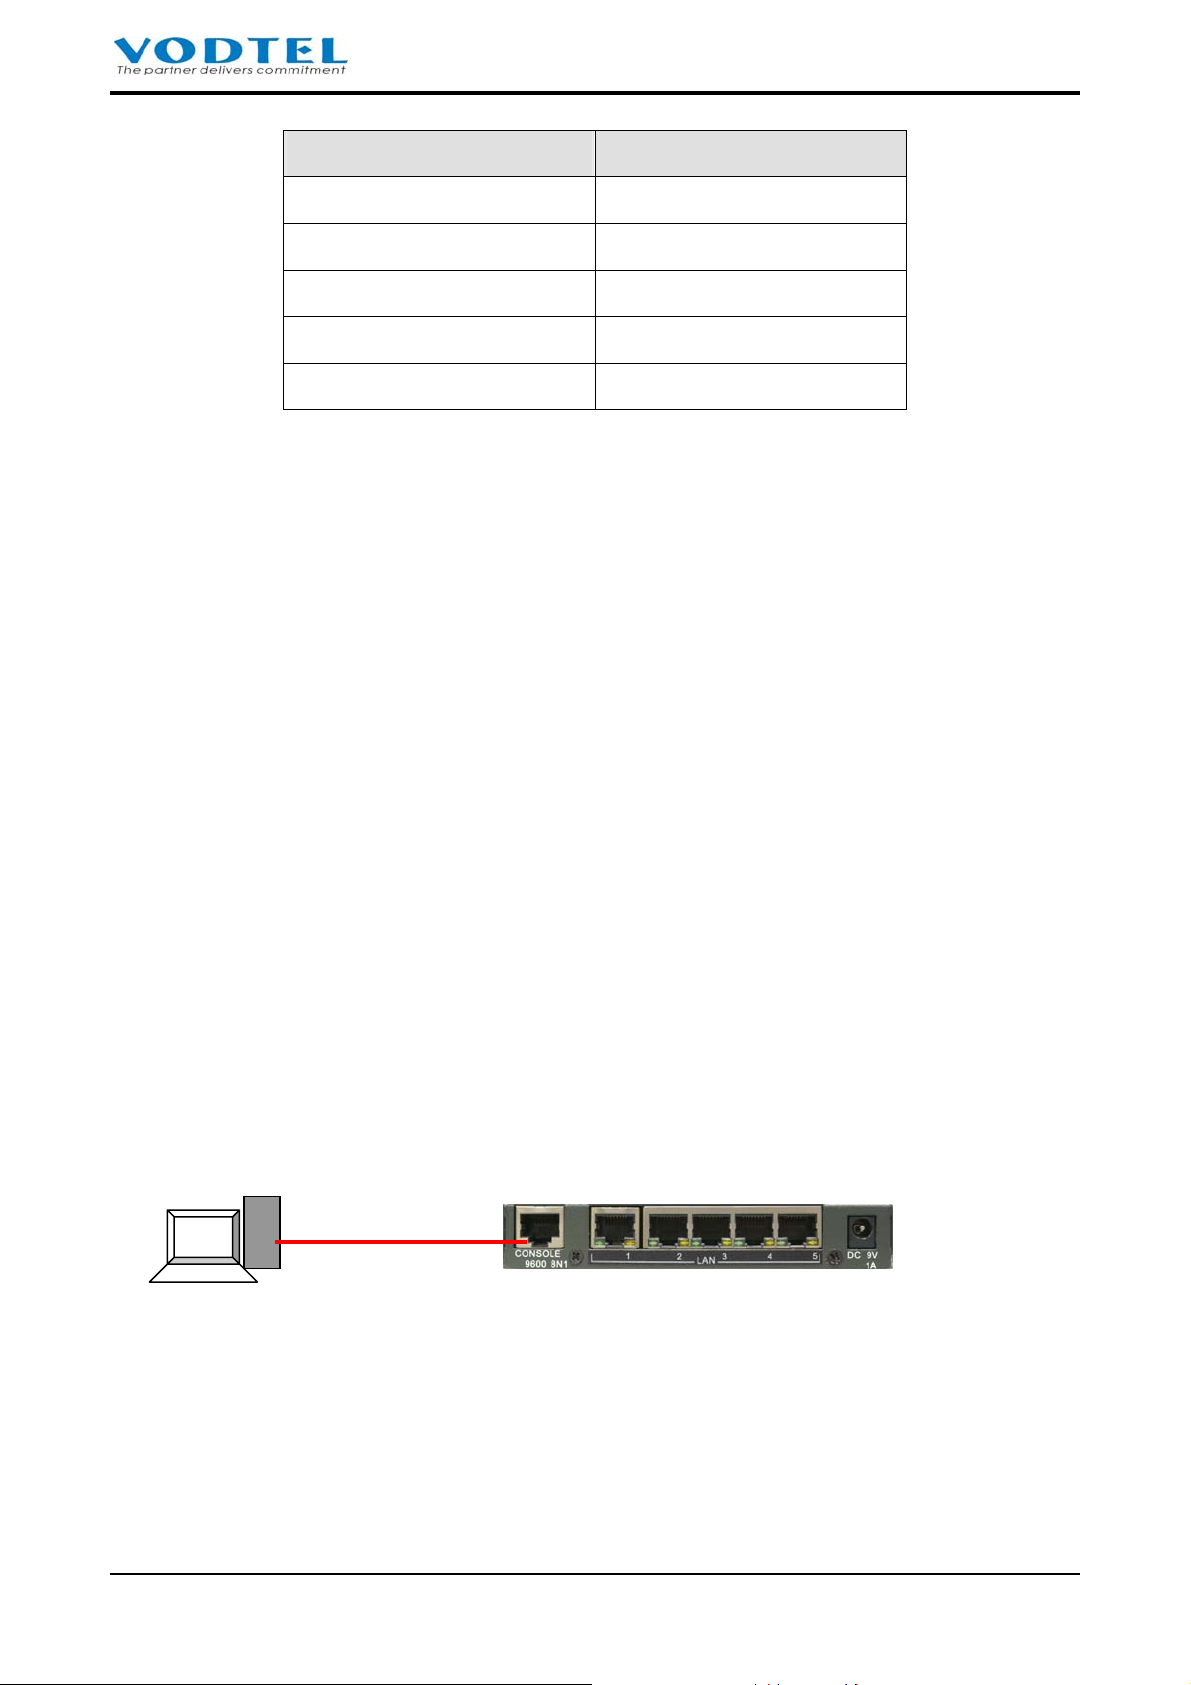
6.3 Connection of Console Cable
There is Console port on this box that can connect to PC for initial settings. You can use Web
Browser to connect default IP: 192.168.0.2, so console connection is not necessary required.
PC
Console
Cable
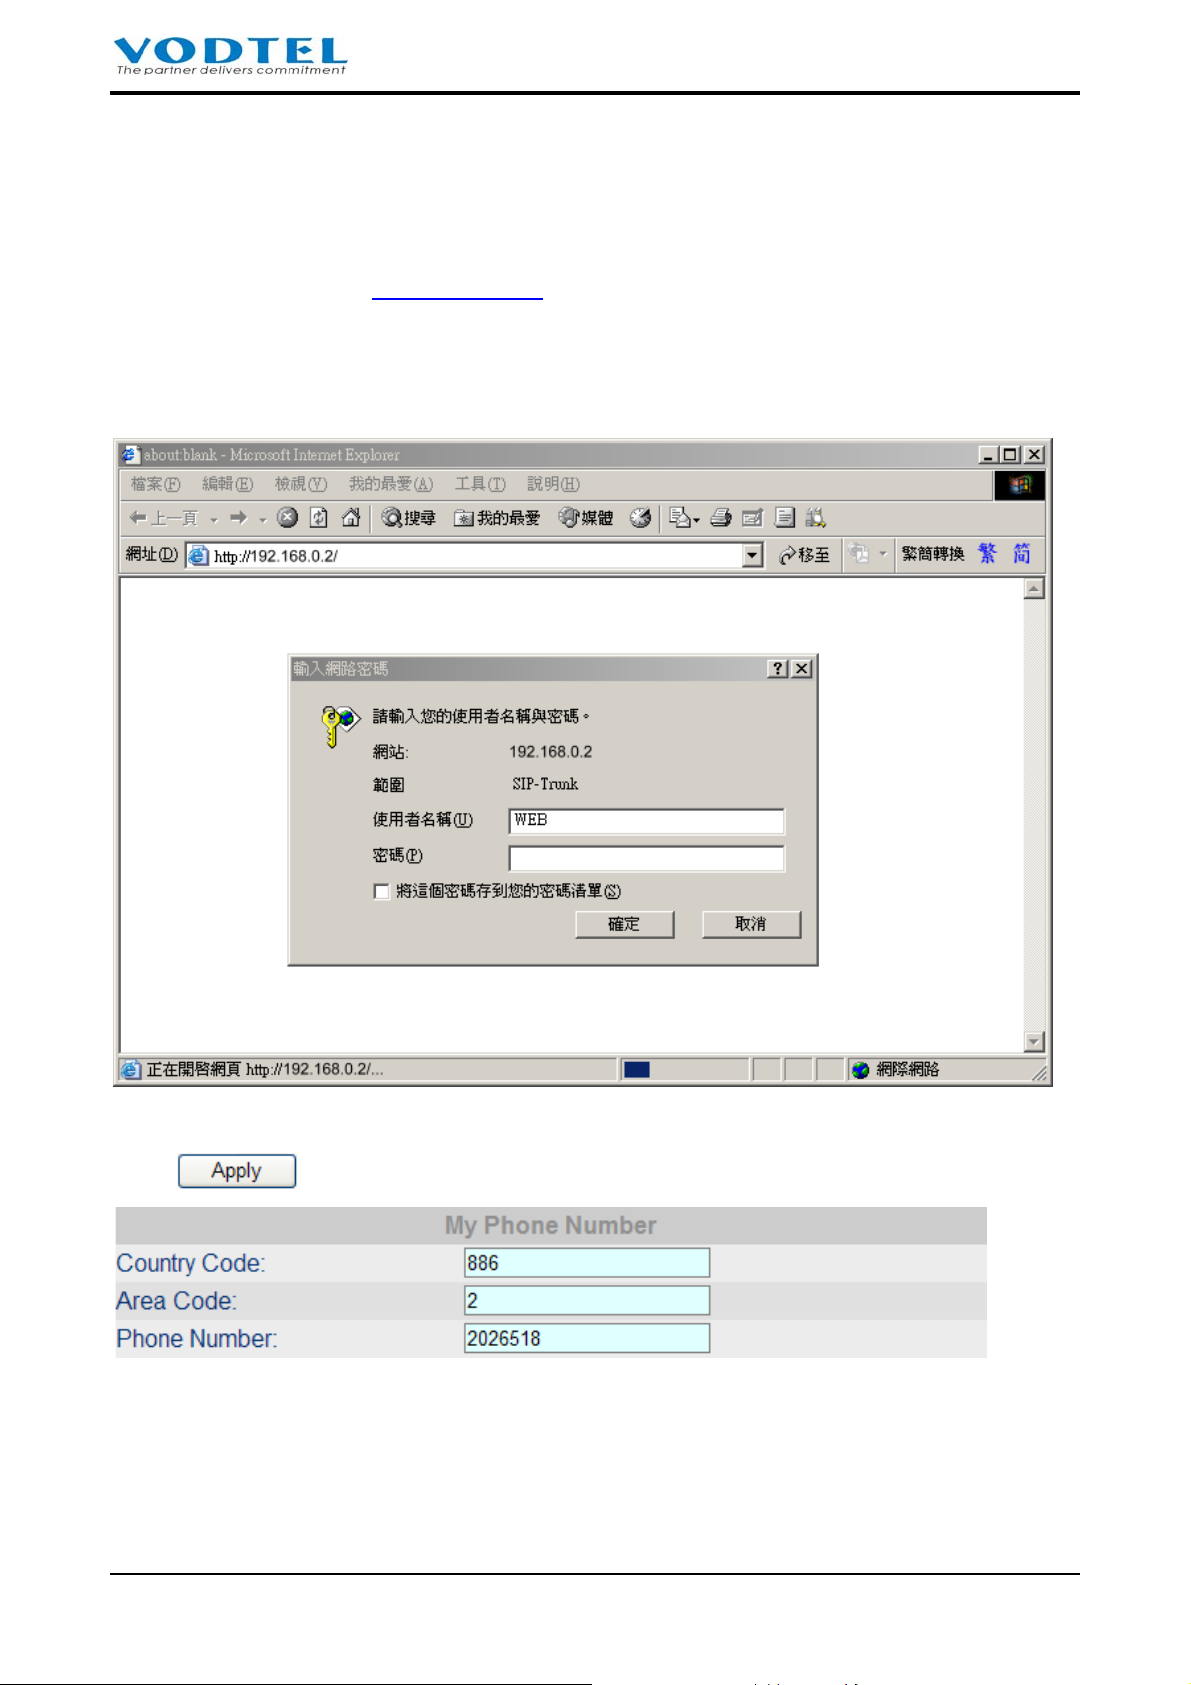
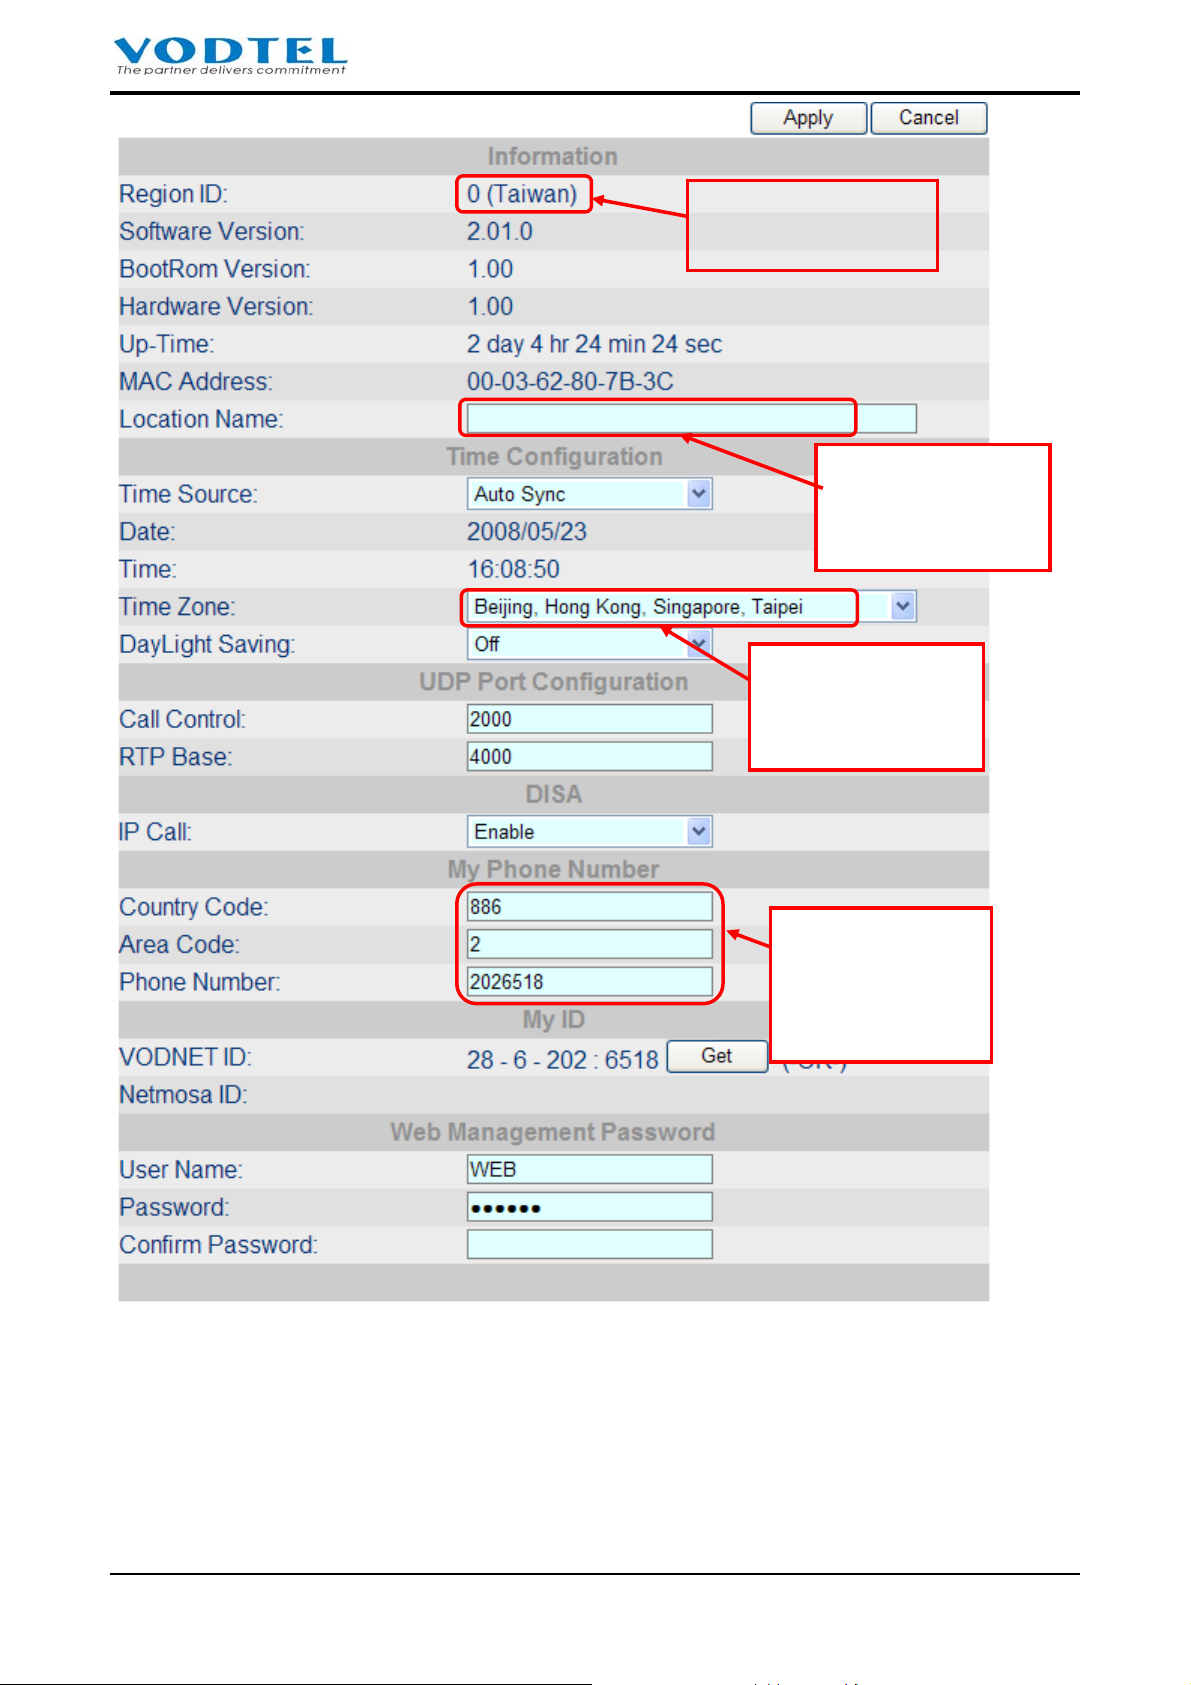
6.4 Configuration of My Phone Number
My Phone Number means the phone number of this machine. Please configure the number the
same as the main PSTN phone number (full number) of your company.
Assume the phone numbers you want to input are
Country Code:886 (Taiwan)
12
Page 13
User Manual
Area Code:2 (Taipei)
Phone Number:2026518
Attention: No matter whether you will make long distance or international call or not, Input the 3
items above is required
Start IE browser and input http://192.168.0.2 (Default IP address of this machine: 192.168.0.2,
Subnet Mask: 255.255.255.0. Please configure the Subnet of your PC to connect this machine)
User Name: WEB, and password is not required
Web Path:1.System Config.\1.1.Basic Information
Click
Restart is required
At left-bottom coner of Web page
when it is done.
13
Page 14
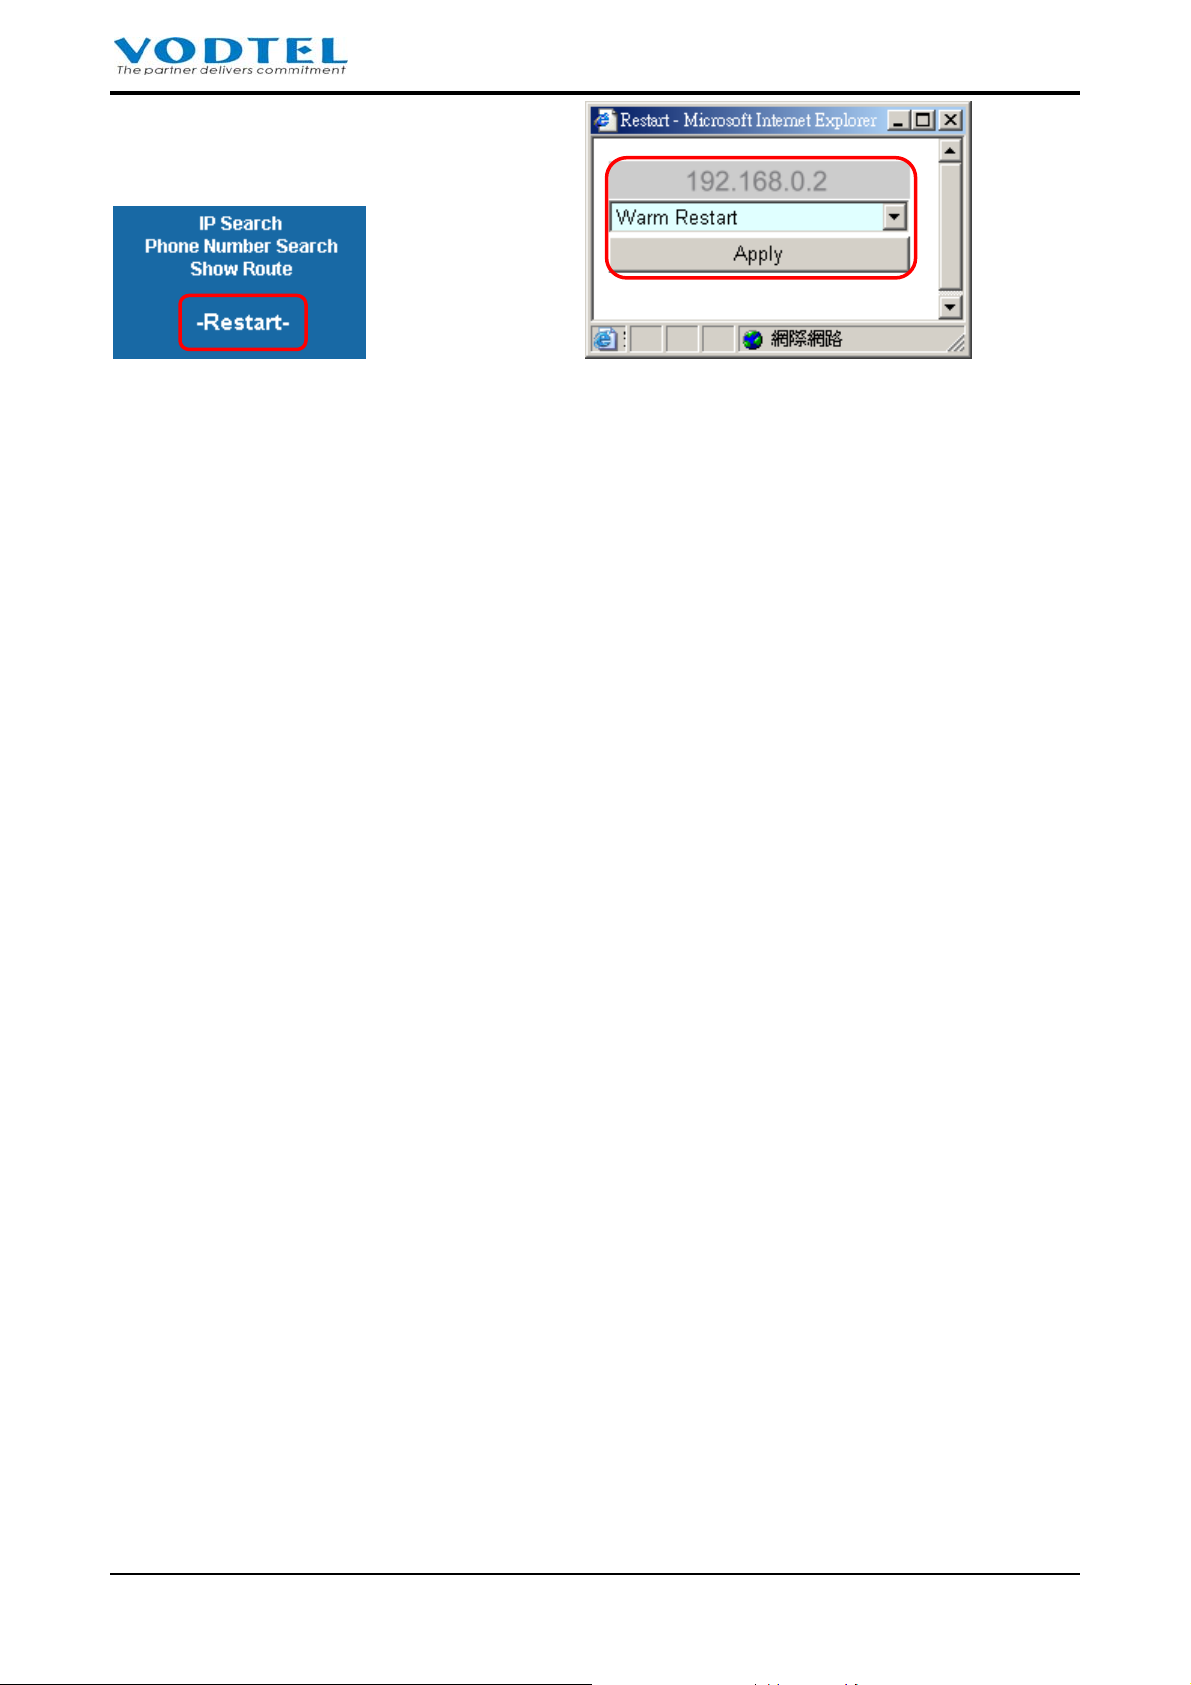
User Manual
Select Warm Restart
6.5 Verification and Check of Management Web
When you had entered WEB management interface, check or tune settings if required. If settings
are modified, Warm Restart at last section can be done here only.
6.5.1 Basic Information
Web Path:1.System Config.\1.1.Basic Information
14
Page 15
User Manual
There is no difference
if it is (is not) Taiwan
To identify this box
easily, input ID
name here
If it is not correct,
change it and click
Apply
As the example,
Change to
86
21
46286434
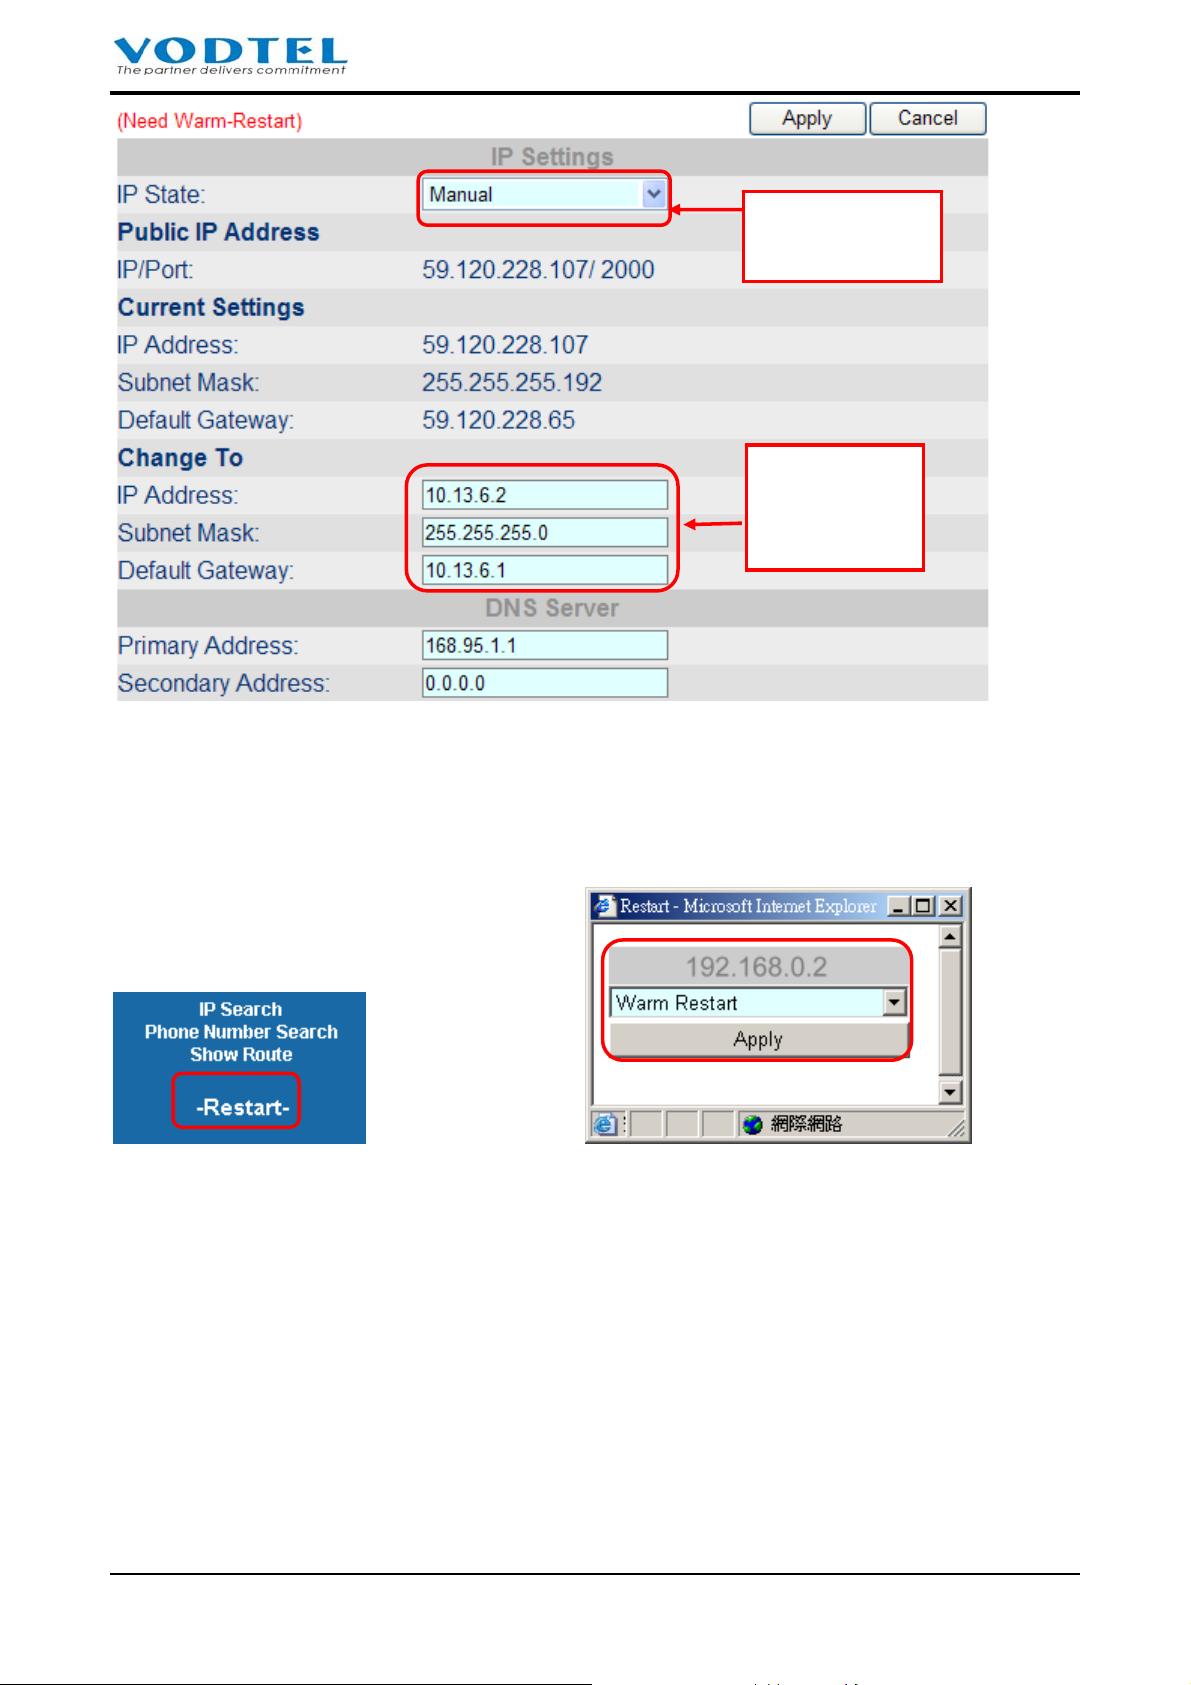
6.5.2 IP Settings
The default IP of this machine is 192.168.0.2. If user doesn't want to change the IP address of this
machine, then IP sharing device has to use subnet 192.168.0.X. If IP sharing device does not assign
LAN as subnet 192.168.0.X, but subnet 10.13.6.X, then this machine has to change and use subnet
10.13.6.X, such as IP: 10.13.6.2, subnet Mask: 255.255.255.0
Web Path:6.IP Settings
15
Page 16
User Manual
Fixed IP, type is
Manual
Change to
10.13.6.2
255.255.255.0
10.13.6.1
6.5.3 Restart
To insure that all setting take effect, restart this machine when all configuration is done. To restart
this machine, click –Restart- at left bottom of Web page to do restart.
Select Warm Restart
Wait for a moment after the system restarts.
If the Router is also need to restart, also restart it. Restart router first than MOSA 4600 Plus is
suggested.
16
Page 17
User Manual
7 Function Configuration
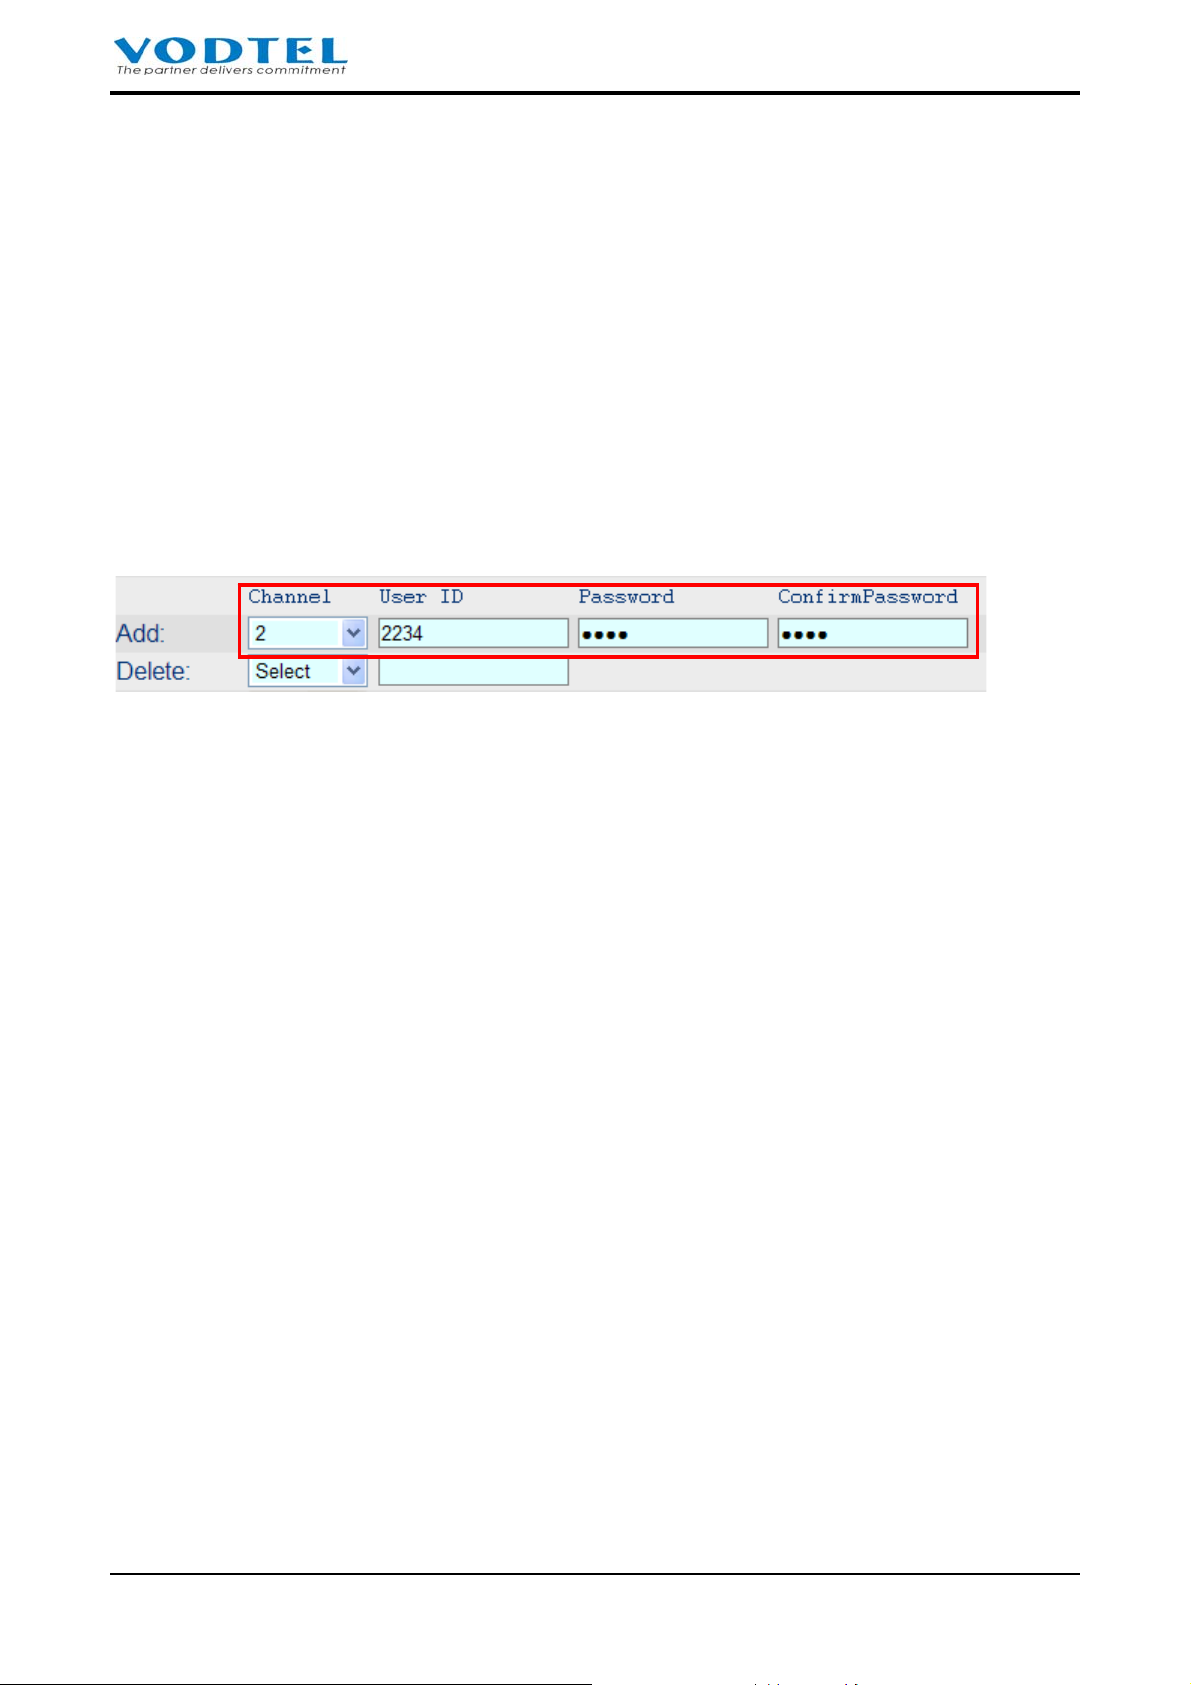
7.1 Configure Authentication of Member
MOSA 4491 has 100 virtual channels for each member. Users have their own accounts and
passwords number for authentication for incoming call. They can change the call forward
destination number any time and also avoid being changed by others. Each user needs to input
channel number and password to configure it.
Here is the method to configure Member
Specify the Channel that user use and input the User ID (default: 0) and password that user will dial
for authentication. Input password again for verification.
Web Path:2.System Advanced\2.1.Member
7.2 Configure Forward Number
When authentication is done for incoming call, user can change call forward destination number
any time.
Incoming call to MOSA 4491 can be forward to the destination below:
To Analog FXS port of remote MOSA 4600 Plus
To SIP extension of remote MOSA 4600 Plus
To local PSTN call (Offnet Forward) via remote MOSA IP-PBX or ITSP (Internet
Telephony Service Provider)
Each user can make call to 4491 and the system greeting help you to configure the Forward To
destination.
17
Page 18
User Manual
(1) Make VoIP call to MOSA 4491 from other MOSA IP-PBX and you hear the system
greeting.
(2) Input access code #1* of instruction greeting. For access code, please refer to 9.8 Web
Path: 2.System Advanced\2.4.Behavior Setting.
(3) By the instruction of greeting, input User ID. For the configuration of User ID, please
refer to last section 7.1 Configure Authentication of Member. Press # when it is done.
(4) Input Password of User ID
(5) Select service item. Press "1" to enter Forward configuration item.
(6) Press "0" to enter Forward Number configuration
(7) Input Forward Number and # to finish
(8) The system plays the number you had dialed. Press "0" to confirm
(9) You hear the successful configuration greeting
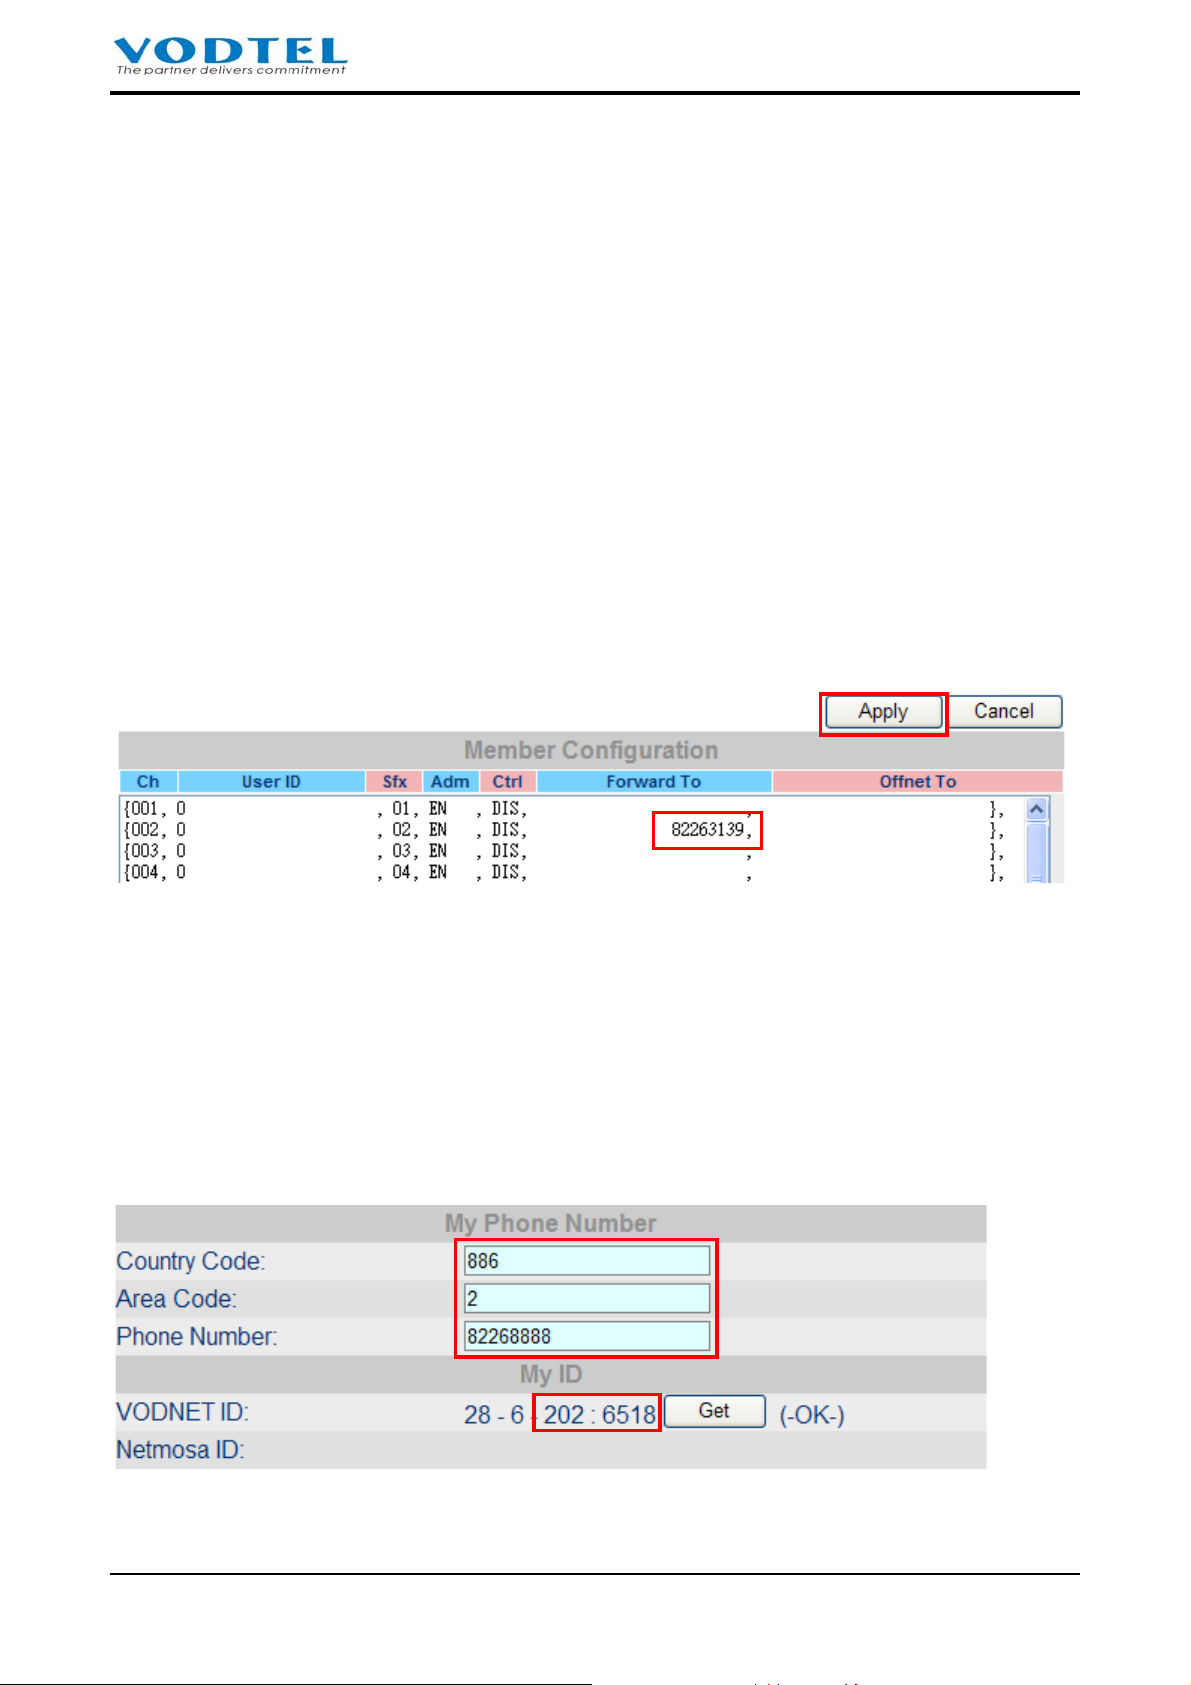
Call forward number of destination also can be configured at Web page
Configure call forward number at Web page
Web Path:1.System Config.\1.2.Channel
7.3 Make Call to Ext. of MOSA 4491 from MOSA IP-PBX
Other MOSA IP-PBX serial products, such as MOSA 4600 Plus, user can make call to this machine
or its extension line.
The Phone Number and VODNET ID of MOSA 4491 is shown below
Phone Number can be the same or different from VODNET ID
Web Path:1.System Config.\1.1.Basic Information
18
Page 19

User Manual
Example 1: User of MOSA 4600 Plus at Kaohsiung makes call to FONEMOSA 4491 at Taipei
Assume the phone number of Taipei MOSA 4491 is 886 2 82268888 and VODNET ID
is 2026518
Dialing Method: User at Kaohsiung picks up phone and hear dial tone, and then dial **02
8226 8888# or **2026518#, later, you hears the system greeting of MOSA 4491
Example 2: User of MOSA 4604 Plus at Beijing make call to channel 22 of MOSA 4491
Channel 22 of MOSA 4491 is configured to Forward To another MOSA 4600 Plus
with VODNET ID: 2006628
Assume the phone number of Taipei MOSA 4491 is 8226-8888
Dialing Method: User at Beijing picks up phone and hear dial tone, and then dial **00 886 2 8226
8888 22#. This call is forward to MOSA 4600 Plus 2006628
7.4 Make Call to MOSA 4491 then Offnet to PSTN or Mobile Phone
7.4.1 Configure MOSA 4491
In addition to Forward Number at previous section, extra Offnet Number is required. Incoming call
is forward to the machine with Forward Number and the machine make outgoing trunk call to
Offnet Number
User can configure this function via phone set.
(1) Make VoIP call to MOSA 4491 from other MOSA IP-PBX and you hear the system
greeting.
(2) Input access code #1* of instruction greeting. For access code, please refer to 9.8 Web
Path: 2.System Advanced\2.4.Behavior Setting.
(3) By the instruction of greeting, input User ID. For the configuration of User ID, please
refer to section n 7.1 Configure Authentication of Member. Press # when it is done.
(4) Input Password of User ID
(5) Press "2" according to instruction greeting to enter Offnet Number.
(6) Input Offnet Number and # to finish
(7) The system plays the number you had dialed. Press "0" to confirm
(8) You hear the successful configuration greeting
(9) Hand off the phone
Offnet To number of destination also can be configured at Web page
Configure Offnet To number at Web page
19
Page 20

User Manual
Web Path:1.System Config.\1.2.Channel
7.4.2 Configure Remote MOSA IP-PBX
Due to charge of Offnet Forward trunk call should be paid by the owner of remote MOSA IP-PBX
or ITSP, so open permission of remote machine for the MOSA 4491 is required.
Configuration on remote MOSA IP-PBX/Gateway:
Add a set of number at Permitted Phone Number for Offnet Forward field and this phone
number has to be the same as the Offnet Number of MOSA 4491
Configuration is shown below: (Example: configuration at remote MOSA 4600 Plus)
Phone Number: For Outbound Forward Number (1.System Config.\1.7.Offnet Forward), full
number is not required. System can compare the first N digits. For example, input
0982, then all numbers with prefix 0982 is able to do outbound call.
Trunk:Select trunk interface
Disable: Trunk call is not allowed
FXO: Trunk call from FXO is allowed
IP: Call from SIP Trunk is allowed
Web Path: 1.System Config.\1.7.Offnet Forward
For example, this MOSA 4491 is located at Taipei and incoming call will be forward to Shanghai
21-6445-1111 and it will be offnet to PSTN 1360567888 at Beijing.
Parameter
Control Enable Forward to:
Offnet to:
Permitted Phone Number for Offnet
forward
Channel 2 of This
MOSA 4491 (Taipei)
862164451111 01360567888 -
- 01360567888
MOSA (8621-6445-1111,
Shanghai) that offnet to
PSTN
20
Page 21

User Manual
7.4.3 Dialing Example
A MOSA 4600 Plus user make call to the channel 2 of MOSA 4491 at Taipei, then the call is routed
to Beijing PSTN phone number 1360567888 via MOSA (862164451111) at Shanghai finally.
Assume that MOSA 4491 at Taipei is 8226-8888
The Channel 2 of MOSA 4491 is configured Forward To MOSA at Shanghai, and
then Offnet To Beijing PSTN number 1360567888.
MOSA at Shanghai had configured permission to PSTN number 1360567888 at
Beijing
Dialing method: Kaohsiung user hook off and hear dial tone, then dial **02 82268888 02#,
the call is route to 1360567888 at Beijing finally.
7.5 Make call to MOSA 4491 then route to other MOSA IP-PBX
When DISA of MOSA 4491 is activated, number can be dialed is not limited to 100 virtual
channels for user that make call to MOSA 4491, it also includes 1000 sets of extension at extension
table. User can make call to other MOSA IP-PBX if Extension Table and Phone Book in MOSA
4491 is pre-configured.
7.5.1 Configuration of Extension Number
Other MOSA IP-PBX product can be configured as a Prefix/Ext. number in Extension Table of
MOSA 4491. User that make call to this machine can dial to other device again by this
Prefix/Extension table.
For example: There is other MOSA IP-PBX with phone number 886218408198. The administrator
hope MOSA 4491 user can dial 8000 to reach that MOSA IP-PBX. Please input the information
below and then click Apply.
Input VODNET ID directly to Phone Number field is also OK, such as 286 200 4341.
Web Path: 1.System Config.\1.3.Extension Number
Note: Here is the Restrictions of Prefix/Extension table
The length of Prefix/Ext. code is 1-5 characters. In principle, you can’t define a new prefix number
starting with the number that has been defined previously. For example, “33” is defined as a prefix
number, then any numbers starting with “33”, like “330”, “3312”, can not be defined as a prefix
number. However, “31”, “32”, or “34” are OK. Another example, “555” is defined previously, then
“5551” or “55522” can not be defined as a prefix/ext. number, but “551” or “552” or “553” …etc.
is OK.
21
Page 22

User Manual
7.5.2 Configuration of Phone Book
At last section, we add MOSA IP-PBX to the extension table of MOSA 4491, then we should add
information of that MOSA IP-PBX into MOSA 4491's Phone Book. By this way, incoming call can
be redirected to correct destination.
If the IP address of remote MOSA IP-PBX is fix public IP, then we can add the phone number
and IP address to static Phone Book.
Web Path: 4.Phone Book
These information can be found on the System Info of management page at other MOSA IP-PBX
(for the example of MOSA 4600 Plus)
If numbers configured at MOSA 4491's Prefix/Ext. table are VODNET ID, then configuration
for phone book in section is not required. However, the MOSA IP-PBX of that VODNET ID
should connect to Internet. If it is located under VPN, then configuration of phone book still
required.
If numbers configured at MOSA 4491's Prefix/Ext. table are VODNET ID, however, the
MOSA IP-PBX (or the router that MOSA IP-PBX connect to) does not use fix public IP, use
this phone book to do learning is required.
Input VODNET ID (such as 2862004388), IP: 0.0.0.0, Port: 0
Web Path: 4.Phone Book
22
Page 23

User Manual
8 Other Configuration
8.1 Configuration of Operator
MOSA 4491 series provides the operator mode below:
¾ Built-in DISA: Auto Attendant that has greeting and answer incoming call
¾ Local Operator: Operator is located at some IP-PBX that the virtual channel connect to
¾ Network Operator: Operator is located at some IP-PBX that is defined at extension table of
this machine
8.1.1 Built-in DISA
The parameter below decide the behavior of DISA
Answer and deal with incoming IP Call
Enable:Activated and process / Disable:No action
Attention: If this function is Disabled, all management function of virtual channel is invalid,
including management system for administrator and IVR.
Web Path: 1.System Config.\ 1.1.Basic Information
Process of Incoming Call
For incoming number from user, MOSA 4491 take action according to the table below:
Dialed number from user Action
Extension No. Forward to the extension of MOSA IP-PBX
Operator Code Forward to the MOSA IP-PBX that is defined for
virtual operator channel.
Function Code #1* or *0 to enter voice management system
None of above Send greeting "The number you dial is invalid". If this
case happens 3 times, system disconnects the call.
For incoming IP call, MOSA 4491 process it according to the workflow below.
23
Page 24

User Manual
r
ule
IP Call
DISA IP Call?
Disabled
Enabled
Greeting
None Op
Op code?
Operator
Assign
Operator To
N/A
Network
Operator
Prefix
Ch. No.
Forward
Configured?
Blank
No
By
greeting
r
8.1.2 Local Operator
When DISA for IP call is Enabled for incoming IP call, MOSA 4491 redirect call to operator if user
dial Operator Code.
Configuration of Operator Code
Web Path: 2.System Advanced\2.4.Behavior Setting
Yes
Forward to
-
Busy T one
Forward to
IP-PBX of
operato
Specify a channel as operator
Web Path: 2.System Advanced\2.4.Behavior Setting
24
Page 25

User Manual
8.1.3 Network Operator
Operator can be assigned to another device through IP network. When incoming call user dial
operator code, system search local operator first. If local operator (Assign Operator to (Channel)) is
set to N/A, system will assume that Operator is defined on another device. From the Network
Operator Extension Number configuration, system will find the Operator for this call. (Of course,
the Network Operator Extension Number has to be configured in Prefix/Ext. table in advance.)
In the following example, the Operator is configured on equipment with Prefix code 81, which is a
MOSA 4600 Plus with phone No. 886-2-8226-8881, as a Network Operator.
Steps of configuration:
1) Web Path: this machine: 2.System Advanced\2.4.Behavior Setting
Set Assign Operator to (Channel) as "N/A"
2) Add Prefix/Ext. number of network operator to the Prefix/Ext. table of MOSA 4491. For
example, the phone number of network operator is 886282268881 and we use 81 as its
Prefix/Ext. number.
Web Path: 1.System Config.\1.3.Extension Number
3) Configure Network Operator of this machine as the Prefix/Ext. of network operator.
Web Path: 1.System Config.\1.3.Extension Number
8.2 Greeting of DISA
About Greeting
Any extension of MOSA IP-PBX can dial into this machine and record the message of greetings.
Totally you may have 4 sections of greetings and max 30 seconds for each section. You can save
the greetings to PC file and then upload the file to other machine via FTP.
25
Page 26

User Manual
You can also use the greeting file from MOSA 4600 Plus. Rename these file name as below and
upload it to this machine.
For example:
File Name
grt_1 Greeting (1)
grt_3 Greeting (3)
grt_4 Greeting (4)
grt_7 Greeting (7) The message that extension is
Attention: If greeting is recorded by phone set, it takes effect immediately without doing restart. If
it is uploaded by FTP, it takes effect after Warm Restart.
Type of
Greetings
Description of Greetings Example of Messages
The Greetings for office hour Good day, this is XX XXX, please dial
extension number or 0 for Operator
The message when the number is
wrong or can not be recognized
The message for waiting, the call
is transferring
unable to answer the call. (May
be network problem or line
problem)
The number you dialed can not be
recognized, please dial again
Thank you, please wait a moment
There is problem or no answer for this
extension, please dial other extension
number or 9 for operator
8.2.1 Method to Record Greeting
User that has Access Code and Password of Administrator is able to record greeting. The
information of Administrator can be configured below.
Web Path: 2.System Advanced 2.4.Behavior Setting
(1) Entering the Management Mode
Hook off the phone set, make call to this machine, dial Access Code + Password (default
*0 0000) to enter the management mode, Æ hear the tone of “DuDu…..”
(2) Recording the 1st section
Dial 99 1 Æ * Æ start to record Æ # (end the record)
(3) Storing the 1st section
Dial 9# Æ hear the tone of “DuDu…”Æ #
26
Page 27

(4) Recording the 2nd section
Dial 99 2 Æ * Æ start to record Æ # (end the record)
(5) Storing the 2nd section
Dial 9# Æ hear the tone of “DuDu…”Æ #
(6) Recording the 3rd section
Dial 99 3 Æ * Æ start to record Æ # (end the record)
(7) Storing the 3rd section
Dial 9# Æ hear the tone of “DuDu…”Æ #
(8) Recording the 4th section
Dial 99 4 Æ * Æ start to record Æ # (end the record)
(9) 9 Storing the 4th section
Dial 9# Æ hear the tone of “DuDu…”Æ #
User Manual
(10) Recording the 5th section
Dial 99 5 Æ * Æ start to record Æ # (end the record)
(11) Storing the 5th section
Dial 9# Æ hear the tone of “DuDu…”Æ #
(12) Recording the 6th section
Dial 99 6 Æ * Æ start to record Æ # (end the record)
(13) Storing the 6th section
Dial 9# Æ hear the tone of “DuDu…”Æ #
(14) Recording the 7th section
Dial 99 7 Æ * Æ start to record Æ # (end the record)
(15) Storing the 7th section
Dial 9# Æ hear the tone of “DuDu…”Æ #
Attention: Don’t forget to dial additional “#” to end the last record, then start the next section.
8.2.2 Method to Listen Greeting
(1) Hook off the phone set, make call to this machine, dial Access Code + Password (default *0
0000) to enter the management mode, Æ hear the tone of “DuDu…..”
(2) Listening the 1st message : Dial 961 Æ If you like to stop, just dial #
27
Page 28

User Manual
(3) Listening the 2nd message : Dial 962 Æ If you like to stop, just dial #
(4) Listening the 3rd message : Dial 963 Æ If you like to stop, just dial #
(5) Listening the 4th message : Dial 964 Æ If you like to stop, just dial #
(6) Listening the 5th message : Dial 965 Æ If you like to stop, just dial #
(7) Listening the 6th message : Dial 966Æ If you like to stop, just dial #
(8) Listening the 7th message : Dial 967 Æ If you like to stop, just dial #
8.3 Instruction Greeting for User
When user make call to this machine, input access code of instruction greeting and then input user
account and password according to the instruction. Operate it according to instruction greeting and
users are able to configure Forward Number and Offnet Number. Record instruction greeting is
required for this system. Max 99 sections and 30 minutes totally are available for this machine.
Upload Instruction Greeting by FTP client software to this machine is also OK. Please refer to 12
Dialing Flow Chart
Example
Greeting Example of instruction greeting
01 Please input user account, end with <#> sign
02 Please input password
03 The user account you dial is not correct. Please input again.
04 To configure Forward Number, please press <1>
To configure Offnet Number, please press <2>
To listen current number, please press <3>
To change password, please press <4>
To end the process, please press <5>
05 The password you dial is not correct. Please input again.
06 The number you dial is not correct. please try again later with new number
07 You had entered...
08 Configuration
09 Please try again
10 To configure Forward Number, please press <0>
To configure Prefix Number, please press <1>
Or press <2> to return previous level
11 Please input Offnet Number, end with <#>
12 The Forward Number you had configured is
13 Thank you, good-bye.
28
Page 29

Greeting Example of instruction greeting
14 Please input Forward Number, end with <#>
15
Please input Prefix Number, end with <#>
16 Press <0> if it is correct
Press <1> if it is not correct
17 Number is not correct, please dial <#> and input again
18 No number is configured currently
23 Cancel
24 Please input new password, end with <#>
25 Change successfully
26 Password exceeds 6 digits. Please dial <#> and input again
27 Configuration is failed
User Manual
28 Configuration is successful
29 To listen Forward Number, please dial <0>
To listen Offnet Number, please dial <1>
To return to previous level, please dial <2>
30 The Offnet Number you had configured is
31 This Account is suspend now, please contact system administrator
8.3.1 Method to Record Instruction Greeting
User that has Access Code and Password of Administrator is able to record greeting. The
information of Administrator can be configured below.
Web Path: 2.System Advanced 2.4.Behavior Setting
(1) Hook off the phone set, make call to this machine, dial Access Code + Password (Default *0
0000) to enter the management mode, Æ hear the tone of “DuDu…..”
(2) Recording the 1st section
Dial 77 01 Æ * Æ start to record Æ # (end the record)
(3) Storing the 1st section
29
Page 30

User Manual
Dial 9# Æ hear the tone of “DuDu…”Æ #
(4) Recording the 2nd section
Dial 77 02 Æ * Æ start to record Æ # (end the record)
(5) Storing the 2nd section
Dial 9# Æ hear the tone of “DuDu…”Æ #
(6) Recording the 3rd section
Dial 77 03 Æ * Æ start to record Æ # (end the record)
(7) Storing the 3rd section
Dial 9# Æ hear the tone of “DuDu…”Æ #
(8) And so on...
Attention: Don’t forget to dial additional “#” to end the last record, then start the next section.
8.3.2 Method to Listen Instruction Greeting
(1) Hook off the phone set, make call to this machine, dial Access Code + Password (default *0
0000) to enter the management mode, Æ hear the tone of “DuDu…..”
(2) Listening the 1st message : Dial 77 01 Æ 0 (listen recording) Æ # (end) Æ Press # to listen
next section
(3) Listening the 2nd message : Dial 77 02 Æ 0 (listen recording) Æ # (end) Æ Press # to listen
next section
(4) Listening the 3rd message : Dial 77 03 Æ 0 (listen recording) Æ # (end) Æ Press # to listen
next section
(5) And so on...
8.4 Application of Forward Map
When there are many MOSA 4491 and they all use the same Forward number, or only slight
modification is enough, you can use this Forward.map file function and modification for each
individually channels via Web is not required.
Forward.map is a text file and it records the Forward To number of each channel. If there is no
extra Forward configuration at individual channel, system use default configuration from
Forward.map.
Use Windows Notepad software to write the example below.
1 ,886282263391
2 ,886282263392
Means the 1
st
port is forwarded to 886282263391
30
Page 31

Means the 2nd port is forwarded to 886282263392
Note: field is separated by ","
Save it and upload this file to machine.
Web Path: 5.File Transfer
User Manual
Or you can upload FORWARD.MAP to the folder under /disk0 by FTP client software
Then restart it. To restart this system, click left-bottom corner of Web page – Restart -
Select Warm Restart
31
Page 32

User Manual
Wait for few seconds of restart procedure
After it is restarted
Web Path: 2.System Advanced\ 2.3.Forward MAP, and it shows information of FORWARD.MAP
8.5 Application of Offnet Map
When there are many MOSA 4491 is located at different location and its PSTN Offnet To numbers
are the same, or only slight modification is enough, you can use this Offnet.map file function and
modification for each individually channels via Web is not required.
Offnet.map is a text file and it records the mapping of Offnet To number via Forward Number. If
there is no extra configuration of Offnet To number at individual channel, system use default
configuration from Offnet.map.
In practical application, the same Offnet To PSTN number can be dialed from different MOSA
IP-PBX. In other words, different Forward Number can map to the same Offnet To Number. By this
way, make call to PSTN via Offnet To number can has different route choices.
Use Windows Notepad software to write the example below.
Ahead from Offnet To number, then followed by Forward Number.
Save it and upload this file to machine.
32
Page 33

User Manual
Web Path: 5.File Transfer
Or upload this OFFNET.MAP file by FTP software to the /disk0 folder of this machine.
Then restart it. To restart this system, click left-bottom corner of Web page – Restart -
Select Warm Restart
Wait for few seconds of restart procedure
After it is restarted
Web Path: 2.System Advanced\ 2.3.Offnet MAP, and it shows information of FORWARD.MAP
33
Page 34

User Manual
In addition to the function above, OFFNET MAP has the ability to change prefix number. This
function changes the prefix of incoming Offnet To number and make outgoing Offnet To number
with new prefix number.
For example:
Web Path: 2.System Advanced\ 2.3.Offnet MAP, shows information of OFFNET.MAP
The prefix of entries 1 and 2 are changed.
34
Page 35

User Manual
8.6 Application of Redirect Map
When this machine works with MOSA 4600 Plus, Redirect Map can provides more available
extension and it is not limited to 100 channels of this machine, also, it make one step dialing to
traditional PBX behind MOSA 4600 Plus possible. The same as Forward Map, Redirect Map is
also a text file, and it can be edited by Windows Notepad software and upload by FTP software to
this machine.
Example of format and field of Redirect Map
Field 1 Field 2 Field 3 Field 4 Field 5 Field 6 Field 7 Field 8 Field 9 Field 10
RSVD1 RSVD2 Forward No. RSVD3 Suffix Query IP address UDP
port
0 0 886282263333 -1 6*** F 59.120.200.103 2000 ;Headquarters
Offnet
No.
Note
Field: (10 fields)
1. Reserve code for system (has to be 0)
2. Reserve code for system (has to be 0)
3. The complete phone number or VODNET ID (max 22 digits) of the machine that connect to
PBX (for the example below, MOSA 4600 Plus)
Illustration Figure
PBX
MOSA 4600
Plus
IP
MOSA 4491
MOSA IP-PBX
4. Reserve code for system (has to be -1)
5. Suffix Phone number that is brought from MOSA IP-PBX (as the figure above, max 22
digits, can be “*”. “*” means any digits from 0~9)
(Note: For example, the number that is brought from MOSA IP-PBX is 9996000; and
configuration here is 6***. It means system retrieve 4 suffix digits only and the first digit
has to be 6. Retrieves 4 digits, 6000 is the result. Make call with these 4 digits only.)
6. Select to inquire dynamic phonebook / VODNET ID or not (F: not query / V: query but IP =
35
Page 36

User Manual
0)
7. The IP address of the device (as the figure above, MOSA 4600 Plus) that connect to PBX
(IP or 0)
8. The Port Number of the device (as the figure above, MOSA 4600 Plus) that connect to PBX
(0~65535)
9. Configuration of Offnet Number. Keep it blank for this application (Max 22 digits, optional)
10. Note for this line. Add “;” ahead in this field. It is optional.
Note: Each field is separated by blank and the 5th field can not be repeated in each records.
The description above can also be another form. When the devices that connect with PBX uses
dynamic IP. That device and MOSA 4491 are all able to connect with VODNET.
Field 1 Field 2 Field 3 Field 4 Field 5 Field 6 Field 7 Field 8 Field 9 Field 10
0 0 2862006003 -1 6*** V 0 0 ;Headquarters
When the editing of this file is done, upload it to MOSA 4491 by FTP software or Web page.
Attention: file name has to be REDIRECT.MAP
To use this special application, tune MOSA 4600 Plus, traditional PBX and other devices is
required. Please contact with us for more detail.
36
Page 37

9 Management Web
9.1 Web Path: 1.System Config.\Basic Information
User Manual
37
Page 38

User Manual
Category Field Description Default V alue
Information
Region ID Displays the Region ID (Country ID) of this
machine. The ID on the screen is what the
machine now using.
Software Version Displays the Software Version of this machine (Read Only)
0
BootRom Version Displays hardware BootRom Version of this
machine
Hardware Version Displays hardware Version of this machine (Read Only)
Up-Time Display the elapse time since last start (Read Only)
MAC Address Display th e MAC address of HW equipment (Read Only)
Location Name Disp lays the identification name of this machine
Time
Configuration
Configuration
DISA IP Call Auto attendant (DISA) for incoming IP Call
My Phone
Number
Time Source Select the method to synchronize the system date
and time
Auto Sync:Synchronize automatically
Manual:Entered manually
Date Enter the date manually, valid only if “Manual” is
selected in Time Source,
In format yyyy/mm/dd
Time Enter the time manually, valid only if “Manual”
is selected in Time Source,
in format hh:mm:ss
Time Zone Select the time zone which the system is located Time Zone of Region
DayLight Saving Select if daylight saving applied
ON:daylight saving applied
OFF:daylight saving not applied
Call Control Define UDP port number for packet transmission.
The number is between the range of 0 – 65535.
(It is activated after system re-started)
RTP Base Define UDP port number for voice packet
transmission. The port number must be even and
between the range of 0 – 65534.
(It is activated after system re-started)
Enable:DISA answer the call
Disable:DISA don't answer the call
Country Code Country Code of the location of this machine
(such as China: 86, USA: 1)
Area Code Area Code of the location of this machine (such as
Shanghai: 21, Taipei: 2)
Phone Number Enter the office telephone number. Phone Number created
VODNET ID VODNET ID is displayed if registration is
successful;
”OK” is displayed if register to VODNET
Get Request VODNET ID
(Read Only)
Auto Sync
(Read Only)
(Read Only)
ID
OFF
2000 UDP Port
4000
Enable
Country Code
according to region ID
Area Code according to
region ID's capital
by MAC
(Read Only) My ID
38
Page 39

User Manual
Category Field Description Default V alue
Web
Management
Password
Netmosa ID NETMOSA ID is displayed if registration is
successful;
”OK” is displayed if register to NETMOSA
User Name User Name to login Web WEB
Password Password to login Web
Confirm Password Double confirm the password to login Web (has to
be consistent with the Password above)
9.2 We b Path: 1.System Config.\1.2.Channel
39
Page 40

User Manual
Category Field Description Default V alue
Member
Configuration
Ch Channel number (Read Only) 001~100
User ID User ID number (Read Only) 0
Sfx Suffix number (Read Only) 01~99, 00
Adm Current status of this channel (Read Only)
EN: Enable
DIS: Disable
Ctrl Configure new state of this channel
EN: Enable
DIS: Disable
Forward To Forward To number
Offnet To Of fnet To number
EN (Enable)
DIS (Disable)
Note:
¾ The text at Web page can be edited on Web page directly. It also can be copy and paste to
Windows Notepad for editing and backup purpose. Edit it at Notepad, copy and re-paste to
Web page, and then click Apply.
¾ You can also use Microsoft Excel to edit or create these data and save it as CSV (*.csv) format
(separated by comma) that has correct format what this machine need.
9.3 Web Path: 1.System Config.\1.3.Extension Number
40
Page 41

User Manual
Category Field Description Default V alue
Network
Operator
Prefix/Ex
tension
Number
Mapping
List
Extension Number Enter the prefix number of equipment that the
Operator is defined. Normally the Operator of this
machine will be connected if Access Code for
Operator (default is “0”) is dialed. If the Operator
of this machine is set to N/A, the call will be
transferred to the Operator of other equi pment
whose prefix number is assigned here.
E.g. the Extension Number of this machine:
Prefix/Ext. No Phone Number type
33 886282268888 iPBX
If the Operator is assigned to equipment with
prefix 33, then enter 33 in this field
Maximum The maximum number of equipment can be
entered. (read only)
Entered The number of equipment has been entered (read
only)
Max. Length of
Prefix/Ext. No.
Add/Modify
The maximum length of Prefix number (read only) 6(Read Only)
Prefix/Ext. No.
Add/Modify a Prefix number
Enter the Prefix/Extension number for other
equipment, digits length is 1~6
Phone Number:
Input the Phone Number or VODNET ID of that
specified machine
Type:
Phone:System will start to create the call path
after dialing the Prefix/Ext. No.
iPBX:System will start to create the call path
after dialing prefix number plus 2 digit suffix
number (prefix ID + Suffix No).
Conference: It has to work with FONEMOSA
4496 (Conference Bridge). When chairman
had invited one person to conference,
chairman can dial # and invite next person to
join.
1000((Read Only)
0
Phone
Delete Input Prefix/Ext. that will be deleted
Delete All Delete All (button), Delete all data of Prefix/Ext.
No.
Search List Input the Prefix/Ext. No. prefigured that you want
to search
Search (button):Click this button to search
number in Search List
41
Page 42

9.4 Web Path: 1.System Config.\1.4.Broadcast Auth.
User Manual
Category Field Description Default V alue
Broadcast
Authentication
Maximum The maximum number of Broadcast server
(FONEMOSA 4483/
(read only)
Entered The number of Broadcast server (FONEMOSA 4483/
MOSA4600P) has been entered (read only)
List
Add/Modify
Delete Input MAC address that will be deleted
Delete All Delete All (button), Delete all data
Search List Input the MAC Address prefigured that you want
MAC Address: List MAC address
Phone Number: The phone number that map the
MAC address
Delete: Delete Entry
Delete (button): Click the button to remove this
entry
Mac Address
Input the MAC address of Broadcast server
(FONEMOSA 4483
machine connects to Broadcast server, then it
needs related information of Broadcast server for
authentication.
Phone Number:
Input Phone Number or VODNET ID of that
specified device
to search
Search (button):Click this button to search in
Search List
MOSA4600P) can be entered.
/ MOSA4600P). If this
64(Read Only)
0
42
Page 43

9.5 Web Path: 2.System Advanced\2.1.Member
User Manual
Category Field Description Default V alue
Member List
List
Add/Modify
Delete All Delete All (button). Click this button to remove all
Result Show s the result of operation
Channel: Channel that specified for the member
User ID: Account of the user. Digits made from
1~9.
Delete: Delete date
Delete (button): Click this button to remove this
entry
Channel: Select the Channel that the user uses.
User ID: Input the User ID for member to operate
that channel by phone set.
Password: Input the Password for member to
operate that channel by phone set.
Confirm Password: Double confirm this password
Channel: Select the channel that its member will
be removed.
User ID: Input User ID of member and click
Apply to remove.
data
Delete
43
Page 44

User Manual
9.6 Web Path: 2.System Advanced\2.2.Offnet MAP
Category Field Description Default V alue
Offnet MAP
Maximum
Entered
List
Search List
The maximum number of entries can be entered.
(read only)
The number of entries has been entered (read
only)
Offnet Number: The Offnet (PSTN) num ber t hat
will dial at remote site.
Forward Number: The Forward number to remote
site
Rem: The prefix length that will be replaced.
Instead Number: Replaced by new prefix num ber.
Change To: The actual number will be dialed.
Input Offnet Number for search
Search (button): Click to search
Note: Text editor software is required to create or edit Offnet Map. Upload it to machine to take
effect. Please refer to 8.5 Application of Offnet Map
44
Page 45

9.7 We b Path: 2.System Advanced\2.3.Forward MAP
User Manual
Category Field Description Default V alue
Forward MAP
Channel
Forward Number
Channel No. 1~10 0
Forward number of that channel
Note: Text editor software is required to create or edit Forward Map. Upload it to machine to take
effect. Please refer to 8.4 Application of Forward Map
45
Page 46

9.8 We b Path: 2.System Advanced\2.4.Behavior Setting
Compare Tailing Digits
Search Redirect.map According to
User Manual
Category Field Description Default V alue
User Programming Access
Code
Operator Setting
Access Code
Operator Code
Assign Operator to
(Channel)
Compare Tailing Digits Digit
Access code for user to enter management mode
by phone set
Dial this code to reach operator None
Assign channel for operator N/A
When this machine works with MOSA IP-PBX
(MOSA 4600 Plus), it can do one-step dialing to
penetrate traditional PBX. By this special
application, it expands available extension
number.
Specify the suffix digits length from MOSA
IP-PBX, and compare these digits with
Redirect.map. If it matches, then dial the
forward number that is specified at
Redirect.map.
#1*
0
46
Page 47

User Manual
Category Field Description Default V alue
Through PBX Seizure Type
Search Redirect.map
Depend On
According to (Trunk
Call only)
System Phone Setting
Access Code Configure access code of phone-set
Programming
Password Configure password of phone-set programming
Confirm Password
Normal: Original using method, calling side of
IP-PBX dials IP call via 4491 (this machine), or
IP->outbound to PSTN call via 4491
Voice Mail: Calling side is the extension of
traditional PBX or Voice Mail. It can seize trunk
to MOSA 4600 Plus and then it is forwarded via
4491. This is for special application.
System can specify outgoing call according to
incoming caller ID automatically. Here specify
the incoming caller ID for judgment
Extension:Extension number of MOSA IP-PBX
Caller ID:Caller ID of incoming trunk call
programming for administrator
for administrator
Input password again
Normal
Extension
*0
47
Page 48

9.9 We b Path: 3.IP Settings
User Manual
48
Page 49

User Manual
Category Field Description Default Value
IP Settings
IP State
Public IP Address
The type of IP Address get:
♦ Manual:User enters the assigned static IP
address
♦ Auto(DHCP):Dynamic IP address from
DHCP server
IP Address / Port current used for this machine
Manual
VODNET
Setting
Setting
CDR Receiver
Current Settings
Change To
Primary Address:
Secondary Address:
Serial Number
Priority
Password
IP Address
Port
Format Select what type of CDR it reports
IP Address
Port
Display the current setting (current using) IP
information, including IP Address, Subnet Mask
and Default Gateway. (Display only)
Enter the information to be updated to, including :
1. IP Address
2. Subnet Mask
3. Default Gateway
(IP State must be at state “Manual”)
After you had filled out these parameters, click
button “Apply” to activate the updated value and
the system must be restarted. (Warm Start)
IP Address of Primary DNS server.
IP Address of Secondary DNS server.
Serial Number of VODNET. Default value is
pre-configured. If you don't have this number,
please contact with distributor. This number is
required for making VODNET call
The priority of the Serial Number above (Read
Only)
If password is required to register VODNET,
please input here.
Input NETMOSA IP
Input NETMOSA Control Port
Regular: Complete data
Compact: Partial
Input the IP address of FONEMOSA 4492 that
will receive CDR data.
Input the control port of FONEMOSA 4492 that
will receive CDR data.
192.168.0.2
255.255.255.0
192.168.0.1(
192.168.0.2
255.255.255.0
192.168.0.1
168.95.1.1 DNS Server
0.0.0.0
2010095953- 50397
1798363112- 49584
1 or 2
0.0.0.0 Netmosa
2000
Compact
0.0.0.0
0
Read Only)
49
Page 50

9.10 Web Path: 4.Phone Book
N
N
User Manual
Category Field Description Default Value
Phone Book
Maximum: Maximum number of "static phone book entries"
allowed
Entered Number of "static phone book entries" entered. 0(Read Only)
Entries List: List of static phone book entries
Phone Number
IP Address
Port (number)
Delete (button): Click it to delete this entry
Add/Modify: There are 2 ways to configure static Phone number
1. If the device use fix IP
Phone Number:
or modify (including country code + area
code + Phone No.)
IP Address:IP address you want to add or
modify
Control Port:Control port you want to
add or modify
2. If the device use dynamic IP
Phone Number:
or modify (including country code + area
code + Phone No.)
IP Address: Set to 0.0.0.0
Control Port:Set to 0
umber you want to add
umber you want to add
100(Read Only)
(Read Only)
50
Page 51

User Manual
Category Field Description Default Value
Delete Input "phone number" (including country code +
area code + phone number) you want to delete. It
removes static phone book entry.
Delete All Delete all "static" entries from the Phone Book. It
won't remove "dynamic" entry from learning
procedure
Y es: Yes, delete all
No: No
Search In List: Search IP/Control Port of other machine via the
Phone number input here. The number input here
has to be complete number (country code + area
code + phone number)
Search (button): Input phone number (includes
country code + area code + phone number) and
click search
No
9.11 Web Path: 5.File Transfer
Category Field Description Default Value
Put File from PC
to this Device
Select file Browse (button): Select the file that will upload to
this machine
Send (button): Execute upload action
Clear (button): Clear the file and path that had
been input
Attention: Run Restart is required when .RUN
and .Web file is uploaded
Keep Original IP
(CFG only)
Click this option to keep IP Address intact if other
CFG configuration is loaded.
51
Page 52

User Manual
Category Field Description Default Value
Get File From
this Device to PC
Sample MEM
file
Result Shows the upload status
Success: file is uploaded successful and take effect
immediately
Need Warm Restart: Warm restart is required, such
as file: GT1~GT8, WEB, VON
Need Cold Restart: Cold restart is required, such
as file: RUN
File ID Error: File uploaded is not for this
machine.
N/A: No action
File Name Shows the file information of in this machine
currently.
File Name
Size File Size
Date File date
Time File time
Get Select file that can be download to PC
If text editor (Notepad) is used to edit the contents,
here is the example of parameter.
N/A
52
Page 53

User Manual
10 File Management
10.1 File Type
The naming convention to the file type of MOSA 4491 is listed in the following table:
File Name File Type Description
FWDSRVR.CFG
FWDSRVR.RUN
FWDSRVR.WEB
FWDSRVR.MEM Text file
FWDSRVR.VON Greeting File Voice greeting that report the ID of user
REDIRECT.MAP Text file
System configuration
file
Executing file System Software
Web file Page for web browser
File of system configuration
MEM setting file can be downloaded by
FTP to PC; open file and modify the
contents using NOTEPAD or other word
processing tool; then uploaded the file to
system.
PS. Data can be added or modified only.
Delete data in the file and upload again
won't delete anything. To remove data,
please remove it from Web directly.
MAP setting file can be downloaded by
FTP to PC; open file and modify the
contents using NOTEPAD or other word
processing tool; then uploaded the file to
system. This file is to expand available
extension number or one step dialing to
penetrate PBX
File meaning in DISK0\ folder: Max 2 MB
File Name File Type Description
VMM.TRE Structure File Structure file of Instruction greeting
GRT_1 Greeting File Section 1 greeting file
…
GRT_2 Greeting File Section 2 greeting file
GRT_7 Greeting File Section 7 greeting file
…
53
Page 54

User Manual
FVPN-01 Instruction greeting Section 1 instruction greeting file
FVPN-02 Instruction greeting Section 2 instruction greeting file
…
FVPN-03 Instruction greeting Section 3 instruction greeting file
FVPN-31 Instruction greeting Section 31 instruction greeting file
FORWARD.MAP Text file
OFFNET.MAP Text file
…
MAP setting file can be downloaded by
FTP to PC; open file and modify the
contents using NOTEPAD or other word
processing tool; then uploaded the file to
system. This file records the default
Forward To number of each port.
MAP setting file can be downloaded by
FTP to PC; open file and modify the
contents using NOTEPAD or other word
processing tool; then uploaded the file to
system. This file records Offnet To
number and its Forward To mapping
number.
…
10.2 Upgrade firmware by Management Web
This is the most simple way and most common use way to upgrade firmware. Please prepare
FWDSRVR.RUN and FWDSRVR.WEB file first
For other upgradable file, please refer to previous section
To upgrade firmware via management web, please refer to 9.11Web Path: 5.File Transfer
10.3 Upgrade firmware by FTP
10.3.1 Software Update by FTP for File Type RUN and WEB
54
Page 55

User Manual
1. Execute FTP Client Software, e.g. CuteFTP
Enter IP Address, User Name (default is FTP), Password (the password of FTP and Console is same,
and the default is blank), and the Port Number to 21
2. Click button Connect to get connection between Gateway and FTP Client. The files of Gateway
will be displayed on the window if the connection is successful.
(1) Files in Root:
55
Page 56

(2) File in /disk0 folder:
User Manual
3. Select the file with extension of .RUN and click button Upload and then Overwrite. (Please notice
that the file name must be same as the file name in the machine, e.g. FWDSRVR.RUN).
4. After the file is overwritten (you may check if the time of the file is updated), machine has to run
Cold Start to store the configure file, then the updating is effective.
5. Select the file with extension of .WEB and click button Upload (Please notice that the file name
56
Page 57

User Manual
must be same as the file name in the machine, e.g. FWDSRVR.WEB). And repeat the step 3 ~ 4.
6. Check if the uploading is successful, you enter the Web Management Page to examine the version
of software.
Check if the
version is
correct
10.3.2 Update MEM file via FTP
Extension Table file can be download via FTP and edit, modify by Notepad or other text editor
software. Upload it back when it is done.
You will see one more file FWDSRVR.MEM via FTP software. This table below is Extension
Table data file.
You can download FWDSRVR.MEM to computer and open it by Notepad, which is shown below.
MEM file
57
Page 58

User Manual
Type
1:iPBX
0:Phone
Prefix
By this way, you can modify or add the data by Notepad software. When it is done, upload it back
to the machine by FTP software, then data is updated.
(Note: this way can modify or add data only . Delete data is useless. Please delete it from Web page)
Phone Number
Remarks for Update Software of File Type MEM:
After the configuration is finished, please make a backup file for CFG file. It is in case that if the
data is lost, you may upload the backup file of CFG file to machine. If you upload the previous
backup file of CFG file to gateway after the MEM file is uploaded, the MEM file will be ineffective
because the backup file overwrites the Prefix Map table. You have to re-upload the updated MEM
file to machine to get the correct data.
58
Page 59

User Manual
11 Network Management
11.1 Management by Console, and Telnet
11.1.1 List of all commands
User Exec commands:
Enable Turn on privileged commands
Exit Exit from the EXEC
Help Description of the interactive help system
Show Show running system information
show:
Dns Show the IP address of domain name server
ethernet FastEthernet port status and configuration
history Display the session command history
Ip Display IP configuration
running-config Show current operating configuration
version System hardware and software status
Privileged Mode:
Configure Enter configuration mode
Delete Reset configuration
Disable Turn off privileged commands
Exit Exit from the EXEC
Help Description of the interactive help system
Ping Send echo request to destination
probe-hook probe busytone cadence
probe-remove stop probe busytone cadence
Reload Halt and perform cold start
Restart Halt and perform warm start
Show Show running system information
Global Mode:
Dbflush DataBase flush
Dns Set the IP address of domain name server
End Exit from configure mode to privileged mode
Exit Exit from configure mode
Help Description of the interactive help system
Ip Global IP configuration subcommands
manager Enable/Disable the specific management function
No Negate a command or set its defaults
password Modify password of enable command
regional_id Set regional id
service_port Set service port number
59
Page 60

User Manual
11.2 Management by Phone-set
11.2.1 Command of phone set
Pick up phone set and hear dial tone, and then dial *0 0000, dial the number below to configure
setting after Du Du Du tone
Item Description Parameter Description
77 Record instruction greeting
93 Configure extension of
operator
96 Play greeting
98 Restart
99 Record greeting
2 Digit;01~99
2 Digits;11~26
1 Digit;1~7
1:Execute
1 Digit,1~7
Record instruction
greeting. T otal 99
sections. Max 30 mins.
Only 31 sections
currently.
Configure an extension as
operator
Play the greeting
Warm Restart
Record greeting, totally 7
sections.
Record Greeting (Please ref er to 8.2 Greeting of DISA)
*
#
0
#
9#
#
Start recording
End recording
Listen recording
Stop listening
Save recording and exit
Leave recording mode
Record Instruction Greeting (Please Refer to 8.3 Instruction
Greeting for User)
*
#
0
#
9
#
Start recording
End recording
Listen recording
Stop listening
Save recording and exit
Leave recording mode
60
Page 61

12 Dialing Flow Chart
User Manual
Input "1" twice
Select Item
Correct
Input "2"
Input Account
Incorrect
Input "3"
No such account
Input again
Err 3 times
Suspend
Busy Tone
Account is
suspend
Busy Tone
Input "5"
Input "4"
Busy Tone
Input Forward No.
End with "#"
Play No.
Confirm "0"
Err. "1"
Press 1
Fail
Press 0
Successful
Press "#" if
No. Err.
Input again
Input Offnet No.
End with "#"
Play No.
Confirm "0"
Err. "1"
Press 1
Fail
Press 0
Successful
Press "#" if
No. Err.
Input again
Forward "0"
Offnet "1"
Press 1
Play
Offnet
No.
Press 0
Input Psw,
Press "#" end
Fail
Successful
Play
Forward
No.
61
Page 62

User Manual
13 Specification
Voice Compression: G.711/G.729 AB/G.723
Silence Suppression: VAD, CNG
Echo Cancellation: G.165/G.168 16 ms
Jitter Buffer: Adaptive Jitter buffer Management
Gain Control:In/Out +/-6db
Packet Time: 40 ms
Transport Protocol: RTP, RTCP
Call Control Protocol: Proprietary
Phonebook: Manual input, Automatic
LAN Interface: 5 * Ethernet Ports; 10BASE-T/100BASE-TX Auto-negotiation; RJ-45 Connectors
System Console interface: 1
Management:
Management Tool: Web Browser, Phone set, System Console, and Telnet
IP Address: Static IP / DHCP
Firmware Update: Web, FTP
Power
Power Adaptor, Voltage: 100VAC ~ 240VAC. Frequency: 50/60Hz
Power Consumption: 9 W
Dimension: 127 mm x 80 mm x 21 mm
Working Environment
Operating Temperature: 0 to 50 , Storage Temperature: ℃ -10 to 70℃
EMI certification: FCC part 15 Class B.CE Mark
PTT Regulation: FCC part 68, NALTE, iD A, JATE
Safety: cUL, CCIB, CB
DCC NO. 9171004703
62
 Loading...