

MORTEX DOWNFLOW ELECTRIC FURNACE Installation Instructions Manual

MORTEX
INSTALLATION INSTRUCTIONS
DOWNFLOW ELECTRIC FURNACE
A. Introduction
Mortex Downflow Electric Furnaces are specifically
designed for Manufactured Housing applications. The
furnaces are rated at 240 volts, 60 Hz, single phase. 10, 12,
15, 17 and 20Kw models are available. All models have
multi-speed blowers capable of handling a wide range of
BTUs of cooling.
These instructions are primarily to assist qualified
individuals trained and experienced in the proper installation
of this type of equipment. Refer to authorities having
jurisdiction for additional guidance.
B. Rules For Safe Installati on And Operation
1. This unit has been designed and manufactured to
comply with National Codes, it is the installers responsibilit y
to install this unit to comply with National Codes and/or
prevailing local codes and regulations. Mortex assumes no
responsibility for units installed in violation of any code or
regulation.
2. Access for servicing is an important factor in the
location of the furnace. A minimum of 24 inches should be
provided in front of the furnace for access to the heating
elements and controls.
3. This electric furnace is approved for zero (0)
clearance to combustible material on all or any part of the
furnace exterior and the inlet or outlet duct work.
4. Duct work must be installed in accordance with the
standards of the National Fire Protection Association (NFP A)
for the installation of Air Conditioning, Warm Air Heating
and Ventilating Systems (NFPA 90A and 90B). See National
Environment al S ys t e ms Co nt ra cto r s Asso ci ati on M a nua l K for
duct sizing recommendations.
5. Ground the unit to prevent electric shock. All
electrical wiring should be in accordance with the National
electrical Code.
6. The safety testing agency label appearing on these
units covers the unit only. It does not cover any other
equipment.
7. The unit should be unpacked on receipt and if
damage is found, a claim should be made immediately by the
receiver upon the shipping carrier.
Closet: Must be of sufficient size to allow removal of air filter
and maintenance of the blower in the furnace. If return is in
door or wall below the furnace casing height a minimum of 6
inches clearance must be allowed on that side of furnace to
allow proper air flow to top of the furnace. Return air
openings must be as stated in alcove installation.
Furnace must be positioned to allow the discharge air to flow
unrestricted into the duct below. A metal transition should be
used. Be sure to seal the joints to prevent air leakage.
C. Physical Installation
Alcove: Must be a minimum of 24 inches deep by 20 inches
wide. Electrical connections are on right side. Door makes
overall depth of unit 25 inches. 24 inches must be clear in
front of the unit to nearest wall or partition. A return air
opening must be provided to allow return air to enter top
opening of furnace. Opening must be a minimum of 200
square inches for heating. Increase to a minimum of 300
square inches for A/C operation. For large A/C or HP
applications a larger opening may be required.
D. Electrical Wiring
Refer to the units nameplate for specific electrical data.
Caution: Disconnect power at main fuse or circuit breaker
distribution panel before wiring furnace to prevent shock
or fire hazard.
Power wiring
Unit is suitable for use with copper conductors. Tighten all
wire connectors. Take care not to damage heater ceramic
insulators. For correct field wire size see unit nameplate and
field wiring table inside electrical compartment. Use 75
degree C minimum wire if wire must be replaced. Circuit
29may98 61BH0001
breakers are provided and supply circuits are to be connected
directly to the marked circuit breaker terminals.
Caution: Furnace is equipped with a protective shield
over field wiring connection. When field wiring is
completed, shield must be replaced to prevent hazard of
electrical shock when servicing furnace.
Note: See unit for complete wiring diagram attached to
back of electrical compartment door.
Control wiring
Field connections to the low voltage leads are made using
appropriate field supplied wiring connectors. Consult
installation instructions provided with accessory items for
specific information on control wiring. Do not use two
separate thermostats for operation of heating and cooling. If
two class two circuits are used, use a thermostat with isolating
contacts to prevent inter-connection of two circuits. Set
thermostat heat anticipator at 0.15 amps for furnaces 10KW or
smaller, 0.30 amps for larger furnaces.
D. Blower Motor
Units are equipped with a three speed blower motor. Two
factory selected motor speed leads are connected to the blower
relay to provide automatic speed change for heating and
cooling airflow volume s.
E. Air Filter
Air handlers are factory equipped with an air filter. If the
return grille has its own filter, a filter installed in the air
handles is not recommended.
F. Check Test and Start
The unit should be tested after the system has been co mpletely
installed to determine proper operation. Unit is equipped with
heater time delay controls. All heating ele ments should turn
on within one minute.
G. Periodic Maintenance
The filter must be changed at least twice a year to permit
proper airflow for safe and efficient operation.
H. Contact us for Help or for Any Comments on Our
Products
As we strive to better serve our customers like you, we are
always ready to help you. We also welcome any comments
from our customers concerning quality and improvements that
could be made to our products. Please feel free to call or write
us. Thank you for the purchase of our product.
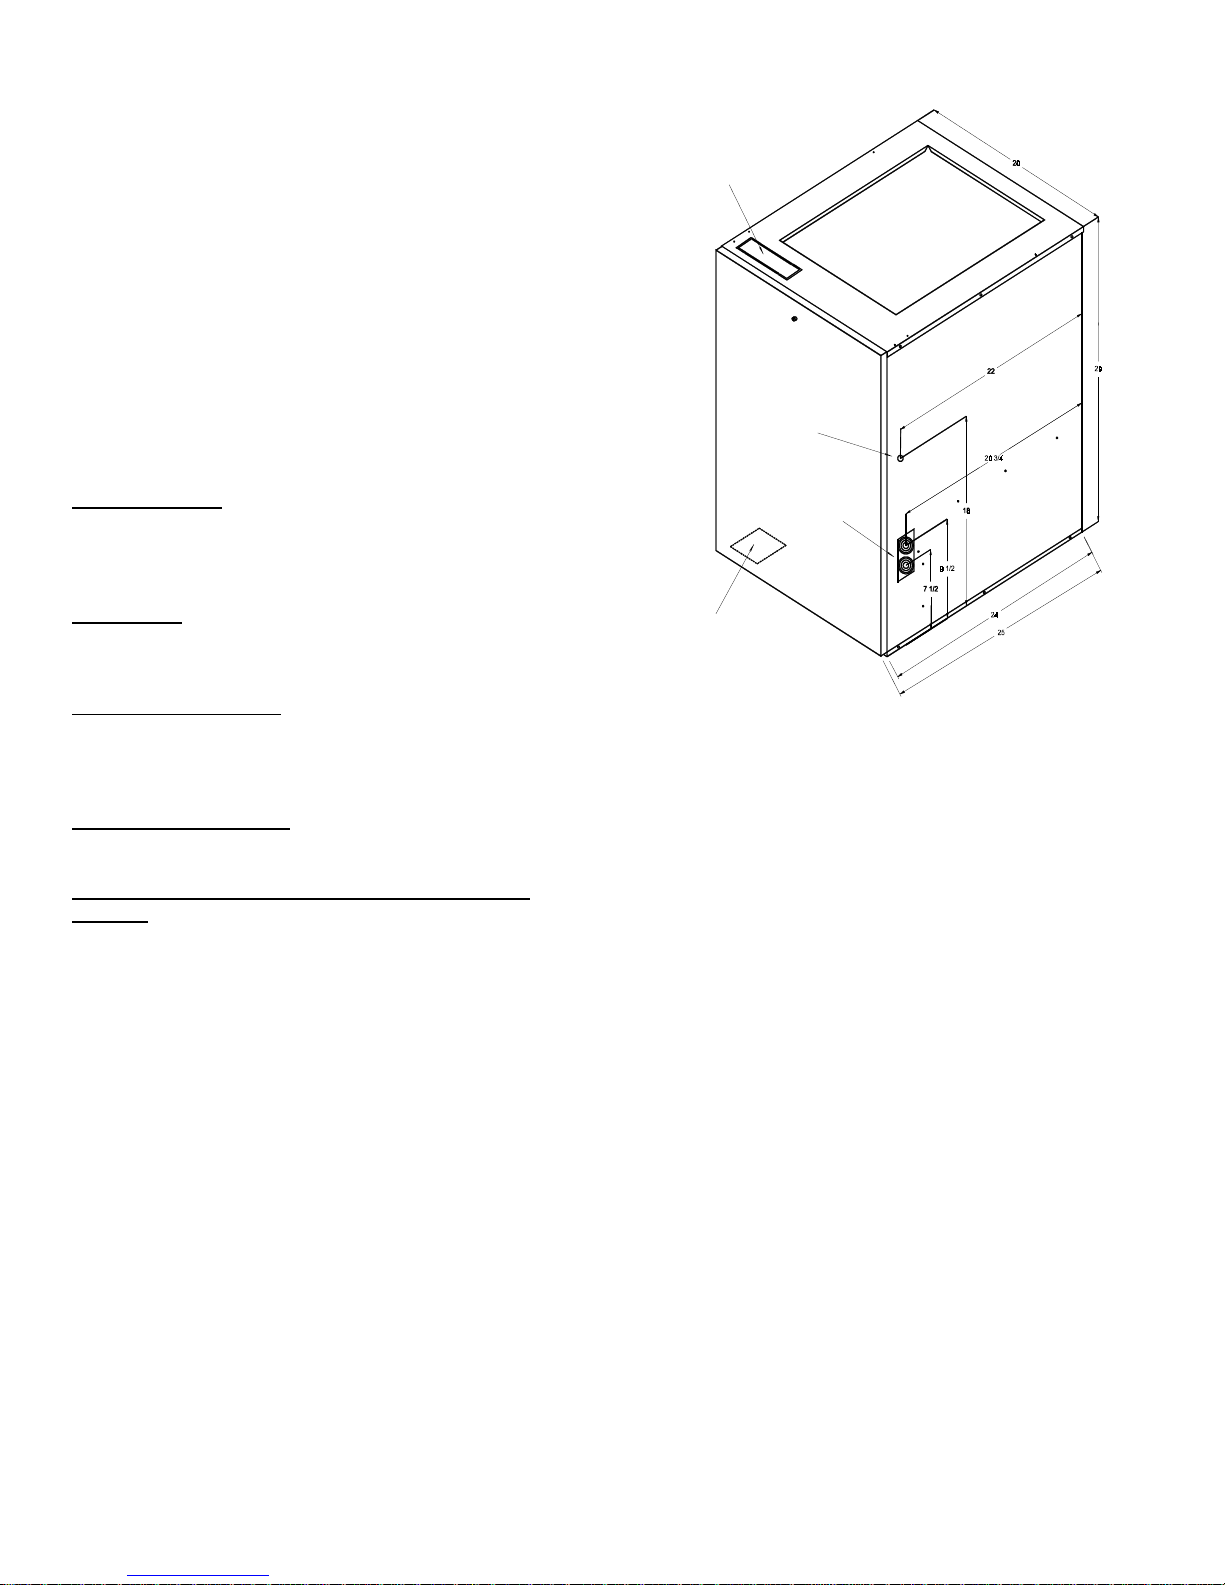
2 X 6 LINE AND DRAIN OPENINT
14 X 18 RETURN AIR OPENING
9/16 THERMOSTAT WIRE OPENING
TWO 1 3/4 LINE VOLTAGE K. O.
3 1/4 X 3 1/2 LINE AND DRAIN OPENING
Mortex Products
P.O. Box 9380
Ft. Worth, Texas 76147
Office (817) 624-0820
Fax (817) 624-8581
61BH0001/2
 Loading...