

Page 1
Instructions for installation and use
3410 & 3440
EN 13240 · 80,1% eciency
DEFRA approved for use in United Kingdom smoke control areas
Distributed by: Morsø UK
Valley Drive · Swift Valley · Rugby, Warks CV21 1TW · England
MORSØ JERNSTØBERI A/S . DK-7900 NYKØBING MORS
E-Mail: [email protected] · Website: www.morsoe.com
Page 2

Enjoy your new Morsø stove!
Morsø, the biggest stove company in the Danish market, has been making wood-burning stoves of the
highest quality since 1853. Just follow the instructions
below, and we are certain that you will be able to use
and enjoy your new stove for many years.
Contents
1.0 Installing your Morsø stove Page no.
1.1 Unpacking the stove 3
1.2 Installing the stove 3
1.3 Chimney sweep 3
1.4 Location of the stove/distance requirements 3
1.5 The chimney 5
1.6 Pipe connections 5
1.7 Connecting to a brick chimney 6
1.8 Connecting to a steel chimney 6
1.9 Draught 7
2.0 Firing/using the stove 8
2.1 Lighting instructions and fuelling intervals 9
3.0 Routine stove maintenance 12
3.1 External maintenance 12
3.2 Internal maintenance 12
3.3 Cleaning the stove 13
4.0 Alternative fuel types 14
Additional accessories
Morsø also oers a comprehensive line of oor plates and accessory products that can facilitate the safe and ecient operation and maintenance of your Morsø stove.
Cast iron
Cast iron is a live material. There are no two ovens that are identical. This is partly due to the
tolerances of the casting process, partly because the ovens are a work of craftsmanship.
Minor unevennesses may also occur in the cast iron surface.
2
Page 3

1.0 Installing your Morsø stove
1.1 Unpacking the stove
3410: After removing the outer packaging, atten it and lay onto the oor close to the stove;
this can then act as protective work surface during the assembly process.
Next, remove the legs and bolts from inside the stove. Gently lay the stove onto its back and
unscrew it from the wooden pallet. Using the bolts supplied, now screw the legs into position
on the underside of the base. The stove should now be lifted and moved into the upright position, avoiding excess load on the back legs.
3440: Remove the stove from the pallet and place it carefully into the right position.
The stoves are heavy and therefore it is strongly recommended that when lifting, it is undertaken by two people. Morsø 3410 weighs 100 kg, Morsø 3440 weighs 116 kg.
The stove is intended for intermittent use.
1.2 Installing the stove
The stove and chimney inst allations MUST comply to all current National and Loc al Building Regulations; your approved Morsø dealer or your local building control ocer can advise reg arding this.
Ultimately, it is you and your installer who is responsible that the installation complies.
1.3 Chimney sweep
It may also be wise to consult your local chimney sweep before installing the stove. After your
stove has been installed, it is advisable to have the chimney checked and swept at least once a
year. In any case, if your chimney has not been used for some time, it should be inspected for
cracking, bird nests, etc. before it is put back into use.
1.4 Stove placement/clearance requirements
Minimum Clearance requirements apply if the stove is placed near to combustible materials.
Permitted clearances to combustible materials are also indicated on the data plate on the
rear of the stove.
In situations where the stove is to be tted into a brick or non-combustible recess, we recommend that the stove is installed with at least 10 - 15 cm clearance to the wall, this will allow heat
to circulate around the stove; also the maintenance of the outside stove is easier. When applied
to masonry, a layer of wallpaper is normally classied as a non-combustible surface. Howerver,
thery may be a degree of discolouration particularly where blow vinyl papers are used.
3
Page 4
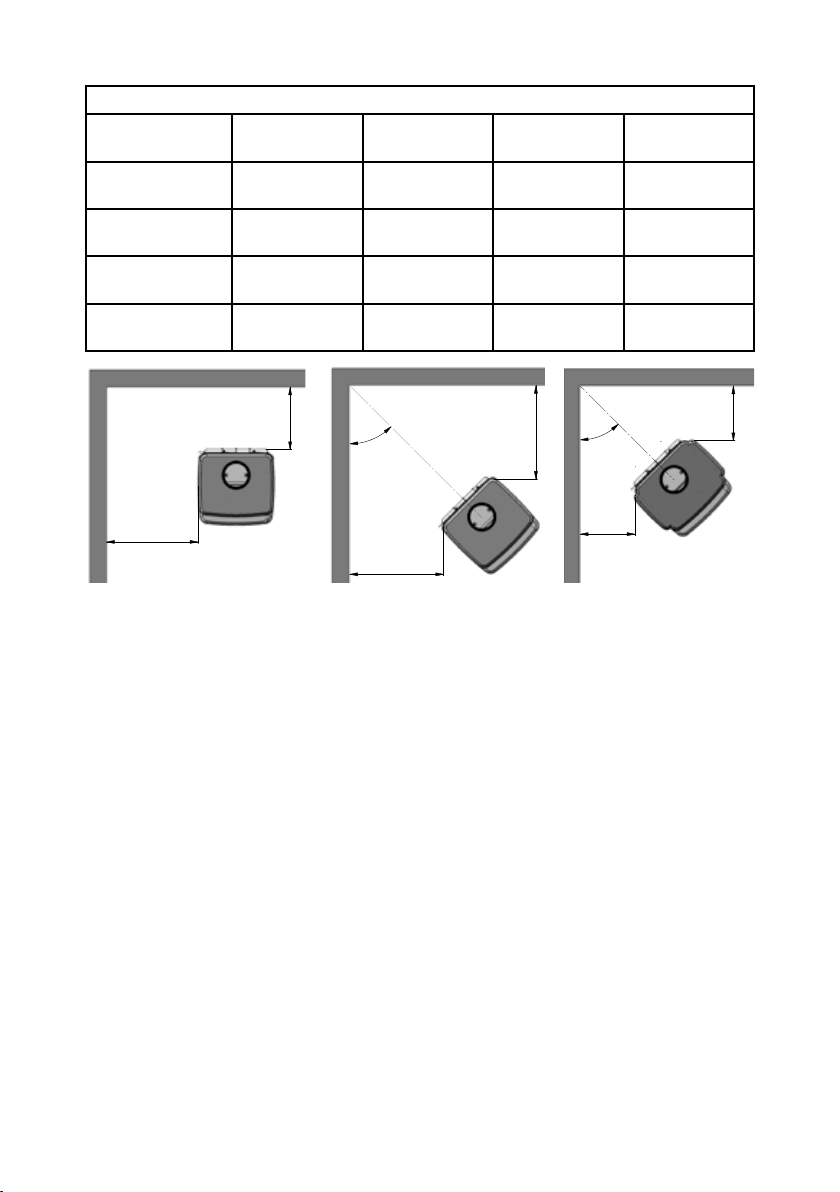
Minimum distances from ammable material:
Stove type Behind the
stove (A)
Morsø 3410
uninsulated ue
Morsø 3410
insulated ue
Morsø 3440
uninsulated ue
Morsø 3440
insulated ue
400 mm 600 mm 600 mm 800 mm
200 mm 600 mm 600 mm 800 mm
350 mm 350 mm 600 mm 800 mm
200 mm 300 mm 600 mm 800 mm
To the sides of
the stove (B)
Above the
stove
To furniture
A
45°
B
B
B
45°
A
A
3410 corner installation 3440 corner installation
On the oor
National and Local Building Regulations must again be obser ved when considering the type,
thickness and area of the hearth to be used in the installation. The hearth temperature under
safety test was less than 65°C.
One should of course always make certain that the underlying oor surface can bear the
weight of the stove.
Clearances to Furniture
The clearance requirement from the stove to any furniture should be no less than 800 mm. It
is always necessary to assess whether or not any furniture or other objects situated close-by
can be aected by heat, i.e. dried out.
The distance to any combustible material in front of the stove is minimum 800 mm.
The surface of a wood burning stove gets extremely hot when used and therefore special
attention to safety is paramount, especially where children or the inrm are present.
4
Page 5
1.5 The chimney
Only if National or Local Regulations permit are you permitted to connect a stove into a chimney that is shared by another appliance. YOU MUST be aware of any applicable Regulations
in this respect.
The wood-burning stove must never be connected to a chimney to which a gas-burning stove
or appliance is connected. An ecient modern stove places heavy demands on the chimney,
and you should have the chimney regularly swept and inspected by your approved chimney
sweep. The cross-sectional area of the chimney (at its narrowest point) must comply with National and Local Building Regulations. Generally, the area needed for a Morsø wood-burning
stove installation should measure at least 175 cm2 (150 mm diameter).
An over-sized chimney is generally hard to keep warm and results in poor draft. In cases where
there is an oversized masonry chimney, it is recommended that the chimney be lined using an
appropriate chimney lining system with the correct internal diameter.
With respect to the chimney termination, all chimneys should terminate in accordance with
National and Local Building Regulations. Note that National and Local Regulations also apply with regard to the placement of chimneys and ues in connection with thatched roofs.
See the section on Draft Conditions, 1.9.
The chimney or ue system must be equipped with access doors for inspection and cleaning. The size of the cleaning door in the chimney must at least equal to that of the crosssectional area of the chimney. In the event that a chimney re occurs resulting from faulty
operation or prolonged use of damp wood fuel, close the air vents completely and contact
your local re department immediately.
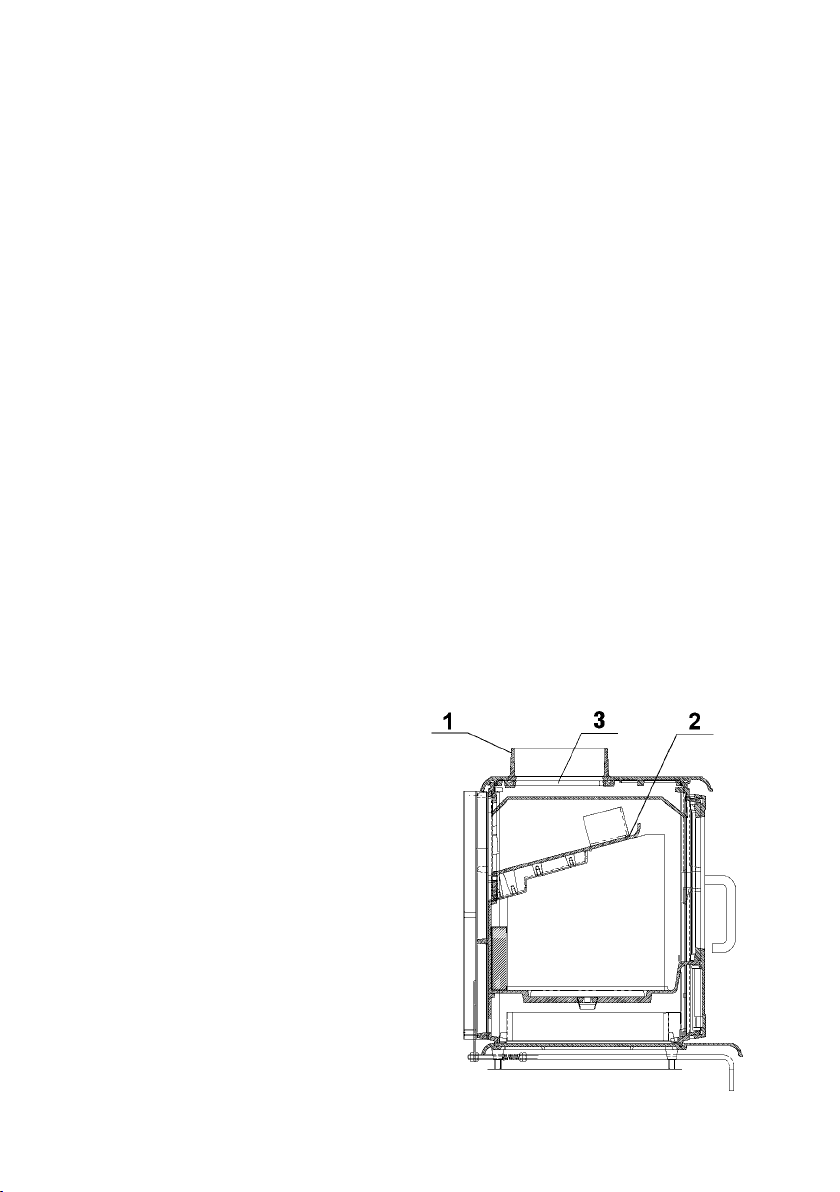
1.6 Fluepipe connections
The stove comes standard with a smoke outlet
(1) and a ball lock (3) at the top, and a cast-iron
cover mounted on the cast-iron back panel behind the convection back panels. If you want to
install the stove with the smoke outlet at the
back, knock the iron plates on the convection
back panels out of the small “bridges” which
hold the plates in place, using light, steady hammer taps. Unbolt the cast-iron cover from the
back panel by turning it anti-clockwise, and install it in the top plate by pushing it down and
turning it clockwise. The cover can work as a
clean-out cover, making access easier for the
annual cleaning of the stove. Centre the smoke
outlet in the hole at the back of the stove and
bolt it securely in place with the bolts and
clamps provided. The ball lock is not used, if the
stove is tted with the outlet at the back.
Please note: During ring, the cleaning valve
(2) must always be installed correctly in the
bae as the top cover may otherwise overheat and sustain permanent damage.
5
Page 6

1.7 Connecting the stove to a masonry chimney
A wall sleeve should be bricked securely into the wall of the chimney at the appropriate height
and the stovepipe inserted centrally. The pipe must not extend into the actual chimney opening, but rather must reach only to the inside of the chimney aperture. The gap between the
stovepipe and sleeve must be sealed using glass bre packing rope.
Only use stovepipe components that comply to National and Local Building Regulations.
1.8 Connecting to a stainless steel insulated chimney system
If your installation involves taking the chimney straight up and through the ceiling, you must comply
with National, Local Building Regulations or ue manufacturers instructions concerning clearances
to combustible materials such as walls, oor joists and ceilings. The joint between the stove ue collar and the stovepipe must also be sealed using glass bre rope. It is important that the insulated ue
system is properly supported both at ceiling level and at roof level. THE STOVE MUST NOT BEAR
THE WEIGHT OF THE CHIMNEY SYSTEM (See chimney manufacturer’s instructions). Excessive
weight on the stove w ill inhibit exp ansion and could lead to dama ge of the stove top. Damage caus ed
to the stove in this way would not be covered by the manufacturers guarantee.
In the event that a chimney re occurs resulting from faulty operation or prolonged use of damp
wood fuel, close the air vents completely and contact your local re department immediately.
Be aware of the following:
Cleaning procedure: Discuss this with chimney sweep or qualied installer prior
to or during the stove installation
Chimney draft: If the chimney draft is naturally poor it is better to install the ue from
the top of the stove so as to minimise any internal resistance of the ue gases.
Avoid having any more than 2 bends in the ue system and limit the length of the
oset between bends.
Fresh air supply
A wood-burning stove requires air for combustion. As a result, ring a wood-burning stove will help create a healthy climate in your house. If the house is very tightly
sealed, and particularly if there is a cooker hood or ventilation system in the house, it
may be necessary to install an air grate in the room in which the wood-burning stove
is installed. Otherwise there may not be enough draught in the chimney, which may
result in the stove not being able to burn properly, and smoke may come out of the
stove when the re door is opened.
If it is necessary to install air grates, they must be positioned so that they cannot
be obstructed.
6
Page 7

1.9 Draft conditions
If smoke spillage occurs when the re door is opened, it is probably due to poor chimney
draft. This t ype of stove requires at least 12 pa of chimney draft to achieve satisfactory combustion and smoke spillage prevention. However, in cases where the stove door is opened
too vigorously you could expect that slight smoke spillage may occur. The ue gas temperature at the rated output is 272˚ C relative to 20˚ C. The ue gas ow is 6.7 gr/sec.
If you have some doubts you can ask you local sweeper to measure the draught of the chimney.
Draught
The draught in the chimney is the result of the dierence between the high temperature in the chimney and the cooler temperature outside. Other factors that determine
whether sucient negative pressure can be produced to create a draught include the
length and insulation of the chimney, and wind and weather conditions.
The draught will be reduced when:
- The temperature dierence is too low, e.g. in connection with a poorly insulated chimney.
If the chimney is cold, it may help to light (burn up) a rolled-up newspaper in
the chimney’s cleaning door.
- The outside temperature is too high, e.g. during the summer.
- There is no wind.
- The chimney is not tall enough, with the result that it sits in the lee of the roof
surface or tall trees.
These conditions are also associated with the greatest risk of smoke coming
back down the chimney.
- Air is entering the chimney in undesired places, e.g. through cracked joints or
leaks in the cleaning door or the ue pipe.
- Unsealed, unused replaces are connected to the chimney.
- The ue pipe and chimney are clogged up with soot due to inadequate cleaning.
- The house is too tightly sealed (please see the section on Fresh air supply).
A good draught is achieved when:
- There is a big dierence between the temperature in the chimney and outside,
i.e. when the need for heating is greatest.
- The weather is clear and there is a good wind.
- The chimney is of the proper height, i.e. Minimum 4 metres above the stove,
and clear of the spine of the roof.
7
Page 8

2.0 Firing/using the stove
The heat output of your stove is regulated by means of the 3 air inlets. The primary air supply,
i.e. the air which passes through the shaking grate, is controlled by left handle under the ash
lip, while the secondary air supply, i.e. the air supplied to the re across the glass window, is
controlled by the right handle.
A third ow of air is supplied right over the re and takes care of burning the gasses that are
freed last from the wood when it is heated. This ow may be regulated with the handle behind
the stove in the left side; however, on EN approved stoves, it must be set in the lowest position.
The stove’s rated heat output is 6,5 kW. The eciency is 74%. Your new Morsø stove is ENtested and recommended to be red with wood. The stove is intended for intermittent use.
The stove is equipped with a removable handle; for safety reasons it should be removed during use, especially where children are nearby.
NB!
Wood is a material that contains a great deal of ga s (approx. 75%). The ga ses are released
when the wood is lit and heated. For this reason, it is important that these gases are ignited quickly after stoking. If the wood just lies smouldering, especially after re-stoking,
a lot of smoke is created which, in the worst case, may cause an explosive ignition of the
gases, resulting in damage to the stove.
In order to ignite the gases that are released from the wood, and to keep clear, lasting
ames during the combustion process, it is important to let in the required quantity of
oxygen (air supply) at all times. The setting of the air supply, the method of ignition and
the lighting intervals depend on the draught in the chimney, the wind and weather, the
amount of heat required, the fuel, etc. This means that it may take some time before
you get to know the correct functioning of the stove under any given circumstances.
Although you can re your Morsø stove with almost all kinds of wood, you should
not re with wet wood, or unseasoned wood. Wood ought to be stored under a roof
for at least 1 year, and preferably 2 years, with free access to wind. Wood should be
chopped as soon as possible after felling if it is to dry quickly. The wood can be used
once the moisture is less than 20%. During the test, all stoves are tested with wood
with a moisture content of (16 ± 4)%.
Never use driftwood as it usually has a high salt content, which damages both
the stove and the chimney. Impregnated and painted wood and chipboard emit
poisonous smoke and fumes so they should not be used as fuel either
Please note that liquid fuel may not be used in the stove.
Pieces of wood with a diameter exceeding 10 cm should always be chopped. The pieces
of wood should be short enough to be able to lie at over the layers of embers, with air
at both ends. The maximum length of fuel in the stove is 30 cm. The maximum quantit y
of fuel is approx. 2 kg/hour (max. 2 pieces of wood each time you re-stoke).
The rst few times you light the stove, the re should be moderate so that the heatresistant paint can harden before ring more vigorously. During the hardening phase,
the paint may develop obnoxious smoke and smell the rst time it is lit, which is very
normal. Make sure that the room is well ventilated during this period.
When heating up or cooling down, the material is exposed to major temperature
dierences that may cause the stove to give o creaking sounds.
8
Page 9
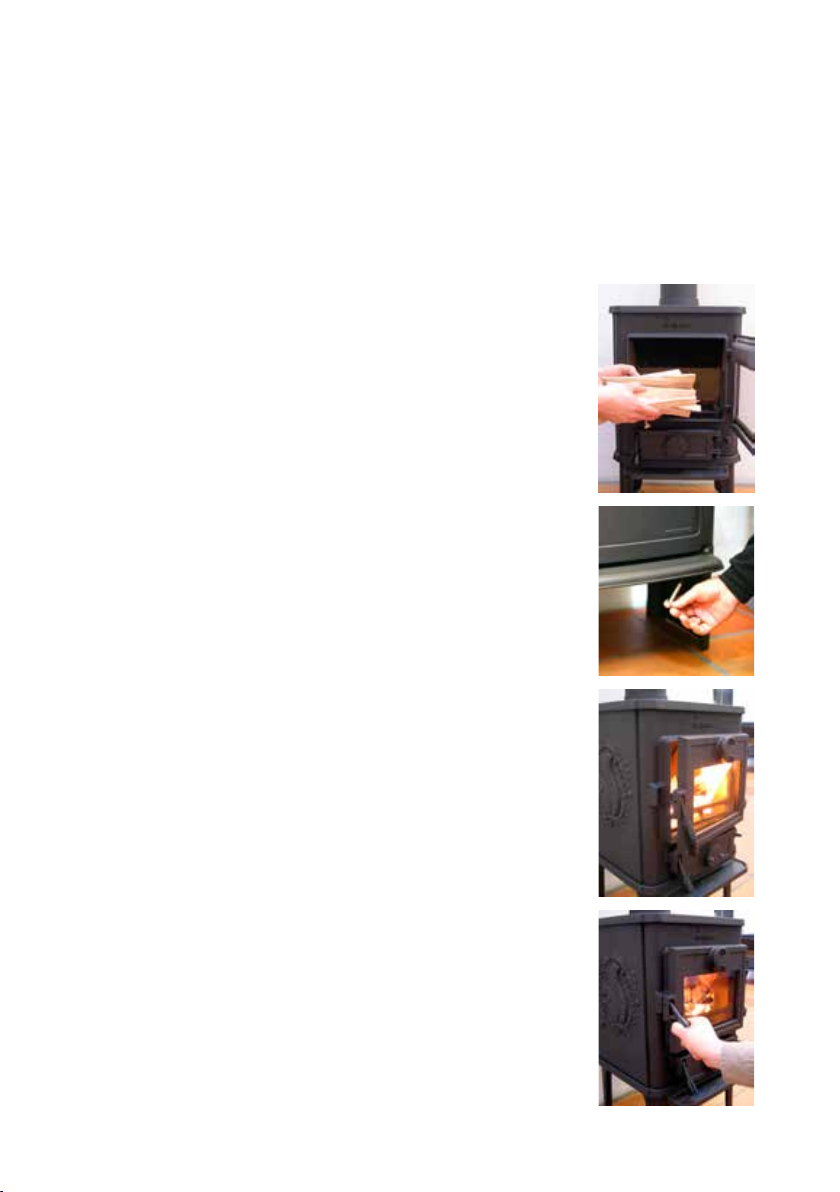
2.1 Lighting and refuelling intervals
Kindling (dry sticks) requires a large volume of air for quick combustion. When lighting the stove
from cold it will help to keep the main door ajar (2-3cm) for the rst few minutes and the air
supply should be fully open during lighting (right handle). When only burning wood it is recommended that a 1 cm deep ash bed be established and maintained on the grate of the stove.
When draught is poor, letting in a little primary air through the grate may facilitate ring; however, it should be noted that this supply of air may cause temporary sooting of both stones
and glass.
1. A layer of embers will form rapidly if the stove is lit with
2 - 4 re lighters or 7 - 10 rolled up sheets of newspaper,
underneath roughly 1-2 kg of dry kindling.
2. Fully open the secondary air supply that is controlled by
the right handle beneath the ash lip.
3. After the paper/re lighters have caught re, leave the
re door ajar about 2-3 cm, so that the chimney draws well.
4. After 5-10 minutes the chimney draft should be established, at this point close the re door. If all the necessary
conditions are met, a nice layer of embers will start to accumulate after another 15 - 20 minutes.
9
Page 10
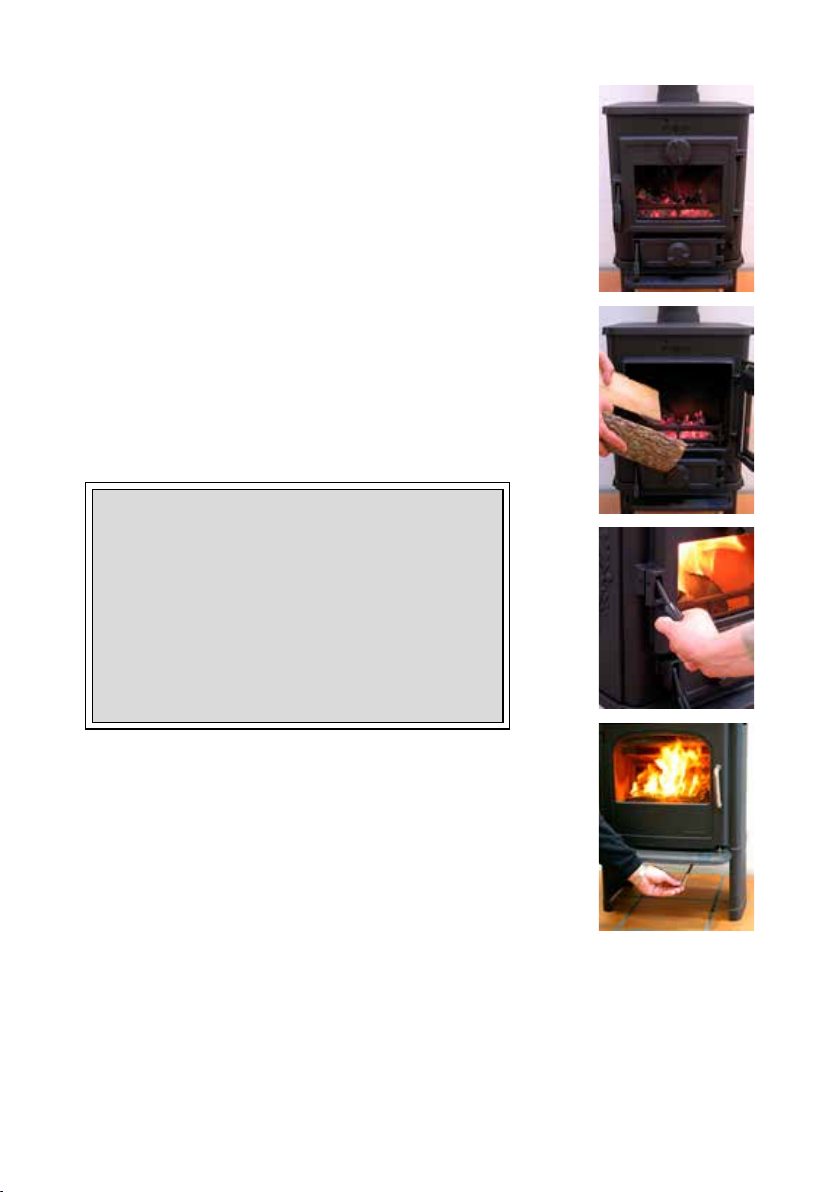
5. Refuelling of your stove should be done while there are
still glowing embers in the bed. Spread the embers across
the bottom, but concentrated mostly towards the front of
the stove.
6. Place three pieces of f uel weighing rou ghly 0.7 kg and meas uring about 30 c m in length acro ss the embers i n one layer, with
spacing of roughly 1 cm between the pieces of wood.
7. When the secondary air supply is opened all the way and
the door is closed, the new fuel will ignite in a few minutes.
Important!
It is important that the fresh quantity of wood star ts
to burn qu ickly. To ensure th e fuel lights qu ickly, open
the combustion air to max. or leave the door ajar to
allow in the amount of air needed to light the wood.
If, however, the wood only smoul ders, there will be a
strong build-up of smoke, which at worst can cause
an explosive ignition of the ue gases with the risk
of material damage and personal injury.
8. Once the new fuel has taken, adjust the secondary air
amount to the desired setting; optimal combustion will
continue until glowing charcoals are produced.
Make sure that there is always enough air (oxygen) to maintain cle ar, lasti ng ames when , and after, reduci ng the amount
of combustion air.
Under normal chimney draft conditions, expect to refuel
your stove every 70 - 80 minutes.
9. A new charge of wood can be added by repeating steps
5 & 6.
10
Page 11

The stove door should normally be opened gently the rst 2 - 3 centimetres, then you should
wait until the pressure has equalised before opening the door all the way. This technique will
prevent smoke from getting out, particularly when there is a poor draught.
The stove door should never be opened when the stove is being red vigorously.
Once the wood has burned out, it becomes glowing charcoal. If a good layer of embers has
already formed on top of a sucient layer of ash, the stove can keep warm for a very long
time, not least due to the favourable qualities of the cast iron.
We would strongly recommend that you do not leave your stove alit at night. It
harms the environment and constitutes very poor use of the wood as the gases
in the wood do not ignite at the low temperature, but settle as soot (unburned
gases) in the chimney and stove. Extreme conditions, such as poor draught in the
chimney, large quantities of wood or wet wood, may in the worst-case scenario
cause an explosive ignition.
When ring in the summer period, when there is minimal need for heat, the combustion
will be poor. The stove provides too much heat so the combustion should be reduced.
But always remember to make sure that there are lasting ames until the wood becomes charcoal. If you want a weaker re, stoke up using less wood.
If you re the stove using wet wood, a lot of the fuel’s thermal energ y will be spent
forcing the water out of the wood, without releasing any heat to the stove. This
incomplete combustion results in a layer of soot being left in the stove, pipe and
chimney.
Comparison between ring with wood and oil:
Type of wood (moisture content 20%) No. of cubic metres per 1000 litre oil
Oak
Beech
Ash
Sycamore
Birch
Elm
Common spruce
Silver r
7.0
7.0
7.2
7.5
8.0
8.9
10.4
10.9
11
Page 12
3.0 Routine stove maintenance
3.1 External maintenance
The surface of the stove is painted with heat-resistant Senotherm paint. If the stove is used
too vigorously, the painted surface may take-on a greyish tinge. It is easily maintained by simply vacuuming the surface with a soft brush attachment and applying two light layers of paint.
Morsø stoves are painted in Morsø dark grey. The touch-up paint is available either as aerosol spray or as regular brush-on.
3.2 Internal maintenance
Glass
If the stove is used and installed onto a ue with the correct draft, very little or no deposits should
appear on the Glass. It is usual for soot deposits to appear during long slumbering res however,
once the re has been re-established to a burn brightly, these deposits should burn o.
If the glass window becomes thoroughly covered in soot due to faulty operation or poor
draft, the soot can be easily removed using, e.g. Morsø Glass Cleaner, but please ensure that
the glass is cold before cleaning. Avoid fuelling the stove with wood that is so long that it
presses against the glass when the door is closed.
Reasons for sooty glass window:
- The fuel is too wet.
- The pieces of fuel are to big/uncut wood.
- The combustion temperature is too low.
- Too much air coming through the bottom grate.
- Poor chimney draft.
Ceramic glass replacement
Ceramic glass cannot be recycled because it has a higher melting point that ordinary glass.
If ceramic glass is mixed with ordinary glass, the raw material is spoiled, and the reclaiming
process may be halted. Take care that the ovenproof glass does not end up among ordinar y
recycled waste. That will be a great benet to the environment.
Note: Should be handed in to a recycling station as ceramic glass.
Internal cast-iron parts and/or wear components
The shaking grate, bae plate and other internal components that are in direct contact with
the re are all constituted as ‘wear’ components or consumables, as, they are exposed to
the most wear. When used properly, these parts will last for many years, but overly vigorous
use will naturally shorten the lifespan. The aforementioned parts are all easily replaceable.
If the bae plate is damaged or warped and is not replaced in time, the top plate could become subject to excessively high temperatures, which may lead to damage here also.
Note: that no unauthorised alterations to the stove design should be undertaken, and
always ensure that any replacement parts purchased are Morsø original parts.
12
Page 13

Reasons for overly rapid wear of internal parts
- Stove red too vigorously.
- Too much air coming through the bottom grate.
- Use of very dry wood (wood from old furniture).
- Too much soot on top of the baes (please see the section on Cleaning).
- Too much ash in the ash pan (please see the section on Ash).
Gaskets
The rope gaskets in the door will need regular inspection in order to ensure and maintain
full control of your stove’s burning rate; over time the rope gaskets will harden and will become less airtight, at this point you will need to remove and replace with new. Use only the
genuine Morsø gasket kit, which comes with detailed replacement instructions.
NOTE: Normal wear components (inner parts) are not covered by Morsø’s 10-year
Maintenance products (Spare Parts, Glass Cleaner, Paint, Gasket Kit, etc) are all available from
your authorised Morsø dealer.
guarantee.
3.3 Cleaning the stove
During normal use and sweeping of your stove and chimney, a layer of ash, soot or debris can
form, particularly on the top of the bae plate or inner reback. Any deposits allowed to buildup over time will have an insulating eec t on these parts, thus restric ting expansion; this will ulti mately result in a shorter lifespan. The cast access door in the bae plate can easily be removed
from the stove and should be regularly checked for debris and cleaned. You must ensure that
your chimney sweep removes all soot and debris from the stove after the sweeping process.
Your chimney should be swept at least once a year; however a regular inspection of your stovepipe and chimney will determine whether a more frequent approach should be adopted.
Ash
In order to achieve the highest combustion temperature possible when burning solely wood,
it is important that a 1cm deep bed of ash is established on top of the grate area. Excess ash
should be removed by simply agitating the grate by moving the riddling rod on the outside
of the stove; surplus ash will fall into the ash pan below the grate where it can be easily and
safely removed.
Be sure to empty the ash pan before it gets completely full; if the ash level reaches the underside of the grate, air ow through the grate will be restricted and will lead to over-heating and
premature wear of the grate par ts.
When emptying the ash pan always dump the waste ash into a metal container (dustbin)
where it can fully cool before being taken away by your refuse collector. Ash from a woodburning stove does not benet your garden as fertiliser.
13
Page 14

4.0 Alternative fuel types
Your new Morsø stove is EN-approved for burning wood.
However, the stove is capable of burning other solid fuels as manufactured smokeless coal
or good quality anthracite (stove nuts). If you re your stove with any fuel other than wood,
it may help to use coal insert/fuel economisers (available for most models), which simply t
into the left and right sides of the rebox. Designed primarily to guide the solid fuel over the
grate area they also slightly reduce the rebox capacity allowing you to have smaller res.
This is an additional accessory and can be purchased from your authorised Morsø dealer.
BITUMINOUS HOUSE COAL SHOULD NEVER BE USED IN YOUR STOVE.
Before burning solid fuel
Install the coal inser t (where available) into the left and right sides of the rebox.
All stove models are supplied with 1 front grate bar, however in the case of the 1400 series
an optional second front grate bar can be purchased from your Authorised Morsø Dealer. A
second front grate bar will allow for a deeper re bed and a longer burn time.
IN ALL MODELS NEVER LOAD THE FUEL ABOVE THE FRONT GRATE BAR LEVEL .
Lighting with solid fuel
All air vents must be fully open during the lighting process.
Start by placing 5-10 crumpled sheet s of newspaper or 2 Morsø relighters on the grate of
the stove; then carefully spread approximately 1 kg of well-dried kindling on the top. Light
the paper/relighters. Once the kindling has fully ignited, gradually add a small quantity of
solid fuel, adding a little bit more once it has ignited. Continue in this manner until the entire
grate is covered with glowing coals. The level of fuel in the stove should never exceed the
level of the front grate(s). Once the bottom half of the fuel bed is glowing, you should partly
close the bottom vent (on the ash pit door). Once the stove has reached your desired temperature you can maintain the output by opening further for more heat or closing for less
heat. The top air regulator must always be open just enough so that the ames burn almost
clearly and the ceramic glass window stays clean.
Note: In cases where smokeless fuels containing petrocoke are burned, a pale greyish
layer may be deposited on the inner glass surface when the stove is lit. Fuels containing a high content petrocoke may cause a glistening in the surface of the ceramic glass.
Although visible, the structure of the glass will remain intact and the stove safe. Glass
is not covered by the manufacturer’s 10-year guarantee.
14
Page 15

In order to maintain the combustion process, the entire grate area must remain covered by
glowing coals. If the coal layer is too shallow you will have less heat and it would not be necessary to supply air via the top vent.
You must empty the ash pan whenever it becomes full. Dierent fuels have dierent ash content and therefore the regularity of the de-ashing process can vary.
Fuel storage
Your fuel supply should always be stored in a suitable, weather-tight coal bunker. These are
usually available through your approved coal merchant.
15
Page 16

Spare parts for the 3400
Description Product no.
Riddling grate 44162500
Intermediate Grate Frame 34341300
Inner Grate Frame 44132100
Bae plate, complete 54346161
Access door (at bae) 34341400
Door Glass 79340000
Side brick - front 79341100
Side brick - rear 79341000
Back brick 79341200
Brick securing bar 54340100
Front grate 34342000
16
Page 17

Guarantee
Product Registration
MORSØ 10 YEAR GUARANTEE CERTIFICATE
Behin d every Mors ø stove is more tha n years of dedicated stove design and manufacturing experience. Quality control has always been at the heart of the production process and detailed measures
have been put into place at all key stages of the build. Accordingly, provided that the stove has been
supplied by an authorised Morsø dealer, Morsø will oer a 10-Year Manufacturers Guarantee against
manufacturing defect to any of the main exterior body parts of its stoves .
Read more about ”Morsø 10 years guarantee/product registration card” and
REGISTER your new Morsø stove online:
http://international.morsoe.com/warranty-registration
Morsø Jerns tøberi A/S - 16.11.2 015 - 7234160
17
Page 18

18
Page 19

19
Page 20

IMPORTANT!
How to heat safely for the environment and yourself!
• Use only dry wood
Use only dry (max. 20% moisture content)
and untreated wood. The fuel must be split
and 8 - 12 cm thick.
• Light
Light with dry kindling (use 1 - 2 kg). Leave
the door ajar and stay close to the stove
during the lighting phase.
• Good layer of embers
Be certain to have a good layer of em-
bers before relling. The wood should
light within 2 minutes. If the logs do
not ignite it may, in an extreme case,
cause the flue gases to ignite which
may pose a risk to material damage or
personal injury.
• Refuelling
When refuelling use 2 - 3 pieces of wood
- no more than 2 - 2.5 kg.
• Ensure adequate air
I.e. clear and yellow ames.
20
• Never burn overnight
Morsø Jernstøberi A/S - 16.11.2015 - 72341600
MORSØ JERNSTØBERI A/S . DK-7900 NYKØBING MORS
E-Mail: [email protected] · Website: www.morsoe.com
 Loading...